#sort of a build
Photo
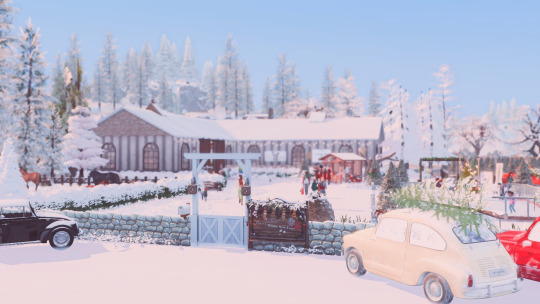
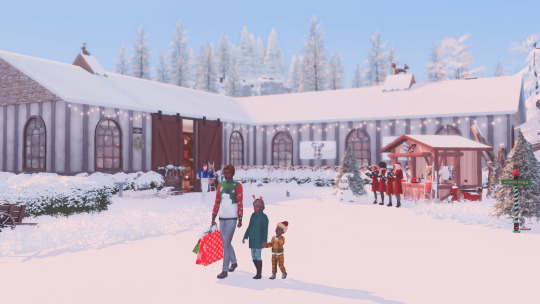


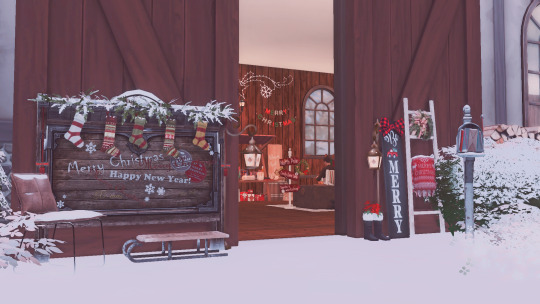
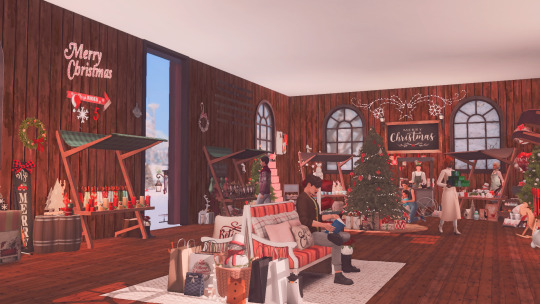
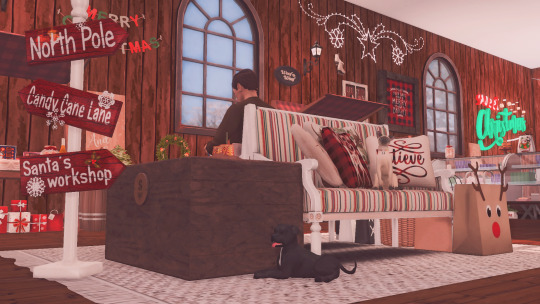
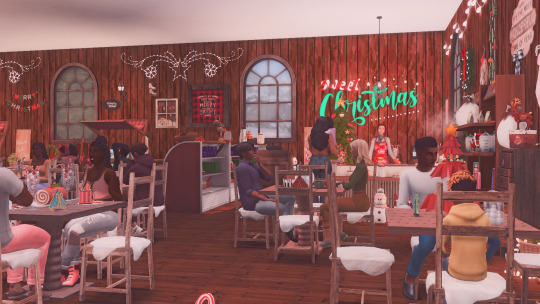
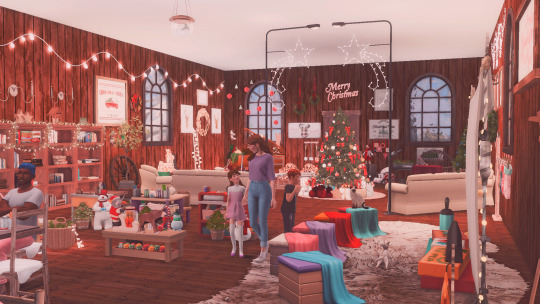
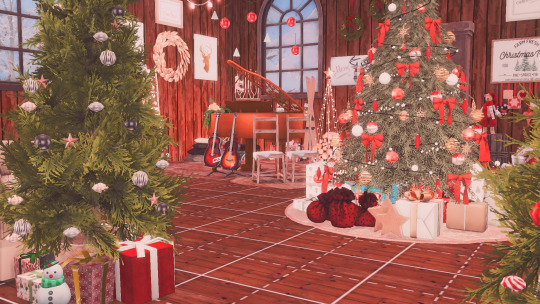
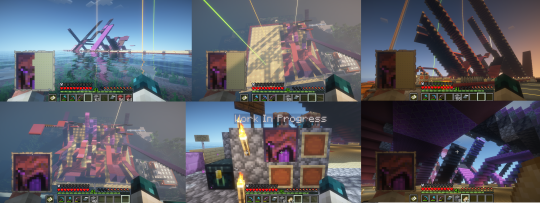
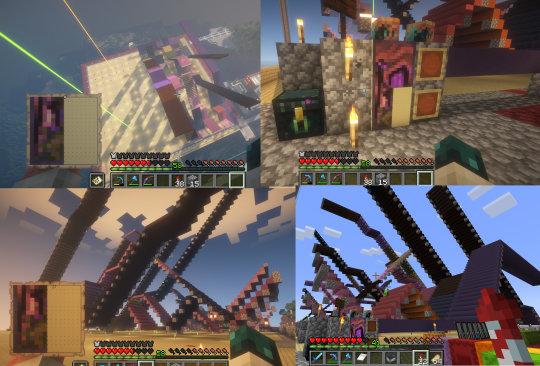
The Christmas Tree Farm & Market
🎶
As I don’t make poses, and I don’t make cc, my christmas gift this year is simply a build that I hope someone can use to send their sims Christmas tree hunting, as well as visiting the local market for some well deserved treats.
Outside you can check on the horses, there are reindeer, a place for some smores for old and young even a skating rink. And of course Christmas trees for everyone that wants one.
Innside there is a marketplace, a small cafe and for those with little ones there is an activety area so they will be entertained as well. People will notice that there are presents under all the trees, these are gifts left by people who pick a tag of a tree and buy a present for someone that would perhaps otherwise not get anything (like orphans on an orphanage and such)
In the very inner part, there is a musical area, where small intimate Christmas concerts can be held.
I hope you like it, and if you (by some random christmas miracle) decide to use this build for anything, tag me so I can see it. I know my own sims will be heading here soon, so you will see this build in later screenshots.
You can get this build here (warning, its a big big file (7+gb), with tons of alpha and mm cc) If any of the cc makers I have used want me to remove their stuff from it, please tell me and I will do my best, its just so much and not all is availible anymore so this is the better/easier way. And a huge thank you to all the cc creators, because something like this would not be possible wihtout your wonderful work!
#sort of a build#I guess#its still more a decorated lot#and it has a lot of cc#and I do mean a lot#much of it is alpha#and a lot is MM#but it is a lot#I am happy with it though#it's very much somewhere I'd visit if I could#but since I live through my sims#they will have to do it for me#christmas is my favorite time of year#so there will be a lot of christmas now#screenshot wise
29 notes
·
View notes
Text
despite Laios low self esteem making him think that if he’d been eaten, Chilchuck and Marcille wouldn’t have helped Falin,
theres a small part of me that thinks the reason Chilchuck stayed with the party and went back in the dungeon in the first place was because he didn’t want to leave Laios alone. That Laios was moreso the reason he stayed.
#dungeon meshi#chilaios#OK SORRY. THE DEMONS. I REALLY DID NOT WANT TO LIKE THIS PAIRING. I DIDNT. BUT. HHH. FHFHJFJV. I FEEL CRAZY. LET ME EXPLAIN.#Pre canon it seems Laios is the person Chilchuck is really the closest to#He gets along with Namari and they are probably way better as buddies than he and Laios but#He and Laios seem *closer*#If that makes sense#Laios calls him his first name enough and without any issue or hesitation from Chilchuck#That I sort of inagine its not like. A misunderstanding. Laios is on a first name basis with him for a reason.#He also worries probably more than anyone about Laios#And his biggest criticism of him is that hes “reckless”#he’s comfortable around Laios in a very specific way and so is Laios around him#and in the series he shows many times that he’ll risk his life to protect Laios#Like staying with him to confront the elves because he was worried Laios would say something stupid#Hes the first one to run up to him when Falin punches him#I mean I think he was also going back for Falin like its not like I think he doesn’t care about her or anything#He clearly does#But I don’t know if he’d have gone back if Laios hadn’t#And if Laios had been eaten I think he wouldn’t have even had to be convinced by Falin#I also think Marcille would’ve gone back for him but probably more bc Falin was going back#Like sort of a reversed thing#AGAIN not that I don’t think she cared about Laios at the beginning either#But she before the story she was mostly Falin’s friend who knew Laios through Falin#She only really got to know him when Falin got eaten and they had to do a team building exercise#Though now I sort of want to see an actually reversed scenario#Bc we also know that Chilchuck is sort of uncomfortable around Falin (said in relationship chart)#So I would love to see them be forced into a team building exercise to find a person they both love the way Laios and Marcille were
1K notes
·
View notes
Text
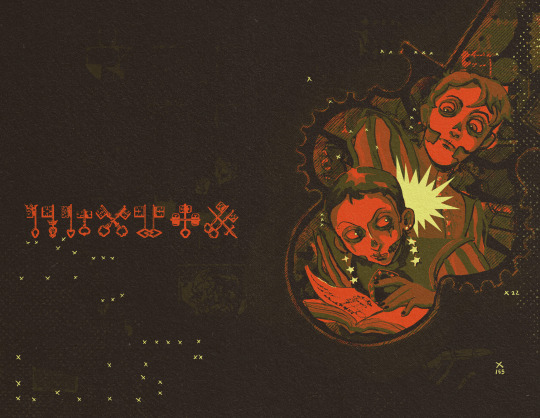

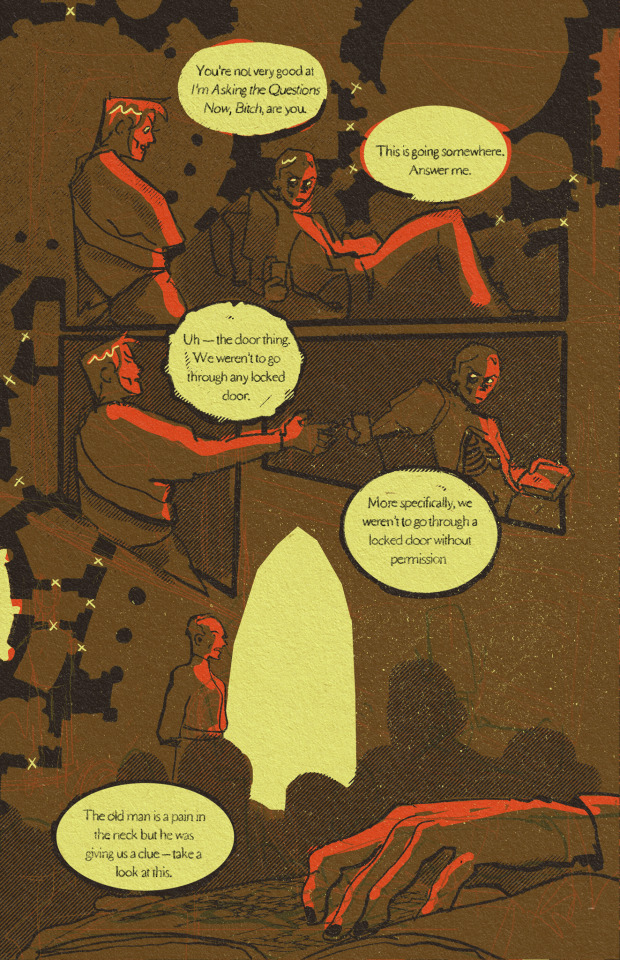

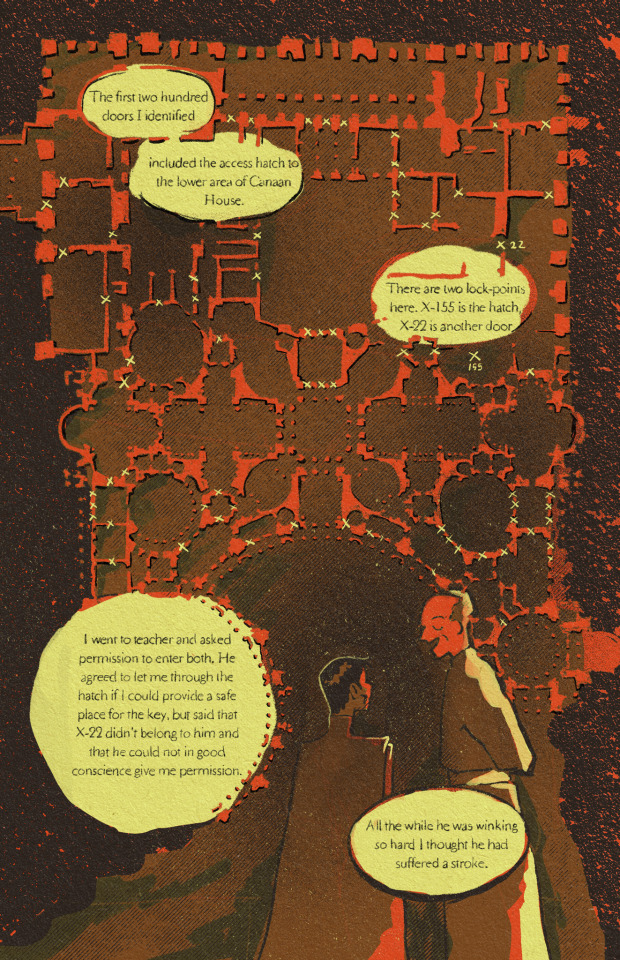
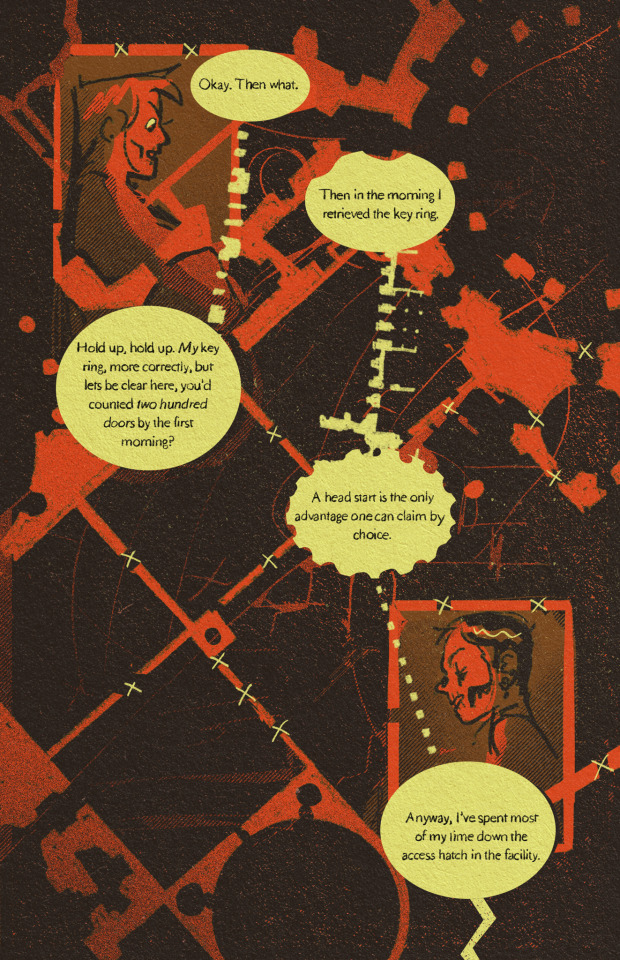

This place is a message... and part of a system of messages... pay attention to it!
#have linked 2 this song before and i will link 2 it again. because HELLO. canaan house thesis statement 2 me.#rlly obsessed w this scene i think i’m just fascinated w the idea of harrows journals…… her drawings of canaan…what else is in there#anyway this was mostly an excuse for me to play around w using architectural drawings as a sort of compositional element/framing device.#did it work? who’s to say. the most important part is that i had fun except. i didn’t even do that.#text is slightly edited for length etc…. + i cut off the scene where i did because well…. makes me insane. lol#don’t pay too much attention 2 the architectural parts they don’t make sense#because i cobbled them together from the plans of like 3 different buildings.#anyway enjoy. or don’t. i’m not ur boss.#the locked tomb#tlt#gideon the ninth#gideon nav#harrowhark nonagesimus#harrow the ninth#okay that’s it
4K notes
·
View notes
Text
I've praised George Rextrew a lot for the emotion he put behind various actions, and I stand by that.
But I also want to take a moment to appreciate Jayden Revri's ability to handle Charles' more explosive emotions.
In the Devlin house, you watch his anguish and anger build in equal measure. Unlike the characters, we get to see the build-up to the outburst that leads to him getting stuck in the loop. The first time he sees that man murder his family he wants to look away, he tries to look away. You can see how much it hurts him, but he turns back and watches anyway--and the horror turns to rage.
When the Night Nurse comes, he fights her off--very aggressively yes, but they didn't see what he did when she took him into his memories--and everyone looks at him like...like he's a bomb that may go off again? Like they've never seen him before?
The boy's just been through some of his most traumatic memories and committed an act of violence that probably only made that experience worse, and he sees his friends looking at him the way he'd always feared they would--like he's a bad guy. And Jayden portrays that grief and pain so beautifully.
And when he gives that little "no" while he's crying and jerks away from Edwin's outstretched hand?
My heart feels like it's been squashed and wrung out.
#dead boy detectives#charles rowland#jayden revri#those sort of emotions can be hard to portray because they are so complex and explosive#you have to portray the build-up with subtlety#and then...explode...and that's EXHAUSTING#that kind of emotion takes so much out of you#Everyone on this show is so GOOD
862 notes
·
View notes
Text


prompt failed he thought it was pretty sick actually
(👍if you ship scc go away)
#the art gallery#deltarune#scc#capsei#anyway so i actually had already started drawing the first image before receiving the ask ! it just gave me an idea for a sort of follow up#being The Rest Of The Comic#anyway the conceit here is like. ralsei asked them to build/repair soemthing Hence Why Ralsei Is There#also i worry that it’s not clear this is castle town with hie#with how Red everything is when castle town is normally dark purpley-blue(mostly black)#It’s Just Hot. and castle town is within a school closet you KNOW it’s stuffy and humid. they don’t even keep classrooms cool.…… nightmare
759 notes
·
View notes
Note
I doth declare that I miss the Losers Club! Mayest I have some art of them from thee? :3
(I adore the Losers, can you please draw them if you have any time? No pressure!)

I know it’s only 2/7 but I hope it’ll do for now!!
#okay so I’ve been sort of trying to get back into IT for a while but for whatever reason it wasn’t sticking#yesterday I saw IT edition cluedo and I’m back IN THE BUILDING AGAIN#Hh Hh h h. hhhh#anyways not sure where we’re going from here but I’m planning on drawing some of the other losers too hopefully#:)#my art#ask#it 2017#richie tozier#eddie kaspbrak#reddie
429 notes
·
View notes
Text
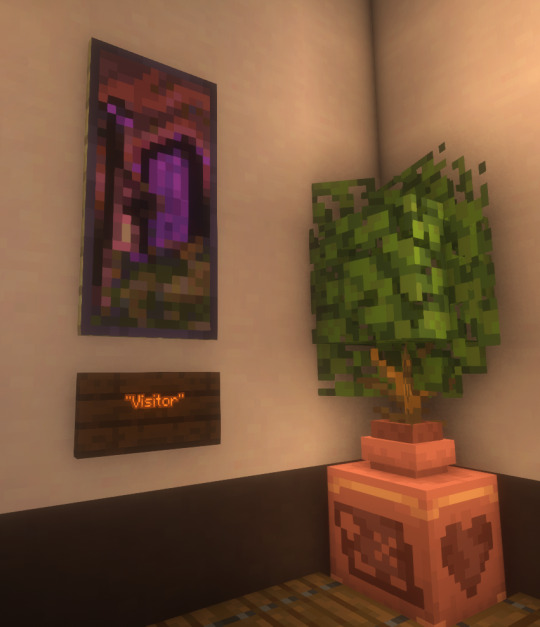
I finally finished a NEW CUSTOM MAP ART!!! "Visitor," a portrait of an enderman, is extra exciting because it's my first full-palette map painting, meaning I used block height to access all the highlight and shadow colours available!! More on the full process under the cut, but the short version of what this means is:
ITS A VERY COMPLICATED CONSTRUCTION. I created the art, then planned and built this manually, without any mods or schematics for construction. Huge props again to everyone else in the server for helping me gather all the materials to make this absurd thing possible!!!
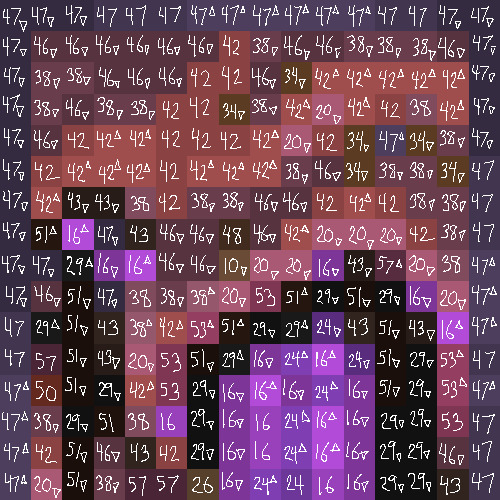
This was the original art I made for it! I'm a huge fan of the "compressed" look of the vanilla paintings, so I've been starting with a large image and shrinking it down, though there were a lot of pixel tweaks to get it to read well. After shrinking it to 16x32 (for an art made of two maps), I convert it to a limited palette that I've set up to match the colours minecraft actually has available:

The map palette is actually tremendously limited, so figuring out a painting that will still look good with that constraint is a challenge in and of itself!
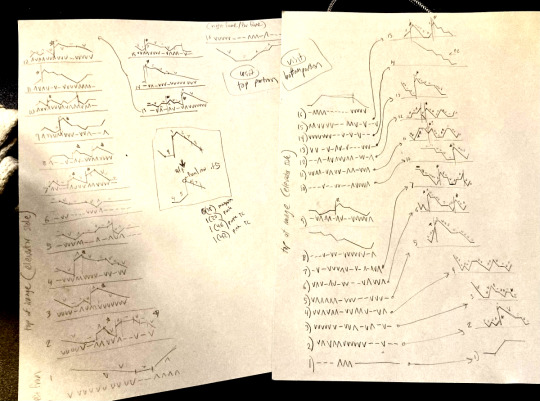
Anyway, the way minecraft maps work, a block that is Taller than the block to the north of it shows up with a slightly lighter colour, and a block that is Lower than the block north of it shows up on the map with a slightly darker colour. So when making a key for this one, I marked all the squares with a little arrow if it's the lighter or darker version:
Each "pixel" here is a full stack of blocks on the mapped area: 64 blocks, 8 rows of 8. In order to achieve the affect of every block in a given pixel being taller or shorter than the block to the north of it, dark and light shades need to staircase either up or down. Because staircasing downwards in survival sounds even worse than this madness, I did some planning to make sure each of the "downwards" staircases would touch the ground, so I could simply staircase up from south to north instead. This involved figuring out how many up and down movements were in each individual column and planning out 32 little layouts:
It's worth noting that if you look up minecraft map art on Youtube, most of what you'll find is either, the simple realisation that placing blocks allows you to make custom map art, or an explanation of how to use a generator that will let you plug in any picture and then produce a schematic for you. It's very cool that these exist, but I wanted to do full palette art myself, without an auto-generated schematic, and at the time THERE JUST WEREN'T ANY TUTORIALS FOR HOW TO DO ALL THIS?? Now, having the experience of finagling all this, i think perhaps the reason is that this is a mad undertaking.
ANYWAY: PROGRESS SHOTS!!
I actually love how the staircases look..... its like some kind of modern sculpture
Fewer shots of the second half since I did it on call with friends; the last screenshot is one Thren took of me activating the new locked map to use for the gallery.
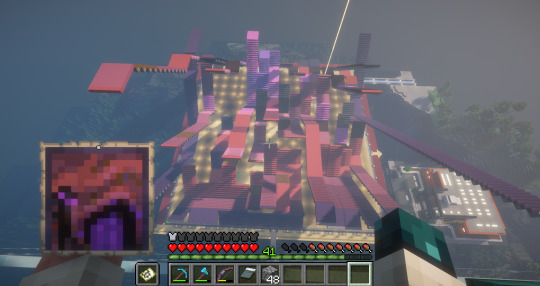
Once these paintings are done, I lock the finished maps, make copies, and stock them in the art gallery so other friends on our server can also put these paintings in their homes! It's a lot of work, but really rewarding to see my art decorating various buildings around the server. ;u;
I have one more custom full-palette painting I've done the art for and gathered all materials for; I still need to do the full key and plan staircasing for it before I can start, but HOPEFULLY if my resolve doesn't waver there'll be at least one more of these!!
#minecraft build#minecraft screenshots#minecraft#block game liveblogging#minecraft map art#GENUINELY SO PROUD OF THIS ONE#bsl shaders#im so tempted to make some sort of tutorial on doing this by hand sometime. you shouldnt do it by hand. but a tutorial should exist!!
310 notes
·
View notes
Text
AO3 Tastemaker Game
You? You're an individual. You're a reader and a forager with fine tastes. You're not afraid to wade into the deep end. Browse the dustiest aisles. Get in the vents. Come, pan for gold with me in the far reaches. The game goes like this:
On AO3, navigate to your pairing/fandom of choice
Apply your standard filters
In the 'Search Within Results' field, paste this: kudos<100 comments<5 bookmarks<5 hits<500 sort:>updated
Press the 'Sort & Filter' button
Read down the line until you find something you like
Comment, bookmark, and mark it as a recommendation
For the ultimate connoisseur:
Bonus Points - share your new rec off-site
Hard Mode - kudos<12 comments<1 bookmarks<1 hits<395 sort:>updated
#won't really work in microfandoms where everyone already has read the 20 existing fics but#inspired by the time i challenged myself to read every fic for a pairing sorted chronologically#I found a lot of really excellent work that i wouldn't have found otherwise!#ao3#archive of our own#fanfic#fanfiction#building community
446 notes
·
View notes
Text


i like these
#hc#cubfan135#everypony. i'm back in the building. again.#first ability partially based on empires crossover when he had that cool axe#second is just 'devouring swarm' ability but vex#i call it “vexxing swarm” :]c#need to draw his teleportation too.. it's like warden emerging sort of :3#sun post#dhhc-au
229 notes
·
View notes
Text


A House in the English Countryside
#ts4#sims 4#ts4 build#sims 4 build#ts4 exterior#my builds#ts4 gameplay#ts4 legacy#postcard legacy#postcard gen 3#ta-dah!!! its another build post 😍#this time its the family farm#building any sort of exterior is by far my favourite thing to do in game
292 notes
·
View notes
Text
"✨️The Stargazers.✨️"


Yeah. These two would usually not get along, but needs must and they have a job to do. Jobs they don't want their respective sides butting in on. Now I would have posted this earlier, but I got dreadfully sick. So I hope this was still worth the wait! A deeper look into Vaggie & Alastor's situation and their other forms to boot! Can you tell I got carried away? XD Introductions are finally done! Next part? Comics! See ya'll then! ^v^
-Bubbly����
#spacebubblearts#HHStargazersAU#chaggie#radioapple#appleradio#hazbin hotel#hazbin vaggie#hazbin alastor#radio demon#angel vaggie#human au#sort of#charlie x vaggie#vaggie x charlie#alastor x lucifer#lucifer x alastor#duckydeer#more LOOORE#GOD I love world building#disguises#character design#I hope y'all like em#I hve my reasons for their new style#sorry for the long read tho#artfic#Vaggie went from ice cold angel to girl in love LOL#my art#coloring#Alastor's shadow#mystery
231 notes
·
View notes
Text
Nie Huaisang pulling a Jaskier where somehow everyone thinks he's physically tiny, because of how he tailors his clothes and the way he moves and acts and refers to himself, but in actuality he's almost the same height and shoulder width as Nie Mingjue and the impression of him as "just a little guy" is a carefully crafted illusion that would shatter if the main cast all lined up naked together.
#mdzs#cql#the untamed#mo dao zu shi#nie huaisang#like I wouldn't say he has nie mingjue's build precisely because he doesn't actually train nearly as much#but the framework is still there#everyone assumes his flashy outfits are adding bulk to him#meanwhile those 'shoulder pads' are in fact like 99% actual shoulder#and if you ask lan xichen he'd say that nie huaisang is shorter than him but taller than a'yao (though most people are taller than a'yao)#but nie huaisang is in fact half an inch taller than lan xichen and has been since he was seventeen#that sort of thing
489 notes
·
View notes
Text
skizz's "giraffe"
#clippies#guess the build#grian#skizz#gem#impulse#jimmy#joel#i need this on my blog right now. god#grians CACKLING is incredible he sounds like a hyena or jackal of some sort
209 notes
·
View notes
Text
Halfling studies + headcanons


#dungeon meshi#aj art#halflings#artistic nudity#sort of#Halfling marcille is here bc I was sort of interested how a half-halfling would look#hopefully I do not get in trouble for this#Its just an art study tumblr pls#Also some world building headcanon stuff
235 notes
·
View notes
Text


I built one of the Mysterious Lotus Casebook model scenes!
You may remember that I built the Lotus Tower model kit last year, and made some modifications to it:

(More about new additions to that model in another post!)
So it's probably no surprise that I also an addition of my own to this kit in the form of some tiny model lights. I love the idea that they could be fireflies accompanying Li Lianhua down the river or souls escorting him to reincarnation.
Progress pics below:

You may be able to guess from its size, that this model came together pretty quickly. Assembling the table together with both the boat and LLH was the trickiest bit:


I love all the small details, though, even if the curves were quite intimidating.
In order to wire it up with the tiny lights, I actually made very little irreversible changes to the model itself.

The base is a hollow space, as you can see bellow, so I used a hole that was intended to hold one of the lotuses to instead thread the lights up through the base to the scene. The lotus in question was meant to be positioned behind the boat, and so wouldn't actually be seen at all - perfect for hiding most of the wiring.
Then, in order to secure the battery pack to the back of the model, I cut off a small portion of one of the tabs that help fit the bottom piece in place. This effectively made a hole right at the bottom of the model for the wires to pass through. And that was all it took!


I stuck everything down with tape so it can be removed easily and without damage should I want to remove the lights at all, or make my messy wiring more respectable 😅
I'm really pleased with how it turned out!
Although you can see the wires around the boat when the lights are off, when the lights are on it pretty much achieves the floaty, ethereal effect I was going for:

#my builds#li lianhua#li xiangyi#莲花楼#mysterious lotus casebook#mlc fanart#sort of#model kit#nikkidraws#model building
154 notes
·
View notes
Text
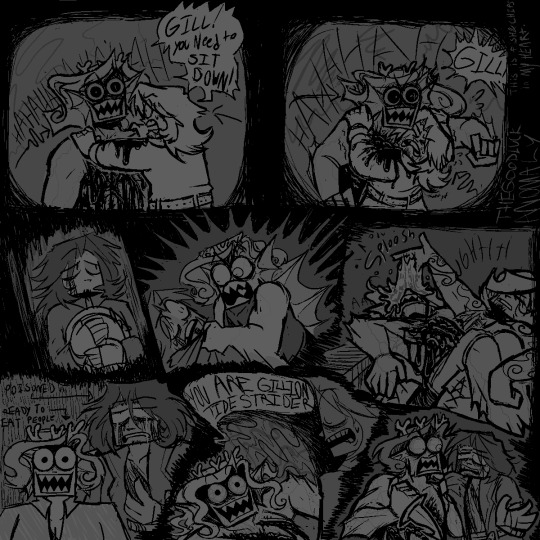
[OLD ART ALERT] A COLLECTION OF SCENES FROM THE GILLIONS CATSCRATCH ARC THAT BROUGHT ME GREAT JOY. i love fishy chips especially when its just gillion being delirious and violent and hostile
#jrwi fanart#jrwi show#jrwi riptide#jrwi riptide spoilers#JUST NOTICED A MILLION MISTAKES FUUUUUUUUCK BUT WWHATEVERRRRR IF I STARE AT THIS ANYMORE IM GONNA HHUURRRLLL#SO I REALLY LIKE FISH AND CHIPS RIGHT. IVE BEEN IN LOVE W THE SHIP EVER SINCE THAT NAT 20 KISS#BUT I THINK I SHIP IT WRONG. OR LIKE. I AM CORRECT BUT EVERYONE SHIPS THEM DIFFERENTLY#THE FISH N CHIPS I SEE EVERYWHERE ELSE IS SO FLOWERY AND SWEET AND ROMANTIC. AND THATS NICE! THAT STUFFS NEAT#but gillion and chip would NEVERRRR enter anything similar to a romantic relationship. chips too damaged and gillions too uninterested#I LIKE MY FISH N CHIPS ONE SIDED AS FUCK#bc 2 gillion chip is his best friend in the whole wide world but hes also kinduvagross little man that took him a MINUTE to really warm up2#but to CHIP gillion is this powerful and gorgeous and heroic paragon of destiny and his best friend in the whole world who will#bring about the eschaton. 'i didnt believe in destiny until i met you' until i met a champion radiating with a light thatll alter the world#OHH REMEMBER THE FIRST ICE ARENA?he was so mad.still probably shaking from the ordeal.NEVER had he felt true divine radiance CLEAVE through#his SOUL like that.do you remember that moment in the forest w the bugs. an alien from the ocean; lacerating the land w lightning#when the realization flickered in chip for a moment.that the thing standing before him was more powerful than he could ever fathom#remember when grizz mentioned that the nat20 kiss was the 'best kiss chip ever experienced'. that has nothing to do w this. where was i.#LOST MY TRAIN OF THOUGHT. BUT HEY. I THINK at the beginning chip absolutely knew that gill was smth grand n powerful n scary#when gillion revealed what exactly the prophecy was;chip got defensive and mad.sure he was sleep deprived but OOH. HES SCARED!#he believes gillion too! he believes that his destiny is to eradicate either the sea or land and that scares him!#but then he gets past it bc ultimately he trusts his bestfriend gillion so so much. he fuckin loves this dude.#he would throw himself intothe path of fire for this dude. he would boat across the ocean for this dude.he would build arenas for this dude#even if this dude will end half the world.even if this dude wields the power and the obligation to eradicate him at any second.#even if this dude is going to throw himself into harms way for his own comrades.even if this dude is just going to sacrifice himself.#one way or another one shall die for the other.these self-sacrificial bastards click so well with eachother!!#chip believes his body is best used to pave roads and gill believes his body is destined to pave prosperity.WHATEVER!!#i really love their dynamic!! they care for eachother so much!in MY heart tho. the icing on the cake here is the fantasy that chip is#just a bit more In Love w gillion than he realizes. like this powerful fish guy is HOT and PRETTY and KIND and FUNNY and LOYAL and STRONG#but gillion would never rly feel that same sort of attraction towards chip. its just not rly his thing. aroace as fuck man.#thats how it is in MY little heart atleast. and i sit here and play w my touys in my brain n i explore my silly lil one sided fish y chips.
212 notes
·
View notes
Last Seen Blogs

a-night-in-december
and the sun came out

freelance-unicorn
Ascenett Stefanie
freelance-unicorn
Ascenett Stefanie

mistressmichellexxxworldstuff
Superior Michelle

sallybytheseashoreus
Untitled