#tutorial blender
Explore tagged Tumblr posts
Visit Tumblr Blog
Explore Tumblr blogs with no restrictions, modern design and the best experience.
Last Seen Tumblr Blogs


Fun Fact
Tumblr.com rank in the US is 25.
Text
@fragilehiggs
HOW TO IMPORT HIGGS 3D MODEL INTO BLENDER / MODELS FROM GAMES INTO BLENDER
figured id make this a post because it’d be easier.. might help other people too!!! on how to put higgs into blender. you probably know some of the stuff i’m gonna explain but for good measure will bring up. this is extremely long because its the sort of thing i wouldve massively appreciated but i unfortunately instead basically had to figure it out going off of little to nothing
—
blender is a 3d program that allows you to import models from games into there which can then be rigged, posed, and animated. people take these models from games using programs called ninjaripper or greyhound. essentially this just goes into the files of the game and takes out the assets. if it’s an asset, it can be taken out. you would then have to rig the model yourself (basically put a skeleton to pose it.) this takes very long and is inconvenient.
luckily, people do this for you. you don’t need to rip your own assets out and rig, which is a hassle and you usually need to pay for these useful programs. a great spot for getting models that have been ripped from games is deviantart. however, there is no telling how these models can perform. they could be badly rigged, or could have messed up textures. unfortunately, such is the case for the one and only higgs model… https://www.deviantart.com/kanbara914/art/Death-Stranding-Higgs-XPS-864224744
the good news is that i fixed the textures. the bad news is that the rigging is absolutely beyond busy. he is poseable, yes, but the amount of points there are makes it really hard to. i’m yet to figure out a better way and might start ripping and rigging my own models. despite having fixed the textures i am unsure if i can export the fixed version. thus.. another tutorial will come through on to do that. unfortunately it takes awhile. all of this requires lots of patience, trial, and error.
so, now, how exactly do we start? FIRSTLY, we need to revisit downloading blender. the current up-to-date blender will NOT work. you need to download blender 2.80, NOT anything else. well, how do you get an older version?
in order to get an older version, navigate to blender.org/download/previous-versions/ and scroll down a bit to you see ‘download any blender version.’ here is a good tutorial but i believe that it is a little outdated so i will explain it furthermore. https://youtu.be/WmlijP9D67o?si=QHhpOQ_D_0LWJP9M this is the one i followed however so, the premise is the same.
we click on download any blender version and it looks quite overwhelming. dont be too worried, you just need to look closely and scroll till you see Blender2.80 . we then click on that and you need to find your operating system. im going to assume you run windows, and if so, pick blender-2.80-windows64.zip from the list.
navigate to your files, and then open up the zip file that you just downloaded. click blender 2.8 again and then what you see is going to look a little busy. dont be fooled, its actually not. just scroll down and find blender.exe. press this and itll bring up a simple process -- all you should have to do is press a few buttons and optimize it like any other download for an application such as blender. it should be installed like regular blender, and if its not on your desktop, simply go to blender.exe in your files in applications. i recommend pinning it to your taskbar.
here comes the next step. there is something called xnalara. i will keep the history of it rather brief but its quite interesting. xnalara was an older program that allowed people back then to rip models from games and import them into the xnalara program. that program is rather old and i rather not use it, however, im thinking about looking into it. its good to use blender regardless because of its studio-accredited attributes. its professional.
some awesome dude later down the line created something called a xnalara add-on for blender. this allowed you to download models ripped from games posted on deviantart that are optimized for xnalara. the file name for these xnalara optimized models end in .xps . these will not regularly be imported into blender, because it doesnt support it. however, this add-on will allow you to do such.
im going to explain how to download it but watching this video regardless is essential. you will probably need to go back to it now and then.
youtube
since youre particularly interested in importing higgs, i will keep it relatively broad but touch on his model a bit more because i am more familiar but this process applies to most models. navigate to https://www.deviantart.com/kanbara914/art/Death-Stranding-Higgs-XPS-864224744 and scroll down into the description of the post. click on the link, mega.nz/file/y88wyQpS#eDkcsSmW… so on and so forth. it will ask you if you want to leave deviantart and click the link again to go there.
you're now in MEGA. this website will allow you to store downloads for people, and i can assure you its safe. i would never download anything im not sure of -- my PC is my baby lol. look down to the bottom right and youll see "SAVE" and "SAVE TO MEGA." pick save. it will download, and you need to look to the top right and click where your downloads are. this will take a couple minutes, grab some water and a snack. when its done, click on it in the tray to open it.
youre going to be overwhelmed by everything you see. do not fret! just close it, dont unzip it. just make sure it exists. you can close MEGA and deviantart now. you now need to refer to the video i linked if you want to follow along with more resources. we need to install the XNALARA add-on for blender 2.80 which can allow us to put it into blender.
before i continue i want to say, being familiar will blender as a whole will be an insane help. unfortunately the only way i figured out some of the stuff that i did was because i knew how to just going off of the program. most tutorials will not have answers for this small issues... but i most likely do especially for this specific model.
here is the add-on. https://github.com/johnzero7/XNALaraMesh . github will look relatively the same as it does in the video. look to your right, youre going to see a bolded 'releases', and under it, XPSTools v2.0.2 or something along the lines of that. you dont need to see the other releases, it's best to have the latest one. click on it.
its going to open up the description of the file. the above is important to note because it says it works with the blender that you just downloaded. if there are any issues for whatever reason with using blender 2.80 (approximately the version from ~2020) those are other versions which are applicable. for the sake of my sanity im gonna explain how to open it in blender 2.80 .
go down to the bolded 'assets'. under it you will see 3 links -- click on the first one which ends in .zip . it will download in the download tray. if your computer tries to flag it or anything as unsafe, click away from that and allow it anyways. this program has been used by thousands for years. it will soon finish downloading. MAKE SURE THE XNALARA ADD ON IS SAVED ON YOUR DESKTOP!!!
go ahead and open up blender 2.80 now. if you have the newest blender installed already make sure youre picking the older version. it will open a terminal alongside of blender, while its running. dont close it. click general.
if you have never used blender, please watch a video on the basics such as this one. https://youtu.be/Z8sg0nHNTTo?si=zjR4aBHVF8XX_Qdn this is the only way to realistically be able to attempt messing with said model, unfortunately. unironically, rendering roblox avatars was a huge stepping stone and aid to my experience with this. i genuinely recommend you do it before you try and do something like this. here is an amazing, step-by-step tutorial that needs no explaining out of the video. https://youtu.be/kpALOtLhX-Q?si=4UrhkBTIK5qYOBfS
from here, this is a much better tutorial to follow >> https://youtu.be/8mqUqob3P3o?si=14a50v88IPZx6O8Y . find yourself at the time stamp of 1:46, the previous is the steps you have already done. go back to blender if you have made it this far, lmao. click on the cube and delete that motherfucker.
look at the top toolbar. it says things like file, edit, render, window, etc. you want to pick edit and scroll to preferences. youll see many options but youre going to want to click add-ons on the left. then, at the top left, click install. go to DESKTOP and click XNALaraMesh.2.02.zip and click install add-on from file on the top right. make sure its the ZIP. this is gonna bring you to a menu with potentially many other downloads. scroll down till you see XNALARA if so. MAKE SURE IT HAS A CLICKED CHECK MARK ON THE LEFT.
go down to the three bars on the bottom left and make sure to save preferences. you can then close that and go back to blender. it will now be one of your downloaded add-ons available! go to the top left again and hit file, import, and XNALARA / XPS. itll hover and youll see another option. make sure to pick XNALara/XPS Model (ascii./.mesh/.xps) . click it and pick Load an XNALara model file.
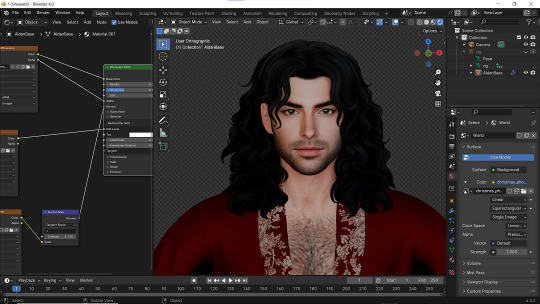
this will open up your file explorer within blender. click desktop and click on the higgs model you saved earlier. clicking it will lead to 2 files, click xps.xps . press Import in the top right. it will take a hot minute to pull everything into blender, be patient. once its imported scroll inwards and look at the son of a bitch. the rig is gonna be highlighted orange and hes gonna be gray. click to anywhere other than the model and face the enemy.
due to the shading settings, his textures arent showing. simply go to the top left where you see 4 ish circles, the second one should be selected. select the one to its right, viewport shading, and give it a second to load his textures in. its gonna look nothing like him. youre gonna have to fix the textures, brave soldier.
--
will post another tutorial if you decide to go through with this or if anyone does because unpacking all of that is such a pain in the ass but i promise it isnt rocket science. just not gonna do it if it isnt asked for because i spent 3 hours figuring out how to fix it the first time i imported his model -- the creator says nothing about this on the download or how to fix it unfortunately and its quite janky :(
if you even made it this far in reading, congratulations, youre a winner. IF YOU HAVE ANY QUESTIONS AT ALL PLEASE FEEL FREE TO ASK and i will answer them to the best of my ability.
SAVE THE IMPORTED MODEL TO REVISIT!!!!!!
#this took me so fucking long lmao#xnalara#blender#3d model#3d art#3d modeling#blender3d#ds higgs#higgs monaghan#higgs#death stranding higgs#tutorial#tut#tutorial blender#blender tutorial#xps#xnalara xps#Youtube
21 notes
·
View notes
Text
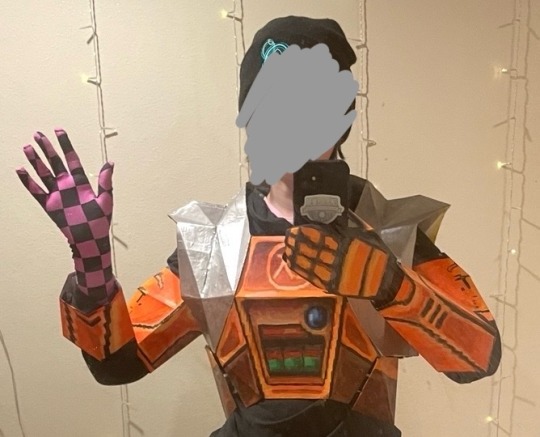
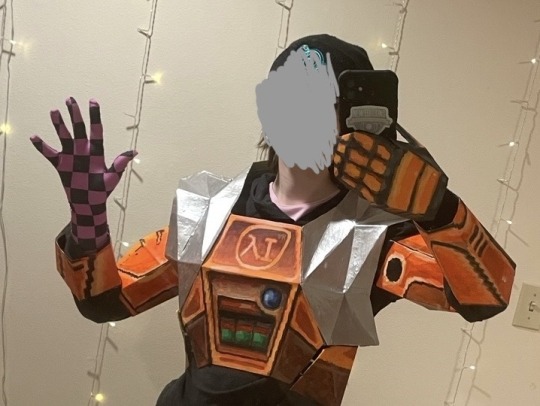
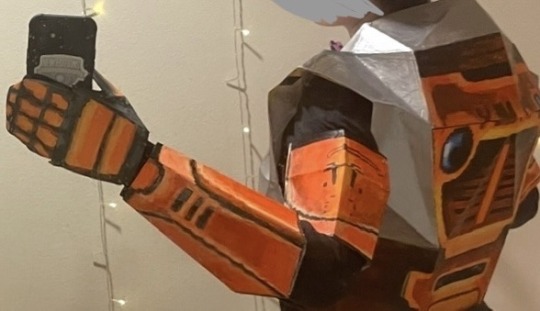
reveal of my gordon hlvrai costume project, now that about half of it is done! this is cardstock and glue and tape and more glue and paint and velcro. and 2 gloves (one hand-sewn)
i got started sometime in early-mid fall, but i committed to making it work with cardstock in january- it was originally meant to be a sizing test before construction with eva foam over the summer. then i realized how expensive thatd be, too much pressure for a form of craft ive never practiced. im pretty amazed with how its come together, even with the large seams! during that whole time when it was unpainted (started painting two weeks ago) there was no way to tell
#thank you sketchfab thank you blender thank you pepakura#school library printer… you were necessary but i dont appreciate that i had to pay per page despite my tuition#i started this because theres a tradition of wearing whatever you want to graduation at my college. ive thought abt how cool itd be to wear#an hev suit like gordon hlvrai.. hlvrai has been important throughout my whole time at college. that plus the stem degree im going for makes#hlvrai the most fitting thing to homage with my outfit#*so important to me#the support of my friends was the last push i needed before research#i havent seen anyone else go for the in-game low poly look for the hev suit! multiple tutorials out there (as expected)#but all i saw involve eva foam and molding. most of them were based on the half life 2 suit which. yeah. that one seems more desirable for#cosplay#lucky that this way was much more simple because its also the most in-theme!#hlvrai#half life vr but the ai is self aware
2K notes
·
View notes
Text


extremely happy to have enough blender skill now to make this shit
#shadow the hedgehog#blender#3d model#sonic the hedgehog#3d#3d art#his extremely fucked up anatomy i love him#btw this isnt the thing i was doing retopology on this is so poorly made i wouldnt know where to fucking begin#i just got sick of that other thing and decided to make something for myself for once#i am very sick of tutorials
3K notes
·
View notes
Text
Randomly remembering that time I posted a SpeedPaint and the majority of comments were a variation of "is that fucking BLENDER???"


I loved it. Made me feel like a Tumblr cryptid 💕
#let me know if you guys want a tutorial or anything#anything to get more blender users#my art#b3d#sonic fanart#sth
158 notes
·
View notes
Text
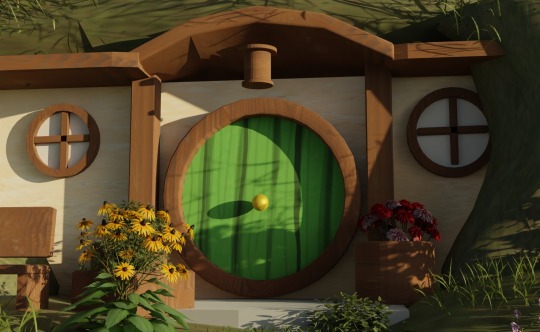
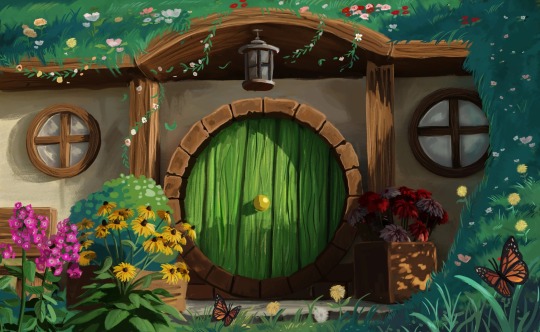
A lot of people have asked me for my Secret to painting background art—- so I put together this short one-minute video on how I combine Blender 3D models with 2D illustrations!
Especially for the latest chapter of my Hobbit Comic I’ve posted over on @retellingthehobbit , I always use a 3D model as a base for more elaborate backgrounds— but the main place where I differ from other artists is that I also use 3D models as a reference for lighting and color. I do a little bit more work upfront in the 3D modeling phase so I have less to do in the Photoshop painting phase. It’s a workflow I really recommend if you have access to Blender! And if anyone wants any more tips, I’m happy to share.
#artists on tumblr#the hobbit#lotr#art#art tips#art tutorial#art process#lord of the rings#digital art#blender#face reveal …. sorta#face reveal if you’re not following me on tiktok
273 notes
·
View notes
Text
Sims 4 Render Lighting Tutorial

"Environmental Lighting" won my most recent poll, so let's get right into it!
A few notes before we begin:
I render exclusively in cycles!
This tutorial assumes some basic knowledge of blender
Though this tutorial covers the basics, HDRIs can be used in conjunction with any scene/your built scenes
I decided to focus on environmental and other lighting in this tutorial, since they all kind of go hand in hand.
For this tutorial, I'll be using my recent Cupid Sim. Here's a render of her with no additional lighting:

1. Base lighting
In any full body, single sim render (like lookbooks, for example), I really like to use a glowing base. It grounds the sim a bit and casts some interesting lighting on them.
To do this, I add a circle under their feet by pressing shift+A and selecting circle.

An empty circle will appear, but we need it to be a solid disk, so go into Edit mode (by pressing tab while the circle is selected) then hitting F on the keyboard to fill it.


After that, you can go into the Materials tab and add in color and glow.
Mine is adjusted like this:

And gives this rendered result:

2. HDRIs
HDRIs (High Dynamic Range images) are extremely useful when it comes to environmental lighting, I always use them now to add better/more dynamic lighting to my renders.
HDRIs are 3D/panoramic, which makes them extremely useful.
You can find/download HDRIs online in a few diff places: PolyHaven, AmbientCO, and Blender Market.
There are also several available for FREE using BlenderKit (my preferred method).
So how do you use an HDRI?
We can add HDRIs to our render by navigating to the world tab and changing the color to "environment texture".


I chose this vaporware HDRI from BlenderKit, & here it is with no adjustments, but it's looking a little rough so let's adjust it.

By adding vector nodes, we can adjust how the HDRI behaves. Here I mostly use the Z rotation and the background strength:


Here's the same render with the Z-rotation set to 50, 150, 200, & 250.


You can put in any value for the Z-rotation, this is just an example of how the HDRI turns. This is maybe not the best example of the rotation, but putting her in a forest just didn't feel right lmfaooo, hopefully you can see how the light changes on her depending on the rotation.
You can also adjust the strength of the HDRI. Here's the HDRI (rotated to 150) set at .5 and 1.5 strength:


For this tutorial, my favorite lighting is the HDRI set to 150, and the strength set to .5, like this (this is a rendered image):

3. Transparent HDRIs + Point Lights
But I'm not fully happy with the lighting. I don't love how the HDRI is a bit blurry, so I'm going to set it to be transparent.
To do this, go to the Render Tab, scroll down to the Film option, and check Transparent:


The lighting effect from the HDRI will stay the same, but the background will be transparent.
From here, you can add a background (when I do this, I like adding a plane, & moving/shading it until I'm happy (kinda like this):


NOTE that you have to put the plane far enough behind your sim so it doesn't affect the HDRI lighting too much.
SECOND NOTE You can use this same method to use HDRIs in conjunction with scenes. They can provide the perfect backdrop!
This is still really dark, so I'm going to add three point lights: -Two on either side of her head/shoulders that will be smaller (in radius) and brighter -One in front of her to add actual light (so details aren't lost)

Here's how I set up my lights.


The pink light settings are for the two point lights on the sides The white light setting is for the light in front of her
For a basic render, this is almost good enough for me, but I really like the glowing effect I get in my renders.
To achieve this, we have to go to the compositing tab:
4. Compositing
Full disclosure, my compositing tab is set to glow by default (that's how much I love it), so all of the renders in this tutorial have it turned on.
I use the glare node and set it to fog glow.
Here's my preferred setting:

I prefer the fog glow effect, but bloom, ghost, streaks and star are also options.
Here's a guide to the glare node!
Tbh, I never use any of the other settings, so I'll leave this tutorial here for today.
Here's the final result (with no additional editing):

If you have any questions, please don't hesitate to send an ask, message or join my discord (no minors pls) for help! <3
#ts4 render tutorial#ts4 blender tutorial#sims 4 render tutorial#sims 4 blender tutorial#sims render tutorial#sims blender tutorial#salemsims tutorial#render school tutorial#blender
209 notes
·
View notes
Text
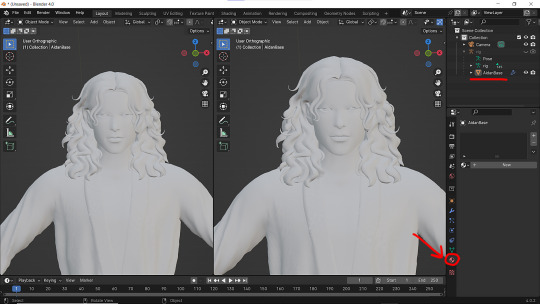
How to apply textures in Blender 4.0 For newbies (´。• ᵕ •。) ♡
So you imported your lovely doll into Blender 4.0, but the textures are messed or missing, here's how to apply base simple textures from the scratch!
I'm using Blender 4.0.2 (Sorry 4.3, but your EEVEE is currently nothing but tears for me) and my lovely Aidan is here to assist me. SO! Seat your bum comfortable and let's begin!
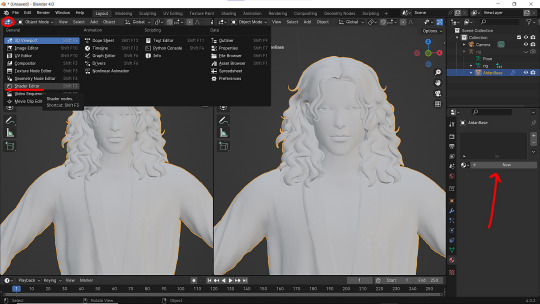
1 - Split your working space by pulling the corner of the screen:
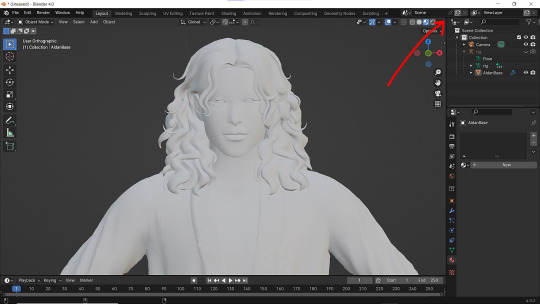
2 - Then click on Material with your mesh selected.
3 - Pick Shader Editor on the left part of the screen and hit New in the Material on the right. You'll get something like this:
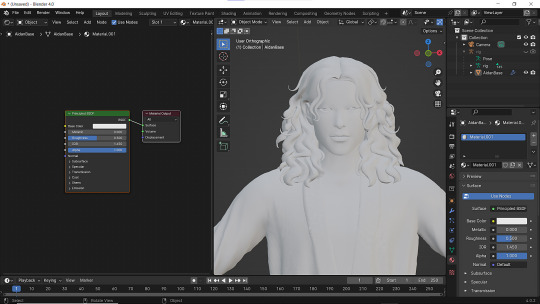

4 - On the left choose Add - Texture - Image Texture. We need three of them at very least :D
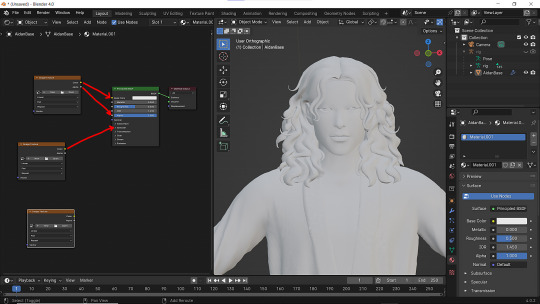
5 - First Image texture: Connect Color to the Base Color and Alpha to Alpha. Second Image texture connect to Specular IOR Level. Don't forget to upload your textures! Color - is well... color pics. Specular looks like Black/White pics and Normal is purple!
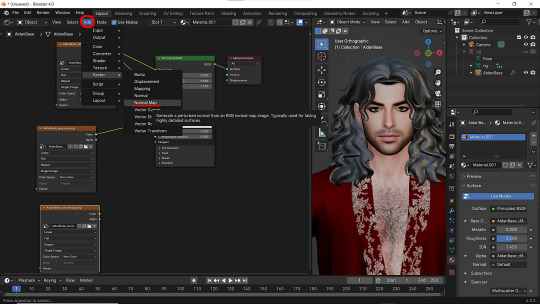
6 - Now add Normal Map. And connect it like on the picture below:
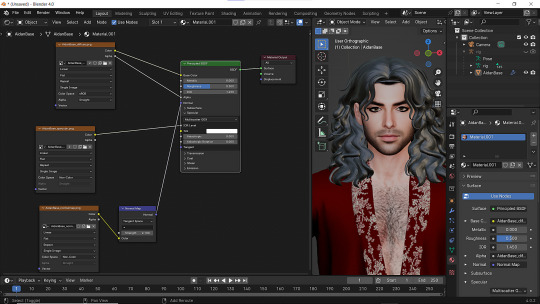
7 - Specular and Normal maps should be NON - COLOR in the Image Texture - Color Space
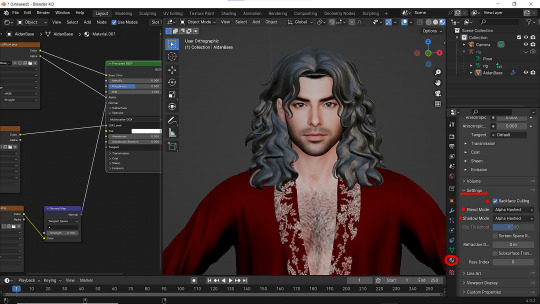
8 - Turn on the alpha. In Material - Settings - Blend Mode/Shadow Mode change on Alpha Hashed + You can check Backface Culling. In some cases it's vital :D
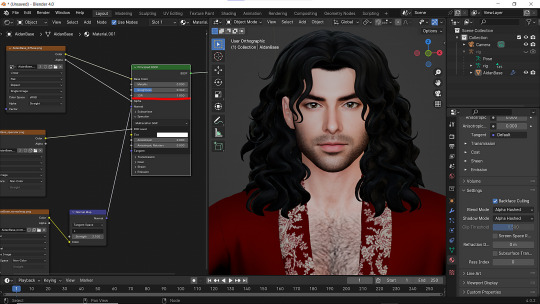
9 - Change the Specular settings in case of weird shining by changing IOR and Roughness parameters.
10 - You did it! (ノ◕ヮ◕)ノ:・゚✧
#WistfulTutorialSims4#the sims 4 blender#sims 4 blender render#blender 4.0#blender eevee#sims 4 tutorials#blender tutorial#sims 4 blender render tutorial#blender render
289 notes
·
View notes
Text
Transferring animations between rigs (e.g. adult to child)
The steps below describe how to transfer an animation from an adult rig to a child rig but the method should be applicable for any transfer between human rigs.
However, I haven't tested other constellations. Let me know if you have any other tips, suggestions, corrections or run into any issues.
Many thanks to thepancake1 for helping figuring out the details that are not obvious at all 💛
I posted this little guide in Creator Musings for someone wondering about it but sharing it here as well.

Step 1)
Export the adult sim animation you want to transfer (=your source) to Blender.
Open a blend file with a child rig (=your target).
Append the adult rig with the animation to the child rig in Blender (File > Append > Select the blend file > folder "Object" > select rig and mesh there)
Select the animation from the adult rig for the child rig (select the child rig in the Outliner menu > select the scene tab in the properties panel below > in "S4S AnimationTools" select the adult animation as the "active animation")
This will get the job mostly done, but the animation will be offset and jumping around, as you see below. To correct for that you will need to set up several constraints as described in step 2.


Step 2)
As you see below the height of the ROOT_bind of the adult sim and child sim differ by about a factor of 0,7:

You can check the exact location in Edit mode:
The ROOT_bind of the child rig is located at 0.6920, the ROOT_bind of the adult rig at 1.0112 on the Z axis, which gives a factor of 0.6920/1.0112=0.6843354430379747

With that information you now need to do the following:
In the Dope Sheet menu, select "Action Editor" and press "New Action" there to make a copy of the selected animation for the child rig.
In the Dope Sheet Summary open the ROOT_bind and disable the location channels but keep the rotation channels enabled (the latter matters if the ROOT_bind is also rotated in an animation). The setting should look like this:

In the Transform menu (now in Pose mode) type in -0,6920 on the X axis for ROOT_bind (thus resetting its position to 0 in the animation; can't properly explain why X axis is chosen here instead of Y but it has something to do with how local rotations of a bone are determined according to pancake).

Create a "Copy Location" constraint for ROOT_bind of the child rig targetting it to the ROOT_bind of the adult rig (this is done in the Properties panel > Bone Constraints), set Influence to 0.6843354430379747 (factor calculated above). (Edit/Correction: Previously I recommended to create another "Copy Location" constraint separately for the "Z" axis and to check "Offset" there. However, upon further testing, this doesn't seem to be necessary. Leaving info here just in case.)
You might then also need to add a "Copy Rotation" constraint for ROOT_bind of the child rig targetting it to the ROOT_bind of the default rig (Influence can stay at 1 here).

The animation should now play as expected:

Step 3)
All you need to do now is bake the animation (thus applying all the constraints you set up). Select Pose > Animation > "Bake Action...", then check "Visual Keying" and "Clear Constraints" in the pop up. The animation will now work stand alone and you can delete the adult rig.
Alternatively, if you use Pancakes animation tools, you just need to export the clips, the constraints will be applied automatically.
287 notes
·
View notes
Text
💧✨based off of this illustration by @passionpeachy!✨💧
video compression muted the colors, so here are a few stills under the cut


tiny bonus: happy pride!

#3d#blender#npr#video#passionpeachy#i actually finished and rendered this out at 2 am but i will schedule this for the morning 😴#thank you azul for letting me use your art!! it made me feel very smart figuring out how to replicate the black shading of the bubble#it's not perfect but it's my first model that wasn't made following a tutorial! so that is to be expected. very fun very charming :]
510 notes
·
View notes
Text
the demons won

#IDK WHAT IM DOING!!!! BUT IM DOING IT!!!!#funny how i have maya installed for university but my dumbass decided to hop in blender to do this#i get so irritated w blender tutorials cause i just want to learn a specific thing nO I DONT WANT TO MAKE A DONUT!!!#txt
243 notes
·
View notes
Text
CC Creation Tutorial: Smooth Seams in Blender

In this tutorial, I will show you how to make your mesh seams smooth inside Blender (no Milkshape required!) and walk you through the process step by step. We will make a perfectly smooth mesh and transfer the normal data from that mesh to our main mesh using the Data Transfer modifier.
I am using Blender 3.6 in this tutorial (though you should be able to follow along using other versions as well)
You do not need to have much previous knowledge to follow this tutorial, but I assume you know some basics in Blender like how to select, things, navigate around, etc, and know how to import the meshes and put them into Blender.
For this tutorial, I exported the Sims 3 afbodyEP4DressPromBigBow mesh with TSR Workshop. You can use any clothing mesh you like though, and works on any meshes, not just Sims 3 ones.

This is our mesh. You can already tell that it has the dreaded seams on the neck and the rest of the body.

First, we need to make a copy of the mesh (in Object mode, select the mesh and hit Ctrl+D Shift+D to duplicate it, then hit Esc to stop it from moving around).
Rename the mesh (I added Seamless to the mesh name).
Make sure the original mesh is hidden (click the eye symbol) and select the Seamless mesh.
Press the Tab key to go into Edit Mode.

Now we select the parts that we want to have smooth seams. Let's select everything that is skin (you can select a litte piece of the mesh and then press Ctrl+L to select the entire piece)!

Now, press M and in the menu, choose By Distance. (in older versions, this is called Remove Doubles).
This will remove all double vertices at the seams on the selection we made.

It will show you how many vertices it removed. The skin looks nice and smooth!
Let's switch back to our original mesh: Make sure you deactivate the eye on the Seamless mesh and activate the eye again on the main mesh. Then, select the main mesh.

Now, let's add a data modifier to our main mesh. Click the blue wrench icon in the vertical list of the properties panel and then onto Add Modifier, then choose Data Transfer from the list.

As the source, we choose our Seamless mesh.

Also toggle on Face Corner Data and click the Custom Normals button.
Hold on, there is a message saying that we should enable Auto Smooth in Object Data Properties. Let's do that next! (if the message does not appear for you, maybe Auto Smooth is already on).

Click the green inverted triangle button and in the Normals section, toggle on Auto Smooth.

Now we can switch back to the modifier tab by clicking the blue wrench icon again.
But hang on, what happened to our mesh? There are now black spots over the dress and shadows on the legs!

This is due to the Data transfer modifier's Mapping setting. If we change it to Topology, our mesh goes back to normal again. Phew!

Now that the normals look good, we can start the transfer of our new smooth normals from the seamless mesh to our main mesh. To do that, we hit the Generate Data Layers button. This button works destructively, so you cannot undo what it did, just FYI.

Note: On newer versions of Blender, Generate Data Layers may not be enough to transfer the normals and you may need to apply the modifier instead.
You can toggle the modifier's visuals on and off with the little screen icon to see the results after you click Generate Data Layers to see if it stuck. If it did not (and you see the seams of your base mesh when toggling it off), try to apply it instead.

I switched from textured to solid shading because the differences are just more noticeable in this mode. This is how our mesh looks now with the modifier turned off.
Because we clicked the transfer button, the normals have been permanently applied to our mesh. The skin is smooth now, and so is the dress (even though we did not smooth that one, hmm...)

If we toggle the modifier back on, suddenly the dress has seams again! What's going on there? I'm not exactly sure why, but Auto Smooth seems to be doing some smoothing on the dress mesh as well.
I am not sure if this is normal behavior or not, but let's pretend that this did not happen and the modifier in fact did not smooth the dress.
Maybe we just forgot to smooth some areas on the Seamless mesh that we noticed only later on. That's no problem. We simply modify our Seamless mesh again!

So let's swap back to the seamless mesh and select it (remember to click the eye icons so only the Seamless mesh is visible).

Let's select the main dress parts and press M -> merge by distance on them. We cannot smooth the whole dress all at once, because then that would remove some seams that we want (like those for the backfaces and the middle section of the dress where the bow is attached).
If we remove the wrong seams, we ruin our normals and will have black splotches.

Now, let's select the backfaces and areas we left out before and repeat this process: M -> merge by distance.

Look at how perfect our Seamless mesh is looking now! Now, let's transfer those beautiful normals to our main mesh.
Select the main mesh and toggle the eye icons again, to hide our Seamless mesh and reveal our main mesh.

Once again, we will use the Generate Data Layers button in our Data Transfer modifier. If you have previously applied the modifier, just add the modifier again to the main mesh and use the settings shown here.
And that's it, you are done! You have a perfectly smoothed mesh that you can export now.

Final Note: it is best to transfer the normals at the very end of your meshing process because any action that recalculates the normals can reset our custom-made smooth normals again.
Of course, you can simply use the Generate Data Layers button again to re-add them, but it saves you time to only do this step at the end.
I almost forgot to say: You still have to use Mesh Toolkit to fix the seams on the edges of your mesh and do the usual shenanigans.
188 notes
·
View notes
Text

It's BIG.
It's BLUE.
It's UPDATED.
Hiya Simblr, it has been a while. I have a big update today- it's one of my oldest guides on MTS, but new and blue! The changelog is in the MTS comments- but the short and sweet is that two years of learning Blender has been squeezed in there for your convenience, complete with graphics and GIF examples.
ModTheSims tutorial Google Docs tutorial Blender Templates

#on a mission to become a human tutorial hub#i follow predominantly ts2 blogs and feel like an infiltrator posting about simcethri#simblr#ts3#the sims 3#ts3 cc#ts3 tutorial#ts3 blender
194 notes
·
View notes
Text


tried to animate a book
#random#my animation#my 3D#blender#i swear there's a tutorial for everythign for blender#god bless the 3D community OTL
78 notes
·
View notes
Text
I hope you know I regret drawing this too

#i paused my blender tutorial to be here#froop#i dont. i dont know if i want to maintag this#oh well#isat
130 notes
·
View notes
Text
Guess who finished the donut tutorial?
#blender#3d modeling#3d model#blender donut#donut tutorial#my art#sunnyaliceart#following the tutorial made me crave donuts the whole WEEK#loud warning
49 notes
·
View notes
Text


trying out making 2d animations in blockbench, using textures i made... about a year and a half ago!
obviously there's other programs that are meant for this, but that'd require, like... actually downloading and learning a new program....
#i think people actually use blender for this kind of thing... but i find most blender tutorials hard to follow haha#rain world#rain world downpour#the rivulet#rw rivulet#blockbench#art#digital art#drawing#digital drawing#gif#animated gif
75 notes
·
View notes