#tutorial mode
Explore tagged Tumblr posts
Visit Tumblr Blog
Explore Tumblr blogs with no restrictions, modern design and the best experience.
Last Seen Tumblr Blogs


Fun Fact
Tumblr’s website traffic is steadily declining.
Photo

Lifeline (Sony Computer Entertainment / Konami - PS2 - 2003)
12 notes
·
View notes
Text


After a brief declutter, I discovered a hidden gem I didn’t even know I had, in the form of Kingdom Hearts: 358/2 Days, especially after considering purchasing a copy from Vinted. Naturally I had to complete the first mission with Axel, followed by the “icing on the cake”…goes to show that sometimes, you really CAN surprise yourself. Got it memorised? 😉😄
#decluttering#a welcome surprise#kingdom hearts 358/2 days#organisation xiii#first mission#tutorial mode#axel#roxas#the icing on the cake#got it memorised
3 notes
·
View notes
Text
Needle Felt Siffrin Build Log: (oct 6 - nov 20, 2024)


Credits goes wholely to @insertdisc5 for creating ISAT and siffrin's design! I am just here to attempt to make cool fanart (and get more people to play isat.. my devious plans are going great so far :3) As always, this isn't a tutorial- it is just a log about how i go about approaching a sculpture and I hope this collection of resources can help others make their own sifs!!
PSA: this has some spoilers for endgame CGs/sprites on my references image board ( also might see it in the backgrounds of my process pics). And bc this is needle felting, you will see some sharp needles! beware!
my inspiration was the intro cutscene where Sif eats the star, so my main goal was to adhere to the style of ISAT as closely as possible while transfering it to 3D space. And I knew i also wanted to try making the cloak for stopmotion purposes, so my process was tailored towards having control over the fabric with wire inlaid within the cloak (more on that later).
I ended up not sticking eyebrows on top of siffrin's bangs lol but anyways, first order of business is Gather Reference! v important. pureref is free and an awesome program. I also do some sketches to visualize the pose and important details i wanted to include in the sculpt.
behold the isat wiki gallery page! tawnysoup wrote an awesome ISAT style guide that absolutely rings true in 3d space too!! adrienne made a sif hair guide here!! (sorry i couldnt find the original link, but it's on the wiki). It says ref komaeda hair so that's what i looked at, along with other adjacent hairstyles! I also like doing drawovers on in progress photos to previs shapes n stuff to get a better idea of the end result.
Also if you're like me and struggle with translating stuff into 3D space, take a look at how people make 3d models and figurines! sketchfab is also a great resource! I looked at the link botw model by Christoph Schoch here for hair ref. (I used Maya, but there's a blender version too ! you can pose characters too if your model has been rigged!)


Face:
Started off blocking out the main shapes of eyelids and iris, and then filling in the colour details in the iris and the star highlights before moving onto adding thin black outlines and eyelashes. I didn't take many in-progress photos cause i kept ripping stuff out to redo them many many times, sorry!! This eye took about 3 hrs bc i just wasn't happy with it!! Sometimes it do be the vibe to give up, go to bed and see how it looks in the morning (more often than naught, it looks fine and it was the "dont trust yourself after 9pm" speaking)

The Mouth:
Couldn't decide if i even wanted to add a mouth as per usual with all my humanoid sculptures.. but i did some drawover tests first to see what expression i liked and to try to visualize it from multiple angles. (I was also testing the placement of stars on the hat brim here)

And then I redid the mouth like 3 times cause the angle just wasn't right (this went on for about the course of a week yay!)
Hair: woe baldfrin be upon ye


I made the hair strands individually first, and then since Sif has some of the hair at the back dyed black, i covered some of the tips with black wool (manually) (I think it would go much faster if i just took a marker to it, but hahaha i love pain and detailing!! )
And then the rest of it was positioning strands with sewing pins layer by layer, always looking at it from different multiple angles- sometimes tailoring the angle or swoop of individual hair flippies. At one point I thought the back looked too cluttered, but the hat covers a lot of it anyways!! yay for hiding mistakes! (imo this is a similar process to how cosplayers style wigs, but on a smaller scale and the same level of time consuming)
As always, look to your reference for guides, and I always do a whole bunch of drawovers over in progress photos to ascertain what was working and what wasn't.
Hat:
A trick to get a super pointy tip, make another tip seperately while keeping the connection point unfelted, and then combine the two to make super pointy hat!! (this also helps if you made the hat too short and need it to be taller. ask me how i know)

The embroidery on the hat brim was done in a hoop and then invisible stitched to the felted top portion. Technically you don't need a hoop but it helps keep the fabric tension, so you avoid puckers in your embroidery. You can also use iron-on stabilizer if your fabric is loose weave or particularly thin. this is the tutorial i used for the stars embroidery! particularly the fly stitch one, french knots, and the criss-cross stitches. highly recommend needlenthread for embroidery stitches and techniques! i learned all my embroidery from this single site alone.

For fabric, I think I used a polycotton i had in my stash,, unsure of the actual fiber content bc i bought it a long time ago. I used DMC Satin floss which was nice and subtle shiny but frayed a lot so it was kind of a pain to stitch with... but keep a short thread length and perservere through it!! After the embroidery was done, I folded up the raw edges and invisible sewed it to the top portion of the hat.
General shape:
Ok general structure of the body is this: wire armature body covered with black wool -> cloak lining & wire cage -> edge of lining is invisibly sewn to the main cloak at the hem -> head

Don't be afraid to mess around with the pattern, it's essentially a pizza with a slice taken out of it to form a steep cone shape!! Use draft paper before cutting into felt to save material! (i think i made like 3 cloaks before i was happy with the shape lol).
You can also hide the seam of the cloak and collars by gently messing up the fibers of the felt with your fingers or a felting needle btw! you can also sandpaper the seams according to Sarah Spaceman in this vid (highly recommend them for their in depth cosplay/crafting builds holy smokes), though since sif cloak is at such a smol scale, I just blended the seam with my felting needle.
For the lining wire cage section, I sewed in wire around the cloak, so the main rotation point is at the top neck area under the collar. These paddles are used to keep whatever pose I need the cloak to be in for stopmotion purposes. Then after the wire is done, I invisibly sewed the lining to the cloak at the hem (same technique as the hat brim to the lining there).
In hindsight, I should've used a thinner fabric for the lining, but i only had sheer white in my stash so had to go with double felt, thus resulting in a really bulky lining but oh well!

Heels:
started with the general boot shape, then tacking on the diamond shape heel stack and also diamond shape sole bc we're committed to the bit here. I skewer the boot onto the armature which also conveniently hides the connection point into the base to keep the whole thing upright and also I can rotate the boot to tweak the angle if needed.

Pins:
I kinda just trial and error'd jewellery wire with pliers into the pin shapes. They're itty bitty!! had a whole bunch of fails before i got two nice ones. A hot tip is to use needle nose pliers and wrap the wire around the tip to get a smooth circle shape!

Base:
I smoothed out the edge of a circular wood base with a dremel, and then used wood stainer to get the black colour. It ended up kinda looking like I took a sharpie to it, but whatever.... now i have a whole ass can of black wood stainer........ I then made a rough mountain of black wool and stuck the feet armature in. And now he's standing!!

Normally at this point when I'm done felting everything, to get a smooth finish, I'd take a small pair of scissors and carefully snip away any flyaway fibers, but this time, I just left them fluffy cause i think that's what sif would do :3c
Photoshoot:
Normally I do shoots using daylight but it was winter so the sun was nonexistent. So I broke out the home lighting setup aka dollarstore posterboard for a nice smooth background, and then hit it with the overhead Fill, side Fill 2, and Rim light, and use white paper/posterboard for bounce light if one side feels too dark. But if things are overexposed, you can move the light sources away until the harshness dims down. I'm using a Olympus mirrorless camera (handed down to me by my sibling so i dont remember the model exactly), which can connect to my phone as a remote so I can avoid shaking the camera when i take photos. Pretty nifty for stopmotion purposes! (yes my camera stand is a stack of notebooks, a tissuebox and some eva foam under the lens, don't judge me)


Stopmotion animation:
I'm still figuring stopmo out on my part, but my process was straight ahead animation ... move the cloak a cm, take a pic.... move another cm, click.... and repeat until i get a version I was happy with. My ref was the cloak animation from Gris (beautiful game btw). The 2d star animation was also done straight ahead using procreate, exported in png with a transparent background, and finally stitched together with the stopmotion footage in photoshop.

My turnarounds are also stopmotion! also secret hack, the turntable is a fidget spinner sticky tacked to a cake platter.
And i think that's all! i mainly wanted to share how I go about thinking about taking a 2d concept and moving it to 3D. I also didn't go in depth into how to actually do the needle felting bc I don't think I''d be very helpful I'm a very good teacher by telling yall to just keep stabbing until it looks right (i'm self taught for this hobby),,, if anyone wants it though, i can share a bunch of tutorials and other felters' process that helped me learn more needle felting!
Hopefully this was helpful to someone! Feel free to send asks if ya got any questions or if anything needs clarification! Or show me your works! I love seeing other people's crafts :3
here have a cookie for making it this far 🥐
#in stars and time#siffrin#isat#isat siffrin#isat fanart#needle felt#soft sculpture#know that i am devouring all the nice words yall leave in the tags/comments of my posts :holding back tears:#I hesitate to call this a tutorial bc this is just how i fumble my way through crafting anything lmao#the only reason I know how long I worked on a project are timestamps on wip photos and however long the day's video essay or letsplay is#sorry time is immaterial when i get into crafting mode#reason why this log is so late is bc after i finish a project i'm perpetually hit with the ray of 'i dont ever want to look at this again'#hence why photos never get edited#AND THIS POST SAT IN MY DRAFTS FOR 2 MONTHS DUE TO BLOODBORNE BRAINROT SORRY#done is better than perfect!!!#sorry i dont control the braincell#sorry for using a million exclaimation points! i am not good at this.. conveying my anxiety in written form!!! my toxic trait
1K notes
·
View notes
Text
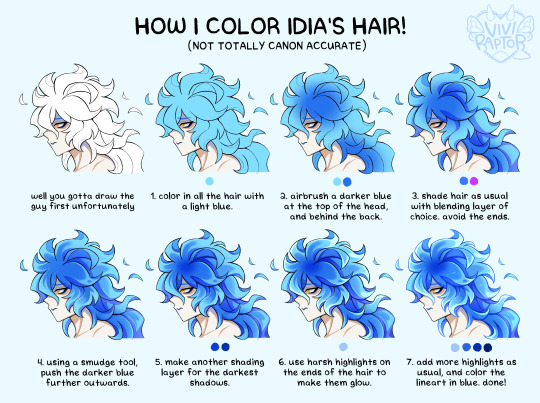
my hyperfix on twst is quickly coming back, so i'm trying to relearn how to draw idia's hair. i made this short coloring tutorial for myself, feel free to use it too if it helps!
#twst#twisted wonderland#idia shroud#twst idia#ignihyde#disney#disney twisted wonderland#art tutorial#coloring tutorial#digital art#fanart#twst fanart#ftr the blending modes are linear burn for shading and add for highlights#anyway i've been drawing him a lot for a very specific reason which will be revealed later. bc i'm shy
2K notes
·
View notes
Text


they're my motivation currently
#i can only play tutorial mode in marvel rivals#my pc keep crashing out ToT#spiderman#iron fist#lin lie#marvel rivals#marvel rivals fanart#ironspidey#spideyfist#spiderfist#IronWeb#peter parker#zakei art#zakeiart
1K notes
·
View notes
Text

#fanyart#using critter to learn how to have fun drawing again#literally the YouTube tutorials give me life#fun things#my art#dark mode users I hope I did u right this time#sorry in advance if this is a flop
201 notes
·
View notes
Text

A friend of mine introduced me to a new art program yesterday and it is my new favourite thing, so I had to draw at least one Feanorian to properly test it out :D:D:D
#maglor#feanorians#silmarillion#the silmarillion#silm art#silmaril#hehehe#this is either a nightmare or the silmaril decided maglor's hands were that dirty it had to float away~#>:D#or it could be symbolism or smth.#take your pick#:D#I absolutely love this art program btw.#it's called sketchbook#and it is way better than krita#kinda reminds me of a bunch of stuff I liked about photoshop#specifically with blend modes doing WHAT THEY ARE SUPPOSED TO and it doesn't have weird 'bloom' effects where they SHOULDN'T BE-#and I just like the lineart brush options so much more#Krita didn't even taper the brush. if you wanted brush sensitivity you had to look up an entire tutorial on how to add it >:(#there are some lil annoying bits about this program too (changing brush size - and choosing colours for example)#but like.#I'm still figuring it out so I might be able to just program some shortcuts or smth#Ye#all in all I prefer this program#:)#but it's been less than 24 hours so I'll probably have a more grounded view of it by the end of the week#:):):)
35 notes
·
View notes
Text
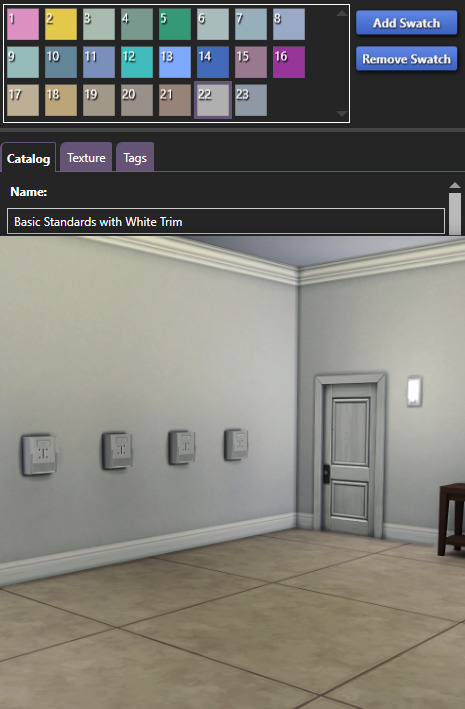
How To Override Apartment Hall Walls and Floors
If you, like everyone else I know, hate the apartment hallways and want to give them the face lift they deserve, here's how!
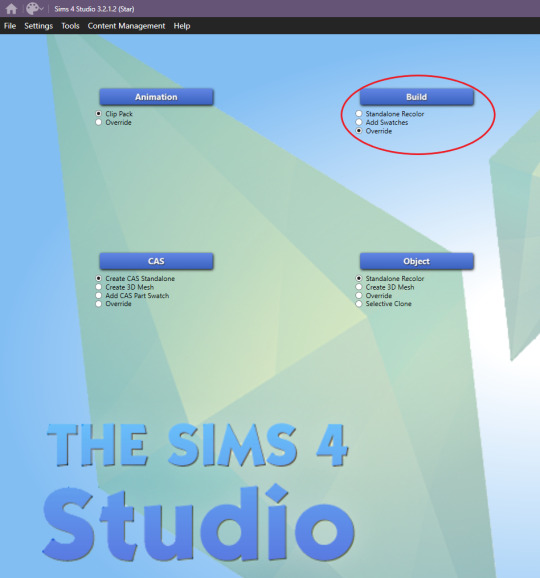
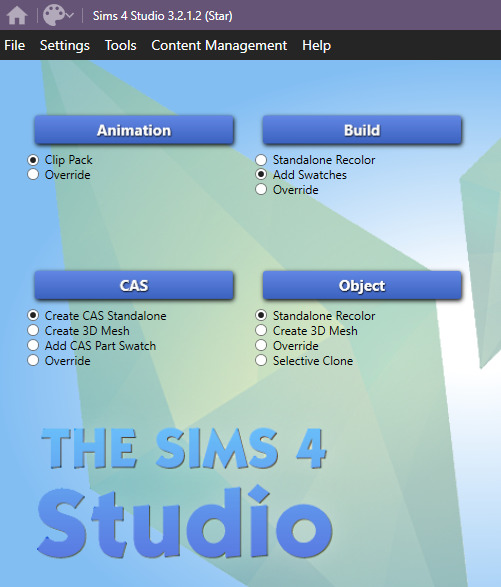
An override is actually super simple. You just need S4S for this. Step one is to choose override under Build, and then click Build.
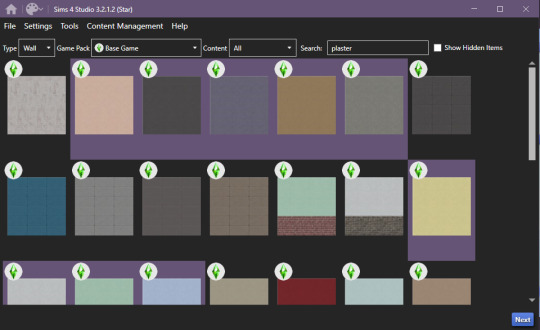
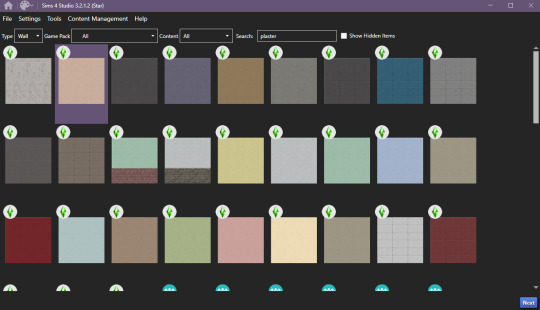
Now you need to find the wall you want to override. For this example, I'm making an override for the apartment in the Hakim House building. That wallpaper is called "Plaster Makes Perfect." (I figured this out by just going into build mode and searching and painting a nearby wall inside the apartment until I found the right one.) I have it set to Wall, Base Game, and I'm searching the word "plaster" to find it more quickly. Just click one swatch of the wall and S4S will pick all swatches, and then click "Next." Also, all of these instructions are exactly the same for floors, you'll just choose floors instead of walls.
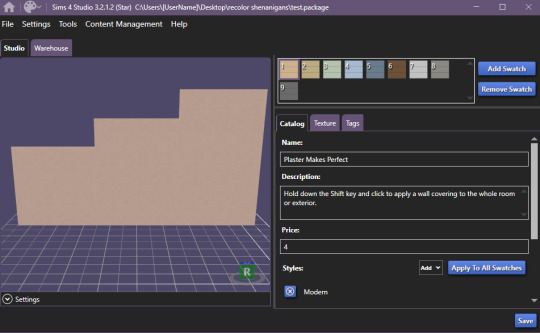
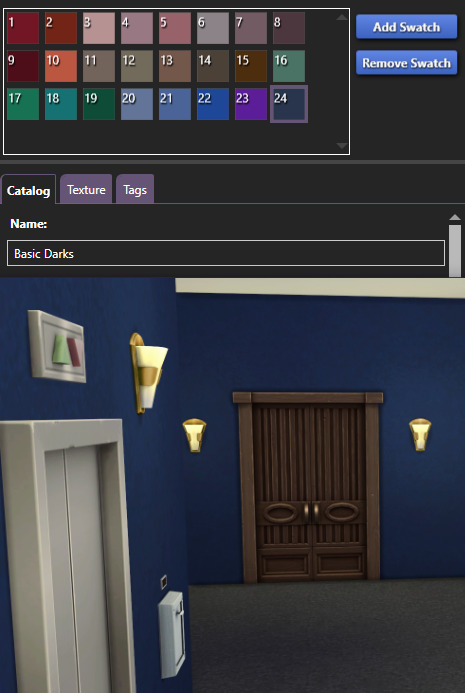
Name your file whatever you want. To be consistent I name all mine to follow the naming convention: username_description. We only want to override one swatch so you'll just click "Remove Swatch" on all of the swatches except for the one you want to override.

Once you're done, go ahead and hit "Save" and then head back to the main menu. Now we need to get the wall we want to replace it with. This time, pick "add swatches" and then click Build. This will only pick one swatch instead of all.
Again, just find the wall you want to use. Only select the actual swatch you want and then click "Next." You'll have to create a file here again, I just have a package called "test" that I save over for these instances where I don't actually need a new .package file, I just need to grab textures.
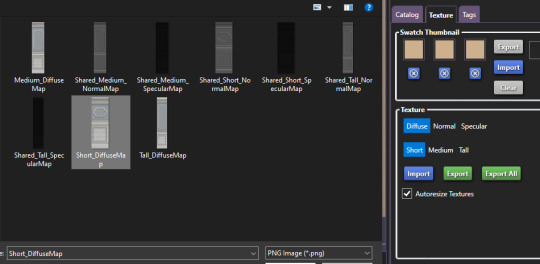
Now you'll go to the "Texture" tab and click "Export All."

On this save screen, create a folder for these texture files and then click "Select folder" to finish exporting.

Now, go back to the main menu and open up your original file. On the texture tab, you now just need to import all of your texture files. You'll import a Diffuse, Normal, and Specular for each wall height. So 9 files total, these are what you just exported. Just click Diffuse, Normal, or Specular, and then click the wall height, and then click Import. Go to that folder of textures you just created and then choose the correct file. S4S named each one exactly what they are so it's easy to pick the right ones.
Keep doing that until you've replaced all 9 files, change your swatch colors, and then hit save. Congrats, you just made an override of that wall!

Hold up, you still want access to that swatch you just made an override of? There's a quick and easy solution. Go back to your main menu and choose "Add Swatch" and then click "Build." Find the exact swatch you made an override of, select it and click "Next." Give your new package file a good name.
Hit save and call it a day. That's it. Now, every wall in the game that is that brown plaster will be the wall with paneling BUT since I added that plaster swatch back, anywhere else that I wanted to use that brown plaster, I can just go and paint it right back!
For all the apartment wall and floor overrides I've created, go here!
Below is the walls and floors for a lot of the apartments:
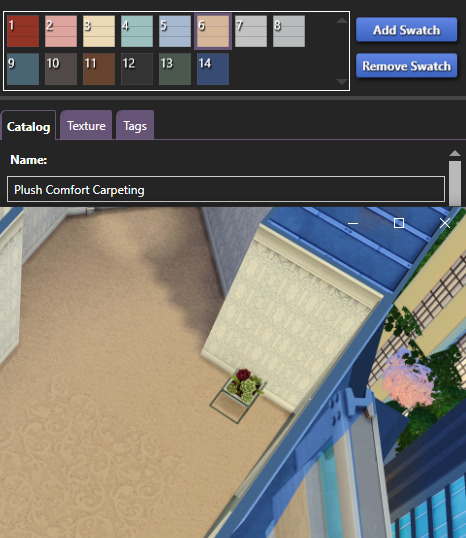
Alto Towers
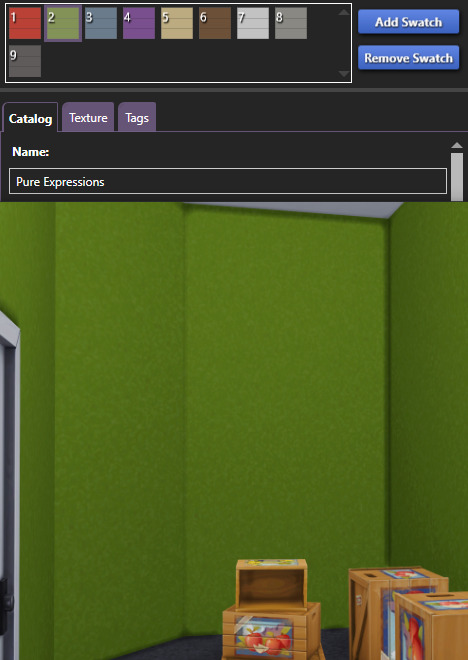
I ended up not making an override of this carpet so the swatch could be 10 or 12 but, as dark as it is, I'm pretty sure it's 12, plus I think 10 appears a bit too brown toned to be the right one:
Chic Street:
Culpepper House:
Jasmine Suites:

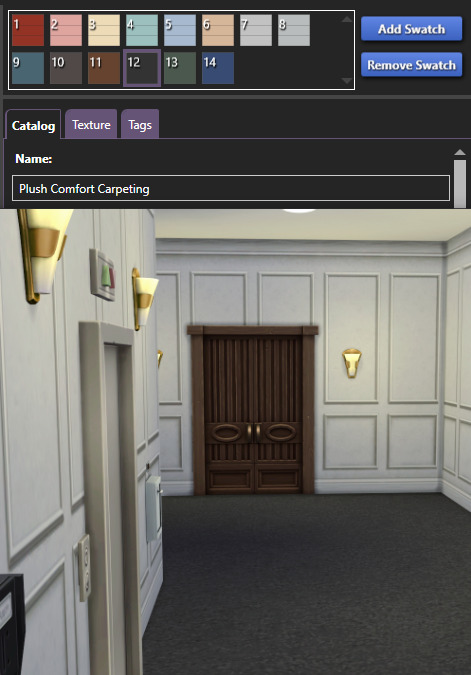
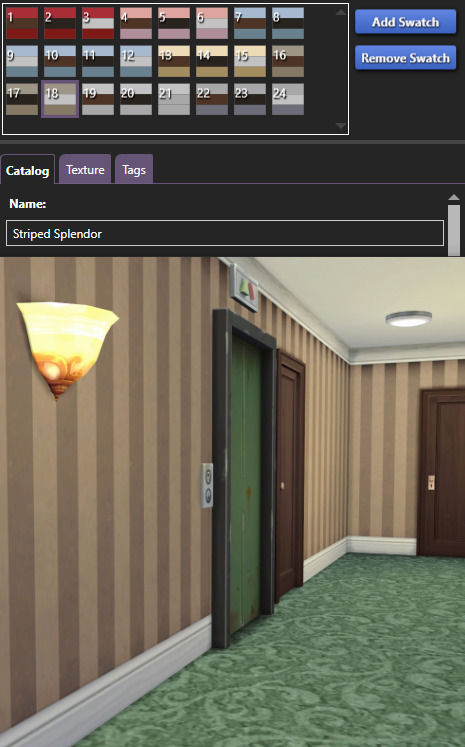
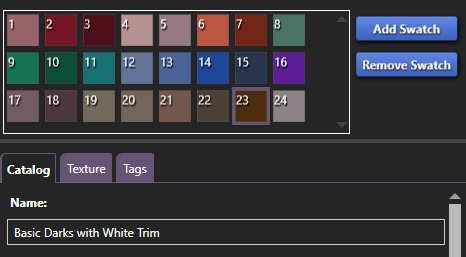
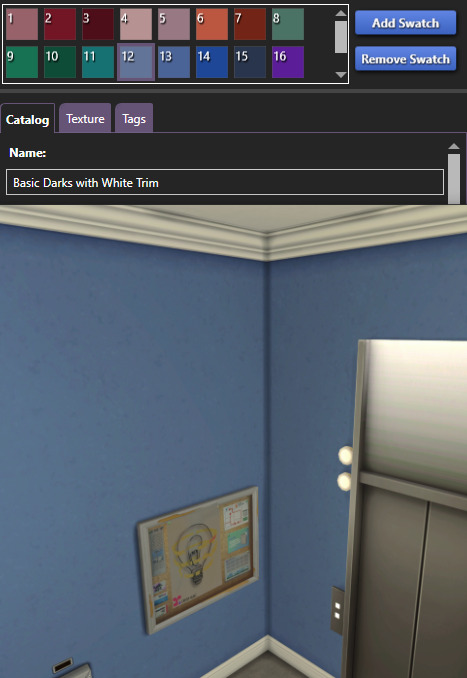
Landgraab Tower:
I missed getting a proper pic before placing my overrides but the original brown walls is the 23rd swatch of Basic Darks with White Trim.
The non-patterned carpet:
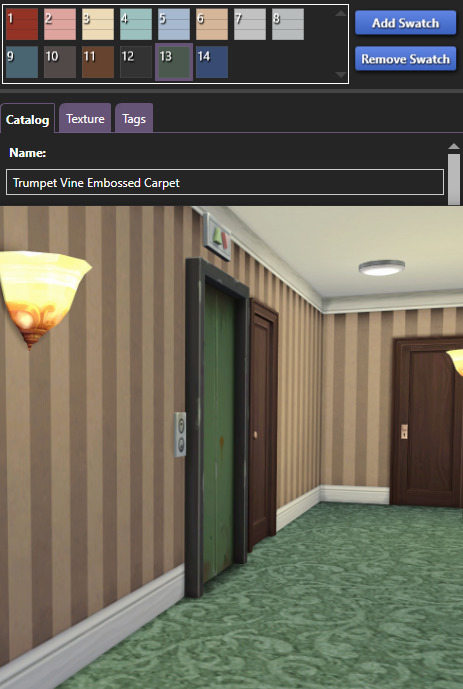
The Patterned carpet:

Spire Tower:
843 notes
·
View notes
Text
how did you get so cool kim
when i was playing DE i searched for some hints. you know how google always shows you the section with related questions? almost every time i got one that went somehow like ‘was kim this hot from the very beginning’
i have zero idea on how or why it appeared on absolutely unrelated searches, but the correct answer is YES YEEEES
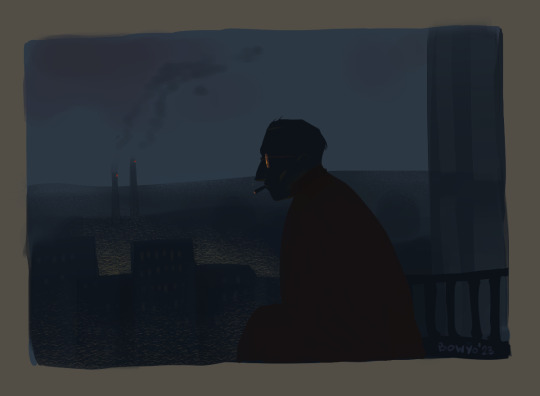
#bowyo art#it’s not whirling in rags btw. it’s the roof of 41th#i made this after watching tutorial about color theory#my personal pride is that i picked all the colors by hand from the wheel#like there’s no filters or layer modes oher than normal#god i love this man so much he’s so beautiful and fun to draw#disco elysium fanart#de fanart#kim kitsuragi#disco elysium
472 notes
·
View notes
Text
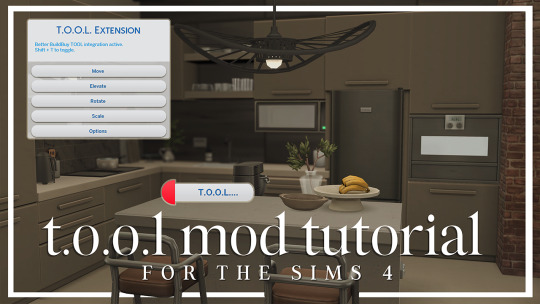
T.O.O.L Mod + Better Build/Buy Tutorial by LargeTayterTots
download links
better build/buy mod by twistedmexi
t.o.ol. mod by twistedmexi
7zip file extractor
andrew's pose player
teleport any sim mod

youtube / tiktok / twitch / patreon / gallery id: largetaytertots
288 notes
·
View notes
Video
youtube
tutorial, Wave Race: Blue Storm 🌊 (Nintendo - GameCube - 2001)
#Wave Race: Blue Storm#Wave Race Blue Storm#tutorial mode#tutorials#GameCube#jet ski#jetski#jetskis#jet skis#summer gaming#zplayz
7 notes
·
View notes
Text
some ultrakill fans flaming people for playing on lenient/harmless is so funny to me because here i am in my little corner playing on harmless with Also 100% damage reduction (in major assist settings) because my severe anxiety cannot handle the idea of me taking any damage at all . i am wearing my propeller hat and eating my lollipop and i am having fun :3 (and maybe one day i can ease that anxiety and play without major assists)
#me when my crippling anxiety is crippling fr#listen . its not as if i Want to get fucking heart palpitations whenever a few goddamn filth spawn in a room#its just how it is . and the only way to ease my irrational ass anxiety is by becoming fucking invincible#I KNOW ULTRAKILL IS SUPPOSED TO BE A (at least somewhat) STRESSFUL AND FAST PACED GAME !!! do not get me wrong#but holy shit man . do not underestimate my anxiety#fucking minecraft survival stresses me out when i encounter a fuckin skeleton (unless its multiplayer . then Suddenly all is ok . stupid#ass anxiety bruh fml)#prelude was stressing me out . PRELUDE . THE FUCKING TUTORIAL#im hoping i can ease up and slowly raise the damage taken to at least like 50% . eventually#im on 1% damage rn because even raising from 0 to 5 was scary LMAOO#like its not as if i want to play it the fuckin baby way . i WANT to be able to actually play ultrakill with damage n shit#but i just have to ease into it ig . because i cant even play video games without my anxiety screaming at me smh . fym my anxiety is a#permanent fixture in my life ? bullshit#im just hoping i can play Normally someday . eventually . because while playing with like 0 damage is more fun than being stressed out 24/7#it Is ofc . a little boring (bc No Shit) .#i want to challenge myself and i will . eventually#surely if ive done all a b and c sides in celeste i can do ultrakill on harmless haha right#ignore the fact that theyre two completely different games and that ive never played an fps in my life#and also that i have 15k deaths in celeste LOL (at least the idea of dying in that game isnt terrifying . shrug)#intense games like ultrakill just aint for everyone . thats why the assist options are there and why there r easier modes#theyre there for losers (/lh) like Me !!!! and i appreciate that theyre in the game bc i Do rlly like ultrakill#and i Do rlly want to play it (‘properly’ someday) . its js that ppl have issues like motion sickness or anxiety#and if they need assistance or an easier difficulty to enjoy the game then thats fuckin fine#literally who cares . ive watched so many videos on ultrakill now and ive seen all the tech n shit and know all the lore#its not as if i dont know the game enough to play it properly lmao#but sigh . at least i can do fun movement tech (except boosting . havent tried yet idk) like slam storage#movement is ez . combat is Hard (but not in the usual way like aim . just Anxiety™)#im ranting so much im such a yapper . anyway#ultrakill#kristiliyaps
44 notes
·
View notes
Text
MCSM Models and stuff to get started if ya'll want it
Heya guys, just thought I'd put this here for everybody that wants to start out with the MCSM Mine-imator/Blender models 💖 Originally posted in the Block by Block: The Amulet server on Discord.
💖💖Enjoy
EDIT: Will be rewriting soon
67 notes
·
View notes
Text
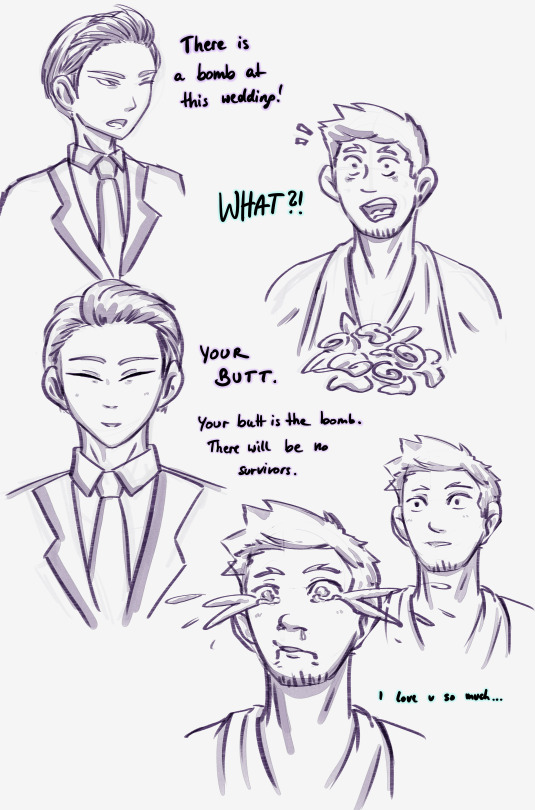
Based on B99 being iconic of course.
And the most beautiful Kafka Bride there is. ♡( ◡‿◡ )
Honestly, if that's not romance to you, we will never work out, sorry..
#kn8#kaiju no 8#kafhoshi#hoshina soshiro#kafka hibino#let's be honest they would have to rescedule the wed cause kafka wouldn't be able to calm himself down again lol#my wimpy boi#i literally scratched through my working hours to finally get home and make this#sorry for always picking up your ideas and add my shit to it ox..#if that bothers you just let me know#also I feel like I wanna learn how to use the comic canvas mode in CSP#feel like it could improve sketches like these a bit..#seems like we're going back at the yt tutorials#icy's art
83 notes
·
View notes
Text
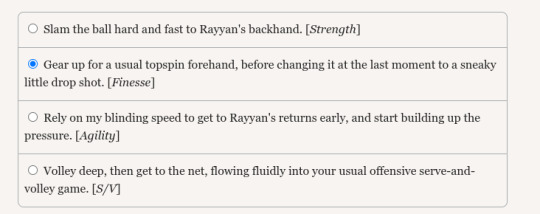
Starting on College Tennis: Origin Story for reasons that honestly escape me, and boy is my complete lack of sports knowledge really kicking my ass right now.
#if#ct:os#Hope the whole tutorial mode thing actually helps#Damn still annoyed my Merry Crisis save seems to have just vanished#Guess I'll get back to that one... at some point#For now. This
110 notes
·
View notes
Text
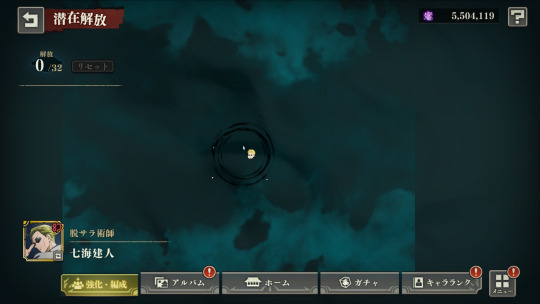
I get the feeling this isn't meant to be blank lmao
But I've blindly stumbled around and managed to find some areas where I could put in extra points for my Nanamins? (If I just click in random areas of the "mist", it pops up with different things that I can level for him 😂 pretty sure that's not how it's meant to work?)
This is how they're looking now:


Looking forward to playing the new events and modes! :D I've heard that SSR 💚Nanami has had some decent buffs, so looking forward to trying him out!! :)
#yup I definitely know what I'm doing!!#haha I'll work it out#probably meant to actually play the new mode first instead of rushing in to level my army of Mins#would have helped if I'd translated the tutorial that popped up as well :'D#jjk#jujutsu kaisen#jjk phantom parade#nanaminnnn#jenji plays#nanami kento#kento nanami#phantom parade#jujutsu kaisen phantom parade
23 notes
·
View notes