#twitter tutorial
Explore tagged Tumblr posts
Visit Tumblr Blog
Explore Tumblr blogs with no restrictions, modern design and the best experience.
Last Seen Tumblr Blogs


Fun Fact
70% of Tumblr users say the Dashboard is their favorite place to spend time online.
Text
⠀⠀谷 : TUTORIAL : link personalizado para twitter


⠀⠀
en notas, escribiremos POR SEPARADO la frase o emoji que deseamos convertir. ¿por qué por separado? si se hace junto nos saldrá como un link invalido y no podremos ponerlo en nuestro perfil, procuren hacerlo por separado (para las letras usen el espacio en blanco para la separación)

⠀⠀
ya con esto realizado, nos dirigimos a la pagina puny coder (https://www.punycoder.com) en donde pondremos nuestros textos respectivos que se codificaran, es muy fácil ya que la misma pagina te entrega la opción de copiar el nuevo formato, copias ambos y vuelves a notas
⠀⠀

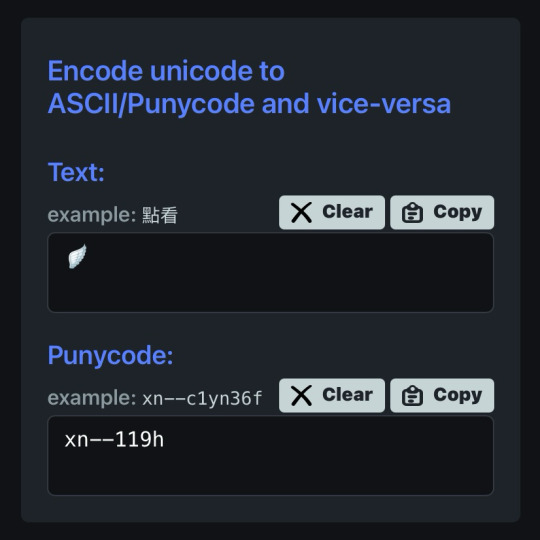
⠀⠀
para lograr cualquiera de los formatos que elijamos, al inicio de nuestro link hay que usar el HTTPS:// y para separar la palabra del emoji hay que usar un PUNTO ejemplo:
⠀⠀
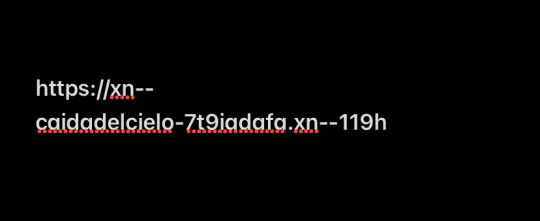

⠀⠀
con nuestro link listo, nos dirigimos a twitter, iremos a editar perfil y procedemos a ingresarlo en la categoría de sitio web, aceptar los cambios y quedará así:
⠀⠀
⠀⠀
esto servirá bastante para hacer tu perfil más atractivo o por el entretenimiento de decorarlo más, recuerden que pueden jugar con todo el formato pero solo está disponible para twitter, en otras apps puede que no se convierta el link pero al menos en twitter puedes cambiarlo infinitas veces. espero haberlas ayudado y haganme saber sus dudas o deseos sobre otros tutoriales ( ദ്ദി ˙ᗜ˙ )
⠀⠀
#᭪𒋲 ִ੭﹕evrthng⠀: post#tutorial#link#aesthetic#messy moodboard#random moodboard#cute moodboard#aesthetic layouts#messy layouts#random layouts#messy headers#random headers#dividers#kaomoji#cute symbols#random usernames#username ideas#twitter usernames#twitter#messy bios#messy locs#messy symbols#alternative users#cutecore#cute locs#goth moodboard#goth users#grunge moodboard#emo moodboard#edgy moodboard
1K notes
·
View notes
Note
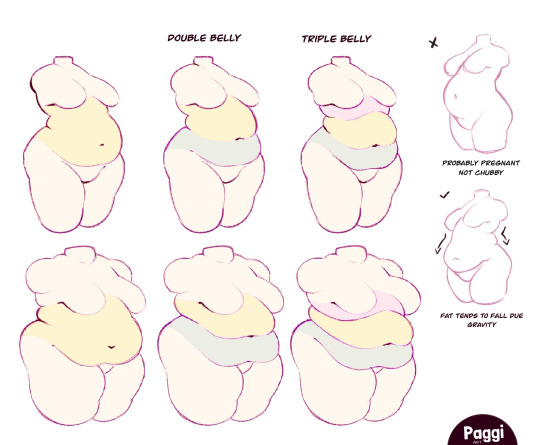
Hope its not a weird question but do you have any tips for drawing plus sized oc's and such?
Im a bit awful with tutorials but an artist i know made a really lovely info sheet on it and i highly recommend it!
source
850 notes
·
View notes
Text
⠀⠀⠀⠀̣݊🤍 ࣭ٜ࣪ ◌゚ ⠀⠀twt links


( 1 )
(http://xn--4hbaa82xababavdd4070feae402tfaf566fgaaaaagaaa14247glak.xn--6iiaaaa)
( 2 )
(xn--xnhaaaa364da55718fbabb.xn--6iiaa)
( 3 )
(xn--6iiaa4965waaaa.xn--6iiaa)
( 4 )
(xn--mcia5t8vaaaabaabaa.xn--6iiaa)
( 5 )
(xn--hddaarbb8ucc9kdd5427eeae147daaafafa.xn--6iiaa)
#⠀⠀⠀⠀⠀⠀⠀⠀⠀⠀⠀⠀⠀⠀⠀ . ˚ * ✦ . . ✦ ˚ ˚ .˚ . . ˚ . ✦⠀⠀⠀⠀⠀#⠀⠀⠀⠀⠀⠀⠀⠀⠀⠀⠀⠀⠀⠀⠀⠀⠀⠀⠀⠀⠀⠀⠀⠀⠀⠀⠀⠀⠀⠀⠀⠀⠀⠀⠀⠀⠀⠀⠀⠀⠀⠀⠀⠀⠀#nudjismo#foryopage#archive#my post#like#visual archive#new post#helping you#recursos#links in bio#cute links#links#twitter#twitter links#x links#x#link#messy layouts#messy packs#messy symbols#aesthetic symbols#cute symbols#simple moodboard#tutorial#tumblr#simple bios#cute bios#biografía
506 notes
·
View notes
Text

the ultimate beginner metadata tutorial !! by a dummy :3

HEY PALS AND PEOPLE doing some tips and tutorials ,,,, kinda explaining the metadata that people do in rentry
the site already have a "tutorial" on the "how" window, these on the post are the ones who need further explanation
i will put in topics and try to do my best on this, its a long read!
• the border i will be using for example its by @/suturical on this post
• now, how to understand this and make the magic happen?
GOTCHA!!!
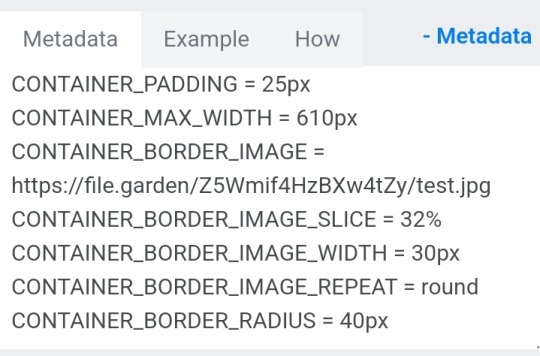
1. Borders: container adjustements
• the least important thing is the container width, you can put as you please but i use it on 400px — 610px, its just my recommendation
• now the padding is important, its basically the distance between the border and the elements of your rentry
• example: padding on 25px
• example: padding 20px
2. Borders: slice
• the image slice is basically how much it will slice your border and repeat it, i recommend using it 20% – 40%, however adjust as you please!
• example: slice 37%
• example: slice 23%
big difference isnt it? and i only changed the slice part, nothing else!
3. Borders: width
• basically the width of the border, adjust as you please but i also recommend to put on 30px as its the maximum size you can put
• example: width 30px

• example: 15px width

4. Borders: repeat
• this is another thing that dont have much secret and explanation about, there are 4 repeating types for borders, they are:
• stretch: will stretch the original size of the border across the entire container

• round: most used, 'normal', will make your border get around the container
• repeat: will repeat a certain part of the graphic image across the sides

• space: will give space between the repetitions

• onto the next part, text!

2. Text: font applying
• ngl its pretty simple, first catch ANY font of the google fonts site and do like the screenshot above, detail, if you font name has a space between the name (example: playfair display) you MUST put the _ to substitute the space, or it won't work
• but if the font name doesn't have any spaces, write it normally
2. Text: text size
• also really simple, explore the sizes on the rentry, i use it 10px – 25px, adjust to your liking!
2. Text: coloring
• tired of coloring all sentences manually? just do the code from screenshot and input your color! it can be written like i did or the hex code/whatever!
• you can still color things manually even when using this
• final with all these changes:


SO THATS IT! the most important actually :33
hope it isnt confusing, any questions please send an ask!
tagging oomfie @chokingonchairs bc finally got the courage to make this and yu asked for hehe ^___^
THANKS FOR READING!
# giftᧉd from 𐓟bove … ⟡#rentry tutorial#tutorial#rentry#rentry decor#rentry graphics#graphics tips#graphic tutorial#icon pack#icons#random headers#twitter icons#headers#icon#random icons#twitter header pack#twitter headers
640 notes
·
View notes
Text
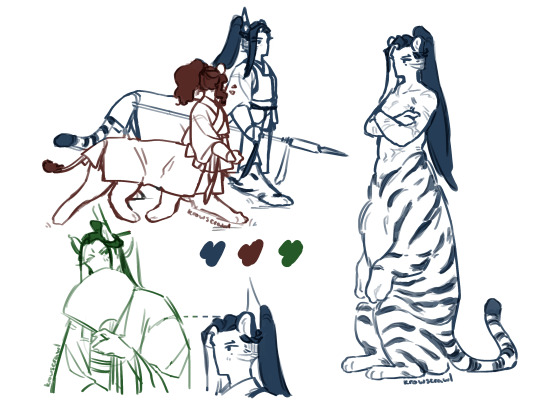
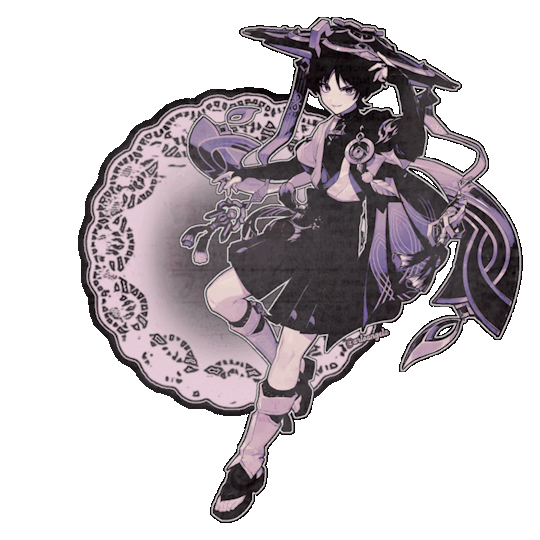
tigertaur lqg (& co.)
crops under the cut
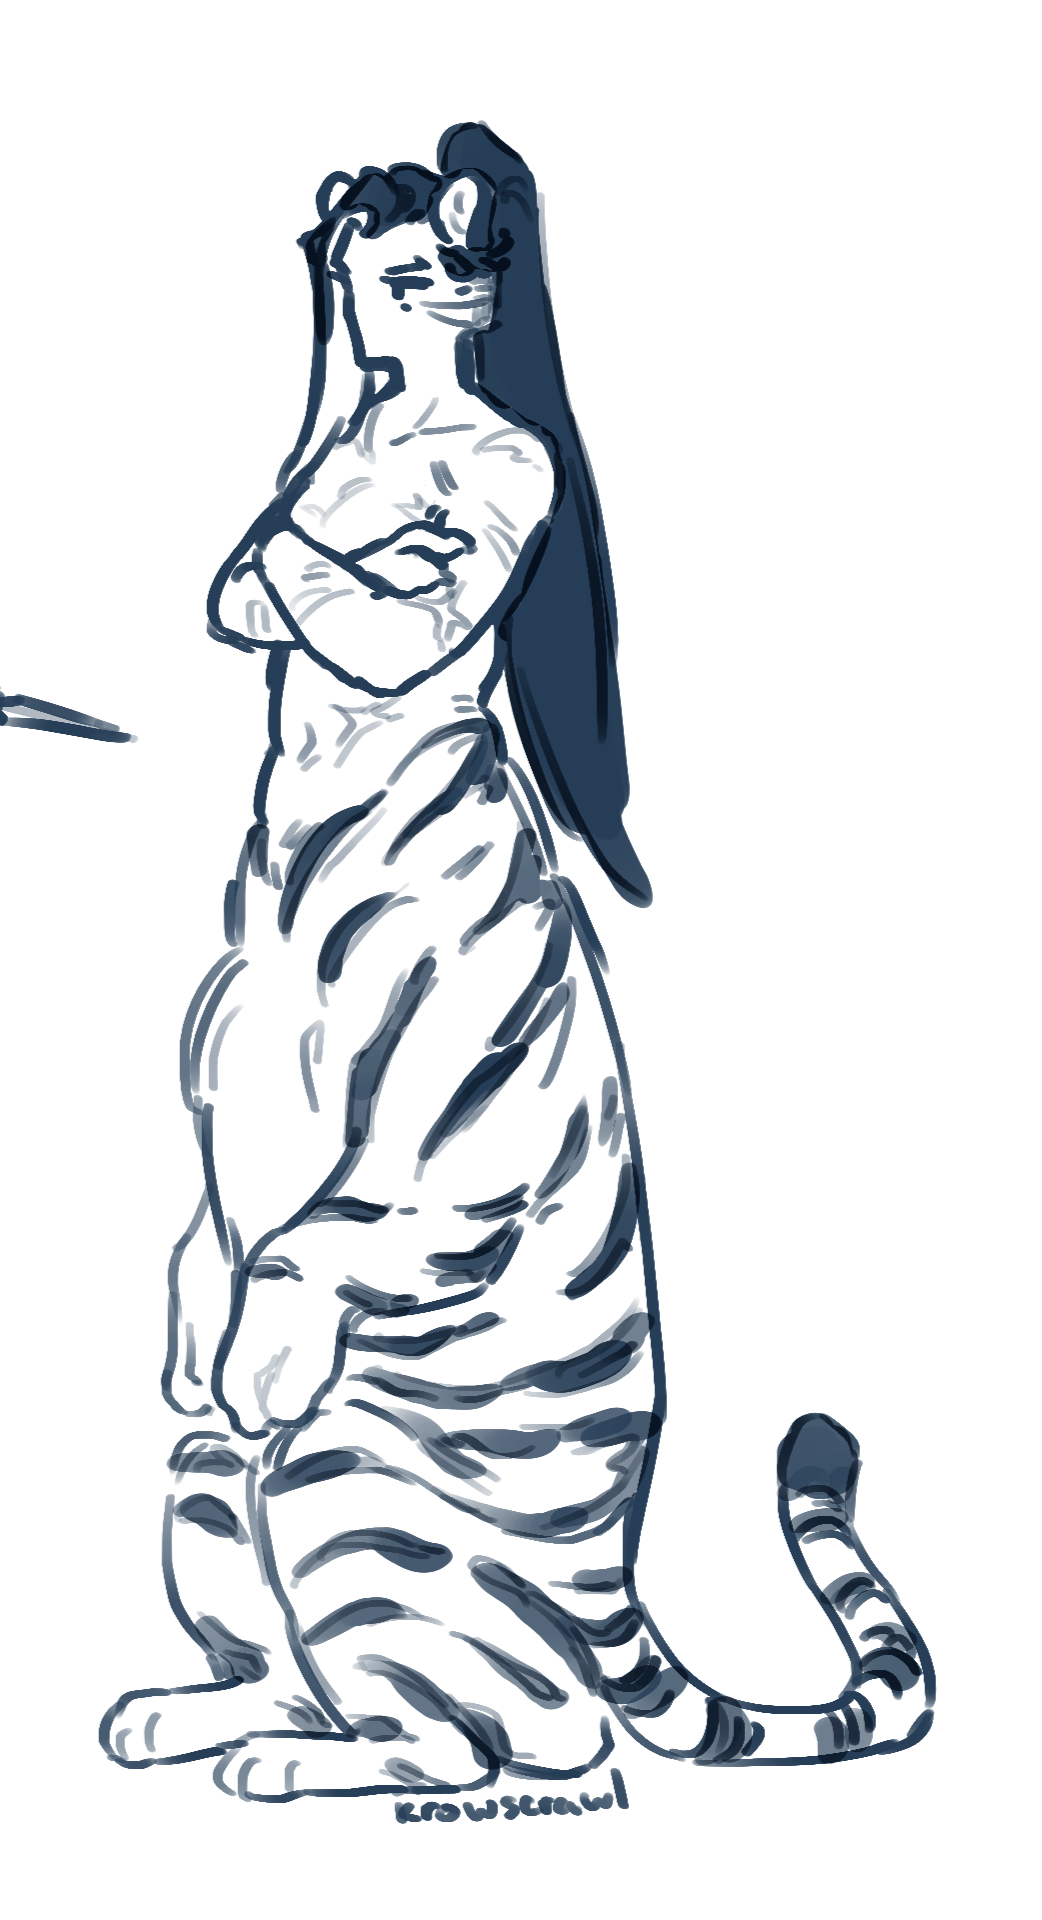
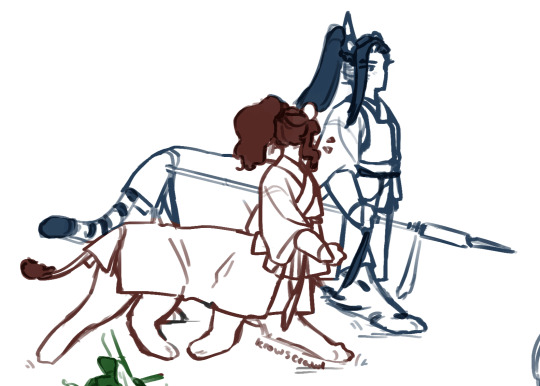
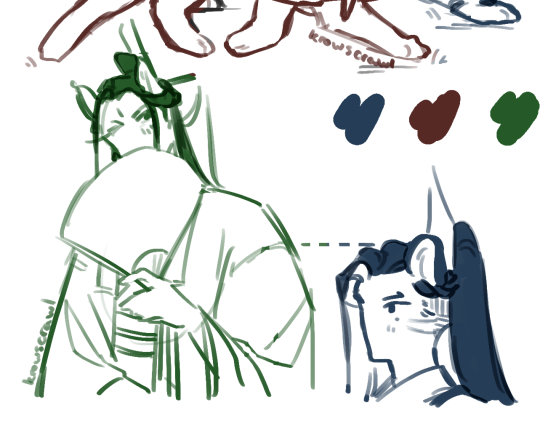
#scum villian self saving system#svsss#fanart#liu qingge#luo binghe#shen jiu#implied#bingliu#liujiu#been seein centaur au in my twitter tl and I wanna join :3#this is also my chance to advertise ryo sumiyoshi's furry tutorial book I love their art I love this book go check it out however you can#ight gnight
616 notes
·
View notes
Text
250307 Big Hit's Tweet, TikTok and Instagram Reel
쩨호오오오옵 사랑해, 사랑한다고😮 나랑 챌린지 찍자~!!! 🔗 #jhope x #Jin: https://vt.tiktok.com/ZSMCWrqgm/ 🕺j-hope's Dance Tutorial: https://vt.tiktok.com/ZSMCWqha5/ #진 #제이홉 #jhope_SweetDreams
J-hoooope I love you, I LOVE YOU😮Let's do a challenge together~~~!!!
🔗 #jhope x #Jin: https://vt.tiktok.com/ZSMCWrqgm/ 🕺j-hope's Dance Tutorial: https://vt.tiktok.com/ZSMCWqha5/
#Jin #Jhope #jhope_SweetDreams
Trans cr; Aditi @ bts-trans © TAKE OUT WITH FULL CREDITS
#250307#j-hope#hosoek#hobi#jin#soekjin#2seoks#tiktok#jhope_SweetDreams#dance challenge#dance tutorial#please use the link to view the dance tutorial#bc Tumblr only allows one video per post#bts#bangtan#bighit#official#twitter#instagram
57 notes
·
View notes
Text
hi I’m a very long time cosplayer (20+ years experience) who has chronic headache and migraine problems and this is a post about how to prevent your cosplay wigs from giving you painful headaches! Nobody likes wandering around the con in blinding pain and so hopefully this post will help you reduce the chances of this happening.
1. If your wig is way too tight, don’t use it. Get something with a bigger cap. tbh I often wear slightly too big wigs to reduce the pressure! Find out what brands and sellers sell wigs that are comfy on your head and prioritize buying wigs from them! I made a big master list of cosplay wig sellers a while back so here’s a few you might not have known about. Arda (and its Canadian and European sites) sells by far the biggest wigs, but I personally find Classe the most comfortable for my specific head. It’s all very YMMV and it’s totally possible for a wig to not actually be too small but fit your head in an uncomfortable way (Blue Beard on taobao does this to me every time), so just don’t buy from suppliers that do that. Also consider resizing wigs to be larger! For wig clients with extra large heads I like to nip the edge of the wig right behind the ear where your ear and hair from above will cover it and add in a little godet of elastic.
2. Reduce weight! A heavy wig will make head pain much more likely, so here’s a few tips on wig weight reduction!
A) if your wig doesn’t need a ton of volume and is already very dense, rip out some wefts in the bottom half. Anything on the part of your head from the ridge where your head starts going in towards your neck won’t really show unless your wig is very short and it’ll obviously reduce weight instantly! You can replace any missing volume with light crimping or light heat and tease, or leave the wig as is for a natural and silky look without the unnatural volume of a cosplay wig.
B) if you need more volume in your wig, instead of going straight to adding wefts for more volume, see first if combining crimping with heat and tease at the roots will give you the extra volume you need! Crimping or heat and tease adds volume and if you straight up destroy the fiber in the first two inches from the scalp by doing both repeatedly, it’ll add huge volume without you needing to add extra hair! When I do this I like to heat the fiber near the roots, tease it, let it cool, crimp the teased part, let THAT cool, and then brush it out. You can flat out double the perceived volume in the back of the wig this way!
C) if your character has a high ponytail or high pigtails, consider using clip on ponytails that you can easily remove if you need the weight off your head right the fuck now. here’s two tutorials I swear by for making a short wig + clip on combination look more natural! They’re in Japanese but easily comprehensible if you use machine translation thanks to the clear photography. They also help with spreading out the weight on the wig itself, and if your hair is long enough, using a clip on with a fishnet wig cap and clipping through the wig and into your real hair will also he lp make it more secure and distribute weight more evenly.
if your character has high pigtails
if your character has a high ponytail
D) when you need extra wefts, opt for sewing in wefts rather than gluing whenever possible. Glue doesn’t seem heavy but enough of it can make a wig get real heavy REAL fast.
E) redirecting the weight to your entire head and not just the front hairline will feel lighter and give you less forehead tension, which is one of the biggest causes of wig headache. Toupee clips sewn evenly around the edges and a Wig Fix https://therenatural.com (the name brand one, the knockoffs genuinely don’t work half as well) can help with doing this. A Wig Fix will also let you use fewer pins to keep your wig on, which is another cause of wig headache. Can’t suggest trying those enough. There are also some velvet wig grips out there but I find those don’t work quite as well, but they’re by far better than nothing.
3) make sure your wig is easy to remove. A lot of characters have horns or veils or other head things on top of the wig so make sure those can easily come off if you need a wig break! I’m a big proponent of using wig glue or double stick tape to glue strands (face framing layers etc) to your face for a more natural and more flattering look, but if you get headaches from wigs, keep that glue or tape in your bag so if you have to de-wig for a bit, you can get it back on!
4) take the ibuprofen or whatever BEFORE you put the wig on, and not when your wig is already making your head miserable! It’s like taking the ibuprofen before you wear the horrible shoes for a special event; it’s more effective in advance.
5) what are your normal headache triggers? Make sure you’re doing the work to EXTRA avoid them before wearing a cosplay wig. Stay hydrated. Keep up with your electrolytes. If you have any food triggers, make sure you’re managing them properly.
6) try multiple types of wig cap before deciding which ones to use! I’m a big fan of the fishnet kind because I’m in agony every time I try to use the stocking kind. Some people find relief in doing pin curls under their cap, and @/battleangelgif on twitter suggested doing this with damp hair the night before you wear the wig. There are tons of methods! Stretching out fishnet caps can be done more effectively when they’re slightly damp and that’ll make them pinch less. Experiment with what you like best to keep your irl hair in place and once you find a method you like, go for it! Make that your go-to!
7) always remember: wearing a short wig is less miserable than wearing a wig to your ankles. consider very carefully whether or not you can actually handle that wig that’s as long as you are tall. sometimes you just can’t and that’s okay! reduce the length of any super long haired character to hip length and it’ll be FINE. I swear. It’ll still read as super long and it won’t be as terrible.
8) always remember you can just. take the entire wig and cosplay off if you’re in agony. it’s not worth it. don’t do that to yourself. If the migraine hits anyway, just take it off.
Hope some of this might help you out! Focusing on reducing and redistributing weight is what helps me out the most 😌 feel free to reply or reblog or message with questions and I’ll try and get back to you ASAP!
#cosplay#cosplay tutorial#wigs#wig tutorial#cosplay tips#reducing wig weight#I just want to save everyone from blinding cosplay wig induced migraine#nobody likes head pain at the con#hope I was clear enough hhhhhh#yes this is an expansion of a twitter thread I wrote#y’all get the better version
633 notes
·
View notes
Note
Hola kiki, venía a preguntar si sabes cómo puedo subir un video de otra cuenta a mi cuenta y que se vea así,, no sé si me explico bien ☹️

Holaa, te voy a enseñar :•3

Primeramente vas a elegir tu video y vas a copiar el enlace de ese mismo
Ya con el enlace listo, lo pegas en un nuevo post y haces lo siguiente 👇🏻

Vas a borrar todos esas letras randoms y el '?' hasta dejar sólo los números.
Ya con todo eso borrado, vas a poner al lado '/video/1' sin separar nada, todo junto. (Arriba del enlace tienes que escribir algo, o poner algún símbolo, sí o sí) 💧

Lo públicas y se tiene que ver así 👇🏻

#⠀🎀⠀ by ⠀ ⠀ •̩̩͙*˚⁺‧͙ ⠀ ⠀ kiki 🪽 ☽ ๋ ✙ ⠀⠀⠀⠀#⠀⠀⠀⠀⠀⠀⠀⠀⠀⠀⠀⠀⠀⠀⠀⠀⠀⠀⠀⠀⠀⠀⠀⠀⠀⠀⠀⠀⠀⠀⠀⠀⠀⠀⠀⠀⠀⠀⠀⠀⠀⠀⠀⠀⠀⠀⠀⠀⠀⠀⠀⠀⠀⠀⠀⠀⠀⠀⠀⠀⠀⠀⠀⠀⠀⠀⠀⠀⠀⠀⠀⠀⠀⠀⠀#nudjismo#my post#foryopage#new post#visual archive#archive#recursos#like#helping you#messy packs#tutorial#rei#twitter
132 notes
·
View notes
Text


• wanderer graphics 。
| ♡ / ↻ + credit to use
| credits: render by oomfie luka :3
| mai phone is tweaking again ,,

# giftᧉd from 𐓟bove … ⟡#genshin wanderer#wanderer#scaramouche#genshin scara#wanderer genshin#wanderer gi#wanderer icons#scaramouche icons#rentry tutorial#rentry#rentry graphics#rentry resources#rentry stuff#rentry decor#icon pack#icons#random headers#twitter icons#headers#random icons#icon#twitter header pack#twitter headers
88 notes
·
View notes
Text
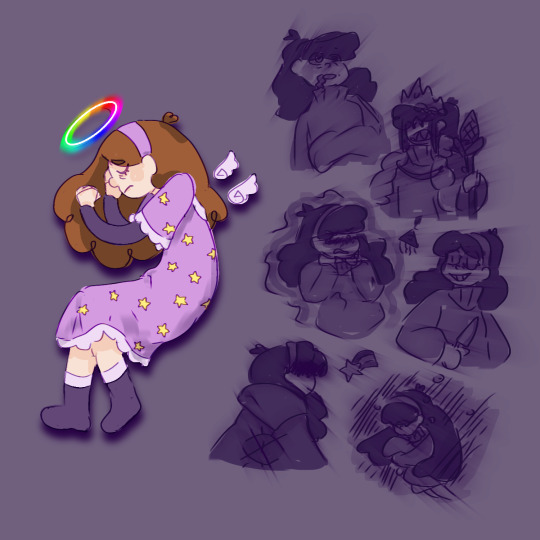
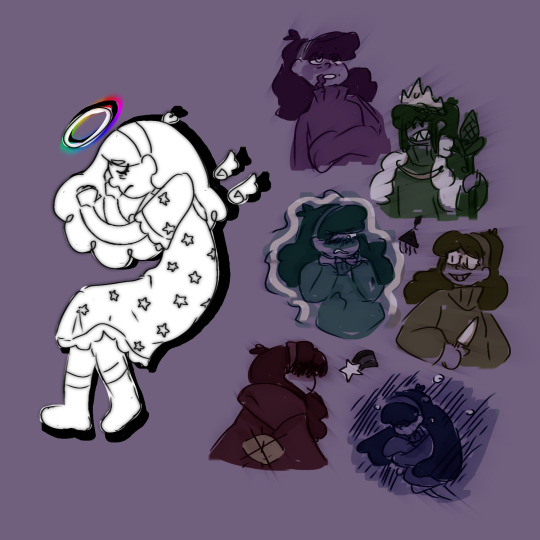

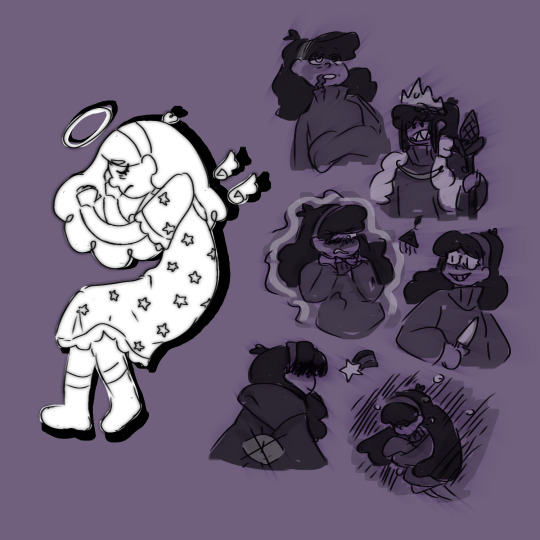
A bunch of different version of this piece bc i couldnt decide which one i liked more :/
#gravity falls#cherub!mabel#mabel pines#i gave her a nightgown bc her dress ruffles were killing me to draw#idk how to make a dreaming effect on art if anyone has any good tutorials or examples that would be cool#i wanted to post it to twitter but isk which one to post so i guess i wont lol#cherub mabel has ‘’nightmares’’ about the bad end mabels everytime she tries to sleep#gravity falls au
53 notes
·
View notes
Text
I’ve got 2 more lighting tips today: first one is something I call “soft rendering.” It gives that fuzzy, 90’s anime feel! I hope you all enjoy it! I’ll post the second lighting tip tonight!
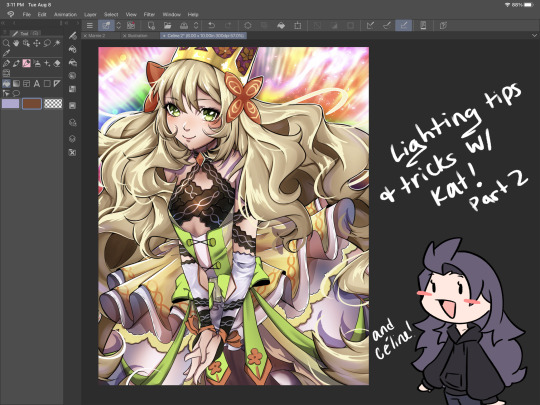

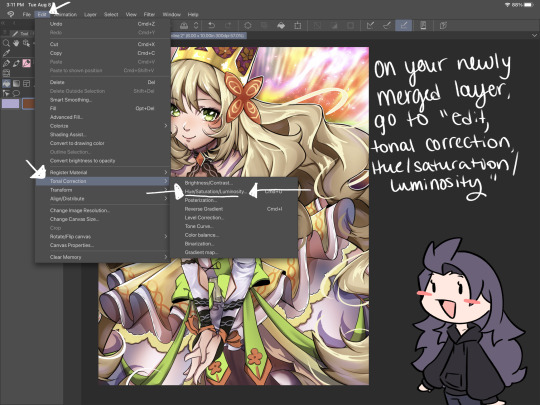
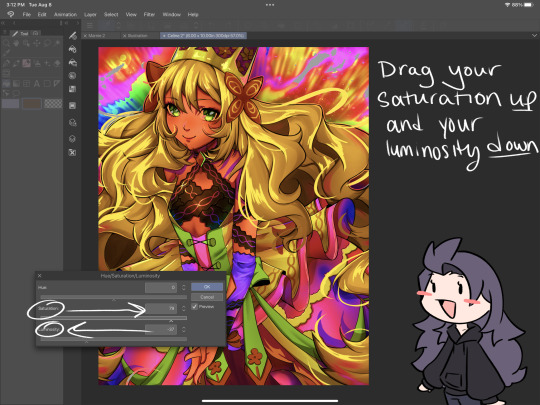
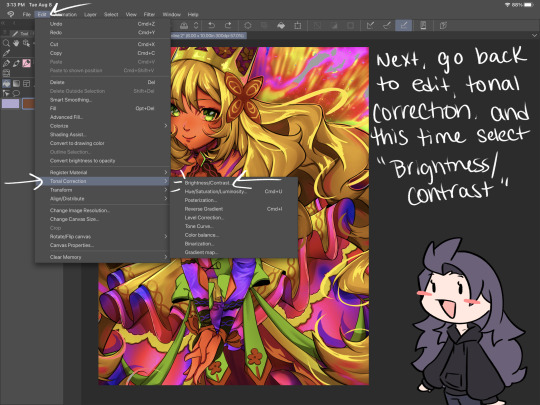

#smkittykat#smkittykat art tips and tricks#digital art#art ref#art reference#art tips#artists on instagram#artists on tumblr#artists on twitter#digital art tutorial#art tutorial
521 notes
·
View notes
Text

A quick tutorial - Here is the way I do eyes
I don't always draw eyes like this but it is my common way for eyes right now
Here are a bunch of eyes from some of my recent drawings - they mostly follow the same process give or take a few steps

63 notes
·
View notes
Text
if you see a screenshot of a tweet that has ALT text, before you reblog thinking "Oh, great, it's already described!" check the ALT text.
If the tweet includes a picture, the picture is probably not included in the ALT text.
When you share a link to a tweet (as of December 7th 2023, who knows if/when Elon Musk is gonna break this feature), it automatically converts itself into a "screenshot", with ALT text automatically generated listing the poster and the text content.
It does not do anything for any images in the tweet, because it's literally just copying the text.
You have to manually describe the images that were in the original tweet.
And because most people don't need image descriptions, they will just see that the image has ALT text, not check to make sure it's accurate, and reblog without realizing they're reblogging an inaccessible post.
Please check that ALT text is correct before reblogging. Even if it's not automatically generated, some people are just using it completely wrong because they don't know what it's for.
If the ALT text is incorrect, create a plain text image description, explain the problem, and ask the OP to add the full ID to the original post.
#accessibility#image descriptions#Twitter#Tweets#ALT text#ableism#systemic ableism#image description tutorial
146 notes
·
View notes
Text
A really random question - is there anything people would want me to make a tutorial for? Or perhaps more speed meshes? I want to be able to provide as much information / tips and tricks because I know how difficult it is to learn how to make CC and feeling like there is no resources out there! Let me know and I'll see what I can do :)
18 notes
·
View notes
Text
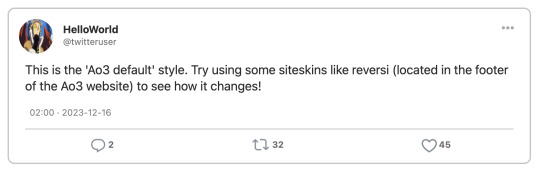
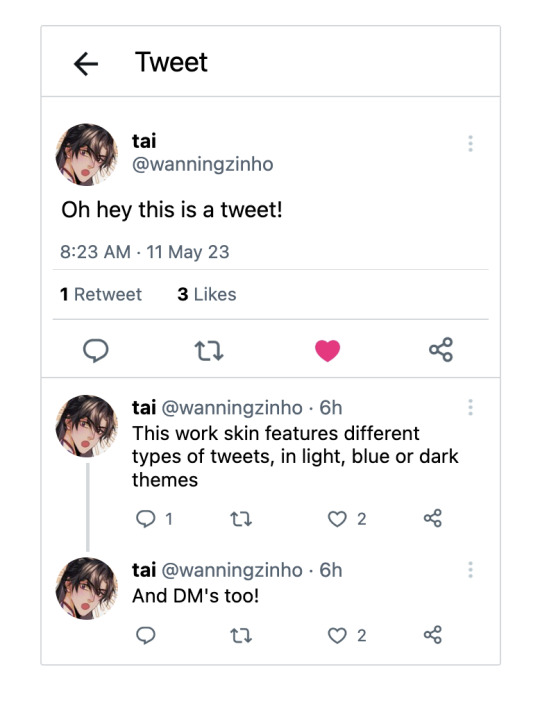
Html Tutorial Rec Wednesday
Twitter
Do the characters in your works use Twitter? Would you like them to?

Are they posting thirst tweets? Long threads compiling information against a specific celebrity or politician? Are they regular people whose tweets accidentally go viral, or are they celebrities that people pay close attention to?
Either way, this tutorial by gadaursan makes it super easy to make tweets for your AO3 fanfictions! Gadaursan has also taken the time to make a code free html generator for any tweets you might want to embed into an AO3 fic!
The tutorial lets you embed images, show polls, and use quote retweets, all while explaining the HTML and CSS structure behind it all. Dark mode tweets are also available, if you prefer that!
Multiple AO3 users have created their own versions of twitter work skins, each with a slightly different look and feel; check them out!
[Ao3 Skin] Twitter with threads by oakleaf
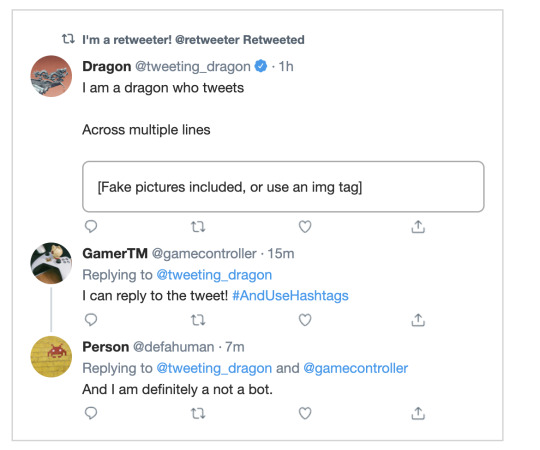
Mimicking Twitter Posts for Fics - Some Twitter Workskins by Ultraviollett
Twitter Work Skin: Tweets & Profile (newest layout) by starskin

Twitter Work Skin Template by etc e tal (pe_pe_peperoncinocandy)
and so on!
These examples are just to show you how there are many different ways to convey the same information / achieve the same result. Hopefully it inspires you to incorporate twitter into your own fics!
#html#html reference#reference#html tutorial rec#twitter#we're not calling it x#fanfiction#ao3#it's actually wednesday this time!! im doing so good
23 notes
·
View notes
Text


• nikolai gogol graphics 。
| ♡ / ↻ + credit to use
| credits: none
| im sleepy n w my stomach hurting again
# giftᧉd from 𐓟bove … ⟡#nikolai gogol icons#nikolai gogol icon#nikolai icons#bsd nikolai#nikolai gogol#bsd gogol#rentry tutorial#rentry#rentry graphics#rentry stuff#rentry resources#rentry decor#icon pack#icons#random headers#twitter icons#headers#icon#random icons#twitter header pack#twitter headers
110 notes
·
View notes