#ubuntu tutorial
Explore tagged Tumblr posts
Visit Tumblr Blog
Explore Tumblr blogs with no restrictions, modern design and the best experience.
Last Seen Tumblr Blogs


Fun Fact
After the announcement of the deal with Yahoo!, there were 170K signatures of unhappy Tumblr users petitioning to prevent the sale in 2013.
Text

Shut the fuck up.
#i explain my choices in the fucking tutorial jfc#you try getting your boomer parents set up with jellyfin that sounds like a nightmare tbh#ubuntu is just more beginner friendly than straight debian that's why i suggest it#fuck off#people on this website fucking piss poor reading comprehension
9 notes
·
View notes
Text
Transform Your KDE Plasma Look Like macOS

Hey fellow KDE enthusiasts! 😄✨ If you're a fan of the sleek and elegant macOS design but prefer the flexibility and customization of KDE Plasma, I've got some exciting news for you! 🎉 Check out this awesome YouTube tutorial on how to transform your KDE desktop to resemble the beautiful macOS interface! 🌟
📹 YouTube Tutorial: Transform Your KDE Plasma Look Like macOS
youtube
In this tutorial, you'll learn how to: 🔷 Install the necessary themes and icons 🔷 Configure the dock to mimic the macOS dock 🔷 Customize the top bar and menu to match the macOS style 🔷 Enable macOS-like gestures and animations 🔷 And much more!

Let's give our KDE setups a stunning makeover and enjoy the best of both worlds - macOS aesthetics with KDE's power! 💻🍏 Don't forget to like and subscribe to the creator's channel if you find the tutorial helpful. Happy desktop customizing! 🎨❤️
Final Result: https://youtu.be/LHhhf8kFPuk Additional Setups: https://youtu.be/wYnvgNuJ9FM Documentations: https://ko-fi.com/s/1130017e20 File Resources: https://www.pling.com/p/2062884/
#KDE#Plasma#macOS#Customization#Desktop#Tutorial#YouTube#fedora#linuxmint#ubuntu#gnome shell#open source#linux#Youtube
30 notes
·
View notes
Text
Essential Linux Commands: Mastering the Basics of Command-Line Operations
Linux, a powerful and versatile operating system, offers a command-line interface that empowers users with unprecedented control over their systems. While the graphical user interface (GUI) provides ease of use, understanding the fundamental Linux commands is essential for anyone seeking to harness the full potential of this open-source platform. In this article, we will explore some of the…
Essential Linux Commands help users navigate, manage files, and control system processes. Here are some key ones:
ls – List directory contents
cd – Change directory
pwd – Show current directory path
mkdir – Create a new directory
rm – Remove files or directories
cp – Copy files or directories
mv – Move or rename files
cat – View file contents
grep – Search text in files
chmod – Change file permissions
top – Monitor system processes
ps – Display running processes
kill – Terminate a process
sudo – Execute commands as a superuser
Mastering these commands boosts productivity and system control!
#Basics of Command-Line Operations#Command-Line Operations#Essential Linux Commands#Linux Commands#linux commands#linux#basic linux commands#linux command line#linux commands for beginners#linux basic commands#linux command line tutorial#learn linux#linux tutorial#linux commands tutorial#command line#commands in linux#best linux commands#linux for beginners#essential linux commands#linux tutorial for beginners#top linux terminal commands#basic linux ubuntu commands#linux commands with examples#commands#linux course
2 notes
·
View notes
Text
What is Linux? Explained in 60 Seconds! 🐧💻 #shorts
youtube
0 notes
Text
LibreOffice: a chi si rivolge questa guida, una breve introduzione.
1 note
·
View note
Video
youtube
Hands-On Guide: How to Install and Set Up Ubuntu and CentOS on VMware
Overview:
Setting up Ubuntu and CentOS on VMware is a crucial skill for DevOps professionals who want to create isolated environments for testing, development, and automation workflows. VMware allows you to run multiple virtual machines (VMs) on a single system, enabling you to experiment with different Linux distributions without altering your primary operating system. In this hands-on guide, we’ll walk through the steps to install and configure both Ubuntu and CentOS on VMware, covering the key settings and best practices for optimizing performance in DevOps environments.
VMware: Getting Started
Step 1: Install VMware Workstation
To begin, you’ll need VMware Workstation or VMware Player installed on your system. Here’s how:
- Download VMware: Visit the official VMware website and download either VMware Workstation or VMware Player depending on your preference. Workstation is a paid tool with advanced features, while Player is a free option that’s perfect for basic VMs. - Install VMware: Run the installer and follow the setup wizard. Once installed, launch VMware.
Step-by-Step: Installing Ubuntu on VMware
Step 1: Download Ubuntu ISO
- Go to the [official Ubuntu website](https://ubuntu.com/download) and download the LTS (Long Term Support) version of Ubuntu, ensuring you have a stable version for long-term usage in your DevOps workflows.
Step 2: Create a New Virtual Machine in VMware
- Open VMware Workstation or VMware Player and select “Create a New Virtual Machine.” - Choose the ISO image by selecting the downloaded Ubuntu file, then click Next.
Step 3: Allocate Resources
- CPU: Assign at least 2 CPUs for smooth operation. - RAM: Allocate at least 4GB of RAM for optimal performance. You can assign more if your system allows. - Storage: Provide at least 20GB of disk space, especially if you plan to install DevOps tools.
Step 4: Installation of Ubuntu
- Start the VM, and Ubuntu’s installation wizard will appear. - Follow the prompts: choose language, keyboard settings, and select Install Ubuntu. - Choose installation type (erase disk if it’s a fresh VM) and configure time zones, user account, and password. - After installation, update your system by running: ```bash sudo apt update && sudo apt upgrade -y ```
Step 5: VMware Tools Installation
Installing VMware Tools improves VM performance, enabling better integration with the host machine.
- In VMware, go to the VM menu and select Install VMware Tools. ```bash sudo apt install open-vm-tools open-vm-tools-desktop -y sudo reboot vmware-toolbox-cmd -v ``` Verify VMware Tools Installation:
```bash vmware-toolbox-cmd -v ```
Step 6: Post-Installation Setup for DevOps
- Install Basic DevOps Tools: ```bash sudo apt install git curl vim ``` - Enable SSH Access: ```bash sudo apt install openssh-server sudo systemctl enable ssh sudo systemctl start ssh ```
Step-by-Step: Installing CentOS on VMware
Step 1: Download CentOS ISO
- Visit the [official CentOS website](https://www.centos.org/download/) and download the CentOS 7 or 8 version (or CentOS Stream, depending on your preference).
Step 2: Create a New Virtual Machine in VMware
- Open VMware and choose “Create a New Virtual Machine.” - Select the CentOS ISO image and proceed to the next step.
Step 3: Allocate Resources
- CPU: Assign at least 2 CPUs. - RAM: Assign at least 4GB of RAM for smooth operations, especially if you’re installing enterprise tools. - Storage: Allocate 20GB or more, depending on your intended use case.
Step 4: Installation of CentOS
- Start the VM, and the CentOS installation wizard will load. - Choose your language and keyboard settings, then proceed to the installation screen. - Configure disk partitioning (choose automatic for simplicity). - Set up a root password and create a user account. - Follow the prompts to install CentOS. Once done, reboot the VM.
Step 5: Install VMware Tools
For better performance, install VMware Tools:
- In the VMware menu, select Install VMware Tools.
- Update Your System: ```bash sudo yum update -y ``` - Install open-vm-tools: ```bash sudo yum install open-vm-tools -y ``` - For graphical environment: ```bash sudo yum install open-vm-tools-desktop -y ``` - Start the vmtoolsd Service: ```bash sudo systemctl enable vmtoolsd.service sudo systemctl start vmtoolsd.service ``` - Verify Installation: ```bash vmware-toolbox-cmd -v ```
Step 6: Post-Installation Setup for DevOps
- Install EPEL (Extra Packages for Enterprise Linux) and Basic DevOps Tools: ```bash sudo yum install epel-release sudo yum install git curl vim ``` - Enable SSH Access: ```bash sudo yum install openssh-server sudo systemctl enable sshd sudo systemctl start sshd ``` - Verify installed tools: ```bash git --version curl --version vim --version ```
Best Practices for Installing and Setting Up Ubuntu and CentOS on VMware
1. Resource Allocation: Ensure you allocate sufficient CPU, RAM, and storage based on the workloads. For most DevOps tasks, assign at least 2 CPUs and 4GB of RAM for optimal performance. More demanding workloads may require additional resources.
2. Snapshots: Regularly take VM snapshots before major changes or installations. This allows you to revert to a stable state if something goes wrong during configuration or software testing.
3. VMware Tools Installation: Always install VMware Tools after setting up the OS. This ensures seamless mouse integration, smoother graphics, and better performance, reducing potential bugs and lag in your virtual environment.
4. Partitioning: For better performance and management, use custom partitioning if needed. This helps in allocating different parts of your virtual disk to `/`, `/home`, and `/var` partitions, improving system performance and flexibility in future updates or installations.
5. Automated Backups: Set up automated backups or export your VMs periodically. This practice is particularly important if your VMs store critical configurations, applications, or databases.
6. Networking Configuration: Ensure that your virtual machines are correctly configured to access the internet and your local network. Consider using NAT or Bridged Network options, depending on your networking needs. NAT works well for internet access, while Bridged is ideal for networked environments.
7. Security Considerations: Configure firewalls and SSH access carefully to secure your VMs from unauthorized access. Set up strong user permissions, enforce password complexity, and enable SSH keys for secure remote access.
8. Regular System Updates: Frequently update both Ubuntu and CentOS systems to ensure they are protected from vulnerabilities. Use the following commands to update packages: - For Ubuntu: ```bash sudo apt update && sudo apt upgrade ``` - For CentOS: ```bash sudo yum update ```
9. Monitor Resource Usage: VMware allows you to monitor CPU, memory, and storage usage. Use these tools to ensure that your VMs are not consuming excessive resources, especially in shared environments.
10. Test Environments: Use VMs as sandbox environments to test and experiment with new DevOps tools like Docker, Kubernetes, Jenkins, or Ansible before deploying them in production.
Conclusion:
By installing and setting up both Ubuntu and CentOS on VMware, you gain the flexibility to experiment with DevOps tools, test automation workflows, and learn Linux system administration in a safe and isolated environment. This hands-on tutorial provides you with the foundation to run and manage your Linux VMs effectively, setting you up for success in DevOps tasks ranging from development to deployment automation. Follow along in this video as we guide you step-by-step to mastering Linux installations on VMware for your DevOps journey.
#youtube#Install VMware Workstation#Step-by-Step: Installing Ubuntu on VMware#ubuntuGetting Started with Linux Installation and Basic Setuplinux tutorial for beginnersopen sourcelinux terminaldistrotubeubuntu is badlin#vmwareubuntuHands On Guide: How to Install and Set Up Ubuntu and CentOS on VMwarevmware workstationcentos 7download and install vmware works#Linux Install and Setup OverviewInstall and Setup VMware Workstation Pro 17Installing Ubuntu on VMware Workstation Pro 17Installing CentOS o
1 note
·
View note
Text
0 notes
Text
How to Install Chrome on Ubuntu in 2024
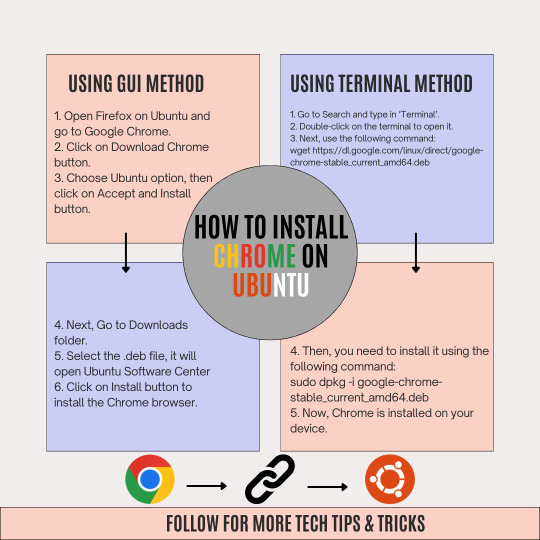
🌠💡Embrace the Chrome life on Ubuntu in 2024!📆💻
🌟👋Say goodbye to compatibility issues and hello to seamless browsing with these simple steps.🪜🚀
👆 Click, install, and dive into a world of endless possibilities!🔍🌍♾️
#chrome#ubuntu#techhacks#smoothbrowsing#2024tech#linux#howto#tech#tutorial#ubuntuuser#ubuntubeginner#googlechrome#chromebrowser#techtips
0 notes
Text
0 notes
Text
#How to Install and Setup VS Code in Ubuntu 20.04 LTS#install visual studio code ubuntu 20.04 command line#install vscode ubuntu 20.04#Step By Step Tutorials
0 notes
Text
Die ersten Schritte nach der Installation von Ubuntu 22.04 (Linux)
Im letzten Beitrag habe ich euch gezeigt, wie Linux Ubuntu 22.04.2 (Jammy Jellyfish) auf einem Computer installiert wird. Wie bereits angekündigt, folgen in diesem Leitfaden die ersten und wichtigsten Schritte nach der...[Weiterlesen]
0 notes
Video
youtube
OpenStack 3 Node Cluster on Ubuntu - Installing and Configuring Nova Com...
#youtube#In this tutorial we'll guide you through the process of setting up an OpenStack 3 Node Cluster on Ubuntu with a focus on installing and conf
0 notes
Text
How to Compile a CryptoNote Coin on Windows 10/11
There has been an active issue for over 5 years now when trying to build the source on modern compilers. The best solution (without updating the actual code) is to simulate the original build environment, Which is Ubuntu 14.04 with the Dependencies of: GCC 4.7.3 or later, CMake 2.8.6 or later, and Boost 1.55. Here is how I was able to compile my CryptoNote Coin using Windows 10: ## Download…

View On WordPress
#BlockChain#Blockchain Development#coin#crypto#CryptoNote#dev#Development#DIY#guide#help#how#Linux#monero#Tutorial#Ubuntu#Virtual Machine#VM#walk#walk-through
0 notes
Text
Zabbix Server 5.0 Installation Tutorial for Ubuntu 20.04
Zabbix Server 5.0 Installation Tutorial for Ubuntu 20.04 Zabbix is an open-source monitoring and management solution that provides real-time visibility into the performance and health of IT infrastructure, networks, applications, and services. It enables organizations to monitor various aspects of their systems, including servers, network devices, databases, and more, by collecting and analyzing…
View On WordPress
0 notes
Text
How I ditched streaming services and learned to love Linux: A step-by-step guide to building your very own personal media streaming server (V2.0: REVISED AND EXPANDED EDITION)
This is a revised, corrected and expanded version of my tutorial on setting up a personal media server that previously appeared on my old blog (donjuan-auxenfers). I expect that that post is still making the rounds (hopefully with my addendum on modifying group share permissions in Ubuntu to circumvent 0x8007003B "Unexpected Network Error" messages in Windows 10/11 when transferring files) but I have no way of checking. Anyway this new revised version of the tutorial corrects one or two small errors I discovered when rereading what I wrote, adds links to all products mentioned and is just more polished generally. I also expanded it a bit, pointing more adventurous users toward programs such as Sonarr/Radarr/Lidarr and Overseerr which can be used for automating user requests and media collection.
So then, what is this tutorial? This is a tutorial on how to build and set up your own personal media server using Ubuntu as an operating system and Plex (or Jellyfin) to not only manage your media, but to also stream that media to your devices both at home and abroad anywhere in the world where you have an internet connection. Its intent is to show you how building a personal media server and stuffing it full of films, TV, and music that you acquired through indiscriminate and voracious media piracy various legal methods will free you to completely ditch paid streaming services. No more will you have to pay for Disney+, Netflix, HBOMAX, Hulu, Amazon Prime, Peacock, CBS All Access, Paramount+, Crave or any other streaming service that is not named Criterion Channel. Instead whenever you want to watch your favourite films and television shows, you’ll have your own personal service that only features things that you want to see, with files that you have control over. And for music fans out there, both Jellyfin and Plex support music streaming, meaning you can even ditch music streaming services. Goodbye Spotify, Youtube Music, Tidal and Apple Music, welcome back unreasonably large MP3 (or FLAC) collections.
On the hardware front, I’m going to offer a few options catered towards different budgets and media library sizes. The cost of getting a media server up and running using this guide will cost you anywhere from $450 CAD/$325 USD at the low end to $1500 CAD/$1100 USD at the high end (it could go higher). My server was priced closer to the higher figure, but I went and got a lot more storage than most people need. If that seems like a little much, consider for a moment, do you have a roommate, a close friend, or a family member who would be willing to chip in a few bucks towards your little project provided they get access? Well that's how I funded my server. It might also be worth thinking about the cost over time, i.e. how much you spend yearly on subscriptions vs. a one time cost of setting up a server. Additionally there's just the joy of being able to scream "fuck you" at all those show cancelling, library deleting, hedge fund vampire CEOs who run the studios through denying them your money. Drive a stake through David Zaslav's heart.
On the software side I will walk you step-by-step through installing Ubuntu as your server's operating system, configuring your storage as a RAIDz array with ZFS, sharing your zpool to Windows with Samba, running a remote connection between your server and your Windows PC, and then a little about started with Plex/Jellyfin. Every terminal command you will need to input will be provided, and I even share a custom #bash script that will make used vs. available drive space on your server display correctly in Windows.
If you have a different preferred flavour of Linux (Arch, Manjaro, Redhat, Fedora, Mint, OpenSUSE, CentOS, Slackware etc. et. al.) and are aching to tell me off for being basic and using Ubuntu, this tutorial is not for you. The sort of person with a preferred Linux distro is the sort of person who can do this sort of thing in their sleep. Also I don't care. This tutorial is intended for the average home computer user. This is also why we’re not using a more exotic home server solution like running everything through Docker Containers and managing it through a dashboard like Homarr or Heimdall. While such solutions are fantastic and can be very easy to maintain once you have it all set up, wrapping your brain around Docker is a whole thing in and of itself. If you do follow this tutorial and had fun putting everything together, then I would encourage you to return in a year’s time, do your research and set up everything with Docker Containers.
Lastly, this is a tutorial aimed at Windows users. Although I was a daily user of OS X for many years (roughly 2008-2023) and I've dabbled quite a bit with various Linux distributions (mostly Ubuntu and Manjaro), my primary OS these days is Windows 11. Many things in this tutorial will still be applicable to Mac users, but others (e.g. setting up shares) you will have to look up for yourself. I doubt it would be difficult to do so.
Nothing in this tutorial will require feats of computing expertise. All you will need is a basic computer literacy (i.e. an understanding of what a filesystem and directory are, and a degree of comfort in the settings menu) and a willingness to learn a thing or two. While this guide may look overwhelming at first glance, it is only because I want to be as thorough as possible. I want you to understand exactly what it is you're doing, I don't want you to just blindly follow steps. If you half-way know what you’re doing, you will be much better prepared if you ever need to troubleshoot.
Honestly, once you have all the hardware ready it shouldn't take more than an afternoon or two to get everything up and running.
(This tutorial is just shy of seven thousand words long so the rest is under the cut.)
Step One: Choosing Your Hardware
Linux is a light weight operating system, depending on the distribution there's close to no bloat. There are recent distributions available at this very moment that will run perfectly fine on a fourteen year old i3 with 4GB of RAM. Moreover, running Plex or Jellyfin isn’t resource intensive in 90% of use cases. All this is to say, we don’t require an expensive or powerful computer. This means that there are several options available: 1) use an old computer you already have sitting around but aren't using 2) buy a used workstation from eBay, or what I believe to be the best option, 3) order an N100 Mini-PC from AliExpress or Amazon.
Note: If you already have an old PC sitting around that you’ve decided to use, fantastic, move on to the next step.
When weighing your options, keep a few things in mind: the number of people you expect to be streaming simultaneously at any one time, the resolution and bitrate of your media library (4k video takes a lot more processing power than 1080p) and most importantly, how many of those clients are going to be transcoding at any one time. Transcoding is what happens when the playback device does not natively support direct playback of the source file. This can happen for a number of reasons, such as the playback device's native resolution being lower than the file's internal resolution, or because the source file was encoded in a video codec unsupported by the playback device.
Ideally we want any transcoding to be performed by hardware. This means we should be looking for a computer with an Intel processor with Quick Sync. Quick Sync is a dedicated core on the CPU die designed specifically for video encoding and decoding. This specialized hardware makes for highly efficient transcoding both in terms of processing overhead and power draw. Without these Quick Sync cores, transcoding must be brute forced through software. This takes up much more of a CPU’s processing power and requires much more energy. But not all Quick Sync cores are created equal and you need to keep this in mind if you've decided either to use an old computer or to shop for a used workstation on eBay
Any Intel processor from second generation Core (Sandy Bridge circa 2011) onward has Quick Sync cores. It's not until 6th gen (Skylake), however, that the cores support the H.265 HEVC codec. Intel’s 10th gen (Comet Lake) processors introduce support for 10bit HEVC and HDR tone mapping. And the recent 12th gen (Alder Lake) processors brought with them hardware AV1 decoding. As an example, while an 8th gen (Kaby Lake) i5-8500 will be able to hardware transcode a H.265 encoded file, it will fall back to software transcoding if given a 10bit H.265 file. If you’ve decided to use that old PC or to look on eBay for an old Dell Optiplex keep this in mind.
Note 1: The price of old workstations varies wildly and fluctuates frequently. If you get lucky and go shopping shortly after a workplace has liquidated a large number of their workstations you can find deals for as low as $100 on a barebones system, but generally an i5-8500 workstation with 16gb RAM will cost you somewhere in the area of $260 CAD/$200 USD.
Note 2: The AMD equivalent to Quick Sync is called Video Core Next, and while it's fine, it's not as efficient and not as mature a technology. It was only introduced with the first generation Ryzen CPUs and it only got decent with their newest CPUs, we want something cheap.
Alternatively you could forgo having to keep track of what generation of CPU is equipped with Quick Sync cores that feature support for which codecs, and just buy an N100 mini-PC. For around the same price or less of a used workstation you can pick up a mini-PC with an Intel N100 processor. The N100 is a four-core processor based on the 12th gen Alder Lake architecture and comes equipped with the latest revision of the Quick Sync cores. These little processors offer astounding hardware transcoding capabilities for their size and power draw. Otherwise they perform equivalent to an i5-6500, which isn't a terrible CPU. A friend of mine uses an N100 machine as a dedicated retro emulation gaming system and it does everything up to 6th generation consoles just fine. The N100 is also a remarkably efficient chip, it sips power. In fact, the difference between running one of these and an old workstation could work out to hundreds of dollars a year in energy bills depending on where you live.
You can find these Mini-PCs all over Amazon or for a little cheaper on AliExpress. They range in price from $170 CAD/$125 USD for a no name N100 with 8GB RAM to $280 CAD/$200 USD for a Beelink S12 Pro with 16GB RAM. The brand doesn't really matter, they're all coming from the same three factories in Shenzen, go for whichever one fits your budget or has features you want. 8GB RAM should be enough, Linux is lightweight and Plex only calls for 2GB RAM. 16GB RAM might result in a slightly snappier experience, especially with ZFS. A 256GB SSD is more than enough for what we need as a boot drive, but going for a bigger drive might allow you to get away with things like creating preview thumbnails for Plex, but it’s up to you and your budget.
The Mini-PC I wound up buying was a Firebat AK2 Plus with 8GB RAM and a 256GB SSD. It looks like this:

Note: Be forewarned that if you decide to order a Mini-PC from AliExpress, note the type of power adapter it ships with. The mini-PC I bought came with an EU power adapter and I had to supply my own North American power supply. Thankfully this is a minor issue as barrel plug 30W/12V/2.5A power adapters are easy to find and can be had for $10.
Step Two: Choosing Your Storage
Storage is the most important part of our build. It is also the most expensive. Thankfully it’s also the most easily upgrade-able down the line.
For people with a smaller media collection (4TB to 8TB), a more limited budget, or who will only ever have two simultaneous streams running, I would say that the most economical course of action would be to buy a USB 3.0 8TB external HDD. Something like this one from Western Digital or this one from Seagate. One of these external drives will cost you in the area of $200 CAD/$140 USD. Down the line you could add a second external drive or replace it with a multi-drive RAIDz set up such as detailed below.
If a single external drive the path for you, move on to step three.
For people with larger media libraries (12TB+), who prefer media in 4k, or care who about data redundancy, the answer is a RAID array featuring multiple HDDs in an enclosure.
Note: If you are using an old PC or used workstatiom as your server and have the room for at least three 3.5" drives, and as many open SATA ports on your mother board you won't need an enclosure, just install the drives into the case. If your old computer is a laptop or doesn’t have room for more internal drives, then I would suggest an enclosure.
The minimum number of drives needed to run a RAIDz array is three, and seeing as RAIDz is what we will be using, you should be looking for an enclosure with three to five bays. I think that four disks makes for a good compromise for a home server. Regardless of whether you go for a three, four, or five bay enclosure, do be aware that in a RAIDz array the space equivalent of one of the drives will be dedicated to parity at a ratio expressed by the equation 1 − 1/n i.e. in a four bay enclosure equipped with four 12TB drives, if we configured our drives in a RAIDz1 array we would be left with a total of 36TB of usable space (48TB raw size). The reason for why we might sacrifice storage space in such a manner will be explained in the next section.
A four bay enclosure will cost somewhere in the area of $200 CDN/$140 USD. You don't need anything fancy, we don't need anything with hardware RAID controls (RAIDz is done entirely in software) or even USB-C. An enclosure with USB 3.0 will perform perfectly fine. Don’t worry too much about USB speed bottlenecks. A mechanical HDD will be limited by the speed of its mechanism long before before it will be limited by the speed of a USB connection. I've seen decent looking enclosures from TerraMaster, Yottamaster, Mediasonic and Sabrent.
When it comes to selecting the drives, as of this writing, the best value (dollar per gigabyte) are those in the range of 12TB to 20TB. I settled on 12TB drives myself. If 12TB to 20TB drives are out of your budget, go with what you can afford, or look into refurbished drives. I'm not sold on the idea of refurbished drives but many people swear by them.
When shopping for harddrives, search for drives designed specifically for NAS use. Drives designed for NAS use typically have better vibration dampening and are designed to be active 24/7. They will also often make use of CMR (conventional magnetic recording) as opposed to SMR (shingled magnetic recording). This nets them a sizable read/write performance bump over typical desktop drives. Seagate Ironwolf and Toshiba NAS are both well regarded brands when it comes to NAS drives. I would avoid Western Digital Red drives at this time. WD Reds were a go to recommendation up until earlier this year when it was revealed that they feature firmware that will throw up false SMART warnings telling you to replace the drive at the three year mark quite often when there is nothing at all wrong with that drive. It will likely even be good for another six, seven, or more years.

Step Three: Installing Linux
For this step you will need a USB thumbdrive of at least 6GB in capacity, an .ISO of Ubuntu, and a way to make that thumbdrive bootable media.
First download a copy of Ubuntu desktop (for best performance we could download the Server release, but for new Linux users I would recommend against the server release. The server release is strictly command line interface only, and having a GUI is very helpful for most people. Not many people are wholly comfortable doing everything through the command line, I'm certainly not one of them, and I grew up with DOS 6.0. 22.04.3 Jammy Jellyfish is the current Long Term Service release, this is the one to get.
Download the .ISO and then download and install balenaEtcher on your Windows PC. BalenaEtcher is an easy to use program for creating bootable media, you simply insert your thumbdrive, select the .ISO you just downloaded, and it will create a bootable installation media for you.
Once you've made a bootable media and you've got your Mini-PC (or you old PC/used workstation) in front of you, hook it directly into your router with an ethernet cable, and then plug in the HDD enclosure, a monitor, a mouse and a keyboard. Now turn that sucker on and hit whatever key gets you into the BIOS (typically ESC, DEL or F2). If you’re using a Mini-PC check to make sure that the P1 and P2 power limits are set correctly, my N100's P1 limit was set at 10W, a full 20W under the chip's power limit. Also make sure that the RAM is running at the advertised speed. My Mini-PC’s RAM was set at 2333Mhz out of the box when it should have been 3200Mhz. Once you’ve done that, key over to the boot order and place the USB drive first in the boot order. Then save the BIOS settings and restart.
After you restart you’ll be greeted by Ubuntu's installation screen. Installing Ubuntu is really straight forward, select the "minimal" installation option, as we won't need anything on this computer except for a browser (Ubuntu comes preinstalled with Firefox) and Plex Media Server/Jellyfin Media Server. Also remember to delete and reformat that Windows partition! We don't need it.
Step Four: Installing ZFS and Setting Up the RAIDz Array
Note: If you opted for just a single external HDD skip this step and move onto setting up a Samba share.
Once Ubuntu is installed it's time to configure our storage by installing ZFS to build our RAIDz array. ZFS is a "next-gen" file system that is both massively flexible and massively complex. It's capable of snapshot backup, self healing error correction, ZFS pools can be configured with drives operating in a supplemental manner alongside the storage vdev (e.g. fast cache, dedicated secondary intent log, hot swap spares etc.). It's also a file system very amenable to fine tuning. Block and sector size are adjustable to use case and you're afforded the option of different methods of inline compression. If you'd like a very detailed overview and explanation of its various features and tips on tuning a ZFS array check out these articles from Ars Technica. For now we're going to ignore all these features and keep it simple, we're going to pull our drives together into a single vdev running in RAIDz which will be the entirety of our zpool, no fancy cache drive or SLOG.
Open up the terminal and type the following commands:
sudo apt update
then
sudo apt install zfsutils-linux
This will install the ZFS utility. Verify that it's installed with the following command:
zfs --version
Now, it's time to check that the HDDs we have in the enclosure are healthy, running, and recognized. We also want to find out their device IDs and take note of them:
sudo fdisk -1
Note: You might be wondering why some of these commands require "sudo" in front of them while others don't. "Sudo" is short for "super user do”. When and where "sudo" is used has to do with the way permissions are set up in Linux. Only the "root" user has the access level to perform certain tasks in Linux. As a matter of security and safety regular user accounts are kept separate from the "root" user. It's not advised (or even possible) to boot into Linux as "root" with most modern distributions. Instead by using "sudo" our regular user account is temporarily given the power to do otherwise forbidden things. Don't worry about it too much at this stage, but if you want to know more check out this introduction.
If everything is working you should get a list of the various drives detected along with their device IDs which will look like this: /dev/sdc. You can also check the device IDs of the drives by opening the disk utility app. Jot these IDs down as we'll need them for our next step, creating our RAIDz array.
RAIDz is similar to RAID-5 in that instead of striping your data over multiple disks, exchanging redundancy for speed and available space (RAID-0), or mirroring your data writing by two copies of every piece (RAID-1), it instead writes parity blocks across the disks in addition to striping, this provides a balance of speed, redundancy and available space. If a single drive fails, the parity blocks on the working drives can be used to reconstruct the entire array as soon as a replacement drive is added.
Additionally, RAIDz improves over some of the common RAID-5 flaws. It's more resilient and capable of self healing, as it is capable of automatically checking for errors against a checksum. It's more forgiving in this way, and it's likely that you'll be able to detect when a drive is dying well before it fails. A RAIDz array can survive the loss of any one drive.
Note: While RAIDz is indeed resilient, if a second drive fails during the rebuild, you're fucked. Always keep backups of things you can't afford to lose. This tutorial, however, is not about proper data safety.
To create the pool, use the following command:
sudo zpool create "zpoolnamehere" raidz "device IDs of drives we're putting in the pool"
For example, let's creatively name our zpool "mypool". This poil will consist of four drives which have the device IDs: sdb, sdc, sdd, and sde. The resulting command will look like this:
sudo zpool create mypool raidz /dev/sdb /dev/sdc /dev/sdd /dev/sde
If as an example you bought five HDDs and decided you wanted more redundancy dedicating two drive to this purpose, we would modify the command to "raidz2" and the command would look something like the following:
sudo zpool create mypool raidz2 /dev/sdb /dev/sdc /dev/sdd /dev/sde /dev/sdf
An array configured like this is known as RAIDz2 and is able to survive two disk failures.
Once the zpool has been created, we can check its status with the command:
zpool status
Or more concisely with:
zpool list
The nice thing about ZFS as a file system is that a pool is ready to go immediately after creation. If we were to set up a traditional RAID-5 array using mbam, we'd have to sit through a potentially hours long process of reformatting and partitioning the drives. Instead we're ready to go right out the gates.
The zpool should be automatically mounted to the filesystem after creation, check on that with the following:
df -hT | grep zfs
Note: If your computer ever loses power suddenly, say in event of a power outage, you may have to re-import your pool. In most cases, ZFS will automatically import and mount your pool, but if it doesn’t and you can't see your array, simply open the terminal and type sudo zpool import -a.
By default a zpool is mounted at /"zpoolname". The pool should be under our ownership but let's make sure with the following command:
sudo chown -R "yourlinuxusername" /"zpoolname"
Note: Changing file and folder ownership with "chown" and file and folder permissions with "chmod" are essential commands for much of the admin work in Linux, but we won't be dealing with them extensively in this guide. If you'd like a deeper tutorial and explanation you can check out these two guides: chown and chmod.

You can access the zpool file system through the GUI by opening the file manager (the Ubuntu default file manager is called Nautilus) and clicking on "Other Locations" on the sidebar, then entering the Ubuntu file system and looking for a folder with your pool's name. Bookmark the folder on the sidebar for easy access.

Your storage pool is now ready to go. Assuming that we already have some files on our Windows PC we want to copy to over, we're going to need to install and configure Samba to make the pool accessible in Windows.
Step Five: Setting Up Samba/Sharing
Samba is what's going to let us share the zpool with Windows and allow us to write to it from our Windows machine. First let's install Samba with the following commands:
sudo apt-get update
then
sudo apt-get install samba
Next create a password for Samba.
sudo smbpswd -a "yourlinuxusername"
It will then prompt you to create a password. Just reuse your Ubuntu user password for simplicity's sake.
Note: if you're using just a single external drive replace the zpool location in the following commands with wherever it is your external drive is mounted, for more information see this guide on mounting an external drive in Ubuntu.
After you've created a password we're going to create a shareable folder in our pool with this command
mkdir /"zpoolname"/"foldername"
Now we're going to open the smb.conf file and make that folder shareable. Enter the following command.
sudo nano /etc/samba/smb.conf
This will open the .conf file in nano, the terminal text editor program. Now at the end of smb.conf add the following entry:
["foldername"]
path = /"zpoolname"/"foldername"
available = yes
valid users = "yourlinuxusername"
read only = no
writable = yes
browseable = yes
guest ok = no
Ensure that there are no line breaks between the lines and that there's a space on both sides of the equals sign. Our next step is to allow Samba traffic through the firewall:
sudo ufw allow samba
Finally restart the Samba service:
sudo systemctl restart smbd
At this point we'll be able to access to the pool, browse its contents, and read and write to it from Windows. But there's one more thing left to do, Windows doesn't natively support the ZFS file systems and will read the used/available/total space in the pool incorrectly. Windows will read available space as total drive space, and all used space as null. This leads to Windows only displaying a dwindling amount of "available" space as the drives are filled. We can fix this! Functionally this doesn't actually matter, we can still write and read to and from the disk, it just makes it difficult to tell at a glance the proportion of used/available space, so this is an optional step but one I recommend (this step is also unnecessary if you're just using a single external drive). What we're going to do is write a little shell script in #bash. Open nano with the terminal with the command:
nano
Now insert the following code:
#!/bin/bash CUR_PATH=`pwd` ZFS_CHECK_OUTPUT=$(zfs get type $CUR_PATH 2>&1 > /dev/null) > /dev/null if [[ $ZFS_CHECK_OUTPUT == *not\ a\ ZFS* ]] then IS_ZFS=false else IS_ZFS=true fi if [[ $IS_ZFS = false ]] then df $CUR_PATH | tail -1 | awk '{print $2" "$4}' else USED=$((`zfs get -o value -Hp used $CUR_PATH` / 1024)) > /dev/null AVAIL=$((`zfs get -o value -Hp available $CUR_PATH` / 1024)) > /dev/null TOTAL=$(($USED+$AVAIL)) > /dev/null echo $TOTAL $AVAIL fi
Save the script as "dfree.sh" to /home/"yourlinuxusername" then change the ownership of the file to make it executable with this command:
sudo chmod 774 dfree.sh
Now open smb.conf with sudo again:
sudo nano /etc/samba/smb.conf
Now add this entry to the top of the configuration file to direct Samba to use the results of our script when Windows asks for a reading on the pool's used/available/total drive space:
[global]
dfree command = /home/"yourlinuxusername"/dfree.sh
Save the changes to smb.conf and then restart Samba again with the terminal:
sudo systemctl restart smbd
Now there’s one more thing we need to do to fully set up the Samba share, and that’s to modify a hidden group permission. In the terminal window type the following command:
usermod -a -G sambashare “yourlinuxusername”
Then restart samba again:
sudo systemctl restart smbd
If we don’t do this last step, everything will appear to work fine, and you will even be able to see and map the drive from Windows and even begin transferring files, but you'd soon run into a lot of frustration. As every ten minutes or so a file would fail to transfer and you would get a window announcing “0x8007003B Unexpected Network Error”. This window would require your manual input to continue the transfer with the file next in the queue. And at the end it would reattempt to transfer whichever files failed the first time around. 99% of the time they’ll go through that second try, but this is still all a major pain in the ass. Especially if you’ve got a lot of data to transfer or you want to step away from the computer for a while.
It turns out samba can act a little weirdly with the higher read/write speeds of RAIDz arrays and transfers from Windows, and will intermittently crash and restart itself if this group option isn’t changed. Inputting the above command will prevent you from ever seeing that window.
The last thing we're going to do before switching over to our Windows PC is grab the IP address of our Linux machine. Enter the following command:
hostname -I
This will spit out this computer's IP address on the local network (it will look something like 192.168.0.x), write it down. It might be a good idea once you're done here to go into your router settings and reserving that IP for your Linux system in the DHCP settings. Check the manual for your specific model router on how to access its settings, typically it can be accessed by opening a browser and typing http:\\192.168.0.1 in the address bar, but your router may be different.
Okay we’re done with our Linux computer for now. Get on over to your Windows PC, open File Explorer, right click on Network and click "Map network drive". Select Z: as the drive letter (you don't want to map the network drive to a letter you could conceivably be using for other purposes) and enter the IP of your Linux machine and location of the share like so: \\"LINUXCOMPUTERLOCALIPADDRESSGOESHERE"\"zpoolnamegoeshere"\. Windows will then ask you for your username and password, enter the ones you set earlier in Samba and you're good. If you've done everything right it should look something like this:

You can now start moving media over from Windows to the share folder. It's a good idea to have a hard line running to all machines. Moving files over Wi-Fi is going to be tortuously slow, the only thing that’s going to make the transfer time tolerable (hours instead of days) is a solid wired connection between both machines and your router.
Step Six: Setting Up Remote Desktop Access to Your Server
After the server is up and going, you’ll want to be able to access it remotely from Windows. Barring serious maintenance/updates, this is how you'll access it most of the time. On your Linux system open the terminal and enter:
sudo apt install xrdp
Then:
sudo systemctl enable xrdp
Once it's finished installing, open “Settings” on the sidebar and turn off "automatic login" in the User category. Then log out of your account. Attempting to remotely connect to your Linux computer while you’re logged in will result in a black screen!
Now get back on your Windows PC, open search and look for "RDP". A program called "Remote Desktop Connection" should pop up, open this program as an administrator by right-clicking and selecting “run as an administrator”. You’ll be greeted with a window. In the field marked “Computer” type in the IP address of your Linux computer. Press connect and you'll be greeted with a new window and prompt asking for your username and password. Enter your Ubuntu username and password here.

If everything went right, you’ll be logged into your Linux computer. If the performance is sluggish, adjust the display options. Lowering the resolution and colour depth do a lot to make the interface feel snappier.

Remote access is how we're going to be using our Linux system from now, barring edge cases like needing to get into the BIOS or upgrading to a new version of Ubuntu. Everything else from performing maintenance like a monthly zpool scrub to checking zpool status and updating software can all be done remotely.

This is how my server lives its life now, happily humming and chirping away on the floor next to the couch in a corner of the living room.
Step Seven: Plex Media Server/Jellyfin
Okay we’ve got all the ground work finished and our server is almost up and running. We’ve got Ubuntu up and running, our storage array is primed, we’ve set up remote connections and sharing, and maybe we’ve moved over some of favourite movies and TV shows.
Now we need to decide on the media server software to use which will stream our media to us and organize our library. For most people I’d recommend Plex. It just works 99% of the time. That said, Jellyfin has a lot to recommend it by too, even if it is rougher around the edges. Some people run both simultaneously, it’s not that big of an extra strain. I do recommend doing a little bit of your own research into the features each platform offers, but as a quick run down, consider some of the following points:
Plex is closed source and is funded through PlexPass purchases while Jellyfin is open source and entirely user driven. This means a number of things: for one, Plex requires you to purchase a “PlexPass” (purchased as a one time lifetime fee $159.99 CDN/$120 USD or paid for on a monthly or yearly subscription basis) in order to access to certain features, like hardware transcoding (and we want hardware transcoding) or automated intro/credits detection and skipping, Jellyfin offers some of these features for free through plugins. Plex supports a lot more devices than Jellyfin and updates more frequently. That said, Jellyfin's Android and iOS apps are completely free, while the Plex Android and iOS apps must be activated for a one time cost of $6 CDN/$5 USD. But that $6 fee gets you a mobile app that is much more functional and features a unified UI across platforms, the Plex mobile apps are simply a more polished experience. The Jellyfin apps are a bit of a mess and the iOS and Android versions are very different from each other.
Jellyfin’s actual media player is more fully featured than Plex's, but on the other hand Jellyfin's UI, library customization and automatic media tagging really pale in comparison to Plex. Streaming your music library is free through both Jellyfin and Plex, but Plex offers the PlexAmp app for dedicated music streaming which boasts a number of fantastic features, unfortunately some of those fantastic features require a PlexPass. If your internet is down, Jellyfin can still do local streaming, while Plex can fail to play files unless you've got it set up a certain way. Jellyfin has a slew of neat niche features like support for Comic Book libraries with the .cbz/.cbt file types, but then Plex offers some free ad-supported TV and films, they even have a free channel that plays nothing but Classic Doctor Who.
Ultimately it's up to you, I settled on Plex because although some features are pay-walled, it just works. It's more reliable and easier to use, and a one-time fee is much easier to swallow than a subscription. I had a pretty easy time getting my boomer parents and tech illiterate brother introduced to and using Plex and I don't know if I would've had as easy a time doing that with Jellyfin. I do also need to mention that Jellyfin does take a little extra bit of tinkering to get going in Ubuntu, you’ll have to set up process permissions, so if you're more tolerant to tinkering, Jellyfin might be up your alley and I’ll trust that you can follow their installation and configuration guide. For everyone else, I recommend Plex.
So pick your poison: Plex or Jellyfin.
Note: The easiest way to download and install either of these packages in Ubuntu is through Snap Store.
After you've installed one (or both), opening either app will launch a browser window into the browser version of the app allowing you to set all the options server side.
The process of adding creating media libraries is essentially the same in both Plex and Jellyfin. You create a separate libraries for Television, Movies, and Music and add the folders which contain the respective types of media to their respective libraries. The only difficult or time consuming aspect is ensuring that your files and folders follow the appropriate naming conventions:
Plex naming guide for Movies
Plex naming guide for Television
Jellyfin follows the same naming rules but I find their media scanner to be a lot less accurate and forgiving than Plex. Once you've selected the folders to be scanned the service will scan your files, tagging everything and adding metadata. Although I find do find Plex more accurate, it can still erroneously tag some things and you might have to manually clean up some tags in a large library. (When I initially created my library it tagged the 1963-1989 Doctor Who as some Korean soap opera and I needed to manually select the correct match after which everything was tagged normally.) It can also be a bit testy with anime (especially OVAs) be sure to check TVDB to ensure that you have your files and folders structured and named correctly. If something is not showing up at all, double check the name.
Once that's done, organizing and customizing your library is easy. You can set up collections, grouping items together to fit a theme or collect together all the entries in a franchise. You can make playlists, and add custom artwork to entries. It's fun setting up collections with posters to match, there are even several websites dedicated to help you do this like PosterDB. As an example, below are two collections in my library, one collecting all the entries in a franchise, the other follows a theme.

My Star Trek collection, featuring all eleven television series, and thirteen films.

My Best of the Worst collection, featuring sixty-nine films previously showcased on RedLetterMedia’s Best of the Worst. They’re all absolutely terrible and I love them.
As for settings, ensure you've got Remote Access going, it should work automatically and be sure to set your upload speed after running a speed test. In the library settings set the database cache to 2000MB to ensure a snappier and more responsive browsing experience, and then check that playback quality is set to original/maximum. If you’re severely bandwidth limited on your upload and have remote users, you might want to limit the remote stream bitrate to something more reasonable, just as a note of comparison Netflix’s 1080p bitrate is approximately 5Mbps, although almost anyone watching through a chromium based browser is streaming at 720p and 3mbps. Other than that you should be good to go. For actually playing your files, there's a Plex app for just about every platform imaginable. I mostly watch television and films on my laptop using the Windows Plex app, but I also use the Android app which can broadcast to the chromecast connected to the TV in the office and the Android TV app for our smart TV. Both are fully functional and easy to navigate, and I can also attest to the OS X version being equally functional.
Part Eight: Finding Media
Now, this is not really a piracy tutorial, there are plenty of those out there. But if you’re unaware, BitTorrent is free and pretty easy to use, just pick a client (qBittorrent is the best) and go find some public trackers to peruse. Just know now that all the best trackers are private and invite only, and that they can be exceptionally difficult to get into. I’m already on a few, and even then, some of the best ones are wholly out of my reach.
If you decide to take the left hand path and turn to Usenet you’ll have to pay. First you’ll need to sign up with a provider like Newshosting or EasyNews for access to Usenet itself, and then to actually find anything you’re going to need to sign up with an indexer like NZBGeek or NZBFinder. There are dozens of indexers, and many people cross post between them, but for more obscure media it’s worth checking multiple. You’ll also need a binary downloader like SABnzbd. That caveat aside, Usenet is faster, bigger, older, less traceable than BitTorrent, and altogether slicker. I honestly prefer it, and I'm kicking myself for taking this long to start using it because I was scared off by the price. I’ve found so many things on Usenet that I had sought in vain elsewhere for years, like a 2010 Italian film about a massacre perpetrated by the SS that played the festival circuit but never received a home media release; some absolute hero uploaded a rip of a festival screener DVD to Usenet. Anyway, figure out the rest of this shit on your own and remember to use protection, get yourself behind a VPN, use a SOCKS5 proxy with your BitTorrent client, etc.
On the legal side of things, if you’re around my age, you (or your family) probably have a big pile of DVDs and Blu-Rays sitting around unwatched and half forgotten. Why not do a bit of amateur media preservation, rip them and upload them to your server for easier access? (Your tools for this are going to be Handbrake to do the ripping and AnyDVD to break any encryption.) I went to the trouble of ripping all my SCTV DVDs (five box sets worth) because none of it is on streaming nor could it be found on any pirate source I tried. I’m glad I did, forty years on it’s still one of the funniest shows to ever be on TV.
Part Nine/Epilogue: Sonarr/Radarr/Lidarr and Overseerr
There are a lot of ways to automate your server for better functionality or to add features you and other users might find useful. Sonarr, Radarr, and Lidarr are a part of a suite of “Servarr” services (there’s also Readarr for books and Whisparr for adult content) that allow you to automate the collection of new episodes of TV shows (Sonarr), new movie releases (Radarr) and music releases (Lidarr). They hook in to your BitTorrent client or Usenet binary newsgroup downloader and crawl your preferred Torrent trackers and Usenet indexers, alerting you to new releases and automatically grabbing them. You can also use these services to manually search for new media, and even replace/upgrade your existing media with better quality uploads. They’re really a little tricky to set up on a bare metal Ubuntu install (ideally you should be running them in Docker Containers), and I won’t be providing a step by step on installing and running them, I’m simply making you aware of their existence.
The other bit of kit I want to make you aware of is Overseerr which is a program that scans your Plex media library and will serve recommendations based on what you like. It also allows you and your users to request specific media. It can even be integrated with Sonarr/Radarr/Lidarr so that fulfilling those requests is fully automated.
And you're done. It really wasn't all that hard. Enjoy your media. Enjoy the control you have over that media. And be safe in the knowledge that no hedgefund CEO motherfucker who hates the movies but who is somehow in control of a major studio will be able to disappear anything in your library as a tax write-off.
1K notes
·
View notes
Text
in wake of yet another wave of people being turned off by windows, here's a guide on how to dual boot windows and 🐧 linux 🐧 (useful for when you're not sure if you wanna make the switch and just wanna experiment with the OS for a bit!)
if you look up followup guides online you're gonna see that people are telling you to use ubuntu but i am gonna show you how to do this using kubuntu instead because fuck GNOME. all my homies hate GNOME.
i'm just kidding, use whatever distro you like. my favorite's kubuntu (for a beginner home environment). read up on the others if you're curious. and don't let some rando on reddit tell you that you need pop! OS for gaming. gaming on linux is possible without it.
why kubuntu?
- it's very user friendly
- it comes with applications people might already be familiar with (VLC player and firefox for example)
- libreoffice already preinstalled
- no GNOME (sorry GNOME enthusiasts, let me old man yell at the clouds) (also i'm playing this up for the laughs. wholesome kde/gnome meme at the bottom of this post.)
for people who are interested in this beyond my tl;dr: read this
(if you're a linux user, don't expect any tech wizardry here. i know there's a billion other and arguably better ways to do x y and/or z. what i'm trying to do here is to keep these instructions previous windows user friendly. point and click. no CLI bro, it'll scare the less tech savvy hoes. no vim supremacy talk (although hell yeah vim supremacy). if they like the OS they'll figure out bash all by themselves in no time.)
first of all, there'll be a GUI. you don't need to type lines of code to get this all running. we're not going for the ✨hackerman aesthetics✨ today. grab a mouse and a keyboard and you're good to go.
what you need is a computer/laptop/etc with enough disk space to install both windows and linux on it. i'm recommending to reserve at least a 100gb for the both of them. in the process of this you'll learn how to re-allocate disk space either way and you'll learn how to give and take some, we'll do a bit of disk partitioning to fit them both on a single disk.
and that's enough babbling for now, let's get to the actual tutorial:
🚨IMPORTANT. DO NOT ATTEMPT THIS ON A 32BIT SYSTEM. ONLY DO THIS IF YOU'RE WORKING WITH A 64BIT SYSTEM. 🚨 (win10 and win11: settings -> system -> about -> device specifications -> system type ) it should say 64bit operating system, x64-based processor.
step 1: install windows on your computer FIRST. my favorite way of doing this is by creating an installation media with rufus. you can either grab and prepare two usb sticks for each OS, or you can prepare them one after the other. (pro tip: get two usb sticks, that way you can label them and store them away in case you need to reinstall windows/linux or want to install it somewhere else)
in order to do this, you need to download three things:
rufus
win10 (listen. i know switching to win11 is difficult. not much of a fan of it either. but support's gonna end for good. you will run into hiccups. it'll be frustrating for everyone involved. hate to say it, but in this case i'd opt for installing its dreadful successor over there ->) or win11
kubuntu (the download at the top is always the latest, most up-to-date one)
when grabbing your windows installation of choice pick this option here, not the media creation tool option at the top of the page:

side note: there's also very legit key sellers out there who can hook you up with cheap keys. you're allowed to do that if you use those keys privately. don't do this in an enterprise environment though. and don't waste money on it if your ultimate goal is to switch to linux entirely at one point.
from here it's very easy sailing. plug your usb drive into your computer and fire up rufus (just double click it).

🚨two very important things though!!!!!!:🚨
triple check your usb device. whatever one you selected will get wiped entirely in order to make space for your installation media. if you want to be on the safe side only plug in the ONE usb stick you want to use. and back up any music, pictures or whatever else you had on there before or it'll be gone forever.
you can only install ONE OS on ONE usb drive. so you need to do this twice, once with your kubuntu iso and once with your windows iso, on a different drive each.
done. now you can dispense windows and linux left and right, whenever and wherever you feel like it. you could, for example, start with your designated dual boot device. installing windows is now as simple as plugging the usb device into your computer and booting it up. from there, click your way through the installation process and come back to this tutorial when you're ready.
step 2: preparing the disks for a dual boot setup
on your fresh install, find your disk partitions. in your search bar enter either "diskmgr" and hit enter or just type "partitions". the former opens your disk manager right away, the latter serves you up with this "create and format hard disk partitions" search result and that's what you're gonna be clicking.

you'll end up on a screen that looks more or less like in the screenshot below. depending on how many disks you've installed this might look different, but the basic gist is the same. we're going to snip a little bit off Disk 0 and make space for kubuntu on it. my screenshot isn't the best example because i'm using the whole disk and in order to practice what i preach i'd have to go against my own advice. that piece of advice is: if this screen intimidates you and you're not sure what you're doing here, hands off your (C:) drive, EFI system, and recovery partition. however, if you're feeling particularly fearless, go check out the amount of "free space" to the right. is there more than 30gb left available? if so, you're free to right click your (C:) drive and click "shrink volume"

this screen will pop up:

the minimum disk space required for kubuntu is 25gb. the recommended one is 50gb. for an installation like this, about 30gb are enough. in order to do that, simply change the value at
Enter the amount of space to shrink in MB: to 30000
and hit Shrink.
once that's done your partitions will have changed and unallocated space at about the size of 30gb should be visible under Disk 0 at the bottom like in the bottom left of this screenshot (courtesy of microsoft.com):

this is gonna be kubuntu's new home on your disk.
step 3: boot order, BIOS/UEFI changes
all you need to do now is plug the kubuntu-usb drive you prepared earlier with rufus into your computer again and reboot that bad boy.
the next step has no screenshots. we're heading into your UEFI/BIOS (by hitting a specific key (like ESC, F10, Enter) while your computer boots up) and that'll look different for everyone reading this. if this section has you completely lost, google how to do these steps for your machine.
a good search term would be: "[YOUR DEVICE (i.e Lenovo, your mainboard's name, etc.)] change boot order"
what you need to do is to tell your computer to boot your USB before it tries to boot up windows. otherwise you won't be able to install kubuntu.
this can be done by entering your BIOS/UEFI and navigating to a point called something along the lines of "boot". from "boot order" to "booting devices" to "startup configuration", it could be called anything.
what'll be a common point though is that it'll list all your bootable devices. the topmost one is usually the one that boots up first, so if your usb is anywhere below that, make sure to drag and drop or otherwise move it to the top.
when you're done navigate to Save & Exit. your computer will then boot up kubuntu's install wizard. you'll be greeted with this:

shocker, i know, but click "Install Kubuntu" on the right.
step 4: kubuntu installation
this is a guided installation. just like when you're installing windows you'll be prompted when you need to make changes. if i remember correctly it's going to ask you for your preferred keyboard layout, a network connection, additional software you might want to install, and all of that is up to you.
but once you reach the point where it asks you where you want to install kubuntu we'll have to make a couple of important choices.

🚨 another important note 🚨
do NOT pick any of the top three options. they will overwrite your already existing windows installation.
click manual instead. we're going to point it to our unallocated disk space. hit continue. you will be shown another disk partition screen.
what you're looking for are your 30gb of free space. just like with the USB drive when we were working with rufus, make sure you're picking the right one. triple check at the very least. the chosen disk will get wiped.

click it until the screen "create a new partition" pops up.
change the following settings to:
New partition size in megabytes: 512
Use as: EFI System Partition
hit OK.
click your free space again. same procedure.
change the following settings to:
New partition size in megabytes: 8000 (*this might be different in your case, read on.)
Use As: Swap Area
hit OK
click your free space a third time. we need one more partition.
change the following settings to:
don't change anything about the partition size this time. we're letting it use up the rest of the resources.
Use as: Ext4 journaling system
Mount Point: /
you're done here as well.
*about the 8000 megabytes in the second step: this is about your RAM size. if you have 4gb instead type 4000, and so on.
once you're sure your configuration is good and ready to go, hit "Install Now". up until here you can go back and make changes to your settings. once you've clicked the button, there's no going back.
finally, select your timezone and create a user account. then hit continue. the installation should finish up... and you'll be good to go.
you'll be told to remove the USB drive from your computer and reboot your machine.
now when your computer boots up, you should end up on a black screen with a little bit of text in the top left corner. ubuntu and windows boot manager should be mentioned there. naturally, when you click ubuntu you will boot into your kubuntu. likewise if you hit windows boot manager your windows login screen will come up.
and that's that folks. go ham on messing around with your linux distro. customize it to your liking. make yourself familiar with the shell (on kubuntu, when you're on your desktop, hit CTRL+ALT+T).
for starters, you could feed it the first commands i always punch into fresh Linux installs:
sudo apt-get update
sudo apt-get upgrade
sudo apt-get install vim
(you'll thank me for the vim one later)
turn your back on windows. taste freedom. nothing sexier than open source, baby.
sources (mainly for the pictures): 1, 2
further reading for the curious: 1, 2
linux basics (includes CLI commands)
kubuntu documentation (this is your new best friend. it'll tell you everything about kubuntu that you need to know.
and finally the promised kde/gnome meme:

#windows#linuxposting#had a long day at work and i had to type this twice and i'm struggling to keep my eyes open#not guaranteeing that i didn't skip a step or something in there#so if someone linux savvy spots them feel free to point them out so i can make fixes to this post accordingly#opensource posting
122 notes
·
View notes