#essential linux commands
Explore tagged Tumblr posts
Visit Tumblr Blog
Explore Tumblr blogs with no restrictions, modern design and the best experience.
Last Seen Tumblr Blogs


Fun Fact
Tumblr is used by 21% of adults online aged 18-29 years.
Text
Essential Linux Commands: Mastering the Basics of Command-Line Operations
Linux, a powerful and versatile operating system, offers a command-line interface that empowers users with unprecedented control over their systems. While the graphical user interface (GUI) provides ease of use, understanding the fundamental Linux commands is essential for anyone seeking to harness the full potential of this open-source platform. In this article, we will explore some of the…
Essential Linux Commands help users navigate, manage files, and control system processes. Here are some key ones:
ls – List directory contents
cd – Change directory
pwd – Show current directory path
mkdir – Create a new directory
rm – Remove files or directories
cp – Copy files or directories
mv – Move or rename files
cat – View file contents
grep – Search text in files
chmod – Change file permissions
top – Monitor system processes
ps – Display running processes
kill – Terminate a process
sudo – Execute commands as a superuser
Mastering these commands boosts productivity and system control!
#Basics of Command-Line Operations#Command-Line Operations#Essential Linux Commands#Linux Commands#linux commands#linux#basic linux commands#linux command line#linux commands for beginners#linux basic commands#linux command line tutorial#learn linux#linux tutorial#linux commands tutorial#command line#commands in linux#best linux commands#linux for beginners#essential linux commands#linux tutorial for beginners#top linux terminal commands#basic linux ubuntu commands#linux commands with examples#commands#linux course
2 notes
·
View notes
Video
youtube
Linux Commands and Command Line Tools
#youtube#🖥️ Master Essential Linux Commands & Command Line Tools! 🚀 In this comprehensive tutorial dive into the powerful world of Linux command-li
0 notes
Text

Welcome back, coding enthusiasts! Today we'll talk about Git & Github , the must-know duo for any modern developer. Whether you're just starting out or need a refresher, this guide will walk you through everything from setup to intermediate-level use. Let’s jump in!
What is Git?
Git is a version control system. It helps you as a developer:
Track changes in your codebase, so if anything breaks, you can go back to a previous version. (Trust me, this happens more often than you’d think!)
Collaborate with others : whether you're working on a team project or contributing to an open-source repo, Git helps manage multiple versions of a project.
In short, Git allows you to work smarter, not harder. Developers who aren't familiar with the basics of Git? Let’s just say they’re missing a key tool in their toolkit.
What is Github ?
GitHub is a web-based platform that uses Git for version control and collaboration. It provides an interface to manage your repositories, track bugs, request new features, and much more. Think of it as a place where your Git repositories live, and where real teamwork happens. You can collaborate, share your code, and contribute to other projects, all while keeping everything well-organized.
Git & Github : not the same thing !
Git is the tool you use to create repositories and manage code on your local machine while GitHub is the platform where you host those repositories and collaborate with others. You can also host Git repositories on other platforms like GitLab and BitBucket, but GitHub is the most popular.
Installing Git (Windows, Linux, and macOS Users)
You can go ahead and download Git for your platform from (git-scm.com)
Using Git
You can use Git either through the command line (Terminal) or through a GUI. However, as a developer, it’s highly recommended to learn the terminal approach. Why? Because it’s more efficient, and understanding the commands will give you a better grasp of how Git works under the hood.
GitWorkflow
Git operates in several key areas:
Working directory (on your local machine)
Staging area (where changes are prepared to be committed)
Local repository (stored in the hidden .git directory in your project)
Remote repository (the version of the project stored on GitHub or other hosting platforms)
Let’s look at the basic commands that move code between these areas:
git init: Initializes a Git repository in your project directory, creating the .git folder.
git add: Adds your files to the staging area, where they’re prepared for committing.
git commit: Commits your staged files to your local repository.
git log: Shows the history of commits.
git push: Pushes your changes to the remote repository (like GitHub).
git pull: Pulls changes from the remote repository into your working directory.
git clone: Clones a remote repository to your local machine, maintaining the connection to the remote repo.
Branching and merging
When working in a team, it’s important to never mess up the main branch (often called master or main). This is the core of your project, and it's essential to keep it stable.
To do this, we branch out for new features or bug fixes. This way, you can make changes without affecting the main project until you’re ready to merge. Only merge your work back into the main branch once you're confident that it’s ready to go.
Getting Started: From Installation to Intermediate
Now, let’s go step-by-step through the process of using Git and GitHub from installation to pushing your first project.
Configuring Git
After installing Git, you’ll need to tell Git your name and email. This helps Git keep track of who made each change. To do this, run:

Master vs. Main Branch
By default, Git used to name the default branch master, but GitHub switched it to main for inclusivity reasons. To avoid confusion, check your default branch:

Pushing Changes to GitHub
Let’s go through an example of pushing your changes to GitHub.
First, initialize Git in your project directory:

Then to get the ‘untracked files’ , the files that we haven’t added yet to our staging area , we run the command

Now that you’ve guessed it we’re gonna run the git add command , you can add your files individually by running git add name or all at once like I did here

And finally it's time to commit our file to the local repository

Now, create a new repository on GitHub (it’s easy , just follow these instructions along with me)
Assuming you already created your github account you’ll go to this link and change username by your actual username : https://github.com/username?tab=repositories , then follow these instructions :


You can add a name and choose wether you repo can be public or private for now and forget about everything else for now.

Once your repository created on github , you’ll get this :

As you might’ve noticed, we’ve already run all these commands , all what’s left for us to do is to push our files from our local repository to our remote repository , so let’s go ahead and do that

And just like this we have successfully pushed our files to the remote repository
Here, you can see the default branch main, the total number of branches, your latest commit message along with how long ago it was made, and the number of commits you've made on that branch.

Now what is a Readme file ?
A README file is a markdown file where you can add any relevant information about your code or the specific functionality in a particular branch—since each branch can have its own README.
It also serves as a guide for anyone who clones your repository, showing them exactly how to use it.
You can add a README from this button:

Or, you can create it using a command and push it manually:

But for the sake of demonstrating how to pull content from a remote repository, we’re going with the first option:

Once that’s done, it gets added to the repository just like any other file—with a commit message and timestamp.
However, the README file isn’t on my local machine yet, so I’ll run the git pull command:

Now everything is up to date. And this is just the tiniest example of how you can pull content from your remote repository.
What is .gitignore file ?
Sometimes, you don’t want to push everything to GitHub—especially sensitive files like environment variables or API keys. These shouldn’t be shared publicly. In fact, GitHub might even send you a warning email if you do:

To avoid this, you should create a .gitignore file, like this:

Any file listed in .gitignore will not be pushed to GitHub. So you’re all set!
Cloning
When you want to copy a GitHub repository to your local machine (aka "clone" it), you have two main options:
Clone using HTTPS: This is the most straightforward method. You just copy the HTTPS link from GitHub and run:

It's simple, doesn’t require extra setup, and works well for most users. But each time you push or pull, GitHub may ask for your username and password (or personal access token if you've enabled 2FA).
But if you wanna clone using ssh , you’ll need to know a bit more about ssh keys , so let’s talk about that.
Clone using SSH (Secure Shell): This method uses SSH keys for authentication. Once set up, it’s more secure and doesn't prompt you for credentials every time. Here's how it works:
So what is an SSH key, actually?
Think of SSH keys as a digital handshake between your computer and GitHub.
Your computer generates a key pair:
A private key (stored safely on your machine)
A public key (shared with GitHub)
When you try to access GitHub via SSH, GitHub checks if the public key you've registered matches the private key on your machine.
If they match, you're in — no password prompts needed.
Steps to set up SSH with GitHub:
Generate your SSH key:

2. Start the SSH agent and add your key:

3. Copy your public key:

Then copy the output to your clipboard.
Add it to your GitHub account:
Go to GitHub → Settings → SSH and GPG keys
Click New SSH key
Paste your public key and save.
5. Now you'll be able to clone using SSH like this:

From now on, any interaction with GitHub over SSH will just work — no password typing, just smooth encrypted magic.
And there you have it ! Until next time — happy coding, and may your merges always be conflict-free! ✨👩💻👨💻
#code#codeblr#css#html#javascript#java development company#python#studyblr#progblr#programming#comp sci#web design#web developers#web development#website design#webdev#website#tech#html css#learn to code#github
94 notes
·
View notes
Text
me when companies try to force you to use their proprietary software

anyway
Layperson resources:
firefox is an open source browser by Mozilla that makes privacy and software independence much easier. it is very easy to transfer all your chrome data to Firefox
ublock origin is The highest quality adblock atm. it is a free browser extension, and though last i checked it is available on Chrome google is trying very hard to crack down on its use
Thunderbird mail is an open source email client also by mozilla and shares many of the same advantages as firefox (it has some other cool features as well)
libreOffice is an open source office suite similar to microsoft office or Google Suite, simple enough
Risky:
VPNs (virtual private networks) essentially do a number of things, but most commonly they are used to prevent people from tracking your IP address. i would suggest doing more research. i use proton vpn, as it has a decent free version, and the paid version is powerful
note: some applications, websites, and other entities do not tolerate the use of VPNs. you may not be able to access certain secure sites while using a VPN, and logging into your personal account with some services while using a vpn *may* get you PERMANENTLY BLACKLISTED from the service on that account, ymmv
IF YOU HAVE A DECENT VPN, ANTIVIRUS, AND ADBLOCK, you can start learning about piracy, though i will not be providing any resources, as Loose Lips Sink Ships. if you want to be very safe, start with streaming sites and never download any files, though you Can learn how to discern between safe, unsafe, and risky content.
note: DO NOT SHARE LINKS TO OR NAMES OF PIRACY SITES IN PUBLIC PLACES, ESPECIALLY SOCAL MEDIA
the only time you should share these things are either in person or in (preferably peer-to-peer encrypted) PRIVATE messages
when pirated media becomes well-known and circulated on the wider, public internet, it gets taken down, because it is illegal to distribute pirated media and software
if you need an antivirus i like bitdefender. it has a free version, and is very good, though if youre using windows, windows defender is also very good and it comes with the OS
Advanced:
linux is great if you REALLY know what you're doing. you have to know a decent amount of computer science and be comfortable using the Terminal/Command Prompt to get/use linux. "Linux" refers to a large array of related open source Operating Systems. do research and pick one that suits your needs. im still experimenting with various dispos, but im leaning towards either Ubuntu Cinnamon or Debian.
#capitalism#open source#firefox#thunderbird#mozilla#ublock origin#libreoffice#vpn#antivirus#piracy#linux
701 notes
·
View notes
Text
If you're a linux[1] user who deploys multiple devices, I implore you: learn the command `scp`. It will change your life
It lets you copy files over an ssh pipe; if there's an ssh server on that host, you can essentially directly address a known file on that filesystem and say pwease gimme. And it's roughly the same syntax as `cp`, just with a `[user]@[host]:` before *either source or destination*[2].
And the real kicker is that neither source nor destination need be local:
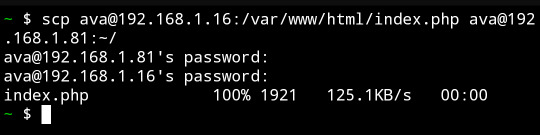
I copied a file from my web server to an icecast source client host by passing it through my phone.
Unreasonably handy tool to have on your toolbelt.
Footnotes under the cut.
[1] Okay, fine, you got me! It's not solely a linux util. SCP is part of the openssh suite, which means that it's available on virtually every OS under the sun... Including being included by default on Windows 10 1709 and later versions of Windows. It's already on your mac, your BSD system, and almost certainly your phone, too. SSH servers and *nix go together like picnics and baskets, though, so I wouldn't exactly pull the *average* windows user aside to recc' `scp`.
[2] What's most interesting to me is that the `[user]@[host]` is used for the SSH client to know where it's authenticating and how, but the actual filesystem location's format is not processed by the SSH client; it's the *server's* format, not the client, that matters for parsing the file location. In some cases this can lead to a mismatch on filenames that you're receiving vs requesting, but the -T flag disables that checking, and then use `[email protected]:D:\\Documents\\testdata.bin` (drive letter indicated and backslashes escaped) to refer to it
#openssh#scp#linux#i am sorry to secure contain protect fans who are uninterested in this being in your tags but. hash collisons happen
147 notes
·
View notes
Note
Please tell us how to get into IT without a degree! I have an interview for a small tech company this week and I’m going in as admin but as things expand I can bootstrap into a better role and I’d really appreciate knowing what skills are likely to be crucial for making that pivot.
Absolutely!! You'd be in a great position to switch to IT, since as an admin, you'd already have some familiarity with the systems and with the workplace in general. Moving between roles is easier in a smaller workplace, too.
So, this is a semi-brief guide to getting an entry-level position, for someone with zero IT experience. That position is almost always going to be help desk. You've probably heard a lot of shit about help desk, but I've always enjoyed it.
So, here we go! How to get into IT for beginners!
The most important thing on your resume will be
✨~🌟Certifications!!🌟~✨
Studying for certs can teach you a lot, especially if you're entirely new to the field. But they're also really important for getting interviews. Lots of jobs will require a cert or degree, and even if you have 5 years of experience doing exactly what the job description is, without one of those the ATS will shunt your resume into a black hole and neither HR or the IT manager will see it.
First, I recommend getting the CompTIA A+. This will teach you the basics of how the parts of a computer work together - hardware, software, how networking works, how operating systems work, troubleshooting skills, etc. If you don't have a specific area of IT you're interested in, this is REQUIRED. Even if you do, I suggest you get this cert just to get your foot in the door.
I recommend the CompTIA certs in general. They'll give you a good baseline and look good on your resume. I only got the A+ and the Network+, so can't speak for the other exams, but they weren't too tough.
If you're more into development or cybersecurity, check out these roadmaps. You'll still benefit from working help desk while pursuing one of those career paths.
The next most important thing is
🔥🔥Customer service & soft skills🔥🔥
Sorry about that.
I was hired for my first ever IT role on the strength of my interview. I definitely wasn't the only candidate with an A+, but I was the only one who knew how to handle customers (aka end-users). Which is, basically, be polite, make the end-user feel listened to, and don't make them feel stupid. It is ASTOUNDING how many IT people can't do that. I've worked with so many IT people who couldn't hide their scorn or impatience when dealing with non-tech-savvy coworkers.
Please note that you don't need to be a social butterfly or even that socially adept. I'm autistic and learned all my social skills by rote (I literally have flowcharts for social interactions), and I was still exceptional by IT standards.
Third thing, which is more for you than for your resume (although it helps):
🎇Do your own projects🎇
This is both the most and least important thing you can do for your IT career. Least important because this will have the smallest impact on your resume. Most important because this will help you learn (and figure out if IT is actually what you want to do).
The certs and interview might get you a job, but when it comes to doing your job well, hands-on experience is absolutely essential. Here are a few ideas for the complete beginner. Resources linked at the bottom.
Start using the command line. This is called Terminal on Mac and Linux. Use it for things as simple as navigating through file directories, opening apps, testing your connection, that kind of thing. The goal is to get used to using the command line, because you will use it professionally.
Build your own PC. This may sound really intimidating, but I swear it's easy! This is going to be cheaper than buying a prebuilt tower or gaming PC, and you'll learn a ton in the bargain.
Repair old PCs. If you don't want to or can't afford to build your own PC, look for cheap computers on Craiglist, secondhand stores, or elsewhere. I know a lot of universities will sell old technology for cheap. Try to buy a few and make a functioning computer out of parts, or just get one so you can feel comfortable working in the guts of a PC.
Learn Powershell or shell scripting. If you're comfortable with the command line already or just want to jump in the deep end, use scripts to automate tasks on your PC. I found this harder to do for myself than for work, because I mostly use my computer for web browsing. However, there are tons of projects out there for you to try!
Play around with a Raspberry Pi. These are mini-computers ranging from $15-$150+ and are great to experiment with. I've made a media server and a Pi hole (network-wide ad blocking) which were both fun and not too tough. If you're into torrenting, try making a seedbox!
Install Linux on your primary computer. I know, I know - I'm one of those people. But seriously, nothing will teach you more quickly than having to compile drivers through the command line so your Bluetooth headphones will work. Warning: this gets really annoying if you just want your computer to work. Dual-booting is advised.
If this sounds intimidating, that's totally normal. It is intimidating! You're going to have to do a ton of troubleshooting and things will almost never work properly on your first few projects. That is part of the fun!
Resources
Resources I've tried and liked are marked with an asterisk*
Professor Messor's Free A+ Training Course*
PC Building Simulator 2 (video game)
How to build a PC (video)
PC Part Picker (website)*
CompTIA A+ courses on Udemy
50 Basic Windows Commands with Examples*
Mac Terminal Commands Cheat Sheet
Powershell in a Month of Lunches (video series)
Getting Started with Linux (tutorial)* Note: this site is my favorite Linux resource, I highly recommend it.
Getting Started with Raspberry Pi
Raspberry Pi Projects for Beginners
/r/ITCareerQuestions*
Ask A Manager (advice blog on workplace etiquette and more)*
Reddit is helpful for tech questions in general. I have some other resources that involve sailing the seas; feel free to DM me or send an ask I can answer privately.
Tips
DO NOT work at an MSP. That stands for Managed Service Provider, and it's basically an IT department which companies contract to provide tech services. I recommend staying away from them. It's way better to work in an IT department where the end users are your coworkers, not your customers.
DO NOT trust remote entry-level IT jobs. At entry level, part of your job is schlepping around hardware and fixing PCs. A fully-remote position will almost definitely be a call center.
DO write a cover letter. YMMV on this, but every employer I've had has mentioned my cover letter as a reason to hire me.
DO ask your employer to pay for your certs. This applies only to people who either plan to move into IT in the same company, or are already in IT but want more certs.
DO NOT work anywhere without at least one woman in the department. My litmus test is two women, actually, but YMMV. If there is no woman in the department in 2024, and the department is more than 5 people, there is a reason why no women work there.
DO have patience with yourself and keep an open mind! Maybe this is just me, but if I can't do something right the first time, or if I don't love it right away, I get very discouraged. Remember that making mistakes is part of the process, and that IT is a huge field which ranges from UX design to hardware repair. There are tons of directions to go once you've got a little experience!
Disclaimer: this is based on my experience in my area of the US. Things may be different elsewhere, esp. outside of the US.
I hope this is helpful! Let me know if you have more questions!
46 notes
·
View notes
Text
pro tip for programmers - how to alias
hey, so you know that annoying thing that happens when you're coding, and you need to run/test the same program 100 times in a row, so you end up typing "python3 testScriptWithASuperLongName.py" into the terminal about 80,000 times?
well, there's a better way! it's called aliasing :D
in your bash shell (or zsh, or whatever shell you use, but bash is the default on VSCode and most people on tumblr use VSCode, so I'm using bash as the default to explain this concept) you can set an alias, essentially a shortcut command, that runs longer commands.
(yes you can just use the up arrow key to re-run the same command, but sometimes you're typing other things into the terminal too and you don't feel like hitting the up arrow key four times in a row, and also this is just a cool and useful tip to get comfortable with aliasing so shhhh)
so, in your terminal shell, just type this:
alias run="python3 testScriptWithASuperLongName.py"
now, you can run that entire super long command, just by typing the word "run" into your terminal. Here's a screenshot of an example on my computer to make it make more sense:

in this example, i just created a simple python file that contains one line of code: print("it works!")
then, as you can see, by setting the alias to run, i can now run that file, runningatestscript.py, simply with the command 'run'.
the best part is, this alias is temporary - it only lasts as long as your shell session is open. so once you close the terminal, the run alias is cleared and you can set it again next time to any file or task you're currently working on, to save yourself a lot of typing, typos, and time.
so if you want to, you can get in the habit of always setting a run alias in the VSCode terminal for whichever file you're working with as soon as you get everything open. that way, when you need to run the same file 50 million times, you have a super easy way of doing it! you can even set it to a single letter if you want to go for maximum speed, but i prefer to use whole short words, because they're easy for me to remember.
note: if you do want to set an alias to work for all sessions, you can simply add it to your ./bashrc file. this is a common way to automate repeatable tasks, and simply to set easier-to-remember commands for terminal commands that are really complicated/confusing/hard to remember.
for example, i saved the alias checkboot="[ -d /sys/firmware/efi ] && echo 'UEFI mode' || 'BIOS mode'" into my zshrc file (zsh equivalent of bashrc file). this way, no matter how many times i rebooted my machine, i would always be able to quickly check which boot mode was running by simply typing 'checkboot'.
yesterday i was updating my boot mode from BIOS to UEFI on my very old machine that is technically compatible with UEFI, but not configured for it by default. So it was extremely helpful and saved me the time and headache of having to remember and type that long-ass command a thousand times in between many different reboots and new shells.
if you have any tasks like that, or terminal commands that you know would be useful to you, but you can never remember them when you need them, i highly recommend getting comfortable with aliasing! it can be super useful to simply set custom aliases for all the commands you don't want to remember, so that you can automate things away and not have to worry about so much linux syntax all the time when you're tring to focus on programming.
i know this may seem like a simple tip to some, but i only learned about it recently and it's been extremely helpful to integrate into my workflow and customize my OS with! so i thought it might be worthwhile to some people if i share :) hope it helps!
#codeblr#linux#hacker#compsci#hack the planet#hacking#studyblr#coding#progblr#programmer#programming#women in tech#women in stem#women in computing#women in cs#comp sci#coding tips#programming tips#software development#software developers#vscode
115 notes
·
View notes
Text
How to install and configure sudo on Debian Linux
The minimal version of Debian Linux 12/11 does not install sudo. When performing a network installation for Debian, the usual approach is to use the minimum version, which only installs the essential packages. Most Linux container images based upon Debian also skip sudo, and if your project needs sudo, then read on how to install and configure sudo and grant access to a user on a Debian Linux 12/11.
11 notes
·
View notes
Text
Building Your Own Operating System: A Beginner’s Guide
An operating system (OS) is an essential component of computer systems, serving as an interface between hardware and software. It manages system resources, provides services to users and applications, and ensures efficient execution of processes. Without an OS, users would have to manually manage hardware resources, making computing impractical for everyday use.
Lightweight operating system for old laptops
Functions of an Operating System
Operating systems perform several crucial functions to maintain system stability and usability. These functions include:
1. Process Management
The OS allocates resources to processes and ensures fair execution while preventing conflicts. It employs algorithms like First-Come-First-Serve (FCFS), Round Robin, and Shortest Job Next (SJN) to optimize CPU utilization and maintain system responsiveness.
2. Memory Management
The OS tracks memory usage and prevents memory leaks by implementing techniques such as paging, segmentation, and virtual memory. These mechanisms enable multitasking and improve overall system performance.
3. File System Management
It provides mechanisms for reading, writing, and deleting files while maintaining security through permissions and access control. File systems such as NTFS, FAT32, and ext4 are widely used across different operating systems.
4. Device Management
The OS provides device drivers to facilitate interaction with hardware components like printers, keyboards, and network adapters. It ensures smooth data exchange and resource allocation for input/output (I/O) operations.
5. Security and Access Control
It enforces authentication, authorization, and encryption mechanisms to protect user data and system integrity. Modern OSs incorporate features like firewalls, anti-malware tools, and secure boot processes to prevent unauthorized access and cyber threats.
6. User Interface
CLI-based systems, such as Linux terminals, provide direct access to system commands, while GUI-based systems, such as Windows and macOS, offer intuitive navigation through icons and menus.
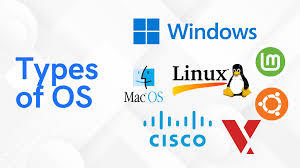
Types of Operating Systems
Operating systems come in various forms, each designed to cater to specific computing needs. Some common types include:
1. Batch Operating System
These systems were widely used in early computing environments for tasks like payroll processing and scientific computations.
2. Multi-User Operating System
It ensures fair resource allocation and prevents conflicts between users. Examples include UNIX and Windows Server.
3. Real-Time Operating System (RTOS)
RTOS is designed for time-sensitive applications, where processing must occur within strict deadlines. It is used in embedded systems, medical devices, and industrial automation. Examples include VxWorks and FreeRTOS.
4 Mobile Operating System
Mobile OSs are tailored for smartphones and tablets, offering touchscreen interfaces and app ecosystems.
5 Distributed Operating System
Distributed OS manages multiple computers as a single system, enabling resource sharing and parallel processing. It is used in cloud computing and supercomputing environments. Examples include Google’s Fuchsia and Amoeba.
Popular Operating Systems
Several operating systems dominate the computing landscape, each catering to specific user needs and hardware platforms.
1. Microsoft Windows
It is popular among home users, businesses, and gamers. Windows 10 and 11 are the latest versions, offering improved performance, security, and compatibility.
2. macOS
macOS is Apple’s proprietary OS designed for Mac computers. It provides a seamless experience with Apple hardware and software, featuring robust security and high-end multimedia capabilities.
3. Linux
Linux is an open-source OS favored by developers, system administrators, and security professionals. It offers various distributions, including Ubuntu, Fedora, and Debian, each catering to different user preferences.
4. Android
It is based on the Linux kernel and supports a vast ecosystem of applications.
5. iOS
iOS is Apple’s mobile OS, known for its smooth performance, security, and exclusive app ecosystem. It powers iPhones and iPads, offering seamless integration with other Apple devices.
Future of Operating Systems
The future of operating systems is shaped by emerging technologies such as artificial intelligence (AI), cloud computing, and edge computing. Some key trends include:
1. AI-Driven OS Enhancements
AI-powered features, such as voice assistants and predictive automation, are becoming integral to modern OSs. AI helps optimize performance, enhance security, and personalize user experiences.
2. Cloud-Based Operating Systems
Cloud OSs enable users to access applications and data remotely. Chrome OS is an example of a cloud-centric OS that relies on internet connectivity for most functions.
3. Edge Computing Integration
With the rise of IoT devices, edge computing is gaining importance. Future OSs will focus on decentralized computing, reducing latency and improving real-time processing.
4. Increased Focus on Security
Cyber threats continue to evolve, prompting OS developers to implement advanced security measures such as zero-trust architectures, multi-factor authentication, and blockchain-based security.
3 notes
·
View notes
Text
How to Transition from Biotechnology to Bioinformatics: A Step-by-Step Guide

Biotechnology and bioinformatics are closely linked fields, but shifting from a wet lab environment to a computational approach requires strategic planning. Whether you are a student or a professional looking to make the transition, this guide will provide a step-by-step roadmap to help you navigate the shift from biotechnology to bioinformatics.
Why Transition from Biotechnology to Bioinformatics?
Bioinformatics is revolutionizing life sciences by integrating biological data with computational tools to uncover insights in genomics, proteomics, and drug discovery. The field offers diverse career opportunities in research, pharmaceuticals, healthcare, and AI-driven biological data analysis.
If you are skilled in laboratory techniques but wish to expand your expertise into data-driven biological research, bioinformatics is a rewarding career choice.
Step-by-Step Guide to Transition from Biotechnology to Bioinformatics
Step 1: Understand the Basics of Bioinformatics
Before making the switch, it’s crucial to gain a foundational understanding of bioinformatics. Here are key areas to explore:
Biological Databases – Learn about major databases like GenBank, UniProt, and Ensembl.
Genomics and Proteomics – Understand how computational methods analyze genes and proteins.
Sequence Analysis – Familiarize yourself with tools like BLAST, Clustal Omega, and FASTA.
🔹 Recommended Resources:
Online courses on Coursera, edX, or Khan Academy
Books like Bioinformatics for Dummies or Understanding Bioinformatics
Websites like NCBI, EMBL-EBI, and Expasy
Step 2: Develop Computational and Programming Skills
Bioinformatics heavily relies on coding and data analysis. You should start learning:
Python – Widely used in bioinformatics for data manipulation and analysis.
R – Great for statistical computing and visualization in genomics.
Linux/Unix – Basic command-line skills are essential for working with large datasets.
SQL – Useful for querying biological databases.
🔹 Recommended Online Courses:
Python for Bioinformatics (Udemy, DataCamp)
R for Genomics (HarvardX)
Linux Command Line Basics (Codecademy)
Step 3: Learn Bioinformatics Tools and Software
To become proficient in bioinformatics, you should practice using industry-standard tools:
Bioconductor – R-based tool for genomic data analysis.
Biopython – A powerful Python library for handling biological data.
GROMACS – Molecular dynamics simulation tool.
Rosetta – Protein modeling software.
🔹 How to Learn?
Join open-source projects on GitHub
Take part in hackathons or bioinformatics challenges on Kaggle
Explore free platforms like Galaxy Project for hands-on experience
Step 4: Work on Bioinformatics Projects
Practical experience is key. Start working on small projects such as:
✅ Analyzing gene sequences from NCBI databases ✅ Predicting protein structures using AlphaFold ✅ Visualizing genomic variations using R and Python
You can find datasets on:
NCBI GEO
1000 Genomes Project
TCGA (The Cancer Genome Atlas)
Create a GitHub portfolio to showcase your bioinformatics projects, as employers value practical work over theoretical knowledge.
Step 5: Gain Hands-on Experience with Internships
Many organizations and research institutes offer bioinformatics internships. Check opportunities at:
NCBI, EMBL-EBI, NIH (government research institutes)
Biotech and pharma companies (Roche, Pfizer, Illumina)
Academic research labs (Look for university-funded projects)
💡 Pro Tip: Join online bioinformatics communities like Biostars, Reddit r/bioinformatics, and SEQanswers to network and find opportunities.
Step 6: Earn a Certification or Higher Education
If you want to strengthen your credentials, consider:
🎓 Bioinformatics Certifications:
Coursera – Genomic Data Science (Johns Hopkins University)
edX – Bioinformatics MicroMasters (UMGC)
EMBO – Bioinformatics training courses
🎓 Master’s in Bioinformatics (optional but beneficial)
Top universities include Harvard, Stanford, ETH Zurich, University of Toronto
Step 7: Apply for Bioinformatics Jobs
Once you have gained enough skills and experience, start applying for bioinformatics roles such as:
Bioinformatics Analyst
Computational Biologist
Genomics Data Scientist
Machine Learning Scientist (Biotech)
💡 Where to Find Jobs?
LinkedIn, Indeed, Glassdoor
Biotech job boards (BioSpace, Science Careers)
Company career pages (Illumina, Thermo Fisher)
Final Thoughts
Transitioning from biotechnology to bioinformatics requires effort, but with the right skills and dedication, it is entirely achievable. Start with fundamental knowledge, build computational skills, and work on projects to gain practical experience.
Are you ready to make the switch? 🚀 Start today by exploring free online courses and practicing with real-world datasets!
#bioinformatics#biopractify#biotechcareers#biotechnology#biotech#aiinbiotech#machinelearning#bioinformaticstools#datascience#genomics#Biotechnology
4 notes
·
View notes
Text
youtube
Linux Administration: The Complete Linux Bootcamp for 2024
This Linux Administration course covers every major topic, including using AI and Natural Language to administer Linux systems (ChatGPT & ShellGPT), all important Linux commands, the Linux Filesystem, File Permissions, Process Management, User Account Management, Software Management, Networking in Linux, System Administration, Bash Scripting, Containarizing Apps with Podman, Iptables/Netfilter Firewall, Linux Security and many more!
I’m constantly updating the course to be the most comprehensive, yet straightforward, Linux Administration course on the market!
This course IS NOT like any other Linux Administration course you can take online. At the end of this course, you will MASTER the key concepts and you will become an effective Linux System Engineer or Administrator.
This is a brand new Linux Administration course that is constantly updated to teach you the skills required for the future that comes.
The world is changing, constantly, and at a fast pace! The technology-driven future in which we’ll live is filled with promise but also challenges. Linux powers the servers of the Internet and by enrolling in this course you’ll power the essential Linux concepts and commands. This Linux Administration course is really different! You’ll learn what matters and get the skills to get ahead and gain an edge.
#youtube#free education#education#linux administration#educate yourselves#hacking#educate yourself#tips and tricks#technology#security#The Complete Linux Bootcamp for 2024#linux tutorial#linux for beginners#linux command line#open source#computers
3 notes
·
View notes
Video
youtube
Getting Started with Linux Commands | ls cp pwd less more id tty date rm...
#youtube#Welcome to our comprehensive guide on Getting Started with Linux Commands! 🐧 In this tutorial we’ll walk you through essential Linux termin
0 notes
Text
DevOps Training in Marathahalli Bangalore – Build a Future-Proof Tech Career

Are you looking to transition into a high-growth IT role or strengthen your skills in modern software development practices? If you're in Bangalore, particularly near Marathahalli, you're in one of the best places to do that. eMexo Technologies offers a detailed and industry-ready DevOps Training in Marathahalli Bangalore designed for beginners, professionals, and career changers alike.
Explore DevOps Course in Marathahalli Bangalore – Key Skills You’ll Gain
This DevOps Course in Marathahalli Bangalore is structured to give you both theoretical knowledge and hands-on experience. Here’s what the curriculum typically covers:
Core Modules:
Step into the world of DevOps Training Center in Marathahalli Bangalore, where you'll discover how this powerful approach bridges the gap between development and operations to streamline processes and boost efficiency in today’s tech-driven environment.
✅ Linux Basics: Learn command-line fundamentals essential for DevOps engineers.
✅ Version Control with Git & GitHub: Master source code management.
✅ Automate your software build and deployment: workflows seamlessly using Jenkins as a powerful Continuous Integration tool.
✅ Configuration Management with Ansible: Manage infrastructure more efficiently.
✅ Containerization using Docker: Package apps with all their dependencies.
✅ Orchestration with Kubernetes: Manage containers at scale.
✅ Cloud Computing with AWS: Get started with DevOps in cloud environments.
✅ Monitoring & Logging with Prometheus, Grafana: Gain insights into application performance.
✅ CI/CD Pipeline Implementation: Build end-to-end automation flows.
✅ Everything is taught with real-time: examples, project work, and lab exercises.
Get Recognized with a DevOps Certification Course in Marathahalli Bangalore – Boost Your Industry Credibility
Upon completing the course, you'll be awarded a DevOps Certification Course in Marathahalli Bangalore issued by eMexo Technologies, validating your expertise in the field. This certification is designed to validate your expertise and improve your credibility with hiring managers. It’s especially useful for roles like:
✅ DevOps Engineer
✅ Site Reliability Engineer (SRE)
✅ Build & Release Engineer
✅ Automation Engineer
✅ System Administrator with DevOps skills
Top-Rated Best DevOps Training in Marathahalli Bangalore – Why eMexo Technologies Stands Out from the Rest
When it comes to finding the Best DevOps Training in Marathahalli Bangalore, eMexo Technologies ticks all the boxes:
✅ Up-to-Date Curriculum: Constantly refreshed to include the latest industry tools and practices.
✅ Experienced Trainers: Learn from industry professionals with 8–15 years of real-world experience.
✅ Real Projects: Work on case studies and scenarios inspired by actual DevOps environments.
✅ Flexible Timings: Choose from weekday, weekend, and online batches.
✅ Affordable Pricing: With the current 40% discount, this course is great value for money.
✅ Lifetime Access to Materials: Revise and revisit anytime.
DevOps Training Institute in Marathahalli Bangalore – Why Location Matters
Located in one of Bangalore’s biggest IT hubs, eMexo Technologies is a top-rated DevOps Training Institute in Marathahalli Bangalore. Proximity to major tech parks and MNCs means better networking opportunities and access to local job openings right after your course.
DevOps Training Center in Marathahalli Bangalore – Hands-On, Tech-Ready Lab Environment
At the DevOps Training Center in Marathahalli Bangalore, students don’t just watch tutorials—they do the work. You’ll have access to a fully equipped lab environment where you’ll implement DevOps pipelines, configure cloud environments, and monitor system performance.
DevOps Training and Placement in Marathahalli Bangalore – Start Working Faster
Job support is one of the biggest advantages here. The DevOps Training and Placement in Marathahalli Bangalore equips you with everything you need to launch a successful career in DevOps, including:
✅ 1:1 career counseling
✅ Resume building support
✅ Mock interviews with real-time feedback
✅ Interview scheduling and referrals through their hiring partners
✅ Post-course job alerts and updates
Many past students have successfully secured roles at top companies like Infosys, Wipro, TCS, Mindtree, and Accenture.
youtube
Don’t Miss This Opportunity!
If you're serious about breaking into tech or advancing in your current role, now is the perfect time to act. With expert-led training, hands-on labs, and full placement support, eMexo Technologies' DevOps Training in Marathahalli Bangalore has everything you need to succeed.
👉 Enroll now and grab an exclusive 30% discount on our DevOps training – limited seats available!
🔗 Click here to view course details and enroll
#DevOps#DevOpsTraining#DevOpsCourse#LearnDevOps#DevOpsEngineer#DevOpsSkills#DevOpsCulture#Git#Jenkins#Docker#Kubernetes#Ansible#Terraform#Prometheus#Grafana#CI/CD#Automation#ITTraining#CloudComputing#SoftwareDevelopment#CareerGrowth#DevOpsTrainingcenterinBangalore#DevOpsTrainingInMarathahalliBangalore#DevOpsCourseInMarathahalliBangalore#DevOpsTrainingInstitutesInMarathahalliBangalore#DevOpsClassesInMarathahalliBangalore#BestDevOpsTrainingInMarathahalliBangalore#DevOpsTrainingandPlacementinMarathahalliBangalore#Youtube
1 note
·
View note
Text
Key Programming Languages Every Ethical Hacker Should Know
In the realm of cybersecurity, ethical hacking stands as a critical line of defense against cyber threats. Ethical hackers use their skills to identify vulnerabilities and prevent malicious attacks. To be effective in this role, a strong foundation in programming is essential. Certain programming languages are particularly valuable for ethical hackers, enabling them to develop tools, scripts, and exploits. This blog post explores the most important programming languages for ethical hackers and how these skills are integrated into various training programs.
Python: The Versatile Tool
Python is often considered the go-to language for ethical hackers due to its versatility and ease of use. It offers a wide range of libraries and frameworks that simplify tasks like scripting, automation, and data analysis. Python’s readability and broad community support make it a popular choice for developing custom security tools and performing various hacking tasks. Many top Ethical Hacking Course institutes incorporate Python into their curriculum because it allows students to quickly grasp the basics and apply their knowledge to real-world scenarios. In an Ethical Hacking Course, learning Python can significantly enhance your ability to automate tasks and write scripts for penetration testing. Its extensive libraries, such as Scapy for network analysis and Beautiful Soup for web scraping, can be crucial for ethical hacking projects.
JavaScript: The Web Scripting Language
JavaScript is indispensable for ethical hackers who focus on web security. It is the primary language used in web development and can be leveraged to understand and exploit vulnerabilities in web applications. By mastering JavaScript, ethical hackers can identify issues like Cross-Site Scripting (XSS) and develop techniques to mitigate such risks. An Ethical Hacking Course often covers JavaScript to help students comprehend how web applications work and how attackers can exploit JavaScript-based vulnerabilities. Understanding this language enables ethical hackers to perform more effective security assessments on websites and web applications.
Biggest Cyber Attacks in the World
youtube
C and C++: Low-Level Mastery
C and C++ are essential for ethical hackers who need to delve into low-level programming and system vulnerabilities. These languages are used to develop software and operating systems, making them crucial for understanding how exploits work at a fundamental level. Mastery of C and C++ can help ethical hackers identify and exploit buffer overflows, memory corruption, and other critical vulnerabilities. Courses at leading Ethical Hacking Course institutes frequently include C and C++ programming to provide a deep understanding of how software vulnerabilities can be exploited. Knowledge of these languages is often a prerequisite for advanced penetration testing and vulnerability analysis.
Bash Scripting: The Command-Line Interface
Bash scripting is a powerful tool for automating tasks on Unix-based systems. It allows ethical hackers to write scripts that perform complex sequences of commands, making it easier to conduct security audits and manage multiple tasks efficiently. Bash scripting is particularly useful for creating custom tools and automating repetitive tasks during penetration testing. An Ethical Hacking Course that offers job assistance often emphasizes the importance of Bash scripting, as it is a fundamental skill for many security roles. Being proficient in Bash can streamline workflows and improve efficiency when working with Linux-based systems and tools.
SQL: Database Security Insights
Structured Query Language (SQL) is essential for ethical hackers who need to assess and secure databases. SQL injection is a common attack vector used to exploit vulnerabilities in web applications that interact with databases. By understanding SQL, ethical hackers can identify and prevent SQL injection attacks and assess the security of database systems. Incorporating SQL into an Ethical Hacking Course can provide students with a comprehensive understanding of database security and vulnerability management. This knowledge is crucial for performing thorough security assessments and ensuring robust protection against database-related attacks.
Understanding Course Content and Fees
When choosing an Ethical Hacking Course, it’s important to consider how well the program covers essential programming languages. Courses offered by top Ethical Hacking Course institutes should provide practical, hands-on training in Python, JavaScript, C/C++, Bash scripting, and SQL. Additionally, the course fee can vary depending on the institute and the comprehensiveness of the program. Investing in a high-quality course that covers these programming languages and offers practical experience can significantly enhance your skills and employability in the cybersecurity field.
Certification and Career Advancement
Obtaining an Ethical Hacking Course certification can validate your expertise and improve your career prospects. Certifications from reputable institutes often include components related to the programming languages discussed above. For instance, certifications may test your ability to write scripts in Python or perform SQL injection attacks. By securing an Ethical Hacking Course certification, you demonstrate your proficiency in essential programming languages and your readiness to tackle complex security challenges. Mastering the right programming languages is crucial for anyone pursuing a career in ethical hacking. Python, JavaScript, C/C++, Bash scripting, and SQL each play a unique role in the ethical hacking landscape, providing the tools and knowledge needed to identify and address security vulnerabilities. By choosing a top Ethical Hacking Course institute that covers these languages and investing in a course that offers practical training and job assistance, you can position yourself for success in this dynamic field. With the right skills and certification, you’ll be well-equipped to tackle the evolving challenges of cybersecurity and contribute to protecting critical digital assets.
3 notes
·
View notes
Text
The Importance of Regular SSD Health Checks for Data Security
Solid-State Drives (SSDs) have become the preferred storage solution due to their speed, durability, and energy efficiency. However, despite their advanced technology, SSDs are not immune to wear and potential failures. Regular health checks play a crucial role in ensuring data security, preventing data loss, and maintaining optimal performance. This article explores why routine test SSD drive health is essential and how it safeguards critical data.
Why SSD Health Checks Matter
1. Preventing Data Loss
Unlike traditional hard drives, SSDs have a finite number of write cycles. Over time, repeated writes can degrade NAND flash memory, leading to data corruption or loss. Regular health checks help identify wear patterns and alert users before critical failures occur.
2. Detecting Early Signs of Failure
Tools that read SMART (Self-Monitoring, Analysis, and Reporting Technology) data can detect issues such as bad blocks, high temperatures, and excessive reallocated sectors. Identifying these warning signs early allows users to take preventative action, like data backup or drive replacement.
3. Maintaining Optimal Performance
As SSDs age, their performance can degrade due to factors like increased bad blocks or inefficient data management. Regular health checks help identify performance bottlenecks and ensure that features like TRIM are functioning correctly to maintain speed and responsiveness.
4. Enhancing Data Security
Failing SSDs can lead to partial data corruption, making sensitive information vulnerable. Regular health checks reduce the risk of data breaches by ensuring that the storage medium remains secure and intact.
How to Perform Regular SSD Health Checks
1. Utilize SMART Monitoring Tools
CrystalDiskInfo (Windows): Provides real-time health statistics and temperature monitoring.
Smartmontools (Linux/macOS): Command-line tools (smartctl) for in-depth drive analysis.
Manufacturer-Specific Utilities: Samsung Magician, Intel SSD Toolbox, and others offer tailored monitoring and firmware updates.
2. Schedule Automated Health Checks
Windows Task Scheduler: Set up recurring checks using tools like CrystalDiskInfo.
Linux Cron Jobs: Automate smartctl commands to log health data periodically.
macOS Automator: Create workflows that run disk utility scripts at regular intervals.
3. Monitor Key SMART Attributes
Reallocated Sectors Count: Indicates bad blocks that have been replaced.
Wear Leveling Count: Reflects the evenness of data distribution across memory cells.
Temperature: High temperatures can accelerate wear and cause failures.
Best Practices for SSD Health and Data Security
Regular Backups: Always maintain updated backups to safeguard against sudden failures.
Enable TRIM: Ensures that deleted data blocks are efficiently managed.
Keep Firmware Updated: Manufacturers often release updates to fix bugs and improve drive reliability.
Avoid Full Drive Usage: Maintain at least 10-20% free space to allow efficient data management.
Conclusion
Regular SSD health checks are a proactive strategy to ensure data security, prevent unexpected failures, and optimize performance. With the right tools and scheduled monitoring, users can extend the lifespan of their SSDs and protect valuable data. In an age where data integrity is paramount, regular health checks are not just recommended—they're essential.
1 note
·
View note
Text
September 30 2024 2009
Sufficiently quenched theres only one thing left for the cans of Tab.

Joining democratic society.
Anyway, WV goes to take a look at the big computer and preses ESCAPE bringing us to a command line screen filled with prompts. At the absolute top are prompts in green that were entered some time before WV appeared.
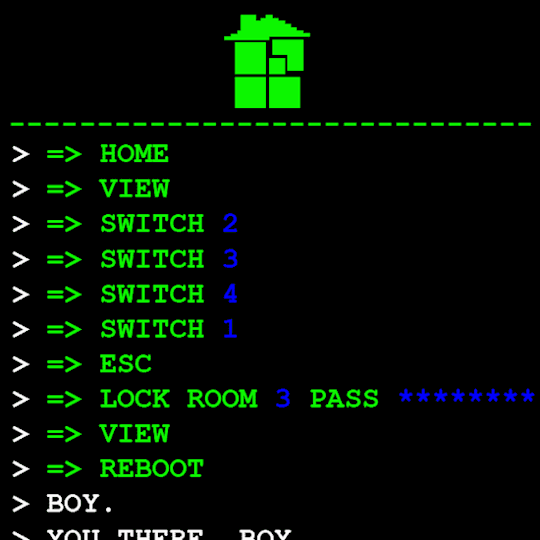
Gonna have to brush off my CS cap for this one. Now since we dont know what system this computer runs on Im going to operate on the assumption that this is Linux as Ive played around more with that terminal than Windows.
I assume that the green text is a Super User (or using sudo privileges but Im pretty sure its rhe former). What is a super user you ask? The windows equivilent would be Admin and essentially gives this user root directory privileges to access the whole system and make changes. Obviously this can lead to problems if done incorrectly so a password is put in place to prevent just anyone from making system changes. Thats where sudo comes in. Sudo elevates the commands you are giving and will require a password when you access.
Now that thats cleared up, lets look at the prompts. Each of these is preceeded with =>, possibly denoting root prompts from a sudo user. Skipping HOME for a moment, we see VIEW which takes us out of the command terminal to video feed on each of the four screens. SWITCH, well, switches between the screens, the order of which was 2-3-4-1.
I dont know if there is a meaning behind starting at two, Roses screen, but screen 2 shows feed of her house displaying static in front of Zazzerpan whos hand has been broken. Screen 3 shows a, to us, future scene of Dave, potentially post strife, and a first level prototyped kernel. This screen brings a lot of questions. Who is Daves server player? If each of these screens is showing current live feed, how much time passed between the strife and prototyping? What happened to Rose that her feed is locked on Zazzerpan? Unfortunately, WV abandons continuing the previous users commands and enters HOME so we cant see who is on screen 4.
Before diving into what happens with the HOME command, lets go back to the green text. ESC we established brings us back to the teminal. Here this user entered the password to LOCK room 3. Its unclear what room 3 is but Im guessing this was supposed to block access to interacting with Dave. Most likely our SU was preparing this computer for whoever stumbled upon it and blocked access to all but Johns screen.

At the bottom of the terminal is a smaller screen that displays the character of focus, in this case John, and the command VIEW which would maximize the camera screen one again. So after ensuring the screens SU wanted were locked, SU returned the view to screen 1 which is what WV saw upon booting. After everything was in order, the system was then rebooted which saved these changes and returned the system to normal user function logging out of the root directory.
In normal user function, entering HOME activates all the screens and our favorite ominous number appears.

Four hours and thirteen minutes. Another countdown, and this time who knows what its for. Nothing more can be typed as the keyboard is now locked.
But WV is none too worried. He is a Mayor now with much more pressing matters.

The militia wont train itself you know.
#i have an AS in comp sci and a BBA in information systems#all to say i know COMPUTERS for BUSINESS with extra focus on COMPUTERS#this was fun to write#i love sharing knowledge#homestuck#homestuck replay#hsrp liveblog#chrono
4 notes
·
View notes