#linux command line tutorial
Explore tagged Tumblr posts
Visit Tumblr Blog
Explore Tumblr blogs with no restrictions, modern design and the best experience.
Last Seen Tumblr Blogs


Fun Fact
Women make up for the other 50% of Tumblr’s audience.
Text
Essential Linux Commands: Mastering the Basics of Command-Line Operations
Linux, a powerful and versatile operating system, offers a command-line interface that empowers users with unprecedented control over their systems. While the graphical user interface (GUI) provides ease of use, understanding the fundamental Linux commands is essential for anyone seeking to harness the full potential of this open-source platform. In this article, we will explore some of the…
Essential Linux Commands help users navigate, manage files, and control system processes. Here are some key ones:
ls – List directory contents
cd – Change directory
pwd – Show current directory path
mkdir – Create a new directory
rm – Remove files or directories
cp – Copy files or directories
mv – Move or rename files
cat – View file contents
grep – Search text in files
chmod – Change file permissions
top – Monitor system processes
ps – Display running processes
kill – Terminate a process
sudo – Execute commands as a superuser
Mastering these commands boosts productivity and system control!
#Basics of Command-Line Operations#Command-Line Operations#Essential Linux Commands#Linux Commands#linux commands#linux#basic linux commands#linux command line#linux commands for beginners#linux basic commands#linux command line tutorial#learn linux#linux tutorial#linux commands tutorial#command line#commands in linux#best linux commands#linux for beginners#essential linux commands#linux tutorial for beginners#top linux terminal commands#basic linux ubuntu commands#linux commands with examples#commands#linux course
2 notes
·
View notes
Text
youtube
Linux Administration: The Complete Linux Bootcamp for 2024
This Linux Administration course covers every major topic, including using AI and Natural Language to administer Linux systems (ChatGPT & ShellGPT), all important Linux commands, the Linux Filesystem, File Permissions, Process Management, User Account Management, Software Management, Networking in Linux, System Administration, Bash Scripting, Containarizing Apps with Podman, Iptables/Netfilter Firewall, Linux Security and many more!
I’m constantly updating the course to be the most comprehensive, yet straightforward, Linux Administration course on the market!
This course IS NOT like any other Linux Administration course you can take online. At the end of this course, you will MASTER the key concepts and you will become an effective Linux System Engineer or Administrator.
This is a brand new Linux Administration course that is constantly updated to teach you the skills required for the future that comes.
The world is changing, constantly, and at a fast pace! The technology-driven future in which we’ll live is filled with promise but also challenges. Linux powers the servers of the Internet and by enrolling in this course you’ll power the essential Linux concepts and commands. This Linux Administration course is really different! You’ll learn what matters and get the skills to get ahead and gain an edge.
#youtube#free education#education#linux administration#educate yourselves#hacking#educate yourself#tips and tricks#technology#security#The Complete Linux Bootcamp for 2024#linux tutorial#linux for beginners#linux command line#open source#computers
3 notes
·
View notes
Video
youtube
Linux Commands and Command Line Tools
#youtube#🖥️ Master Essential Linux Commands & Command Line Tools! 🚀 In this comprehensive tutorial dive into the powerful world of Linux command-li
0 notes
Video
youtube
How to Navigate File System in Linux Terminal
This is a basic introduction about Linux commands and how you can navigate the file system using Terminal (command line). All Open Source! Arashtad provides high quality tutorials, eBooks, articles and documents, design and development services, over 400 free online tools, frameworks, CMS, WordPress plugins, Joomla extensions, and other products. More Courses ▶ https://tuts.arashtad.com/ Business Inquiries ▶ https://arashtad.com/business-inquiries/ Affiliate Programs ▶ https://arashtad.com/affiliate-programs/ eBooks ▶ https://press.arashtad.com/ Our Products ▶ https://market.arashtad.com/ Our Services ▶ https://arashtad.com/services/ Our Portfolio ▶ https://demo.arashtad.com/ Free Online Tools ▶ https://tools.arashtad.com/ Our Blog ▶ https://blog.arashtad.com/ Documents ▶ https://doc.arashtad.com/ Licensing ▶ https://arashtad.com/licensing/ About us ▶ https://arashtad.com/about/ Join Arashtad Network ▶ https://i.arashtad.com/ Our Social Profiles ▶ https://arashtad.com/arashtad-social-media-profiles/ Vimeo ▶ https://vimeo.com/arashtad Udemy ▶ https://www.udemy.com/user/arashtad GitHub ▶ https://github.com/arashtad Linkedin ▶ https://www.linkedin.com/company/arashtad Twitter ▶ https://twitter.com/arashtad
0 notes
Text
dusted off my cohost and bluesky to follow people since i saw some people linking their accounts here... i don't currently have any plans to go anywhere, but my username is spellbot or spellbot_ on most sites (except neopets, where i'm fudgelade)
also if you're worried about people you follow migrating to sites you don't wanna join, check out my pinned post about social media RSS feeds. if you're interested in making your own web site and buying a domain for it, check out namesilo or namecheap. and you can use a custom domain on a neocities site if you become a neocities supporter for $5 a month (and if you don't care about custom domains you can just use neocities for free)
#if you want php/mysql i would recommend digitalocean but with a disclaimer that it's kind of for advanced users#like you would be managing the server yourself in a command line. so it's cheaper but you gotta wrestle in the mud with linux#they also got a free 60-day trial + tutorials if you want to try it out to decide if you HATE mud wrestling with linux! YECCCK!!!! PTOOEY#silly storie
1 note
·
View note
Note
Any recommendations/cautions about using Alpine Linux on the desktop? It's always intrigued me and you're the only person I've seen post about it
Alpine is pretty good for desktop, very stable, good security practice, professional development philosophy, broad package availability. You will run into some very obvious pitfalls, although they can mostly be obviated by using some modern applications.
The Alpine wiki is a little sparse and at times can be weirdly focussed, like spending a lot of the installation page talking about the very specific usecase of a diskless install. Nonetheless, it's quite good and should be your first port of call. A lot of the things I'm mentioning here are well covered in the article on Daily Driving for Desktop use. I'm basically just editorializing here.
The installation procedure is command-line only, but pretty straightforward, you run setup-alpine and follow the prompts, assuming you want a basic system. If you need special disk partitioning, you'll usually have to do it yourself. There's a whole whackload of helpers to get you set up, like setup-desktop which will help you install any of 'gnome', 'plasma', 'xfce', 'mate', 'sway', or 'lxqt'. Most of these are called by setup-alpine for you, but not the desktop one. You can call it at any time though.
Most obviously, musl libc, no glibc. Packaged software will work fine. There's a compatibility shim called gcompat that will usually work, but might fall apart on more complicated software expecting glibc, for example I've had no luck running glibc AppImages. For more complex software, Flatpaks are a good option, e.g. Steam runs great on Alpine as a Flatpak, I run the Homestuck Companion Flatpak. Your last ditch is containerization and chroots, which are fortunately really easy to handle, just install podman and Distrobox and you can run anything that won't run on Alpine inside a Fedora or Debian or Whatever container seamlessly with your desktop.
Less obviously: no systemd. Systemd underpins some really common features of modern Linux and not having it around means you have to use a few different tools that are anywhere from comparable to a little worse for some tasks. Packaged applications will work smoothly, just learn the OpenRC invocations, Alpine has a really great wiki. For writing your own services, it's a lot more limited than SystemD, you're not going to have full access to like, udev functionality, instead you get the good but kind of weird eudev system.
If you're mainly installing things from the repos you'll barely notice the difference, other than that every package is split up into three, <package>, <package>-docs, and <package>-dev. This is a container-y thing, to allow Alpine container images to install the smallest possible packageset. If you need man pages you'll have to install them specifically.
Alpine has a very solid main repo, and a community repo that's plenty good, and worth enabling on any desktop system. It'll generally be automatically enabled when you set up a desktop anyway, but just a notice if you're going manual. You can run Stable alpine, which updates every six months, or if you want you can run Edge, which is a rolling release of packages as they get added. Lots of very up-to-date software, and pretty stable as these go. You can go from Stable->Edge pretty easily, going back not so much.
There's also the Testing repo, only available on Edge, which I don't really recommend, especially since apkbuild files are so easy to run if you just need one thing that has most of its dependencies met.
Package management is with APK, which is fast and easy to work with. The wiki page will cover you.
Side note: if you want something more batteries-included, you could look at Postmarket, an Alpine derivative mainly focussed on running on smartphones but that is a pretty capable desktop OS, and which has a fairly friendly setup process. I run this on an ARM Chromebook and it's solid. Installation requires some reading between the lines because it's intended for the weird world of phones, so you'll probably want to follow the PMBootstrap route.
8 notes
·
View notes
Text
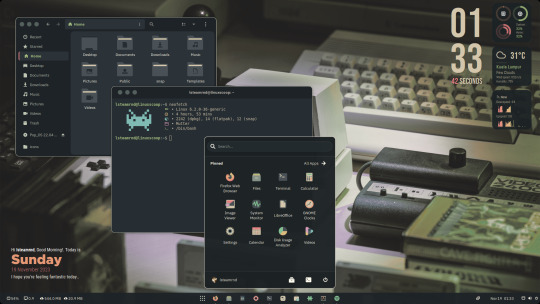
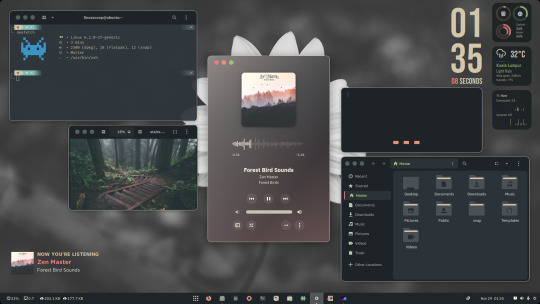
Ubuntu 22.04 Customization - Version 3.0
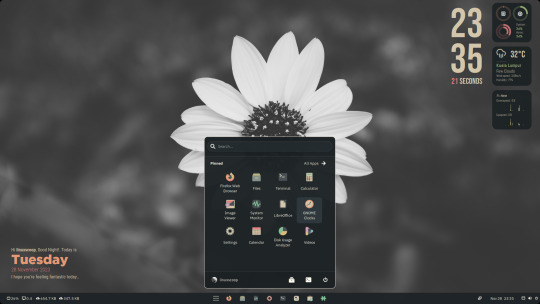
Hey Ubuntu enthusiasts! 🐧✨ Dive into the ultimate customization experience with Ubuntu 22.04 Version 3.0! 🌈 Here's a glimpse of the magic we've woven into our desktop:
🎨 Everforest Color Scheme Magic: Witness seamless application of the Everforest color scheme across themes, icons, and cursors, giving your Ubuntu a fresh and vibrant look!
🖥️ Desktop Layout: Optimized for productivity! A sleek single panel at the bottom with the main menu in the center—effortless navigation at your fingertips!
⌛ Conky Widget Awesomeness: Stay in the loop with real-time updates on clock, CPU, RAM, weather, network, and the current audio or music track, thanks to our Conky widget on the desktop.
🔧 Additional Setups:
🔄 ZSH and Powerlevel10k: Elevate your terminal game!
🌈 Everforest GNOME Terminal: Bringing color harmony to your command line.
🦊 Everforest Firefox Theme: A consistent aesthetic across your browser.
🚀 Flatpak Applications: Streamlined installation for your favorite apps.
📊 Command-line Apps: Enhance your Ubuntu experience with cava, htop, cmatrix, and neofetch.
🎨 Customize Plymouth: Make your boot experience as unique as you are!
📥 Download Resource Files and Documentation:
Resource Files: Download Here for Documentation: Check it out
🎬 Watch the Final Result and Tutorials:
🌟 Final Result Video: See it here
📽️ Tutorial Video: Learn how
🛠️ Additional Setups Video: Get inspired
Customize your Ubuntu 22.04 like never before! 🚀✨ Share your personalized desktops with us using #UbuntuCustom3_0. Let's make Linux uniquely yours! 🌟💻
#Ubuntu 22.04#Linux#GNOME Shell#GNOME#Open Source#Desktop Cutomizations#Linux Desktop Customizations
44 notes
·
View notes
Note
Do you have any tips or guides on how to make gifs?
I do! Firstly, this guide here is probably the best guide I've seen for gif making. It's concise and easy to follow, and it's what I used to learn myself. They have a lot of resources as far as programs go, but I'll list what I use below. As always, never download and install anything from unknown sources without doing your own due diligence. Run everything through your antivirus and/or virustotal before installing always always always!
This is kinda long, so imma put it under the cut lol. Also note that I use windows (Win10), so things may not work the same way for mac or linux
Before you can actually make the gifs, you need a way to download high quality videos! I like jdownloader 2 because I find the interface to be user friendly, it gives you the option to download multiple elements (like srt files), and it works with more websites than lots of other video downloaders (and their user support is leagues better as well). My second choice is yt-dlp, which isn't necessarily more complex but might look a little more intimidating. Both are great programs, but a quick note about jd2: DO NOT download it from anywhere else but the link above. The developers package adware in all their installers EXCEPT for that one (I hate it too, and I think it's fundamentally unethical, but at least they're up front about it and they have an adware free version). Both methods automatically download the highest quality video available in your source link, so you don't have to worry about fiddling with that.
Now on to extracting frames! My method of choice is ffmpeg. It looks more intimidating than it is, and it's honestly the best way to extract frames imo. Like yt-dlp, it uses your computer's command console, which means you'll need the relevant command lines to run it. This tutorial is great to get you started, and it includes a command line for if you only want to extract frames from a specific part of your video. If you want to extract every frame from the entire video, you can either input the start and end times of the video into that command line, or you can use this version (I use both depending on what I'm doing):
ffmpeg -i "file path" "out-%05d.png"
Always make sure you're working with png files. To make quality gifs you have to start with quality images, and png files, unlike jpg, are lightweight and lossless, meaning you won't end up with compression artifacts and fuzziness
To get the file path for your video, select the file, then in the upper left hand corner of your window select home > copy path. It will copy the path in quotes, so replace the entire section "file path" with the path you just copied. Then copy and paste the entire line into your command console. The tutorial above says this as well, but be sure to create a folder for your frames, go into that folder and click the file path bar at the top of the window, then type "cmd" to open the console. This will ensure your files are dumped in that folder
So now you need a way to actually MAKE the gif. This is... a little more tricky. You can use gimp, I think, though it's certainly not my program of choice. You could buy PS but like... ew. OR you could do what I did and arr it. I use a portable version of CS6 that I downloaded literally a decade ago, and unfortunately the website I got it from isn't up anymore. I did a quick search and found this on reddit, but again, do your due diligence before downloading and installing anything!
Now I'll talk a little bit about my actual process. The actual process of making frames into layers into a gif I got from that first tutorial I linked. I took that process and made an action on PS so that I never have to do it manually again because I'm lazy and my memory is dogshit and I didn't want to have to consult a guide every time I wanted to do something lol. Everything else I learned through experimenting and my own experience as a photographer, so I encourage you to play around with everything to see what you like and what works for you
For coloring, I fiddle with levels, brightness/contrast, and color balance adjustment layers until I'm happy with how it looks. You can use curves instead of levels if you want finer control (or if you want to produce effects like matte), but levels works just as well and has a histogram right there in the panel, which makes it easier to adjust the exposure based on the image's actual data
For sharpening, I have a couple of custom actions I use. Here's what they look like:

The first one (bound to the F2 key) gives a smoother appearance, and I like to use it for kpop gifs where the subjects are already airbrushed and smooth without much texture, or wide shots where detail isn't super important
The second one (bound to the F3 key) is the one I use when I want to preserve texture in the image. Closeups of people where you can see their skin texture, or busy images with lots of detail benefit most from this one
The basic gist of it is, the "sharpen" filter does exactly what it says on the tin and it's usually all the sharpening an image needs, and the "surface blur" filter erases or dampens artifacting created by the sharpening filter. Sometimes I'll run the action twice, or use them both in combination to get the effect I want. Here's what the difference looks like in practice, featuring two very cute dudes:
F2 sharpening action


F3 sharpening action


You'll notice in the first two gifs, there's not much in the way of texture to preserve. Yoongi's skin is smooth and airbrushed, and the scenery is all metal and concrete shot with a wide aperture, which makes the background nice and blurry and smooth. In the second set, Jesse has facial hair and stubbly texture on his throat that I wanted to preserve, so I used the action with the lighter surface blur
My advice on all of this though, again, is to play around with it and see what you like! And if you have any more questions, feel free to ask! I'm by no means an expert, but I'll do what I can to help!
edit: oh, a quick note about speed! The tutorial I linked above mentions changing the delay to 0.05, and that's great for full speed gifs! But if you want them slow like my gifs above, I set the delay to 0.08. Sometimes I'll slow them down even more by setting the delay to 0.09 or 0.1, but any higher and you start to lose some of that smoothness
15 notes
·
View notes
Note
Where do I learn how to code and use linux? I want to try it but I don't know anything about coding.
I will do my best to help! The answer to that question is very long if I write it all out here, but a lot of it has been answered by other people, so I'll give you an overview and link you to some resources along the way.
The good thing is that you don't need any programming knowledge to use Linux. If you just want to try out the Linux operating system and see what it's like, I would start by downloading a program like Oracle's VirtualBox: https://www.virtualbox.org/
This will allow you to basically run a second, simulated, computer on your actual computer. From there, you can download a Linux image and install it, run it inside VirtualBox, and get familiar with the operating system. This has the additional benefit that if you do something wonky to your Linux virtual machine (VM for short) by mistake, you can just delete it and recreate it and no harm will be done to your actual computer. For a step-by-step explanation, see: https://ubuntu.com/tutorials/how-to-run-ubuntu-desktop-on-a-virtual-machine-using-virtualbox#1-overview
Short aside: Linux is not a monolithic operating system like Windows or MacOS. Linux, written by a man named Linus Torvalds, is a "kernel" made up of certain very basic computer functions, and the rest of the operating system, things like the graphical user interface (GUI, to nerds like me) doesn't come with it. To be usable by normal people, Linux has to have that functionality filled in by other programmers, which creates something called a distribution, or distro for short. Ubuntu, Debian, RedHat, Linux Mint, and OpenSUSE are all Linux distros. Different distros are designed for different purposes. Ubuntu and Mint are both pretty friendly to normal folks who want to write documents, check their email, etc. RedHat is for large companies. There's a distro called Kali that's for cybersecurity and penetration testing. Etc. etc. etc. There are tons of distros. If you don't know which one to pick, I recommend Ubuntu or Mint, as I have experience with both, and they're fairly easy to use.
From this point out, a search engine will be your best friend. There are lots of helpful tutorials online, and also answers to almost any question you can imagine. If you're unsure where to start, documentation from the website of an official Linux distribution, like Ubuntu, is usually reliable, though it can be kind of opaque if you're not used to reading tech-ese. The tutorials on Ubuntu's site, however, seem to be structured with beginners in mind, and I would run through this one to start with: https://ubuntu.com/tutorials/command-line-for-beginners#1-overview
Once you get to the point of having specific questions about how a command works or how to make the operating system do something, I would take a good look at any answers from StackOverflow, which is basically a website for computer people of all skill levels to ask each other questions ranging from the basic to the ridiculously obscure. If you're wondering it, chances are good someone on StackOverflow has asked it.
Other than that, click around your new VM, create files, find programs, etc. If you really get stuck, I'll try and help, but keep in mind I may very well be searching StackOverflow myself. XD
The other cool thing about VMs is that you can try multiple operating systems, i.e. Linux Mint (https://linuxmint-installation-guide.readthedocs.io/en/latest/) which is pretty user-friendly, as I recall.
Once you get to the point where you actually want to install Linux, you'll want to back up your computer to an external hard drive so you can restore from the backup if something goes wrong, and then follow the instructions for your chosen Linux distro. LibreOffice runs on Linux and can open most Microsoft file types, so you shouldn't need to move your files to a different type, you'll just need to copy them somewhere (like another external hard drive or a thumb drive) and then copy them back when you're done with the installation. Obligatory word of warning: installing Linux on your actual machine, as opposed to a VM, WILL OVERWRITE YOUR ENTIRE HARD DRIVE. Do this with caution. Restoring from a backup is possible, so as long as you backed everything up you will not lose any data, but it can be a pain in the neck and if you're not particularly tech-savvy, you may have to go to a computer repair store to get them to do it.
Now, as to your question about learning to code: this requires no VM and no new installation; you can start doing that today. There are almost infinite tutorials online about how to start coding. CodeCademy.com is a pretty decent one, as I recall, though it's been a long time since I used it. There's also a channel on YouTube called BroCode that puts up free 'how to get started in this programming language' tutorials, which are pretty beginner-friendly. I would recommend that you start with either Python or Java (NOT JavaScript; it's not the same thing as Java, and it's a really annoying programming language, so don't do that to yourself). Python has syntax that is more similar to English than most programming languages and it is pretty powerful, but it may confuse you when you start moving to other programming languages. Java is less immediately comprehensible but probably more representative of programming languages as a whole.
Hope this helps! Feel free to send me follow-up questions or ask for clarification if I lapsed into tech-speak and this doesn't make sense.
2 notes
·
View notes
Text
Hey, Here's something I learned for creating my tumblr bio.
So, in current times, I'm a little apprehensive to say anything too searchable in my bio such as that I'm trans. So I didn't want to use the official emoji. But I wanted the flag there for humans to see. I have very limited knowledge of html and css but I got this to work. I embedded the image data it's self into the html code. Usually images are linked, and the address is stated in the html, but that would require uploading the image somewhere and tumblr linking to it even when my not viewing it within my tumblr themed page.
So here's what I did. First I created a file in photoshop that is 8×5 pixels. I painted it with the colors of the trans flag. As tumblr limits how many characters you can put in your bio, the smaller the image the better. As the flag is the same left to right, I reduced it to 1×5 px. Then I saved it as a gif to the desktop.
I'm sure this is easy to do on a Windows or Linux computer too but on a Mac, open the Terminal app. *See alternative option below. type:
cd desktop
Then type: (include the single space at the end after txt)
base64 -i imagename.gif -o imagename.gif.txt
It'll export a file on the desktop with a code in it that looks something like this:
R0lGODlhAQAFAKIAANUtAP+aVv///9NipKMCYgAAAAAAAAAAACH/C05FVFNDQVBFMi4wAwEAAAAh+QQEAAAAACwAAAAAAQAFAAADBAghQwkAOw==
Add the image into the html with a usual:
<img src="#" alt="text" title="text"
Replace the # with this code and the image data:
data:image/png;base64,
Add the inline css to size and position it.
style="image-rendering: pixelated; height: .8em; width: 1.2em; display: inline; position: relative; top: -.15em;">
The final html code looks like this: (remove the $, its there to let you see the code without it rendering the image)
<$img src="data:image/png;base64,R0lGODlhAQAFAKIAAFvO+tewxfWpuPvd4////wAAAAAAAAAAACH/C05FVFNDQVBFMi4wAwEAAAAh+QQEAAAAACwAAAAAAQAFAAADBAhCAgkAOw==" alt="TF" title="TF" style="image-rendering: pixelated; height: .8em; width: 1.2em; display: inline; position: relative; top: -.15em;">
So that's it. It doesn't work in posts, only a tumblr bio or a webpage of your own. Let me know if it works for you and I'll try to help if you run into trouble.
BTW, tumblr only allows up to 2000 characters including spaces in your bio.
Here are some references and additional information that I used to create this.
References:
https://www.thesitewizard.com/html-tutorial/embed-images-with-data-urls.shtml
https://developer.mozilla.org/en-US/docs/Web/CSS/image-rendering
https://www.macworld.com/article/221277/command-line-navigating-files-folders-mac-terminal.html
https://www.w3schools.com/Css/css_positioning.asp
*this next one is a tool that lets you create the image code without the Terminal app.
https://www.coderstool.com/gif-to-base64
hopefully I didn't miss anything, goodluck!
1 note
·
View note
Text
How To Find a Directory On Linux Based System
17 notes
·
View notes
Text
Setting a GNOME extension to run at the greeter
I recently installed Linux on my old Surface Book, a touchscreen device. I want to be able to use the entire interface with the keyboard unplugged. This means I must use the onscreen keyboard frequently - but the default GNOME OSK (onscreen keyboard) is doo doo trash, and I don't want it. You will need root access for this tutorial.
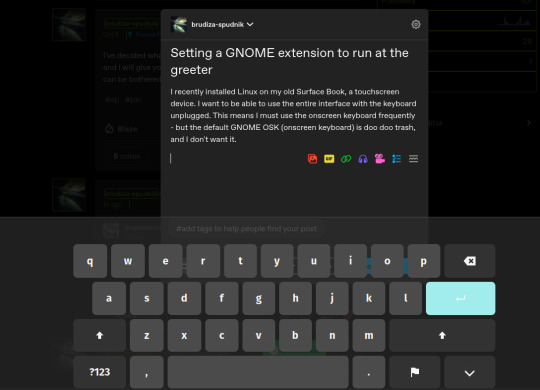
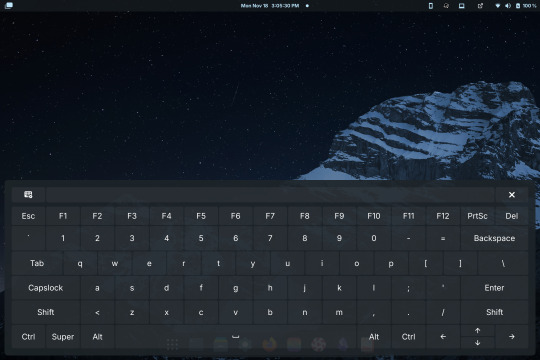
Compare the default GNOME OSK (left) to the new and improved one (right).
This tutorial involves copying a standard GNOME extension into a folder that's readable by any user, then enabling it for use by the GDM user, which governs GNOME's greeter (login screen).
The extension I will be installing using this method is the above keyboard, [email protected] (which can be found via GNOME's extension manager). This is done with the purpose of accessing this significantly improved onscreen keyboard even at the login screen - without this tutorial, the extension does not load until after you have logged in. This method can be done with any extension, although I'm told the GDM user is more restricted than the actual user so some things may not work.
Step 1: Set up the extension in userspace.
Modifying the extension config after it's copied over will be a pain in the ass. Get all your configs ready using the extension's own menus or config files. No rush, as you can still do this bit up until step 5.
Step 2: Move the extension from user-install to system-install.
In order for the GDM user to access the extension it must be in the system-installed folder. For my OS (Zorin) it will be in good company.
sudo mv -r ~/.local/share/gnome-shell/extensions/[email protected] /usr/share/gnome-shell/extensions/
You can also copy it instead of moving it, but you have to rename the user-install folder (in ~/.local) to break it. Otherwise the system would rather use the user-installed one, and will ignore the system-installed one on boot. I think.
Make sure that the gdm user can actually access the files as well:
sudo chmod -R a+rX /usr/share/gnome-shell/extensions/[email protected]
Step 3: Modify the extension metadata file to let it run on the login screen.
sudo nano /usr/share/gnome-shell/extensions/[email protected]/metadata.json
look for the line that says
"session-modes": ["user"],
If the line doesn't exist, just add it. You need it to say
"session-modes": ["user", "gdm", "unlock-dialog"],
Step 4: Enable the extension for the gdm user.
To do this and the following step, you must be able to log in as the gdm user. There are multiple ways to do this, but the way I used is via `machinectl`. If you try to run this command on its own it should tell you what package you need to install to actually use it. I do not know the ramifications of installing this, nor do I know its compatibility; all I can say is it worked for me. If you are uncertain you will have to carve your own path here.
Once it is installed, log into the gdm user from a terminal:
machinectl shell gdm@ /bin/bash
and enter your sudo password.
At this point I recommend checking the current list of enabled extensions:
gsettings get org.gnome.shell enabled-extensions
On my computer, this came back saying "@as []", which means it's blank. To enable your desired extension:
gsettings set org.gnome.shell enabled-extensions "['[email protected]', 'if the above command did NOT come back blank just put the rest in here.']"
Step 5: Transfer the settings from the userspace install to the system install.
Right now, the extension should be working on the login screen. To make sure, press ctrl + alt + delete to log out, or restart your computer. You will notice that while the extension is functioning, none of your settings saved. To fix this you must use dconf to dump and then reimport the settings. Get back to a regular user terminal and run:
dconf dump /org/gnome/shell/extensions/[email protected]/ > extension.ini
Now you have your settings in a nice neat file. The gdm user can't access this though since it's in your user folder. My quick and dirty solution:
sudo mv ~/extension.ini /extension.ini sudo chmod 777 /extension.ini
If you want it in a better place than the system root folder you can put it there. I don't really care.
Now you log into the GDM user and import the settings file there.
machinectl shell gdm@ /bin/bash dconf load /org/gnome/shell/extensions/[email protected]/ < /extension.ini
Now log out of the gdm user and clean up after yourself.
sudo rm /extension.ini
Now restart or log out and you will see that your extension is now functioning with all its settings.
Huge thank you to Pratap on the GNOME Discourse site. This post is basically just a tutorialized adaptation of the thread I followed to do this.
3 notes
·
View notes
Text
Alright, Long Rant Incoming:
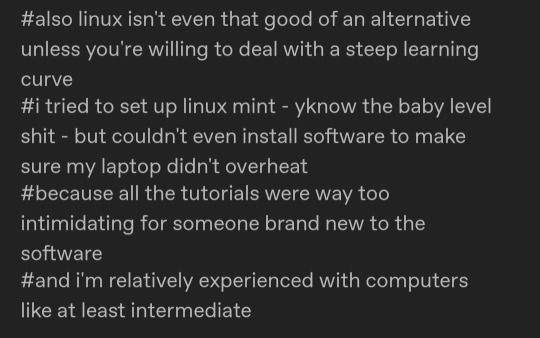
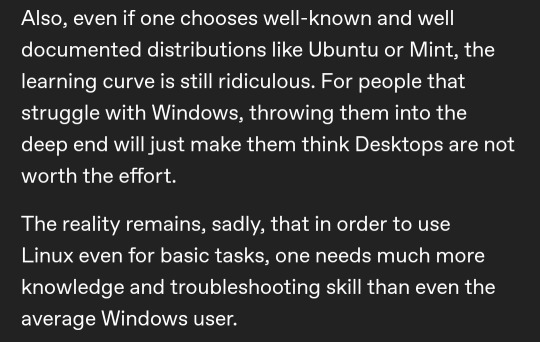


there is NOTHING about Linux that is inherently (inherently) harder to learn than Windows.
this is part of the problem!!
Windows also has a command line. Windows also uses and depends on the BIOS. Windows is also a pain to install if it wasn't already on your machine. Windows is also crammed full of confusing and hard to understand subsystems!
(and for that last point, at least Linux's confusing subsystems are well-designed. most Windows users would never survive contact with the Windows registry...)
as someone who regularly uses both Windows and all sorts of Linux distros, I (at least personally) don't see any real difference in complexity. so if that's not the problem, then what is?
well, there's a few different causes of this:
Windows is the primary branch of an extremely powerful oligopoly, and so the vast majority of tech resources are based around it. every non-Apple computer you buy is going to have an OEM copy of Windows on it. every computer science class you attend will use Windows. most online tutorials assume you're using Windows. (This isn't even touching on software support, which is a related but different issue.)
computer literacy classes don't teach how to use text-based interfaces. this is a problem! just because microsoft doesn't want you to acknowledge the existence of the command prompt doesn't mean it isn't a key feature, and this is, in fact, a major source of Windows's design problems. (even Microsoft themselves seem to have realized this when they added a truly abysmal text-based package manager in Windows 10.)
the average contemporary consumer of tech hasn't been taught how to expect more from their machines than what they advertise on the surface level. this isn't to deride or shame those consumers; the blame lies with the corporations that are designing the interfaces they use. the tools I mentioned above do exist on Windows, but only out of obligation - if they could get away with it, Microsoft would happily lock those features entirely out of the hands of end users, just as mobile phone OSes have done for more than a decade. Linux, on the other hand, has no reason to hide its capabilities, and so it fully exposes them in a way that is jarring to those unaccustomed to it. the solution is, as always, more education.
Microsoft and Windows are just as guilty of causing the modern stagnation of tech literacy as Google and Apple. if there is ever a future where people can truly trust the tech that supports their lives, it will be using software that is free and open.
We need to lay more blame for "Kids don't know how computers work" at the feet of the people responsible: Google.
Google set out about a decade ago to push their (relatively unpopular) chromebooks by supplying them below-cost to schools for students, explicitly marketing them as being easy to restrict to certain activities, and in the offing, kids have now grown up in walled gardens, on glorified tablets that are designed to monetize and restrict every movement to maximize profit for one of the biggest companies in the world.
Tech literacy didn't mysteriously vanish, it was fucking murdered for profit.
78K notes
·
View notes
Link
Mastering grep in Linux – From Basics to Advanced The grep command is one of the most powerful and widely used text search tools in the Linux command line. Whether you're a system administrator, developer, data analyst, or Linux enthusiast, learning how to use grep effectively can save you hours of manual searching through log files, codebases, and configuration files. This comprehensive tutorial covers everything from basic usage to advanced regular expressions, recursive searches, and context filtering – making it perfect for all skill levels. 1. Setting Up the Environment for grep To follow along, we’ll first set up a simple environment using sample directories and files that simulate common use cases such as log analysis and text extraction. 2. Basic grep Usage in Linux Learn how to search for exact string matches in individual files using grep "pattern" filename. We’ll also cover essential options like -i for case-insensitive search and -n to show line numbers in search results. 3. Recursive grep Search in Directories Use the -r or --recursive flag to search for text patterns across all files and subdirectories. Learn how to filter specific file types using --include and --exclude patterns. 4. grep and Regular Expressions Discover how to use basic and extended regular expressions with grep. We'll demonstrate powerful pattern matching using -E (or egrep) to search for complex patterns and alternatives such as "Error|Warning". 5. Show Context with grep (-A, -B, -C) Display lines before and after your matched pattern using -A (after), -B (before), and -C (context). This is especially useful when inspecting logs or debugging issues in source code. 6. Count Matches, Invert Matches, Match Whole Words Get total matches with -c, exclude matches with -v, and match entire words using -w. These options are essential for fine-tuning your search results in large datasets. 7. Colored grep Output and Highlighting Enable colored output with --color=auto or --color=always to visually highlight matching text in terminal output, improving readability during analysis or live debugging. 8. Using grep with Pipes and Output Redirection Combine grep with other Unix commands such as cat, dmesg, and ps using pipes (|). Redirect search results to a file using > and >> for saving or sharing filtered data. Conclusion: Why grep is a Must-Know Linux Tool By mastering the grep command, you gain the ability to quickly search and analyze text files, configuration files, and logs. This skill is essential for troubleshooting, scripting, automation, and daily command-line efficiency in any Linux environment. Start practicing now to unlock the full power of pattern matching with grep! Subscribe to Our YouTube for More Download as PDF
0 notes
Text
Docker Tutorial for Beginners: Learn Docker Step by Step
What is Docker?
Docker is an open-source platform that enables developers to automate the deployment of applications inside lightweight, portable containers. These containers include everything the application needs to run—code, runtime, system tools, libraries, and settings—so that it can work reliably in any environment.
Before Docker, developers faced the age-old problem: “It works on my machine!” Docker solves this by providing a consistent runtime environment across development, testing, and production.
Why Learn Docker?
Docker is used by organizations of all sizes to simplify software delivery and improve scalability. As more companies shift to microservices, cloud computing, and DevOps practices, Docker has become a must-have skill. Learning Docker helps you:
Package applications quickly and consistently
Deploy apps across different environments with confidence
Reduce system conflicts and configuration issues
Improve collaboration between development and operations teams
Work more effectively with modern cloud platforms like AWS, Azure, and GCP
Who Is This Docker Tutorial For?
This Docker tutorial is designed for absolute beginners. Whether you're a developer, system administrator, QA engineer, or DevOps enthusiast, you’ll find step-by-step instructions to help you:
Understand the basics of Docker
Install Docker on your machine
Create and manage Docker containers
Build custom Docker images
Use Docker commands and best practices
No prior knowledge of containers is required, but basic familiarity with the command line and a programming language (like Python, Java, or Node.js) will be helpful.
What You Will Learn: Step-by-Step Breakdown
1. Introduction to Docker
We start with the fundamentals. You’ll learn:
What Docker is and why it’s useful
The difference between containers and virtual machines
Key Docker components: Docker Engine, Docker Hub, Dockerfile, Docker Compose
2. Installing Docker
Next, we guide you through installing Docker on:
Windows
macOS
Linux
You’ll set up Docker Desktop or Docker CLI and run your first container using the hello-world image.
3. Working with Docker Images and Containers
You’ll explore:
How to pull images from Docker Hub
How to run containers using docker run
Inspecting containers with docker ps, docker inspect, and docker logs
Stopping and removing containers
4. Building Custom Docker Images
You’ll learn how to:
Write a Dockerfile
Use docker build to create a custom image
Add dependencies and environment variables
Optimize Docker images for performance
5. Docker Volumes and Networking
Understand how to:
Use volumes to persist data outside containers
Create custom networks for container communication
Link multiple containers (e.g., a Node.js app with a MongoDB container)
6. Docker Compose (Bonus Section)
Docker Compose lets you define multi-container applications. You’ll learn how to:
Write a docker-compose.yml file
Start multiple services with a single command
Manage application stacks easily
Real-World Examples Included
Throughout the tutorial, we use real-world examples to reinforce each concept. You’ll deploy a simple web application using Docker, connect it to a database, and scale services with Docker Compose.
Example Projects:
Dockerizing a static HTML website
Creating a REST API with Node.js and Express inside a container
Running a MySQL or MongoDB database container
Building a full-stack web app with Docker Compose
Best Practices and Tips
As you progress, you’ll also learn:
Naming conventions for containers and images
How to clean up unused images and containers
Tagging and pushing images to Docker Hub
Security basics when using Docker in production
What’s Next After This Tutorial?
After completing this Docker tutorial, you’ll be well-equipped to:
Use Docker in personal or professional projects
Learn Kubernetes and container orchestration
Apply Docker in CI/CD pipelines
Deploy containers to cloud platforms
Conclusion
Docker is an essential tool in the modern developer's toolbox. By learning Docker step by step in this beginner-friendly tutorial, you’ll gain the skills and confidence to build, deploy, and manage applications efficiently and consistently across different environments.
Whether you’re building simple web apps or complex microservices, Docker provides the flexibility, speed, and scalability needed for success. So dive in, follow along with the hands-on examples, and start your journey to mastering containerization with Docker tpoint-tech!
0 notes
Text
How to Enable HTTP/2 on WHM/cPanel Using EasyApache 4 🚀
Want faster site speed, better efficiency, and modern web performance? HTTP/2 is the upgrade you need. We’ve written a detailed step-by-step guide to help you enable HTTP/2 on your WHM/cPanel server using EasyApache 4 or via the command line.
💡 Boost performance 🔧 Reduce latency 📈 Improve resource handling
Read the full guide now → What is HTTP/2 and How to Enable It on WHM/cPanel Server | EasyApache 4 Guide
🔗 Powered by ServerMO — Experts in Dedicated Servers & DDoS Protection. #http2 #webhosting #cpanel #apache #serveradmin #linux #dedicatedserver #servermo #tutorial
0 notes