#which they are. if i see multiple of someones post in the recommended tab they are a big account
Text
tumblrs recommended posts algorithm is so bad
#like genuinely the for you tab is awful. havent looked at it much but what i can gather is that 1. you will repeatedly see the same posts#frm ppl you follow on there. 2. repeatedly show the same posts by ppl you dont follow. refreshing gives you basically the same thing as what#was already there and it remains the same for days. days of being shown the same post multiple times. actually to go back to the first point#if you interact with a post frm someone you follow it will not reappear on the for you page. only the posts that you saw and decided you#will not like or rb it appear multiple times.#also i am pretty sure it interprets you clickling on the ball menu so you can press not interested in this post as you interacting with the#post. its an endless loop of being rerecommended stuff you dont want to see. blocking ppl works better cuz at least it wont repeatedly show#posts by that specific op. but tumblr im pretty sure also interprets you going on the blog/clicking the ball menu to block them as#interacting with the post. which again means itll recommend more posts like thar#like its just.....so bad its crazy they thought it would be better for new users
2 notes
·
View notes
Text
How I draft long plots
(I was once asked about this topic, and I thought I'd write an actual post about it. I don't know if the person who asked is around anymore, but I decided to post this just in case it might be useful for someone else. 🧡)
***
So, this is just a tiny little understatement, but I have a tendency to write REALLY long stories, and over time I’ve just kind of gravitated towards organizing my writing in a very specific way, and I thought I'd illustrate that process a little bit here (with pictures!).
I really hope that there's at least something useful here for someone! I do want to emphasize that everyone’s writing style/process is unique, and there are no right or wrong answers. In the end, it's best just to try various different things and then pick & mix whichever of them work for you! 😊💛
(I have no idea if anyone ends up reading any of this, but if you do I’d love to hear your thoughts and I’d be happy to answer any questions as well! 🌻)
Note: I originally posted this on my personal blog here, feel free to read or comment wherever you prefer! 🤗
1. Lightweight program for writing
I know a lot of people use google docs to write fanfics, but I personally never use it for any fictional writing (only when necessary for work or other official files). I really just do not vibe with gdocs on any physical, spiritual or virtual level... 😅
Instead I’ve written all of my fics using a very old program called Rough Draft*. The best part about using this type of simple & lightweight software is that I can always have many MANY long text files open in multiple tabs within the program without having any issues with lagging or loading at all. This makes all the different chapters easily accessible and it’s super quick to switch between them (seriously ZERO loading times).
This feature is absolutely necessary for me, since I write SUPER long chapters, and if I’m writing chapter 4 for example, I will always have at least chapters 3 & 5 open at the same time (+ usually many more chapters, or other fics I'm working on). The previous chapter is open so that I can look up specific parts that I might need to reference from it, and to check any details that I might’ve forgotten. The next chapters are usually open, because I often edit/cut parts from the current chapter and move them into future chapters that are still in progress.
Another feature that I use all the time is the "Notepad" tab, which automatically saves as a separate text file. It makes editing feel a lot less stressful, when I can just freely dump every single bit of deleted writing in the little notepad box, knowing that I could still easily dig them up later if I need to.
In this screenshot, you can see the "Pad" tab (a separate file of its own), where I've cut & pasted all the sentences I deleted from that chapter (ahah there's A LOT...).

(*unfortunately Rough Draft is very old & buggy at this point, so I do recommend finding a newer similar program to use instead. Also, I still have to use html-coding with it as well…)
2. Chapter index
I usually spend A LOT of time making sure the main plot is as easy to follow as possible (without sacrificing any suspension or complexity), because I personally feel like having a clear narrative flow improves reading immersion significantly.
Many of my stories have at least 10+ chapters and to keep track of them all (especially in a way that helps to organize the story into a coherent narrative) I usually make a separate chapter index file for each story I'm writing. That file basically serves as both a plot/chapter overview, and a central place to gather all the various potentially relevant info for the story.
Since I write Multi POV stories, 90% of the time I divide the chapters into different character sections, which honestly helps me to better understand the story as a whole as well. Under the titles or character names I write down basically anything that could be useful for that particular part (snippets of dialogue, research notes, new ideas, possible story changes, references/relations to other characters or events etc).
I decided to use an AtLA fic as an example here, since the notes for that fic look a lot more organized and less spoilery than for most of the other fics. The first pic below is a screenshot of the chapter index file for The Spirit Stone, showing a few chapters that I’ve already posted on ao3.
.....And if all of this looks like I'm making an unnecessary amount of lists, that's because that's exactly what I'm doing lol. 😂 I just genuinely like making neat lists of things! 🧡 I always make sure to also colour-code the different character POVs to make them appear more distinct from each other – and more importantly so that the list is nicer for me to look at heheh :3 (which is obviously very crucial).
(*Sokka got assigned a lovely lilac, bc Katara already had blue and Sokka didn’t have any other canon colour associations 😅)

Sometimes if I feel like the scene could be more interesting/relevant from a different perspective than I had originally planned, or if it seems like one character POV is becoming too dominant or repeats too many times, I go through these lists and try to figure out in which way I could change or move around the POVs without interrupting the pacing/narrative flow of the main story.
Here’s also an overview of another fic I’m writing (first half of Residually), in which I use the exact same style again for breaking down the different POVs. Like in above pic, I didn’t include any actual chapter notes here either, since they were super spoilery. (The plot & flashbacks in this fic are crazy intertwined, which I suppose is fitting for a story about an omniscient network of fungi lol :3)

3. Chapter notes
Above screenshots are overviews of multiple chapters, however, like I mentioned I removed the random chapter notes to make the example pictures look cleaner & less spoilery. While the writing is still in process, those individual chapter & POV headings are actually FULL of various notes & scribblings. And usually they look pretty messy too, since I just throw any potentially useful thoughts/ideas/research tidbits into those notes.
Things that I generally add to the chapter notes:
- first a list of potential POVs to figure out which characters should be prominent/are central to this chapter
- under the POV headings, the main gist of what a character does or should do at this point in the story
- some key conversation snippets/dialogue
- important plots points that I need to keep in mind
- research info that I want to include in the chapter/is relevant later
- connections/references to some other part of the story
- reminders of which POVs/sections are still unclear or need more work/edits
- possible changes to the chapter/overall plot (if they're crucial changes they'll be accompanied by !!!!! and a red highlighter lol)
Below is a screenshot of (Spirit Stone) chapter 5 notes while it was still a work in progress (from early stages, I added more notes later).

Also here’s a screenshot of chapter notes for one of the newer fics that I’ve been writing (for Taxi Driver/모범택시, not sure if I’ll ever post it publicly though). I’ve obscured most of the actual text, but this is just to demonstrate that I use this same method all the time, and I write down A LOT of notes in this way, especially in the early stages when planning out a new story.

4. Major story arcs
I don’t use this kind of index very often, but occasionally I also do lists with notes like this about major story arcs spread over multiple chapters (the below pic is also of Spirit Stone). Sometimes this kind of list can be helpful to write down, or at least think about, if you're worried about dealing with many complex topics that might make you lose sight of the bigger overarching story. It’s enough to write just a few simple sentences about the main plot points/themes that you want to deal with in those specific chapters (but ofc they don’t need to be set in stone, the story can still change drastically even when half-way finished).
I don't usually use this during the first stage of drafting plots, to me this kind of list is mostly there as clarification or reminder about the overall structure/themes/goals of the story.

5. Writing the chapters
(caution: worst method ever, not recommended 🚫)
So, usually the way I write the actual POV parts of the chapters is basically just writing an overlong rambly block of text (just a SHIT TON of text), with conversations & scenes often in non-linear order, and then painstakingly editing & arranging all of that into something more coherent and smoother to read (this is why it takes me absolutely fucken' forever to edit my stories, WAY longer than the writing itself ahah...). Tbh this process kind of feels like dragging in a big-ass log of wood, and then (like a dumbass) trying to whittle an elaborate sculpture out of it with a flimsy little pocket knife lol. :'))
Is this method a smart way to write? Nope, absolutely not.
Is it incredibly ridiculously time-consuming? Oh yes, absolutely.
Does it for some frustrating reason work for me? Yeah, unfortunately it does...
Do I recommend it? Nope, never, please save yourself and be smarter than me. 🙃
▫▫▫
Regardless of fandom or whether I’m writing original stories, my basic approach is the same. But like I mentioned before, organizing the chapters in this way was mostly born out of the fact that I usually write Multi POV stories with various alternating characters. Although, I’m sure you could definitely do this kind of categorizing with a single POV character too, if that’s more your kind of thing! :)
Just to reiterate, there are no right or wrong answers or methods. It's always good to try out different things and then eventually you'll find a process that works for you specifically! 😊🧡
2 notes
·
View notes
Note
I need to know your process of drawing, sir lancelot sword. I'm having trouble with it myself for my own version of him. I saw the commission of lancelot cleaning his sword. I haven't seen someone draw the blade that good
Hi! I appreciate the ask, but I don't think that I'm the right person for this question of yours, as intriguing as it is, since I commissioned another artist who made that specific artwork.
However, I can try and give you my thought and opinions as how I would proceed. And the answers would be: "searching for references" and "to study".
Depending on how close to the source material you're going for, the best way is to simply find a lot of images of the sword, so that you can look at the details, get a good enough look of what the details look like, how they are done and practice drawing it yourself.

This of course requires a lot of patience and practice, since you will have to redo this over and over again until you feel satisfied.
If you're going to draw the sword from an angle, I recommend looking up references and poses for that as well, since all the details will be angled, and occationaly can make it difficult with the details where to place them and how to draw them.
-
I commissioned that drawing from @silvermun since they are an incredible SatBK artist, and I've seen their work and the detailing they do when drawing the knights. Which is why I would also recommend to check out their other artwork.
They have put immense amount of time, and studied the details in order to draw those said details, be it for the sacred swords or the details on the armour to get as close to the official design as possible.
Here's just to share an old post they've done a few years ago, where they shared their notes of the details for how they draw the character, the details and markings for not only Lancelot's armour but even the sword, Arondight. As you can see, they did mention that they used multiple references in order to figure out the details.
As for myself, my process is always to figure out depending on what I'm drawing (an action scene, something serene, a battle .etc.) how the drawing looks like, I like to build up the image by sketching it out from different angles, different viewpoints, that way I can figure out what goes where, what angles am I dealing with and so on.
As for drawing the sword itself, I always build things up by using "shapes", the shapes help me figure out if the image looks good, do I need to adjust things or if the perspective looks right. After that I slowly start to draw out the sword bit by bit, and adjust the details along the way until it looks close to how I wanted the artwork to look like.
-
This is really the best that I can do answer to your question.
I myself always keep tabs open or have a bunch of images turned into a huge collage, so that I can look up at details or guidance for whatever it is that I'm drawing. It's the best way to keep yourself on track, not to mention that the more you draw something you will eventually learn to figure out how it works, in order to make it fit for what you're doing, be it perspective, turn arounds or something else.
I hope this was somewhat helpful to you, and good luck with your work in progress.
3 notes
·
View notes
Note
Hello! this is a 2 part ask but, I'm sending it all in one to avoid cluttering up your inbox!!
Back in February or so you received an about your lighting setup for taking photo shoots and you linked all the stuff you use for them (thank you!), but… could we see how you have the lights arranged and such? It's something I've been trying to emulate because I find the lighting in your posts really nice, but can´r quite wrap my head around.
The 2nd part of the ask is a WCIF (sorry!) for the boxers and briefs in these 2 posts (/deathbypufferfish/718514235415691264 and /deathbypufferfish/718527232399884288/outtakes-since-yall-absolutely-lost-your-mind-for)
So sorry for sending such a long ask, and I hope you're having a great day or night! 💗
Yeah someone actually inquired about my set-up but I kept putting it off and then felt awkward doing it so late 😭 I'll answer the wcif in a separate post heheh. This is the post with my light and backdrop cc. The ceiling light is from Get Famous.
I have a build save that I use for photoshoots so I don't have to worry about clones walking around. It's just a basic room with my lighting set-up plus a space to teleport sims out of the way. I recommend turning off sim autonomy in this save too. I just evict sims when I'm done with their shoot.
Use different lights for different intensity, shapes of the light source, softness/harshness, and direction of light. If you experiment with different lights in build mode you'll see what I mean.

This is my general lighting set-up, but I am always adjusting the lights' color and brightness for what I need. Or turning some off. It depends on the mood I am going for and the sims complexion. (Since pale sims get blown up with my gshade on a white backdrop lol.) If I want a light from the left I will only have the front light and left one one for example. Mess around with the position of your angled lights!
Save your camera state so you can replicate the same shot for other sims or if you need to redo part of your set-up. Simply find your shot, hold down Ctrl and select a number key between 5-9. When you want to snap to your position, enter tab mode and press the number you set. You can set multiple camera states with different numbers. To clear the camera state, use Alt+ [5-9], or override it by repeating the original step.
Keep Teleport Sims statues on hand so you can drag them to the position of your sim if you need to switch out subjects and get the same position. Also to teleport sims away from your set-up.
For dynamic lighting like I do a dark backdrop with lights on the right and left of the sim at an angle. The colors I use the most are magenta for the focus area and blue for the shadows/contrast. It depends on the mood or sims complexion.
If you want a light source from below, use a table or outdoor light at their feet and turn off some/all lights.
Using the backdrop with different colors can affect the hue and brightness of your screenshot so be careful with that. If you need to key out the background, choose a color not present on your sim. You don't need to just use green. Mxao will also add a seam at the backdrops curve which can be edited out later.
18 notes
·
View notes
Note
Hey i was wondering where do you write all your drafts? I wanted to start getting into writing but someone told me Google docs isn’t the best so I’m a little lost. Love all your work btw 🥺
Hello!
I use scrivener and Notion to help me write, as explained on my previous post here. but I write my drafts mainly on scrivener, which is a writing program that is available offline yet is capable of being saved in an online cloud (I save my backup in dropbox with autosave and save some copies in my google drive for extra measures)
I used to write my drafts on Google docs in the past. It's actually a really good place to save up your draft, only that there have been issues in the past that made me reluctant in doing it again. I'm guessing I'm not the only one having these problems though, seeing that many others have switched from Google docs to other available options.
The thing about writing in Google docs is that the web features aren't going to make it easy for you in terms of organizing your drafts. Unlike Scrivener which allows you to save multiple drafts and create separate folders in one file, you won't be able to do the same in Docs. Your drafts remain separate and you can only combine them in folders which is (as of now) only accessible through Google drive. Opening different drafts mean opening them in separate tabs so it can be a hassle if you're working on chaptered series.
and there are also risks of losing your progress on Docs. This was what led me to ditching the web and started to move everything into Scrivener, after losing some written progress for my series in the past (including Chance Encounter). Google docs' autosave often takes you back to your previous progress when it's lagging, deleting whatever progress you've made while in between, and I think I've lost an entire written draft from the folder once when an error occurred or because the web claimed the storage was full (my google drive was, in fact, not full)
Scrivener is a paid program though, which means you'll need to buy it. So if you're looking for other options that are free or more affordable, you can check out Evernote (highly recommended. this was the program that I used back in the day before I found Scrivener. you can even sync your progress to your mobile app to write everywhere you go) or Freedom. Both are free but with paid and pro versions if you want an upgrade.
0 notes
Text

You
#HOW did they even find that post#(it was one where i mentioned they blocked me)#suspicious but im happy being unable to interact <3#although i spose they unblocked me now?#maybe i just couldn't interact with them for some other reason?#oh well?#anyways#this scared me to death i had just woken up#(also apparently they're insulted i called them a popular blog? maybe insulted isn't the right word but i did not mean that as a bad thing#i literally meant it as a i see their posts all the time and i can't interact thing??)#(adding this incase they somehow find this post too lmao)#(also mullets aren't short hair (: thats what i would be judging them about (:)#im sexy for being vagued by big accounts though hehe <3#which they are. if i see multiple of someones post in the recommended tab they are a big account#okay okay sorry about how long these tags are im just weirded out by them responding and taking offense to what i said in the tags#OH okay okay sorry i just realized why they assumed i dislike dean and dean stans from those tags#(i must infer they only saw that post?)#its because i said it was cringe that they weren't a cas account lmao#btw i don't actually hate dean stans ily guys i just don't really like dean personally <3#okay but im actually done now hsjdgdj i need to study for one of my finals#mine#okay im adding more im so sorry#but i said it was cringe that they weren't a cas blog in the tags because i had called them a cas blog in the main post#i figured i didn't just randomly call non cas blogs cringe i knew it was a joke lmao#im not even a cas blog lmao#okay im hopefully actually done now. if i had literally anyone to text about this i would but because i don't it gets to be a post <3#rip to not being able to talk to people online i could have used you rn 💔#although i would have needed to already have befriended them#i couldn't start a conversation like 'okay so a while back i made a post about.....'#well i could but that would be weird
1 note
·
View note
Text
Last Monday of the Week 2022-08-22
Plans progressing at whatever the opposite of apace is. I got no idea when any of this is going to pan out but it sure is happening.
Listening: Double entry here, 1) I've been using the Tohou music as my work soundtrack this week, so here's "A Midsummer Fairy's Dream"
youtube
In addition, I was reading some TTRPG posts and someone posited that if you're designing Goblins your sole criteria is "would they fit into this "The Chats" music video" which. Yeah you're not wrong.
youtube
I've had this stuck in my head for four days. Thanks.
Reading: Started on The Diamond Age because I've been picking up books and putting them down for like two weeks now and I needed a reliable deluge of concept. I was talking books with the friend who got me into Stephenson in the first place and we each got to tell each other about how some Stephenson book is a secret sequel to another book, the man has a problem.
Also rereading large chunks of my favourite KSP Letsplay, "Long Term Laythe." The original author migrated to a new hosting service finally so he's back online, it's a pretty long series that spans multiple real world and in game years of running a research base out in the gas giant of the game system, if I had to recommend one chapter as an introduction it'd be Chapter 12, in which a research plane is stranded on a remote island and a rescue is launched that employs hardware that's been sitting in orbit for years. Very notably this is all from old KSP before science got added so all of this is pure role-play.
Watching: Finally got around to watching The Matrix: Revolutions a few weeks after I did the other two. I still like all the Matrix movies! Well, I haven't seen the new one yet, but we'll see soon.
Making: Cooking adventures making some kind of cheesy mushroom thing out of leftover ingredients, and Shakshouka. Both turned out really well so they're now part of the repertoire.
Made some more progress on the Penrose Quilt and got the overall plan printed out so that we can keep track of what we're doing.
Playing: Board games day with The High School Friends. Wingspan, the bird-themed engine builder. Way more fun than I expected, and not nearly as confusing as it sounds. I kind of assumed such a cool looking game would have structural issues. I didn't build much of an engine per-se but I did set up some good multi-turn mechanisms.
Also a long, long game of Mansions of Madness which we did not win but which was extremely fun, Mansions is more of a physical CRPG than a board game but it uses the power of a computer assistant very effectively to make a game with lots of reliable threads to pull on that ramps up the complexity and keeps a lot of hidden clocks going in the background.
Tools and Equipment: Shout out to the bootlin kernel documentation. It's basically just running cscope against the kernel source code but online and that's exactly what you need sometimes. The ability to spin off dozens of tabs for every little identifier is extremely valuable when you're hunting for tiny little discrepancies.
10 notes
·
View notes
Photo


Lee says:
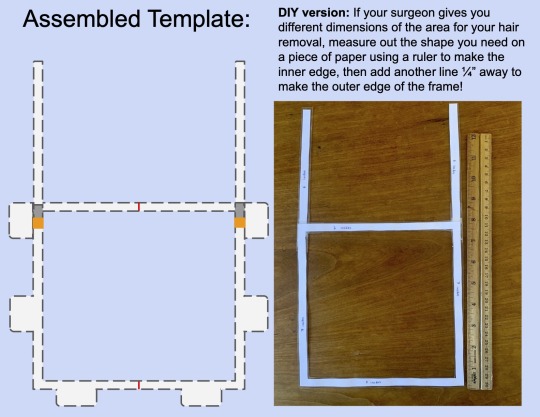
I made a little template showing an example of where to get hair removal for ALT phalloplasty.
The first image is from NYU Langone and it was included to show what my template is trying to mimic, but I’d like to clarify that the template is my own design and it is not made by the NYU.
I include a link to download my template here, and there are two sets of instructions so you can either make multiple recyclable templates or make a single reusable template.
Disposable templates:
Use disposable templates if you want to tape the actual template to your leg during electrolysis sessions. That way you can throw out the template afterward which helps with sterility.
Doesn’t stain your pants like putting on eyeliner on before going to appointment
Don’t have to own eyeliner if it makes you dysphoric to carry
Doesn’t smudge during session
Don’t have to buy laminator if you don’t already have one
Reusable templates:
Use a single reusable template if you don’t want to tape the template to your leg during electrolysis. That way you can use the template as a guide to trace the template on your leg with eyeliner at the appointment.
More comfortable than taping on template
Better for environment than printing a bunch of papers
Less time-intensive because you only need to make one
I didn’t include pictures showing each of the steps involved in making either version, but I think the instructions should be pretty self-explanatory.
Note: You should talk to your surgeon about what dimensions you should use to remove hair and then use this template as inspiration for making your own. Do not use my template as your instructions for where you should be doing hair removal without talking to your surgeon.
You will need hair removal on your donor site before phalloplasty if hair grows there, otherwise you will have hair in your urethra and on your penis.
Hair removal will likely take at least a year or even longer, but don’t get discouraged about how long hair removal is taking because it’s important to be thorough.
You can get numbing cream prescribed by your doctor to make the hair removal less painful. You can see a picture of the numbing cream I got for my electrolysis sessions here. This is often cheaper than getting over-the-counter numbing cream if your insurance will cover the cost.
Some people won’t need it, but it’s usually good to get the prescription and not use it instead of not having the option at all. But you can’t put on the numbing cream during the electrolysis/laser session if you change your mind- it needs to be applied at least 1 hour before.
You sometimes are told to stop hair removal 3-4 weeks before you get surgery to give the skin some time to heal, so include that buffer time in your mental phallo prep.
If you’re going to get a UL, it’s often medically necessary to get hair removal on the area where you’re going to have the UL graft taken from. It isn’t medically necessary to get hair removed from the donor site that will be become the outside of your penis, but people usually do get that hair removed for aesthetic reasons.
You can do some hair removal on the shaft post-op for aesthetic reasons if you find a technician comfortable dealing with genitals, but you should do the majority of hair removal pre-op since you sometimes can’t do electrolysis once you have your implants placed.
People using a different donor site like RFF, MLD, or abdominal phalloplasty will likely be using different dimensions than the ones for ALT even if they see the same surgical team as I am.
If they are doing ALT but with a different team, that might impact things too because different surgeons have different techniques and take the donor site from different spots so they may want it closer or farther from the knee.
Even if someone does use the same donor site (ALT) and the same team (NYU) as me, my template still might not apply to them precisely because different people have different size legs and different goals in terms of what penis size they want so they may need to remove more or less hair, even if they're seeing the same surgical team for the same surgery.
So I hope I have made it clear that I'm sharing this template with y'all as an example! This is my hair removal template so it isn't a template that you should unquestioningly print and use (unless you ask and your surgeon tells you that you can).
The Patients’ Guide to Pre-Operative Hair Removal for Phalloplasty has a lot of general info on hair removal, and I would recommend reading that if you don’t know what electrolysis is or how the process of hair removal works, and this page has more general info on bottom surgery.
You can download my template here if you want to print it. Don’t save the picture in this post and then print it because I don’t know if it’s scaled correctly as a jpg; this Google slides link should allow you to download the template as a PDF and print it as the correct size.
#Lee says#alt phalloplasty#alt phallo#phalloplasty#phallo#alt#Anterolateral Thigh Phalloplasty#bottom surgery#lower surgery#genital m#penis m#trans#transgender#nonbinary#lgbtq#lgbt#transgender teen survival guide#transgenderteensurvivalguide#TTSG
147 notes
·
View notes
Text
Post-trip round-up, integration, thoughts (cut for length & some Heavy Shit)
WOW I needed that and I am so glad I realized I needed that. It has been well over ten years since I last took LSD, and my reluctance to indulge in psychedelics again was rooted in a long and complicated history that I don't really need to hash out here, but doing a mild dose of mushrooms last weekend gave me the confidence and conviction that I was ready.
Would it have been wiser to take a less bonkers dose for the first time in a decade plus? Probably! Do I regret a single moment of it? Not a whit! It's tough to overstate just how powerful, therapeutic, and restorative a good acid trip is, even an occasionally intense, uncomfortable one. I do not recommend eating multiple tabs of extremely good blotter on your first rodeo, but Adam's even more of a veteran psychonaut than I am, so I was 1000% well cared for, totally safe, and in a comfortable, familiar environment. In that setting, and in a positive frame of mind, acid is not going to throw anything at you that you are not equipped to handle. I would love to make this an annual or biannual thing.
The cool, funny, wacky delightful stuff:
Put it under my tongue at 10 AM-ish. Went to go listen to some music and doodle until it kicked in. I forgot that the come-up is like, do not make any fucking plans involving hand-eye coordination LMAO. I was trying to doodle Bowery Ballroom in an old sketchbook, and that devolved quickly. The markers were old so some of the caps were really stuck on there, and I wound up devolving into fits of laughter from the absurdity of pulling the caps off with my teeth.
Ink stains on my hands started writhing and trailing and were very cool. That was the first thing I noticed. I got very sad that I stopped drawing and making art, which was something I did all my life and almost went to school for but stopped doing as an adult. And then I realized I could start drawing again any time if I wanted to, and I didn't have to be GOOD at it or a proper artist for it to be worthwhile and fun. Felt immediately happy again.
Adam decided to watch Lethal Weapon???? I was like, Don't Like That. Even though he had headphones on and I couldn't hear anything. I am ambivalent about screens at best when I'm tripping, and at worst I don't even want to be in the same room with them. Guns and violence seemed comically, brutally stupid. Turned my back to the TV and continued drawing and writing until I could no longer hold a pen. Eventually Adam got on my wavelength and was like yeah, this is too much! (He took like, twice the dose that I did. I have no idea how he was even able to talk to me, but he managed!)
Felt the need to message Liana while peaking, picked up my phone, and saw that she had already sent me this:
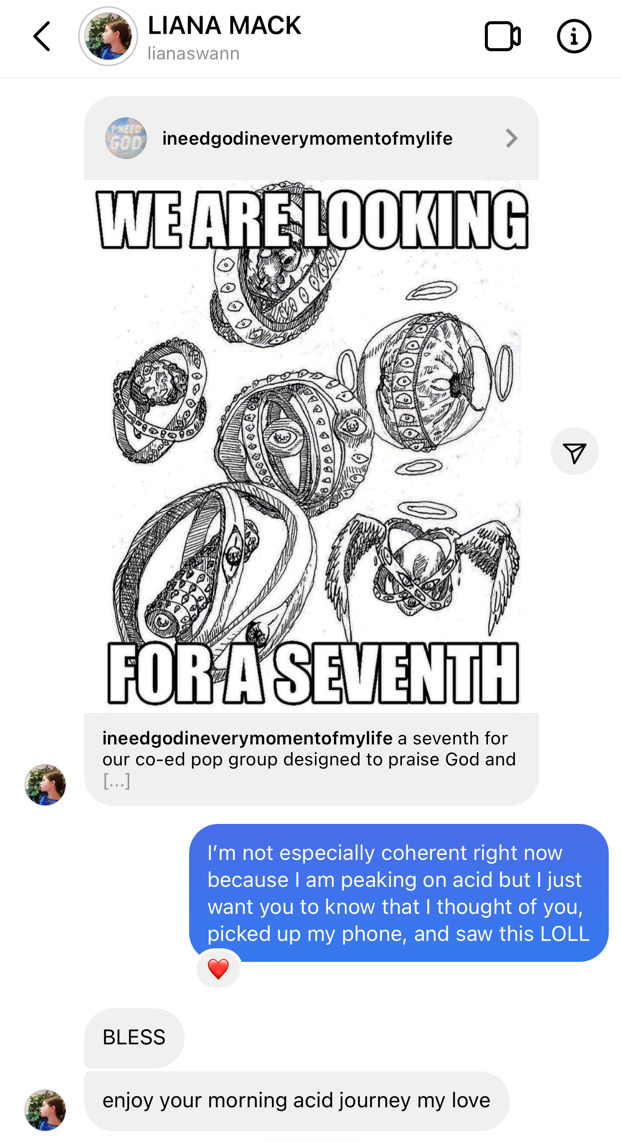
I thought that was HILARIOUS (tbh it actually was, and it was not just the acid talking)
For the first few hours of teeth-grinding, reality-shearing intensity, Adam and I mostly lounged in bed with the shades pulled all the way up and the window open, cuddling and petting Ernie. Fantastic bonding experience for the whole fam.
Looking at every surface in the apartment became like looking at a stained glass ceiling, or an infinite mandala, or the muddied rainbows in oil-slicked puddles. It looked like Ernie's fur was breathing and someone had colored all over the white parts of him with a highlighter. Adam agreed with this assessment. Formica on the kitchen counters was bananas. So were the trees outside, rippling like celluloid and brighter green than I had ever seen them.
The two of us spent a good 15 minutes doubled over with laughter because Adam suggested a contraption for funneling Fancy Feast directly into Ernie's mouth, kind of like shotgunning a beer
Adam: "I can't believe I used to to this and get on the subway and try to do things with people." Me: "What? How did you even figure out how to get from Point A to Point B?" Adam: "I mean, we didn't, really. We usually got lost. It was fine, though." Truly, it's about the friends you make along the way!
The second half of the trip, when things are starting to mellow out a bit, is when you become a real rock star. I went outside for a walk around the neighborhood, and to sit in the park with my headphones on while watching kids play on the playground, and it was ECSTATIC. I was just overjoyed. My face still hurts from smiling.
Forgot that I needed money to realize my goal of obtaining a popsicle, so I had to detour back into the apartment and explain all of this to my husband before resuming the popsicle quest. He thought it was very funny, but sympathized.
Fresh air, popsicles and San Pellegrino on acid. On another level! 100/10.
Bathrooms still universally suck, LOL. -10/10. Not a fan of that bathroom while tripping face! Every time I had to pee it was like WELL here we go again into the Pink Squirming Hell Chamber (I am making this sound like more of a big deal than it actually was)
15 HOURS. 15 HOURS Jesus Christ lmao I did not stop seeing weird shit on screens and surfaces until like 1 AM. And even then, if I stared long enough, funky colors and patterns would re-emerge. It's a commitment. I feel happy and refreshed, but also totally exhausted. Definitely have to budget a full weekend of No Plans for any future trips.
The Heavy Shit:
There is some Cronenberg-level body horror right before the visuals get super rainbow-stained and stereotypically psychedelic, which sounds bad, but I promise it isn't. It's watching the veins pulse under your skin and change into very saturated colors, pores and hair and scars become very defined and wiggly, and as someone who has so much bodily anxiety related to my alopecia/IBS, it was weirdly... freeing? You get to experience all this stuff in an entirely new frame of mind, shedding judgment and old thought ruts. I remember thinking, "I do not need to feel shame about my body," and letting go of so much baggage.
At some point mid-afternoon I decided to retrieve my phone from the drawer again, and saw that I had a missed call and a voicemail from my dad. I decided to play it back, and he was just phoning to tell me that he was listening to a live version of "Sally Simpson" and Keith was doing this thing where he wasn't even touching the cymbals, and had I listened to that specific performance before and noticed the same thing, and wasn't he truly the greatest drummer that ever lived? "Anyway, no need to call me back, just wanted to let you know. I love my bubbie!" (His term of endearment for me.) And I went to go sit in bed and weep for a straight 15 minutes, the most cleansing, purging cry you could possibly imagine, while Adam hugged me and rubbed my back. I was overwhelmed, overcome by this feeling of cosmic Love and Connection with my family and my husband and all of my friends.
I had been sitting on and burying so much fear and distress from the past 18 months, the chronic, low-grade trauma that was worrying if COVID was going to kill my father, my best friend and closest confidante and the one person on earth who I feel truly Gets Me on a spiritual level, and all of that came out. Fully processed and released every ounce of grief. What replaced it was the absolute, unshakable faith that no matter what happens — including my greatest fear, which is inevitable, no matter how far off it may be — he will always be with me, and a part of me, in the music we both love, and I will never, ever lose that.
17 notes
·
View notes
Note
Hi! I love all of your posts about Snape, and your art is perfect. 🥺 The difference in animation for the drawing is so incredible, keep doing this incredible work! My question is, if you could recommend fanfics like 'The Pauper Prince' that give Snape more meaning and a person who gives the love he deserves ❤️ Could be SnapexRemus SnapexHarry (and sorry for the long comment 👉🏻👈🏻 I always go on your tumblr to see your recommendations
Thank you so much! I’m glad you’re enjoying my art :D
A complicated traumatized Severus learning how to be loved by somebody is my absolute favorite thing in this world, so I definitely have a few of those to recommend to you! Here are a few of my favorite Severus x Harry fics:
Chrysalis by starcrossedgirl
In which Harry is a tad messed up after the war, but Snape gives him a run for his money. Or: an epic tale of PTSD, recovery and gay porn! (For detailed warnings, please see author's notes.)
Never-Ending Road by @laventadorn
AU. When Lily died, Snape removed his heart and replaced it with a steel trap. But rescuing her daughter from the Dursleys in the summer of ’92 is the first step on a long road to discovering this is less true than he’d thought. A girl!Harry story, starting in Chamber of Secrets and continuing through Goblet of Fire. Future Snape/Harriet.
Rapture by mia_ugly
Snape sees the man, for the first time, on his twenty-fifth birthday.
Making Do by ravenkira (English translation of Смотрящий)
After the war, Severus Snape tries to find another way to deal with his abominable life.
Close Encounters by bleedcolor and Likelightinglass
Years after the war, Harry Potter and Severus Snape meet and fall in lust, then love.
Too bad they don’t know who they’ve fallen for.
I haven’t really read as many Severus x Remus fics, but in addition to TAB, I also really love these two:
Alive and Unwell by @littl-prince
Severus Snape finds himself saved by an unlikely source of help, and presented with choices he never thought he would have.
An AU of the Battle of Hogwarts and the immediate aftermath through multiple POV's, from Ronald Weasley to Nymphadora Tonks. But the main thread follows two men, who have found each other time and time again - and this time, might just be on the way to finding themselves.
there is a light that never goes out by fortunedays
He thinks of Evan’s last request, a promise hastily made in the summer twilight of a mangled youth. He hadn’t meant it at the time, not truly. Never intended to let someone in as he had Evan, never intended to live long enough to need it.
He won’t admit that he needs the protection. But looking at Remus knelt before him, hands clinging to his in silent oath, Severus wants it.
Or, how Severus handles war, pain, and something like love.
Thank you for sending me this ask! I love recommending fics to people and I hope you enjoy these :)
49 notes
·
View notes
Text
how I make my gifs: a tutorial
Hi everyone! Just in case someone asks in the future + for those curious, I'm here with a tutorial on how I make gifs! If you have any questions whatsoever, please do send me an ask! I’ll be glad to help! The gif I made with this tutorial is the one right here!
So... let’s start this tutorial with the programs I use.
Adobe Photoshop 2020
- To make the gifs, majority of the work is done in this program.
TopazLabs (Topaz DeNoise 6 and Topaz Clean 3)
- To "denoise" and "clean" the gifs, as the names would suggest.
Links for download: Topaz DeNoise 6 & Topaz Clean 3
KMPlayer (an alternative would be PotPlayer, or any other video playing program that allows you to capture the frames)
- To capture the frames.
- I use an older version of KMPlayer, though I don't know which exact version that is.
Now let’s continue onto how I use these programs to create gifs!
Step 1: After you’ve downloaded the necessary programs, download your video. The way to get the best gifs? Quality videos. That’s the first step. For K-pop performances, I recommend this website (the hq files are in .ts form, KMPlayer should be able to open these). Bookmark it! It’s really handy :) Get the video you want to make a gif from and open it in KMPlayer (or PotPlayer or any other program, but for this tutorial I’ll use KMPlayer). Open your video in said program and look for the part you want to make a gif of. Then press CTRL+G (I apologize because I cannot for the life of me remember if this was a standard shortcut or not)
Step 2: After pressing CTRL+G, you’ll be met with this screen:

I’ll briefly explain the numbered parts, but before that, these are my standard settings and just make sure you have them all the same and it should be good!
1: This is where your captured frames will be extracted to. I have them extracted to the standard folder, but you can change this if you want to. You’ll need this folder later when opening the frames!
2: Like it says, this is the image format. I use PNG in the highest quality, as the name would suggest, for the quality.
3: These are the amount of frames the program captures. Say you put in every 2 or 4 frames, you’ll get more choppy gifs. To get the smoothest gifs, put “every frame” (this in turn will increase the gif size as the amount of frames will obviously be bigger).
Once you’ve put in the correct settings and you’ve put the slider where you want the capturing process to start, press “start” (now, before you do this I recommend putting the video on mute as the audio will start to get kinda demon-y the longer you record lol save your ears pls). Then, when you’ve captured all the frames you need, pause the video, press CTRL+G again and click “stop” and close the pop-up/program.
Step 3: It’s time to open up Photoshop! Then go to File > Scripts > Load Files into Stack... (for older versions/another version I used in the past this one didn’t work and I had to use the “Load Multiple DICOM Files...” instead. It should work similarly though, if I remember correctly).
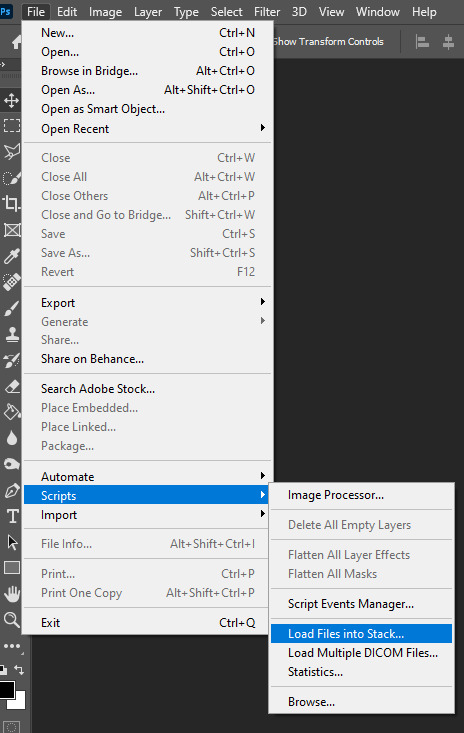
You then get a little pop-up that looks like this:
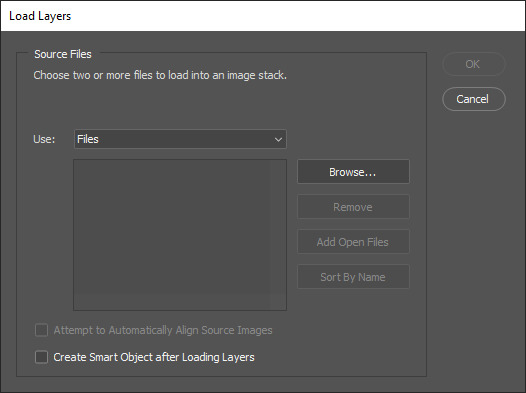
All you have to do here is click “browse” and navigate to the folder where your captured frames have been saved in. Select all the frames you need, wait for them to load in and then click “OK”!
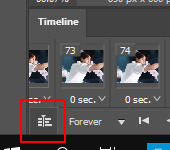
Step 4: Depending on the amount of frames you’ve selected to load in, as well as the beefiness of your PC/laptop, the frames loading part might take a little while. Photoshop is importing every frame as a separate layer into one file, so just... grab a drink or something and wait a bit! When you’re done waiting, if you haven’t already, go to Window > Timeline. This will show you the animation timeline. For older Photoshop versions this is slightly different (I believe it’s called animation). Then click “Create Video Timeline” and click the 3 squares on the left bottom side (in older versions it’s on the right bottom side, not sure).
Step 5: After you’ve done all that, you’ll want to select all your layers. You can do this by pressing ALT+CTRL+A or going to Select > All Layers. With all the layers selected, you have to go to Layer > Arrange > Reverse. You only have to do this if you used the “Load Files into Stack” option!
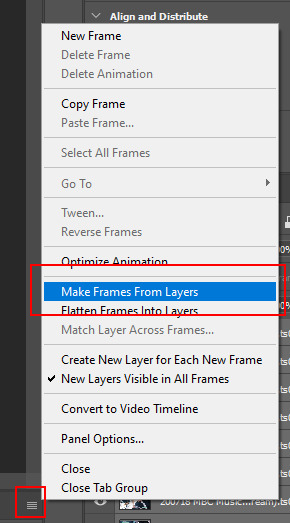
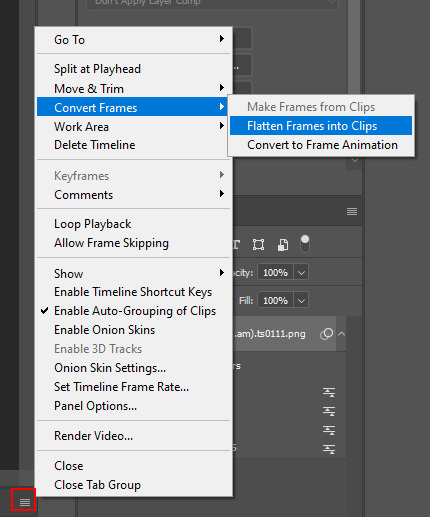
Step 6: After reversing all your layers, you’ll want to go to the three lines you see in the following screenshot, and click “Make Frames From Layers”.
As the name suggests, this turns all the layers into frames. I don’t know why but the first frame will always be 5 seconds long, so to make it easy on yourself when you want to check your gif while editing, just put that on 0 for now. You can do that by clicking the seconds under the frame and clicking “No delay”. After this, check to see if you have the right frames and if you need to delete some (you can do this at any point in the process but I didn’t know where to put it in the tutorial oops).
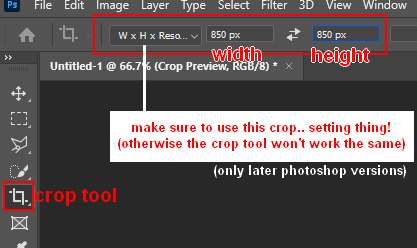
Step 7: Time to crop the gif to the correct size! For this gif I’m using as an example, I’m making it specifically for Twitter, so the sizes aren’t that obvious (for Twitter I usually use a width of 850 px to keep it sharp, for long size gifs (more height than width for example), I add a background so that it eventually still becomes 850x850 pixels). There’s many posts on Tumblr about the correct sizes for gif/photosets, but a brief rundown of my most used sizes: one gif spanning the entire width of the post has to be 540 px in width. Two gifs next to one another need to have a width of 268 px. I use these dimensions the most! For others, you can Google!
Step 8: After you’ve cropped the gif, you can do either of two things: either you first add the coloring of your choice and then sharpen the gif OR you do it the other way around. I usually switch these two around depending on how sharp the gif already looks before sharpening because I can’t stand looking at 2 pixels while coloring (lmao). For this one I’ll do the sharpening first.
The whole sharpening process is actually quite simple but you need to make sure that you do the following little steps in the right order or else it won’t work! Select all the layers (CTRL+ALT+A or Select > All Layers) and then click this little thingy:
Then you’re going to Filter > Convert for Smart Filters
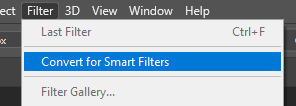
If you don’t do it in this order, your gif will end up... well, not being a gif and not moving. If that happens, track back in your history to see if you did it in the correct order! :)
Step 9: The actual sharpening process! After clicking the “Convert for Smart Filters”, you’ll want to go to Filter again and find the Topaz Labs tabs. Personally, I usually do it in the order of DeNoise first and then Clean, but this is a personal thing, really.
I recommend playing around with the settings to see what fits the gif but here are my go-to DeNoise settings (tip: save these as a preset so you only have to click that for faster giffing!):
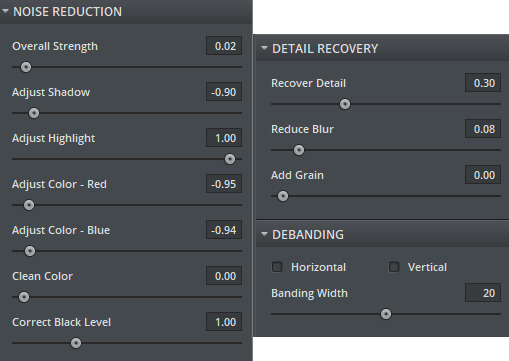
And my Clean settings:
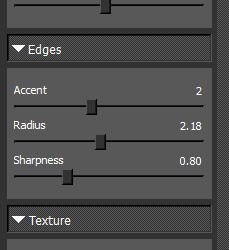
Press OK when you’re done with these and then go to Filter > Sharpen > Smart Sharpen. These are my SS settings (just copy these, and again, save as a preset!):

Depending on how sharp you want the gif to be, you can input the same settings or go to this in the layers and change the percentage.
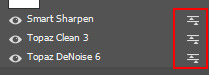
Now that we’re done with these... it’s time to flatten it! Just follow these little steps:
And then you wait. Again. I know.
Step 10: After playing the waiting game, you’ll click the three little squares again and do the same thing you did earlier: “Make Frames Into Layers”. Delete the first frame. Add a coloring of your choice (can be a PSD, can be your own coloring, etc. this is honestly just... playing around with things and see what it can do). After you’ve done coloring, select all your frames (same lines as previous screenshot except now you’ll see a “Select All Frames” option, click it!) and change the time to whatever you like (I usually go for 0.05, 0.06, or 0.07. Again, just play around with this!! Try different things!)
Step 11: Final step! Saving :) I use shortcuts a lot to make things faster so either press ALT+SHIFT+CTRL+S or go to File > Export > Save For Web. Not much to do here, just copy the following settings and save the file!
!!! NOTE: After making a new gif today I realized there’s a weird dotted border on the top of my gifs, it’s a bit difficult to explain but I had no idea what it was. Turns out that the reason why this showed up was because, as shown in the screenshot below, I had “Transparency” selected. If you’re experiencing this too, UNSELECT the transparency and it should be all good!
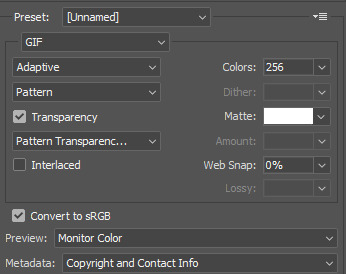
Also make sure that the “Looping Options” is set to Forever, or else your gif will play only once and then stop!
Tip: While making gifs for Twitter I at one point noticed that if I added in a white background, no matter what I’d do, it’d show up as yellow-y in the preview box. After googling I found that going to the options (1 in the screenshot) and then clicking “Sort by Luminance”, then double-clicking the lightest color (not the transparent one, 2 in the screenshot) and selecting white (or FFF) will get rid of this! This likely won’t be that useful for Tumblr gifs but just in case you ever want to have a white background...!

Then just... save, and upload to Tumblr! :)
Final note: Tumblr has a mix gif size of 3MB. If you have a gifset of 4 gifs you want to upload, all 4 gifs can be max 3MB each. Keep this in mind! If you’re over 3MB, delete a few frames and try again, or resize/crop your gif!
As it turns out, Tumblr has increased their gif size to 8MB, however, the quality tends to get compressed with larger gifs like that so per recommendation: keep them below 5MB! (thank you @yeoli for letting me know!)
I hope this helped! If you have any questions, feel free to send me a message and I’ll try my best to answer them.
75 notes
·
View notes
Text
Rarely do I ever see posts for sex workers outside of the blogosphere of sex work blogs, that aren't thinly-veiled judgments, or vague affirmations written by someone who has never participated in sex work, so as a former FSSW/cam worker, I'm sending out some reminders to current sex workers, as well as anyone interested in starting <3 Below the cut bc it gets kinda long, and bc I can't properly tag without getting smacked by Tumblr.
Feel free to add if you have experience.
Learn to do your own taxes as a self-employed person (if applicable)
Learn to spot signs of a scam (connecting with other sex workers is harder than it used to be, but can be very helpful for this!)
Find a place to get tested regularly that you trust. LGBTQ centers often offer free testing, even if you are not LGBTQ yourself. Most also are sex-worker-friendly, in my experience. Be honest about what sex acts you're participating in.
Bring your own protection and lubricant, and make sure they're compatible.
Learn how to practice sex safely. This goes beyond Health Class 101. This includes learning how to clean your toys, how to use lubricant and signs you need to re-apply, how to acquire and use PrEP/PEP (which I recommend for everyone, if you're able to get it and have sex with multiple partners. There's a number of resources out there for aquiring low/no cost PrEP) contraceptive use (beyond just condoms!) and more.
Search yourself (both your alias(es) and real name) regularly. Try to send takedown notices for stolen content. You may even be able to pursue legal action. If you don't want your sex work alias connected to your real identity, this can also help you keep tabs on that. Reverse image search on some of your pictures every so often (but keep in mind RIS works...less well for pictures of naked ppl)
You don't need to be your full, authentic self for clients. This seems obvious (or should,) but also remember that you are not betraying your identity/community if you choose to closet yourself to clients, use buzzwords that may be offensive for better search results, etc.
Money 💰 first 💰 always 💰. Especially for FSSW. Negotiate any additional fees beforehand.
Re:money, be careful what apps you use, if any, and what information is tied to them. Learn about how much cash you can deposit at once into your bank account, and stay far enough below that number so as not to arouse suspicion from your bank. Sex workers are the best friend of a new money service and the worst enemy of an established one. Have backups. Established/long-time sex workers will remember what happened to Venmo, Cashapp, etc.
It can be easier to lower your prices than raise them (often, but not always.) I liked to have a range that I kept to myself, so I can offer cheaper rates to people I liked, and more expensive rates to people I didn't. Don't undersell yourself. This is SO much harder now with OF etc being in the mainstream and cheaper than before, but remember that you are the only one who can offer your specific body and services. Don't sell yourself short.
Remember that as a gig worker, your money will not be consistent. You may hit a strong cash flow at some point in your career, don't bank on it always being as strong. If possible, have enough saved for at least 1-2 months of crickets.
Be nice, be friendly, but don't be a doormat. If you're new to in-person sex work, practice ways to say no politely but firmly. There are people who know that you have fewer resources to report them for bad behavior.
^ Related, take safety measures. Learn what self-defense tools are legal for you to carry in your state/city/country, and how to use them. Pepper spray requires a firearm license in some states, and the last thing you want in a worst-case scenario is to be hit with a charge for defending yourself. Learn some form of weaponless self-defense, ideally more than one.
Additionally, have a way to check in with a safety person/trusted friend. I used to use Kitestring, but it looks like that's being shut down. Asking a friend to send you a text 5-10 minutes past when you think you should be done, and telling them what you want them to do if you don't respond would be a good alternative, as well as telling them where you're going and who you'll be with.
Learn the laws in your area, as specifically as possible. Take advantage of loopholes. Have a cover story. This applies extra the more marginalized identities you hold.
Have a cover story for friends/family you don't want to know about your work. This can be as specific or vague as you feel comfortable, but make sure it's consistent.
At least one person you know will find out, almost guaranteed, especially in the age of the internet/for internet-based work. Be prepared.
Remember to sometimes have sex for your own fun, if you want to. It can be nice to not have to focus as strongly on a partner as a client, or associate sex purely with a transaction.
Know your limits/boundaries. I advise not having any "first times" with a client unless you have an established relationship. If a client suggests something that you've never done before, I advise practicing with a trusted friend/partner before doing it professionally. If you don't want to be contacted on short notice or during certain times, be upfront.
Risk reduction! It's a huge topic. Many of the things we do are not free of risk. Learn how to practice things safely, whether that includes substances, kinks (especially kinks including impact play and bondage,) etc.
Have a plan for the future. Have more than one. Maybe that includes shifting genres (if that's the case, know at some point you'll need to shift from focusing on the loyalty of clients to getting new ones,) making more niche content, or getting a "vanilla" job. A lot of sex work (but not all!) depends on staying pretty, and people don't stay pretty forever. If your line of work is illegal or grey-legal, it may involve switching to a more protected line of sex work, like working in a dungeon, or a line of work that is adjacent, like some non-profit work. To reiterate from a few points ago, a good safety net is making sure you have enough savings to keep yourself afloat for at least a few months.
SW is in a weird position of being something many people want, but also something many people (including the former!) don't want to respect. Something endless participate in to different degrees, but something still not protected by the law in most places. Highly desired and largely shunned. Sending all SWers of all varieties lots of love and support.
#not adding tags so this doesn't get nerfed#but I would appreciate reblogs if you're comfortable#nsft#long post#sw tw#disclaimer that the climate of SW has and will continue to change
1 note
·
View note
Text
Advice for 16-year-olds (from someone who was once 16)
Always have good music as close to hand as possible.
Don’t be afraid to laugh, to goof off, to completely waste time you should spend learning just having fun. Those are the memories that’ll stick with you.
The vast majority of your peers are either going to be as stressed as you, or more stressed than you. Take heart from the fact that you’re not alone in your suffering, but don’t be afraid to be kind to someone if they’re stressing out, either.
Never stop consuming media. It doesn’t have to be the classics (or even books!), but anything that stimulates you and gets you learning, or inspired, or at least a bit creative.
However careful you think you’re being with your personal information on the internet, be at least 20% more careful than that.
Walking away is basically always an option.
People are going to see you as an adult and a child simultaneously, and you’re probably going to get the worst of both worlds (pressures of adulthood mixed with the lack of agency of childhood) – that’s just the curse of being a teenager.
If you condemn someone, make sure it’s for genuine ill intent and ill actions, and that they haven’t just made an honest mistake.
When it comes to drinking, make sure that the first time you get drunk, you’re with people you trust beyond any shadow of a doubt.
The sooner you discover your limits, as well as how you act when you’re drunk, the better.
If at all possible, don’t become famous.
(the rest is under the cut, it was getting long lol)
You can loop YouTube videos by right-clicking on the video while it’s playing and then pressing the ‘loop’ icon.
There’s always more free stuff on the internet than you’d think, but exercise caution and make sure you don’t download any viruses.
When people say they “aren’t political”, or don’t care about politics, the implication of that (which they may not even be conscious of) is that the system as it is now suits them just fine, and they have no desire to see the world change. Do with this information what you will.
If you’re looking for music to revise to, videogame soundtracks are the best. There are no vocals to distract you, they’re long, and they’re designed to immerse you and make you more focused.
Be careful when crossing roads – wherever you’re trying to get to may be important, but your life is importanter.
Make sure that your relationships with people are roughly give-and-take – if they’re initiating all the conversations, make the effort to reach out to them first sometimes. If you’re the one always making the effort – I mean, that one’s more situational, but I’d say you should at least consider the fact that you might care about them more than they care about you.
Have a handful of books, shows, or movies, that you think are really good and are always willing to talk about – bonus points if you can articulate exactly why you like them so much.
Being passionate and well-informed is a great combo!
Look at a sunset at least once a day.
On the subject of uni, I’ll just say this: going to a university is worth it for the accesses and privileges alone, because you’ll get to read all sorts of genuinely interesting papers and sources.
On the one hand, student debt. On the other hand, I got to read a paper about what drugs cave people might have been on. Just sayin’.
Keep an open mind, and never be afraid to admit that you’re wrong about something.
Make sure you can play an instrument at least passably.
A living space should be clean, but it should also be exciting, and be yours. Don’t be afraid to display yourself and the things you honestly care about.
Hugs are good. I’d recommend lots.
Know your history. There are always going to be influences on the present in the past, like them or not. (Also, when you try to say something about history and get it wrong, the actual historians will laugh at you. No-one wants to be laughed at by historians. They’re nerds. It’s like getting beaten up by someone less than 5 feet tall.)
Don’t get twitter. If you do, don’t make any posts, and stay out of the trending tab.
Always stay updated on your emails from school/university/work. As you grow older, the onus will be on you to remember things, so it’s up to you to keep on top of your responsibilities and workload.
Know at least three good dance moves (that you can easily bust out at any given time).
Never listen to guys who criticise ‘girly’ videogames because ‘the entire game is just about doing tasks’ (like talking or farming or shopping). Point and shoot is also a task, it’s just violent. (or so sayeth the Tumblr post)
You feel old, which is fair, because this is the oldest you’ve ever been. But in a lot of ways, you’re still young, and it can sting to be reminded of that. Don’t get upset because you don’t have a lot of life experience yet – just listen to the people who do.
Of course, if someone is rude, patronising, or disrespectful to you just because you’re young, you have full right to tell them to shove it.
Never trust anyone who says treats animation like a genre instead of a medium.
Cite your sources whenever possible.
Question your sources whenever possible.
There’s a gannet to run between going along with the crowd, and being stubbornly contrarian at every opportunity. You’re gonna want to a look for a happy medium between these two.
Do lots of THINGS. You regret mistakes, but you regret the missed opportunities more.
The quickest way to double your money is to just keep it in your pocket.
Open a bank account as soon as you’re able - even if you get on well with your parents, it’s still nice to be able to buy stuff for yourself without having to run everything by them first
On that front, it’s definitely best to start saving up for stuff like a pension as soon as you can, if you’re in the position to do so.
Almost everyone looks at least a BIT ridiculous in photos, especially at the age of 16. The sooner you accept that and learn to laugh at yourself and others in equal measure, the happier you’ll be.
If you’re monolingual, try and learn another language. Go on. Do it. Make an effort.
There’s a reason that the classics are classics. Don’t disparage them and throw them away just because they’re old, or problematic.
Love yourself, love yourself, love yourself. You are your own best friend.
Legality and morality are so not the same thing.
That being said, breaking the law can definitely be more trouble than it’s worth. Don’t just do it for shits and giggles, yeah?
Cry if you want to. Especially if you’re a boy. I really think you’ll feel so much better if you let those feelings out instead of keeping them repressed.
You don’t owe internet strangers and weirdos a damn thing, least of all a debate.
Get outside and take a deep breath. It’s okay. It’s going to be okay.
Life is a series of venn diagrams. It is possible to hold multiple opinions on a topic, and it is possible to think in shades of grey.
If nothing else, hang in there for at least one more year, because at the age of 17, you are granted the rank of Dancing Queen.
Um
That’s it.
OH WAIT
Never be afraid to tell people you love them.
#I was writing a thing for my sister (because she's 16 now) and it got out of hand so here y'all go#advice#advice post#I haven't the FOGGIEST how to tag this#top tips????#yeesh
4 notes
·
View notes
Text
So, since the option for @new-xkit-extension users to keep the old dash (with working Xkit extensions) appears to be gone now I’m just gonna start a list both for my own reference and for requests to tumblr staff of the extensions I am now finding it hardest to do without, more or less in order of how much I miss them. Feel free to add your own must-haves! (and the list at https://github.com/new-xkit/XKit/issues/1802 is handy for tracking which extensions in Xkit have already been updated for the new dash...)
[ETA a read more as my list got longer than I expected!]
Read Posts: oh my goodness when I’m catching up in the morning, or in the evenings after work once going back in to work will be a thing, it is so frustrating not to have that dimmed post tell me that I’m all caught up now! How many posts will I obliviously scroll through multiple times before realizing I saw that one the last time I read through my dash? The fact that many posts show up multiple times in reblogs makes it even harder to keep track of where you left off, so the disabling of this extension has thrown my tumblr routine into considerable confusion. I’m either gonna end up rereading everything from the last time I caught up or I’m gonna not catch up all the way because I’ll see a reblog that I know I saw in my previous catch-up session and it’ll actually be someone else’s reblog of the same post so I’ll miss whatever came before it.
No Recommended (or possibly it was Anti-Capitalism): it’s supposed to hide the recommended posts that come from your followed tags and then just show up on your dash as if you were following the OP. At least I think this is the extension that was removing those for me? It’s actually checked on the list linked above so maybe it was a different extension that had this covered. At any rate, the first I realized the “revert to old dashboard” option must have been eliminated was when I started seeing these again, sigh. Now I may just unfollow all my followed tags and see if that stops them from throwing up random blogs I didn’t ask to see.
Shorten Posts: Oh my goodness things are so LONG now. And is the font bigger? Less of each post, especially longer or photo posts, fits on the screen at a time and so it takes longer to get through it. Might have to unfollow blogs as well as my followed tags just to have the time to keep up with what I do follow.
Read More Now: UGH, “Keep reading” links open in a separate tab again. :-( It’s a hassle and RMN made it so much more streamlined.
ETA: When not on the dash but on the dash-style version of my own blog (so tumblr.com/blog/rannadylin that is), clicking the “Keep Reading” opens up like this extension used to? Hm i’ll need to check next time a read more comes up on my dash whether it’s been updated to work there too...
Quick Tags: Looks like if reblogging or making a post from your dash you can no longer use this extension to add tag bundles for quick & easy organization of posts. Oh my goodness. I’m already tired at the thought of typing them all out by hand. (Side note: The Activity page seems to still be untouched by the changes - extensions that apply to it are still working - so if you go to that page first then click the new post icon, you can use the tag bundles. No good for reblogging though, unless you are reblogging a post from your activity page somehow?)
Auto Tagger: Not quite as annoying as the loss of Quick Tags since this one I mostly just used for things like “queue” and “ranna reblogs” on non-original posts and “from the desk of ranna” on original posts, and that’s just one tag to add. But you can be sure I’ll forget to add them most of the time, so there goes that layer of organization (and the option of blocking those tags if you didn’t want to see that portion of content from my blog).
Cancel that; it looks like this one is still working as I just attempted to reblog something and my auto tag for that showed up!
Er...maybe not, since it just used my original post tag on a reblog instead of the tag that should go on things I reblog.
Tag Tracking+: I mean, this one won’t be necessary if I have to unfollow my tracked tags to make tumblr stop putting posts from the tags on my dash from blogs I don’t follow, but also now it’s not as simple to find those followed tags...so that I can unfollow them...
Header Options: I used this to “Show my blogs on the header” so I had quick links to switch between this, my main blog, and sideblogs like @roleplayers-of-eternity and @pillarspromptsweekly. So that’s just a few extra clicks to do that switching but still it slows things down overall. Heeeey, this one just got updated and looks functional on the new dash now! Huzzah!
Blacklist: Well, the new tumblr has something of the sort built in but I haven’t blacklisted as many things there as I had in Xkit so I’m not entirely sure yet (until I start comparing blacklisted phrases on the posts that are being hidden by whatever) if this one’s still working or if it’s just tumblr’s blacklisting that’s working. I suppose as long as we have one functional version of this it’s fine. (On a third thought, it might be the separate-from-Xkit Tumblr Savior extension that’s working again now? While I had the Xkit “Revert to old dashboard” option switched on I don’t think TS worked with that but maybe it’s been updated for the new dash?)
OK after some cross checking I think it is Tumblr Savior that has the blacklist phrases I’m seeing with a “Content Warning” hiding the post. Not sure if Xkit’s Blacklist is also working but that is quite possible...we’ll see if I can find a post hidden that is only blacklisted there...
ETA: Annnnd I just saw a post blocked with a tag I only had blacklisted in the Xkit Blacklist! So, good, it looks like all versions of blacklist functions are working.
Now for one that wasn’t even an extension, I don’t think: you know how you can hit J to scroll down a post and K to scroll up a post? Well that still works; but previously you could then hit the right arrow key to go to the next page of posts if you don’t have endless scrolling on (or left arrow to go to the previous page if you need to) and it appears those no longer function that way. So farewell to mouse-free dash scrolling, I guess, gonna have to click that Next > button every time manually now.
Also, upon going to my Queue to see if there are extensions broken there that I will miss (e.g. Scroll to Bottom for when you need to quickly find the most recent thing you queued to adjust tags or something), it...isn’t actually showing any of my queued posts? What?
As noted earlier, the Activity page is not yet switched over to “new” tumblr, and it looks like the Inbox isn’t either, so the Outbox extension still works which is great for old folks like me prone to forgetting whether we already sent that ask we meant to send. *ahem* In other words, if the Inbox switches to the new engine or whatever and this extension goes away, UGH.
ETA: Oh and I just noticed as I added some indented bullet points to the list above...they’re all showing up at the first level of indentation, not outline-style like intended, when viewed on the actual dash. Sigh.
On the bright side of the changes, it definitely seems to load faster on the new dash! And as I’m going through my list of Xkit extensions there are several that I see are actually redundant now because their functionality is already a part of the new dash. If Tumblr can incorporate the usability features that we used to have to turn to 3rd party extensions to supply, that’ll be great!
28 notes
·
View notes
Text
Scrap->Reclaimed->Refined Metal, all you need to know about Crafting!
This is a guide for crafting in TF2. Crafting in TF2 is an important component for attaining cosmetics, weapons, and all other kinds of fun stuff. It is most importantly one of the easiest ways to make money from your playtime in TF2 (although, I recommend this to no one for a source of income). I recommend anyone who plays a lot of TF2 get to understand the way to craft for metals, etc as it can save them money and help them get cool stuff!
This guide covers the very basics of crafting for metals, Reclaimed Metal as currency, and How to Craft Hats/Weapons! (It’s long I’m sorry, but if comes with tons of pretty pictures!).
First thing’s first, why is it important to know how to craft in TF2? To put it simply, crafting can get you free cosmetics, weapons, and a couple other things within the game. The only thing you are spending is your time!
Playtime in TF2 will grant you free Normal Quality weapons. These weapons will add up over time and you will eventually begin to get duplicates! These duplicate items can be crafted into Scrap Metal or Class Tokens. Metal and tokens are able to be directly used for either the creation of cosmetics, weapons, or used as currency within the TF2 trading market.
So how do you craft?
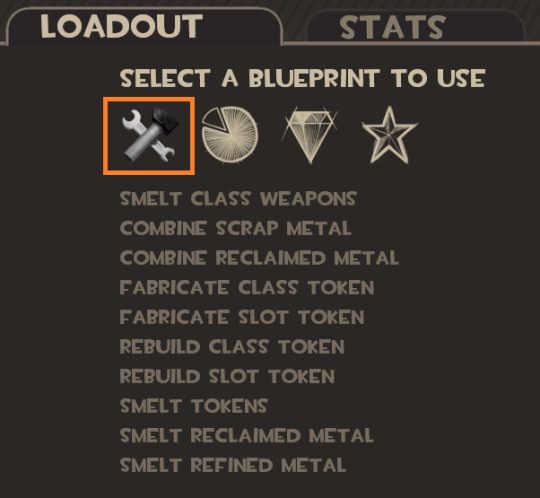
Step 1: go to your Items tab on the main menu!

Step 2: Click on the Crafting tab! (Pretty self explanatory).
From here you will have multiple tabs for where you can craft. Most of your crafting will be done on the first tab that I have shown here. It is hard to miss because it is the first one that shows up on the crafting menu. I have the tab for it outlined in orange as well!
From here, you have many options (as you can see). These can get confusing if you have no idea what they mean or what they’re for. Understandably, I would avoid crafting if I had no idea what was going on in this menu too!
So, the beginning to almost all crafting is smelting class weapons (unless you specifically want a token, which I will get to).
Smelting class weapons will create scrap metal. The requirements for creating scrap metal is two weapons from the same class, IE: You would need two weapons from Scout. This is shown below:
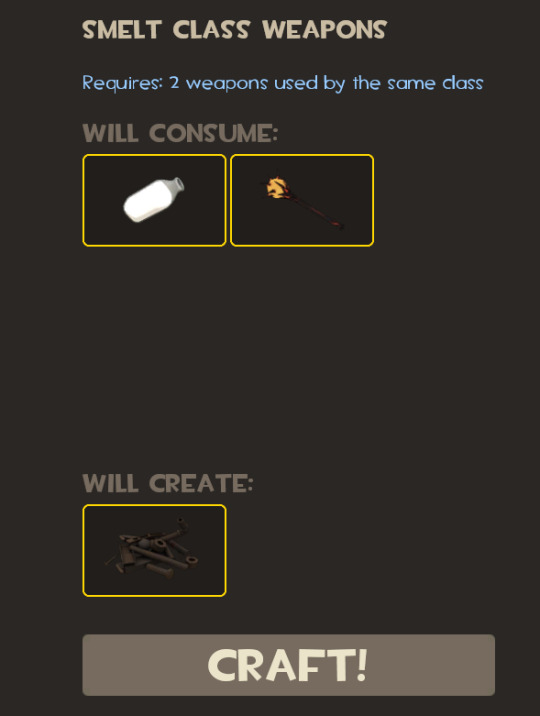
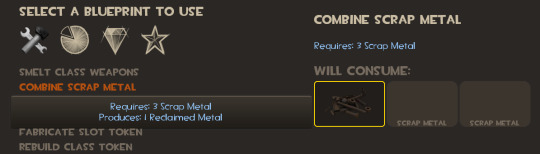
By putting in two weapons from the Scout class, I am able to craft for one pile of scrap metal. Cool! From here you will craft reclaimed metal. Reclaimed metal requires the use of 3 piles of scrap. This means you need 6 weapons to create one piece of reclaimed metal.
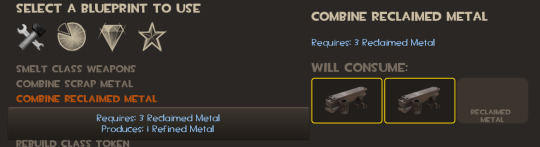
From reclaimed metal you can craft refined metal. Refined metal is there things get to be fun with crafting/trading! To craft refined metal, you will need 3 piles of reclaimed metal. This means you will need 18 weapons just to create one pile of refined metal.
To create a crude diagram of how much it takes to get refined metal, here’s a crude diagram I made in 5 minutes!
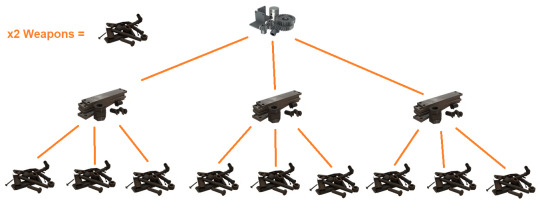
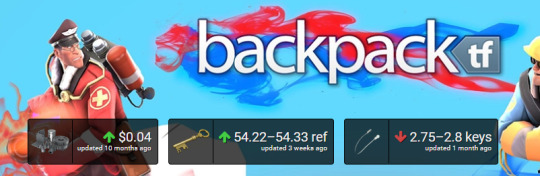
It’s hideous but I find that this is a good way to show exactly how much goes into refined metal. Refined metal can be used for many things in the TF2 community. First and foremost, it is a legitimate form of currency within the TF2 economy. Traders will use refined metal, reclaimed metal, and scrap metal to price items on sites like backpack.tf. The current price of refined is $0.04 USD. This is a small amount but you would be surprised what you can trade for using refined! You can even see that you can get keys using refined metal! TF2 has its own economy!
Remember what I said about TF2 crafting not being a legitimate form of income? This is what I meant! The good news though is that you can put in less money and get more through the usage of crafting. I highly recommend everyone learn to use it for things like trading. If you would like to learn more about how to trade on Backpack.tf, I have a guide posted Here.
So what about the other parts of Crafting?
What if you want to ignore trading altogether and create things for yourself from your own bare hands? You can do that too! TF2 allows you to craft weapons and cosmetics for yourself. They will only be normal quality (someone correct me if I’m wrong), but you don’t have to pay anything for them.
To craft weapons, you will need a combination of things depending on what you are looking to craft. If you just want to craft a weapon for a specific slot for a specific class, you will need a Class Token, Slot Token, and one pile of scrap. This option can be found on the 2nd crafting tab: Common Items.
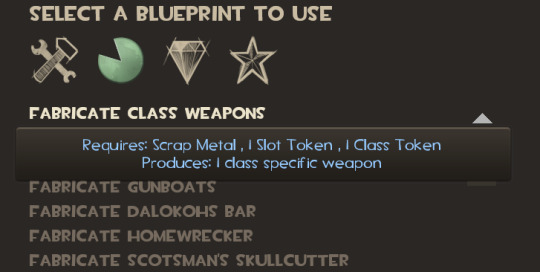
Slot Tokens and Class Tokens are very simple. Much like scrap, they are made from weapons. To create a Slot Token, you will need 3 weapons equipped in the same loadout slot. For example, if you wanted to craft a Primary Weapon for Soldier, you would need 3 Primary weapons from any class to create the token. There are no class requirements for Slot Tokens.

To craft a Class Token you will need 3 weapons used by the same class. They do not need to be from the same slot in a load out.

From here, you can use those tokens to craft class weapons and class cosmetics. Certain class weapons can also be crafted directly on the Common Items menu. These items will tell you what they require to be crafted. The list of directly craft-able weapons is a bit weird so I suggest you check it out for yourself! The items needed to craft a specific weapon depends on the weapon itself and will require things like metal and other weapons.
Cosmetics can be created in the Rare items tab.
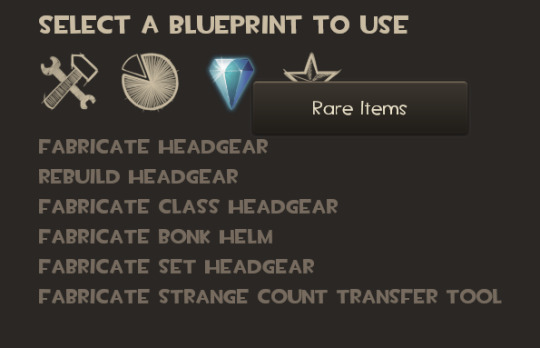
As you can see here, there are many different things in the Rare Items tab. But to craft cosmetics, or Headgear, you will need 3 pieces of Refined Metal. So for the TF2 economy equivalent of 0.12 USD, you can get a random cosmetic for a random class! This does not include ALL cosmetics available so if you want something specifically you will probably want to get into trading.
If you want to craft one for a specific class, you will need a class token and 4 pieces of Refined metal. The craftable class headgear can be found in this wikipedia link: https://wiki.teamfortress.com/wiki/Random_crafting_recipes. To my knowledge this also includes all craftable cosmetics.
Otherwise, that’s pretty much the basics for crafting! There are many other things you can craft or do with your crafted materials within TF2, but I will let you guys find those out for yourself! If you have any questions please shoot one to the askbox and I will get back to you!
Signed: @r2mich2
23 notes
·
View notes
Note
Do you plan out the whole story before you start writing? I always have so much trouble with that kind of stuff I give up even writing before I start. What is your system like, if I can ask?
So I actually have two systems that I decide on based on how much of a plan I have. I’ll do a quick summary of them and then if you click “Keep Reading” I’ll go into more detail there (with pictures, so you’ll learn the plot of the first 2 chapters of the fic I guess).
Also, I have two planning sheets that can help people clarify their vision and plot if they have trouble with WORLD or CHARACTER building.
If you would like a document version or printable PDF of either sheet, just DM me. I keep them in a dropbox folder and get about 20 requests for the files per week, so please do not be shy about asking if you need it!!!
System 1: Fill In As You Go
That is what this particular notebook is structured for. This is my default setting for longform fics just to help keep details clear. The “Chapters” tab lets me put a short summary of what happens in that chapter in case I need to reference something later and don’t remember which chapter to go to (This fic will probably end up being several hundred pages long typed out (it feels like a 40 chapter fic), so this is more important for longform than, say, a 6 chapter one.
I don’t fill out anything until a chapter is finished, wholly edited, and ready to be posted. I have a history of wiping out 20+ pages of my own writing because the flow doesn’t feel right, so holding back on filling stuff out until I’m ready to double-down on the material keeps me from getting confused. If you’re constantly writing and erasing large swaths you’ll forget who you’ve introduced when and what you deleted thinking you would put in later vs what has always been there.
System 2: Index Cards of DOOM
This is the most extreme system I use, and I only use it for the most complex of stories (and for Draft 2 of any originals) that must be planned extensively before writing. I first started using it for “Project Echo: Part 3″ because every even-numbered chapter takes place ### Days before a certain incident happens, and that incident in the flashback has to take place immediately before the “present” arc chapters reach the grand final battle. I had to balance the number of chapters between each arc and add details to one or the other as needed to keep the chapters dynamic. So a lot of preparation was needed.
Basically take index cards and cut them in half (or buy the small pre-cut ones). On each card write out a single detail. I highly recommend a color coding system, with different colors for ships, main story details, side story details, villain movements, and secondary characters. Do not double-up on any card, keep it to a single sentence even if you need to note multiple things happening in a single scene.
Lay out the cards and group them together by chapter. Then note at the bottom of each card which chapter you put them in, and keep them in order. Write in a notebook each bullet point (I use the same color coding system) in their new order, and keep the cards as backup in case I have to re-shuffle details.
Click “Keep Reading” for more details (and pics) of each method.
System 1: Fill In As You Go
So I posted the pic of my notebook with the tabs, but this is what it looks like when you actually open it--
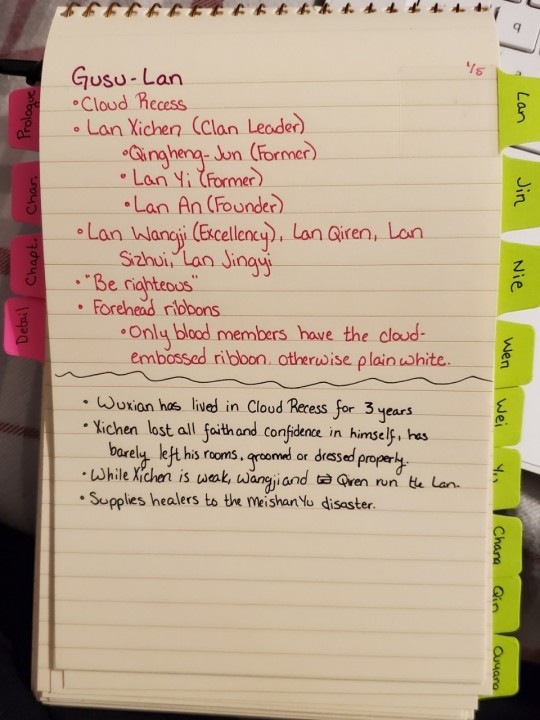
For the green tabbed “Clan” sections, what is written in pink is canon details. I used the fandom wiki to fill these out so even if something is not referenced in the show, if it is mentioned in the novel it should be accurate.
Anything written in black, meanwhile, are story details I add. Each clan has a handful of blank pages so I can add notes in black as needed.
Another area I’d like to highlight is the “Chapters” tab (I write “Details” because it is chapter details, the “Detail” tab off to the side is little worldbuilding notes like added clan capitols (also noted in each clan tab). Most details in the notebook are repeated 2-3 times so however I need to look it up later on, I will find it.
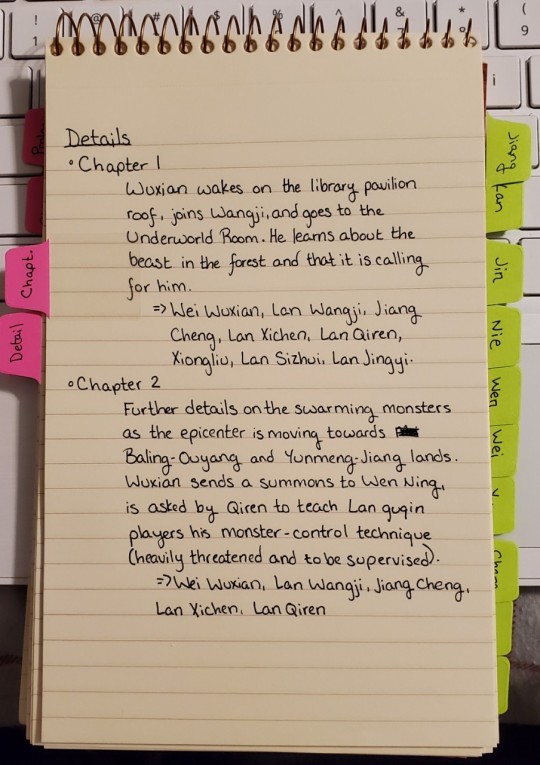
And finally, this list is cut-and-dirty. It is in whatever order the characters appear and is kind of a sloppy list before they are added to the “Chapters” or clan tabs later on (Note to self: Add Liqin to the Lan tab).
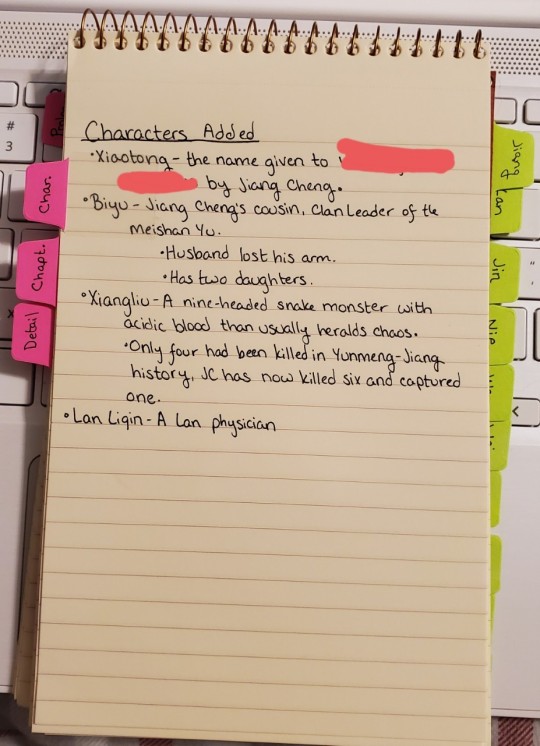
-----
-----
System 2: Index Cards of DOOM
Really this is the one I thought you guys might need pictures to explain. I posted something about it a few years ago and got a TON of questions. I also want to warn you--- this looks and sounds super intimidating, but it’s actually crazy simple!!
I only keep my index cards until the series I am writing is done, so these are for my original (I mentioned “Project Echo: Part 3″ above, an Avengers fic I finished writing in 2016, so those cards were thrown out).
Here is what the index cards look like when all the damage is done, but read the how-to before you panic!!!
OK, that looks complicated, but here is the key to reading it::
The 4 columns of marks correspond to 4 POV mains. Since the chapters rely on POVs, all the column means is that whatever the card says happened during a specific POV. The column has no other meaning.
Now for the colored markings themselves (which I know in this pic it is hard to distinguish colors but I also wrote on the card itself in that color, which is more useful than the markings at the top)::
Pink:: Aerynn POV, actions that directly move the plot along.
“Aerynn meets with Maya”
“Aerynn liaison with priestess”
Magenta:: Brionna POV
“Brionna introduced”
“Brionna slips out of labyrinth to meet someone”
Sky Blue:: Samena POV
“Samena revealed to be working for White Queen”
“Samena revealed to have Ouroborous”
Both of the above are revealed in her first chapter, so they aren’t spoilers.
Dark Blue:: Nereene POV
“Nereene receives hair combs from #########”
“Nereene attends meeting with ########”
Peach:: A character in a ship, even if what they are doing is not about the ship itself. It just means “love interest” and separates them from the secondary characters.
Pertains to Vivienne (Nereene), Emad (Nereene), and Colm (Samena)
“Colm goes to the Under Vault doors”
“Emad tortures Sorrese”
“Flashback: Vivienne and Nereene saying goodbye”
Black:: Someone planning on killing someone else (You’ll notice Column 1, Nereene, has a lot of black since she is an untouchable sociopath)
“Nereene announces plans to kill Turi”
“Caldair tries to kill Nereene”
Purple:: Secondary Character
“Sorrese introduced”
“Donia visits Nereene”
Red:: Actions against POV mains by others that impede the progress of the plot
“Caldair enacts slave purge” (forcing many of the slave characters into hiding)
“Army moved into capitol” (making missions of slave rebellion more delicate).
This is the simplest picture of all to explain::
Once you’ve got your cards figured out and in their piles, gather them together on a per-chapter basis, write the chapter number at the bottom of the card itself so you can put them in order if they’re dropped or something, and then use 2 alternating colors as you see above to unite cards of each individual chapter.
Basically every time you see a wad of green, then a wad of pink those are cards pertaining to different chapters. Some chapters had more details noted so the wads of cards are thicker, some chapters early on especially (when they just say “introduce character” because I don’t have need-to-note plans) they are only 1-2 cards.
This is just so if you need to quickly grab the cards for, say, Chapter 10, you can count the alternating colors and pull out just the cards for Chapter 10 without having to flip through the fronts of them to the numbers you wrote.
So yeah, those are my systems.
Usually I just write free-range. I only plan long-form fics. I don’t really have a specific cut off for what counts as a long form vs shorter fic. My longest short-form fic is 6 chapters and my shortest long-form fic is 35 (I think, I’ve rewritten the first 10 chapters of Project Echo: Part 1 a few times to adjust how it begins so I think it’s at 35 now).
Just decide for yourself if you need intense pre-planning (System 2) or if you want to let the story flows where it flows while still keeping track of details you may need to recall later on (System 1).
#my writing#writing references#writing reference#mine#ask#PLEASE BE AWARE:: on PC it is glitching and locking the 'keep reading' at the very top above any text#I did not place it there and it doesn't show up in HTML view even for me to remove#maybe my computer is glitching but yeah#i answered in detail beneath#so if you are on computer just click through#and fuck this glitchy website
30 notes
·
View notes
Last Seen Blogs

ancientsims
Muhteşem Yüzyıl in the Sims 3

eltriconfessions-blog
EL TRI CONFESSIONS

thehealthville
The Healthville


online-earning-method
Top 10 Online Earning Method