#woodworking diy
Text
Mastering Advanced Woodworking Techniques
Woodworking is an art form that has been practiced for centuries, with its roots dating back to ancient civilizations. From building shelters to creating intricate furniture pieces, woodworking has evolved into a fine craft that requires skill, patience, and precision. While many enthusiasts may have some experience with basic woodworking techniques, mastering advanced techniques is crucial for those looking to take their craftsmanship to the next level. In this article, we will delve into the world of advanced woodworking techniques, exploring the various methods and skills that can elevate one's woodworking skills to a professional level. Whether you are a seasoned woodworker or just starting out, this guide will provide valuable insights and tips on how to master advanced woodworking techniques and create stunning, one-of-a-kind pieces that will stand the test of time. So, let's sharpen our tools, roll up our sleeves, and dive into the world of advanced woodworking techniques.
Precision cuts: achieving flawless edges
Achieving precise, flawless edges is a crucial aspect of mastering advanced woodworking techniques. It requires a combination of skill, patience, and the right tools to achieve the desired results. Whether you are working with wood, metal, or other materials, the ability to make precise cuts is essential for creating high-quality, professional-level pieces. In this article, we will delve into the importance of precision cuts and offer tips and tricks to help you achieve flawless edges in your woodworking projects. By mastering this fundamental aspect of woodworking, you will be able to take your craft to the next level and create truly exceptional pieces.
Joinery mastery: perfecting complex connections
In addition to achieving precise edges, mastering complex connections is another essential skill for advanced woodworkers. These connections, such as dovetail joints and mortise and tenon joints, require a high level of precision and attention to detail. One small mistake can affect the overall stability and strength of the piece. By perfecting these complex connections, woodworkers can elevate their craftsmanship and create truly impressive and durable pieces. In this article, we will discuss techniques and strategies for mastering these advanced woodworking techniques and taking your skills to the next level.
Advanced shaping techniques: sculpting intricately
Another crucial aspect of advanced woodworking is mastering the art of intricate sculpting. This involves using different tools and techniques to create intricate and detailed designs on wood surfaces. It requires a high level of precision and control, as well as a deep understanding of how different types of wood respond to various shaping methods. By mastering intricate sculpting, woodworkers can take their pieces to the next level and add unique, personalized touches that truly showcase their skill and creativity. This skill can also open up new opportunities for creating custom pieces and fulfilling more challenging and rewarding projects. With practice and patience, advanced woodworkers can become experts in sculpting and elevate their woodworking abilities to new heights.
Veneering secrets: creating stunning finishes
One of the key components of advanced woodworking is the art of veneering. Veneering allows woodworkers to create stunning finishes by applying thin layers of wood to a base material. This technique not only adds a beautiful aesthetic to the piece, but it also adds strength and durability. To achieve the best results with veneering, it's important to understand the different types of veneer, the proper techniques for applying and cutting veneer, and how to properly seal and finish the final product. With these veneering secrets in your repertoire, you can take your woodworking to the next level and create truly stunning pieces.
Mastering inlay and marquetry: Elevating craftsmanship
Another advanced woodworking technique that can take your craft to the next level is mastering inlay and marquetry. These techniques involve using small pieces of contrasting wood, metal, or other materials to create intricate designs on the surface of a piece. With precise cutting and fitting skills, as well as an eye for design, woodworkers can add a touch of elegance and sophistication to their pieces through inlay and marquetry. These techniques require patience and attention to detail, but the end result is a stunning piece that showcases advanced craftsmanship. By incorporating inlay and marquetry into your woodworking, you can elevate your skills and create truly unique and beautiful pieces.
Advanced router techniques: Enhancing versatility
Another advanced router technique that can greatly enhance the versatility of your woodworking skills is edge banding. This involves applying a thin strip of material, such as wood veneer or PVC, to the exposed edges of a piece of furniture, giving it a clean and finished look. This technique allows woodworkers to use less expensive materials for the main structure of a piece while still achieving a high-end appearance. It also opens up the possibility of incorporating different materials and textures into a design, giving the finished piece a more dynamic and visually interesting look. By mastering edge banding, woodworkers can take their creations to the next level and truly showcase their skills and creativity.
Fine furniture finishing: achieving showroom-quality
Achieving a showroom-quality finish on your fine furniture is the ultimate goal for any woodworker. It not only enhances the overall appearance of the piece, but it also adds value and longevity. To achieve this level of perfection, it is important to pay attention to every detail of the finishing process. From selecting the right materials to mastering the techniques, every step is crucial to creating a flawless finish. In addition to edge banding, other advanced techniques such as hand-rubbed finishes and French polishing can also elevate the look of your furniture to a professional level. With patience, practice, and attention to detail, you can achieve a showroom-quality finish that will make your furniture stand out as a masterpiece.
Carving mastery: creating intricate designs
Another important aspect of mastering advanced woodworking techniques is the ability to create intricate designs through carving. This skill requires patience, precision, and a steady hand to achieve the desired results. Whether it's adding decorative motifs to furniture pieces or creating stand-alone wood carvings, mastering this technique can elevate the overall aesthetic and value of your work. It takes practice and dedication, but with the right tools and techniques, you can achieve carving mastery and take your woodworking skills to the next level.
Advanced sanding techniques: achieving smoothness
Achieving a smooth finish on wood surfaces is a crucial aspect of advanced woodworking techniques. While sanding may seem like a simple task, there are specific techniques and tools that can help you achieve a flawless finish. The key is to start with a lower-grit sandpaper and gradually work your way up to a higher-grit sandpaper, as this will smooth out imperfections and create a polished surface. Additionally, using a sanding block or a power sander can help provide even pressure and prevent uneven sanding. Remember to always sand with the grain of the wood to avoid creating scratches or marks. With these advanced sanding techniques, you can achieve a professional level of smoothness on your woodworking projects.
Woodturning wizardry: sculpting exquisite forms
Another advanced woodworking technique to master is woodturning. Woodturning is the process of shaping and sculpting wood by rotating it on a lathe while using specialized tools. It requires precision, control, and a deep understanding of the wood's grain and characteristics. With woodturning, woodworkers can create intricate and unique forms, from bowls and vases to decorative objects and furniture components. By honing their woodturning skills, woodworkers can elevate their craft and produce truly exquisite pieces.
In summary, mastering advanced woodworking techniques requires dedication, patience, and a willingness to learn. By continually pushing yourself to try new techniques, you can expand your skills and become a true master in the art of woodworking. With the right tools and knowledge, you can create beautiful and intricate pieces that will stand the test of time. Keep practicing and honing your skills, and soon you will be able to take on any woodworking project with confidence and precision.
FAQ
What are some advanced woodworking techniques that can be used to create intricate designs and patterns in wood?
Some advanced woodworking techniques that can be used to create intricate designs and patterns in wood include marquetry, inlay, carving, and woodturning. Marquetry involves using thin pieces of wood veneer to create detailed and decorative designs on the surface of a larger piece of wood. An inlay refers to the process of cutting out a recess in the wood and fitting it with contrasting materials, such as metal or another type of wood, to create patterns and designs. Carving involves removing wood to create intricate shapes and designs, while woodturning involves shaping wood on a lathe to create symmetrical and detailed patterns.
How can one achieve a seamless and invisible joint when working with different types of wood?
Achieving a seamless and invisible joint when working with different types of wood requires careful planning and precise execution. One key aspect is to select woods with similar grain patterns and colors to ensure a harmonious blend. Proper measurement and cutting techniques, such as using a sharp blade and making accurate cuts, are essential. Additionally, ensuring a tight fit by using clamps or other joining methods, along with using appropriate adhesives, can help create a strong and invisible joint. Sanding and finishing the joint afterward will help to further conceal any visible seams and create a seamless appearance.
What are some effective methods for creating complex curved or angled shapes in wood?
Some effective methods for creating complex curved or angled shapes in wood include using a bandsaw or jigsaw to cut along the desired curve or angle, using a router with a template or jig to shape the wood, using a scroll saw for intricate cuts, and employing steam bending techniques to bend the wood to the desired shape. Additionally, using a combination of hand tools such as chisels, rasps, and files can help refine and shape the wood further.
What are some advanced finishing techniques that can be used to enhance the natural beauty of wood?
Some advanced finishing techniques that can enhance the natural beauty of wood include sanding to a finer grit, using wood dyes or stains to deepen or alter the color, applying multiple coats of clear finish to create depth and shine, using techniques like glazing or distressing to add visual interest, and applying a final coat of wax or polish to enhance the wood's natural luster. These techniques can bring out the grain patterns, highlight the natural color variations, and give the wood a smooth and polished appearance.
How can one master the art of wood carving and create intricate and detailed sculptures from a single piece of wood?
To master the art of wood carving and create intricate sculptures, one must first acquire the necessary tools and materials. Next, it is essential to practice and develop a good understanding of the different carving techniques, such as relief carving and chip carving. Learning from experienced woodcarvers through workshops or online tutorials can be immensely helpful. Patience, attention to detail, and a steady hand are crucial in achieving intricate and detailed sculptures. Beginning with simpler designs and gradually progressing to more complex ones can also aid in honing skills. Regular practice, experimentation, and a genuine passion for the craft are key to becoming a master woodcarver.
#woodworking#woodworking tools#woodworking techniques#woodworking techniques and tips#woodworking projects#woodworking tips#woodworking hacks#woodworking chisel techniques#woodworking project#advanced woodworking#woodworking diy#woodworking skill#fine woodworking#waste to a cool woodworking project.#woodworking ideas#woodworking design#woodworking passion#woodworking artistry#woodworking guide#woodworking skills#woodworking craftsmanship
0 notes
Video
undefined
tumblr
Source
2K notes
·
View notes
Text
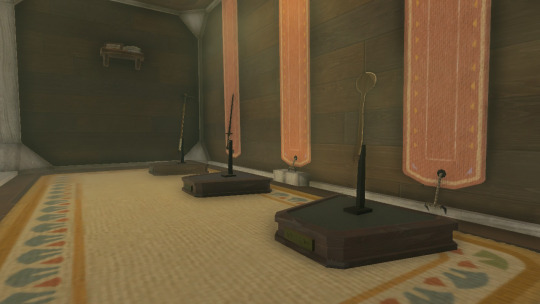
i made these sword wall mounts from Link’s house in BotW! i made three in total to match the three in Link’s Hateno house. the TotK ones are slightly different, featuring a rod to stand the weapon upright, rather that against the wall.*
i’m gonna be overly descriptive here for my own reference, as well as anyone else who would like to make something similar!


here’s the specs:
mount:
h - 44 in // w(top) - 16 in // w(bottom) - 14 in
plaque:
h - 2.5 in // w - 8.5 in
- made from plywood and cut wooden sticks
- bindings used screws, wood glue, and a nail gun
- base colour using spray paint
- border colour using primer paint
- fastened with velcro temporarily
- backside is hung on wall with a wire line
i plan to add Hylian text to the plaques. probably something general rather than a specific weapon name (so i can swap swords between mounts).
also planning to replace the velcro strip with a leather strap and buckle. something adjustable for different sizes. i’ll either use rivets or simply cut two slots in the sides for the leather strap to go through.
all my swords i plan on hanging here are high-density foam/PVC pipe. so far, i have the royal claymore, great flameblade, and master sword. although the first two are larger in game, they are roughly the same size as the master sword seen in the photos. this allows me to make a one-size-fits-most build!

inspired by u/ on reddit and twitter for the inspiration!


*here’s the different versions between games:

#legend of zelda#botw#the legend of zelda: breath of the wild#zelda botw#botw link#loz botw#tarrey town#hateno house#hateno village#breath of the wild#sword#zelda diy#zelda decor#botw diy#botw decor#diy projects#diy craft#diydecor#woodworking#medieval#ren faire#fantasy#cottagecore#botw cosplay#cosplay props
87 notes
·
View notes
Text
So I am a bit dumb and i bought a second hand aquarium and stand which is too heavy for my floor. Thankfully the front of my house has a covered concrete patio I can put it on!
Problem, the stand is timber and I am very sure it is not sealed properly against the elements. Even if it is going to be under cover.
I am seeking advice on how to seal this as best as possible to make it as waterproof as possible with as little effort as possible because I don't own any kind of sanding tools other than sandpaper and it's got lots of nice decorative curves. i.e I can't sandblast it. Also the back edges don't look finished in any way so I can see the plywood and where they didn't varnish it everywhere originally.
Help woodworking/DIY tumblr!


103 notes
·
View notes
Text
Retirement
My husband worked as a forester for 30 years, and retired this month. He worked as a cabinet-maker before college, and wants to spend at least part of his retirement getting back to his 'woodworking roots.'
Years ago he made a butcher-block style countertop when we updated our kitchen (from the 1950s to the 2010s) He very carefully cut out the part where the double sink would go and tucked that rectangular piece away for 'someday'. Someday came last weekend, when he took the metal base from an old Singer sewing machine, cleaned up the edges of the section of butcher-block, and put it all together.
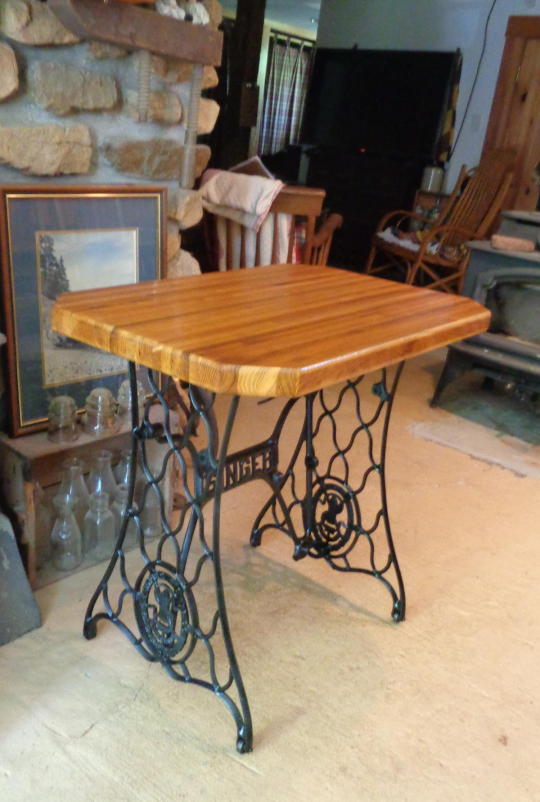

Since there are ALL KINDS of unique bits and pieces of wood and other materials at Home Farm, he will be able to make quite a few one-of-a-kind pieces with almost no cost for materials. He just needs to figure out how to price them and sell them.
#woodworking#diy#handmade#handcrafted#table#furniture#sloarpunk#reduce reuse recycle#upcycle#vintage
220 notes
·
View notes
Text


𝓣𝓲𝓼𝓱
x x x x x x x x x
#stim#stimmy#sensory#stimboard#stimblr#palia#tish#woodworking#flowers#paint#drink#diy#cosmetics#hands#food#green#blue#teal#mint#brown#tan#yellow#ice cream#joinery
24 notes
·
View notes
Text
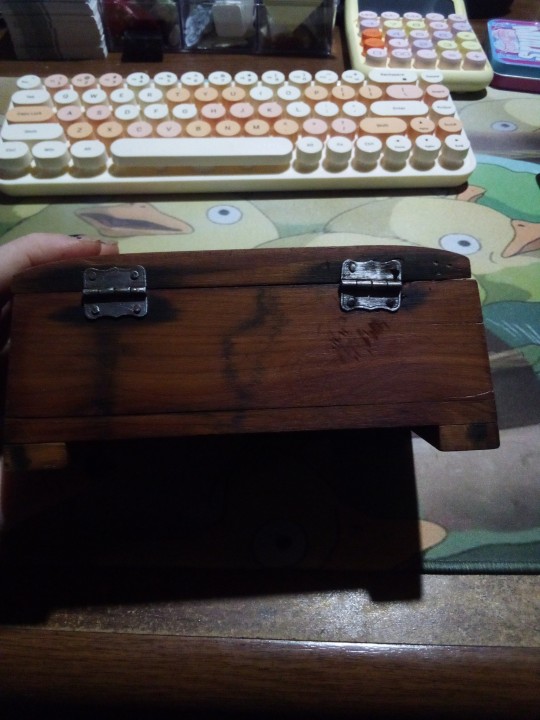
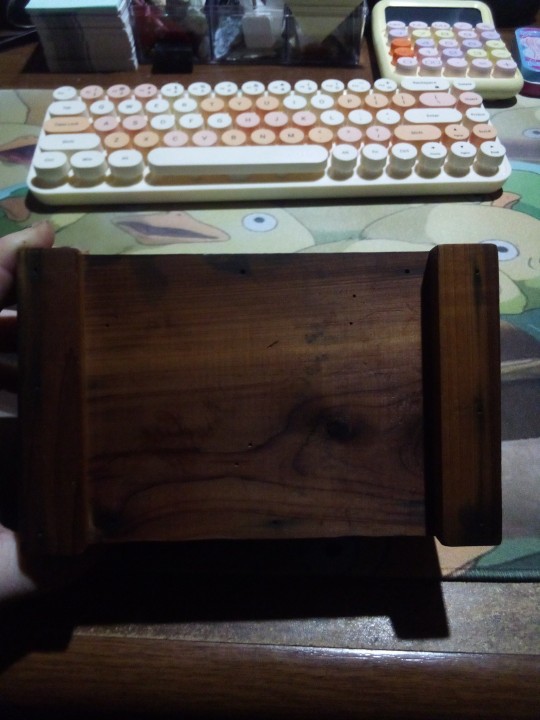
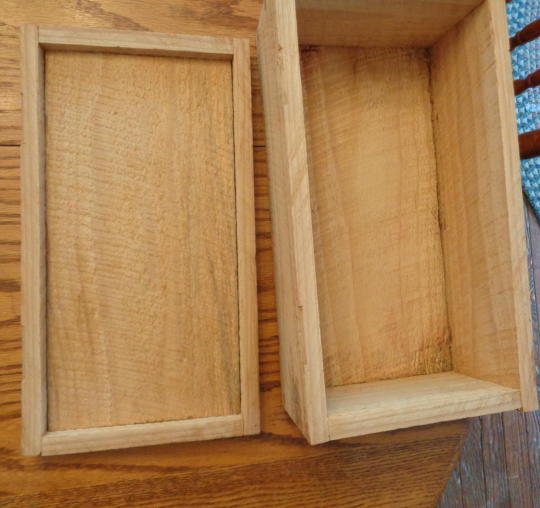
I forgot to take a before picture(RIP) but my first restoration/remodel!
Got this little wooden box from the thrift shop and it was in bad condition, loose wobbly off center hinges, an ill hitting lid, chipping laquer and scratched to hell.
Used what I had on hand, so it's not perfect, but I think it's pretty!
Sanded her down and sanded down the metal bits with some wd40 and put everything back together. Gave her a light coat of wd40 to make the grain stand out more and to shine it up (more of a light satin type shine) and she's done!!


#woodworking#2ood#jewelry box#aesthetic#goblincore#gremlincore#woodworking is cool ok#i kinda wanted to wood burn it but i dont have that much talent lmaoo#diy#repair#restoration#antique#vintage#idk its solid wood so its prob p old lmao#woodwork#restoration diy#do it yourself#crafting#crafts
77 notes
·
View notes
Text
Kicked out of Home Depot for nailing all the 2x4s together
#woodworking#diy#home improvement#r/196#196#r/196archive#/r/196#rule#meme#memes#shitpost#shitposting
27 notes
·
View notes
Text
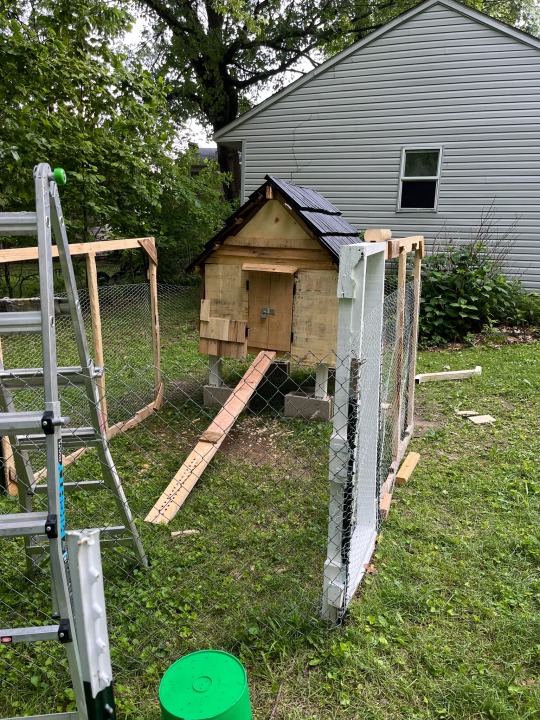
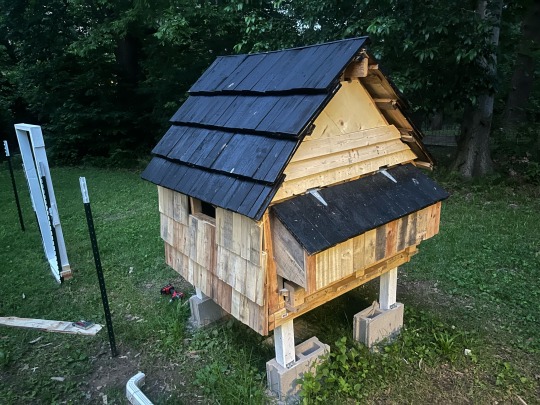
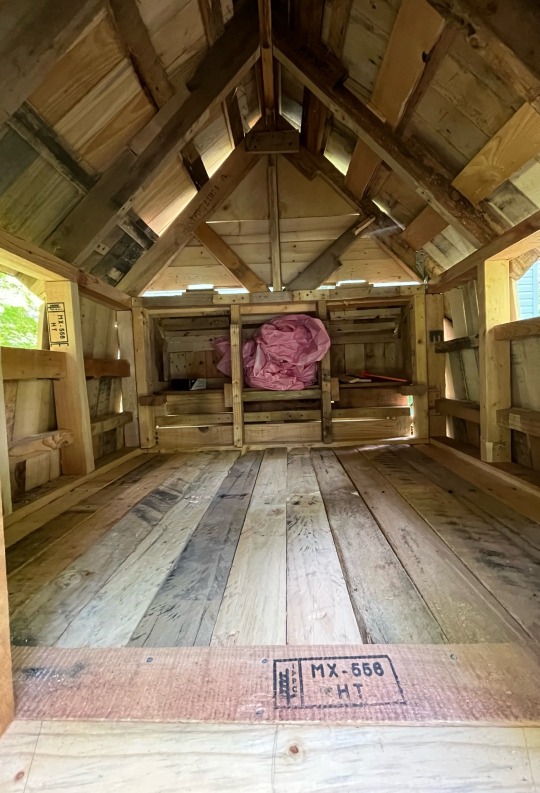
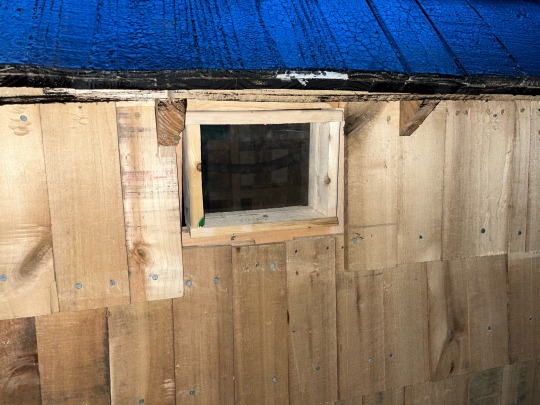
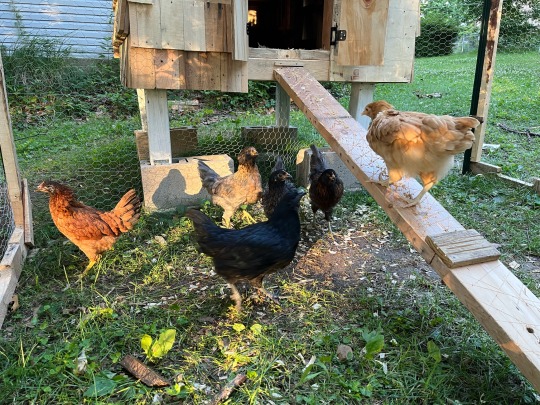
Long time Tumblr enjoyer, first time poster.
Here is a chicken coop I have been building. In true goblin fashion it is 90% made from pallet wood and reclaimed materials aka trinkets from my travels. See list below for examples
Palletwood- taken from local shipping company
Nails- removed from mallet Pallet wood, bent back to shape
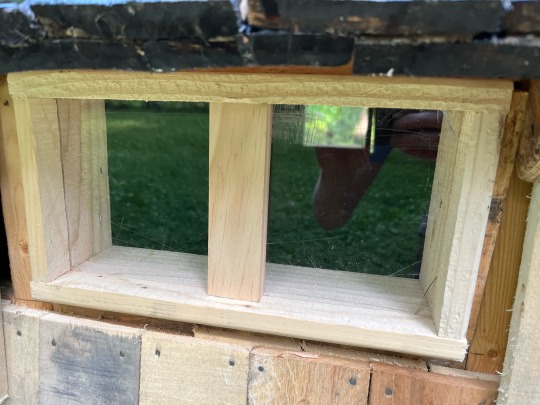
Windows: made from a scrap of acrylic found in the dumpster at work
Vertical posts: dug out of the creek behind my house
Cain link fence for the run: also dug out of the creek
Concrete pavers: also also dug out if the creek
These pictures are from various points in the process and trust me, I have taken loads more if anyone is interested… I’m still working on a more permanent run but hopefully that will be done soon. I’m glad to finally have the chickens in it!
#farm#chickens#reclaimedwood#woodworking#chicken coop#goblin aesthetic#goblincore#wooden pallets#trashy coquette#cheap handyman special#diy projects#diy or die#chicken mom#eggs#cowboy#diy
44 notes
·
View notes
Text
Making a cute new cage for our piggies because they need an upgrade ^-^ Which is better:
I ran out of options to do an "other" but please PLEASE if you have more ideas put them in the tags/notes.
I'll show the sketches of the favorite ones + explain some cool ideas I had for them. We're building one of them now, but it's also built such that we can swap rooms out, so we can make more of these later lol. Ever shifting building seems a bit Magnus Archives Michael McFuckHands Distortion to you? A bit evil? Well it's enrichment. For me. (For the pigs. For the pigs.)
#guinea pigs#poll#humor#funny#guinea pig cage#building#diy#woodworking#crafts#pets#cavies#hal rambles
23 notes
·
View notes
Text

been collecting vintage tiles for the surface of the studio work bench I’m building. a bunch of these were sourced from demolition sites in the path of Sydney’s WestConnex motorway, scraps of vintage fireplaces rescued from the rubble by another local artist.
aiming to use recycled/second hand materials where possible…sourcing recycled timber next week <3
#ceramic tiles#vintage#cottagecore#home & lifestyle#artists on tumblr#home decor#diy projects#art#tiles#diy craft#woodworking#studio#tile art#mosaic#ceramics#recycling#upcycle#reduce reuse recycle#creatives#vintage decor#mid centruy modern#furniture#art project
19 notes
·
View notes
Text
hear me out hear me out

swap au

#shitpost#my artwork#silly doodles#castlevania#castlevania games#akumajou dracula#haunted castle#castlevania haunted castle#simon belmont#selena belmont#selena (haunted castle)#castlevania selena#acnh#animal crossing#animal crossing new horizons#cyrus animal crossing#reese animal crossing#swap au#my au#crack au#i just want simon and selena to be happy man#ive heard a few other people say that they had simon woodworking / diy man headcanons so i think that could tie into this as well#hence him being cyrus and selena as reese#tbh i feel as if reese and cyrus were in haunted castle#dracula would kidnap cyrus instead of reese 💀💀#idk why i think that but i just do#just hear me out#sorry if the drawing on the top looks stupid thats because it is and idk how to draw animals and my phones at 6% 💀💀#you can tell which ones are my favourites with these doodles...#honestly i'd like a lot if simon belmont customized my then-ugly bed for me
14 notes
·
View notes
Text


I built this small guitar/ukulele for fun.
The neck-trough design was sculped from a single slab of pine, dyed and finished with teak oil.
The pickup cover, wraparound tailpiece and pickguard were handmade. The tailpiece was made from a block of aluminium from a power supply heatsink. I left some of the grooves to position the F string saddle.
It has a 17" scale, and uses standard guitar strings. I tuned it to G, C, F, A#. It is the same as the four upper strings of a standard guitar with a capo at the 3rd fret. This way I can play some power chords on it.
8 notes
·
View notes
Text
Second creation of the forest wave ~
7 notes
·
View notes
Text
Do NOT know why my father made this; however, I can use it. I removed the hinges, rough-sanded most of the surfaces, and got a nice, fragrant* coat of tung oil on it. The smaller piece will become a shallow shadow box lined with a piece of an EXTREMELY old hexagon quilt I was given by an older neighbor. The larger piece


m-i-g-h-t help alleviate the clutter that build up on the night table. Maybe. So I can take "box" off the project list and add "wood painting", because my husband got this piece sanded smooth:

and he would like me to paint this little creek on there.

So I need time to sew, craft, cook, clean, take care of Hero and the pasture, the garden, tutor, paint, and uh . . hmmmm. No, nope, I can definitely do everything. This will work.
.* well I think it smells kind of nice; it's oil from nuts of the tung tree.
#farmblr#diy projects#diy#woodworking#reduce reuse recycle#farm#artists on tumblr#momblr#solarpunk#crafting#upcycle#oil painting#artist
70 notes
·
View notes
Text
youtube
In this video, I'll experiment with making new wood look old using vinegar and steel wool to form iron acetate. This detailed video walks you through the step-by-step process of achieving a sun-weathered effect on wood while explaining the science behind the formation of iron acetate, the role of black tea, and why the vinegar and steel wool solution reacts with wood the way it does
8 notes
·
View notes
Last Seen Blogs

iankihn34-blog
Untitled

emmasblog16
Emmas Blog 16

thegloomking
Hell Was Full, So I Came Back...

thehollowkai
Kai Supremacy

higemania
画像庫