#5 Tips for Using Sewing Patterns
Explore tagged Tumblr posts
Visit Tumblr Blog
Explore Tumblr blogs with no restrictions, modern design and the best experience.
Last Seen Tumblr Blogs


Fun Fact
Celebrities use Tumblr as well.
Text
5 Tips for Using Sewing Patterns
Oh, my crafty friend, I’m thrilled that you’re diving into the magical world of sewing patterns! They’re like roadmaps to your creative dreams, guiding you to easily stitch-up masterpieces. Let me sprinkle some sewing pattern wisdom your way with these five tips that will have you dancing with joy in your craft room. Read and decode: When you first lay eyes on a sewing pattern, take a moment to…

View On WordPress
#5 Tips for Using Sewing Patterns#choosing the right size in a sewing pattern#how to read a sewing pattern#jesyanderson#learn to sew#learn to sew in dayton#needle ink and thread#patttren markings#sewin with patterns#sewing classes near me#sewing patterns tips#what do pattern markings mean
0 notes
Note
what kind/style of endbands do you usually do? they look so good 👀
hi!! sorry for taking a while to answer, I wanted to make sure I could give you my best answer.
I usually do what's called a "double core" endband. I use double core endbands over the "bead on front" method because bead on front style is not great for uneven distributions of color, irregular patterns, or using more than three colors. Functionally it works by having your extra threads wrapped up inside the thread that is showing, forming the smaller secondary core. Ultimately you are doing figure 8s around the main core & then your secondary core of thread. This keeps things pretty neat & tidy. The tutorial I first used was this one by DAS Bookbinding, though I don't think his endband tutorials are his best ones. Another binder I've spoken with endbands about a lot is maleeka, who recently did an endband tutorial herself.
maybe I should do one... but it takes a lot for me to get enough motivation to make videos. I'll take this opportunity to write up some tips I've shared when people ask instead:
1. Endband core material is the MOST IMPORTANT component. You need a core that is stiff but flexible - it should NOT be floppy because it wiggles everywhere under the tension of the thread, but still needs to flex with the opening & closing of the book. You want something that doesn't compress, to reduce tension shifts in thread creating a lumpy endband. Have a smooth core is less critical but helps to avoid snagging threads & allows you some leeway on sliding threads around for adjustments. My personal choice is smooth leather jewelers cord (link is just an example, I get mine from a local craft store).
2. Thread size. All your threads need to be the same size; it will be visible if you are using two different sizes, and mess with your front core. Additionally, I know lots of people will use larger twists of multiple strands of embroidery thread, which can work, but is more likely to compress & alter its size in unexpected ways. A single strand is preferable. If you want something thicker you can find some thread weights that are heavier twists intended to be used in a single strand, not pulled apart. I prefer smaller sizes because it works better for the gradient designs I like.
3. Silk thread is your friend (if you can spend the money on it). It reduces fuzz (no fuzz like you get with cotton/DMC embroidery thread), it's usually easier to manage, has a more compact twist, and a higher shine. I use Japanese silk hand sewing thread in size #9 (9号). There's multiple brands (Tire, Daruma, KNK/kanagawa, etc). Here's a wholesale listing (minimum 20,000¥ for international). A non-Japanese brand is Guterman silk (German brand). Both the Japanese & German threads come in a heavier weight (Japanese is #16, Guterman is buttonhole).
4. Thread tension is the most important part of the actual technique. You need to ensure the threads currently wrapped in the secondary core keep tension when you are working the thread around them.
5. Working on a curve. This is only really relevant if you're doing an endband on a rounded book, but the circumference of the curve means there's more real estate on the outside vs inside of the curve. Sometimes this can cause bunching on the secondary core. My own solution to this is that sometimes I wrap the primary core but drop a wrap here or there around the secondary core (only between two wraps of the same color I'm dropping). I uh... don't know of anyone currently recommending this besides myself so I can't point to any pro endorsement for this method, it's just what works for me. Forgive my terrible writing:
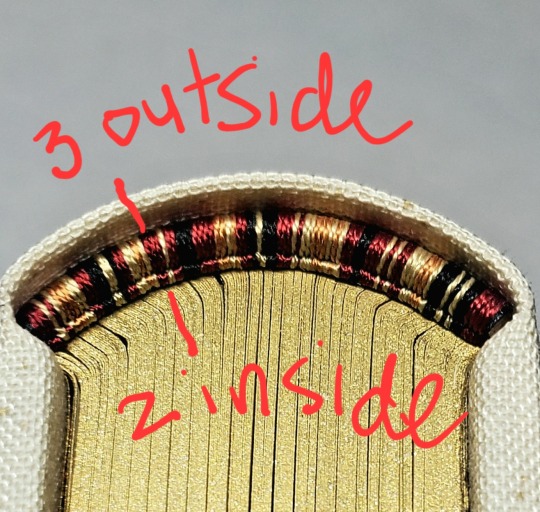
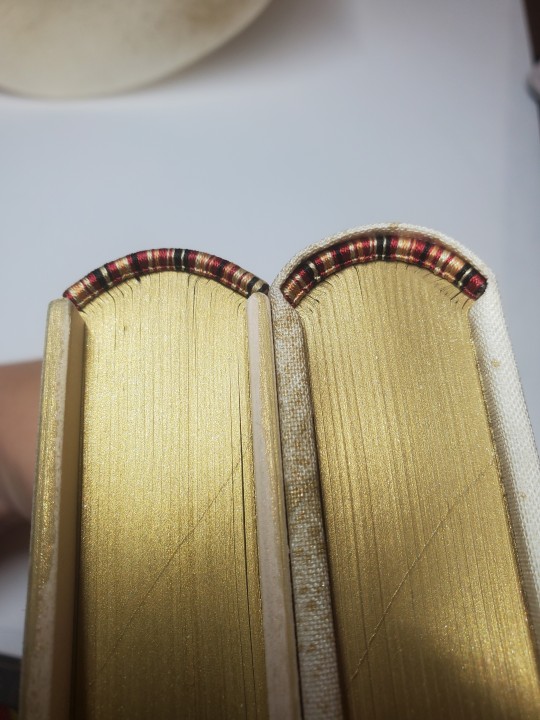
6. Pattern management. I... don't really plan much how my patterns sit on the spine, which is not very helpful. HOWEVER you can do some pattern management on the fly, if you really want your pattern to end at a certain place. Thread can be packed more or less densely on the core, resulting in some pattern compression; you could also strategically drop wraps in less noticeable locations. An unintended example: I was replicating the pattern on this endband (left) when I realize I wasn't packing the thread as densely as I had the first time around (right), which resulted in the overall pattern taking up more space. You can do this on purpose, if you need to.
this was way more than you asked but it gave me a chance to put all this in one spot. Best of luck in vanquishing the dreaded EndWyrms.
#fanbinding#bookbinding#celestial sphere press#in progress review#ask des#i tend to shock ppl a big when i say i don't actually enjoy sewing endbands#i merely Tolerate it#all of this knowledge is 100% spite driven to reduce my own frustration
385 notes
·
View notes
Text
Amigurumi/Crochet Toy 101 + Resources
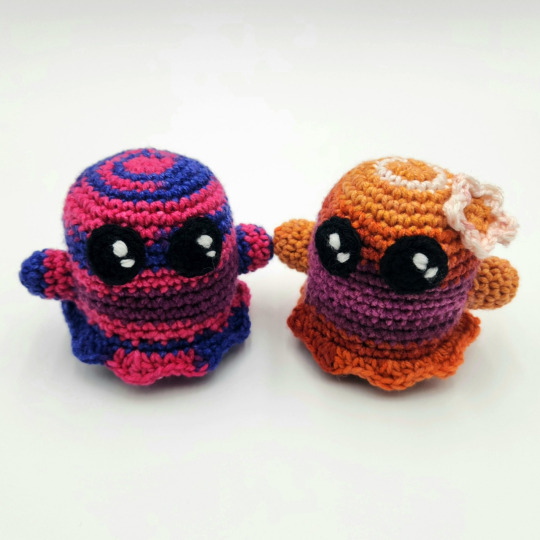
Noticed a couple folks in my tags mentioning that they wanted to learn or wished they knew how to crochet amigurumi. So here's a quick and dirty little how-to guide with resources I threw together? Hope it helps!
Tools + Materials
Crochet is one of those hobbies that is actually relatively cheap to get into. Here is a basic list of what you'll need to get started. You can find most of these at any craft store or even Walmart.
(1) Yarn (Required)
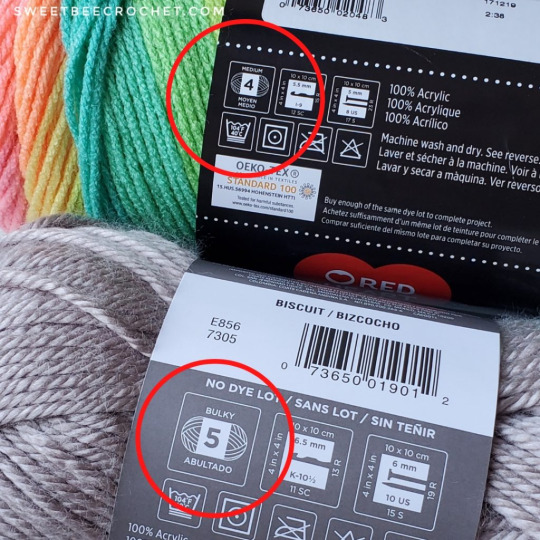
Yarns come in a variety of weights (sizes) and fibers. I recommend a soft, worsted weight acrylic yarn (indicated by a number "4" and "medium" on the yarn label) for your first few projects.
Image
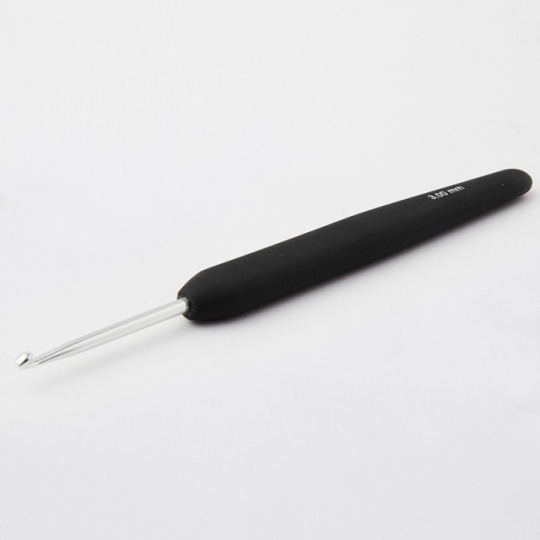
(2) Crochet Hook (Required)
These come in a lot of sizes and styles, and what size you'll use will depend on your yarn weight and how tight you want your stitches to be. I'd recommend buying just one hook to start with rather than a larger set. Metal hooks with ergonomic rubber handles are easiest for beginners (and on your wrists longterm, lol). A 5.0 MM/Size H or a 4.50 MM/Size G works best for making amigurumi with worsted weight yarn.
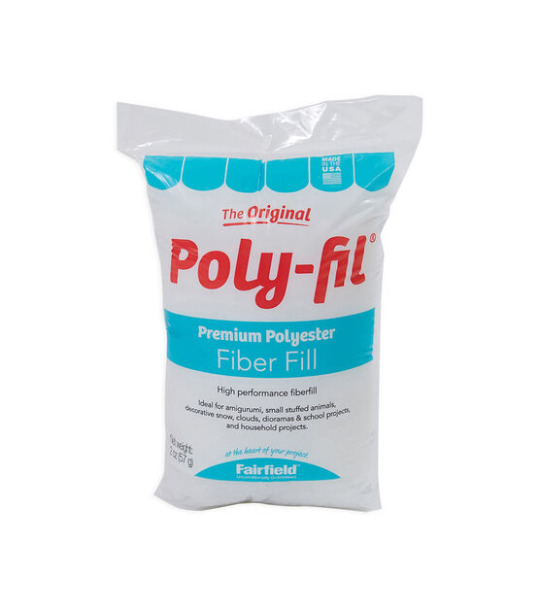
(3) Polyfil/Stuffing (Required)
For stuffing your project.
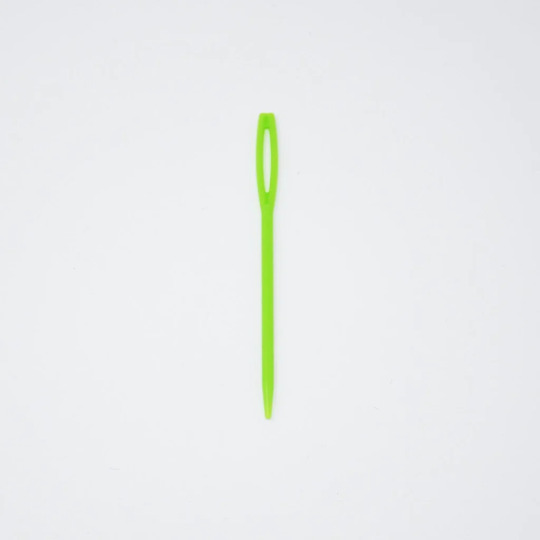
(4) Yarn Needle (Required)
Most crochet projects require sewing to one degree or another. Yarn needles are distinguished from regular sewing needles by their larger size, larger eye, and blunter tip. Yarn needles may be straight, or they may be angled at the tip (i.e. a darning yarn needle).
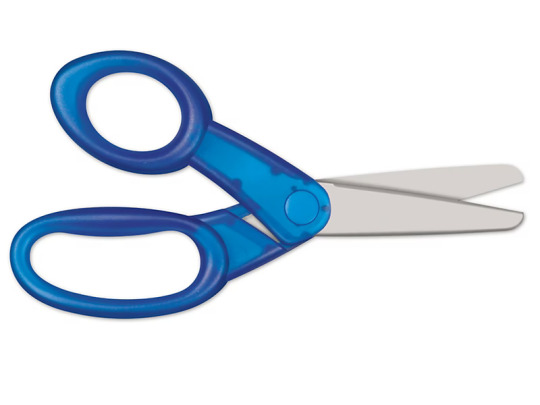
(5) Scissors (Required)
Any sharp, medium-sized pair of scissors will do for cutting your yarn.
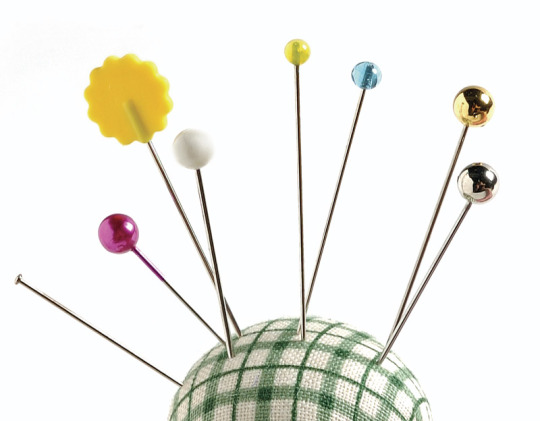
(6) Sewing Pins (Recommended)
For holding parts in place as you sew them on.
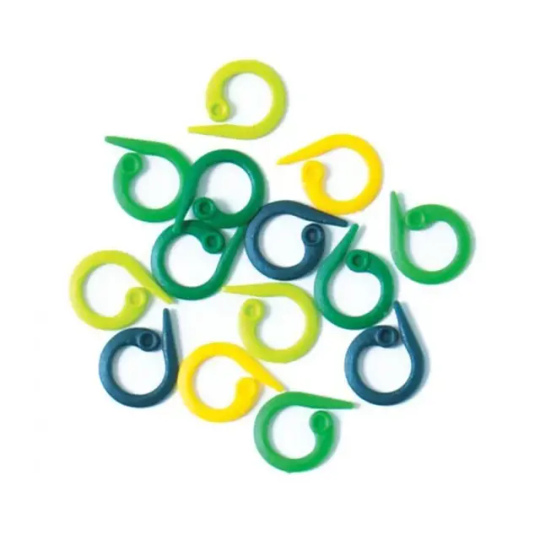
(7) Stitch Marker (Recommended)
Many amigurumi projects are worked in rows of continuous rounds, and stitch markers can be used to mark the beginning or end of these rounds. They can also be used to mark areas of interest in your project or to secure your project to keep it from becoming accidentally unraveled. I strongly reccomend getting split ring ones. Scrap pieces of yarn also work in a pinch as stitch markers.

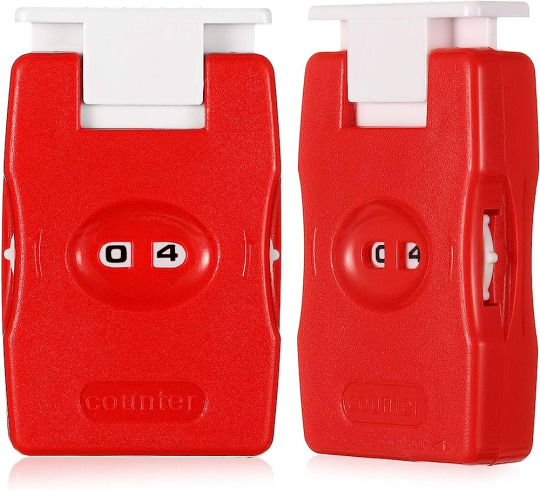
(8) Counter (Recommended)
For keeping track of your rows as you work a pattern.
(9) Safety Eyes (Recommended)
Most amigurumi will require eyes of some sort. Safety eyes (you can find these in various sizes in the doll section of any craft store) will give your project a polished look, but you can also use buttons, felt, or even embroider the eye details on your amigurumi.

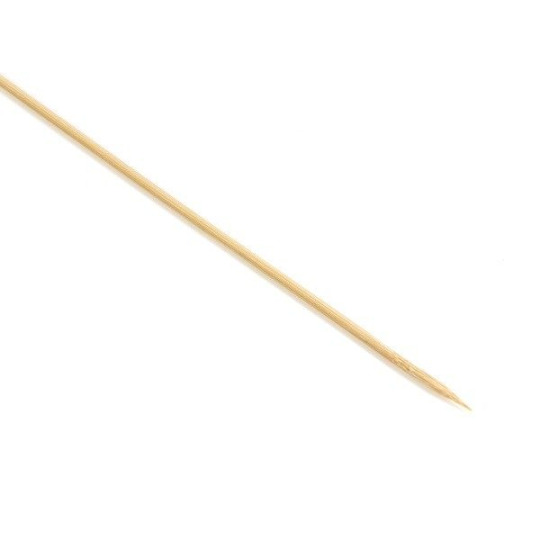
(10) Stuffing Stick (Recommended)
For getting your stuffing into hard-to-reach spots. A chopstick or wooden skewer works very well for this.
Basic Crochet Stitches + Amigurumi Techniques
Most crochet patterns are built from a few basic stitches. Before attempting any larger project, I recommend getting comfortable with these stitches by making a few small, flat pot holders out of each basic stitch. A lot of crochet is pure muscle memory and practice, and this is a great way to start.
There are also a few techniques specific to making amirugumi that will be helpful for you to know. You can find any number of free videos/tutorials online. Below are links to a few videos that I found helpful when I was learning to crochet.

Image
How to Make a Slip Knot
Single Crochet (+ Starting Chain and How to Count Stitches)
Half Double Crochet
Double Crochet
Triple Crochet
How to Keep Starting Chain from Twisting
Magic Ring
Ultimate Finish
Invisible Finish
Invisible Decrease
Beginner Amigurumi Patterns
These were the first three patterns I learned in the process of teaching myself how to make amigurumi. I recommend working them in the order they are listed. The first two links have step-by-step instructional videos and will help ease you into learning to read amigurumi patterns. All of these patterns are free, and there are many more free patterns out there as well. Have fun!
Amigurumi Ball
Amigurumi Whale
Amigurumi Stegosaurus
3K notes
·
View notes
Note
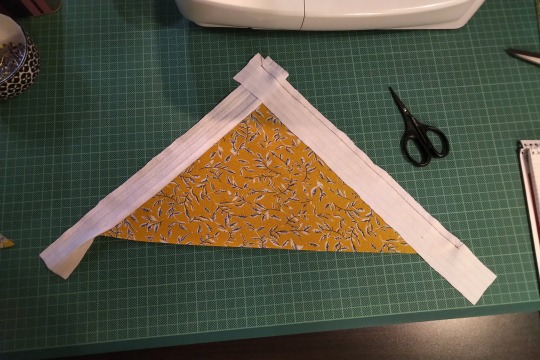
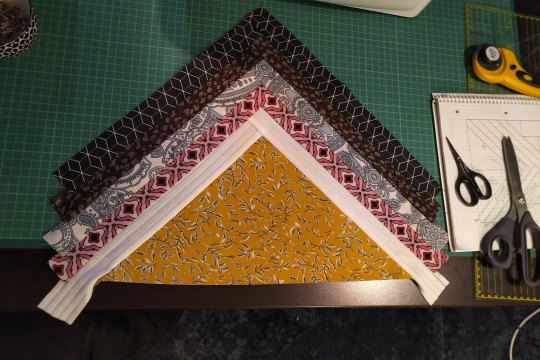
Hi! I just saw your quilted butterflies photo, and I was wondering if you would willing to share how to make them, or link to a tutorial? They're gorgeous and I'd love to try, but i don't know the right search terms to find those, i think.
Oh absolutely! Everyone needs an easy craft to do right now. This will be a photo tutorial, so if you need a video the search terms are "origami butterfly bookmark". The instructions will be pretty similar.
*If you are using a sewing machine a single butterfly should take between 15-30mins, and if hand stitching my guess is ~1hr
Tools: -2 Scrap fabrics or 2x fat quarters, one for the main/outer fabric, one for the inner contrast -I recommend quilting cotton, though any easily ironable, non-stretch fabric will work -ruler and marking tools -scissors OR rotary cutter and mat -Pins (if desired) -Thread in a matching OR contrast colour - depending on preference -Iron and Ironing board - You can use a piece of cotton folded into a thin pad in a pinch as long as it's flat!
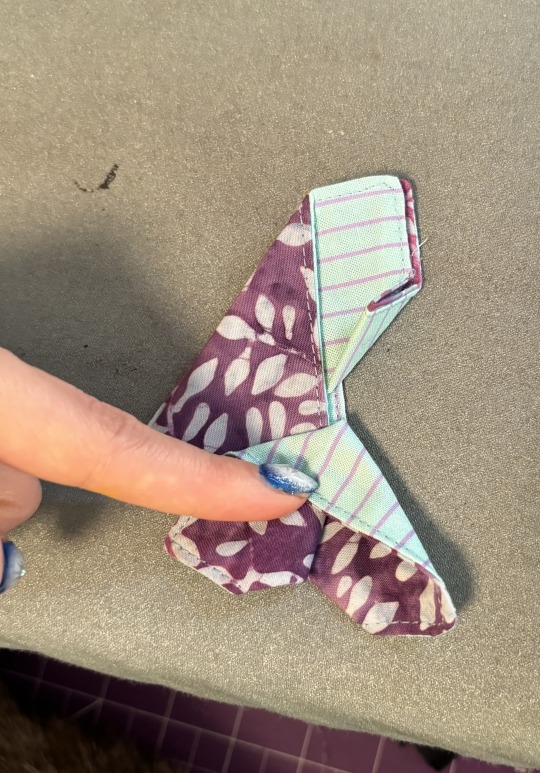
Step 1: Cut out two rectangles. You can make the butterflies as big or small as you'd like, as long as it's in keeping with the 2:3 ratio. For me, I like to use 4" x 6" rectangles. Use your marking tools to mark out the rectangle on the back/wrong side of the fabric, then cut them out!
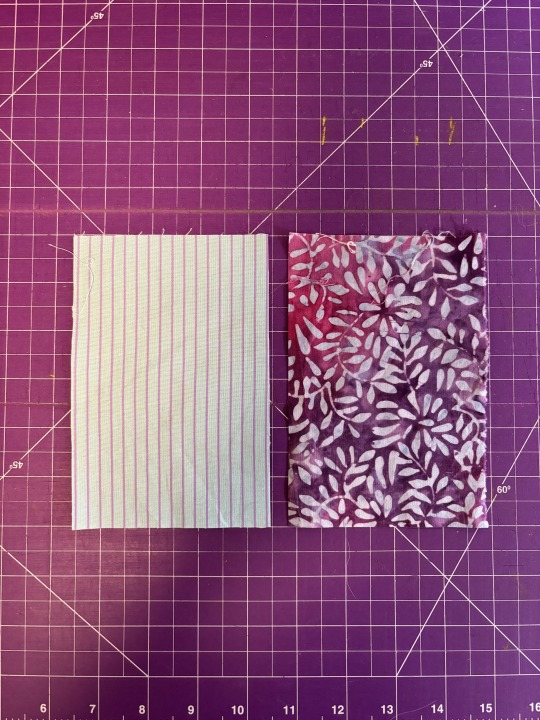
Step 2: Put the rectangles on top of each other, with right/patterned sides facing each other. Make sure all your corners and edges line up. Pin in place if using pins. (in this example one of my fabrics has the pattern on both sides of the fabric)
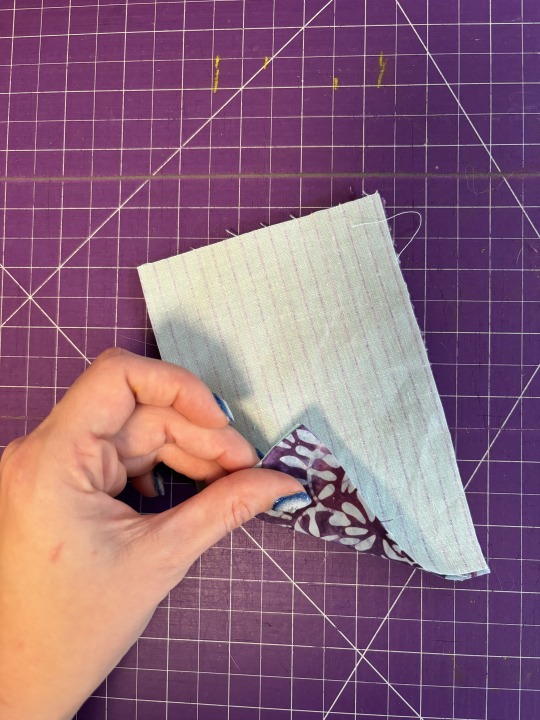
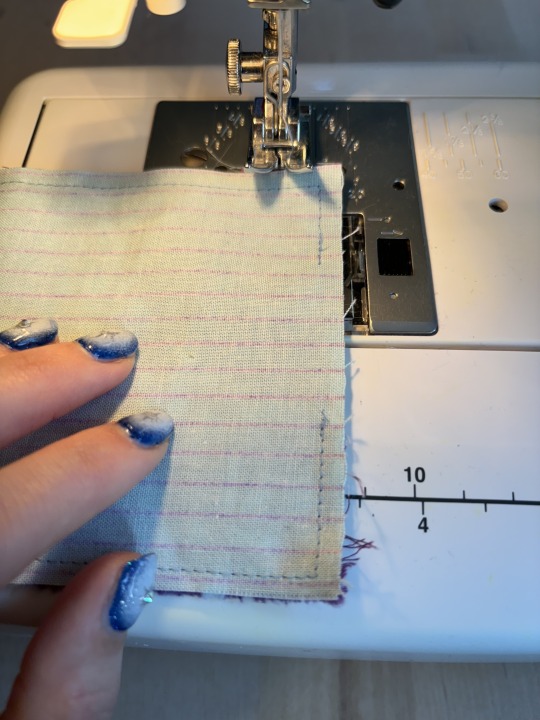
Step 3: Sewing! Mark a 2" gap on one of the short edges. If using hand needle mark out 1/4" distance from the edges. Sew. If using a machine, line up the edge with the 1/4" inch mark and sew. (Image is completed stitching, not placement on machine)
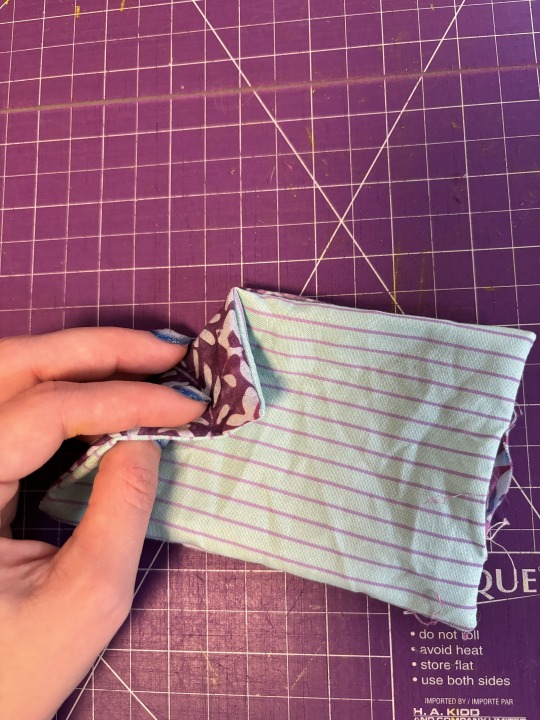
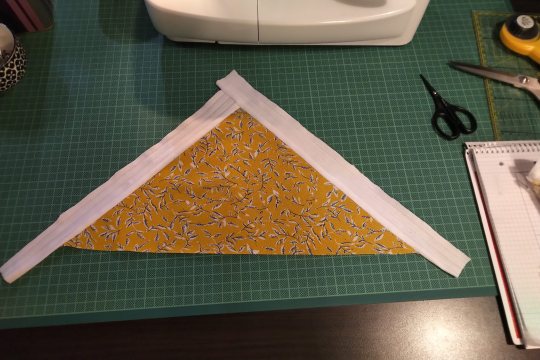
Step 4: Trim the corners without cutting into the stitching line, then flip the fabric inside out through the 2" gap you left. Make sure to stick your finger or something blunt but pokey -like a chopstick- into the corners to make sure they are nice and crisp!

Step 5: Press all your frustrations out by pressing that fabric! Get it nice and flat and crisp! Make sure you've folded in the edges of the 2" gap to match the seam allowance of the already-sewn edges before you press. Then, if hand sewing, slipstitch the gap closed. If using a machine, set your fabric at a 1/8" distance and sew around the edges, effectively closing the gap and giving you a lovely topstitch detail.
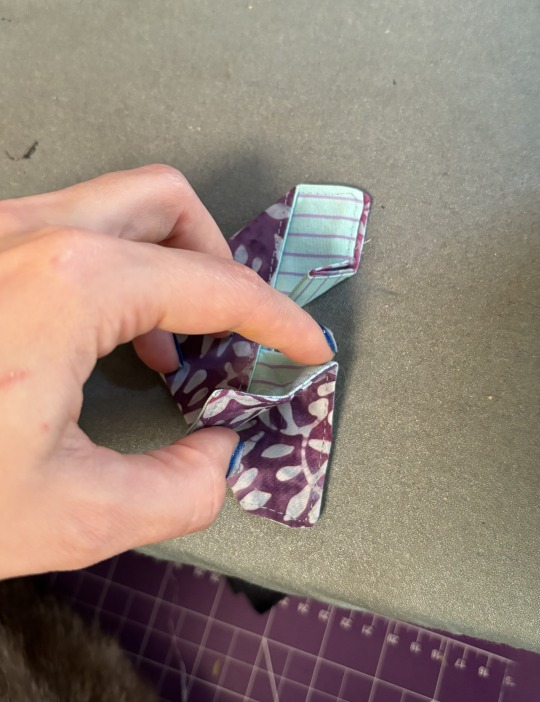
Step 6: Let's start folding! First move we're going to make is folding it in half, bringing the short edges together. Keep in mind, whichever fabric is on the outside will be the main fabric of your butterfly, and what is on the inside will be the contrast! Press hard! Then, make sure the edges you just brought together are facing you for the next step.
Step 7: Take the top fabric of the right open edge and bring it to the left side of the open edge. It will tent up in the corner, use this and press that tent down until you have what looks like a triangle of the outside fabric on top of two rectangles of the contrast fabric. Press! (I forgot to take pics of the whole process with the first one, don't mind the fabric switch).
Step 7.5: Flip your butterfly and repeat step 7 on the other side until you have a strange looking triangle like this.
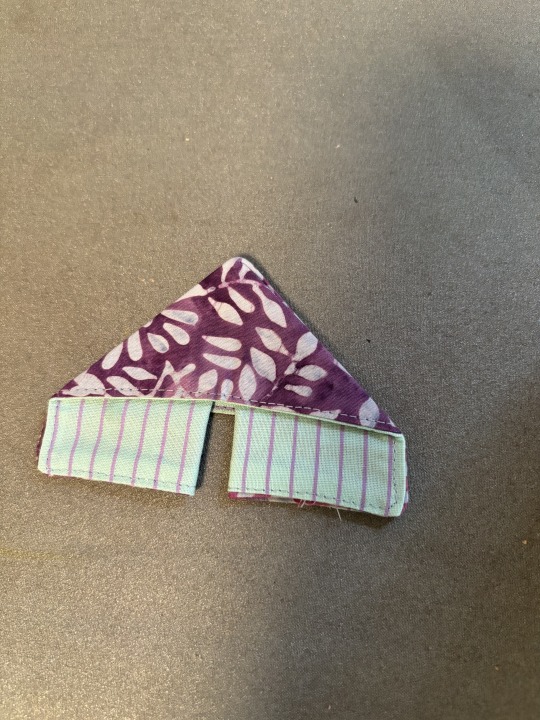
Step 8: Take the inner corners of the contrast fabric and fold it up towards the outer fabric. The bigger this fold, the more contrast fabric you will see in the final butterfly. Press.
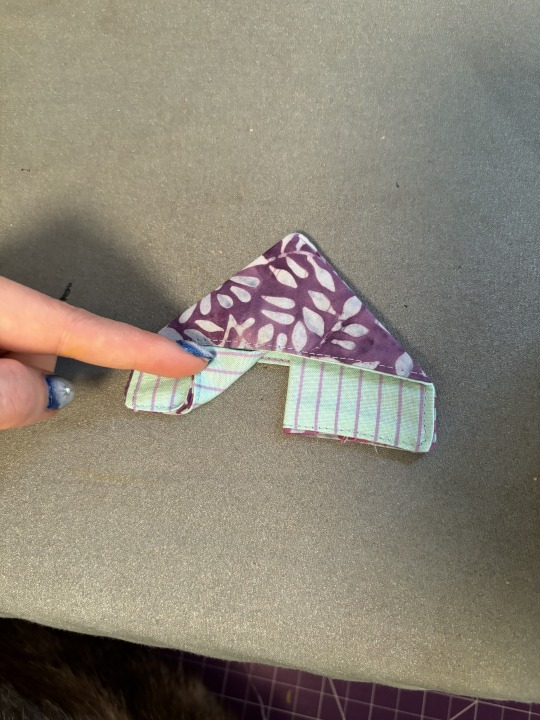
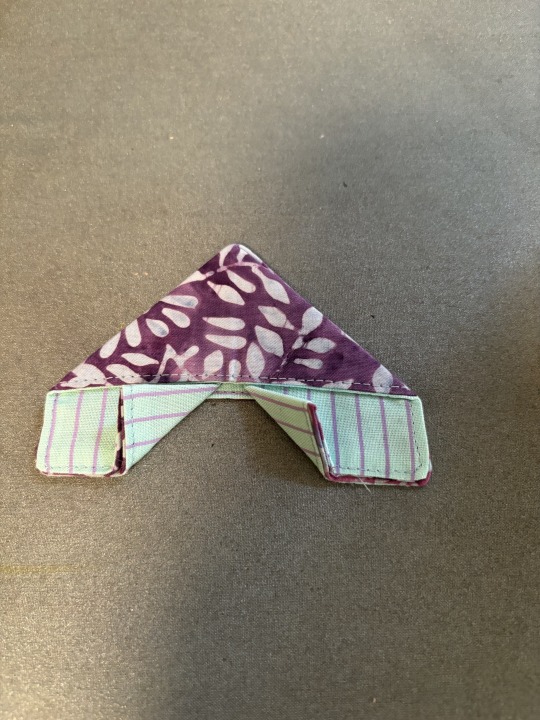
Step 9: Take the tip of one of the corners you just pressed up and bring it back to it's original position. Do not press. Gently press down on the tip of the corner, letting the fabric unfold. The butterfly wing should unfold, with the contrast fabric showing in the centre. Adjust until you have as much contrast showing as you'd like, then press hard. Repeat on the other side.
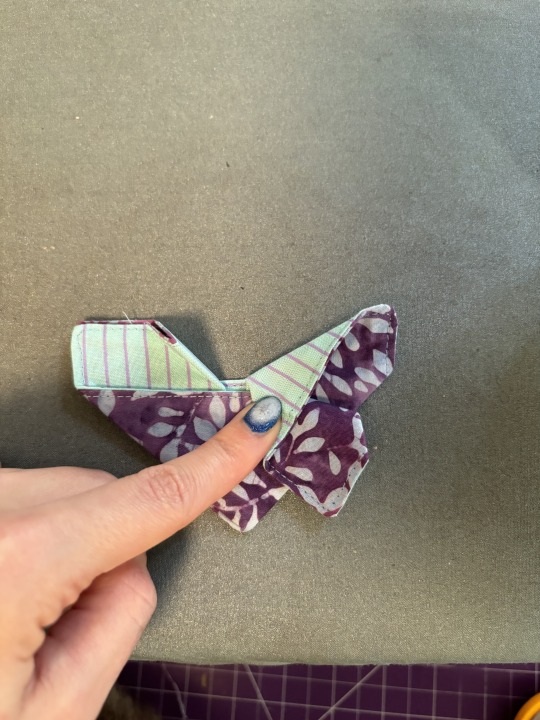
Congratulations!! You now have a butterfly!! You can make a garland, stick them on hairclips, or simply put them on your windowsill to keep you company! If you want to ensure that your butterfly doesn't unfold, you can add a small hand stitch in the centre of the two triangles that make up the "body" of the butterfly right along where the topstitching is.
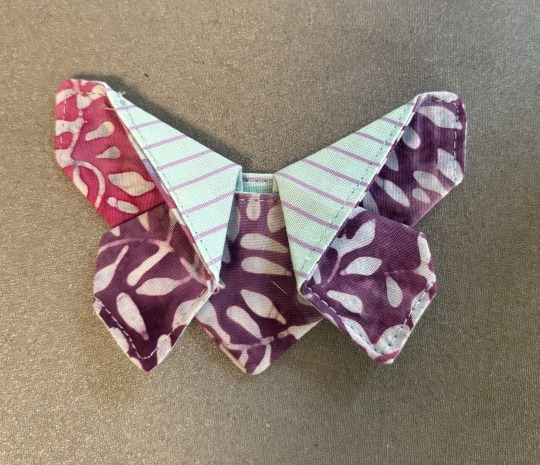
Hopefully this was clear to follow, but if you have any questions, let me know!
230 notes
·
View notes
Text
Progress Pride Flag Quilt Block Pattern & Tutorial
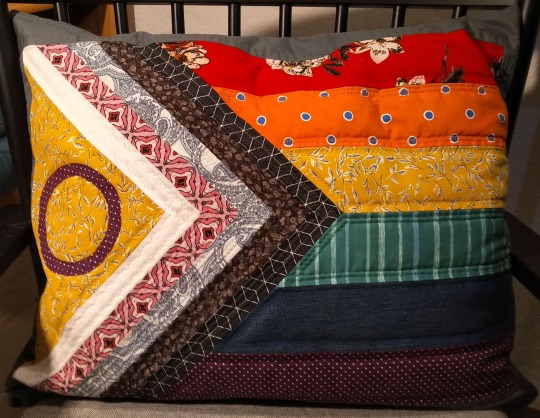
Don't you just love the flag of our people? Do you have an inner grandma that years to make stuff? Do you want to combine these two things and make a queer quilt?
Well, I've got you.
Behold the pattern! And my lack of graphic skills, so I drew it on paper!
Basically it's a bunch of rectangles, one half square triangle and a fuzzy cut circle. I don't know shit about quilting and I was able to come up with it. Why centimeter, you ask? Because I'm German and that's what I'm familiar with. Why weird measurements and not jelly rolls and layer cakes and stuff? Because I'm German and quilting is not really a thing here.
Onto the tutorial!
You'll need:
A scrap of fabric of red, orange, yellow, green, blue, purple, black, brown, light blue, pink, white each
additional fabric for the border
Cutting mat, quilting ruler, roll cutter
sewing machine
thread
pins
double sided interfacing
iron and ironing board
fabric sheers
compasses
Step 1: Cut everything. Duh. We'll take care of the circle later, don't worry about that now. The half square triangle is exactly what it sounds like. A square and then you cut it diagonally. That's why I didn't give the length of the hypotenuse.
(Note: I'm making two blocks at the same time, that's why there's so much fabric. Also this is a middle of the night project, hence the lighting.)
I'm using all kinds of different fabrics, different weights and drapes, some stretchy, some transparent, so I needed to interface some of them.
Step 2: Sew the rainbow together. 0,5cm seam allowance on everything, that's exactly the edge of the foot on your machine. Double and triple check that everything is facing the right direction before sewing. The seam of yellow and green does not get sewn fully, only 21,5 cm! That's important later! Also backtack there. Don't forget to iron.
Step 3: Sew the strips to the half square triangle. For this you have to switch between the sewing machine and the ironing board constantly. Attach the shorter strip diretly to one side of the HST, iron it open. The second strip of the same colour gets attatched to the other side of the HST and the first strip. Look at the pictures closely if you're unsure how that works. Also the strips are longer than the triangle. We'll square that up later.
All strips attatched will look like this. See how the two strips meet at the tip!
Step 4: Cut the rainbow part to size. The length between yellow and green is 22cm long. The shorter seam from before plus some seam allowance. The outsides of red and purple are 44,5cm long. These two points are the beginning and end of your cutting line. You will cut a little triangle from every single colour. Do this slowly and carefully. Maybe your fabrics have stretched a bit (mine did). Don't worry, it will be ok.

Step 5: The Y seam, part one. Y seams are tricky, but there's only one for this block. So put your strips part on your rainbow part and line them up so that the tip of the strip part overhangs the seam between yellow and green by about half a centimeter. Remember that it's not about the edges of the fabric, but where the seam will be. But don't sew all the way! Leave 0,5cm at the tip!
You can also mark on your strip piece two lines 0,5cm from the edges of the black. They should form a little square at the tip. There they meet is where the actual tip on the finished block will be. So place this spot directly on the seem between yellow and green and only sew right up to it. Not beyond.
Step 6: The Y seam, part two. Now, fold both the rainbow part and the strips part in half and if you've done the last step correctly, the remaining two edges will allign. Pin and sew.
I can't explain it better than I've done here, I'm sure there are tutorias out there. Good luck!
Step 7: Square up. Iron your block to that everything is nice and straight and flat. Then use the fabric edges of the red and purple to cut the remaining ends of the strips. Use the HST to cut the white. Be careful, the long side of the triangle is on the bias and likely stretched a bit.
I already added borders here. I'm making a pillow case.
Step 8: Fuzzy cut and raw edge applique. Double sided iron on interfacing is essentially double sided tape. It has two types of glue, one gets activated by 2 seconds of heat, the other by 5 or so (depends on the product). The second side is also covered with a paper that needs to be removed before the second gluing. Read the instructions of the product you are using!
Use your compasses to draw a circle on the protective paper side of the interfacing. It's actually two circles from the same middle point, see pattern. Cut it out roughly. Then place it with the rougher side on the backside of your purple fabric and iron for 2 seconds on middle heat. If you've just ironed your fabric before and the ironing board is still hot, wait for it to cool down. Also let the fabric cool down after applying. Then cut out your circle. The interfacing will have stiffened the fabric, so that shouldn't be a problem. Then remove the protective paper, place the circle on the yellow triangle where you want it and iron for 5 seconds. Let cool.
And you're done! The applique at this point is only secured with the interfacing, but it should hold fairly well. The quilting will secure it further.
And that's it. BTW, did you know that this design was made by Valentino Vecchietti for Intersex Equality Rights UK in 2021? Now you do. Happy quilting!
#lgbt+#lgbtq+#lgbtq community#pride flag#progress pride flag#valentino vecchietti#quilting#quilt#quilt block#quilt pattern#quilt tutorial#sewing#sewing machine#sewing tutorial#sewing pattern
274 notes
·
View notes
Text

FINISHED MY TOOTHLESS PLUSH!!
Materials, info and some comments under the RM!
Toothless' Pattern I purchased
Materials: 6 yards of black minky 1 yard red minky 5 yards of Poly-Fil extra loft medium quilt batting 18 oz of poly pellets (4 oz in each foot) 2 Mainstay firm bed pillows for stuffing 1 spool of purple thread for the top stitching details on his tail, hip and main wings 2.5 spools of black thread Dark green, lime green, goldenrod and light yellow embroidery floss black acrylic paint white fabric paint Velcro one very old, small and cranky sewing machine who somehow survived this ordeal several comfort shows, podcasts, and music to listen to
This was my winter break project! Granted I started bits and pieces of the process in early December, but once my two weeks off hit he really started getting worked on lol.
I know it's hard to tell from photos, but he is A BIG CHONGUS. Toothless is 5.5 feet from head to tail tip, and has a 9 foot wingspan. He weighs about 8 lbs.
He took about 60ish hours and was very complex. My budget was $200 and he came in at $202! That includes things like the bulldog clips that I bought when he was being pinned because the minky was so slippery! This cost EXcludes a sewing machine, or things like an embroidery ring which my mom had, so I was very lucky in several areas—but he still was not cheap, either by expense or by time and sweat/tears!
Of course, the minky was by far the most of the cost, coming in at $122. I’d say the batting would be next, but I waited and snagged a good deal at my local craft store and got the batting for $18. I HIGHLY recommend buying bed pillows. The original maker of the pattern used IKEA pillows I believe.
I increased his size by 20%, so I printed him at 120% and guesstimated on the minky amount. My WORST mistake was forgetting to mirror the WINGS, which meant I had to recut two of the four pieces of fabric. (I should have marked it on the pattern, which I did mark well for things like number count.) Had I not done this, I would have used a lot less minky. I bought 7 yards and only needed 5.5 before my error.
(Now I’ve got scraps and a whole yard left sitting there whispering that it wants to be made into a Krobus plushie…who seems much less of a hurdle than Toothless.)
I stuffed Toothy’s hip fins and tail fins with one layer of quilt batting. His wings however, are double layered with the batting for extra plush, warmth, and durability. His eyes are hand embroidered (my first time!) but stitched on with the machine. Toothless has poly pellets in his feet to help support his bulk, but most of his weight is in his body, hips and start of his tail so he actually sits up really well.
He was a huge labor of love for sure! The pattern was great, the instructions were��less great. But my mom helped me figure out a lot of the troubling bits. Some parts were easy to follow and others were basically "bing bong fuck ya life." Despite that, I do suggest this pattern. But this is definitely an intermediate or advanced pattern. They also sell the eyes for those that have access to an embroidery machine.
I followed the pattern closely as I desired. I did omit the back spikes on his rear legs, and I couldn’t embroider his lil nose by hand ^^; I also did not make his blue alpha fins because of expense and mistrust in my own skills...also, I kinda wanted HTTYD1 Toothless haha. I love the series as a whole but the og movie is literally one of the reasons I went to college, and it went into my thesis as well.
I want to remake his prosthetic at some point when I have time and energy, but for now I’m pleased with 99% of him, especially since this is my first plushie I’ve ever made. I do not regret any of my personal changes and I’m totally in love with him.
275 notes
·
View notes
Text
Crochet Prawn
For Christmas my (marine biologist) dad wanted some prawns and I could not find any free patterns anywhere so I ended up drafting my own pattern. It has since been approved by my dad despite having no rostrum or antennae (I found these too hard to look good - if anyone has any tips please let me know!).

Also this pattern is NOT made in the round and so does require sewing and has a few fiddly bits. In order to make the legs smaller than the rest of the body without changing the colour, I separated out smaller sections of the ply, much like when using embroidery floss. I'm not sure if proper crochet-ers do this but I've found it works for me as long as it is 2-ply or greater.
Full Pattern under the cut:
INGREDIENTS:
3.5mm and 2mm Crochet Hooks
6mm Safety Eyes
Pinky Yarn (Colour A)
Darker Yarn (Colour B)
METHOD:
Note: ch1 and turn between each row. inc= 2 sc in same stitch. sc2tog= sc 2 together. blo= back loops only
Changes in colour will be denoted using A! (change to colour A) and B! (change to colour B)
MAIN BODY
Using colour A and a 3.5mm hook:
Ch4
sc 3
sc 1, inc 1, sc 1
sc 1, inc 2, sc 1
sc 2, inc 2, sc 2
sc 2, inc 4, sc 2 (eyes will be inserted between row 6 & 7)
sc 12
sc 5, sc2tog, sc 5
sc 11
sc 11
sc 11
sc 11
sc 11
sc 11 in blo (this ridge separates the head from the body)
sc 11
sc 2, B! sc 7, A! sc 2
sc 5, inc, sc 5
sc2tog, sc 8, sc2tog
sc 2, B! sc 6, A! sc 2
sc2tog, sc 2, inc 2, sc 2, sc2tog
sc 10
sc 2, B! sc 6, A! sc 2
sc2tog, sc 6, sc2tog
sc 8
sc 2, B! sc 4, A! sc2
sc 8
sc2tog, sc 4, sc2tog
sc 2, B! sc 2, A! sc 2
sc2tog 3 and finish off
Now using the ridge created by the blo row (shown in picture above), slip stitch across the surface of the prawn to enhance the ridge and accentuate the difference between the head and the body. Your prawn should now look like this (folded):

TAIL x2
Note: all stitches within [] belong in same stitch
The tail might be a bit tricky as it goes up and around the foundation chain like this:
Using colour A and 3.5 mm hook:
ch 6
from 2nd chain - slst, sc, hdc, hdc, [dc, hdc, dc], hdc, hdc, sc, slst then finish off
PLEOPODS (Back Legs) x10
Separating colour A to create a 3-ply yarn and using a 2mm hook:
ch 11
from 2nd chain - sl st 10 then finish off
PEREOPODS (Front Legs) x10
Separating colour A to create a 2-ply yarn and using a 2mm hook:
ch 15 then finish off
ASSEMBLY
Secure eyes between rows 6 & 7 and weave in ends to the inside of the prawn (don't bother clipping the yarn as this can be used as extra stuffing!).
Attach tail at a slight angle at the end of prawn to get the positioning to look more realistic.
Start attaching the pleopods approx. one row back from the head ridge and one stitch in from the side, continuing attaching them ~1 row each until five are attached per side.
Attach the pereopods approx. one row forward from the head ridge and one stitch from the side, continuing to attach them every 1/2 row until five are attached per side.
Whip stitch the prawn together using colour A until you reach the end, stuffing as you go.
Congratulations, you now have your very own prawn!!
Please reblog with pictures if you make your own! And any tips and tricks to make them look even better :))))
347 notes
·
View notes
Text
Kyubey Plush Translated Instructions

Material -Fur (Short Haired) 145 cm Width... 60 cm -Felt (pink) (red) (black) -Cotton -Button (red) 1.3 cm... 12 pieces -Wire (thickness 3mm) (thickness 2mm) -Underlay (any transparent plastic sheet will do) -Stuffed Toy Joint Diameter 3 cm -Cover Button Kit 18mm... 2 pieces -Soft pastel (light pink) -Spray (yellow) -Glue You can make your own original design with a home printer! -Printed Cloth
Mouth and Eye Pattern (copy and scan it to use) -Eyes for iron-on printing (please flip left and right if necessary) -Mouth -Eyes for 18 mm Covered Buttons
How to Make Unless otherwise specified, you can use either backstitching or machine sewing. Basically, sew with front sides facing each other and then turn it right side out for later. 1) Make your stomach Sew [Front Legs (inside)] to [Body (belly)]. Look at the alignment marks and pay attention to the front and back.
2) Back making Sew the Back of the Body [Body Outer]. Leave the opening in the middle unstitched. Look at the marks and pay attention to the front and back.
3) Align the torso Sew (1) and (2) together, leaving a hole for the butt and neck (approximately 8mm or 1 cm for the joint). Open the tips of the front legs to the side, flatten them, and sew (see bottom right).

3a) Detailed diagram of how to sew the front legs [Front legs (back side)] <- -> Spread the tips of the front legs out to the side and flatten them l V [Front legs (back side)] Sew in the shape of a foot. Cut off the excess seam allowance.
4) Making hind legs. Sew the left and right lines of the [Hind Legs (inside)] and [Hind Legs (outside)]. Sew the darts of [Hind Legs (outside)]. Sew on the [soles] of the legs.
5) Sew on the body Pay attention to the direction of the legs and sew the hind legs to the body. Line up the alignment marks and make sure they go straight down.
6) Make a tail Leave the opening and the base where the joint will be attached unsewn, and turn it inside out. Attach a joint at the base of the tail.
7) Make a frame The wire is shaped into a ring and spray painted (yellow). The wire is attached to the cut out transparent file with glue, and passed through the ears.

8) Make triangular ears If you sew the felt and fur together lightly, the fur will float, but this is fine for now.
9) Make floppy ears Turn it inside out, leaving an opening for turning, and insert wire to sew the opening. Color it (the ends with the soft pink pastel), thread the gold ring (attached to the cut out transparent file) through it, and attach the (red) buttons.
Color with soft pastels. Apply a thick layer and shake off any excess powder to get the desired effect.
10) Make the head Sew 6 darts in total and sew the front and back together. Leave a hole for the neck to pass the joint through and an opening for turning. Once sewn, turn it inside out.
11) Combining. If you want to move the head or tail, use joints to connect them to the body. If you can't get hold of joints, sew them together firmly by hand. Look for them in the stuffed animal section of a craft store.
12) Insert the wire Insert wire into the body and tail. Make a circle above the neck so that the head can rest on it. After roughly shaping it, insert wire through the opening and align it.
13) Fill the body, tail, and head with cotton. Use a stick to push the remaining part in. Pack it evenly, avoiding the wire.
14) Sew the opening Seal the back, head and tail.

15) Make eyes Scan the pattern from the magazine and transfer it to the printed fabric, then cut it out. Make a covered button that fits the base. Refer to the package for instructions on how to make a covered button. If you temporarily attach the fabric and base with double sided tape before making it, the center will not shift.
16) Make a mouth Stick the pattern onto the back of the sticker felt and cut out the shape. 17) Add ears, eyes, and mouth and back patterns Bend the triangular ears and sew them to the head so that they are evenly balanced. Sew the drooping ears to the inside of the triangular ears. Sew the eyes on like buttons and stick number 16 on for the mouth. Stick the pattern on the back as well.
Kyubey says: You can use felt for the ear buttons instead. If you make the body out of fleece and the eyes with iron-on printing, it will look like this. If you use a joint, it will move but will be a little wobbly, so if this bothers you, you can sew it on directly without using a joint.
24 notes
·
View notes
Text

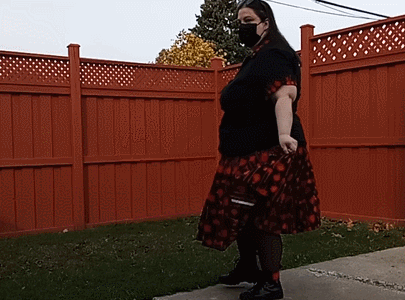


This outfit has been a long time coming!
I bought this black fabric with blood splatters on it in a post-Halloween sale last year. I didn't have a specific project in mind at the time, I just couldn't pass up blood splatter at 5$ a metre. So it sat in my fabric stash for a while. Then, I started teaching my sewing class. And in the process of showing my students all the amazing things you can create for yourself, I made my first(successful) fully tailored blouse. And LOVED it. And I thought, hey, you know what would look cool? A black blouse with that blood fabric as a contrast.
And thus, the Blood Splattered Rockabilly Ensemble was born.
It features a circle-and-a-half(ish) skirt with more than two dozen pleats of varying sizes, a black stretch cotton princess seam blouse with slight ruching detail over the bust and heart shaped buttons(I sew my button plackets closed so I don't risk gaping, and sew the buttons on where the holes would be. The shirt is pulled on.), and contrasting cuffs and collar.

It's a really small thing and you wouldn't notice because it's against my neck or under the collar, but I am so pleased with how the pattern matching came out on the collar and stand. Those streaks of blood really just blend right into each other in some places!

As a final touch, I picked up a 5$ pair of faux leather sneakers and used dimensional fabric paint to make them a bloody mess.
While this is technically a Halloween outfit, I have to be honest. I would wear this year round.
(Also, please appreciate how adorable I am in those gifs, because my phone died recording them)
If you like what I create and want to help support me and my sewing class, consider dropping a tip in my little tin cup:
https://ko-fi.com/tigerintheflightdeck
#halloween aesthetic#halloween outfits#home sewing#garment sewing#homemade clothes#tiger sews#sewing#sewblr#goth sewing
30 notes
·
View notes
Text
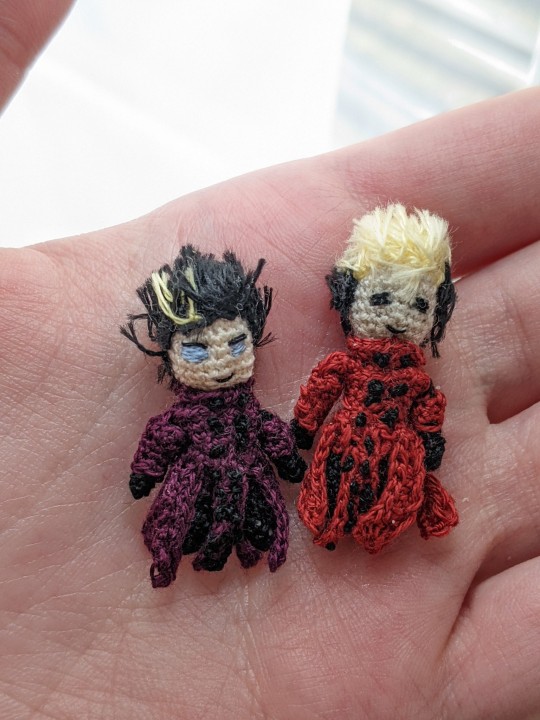
Mini Crochet Vash the Stampede Pattern
Mini crochet Vash the Stampede
This one is the dark palette but it works for any colors

None of this is done in a round as in you have to slip stitch after each round.
I used DMC thread for all of this, but I could not tell you what specific colors just: pale yellow, red, black (or for dark Vash, a dark purple instead of red). I used a 1.15 mm hook for this whole thing and a quilting needle, which is just a really short sewing needle (an inch or so long).
Mc = magic circle
Sc = single crochet, American terms
Sl st = slip stitch
Head: *I used a pale white thread color for this you can obv use whatever* start with a magic circle || sc 6 in the circle, sl st to first stitch (6) || ch 1, sc 2 in each stitch to increase to 12, sl st (12) || ch 1, sc 1, sc 2 in same stitch, repeat 5 times, sl st (18) || ch 1, sc 2, sc 2 in same stitch, repeat 5 times, sl st (24) || ch 1, sc 24, repeat 3 times for a total of 4 rounds of 24 scs, sl st (24) || ch 1, sc 2 dec 1, repeat 5 times, sl st (18) (you can start to stuff it here, I used less than a cotton ball for the whole thing) || ch 1, sc 1 dec 1, repeat 5 times, sl st (12) || ch 1, dec every stitch, sl st (6) || cut the thread but leave enough so you can sew it to the body *Do NOT pull the hole closed. It’s going to be the neck hole where you attach to the body.
Legs: *in black thread* mc || sc 4 in the circle, sl st (4) (Tip: I would recommend waiting to close the hole until the next step because it makes it easier to see where the stitches are) || ch 1, sc1, sc 2 In same stitch, repeat again, sl st, (6) || ch 1, sc 6, sl st, repeat 2 more times for a total of 5 rows (6) || cut the thread and stuff it || you can also hide the thread ends here if you want I just stuffed them at the bottom when putting in the stuffing. For the second leg just repeat the above steps.
Body: *change to red thread* connect to one of the legs anywhere that feels secure | ch 2 (this just gives some distance between the legs), sl st to the other leg, ch 1, sc 5, sc 2 in one side of the ch 2 from before, sc 5, sc 2 in the other side of the ch 2, sl st (14) ||ch 1, sc 14 (14) || ch 1, dec to 11 it doesn’t really matter where you do it as long as they’re evenly spaced, sl st (11) || ch 1, sc 11, three more times for a total of 4 rows of 11, sl st (11) || ch 1, dec to 9, again, it doesn’t matter where, sl st (9) || ch 1, sc 9, sl st (9) || cut the thread and hide the ends
Arms: *change to black thread* mc || ch 1, sc 4 in the circle, sl st (4) (I recommend not pulling the hole closed yet because it is hard to see) || ch 1, sc 4, three more times for a total of 4 rows of 4, sl st (4) || cut the thread and hide the ends. repeat the steps for the second arm. You don’t have to stuff these because they’re so little :D
Decorations (using red thread):
Arm 1- ch 5, sl st to make it a circle || ch 1, sc 5 for two rows, sl st (5) || cut the thread but leave enough to sew securely to arm.
Arm 2- ch 5, sl st to circle || ch 1, sc 5 for four rows, sl st (5) || cut thread and leave enough to sew to the shoulders.
Chest- ch 12, sl st || ch 1, sc 12, slst (12) || ch 1, sc 2 in same stitch (1st and 2nd stitches), sc 6, sc 2 in same stitch (8th and 9th stitches), sc 5, sl st (14) (this is to make the shoulders point out a little) || ch 1, sc 2 in same stitch (1st and 2nd stitches), sc 6, sc 2 in same stitch (9th and 10th stitches), sc 6, sl st (16) || ch 1, sc 2 in same stitch (1st and 2nd stitches), sc 7, sc 2 in same stitch (10th and 11th stitches), sc 7, sl st (18) || sew to the main body by stabbing through the waist line, cut thread

Shoulders- (this one goes in the empty spot between the main body and the chest piece from above) ch 5, turn, sc 2, skip a chain, sl st to last chain, pull through and cut thread (2 ½) || sew into the empty space on the shoulder. You can also attach the arms after finishing this, hopefully I will remember to include a photo to show where to attach them.

Legs? Train? - ch 9, sc 8, sl st (8) || ch 1, sc 8, sl st (8) || repeat 4 more times for a total of 5 pieces and attach to chest piece, one centered around the front, two on either side of that, and two in the back. If there is extra space in the back, you can make a sixth one and space the pieces more evenly in the back.
I would recommend attaching his head at this point, but we will add hair and the face later
Collar- ch 11, sc 15 (inc every other) (15), sew to the neck of the jacket.
Buttons- (using black thread) sew 2 french knots on the collar (you can hide the thread by either going through the back of his head or through his chest), then maneuver the needle to the jacket and sew either 6 or 4 french knots (depends on how much room you have), three on both sides, and then finally, on the train of his jacket, make 12 french knots with 6 on both sides.
Hair: his hair is a little complicated to explain but I’ll try my best. Using a light yellow and black thread, tie a whole bunch of knots to his head wherever you want his hair line (I was just pulling the thread through until it got close to the end, and then tying a knot and cutting it quite long so make sure you have plenty of thread) You shouldn’t be making it too thick at the front because then his hair won’t lay right. It can be a little thicker at the back of his head because we will have to cut it quite short when we get to that point. I don’t know how many knots I tied or where because it really just depends on the shape of his head. But once you’re finished tying all the knots try to press the hair down and shape it a little before cutting it (remove knots if you have to it happens all the time). When everything looks good then go ahead and start cutting. It may take a while to get the shape as you want it but go slow.
Face: I started with a light blue this time (because with the first Vash I gave him black eyes). It just takes some trial and error to get the eyes right because this also depends on the shape of the head but definitely make sure they’re evenly spaced lol. I think I did 4 sets of lines for each eye to get the size right. After that I used black thread pierced through the back of his head to make… eyelashes, I suppose… and the mouth.
#phew this one was hard lol#please be nice to me ive never written a pattern before#this is all for that one person who asked for it 😙#and any in the future#vash the stampede#trigun#crochet#mini crochet#handmade
60 notes
·
View notes
Text
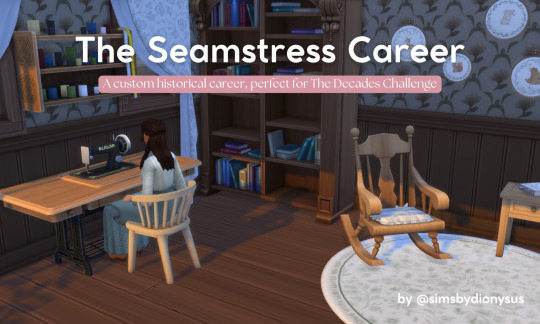
THE SEAMSTRESS CAREER MOD - by simsbydionysus

Hey! This is my first mod :) I wanted to have more career options when playing the Decades Challenge or a Historical Savefile, so I decided to make my own!
For updates info, scroll all the way down. Download under the cut.
There already exist some similar mods, but I wanted to adapt it to historical gameplay, so this career can be used in almost any time (although it was specifically designed for the early 20th century), including modern gameplay too.
How does the mod work?
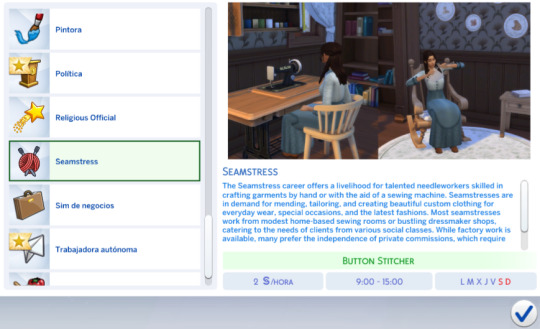
Entering the career: select the Join a Career option on the left-down menu, or through the phone/computer. Scroll down until you see this option:
This is essentially a rabbit hole career, meaning that you can't follow your sims to work (this is my first career, so that would be very complicated). However, I've added some options to make it feel more immersive.
Other features
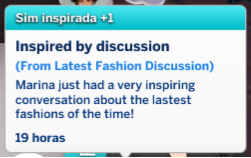
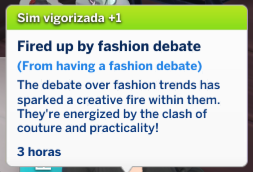
There are 4 new interactions: Discuss latest fashions, Debate Couture vs. Practicality, Offer tailoring tips (all under the Friendly category/Hobbies sub-category), and an extra interaction: Complain about unruly clients (under the Mean category/Malicious sub-category).
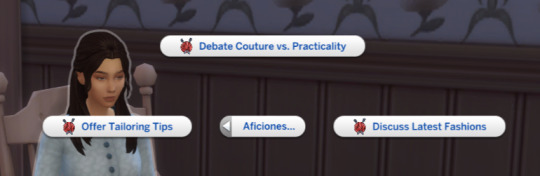
They all have custom buffs for the sim making the interaction and one for the target-sim (making these buffs work was honestly harder than it needed to be xD). Here are some examples:
Also, they can only be accessed when you join the career, to make it more realistic!
How many levels does the career have?
It currently has 10 custom levels with only one simple task to level up (firstly, because it was easier to do it this way at first; secondly, because it also makes sense for it to not be too much time consuming, since it is meant to be more of a storytelling mod, especially if it's a historical savefile), also includes money rewards after each promotion.
Level 1: Button Sitcher (§2/h)
(Sim name) has just taken their first step into the sewing world. Their days are spent sewing buttons and performing simple mending tasks. It's tedious work, but everyone starts somewhere.
Level 2: Apprentice Seamstress (§4/h)
As an apprentice, (Sim name) assists more experienced seamstresses, cutting fabric, threading needles, and practicing basic stitches. Their skills are improving, but there's much more to learn.
Level 3: Dressmaker's Assistant (§8/h)
(Sim name) works in a small dressmaker’s shop, helping with simpler projects. Hemming skirts, adjusting seams, and learning to follow patterns are all part of their daily tasks.
Level 4: Home Tailor (§12/h)
(Sim name) has begun taking private clients from their own home. Repairing clothing and making simple garments is their bread and butter. Their reputation is starting to grow.
Level 5: Skilled Seamstress (§16/h)
(Sim name)'s skills have sharpened, and clients seek them out for quality work. They can now create custom garments and replicate popular fashions of the era.
Level 6: Dress Maker (§20/h)
As a dressmaker, (Sim name) has gained a solid reputation. They are trusted with creating elegant dresses, suits, and intricate patterns. They are no longer just a worker—they are an artist.
Level 7: Master Tailor (§30/h)
Clients from higher social classes are commissioning (Sim name)'s work. Every piece they create is a testament to their skill and creativity.
Level 8: Renowed Dressmaker (§45/h)
(Sim name)'s name is spoken of in fashionable circles. They now receive commissions for special occasions, from bridal gowns to theatrical costumes.
Level 9: Couturière Extraordinaire (§70/h)
(Sim name)'s work is art, admired and desired by the elite. They have clients who will pay handsomely for their skillful creations.
Level 10: Fashion Legend (§100/h)
(Sim name)'s reputation has reached legendary status. Everyone wants to wear their creations, and their designs inspire the fashion world. They’ve achieved the pinnacle of their craft.
Are there any requirements?
Yes, only sims YA and up are able to access it and you must have the Nifty Knitting SP to level up the knitting skill and get promotions (a BGC workaround would be to make the level-up skill be maybe handiness or charisma, I could try to make it too).
How to install?
Download both files (.package and .ts4script) and insert them directly into your Mods folder or only one sub-folder deep. Otherwise, it may not work properly or even show up in the game.
Future plans
I would love to add more interactions (career and non-career restricted), make it BGC (with the previously mentioned workaround or if I'm able to, with a custom skill), add more promotion tasks, and generally make more career mods for specific needs (especially for the Decades Challenge). I would really appreciate any ideas, suggestions, tips, etc.
Credits
Firstly, Mod Constructor and S4S, Build-A-Sim Icon Pack; to even begin to understand how to create this mod I used Serra's videos on YT (which are so helpful!) Serra - YouTube, and lastly, to myself! Because I spent many hours researching, figuring out how to use MC, fixing errors... And in general because it was my dream to create a mod for the Sims 4 and I've finally achieved it!
Updates
This mod will be updated whenever it's needed, but because it's just a career there shouldn't be many problems (at most, the interactions and buffs).The current version of the mod is compatible with the March 6th patch: PC: 1.113.288.1020 / Mac: 1.113.288.1220
Download:
Alternative option:
9 notes
·
View notes
Text
I used to sew all the time and then I moved and had to leave my sewing machine behind so I haven't really done it since (about 5 years), but I've been more choosy about where I am spending my money and what I'm spending it on lately and I've found I have a growing interest in making my own clothes again.
So, if anyone has any beginner tips about where to get patterns (or make my own), where to get fabric, & how to alter my own clothing I'd be grateful <3
#sewing#:)#not my usual post but I am going to pick up my new sewing machine this week and have some projects that need doing
10 notes
·
View notes
Text
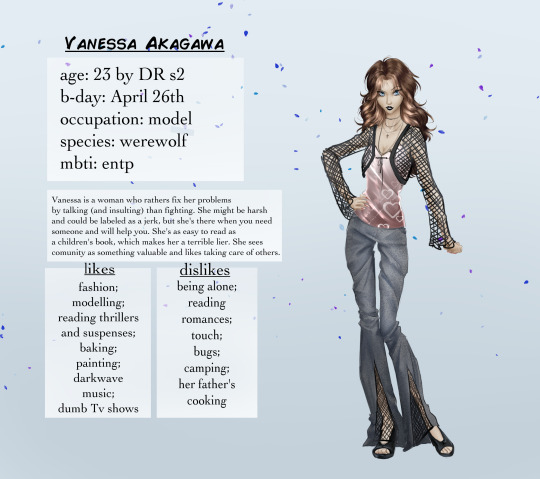
Full name: Vanessa Yuhara Akagawa (her realm's culture allows her to have more than one last name, but usually referred by her second last name by most). She's constantly called Nessa.
Age: 23
Birthday: April 26th
Sexuality: Lesbian
Species: Werewolf
Elemental Powers: No elemental power
Occupation: Model (although not famous)
Personality: Vanessa is sincere and doesn't hold back when needing to tell the truth, but unlike her sister, Vanessa does this to annoy and cause a reality check instead of causing discomfort. She isn't as observant as Valerie, but understands patterns well and replicates them to understand other people.
She's good at speaking up for herself, but used to be easy to manipulate, until her incident. Vanessa is harsh, but does it out of good intentions, especially towards her siblings, mostly Valerie, trying to help her with her pyrophobia problem and stop her overprotectiveness. Vanessa enjoys taking care of others and expresses her love this way. She's the type to think before acting, so she's usually talking senses into Valerie, Kenichi and Shunsuke.
Vanessa cannot hide her emotions, wearing her heart on her sleeve independently of the circumstance, but she thinks that when she puts on the effort to lie people will believe her, since they assume she's telling the truth, which isn't completely untrue, but she isn't that good at lying as well, so there's usually a 40% chance it may work.
Story: Vanessa was born as a twin in a loving family. She loves spending time with her father, and was always quiet in his studio to not disturb him or her brother while they sew. Vanessa was mesmerised by their work and her father's designs, and does remember calling a few of Kenichi's designs ugly when he was a teen. Unlike Valerie, she did have a filter, so whenever she said something "mean", you knew it was intentional. Her way of dealing with other mean kids was always less scandalous than Valerie or Kenichi, fixing her problems through "fancy insults" instead of punching.
Vanessa was never good at hiding her emotions, so she would easily be caught lying, especially when lying about having a crush on some girl. Vanessa's art classmate was her crush and also a wannabe-model, but a little bit more experienced than Vanessa. She gave her tips and eventually started dating, but after Vanessa started gaining attention, the girlfriend got jealous and Vanessa broke up with her. However, this attention only caused Vanessa problems, causing her to develop night terrors and traits of agoraphobia... She has an incident that ends up causing the the existence of MVRR gang, and she blames herself for Valerie's misery.
(the rest will be explained later maybe through comic's, books, whatever, so idk)
TRIVIA AND HEADCANONS!
Chews ice when under stress;
Has a skin care routine she follows religiously;
Her favourite food is ratatouille;
Likes to bake specifically cupcakes;
Very messy, barely can keep her side of the room organized;
Can cook;
Smokes;
Besides painting, her favourite thing to do is dancing;
Among all the Ninja, she gets along better with Cole than anyone else;
"Only I can insult my sister" kind of sister;
5 minutes younger than Valerie;
Has a "resting bitch face";
Likes to spend time with Nya and her sister;
Sometimes joins Zane to do the cooking;
Training to help the Ninja on missions because she hates feeling useless.
Her main inspirations for personality are Julie Powers from Scott Pilgrim and Denise from Teen Monica's Gang
#ninjago#lego ninjago#digital art#digital drawing#ninjago oc#ninjago oc vanessa#oc: Vanessa#ninjago oc art#lego ninjago fanart#lego ninjago oc#digital artist#artists on tumblr#art on tumblr#vanessa is not as much consolidated in my mind as much as valerie is#so i may come back here and edit a few things#robin's art
15 notes
·
View notes
Text
a while ago i knitted nepeta's hat from homestuck and i just remembered that there's a pattern on my deviantart but i'm never active on there so i thought i'd share it here!!

disclaimer: i am aware this is not canon-accurate. it's my own design inspired by the original disclaimer 2: idk much about yarn weights or size charts. this is by no means a professional pattern. i'm just writing down what i did incase someone wants to do it too
pattern under keep reading!!
tools & materials: circular knitting needles (i used 3,5mm) a crochet hook (for the edging, mine is 4,5mm) a sewing needle blue, orange, red and yellow yarn (i'm unsure of how much exactly is needed, but it's less than a ball each) 8 stitch markers (it doesn't have to be anything fancy, i literally used safety pins)
abbreviations used: r[n] - row number k - knit p - purl mk1r - make one right (tutorial) mk1l - make one left (tutorial) k2tog - knit two stitches together (tutorial) ssk - slip, slip, knit (tutorial)
ear flaps (make 2): cast on 7 stitches r1: p7 r2: p1, mk1r, k untill 2 stitches before the end of the row, mk1l, p1 r3: k1, p until 1 stitch before the end, k1 repeat rows 2 and 3 for 12 rows (you should have 21 stitches by then) r4: k1, p until 1 stitch before the end, k1 r5: p1, k until 1 stitch before the end, p1 repeat rows 4 and 5 for 10 rows do not cast off
hat: (tip: when knitting on circular needles, place a stitch marker at the beggining of the row) put the 1st ear flap on circular needles, cast on 18 stitches, put the 2nd flap on, cast on 28 stitches knit for 35 rows r36: *k11, place stitch marker*, repeat between ** until the end of the row r37: *k untill 2 before stitch marker, k2tog, put stitch marker on right needle*, repeat between ** until the end of the row r38: k whole row repeat rows 37 and 38 for 20 rows (you should have 8 stitches left) cast off, leave a tail and sew up the top
horns (make 4): cast on 15 stitches with red yarn r1-r5: k r6: k2tog, k13, ssk switch to orange yarn r7-r9: k r10: k2tog, k11, ssk r11: k r12: k2tog, k9, ssk switch to yellow yarn r13: k r14: k2tog, k5, ssk r15: k r16: ktog, k3, ssk r17: k r18: k2tog, k1, ssk cast off
sew together 2 horn peices and stuff them with scrap yarn/stuffing, then sew onto hat (i recommend pinning it first, so you're sure of the placement)
stars (make 4): stars were made following this pattern, exept i purled uneven rows (1, 3, 5, ect) sew 2 stars together, purl side out. stuff them with scrap yarn/stuffing
border: with a crochet hook and orange yarn, crochet a border around the edges of the hat. this is opional but makes the edges not curl up. i don't know much about crochet so i can't rlly explain this part
chain about 30 stitches with a crochet hook and make a border around the stars. do this twice for both ear flaps
if y'all have any questions lmk in the comments and i'll try to answer!! :3
#knitting#knitting pattern#homestuck#nepeta leijon#homestuck nepeta#hs nepeta#hom3stuck#cat ear beanie
38 notes
·
View notes
Text

Ghostly from TADC -- free crochet pattern
Ravelry link to free PDF here
Ok listen, I know they only appeared for a minute in one episode but I love their shape and their face! I made two immediately, and I made a pattern in case anyone else is interested.
Pattern below the cut:
You will need:
- less than 50g/160m of DK* yarn in two colours: turquoise/green and white
- a 3.5mm* crochet hook
*Sizes can be changed if you want. This will affect the amount of yarn used and the resulting amigurumi size.
- stuffing
- a darning needle to sew and hide ends
- pins
- scissors (unless you like snapping your yarn)
- stitch marker / scrap yarn to mark the round start
Stitch key (US terminology)
sc: single crochet
inc: increase
dec: invisible decrease
hdc: half-double crochet
ss: slip stitch
Finish off: slip stitch into the next stitch, cut your yarn, and pull the loop until the end comes through
Head
1. 6sc into a magic ring [6]
2. 6inc [12]
3. (sc, inc) x6 [18]
4. (sc, inc, sc) x6 [24]
5. (3sc, inc) x6 [30]
6-9. 30sc (4 rounds) [30]
10. (3sc, dec) x6 [24]
11. 24sc [24]
12. (sc, dec, sc) x6 [18]
13. 18sc [18]
Stuff the head. Keep stuffing as you go.
14. (sc, dec) x6 [12]
15. 12sc [12]
16. 4sc, 4dec [8]
17. 4sc, 2dec [6]
18. 4sc, dec [5]
Finish off. Thread the tail through each front loop, and pull to cinch the hole closed.
Body
Some stitches are slip stitches (ss). These must be kept loose, so you can go into them again without trouble.
1. 7sc into a magic ring [7]
2. 7inc [14]
3. (sc, inc) x7 [21]
4. (3sc, inc, 3sc) x3 [24]
5. (7sc, inc) x3 [27]
6. 27sc [27]
7. 27sc [27]
8. (7sc, dec) x3 [24]
9. 3sc, 8ss, 4sc, 8hdc, sc [24]
10. 4sc, dec, 2sc, dec, 5sc, 8hdc, sc [22]
11. 5sc, dec, 6sc, 8hdc, sc [21]
12. 3sc, 6ss, 4sc, 8hdc [21]
13. 3sc, dec, 2sc, dec, 4sc, 8hdc [19]
14. 2sc, 6ss, 2sc, 9hdc [19]
Stuff as you go.
15. (2sc, dec) x2, 3sc, dec, 3hdc, dec, sc [15]
16. sc, 6ss, 2dec, 2hdc, dec [12]
17. (2sc, dec) x3 [9]
18. 9sc [9]
19. (sc, dec) x3 [6]
20. 6sc [6]
21. 4sc, dec [5]
Poke some stuffing into the tip and finish off. Use the tail to cinch the end shut.
Sew the head to the body (see below).


Align the head to the body, like the pic on the right, with the head angled. Use pins to mark the corners of where you want to sew the piece. It's easier to attach a circle when you treat it like a square.
Eyes (x2)
1. (turquoise/green) 7sc into a magic ring [7]
Slip stitch into the first sc with white yarn.
2. (white) 7inc [14]
Slip stitch and finish off. Pin the eyes high on the face, about 4 stitches apart.
If you want an open mouth, first mark a diamond shape, roughly covering the starting magic ring. Using that as a guide, embroider on a round/oval solid white segment using a fill stitch (below).


To embroider this, repeatedly add vertical lines that are longer at the centre until you get a solid-looking circle/oval. You can then optionally sew around it with a couple of large lines to define the edge.
UWU mouth pieces (x2)
Make in your turquoise/green yarn.
1. 4sc into a magic ring [4]
2. 3inc, 2ss [7]
The second slip stitch does go beyond the end of the row. Finish off.
Attach the uwu segments side-by-side with the slip stitch sides touching each other.

Sew the uwu pieces slightly covering the mouth. :3
After that, sew on the eyes if you haven't already. The bottoms of the eyes should be just below the top of the lip.
Arms (x2)
1. 5sc into a magic ring [5]
2. 5sc [5]
3. 4sc, inc [6]
4. 6sc [6]
5. 5sc, inc [7]
6. 7sc [7]
7. 7sc [7]
8. 7sc [7]
9. 6sc, inc [8]
10. 8sc [8]
Stuff the arm lightly. Fold the open part so your current stitch is at one corner. Push your hook through both sides and 4sc across the top to shut it.

Attach the arms at the sides, between the two rows just below where the head connects.
You should now be done!
#the amazing digital circus episode 3#tadc#tadc ghostly#crochet#amigurumi#crochet free pattern#ghost#halloween
16 notes
·
View notes
Text
The Making of the Howl Jacket (Tutorial)
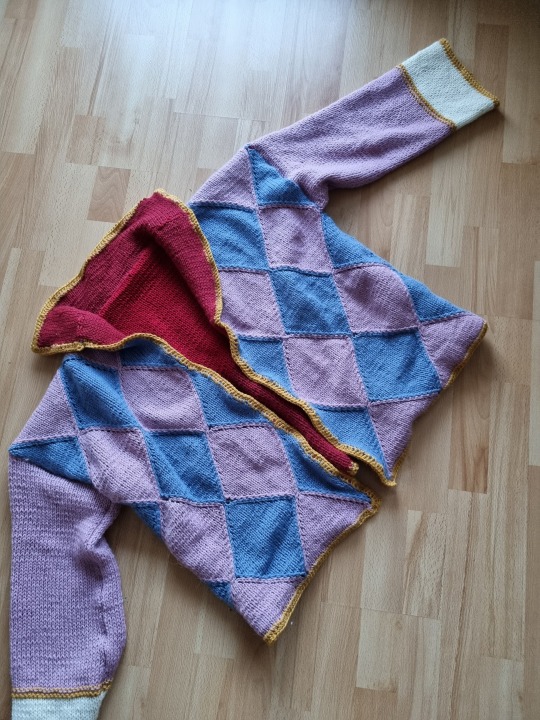
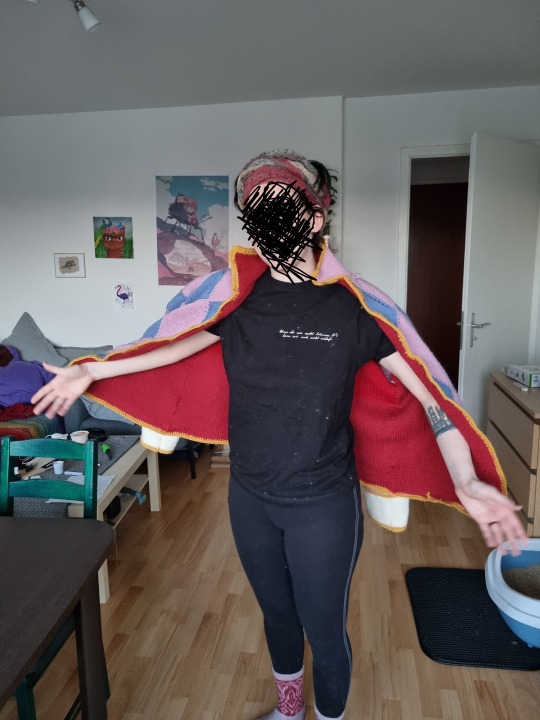
Many People have been asking me about how I did my Howl (inspired) jacket, so here it goes:
(obligatory disclaimer that I am just some person and not a professional pattern maker or anything)
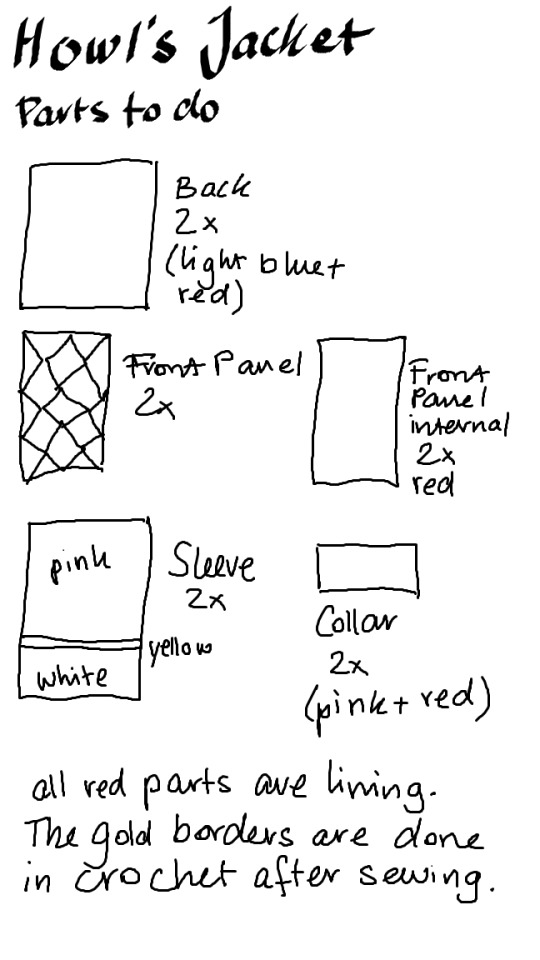
This is an overview of the parts I did. Note that I did no lining for the sleeves because I felt it would be overkill (and strand me on sleeve island forever).
So, let's get technical:
I used Drops Nepal (65% wool, 35% alpaca) and 5 mm needles.
pink (6 balls)
light blue (7 balls)
red (9 balls)
yellow (2 balls)
white (1 ball)
however I was a dumbass and only ordered 6 red balls so there is a colorshift on the backpanel of the lining.
The knitting:
All the pieces are rectangular and mostly in stockinette stitch. I had most trouble with the front panel which also changed the most after blocking, so I would recommend starting with them. Also block the pieces as you go and pay attention to the dimension you block them to.
Frontpanels (outer and lining):
Cast on 55 stitches.
For lining: work flat for 120 rows (or until desired length. Mine are 32 cm wide and 60 cm high)
For outer layer: work 1 stitch blue, 26 pink, 1 blue, 26 pink, 1 blue from seperate balls of yarn. Then work increases and decreases like I outlined here.
This will lead to you having odd stitches of blue and even stitches of pink. When you come to the tips of the pink diamonds, cross them over like you would with cables (1/1 left over right). On the tips of blue diamonds you can slip one, knit two together and slip the first stitch over to make 3 into 1 stitch.
Backpanels (outer and lining):
Cast on 100 stitches, work flat for 120 rows (or until desired length. mine are about 60 cm high and 65 cm wide)
Collar (outer and lining):
Cast on 109 stitches, work flat for 18 rows.
Sleeves:
Cast on 60 stitches, work flat in pink for 72 rows (about 35 cm), then work 3 rows in GARTERSTITCH in yellow (this will raise the yellow off the flat part) followed by 18 rows white.
You can either work the crochet border immediately (2 rows of single crochet) or after you sewed the sleeves together.
Congrats! You did all the parts!
The construction:
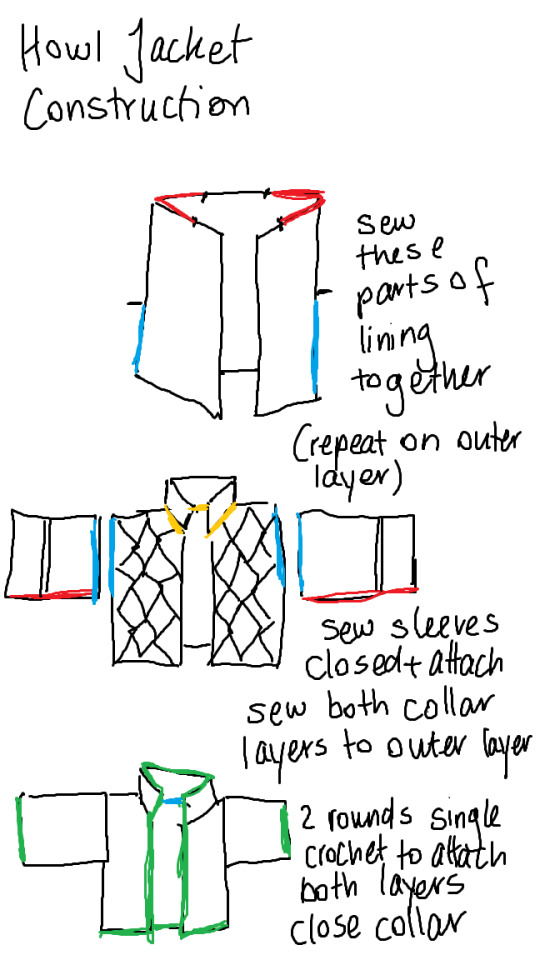
sew the front panels to the back panels. leave 20 cm on the backpanel and 10 cm of each front panel open for your neck to fit and attaching the collar. leave about 30 cm open to attach the sleeves. do this on the lining AND the external layer.
sew sleeves closed and attach to both lining and outer layer at the same time. attach collar on both layers seperately (outer and lining).
Finish off the edges by doing two rows of single crochet.
Weave in all your ends and DONE!
Some detail photos for you:
38 notes
·
View notes