#And I needed the tutorial to get used again to the commands lol
Explore tagged Tumblr posts
Visit Tumblr Blog
Explore Tumblr blogs with no restrictions, modern design and the best experience.
Last Seen Tumblr Blogs


Fun Fact
Celebrities use Tumblr as well.
Text
Me? Adding a little bit of blue on Shepard's armor in reference to her relationship with Liara in a very rwby fashion? It's more likely than you think
#Guess who started mass effect 2 AGAIN?#Maybe this time I'll finally get to finish the story#I had to restart because I remembered almost nothing#And I needed the tutorial to get used again to the commands lol#Is it normal that it kinda deleted my old save automatically after creat4a new game? I didn't expect it#Not that I care about it since I don't remember it#But when I will try harder difficulty i will need to make multiple saves#The first one is the story one i wanna be consistent#And keep it all linear through all 3 games#Tags longer than the post lmao
5 notes
·
View notes
Text
Multiple MC's/posing tutorial:

Since people ALWAYS ask, and no one ever gives an in depth description on how to use all these mods I thought I would go ahead and make one! It always feels like everyone is gatekeeping their methods but really it's just a lot to explain and no one wants to type all that out so....
Anyway! Here's how I added multiple MC's into one shot and posed them all pretty!
1. You need the following mods:
2. Once you have all of the mods working you will start out making your mc into the first character you want added to your picture using the character editor mod, then get the outfit you want on etc. (You cant edit it once its out there so get it just right)
3. Youre going to use UE tools to duplicate your MC. press f10 to pull up the command bar and the in: "uetools_summon bp_biped_player_c"
(without quotes) Exactly like that then hit enter.
4. You should now have a second copy of your character hanging out by your original one. Now press f8 to open the animation mod, it now moves the most recently summoned mc instead of the one you are controlling. Use the postion and animation settings to move them where you want and find a pose you like. You won't be able to edit them once you summon the next character so make it look pretty!
5. Once you have posed your character, repeat steps 2-4 until you have posed all of the MC's you want. You cannot pose NPC's, but with other mods you can make an mc of them!
BONUS:
For the lighting, you dont have to wait around all day for the sun to light you up just right either. Type in "uetools_setworldsettings timedilation 20" to make time fast forward until the lighting is just right, then type "uetools_setworldsettings timedilation 1" to put it back to normal.
If you want to take a pic at night you can spawn a floating light source with the command "uetools_customlight pointlight 100 180 true"
This one you will want to mess with and practice with first. The first number where i have written 100 is a number representing the intensity of the light. 100 is very soft. The second number where i have put 180 is how spread out it is, so making it bigger will cause it to effect a greater area. Where it says true - that is what determines whether the light source you add will cast shadows. Type false is you dont want them - i usually do. The light spawns right in the center of your characters body, you will want to set custom lights up before posing any characters. Just walk around and spawn them, use "uetools_ghost" to let you fly in order to make yourself go higher or lower to change where you place the lights and then type "uetools_walk" to walk again. Custom light usually only shows up at night but in extra shadowy areas it works fine.
Sorry that was so long winded, I hope it helps someone! Doing the poses takes a really long time sometimes but its still fun to me lol
#hogwarts legacy#hogwarts legacy screenshots#hogwarts legacy mods#tutorial#hogwarts legacy mc#uetools
381 notes
·
View notes
Note
Hi!! I wanted to say that I loved reading about your journey of creating a personal website. I'm still unsure between Vercel and Netlify. I have a small question to ask. See, one of the reasons I want to make a website is to archive drawings and journal/sketchbook. Would you have any tips for creating an area on my website just for the diary/journal, which has tags, files for each entry, etc.?
Bello!

Really happy to hear about your interest in websites! I want everyone to make their own site so I don't have to log into social media and get instant tummyaches ♥
Vercel vs Netlify: I think I settled on Vercel for absolutely no reason whatsoever. I just made a site on Netlify, then tested on Vercel, and now I have like 5 websites on Vercel so I just kept using it LOL. I'm sure a more tech-savvy person would know the difference - I think they have certain integrations with specific programs.
Creating a diary or journal with tags:
There's a couple of different ways you can do that, with different levels of work needed.
you got me yapping again:
This sadgrl tutorial might be outdated and may or may not work, but explains the process better than I can.
Easiest: make a journal on Dreamwidth, or another blogging site (wordpress??) that allows easy tags and RSS feed, and embed that RSS feed onto your site.
This requires almost no HTML set-up, and the easiest to organize tags, but you don't truly have the data on your own site since it's just embedded.
When I snuck into a web design class at college, this was one of the methods that the professor used for a blog within a portfolio site LOL.
Shit like wordpress is what a LOT of ~professional~ sites do for their blog section. They code it separately from the main site haha. It's the most popular thing, but not necessarily the best. And wait til you read on what the CEO of wordpress has been having meltdowns about... he owns tumblr too!
It's made with a tutorial for Neocities if that's what you use.
Medium: Set up zonelets.
It will require some HTML and JS editing, but will help automate making headers/footers for each page of a blog.
I've never used it myself, but I see other people speak highly of it.
HARD FOR ME CUZ I'M A GORILLA: I believe a lot of professional web devs will slap your face with their coding cock until you use a static site generator (SSG) to make your site.
You will need some coding knowledge to set up the tagging system since it doesn't come with it enabled by default. But it's made explicitly to be an alternative to big Static Site Generators which are...
It requires some more intimidating knowledge, because it's a lot of scripts that turn files that are not HTML/CSS/JS into plain HTML.
Also you have to use the command line, and that doesn't come with buttons that tell you what you can do. You have to copy/paste all that shit or memorize the code to 'dev build astro' and it all looks silly.
I've used Eleventy, and now am using Astro. Other people use Hugo or Jekyll or some other stuff with crazy names like Glup Shitto. I hate all these sites cuz none of the words mean anything to me. This is a common theme for me and tech. I don't know what NODES or CONTENT or ISLANDS are!!!
I had the most success attempting to learn how to use a SSG by downloading a template and altering it with github + VScodium. Here's the template page for Astro. You click on a theme you like, and it takes you to its github page. (If you don't want to use evil Microsoft stuff sorry. Skip this entire section.) Follow the instructions on the page for "forking" the glup shitto. When it tells you to run commands, I run those commands through the terminal window in VScodium. These tutorials never tell you what these commands do cuz they assume you already know. Usually those commands automatically install the files you need onto your computer, and create the final files.
You can see my wip here for a "tag system" that SHOULD show members of a web listing haha but I don't know what I'm doing and I have a reading disorder AND don't know cumputer good.
THEORETICALLY this will be the simplest and easiest way to maintain tags and files, because after you set it up you just have to write the "content" of the blog page. And you don't have to set up the header/footer ever again. I see the vision, and potential, but I am not there yet when it takes me 5 hours a day to figure out what any of the words in the documentation mean and I don't want to ask an actual tech person cuz they will be like 'obviously just press the Blip on the Repository and then Suck My Ass in the command line".
(side note I haven't updated fujofans in like a year cuz I'm struggling with this part to make updating easier).
Con: the final HTML/CSS code is really ugly if it's "minified", and a lot of themes use """"""professional"""""" CSS libraries like Bootstrap and Tailwind that I honestly think are ugly cuz that's what every fuckin' tech website uses to style their pages and make them look Professional and Minimalist with stupid code like style="500-w dark-gray-balls D-cup-bra" on every single element. Even Toyhouse uses Bootstrap. Eugh!
But maybe you're smarter than me and can wrangle these things better!
That was really long. Woops. I hope you can slug through this wall of text and find something helpful. Feel free to email me if you have any more specific questions. I may or may not be helpful.
If someone else sees this and has better suggestions for making BLOGS, please chime in. I'm begging you.
64 notes
·
View notes
Text
YEHAW DA:V REVEAL THOUGHTS BELOW!!
Overall: Feeling so excited for this game. I'm climbing up the walls. I can't believe that was 20 minutes, it felt like 10. Need this in my hands yesterday.
What I liked:
-Holy fuck wow wow wow the hair looks like nothing I've seen in a video game before.
-Combat seems very different but also a natural progression of gameplay past. Real-time turn-based was always a little on the clunkier side, and while it never really bothered me, moving towards something more ME-style was expected. Very excited about being able to aim a bow. Would like to know what difficulty they were showcasing bc I'm considering jumping right into a Nightmare run.
-Now that I've been soulsborne-pilled the prospect of a parry mechanic has me buzzing.
-I feel like people are gonna dunk on the "stiffer" animation, but I prefer it so much more than the BG3/HZD constant wobbling. It'll make the key performances stand out instead of mostly jangling keys in front of a baby and letting the big moments get lost in the sauce. (Not that the aformentioned games didn't have good animation, just. If your characters don't need to move their whole body to convey dialogue I'd prefer if they didn't.)
-The sublety in the facial animations is CRAZY.
-The roleplay dialogue seems really reactive!! And the cuts to inject the unique dialogues feels smooth. I'm sure there will still be moments where it's easy to tell, but still cool. Seems like they're gonna be paying more attention to your personality type like DA2 too.
-So excited about Harding and Neve as companions and can't wait to meet everyone else.
-Neve's staff/wand makes me excited to see what kinds of focus options we'll get as a mage AAAA.
-God the costumes have so much swag. One of my hottest of many BG3 takes was that the costumes were overall flavorless. (Really hoping they didn't change the Grey Warden uniforms though that would really disappoint me.)
-Cinematography looks fantastic. Lots of well set up shots.
-NGL I felt something when Solas showed up. Wasn't expecting that. And while not perfect, I liked his interaction with Varric. Their relationship from Inquisition really slips under the radar if you're not bothering to look.
-Varric has never gotten over the trauma of what happened with Anders and it breaks my heart in a good way. God you could see it in his eyes!! [chef's kiss]
-However, I definitely have to kill Solas now for what transpired in this preview.
What I'm iffy about:
-The voice peformances feel a bit stilted. Not really what I'm used to from Bioware and I feel like it's important when the animations are more subdued. Hopefully this feeling will change when I get more of the game.
-The dialogue also felt a bit dumbed down. "Solas is doing his ritual!" "Yes. Solas' ritual. The ritual that we have to stop." Again, hopefully this is symptomatic of a tutorial level/trying to onboard newbies quickly and not the whole game lol. While I prefer this to dialogue that tries to sound smarter than it is, I'm really hoping we see an overall improvement from Inquisition.
-Sort of wish they went with the Andromeda dialogue system instead of bringing back Inquisition's, but I do like that it seems all dialogue options are getting tonal indicators again and they're not as easily conflated with morality. (Though I imagine people will STILL interpret it that way.)
-A little confused about them introducting Minrathous' panopticon shit and then immediately swerving into Solas' ritual. Would have liked some breathing room on that kind of worldbuilding.
- While I'm generally open minded about the change, I Do Not Love not being able to switch to playing companions. Might turn around on this if your ability to issue them commands opens up the closer you are to them/the more you grow into a leadership role. I do like that it seems you will eventually be able to command when they use abilities a la OG Mass Effect bc that was my biggest beef with the Andromeda gameplay, esp on Nightmare/Insanity difficulty.
-Not crazy about the new Pride demon design where are their leggies.
-Not really a Criticism, but they are definitely setting up for Varric to die and while I get it, narratively, I'm NOT HAPPY. Dragon Age has been almost allergic to scripted deaths so it's also gonna feel like being dunked in an ice bath. EVIL STUFF. IN DENIAL.
133 notes
·
View notes
Note
Do you have any tips or guides on how to make gifs?
I do! Firstly, this guide here is probably the best guide I've seen for gif making. It's concise and easy to follow, and it's what I used to learn myself. They have a lot of resources as far as programs go, but I'll list what I use below. As always, never download and install anything from unknown sources without doing your own due diligence. Run everything through your antivirus and/or virustotal before installing always always always!
This is kinda long, so imma put it under the cut lol. Also note that I use windows (Win10), so things may not work the same way for mac or linux
Before you can actually make the gifs, you need a way to download high quality videos! I like jdownloader 2 because I find the interface to be user friendly, it gives you the option to download multiple elements (like srt files), and it works with more websites than lots of other video downloaders (and their user support is leagues better as well). My second choice is yt-dlp, which isn't necessarily more complex but might look a little more intimidating. Both are great programs, but a quick note about jd2: DO NOT download it from anywhere else but the link above. The developers package adware in all their installers EXCEPT for that one (I hate it too, and I think it's fundamentally unethical, but at least they're up front about it and they have an adware free version). Both methods automatically download the highest quality video available in your source link, so you don't have to worry about fiddling with that.
Now on to extracting frames! My method of choice is ffmpeg. It looks more intimidating than it is, and it's honestly the best way to extract frames imo. Like yt-dlp, it uses your computer's command console, which means you'll need the relevant command lines to run it. This tutorial is great to get you started, and it includes a command line for if you only want to extract frames from a specific part of your video. If you want to extract every frame from the entire video, you can either input the start and end times of the video into that command line, or you can use this version (I use both depending on what I'm doing):
ffmpeg -i "file path" "out-%05d.png"
Always make sure you're working with png files. To make quality gifs you have to start with quality images, and png files, unlike jpg, are lightweight and lossless, meaning you won't end up with compression artifacts and fuzziness
To get the file path for your video, select the file, then in the upper left hand corner of your window select home > copy path. It will copy the path in quotes, so replace the entire section "file path" with the path you just copied. Then copy and paste the entire line into your command console. The tutorial above says this as well, but be sure to create a folder for your frames, go into that folder and click the file path bar at the top of the window, then type "cmd" to open the console. This will ensure your files are dumped in that folder
So now you need a way to actually MAKE the gif. This is... a little more tricky. You can use gimp, I think, though it's certainly not my program of choice. You could buy PS but like... ew. OR you could do what I did and arr it. I use a portable version of CS6 that I downloaded literally a decade ago, and unfortunately the website I got it from isn't up anymore. I did a quick search and found this on reddit, but again, do your due diligence before downloading and installing anything!
Now I'll talk a little bit about my actual process. The actual process of making frames into layers into a gif I got from that first tutorial I linked. I took that process and made an action on PS so that I never have to do it manually again because I'm lazy and my memory is dogshit and I didn't want to have to consult a guide every time I wanted to do something lol. Everything else I learned through experimenting and my own experience as a photographer, so I encourage you to play around with everything to see what you like and what works for you
For coloring, I fiddle with levels, brightness/contrast, and color balance adjustment layers until I'm happy with how it looks. You can use curves instead of levels if you want finer control (or if you want to produce effects like matte), but levels works just as well and has a histogram right there in the panel, which makes it easier to adjust the exposure based on the image's actual data
For sharpening, I have a couple of custom actions I use. Here's what they look like:

The first one (bound to the F2 key) gives a smoother appearance, and I like to use it for kpop gifs where the subjects are already airbrushed and smooth without much texture, or wide shots where detail isn't super important
The second one (bound to the F3 key) is the one I use when I want to preserve texture in the image. Closeups of people where you can see their skin texture, or busy images with lots of detail benefit most from this one
The basic gist of it is, the "sharpen" filter does exactly what it says on the tin and it's usually all the sharpening an image needs, and the "surface blur" filter erases or dampens artifacting created by the sharpening filter. Sometimes I'll run the action twice, or use them both in combination to get the effect I want. Here's what the difference looks like in practice, featuring two very cute dudes:
F2 sharpening action


F3 sharpening action


You'll notice in the first two gifs, there's not much in the way of texture to preserve. Yoongi's skin is smooth and airbrushed, and the scenery is all metal and concrete shot with a wide aperture, which makes the background nice and blurry and smooth. In the second set, Jesse has facial hair and stubbly texture on his throat that I wanted to preserve, so I used the action with the lighter surface blur
My advice on all of this though, again, is to play around with it and see what you like! And if you have any more questions, feel free to ask! I'm by no means an expert, but I'll do what I can to help!
edit: oh, a quick note about speed! The tutorial I linked above mentions changing the delay to 0.05, and that's great for full speed gifs! But if you want them slow like my gifs above, I set the delay to 0.08. Sometimes I'll slow them down even more by setting the delay to 0.09 or 0.1, but any higher and you start to lose some of that smoothness
15 notes
·
View notes
Note
hi!! ikesoren height anon again, thank you for the detailed answer!! i honestly loved how thorough it was, but you talking about the height and weight stats in-game also made me think—soren's probably not wearing any armor into battle with a weight stat like that, huh?? ike being even heavier than he is tall makes sense because he's got armor and a big sword and whatnot, but soren is really just charging into battle in nothing but a shirt and cloak... i know mechanically it's somewhat normal for mage classes in these kinds of games to only wear light/leather armor or even just cloaks, but i wonder how ike feels about soren waltzing into fights with zero padding lol
Hi height anon! Yeah, like you said, it's pretty typical for Fire Emblem mages not to wear much in the way of armor. Typical fantasy RPG things. (His strength stat in FE9 starts at, uh. Zero.)
But on the general topic of Ike worrying over Soren/being protective over him, there's a couple of things this ask brought to mind, like these quotes from Soren's introductory chapter.
Shinon: All right, Ike. Let’s see how you handle the role of captain. Well? What are your orders, boy? We’ll do what you say, so long as you hurry up and spit it out! Ike: I know, I know! I’m thinking! Give me a moment, will you, Shinon? Shinon: Bah. Useless! We’d be better led with Mist than this soft, untested whelp. Ike: Let’s see…We’re in the middle of the road, and there’s not much cover. Soren and Rhys are vulnerable, so we have to protect them from enemy attacks…Right? Soren: That’s a sound strategy, Ike. I can attack from behind your defenses. Good thinking. Ike: Do you mean that? Um…all right! Let’s do that then.
(FE9, Chapter 4.) For context, Ike's the son of a mercenary commander and this is the first job he's been given lead over, so he's very much still learning how to command -- so this is a little bit tutorial-y for players, built into the script, since Soren is your first mage and positioning him behind a character with better defense like Ike is a pretty good strategy for training him up. (There's also some boss dialogue much later where Shinon accuses Soren of, quote, "hiding behind Ike's apron.") The above is the default, where everyone is alive, but there's this variation if you've (somehow) gotten multiple other characters killed.
Soren: Ike, do you have any ideas on how you want to approach this fight? Ike: Let’s see…We’re in the middle of the road, and there’s not much cover. You’re vulnerable, so I have to be sure you’re protected from enemy attacks, right? Soren: Right. Er…sorry for the trouble…but I appreciate the consideration. Ike: Sure. All right, let’s do that then.
I think the awkwardness of this variation is really cute, tbh, down to Soren apologizing for the trouble. It fits considering how young they both are at this point in the game, and that it takes place in the early chapters before war breaks out.
And then a variety of "death" quotes -- Soren is too plot important to actually be killed before the very final chapters of FE10, so if you do get him killed, Ike will order him to retreat. (Classic Fire Emblem has permadeath for characters, and it's sort of an in-joke-that's-not-entirely-a-joke that a lot of players, including me, will just reset if characters die. Listen, it's the right way to play. But I always like looking at the death quotes, they tell you a lot about the characters, and Soren has a lot of special ones.)
Soren: Oof! That was…poorly done. Ike: Retreat, Soren! You’ve done all you can here! Soren: But, Ike… Ike: You heard me. Fall back! You can still help us with our planning. Besides, if you tell us all what to do, we’ll be better off, right? Soren: I… I understand… Please…be careful!
(Up until FE9, chapter 17.)
Soren: Oh… Ow! Ike: Hold it, Soren! You’re not staying in this a moment longer! Withdraw! Soren: Ike, I can still– Ike: Our tactician isn’t allowed to make faces like that. Ever! Listen, we need you planning our strategies at base, so leave that attitude behind. That is unless you have a problem with the two of us in command. Soren: Of-of course not! I didn’t see… … I understand. But listen… Stay safe, Ike.
(FE9, chapter 18 until the endgame chapter.)
Soren: Argh! Not now… It’s the last battle… How could I be so careless? Ike: Soren! Just fall back! This may be the last battle for Crimea, but it won’t be the last battle for us, will it? Soren: What? Ike: We’re mercenaries. After this battle, there will be hundreds, maybe thousands of fights ahead. Am I wrong? Soren: I… No… Ike: Right. So get out of here. Our little group needs you! Do you understand? Soren: Ike… I understand. I will withdraw… Ike! Don’t let me down!
(FE9, endgame.)
Soren: …Ugh… What a terrible place… to die… Ike: Soren, retreat! Soren: But, Ike… Ike: Aren’t you supposed to be my strategist? Use your head! I need your help. Soren: …I see. As you command…
(FE10, part 3.)
And, okay, listen, not on the subject of Ike being protective, but Soren's endgame actual death quote is a lot.
Soren: Ike… Please live… Even if all the cities burn, and the seas swallow Tellius… You mustn’t die… Not you…
(FE10, part 4 endgame.)
There's also some fun game mechanics at play -- if you have Ike and Soren next to each other in FE9, Ike negates critical hits against Soren. Soren is the only character he does this for, notably.
The possessed version of Ike from the mobile game also explicitly warns only three characters to stay away from him so he won't hurt them -- Mist, his sister; Titania, his surrogate mom; and Soren.
28 notes
·
View notes
Note
hey transitions anon back again! I was struggling with sprite (transforms?? animations???) when I sent the ask (still cannot get that scene from Fantastic Wonderland out of my head where Buck butchers the rabbits and the parts fly lol its so wellmade), but I'd love to see how you do with your CGs and scenes too if you have the time or want!!! (Still thinking about the CG in the first arc where Orlam dips Genzou in the water, it hurt but it looked so cool)
sorry for the delay in this i've been having some really bad dizzy spells the past few days making it hard to be on the computer much 😵💫 but i've tried to put together a short basic tutorial here with some fundamentals for sprite movement!
since you mentioned the bucks scene i thought i'd just walk through how you could recreate that as it includes pretty much all of the basic ATL that i use for the majority of my sprite movements. we'll be recreating this scene in ren'py (well, the animation at least):
under the cut! (i'll also share a link to the full code for this scene at the end so you can see the full thing more easily with all the interwoven stuff). note that this is not really written for complete ren'py beginners as it assumes at lease some basic familiarity, such as needing to define images, etc, as i don't really talk about that
i will say first off that none of the actual animation coding... script... stuff is actually that complicated at all. it really only uses a few different commands. it's more how you use them than anything that's particularly complex
the main command you'll use ridiculously often when moving sprites around is ease. ease just tells "something to happen to an object over a period of time with a small ease in and ease out on both sides." this something could be the object moving somewhere (most common) or something else like the object blurring or going transparent, etc.
so for instance you could write ease 1.0 xalign 0.5 and this would just mean "move this object to an xalign of 0.5 over a period of 1 second with a slight ease in and ease out on both sides of the movement." xalign align here is just saying a position aligned horizontally on the screen with 0.0 being the far left and 1.0 being the far right (meaning that 0.5 would be right smack in the middle). you can also use xpos instead of xalign. xpos just refers to a more exact position not relative to the screen and based on the left edge of the object... i tend to use a combination of the two depending on what i need. like if i need to move something completely off the screen i don't normally use xalign because it starts to get all weird since it's relative to the screen. anyway, you'll see some of these in action for the scene in just a bit
so at the start of this scene, bucks is at the center of the screen. i moved her there originally using this code:
the show command is just how you show or move an image on the screen. so here i'm moving the image bucks_axe angry to xalign 0.5 over a period of 0.8 seconds with an ease in and ease out on both sides. this command happened before the gif started, so bucks is now already at the center of the screen. what happens next?

she needs to go running off the screen to the left!
this is very simple... you just need an ease!
this moves bucks to a position of -1.5 over a period of 1 second. as i mentioned earlier, usually when i'm moving stuff off the screen entirely i switch to xpos. this xpos is super to the left actually, i'm not quite sure why i made it so intense now that i'm looking at it LOL oftentimes if you just have a small sprite you only need to move it to like xpos -0.5 or so depending on how wide it is. anyway, this time she goes all the way to -1.5, which is part of why it looks like she moves very quickly because she has a ways to go in only 1 second
then what happens...
this is a little bit more complex as we're going to have to talk about knots. first let's talk about the red screen and the shake. these are both handled with this code:

the top line is telling the bg to shake. this is a custom transformation i wrote myself called hbounce. i have it defined in the top of my script file (or in my first script file when i use multiple files) and it looks like this:
feel free to use it if you want! it's just a rapid-fire sequence of very small eases and xoffsets that when triggered will make it look like the object shakes.
in this instance, the object shaking is the bg, but you can also use it for sprites. i like using it for energetic expressions or like if the sprite is supposed to be doing something that would realistically have a bit of movement
you can use this transformation on any object by using at, just as you see in the first screenshot. so show bg at hbounce, or if you wanted to make bucks shake, you could type show bucks_axe angry at hbounce
next i make the screen red by introducing a new image i have called red that's literally just a 1280x720 red image. i start it off at an alpha of 0.0, which means it's completely transparent. then i use ease 0.5 alpha 1.0 to make it fully visible over of a period of 0.5 seconds.
now things are gonna get a bit more complicated... first i'm going to make the bunny heads and arms appear on the screen. but i need them to be offscreen to the left first, so i first use some code to place them there:

this makes 2 bunny heads and 2 bunny arms appear on screen at various positions. all of them are offscreen to the left (either -0.5 or -0.4). and they have different yposes (ypos is the same as xpos just for vertical instead of horizontal).
now i need them to move onscreen while making an arc downward and going offscreen at the bottom... complicated. you need to use knots for this sob. i hate knots as i always need to tweak them a bajillion times before i get them right, but they're necessary sometimes. knots just make something curve rather than move in a straight line. so the code for the downward arc movement for each object is:
you'll notice each of these is slightly different. that's because i did them all manually to try and make them look good... it's annoying.
first up, you'll see that i repeated the initial position for each object. that's because for some reason knots don't work properly if you don't have the initial position defined within the same command (including both xpos and ypos)??? also if you use xpos/ypos for the initial position, you need to use xpos/ypos for the final position (you can't use xalign/yalign). so the first line of each is just a repeat of the positions from the previous screenshot
then comes a long one. linear 1.0 pos (0.7, 1.4) knot (0.4, .0) rotate 90. this is saying "move the object to a position of xpos 0.7 and ypos 1.4 over a period of 1 second except have it arc towards a position of xpos 0.4 and ypos 0.0 while also rotating that object 90 degrees" WHEW
a ypos of greater than 1.0 will put that object below the bottom of the screen, which is why the heads and arms look like they're falling offscreen. i could not really tell you a good strategy though for figuring out the knot... what i usually do is start by setting it about halfway between the initial position and the final position, then tweaking it based on what looks good by testing it a gajillion times LOL there is probably a better way to do this but i do not know it...
(btw the difference between ease and linear is just that ease puts that small ease in and ease out on both sides of the movement while linear is just a straight movement; i usually use ease for like 95% of my movement as it looks much softer, but sometimes i use linear depending on what needs to happen)
anyway, each of the heads and arms has a slightly different final point and knot, so they all fall just a bit differently, which is good for making it look more realistic (if you could call flying bunny heads and arms realistic)
the next couple movements are going to be basically the same now that you know how to do this:

bucks just needs to move to the opposite side of the screen, followed by the same screen shake, red screen, and flying bunny limbs. you're just going to need to reverse them for the ones on the other side. so first i move bucks to the other side of the screen (offscreen right) using this:
(remember that an xpos greater than 1.0 will be off the screen to the right while an xpos of less than 0 will be offscreen to the left, although since it calculates from the left edge of the object, you'll need to usually do like xpos -0.5 to get it fully offscreen)
then comes the complicated stuff:

so just like before, first i have the bg bounce. then i make the red screen become visible with an ease of 0.5. there's some pauses in there. and then i have the bunny heads and arms appear from the right offscreen this time and fall to the left and offscreen on the bottom. it's the exact same code just with the positions kinda semi-reversed and my heads and arms are flipped...
you might be wondering why i'm constantly showing and hiding and changing alpha for various objects somewhat haphazardly. this is because objects you show later will show on top of objects you show earlier. so whenever you see this type of stuff happening in my code it's usually just because i need to ensure the right things are showing on top... sometimes i need to use a few tricks, like actually showing an image way earlier but having the alpha be 0.0 so it's invisible, then later i change the alpha to 1.0. this lets it still show on the bottom even if i show other objects later. there might be a better way to do this too LOL but i do not know it. my scripts are constantly full of these types of weird tricks that don't make sense at first glance until you figure out that's what i'm doing hahaha. half the time if i haven't looked at it in a while i forget myself what i was even doing...
ok now to the last part (hopefully this hasn't been ridiculously confusing). bucks needs to return to the center of the screen and start spinning, then move offscreen...

this starts out simple using a command we all know and love to get her in the middle of the screen:

now we need to make her spin! for this, i defined completely new images for bucks called bucks_axe spinslow and bucks_axe spinfast:
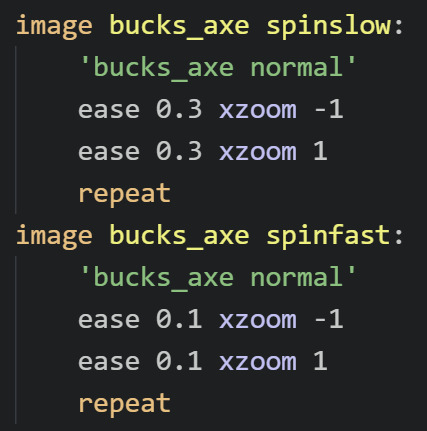
each image uses an image i defined previously as a base: bucks_axe normal. which is just my basic bucks_axe image. then... i flip it horizontally twice in a row and repeat it. an xzoom of -1 will flip an image. while an xzoom of 1 will show an image normally. an xzoom of 0 will make the image look like a tiny line at the center of the screen LOL you can use xzoom to flip a sprite horizontally if you want it to face the other way. and if you use ease with the xzoom, then it'll make it look like it's actively flipping rather than just instantly facing the other way. the repeat at the end here just tells it to keep repeating forever, so it'll keep flipping back and forth, making it look as though it's spinning. i have a slow version defined that takes 0.6 seconds to make a complete spin, and a faster one that does it in only 0.2 seconds
now, this was just defining these objects. this doesn't show these objects on the screen. remember you can only do that with the show command. so next we need to actually show the spinning bucks:

first i show the slower version for a period of 0.4 seconds. then i show the faster version for a period of 0.4 seconds before having the spinning bucks go shooting off the screen to an xpos of 1.8. having the slow version switch to the fast version like this is what helps it look more like she eases into the spin
once she's offscreen, we get to the final part of the scene, where the heads and arms spin upwards very comedically:

for some reason this took me forever to get right. i had to mess around with the code a ton before it started acting the way i wanted it to. tbh that's really what so much of this comes down to. writing code you think could possibly work, then testing and tweaking it 50 million times until it looks how you want it to look. anyway... for this part, the heads and arms have been set up very similarly to the spinning bucks, with each of them having a new defined version of them rotating:
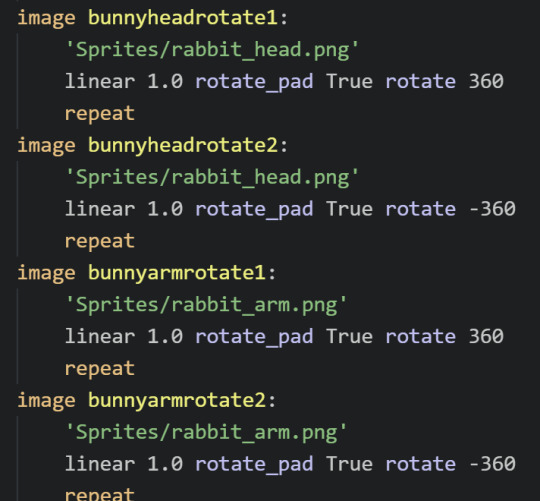
here i have 2 rotating heads and 2 rotating arms. some of them rotate clockwise 360 degrees, while others rotate counter-clockwise 360 degrees over a period of 1 second. and then they repeat so they just keep rotating forever. the rotate_pad True in the middle here makes it so that the objects don't change size while rotating and thus won't start changing position as they rotate. i don't fully understand it tbh but it's necessary if you want your rotating objects to stay in one place while they rotate
now that you have these rotating bunny pieces, they need to jump from the bottom of the screen, hover for a moment, then fall back offscreen. this is, as always, just a series of eases...

each bunny piece starts below the bottom of the screen (greater than ypos 1.0), then leaps up onscreen (ypos 0.0) over an ease of 0.8 seconds, then falls back below the screen (ypos 1.5) over an ease of 0.8 seconds. and i put small pauses in between so that they come up one by one...
...and that's it!!! that's honestly all it is. every single piece of movement happening here is just an ease or a linear to move the object to a different xpos or ypos (or xalign/yalign). some of them are a bit more complex, like when i add a knot in the middle of the movement to make it arc or have base defined images that are spinning or rotating. but the fundamental animations really all just come down to those types of movements
i realize this tutorial might not be nearly as clear as it was in my head as i tried to type it up, especially if you don't have much experience with ATL in ren'py to begin with, so you can feel to ask me any specific questions you may have if something doesn't make sense or if there's something else you're trying to do that you can't get to work
since i only copy-pasted bits and pieces of the most important code to talk about above, i thought i would also share the complete code for this snippet here: https://wtools.io/paste-code/bT61
this way you can see all the rest of the code around it to see everything in context, as well as all the other stuff like how the text is in there, pauses and sounds, repeated stuff i didn't bother to include in the copy-pastes, etc. realize ofc that you can't just copy-paste this entire snippet into your own projects because it references a lot of images you don't have!! LOL however, you can copy-paste bits and pieces of it for different specific movements if you want!
and as i mentioned earlier, feel free to ask me any questions!
19 notes
·
View notes
Text

MY GIFMAKING TUTORIAL
hi !! i am finally getting around to making a gif tutorial so here we are, the most i have done is answer an ask about high quality gifs so i’ll just put that link here - x.
i'm gonna try and go over the whole process but i might end up forgetting something so if you need clarification or a further explanation on something feel free to ask i'm happy to help !! also i'm gonna stick this under a read more bcs this is probably gonna end up being quite long.
SOFTWARE
firstly, i have a mac and use photoshop cc 2022 to make my gifs. to screencap i use mpv player. someone made a really good tutorial on how to download mpv player so i’ll link that here - x.
also i use qbitt*rrent to open t*rrent files so you’re gonna want to download that as well if you’re using t*rrent files.
btw for newer versions of photoshop you can’t access the smart object timeline without an action so you’ll have to download this - x. to load an action into photoshop go to window > action and then the actions should pop up next to your history, then you have to press the four horizontal lines next to the arrows (that’s if yours is set up like mine lol) and press on load actions and just select the action you downloaded from me which should be in your downloads and press open and it should appear in your actions section !!

DOWNLOADING THE MEDIA
firstly, you’re gonna wanna download everything in 1080p if possible as this will help to keep the highest possible quality for your finished gif !! now as to where to download media:
- tv shows and most movies: t*rrent from rar.bg with 1080p files with a x264 codec (don’t download x265 as you won’t be able to screencap properly) i try to go for bluray or amazon t*rrents as they tend to have the best quality and most seeders. individual episodes should be around 2-4 GB so full seasons can be anywhere up to 70GB if they’re in 1080p. as for movies i tend to go for files around 10GB, anything under 2GB doesn’t tend to have the best possible quality even if it’s listed as 1080p.
- other movies: some movies, particular older ones aren’t on rar.bg or have literally no seeders so i go to yify. unfortunately the quality isn’t as good as it would be if i downloaded it from rar.bg as the file sizes are made to be as small as possible but hey ho sometimes its the best we can get.
- youtube/twitch videos: 4k video downloader is the best application to use, you do have to download it as software though and you can only do 5 downloads per content creator account with the free version (which i have now run out of :/). so atm i'm using loader.to, for some reason it increases the saturation of the video a little bit but i don’t really mind that cause it’s a lot easier to fix and work with over saturation than under saturation.
SCREENCAPPING
open the file in mpv player
find the section you want to gif (i tend to start a little before said section starts so i can cut it down later)
to start screencapping press option + s (for mac) and then it should start screencapping really slowly but hang on in there it’ll get there. most of my gifs tend to be anywhere between 30-75 frames (per gif) depending on the sizing of my gif and the quality + colouring i’m using.
to stop screencapping just press option + s again. and now you have successfully created your screencaps.
IMPORTING SCREENCAPS INTO PHOTOSHOP
file > scripts > load files into stack

2. browse then use command + a to select all screencaps in that folder then press open then once you get to this (photo below) you can press okay and photoshop will start loading your screencaps in !!

3. your files should now have imported into the bottom far right in layers

PUTTING SCREENCAPS INTO TIMELINE
firstly go to window > timeline

which should then create something like this at the bottom of your screen:

so that’s your timeline ^^. and then for putting the screencaps into timeline: i’ve actually made an action for this so i haven’t done this manually for a while lmfao but this is essentially what it does if i were to do it manually:
click on ‘create frame animation’ which should then create this:

2. command + a on your screencaps in layers to select all of them at once then click on the little four horizontal lines to the immediate left of the layers and press ‘make frames from layers’.

4. then command + a and select all your frames in timeline

5. then press ‘flatten frames into layers’ which is right under ‘make frames from layers’. this should then create layers titled as ‘frames’ in your layers section right above your original screencaps. i then put all my frames into a group and delete the original screencaps to save storage space.

6. make sure to reverse your frames so that the gif isn’t backwards - again command + a and select all your frames in the timeline then click on the four small horizontal lines and press ‘reverse frames’.
*this is future alice coming back and realising that i never cut down the amount of frames for my gif lmfao *facepalm*. so yes after you’ve done this or set your frame delay, either cut down and delete some of your frames from the timeline and/or copy and paste them in another document and repeat the giffing process for each one. now remember that you can drag your colouring from one document to the other so you don’t have to redo your colouring on each one (alas i did not know this when i first started gifmaking 💀 ).
for bigger gifs i tend to use 35-50 frames and up to 75 for smaller sized gifs.
SETTING FRAME DELAY
for most of my gifs i use frame delay 0.05, but occasionally 0.04 or 0.06 depending on the gif. anything slower will end up reducing your gif quality and anything faster tends to look a bit fast imo.
again you’re going to want to command + a and select all of your frames in the timeline and then click on the 0 sec right underneath the frame icon. then press other because the speed we want isn’t in the already listed options.

after you’ve pressed other you’re just gonna want to type in your frame speed - 0.05 would be my optional speed.

then press okay and your frame delay should be set !!

CONVERTING TO SMART OBJECT
for the newer versions of photoshop you’re gonna have to use the action i linked at the top. all you have to do is command + a and select all your frames in timeline and select the group in layers which has all your frame layers then just press play on the action using the little triangle at the bottom:

give it a second and then your timeline and layers should look like this:


my action also turns all your layers into a smart object which is why is has just turned the group into one layer ^^. if you’ve done it correctly the gif should move if you drag the red vertical line across the purple box in the timeline.
CROPPING
okay so tumblr sizing: ava made a good tutorial/description for that here - x. she also goes over sharpening and a few other things. but basically what you need to know is that for one gif it is 540 px in width, the dimensions that i tend to use for one gif horizontally are: 540 x 400, 540 x 310, 540 x 540, 540 x 460.
for two gifs that you’re gonna place next to each other they’re going to have to have a width of 268 px. i tend to use the dimensions of: 268 x 300 268 x 350 268 x 268
and for three gifs next to each other they’re gonna have to have two different dimensions:
so the one of the left is 177 px, the one in the middle 178 px, and the one on the right is 177 px. again a visual representation is much easier to understand so just have a look at ava talking abt it ^^.
COLOURING
okay so colouring is kind of a personal preference and you kind of just have to play around with it til you get something that you like but i’ll walk you through what i did with this gif. (i'm actually using the colouring that i used in this gifset which i saved as a psd).
this is what my base gif looks like without any colouring:

you can find all of these things i used to colour in properties (just hover over each icon to find out what it is):

firstly i'm going to add a curves layer to make it a bit brighter - so i enhanced the highlights and upped the shadows a bit:

then i added a brightness/contrast layer to add more contrast:

increased the vibrance by 15:

added a gradient map to add a bit of contrast which i then put on soft light blending mode and changed it to 15% fill:

fiddled around with the colour balance to balance out the hues:

added a levels layer to increase highlights and shadows:

then i just finished of with selective colour where i went through each colour individually and changed it til i liked how it looked. i change red, yellows, greens, cyans, blues and magentas on absolute and then white, neutrals and black on relative. you can toggle between relative and absolute at the bottom of a selective colours in properties (you can’t change the setting for different colours in one layer, so you’ll have to make another selective colours layer to change to the other mode)

SHARPENING
okay so i actually sharpen my gif before colouring in order to see the colouring better, and then i end up deleting that sharpening and adding it again with my colouring on top of the gif which i talk about further down but for now here are my sharpening settings:
filter > sharpen > smart sharpen:


^^ using legacy and more accurate defines the sharpening a bit more so i use that, you find it by pressing on the little cog at the top of smart sharpening.
another sharpening layer
filter > sharpen > smart sharpen

again using legacy + more accurate
and finally one more smart sharpen layer but this time without legacy so i can reduce the noise slightly:

finally, i add a gaussian blur layer to smoothen out my sharpening:
filter > blur > gaussian blur

then i change the opacity of my gaussian blur layer to 15% by double clicking on the lines on the far right of my gaussian blur:


and that is my sharpening settings and now for when i add my sharpening:
i merge my colouring and gif layers together and then sharpen cause it makes the colouring stick better:
so i duplicate my gif layer and colouring group using command + j while selecting both layers at once:

ignore the current sharpening cause i'm going to get rid of that, its just as i said before to make the colouring process slightly easier.
then cause i have my current sharpening i'm just gonna drag the ‘group 1 copy’ smart filters to the tiny bin icon to the bottom right so it gets rid of my sharpening. and my layers now look like this:

now you’re going to have to select both the ‘group 2 copy’ (my colouring) and ‘group 1 copy’ (my gif) at the same time again using command + a then go to
filter > convert for smart filters

this will the merge the colouring and gif into one layer, do not attempt to normally merge using command + e cause that will stop the gif from moving.
then we add the sharpening as i’ve already shown above. to the merged group so the final gif in layers should look like this:

EXPORTING
now to export the final gif:
file > export > save for web (legacy)

now after you’ve waited up to several minutes for the damn thing to load you should now have this:

these are also the setting i'm going to be using and also usually use. the only things i ever really change are the colouring and diffusion modes

i actually went over this in more detail here - x. i already linked this at the top but here it is again. i do however use pattern diffusion mode now instead of diffusion cause i find it has a better overall finish but again its personal preference.
also remember that tumblr has a size limit of 10mb so keep an eye on the size in bottom left (you might have to reduce the number of frames for your gif if the size is too big):

and now we are done and this is my final finished gif.

i apologise if certain parts of this or none of it made sense lmao i'm kind of tired and i tend to ramble incoherently at times. please do ask questions if you don’t understand or need me to explain something again i'm happy to help.
tagging some mutuals tracking tags (hope that’s okay) <3
#*tutorial#photoshop#photoshop tutorial#gifs#giffing tutorial#gif tutorial#ps tutorial#tutorial#cowboycoven#useralison#arthurpendragonns#ughmerlin#uservalentina#fieryfrankie#seraphcastiel#tuserpris#usersila#bluefirecas#donestiel
594 notes
·
View notes
Note
could you tell us the story of your shiny competitive latias in gen 3? im so curious
oh yeah so the reason i didn't go in depth about that in the post is it's actually quite a lot of obscure game mechanic talk and i didn't wanna divert from the heartwarming story to break people's brains potentially lol but yeah sure! i'll put the whole explanation below a cut because it's pretty long. warning that i'm going deep on the nerd shit sorry in advance LMAO
essentially the latias i use in gen 4 was obtained in pokemon emerald and then transferred through the pal park, i obtained it by combining ACE (arbitrary code execution) and RNG manipulation. neither of these things are hacking or require any sort of tampering with the game and can be done on original hardware (i did all this on my original emerald cart in an actual GBA SP) but it is an unintended way of playing the game, just to be upfront, not that i mind because i'm doing singleplayer stuff for fun.
so, RNG manipulation is the process of perfectly timing your button inputs and actions to get the game to spit out the "random" result that you want. because computers struggle to do true randomness (especially something as old as generation 3 pokemon games) usually "randomness" is actually based on elaborate algorithms/equations. in emerald, the game is supposed to choose a "seed" to generate random pokemon spawns etc with (think minecraft world seeds and how those generate a world, but with wild pokemon and stuff instead if you've ever played minecraft!) based on the RTC (real time clock) of the cartridge, but due to a programming error, emerald actually never seeds properly, causing it to always be stuck at a seed of 0. there have been a couple methods discovered to force the game to seed but that's irrelevant here. since the seed is always 0, every time you play emerald, all of the possible spawns are actually the same each time. to a casual player they will never notice such a thing but to an rng manipulator this becomes very, very useful.
when you get into a wild encounter (or obtain a gift pokemon, encounter a legendary, etc) the game checks what frame you're on since you booted the game, tosses that frame into its random number generating algorithm against the seed, and then every aspect of that pokemon is determined by the result, like IVs and nature and etc. so, if you were to backwards engineer this algorithm and then figure out a way to perfectly time your A press to hit the exact frame you want, you'd be able to get any IV spread etc you want... and you'd also be able to predict and time your inputs to get shinies assuming that you know your SID (secret ID, a hidden value paired with your trainer ID on your trainer card) which can be figured out through a variety of methods that i won't get into here.
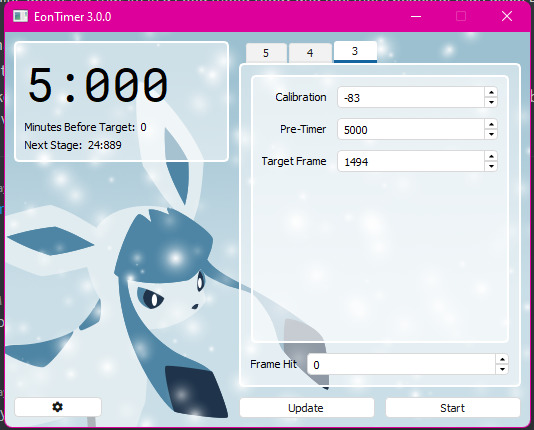
as it turns out, the pokemon community is nuts and the whole backwards engineering process was already done by people way smarter than me, and software has been developed to be able to sift through all possible pokemon encounters in pokemon games, including emerald. i use PokeFinder which is by far the best program out for this right now that is getting consistently updated. software has also been developed to time your A presses, the main one i use is EonTimer which lets me pop in what frame i want to hit and it calculates the amount of time i have to wait and then beeps to tell me when to hit A. i feel the need to repeat again this software does not require you to tamper with your games in any way - i honestly highly recommend trying it sometime even if just for the novelty of getting a shiny to appear on command, it's really fun and there's tutorials on youtube by "i'm a blisy" dsfjfdskd
edit: here's a screencap of what eontimer looks like btw! not the same target frame i used back when i got this latias but yeah. it's neat
with all of that out of the way, it sounds like it should be as simple as saving in front of the latias and then looking up the spread i want, popping it into the timer, and then resetting my game, waiting for the beep, hitting A and rinse and repeat until i get it. there's a few holes in this plan though:
the spread i want (timid 31/31/31/31/31/31 AKA perfect IVs) would require me to leave my game on for literal weeks on end per attempt, which is entirely unrealistic and unfeasible. i'm doing this on actual hardware, no speedup!
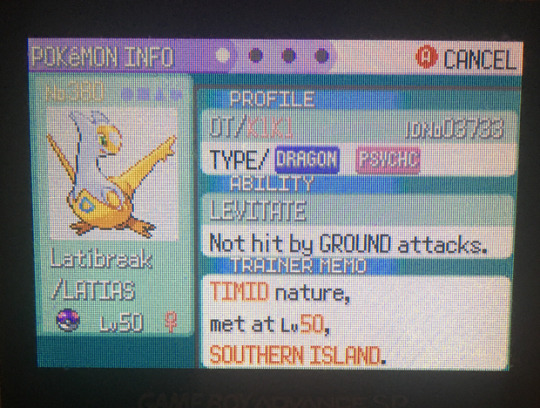
the spread in question also isn't shiny with my current SID. i don't need the latias to be shiny or anything, i just want it to be for fun
i am using my emerald save file that already has the roamer Latios generated, so i no longer have the option of rng manipulating that one. this means i need to get to Southern Island and RNG the latias there... which is a mystery gift. i do not own the e-reader nor do i own an extremely expensive eon ticket to get that event in my game
and this is where ACE comes in! ACE is... complicated. if you've ever seen people pull off some excessively wild and glitchy stuff in gen 1 by swapping items around in their inventory, you were probably watching a form of ACE in action. it's the process of glitching the game into a state where you can get it to take some form of input from the player as code and then run that code, hence "arbitrary code execution". honestly ACE is not something i have studied in depth, especially with gen 3, and i mostly just followed tutorials on getting what i wanted. i can summarize this process down into a few steps:
getting the NPC trade pokemon DOTS the seedot and EV training it to a very specific spread
performing glitzer popping (wild name, i know) to corrupt DOTS the seedot into a very specific glitchy egg
changing the name of my PC boxes to what is essentially GBA assembly instructions
cloning the aforementioned glitch egg using the emerald battle tower cloning glitch a bunch of times so i can use them whenever and then hatching them, which due to the EV spread i gave DOTS, will execute the code i changed my PC box names to!
i used ACE to solve all of the aforementioned problems with this rng manipulation.
i used ACE to make my game jump thousands upon thousands of frames forward, just a little bit before the competitive spread i wanted, and then went to the battle frontier to save a battle video at the battle factory by going in and instantly losing... this is because every time a battle video is loaded, it doesn't actually save every random result that happens in the battle (like missing and damage rolls) and instead just remembers the state of the RNG before the battle started and player choices and re-calculates the same exact random chances. therefore, if i watch this battle video from the trainer card upon every reset, i will jump back to that place thousands of frames forward, right before the latias spread i want
i used ACE to change my SID to a value that would make the spread i want shiny in combination with my TID because why not
i used ACE to spawn latias on southern island and to give myself the eon ticket to get there, no real life eon ticket/e-reader required (there are ways to inject this event that don't require ACE/the real life event items but i wanted to do all this without tampering!)
as a side tangent, i should mention that i had a very obscure problem with running the ACE to get to southern island that i had to contact some gen 3 ACE experts for help on... too complicated to explain here in any sort of legible way i think, but basically the problem was every time i hatched the glitch egg, the game just froze despite my code being typed in properly in my PC boxes with no typos. the audio kept playing but it would hang on the hatching screen, resulting in this extremely cursed footage of me hatching a void egg that looked like nothing and caused my game to crash:
i just think that's neat LMAO. anyways yeah after getting all that complicated ACE shit out of the way that took me 123989123 years to set up, it was just a matter of standing in front of the rock on southern island, saving my game, getting my timer ready, soft resetting my game, watching my battle video and starting my timer, and then waiting a handful of seconds and trying to press A with the exact 1/60th of a second timing to get the latias to appear. (emerald runs on 60 fps, this always takes a few tries)

(i can't put 2 videos in a tumblr post but if you want to see the encounter happen, i took a video here, it's a direct discord file link lol)
after that i simply transferred latibreak through HGSS pal park and trained her up and started using her in the battle tower :) technically a player could randomly stumble on this latias if they left their game open long enough and had the right TID/SID, it is a completely valid encounter that can move through pokemon bank and pokemon home! i just used a variety of game knowledge and glitches to get it to appear for me without having to wait for luck. i hope any of this made sense and sorry for all the jargon!! i wasn't sure how else to tell this story tbh. if any of this sounds interesting to you i highly recommend trying out at least rng manipulation sometime! you can do a lot of cool stuff with it even without ACE being involved, i just really needed ACE for this specific pokemon i wanted SDFJFDS
#pokemon#pokemon emerald#rse#latias#long post#asks#faterunes#kiki was here#kiki plays games#rng manipulation#arbitrary code execution
40 notes
·
View notes
Text

hiii loves! I'm making another tutorial for this shape gif or gif shape edit you see up there! (lol I don't know what you call this) I've seen quite a few edits like this and it's a fun effect to achieve and really easy!
I use photoshop to edit my gifs and mplayer to get my clips btw.
TUTORIAL UNDER THE CUT:
1. ADDING THE SHAPE
2. CREATING A CLIPPING MASK
3. EXTRAS
So you'll need two gifs for this tutorial one that will be your main background and the second that will go into your shape.
Tip: Open them in separate psds so they are easy to edit. And find a color theme you'd like to incorporate in your edit I went with blue and pink
1. ADDING THE SHAPE
For the shape you can simply look up the shape you'd like on google. For the best possible results look up your shapes clipart. For example I looked up "diamond shape clipart" and found exactly what I was looking for.
If you want to use a circle or square you can make them right in photoshop with the shapes tool.

This is my shape which I'll be changing the color of later. Since my shape has a background I have to get rid of that first.
Open the jpeg of the shape in photoshop
Then using the quick selection tool

select your shape

it should have the marching ants around it like this ^
next copy the shape directly from the layer with command 'c' (for mac) or control 'c' (for pc)
now go to your main background gif and paste it there with command 'v' or control 'v'

It should look like this now! From here you can center it or transform it the way you'd like.
2. CREATING A CLIPPING MASK
For this portion you need your second gif. All you need to do is copy the whole gif thats in the other psd into your main background psd including the adjustments you made to it.

you want to copy all those layers and place them above your shape in your layers window like this^
before adding your clipping mask it should look something like this

a little wonky but the clipping mask will fix all of this!
now select all of your second gif layers including the adjustments. just press shift and click on all the layers that you need.
then hover your cursor over those layers, right click on your mouse or trackpad and select the option that says "create clipping mask"

after selecting that your gif should look like this

at this point you've completed the main portion of your edit! But let's make it prettier!
3. EXTRAS
You can add an extra shape to the background of your main shape to make it stand out. Simply duplicate your main shape or copy it again from its main psd
And using the paint bucket tool fill it in with any color you'd like. I put a gradient overlay adjustment on mine to make it pink and blue. Then add some text or leave as is.
Here is my final edit!

hopefully this helps ya'll out if you have any questions about this tutorial don't hesitate to send me an ask! Have fun!
#gif tutorial#tutorial#resource#nobie does stuff#this was really fun to do#and making it your own with your style and coloring is much more fun
331 notes
·
View notes
Note
Hi there, just a question for you if you have the time ♡ I know that you allow people to convert your Cyberpunk items from TS3 to TS4 freely (you are amazing, you know that?). However since I have the game, do you have or know of a tutorial for exporting from my files? The one I found was very general, very not 'beginner friendly'. Else I will just bring some of your stuff over if it's not been done yet, miss having them in my game (and base game TS4 only is limited). Love you ♡
Hi! Yeah, feel free to convert whatever; I think CC TOU/policies are ridiculous, and perversely counterproductive to uploading content publicly on the internet anyway.
Just be warned that a lot of my CC's not that great, cuz C2077 uniquely does not use or include typical diffuse textures, so I had to make many of the textures myself (and that's never a good idea, LOL). Not to mention, I had to shave off 1/2 - 3/4 of the polys on most of the meshes, cuz they're just excessively high. Even after decimating the polys they're still too dang high. It's been a pain in the neck to do anything with this effing game, even when not actually playing it! (-‸ლ)
☽✶•.¸(✶•.¸★¸.•✶´)¸.•✶´☾ ☆«´¨`•°°•´¨`»☆ ☽.¸.•✶(¸.•✶´★`✶•.¸)`✶•.☾
Welcome to Murf’s School of Crap and Crap-Making!
School Motto: Prepare to be tortured! For Science!
Lesson #6B: MORE ON GAME EXTRACTING (PT2)
☽✶•.¸(✶•.¸★¸.•✶´)¸.•✶´☾ ☆«´¨`•°°•´¨`»☆ ☽.¸.•✶(¸.•✶´★`✶•.¸)`✶•.☾
Trust me: extracting from C2077 in general is not very beginner friendly--this is the hardest game I've ever converted from, next to all the Koei Warriors games. Because not only did I have to use EFFING COMMAND LINES again, but the way CDPR arranged the game files (particularly the textures--or lack thereof)--were just saturated in demonic energy.
Mind you, I extracted C2077 back in the EARLY days, within the first weeks of the game's release, way before the Toolkit updated and got a GUI and CDPR released its dev toolkits for modders, so it’s possible I’m giving you outdated information, as the process nowadays might be pretty different from how it was back when I did it. ¯\_(ツ)_/¯
I used the CP2077 Toolkit here, and followed the steps here.
To be fair, the steps themselves are actually very straightforward. I'm just a lazy, spoiled little ingrate who likes nice clean and simple GUI tools so i can click a button and see all the meshes & textures and go about my frikkin day. But no, instead i have to sit here with EFFING COMMAND LINES and try to figure out WTF these lines of code & text frikkin mean, with zero mesh preview tool to speak of. So I literally have no frikkin idea what anything looks like until I import it into Milkshape/Blender/3DS Max. GRAND. 🤬
(My horoscope told me I needed to get more sleep, and boy they weren't kidding, cuz I'm ornery AF today. 😩 )
But yeah, basically all you have to do is open the CP2077 toolkit .exe, and use the format the steps provide you with whatever the directory is where you installed the game.
As I've explained before in Pt1, all games bundle their files differently, so the trick with extracting is just to figure out what kind of bundle it is, what's in it, how to open it, and how to convert the mesh files into .obj format and the textures into .dds format.
For C2077, most of the files are in typical .bin files, with the meshes (.mesh files) & textures (.xbm files) in content\basegame_4_gamedata.archive | content\basegame_3_nightcity.archive |
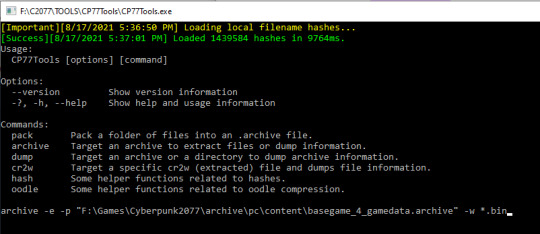
So all you have to do is follow the steps and the formats they give you: copy/paste their extraction format code, and the "path to archive" is your installation directory: (e.g.: "archive -e -p "F:\Games\Cyberpunk2077\archive\pc\content\basegame_4_gamedata.archive" -w *.bin" to extract the .mesh files; or "archive -u --uext dds -p F:\Games\Cyberpunk2077\archive\pc\content\basegame_4_gamedata.archive -w *.bin" to extract the .dds files from the Gamedata bin archive).
Then just wait several HOURS (no exaggeration) for each archive to extract. I let mine run overnight for a a day or two--it took bloody frikkin forever.
Once you have all the meshes extracted, the good news is that converting them to .obj files The Sims can read is very easy, cuz all you have to do is use good ole NOESIS, THANK GOD~! ^0^ (Noesis can also open the .xbm texture files, BTW--it’s that clutch; I keep telling y’all.)

The issue with the textures is that C2077 just legit doesn't have many. 💀 It's a feature, not a bug--instead of using diffuse textures (like The Sims' overlay/multiplier diffuse), games like C2077 and Call of Duty instead use materials--kind of like the sample fabric swatches in a textiles shop or tailor, with dozens upon dozens of simple materials & microblends & patterns (a leather print, a metallic sheen, a paisley pattern, etc) shared between all meshes. It’s awful.
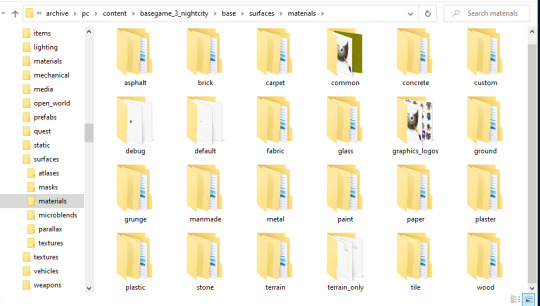
So you the extractor/porter/converter are now left with the sad task of patching all these materials together to make a lick of sense on a mesh that might very well use 100 different material files (no joke!) rather than 1 or 2 diffuse textures. And WOE BE UPON YOU if you’re trying to convert it for The Sims 3, where meshes can only use textures on ONE UV Map. The saving grace of TS3′s UV Mapping is that we have CASt, so often we can get away with having plain multipliers, so long as the RGBY Mask allows us to have recolorable channels that do a lot of that heavy lifting for us with patterns & color wheels. For TS2/TS4, however, I imagine more work would need to be done providing swatches, as nothing’s recolorable in those games.
So REJOICE at the pithy handful of actual diffuse textures (mostly decals & posters, etc) that CDPR bothered to grace us with in C2077--they're acts of mercy, I promise you. 🙏
And speaking of UV Maps--C2077′s are upside down. Which is absolutely frikkin lovely; who doesn’t love extra work, seriously. 😒
But yeah, that’s it for extracting, really.
Again, the method I used might be outdated by now, since I did all of mine in December 2020/January 2021, and I haven’t needed to stay up to date with the tools or anything since i already got what I needed out of them. :\
17 notes
·
View notes
Text
Somewhere (1/?)
Pairing: Sirius Black x Female!Reader
Warnings: None
Word Count: 1.7k
Series Summary: Based in the early summer of ‘78, tonight Y/N is celebrating her 18th birthday. Her protective older brother and their friends take her out dancing. She envisions the perfect night!
A/N: In this story, muggles are aware of the wizard world. The series is based on West Side Story and POV switches between Sirius and Y/N. The red dress is based of the Saturday Night Fever red dress btw lol
Masterlist

Reader
While business slows down in the boutique, I hurry along on finishing last-minute tasks before the weekend. The goal is to get all of these orders done before closing.
“Hey, Lauren?” I shout for my best friend as she finishes stocking up the backroom for the weekend.
“Yeah?” She calls distantly.
“Could you bring me two of those navy cardigans when you come back out?” I recite, looking over the shipment list in front of me.
“Sure thing!” She complies.
Today is my eighteenth birthday. To celebrate, my older brother, Brady, is taking me out to the disco with our friends. It’ll be the first time I can go out to a club and drink. That’s not the most exciting part of today either! I’m officially an adult, a functioning, independent, member of society. My brother and his friends will no longer see me as the youngest who’s in constant need of looking-after. Brady has always been overprotective, but Lauren has tried to help convince him that I can take care of myself. Lauren and Brady have been dating since they were in high school, almost five years now. They’ve graduated from college and Lauren is eager to be married. In my opinion, it’s only a matter of time. I can’t see either of them with anyone else. Plus, I already consider Lauren my sister.
Lauren appears out from the backroom with a bright grin as she joins me at the register counter. “So, are you excited?”
“Yes! It’s going to be so much fun!” I gush, practically bursting. “Finally after four years of watching you guys go out with me, I can join!”
She gives me a knowing look, “did you ever end up showing your brother that dress you picked out?”
I bite down on my lip, pretending to return my attention to the order sheets in front of me. I can already hear her reprimanding, Brady’s too when he sees the bright red off the shoulder dress I picked up yesterday from the shop down the street. The fact that it’s off the shoulder will go over like a led balloon.
Lauren’s jaw drops, “Y/N!”
“I know, I know,” I sigh, trying my best to avoid a lecture. Moving around to the other side of the counter, I head to the office with the order sheets.
Lauren follows on my heels, “he’s never going to let you go, especially if you step out of your room in that dress and those matching heels you bought!”
“But it’s my birthday!” I plead, turning to face her with puppy-dog eyes. “My eighteenth, the most important one! It’s my first night as an adult.”
Lauren sighs defeatedly and I continue to express a poor, pitiful, pout. I can tell she’s on my side, but she also doesn’t want to go against her boyfriend. I understand her predicament, yet then again, my brother can be unreasonable too.
“I’ll see what I can do,” she offers, rubbing her temples stressfully.
I jump up and down, pulling her into a hug. “Thank you! Thank you! Oh, thank you!” I repeat profusely. If Brady is going to listen to anyone, it’s her.
“Ah, ah, ah, don’t get excited just yet,” she parts from me with a stern expression. “Your brother won’t be happy. I will vouch for you, but it’s up to you to stay in line. Tonight is your chance to really prove to Brady that you’re not a baby anymore.”
I nod my head frantically, “yes, yes, of course! Tonight will be perfect! Promise!”
Lauren narrows her eyes with a smirk, unconvinced. She hums, taking the sheets of paper from me to put them in the office.
Tonight will be perfect! I can feel it. I’ve been waiting for this night ever since I can remember. After tonight, everything will be different.
____________________________________________
Reader
As I listen to my Gloria Gaynor record, I stare at my reflection in my full-length mirror. More specifically, I admire the red satin dress that hangs off my shoulder. It’s everything I imagined it would be. As I think about it, it’s funny, I don’t feel any older, I don’t look any older, yet I feel different.
Over the music, I hear a series of knocks on my bedroom door. "You coming, Y/N?” Brady calls from the other side. “Lauren and the others are here!"
"In a minute,” I announce, lowering the volume of my music. “I have to do my makeup!"
"You look fine as you are!" My brother insists as I hurry into my bathroom. "Besides, someone is really excited to see you..." he insinuates.
"I have to look immaculate,” I argue, rushing to put on my makeup in front of my skin. “Plus, Jay can wait!"
Working as fast as I can, I follow a makeup tutorial Twiggy did for Cosmo. It’s crucial I perfect my eyeliner and large lashes.
"We're just going to the disco," he huffs, growing impatient. He would never last as a girl.
"It's my eighteenth birthday!” I remind him. “It's the first time I can drink and actually go into a club. Let me do what I want!” I then shoo him away, "go entertain your friends downstairs!"
"You have ten minutes!” He announces as a form of compromise. "Everyone's waiting for us!"
Mouthing the words to Gloria’s latest album, I’m practically dancing already and we’re not even at the disco yet! If only tonight could last forever. I want to ponder every minute, every second because tomorrow will be just another day and the magic will be gone.
Sirius
James stopped by my apartment to go over things for his wedding to Lily, but I have other plans.
"A disco?" James repeats with a frown, rolling over to lay onto his stomach on my bed. “And why would we want to do that?”
"Muggles really love them!” I tell my best friend as I move about my bedroom to get ready. “Plus, it’s the start of summer! We are officially Hogwarts graduates, what better way to celebrate!”
"Why can't we just go to a bar in Diagon Alley?" He reasons.
"You'll like this place, promise! Muggle music…” I struggle to describe it. “It’s unlike anything I've ever heard before!"
"But muggles are so... mundane,” he shakes as though he just caught a chill at the thought of them.
"I invited Remus and others too," I mention, certain that'll help convince him to come.
"At least we'll know people, I suppose," he shrugs, at least now considering the idea.
"Just give it a chance, James. Watch, after tonight you're going to want to spend every night of our summer holiday there!" I predict, nearly positive it’ll happen.
"Oh alright,” he complies with a huff, rising up from my bed to get ready. “I guess we don't have anything better to do," he grumbles on his way to the door. "Plus, we won't have to worry about any Death Eaters joining in on the fun."
Reader
I hurry down the stairs, to join Brady and his friends, Jay, Adam, and Henry, in the living room. The boys and their girlfriends have already started drinking while listening to some Queen in the background. They’ve gathered around on the couches and armchairs as they’ve done countless times before and after going out together. My brother is the only one standing, leaning against the fireplace mantel with a glass of scotch. Brady is the first one to notice me enter the room, he takes in my appearance in a scan of his eyes and waves me over. Clenching his jaw, he downs the remainder of his drink.
“What are you wearing?” He asks rhetorically, wasting no time to reprimand me.
“A dress,” I sass.
“Cute,” He remarks sharply, not finding amusement in my response. “Go change, now.”
“Oh come on, please,” I beg, taking his hand pleadingly. “It’s not that revealing and it’s my birthday!”
He shakes his head, pointing toward the steps. “Go, hurry up.”
“One night! One night and I’ll return it first thing tomorrow!” I negotiate.
He glances between me and his empty glass, twirling around the leftover ice cubes, clearly debating whether he should accept my offer.
“Please…” I mutter, pouting dramatically to get a rise out of my brother.
He huffs and turns to the group. "Alright!” He shouts to gain their attention.” All eyes shift to me and my brother. “Jay, boys, I need to keep an eye on Y/N,” Brady commands of his buddies as he wraps an arm around my waist protectively. “It's her first night out and the last thing she needs is uninvited attention, especially from wizards," he mutters the last part with disgust.
I look up at my brother in confusion. “Do you think they'll actually go to a human club?" I ask him, the idea never once crossing my mind.
Wizards don’t really interact with us. In fact, they’ve created a whole other system and lifestyle apart of our own to avoid us. Different schools, stores, forms of government. I would imagine they have discos of their own.
Lauren steps forward, "they're actually considered human-"
"Lauren!" My brother barks, causing his girlfriend to bite her tongue.
"That's debatable," Brady’s best friend, Jay, grumbles disdainfully, focusing on the drink in his hand.
Henry and Adam hum in agreement, looking at Brady like he’s a preacher.
"If we do see some, just stay clear, okay?" Brady orders strictly. Based on the sharpness of his stare, I best not test him.
"How will I be able to tell?" I mumble, having only seen a wizard once or twice my whole life, at least consciously.
According to Brady, and the others, wizards have the uncanny ability to appear normal just like us. However, in recent years, there’s been trouble amongst the wizard race. There’s a group of wizards who want their society and ours to be completely separate. My family and Brady’s friends are quite fond of the idea. In fact, most people are too. It’s such a frequent topic in the news, in addition to the tensions surrounding it, that I’ve grown annoyed by the dramatics.
"Believe me, you'll know,” Brady assures. “They're so dependent on their magic that they can't help but use it."
"Okay, I will..." I mutter, wondering if I’ll truly see magical-beings tonight.
_________________________
Masterlist
#sirius black#sirius black imagine#sirius black x reader#harry potter fanfic#harry potter imagine#harry potter au#sirius black au#james potter#lily evans#marlene mckinnon#remus lupin#peter pettigrew#hp fanfic#marauders fanfic#marauders x reader#hp marauders#hp fandom#marauders#alice longbottom#frank longbottom#og story
94 notes
·
View notes
Text
My Beloved, Penis
Fuck it. I was infected by Penis SMP by @demonboyhalo reblogging a bunch of it and the lack of consistent lore bugged me, so I somehow banged out 2000+ words of fanfic about the Penis SMP and how it got started. Lots of internet humor and classic MInecraft shenanigans in this one folks. *slaps roof* This baby can fit so much crack treated seriously, lol. This is also up on my AO3, Zazibine, if you would prefer to read it there.
_-_-_-_
It was never supposed to get so big. It was just an SMP with a couple friends of his he had met from the Hypixel discord server, where he had logged on simply to trash talk the absolute asshole who had dared to kill him last minute in bedwars, only to stumble upon said asshole- going under the name shittyfartbaby69 of all things- complaining to his girlfriend(?) Milfboss in the voice chat. Thirty minutes later of awkward hellos and the manliest of bitching at each other (with Milf chiming in every once in a while to roast them both), and PenisUnavailable had perhaps his first Minecraft friend in, like, forever.
Then Admiral_Anus had entered chat, bitching about his competitor in ABBA Mining and his bullshit bad luck and the whole process repeated. By the end of the day, Penis had three new friends, a private discord server for the four of them, and a promise to meet up with them in Hypixel next Sunday for the ultimate round of bedwars.
The game went spectacularly. Somehow, Admiral had some of the best bridging skills any of them had ever seen, and between Milfboss' terrifying Scottish screaming and pvp and Shitty with his clutch TNT skills, the three of them almost made up for Penis' awful depth perception. They still lost around forty percent of their games, but that was certainly better than Penis' own abysmal record, not helped with his habit of walking off the edge at inconvenient times.
And it was... fun. Usually bedwars was just him playing in his bedroom alone for an hour before he rage-quit and went back to survival for a bit before he died to fall damage and rage quit that too. But shittyfartbaby69 would crack dirty jokes that he'd never even heard of before, and Milfboss would roast him for looking it up on reddit and Shitty would cuss her out as he tried to prove that no, he was being original- all while Admiral would comment of them as if they were a sideshow display. Then Admiral_Anus would turn around and knock an enemy player off their island with some clever pvp and they would all hoot and holler and swear for a while before going back to their conversation, joking about forgetting the topic and starting up a running gag about something new.
And their accents, mmm. PenisUnavailable would never say it, but he really was as American as white Wonder bread and Milfboss' Scottish brogue, Admiral's smooth British snark, and Shitty's shrieking in Australian, well. Ear candy, you know? Even if he teased them mercilessly for pronouncing shit wrong, like "buhguhr". Ppffttt, it still cracked him up how Milfboss had threatened to murder him after the dictionary app on his phone had proved him right that it was actually "Bur-gur", even if Admiral kept insisting it was pronounced "bruh-girl".
Four hours and twenty-eight wins later, they had agreed to meet up the next day to play again, preferably at an hour that wasn't two am for Shitty again. (It was two am for Shitty again, although that was because they played for six that time.) Eventually, it just became a regular thing, them playing bedwars and competing at ABBA Caving- the one game Penis was unnaturally good at, much to Admiral's annoyance- to the point where they ran out of funny jokes about their competitors and the game itself and started talking personal anecdotes.
Milfboss owned a motorcycle. Admiral, entirely independently, also owned a motorcycle, as that was the only vehicle of reasonable speed and style that could actually handle the London traffic. Shitty couldn't drive at all, something about never passing his driving test. Admiral ate cheese at breakfast. Shitty liked to burn his garbage in a metal oil drum in his backyard. Milfboss posted herself singing covers of shit over on Youtube. And it wasn't just real life stuff either- their minecraft skills were also on the table for them all to collectively roast.
Admiral had never seen a single Minecraft Championship. Milfboss thought a flat cobblestone roof was entirely acceptable. Shitty's favorite block was the flint and steel. (That's not a block, sixty-niner. Shut up, is too. OoOh, real clever, 'shut up'! Uh, how about no? How about I fuckin' make you, ever think 'a that? No nono nonono, I'm on two hearts! I'm on two hearts, stop!) It made him curious, honestly. He wanted to see Milf's builds for himself, get revenge on Shitty, see if Admiral really could beat the Ender Dragon with a knockback stick like he said he could.
So he made a minecraft server. And they all joined it. (And stuck PenisUnavailable with the bill, suckaaahhh~!)
Predictably, it all went to Hell in a hand basket pretty quick.
See, it's one thing to play with nutters like his friends in a structured set up like Hypixel games, it's quite another to try and keep a semblance of order in an open world survival server like the Penis SMP. The first five minutes had been him trying to explain the rules and teleporting everyone back to spawn over and over as they tried to "escape the cops," ie, him. The next five minutes was Shitty scream-laughing "scatter!" and other John Mulany references down the mic as everyone ran off to start their houses. Penis, as he was still "god" at that moment, used admin commands to find the closest flower field biome to settle into, hoping for some- ha- peace and quiet.
Shitty, inevitably, ended up trying to settle in the fucking Nether. Like a mad lad, you know, as you do when you are apparently obsessed with all things lava. Milfboss ended up making an oak plank box of a "tree house" in a dark oak forest, while Admiral_Anus picked a nearby swamp for his starter base. Outside of that, they just kinda vibed in discord as they tried to fend off the mobs and get enough resources to try and build up houses that were a bit more than cobblestone towers and wood boxes- er, mostly. Milf kinda just fucked off to go mining, found a skeleton spawner by chance, and made a set of iron gear to stand in the dungeon room with to just chill and kill mobs for a while. She ended up with something like 45 levels and burned her only diamond on an enchanting table so she could buff the Hell out of her iron weapons and armor.
Penis, rather typically, he though to himself, put together a basic sheep farm and started work on a cute little cobblestone cave base. He managed to get a whole twenty by twenty block room done and fully furnished before he noticed the chat full of Shitty's death messages and went to go investigate. After nearly dying in lava twice, he managed to find Shitty's pile of items floating on a basalt pillar about a hundred blocks out from his... base?
It was a soccer ball. Shitty's base was a perfect fucking spherical soccer ball made up of quartz blocks and basalt. Just. What. The Fuck??? Then out popped shittyfartbaby69 and it was PenisUnavailable's turn to misjudge a jump and plummet right into lava. Fifteen minutes and much shrieking later about losing his diamond pick, and it turns out that Shitty didn't really care about his lost items, as he really only had four gold picks, a stack of dark oak, two furnaces, a bucket, and thirteen cooked mutton to his name. Not even a bed, the fucker. He just ran back to his portal from spawn every time he just burned to death, taking the chance to gather resources on the way back each time.
And no, he wasn't following a tutorial for his "football" base. Jerk. (Although Penis did have to admire his determination...)
The day ended on Milfboss, Shitty, and Penis reconvening back at spawn to try and hunt down Admiral_Anus, who they found later having built a thirty block tall castle of all things. Out of cobble stone and the windows weren't quite even, but still, it was pretty impressive. And of course, when presented with a castle, what can what do but siege it? So they lay siege to the castle and Milfboss curb-stomped Admiral in pvp and laid claim to the throne, crowning herself queen before summarily throwing the rest of them out. It was a good day.
And the day after was a good day. They played dodge ball crossed with hide and seek in forest around Penis' house with arrows supplied by Milfboss. And the day after that, too, where they had a building competition using nothing but cobble stone, specifically to spite Milfboss, who had kicked all of their asses the day before. In fact, three wonderful weeks passed of doing normal Minecraft shit and being friends passed by, and every bit of it was great fun.
And then came the fucking role play.
PenisUnavailable would have liked to preface that with he only participated under duress, but really, Milfboss had been queen for too long and nobody wanted to risk TNT cannoning any of Shitty's nice builds, so. Well, the castle was better than his drafty cave, alright? It was cold and wet and didn't have a proper door because aesthetic (and because it usually took him several tries to work an iron pressure plate door), so there were far too many mobs wandering in at night and spawn camping him. He and Shitty had almost the same number of deaths and Shitty lived in the fucking Nether.
So yeah. Castle time, baby! Daddy needs a new home! And Admiral obviously wasn't happy living out of Milf's awful tree house hot box where they all did drugs together on day fifteen and it still smelled of burnt wheat seeds, aka "weed." It was only obvious that they teamed up to try and take back the castle.
The battle itself didn't exactly go great, but it wasn't exactly horrible either. A lot of shouting shit at each other for fifteen minutes, the majority of which he wouldn't remember until it was too late- something about server unity?- only to find out that it wasn't two on one girl boss, it was two on a girl boss and her "baked out of his mind" henchman, also known as Shitty in a squirrel furry skin.
The ears man. Those stupid (cute) ears.
And then they were running for their lives because Milf had somehow gotten her hands on a flame bow with infinity enchants.
It all culminated in a dramatic stand-off in front of Shitty's Nether Soccer ball, Milf on one side, diamond axe in hand, not a bit of armor on because of an unfortunate run in with lava, Penis and Admiral on the other, picks in hand, threatening to tear down shittyfartbaby69's base. Shitty wasn't online just then to comment, but they could all hear him click-clacking away on his keyboard so he obviously hadn't gone to sleep just yet like he said he had. At an impasse, and unable to justify letting her teammate's home be used as collateral, Milfboss stood down and gave up her "crown," an enchanted golden Prot IV helmet she had gotten off a skeleton from her spawner.
Then the great betrayal, the beginning of the end. Shitty came back online. 96-Cam joined the game, not that they noticed in the chaos. Admiral-Anus cackled wildly and PMed Milfboss the message that Shitty had sent him, giving Team Gay Sex permission to tear down his base in the name of winning the war if it came down to it- making Milf's sacrifice worthless in the end. Penis gave another dramatic speech, circling around Shitty, who was acting weirdly apologetic to Milf about betraying her and still wearing that fucking squirrel furry skin.
"You see Milf, there's one thing more powerful than a girl boss, and when it comes down to wars between kingdoms, there's something you need to remember!" Penis got out his golden ax, helpfully labeled 'Piss Off'. "And that's a dilf with something to lose!" An enderpearl in his off hand and he teleported behind Milf, catching on fire from the lava but still landing the last hit needed to finish her off. She puffed into a cloud of EXP, swearing up a storm, and then Admiral and Penis turned their gaze to the cheering Shitty.
"AAAAAYYY, LET'S GO DADDY!" the squirrel man screeched, wild laughter shorting out the discord voice chat, making him go quiet in patches when the volume overloaded the client. Behind him, Admiral quietly started building a chair out of birch fence posts and slabs.
"Not so fast, shit-ty-fart-baaaaa-byyyyy~, this isn't quite over yet!" Penis fucking chirped, barely holding back his laughter. "You're still a fucking traitor and we can't have you backstabbing us too. Get in the chair for Daddy, okay baby?"
Admiral finished the chair just in time for Shitty to turn around and see the completed monstrosity, shrieking dying off immediately. "Oh screw you, that's just mean. The Hell man? That's not a chair, that's illegal. If you want an electric chair or some shit, just ask. That's just sad." Mentally shrugging, Admiral lit up his work with a flint and steel while Penis pillared up above where Shitty was building an electric chair out of iron bars and trap doors. Admiral nudged Shitty into the chair, Penis dumped a bucket of lava over the edge of the pillar so it flowed over him, and Shitty started giving a soliloquy about how betrayal and how his love for his "Daddy" still "burned strong".
Like his dick. Apparently.
By the time the lava finally hit the floor and burned Shitty to death, Penis was crying with laughter, shrieking down the mike and banging on the desk hard enough to make him forget that his was still on the mouse, making him mine the block under him with the bucket and sending him hurtling to his fiery death too.
It was a good day... almost.
Because, as it turned out, shittyfartbaby69 was actually a tiktokker of some renown and his cam account had record everything. And he had uploaded the bit to tiktok, as you do, where it went viral, where it wasn't supposed to. And Milfboss, who had recently been uploading covers of herself singing old classic Minecraft songs, had attracted the Minecraft fandom kids to her twitter, where she had gone to post her rage about the events of her dethroning and Shitty's execution.
Penis SMP had gotten on. Fucking. Trending. And now everyone was demanding the full clip, their names, their Twitch streamer handles, their characters' backstories.
The masses wanted lore.
Penis watched in disbelief, head in his hands and mouth agape as sugar crash played over a clip of him killing Milf on loop.
They were making memes.
...Oh god. They were screwed.
#penismp#penis smp#fanfiction#minecraft#my writing#crack#crack treated seriously#also on ao3#penisunavailable#milfboss#shittyfartbaby69#admiral_anus
14 notes
·
View notes
Text
So I’ve been researching early film color models, (originally as part of a school project but I don’t think most of this will actually be useful there lol) and I’ve found a nifty technique for re-creating the effect of various different color processes from the 1930s
Here are some of the results.

(Original image source: http://firstanimationart.com/WB/Animaniacs.html)
First up, The Warner Siblings! This one is based on the look of the two-strip technicolor III process, used by Warner Bros in the 1930s for cartoons like I Haven’t Got A Hat (1934) before Disney’s exclusivity deal on the higher-quality three-strip technicolor IV process ended.


(Original image source: https://www.gamesradar.com/cuphead-review/)
Next up, following the theme of “cartoons designed to look like they’re from the 30s that aren’t actually”, this Cuphead screenshot I’ve used to recreate the look of both the technicolor III (bottom) and the cinecolor process (top). The difference might not be entirely clear at first glance, but the technicolor version uses red and green, where as cinecolor uses red and cyan.

Here’s a demonstration of the differences in color between my digital recreations of the processes and the original image.
Now, you’re probably wondering, how does this work? How can I do this? Well you’re in luck because I’ve decided to be nice and give a quick tutorial on how I recreated the effect.
Step 1: Get your color palettes. This is crucial to getting the effect to work properly. While incorrect colors will work, for the most realistic effect, these are the exact hues you’ll need

Step 2: Copy your image into two or three layers. Cinecolor will need one cyan layer and one red, Technicolor III needs one green and one red, and Technicolor VI needs one cyan, one magenta, and one yellow

Step 3: In GIMP, go to Colors > Components > Extract Component
On your cyan/green layers, extract the "RGB Red” component, on your magenta/red layers extract the “RGB Green” component, and for the yellow layer, extract the “RGB Blue” component. After this, all of your layers should be black and white.

Step 4: Invert all layers.

Step 5: Go to the “Colorify” tool and fill in each layer with red, green, and blue respectively. (You can find the colorify tool if you look it up under Help > Search and Run a Command)

Step 6: Invert all your layers again

Step 7: Select the paintbrush tool and set the brush mode to “HSV Hue”, then color your layers with the palettes provided in Step 1

Step 8: Set the layer blend mode on all layers to “Darken only” (already shown in above post)
And here are the final results!

From left to right: Cinecolor, Technicolor III, and Technicolor IV
The method here is based on the real-life method used to produce three-strip technicolor film, which you can learn more about in this wonderful video by Vox:
youtube
So, yeah! Thanks for coming to my technicolor TED talk.
#gimp tutorial#animaniacs#cuphead#technicolor#cinecolor#old films#old cartoons#film history#animation history#long post
14 notes
·
View notes
Note
I really wouldn't mind you aiding me with some tutorials love
giffing tutorial/resources
hi anon! sorry it took me so long to answer. i figured this might be helpful for others out there who have asked me similar questions, so i’ve compiled a pretty comprehensive list of tutorials/resources. idk about others but when i was new to giffing, it took me a lot of painful effort to go around and look for resources, so i’m putting it all here to make it a little easier!
i download videos using 4k video downloader. it will download very good quality 1080p videos in .mp4 format. if you’re downloading a 4k video, make sure to change the setting option to .mkv so that you get 4k and not 1080p—for obvious reasons since you want the highest quality.
i rely on kpopexciting to get .ts files — which are basically raw, very high quality video files for live performances. they are much less grainy than .mp4 versions of live performances—which are the ones you’ll see uploaded to youtube. i’ve found that 4k videos (in .mkv) are just as good quality as .ts, but obviously you will rarely see live performances in 4k, so get .ts when you can!! you can also try to find .ts files on twitter, but you may have to do a lot of digging. i wish i could recommend you twitter accounts, but the ones i used to go to have been very inactive/taken down all their drives :( but this website is really nice and updated frequently so i would recommend it!
vapoursynth links + download. the reason you would use vapoursynth is to resize your gif, while maintaining the optimal quality of the gif. if you gif without vapoursynth (.ie only using photoshop), it will still be fine, but the image quality may be grainier. also, you will definitely need vapoursynth to gif .ts files —more will be explained in the tutorial i’ve linked below. i would recommend that you have a high processing/lots of ram/newer desktop or laptop to use vapoursynth so that 1, your computer isn’t fried and 2, your vapoursynth process will go a lot faster. i am using a 2017 macbook pro for all my work, and it runs pretty well, but my laptop still gets pretty hot so just make sure you’re not running a million things in the background while using adobe products and vapoursynth lol. i used a pretty old and beat up 2011 model macbook air back then, and i will say that yes vapoursynth worked and ran on it, but it took much longer, and basically fried the laptop’s battery (aka i had to get the battery changed twice and the laptop would die randomly) but issok it was a school borrowed laptop so i didn’t feel too bad lol. im just saying this as a precaution, to preserve the health of your electronic devices!! but don’t be afraid to use vapoursynth! you should still try it at least once.
thank you to @realstraykids for this super detailed, really nice tutorial! it includes how and where to download videos, how to gif using vapoursynth, using photoshop, comparisons, coloring, and pretty much all you need to know. 10/10 would recommend
thank you to @dreamcolouring for this lifesaver!!! the best and easiest way to blur out unwanted captions/objects in your gifs. i recommend doing this step after converting your frames to video timeline and before you do sharpening and coloring. another tip i’ll add is to feather the selection you’ve made right before you click on “add vector mask” —this will make sense once you’ve read through the tutorial. feathering it will make the blurred spot less noticeable and more subtle.
i use this generator to create gradient colored captions! copy and paste your text, then select the colors you want. generate the code, and copy it. change the settings of the text editor on your post to HTML. paste the code, preview, and voila! add elements <blockquote>,<b>,<i>, etc as needed. see more on colored captions in this tutorial by @kylos --i believe op mentioned a different and better color generator but for some reason it won’t work for me :( hopefully it works for u! basically same idea as the previous generator i mentioned.
my own mini tutorial/workflow process of making gifs. this includes working with a .ts file, vapoursynth, photoshop, coloring, watermarking, etc. and a few of my own tips below:
if you are working with an .mp4, you do not have to make any changes to the preprocessor/denoise filters/sharpening in the resizing part of vapoursynth—it doesn’t make that big of a difference if you do. but if you are working with a .ts file, definitely do make those changes,, that’s the whole reason you have vapoursynth. with an .mp4, i like to use vapoursynth to just resize, but i don’t add any additional settings. i use smart sharpen in photoshop to sharpen it, which is pretty good on it’s own (at least in photoshop 2020!).
my rule of thumb is to do add .02 seconds when i am setting frame delay. so if when you first import the frames, they are at 0.04 seconds, i usually change them to 0.06. of course, this is my personal taste—you can make all your gifs faster or slower depending on how you want em to look.
if you are on a mac, you can screen record by pressing Command+Shift+5 (it’s a shortcut to quicktime screen recording). I only screen record for things like the beyond live concert or other live streamed events. the image quality of the screen recording, in my experience, is actually pretty good. when you gif the screen recording however, you may notice that it adds extra frames that you don’t need. by that i mean duplicate frames. you could keep the duplicate frames but that just means the size of your gif is going to be much bigger (keep in mind the limit is 8mb). in order to remove those duplicates, my only solution has been to remove them manually (by holding Command while selecting), or when you are importing the video to frames, select the option to “limit to every 2 frames”—but this method will be less precise and still not as good as manually removing frames. if you remove the duplicate frames, this means you will need to set the frame delay even slower, to make up for lost frames. in my experience, fps(frames per second) and frame delay work in conjunction. so for example, if i delete every other frame because they are duplicates, but the starting frame delay is 0.02, i am now going to change it to something like 0.05 (so i added 0.03 seconds rather than my usual 0.02). if the duration length and the image dimensions of the gif are short/small, feel free to keep the duplicate frames in—i only delete duplicate frames in order to keep my gif under the 8mb limit. then, if you keep the duplicate frames in, continue with your standard frame delay preferences. now that i’m writing this im realizing this might not make a lot of sense lol.. but don’t worry about it for now and if you run into trouble w screen recorded gifs then you can come back to this for reference. again, this is only my experience recording on a mac—it may be a lot different if you use a screen recording program or are on a pc.
i don’t really use .psd templates because i like to give every gif/gifset it’s own unique coloring—so i remake the coloring every time, but if you get into a rhythm it’s pretty easy. there are a lot of nice coloring tutorials out there, too! my personal coloring adjustments in order: levels, exposure, color balance, selective color (if needed), vibrance, photo filter (if needed), color lookup (i use 2strip most often and i put it on ‘color’ blending mode). don’t forget to adjust the opacities and fills of the ‘color lookup’ adjustment layer in case it’s too strong. go back to correct each adjustment layer as needed. then, when you’re done and satisfied, group all those layers, copy the group (you can do an easy command+c), and paste it onto the next gif you’re working on for easy workflow.
if for some reason you can’t see the frames when you import your layers/video, it’s likely because your ‘timeline’ window isn’t showing up. just go to the window menu on photoshop, go to the bottom and you’ll see ‘timeline.’ make sure it has a check next to it.
i recommend watermarking your gifs because a lot of people like to repost tings these days 😠 - so make sure u got your brand on it! i keep my watermark saved to my ‘libraries’ in photoshop so it’s ready when i need it. i use the blending mode ‘overlay’ and adjust the opacity, but if you don’t want to do that you can also add a stroke/shadow to your watermark/do all sorts.
tag #nctinc for your nct creations and #jenonet for your jeno creations!!
here’s my own mini tutorial (well not much of a tutorial ig more like a work process vid?): took about ten minutes including the time to search and download the video (but i didn’t record that part i trust yall know how to do that), vapoursynth, and exporting. i hope this helps somewhat! feel free to ask more questions whenever :)
youtube
keep in mind that giffing takes a lot of patience, energy, and experience—so don’t worry if it takes you a bit to figure things out or if your gifs don’t turn out the way you want them to the first time around. we all start at the same place and all run into problems. i know giffing can sound intimidating and seem like a lot of work, but i promise, once you get into a routine, giffing is going to happen in minutes—and you’ll get beautiful gifs. have fun! 😊
#anon#answered#tut#tuts#giffing tutorial#should i make a tut/resources post on gfx? not rly sure if gfx can be taught.. it's like a lottt about personal style imo lol#hope this helps!#not just for anon but for anyone
119 notes
·
View notes
Text
I've been thinking about this since I answered the ask about gifmaking a little while back, and I've been kind of unsettled about it since. Not because I don't like sharing my process, nothing could be further from the truth, but because I realized that that process isn't entirely accessible. So here I am again with an alternative way to make gifs that's infinitely easier, way more accessible, and just as valid as the other way. I wanna stress that. Anything you put time and effort into is valid and worthwhile. No time spent on doing something you enjoy is ever wasted, not least of all anything creative
That said, this method is considerably more limited. I made gifs this way for years before my brain was quite literally hijacked by an idea I could not get out of my head and I had to learn to do it the fancy way. I was also intensely annoyed at having to rely on my shitty internet to make gifs, and I probably would have made the switch at some point regardless just for that lol
I would also like to stress that this is not necessarily a tutorial any more than the other post was, it's simply a couple of resources and more or less how to use them. Like I said in the other post, never download and install anything to your device without doing your own due diligence first!
details under the cut
So first, you need to get the video. If you're on mobile, your device should have a screen recorder built in. Use that, and be sure to turn on Do Not Disturb so you don't accidentally capture any notifications! Once you've recorded your video, you can use your device's native editing ui to trim and crop the video and adjust color. If you want effects like slow motion, I like Splice on iOS. The big thing is that it doesn't watermark your videos, but it's also just a pretty good app overall for video editing. If you're willing to pay for it, it'll also allow you to make gifs right there in the app, but it's subscription based and the price is absolutely outrageous, so I don't recommend doing that when you could just use a free online converter
Which brings me to the next step: ezgif. You probably know this one, most everyone does, I think, but if you don't, here's the basic gist of it. Select Video to Gif and upload your video there. Be sure to trim it down to seven seconds or less, or else you'll never be able to get it down below 10mb. On the next page, change the size of the gif to 540xAUTO (for Tumblr), then change the frame rate to 20 or 25. More frames means a smoother gif, but it also means a bigger gif, so play around with it to see how the frame rate affects your gif. I don't think there's really a huge difference between 20 and 25, so 20 should be sufficient. If your gif is still too big, you can select optimize and try to compress it a little. The lowest compression level is 5, so start there and go up by fives until you're satisfied. If you get the gif below 10mb and it looks bad, then you should go back and trim your video length down further and try again. After that, simply save the gif to your device and upload it wherever!
PC is more or less the same, you just need to get a third party screen recorder. You can actually use ffmpeg to screen record if you'd like (I don't have the command line for that, however, and at that point, you should just go ahead and use yt-dlp instead to get a high quality video). If the command prompt is too much, you can just use a screen recorder app instead. I like 2-Click Screen Recorder. Again, you can actually use ffmpeg on that video to create frames and then upload those to ezgif, but if you'd still rather go from video to gif, then use CapCut or a similar video editing software to trim down your video to seven seconds or less. From there, the process with ezgif is exactly the same as it is on mobile
And there you have it! Easy mobile gifs! While I do really encourage you to try the "fancy" method of making gifs, this is still a great alternative, and you can make some pretty good gifs this way. Here are some of mine I made this way before I switched:


8 notes
·
View notes