#Blender 3D View
Text


#mha#bkdk#bakudeku#bakugou katsuki#izuku midoriya#my art#bnha#bnha fanart#mha fanart#lore is that this is established relationship bkdk but like early days#izuku really should give him a key atp but hes working his way up to it#his neighbors are starting to get concerned#i drew the floorplan for his entire apartment complex just to only draw one room#teacher!izuku#PH!katsuki#he's just getting off his patrol shift#dont ask me why i put most of my effort into the top view of his desk#i made a 3d model of it in blender bc i couldnt conceptualize how the lighting would work wit h so many sources
7K notes
·
View notes
Text
This was technically my Art Fight 2023 attack on @factorybought but I never finished it in July. Still wanted to continue working on it though! I promise this outline took me longer to make than it looks.

#b3d#3d#lowpoly#my art#art#furry art#artists on tumblr#also if youre reading this as per usual if you want the model file you can dm me :)#the outline is all done in blender using compositing and view layers and stuff#took me several afternoons to figure out#and i ended up not even using it on the thing that actually moves lol#whatever its there#also proud of the face shape!
142 notes
·
View notes
Text

trying to learn blender properly (watched 1 and a half tutorials) and finish a model for once
#her windup key isnt visible in front view :( its there i promise#ghostart#oc#original#rime#blender#apple core#3d
33 notes
·
View notes
Text
youtube
If you are searching for some good horror content this halloween. Give the work of Kane Pixels a shot. Found footage horror at its best. The Oldest View Series is so suspenseful and unnerving!
#kane pixels#the oldest view#the rolling giant#video#youtube#horror#found footage#3d modelling#blender#Youtube
75 notes
·
View notes
Text

Making a guy and why this go kinda crazy
10 notes
·
View notes
Text
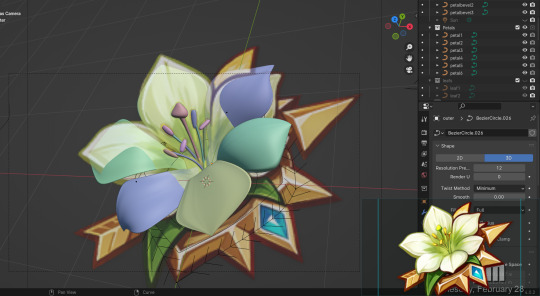
literally just arranging this flower over and over and over and over and
#genshin impact#i have a zhongven kinda piece in progress yet got sidetracked by 3d modelling a flower#i've changed the angle of the view three times after reshaping the base + rearranging the petals and oNCE AGAIN#it's teaching me a good amount about blender at least#i fear learning materials but i must#my wips
9 notes
·
View notes
Text

Render of Viz at the ocean, watching the sunset.
2 notes
·
View notes
Text
Things I hate about the blender "Community"
As someone who is proficient in blender and has been "in the community" I've honestly seen so many people fall down the "realism! Realism! REALISM!" Rabbit hole where they will willingly remove any creativity from their work and simply focus on how realistic a face is or if this scene could be made in real life.
It's genuinely disappointing seeing people fighting each other over how realistic something is or ways to fix it.
Actual things I've heard people say:
"that film grain on that render looks disgusting and I can show you how to fix it"
"it's laughable just how cartoony that face is, we can clearly see your lack of skill."
"this is the latest face model! It looks so realistic compared to the last one!" (There is literally no actual difference between the 2 models)
Imitating real life perfectly in a blender render sometimes is pointless. Why are you trying to make something look realistic when you have the real world for that?
Blender is reaching the point where do many people's art is looking so similar from each other because everyone is trying to conform to this hyper realistic look.
#These are my own views and I understand that I will be wrong when it comes to situations where you need something realistic in blender#blender modeling#blender community#Blender discourse#blender render#blender 3d#blender scene#blender3d#art community#realism art#Realism#Realistic#internet#technology#digital animation#animation
0 notes
Text
Non-AI Naridarbandi.

View On WordPress
#3D artist#@naridarbandi#After Effects#AI#Artlist#Artwork#Blender D#Buy#DJ Storm#DJ Storms Blog#Nariman Darbandi#Support#View
0 notes
Text


Greetings dear friends,
3D Military Radio | Blender 3d | Cycles Render | Game Asset | Props
Thanks for your attention. :) Have a good day.
#3d#blender#3drender#digital art#graphic design#art#artists on tumblr#popular#view#3d design#designer#writers on tumblr#hi#gamer#props#asset#military#blender3d#blender 3d#blender cycles
1 note
·
View note
Text
instagram
Calm
#3d#digital art#surreal#art#artists on tumblr#artwork#blender#surrender#relaxingtime#skyline#ocean view#sunset#Instagram
1 note
·
View note
Text
how i make character models* in paint3d
*they are not models. you cannot rig them. but for simplicity i will call them this. also this guy is the example ⬇️

so. paint3d is very jank and not actually that good But it is fun to mess around with and for getting that early 2000s computer game effect for things. this program crashes and lags a lot especially when making more detailed stuff like this so. throughout this Please save your project periodically. I have lost so much to not doing this
if your computer isn't that great it's best to keep the quality setting at it's lowest. these models aren't really that detailed so it doesn't make a huge difference anyways LOL


when you open p3d you start with a blank 2d canvas. if you've Never used the program before i recommend fucking around with 3d view + making 3d shapes for a bit. make a Thing. like just some random object. it does not have to be good it's just to get used to how the controls work (because it is different between my mouse and drawing tablet and im not going into that here LOL). the biggest positive about p3d is how user intuitive it is compared to.yknow. blender
when you're done with the Thing and u want to start with your character go back to the 2d canvas/2d view for sketching time

you could probably do this in another program but. i find it easier to just do it here. i keep these pretty simple and try to keep depth in mind

then go to canvas and make the background transparent. and then switch to 3d view to start making the base for the model on top of the sketch


at this point i don't use the 3d doodle shapes yet because they are finnicky as hell. the preset ones are a bit easier to control and move around so they're nicer for the planning part. what shapes you use depends on your character but my guy here is very circles and round so its just a sphere and some cylinders


make sure you're in 3d view and checking the pose from every angle ! if ur guy looks like a roblox avatar without the assets loaded fully then that is ideal. once you're happy with the pose it's Sculpting Time
where you choose to start is up to you but i usually get the head out of the way bc it tends to be the most complicated thing.

this is my best friend forever. the sharp edge is helpful for stuff like metal and whatnot though so i use them both.

for stuff like hair and fur i find its easier to make a bunch of small shapes and then connect them instead of trying to do it all in one go


^better examples with fluffier guys
this part is pretty much just personal preference for how you want your model to look though. just keep adding Stuff until it looks alright. also reminder to be saving your work bc this is when it gets really annoying if p3d crashes

finished head. jus keep addin stuff. copy and paste is a godsend btw.

puffier jacket. also connecting the limbs. just keep addin stuff.

these take a few hours .finished limbs. pretend the backpack is there i forgot to get a progress shot of it
now it is time for the objectively best part which is painting the guy. switch back to the 2d brush but stay in 3d view and start Coloring . i only really use the watercolor brush for shading/gradients and the marker one for lines but this part is also personal preference.

watercolor brush for the blue gradient and marker for the face .


i would Not do this in 2d art but i like adding a white gradient to pastel colors like with the hair here. it compliments the soft shapes well i think. to quote a friend it Looks Gummy

my silly highlights.


almost done with the creature. also mentioning that there are different textures for objects that you can change when picking their base color. the zipper is metal so it gets to be shinier.

theres also different lighting/filters to mess around with + you can doodle on the transparent canvas still.


save ur guy as a image and/or a turnaround gif/video/whatevar u want . and thas it! you can also mess with the model more for different poses and expressions (although this is super laggy bc it has to render a bunch of shapes at this point)

go make some CREACHURES !!
938 notes
·
View notes
Text
Right, given @somerandomdudelmao request for clip brushes, and me being at work, y'all about to get one hell a scrappy resource post for clip studio, also Clip can import ABR files, which are photoshop brush files:
Free stuff:
https://assets.clip-studio.com/en-us/detail?id=1930804 - Show style Ink Pen Mimic.
https://tamberella.gumroad.com/l/YLfEvh - City themed brushes, ie: windows, bricks
https://drive.google.com/file/d/1fqEHk1LxtrQNbreu-AIO82QbwLJv4Rxw/view - Sooo someone attempted to re-create the block blender used in ROTTMNT had it on the clip store, but, like, cause they linked to the twitter I believe it got taken down, I thiiink this is the base version I have because I've been attempting to make it better. (Can drsg and drop this into your clip brushes or import it from the menu)
https://assets.clip-studio.com/en-us/detail?id=1989496 - Body types of the boys as 3D Modles
https://assets.clip-studio.com/en-us/detail?id=1762185 - Traffic lines
https://assets.clip-studio.com/en-us/detail?id=1793198 - Bricks
https://assets.clip-studio.com/en-us/detail?id=1890997 - More Bricks
https://assets.clip-studio.com/en-us/detail?id=1922029 -Even more bricks
https://assets.clip-studio.com/en-us/detail?id=1726896 - can you tell I had trouble with bricks?
https://ruunin.gumroad.com/l/wuPpz?layout=profile&recommended_by=library - Yet more bricks
https://tamberella.gumroad.com/l/OXJRt?l - books
https://assets.clip-studio.com/en-us/detail?id=1788819 - simple graffiti brush
https://assets.clip-studio.com/en-us/detail?id=2017520 - Stars that are similar to the effect stars
https://assets.clip-studio.com/en-us/detail?id=1803788 - Chains
https://assets.clip-studio.com/en-us/detail?id=1996420 - more chains
https://assets.clip-studio.com/en-us/detail?id=1826539 - Highlights for hair I use.
https://assets.clip-studio.com/en-us/detail?id=1938479 - Comic panel pens that I think go well with the mimic pen.
https://assets.clip-studio.com/en-us/detail?id=1920392 - Ruined Building brushes
https://assets.clip-studio.com/en-us/detail?id=1851086 - Street lamps
https://assets.clip-studio.com/en-us/detail?id=1989018 - Windows
https://assets.clip-studio.com/en-us/detail?id=2013894 - more windows
https://assets.clip-studio.com/en-us/detail?id=1993252 - Spray paint + 3d models!
https://assets.clip-studio.com/en-us/detail?id=2010437 - halftones
https://assets.clip-studio.com/en-us/detail?id=2009279 - more halftones
https://assets.clip-studio.com/en-us/detail?id=1997395 - glitch brushes
https://assets.clip-studio.com/en-us/detail?id=1998092 - scales
https://assets.clip-studio.com/en-us/detail?id=1881515 Spray paint
https://assets.clip-studio.com/en-us/detail?id=1702179 - electric poles
https://assets.clip-studio.com/en-us/detail?id=1749838 - easy speed lines
https://assets.clip-studio.com/en-us/detail?id=1948104 - pen I use to edit cass's comics (I'm sure you've noticed added limes or hatching)
https://porforever.gumroad.com/l/edags - metal textures, some post apocalyptic based brushes.
Needs Clippy/Gold:
https://assets.clip-studio.com/en-us/detail?id=1997417 - Spray Paint.
https://assets.clip-studio.com/en-us/detail?id=1673277 - Bricks
https://assets.clip-studio.com/en-us/detail?id=1776544 - More bricks
https://assets.clip-studio.com/en-us/detail?id=1983742 - Even more bricks
https://assets.clip-studio.com/en-us/detail?id=1942640 - More bricks + wood
https://assets.clip-studio.com/en-us/detail?id=2010200 - Half Tones
https://assets.clip-studio.com/en-us/detail?id=1806325 - more half tones
https://assets.clip-studio.com/en-us/detail?id=1808513 - Even more Halftones
https://assets.clip-studio.com/en-us/detail?id=1772102 - lots of half tones
https://assets.clip-studio.com/en-us/detail?id=1835699 - Caution Tape
https://assets.clip-studio.com/en-us/detail?id=1820838 - Keep out Tape
https://assets.clip-studio.com/en-us/detail?id=1822998 -Ruined Windows
https://assets.clip-studio.com/en-us/detail?id=1950280 - Steel beams
https://assets.clip-studio.com/en-us/detail?id=1977378 - Chains in motion
https://assets.clip-studio.com/en-us/detail?id=1982838 - Rust
https://assets.clip-studio.com/en-us/detail?id=1701296 - more rust
https://assets.clip-studio.com/en-us/detail?id=1740528 - electric poles
Needs Real Money:
https://saturnsday.gumroad.com/l/scalebrushes?layout=profile&recommended_by=library - Scales
https://jasonpiperberg.gumroad.com/l/HcXtB?layout=profile&recommended_by=library - Half tones, and a nice halftone blender.
https://delta9.gumroad.com/l/MxjHz?layout=profile&recommended_by=library - More Half tones.
https://porforever.gumroad.com/l/ksemc?layout=profile - buildings, windows, etc
#resource#brushes#brush#rottmnt#clip studio paint#rise of the teenage mutant ninja turtles#rise of the tmnt#cass apocalypse series#cass apocalyptic series
1K notes
·
View notes
Text
How To: Auto Height for Shoes
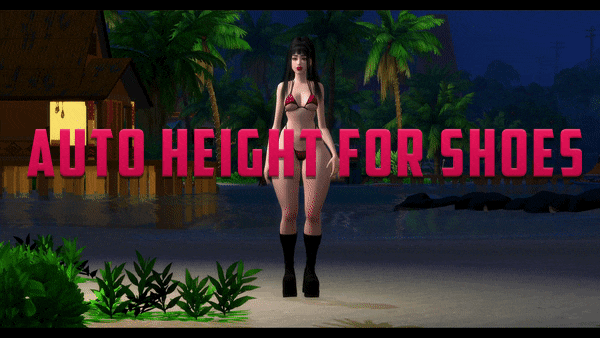
Haiii! As promised, here is the tutorial to make it so your custom shoes no longer require a shoe slider!
Thank you to the bestie who took the time to pick through Madlen's package file to figure out how it worked. And of course, thank you to Madlen who did the majority of the work figuring out how to make this possible in the first place!
♥ Tut below cut ♥
~~~
Set Up Your Blend File:
We're going to add a plane that will act as the mesh for the SlotRay which will allow for you to adjust the height of your shoes!
Open your blend file that contains the shoes your wish to adjust.
In the 3D View, press Shift + S and in the menu, select “Cursor to Center” In the 3D View, press Shift + A and in the menu, hover over “Mesh” then add a plane.
Now size this plane down as small as you can get it. You don’t want this plane visible in game.
Double check to make sure the plane has not moved from the center!! Your sim won't be centered in game if it has! If you see that it's moved:
Press "Shift + S" and click "Cursor to Center".
Then Select your plane and press "Ctrl + Shift + Alt + C", click "Origin to 3D Cursor".
Press "Ctrl + Shift + Alt + C" again and click "Geometry to Origin".
Navigate to the “Object data” tab and under “UV Maps” add a new one then name it “uv_0”.
Next, navigate to the “Scene” tab and under “S4Studio CAS Tools” set the cut number.
Depending on how many cuts your shoes have, you’ll want to adjust this number. For example, if your shoe has 3 cuts (0000, 0001, 0002) then this plane would have a cut number of 0003.
Since my boots only have one cut, I will put the number as 0001.
Now select your shoes and enter Edit mode. Select a face/vertice/edge on the very bottom of your shoes. Look to the panel on the left side of the screen (if it’s not open, press “N”). Under “Transform”, note down the number next to “Z”
After that, save your blend file under another name so you can distinguish which is which. I’ll name mine “Boots_3_Height Cut”
youtube
~~~
Add a New Cut to your Package File:
We're going to add an additional cut in your package file for the new plane!
Open Sims 4 Studio, make a new package file for your shoes and import them.
Go to the Warehouse tab and select your LOD 0, it will be the geometry with the largest file size. Sometimes you have to close then reopen the package to see the geometry.
Duplicate this geometry and in the box that pops up, change the last character of the “Group”. It can be any number or letter as long as it’s not the same as the duplicated geometry. On the duplicated geometry, note down the Group, Instance & Type values.
Find the “Region Map” and next to “Entries” click “Edit Items”. Add a new entry and in the “Layer” box, type the number you used for your cut. Since I used the cut number 0001, I will type 1.
Keep the “Region Type” as “Base” and move to “Models” then click “Edit Items”. Add a new Model entry and paste the Group, Instance & Type values you noted down before. Save and close each box.
Find your “CAS Part”, this is your swatch.
If you have additional swatches, it is a good idea to remove them and add them back once you are finished with this process.
Scroll down until you find the “Lods”.
Click “Level: 0” and next to "LOD Models", click “Edit Items”. Add a new entry and paste the Group, Instance & Type values again.
Save & close each window and return to the Warehouse.
youtube
~~~
Adjusting SlotRays:
We are now going to edit the SlotRays for the new cut which will adjust the height of the sim for your shoes!
Return to the new duplicated Geometry and in the “Data” tab, find the “SlotRay Intersections” and click “Edit Items”. Add a new entry and find the “OffsetFromIntersectionsOs” box.
You'll want to change ONLY the middle coordinate number. That will be the height of the sim.
You want to take the “Z” coordinate that you noted down from blender and replace middle coordinate number. If the number you wrote down is negative (i.e -0.01234) make it positive (i.e 0.01234).
In the “SlotHash” box, change the value from “00000000” to “FEAE6981”. This is the hash for the b__ROOT__ bone in the Sim's Rig.
Save and close the dialogs then return to the warehouse. Next, reimport your mesh and save your package file. You can now test your shoes in game!
youtube
Please keep in mind:
You have to do this for every LOD of your mesh
You can freely replace the mesh of your shoes and adjust the height since the cut with the plane has the SlotRay data
Animations may be off since EA hasn't made the game to support taller sims
CAS windows may move slightly if your sim is using poses/animations where they are leaning to the side. This won't affect gameplay
I recommend using Helgatisha's Stand Still in CAS mod to make sure your sim is absolutely centered
Hope this helped :)
1K notes
·
View notes
Note
how do you get your shapes and models looking so well?!?!? especially your pokemon renders they're amazing, i need to know your secrets if you're willing to share
Thank you! There's a few different aspects that go into making my stuff look "presentable," but I find that manipulating perspective while working on my renders plays a huge part in making them look better than they would otherwise, especially since I usually try to keep my poly count as low as possible. Since the majority of my 3D art is intended to be seen only from certain angles and doesn't have to be exported to a game or something where people could view them in full, I can take a lot of liberties with it. For example, here's a render from a few years ago (2022) that I still like:
And here's what it looks like "off camera"
Everything is made of very simple shapes cobbled together to look like something more complex when viewed from the intended angle.
The materials, shaders and post-processing effects used can really help things look more impressive, as well. I tried my hand at (partially) sculpting in Blender recently (based on this Pokemon trading card), and here's the result without any shaders or effects, and then fully rendered:
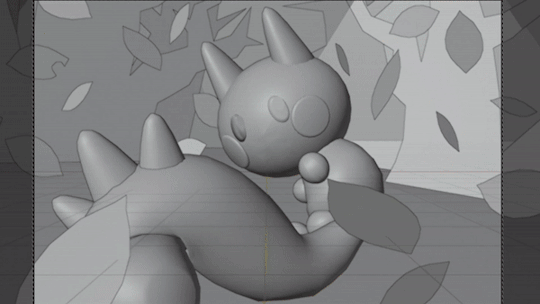
For this one, everything is still made up of relatively simple shapes, and the materials and lighting are doing a lot of the heavy lifting (if you're curious about my process for materials and lighting, I've posted about that a bit here and here and elsewhere on my blog).
But anyway, that's just my process as a self-taught hobbyist. Hope my rambling made sense!
#todd howard voice it just works#ask#asks#tutorial#tutorials#the full render of that last gif is coming soon btw. there's a few things ahead of it in the queue#long post
95 notes
·
View notes
Text
How I Make My Sims in 10 mins +Download included
I would like to show you guys how I create my sims usually. It will be more consistent and time-saving to use presets from our amazing cc creators. Personally I love to use presets but there are limited presets created for male sims. So it usually takes me about half an hour to make a male sims.
No matter what, I am not good at in-game screenshot and photo editing, not to mention using Blender, so creating sims is just for fun only. I rarely use for in-game cause the lighting really ruins my sims. I usually just build lots / houses in-game . SO, Don't be stressed! We don't need to be perfect, so do our sims.
No reshade used
Screenshot taken from CAS.
(Continue to view the video and cc list)
youtube


==CC List==
SKIN:
Soft rose B Full body by @northernsiberiawinds
Spotlight by @simandy
Head preset 5 by @northernsiberiawinds
Ear preset 2 by @mmsims
Nose preset 13 by @eunosims
Blush from GPME-GOLD MAKEUP SET by @goppolsme
HAIR:
HAIR 09HQ by @jino-sims
EYE:
Eyebrow G24 by @goppolsme
Eye preset N1 by @northernsiberiawinds
Eyes 48 by @bunbunzsims1
Eyeliner cc52 by @goppolsme
Eyeshadow from GPME-GOLD MAKEUP SET CC70 by @goppolsme
3D Lashes N3 by @obscurus-sims
LIPS:
Lip presets 012 (I guess) by @lutessasims
Lipstick 14 by @bunbunzsims1
OUTFIT:
knit bustier top & skirt set by @yuns2ol
SHOES:
Shine Boots by @shoestopia
Classic tights by @magic-bot
ACC:
Earrings Sofia @enriques4
Sweat Suit Set Bucket Hat by @rimings
Download my sims here
(Please make sure you download all the cc above as well)
Please tag me to let me know you are using it.
Let me know if I missed some cc. There are too many, I may have missed.
Thank you for your support!❤️
#sims 4 cc#s4cc#ts4cc#s4cc finds#cc finds#s4ccfinds#ts4 eyes#ts4 eyelids#s4 maxis match#sims 4 maxis cc#ts4 mm cc#ts4 genetics#sims 4 makeup#ts4cc female#ts4cc male#my sims#download#Youtube
103 notes
·
View notes
Last Seen Blogs

unfilteredmomlife
Motherhood Unfiltered: A Day In My Life As A Mom

itssmolladybug
LADYBUG

maxnaum
Max Naum


itsredmichelle-blog
Sin título