#CSS elements for websites
Explore tagged Tumblr posts
Visit Tumblr Blog
Explore Tumblr blogs with no restrictions, modern design and the best experience.
Last Seen Tumblr Blogs


Fun Fact
Tumblr Inc. is using 66 technologies for its website.
Text
The Elf Who Would Become A Dragon
PRELUDE
Welcome visitor! What has brought you to this chamber of wonders? For what reason have you crept unto this treasure trove, so [early in the dawn/late in the evening]?
No need to answer. I can see by the hunger in your eyes that you are here for the challenge — that you hope to fill your pockets with this hoard. By all means, feel free to examine the jewels, and the coins, and especially the art, here gathered for your pleasure. See how the rubies gleam. Observe where the colours ripple and glitter in the curve of the opals. And as you pace back and forth in astonishment, notice how the piles of gold and silver shimmer like cresting waves on a restless sea.
Yes, this wealth is yours for the taking. But there are rules. One rule, in fact.
You must sit and listen to a story. After an hour has passed, so long as the tale is yet unfinished, you are free to take all that you can carry and go… but if you carry out so much as a single coin from this place, you will never hear its ending.
There is no trick: the story takes much longer than an hour to tell. It is a tale about what it means to belong; a tale about that which we choose for ourselves, and that which is chosen for us; a tale requiring patience and consideration, for the story is richer and more deeply layered than all the wealth spread before you. The tale I will tell you is about worth in all its forms — but in the end, you must decide the worth of the people I speak of, and whether each deserved the price they paid for who they were.
That is the challenge, dear visitor. And fret not, for there is no penalty should you fail to leave before my telling is done. Many before you have left this chamber with their pockets light, though I cannot say the same for their thoughts…
You are disbelieving. Perhaps you are eager to begin? Good. Sit comfortably, and I shall tell you a bittersweet tale of warmth, magic, revenge, and dragons.Listen, now, to the story of Saphienne:
The Elf Who Would Become a Dragon
or, The Fires of Her Ambition

CHAPTER 1 – The Frog and the Toad
Long before Saphienne grew into adulthood, five moments defined the woman she would become. To know these is to know her. I shall tell them to you in the order they happened, but do not mistake the telling of them for their relative importance. All mattered in different ways. All will matter, later, when you wonder why she did the things that I shall recount for you.
So:
See Saphienne as she was, the quiet young girl, ten years old. Spring was in the air, and so her hair was the rich brown of the nourishing soil — for like all elves of her kind, her hair changed colour with the seasons. She was pale, like the bark of a birch tree, and slight in build, too small to yet be gangly, too large to be unawkward. Her eyes were also the colour of spring, pale green, but these did not change with the passage of the year, only growing brighter or darker in accordance with her mood.
Which was low, then, and so her eyes were the shadowy green of late evening. She was sat on the edge of a small glade, a glade in which the boyish girls and girlish boys from her village typically played. To see how the young elves laughed and cavorted in the afternoon sunlight, aglow in their fine white clothes, you would think all was idyllic, that their joy was infectious. But Saphienne was not sharing in their joy.
She was, as I said, quiet. Softly spoken, far from outgoing, the adults in her village thought she was sweet but plain, while the other children thought she was boring, too slow to play along. They seldom invited her to join in their games, and when they were obliged to include her she was never given much attention. Not that they were intentionally cruel. To them, she was an afterthought, neither loved nor hated, neither welcomed nor turned away, and never once envied.
This was why she sat on a fallen log and watched as they played their games, not even the book on her lap able to distract her. In those days, she was a precocious reader, and would sneak books out from the small village library that she thought were not intended for her (and that the librarian pretended not to notice her take). What else was there to do, but lose herself in stories of other times and places? To hear of other people, and so live vicariously through them?
Yet the book she had taken that day was not very interesting, and while her curiosity demanded she finish it, in that moment she longed more for company than for escape. Not enough to approach the other children, but certainly enough to watch them, and feel things that no child of her age should ever have to feel.
“Saphienne!”
See now a transformation: at the sound of her name, Saphienne’s eyes lit up even brighter than the daytime, her face unguarded and smiling as she twisted around. The book slid off her lap, and she let it fall. Her attention was on the girl who was bounding through the long grass under the trees.
Kylantha was two years younger than Saphienne, nearly a full head shorter, and had none of her meekness. She also stood out, but not because of how she behaved: her hair was always bright blonde, even beyond summertime, and her ears were shorter and less pointed than those of other elves. For this reason she, too, was not invited to play, but that never stopped her from pushing her way in… when she wanted, which was not often. She preferred to spend time with her best friend, her only real friend, the only person with the patience to answer her endless, exhaustive questions.
“Saphienne! Guess what I have?” Kylantha had her hand behind her back, and she kept facing Saphienne as she sidestepped around the log, nearly tripping.
Saphienne’s nose wrinkled, though her smile remained. “Another toad?”
“It was a frog.”
“Frogs have smooth, wet skin, remember?”
“It was wet!”
Laughing, Saphienne reached down and scooped up her book as Kylantha sat. “Because you’d dropped it in the pond before you brought it to me, silly.”
“I wanted to see it swim.” She was pouting.
“I remember. And I remember it had rough skin and shorter back legs, which means it was a toad, not a frog. They’re different creatures. I told you this. Frogs aren’t toads, and toads aren’t frogs.”
Thinking on the difference, Kylantha looked down and went quiet. This usually preceded a question, and sure enough, a moment later she lifted her head. “Do you think there are half-frogs?”
Saphienne opened her mouth, then realised she didn’t know. “Maybe,” she guessed. “I don’t know if toads and frogs can make babies together.”
“How do they do it, anyway? They don’t look like they can kiss.”
Saphienne didn’t know the answer to that, either, though she was old enough to know that kissing was only part of the process. “I think there’s more than kissing. Maybe they skip that part.”
“Do frogs think toads are ugly?”
“I mean, they look nearly the same.” Saphienne stared up at the boughs overhanging the edge of the clearing, watching them sway back and forth in the breeze. “Toads crawl on land and swim, while frogs mostly swim, and that means frogs aren’t as comfortable as toads out of water. Maybe frogs envy toads. Maybe they think they’re beautiful.”
Kylantha hung on her every word. Then, she smiled to herself. “I think a half-toad would look even prettier to a frog.”
Saphienne looked back down. “Why?”
“Because they’d look like a toad, but get along better with the frogs.”
That made her giggle. “I don’t think they spend much time together.”
“Well, they should. They’re the same.”
Prepared to argue, Saphienne knew she wouldn’t win. So she just smiled, and shook her head. “Close enough. But, what do you have, if it isn’t a toad?”
Remembering that she was holding something, the younger girl gasped, and she sat up straighter. “You need to close your eyes and hold out your hands.”
“…Last time you said that, you gave me a toa–”
“It’s not a toad!”
“Is it something else with poisonous skin?”
“Neither of us got sick! And it’s not poisonous.” She was pouting again, and her brown eyes were wide. “Please, Saphienne?”
She relented. “All right.” Setting the book beside herself on the log, Saphienne closed her eyes, and held out her hands.
Kylantha kept her waiting, made sure her eyes were closed before she brought her hand around and gave Saphienne what she’d been hiding. It felt light, and soft, like it was made of fabric, but also wooden.
“You can look now.”
Saphienne looked. She was holding a drawstring pouch, made from fine cloth, onto which chips of bark had been tightly sewn in interlocking layers. Shaking it, she realised it had something inside, and when she opened it she saw a single, shining, copper coin.
“Do you like it?”
She took the coin out, held it up to the light. She’d never seen one in person before, but she’d read about them. This one was minted with a crude human face on one side, and when she turned it over she saw it had also been struck with a poor depiction of a tree. “Did you make this?”
“Yes!” Kylantha beamed. “Mother taught me how to stitch, and I’ve been learning how to make things I’ll need.”
Saphienne looked down at the pouch, recognising that the needlework was poorer than that of the traditional elven clothing they wore. “I meant the coin.”
“Oh, no. Mother gave me that. She said if I was going to have a purse, I should have something to put in it.”
“I’ve never seen one before. Humans use them for trade, don’t they?”
“I think so.”
“So…” She put the coin back in the pouch, tying it shut. “Why do you need a purse? And why does it have bits of bark on the outside?”
“It’s not for me.” She was grinning. “It’s for you.”
Saphienne blinked. “But, why do I need it?”
“So that you have somewhere to keep your coins when we travel.”
Slowly, she smiled. “We’re going to travel?”
“Of course we are! We’re going to see all the things you’ve read about.” Kylantha stood up, spread out her arms, began to spin as she spoke. “As soon as we’re grown, we’ll go on a journey. We’ll go over the mountains — and across the sea. We’ll be adventurers! We’ll see all the things there are to see, even things that no one’s seen before, and you’ll write them down in a book of your own.” Leaping up onto the log, she wobbled there, arms outstretched for balance. “That’s why it’s arm– armed– protected on the outside, so no thief can cut it open.”
Saphienne was grinning now as she looked up at her. “I’m only ten. It’ll be ninety years before I’m an adult, ninety-two for you. That’s forever.”
“Well, we can prepare! I’ll learn to fight, so you won’t need to worry.” Standing more firmly, she brought her hand against her chest. “I’ll be a knight! I’ll protect you, with my sword, and my song.”
“And what should I become?” Saphienne asked, shifting her legs so that she half-knelt on the log.
Swaying, nearly losing her balance, Kylantha sat back down with a hollow thump. “You can be whatever you want to be. I won’t mind.”
“Even a thief?”
The younger girl scowled. “As long as you give it back.”
* * *
Playing with the other children was of no interest to Kylantha — she wanted to explore instead. “We should go up to the lake!”
Saphienne was intimidated by the prospect. “But it’s really far away, and we’re not grown enough to go on our own,” she said. “We might get into trouble–”
“It’s just water.” Kylantha was unfazed. “Lots of water. It’s not dangerous — where did you think I got the frog from?”
“…It was a toad…”
“Same thing,” she sniffed. “No one will notice we’re gone. And who cares if we get into trouble, anyway? What’s the worst they’ll do?”
Especially back then, Saphienne had a tendency to take things literally. “Our mothers will care… and they could shout at us…”
“Mother likes when I explore.” Kylantha’s smile was as bright as her hair. “And who cares about shouting? Words don’t matter, not really. Don’t you want to see the lake? The toads might still be spawning.”
Though she was unconvinced, Saphienne had never been taken to see the lake, and she desperately wanted to… but she was, at that time, a rigidly obedient child. “Can’t we do something else?”
“Like what?” Kylantha shifted closer to her on the log. “Do you have a better idea?”
“We could go to the library–”
“Enough books!” Kylantha rolled her eyes, snatched the book from Saphienne’s hand, and held it away from her. “Today is for exploring.”
Saphienne could easily have taken the book back, if she had more confidence. Instead, she wilted slightly, then turned her mind to other ideas. “We could play hide and seek?”
“That’s not exploring.”
“We could go to your house? Or a shrine–”
“Boring…” Kylantha mimed a yawn. “Let’s go somewhere we haven’t been. Somewhere no one expects us to go…”
“Where?” Saphienne was struggling to understand what Kylantha wanted. “And what will we do, when we get there?”
“I want to see things we haven’t seen before.” Her eyes held an insistent plea. “We need to practice for when we travel.”
That made sense to Saphienne. Her uncertainty fell away as she held Kylantha’s gaze, replaced by resolve to please her friend, and the smile that grew on her lips held a measure of the other girl’s bold mischief. “Then,” she said, “I know somewhere we could go… somewhere that no one’s told us we can’t go…”
Beside her, Kylantha pouted. “But, where’s the fun in–”
“We can go to the wizard’s house.”
After her shock wore off, Kylantha reflected Saphienne’s smile.
* * *
Neither child understood the degree to which wizardry shaped both their lives, and Saphienne had not even the slightest premonition of how greatly magic would matter to her personally in later years. Though they had grown up surrounded by enchantments and magical wonders, all was commonplace to them, and so they only recognised what was unusually grand, like when the local wizard would celebrate the new year by making fantastic colours stream across the sky.
“Master Almon,” Kylantha whispered to Saphienne, mildly disappointed by what she saw. “That’s him… I think.”
Saphienne peered through the bushes in which they were poorly hiding, oblivious to the fact that her white clothes made her stand out amidst the spring foliage. The adult elf who had just exited the tall, towering tree across the grove seemed an imposing man, dressed in vivid blue robes that were so heavy they looked like they could smother her — yet offered no impediment to his stride.
He walked away from the watching children, setting out into the village… only to pause, his back toward them.
“What’s he doing?” Kylantha was cheek-to-cheek with Saphienne.
With a wave of his hand, the wizard poured sapphire sparkles from his fingertips, flickering sparks that leapt on the air and coalesced into a bolt of lightning that staked the ground before him with a thunderous boom — there to shimmer and twitch as it hardened and cooled into fine, fire-blackened wood, still yet burning with tawny embers.
Stunned, the girls froze in place…
Only for the wizard to nonchalantly lift his walking stick, and casually stroll on.
Kylantha was subdued. “…Maybe we should go back.”
Saphienne, however, was still emboldened: she pushed through the bushes, making a beeline for the doorstep. “You said you wanted to go somewhere new…”
“We did,” Kylantha pleaded, following after the older girl. “And that was– I’ve never seen anything like that before! So we’re done–”
“No, we’re not.” Saphienne quickened her pace. “We haven’t been in his house. We have to see our journey through!”
“But he’s not home–”
“So?” She rounded on Kylantha with a wicked smile, copying her voice. “That means he won’t notice we’re there. And who cares if we get into trouble, anyway? What’s the worst he’ll do?”
Her teasing made the younger girl blush, which in turn made her clench her fists and stand a little taller. Still, she smiled broadly. “Maybe he’ll turn you into a toad.”
“Or you into a frog.”
That cut through Kylantha’s bravado, and her eyes widened in thought. “…Do you think he could?”
“Only one way to find out…”
Yet, they slowed when they crossed between the flowerbeds that flanked the door.
Saphienne gently shoved Kylantha forward. “You first!”
“No, you!” Kylantha pushed back. “This was your idea!”
“You’re the one who wanted to go somewhere new!”
“I wanted to go to the lake! …I’m not going in.” She folded her arms.
“Well…” Saphienne folded her arms too. “…One of us has to. Or it doesn’t count.”
They stared at each other, at an impasse.
Then Kylantha suddenly grinned. “I know what we’ll do.” She thrust out her hand in demand. “Give me the coin!”
Puzzled, but trusting her friend, Saphienne withdrew the pouch and fished out the copper disc. “What are you doing?”
“Just watch.” Kylantha took the coin, balancing it upon her fingers, only to flick it into the air. “Heads!”
The metal glinted where it fell among the flowers — tree-side up.
“…Oh.” Kylantha paled. “I called it wrong. That means I lose.”
“It does?” Saphienne bent down, retrieving the coin with a frown.
“Yes,” the younger girl nodded, already steeling herself. “You choose what you want to happen, then call which side the coin will land. If it lands the way you called, you win… or else…”
She bounded up to the step, gripped the door handle, and–
…Discovered it was locked.
Wordlessly, they faced each other.
And then the two burst into great guffaws of childish laughter, all their fear and tension dispersed like night mists in the dawn. They were still giggling as they ran away — though Kylantha darted back to the flowerbeds, stooping to carefully uproot a blooming hyacinth from its rightful place in the front garden, before she sprinted after Saphienne.
The casual vandalism worried the older girl. “Why’d you do that?”
“To show my mother.” She grinned, full of play as she caught up. “Don’t worry! It’s just a flower. I’m not a thief…”
Appeased, Saphienne offered her hand — and was dragged along after Kylantha as she raced away. “…So long as you put it back!”
* * *
All of this was happy prelude to the first moment.
One year and half again later, in the autumn, when Saphienne’s hair was red and she had begun to notice other changes creeping in, she was surprised by shouting. She was lost among the shelves of the library, usually so tranquil, when she heard the sound of the door crashing open, adult voices from outside calling after running feet.
“Saphienne! Saphienne!”
Kylantha nearly ran into her as Saphienne emerged from the end of the row, and then she did collide with her, throwing her arms around the taller girl with a muffled wail that only became louder as she cried.
“Kylantha!” Saphienne held her, caught between shocked white and an uncertain blush. “Kylantha, what’s wrong? Are you hurt?”
But she only cried and cried, and clung more tightly, her grief too great for words. They stayed like that as the librarian led a man to where they were standing, a man that Saphienne did not recognise, dressed in dull brown leathers and draped with a cloak that was patterned like the forest. He did not interrupt, not at first, waiting until the wailing turned to sobbing, and only then did he crouch down, his voice gentle but firm.
“Finish your goodbyes, girl.”
As softly as he spoke, suddenly Saphienne felt very cold. “Goodbye?” She pulled Kylantha tighter against herself.
But Kylantha drew back far enough to look up, her face red, nose running. She swallowed, and her usually vibrant voice was hoarse, broken. “Saphienne…” She struggled to speak. “Saphienne… they’re taking me away…”
End of Chapter 1
Index of Chapters here: https://www.tumblr.com/ljamberfantasy/775306768397074432/the-elf-who-would-become-a-dragon
#elves#fantasy#lgbt#progress fiction#web serial#writing#writers on tumblr#the elf who would become a dragon#tewwbad#content warnings available on author's website#I cannot for the life of me figure out how to get elements to centre using css on here help
19 notes
·
View notes
Text
Working on my javascript for my web page. Turns out I have the perfect kind of setup to accomplish some of the project requirements, specifically with even handlers and user interactions
My website, conceptually, will load a different employee details page depending on what employee name is clicked on. But I need to load it dynamically (instead of hard-coding it) so that the user can add or delete employees & it'll be able to still load the relevant shit.
So! Only one employee details page, but depending on how it's loaded, it'll load a different employee's information. Still working on getting down Exactly how to do it (I'm thinking using URL parameters that'll read a different object depending on what ID is used)
It's entirely doable. In fact, it's probably extremely common to do in web pages. No one wants to hard-code information for every new object. Of course not. And thus the usefulness of dynamic javascript stuff.
I can do this. I can very much do this.
#speculation nation#i wasnt very good when i got home and i read fanfic for a while#then took a nap. and now im up again and Getting To Work.#i dont have to have this 100% perfect for final submission just yet. bc final submission isnt today.#but i need to have my final presentation over my thing done by noon (11 hours from now)#and im presenting TODAY. and part of that will be giving a live demo of my project website#so. i need to have all of the core functionality of my website down at the Very Least#might not be perfect yet. but by god if im gonna show up to my presentation with my website not working.#i need to have the employee list lead to employee details with personalized information displayed per employee#i need to create an add employee field that will Actually add an employee. using a form.#and that employee will need to show up on the list and have a new id and everything. the works.#need to set it up so that employees can be deleted. shouldnt be too much extra.#and it would be . interesting. to give an actual 'login' pop-up when someone clicks on the login button#with some kind of basic info as the login parameters. this cant be that hard to code.#the project requirements are: implement 5 distinct user interactions using javascript. at least 3 different eventhandlers#at least 5 different elements with which interaction will trigger an event handler. page modification & addition of new elements to pages#3 different ways of selecting elements. one selection returning collection of html elements with customized operations on each...#hm. customized operations on each... the example given is a todo list with different styles based on if an item is overdue or not#i wonder if my personalized detail page loading would count for this... i also have some extra info displayed for each#but i specifically want the employees to be displayed in the list uniformly. that's kinda like. The Thing.#actually im poking around on my web pages i made previously and i do quite enjoy what i set up before.#need to modify the CSS for the statistics page and employee details to make it in line with what i actually wanted for it#maybe put a background behind the footer text... i tried it before & it was iffy in how it displayed...#but it looks weird when it overlaps with a page's content. idk that's just me being particular again.#theres also data interchange as a requirement. but that should be easy if i set an initial employee list as a json file#good god im going to have to think of so much extra bullshit for these 10 made up employees#wah. this is going to be a lot of work. but. im going to do it. i just wont get very much sleep tonight.#that's ok tho. ive presented under worse conditions (cough my all nighter when i read 3gun vol 10 and cried my eyes out)#and this is going to be the last night like this of my schooling career. the very last one.#just gotta stay strong for one more night 💪💪💪
6 notes
·
View notes
Text
Ublock Origin
Youtube: SponsorBlock (skips ads within videos), DeArrow (replaces clickbait thumbnails & titles), Blocktube (block channels), Enhancer (Quality of Life features), Youtube-Shorts Block
Youtube Mobile: Youtube Vanced/Revanced Manager
Twitter: Minimal Theme extension
Tumblr: xKit/xKit Rewritten, Dashboard Unfucker, Stylus with "Old Tumblr Dashboard" userstyle
Spotify: xManager (desktop & mobile)
Firefox: High chance you'll love it and curse holding out for so long.
Linux: No whiney search box trying to Edge you, no ads in the start menu, no trending searches reminding you about celebrity gossip & politics.
i would move heaven and earth to avoid hearing one single advertisement
#I'm not going to blindly tell you to “switch to Linux” but you can easily test it out in a Virtual Machine within windows.#There are guides online that will hold your hand through the setup process. Linux Mint is not scary. You might love it.#If setting up a VM still feels like too much? Then yeah stick with Windows. That's understandable.#but if you're reading this far then you must have caught on to how your ability to fight back is tied to your tech literacy skills#If you're already following workaround guides to forcibly disable Windows features that piss you off or install modified apks...#then you're halfway there#we all pick our battles & hills to die on though (My deepest condolences if you require Adobe for work 🥲)#There is also Ublocks 'element picker' but you can cause more confusion than good if#you don't know what you're doing (You can always remove filters)#Or do what uBlock picker does by learning a tiny bit of CSS and you can make anything you want on a website go bye-bye#pssst! ''display: none'' & ''visibility: hidden'' CSS declarations#I originally listed all this in the tags and realized it was a mess. May as well keep the tags now though:#Linux#Firefox#uBlock Origin#SponsorBlock#Youtube-Shorts Block#DeArrow#Youtube Vanced#ReVanced Manager#Revanced#Minimal Theme for Twitter#Stylus#xkit#xkit rewritten#Dashboard Unfucker#xManager#I spent my morning free-time on this 😪
58K notes
·
View notes
Text
#react#css#custom#scrollbar#web#elements#site#website#how-to#how to#how#to#design#development#developer#code#codeblr#studyblr
0 notes
Text
Elevate Your Website 's Visual Appeal with these Effective Techniques for Centering Elements Using CSS
In today’s fast-paced digital world, having a visually appealing website is essential to stand out from the crowd. One effective way to achieve this is by centering elements using CSS. Not only does it make your website look more professional, but it also enhances user experience.

In this blog post, we will introduce you to 11 effective techniques for centering elements using CSS that will elevate the visual appeal of your website and take it to the next level! So get ready to enhance your design skills with these simple yet powerful techniques.
WHAT IS CENTERING ELEMENTS IN CSS?
Centering elements in CSS is a technique for positioning HTML elements on a web page. There are several ways to center elements in CSS, and the most common method is to use the “margin: 0 auto” property.
Other methods of centering elements in CSS include using the “text-align: center” property, or setting the element’s position to “absolute” and using the “left: 50%” and “transform: translate(-50%)” properties.
The method you choose will depend on the type of element you’re trying to center, and whether or not you want that element to be responsive.
WHY IS IT IMPORTANT TO CENTERING ELEMENTS IN CSS?
It’s important to center elements in CSS because it helps create a more balanced and symmetrical look for your web page. When elements are properly centered, they can add visual appeal and help direct a user’s eye toward the most important information on the page.
There are a number of different techniques that can be used to center elements in CSS. The most common method is to use the text-align property with a value of “center.” This will align all the text within an element to the center of that element.
Another popular technique is to use the margin property with auto values for both the left and right margins. This will cause the browser to automatically calculate equal margins on both sides of an element, effectively centering it within its containing element.
One can also use absolute positioning to center an element within its containing element. This involves setting the position property to “absolute” and then using either top or bottom and left or right properties to adjust the position of the element until it is perfectly centered.
HOW TO CENTER DIV OR TEXT IN DIV USING CSS?
If you’re working on a web design project and want to center either a div or text within a div, there are a couple of ways you can do it using CSS.
If you want to center a block level element like a div, you can use the CSS property “margin: 0 auto”. This will set the margins on the left and right sides of the element to be equal, thereby centering it.
If you want to center text or inline elements within a div, you can use the “text-align: center” property. This will align all the text within the div to be centered.

8 EFFECTIVE TECHNIQUES FOR CENTERING ELEMENTS USING CSS
In order to center elements using CSS, there are a few different techniques that can be employed. One popular technique is to use the “text-align” property with a value of “center.” This can be applied to any block level element, such as a paragraph, and will cause the contents of that element to be centered within the overall width of the containing element.
Another common technique is to set the width of the element to be centered to a specific value, then use the “margin” property with a value of “auto.” This will cause the element to be horizontally centered within its containing element, regardless of the width of that container.
It’s also possible to center elements vertically within their containing elements using CSS. This can be accomplished by setting the height of the container to a specific value, then using the “line-height” property with a value that is equal to or greater than the height of the container. The element will then be vertically centered within its containing element.
These are just a few of the many techniques that can be used for centering elements using CSS. By employing one or more of these techniques, you can easily improve the visual appeal of your website.
– FLEXBOX
When it comes to centering elements using CSS, there is no better option than flexbox. Flexbox provides a simple way to center elements horizontally and vertically within their container. In addition, flexbox can be used to create responsive layouts that automatically adjust to the size of the screen.
To use flexbox for centering, you must first set the display property of the container to flex. Then, you can use the justify-content property to center the elements horizontally, and the align-items property to center them vertically. For example, if you want to center an element horizontally and vertically within its container, you would use the following code:
container { display: flex; justify-content: center; align-items: center; }
– GRID LAYOUT
When it comes to CSS, there are a few different techniques that can be used to center elements on a page. The most common technique is known as the grid layout. This technique involves using a series of nested dives to create a grid of boxes that can then be used to position elements within that grid.
The first step in using the grid layout is to create a series of divs that will act as the columns of your grid. These divs should be given a class name so that they can be easily targeted with CSS. Once you have your column divs in place, you’ll need to add some content to them. This can be done by adding more divs or by using other HTML elements such as paragraphs or headings.
Once you have your columns and content in place, you can start positioning elements within the grid. To do this, you’ll need to use the CSS properties “float” and “clear”. The float property allows you to specify how an element should float within its parent container. By default, elements float to the left side of their container. However, if you want an element to be centered within its container, you’ll need to set the float property to “none”.
The clear property specifies what side of an element’s container other elements are not allowed to float on. So, if you want all subsequent elements after a centered element to also be centered, you would set the clear property to “both”.
App lying the grid layout technique is a great way to create a visually appealing design that is easy to understand and maintain. It also allows you to easily define how elements should be positioned within the grid, making it simple to adjust as needed.
– ABSOLUTE POSITIONING
When it comes to CSS, there are a few different methods that can be used to center elements on a web page. The most common method is to use the text-align property, which can be applied to both block-level and inline elements. However, this method only works if the width of the element is explicitly set.
Another method that can be used is the margin: auto; technique. This can be applied to block-level elements that have a set width, and will cause the element to be centered within its containing element.
If you want to center an element that is not a block-level element, or if you don’t want to set a width, then you can use the absolute positioning technique. With absolute positioning, you can specify exactly where you want an element to appear on the page using the left and top properties. You also need to set the position property to “absolute” for this technique to work.
– RELATIVE POSITIONING
When it comes to CSS, there are a few different ways to center elements on a web page. The most common method is to use the “text-align” property. This can be applied to either the entire page or to individual elements. For example, to center all of the text on your page, you would add the following CSS rule to your stylesheet:
body { text-align: center; }
You can also use the “text-align” property to center specific elements on your page, like images, blockquote, etc. For example, if you want to center an image that’s inside a div element, you would add the following CSS rule:
div { text-align: center; } img { /* this is for centering images */ display: block; margin: 0 auto; /* important */ /* top and bottom margins are 0 */ width: 50%; /* image width can be anything less than or equal to container width */ }
Another way to center elements is by using the “margin” property. You can set the left and right margins to “auto”, which will evenly distribute them within the containing element. This works for both block level and inline elements. For example, if you want to center a div element on your page, you would add the following CSS rule:
div { margin-left: auto; /* important */ margin-right: auto; /* important */ width: 50%; /* div width can be anything less than or equal to its parent container width */ }
Finally, you can use the “position” property with the “relative” value. This will set an element’s position relative to its containing element and then center it using margins. For example, if you want to center a div element on your page, you would add the following CSS rule:
div { position: relative; /* important */ left: 50%; /* important */ top: 50%; /* important */ margin-left: -25%; /* important */ margin-top: -25%; /* important */ width: 50%; /* div width can be anything less than or equal to its parent container width */ }
– TRANSLATE METHOD
When it comes to centering elements using CSS, there are a few different methods you can use. The ‘translate’ method is one of the more popular and effective techniques.
With the translate method, you can essentially move an element around on the page until it’s perfectly centered. To do this, you’ll need to set the element’s ‘transform’ property to ‘translate(X, Y)’. X and Y represent the amount of pixels you want to move the element horizontally and vertically, respectively.
For example, if you wanted to center an element horizontally on a page, you would set the X value to ‘50%’ and leave the Y value at ‘0px’. This would cause the element to be positioned 50% from the left side of the page (the exact center).
You can also use negative values for X and Y if you want to move an element up or left from its current position. So, if you wanted to move an element 10px to the left and 5px up from its current position, you would set the X value to ‘-10px’ and the Y value to ‘-5px’.
Once you have your desired position set, all that’s left is to add some vendor prefixes (-webkit-, -moz-, etc.) so that your CSS will work across all browsers.
– MARGIN AUTO METHOD
When it comes to CSS, there are a number of different methods that can be used to center elements on a web page. One popular method is known as the margin auto technique. This approach is relatively simple and only requires a few lines of code.
Here’s how the margin auto method works:
First, you need to set the width of the element that you want to center. This can be done using the width property in CSS. Next, you need to set the left and right margins to auto. This will cause the browser to automatically calculate equal margins for the element, effectively centering it on the page.
And that’s all there is to it! The margin auto method is a quick and easy way to center elements using CSS. Give it a try next time you’re working on a web project.
– TEXT ALIGN PROPERTY METHOD
The text-align property is a CSS method for centering elements on a web page. This can be done horizontally, vertically, or both.
To center horizontally, you would use the text-align: center; property. This is probably the most common way to center elements on a web page.
To center vertically, you need to use a different method. One way to do this is by setting the element’s height and width properties to 100%. Then, set the top and bottom margins to auto. This will make the element centered vertically on the page.
You can also use the flexbox model to center elements vertically. The flexbox model is powerful and has many other applications beyond centering elements. If you’re not familiar with flexbox, there are plenty of tutorials online that can help you get started.
– TRANSFORM PROPERTY METHOD
When it comes to centering elements using CSS, the transform property method is one of the most effective. This is because it allows you to center an element horizontally and vertically at the same time.
To use this method, you first need to add the following CSS code to your element:
transform: translate(-50%, -50%);
This will cause your element to be positioned 50% from the top and 50% from the bottom of its containing element. As a result, it will be horizontally and vertically centered.
CONCLUSION
CSS centering elements is a simple but effective way to improve the visual appeal of your website. By implementing these techniques, you can create attractive and well-balanced designs that are both eye-catching and easy to read. With the help of CSS, you can add custom styles to your webpages in no time at all.
So don’t wait any longer – get started with centering elements using CSS and elevate your website’s visual appeal today!
#Elevate Your Website 's Visual Appeal with these Effective Techniques for Centering Elements Using CSS#software development#digital marketing#web development#web design#web design agency in toronto canada#app development#digital marketing agency canada#graphic design#multimedia / flash animation services#web devlopment#web design company in mississauga
0 notes
Text
Honestly I recommend everyone learn just a littttle bit of CSS because it really is powerful and just makes bits and pieces of your internet experience more convenient.
Right now I'm cataloguing recipes I've really enjoyed, just trying to get them all in one place. Many of these are instagram recipes and, because I don't trust link rot (aka the possibility that the instagram link goes dead one day), I'm including a screenshot of the recipe along with the link.
But instagram on desktop... looks like this
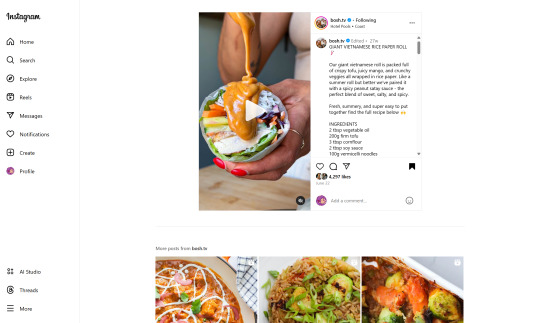
(Link, for credit. It's a good recipe)
I obviously could just copy-paste the recipe out of there. But a screenshot would be cleaner for how I'm cataloguing these.
And as-is, I'd have to scroll the whole height of that small right-side window about 4 times to fit it all.
But actually... I can just resize that div holding that whole right-side content
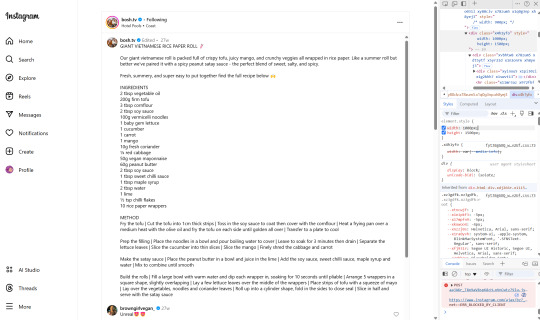
Basically I
hit f12 to open the dev tools
clicked the element finder
clicked on an element inside the recipe side
followed it up the tree until I found the element holding the whole recipe side (do this by hovering the div in the dev tools panel way on the right, then hovering upward and up until I find the element which is the highest up that still only contains the recipe-side content)
in the element.style part, set "width: 1000px" and "height: 1500px"
(I notice the width seems to still be less than 1000px, even though it got bigger)
likely suggests there's an element above it with a max-width set
go up the tree higher until I find the element with the max-width and uncheck that style
screenshot ready
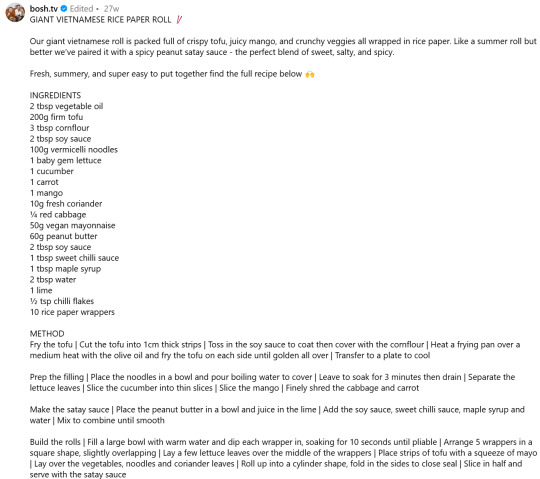
Maybe that sounded complicated but it took me probably 20-30 seconds
And this isn't just about screenshotting recipes like.
website with an annoying gif? select gif, delete gif
do you want a clean screenshot of a digital receipt for record-keeping without a large company banner or irrelevant information? delete unnecessary elements, adjust widths, screenshot
SOMETIMES, you can bypass paywalls if they're relying on something like overflow: hidden, or an overlay in the way, or some JS that runs (you can disable JS in the dev tools)
lost the jpg/png file you used for your profile picture and size doesn't totally matter? grab it from the img src while logged in. (you might even be able to find it in a bigger size by changing the url query parameters)
color contrast on an article really bad? find and change background color. find and change font color
want to make a funny fake screenshot without learning photoshop? just edit the page content in the dev tools
This isn't about like being good enough to write scripts or browser extensions. Really if you just have some basic HTML/CSS understanding a hat worth of tricks, you can make so many little adjustments in your favor.
683 notes
·
View notes
Note
you were on cohost? i guess too late now, how was it for you?
cohost had its fair share of problems and i could often find the community there a bit too tumblr-core fingerwaggy if you know what i mean. but the site's dead now so it's kind of a moot point. what i find myself reflecting on most these days are the positives.
first, no numbers. i think their no numbers policy was probably a bit over-aggressive, but it quelled some of the rat race popularity contest aspect of social media that often makes it so tedious. i liked their tag tracking system, their robust content warning options, and the absence of infinite scroll. what i miss most about cohost is that their text editor supported CSS, which led to people programming elaborate text effects and puzzles and games in-site that harkened back to the days of flash animations. there was something in this combination of elements that drew out a rebellious creativity in users.
cohost came at a time when social media was across the board feeling terrible (and it's only gotten worse hahaha), particularly as someone who makes shit that relies on you clicking links that take you away from the website or app. algorithms hate this and punish it. users also just seem kind of lazy and disinterested in using the internet so much as letting the internet happen to them passively. but when a post of mine went viral on cohost, people engaged with it. it wasn't just likes and shares, it was comments and additions. it felt like a place that (at its best) encouraged actual conversation and the development of new ideas among like-minded peers. when my posts did well and i included a donation link, people gave me money. it felt genuinely like a website that COULD support professional blog work in a way that was more customizable even than substack yet still RSS friendly, and the Following tab which let you easily see posts of specific users was a REVELATION, like a mini RSS reader within the website itself.
but the enterprise was unsustainable for various reasons (not all of them outside the dev crew's control) and the haters got what they wanted. now our big social media alternative is bluesky, a website that dares to ask the question "what if there was another twitter?" the answer is that it fucking sucks. i hate microblogs so much dude, why on EARTH are we still acting like these disambiguited 300-character-limit posts are the most preferable means of social communication online??? why would you set out to make a better twitter and then deliberately choose to replicate literally every aspect of the user experience that encouraged low-information high-drama conflict fabrication? WHY WOULD YOU MAKE A VERSION OF TWITTER WHERE YOU CAN EASILY LOOK UP THE ACCOUNT OF EVERYONE WHO HAS YOU BLOCKED AND IT'S SUPPOSED TO BE A FEATURE NOT A BUG???????? i just don't get it. i don't even get the optimism of the early adopters. i've seen people decry the post-election decay of the platform like "of course the cishets come in to ruin a community that was defined by trans & queer people" i'm sorry HELLO???????? from literally day zero bluesky was aiming to be a hands-off centrist IPO-friendly tech startup, there was never anything structurally embedded within the platform itself to keep this kind of decay from happening, you just happened to be on there when there were dramatically fewer users most of whom were curious tech enthusiasts. seriously, how have we not learned this lesson yet? you can't define a digital culture by the vibes of random user behavior! unless you have LAWS and GUIDELINES whereby you fucking BAN people for being shitheads, unless you enforce an actual code of conduct and punish bigoted speech and design a system that encourages constructive conversation, you are always always ALWAYS going to wind up at unhinged facebook boomer slop!
the death of cohost and the utterly predictable decay of bluesky are a big part of the reason why i've been posting so much more on tumblr. this is like the last bastion of anything even remotely resembling the old web, with its support of longposts and tagging and how easy it is to find random hobbyists doing cool shit you never knew existed before. like, yeah, you have to search that shit out and tailor your feed to not drive you crazy, but that's what i like about it!!! i am an adult with agency who understands that life is complicated and as such i expect to have to put some work into making my experience with a website positive! but in the hellworld of the iphone everything is walled garden apps for aggregating content where the content and its creators are structurally established as infinitely replaceable and uniquely worthless punching bags to be used and cast aside. everyone's given up on moderation and real jobs don't exist anymore especially if you happen to work in the "creative economy" IE are a writer or critic or artist or hobbyist of literally any kind. we've given up on expecting anything from the rich moneyboys who own and profit immensely off of the platforms whose value we literally create!!! especially now with the rise of "AI" grifters, whose work has ratcheted good old fashioned casual sexism and racism and homophobia up to levels not seen in such mainstream spaces since the early 2000s.
i like tumblr because i don't have to use a third party app to get & answer asks at length, and because it is a visual artist friendly platform where i won't be looked at funny for reblogging furry postmodernism or transgender homestuck OCs. it is a site that utterly lacks respectability and that's what makes it even remotely usuable. unfortunately it also sucks! partly it sucks because this place was ground zero for the rise of puritanical feminist-passing conservatism in leftist spaces, so it's like a hyperbolic time chamber for brain-melting life or death discourse about the most inconsequential bullshit you could ever imagine. but it also sucks because it's owned by a profit-motivated moneyboy who has consistently encouraged a culture of virulent transphobia and frequently bans trans women who call this out. so like, yeah, this place is cool compared to everywhere else, but it is exactly like everywhere else in that is also on a ticking clock to its own inevitable demise. the owners of this website will destroy everything that makes it interesting and will EAGERLY delete the nearly twenty years (!!!!!!) of posts it's accumulated the instant it will profit them to do so. this will be immensely unpopular and everyone will agree it's a tragedy and it won't matter. the culture and content of a social media platform is epiphenomenal to its rote economic valuation. i mean, obviously it isn't, zero of these massive tech companies would be what they are if so many people weren't so eager to give their time and labor away for free (and yes, writing a dumb dick joke on tumblr IS a form of labor in the same way that doing a captcha is labor, just because it's a miniscule contribution in an economy of scale doesn't mean you didn't contribute!), but once a tech company reaches a certain threshold its valuation ceases to be tethered to anything that actually exists in reality.
all of which is why i remember cohost with a heavy heart. yeah, it was imperfect. it was also independently owned, made with the explicit goal of creating a form of social media that actually tries not to give you a lifelong anxiety disorder so it can sell you homeopathic anti-anxiety sawdust suppositories. for the brief window of time when it was extant, i was genuinely hopeful for the future of being a creative on the internet. part of why i spend so much time on godfeels, a fucking homestuck fanfiction with no hope of turning a profit or establishing mainstream legitimacy, is that my readers actually ENGAGE with the material. what brought me back to using this website consistently was precisely the glut of godfeels-related questions i got, and the exciting conversations that resulted from my answers. meanwhile i put so many hours into my videos and even when they do well numerically, i barely see any actual engagement with the material. and that is a deliberate design choice on the part of youtube! that is the platform functioning as intended!! it sucks!!!
what the memory of cohost has instilled in me is a neverending distaste for the lazy unambitious also-rans that define the modern internet. i remember the possibility space of the early web and long for the expressiveness that even the most minor of utilities offered. we sacrificed that freedom for a convenience which was always the pretense for eventually charging us rent. i am thinking a lot these days about what a publicly funded government administrated social media utility would look like. what federal open source standards could look in an environment where the kinds of activities a digital ecosystem can encourage are strictly regulated against exploitation, bigotry, scams, and literal gambling. what if there was a unionized federal workforce devoted to the administration of internet moderation, which every website above a certain user threshold must legally take advantage of? i like to imagine a world where youtube isn't just nationalized but balkanized, where you have nested networks of youtubes administrated for different purposes by different agencies and organizations that operate on different paradigms of privacy and algorithmic interaction. imagine that your state, county, and/or city has its own branch of youtube meant to specifically highlight local work, while also remaining connected to a broader national network (oops i just reinvented federation lmao). imagine a world where server capacity is a publicly owned utility apportioned according to need and developed in collaboration with the communities of their construction rather than as a deliberate exploitation of them. our horizons for these kinds of things are just so, so small, our ability to imagine completely captured by capitalist realism, our willingness to demand services from our government simply obliterated by decades of cynical pro-austerity propaganda. i imagine proposing some of this stuff and people reacting like "well that's unrealistic" "that'll never happen" "they'd just use it for evil" and i am just SO! FUCKING! TIRED!!!!
like wow you're soooooo cool for being effectively two steps left of reagan, i bet you think prison abolition and free public housing are an impossible pipedream too huh? and exactly what has that attitude gotten you? what've you gained by being such a down to earth realist whose demands are limited by the scope of what seems immediately possible? has anything gotten better? have any of the things you thought were good stayed good? is your career more stable, your political position more safe, your desire to live and thrive greatly expanded? or do you spend every day in a cascading panopticon of stress and collapse, overwhelmed to the point of paralysis by the sheer magnitude of what it's cost us to abandon the future? you HAVE to dream. you HAVE to make unrealistic demands. the fucking conservatives have been making unrealistic demands forever and look, they're getting everything they want even though EVERYONE hates them for it! please i'm begging you to see and understand that what's feasible, what's reasonable, what's realistic, are literally irrelevant. these things only feel impossible because we choose to believe The Adults (and if you're younger than like 45, trust me, to the ruling class you are a child) whose bank accounts reflect just how profitable it is to convince us that they're impossible. all those billions of dollars these fuckers have didn't come from nowhere, it was stolen from all of us. there is no reason that money can't and shouldn't be seized and recirculated back into the economy, no reason it can't be used to fund a society that is actually social, where technological development is driven not by what's most likely to drive up profits next quarter but by what people need from technology in their daily lives.
uh so yeah basically that's my opinion of cohost lmao
#sarahposts#cohost#social media#politics#long post#political diatribe#i miss cohost#this is what happens when my ritalin kicks in mid-stream#i promise i didn't MEAN to make this a whole Thing#but i've been thinking a lot about this stuff and cohost is a big part of why
111 notes
·
View notes
Text
Introduction To HTML
[Note: You need a text editor to do this. You can use Notepad or Text Edit. But it's so much better to download VS Code / Visual Studio Code. Save it with an extension of .html]
HTML stands for Hyper Text Markup Language
It is used to create webpages/websites.
It has a bunch of tags within angular brackets <....>
There are opening and closing tags for every element.
Opening tags look like this <......>
Closing tags look like this
The HTML code is within HTML tags. ( // code)
Here's the basic HTML code:
<!DOCTYPE html> <html> <head> <title> My First Webpage </title> </head> <body> <h1> Hello World </h1> <p> Sometimes even I have no idea <br> what in the world I am doing </p> </body> </html>
Line By Line Explanation :
<!DOCTYPE html> : Tells the browser it's an HTML document.
<html> </html> : All code resides inside these brackets.
<head> </head> : The tags within these don't appear on the webpage. It provides the information about the webpage.
<title> </title> : The title of webpage (It's not seen on the webpage. It will be seen on the address bar)
<body> </body> : Everything that appears on the webpage lies within these tags.
<h1> </h1> : It's basically a heading tag. It's the biggest heading.
Heading Tags are from <h1> to <h6>. H1 are the biggest. H6 are the smallest.
<p> </p> : This is the paragraph tag and everything that you want to write goes between this.
<br> : This is used for line breaks. There is no closing tag for this.
-------
Now, we'll cover some <Meta> tags.
Meta tags = Notes to the browser and search engines.
They don’t appear on the page.
They reside within the head tag
<head> <meta charset="UTF-8"> <meta name="viewport" content="width=device-width, initial-scale=1.0"> <meta name="description" content="Website Description"> <meta name="Author" content="Your Name"> <meta name="keywords" content="Websites Keywords"> </head>
Line By Line Explanation:
<meta charset="UTF-8"> : Makes sure all letters, symbols, and emojis show correctly.
<meta name="viewport" content="width=device-width, initial-scale=1.0"> : Makes your site look good on phones and tablets.
<meta name="description" content="Website Description"> : Describes your page to Google and helps people find it.
<meta name="author" content="Your Name"> : Says who created the page.
<meta name="keywords" content="Website's Keywords"> : Adds a few words to help search engines understand your topic.
_____
This is my first post in this topic. I'll be focusing on the practical side more than the actual theory, really. You will just have some short bullet points for most of these posts. The first 10 posts would be fully HTML. I'll continue with CSS later. And by 20th post, we'll build the first website. So, I hope it will be helpful :)
If I keep a coding post spree for like 2 weeks, would anyone be interested? o-o
#code#codeblr#css#html#javascript#python#studyblr#progblr#programming#comp sci#web design#web developers#web development#website design#webdev#website#tech#html css#learn to code#school#study motivation#study aesthetic#study blog#student#high school#studying#study tips#studyspo#website development#coding
100 notes
·
View notes
Note
Hello! Your IF story inspired me to start my own IF game
Im thinking of using twine
And I would like to ask you if you had any tips or advice
Thank you!
Also side note I’m really excited and very interested in how this story is going to play out I already love the cast and can’t wait to see the rest!
OOoo thank you so much! I'm very flattered the game inspired you!
Twine has many different story formats, each with their own pros and cons. I personally use Sugarcube (I think next to Harlow, it is the most popular) so all my tips will be for Twine Sugarcube:
Basic tips:
Bookmark the Sugarcube V2 Document. This is your bible. It will have everything you need to use Twine. It's a daunting read, but I use it to troubleshoot when I forget how Macros work. I always have tab open for it.
Download a Twine Template. If you are brand new to Twine and making IFs, I heavily suggest downloading a template or two. Most of them come with tutorials and examples on how they work. Sometimes they even provide more helpful resources on Twine. I use Vahnya's Template II that I modified myself afterwards.
Study from pre-exisiting Twine IFs. Might be controversial, but I personally believe that diving in and seeing how other authors code and structure their stories helps a lot. Eventually you'll figure out a system and structure that works for you. It might not work for all games, but most Twine games can be downloaded and opened up in the twine editior. If you're worried about spoilers or upsetting people, feel free to download my game and see whats inside. I make multiple copies of the game, so any build I have out in the public is not the original build and therefore have no spoilers. I know it will look insane when you open it, but there's a method to the madness.
Writing and Planning:
Making an IF is no joke! Plan your story out, know your big variables, your branching routes and at least some part of your ending!! Try to stay as organized as possible. These projects and can will spiral out of control if you're not careful. I suggest having a giant excel sheet with tabs for important variables, chapter/scene breakdowns, wordcount and characters ect. Updating it will be a pain (that I am guilty of not doing) but will make developing easier. Even if you don't make a big project, its still good practise to do it.
#Stylesheet:
All the code in here relates to how the game looks. You can fiddle in there to configure the game to look how you want it to look. If you even want to see what element is tied to what ID code, the best thing to do is playtest the game (build >> play) and then leftclick and select "inspect element" you browser will open up the developer window and you see what elements are tied to what and even play around with the contents to test out CSS elements you like.
This website is a great resource on using CSS and other coding language. I personally used it many time to modify my game.
Helpful resources and Macros:
Chapel has made a LOT of custom macros that you can add to your game. You can find the list here.
But the most important one is the Pronoun Template. It might be confusing at first but one you understand how it work, its a great tool to have. You can even add gendered titles so that they work with the pronoun template.
Idrellegame is a great resource on coding in Twine. You can find the list here. It helped me out when starting out.
Exporting to Itch:
I never see people talk about Butler when it comes to uploading If games onto itch.io, so i'm doing it now.
What is Butler? Its a command-line tool that Itch made to upload your game onto Itch.io quickly and reliably.
The documentation is here. And I suggest coping and pasting the export codes onto a doc so you can use them for every update afterwards.
Here is a youtube tutorial you can follow along as well: https://www.youtube.com/watch?v=_JCJa5iWREM
I personally have the Butler on the Itchio.app so that's its always up to date.
Thats all I can offer off the top of my head, if you or anyone wants some help on something specifically, feel free to DM me or drop another ask in the inbox. Always happy to help. Working in twine is very overwhelming for newcomers.
60 notes
·
View notes
Text
YOU MUST MAKE A WEBSITE
Oh wow, look at that! YET ANOTHER post urging you to make a webbed site! What a completely new thing that people haven't made a thousand masterposts for already!!
• Making a website might look scary. It is Not.
At first, I too thought making a website was too much work. It really isn't! It turns out that all you need is
an HTML file,
a web hosting service and
w3schools tutorials,
and that's about it!
This post will point you towards these resources, and others I found useful while figuring out how to make a website.
• VERY QUICK EXPLANATIONS:
What's HTML and CSS?
HTML is the content of your webpage, the skeleton of it. What shows up in a webpage is what's written in the HTML file!
CSS is the way the HTML is styled; the colour of the background and the letters, the size of elements, the font, all that!
Do I absolutely NEED JavaScript for a website?
Not at all! You don't need to worry about learning it before getting started.
• What do I make a website for? What do I put in there?
ANYTHING AND ALMOST EVERYTHING. Here's some ideas for pages from a post of mine were I was very normal about websites:
You can make a page that's only pictures of your pets.
You can make an interactive adventure.
You can make your own academic blog full of your own essays or articles.
You can just post a ton of art or make a full music page.
You can make a blog and infodump eternally, give book reccs and reviews. You can host a thousand virtual pets and nothing else.
Upload entire books in a single html file. Make a wikipedia for your ocs. Make a fake site for a random fictional place (restaurant, hotel, whatever). You can make a thousand fanpages/shrines about your favorite media. You can upload your own webcomic and make it all like a fancy website and shit.
I could keep going but, for the sake of "brevity", I won't.
• WEBSITE EXAMPLES!
If I started listing the websites I know, this post would be bottomless. Here's only seven:
https://publictransit.neocities.org/ - A webbed site, for sure
https://ribo.zone/ - A personal site
https://leusyth.neocities.org/ - An art archive
https://solaria.neocities.org/ - Personal website with A Lot of stuff (it'll come up in a bit, because it offers web making resources)
https://hog.neocities.org/ - The Hogsite
https://thegardenofmadeline.neocities.org/ - Another personal site! It also has a web resources page and has made another masterpost like this one (but better)
https://spiders.neocities.org/ - My own website, which must be weird to see in mobile . sorry
• You've convinced me. I want a webbed site. Where do I start?
https://neocities.org/
FIRST OF ALL: Neocities. It is a free web hosting service, and it's the one I and the sites I linked use!
When I first started, my website was a black page with red letters and a drawing, and nothing else! It was like that for a month, till i started picking up on how to do things.
Here's what helped me get an idea of how to make things work:
https://sadgrl.online/learn/articles/beginners-guide-neocities
An absolute beginners guide to neocities -- while when you make an account there you get a tutorial page from the site, this one's extra support for that.
https://www.w3schools.com/
Learn HTML, CSS, JavaScript and MANY other coding things for free. All the tutorial/reference pages have live testing windows for you to mess with!! helped me a LOT while figuring this stuff out!
https://htmlcheatsheet.com/
https://htmlcheatsheet.com/css/
Cheatsheets for HTML and CSS, respectively. It includes a JavaScript one too!
https://sadgrl.online/webmastery/
Sadgrl's webmastery resources! Also includes the next resource listed here:
https://sadgrl.online/projects/layout-builder/
Sadgrl's layout builder; not a lot of customization at a first glance, but I've seen wildly different websites all using it as a base, plus it works using CSS Flexbox, so it generates a responsive layout!
(basically, a responsive layout is one that translates well in different sized screens)
https://www.tumblr.com/fysa/728086939730919424/wikitable-code?source=share
Tumblr user fysa made this layout imitating a wiki page!
https://brackets.io/
At some point, you might want to do things outside the Neocities code editor and get one outside the site. I recommend Brackets, because my old as fuck computer can run that and absolutely nothing else apparently, and it works wonderfully! Though I recommend either turning off the code autocomplete or using it after a good while of already using the Neocities code editor, so you get used to coding on your own.
http://www.unit-conversion.info/texttools/text-to-html/
Turn your text into HTML code! i use this kind of pages for my lengthy blog entries that I don't feel like formatting myself.
https://imagecompressor.com/
COMPRESS YOUR IMAGES.
The heavier an image is, the more your site weighs and the more time your page will spend loading. You don't want that, specially if your site is heavy on graphics. This might help!
https://solaria.neocities.org/guides
Some CSS, JavaScript and Accessibility guides! Worth checking out!
https://eloquentjavascript.net/
This is a free, interactive book for learning JavaScript! NOTE: It is very intuitive, but JavaScript is HARD!! I still haven't learned much of it, and my website does fine without so don't worry if you end up not doing much with it. It's still useful + the exercises are fun.
And now, accessories!
• Silly stuff for your page :]
https://gifypet.neocities.org/
Make a virtual pet, copy the code and paste it in your HTML file! You'll get a little guy in your webbed site :]
https://www.wikplayer.com/
Music player for your website!
http://www.mf2fm.com/rv/
JavaScript silly effects for your site :]
https://blinkies.neocities.org/geoblinkies
Blinkie search engine!
https://www.cbox.ws/
Add a chatbox to your site!!
https://momg.neocities.org/
Infinite gallery of gifs. i've spent hours in there looking at moving pictures and out of them all, the ONLY gif i actually ended up using on my site was a rotating tomato slice. it is still there. trapped.
https://wrender.neocities.org/tarotinstructions
A widget that gives you a random tarot card!
https://www.websudoku.com/widget.php
Sudoku widget!
That's about it for now! I don't know how to end this!!! Remember to have fun and google everything you don't know :]
625 notes
·
View notes
Text
Edgaring time!
Tutorial on how to make your own responsive Edgar :D I will try to explain it in really basic terms, like you’ve never touched a puter (which if you’re making this… I’m sure you’ve touched plenty of computers amirite??? EL APLAUSO SEÑOOOREEES).
If you have some experience I tried to highlight the most important things so you won’t have to read everything, this is literally building a website but easier.
I will only show how to make him move like this:
Disclaimer: I’m a yapper.
Choosing an engine First of all you’ll need something that will allow you to display a responsive background, I used LivelyWallpaper since it’s free and open-source (we love open-source).
Choosing an IDE Next is having any IDE to make some silly code! (Unless you can rawdog code… Which would be honestly impressive and you need to slide in my DMs and we will make out) I use Visual Studio!!!
So now that we have those two things we just need to set up the structure we will use.
Project structure
We will now create our project, which I will call “Edgar”, we will include some things inside as follows:
Edgar
img (folder that will contain images) - thumbnail.png (I literally just have a png of his face :]) - [some svgs…]
face.js (script that will make him interactive)
index.html (script that structures his face!)
LivelyInfo,json (script that LivelyWallpaper uses to display your new wallpaper)
style.css (script we will use to paint him!)
All of those scripts are just literally like a “.txt” file but instead of “.txt” we use “.js”, “.html”, etc… You know? We just write stuff and tell the puter it’s in “.{language}”, nothing fancy.
index.html
Basically the way you build his silly little face! Here’s the code:
<!doctype html> <html> <head> <meta charset="utf-8"> <title>Face!</title> <link rel = "stylesheet" type = "text/css" href = "style.css"> </head> <body> <div class="area"> <div class="face"> <div class="eyes"> <div class="eyeR"></div> <div class="eyeL"></div> </div> <div class="mouth"></div> </div> </div> <script src="face.js"></script> </body> </html>
Ok so now some of you will be thinking “Why would you use eyeR and eyeL? Just use eye!“ and you’d be right but I’m a dummy who couldn’t handle making two different instances of the same object and altering it… It’s scary but if you can do it, please please please teach me ;0;!!!
Area comes in handy to the caress function we will implement in the next module (script)! It encapsulates face.
Face just contains the elements inside, trust me it made sense but i can’t remember why…
Eyes contains each different eye, probably here because I wanted to reuse code and it did not work out and when I kept going I was too scared to restructure it.
EyeR/EyeL are the eyes! We will paint them in the “.css”.
Mouth, like the eyeR/eyeL, will be used in the “.css”.
face.js
Here I will only show how to make it so he feels you mouse on top of him! Too ashamed of how I coded the kisses… Believe me, it’s not pretty at all and so sooo repetitive…
// ######################### // ## CONSTANTS ## // ######################### const area = document.querySelector('.area'); const face = document.querySelector('.face'); const mouth = document.querySelector('.mouth'); const eyeL = document.querySelector('.eyeL'); const eyeR = document.querySelector('.eyeR'); // ######################### // ## CARESS HIM ## // ######################### // When the mouse enters the area the face will follow the mouse area.addEventListener('mousemove', (event) => { const rect = area.getBoundingClientRect(); const x = event.clientX - rect.left; const y = event.clientY - rect.top; face.style.left = `${x}px`; face.style.top = `${y}px`; }); // When the mouse leaves the area the face will return to the original position area.addEventListener('mouseout', () => { face.style.left = '50%'; face.style.top = '50%'; });
God bless my past self for explaining it so well, but tbf it’s really simple,,
style.css
body { padding: 0; margin: 0; background: #c9c368; overflow: hidden; } .area { width: 55vh; height: 55vh; position: absolute; top: 50%; left: 50%; transform: translate(-50%,-50%); background: transparent; display: flex; } .face { width: 55vh; height: 55vh; position: absolute; top: 50%; left: 50%; transform: translate(-50%,-50%); background: transparent; display: flex; justify-content: center; align-items: center; transition: 0.5s ease-out; } .mouth { width: 75vh; height: 70vh; position: absolute; bottom: 5vh; background: transparent; border-radius: 100%; border: 1vh solid #000; border-color: transparent transparent black transparent; pointer-events: none; animation: mouth-sad 3s 420s forwards step-end; } .face:hover .mouth { animation: mouth-happy 0.5s forwards; } .eyes { position: relative; bottom: 27%; display: flex; } .eyes .eyeR { position: relative; width: 13vh; height: 13vh; display: block; background: black; margin-right: 11vh; border-radius: 50%; transition: 1s ease } .face:hover .eyeR { transform: translateY(10vh); border-radius: 20px 100% 20px 100%; } .eyes .eyeL { position: relative; width: 13vh; height: 13vh; display: block; background: black; margin-left: 11vh; border-radius: 50%; transition: 1s ease; } .face:hover .eyeL { transform: translateY(10vh); border-radius: 100% 20px 100% 20px; } @keyframes mouth-happy { 0% { background-color: transparent; height: 70vh; width: 75vh; } 100% { border-radius: 0 0 25% 25%; transform: translateY(-10vh); } } @keyframes mouth-sad { 12.5%{ height: 35vh; width: 67vh; } 25% { height: 10vh; width: 60vh; } 37.5% { width: 53vh; border-radius: 0%; border-bottom-color: black; } 50% { width: 60vh; height: 10vh; transform: translateY(11vh); border-radius: 100%; border-color: black transparent transparent transparent; } 62.5% { width: 64vh; height: 20vh; transform: translateY(21vh); } 75% { width: 69vh; height: 40vh; transform: translateY(41vh); } 87.5% { width: 75vh; height: 70vh; transform: translateY(71vh); } 100% { width: 77vh; height: 90vh; border-color: black transparent transparent transparent; transform: translateY(91vh); } }
I didn’t show it but this also makes it so if you don’t pay attention to him he will get sad (mouth-sad, tried to make it as accurate to the movie as possible, that’s why it’s choppy!)
The .hover is what makes him go like a creature when you hover over him, if you want to change it just… Change it! If you’d rather him always have the same expression, delete it!
Anyway, lots of easy stuff, lots of code that I didn’t reuse and I probably should’ve (the eyes!!! Can someone please tell me a way I can just… Mirror the other or something…? There must be a way!!!) So now this is when we do a thinking exercise in which you think about me as like someone who is kind of dumb and take some pity on me.
LivelyInfo.json
{ "AppVersion": "1.0.0.0", "Title": "Edgar", "Thumbnail": "img/thumbnail.png", "Preview": "thumbnail.png", "Desc": "It's me!.", "Author": "Champagne?", "License": "", "Type": 1, "FileName": "index.html" }
Easy stuff!!!
Conclusion
This could've been a project on git but i'm not ready and we're already finished. I'm curious about how this will be seen on mobile and PC,,, i'm not one to post here.
Sorry if I rambled too much or if i didn't explain something good enough! If you have any doubts please don't hesitate to ask.
And if you add any functionality to my code or see improvements please please please tell me, or make your own post!
98 notes
·
View notes
Text
Friendly reminder that Wix.com is an Israeli-based company (& some website builders to look into instead)
I know the BDS movement is not targeting Wix.com specifically (see here for the companies they're currently boycotting) but since Wix originated in Israel as early as 2006, it would be best to drop them as soon as you can.
And while you're at it, you should leave DeviantArt too, since that company is owned by Wix. I deleted my DA account about a year ago not just because of their generative AI debacle but also because of their affiliation with their parent company. And just last month, DA has since shown their SUPPORT for Israel in the middle of Israel actively genociding the Palestinian people 😬
Anyway, I used to use Wix and I stopped using it around the same time that I left DA, but I never closed my Wix account until now. What WAS nice about Wix was how easy it was to build a site with nothing but a drag-and-drop system without any need to code.
So if you're using Wix for your portfolio, your school projects, or for anything else, then where can you go?
Here are some recommendations that you can look into for website builders that you can start for FREE and are NOT tied to a big, corporate entity (below the cut) 👇👇
Carrd.co

This is what I used to build my link hub and my portfolio, so I have the most experience with this platform.
It's highly customizable with a drag-and-drop arrangement system, but it's not as open-ended as Wix. Still though, it's easy to grasp & set up without requiring any coding knowledge. The most "coding" you may ever have to deal with is markdown formatting (carrd provides an on-screen cheatsheet whenever you're editing text!) and section breaks (which is used to define headers, footers, individual pages, sections of a page, etc.) which are EXTREMELY useful.
There's limits to using this site builder for free (max of 2 websites & a max of 100 elements per site), but even then you can get a lot of mileage out of carrd.
mmm.page

This is a VERY funny & charming website builder. The drag-and-drop system is just as open-ended as Wix, but it encourages you to get messy. Hell, you can make it just as messy as the early internet days, except the way you can arrange elements & images allows for more room for creativity.
Straw.page
This is an extremely simple website builder that you can start from scratch, except it's made to be accessible from your phone. As such, the controls are limited and intentionally simple, but I can see this being a decent website builder to start with if all you have is your phone. The other options above are also accessible from your phone, but this one is by far one of the the simplest website builders available.
Hotglue.me

This is also a very simple & rudimentary website builder that allows you to make a webpage from scratch, except it's not as easy to use on a mobile phone.
At a glance, its features are not as robust or easy to pick up like the previous options, but you can still create objects with a simple double click and drag them around, add text, and insert images or embeds.
Mind you, this launched in the 2010s and has likely stayed that way ever since, which means that it may not have support for mobile phone displays, so whether or not you wanna try your hand at building something on there is completely up to you!
Sadgrl's Layout Editor

sadgrl.online is where I gathered most of these no-code site builders! I highly recommend looking through the webmaster links for more website-building info.
This simple site builder is for use on Neocities, which is a website hosting service that you can start using for free. This is the closest thing to building a site that resembles the early internet days, but the sites you can make are also responsive to mobile devices! This can be a good place to start if this kind of thing is your jam and you have little to no coding experience.
Although I will say, even if it sounds daunting at first, learning how to code in HTML and CSS is one of the most liberating experiences that anyone can have, even if you don't come from a website scripting background. It's like cooking a meal for yourself. So if you want to take that route, then I encourage to you at least try it!
Most of these website builders I reviewed were largely done at a glance, so I'm certainly missing out on how deep they can go.
Oh, and of course as always, Free Palestine 🇵🇸
#webdev#web dev#webdesign#website design#website development#website builder#web design#websites#sites#free palestine#long post#I changed the wording multiple times on the introduction but NOW I think im done editing it
503 notes
·
View notes
Text
It is very funny learning the absolute basics of various coding languages having approximate knowledge of many things, because I would be the first to tell you I cannot code web pages and my HTML is extremely scattershot, but I had to read a basic tutorial for both HTML and CSS this week and was immediately like, "Ohhhhh. Everything makes sense now." I had a ton of random elements but NO syntax so the moment the basic syntax was explained, I was suddenly like, ah. I can redesign my website now. GREAT.
#very thrilled about it cuz wordpress GUI is a fucking nightmare to use these days#it will be simpler but it won't fucking break the minute I want to change something. and frankly the layout will look better#cuz jesus christ#megs vs mlis
32 notes
·
View notes
Text
Anyways I forgot a formula for an excel spreadsheet so naturally I navigated to my OC spreadsheet because I know I had that exact formula there. It’s like how my Wattpad cover making days made me learn how to use Canva and I make annotations on maps in Procreate. (Procreate is seriously not the best but I learned my way around it.) I learned HTML and CSS for writing fic and making a Neocities website for my favourite song. I learned to use inspect element for unreality mock-ups. I learned about overlay and multiply and screen and change hue from my Love Live sprite edit days. All my skills are cobbled together and precariously held like Jenga blocks. Fuck around and find out. This shit has always been so ass
#personal#do it for the bit#i used to have to search up html for ao3 every time now it’s like yeah i know this#transferrable skills or whatever#ria.txt
27 notes
·
View notes
Text
Hello fellow FFIV lovers!
In just about a month, on July 19th, we will celebrate the 34th anniversary of that wonderful game. To celebrate, I would like to offer you a little help to get the creative mind running ~
This website will generate for you a Bingo sheet, customized based on selected elements and prompts. With this, you can create a grid of bits of inspiration to use for writing, drawing, anything you can think of! There are characters, places, elements specific to the game, themed prompt, writing or painting challenges...

I offered a few way to play but to celebrate this coming anniversary there's one I particularly have in mind. Creating a 6x6 grid gives you 18 pairs of prompts... Enough to cover from July 1st to the special day ! One day, two square checked, one piece of fanwork, until the grid is filled.
Of course, you don't have to use that. No matter what you make of this website, I would love to see the kind of grid you create and the fanwork that comes out of it!
To hype ourselves for the incoming anniversary, you can tag all your grids and works with #FFIVbirthday2025 !
And watch out for @wordlesslyjenneh's blog as july comes for more FFIV love and hype ~
(Finally: I'm all open to improvement suggestions, additional prompts, ideas... unless it's on the visual end. Don't make me touch more CSS.)
29 notes
·
View notes
Text
Elevate Your Website's Visual Appeal With These Effective Techniques For Centering Elements Using CSS
In today’s fast-paced digital world, having a visually appealing website is essential to stand out from the crowd. One effective way to achieve this is by centering elements using CSS. Not only does it make your website look more professional, but it also enhances user experience.
In this blog post, we will introduce you to 11 effective techniques for centering elements using CSS that will elevate the visual appeal of your website and take it to the next level! So get ready to enhance your design skills with these simple yet powerful techniques.
WHAT IS CENTERING ELEMENTS IN CSS?
Centering elements in CSS is a technique for positioning HTML elements on a web page. There are several ways to center elements in CSS, and the most common method is to use the “margin: 0 auto” property.
Other methods of centering elements in CSS include using the “text-align: center” property, or setting the element’s position to “absolute” and using the “left: 50%” and “transform: translateX(-50%)” properties.
The method you choose will depend on the type of element you’re trying to center, and whether or not you want that element to be responsive.
WHY IS IT IMPORTANT TO CENTERING ELEMENTS IN CSS?
It’s important to center elements in CSS because it helps create a more balanced and symmetrical look for your web page. When elements are properly centered, they can add visual appeal and help direct a user’s eye toward the most important information on the page.
There are a number of different techniques that can be used to center elements in CSS. The most common method is to use the text-align property with a value of “center.” This will align all the text within an element to the center of that element.
Another popular technique is to use the margin property with auto values for both the left and right margins. This will cause the browser to automatically calculate equal margins on both sides of an element, effectively centering it within its containing element.
One can also use absolute positioning to center an element within its containing element. This involves setting the position property to “absolute” and then using either top or bottom and left or right properties to adjust the position of the element until it is perfectly centered.
HOW TO CENTER DIV OR TEXT IN DIV USING CSS?
If you’re working on a web design project and want to center either a div or text within a div, there are a couple of ways you can do it using CSS.
If you want to center a block level element like a div, you can use the CSS property “margin: 0 auto”. This will set the margins on the left and right sides of the element to be equal, thereby centering it.
If you want to center text or inline elements within a div, you can use the “text-align: center” property. This will align all the text within the div to be centered.
8 EFFECTIVE TECHNIQUES FOR CENTERING ELEMENTS USING CSS
In order to center elements using CSS, there are a few different techniques that can be employed. One popular technique is to use the “text-align” property with a value of “center.” This can be applied to any block level element, such as a paragraph, and will cause the contents of that element to be centered within the overall width of the containing element.
Another common technique is to set the width of the element to be centered to a specific value, then use the “margin” property with a value of “auto.” This will cause the element to be horizontally centered within its containing element, regardless of the width of that container.
It’s also possible to center elements vertically within their containing elements using CSS. This can be accomplished by setting the height of the container to a specific value, then using the “line-height” property with a value that is equal to or greater than the height of the container. The element will then be vertically centered within its containing element.
These are just a few of the many techniques that can be used for centering elements using CSS. By employing one or more of these techniques, you can easily improve the visual appeal of your website.
– FLEXBOX
When it comes to centering elements using CSS, there is no better option than flexbox. Flexbox provides a simple way to center elements horizontally and vertically within their container. In addition, flexbox can be used to create responsive layouts that automatically adjust to the size of the screen.
To use flexbox for centering, you must first set the display property of the container to flex. Then, you can use the justify-content property to center the elements horizontally, and the align-items property to center them vertically. For example, if you want to center an element horizontally and vertically within its container, you would use the following code:
container { display: flex; justify-content: center; align-items: center; }
– GRID LAYOUT
When it comes to CSS, there are a few different techniques that can be used to center elements on a page. The most common technique is known as the grid layout. This technique involves using a series of nested divs to create a grid of boxes that can then be used to position elements within that grid.
The first step in using the grid layout is to create a series of divs that will act as the columns of your grid. These divs should be given a class name so that they can be easily targeted with CSS. Once you have your column divs in place, you’ll need to add some content to them. This can be done by adding more divs or by using other HTML elements such as paragraphs or headings.
Once you have your columns and content in place, you can start positioning elements within the grid. To do this, you’ll need to use the CSS properties “float” and “clear”. The float property allows you to specify how an element should float within its parent container. By default, elements float to the left side of their container. However, if you want an element to be centered within its container, you’ll need to set the float property to “none”.
The clear property specifies what side of an element’s container other elements are not allowed to float on. So, if you want all subsequent elements after a centered element to also be centered, you would set the clear property to “both”.
App lying the grid layout technique is a great way to create a visually appealing design that is easy to understand and maintain. It also allows you to easily define how elements should be positioned within the grid, making it simple to adjust as needed.
– ABSOLUTE POSITIONING
When it comes to CSS, there are a few different methods that can be used to center elements on a web page. The most common method is to use the text-align property, which can be applied to both block-level and inline elements. However, this method only works if the width of the element is explicitly set.
Another method that can be used is the margin: auto; technique. This can be applied to block-level elements that have a set width, and will cause the element to be centered within its containing element.
If you want to center an element that is not a block-level element, or if you don’t want to set a width, then you can use the absolute positioning technique. With absolute positioning, you can specify exactly where you want an element to appear on the page using the left and top properties. You also need to set the position property to “absolute” for this technique to work.
– RELATIVE POSITIONING
When it comes to CSS, there are a few different ways to center elements on a web page. The most common method is to use the “text-align” property. This can be applied to either the entire page or to individual elements. For example, to center all of the text on your page, you would add the following CSS rule to your stylesheet:
body { text-align: center; }
You can also use the “text-align” property to center specific elements on your page, like images, blockquote, etc. For example, if you want to center an image that’s inside a div element, you would add the following CSS rule:
div { text-align: center; } img { /* this is for centering images */ display: block; margin: 0 auto; /* important */ /* top and bottom margins are 0 */ width: 50%; /* image width can be anything less than or equal to container width */ }
Another way to center elements is by using the “margin” property. You can set the left and right margins to “auto”, which will evenly distribute them within the containing element. This works for both block level and inline elements. For example, if you want to center a div element on your page, you would add the following CSS rule:
div { margin-left: auto; /* important */ margin-right: auto; /* important */ width: 50%; /* div width can be anything less than or equal to its parent container width */ }
Finally, you can use the “position” property with the “relative” value. This will set an element’s position relative to its containing element and then center it using margins. For example, if you want to center a div element on your page, you would add the following CSS rule:
div { position: relative; /* important */ left: 50%; /* important */ top: 50%; /* important */ margin-left: -25%; /* important */ margin-top: -25%; /* important */ width: 50%; /* div width can be anything less than or equal to its parent container width */ }
– TRANSLATE METHOD
When it comes to centering elements using CSS, there are a few different methods you can use. The ‘translate’ method is one of the more popular and effective techniques.
With the translate method, you can essentially move an element around on the page until it’s perfectly centered. To do this, you’ll need to set the element’s ‘transform’ property to ‘translate(X, Y)’. X and Y represent the amount of pixels you want to move the element horizontally and vertically, respectively.
For example, if you wanted to center an element horizontally on a page, you would set the X value to ‘50%’ and leave the Y value at ‘0px’. This would cause the element to be positioned 50% from the left side of the page (the exact center).
You can also use negative values for X and Y if you want to move an element up or left from its current position. So, if you wanted to move an element 10px to the left and 5px up from its current position, you would set the X value to ‘-10px’ and the Y value to ‘-5px’.
Once you have your desired position set, all that’s left is to add some vendor prefixes (-webkit-, -moz-, etc.) so that your CSS will work across all browsers.
– MARGIN AUTO METHOD
When it comes to CSS, there are a number of different methods that can be used to center elements on a web page. One popular method is known as the margin auto technique. This approach is relatively simple and only requires a few lines of code.
Here’s how the margin auto method works:
First, you need to set the width of the element that you want to center. This can be done using the width property in CSS. Next, you need to set the left and right margins to auto. This will cause the browser to automatically calculate equal margins for the element, effectively centering it on the page.
And that’s all there is to it! The margin auto method is a quick and easy way to center elements using CSS. Give it a try next time you’re working on a web project.
– TEXT ALIGN PROPERTY METHOD
The text-align property is a CSS method for centering elements on a web page. This can be done horizontally, vertically, or both.
To center horizontally, you would use the text-align:center; property. This is probably the most common way to center elements on a web page.
To center vertically, you need to use a different method. One way to do this is by setting the element’s height and width properties to 100%. Then, set the top and bottom margins to auto. This will make the element centered vertically on the page.
You can also use the flexbox model to center elements vertically. The flexbox model is powerful and has many other applications beyond centering elements. If you’re not familiar with flexbox, there are plenty of tutorials online that can help you get started.
– TRANSFORM PROPERTY METHOD
When it comes to centering elements using CSS, the transform property method is one of the most effective. This is because it allows you to center an element horizontally and vertically at the same time.
To use this method, you first need to add the following CSS code to your element:
transform: translate(-50%, -50%);
This will cause your element to be positioned 50% from the top and 50% from the bottom of its containing element. As a result, it will be horizontally and vertically centered.
CONCLUSION
CSS centering elements is a simple but effective way to improve the visual appeal of your website. By implementing these techniques, you can create attractive and well-balanced designs that are both eye-catching and easy to read. With the help of CSS, you can add custom styles to your webpages in no time at all.
So don’t wait any longer – get started with centering elements using CSS and elevate your website’s visual appeal today!
#Elevate Your Website's Visual Appeal With These Effective Techniques For Centering Elements Using CSS#Multimedia / Flash Animation Services#Reliable seo consultant#Best Web Design Company In Toronto
0 notes