#CSS elements for web developers
Explore tagged Tumblr posts
Visit Tumblr Blog
Explore Tumblr blogs with no restrictions, modern design and the best experience.
Last Seen Tumblr Blogs


Fun Fact
In 2020, Tumblr had 29.4 million users in the US.
Text
Advanced CSS Techniques and Best Practices - A Comprehensive Guide by WebTutor.dev

Cascading Style Sheets (CSS) plays a crucial role in web development, allowing developers to bring life and style to their web pages. If you are looking to take your CSS skills to the next level, you're in the right place! In this advanced blog post, we will delve into the world of CSS, focusing on the comprehensive guide provided by Webtutor.dev in their CSS Introduction tutorial. Get ready to enhance your CSS knowledge and discover advanced techniques and best practices.
Optimizing CSS Performance: Techniques and Tools
Efficient CSS code is essential for maintaining fast-loading web pages. We'll explore advanced techniques to optimize CSS performance, such as minimizing file size, reducing render-blocking CSS, and utilizing CSS preprocessors. The Webtutor.dev guide will provide insights into performance optimization strategies and recommend helpful tools.
CSS Layouts: Flexbox and Grid
Modern CSS layout techniques, namely Flexbox and Grid, have revolutionized web design. We'll dive deep into these powerful tools, exploring their features, properties, and best use cases. The Webtutor.dev guide will offer practical examples and tutorials to help you master the art of creating flexible and responsive layouts.
Advanced Selectors and Pseudo-classes
CSS selectors allow you to target specific elements on a web page. We'll go beyond the basics and explore advanced selectors, including attribute selectors, sibling combinators, and pseudo-classes. The blog will highlight real-world scenarios where these selectors shine, enabling you to create targeted and dynamic styles.
CSS Transitions and Animations
Adding subtle animations and transitions can greatly enhance the user experience. We'll delve into CSS transitions and animations, covering advanced techniques such as keyframes, timing functions, and complex animations. The Webtutor.dev guide will provide practical examples and tips for creating smooth and visually appealing animations.
Customizing and Styling Form Elements
Forms are an integral part of web applications, and customizing their appearance can greatly improve usability and aesthetics. We'll explore advanced techniques for styling form elements using CSS, including styling checkboxes, radio buttons, dropdowns, and input fields. The blog will showcase creative examples and provide guidance for cross-browser compatibility.
Responsive Design: Advanced Media Queries and Breakpoints
Responsive design is essential for creating websites that adapt to different screen sizes. We'll dive into advanced media queries and breakpoints, enabling you to design fluid and responsive layouts for a variety of devices. The Webtutor.dev guide will offer tips for managing complex layouts and provide examples of responsive design patterns.
Cross-browser Compatibility and CSS Prefixing
Ensuring consistent rendering across different web browsers can be a challenge. We'll discuss advanced techniques for achieving cross-browser compatibility, including CSS prefixing, vendor-specific properties, and polyfills. The blog will provide insights into browser support tables and strategies to handle browser-specific quirks.
Conclusion
As we conclude our exploration of advanced CSS techniques and best practices with the guidance of Webtutor.dev's CSS Introduction guide, you're now equipped with the knowledge to take your CSS skills to new heights. Remember to experiment, practice, and stay updated with emerging CSS trends and techniques. With the expertise gained from this comprehensive guide, you'll be able to create stunning, performant, and responsive web designs. Happy coding!
#Learn Code for Free#Learn CSS Online#Free Online CSS Tutorial#Css Online Tutorial#CSS Introduction tutorial#Advanced CSS Techniques#CSS trends and techniques#Learn CSS selectors#Learn CSS Layouts#Modern CSS layout#Learn CSS Prefixing#Styling Form Elements#CSS elements online tutorial#CSS elements tutorial for beginners#CSS elements for web developers#CSS tags and elements#Learn CSS elements#CSS elements for web development tutorial#Basic CSS elements#CSS elements for beginners#CSS elements for websites
1 note
·
View note
Link
Harnessing the Power of :not() in CSS: Styling by Exclusion
The article delves into the significance of the :not() pseudo-class selector in CSS, elucidating how it enables developers to apply styles through exclusion. It begins by introducing the concept of the :not() selector, highlighting its function as a negation pseudo-class. The provided code snippets and examples vividly illustrate how the selector can be utilized to style elements while excluding specific criteria, such as classes or attributes.
The article's comprehensive coverage spans from basic usage to more intricate scenarios, such as combining :not() with multiple classes or leveraging it for advanced design considerations. By showcasing real-world implementations and scenarios, the article equips web designers and developers with practical insights into harnessing the power of the :not() selector. This knowledge empowers them to craft more targeted and precise styles without resorting to JavaScript for class manipulation.
In a succinct manner, the article offers a comprehensive guide to the :not() pseudo-class selector, imparting the ability to leverage this tool effectively for crafting sophisticated CSS designs with exclusions.
#CSS#pseudo-class selector#styling#element targeting#exclusion#web design#front-end development#code examples
0 notes
Text
#react#css#custom#scrollbar#web#elements#site#website#how-to#how to#how#to#design#development#developer#code#codeblr#studyblr
0 notes
Text
Elevate Your Website 's Visual Appeal with these Effective Techniques for Centering Elements Using CSS
In today’s fast-paced digital world, having a visually appealing website is essential to stand out from the crowd. One effective way to achieve this is by centering elements using CSS. Not only does it make your website look more professional, but it also enhances user experience.

In this blog post, we will introduce you to 11 effective techniques for centering elements using CSS that will elevate the visual appeal of your website and take it to the next level! So get ready to enhance your design skills with these simple yet powerful techniques.
WHAT IS CENTERING ELEMENTS IN CSS?
Centering elements in CSS is a technique for positioning HTML elements on a web page. There are several ways to center elements in CSS, and the most common method is to use the “margin: 0 auto” property.
Other methods of centering elements in CSS include using the “text-align: center” property, or setting the element’s position to “absolute” and using the “left: 50%” and “transform: translate(-50%)” properties.
The method you choose will depend on the type of element you’re trying to center, and whether or not you want that element to be responsive.
WHY IS IT IMPORTANT TO CENTERING ELEMENTS IN CSS?
It’s important to center elements in CSS because it helps create a more balanced and symmetrical look for your web page. When elements are properly centered, they can add visual appeal and help direct a user’s eye toward the most important information on the page.
There are a number of different techniques that can be used to center elements in CSS. The most common method is to use the text-align property with a value of “center.” This will align all the text within an element to the center of that element.
Another popular technique is to use the margin property with auto values for both the left and right margins. This will cause the browser to automatically calculate equal margins on both sides of an element, effectively centering it within its containing element.
One can also use absolute positioning to center an element within its containing element. This involves setting the position property to “absolute” and then using either top or bottom and left or right properties to adjust the position of the element until it is perfectly centered.
HOW TO CENTER DIV OR TEXT IN DIV USING CSS?
If you’re working on a web design project and want to center either a div or text within a div, there are a couple of ways you can do it using CSS.
If you want to center a block level element like a div, you can use the CSS property “margin: 0 auto”. This will set the margins on the left and right sides of the element to be equal, thereby centering it.
If you want to center text or inline elements within a div, you can use the “text-align: center” property. This will align all the text within the div to be centered.

8 EFFECTIVE TECHNIQUES FOR CENTERING ELEMENTS USING CSS
In order to center elements using CSS, there are a few different techniques that can be employed. One popular technique is to use the “text-align” property with a value of “center.” This can be applied to any block level element, such as a paragraph, and will cause the contents of that element to be centered within the overall width of the containing element.
Another common technique is to set the width of the element to be centered to a specific value, then use the “margin” property with a value of “auto.” This will cause the element to be horizontally centered within its containing element, regardless of the width of that container.
It’s also possible to center elements vertically within their containing elements using CSS. This can be accomplished by setting the height of the container to a specific value, then using the “line-height” property with a value that is equal to or greater than the height of the container. The element will then be vertically centered within its containing element.
These are just a few of the many techniques that can be used for centering elements using CSS. By employing one or more of these techniques, you can easily improve the visual appeal of your website.
– FLEXBOX
When it comes to centering elements using CSS, there is no better option than flexbox. Flexbox provides a simple way to center elements horizontally and vertically within their container. In addition, flexbox can be used to create responsive layouts that automatically adjust to the size of the screen.
To use flexbox for centering, you must first set the display property of the container to flex. Then, you can use the justify-content property to center the elements horizontally, and the align-items property to center them vertically. For example, if you want to center an element horizontally and vertically within its container, you would use the following code:
container { display: flex; justify-content: center; align-items: center; }
– GRID LAYOUT
When it comes to CSS, there are a few different techniques that can be used to center elements on a page. The most common technique is known as the grid layout. This technique involves using a series of nested dives to create a grid of boxes that can then be used to position elements within that grid.
The first step in using the grid layout is to create a series of divs that will act as the columns of your grid. These divs should be given a class name so that they can be easily targeted with CSS. Once you have your column divs in place, you’ll need to add some content to them. This can be done by adding more divs or by using other HTML elements such as paragraphs or headings.
Once you have your columns and content in place, you can start positioning elements within the grid. To do this, you’ll need to use the CSS properties “float” and “clear”. The float property allows you to specify how an element should float within its parent container. By default, elements float to the left side of their container. However, if you want an element to be centered within its container, you’ll need to set the float property to “none”.
The clear property specifies what side of an element’s container other elements are not allowed to float on. So, if you want all subsequent elements after a centered element to also be centered, you would set the clear property to “both”.
App lying the grid layout technique is a great way to create a visually appealing design that is easy to understand and maintain. It also allows you to easily define how elements should be positioned within the grid, making it simple to adjust as needed.
– ABSOLUTE POSITIONING
When it comes to CSS, there are a few different methods that can be used to center elements on a web page. The most common method is to use the text-align property, which can be applied to both block-level and inline elements. However, this method only works if the width of the element is explicitly set.
Another method that can be used is the margin: auto; technique. This can be applied to block-level elements that have a set width, and will cause the element to be centered within its containing element.
If you want to center an element that is not a block-level element, or if you don’t want to set a width, then you can use the absolute positioning technique. With absolute positioning, you can specify exactly where you want an element to appear on the page using the left and top properties. You also need to set the position property to “absolute” for this technique to work.
– RELATIVE POSITIONING
When it comes to CSS, there are a few different ways to center elements on a web page. The most common method is to use the “text-align” property. This can be applied to either the entire page or to individual elements. For example, to center all of the text on your page, you would add the following CSS rule to your stylesheet:
body { text-align: center; }
You can also use the “text-align” property to center specific elements on your page, like images, blockquote, etc. For example, if you want to center an image that’s inside a div element, you would add the following CSS rule:
div { text-align: center; } img { /* this is for centering images */ display: block; margin: 0 auto; /* important */ /* top and bottom margins are 0 */ width: 50%; /* image width can be anything less than or equal to container width */ }
Another way to center elements is by using the “margin” property. You can set the left and right margins to “auto”, which will evenly distribute them within the containing element. This works for both block level and inline elements. For example, if you want to center a div element on your page, you would add the following CSS rule:
div { margin-left: auto; /* important */ margin-right: auto; /* important */ width: 50%; /* div width can be anything less than or equal to its parent container width */ }
Finally, you can use the “position” property with the “relative” value. This will set an element’s position relative to its containing element and then center it using margins. For example, if you want to center a div element on your page, you would add the following CSS rule:
div { position: relative; /* important */ left: 50%; /* important */ top: 50%; /* important */ margin-left: -25%; /* important */ margin-top: -25%; /* important */ width: 50%; /* div width can be anything less than or equal to its parent container width */ }
– TRANSLATE METHOD
When it comes to centering elements using CSS, there are a few different methods you can use. The ‘translate’ method is one of the more popular and effective techniques.
With the translate method, you can essentially move an element around on the page until it’s perfectly centered. To do this, you’ll need to set the element’s ‘transform’ property to ‘translate(X, Y)’. X and Y represent the amount of pixels you want to move the element horizontally and vertically, respectively.
For example, if you wanted to center an element horizontally on a page, you would set the X value to ‘50%’ and leave the Y value at ‘0px’. This would cause the element to be positioned 50% from the left side of the page (the exact center).
You can also use negative values for X and Y if you want to move an element up or left from its current position. So, if you wanted to move an element 10px to the left and 5px up from its current position, you would set the X value to ‘-10px’ and the Y value to ‘-5px’.
Once you have your desired position set, all that’s left is to add some vendor prefixes (-webkit-, -moz-, etc.) so that your CSS will work across all browsers.
– MARGIN AUTO METHOD
When it comes to CSS, there are a number of different methods that can be used to center elements on a web page. One popular method is known as the margin auto technique. This approach is relatively simple and only requires a few lines of code.
Here’s how the margin auto method works:
First, you need to set the width of the element that you want to center. This can be done using the width property in CSS. Next, you need to set the left and right margins to auto. This will cause the browser to automatically calculate equal margins for the element, effectively centering it on the page.
And that’s all there is to it! The margin auto method is a quick and easy way to center elements using CSS. Give it a try next time you’re working on a web project.
– TEXT ALIGN PROPERTY METHOD
The text-align property is a CSS method for centering elements on a web page. This can be done horizontally, vertically, or both.
To center horizontally, you would use the text-align: center; property. This is probably the most common way to center elements on a web page.
To center vertically, you need to use a different method. One way to do this is by setting the element’s height and width properties to 100%. Then, set the top and bottom margins to auto. This will make the element centered vertically on the page.
You can also use the flexbox model to center elements vertically. The flexbox model is powerful and has many other applications beyond centering elements. If you’re not familiar with flexbox, there are plenty of tutorials online that can help you get started.
– TRANSFORM PROPERTY METHOD
When it comes to centering elements using CSS, the transform property method is one of the most effective. This is because it allows you to center an element horizontally and vertically at the same time.
To use this method, you first need to add the following CSS code to your element:
transform: translate(-50%, -50%);
This will cause your element to be positioned 50% from the top and 50% from the bottom of its containing element. As a result, it will be horizontally and vertically centered.
CONCLUSION
CSS centering elements is a simple but effective way to improve the visual appeal of your website. By implementing these techniques, you can create attractive and well-balanced designs that are both eye-catching and easy to read. With the help of CSS, you can add custom styles to your webpages in no time at all.
So don’t wait any longer – get started with centering elements using CSS and elevate your website’s visual appeal today!
#Elevate Your Website 's Visual Appeal with these Effective Techniques for Centering Elements Using CSS#software development#digital marketing#web development#web design#web design agency in toronto canada#app development#digital marketing agency canada#graphic design#multimedia / flash animation services#web devlopment#web design company in mississauga
0 notes
Note
Would it be possible to implement more options for the dashboard? For example, adjusting font sizes and font faces manually on the user end, not just via the themes available by default. I find a lot of people use <small> html tags and the text is too small for me to read, but could easily be fixed if I could bump up the font size for that. On that note, would it be possible to implement more html tags for text posts, like super/subscript, code text (in-line, not for the whole paragraph element), more colors and headings, etc.?
Thank you!
Answer: Hi, @acidcorrodes!
It’s a good question, but it is unlikely that we will be adding these kind of appearance options to the dashboard. That said, we will more than happily point you to some available third-party browser extensions to do the trick instead! For adjusting the font face and font size, for example, you might want to try out Palettes for Tumblr—or, if you’re comfortable writing your own CSS, maybe Stylus would give you the font freedom you’re yearning for.
On that note, would it be possible to implement more html tags for text posts, like super/subscript, code text (in-line, not for the whole paragraph element), more colors and headings, etc.?
It is a fact that there are several of us among Tumblr Staff who would love to see this as much as you. Sadly, this is the kind of thing that would take a full project team to properly implement across our web, Android, and iOS clients—and there are much more pressing issues for our development teams to address at the moment.
We hope this was enlightening! Please do keep the questions coming.
42 notes
·
View notes
Text
Web designer in Jodhpur
Creative Web Design
We are a web designing company that has a team of skilled and experienced web designers and developers who can create stunning and functional websites for any type of business or domain. We offer a variety of web designing services, such as custom web design, web development, web hosting, SEO, and maintenance. We also provide you with a free web design consultation, where we can discuss your goals, needs, and preferences, and provide you with a web design proposal that suits your requirements and expectations.
What we do in Web Design
Our web designing services are the services that provide web designing solutions for clients who want to create or improve their online presence. It involves the use of various elements such as colours, fonts, images, graphics, animations, and interactions to convey the message and purpose of the website to visitors. Web designing services can help clients with various aspects of web designing, such as Consultation: Our web designing services can help clients understand their goals, needs, and preferences, and provide them with expert advice and guidance on how to achieve them . Strategy: Our services can help clients develop a clear and effective web design strategy that aligns with their brand identity, target audience, and business objectives.Design: We help clients create a unique and attractive web design that reflects their vision and personality, and that engages and impresses their visitors.Launch: Our services can help clients launch their website to the public, and provide them with web hosting, domain registration, and security services.
Our Design Technology
At Web Farm House, we understand that web design is not just about making a website look good. It is also about making it work well, communicate effectively, and provide value to the users. That is why we use the latest web design technology to create websites that are:
Visually appealing: We use web graphic design to create stunning and consistent visual elements for your website, such as colours, fonts, images, icons, and animations.
Easy to use: We use user interface design to create intuitive and interactive elements for your website, such as buttons, menus, forms, and navigation.
Functional and reliable: We use web development to code and program your website, using languages such as HTML, CSS, JavaScript, PHP, and others. We follow the principles of web standards, web accessibility, web performance, and web security, to ensure the quality and reliability of your website.
Our Work Process
At Web Farm House, we follow a systematic and collaborative work process to create your website. Our work process consists of four main phases: Discovery, Design, Development, and Delivery:
Discovery: This is the phase where we get to know you and your project. We will ask you some questions about your goals, needs, preferences, budget, and timeline. We will also conduct some research on your industry, competitors, and target audience. Based on the information we gather, we will create a project proposal and a contract for you to review and approve.
Design: This is the phase where we create the visual and interactive elements of your website. We will start by creating a sitemap and a wireframe, which are the blueprints of your website’s structure and layout. We will then create a mockup, which is a prototype of your website’s appearance and functionality. We will present the mockup to you and ask for your feedback and approval. We will make any revisions as needed until you are satisfied with the design.
Development: This is the phase where we code and program your website. We will use the latest web development technology to create a website that is functional, reliable, and compatible with different devices and browsers. We will also test and debug your website to ensure its quality and performance. We will show you the progress of the development and ask for your feedback and approval.
Delivery: This is the final phase where we launch and maintain your website. We will upload your website to your chosen hosting service and domain name. We will also provide you with a user manual and a training session on how to use and update your website. We will also offer you ongoing support and maintenance services to keep your website running smoothly and securely.
We will also listen to your feedback and suggestions and make any changes as needed. We will work with you as a partner and a friend, not just as a client and a vendor. we value your input and satisfaction throughout the work process. We will communicate with you regularly and keep you updated on the status of your project.
Our Web Designing Services
Our is provides web design services for clients who want to create or improve their online presence. We help clients with various aspects of web designing, such as consultation, strategy, design, development, testing, launch, and maintenance:
Static web design
Liquid web design.
Adaptive web design.
Dynamic web design.
Responsive web design.
Single-page web design.
Why Choose Us?
We are a One-Stop Solution for delivering the best web design and development services. We render customized and affordable web design facilities to suit your requirements. Choose the best plans for building a responsive web design according to your needs:
Excellent technical support
Core PHP &Codeigniter + MySQL.
Secure and Reliable coding.
Satisfactory Customer Support.
SEO-friendly web development.
33 notes
·
View notes
Text
AGARTHA Aİ - DEVASA+ (2)

In today’s digital landscape, a captivating and functional website is crucial for any business looking to thrive online. Full service web design encompasses a comprehensive approach, ensuring every aspect of your site is tailored to meet your unique needs. From the initial concept to the final launch, this service provides an array of offerings, including website service, responsive web design, and custom design services. Whether you’re a startup seeking to establish your brand or an established enterprise aiming to enhance your online presence, understanding the elements of full service web design is essential.
Full service web design
Full service web design encompasses all aspects of creating a website, from initial conceptualization to ongoing maintenance. This approach ensures that every detail is carefully considered to meet the specific needs of a business or individual. With a team of experienced designers and developers, full service web design offers a seamless experience that integrates aesthetics, functionality, and user experience.
One of the key advantages of opting for a full service web design is the cohesion of the website elements. Since all parts of the project are managed by a single team, there is less chance for miscommunication or inconsistency in design. This results in a more polished final product that reflects the brand’s identity while providing an engaging experience for visitors.
Additionally, full service web design allows for customized solutions tailored to unique requirements. Whether you need an e-commerce platform, a portfolio site, or a blog, a full service provider will offer dedicated support and expert advice throughout the entire process, ensuring your vision comes to life exactly as you imagined.
Website service
In today's digital landscape, website service is essential for businesses to thrive and maintain an online presence. A well-structured website serves as a powerful tool that encourages customer engagement and drives sales. By investing in a comprehensive website service, businesses can ensure that their website not only looks great but also functions seamlessly across all devices.
A key aspect of website service is the ability to optimize for search engines. By implementing SEO best practices, businesses can enhance their visibility and attract more organic traffic. This is where a reliable website service provider plays a crucial role, as they possess the expertise and techniques necessary to elevate your search engine rankings.
Furthermore, ongoing support and maintenance are vital components of a reliable website service. As technology evolves and user needs change, having a team that can promptly address issues or updates will keep your website relevant and effective in reaching target audiences. This ongoing relationship is instrumental in achieving long-term success in the digital realm.
Responsive web design
Responsive web design is an essential aspect of modern web development that ensures a seamless user experience across a variety of devices. With the increasing use of smartphones and tablets, having a website that adapts to different screen sizes is not just a luxury but a necessity.
The core principle of responsive web design is fluidity. This means that the layout of your website adjusts dynamically based on the screen width, ensuring that content remains accessible and visually appealing regardless of the device used. This approach improves usability and can significantly boost conversion rates.
Incorporating responsive web design techniques involves using flexible grids, images, and CSS media queries. These elements work together to create a layout that responds gracefully to changes in screen size, making your website not only functional but also competitive in the digital marketplace.
Custom design services
In today's digital landscape, custom design services have emerged as a vital component of creating a strong online presence. Businesses understand that a one-size-fits-all approach does not cater to their unique needs and branding. Therefore, opting for custom design services allows them to differentiate themselves in a crowded market.
These services offer tailored solutions that resonate with a company's specifics, from colors to typography and layout. By leveraging custom design services, businesses can ensure that their websites not only reflect their brand identity but also provide an intuitive user experience. This is crucial for keeping visitors engaged and encouraging them to take the desired actions.
Investing in custom design services ultimately contributes to better customer satisfaction and improved conversion rates. With a website designed specifically for their target audience, businesses can more effectively communicate their message and achieve their goals. This bespoke approach is invaluable in today's competitive environment.
43 notes
·
View notes
Text
Hey there,
I just wanted to drop a quick note to express how grateful I am for each and every one of you who has subscribed to my content and given it some love.
This is my secondary Tumblr account, and I'm still figuring some things out, especially when it comes to responding to comments. So, I would love a little help on that !
I'd like to give a special shoutout to @variablecemetery for their comment on my introduction post.
And to @mousiecat, who asked about CSS selector priority – Here's your answer
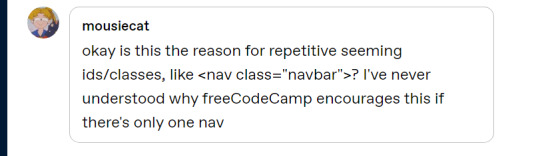
Adding a class like class="navbar" to a <nav> element in HTML, even if there is only one navigation element on the page, is a common practice in web development. This practice has several advantages:
Consistency: It helps maintain a consistent naming convention in your HTML and CSS. If you have multiple components or sections on your website that share similar styles, using classes can make it easier to manage and apply those styles consistently.
Reusability: If you decide to add another navigation element in the future, you can easily apply the same CSS styles to it by giving it the same class name (class="navbar" in this case). This makes your code more modular and reusable.
Specificity: CSS class selectors have a higher specificity than HTML element selectors. This means that if you ever need to style the element differently in a specific context or override other styles, using a class selector can give your styles higher priority without affecting other elements on the page.
Readability and Maintainability: Adding class names that describe the purpose of an element (e.g., class="navbar") makes your code more readable and understandable, which can be helpful when working on a team or revisiting the code later.
Documentation and Self-Documentation: Using class names like class="navbar" can serve as a form of documentation for your HTML structure. When someone else, including your future self, looks at the code, they can quickly understand the role and purpose of that element.
#code#codeblr#css#html#javascript#java development company#python#studyblr#progblr#programming#comp sci#web design#web developers#web development#website design#webdev#website#tech#html css#learn to code
63 notes
·
View notes
Text
You know what, I'll bother making this post. It's long overdue.
PSA: Please don't install uBlock Origin rules for Tumblr that use :nth-of-type(), and please remove or fix any you have installed. They can and will hide the wrong things. I'll show you a few alternatives below.
First, an example of how we get here. I've used the uBlock Origin element picker to try to hide the "Get a Domain" sidebar item:
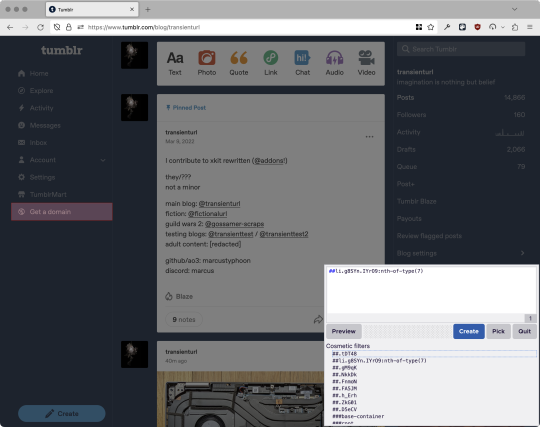
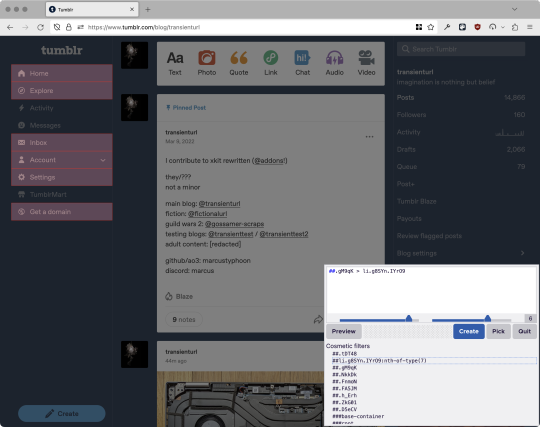
With some different adjustments of the sliders, it gave me these two snippets, one of which targeted a whole bunch of sidebar items, and the other of which selected the right one. Great, right? Read on.
www.tumblr.com##li.g8SYn.IYrO9:nth-of-type(7) www.tumblr.com##.gM9qK > li.g8SYn.IYrO9
As you can see, these both target a particular kind of sidebar item via "li.g8SYn.IYrO9"—fine—and as you can probably guess, the second one counts them all up and hides the seventh it finds.
This is bad, because what it actually hides depends on exactly how many sidebar items there are! Users can "snooze" Tumblr Live, which will make an item appear or disappear, and users with/without Ad-Free subscriptions will have or not have another. I have seen many, many people accidentally hide their activity, messages, inbox, etc using someone else's rule that's supposed to hide Live. Worse, some rules intended for e.g. recommended post carousels that use nth-of-type translate to something like "hide item number three on the dashboard no matter what it is," which will lead to a seemingly random post on your dashboard disappearing!
This isn't a problem specific to Tumblr, of course—I personally think uBlock Origin should never autogenerate these rules—but Tumblr has a ton of elements that aren't in fixed positions, so I feel comfortable wording that PSA the way I did. On a very static site, those rules might be fine. Here they almost always aren't.
So how do we fix this? First of all, as a developer of XKit Rewritten (check out @addons!), I must suggest you check if it has a feature to do what you want. Plenty of times it won't, though, and if not, we want to make a rule that hides an element based on what it is, not where it is. Here are three ways to make a robust rule:
First, I'll right-click the element I want and use the inspect element tool in my browser's developer tools to look at the element I really want (Firefox and Chrome/Edge/Opera have different but overall similar interfaces for this):
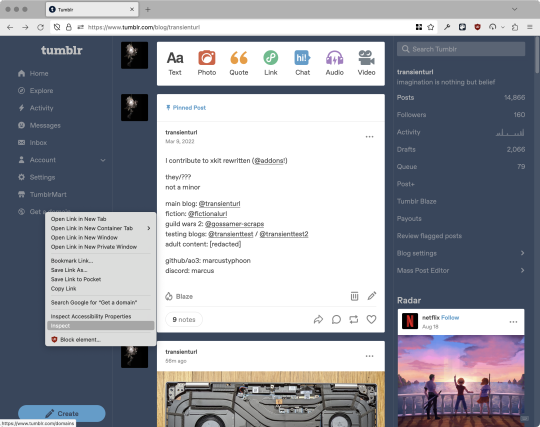
The HTML looks, for reference, like this (Tumblr sucks at code blocks but I'll try):
<li class="IYrO9 g8SYn" title="Get a domain"> <a class="tDT48" href="/domains"> <div class="kn4U3"> <svg> <use href="#managed-icon__earth"></use> </svg> </div> <div class="a132D"> <span class="ZC1wz">Get a domain</span> <!-- other unimportant stuff removed--> </div> </a> </li>
What's something unique about this element, preferably about the outermost element, and preferably contained within the <angle brackets> (HTML tags)? In this case, we have it easy: title="Get a domain" is definitely unambiguous and fulfills all of those three. If you're very familiar with web design using CSS, you'll know how to target that; if you've vaguely heard of CSS, you may be able to look at a reference sheet of CSS selectors, see [attribute=value], and figure it out, and if neither is true, I'll spoil it for you and say that we just put it in square brackets in this case.
So—taking the rule uBlock Origin made, removing the :nth-of-type() and replacing it with our better selector—here's our first working, bug-free uBlock Origin rule:
##li.g8SYn.IYrO9[title="Get a domain"]
Okay, great. But what if we didn't have that attribute to target? What if our top-level element looks the same as the other ones? What if we want this rule to work if we change our Tumblr language to Spanish? Let's move on to :has().
:has() is a CSS selector (supported in uBlock Origin even in browsers where you can't use it for web development yet, i.e. Firefox), that lets you check the contents of an element for whatever is in the parentheses. Let's assume that Tumblr would never make two sidebar items with the same icon, and target that href="#managed-icon__earth" property:
##li.g8SYn.IYrO9:has([href="#managed-icon__earth"])
Yep, that works too!
Finally, what if we couldn't use either of those because we need to target the content of the page that's not contained within the <angle brackets>? We can take a look at the uBlock Origin documentation and find that it has something for that too: :has-text(). You can do very powerful things with this (e.g. you can sort of implement Blacklist entirely using uBlock Origin using something like article:has-text), but it doesn't perform well and can pretty easily be used incorrectly, so I'd suggest you avoid it when possible.
However, let's try using it here to target the "Get a domain" label text:
##li.g8SYn.IYrO9:has-text(Get a domain)
And that also works!
With these techniques, you should be able to target any specific thing you'd want to hide without using any fragile positional selectors. If you're going to share your uBlock Origin rules with others, please make use of this! If you're just using your rules for yourself, then hopefully I've given you enough information so that you can understand what a rule does and decide for yourself if it's worth bothering to fix (menu item order might not change that often, so maybe you're fine with certain rules being a bit prone to breakage; if your rule hides the first post in your timeline you really do need to fix that one!)
-
And, of course, a note for you web developers out there: :has() isn't natively supported in Firefox quite yet, so you can't really use it (I would not recommend using JQuery's simulated version—it's not quite the same). And :has-text() is just not a thing for CSS at all. Just use javascript at that point! Edit: No longer true in 2024; style away!
Final note: any rule with a random 5-character string like g8SYn will eventually break when Tumblr rebuilds its CSS map, though they haven't done that in ages. But when they do: no, it's not "Tumblr devs breaking our rules because they hate us." (Yes, I hear that sentiment a lot in contexts when it almost always makes zero sense.) If you're fairly experienced with CSS you can sometimes make Stylus/uBlock Origin rules that don't reference any, but it's usually convoluted and more trouble than it's worth.
81 notes
·
View notes
Text
The Complete Manual for SEO in 2025: Methods to Rule Search Results
Digital marketing
Because Google's algorithms are becoming more intelligent and user behavior is changing, search engine optimization, or SEO, is always changing. To stay ahead of the curve in 2025, you will need to combine technical know-how, excellent content, and strategic link-building. If you are a blogger, digital marketer, or business owner, learning SEO can help you increase conversions and drive organic traffic.
In order to help you dominate search engine rankings in 2024, we will examine the most recent SEO tactics in this guide.
1. Recognizing SEO in 2025
Enhancing your website's visibility on search engines such as Google and Bing is known as SEO. A higher ranking for pertinent keywords, organic traffic, and improved user experience are the objectives.
Relevance, authority, and high-quality content are given top priority by search engines. Google's algorithms have become increasingly complex in comprehending search intent and rewarding websites that offer genuine value as a result of developments in AI and machine learning.
2. Keyword Analysis: The Basis for SEO
The foundation of SEO is still keyword research. But in 2025, search intent will be more important than ever. Take into account the following rather than just high-volume keywords:
Long-tail keywords are longer, more focused terms with higher conversion rates and less competition.
Semantic keywords: Include synonyms and variations of your primary keyword because Google's algorithms can comprehend related terms.
Keywords that are based on questions: A lot of users enter terms like "how to," "best way to," or "why does." By responding to these questions, you can increase how likely you are to be featured in snippets.
The Top Resources for Researching Keywords:
For both PPC and organic search insights, Google Keyword Planner is a free and helpful tool.
Ahrefs: Offers competitor analysis, search volume, and keyword difficulty.
SEMrush: Provides backlink analysis, site audits, and keyword research.
Finding frequently asked questions about your subject is made easier with AnswerThePublic.
3. Optimizing Your Content with On-Page SEO
Improving search rankings by optimizing individual pages is known as on-page SEO. Here's how to make your content better:
a. Meta descriptions and title tags
Your title tag should contain your target keyword, be compelling, and be no more than 60 characters. Likewise, your 160-character meta description should enticingly summarize your content and entice readers to click.
b. Header tags, such as H1, H2, and H3.
Use the main title in H1.
Utilize H2s and H3s for subheadings to enhance structure and readability.
Naturalize the use of primary and secondary keywords.
c. Optimizing URLs
A clean, descriptive URL helps both search engines and users. Example: Bad URL: www.example.com/p=12345 Visit www.example.com/seo-strategies-2025 for a good URL.
d. Linking Inside
Link equity is distributed, navigation is improved, and user engagement is prolonged when you link to other pertinent pages on your website.
e. Optimization of Images
To speed up page loads, reduce the size of images.
To help search engines understand images, use alt text to describe them.
4. Improving Website Performance with Technical SEO
Making a site's backend better for search engines to crawl and index is the main goal of technical SEO.
A. Optimization for Mobile
As mobile-first indexing is the standard, make sure your website is responsive. Google's Mobile-Friendly Test can be used to test your mobile performance.
b. Page Speed and Essential Web Elements
Google takes into account Core Web Vitals (LCP, FID, and CLS) and page speed when determining rankings. Boost speed by:
making use of a content delivery network (CDN).
making videos and pictures better.
turning on browser caching and minifying JavaScript and CSS.
c. Make Your Website Secure with HTTPS
Safe websites are given priority by Google. Convert your website to HTTPS if it still uses HTTP for better search engine rankings and user confidence.
Robots.txt and XML Sitemap
Make sure that all of the key pages are indexed by submitting an updated XML sitemap to Google Search Console. A robots.txt file can also be used to prevent the crawling of unnecessary pages.
5. Developing Authority and Trust through Off-Page SEO
a. Creating Links
One important ranking factor is still backlinks. Quantity is not as important as quality. Pay attention to:
guest posting on trustworthy websites.
Links are created by having high-quality content.
"Broken link building" is the process of identifying and fixing broken links.
Consider using HARO (Help A Reporter Out) to get backlinks from news websites.
b. Social Media Brand Mentions
Despite social signals not being direct ranking factors, a strong social media presence can boost credibility and drive traffic.
c. Local SEO and Internet critiques
If your business operates locally, encourage customers to leave positive reviews on Google My Business and Yelp. The local SEO rankings of your business are also raised when local citations contain your company's name, address, and phone number.
7. The Growth of Voice and Zero-Click Searches
It is imperative to optimize for voice search given the popularity of smart assistants like Alexa and Siri.
Make use of FAQs and keywords in natural language.
Because many voice searches are location-based, make sure your website is optimized for local search engines.
There is also an increase in zero-click searches, in which Google provides an answer right in the SERP. In order to appear in featured snippets:
Give succinct, well-organized responses.
For clarity, use lists and bullet points.
8. The Synergy of Content Marketing and SEO
Content marketing and SEO are closely related. For 2025 success, concentrate on
1,500+ words of long-form content that offers comprehensive answers.
Integration of multimedia (podcasts, infographics, and videos).
User interaction promotes sharing, comments, and conversations.
9. Tracking and Enhancing SEO Results
Use resources such as:
Google Analytics: Monitors conversions, traffic, and bounce rates.
Data on indexing and keyword performance is provided by Google Search Console.
Analysis of competitors and backlinks is provided by Ahrefs and SEMrush.
Important data to monitor:
an increase in organic traffic.
ranking of keywords.
CTR stands for click-through rates.
bounce rates and dwell time.
Conclusion: Make Your SEO Strategy Future-Proof
The process of SEO is continuous and necessitates continuous modification. Creating valuable content, staying up to date with algorithm changes, and focusing on technical optimizations are all ways to maintain high search rankings in 2025.
Ready to make your website more successful? Put these tactics into practice right now, and see how your organic traffic increases!

2 notes
·
View notes
Text

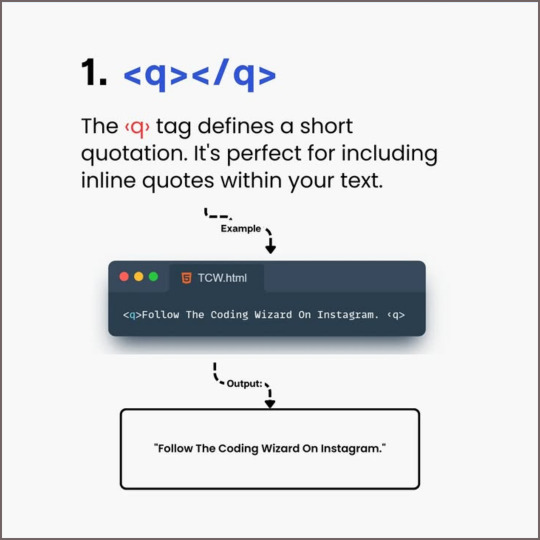
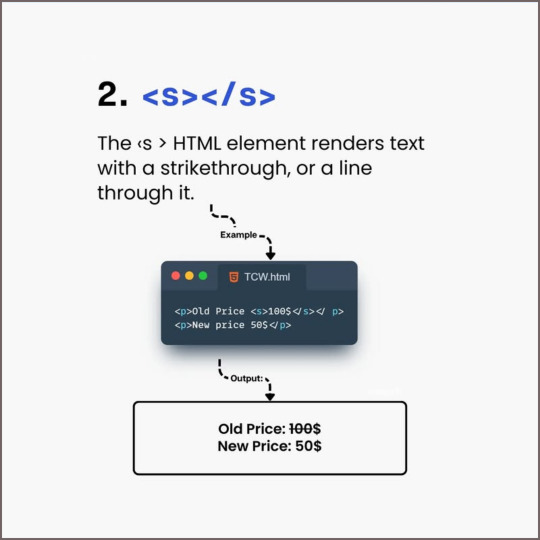
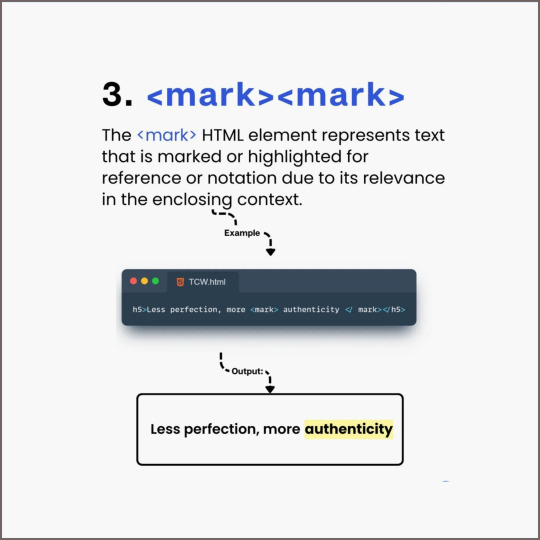
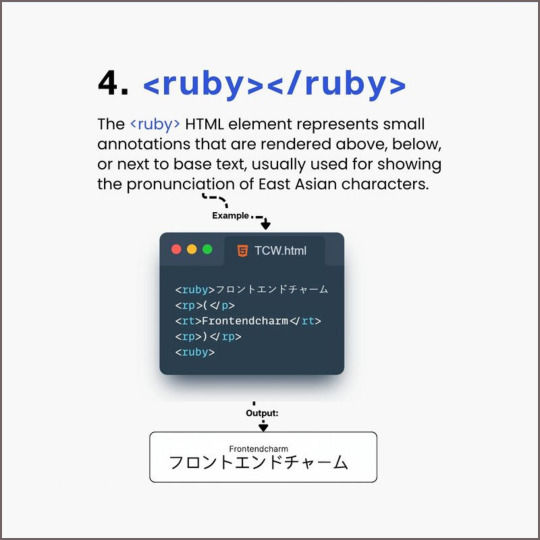
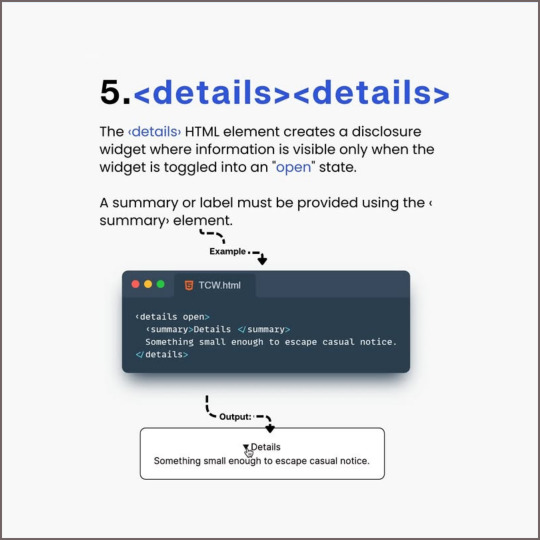
5 Unique HTML Elements You Must Know ⬇️
1.<q></q> 2.<s></s> 3.<mark></mark> 4.<ruby></ruby> 5.<details></details>
html #css #javascript #notes #interview #code #reactjs #react #nodejs #webdeveloper #mern #mean #webdevelopment #developer #coding #mernstack
#programming #python #mongodb #programmer #fullstackdeveloper #node #expressjs #css #angular #webdesign #java #backend #web #frontend
3 notes
·
View notes
Link
Harnessing the Power of :not() in CSS: Styling by Exclusion
The article delves into the significance of the :not() pseudo-class selector in CSS, elucidating how it enables developers to apply styles through exclusion. It begins by introducing the concept of the :not() selector, highlighting its function as a negation pseudo-class. The provided code snippets and examples vividly illustrate how the selector can be utilized to style elements while excluding specific criteria, such as classes or attributes.
The article's comprehensive coverage spans from basic usage to more intricate scenarios, such as combining :not() with multiple classes or leveraging it for advanced design considerations. By showcasing real-world implementations and scenarios, the article equips web designers and developers with practical insights into harnessing the power of the :not() selector. This knowledge empowers them to craft more targeted and precise styles without resorting to JavaScript for class manipulation.
In a succinct manner, the article offers a comprehensive guide to the :not() pseudo-class selector, imparting the ability to leverage this tool effectively for crafting sophisticated CSS designs with exclusions.
#CSS#pseudo-class selector#styling#element targeting#exclusion#web design#front-end development#code examples
0 notes
Text
0 notes
Text
Anyone can program (yes, even you)
"Programming is easy"
I saw some variations of this statement shared around the site recently, always in good intentions of course, but it got me thinking.
Is that really true?
Well it certainly isn't hard in the way some developers would want to make you believe. A great skill bestowed only upon the greatest of minds, they're the ones making the world work. You better be thankful.
That is just elitist gibberish. If anyone ever tells you that programmers are "special people" in that way, or tries to sell you on the idea of "real" programmers that are somehow better than the rest, you can safely walk in the other direction. They have nothing of value to tell you.
But I think the answer is more complicated than a simple "Yes, programming is easy" too. In all honesty, I don't think it's an easy thing to "just pick up" at all. It can be very unintuitive at first to wrap your head around just how to tell a computer to solve certain problems.
One person in the codeblr Discord server likened it to cooking. That's a skill that can be very hard, but it's also something that everyone can learn. Anyone can cook. And anyone can program.
I really mean that. No need to be good at maths, to know what a bit is or whatever it is people told you you need. You're not too old to learn it either, or too young for that matter. If you want to start programming (and you can read this post), you already have everything you need. You can write your first little programs today!
One of the cool things about programming is that you can just fuck around and try lots of stuff, and it's fine. Realistically, the worst thing that can happen is that it doesn't work the way you imagined. But you'll never accidentally trigger the fire alarm or burn your house down, so feel free to just try a bunch of stuff.
"Okay I want to learn programming now, what do I do?"
That's awesome, I love the enthusiasm! As much as I'd love to just give you a resource and tell you to build a thing, you still have to make a choice what you want to learn first. The options I'd recommend are:
Scratch: A visual education tool. The main advantage is that you don't have to worry about the exact words you need to write down, you can just think about the structure of your program. The way it works is that you drag and drop program elements to be executed when they should be. You can relatively quickly learn to make cute little games in it. The downside is that this isn't really a "professional" programming language, so, while learning from Scratch will give you the basics that apply to most languages and will make switching to another language easier, you're still gonna have to switch sooner or later. Start here: https://scratch.mit.edu/
Python: The classic choice. Python is a very widely used, flexible programming language that is suited for beginners. It is what I would recommend if you want to skip right to or move on from Scratch to a more flexible language. https://automatetheboringstuff.com/ is your starting point, but there's also a longer list of resources here if you want to check that out at some point.
HTML/CSS/JavaScript: The web path. HTML and CSS are for creating the look of websites, and JavaScript is for the interactive elements. For example, if you ever played a game in your browser, that was probably written in JS. Since HTML and CSS are just for defining how the website should look, they're different from traditional programming languages, and you won't be able to write programs in them, that's what JS is for. You have to know HTML before you learn CSS, but otherwise the order in which you learn these is up to you. Your JavaScript resource is https://javascript.info/, and for HTML and CSS you can check out https://developer.mozilla.org/en-US/docs/Learn/Getting_started_with_the_web.
I put some starting out resources here, but they're really just that - they're for starting out. You don't have to stick to them. If you find another path that suits you better, or if you want to get sidetracked with another resource or project, go for it! Your path doesn't have to be linear at all, and there's no "correct" way to learn things.
One of the most important things you'll want to do is talk to developers when you struggle. The journey is going to be frustrating at times, so search out beginner-friendly coding communities on Discord or wherever you're comfortable. The codeblr community certainly tends to be beginner-friendly and kind. My DMs and asks are also open on here.
#programming#is that a motherhecking RATATOUILLE reference??!?#codeblr#coding#the only reliable predictor of whether someone can be a good programmer is whether they have or can develop a passion for programming#how did me thinking “well is programming actually easy" turn into a resources post uhm#coding resources#shoutouts to the codeblr discord they're coo#long post#Most good programmers do programming not because they expect to get paid or get adulation by the public; but because it is fun to program#- Linus Torvalds
24 notes
·
View notes
Text
Welcome to The Aureum

Hi! I'm a newer software dev, but with a long history with programming (thanks to this accursed site in 2014 and my desire to join robotics) I also happen to love writing and art, and have a lot of OCs. I always struggled with keeping them organized and finding a software that works for me.
Enter, The Aureum!
What is The Aureum?
The Aureum is a work in progress web based app made with electron that I am working on so that I can organize my characters in a bit of a different way. A lot of elements and planned features take inspiration from the fandom community wiki, mixed with some of my other favorite world building websites that just ended up not being a good fit for me.
I made this blog so I can easily keep track of my development progress on this, and maybe make some cool new friends in the process.
What does it do?
Currently? Very little, other than make characters with information.
However, I'm currently working on a number of features, one of my most ideal features being project organization. This would allow me (and other users ofc) to sort their OCs and locations BY the project. Maybe you're a writer working on a few different series/stories at the same time, and you need some way to seperate them. Maybe your a game dev, visual novel creator, etc and you just want to have some way to store all of your story and character information in one place.
I also have some more fun and 'unique' features that are being worked on, like an automatic reference sheet generator, which prints out some of your characters information like name, age, height, weight, body type, and some of your preselected colors.
Another favorite feature I'm working on are the personality sliders! In the characters page there are sliders that you can edit to have a little more of a 'fun' view of how your characters act. Here are some screenshots of the layout from within Figma!


Currently, I'm setting up the data storage structure so that we can input all of this character information and still be able to create a project after to put the character in. But while I'm still working out the kinks, here's a list of the main planned features that will be implemented before i send it out to friends to alpha test!
Features
Multiple Projects/ Worlds
Entirely locally hosted, no internet connection required
Personality sliders
Character sheet generator
Timeline feature per project/world
Ability to link to sources and citations
Relationship linking between characters (Similar to fandom wiki setups)
The Aurei - The golden ones, your favorite OC's flagged so that you can access them faster, especially if you have favorites from multiple projects.
Random generation features, for things like art prompts and writing prompts.
Ideas for future releases
D20, d6, etc dice roller
Fake social media screenshot generator similar to twinote or photonote
Additional timeline just on a character by character basis
Ability to sort OCs by tag - by gender, species, location, etc.
Dark mode (maybe custom color palettes for later that users can upload/customize via css)
and more!
Okay but when will it be done?
Truthfully, who knows? I'm solo deving this software for fun, while working a full time job on top of my normal small game projects I make. It might be functional in a few months, or it might take a few years. Ultimately, I have no timeline for this project, and I want to be up front right out of the gate. Once i get a stablle build with the main character and project features implemented and organized, I'll send it off to friends to alpha test, and if all goes well for a few weeks, then I'll post the alpha build for others to use.
Why are you doing this?
the short answer is just because i want to. The longer answer is because, while I love using things like notion, obsidian, metos, worldanvil, etc. I find that there's always one or two things missing from each of them that I'd personally like to have. A lot of these softwares/websites are created with specific things in mind, like note taking, etc. But for me, I make games, i do art, i write stories, and I'm a DND Dungeon Master, so not all of those softwares will work for my every project.
I wanted to make something that would work for everyone, for all of their creative needs.
Also a mini note, to anyone who comes back and sees this or is curious, this project *will* be free on release to the public and likely hosted on itch.io. There are currently NO plans for an online sync or any only features, as that is not within my devstack or technical abilities at this time.
#Welcome to the aureum#aureumdev#theaureuem#softwaredev#developer#electronjs#webdev#character development#oc#worldbuilding
6 notes
·
View notes
Text
JavaScript Tutorial: A Beginner's Guide to the World of Web Development
Welcome to the exciting world of JavaScript! If you're looking to dive into web development, understanding JavaScript is essential. This versatile programming language powers the interactive elements of websites and is a key component of modern web applications. In this tutorial, we'll cover the basics of JavaScript, its syntax, and some practical examples to get you started.
What is JavaScript?
JavaScript is a high-level, dynamic, and interpreted programming language that is primarily used for enhancing the interactivity of web pages. It allows developers to create rich user experiences by manipulating HTML and CSS, responding to user events, and communicating with servers.
Why Learn JavaScript?
Ubiquity: JavaScript is supported by all modern web browsers, making it a universal language for web development.
Versatility: Beyond the browser, JavaScript can be used on the server-side (with Node.js), in mobile app development (with frameworks like React Native), and even in game development.
Community and Resources: With a vast community and numerous resources available, learning JavaScript is more accessible than ever.
Getting Started with JavaScript
Setting Up Your Environment
To start coding in JavaScript, you don't need any special software. All you need is a web browser and a text editor. Here’s how to set it up:
Choose a Text Editor: Popular options include Visual Studio Code, Sublime Text, and Atom.
Open Your Browser: You can use any modern browser like Chrome, Firefox, or Edge.
2 notes
·
View notes