#Construction Workflow
Explore tagged Tumblr posts
Visit Tumblr Blog
Explore Tumblr blogs with no restrictions, modern design and the best experience.
Last Seen Tumblr Blogs


Fun Fact
After the announcement of the deal with Yahoo!, there were 170K signatures of unhappy Tumblr users petitioning to prevent the sale in 2013.
Text
Constructing Excellence: How 3D Engineering Applications Revolutionize Workflow Management

In the realm of construction, efficiency, accuracy, and collaboration are key factors that determine the success of a project. Traditional methods of construction management often involve intricate paper-based plans, complex communication channels, and a higher probability of errors. However, with the advent of 3D engineering applications, the construction industry has witnessed a transformative shift towards more streamlined and effective workflow management.
The Evolution of Construction Workflow Management
Historically, construction projects were managed through manual processes that relied heavily on physical drawings, blueprints, and handwritten documents. This approach often led to miscommunications, discrepancies between design and execution, and delays in project completion. As technology progressed, Computer-Aided Design (CAD) systems revolutionized the way designs were created and shared, but the inherent two-dimensionality still posed limitations in visualizing complex structures accurately.
Enter 3D engineering applications. These sophisticated software solutions allow architects, engineers, contractors, and other stakeholders to create, collaborate on, and manage construction projects in a three-dimensional virtual environment. This technology leverages Building Information Modeling (BIM), a process that integrates 3D geometry, spatial relationships, geographic information, and building component data into a comprehensive digital representation of the project.
Benefits of 3D Engineering Applications in Construction Workflow Management
1. Enhanced Visualization
3D models offer a more accurate and comprehensive visualization of the project, enabling stakeholders to understand the design intent more effectively. This visualization aids in identifying potential clashes, interferences, and design flaws before the construction phase, saving time and resources.
2. Improved Collaboration
3D engineering applications facilitate enhanced collaboration among project stakeholders. Design teams, architects, engineers, contractors, and clients can access the same model, providing a shared platform for discussion, feedback, and decision-making. Real-time collaboration reduces errors and minimizes delays caused by miscommunications.
3. Clash Detection and Conflict Resolution
One of the significant advantages of 3D engineering applications is automated clash detection. These applications identify clashes between different building systems (e.g., mechanical, electrical, plumbing) and structural elements early in the design phase, allowing teams to address conflicts before they manifest in the field.
4. Efficient Construction Planning
3D models provide an accurate representation of the project, enabling construction teams to plan and sequence tasks more effectively. This leads to optimized construction workflows, reduced downtime, and increased efficiency on the job site.
5. Resource Allocation and Budgeting
With 3D engineering applications, project managers can accurately estimate the quantity of materials required, which helps in budgeting and resource allocation. This reduces the likelihood of overruns and unforeseen expenses.
6. Risk Mitigation
The ability to simulate construction processes and identify potential risks allows teams to develop strategies for risk mitigation. This proactive approach minimizes disruptions and ensures the safety of workers and the project itself.
7. Progress Tracking and Reporting
3D models can be used to track the progress of construction against the original design and schedule. This visual tracking provides a clear understanding of project milestones and helps in generating accurate reports for stakeholders.
8. Facility Management and Maintenance
After construction, the 3D model can be handed over to facility management teams. These teams can use the model to manage building operations, plan maintenance activities, and make informed decisions throughout the building's lifecycle.
Challenges and Implementation
While the benefits of 3D engineering applications are evident, their successful implementation requires addressing certain challenges:
1. Learning Curve: Adapting to new software and workflows can be challenging for construction professionals accustomed to traditional methods. Training and support are crucial to ensuring a smooth transition.
2. Data Management: Managing the large volume of data associated with 3D models requires robust data management systems and practices.
3. Software Integration: Integrating 3D engineering applications with other construction management software (e.g., project management, scheduling) is essential for seamless workflow management.
4. Hardware and Software Requirements: Running sophisticated 3D applications requires powerful hardware and software, which might necessitate investments.
5. Collaboration and Communication: Effective collaboration relies on strong communication practices. Establishing clear communication channels and protocols is vital.
Conclusion
3D engineering applications have revolutionized construction workflow management by providing accurate visualization, improved collaboration, clash detection, and enhanced planning capabilities. By embracing these technologies, the construction industry can significantly reduce errors, save time, optimize resource allocation, and mitigate risks. Despite challenges, the potential for increased efficiency, reduced costs, and improved project outcomes makes the integration of 3D engineering applications a compelling proposition for modern construction projects.
#3D Engineering Applications#BIM Applications#Construction Workflow#Construction Workflow Management#Computer-Aided Design (CAD)#Building Information Modeling (BIM)
0 notes
Text
Pre-Construction Automation: Boost Efficiency-Streamline Workflow
Unlock maximum efficiency with pre-construction automation. Learn how to streamline your workflow, reduce errors, and save time.
Read More

#pre-construction automation#streamline workflow#construction efficiency#project management tools#construction automation#workflow optimization#pre-construction process
0 notes
Text
"How SketchUp Pro Enhances Engineering & Architecture Workflow | PI Software"
"Learn how SketchUp Pro improves engineering and architectural workflows with precise modeling, seamless integrations, and efficient design processes. Discover its benefits for professionals."
#SketchUp Pro#Architecture Software#Engineering Design#3D Modeling#CAD Software#Design Workflow#Building Information Modeling (BIM)#Construction Technology#Architectural Visualization#Digital Design Tools#Engineering Workflow#Structural Design
0 notes
Text
#AI Factory#AI Cost Optimize#Responsible AI#AI Security#AI in Security#AI Integration Services#AI Proof of Concept#AI Pilot Deployment#AI Production Solutions#AI Innovation Services#AI Implementation Strategy#AI Workflow Automation#AI Operational Efficiency#AI Business Growth Solutions#AI Compliance Services#AI Governance Tools#Ethical AI Implementation#AI Risk Management#AI Regulatory Compliance#AI Model Security#AI Data Privacy#AI Threat Detection#AI Vulnerability Assessment#AI proof of concept tools#End-to-end AI use case platform#AI solution architecture platform#AI POC for medical imaging#AI POC for demand forecasting#Generative AI in product design#AI in construction safety monitoring
0 notes
Text
Grow a home with me! Let's make hemp homes from farm to tables everywhere. I'm working to build this as a production that's participatory and easy to engage for DIY creators and builders everywhere Vote us up now at HempHome = https://artizen.fund/index/p/hemphome
#realitycraft#hemp#hemp home building#hempcrete#hemp materials#natural building#ai art#concept development#production#XR#AI#AR#construction#building#hardware#workflow#design#natural building design#DIY#artizen#evo heyning#art wip#youtube
0 notes
Text
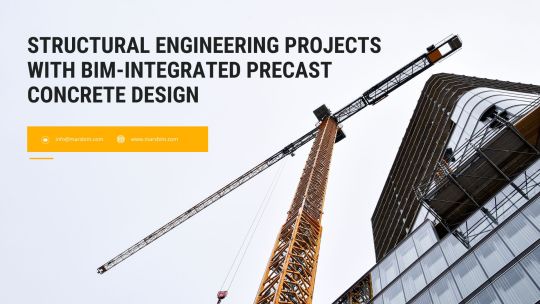
Structural Engineering Projects with BIM-Integrated Precast Concrete Design
Discover the future of construction with BIM-Integrated Precast Concrete Design! This innovative approach revolutionizes how we plan and execute structural engineering projects. By integrating Building Information Modeling (BIM) with precast concrete, we achieve unparalleled precision, efficiency, and sustainability. Say goodbye to traditional methods and embrace a smarter, more streamlined process that saves time and reduces costs.
Join the movement towards modern construction excellence! BIM-Integrated Precast Concrete Design not only enhances collaboration among project stakeholders but also ensures higher quality and consistency in every build. From concept to completion, experience the benefits of cutting-edge technology in your structural engineering projects. Let's build the future together! 🏗️✨
#precast CAD drawings#precast concrete design#precast concrete design workflow#precast constructions using BIM software#precast engineering design
0 notes
Text
Construction Automation: Types, Benefits and Future Outlook
Introduction In recent years, the construction industry has lagged behind manufacturing in adopting automation technologies. However, the current landscape presents an opportune moment for change. The construction sector’s trajectory towards a digital transformation is now marked by the increasing integration of automated technologies. From streamlining digital design and analysis processes to…
View On WordPress
#Automated Workflows#Autonomous Construction Equipment#Benefits of Construction Automation#Construction Automation#construction industry#Data Collection#digital transformation#Efficiency and Production#Future Outlook#Housing Crisis#integration#Job Creation#Off-Site Automation#On-Site Automation#Predictability and Quality Standards#Resource Scarcity#Robotics Adoption.#Robotics in Construction#Safety in Construction#Scalability in Construction#standardized components#Sustainability#sustainability in construction#Workforce Shortfalls
0 notes
Text
0 notes
Text
youtube
About Future Proof Accountants Webinars
Here at Futureproof Accountants, we offer a bunch of ready to watch webinars waiting for you to explore.
#accounting industry#managing workflow#Accountants webinars#construction accounting#workflow management system#workflow system#workflow tool#project workflow#project management workflow#work flow management#cpa webinar#account payable webinar#freeagent webinar#account webinars#accounting webinars#bookkeeping webinars#free bookkeeping webinars#accounting basics#financial accounting#about future proof accountants#accountants webinars#Youtube
0 notes
Note
hellooo i LOVE your art and all of ur little games so so dearly <3 ur style inspires me every day and i'm always excited to see what you put out next! i've been interested in creating my own games recently and i was wondering if you had any advice as to where to start?
( ^^)人(^^ )♡!!
i recommend you look into these tools/engines, which require little or no coding:
free: -twine -bitsy -decker -GB studio -godot (this one needs more coding knowledge afaik but very beginner friendly)
paid: -construct 3 -RPG maker
please note that even with the simplest ones, "no coding" doesn't mean you'll automatically know how to use them. all of them have their own logic and workflow and you're gonna need some patience (i myself tried using RPG maker and didn't understand sh1t lol but plenty of people find it easy)
you could also look for gamejams to join ^^ some people join without pre-established teams and look for others to team up/learn together
220 notes
·
View notes
Text
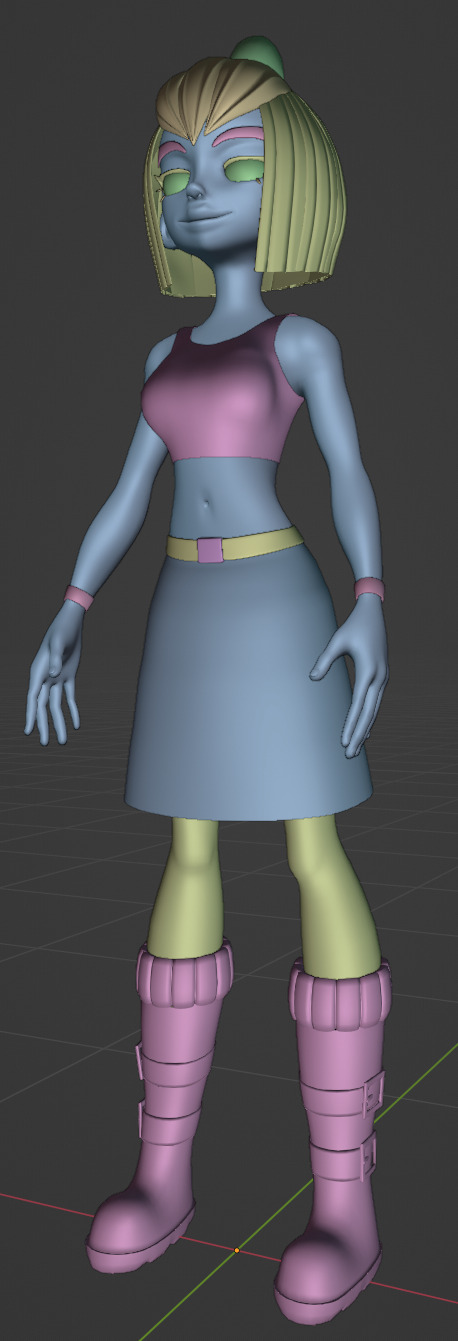
Road to 3D- Sam Manson (Part 2):
Character Modeling


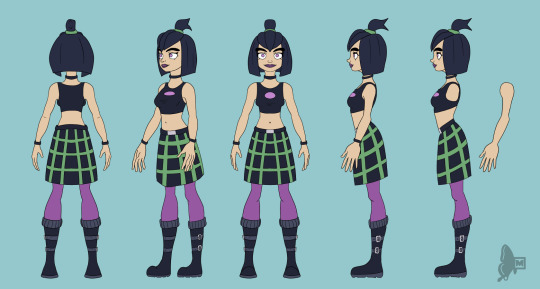
Part 1: Model Sheet
Welcome to the second and final part of this project. Since people have asked how I do my models, I decided to make a write-up on how I approach these things using the example of a model of Sam Manson. The first part focused on how I make a model sheet fo a 3d model the second part focus just on the modeling. There are many more things about how to create a fully realized 3d character that I could make whole other chapters for, like UV unwrapping, texturing, shading and rigging, but I don't have enough knowledge past the fundamentals on these topics that could warrant their own seperate posts.
Additional stuff before I continue:
I use Blender for all my model
This not a beginners guide or something similar, it would be helpful to already know the general workflow of a modeling, how to use Blender and know different terminology like edgeflow, retopology etc.
If you are a beginner and want to learn more about character modeling I recommend the videoseries "Modeling for Animation" by Dikko on Youtube
Maybe I make some reference some tricks from this videoseries
That's it, let's go!


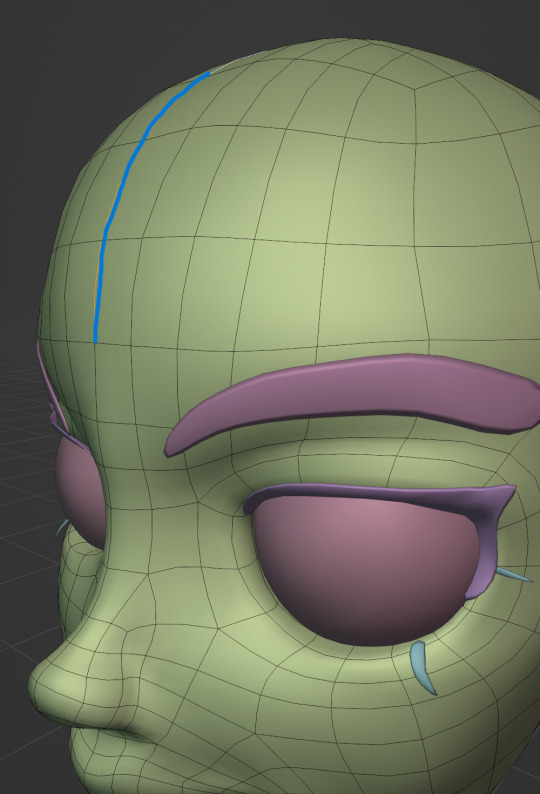
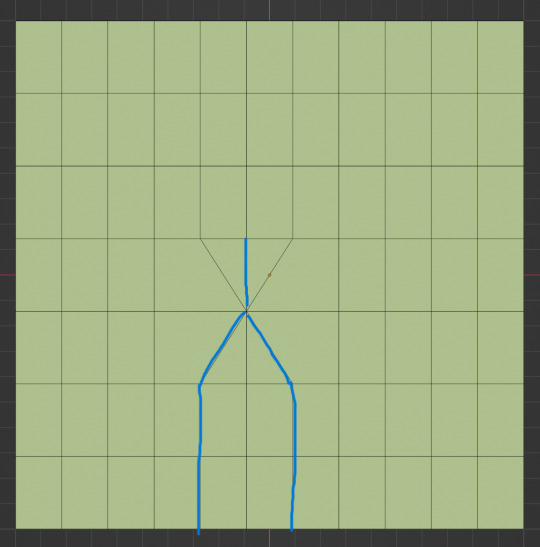
My first step is always the block-out phase. The block-out phase is what the construction lines and the first sketch in a drawing are. I align the frontview and sideview from the model sheet I made in part 1 with the z-axis (the blue line in the images above) and roughly shape out the forms with primitive forms. For this I mostly use a cube with a subdivide modifier.
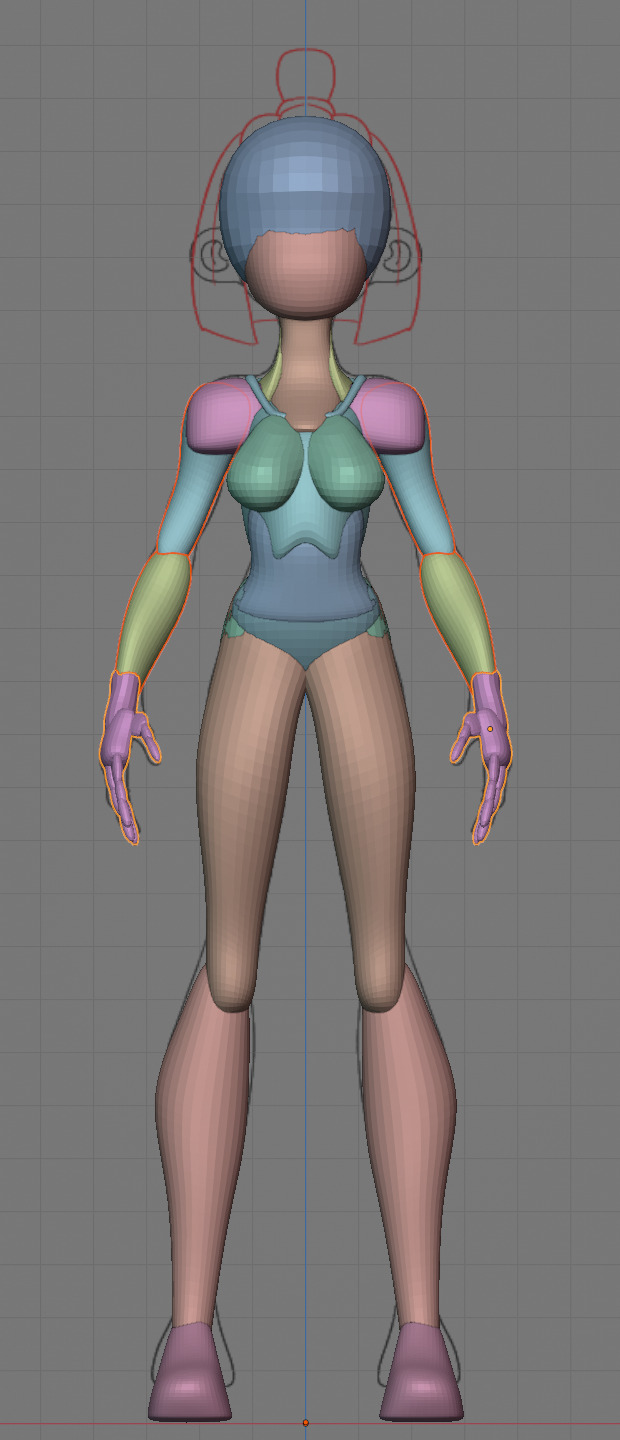


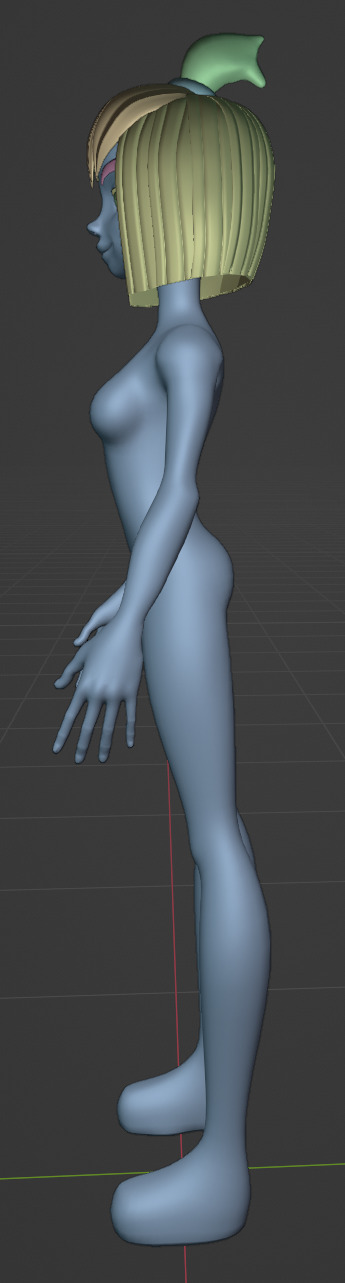
Having a modelsheet without the clothes obscuring the body makes it much easier the get the form right. The block-out phase is one of the most important steps, if it looks good than I have practically half the work done. This is also a good opportunity to practice anatomy.
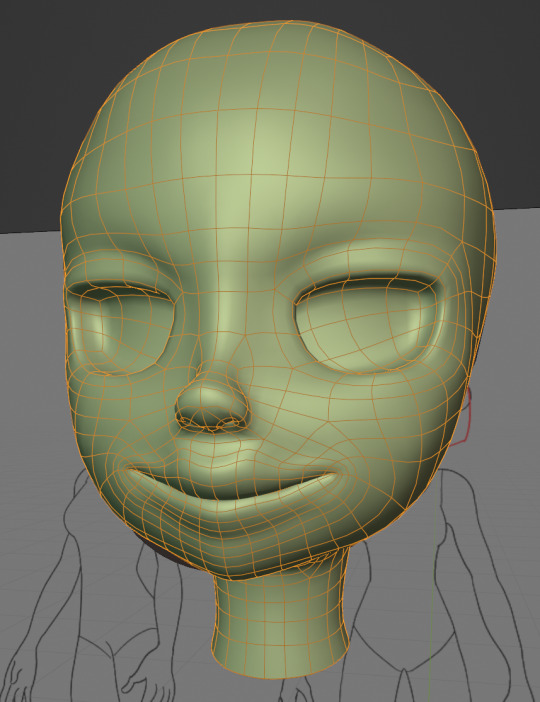

After this stage I continue with the head. First of all, don't forget to add the mirror modifier so I just need to model half of the model. There are different methods to approach modeling the head, like sculpt the head first, retopologize and than bake all the deatails onto the retopologized head. I actually prefer to polymodel the head especially when I have a good model sheet. I practially trace the lineart from the model sheet by extruding vertices, once from the frontview and once from the sideview. The most important points are the form of the eyes, the mouth, the form of the face and the jawline. The head block-out is used as an anchor point for the shrinkwrap modifier so that the traced forms actually look like they belong to a 3d form and not 2d lines floating space. From this point on it's just connecting everything, pull and push vertices so it looks like a 3d head and make sure the edgeflow is good. (It's also helpful to know how the planes of the head look like) After that I add the eyelashes, eyebrow, eyes and the ears, now it looks like something!
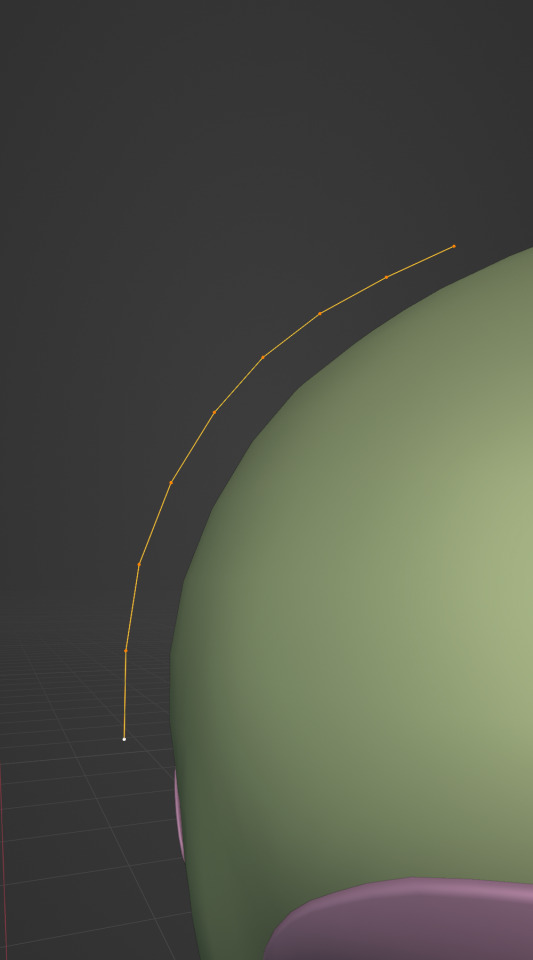
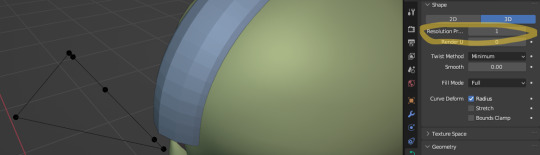
Now comes the hair. For the hair I used the "curve trick" like mentioned in the video series I recommended. Here is a tip to save time: I choose some edges from the head, duplicate and seperate it from the mesh. I convert this seperated line into a curve and choose a beziercircle as a bevel geometry. This is now the perfect foundation to model the hair further. One thing I needed a long time to notice: To get the beziercircle to a perfect square or in this case a triangle lower the Resolution U to 1 in the shape options. Now I just convert the curves into a mesh and add details and the head is done!
With the head finished I continue with the body. Remember how I wrote with a good block-out half of the work ist finished? Well, for this step I practically just use the smooth brush in sculpt mode and smooth everything out so everything looks connected. Then I retopologize the body and that's it. Well, ok there is a little bit more to it: Before smoothing things out I join the block-out part to a single mesh and remesh it with the remash modifier expept for the hands. I prefer to polymodel the hands seperatly without worrying about the rest of the body because they are difficult to model. I reattach them later. Speaking of reattaching, I make sure that the connection points have the same number of vertices while I retopologize/polymodel. To ensure that, I often use the following trick visualized with a simple example ( which is also described in the video series):
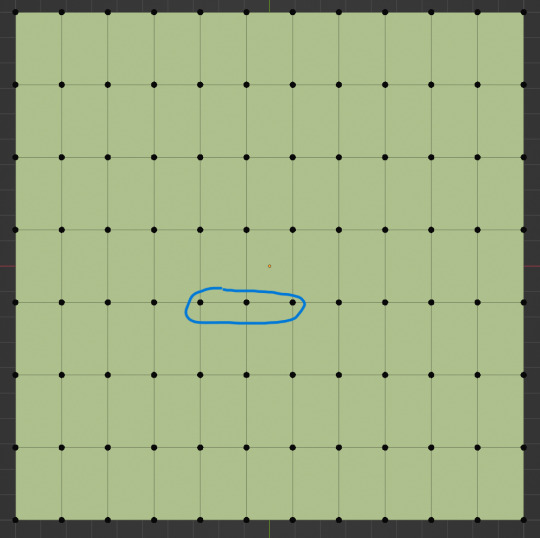

I want to reduce the amount of edges at the bottom of this plane, for this I merge 3 vertices from the middle into 1 vertice seen in the left image. After that I can select the blue marked edges from the center image and dissolve them. The result, which you can see on the right, is a nice clean edgeflow with a reduction in the number of edges.

After modeling every part I attach them together and I have a finished bodymesh the work with.

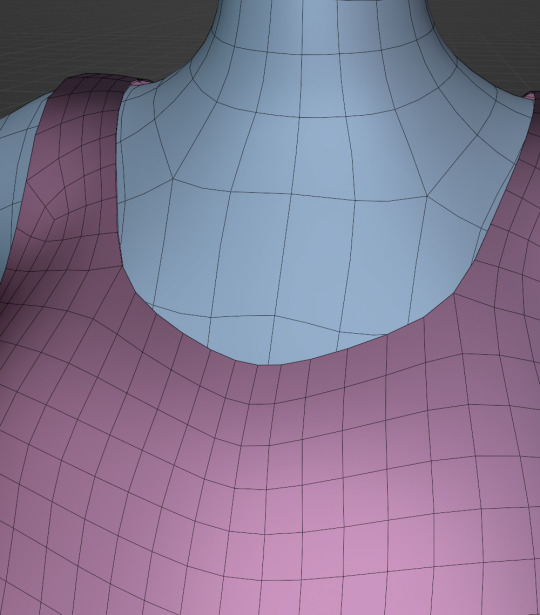
Now onto the clothes, for this I use the model sheet with clothes as reference. Having a retopologized body makes it easier to model simple stuff like e.g. Sam's shirt. On the left image the marked faces of the the bodymesh already looks like a shirt. I just need to duplicate and seperate this area, clean it up a little and the shirt is basically finished. The more complex stuff like the boots I need to polymodel around the bodymesh.

With that the modeling part is done! Now comes the things I said above: uv unwrapping, texture painting, rigging and shading. These are whole other topics I cannot go deeper because I'm still learning how to do these things but I hope my little write-up about how I appoach character modeling was enough to learn one thing or two.
Thank you for your time and thank for reading!
#3d modeling process#3d model#blender#danny phantom#sam manson#long post#my animation#my art#art resources
239 notes
·
View notes
Text
Streamlining Home Builders' Construction Process: Improve Efficiency & Deliver Results
Learn how to streamline the construction process for home builders. Discover tools and strategies that help manage projects efficiently, reduce delays, optimize workflows, and improve communication, ensuring faster project completion and higher client satisfaction.
Read More

#streamlining home builders' process#efficient construction process#improving home building efficiency#project management for home builders#optimizing home building workflow#reducing delays in construction#home builder project management tools#enhancing home construction efficiency.
0 notes
Note
Little!Stolas and CG!Blitzø fluff oneshot pls?
Takes place post-Sinsmas
Stolas is playing (activity of your choice; tea party, coloring, etc.), and Blitzø joins in on the fun

Absolutely! Thx so much for the patience; I’m graduating in a couple weeks and the work load this month has been CRAZY. Anyway, here it is, friend! Hope you’re having a good day! 💝💝💝

SFW AGE REGRESSION FIC. DNI IF NSFW, KINK, PROSHIP, OR SIMILAR. DO NOT REPOST TO OTHER SITES
Title: Paper Snowflakes
Pairing: CG!Blitzø & Little!Stolas
Wordcount: 1039
Description: A 100% domestic, fluffy moment between Blitzø and Stolas after Sinsmas

Paper Snowflakes
It had been several weeks since Sinsmas. The new year had since rolled around and the Extermination in the Pride Ring had slowed down I.M.P.’s workflow. In years past, Blitzo would have been bored with the slowed schedule, maybe taking a little too much pleasure in his escapades to the living world, but now? He couldn’t be bothered by it. The word thankful even crossed his mind.
Stolas had been staying at his apartment since the Sinsmas fiasco. He might have been a very well-mannered and quiet prince, but keeping him entertained seemed like a full-time job in itself. But maybe, just maybe, Blitzo would admit that spending time with Loona and his little one, with the occasional visits from M&M, made family time better than whatever jobs could have been thrown his way.
Hence why he didn’t hesitate to call in a long-weekend when Stolas woke up small one Monday in January. When the imp’s alarm clock had gone off, and he was greeted by a disturbed cry from a Little (and not a low grumbling about five more minutes like Stolas would have done if Big) he snatched his Hellphone off the nightstand to text Millie and Moxie that they wouldn’t be coming to the office.
From there, the morning started as usual. The two fell into what had become their comfortable regression routine since Stolas moved in; Blitzo worked in the kitchen to make breakfast, while the Little watched cartoons on the couch. Snuggled under a blanket and the volume low, the prince had time to slowly wake into the living world, while his Caregiver was energized by a quiet cup of coffee just a few yards away.
After they each had enjoyed a bowl of cereal and the morning cartoons had ended, Stolas had wandered over the cupboard, where several of his Sinsmas presents were stashed. He seemed set on the craft supplies, as the little owl attempted to carry far too many art supplies at once.
“Do you want some help with that, handsome?” Blitzo asked amusedly as he watched.
A stack of colorful construction paper was tucked under one wing, crayons and markers held close to his chest, a sticker book clamped in his beak–and rather than accepting assistance, Stolas managed to carry it all and, say, (around the sticker sheets in his mouth) ��G’t ‘t. ‘M big.”
Blitzo laughed to himself, “You’re right. You’re a very big boy who can handle it on you own, huh?”
“Mhm.”
To his credit, Stolas managed to carry the cache to the coffee table without spilling anything, then dropped them unceremoniously onto the surface and plopped down onto the floor. The boxes of crayons and markers were dumped out, so the cylinders of ink and wax were scattered everywhere.
Briefly Blitzo sighed at the mess, more resigned than annoyed as he took in the colorful chaos he would certainly have to clean up in twenty minutes or so.
“Color with me?” Stolas inquired, holding a marker out to his Caregiver to emphasize his question.
His wide eyes were hopeful, and the calmest they had been in weeks, and Blitzo knew he would never be able to say no to that face.
“Sure, buddy,” he replied with a smile and sat down beside him. “What are you making”
“It’s a surprise. No peeking,” Stolas replied with a faint smile appearing.
The mild mischief and happiness on his Little’s face made Blitzo’s own grin widen as he took a white sheet of paper from the pile.
While Stolas was rapidly switching between crayon colors, with precise and determined scribbles across his page, Blitzo instinctively began folding his. Picking up the safety scissors, he made random cuts across it. He hadn’t made paper snowflakes since he was quite young, but he remembered when he and his sister would make twenty-some and string them together to hang on the walls.
“Look, it’s done!”
Startled from his thoughts (maybe that was for the best), Blitzo looked to see Stolas’ drawing, which was being shoved towards him enthusiastically. He took the excitement in stride, taking the waxy paper into his hands to admire it properly.
It was a drawing of the two of them holding hands–a scene Stolas had depicted many times before, just like many children who enjoyed portraying their families in their art. But no matter how many times the image was reiterated, it never failed to tug at Blitzo’s heart strings. Kids drew what was important to them, the things they liked best, the emotions they wanted to express but didn’t quite have the words for.
And Blitzo liked this better; he preferred the simplicity of a drawing, colorful blobs holding hands with smiles to express happiness rather than the long awkward speeches adults were forced to have. In these quieter moments, when saying ‘I love you, I feel safe, I feel happy,’ could be contained in a piece of paper and not in a long-drawn conversation that took uncomfortable overanalyzing or social rules. It could just be this.
“I love it,” Blitzo smiled genuinely. “Mind if I put it up on the fridge?”
“Okay. What are you making?” Stolas asked, pointing to the now mostly shredded paper in his Caregiver’s hand.
“A snowflake. If you fold and cut the paper, it’ll make patterns. Here, watch,” he explained, glad to have another distraction before he got too emotional about the meaning behind the drawing (though now he had just oscillated back to the memories paper snowflakes–remember the days he could just shut out the memories he didn’t like? Caregiving was making him much too soft and emotionally competent)
Blitzo unfolded the paper, gradually revealing its design. It wasn’t nearly as good as his childhood ones–evidently out of practice in making graceful and detailed patterns–but Stolas still awed at it.
“Wow! I want to try! Show me?” he pleaded, and Blitzo relented easily.
There’s still a few months of winter left, he thought, maybe we could make a chain of them for the apartment or the office. They’d look nice on my desk, the imp thought.
By the end of the hour, they had made twenty-some, and found the string to hang them down the hallway.

#agere blog#sfw regression#little space#age regression community#agere little#age regression caregiver#sfw interaction only#age regressor#sfw agere#agere community#helluva blitzo#helluva stolas#helluva boss#helluvaverse#helluva boss agere#agere cg#safe agere#Caregiver Blitzø#Caregiver blitz#Age regressor stolas#Little stolas#martys agere fics#agere fic#Helluva boss agere fic#stolas x blitz#stolas#stolitz
14 notes
·
View notes
Note
Hi! I recently found your account, and I'm obsessed! I am pretty young, and have always struggled with self-image and am always trying to re-invent myself. I'm sure you have answered this a million times, but how do you start embracing your dark femininity? Thanks so much!!
Hi love! Thank you so much<3 Please see below:
Hope this helps xx
Cultivate your sense of self: Let go of your people-pleasing tendencies. Discover your values, likes, dislikes, goals, and dreams. What are your most genuine desires? What gives you energy? Who and what ignites a fire inside you? Write down your list of core values and 'rules for life.' You deserve a personal manifesto.
Build your cult of personality: How do you want your authentic self portrayed to the masses, your inner circle, partners in business, or pleasure? Which aspects of your personality do you want to be associated with your personal brand? How do you dress, smell, and carry yourself? How do you do your hair, nails, and makeup – what's your 'signature' look? What industry, professional, and social circles/activities do you want to be associated with? What hobbies, favorite meals, music, and destinations, should be synonymous with your name? Over time, these aspects of other people's lives with be synonymous with you. Elevate yourself with this allure of living through association. It encourages others to perceive you as equally relatable and unattainable.
Refine your wardrobe, speech, and habits: Streamline the external and internal aspects of your personal brand. This attention to detail demonstrates that you value yourself, your appearance, and your presence with others.
Set goals: Professional, financial, health, relationships, self-development, creativity, and pleasure. How do you want these areas of your life to look? What activities can you engage in to feel fulfilled, successful, and desirable in each category?
Construct routines, habits, and systems that serve you: Cultivate a ritual for every aspect of your life and time of day. Set a morning routine, night routine, diet and workout plan, workflow and schedule, budget and investment plan, relationship and sexual expectations to help you achieve your goals.
Indulge daily: Drink your favorite coffee in the morning, invest in high-quality skincare and pajamas, have that glass of wine after work, listen to music that speaks to your soul, draw, sing, dance, write, create a vision board – find ways to make your soul feel alive every day.
Set Boundaries: Protect your peace at all costs. Your life is for you. Decide what behaviors, people, and circumstances you will accept. Know when to compromise and when to walk away. Your life is for you.
Seduce yourself daily: Write and say affirmations, admire yourself in the mirror, and engage in activities that make you feel more confident (in your body and mind). The perception of an alluring personality starts with the habits you practice alone.
#dark feminine energy#dark femininity#self concept#personal development#personal branding#q/a#femmefatalevibe
157 notes
·
View notes
Text

Daily drawing 1860. I've been trying to practice digital painting when I have the time because I still feel really shakey with it. Normally I think of my workflow as being closer to drawing and layering since I'm more use to a construction style workflow than an organic one. But I am trying to expand my skill set more. I did immediately learn one thing though. I still tend to draw what I think I see instead of what I actually see. Since I'm following the color wheel for Huevember, I thought today's yellow would be good for a lemon study. But in reality, lemons are typically much more orange shifted than this more green shifted hue. It's a good reminder for me to think more carefully about what colors I am actually seeing.
35 notes
·
View notes
Note
for me, the loveliest parts of your drawings are the construction. like veryyy inspired and true to anatomy but very clearly your own flavor. your pdf has really really put that "spark" for me in drawing again 💖 especially since I also draw doodley & small. unfortunately, with my ADHD/current workflow it's a real uphill battle to not give up a study despite desperately wanting to get better at construction. :(
if you use studies a lot, do you have any tips on how to keep studies fun? What sources have worked for you in the past? (especially for fat/wrinkles/clothes)?
This is getting to be a pretty specific ask haha sorry if it's a lot. I hope some of it made sense tho :)
hi hi so idk that i'd endorse it per se but what worked for me was only focusing on stuff i was interested in for years LOL
so in high school i loved drawing hands and arms... so i only ever focused on hands and arms...
i literally did not start fully focusing on/trying to learn Legs (for example) until the last 2 years. you can see even now that idk how to draw shoes (and idk that ill ever learn because ive never cared about em irl and only really use one pair LMFAO but that could change!) and then its slowly come together like puzzle pieces.
All of this came from personal interest....i was fascinated with hands and arms at first, the shapes the forms. then u can combine it with other things. i became determined to draw all sorts of bodies well so i could depict my ocs accurately. i had a focus on noses because i love noses and wanted to have ocs with their own unique noses, so i had an excuse to draw said ocs more to learn. (and then becoming enamored with all the ways skin and flesh can sit and squish helped with wanting to draw bodies more).
stuff like that helps keep it fun. sometimes when i do body studies now i dont draw the heads/faces because its less fun (TO ME) to do that and i know ill end up focusing more on that than the learning of the body.
sometimes i draw the bodies with my ocs heads so i have more fun. when i first started learning legs i only drew disembodied ones.
im not saying to do dis and yes you have to leave your comfort zone to get better sometimes but you have to find what works for YOU... bc if you get too "uncomfortable" then u wont wanna do it at all (see again: i could force myself to draw a page of shoes but i genuinely just dont want to adn i dont care. maybe in a few years ill be obsessed with them. im king of not leaving my comfort zone. i love being comfortable. but i make it work)
however you Learn you can always expand upon it once u have the foundation! like how over the years ive added more little details to some forms (because i like seeing them!)
idk how i learned to get better at drawing fat but i recommend sources like fatphotoref, morpho's book on fat and skin folds, and (18+ recommendation) subreddits for nudes, especially if they're focused on fat people. i like this last one bc you can truly see a range of difference in body proportions and fat distribution etc as well as seeing how other people stylize such things
im going to be real with u and say i SUPER dont know how i learned folds. im actually still learning now that im exploring more fashion in the real world, but even now i kind of just guess from what i know theyre meant to look like. if i REALLY want it to look accurate ill wear a similar garment and use that as a ref and then keep that in my mental library. here's 2 examples i can think of where i really had to take a pic because my imagination wasn't cutting it (and even then the 2nd was exaggerated of course.) this seems like a "leaving the comfort zone" moment but it was truly fueled by curiosity and fascination more than anything, which is good. (but AGAIN. you could not get me to care this much about drawing shoes. so it really depends on You and your interests in order to make it fun.)


otherwise i kinda just guess 😭 this is where i excel at focusing on making something look Good instead of right. i just see what shapes look fun, sculpt them around the body...
morpho also has a clothing + folds book though, so i wld look there ^_^ perhaps try putting a subject you really enjoy into your favorite outfit for practice? stuff like that... that post about how improvement comes from being insanely obsessed with something is real u just gotta find and latch onto whatever that may be
22 notes
·
View notes