#DIY Tailoring
Text
Belt Loops: Guide to Crafting and Attaching for Beginners
In this post, you will learn how to sew and attach belt loops to your pants, dresses and skirts.
Join me on a journey through the art of sewing as we delve into the world of belt loops—a small but mighty detail that can transform any garment. Whether you’re a seasoned tailor or a DIY enthusiast, mastering the technique of creating and attaching belt loops is a skill that elevates your fashion…

View On WordPress
#Belt Loops#clothing repair#Custom Tailoring#DIY Tailoring#fabric selection#fashion DIY#Garment Crafting#Sewing Techniques#sewing tips#Tailoring Essentials
5 notes
·
View notes
Text
Me: why is the thread tangling and breaking on my sewing machine?
My sister, professional seamstress with a degree in fashion design: what are you doing with it?
Me: altering a leather jacket with upholstery thread and a size 110 needle.
My sister: oh for FUCKS SAKE!
#i had to live with her when she was the worst possible teenager#so now i get to torment her with my shenanigans#diy#diy tailoring#apparently i have slightly shorter arms than the average shop window mannequin my size#which is easy on shirts and not so easy on genuine leather jackets#of which i have entirely too many#but also torturing W is one of the most fun things
5 notes
·
View notes
Text
Video of the full process for my Targ dress, including the method I use to make very sturdy embroidered patches. Theoretically I could take these off and put them on a different dress or jacket if I wanted to!
#diy patches#patches#embroidery#sewing#tailoring#thrift flip#thrift finds#thrifting#sustainable fashion#sustainable#mine#asoiaf#a song of ice and fire#hotd#house of the dragon#costuming#house targaryen
59 notes
·
View notes
Text
I feel like everyone should be taught basic tailoring at some point because it makes things look so much better
Sleeves just a little too long? Hem them instead of letting them stack and wrinkle and make you look like a kid playing dress-up
Pockets too shallow? Rip some out of an old pair of pants and use them as extensions
Shapeless dress but it has a nice color and good pockets? Take in that waist, trim what's not needed, and bam, nice dress
Tank top sticks out under the arms? Fold it in and sew it up—voila, a well-fitting tank top
Button starting to get loose? Grab some needle and thread and loop the thread through the holes a few times. That button isn't going anywhere.
You don't even need a machine. I do most of my alterations by hand (I find the machine most useful for bigger jobs that are better done quickly, while hand stuff is better for smaller and slower jobs).
It doesn't even have to be obvious! Several of my work polos are tailored (short sleeves brushed the insides of my elbows, which I didn't like, so I shortened them slightly) and no one said a word. It's difficult to tell that the extra fold is there—the sleeves were cuffed, so I folded it up and sewed it in place by hand. When I was working, I sometimes had to compare sleeves to see which ones I'd done.
You don't even need to cut anything if the alteration is small. I didn't cut anything but thread while altering my work polos. Taking in the tank top that stuck out under my arms was my first time tailoring, so I avoided cutting anything just in case I made a mistake.
Anyway learn basic tailoring if you can
673 notes
·
View notes
Text
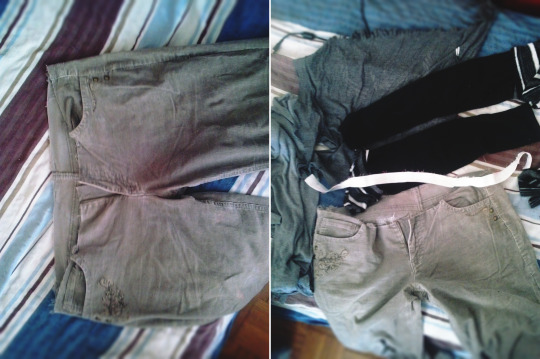
Fixing pants with overly-tight waistband
So, I accidentally found some warm winter pants in a box under my bed! I was extremely happy to find them because I've been out in freezing temperatures in jeans, my legs getting red and irritated from the cold. However, these pants I found, there's something interesting about them; they've got their waistband completely cut off.
I have no memory of cutting that off, but I'm 100% sure it was me, because I know what my line of thinking was. The waistband was too tight, and the pants were high-waisted, so I thought, hey, I just need to cut off this tight part and then the pants will be wearable. And then, after I cut if off, I found out, that no, you can't just cut off the piece of pants that keeps them on your body. They slide off. So after that bold move I just abandoned them in a box. I had no confidence that I could fix them, but this has changed! I am not any better at sewing than I was back then, but my confidence is through the roof, I believe I can not only fix this but make them the most comfortable pair of pants I own.
I rummaged around to find some materials I could use for a new waistband, and I was purposefully picking materials that are very stretchy, soft and warm. I want a soft stretchy waistband! I ended up being specifically drawn to these 2 black sleeves; they're from a sweater, super warm and stretchy, and also durable. I also found an elastic that I ripped out of some sweatpants in the past because it was too tight.
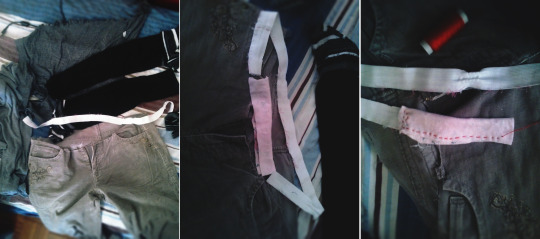
I decided to make the elastic longer by adding a piece of cotton fabric in the middle, and I sewed that together, I feel like it doesn't matter if there's some normal cloth in there. It won't be visible anyway.Now, to make those sleeves into a waistband. I figured out I could do it without cutting them into pieces of fabric; they're already sewn into tubes. So instead I cut them to be the same length as my elastic, and sewed them together into one long tube (I made a mistake at first and flipped one sleeve on the wrong side. But I redid it and now they're good).
Now my long tube can hold the elastic in it! But then I decided, wait, I would prefer if I just folded those tubes into a new, doubly thicker tube, because I really want as many warm layers as possible on my hips (don't wanna get cold). So the tube is folded, and elastic is placed in.
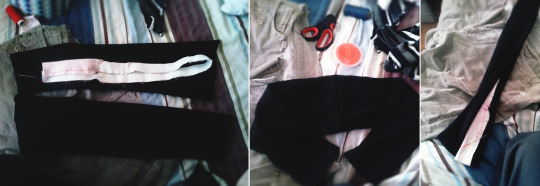
So now I needed to sew these sleeves into a new tube, with the elastic inside, and I figured, hey, I could just sew them onto the pants at the same time, so I don't have to sew that part multiple times.
I lined up the tube with the pants, and you can see I very haphazardly just sewed them on with a normal running stitch; I was mostly doing that to try it out, and see how it would look like all put together. I then sewed the elastic together in a circle, and closed the tubes together as well. The waistband at this point was shorter in length than the cut off hem of the pants, so I was lightly scrunching the pants while sewing, to match the length, knowing once I put them on this will not be visible and even out. Then I tried them on, and while it looked okay, my running stitch came apart, and the waistband separated!
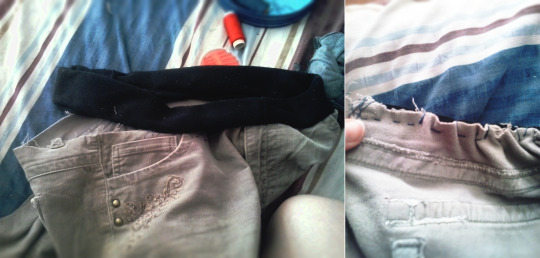
You can see here how half of the waistband is off. I was so focused on scrunching the pants I forgot to make the stitch adjusted to the stretchy fabric.
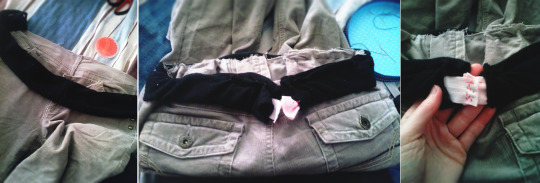
I know sewing machines have a special stitch that is used on stretchy fabric so the stitch itself is stretchy, but I never found out how to do something like that by hand, and I was at that point, in a room with no internet so I wasn't gonna find out. Instead, I invented my own little stitch that would do a good-enough job. In the second picture you can see how every few stitches, there's thread just going around the edge, that was my trick. This way, when I'm stretching the waistband, instead of the thread breaking, it will pull from these areas where I've wrapped it around, because it's a bit more loose in there and can be tightened without breaking. I've also sewn it in 4 sections, so its not one continuous thread going through the same waistband.
Once I did that, I was mostly done! Here's the pants mended and how they look on me.
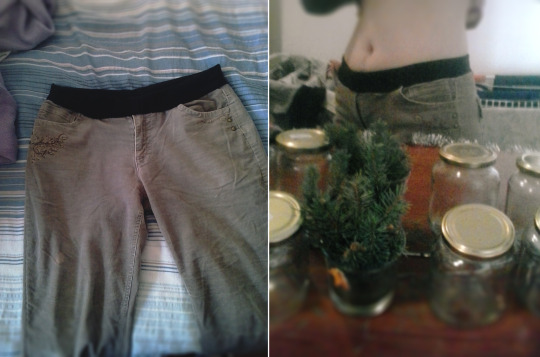
I've converted them into sweatpant-like garment, which, yes, good. But! I was wrong about one thing. That elastic, even though I added some length on it, was still too tight, making me feel uncomfortable and tight. So. I opened up the waistband again. Pulled the elastic out. Stitched it back, and tried it on. And decided to keep it like that. This fix didn't need an elastic, I was just paranoid that my new waistband wouldn't hold without one – but it was stretchy and firm enough to hold without any issues! They look just the same as with the elastic in them. I've since worn them outside and they're great!
This entire fix maybe took an hour and now I have comfortable pants to wear all winter. 10/10 recommend trying it out.
Also this is not an official way how to fix a waistband, I've done it before by just adding extra fabric to the waistband that was already there, and it's a lot less work, however... this works too. If you've.. chaotically cut the whole waistband off. Completely salvageable.
#mending#fixing clothing#sewing#clothing#diy#new waistband#fixing insane choices from the past#but this is much more comfortable solution#than just adding more fabric into a tight waistband#this is a new and better and warmer waistband#the old one could not compete#making garments comfortable#making pants comfortable#say no to female suffering of tight clothing#tailor that stuff so its comfy instead
24 notes
·
View notes
Text
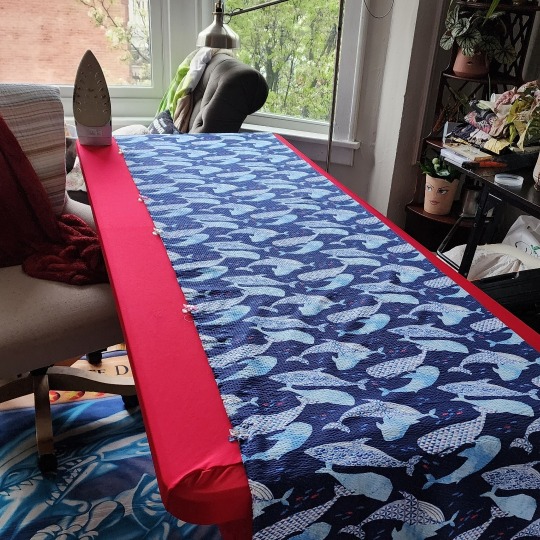
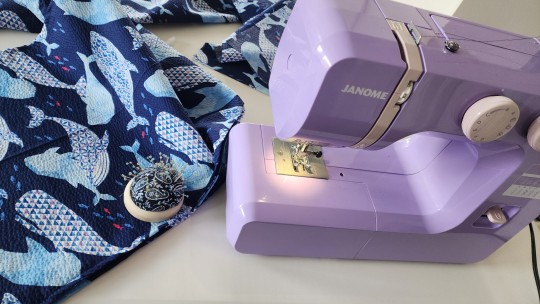
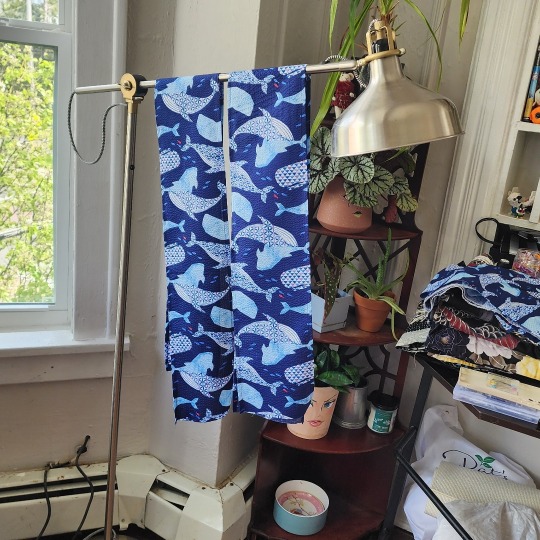
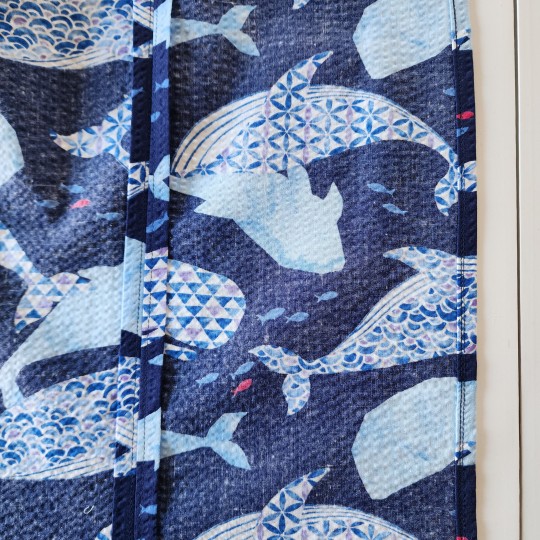
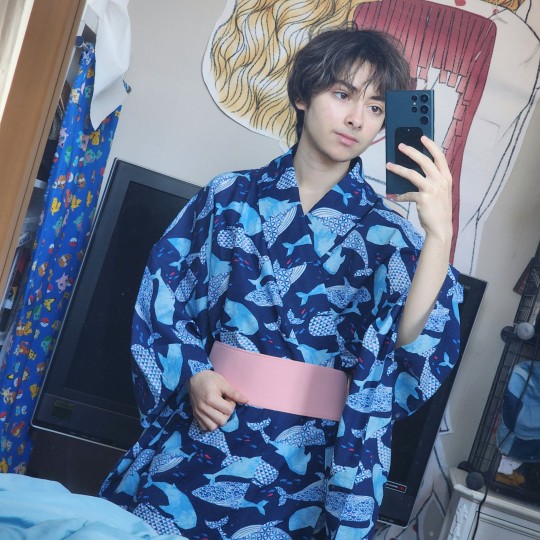
the whale yukata... lives.
my obi are still in storage, but for some reason i have a datejime.
seriously love this thing
#yukata#kitsuke#kimono#whales#sewing#sewist#selfie#me#diy#tailoring#wafuku#summer#japan#japanese fashion
13 notes
·
View notes
Photo

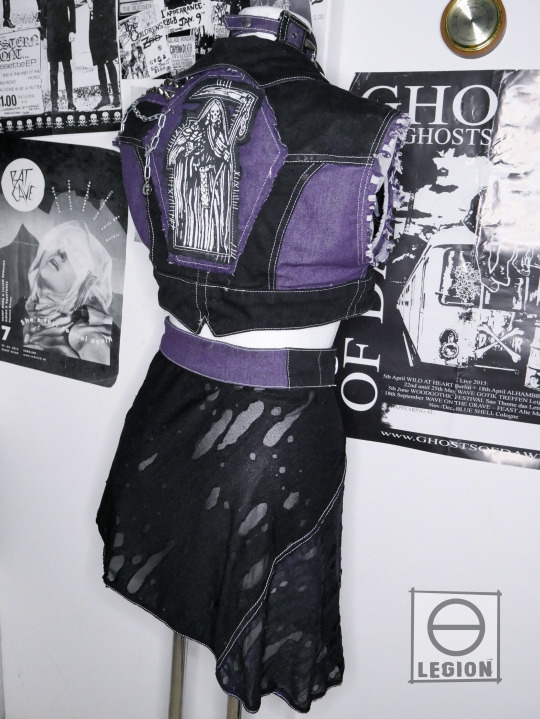
Santa Muerte
#Gothic#Deathrock#Post-Punk#DIY#Tailoring#fashion#fashion design#denim#purple#gothicfashion#deathrockfashion#underground#undergroundfashion#pun#punkfashion
162 notes
·
View notes
Text
youtube
These DIY Tailoring Terms Can Be CONFUSING! (Stylish D)
#wasteless crafts#youtube#diy#how to#tutorial#tailoring#sewing#mending#stylish d#no subtitles#no captions#uncaptioned video#video#tailoring terms#sewing terms
179 notes
·
View notes
Note
Could a haori be used as a top part of a two-piece kimono or it is made so different that it wouldn't work? I was planning to buy a haori to turn it into the top part and use some fabric to make the skirt of the kimono, but I want to make sure first hahaha
[my askbox is clear, if you didn't hear from me Tumblr might have eaten your ask away, don't hesitate to send it back ;)]
Hi! To be honest, I’d advise not going that way ^^; Kimono and haori might look the same, but are in fact tailored differently.
A haori will not sit right if you try closing it crossed like a kimono for example (their fronts lack okumi front panels to wrap around your body). Haori collars are also pretty different (much narrower and always sewn folded), as are their sides (which have gussets inserts).
You can check how different kimono/haori are below (pic source):

Another argument against your plan is the difference between top vs bottom fabrics. Part of the kimono look is the “unity” going on the whole garment vertically. Even patchwork like kimono keeps that idea going, see katamigawari like this or this (I am not touching boro style clothing though).
If the 2 parts is for easy dressing, your best shot would in fact be to buy a kimono and cut it in a top + a skirt. You'd also be able to lenghten a too short kimono that way by adding fabric on skirt part which would be hidden by the top one when dressed.
Otherwise, you can find online sewing tutorial as to make your own kimono :) Process is quite accessible the hardest part to figure being the collar area. I’ve not tried it yet, but Billy’s step by step is super detailed:
youtube
As for haori tailoring this video seems pretty nice too:
youtube
#ask#japan#fashion#kimono#haori#tailoring#kimono tailoring#sewing#sewing kimono#sewing haori#haori tailoring#kitsuke#two part kimono#katamigawari#patchwork#diy#billy matsunaga#着物#羽織
211 notes
·
View notes
Text
Men's fashion needs more variety, and women's fashion needs more practicality.
#text post#my thoughts#men's fashion is BORING#i refuse to wear a tuxedo to my wedding#let women have pockets#let men have more fit and colour choices#not all of us can afford a fucking tailor you know#not all of us have the patience or skill for diy either#WEAR WHATEVER THE FUCK YOU WANT#(within reason)
9 notes
·
View notes
Text
some absolute bangers on reddit today
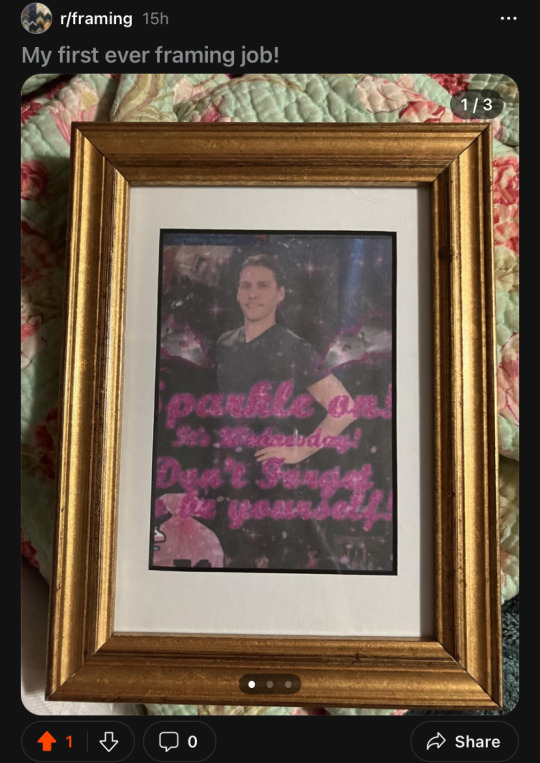
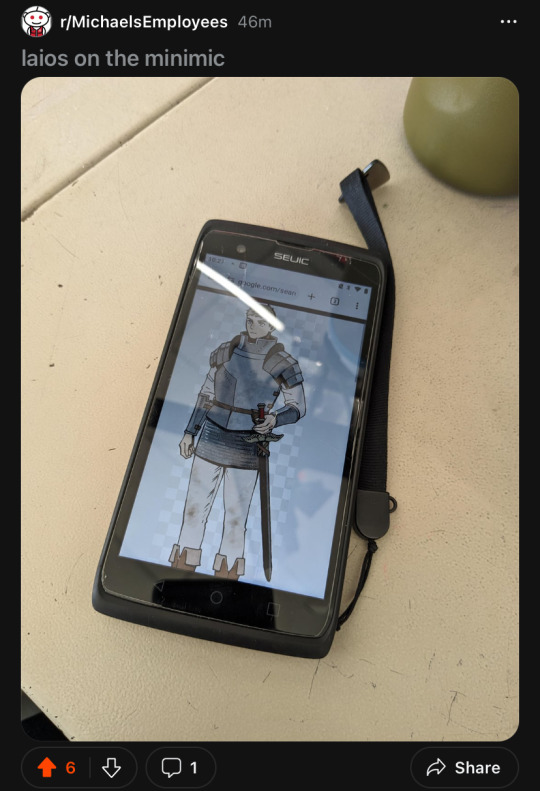
#just so you all know r/framing is one of those kinda stuck up niche hobby kind of subreddits#tailored to custom framing which normally is very expensive and has those. kinds of customers#ans sometimes some discussion of DIYing custom framing#so this person DIYed a frame… of jerma#while custom framing is normally used for like very prestigious artworks and occasionally photographs#not. jerma.#i find it hilarious but i think the lack of comments and the downvotes are due to the larger culture of that subreddit#and the michaels one is just. well. imagine using your work handheld scanner that only functions to scan items#and then pulling up laios dungeon meshi on it#brot posts#anyway side note one of my oldest OCs is named laeios and i keep reading/typing laios as laeios !! augh
4 notes
·
View notes
Text
How to Cut Patterns for Sewing- Beginner Friendly with Video
In this post, you will learn how to cut patterns for sewing.
Embark on a transformative journey into the world of sewing with my essential guide on how to cut patterns for sewing. This foundational skill is the cornerstone of creating bespoke garments that fit flawlessly and look professional. Whether you’re a novice eager to learn pattern cutting for beginners or an experienced crafter refining…

View On WordPress
#DIY Sewing Projects#Fabric Cutting Guide#Fabric Selection Tips#Home Sewing Insights#Pattern Cutting Basics#Sewing Craftsmanship#sewing for beginners#Sewing Pattern Preparation#sewing patterns#Tailoring Techniques
3 notes
·
View notes
Text
i think sometimes people are overzealous about saying certain clothing alterations can't be done. there are definitely some things that can't be done to "professional tailor" standards but i just have "nobody will notice" standards
#magpiemending#remains to be seen how my DIY alterations will turn out but i tried basting some of them to see and things look good so far#also sometimes the objection is not 'this is impossible' but 'the amount it would cost to have a tailor do this would make it silly to do'#which doesnt apply to some weirdo with a hobby doing it themselves
5 notes
·
View notes
Text
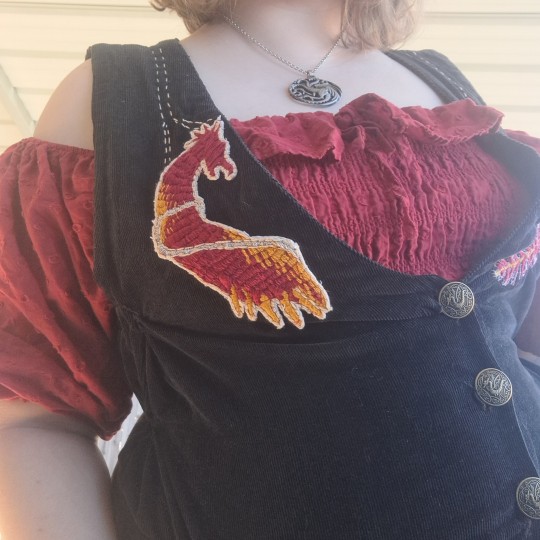
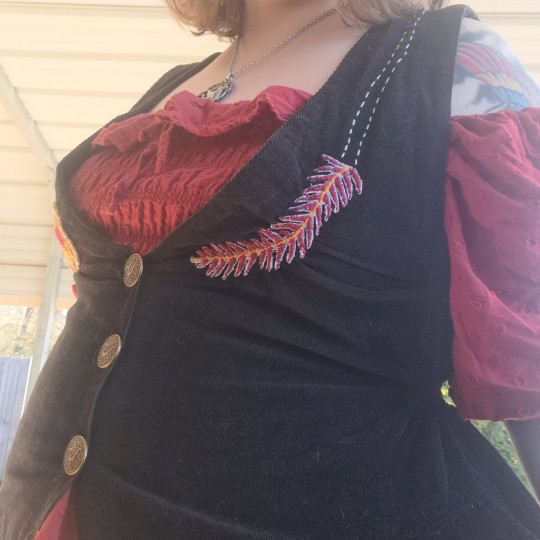
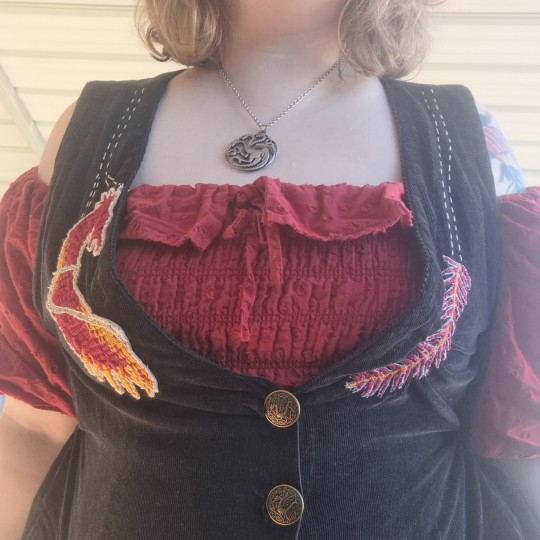
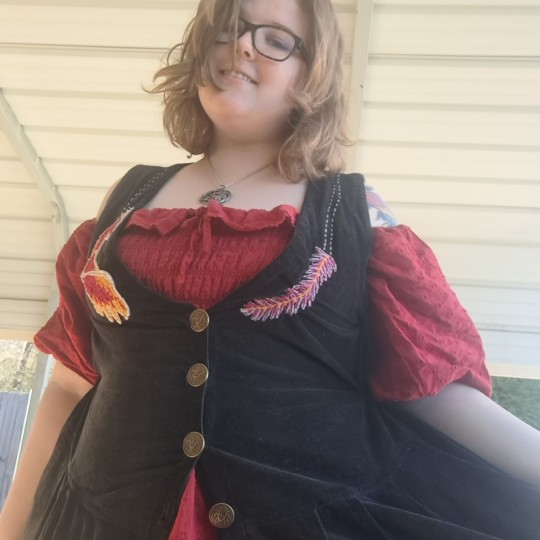
Thrifted dress that I tailored to fit better, gave new buttons, and embroidered with some pieces inspired by House Targaryen from ASOIAF. I was really excited to find a 100% cotton corduroy dress at Goodwill, but it was a little big on me and needed new buttons, so I decided to go ahead and add some dragons while I was working on it lol
I was reading Fire and Blood when I started this project, but I also took inspiration from two of Rhaenyra's outfits on the House of the Dragon show, especially the one she wears when she's declared Heir to the Iron Throne in the pilot.
I'm really happy with how this turned out!
#thrift flip#thrift finds#thrifting#sustainable fashion#sustainable style#tailoring#sewing#embroidery#diy patches#plus size#plus size fashion#fiber art#fiber arts#house targaryen#rhaenyra targaryen#asoiaf#a song of ice and fire#fire and blood#house of the dragon#hotd#mine
22 notes
·
View notes
Text
I realized that I never shared a sticker that I made several months ago (one of my DIY stickers). I put it on my phone case, although this is a picture of it before I put it on my phone case. (And yes, it is still on my phone case!)

#my art#btw for anyone who does not know: that is one of Big Country's logos (and part of the chorus to their song ''Peace in Our Time''). I just#tailored it to support Palestine in specific 💗❤🖤🤍💚#I guess I got a kind of tilted photo of it originally but actually the only way it would fit on my phone case was if I put it on diagonally#because below this sticker is my DIY 'Hooty in front of the typewriter' sticker that I made awhile ago that's still on there :)#I don't remember if I ever showed/posted that particular Hooty sticker either? but it's been on my phone case for a long time now#so this and the Hooty sticker are the only stickers on my phone case at the moment
3 notes
·
View notes
Text

Tailoring - blazer anatomy
#fashion design#fashion#fashion school#fashion designer#diy fashion#high fashion#tailoring#savile row#alexander mcqueen#martin margiela#maison margiela#john galliano#haute couture#hautefashion#streetwear#street fashion#jeanlouiecastillo#goth fashion#goth menswear#menswear#mensfashion#menstyle#pattern making#pattern cutting#sewing#hand sewing#sewing machine#dark fashion#punk aesthetic#punk
3 notes
·
View notes
Last Seen Blogs

1234off
Untitled

azuritsstuff
Untitled

forbidden-fandoms
forbidden-fandoms

wondermutt20
Wondermutt’s Lair

nim-lock
Nim-lock