#Design tutorial
Explore tagged Tumblr posts
Visit Tumblr Blog
Explore Tumblr blogs with no restrictions, modern design and the best experience.
Last Seen Tumblr Blogs


Fun Fact
In 2020, Tumblr had 29.4 million users in the US.
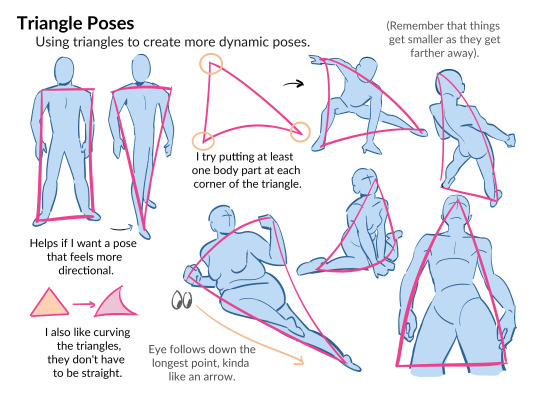
Text
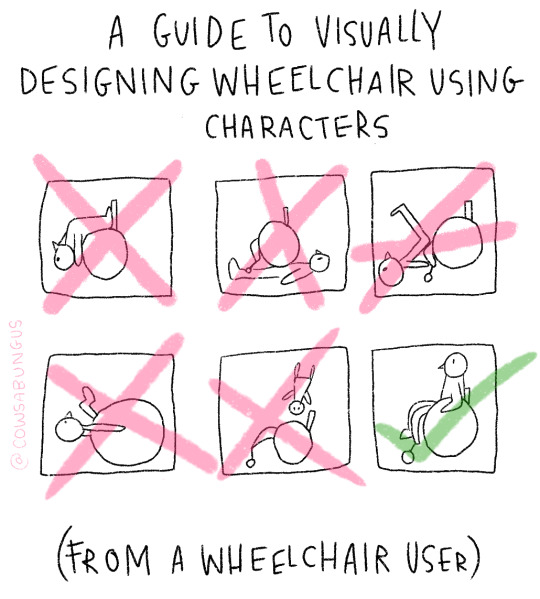
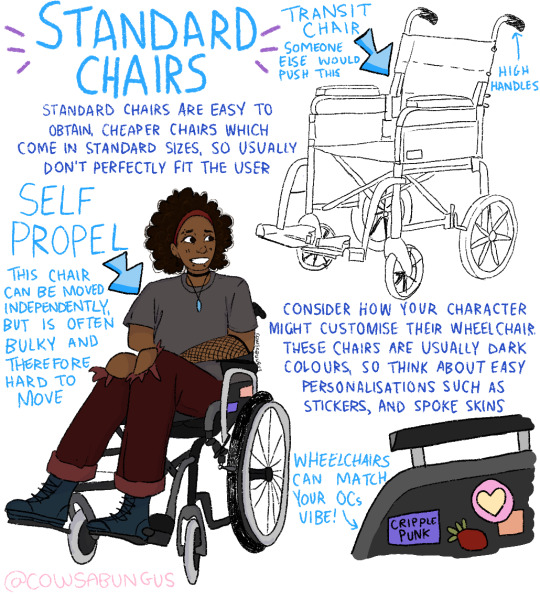
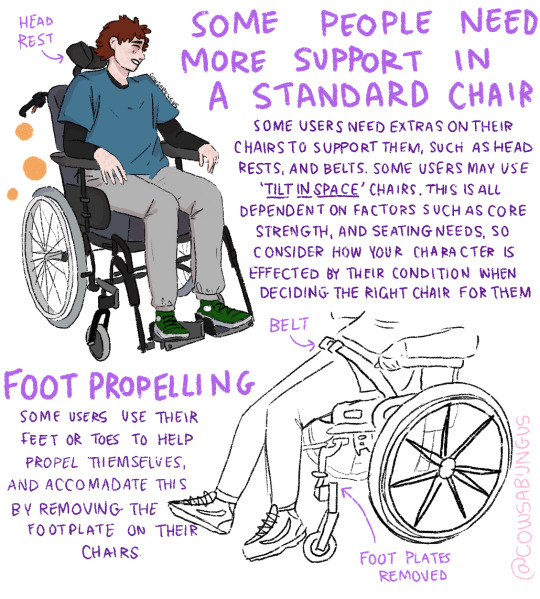

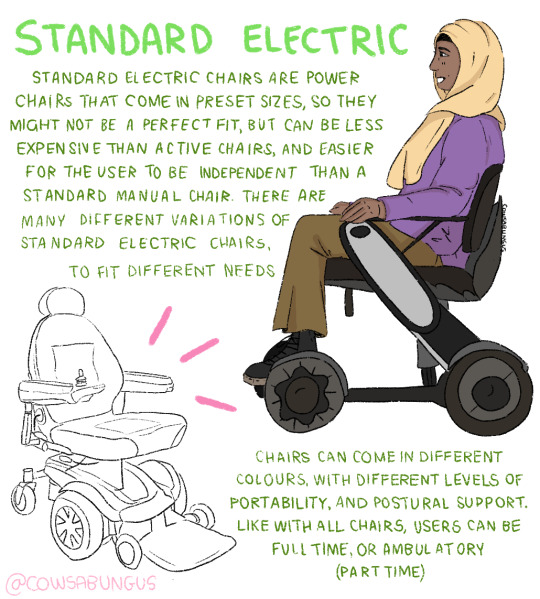

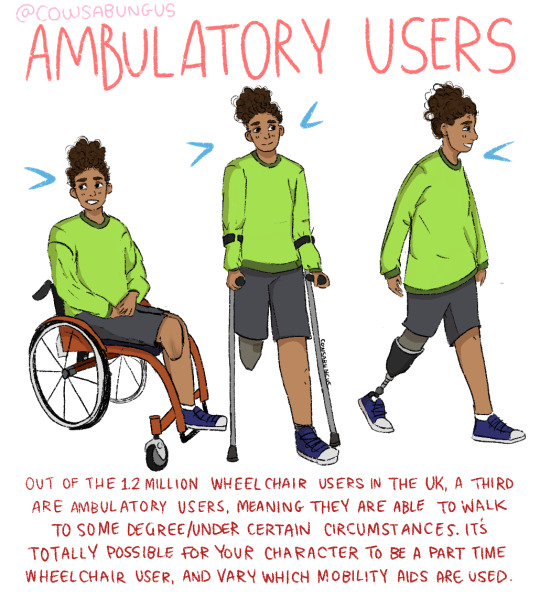
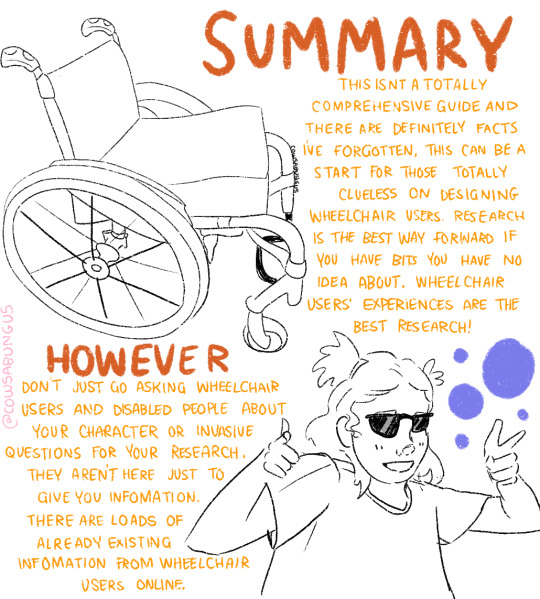
A guide to designing wheelchair using characters!
I hope this helps anyone who's trying to design their oc using a wheelchair, it's not a complete guide but I tried my best! deffo do more research if you're writing them as a character
#art#original art#artist#oc art#original character#queer#disabled#disabled rights#disability#disability pride month#tutorial#art tutorial#disabled character#design tutorial#drawing tutorial#Tumblr tutorial#character design#character illustration#concept art
114K notes
·
View notes
Note
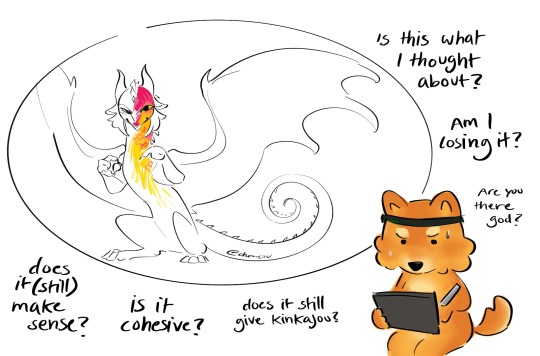
oh i just LOVE your style!!!! if you wouldn't mind, could you explain how you go about designing and what your artistic process is with dragons specifically?? I love your lady jewel design the most!!!!!!
Of course, and thank you so much! @aldershadows also asked this question, and I hope I can give you a comprehensive answer, and will be taking this oppurtunity to create a one-and-done design tutorial to answer any similar questions that may come up in the future.
Bear in mind that I'm not a professional, and I'm not looking to dissuade people from following traditional techniques or other advice. This is purely a discussion of MY process, and what I consider to be good/bad design technique.
Where to Start
There are six important conceptual 'principles' I like to consider when in the initial stages of (Re)designing a character: Story, Personality, Aesthetic, Interpretation, and canon/fanon appearance. Fully understanding these principals can help you understand a character, which will make both your life and design better.
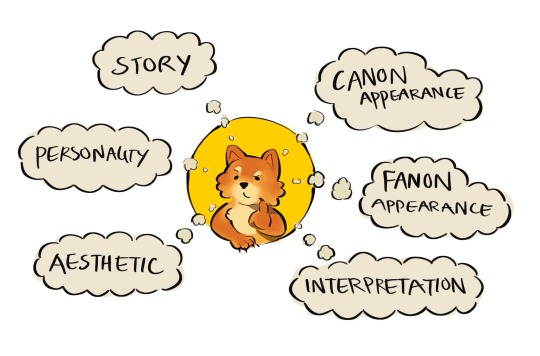
Story: What is this character's actual story? What's their lore? Where do they start, and where do they end up - and most importantly, where does your design fit into that timeline? When I design characters, I try to be clear on exactly what part of their journey they are on. (Ex: blaze and the coat -> sandwing succession war)
Personality: This one is pretty easy - what is your character like, and how do they present themselves to the outside world? When you make a character and show them to the world, everything in the canvas is interpreted by the audience: even down to simple details like posture or background. Treat it like an opportunity to show off as much of your character's personality as you can.
Aesthetic: Aesthetic plays the most important role of all: it's job is to make sure your design is cohesive. It can be a common theme, pattern, color pallet or shape - as long as it reoccurs throughout a design, it's good. Use aesthetics to amplify the other principals, and figure out how to make it *look* nice as a secondary goal.
Interpretation: This one is specific to redesigns, but could also be applied to OCs - I like to consider my personal interpretation of a character: the media I see, the opinion I have... Multi-animator projects, other fanart pieces and personal quirks make up my interpretation of most WoF characters. You don't always need to incorporate your interpretation, but it's good to have in mind.
Canon/Fanon appearances: If you want to design and OC, ignore this. If you're redesigning an existing character, it's useful to consider how your audience views them - for example, most of us collectively agree on a few key design aspects of most characters. That doesn't mean you have to follow those conventions, but keep in mind that they may make your character more or less recognizable. You can also call on the other principles of design to make up for any leap-of-faith redesign choices you make.
Narrow It Down
Now that you're thinking, it's time to narrow those ideas down! Be aware that sometimes, less is more: you might have a ton of cool concepts, but your design will look BAD if you can't stay cohesive. The number of different ideas that can co-exist in one design varies a lot by preference and similarity, so be evaluative when doing this. If you follow my blog, you might notice I tend to walk the line between detailed, cohesive design and overwhelming animator repellent. To combat this, I try to step back often and consider if I've gone too far.
At this stage, it's good to make notes or small sketches - anything to get your ideas down.
Experiment
Test your ideas out with more sketches - alter, add, subtract... whatever your heart desires. Experimentation is the best way to discover your specific design tendencies, as well as breaking new ground and stepping out of your comfort zone. The more you experiment, the quicker you'll improve. This is usually the point where I start testing out different patterns, since those are the main highlight of most of my redesigns. Pertaining to dragons, it's always a good idea to test out different shapes - especially wings, spikes, arms and tails, which are generally the most customizable features of a character. Looking to other artists for advice/inspiration is also a great tactic, but be sure to follow the 80/20 rule of originality within your designs!
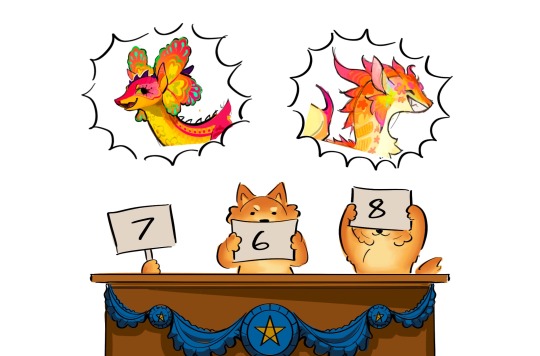
Judge yourself (not literally)
Evaluating your designs as you make them is always a great idea, but sometimes you need multiple tests/sketches in order to know what you REALLY want. Compare your experiments - what do you like about them? What do you dislike? Which are more faithful to the character, and which ones confuse you? understanding the flaws in your design can help you to overcome even the biggest challenges.
I've used Kinkajou to show how important evaluation is: despite being my favorite character, she has proved exceedingly hard to redesign (to my satisfaction,) even with multiple attempts from this year and the last. She might not even be released by the time this post airs - but with the power of critical thinking and good evaluation, her design has gradually improved over my last few attempts.
Stay on your toes
Did you think you were done? Did you think it was over? NO. Life doesn't get easier just because you made it past the idea stage. When you have your final thoughts and want to get chugging with your reference page/illustration, make sure to stay alert! Keep evaluating, keep experimenting, and make sure to stay mindful of what you do! One of the more common issues I have is that I turn my brain off while I draw, and then slowly my designs drift further and further away from the idea I actually wanted to put down. Asking yourself questions along the way can help to sharpen your design, and train your mind to think more artistically.
It's always good to take a once-over of your final product: check for errors you might have made, and think about whether or not your design still looks good. Does it show personality? Is it consistent?
If you do find that your end product isn't what you really imagined, don't despair - there are plenty of lazy tricks you (And I) can pull to string things back together again. Using gradient maps is a great way to fix your colors, and simple filters like 'overlay' (procreate) can help to neutralize your pallet. My favorite trick is to use the 'curves' tool (procreate) to make certain colors darker, in the case that I feel my design doesn't use a wide enough range of light and dark shades. I also like to turn saturation down if I think there's a color problem, to see if it's actually my pallet or if I'm using too many colors with the same tone.

Keep Going
My design strategy relies on confidence. You won't be able to improve if you doubt that you can! So, my most important piece of advice is to keep going, no matter how fast or slow you seem to make progress. My second most important piece of advice is not to compare yourself to other artists - focusing on their progress is neglecting your own.

To everyone who made it this far, thank you so much! Posting here truly is an amazing experience and I adore you guys. Sorry if this got a little out of hand. I hope this was helpful to you and anyone else with the same question, as well as being a useful resource to other artists in the future! As always, my askbox is open to any and all questions + requests for redesigns!
( ´ ω ` )ノ゙
441 notes
·
View notes
Text


Last year, I had the amazing opportunity to create a character design tutorial for "Inspired by Nature" by @3dtotal. Here are some of the artworks included in it!
The book teaches readers how to use flowers, plants, trees, fungi, and other elements of the natural world as inspiration for character designs. My task was to choose a summer flower and design a character based on its features.
I chose the cornflower and created this little goblin, Periwinkle!
Periwinkle specializes in collecting nectar and pollen to make infusions and medicines for animals and insects in need. His friend and assistant, Bumblebee (also included on the artworks here!), helps him gather the ingredients, with the added benefit of pollinating flowers along the way.
In addition to Periwinkle, the book features 16 other incredible characters to explore and learn from. If you're interested, the book is available in the @3dtotal store!
#digital art#norapotwora#characterdesign#character art#original character#fantasy#character tutorial#design tutorial#cornflower#goblin design#goblin character#goblin#flower character
401 notes
·
View notes
Note
resident evil banners?
[REQUESTED] Resident Evil Banners


#carrd moodboard#carrd graphics#carrd inspo#carrd stuff#discord chat#discord roleplay#design tutorial#banner design#tumblr banner#banners#carrd resources#discord server discord chat discord roleplay aesthetic#resident evil#leon kennedy#ada wong#ethan winters#discord server discord chat discord roleplay aesthetic banners tumblr banner banner design template aethstetic black and white#design#diy#digital art#blinkies
99 notes
·
View notes
Video
youtube
how to add dynamic Page numbers in Canva
#youtube#canva#canva design#canva tutorial#canva update#canva new feature#page numbers#dynamic page numbers#graphic design tips#design tips#tutorial#learn design#design tutorial#book design#book pages#book page numbers#canva tutorial for beginners
2 notes
·
View notes
Text
Transform your designs with a chalk effect in Photoshop! Learn how with Graphic Designer India.
For more tips and tutorials,
visit : https://www.instagram.com/virtualrealdesign
visit our website: https://graphicdesignerindia.in/
#designer#graphic design#photoshop#phototshoptutorial#photoshoptips#tutorial#art tutorial#art tip#art tools#graphic art#tips#design tutorial#viral video#viral#viral trends#trendingnow#reels
2 notes
·
View notes
Note
hi bestie- any starting points on how to make an album redesign?
Hey, yes! Under the cut
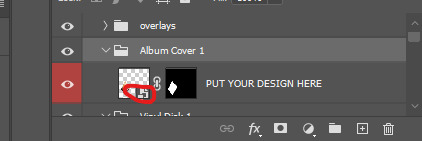
So, firstly, you’ll need to decide the images you want to use for your cover. Always use an HD image, for Taylor stuff I recommend getting one from taylorpictures.net, and if you want to make a more elaborate cover and add a different background, I recommend getting background images from pexels.com, which are copyright-free. Avoid Pinterest because most images are reposted and copyrighted, and the quality is bad. I’m assuming you know the basics of making a cover (resizing, sharpening, removing the background), so I’ll briefly describe my process, but if you want something more visual on how to make the cover, let me know. After you’ve chosen your images, make the cover as you usually would. For the Evermore cover, I started by removing the background on the Taylor photo, then resizing it (the dimensions used on both pictures were 540px x 540px), sharpening and coloring it. After that, I dragged the Taylor photo on the autumn background and added text and for the back cover, I added a logo of Republic Records. The most important part is done, after that, you’ll need a CD or vinyl template. I've used these in the past and they're pretty good. I'm gonna show you how to put the cover on the template. Open the template on Photoshop/photopea, go to the album cover folder and right click on the tumbnail circled in red (apologies for the bad circle)
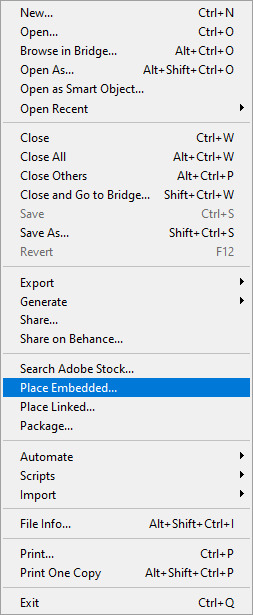
Another tab should open, then you just put your design there using place embedded, that way you can adjust the size a bit without having to resize it.
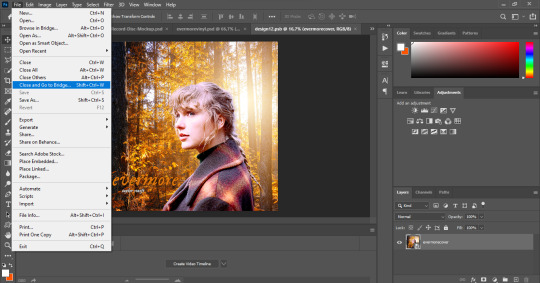
After you've put your design there and adjusted it to your liking, click on file > close and go to bridge so it will show up on the template.
Repeat this process for the disc and back cover until you're done

When you're done, just save your design as a png file and you should be good to go! If you need anything else, my inbox is always open <3
4 notes
·
View notes
Video
youtube
How to make a vintage collage in Photoshop
3 notes
·
View notes
Text
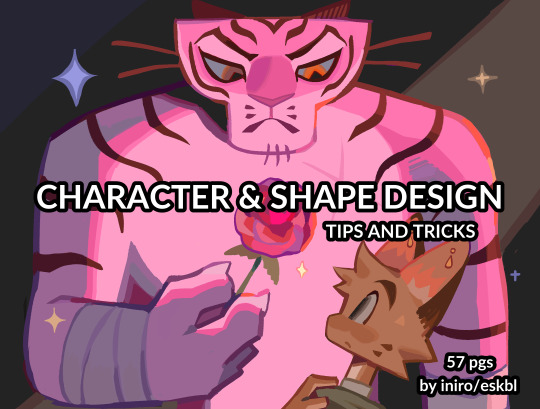
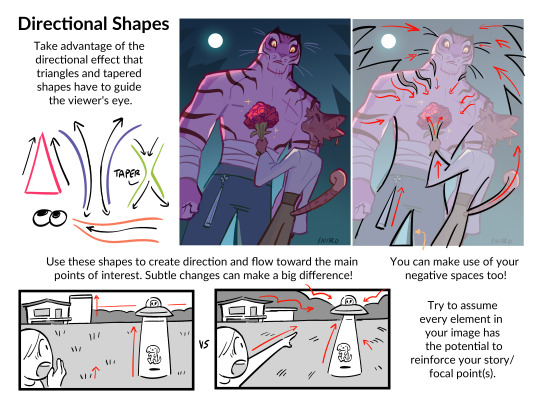
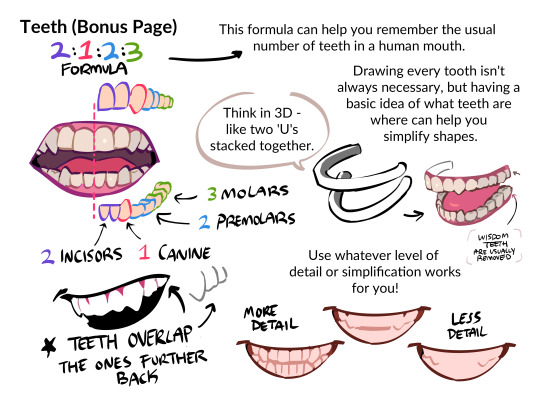

HII my character & shape design tips PDF is now available! ^_^ hope you enjoy !!
BUY HERE or HERE
#character design#art tutorial#art resources#csp brushes#art tips#shape design#myart#i beat the page count of my last pdf woo!
38K notes
·
View notes
Text
Some blue banners


#discord server discord chat discord roleplay aesthetic banners tumblr banner banner design template aethstetic black and white#tumblr banner#banner design#banners#discord server discord chat discord roleplay aesthetic banners#design#design tutorial#carrd stuff#carrd moodboard#carrd graphics#carrd resources#carrd inspo#blue#blue aesthetic#aethestic
84 notes
·
View notes
Photo
Ooooooh shiny!
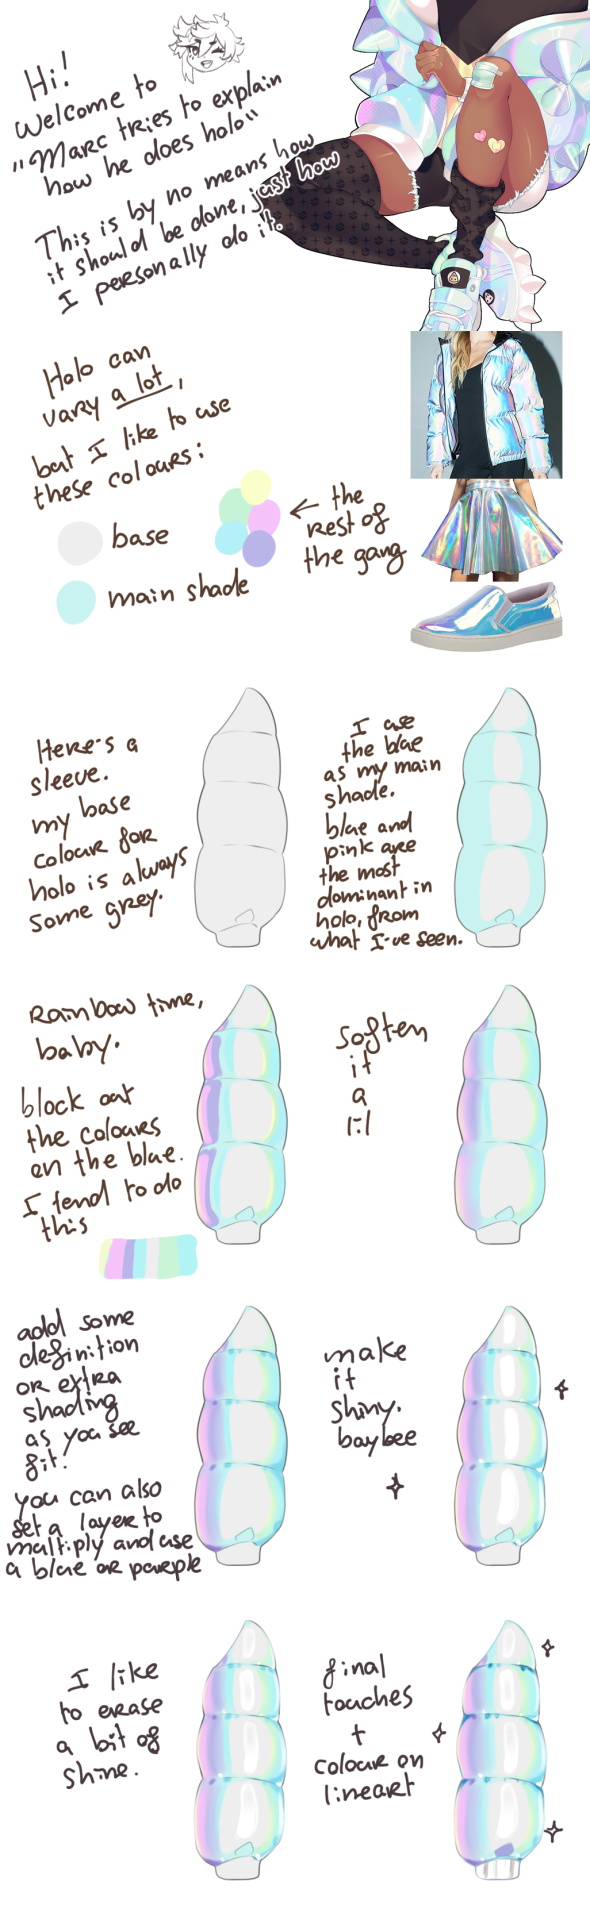
How Marc colours iridescent by Roxoah
#art#art tutorial#coloring tutorial#iridescent tutorial#how to color iridescent#iridescence#art help#holographic#how to color holographic#coloring iridescence#design tutorial#design#Roxoah
13K notes
·
View notes
Video
youtube
how to create beautiful Illustrative Indian Wedding card in Canva | Step...
#youtube#Canva#canva design#canva tutorial#canva tips#Indian wedding card#indian wedding#Wedding card#Wedding invitation#graphic design tutorial#Canva design tutorial#tutorial#learn design#design tutorial
2 notes
·
View notes
Text
OKAY SO YOU KNOW THAT FEELING when you spend hours creating this gorgeous pattern and it looks PERFECT on your screen but then you print it and suddenly there are these OBVIOUS SEAMS EVERYWHERE??? 😭
Listen, we've been there. We've cried those tears. We've rage-quit Illustrator more times than we can count. And after countless cups of coffee and approximately 47,385 test prints, we're here to share Everything We Learned About Pattern Design™️
This isn't one of those "professional expert guru" guides because honestly? We're still learning too! But we've compiled all our "oh god I wish someone had told me this sooner" moments into one massive post, including:
→ How to fix those annoying visible seams (WITHOUT starting over) → The actual difference between half-drop and brick repeats (with pictures!) → Why your beautiful design might look like a blob when printed on fabric (learned that one the hard way 😅) → All the tools we tried (so you don't have to waste money on the wrong ones) → Real talk about pattern design across different industries
Plus a bunch of troubleshooting tips we've collected through our many, many mistakes. Because if we're going to mess up, at least let's mess up together! 💕
#pattern design#surface pattern#design resources#art tips#artist help#design help#creative resources#art tutorial#design tutorial#pattern tutorial#artist advice#creative career#digital art#art tips and tricks#design basics#pattern making#textile design#surface design#art resources#creative tips
0 notes
Text
youtube
This could be really helpful. The trick is to find software that specializes in an aspect of the Blender-related workflow and find tutorials relating to it.
#mvtjournalist speaks#3d artwork#3d model#3d modeling#3d#3d art#blender3d#blender#blender tutorial#art tutorial#design tutorial#tutorial#online tutoring#art tutorials#youtube#youtube video#Youtube
0 notes
Text
Yes yes yes yES YESSS-
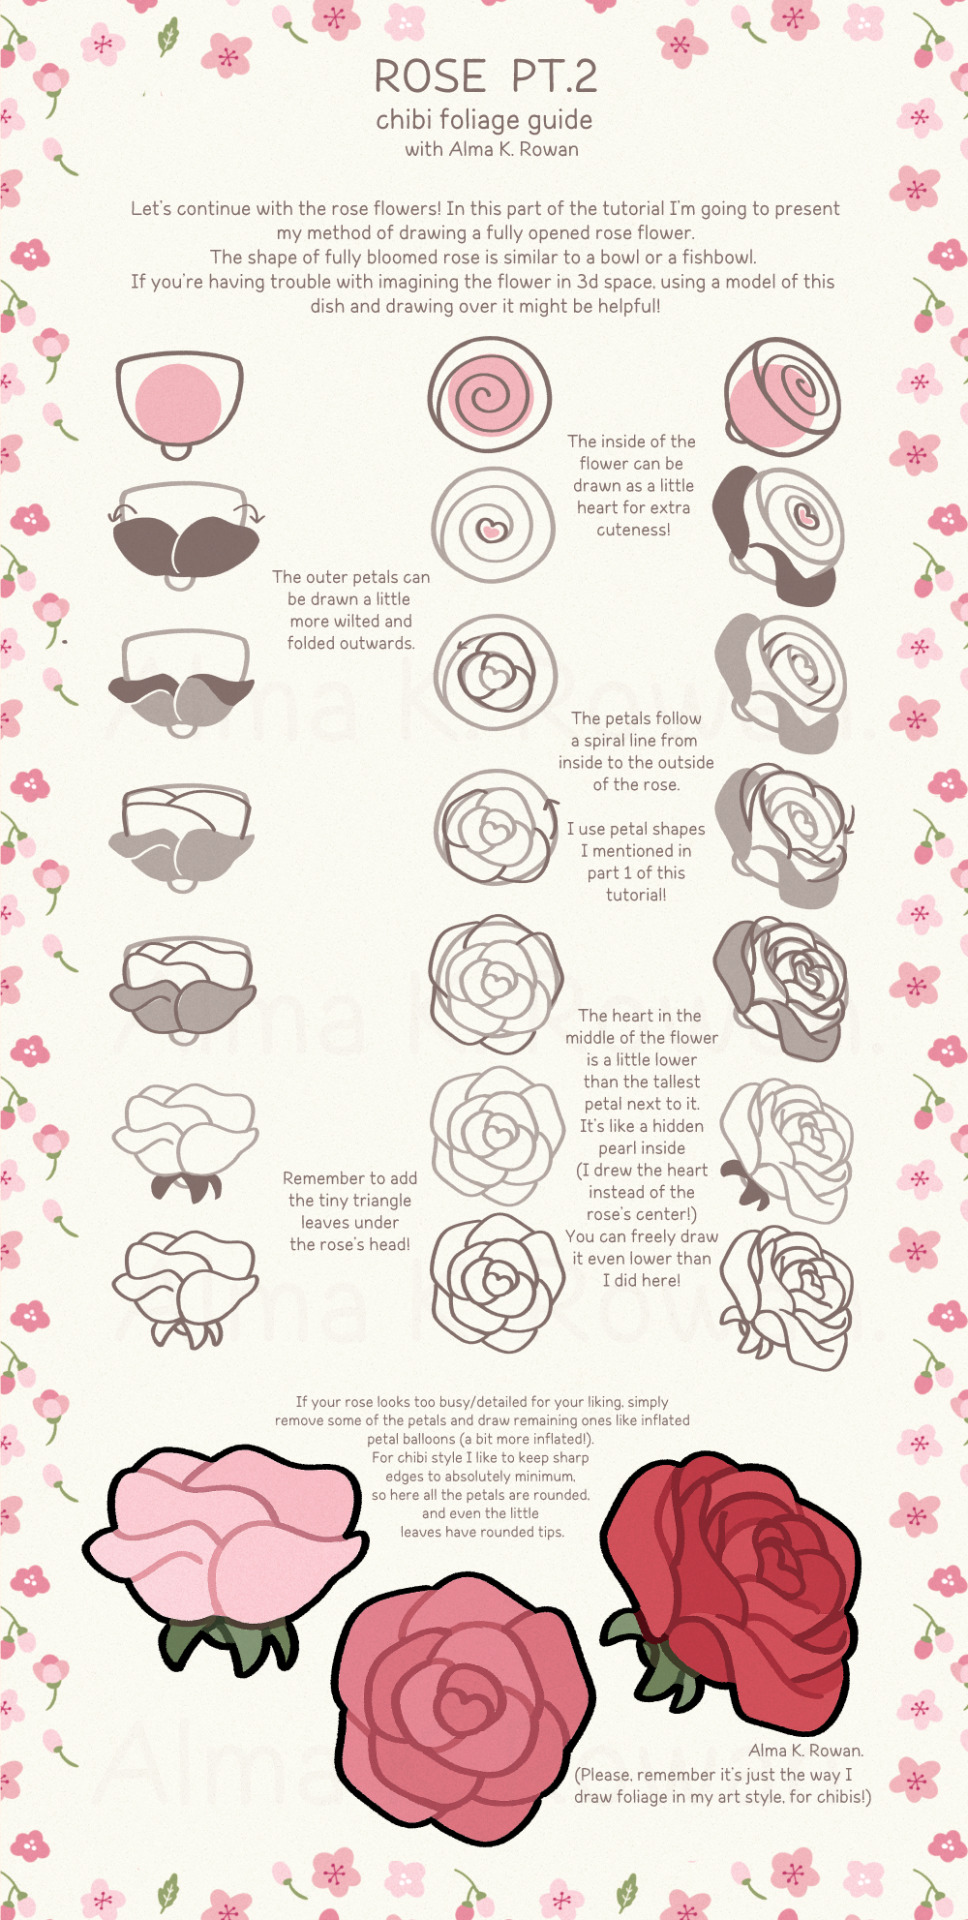
Chibi foliage guide: Rose (pt.2)
#how to draw#art tutorial#almakrowantip#tutorial#art resources#chibi flowers#digital art#chibi flowers guide#chibi foliage#chibi rose#rose tutorial#design tutorial#design
14K notes
·
View notes
Text
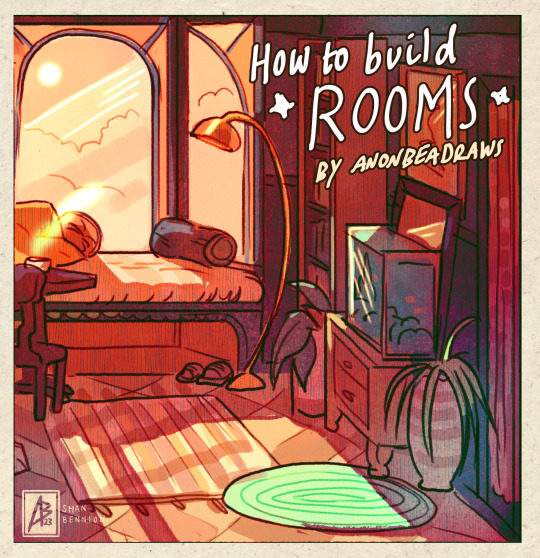
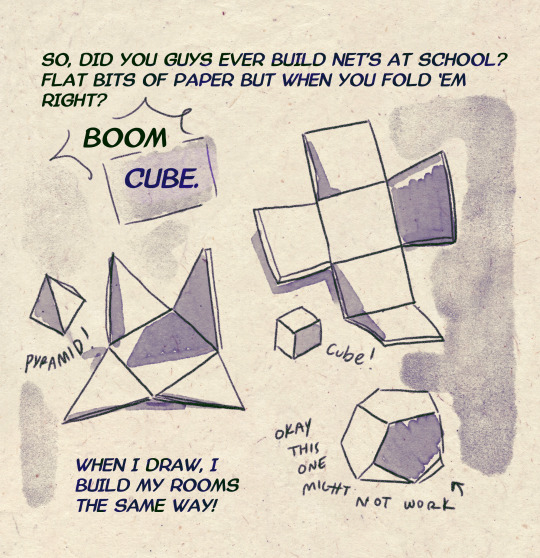
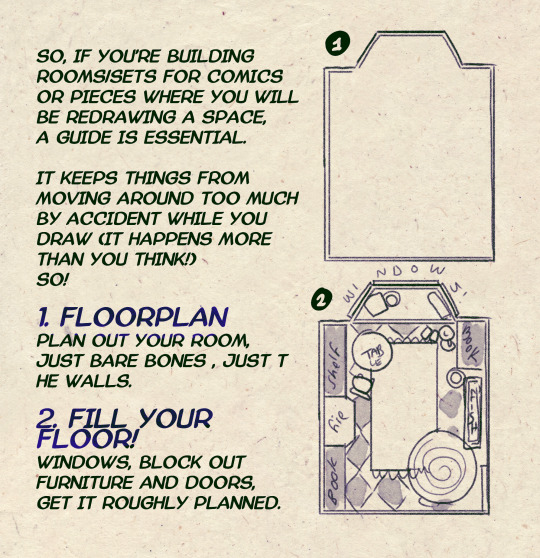
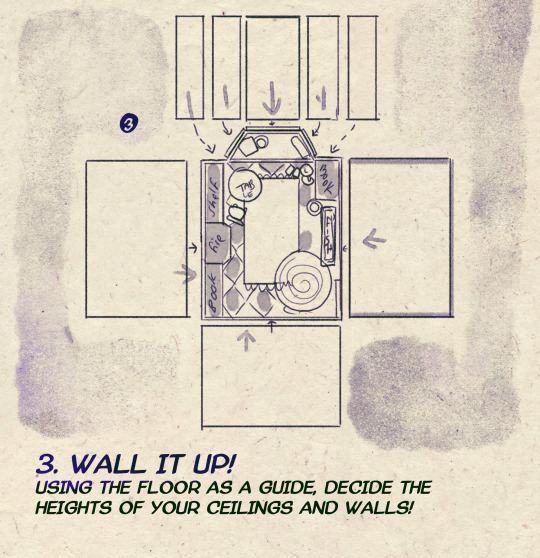


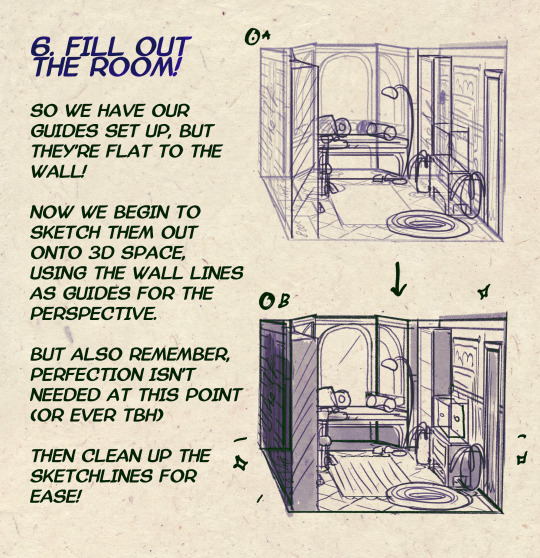

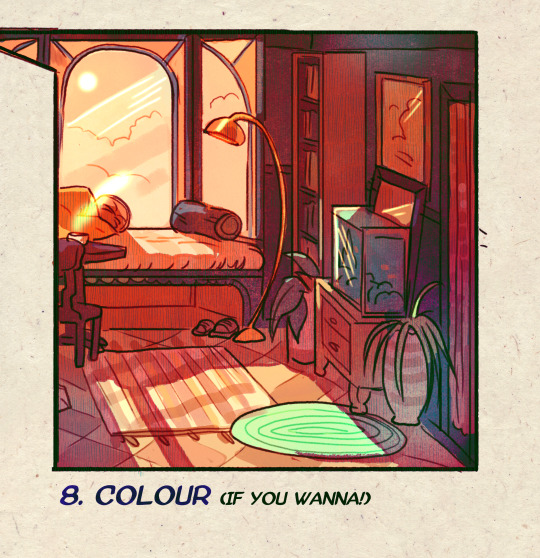
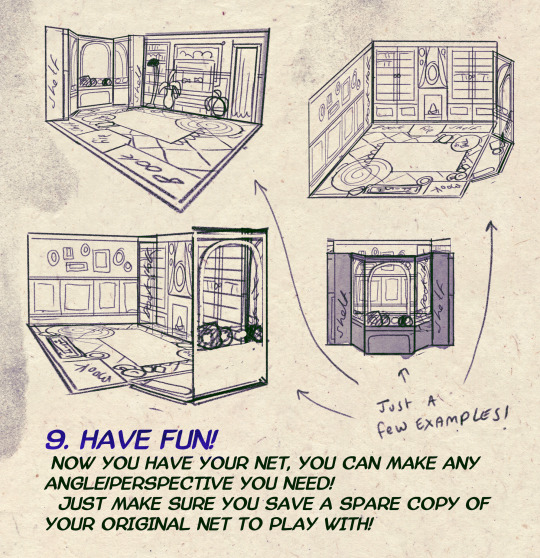
I made a Room Building tutorial! Lemme know if it helps! 🧡
Tip me here| Commission info here!
#anonbeadraws#digital#art tutorial#tutorial#room building#room design#illustration#gif#digital art#digital tutorial#art help#art resource#let me know if it helps!#tried to make it as simple as I could
42K notes
·
View notes