#iridescent tutorial
Explore tagged Tumblr posts
Visit Tumblr Blog
Explore Tumblr blogs with no restrictions, modern design and the best experience.
Last Seen Tumblr Blogs


Fun Fact
In Q3 of 2020, 31% of US users access the Tumblr app daily.
Photo
Ooooooh shiny!
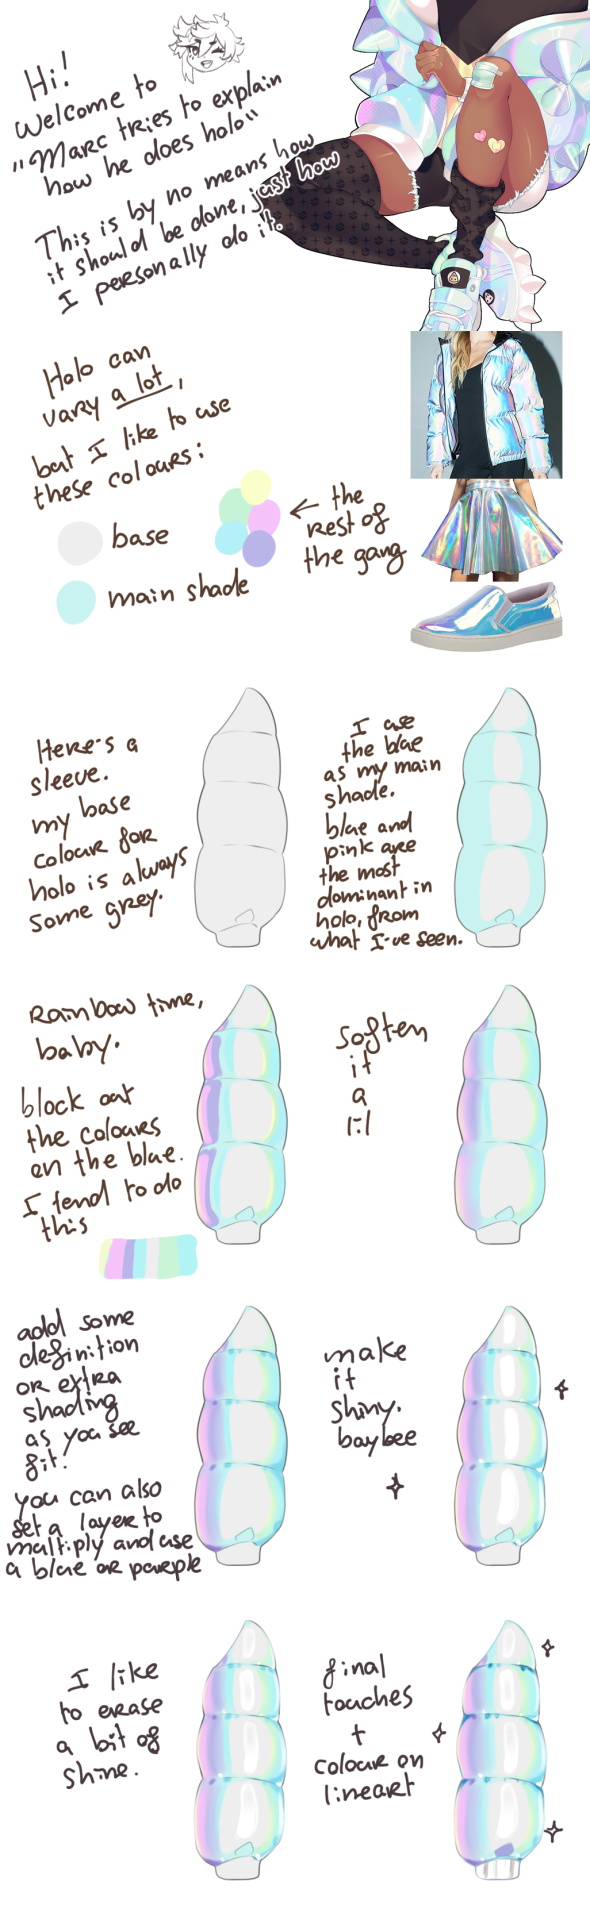
How Marc colours iridescent by Roxoah
#art#art tutorial#coloring tutorial#iridescent tutorial#how to color iridescent#iridescence#art help#holographic#how to color holographic#coloring iridescence#design tutorial#design#Roxoah
13K notes
·
View notes
Text


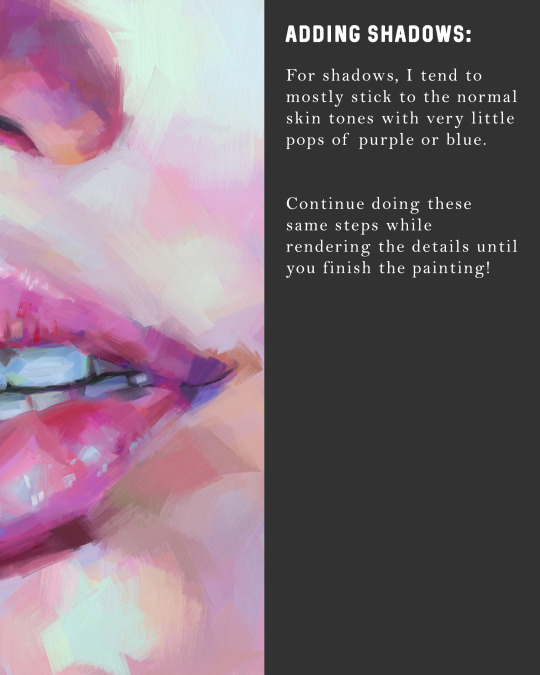
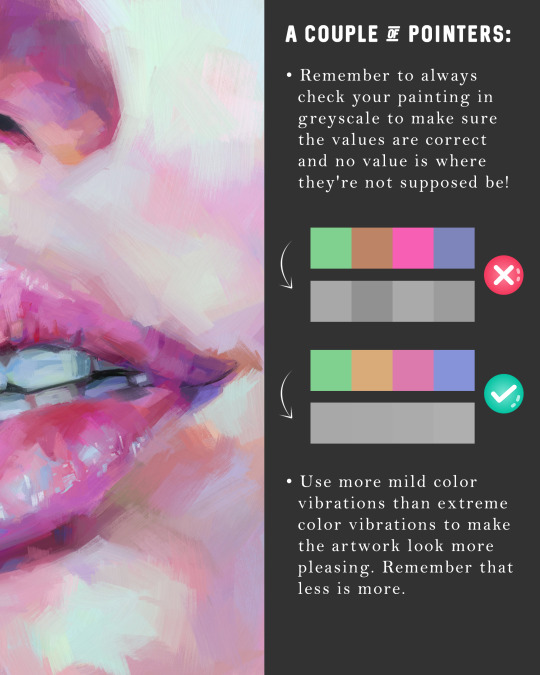
#Digital Art#Digital Painting#How To Paint Skin#Skin Tones#Art Tutorial#Digital Art Tutorial#Iridescent Skin#Holographic Skin
236 notes
·
View notes
Note
can you do a tutorial of the nuso esva rainbow-like skin?? still can't color him as well as you T^T
here's a tutorial i made a couple years ago :3

some notes:
make sure your shading is pretty much done before you start doing the holo effect
make your object a bit darker than you want it because the holo effect will make it appear lighter
i put the holo effect on a separate layer and use a soft round brush at 10-20% opacity
here's a holographic glitter ball i doodled more recently for practice

notice how the colors closer to the light source are lighter and the colors farther from it are slightly darker (but no less saturated!) and shift in hue a little. a great way to study the way holographic objects refract color is looking at a CD in sunlight. a great way to study how light behaves on curved holographic surfaces is buying one of those holographic makeup bags that are like $5 in stores or on aliexpress and look at them in different lightings
95 notes
·
View notes
Text
youtube
A step by step Aurora gel Nails tutorial to do at home! An uruuru Spring nails design featuring blue skies, clouds, green grass gardens with cute flowers and iridescent butterflies, of course!
#aurora#uruuru#cute nails#nail art#diy nails#gel nails#iridescent#clouds#flower nails#floral nails#spring nails#rainbow nails#nail design#nail tutorial#aimeili#modelones#vettsy#3d nails#kawaii nails#kawaii#kawaii aesthetic#cute aesthetic#green nails#blue nails#sky#garden#spring#japanese nail art#Youtube
0 notes
Text
Very useful for drawing iridescent liquids! Thank you!
✨✨Batdr ink tutorial!✨✨
I have been drawing alot of #batdr stuff for twitter and insta and thought I should post this here too.

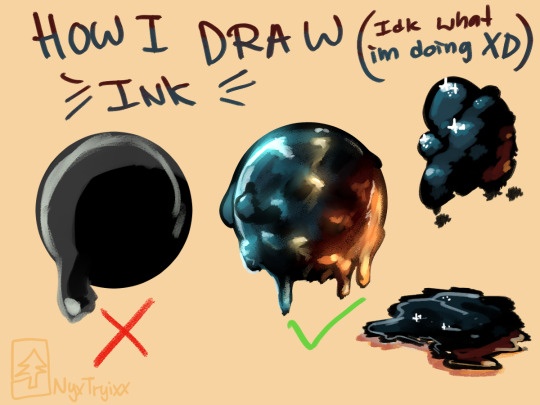

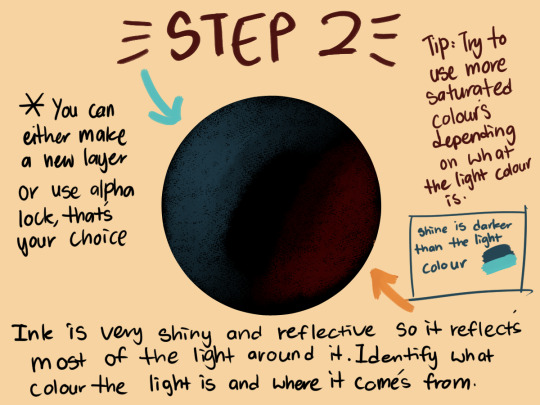
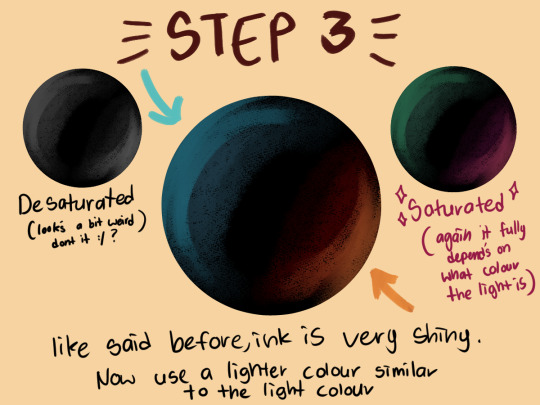
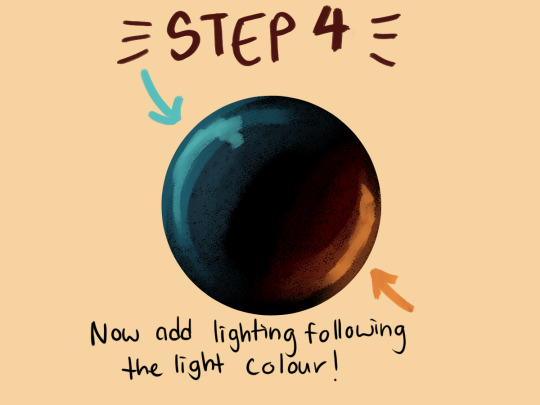


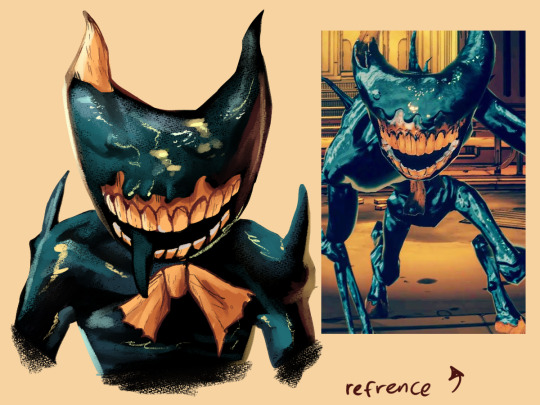
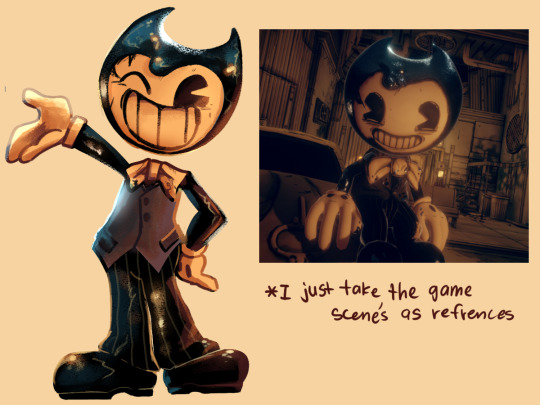
#tutorial#art#illustration#gaming#bendy and the dark revival#bendytheinkdemon#bendy and the ink machine#art tutorial#how to draw#ink#design tutorial#design#iridescent tutorial#iridescent
2K notes
·
View notes
Text


ೃ⁀➷ intertwined—eren offers to let you practice braiding his hair.
.ᐟ fluff, drug usage (weed), bf!eren yeager

“rennie, can you please stop fidgeting?”, the bristles of your Hello Kitty brush made yet another pass through his nutmeg strands. a frustrated tug dragging his lazy neck back onto its slot against your pajama pants.
your living room was a cozy mess—pink cushions scattered across the fuzzy carpet and the faint scent of eren’s incense mingling with the lazy drift of smoke from his blunt. the moonlight flickered through the sheer curtains, casting a dimlit iridescence over the room as you both lounged in this safe haven you called home.
the victim in question was your lovely boyfriend eren. he swore his only intention was to pass by and bring you takeout from your favorite restaurant. somehow that led to asking about the video playing in your background. the next moment he was surpassing your doorstep and sitting on a pillow before your tv.
your sore fingertips paused to collect the remote and rewind the tutorial for what felt like the hundredth time. again—the stylist’s annoyingly chirpy introduction blared throughout your entire house.
then they were scrambling back to the side of eren’s slanted head. it’s a pace that seemed almost too impossible to keep up with. you sat crisscrossed behind eren who’s shirtless back leaned against the couch. his legs sprawled out and red eyes low-lidded from tranquility—or maybe the weed. your presence serenaded eren, and this just so happened to be the perfect excuse to be in it.
“ugh! okay…so i section it into three parts…”, you sheepishly whispered, more to yourself than to eren. he was all for being glued at the hip, but not if that meant you being this hard on yourself. “this is so humiliating. what girl doesn’t know how to do a simple braid—and at my big, old age on top of that”.
eren took a slow drag from the burning stick, a sympathetic smile plastered on his plump lips while he exhaled. “hey, you’ve got this,” he soothed you amidst the thick fog, words punctuated by lazy curls of smoke.
you huffed softly, more in self-beguilement than frustration. “thank you for both your cooperation and the kind words,” it was a light tease as you gently parted his hair with your comb, trying to mimic the swift motion on screen without entangling your own worries.
“eh, call it free therapy,” eren nodded stiffly, “plus you get to learn a new skill. it’s a win-win.” his high might’ve slurred every intricate thought that dared to hit his cloudy brain. including the fact that he’d been glued to your floor for nearly two hours. your own patience had thinned like a thread, fraying at the edges with every failed attempt at achieving the same smooth finish as the girl in the video. yet, comfort lingered as you both sported matching face masks. the thin sheet long dehydrated against both of your tired features. when he wasn’t scrolling through his phone, he kept ahold of your nearby knee.
up until that final section, each braid was knitted with the same undying dedication. the split worry of tugging too hard and keeping the pattern intact consuming you whole. your wrist’s rhythm settled into something ritualistic and steady, tying the ends together with a tighter grip. finally you tied off the last one.
an unknown breath you were holding escaped while eren clawed up the side of the couch. poor boy—his jelly limbs nearly collapsed before he stood tall again. a nervousness washed over you as he made his way to the mounted mirror. you make out the backside of his reflection, a look of flattery could be seen as he rotated his neck to check out your artwork. you’re no renowned hairstylist—each braid varied in tightness and thickness. some ends levitated off the nape of his neck while others conjoined the neighboring braid. but, all eren saw was your unmistakable handwork. he saw the countless hours you sacrificed to bunch each strand of hair into its own group.
eren’s pupils gleamed with sincerity, he adored your efforts. “babe, i love them,” he turned to you while swooning over his new hairdo, a rosy hue overtaking his cheeks. “they are absolutely perfect.”
your shoulders slouched as you took in the sight of his wonky, puffy hairline. you’d given this style every fiber your being could muster up, yet it wasn’t nearly as neat as the scene behind him. your heart fluttered at eren’s words, at the simple honesty and appreciation in his gaze. “but ren, they’re nothing like the video. they’re uneven and that one is literally falling apart in the back,” you pointed out, a hint of insecurity lingering in your tone.
“and that’s my favorite part,” he reassured, taking the cushion next to you and slipping a palm into yours. his legs stretched out as he leaned closer to nuzzle his nose into your neck. “this is you. that makes them better than any tutorial.”
for the first time all night a smile crept onto your face. a genuine display of how soft his words had you. you gave eren’s hand one last squeeze before bringing your digits back to his head. one swipe along the top allowed you to feel all the authentic imperfections that were misplaced hairs and lopsided linework. these mismatched braids were every bit of you— delicate, rough, flawed…yet complete.
as eren settled into his spot, your head dipped down to his shoulder. his familiar scent, the mixture of lingering aromatics, and your closeness made everything feel just right. it didn’t need to be a masterpiece; it simply needed to be yours. intertwined in ways beyond braids, these were the kind of memories you cherished forever.

#6slux#eren yeager#eren jaeger#eren aot#aot x black y/n#aot#attack on titan#aot x black reader#attack on titan fanfiction#aot eren#eren x reader#eren x black fem!reader#eren x y/n#eren fluff#fluff#attack on titan eren#black writers#black reader#black y/n#eren x you#eren x black reader#eren yeager x you#aot fanfiction#writing#comfort
524 notes
·
View notes
Text

Bound: I Am Not Who I Became by mab_di
Typeset, bind, and illustrations by: me, @phoenixortheflame.
Draco left England after the trials and has travelled the world meeting wizards and Muggles from different cultures and with vastly different relationships to magic, each other, and the natural world. Now he's a fisherman in Finland on commercial vessels. Harry has been struggling since the war and has become a recluse while trying to write his autobiography. An invitation to the Hogwarts class of 1998's 15th reunion isn't welcomed by either of them, but neither could predict how the night, and their reunion, will upend their lives.


I made this bind for a friend who wanted me to surprise her with a Drarry bind of my choice. I'd had I Am Not Who I Became on my list for a while, because I just knew it would lend itself to some really beautiful imagery.
In the fic, Draco teaches Harry to fly fish, and so I instantly had the idea to draw a unique fly for each chapter head (there are 15 total), which I also included on the dust jacket.
I've been wanting to push myself to include more original art in my designs, and this was the perfect opportunity to practice my drawing on something low-stakes. It took me just under a month to draw all the flies, in between binding and writing and watching Severance.

I've been really loving the printable canvas for wrap covers, and I found this piece of public domain art titled "Cleaning Fish" by George Bellows which, in my opinion, fits the theme perfectly. I was going to do gold HTV on the spine, but decided against it since the art is so beautiful.


I think I'm finally getting better at endbands, but I still hate doing them just the same. @sits-bound introduced me to a new technique, which you'll see in my upcoming bind. In the meantime, this is a faux double-core endband, which I achieved using @maleekamolscreates amazing tutorial.
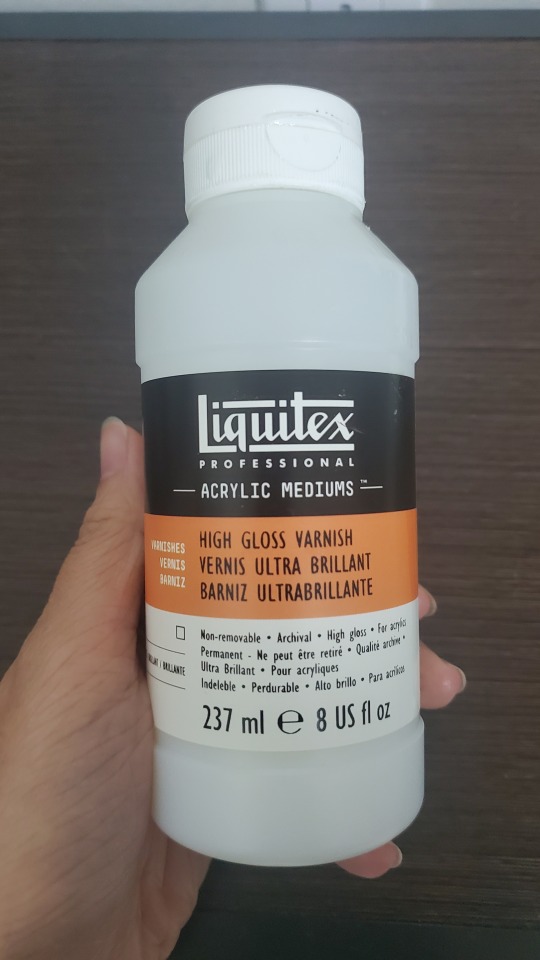
I had to gild the edges, because gold. I used Liquitex Iridescent Bright Gold acrylic ink and I highly suggest doing at least a bit of a sand before you apply to keep it from flaking too much, even if you do have a guillotine.


The endpapers are chiyogami paper, which might be my favourite paper to work with. The colours are so rich, and the patterns are so striking. This one in particular was made for this book.

I kept the typeset simple so as to show off the flies. Though I really like the vertical chapter titles, which I think add a modern touch to an otherwise pretty classic overall aesthetic.


As always, I made a copy of this fic for the author. And one for me, too.
All copies were gifts and no money was exchanged.
If you have any questions and want to learn how to bind fic for yourself, feel free to get in touch!
#drarry#draco malfoy#harry potter#fanbinding#ficbinding#typesetting#bookbinding#i am not who i became#mab_di#phoenix binds
180 notes
·
View notes
Text
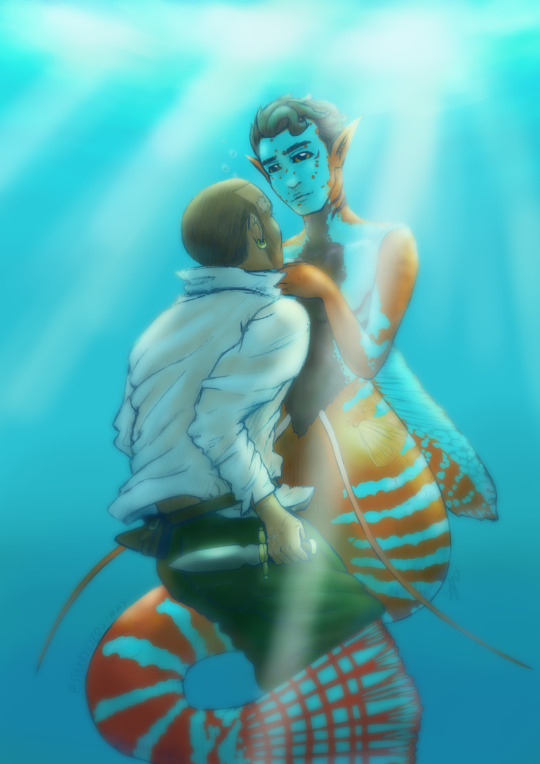
[⭕] TRUST [✖️] DON'T TRUST
bonus pics & ramblings below
what's going through both their heads at this very moment
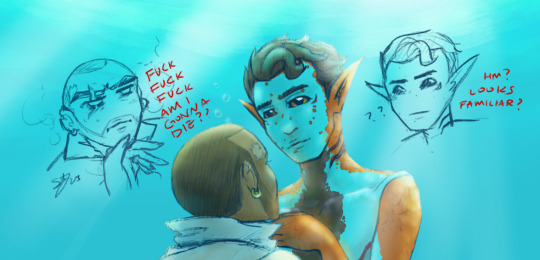
markus is a pirate captain that fell overboard during a storm. he's lost at sea when he comes face to face with a merman. he's heard tales of sirens and mermaids drowning and eating sailors, but this one doesn't seem hostile? he might even be familiar? should he trust him?
this was just gonna be a one-off doodle for mermay but it escalated very quickly and now i have this whole au mapped out in my brain with their backstories and an entire storyline. i'll save the long ramblings about the au for another post since i got more doodles for it so i'll infodump about it there.
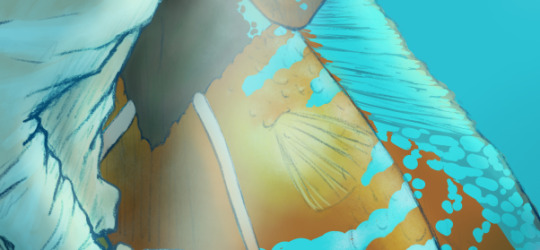
i like my merms to lean more on the merm side than the human looking side so we got a very fishy looking connor here. obviously, i had to model him after the dwarf gourami (shoutout to dewey) because it's CONNOR. c'mon was there another fish to even consider???? but it was EXHAUSTING coloring his pattern and adding all those textures and details. it took a bit of trial and error to achieve an iridescent effect on his scales but i think i did it decently???
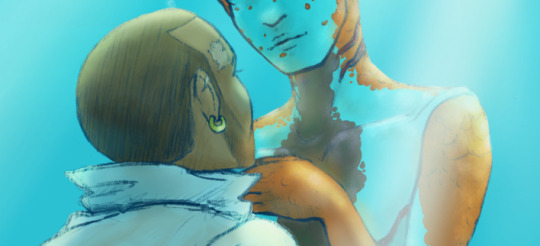
i really love drawing underwater scenes. it's just so fun breaking down the lighting and all the effects. maybe one day i'll post a breakdown of how to make a convincing underwater drawing. i'd like to think i do a convincing job, so maybe i'm qualified to make a tutorial hahahah. anyway, i'm honestly very proud with how everything in this piece turned out!!!
finally, here's some close-ups because i spent over 12 hours on this and we're gonna appreciate every single damn detail


happy mermay everyone!!!
#dbh fanart#mine#mermay#rk1k#markus#connor#mermaid au#rk1000#conkus#markus x connor#connor x markus#dbh markus#markus rk200#dbh connor#connor rk800#dbh rk800#dbh#detroit become human#detroit: become human#d:bh
129 notes
·
View notes
Text
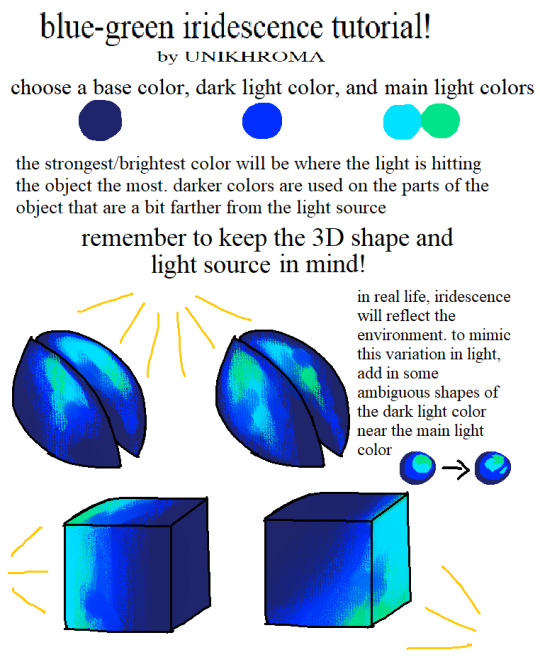
very basic blue-green iridescence tutorial that i made for someone in a server who was asking for advice on it; it came out alright so i am sharing here as well
64 notes
·
View notes
Text
➲ how to make a gif tut ! ✼


♡ hii this is a tutorial on how to make two types of flash gifs! the first gif will be a flash gif with a png overlay and video effects. the second flash gif is a sort of stop-motion-like gif made from multiple images.
this was for an ask in my inbox, but i accidently deleted it cuz tumblr was being weird.. anyways hope this helps anyone who's curious!
⤷ flash gif w/ png overlay + video effects
⋯ to make this type of gif i use capcut and a website called ezgif.com.
first, start a new project on capcut and select all the pictures you want to use in the gif (except the png) and click add.


⋯ once the pics are loaded in, adjust the duration of the photos to your liking (i do 0.6 but you can adjust to your preference). changing the duration of the pictures will determine how fast the pictures in the gif will pop up and how long the gif is.
i screenrecorded my process in capcut since it's kinda hard to explain with screenshots so feel free to replay certain parts you were stuck on!
⋯ after changing the duration of pics, overlay the png and then apply an animation to the png overlay (not required!). i like to apply a fade in and fade out animation on the png so it can appear and disappear in the gif smoother. then add video effects and adjust the settings to your preference. i mostly use video effect called iridescent for sparkles (you can use whichever effects u prefer tho!)
once you're satisfied with how it looks, export the gif to save it on your device. then go to ezgif.com and the tab that says video to gif.


⋯ upload the video you just saved from capcut onto ezgif then scroll down and convert to gif. you should then get your outputted gif and save to your device!

⋯ one of the cons i don't like about ezgif tho is that it greys out the colors of video to gifs.. if you know how to recolorize gifs or a different gif convertor website you can use that instead (pls tell me).

⤷ regular stop-motion flash gif
⋯ for this gif you only need to use ezgif.com. this is mainly for gifs where the images are moving without transitions and no effects. (png overlays are made beforehand and saved in different photos) luckily the colors don't change for this type of gif!
first you want to go to the gif maker tab then click switch to manually ordered upload. after that, upload all the images you want in your gif.


⋯ then change the delay time for all images to adjust how fast the gif will play. the larger the number, the slower the gif. i personally like to make the delay time 35 but it's not necessary for you to change the auto delay time of 20.


⋯ after changing the delay time, click make a gif! your outputted gif should load below and then save to device.
hopefully this was easy to understand 😓 comment or feel free to dm any questions if you're confused or need help! this is just a base tut for making gifs in mbs, you can change anything to your own preferences !
68 notes
·
View notes
Text
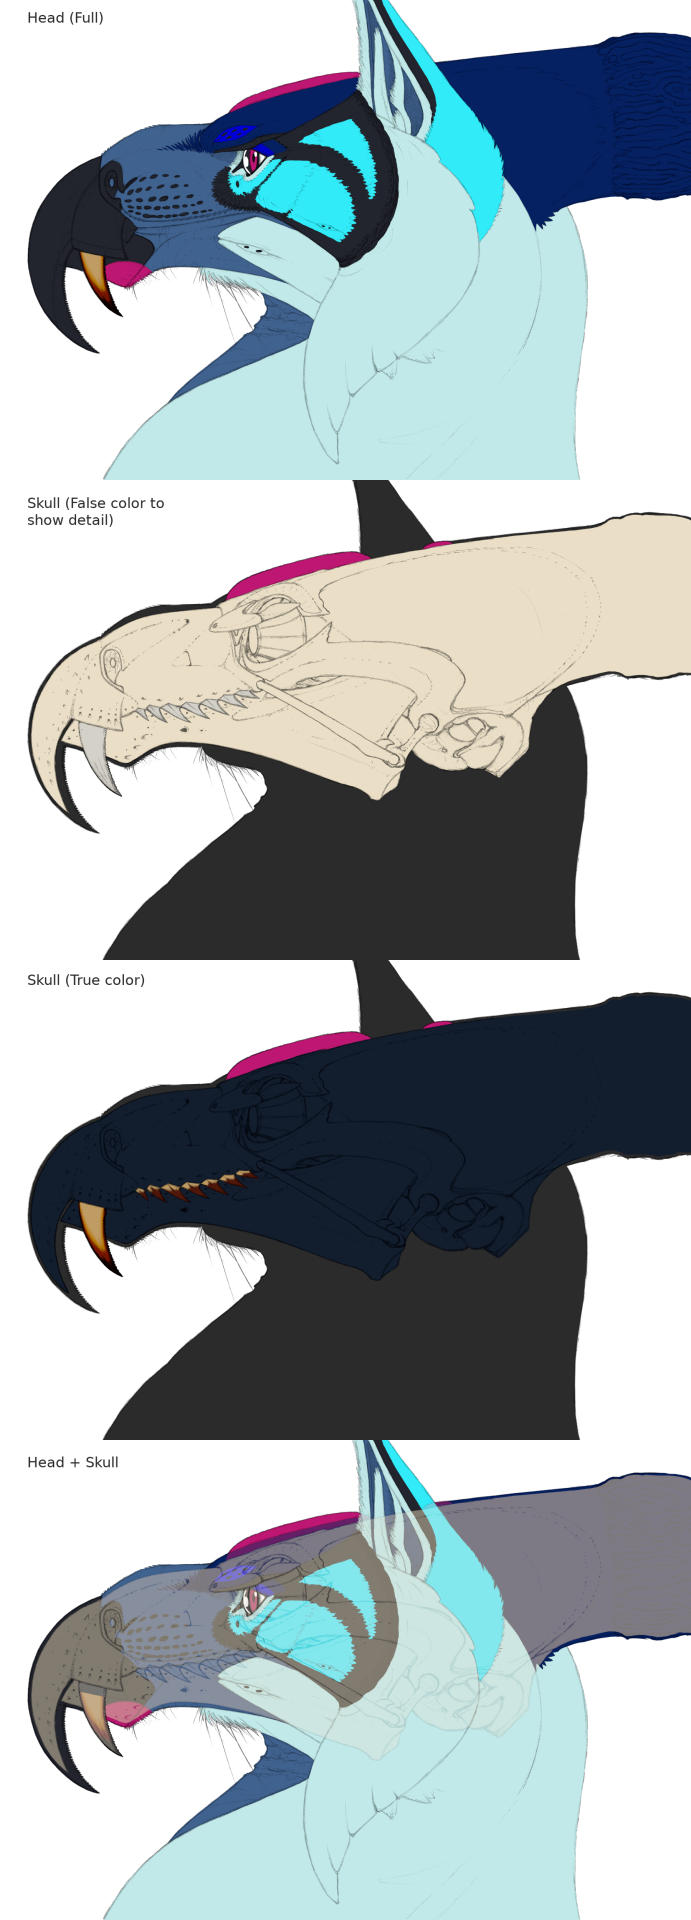
And now for the colored version! Well, base colors at least, I'm going to have to look at a *lot* of tutorials to get the full coloring on this done. Eowenah is very, very iridescent. Dazzlingly so! Even her bones are iridescent due to the microstructures within them, like an abalone shell! So yeah, it'll be a while before it's fully done. I've never been good at painting, so this'll be interesting.
Since there's a character limit, and because I am incredibly lazy, I will link to the DeviantArt post for the full description. You can see the full text here: https://www.deviantart.com/legendguard/art/Anatomy-Eowenah-s-Head-Base-Colors-1165360276 Expect more from this series, believe me there is a lot.
#legendguard#eowenah#gryphon#griffon#griffin#pokemon#fakemon#anatomy#skull#animal skull#pokesona#sona#my sona#bird#mammal#pterosaur#hybrid#hybrid creature#chimera#speculative#speculative biology#speculative evolution#speculative zoology#pokescience#pokebiology#skull anatomy
22 notes
·
View notes
Text

Iridescent Skin Tutorial by Fruitegg
#art#digital art#iridescent#iridescence tutorial#painting iridescence#how to paint iridescent#digital painting tutorial#fruitegg#rainbow effect tutorial
789 notes
·
View notes
Note
heyyo! Sorry to bother you but could you put a walk through/tutorial of your proses of drawing dragons/just drawing stuff?
also are you participating in art fight?
Here's a time-lapse of one of my recent simple-ish doodles:
I usually start off with drawing the head + rough shape of the body and setting the vibe of the pose first off. breaking the dragon down into "pieces" is useful
Wings are the hardest for me to fit on a canvas without blocking off a bunch of details, so working out where they are going pretty early on is pretty important to me (each of these parts are on seperate layers)
Arms and legs can be wiggled around freely. I often draw them a bit too big and have to shrink em a bit
My sketch is usually about this detailed - I'll either clean it up by erasing OR I'll go in for lineart. I like the roughness of a sketch/sketchy lines so I try and hold onto that in my pieces generally
I don't really do anything fancy with colours, it's usually just flats with some layer effects thrown on top. So this had dark scales on multiply, plus a bunch of smaller scales for a bit of shiny/iridescence on add and then a bunch of bright colours on a very low soft light setting to give the illusion of some colour variance for the flats
Finish it off with a nice coloured lineart. coloured lines which match the piece are important to me
Every year I think about participating in art fight but I never seem to find time to do so. maybe next year!
40 notes
·
View notes
Text
Beetle bug bag tutorial
youtube
Nils has his pattern for sale
Someone please make one in iridescent green
36 notes
·
View notes
Text

Emhyr Sleeps Re-edit
With nothing in the think tank, I decided to see if I can prettify my old arts.
If I hadn't stumbled upon someone else's art tutorial, I wouldn't have known the uses of gradients in digital art. I rarely use gradients and the very few, I experiment with photos.
Above are 2 types of iridescent gradients- softening the hard contrasts of the original painting- plus some hard light and linear dodge layers (masking and unmasking).
This is the original portrait.

Gradients made a HUGE difference and I think I will do this on my future portraits and commissions!
#emhyr var emreis#emhyr#nilfgaard#digital art#artist on tumblr#the witcher 3#photoshop#tlylaedits/arts
14 notes
·
View notes
Text
Houseki no Kuni/Land of the Lustrous Wig Tutorial: How to Create a Beautiful Gem-like Finish!
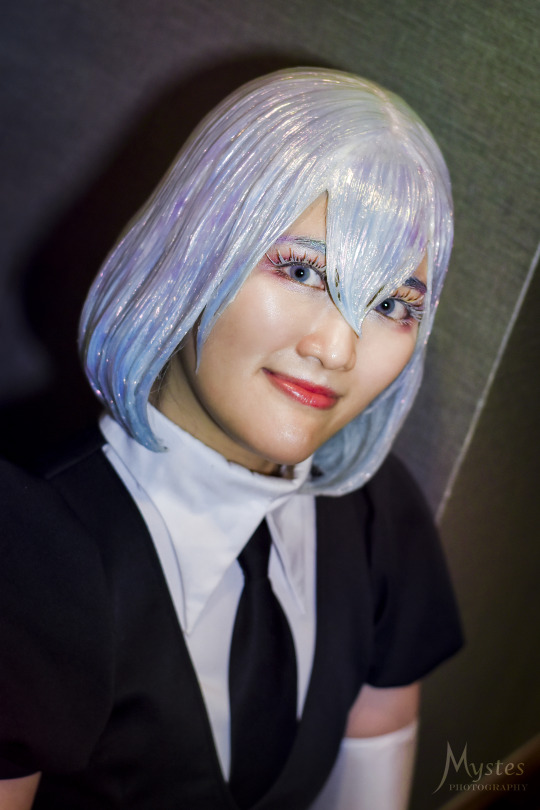

(Left photo taken by @/mystes_photo on Instagram)

When I first saw the characters in Houseki no Kuni, I knew right away that I wanted to cosplay Diamond, but to be honest, I did not like any of the commonly used methods to achieve the iridescent effect at the time (cellophane can easily be damaged, glitter doesn’t have the finish I want, resin is difficult to work with, etc.), so I did some research on ways to achieve a more convincing finish.
My main inspiration came from nail artists achieving a smooth iridescent finish similar to what I wanted for my wig (Fun fact, I became a SimplyNailogical fan during this whole process XD). Once I discovered that iridescent nail powder was the key material I needed, from there, I did some trial and error experiments to figure out the best method to apply it onto a wig and came up with this method!
This is not a styling tutorial on how to create a Diamond wig specifically, but rather how to create the unique gem-like finish on any wig! This tutorial can apply to any Houseki no Kuni/Land of the Lustrous character you’d like! :D
(Disclaimer, this method and the Diamond wig pictured above were created in 2021, but the wig featured in this tutorial was styled in 2024)
Skill level: Intermediate
Prerequisite: At least basic wig styling skills, dependent on character
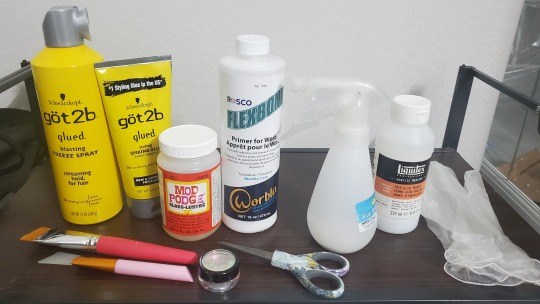
Materials needed:
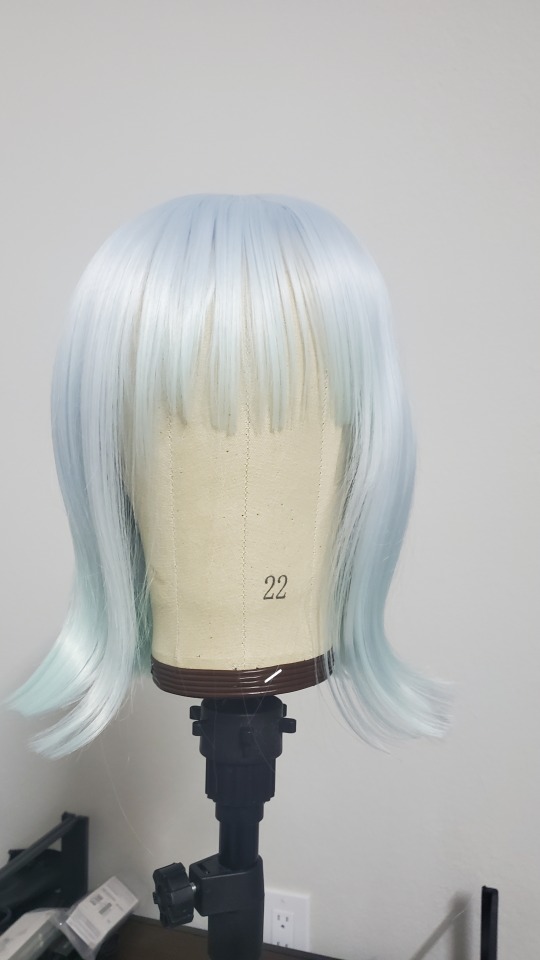

Wig (style varies based on character, but I recommend using a thick base wig if you can! )
Wig head that’s close to the size of your head to ensure that style conforms properly to your head size
Wig stand
Got2b spray and glue
Flexbond primer (amount needed varies, but for reference, I was able to cover my Diamond wig with about ¾ of a 16 oz bottle)
Mod Podge Gloss waterbase sealer (optional if Flexbond is tacky enough on its own)
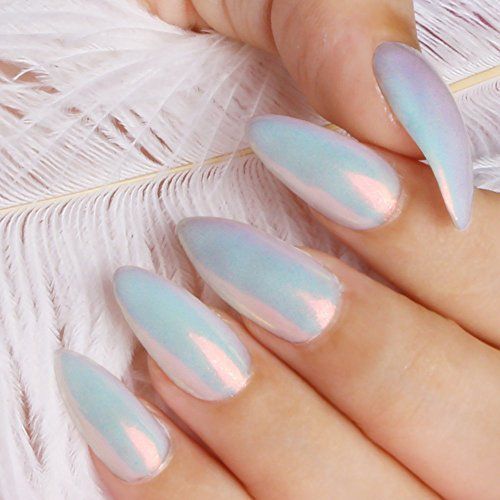
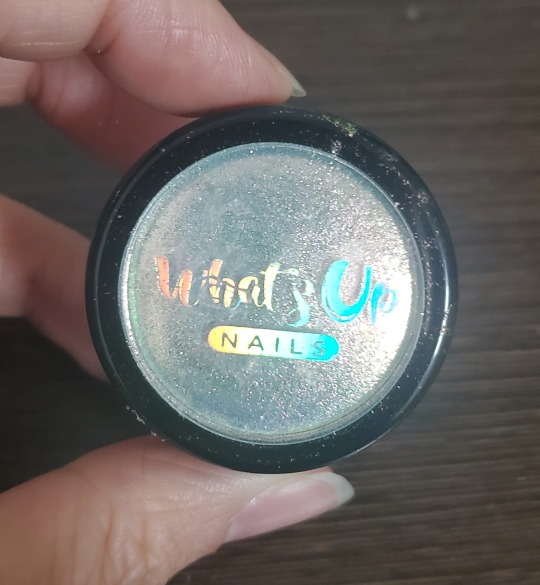
Iridescent/holographic nail powder (any can work depending on the finish you want, but I used the Aurora pigment powder from the brand What’s Up Nails. One little 1 gram jar was enough to cover two Diamond wigs with quite a bit left over, a little goes a long way!)
Clear gloss varnish
Spray bottle
Wide decoupage brush and/or any wide paintbrush
Silicone face mask brush (optional, but I find it great for smoothing out thick coats of Flexbond)
Mini scissors to trim stray hairs and/or excess Flexbond
Latex or vinyl gloves to rub on nail powder
Safety requirements:

Wear gloves to protect your hands. The nail powder is safe to touch barehanded, but the rubbing needed to buff the powder onto the wig may cause skin irritation or chafing if done excessively.
The nail powder is very fine, so I suggest wearing a face mask to avoid breathing it in/blowing it away. There are no toxic fumes or substances used in this tutorial, so a basic face mask should suffice.
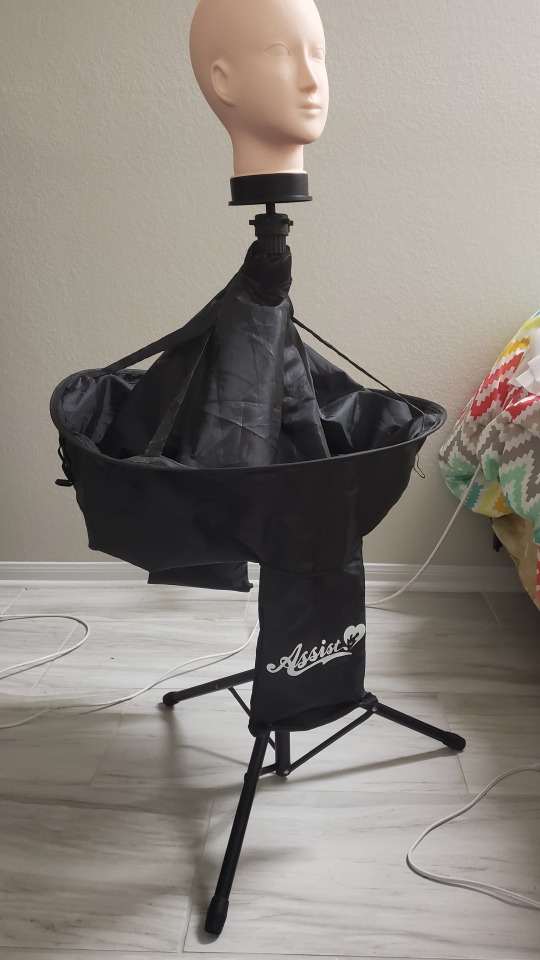
Keep the floor covered to protect the Flexbond from getting on it and causing a slipping hazard (also great for easy cleanup!) I initially laid out a bunch of old Amazon bags around the wig stand, but I recently picked up a handy device from Assist Wigs in Japan that was originally designed to catch cut wig hair, but it does a pretty good job catching dripping glue and loose nail powder as well!
Step 1:


Style your wig as you would a normal wig. This is highly dependent on the character you choose, but from experience, I have two tips I would highly recommend:
Make your wig about 10-20% fuller than you want the final wig to be. Like how actual hair flattens when it’s wet, depending on how the wig is styled, the same thing may happen once the Flexbond is added.
Try to keep at least the outer layer of hair on your wig as smooth and free of tangles as possible. When you coat the wig with Flexbond, any knots or irregularities in the wig will be emphasized. To avoid this, thoroughly comb through your wig to get rid of tangles and straighten any kinks or irregularities. Teasing your wig can leave the outside looking messy, so try to stick to the crimping method to add volume to wigs if needed, or at least limit teasing to areas that will be hidden with smoother hair later on.
youtube
I was quite fortunate that there’s an official 3D model video with the perfect references for Diamond’s hair that I was able to use as reference for my wig!
Step 2:
If you haven't already, protect the floor underneath your wig with any sort of protective covering to catch the Flexbond that will drip down from your wig.
Step 3:
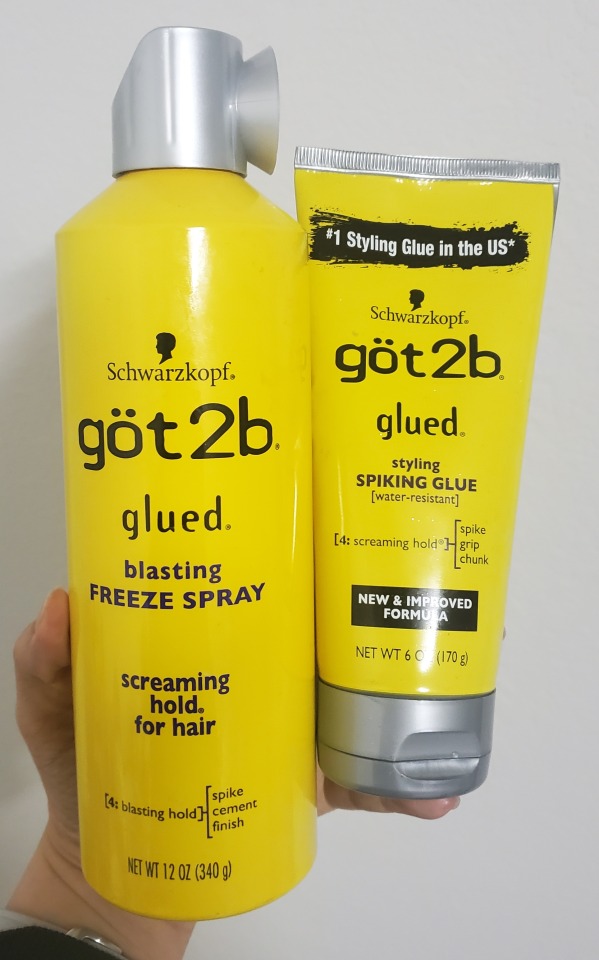
Use Got2B spray and spiking glue to hold the style in place to prepare for the next steps. Apply enough to make the wig relatively stiff, but avoid getting the hair saturated up to the point where the hair looks wet and stringy.
You'll know your wig is ready for Flexbond when your wig is quite stiff on the outside, as shown in the video above.
Step 4:

Take your Flexbond and dilute it with water to make a thin sprayable glue. I recommend about a 1 to 3 ratio of Flexbond to water to create a solution that is thin enough to easily spray yet still strong enough to be an effective glue. I would say the viscosity is similar to milk.
Step 5:
Apply the diluted Flexbond to the wig in a fine mist. If you see any significantly large droplets, use your fingers to carefully smooth them out. Do your best not to press down too hard or oversaturate the wig, as the goal is to create a hard outer shell on your wig rather than to saturate the entire wig in glue.
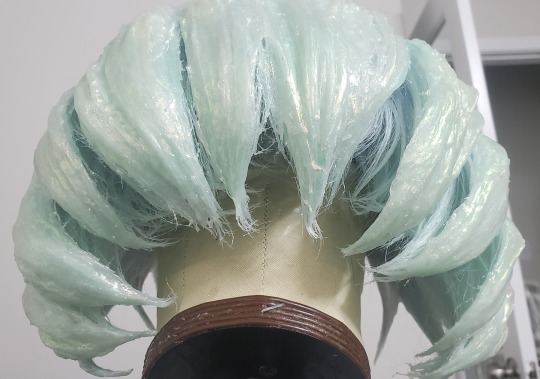
Repeat Step 5 a few times until your wig feels solid up to the point where the wig hair stays in place even when shaken around (or even turned upside down!) This step is very important because this creates the solid foundation for your wig that will support all the thick Flexbond layers you will be applying later.
Step 6:
Once your wig is solid, coat the outer surface of the wig (you can cover all visible hair if desired, but I like having the hair inside soft against my skin) with a generous coat of Flexbond. You want this first coat to be thick enough to completely cover the outside of the wig’s surface, but not so much that the Flexbond is dripping.
However, if noticeable drips do occur, you can smooth them out with your brush while they’re still wet or trimmed off with scissors if already dried.
Repeat Step 6 for about 2-3 layers or until your wig has a smooth, almost glossy looking appearance, as pictured below.
Below are a few helpful tips to help you with this step!

Remember how if you did Step 5 correctly, you should be able to turn the wig upside down? You can use this to your advantage to help you coat the bottom half of the wig! Just be sure that the top half is completely dry before you place it on a surface. I would also alternate between coating the top half and the bottom half to keep the coats even.
2. You can use the Flexbond to gradually fill gaps between the fibers for a smoother appearance. Also, the more layers, the less emphasized the hair strands will be on the final product.
Step 7:

If you have stray hairs or glue strands that you find distracting, you can trim them off using a sharp pair of scissors. In the example above, you can see how I trimmed the frayed-looking ends of the hair to create nice clean points
Make sure to do this step prior to applying any nail powder to avoid wasting powder that be covering an area that will be cut off.
Step 8 (Possible extra step):
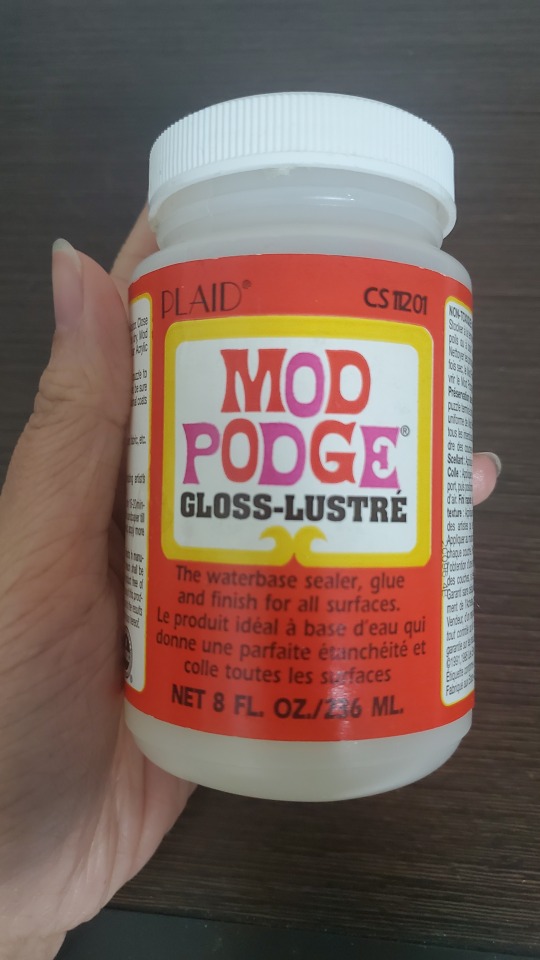
The first time I made my Diamond wig, I was able to rub the nail powder directly onto the Flexbond, which was just tacky enough for the powder to adhere itself to the wig. However, this time around, the Flexbond was not tacky enough and the powder would not adhere properly. I am unsure why this occurred, whether it was the weather/humidity (I created the first wig around Summer 2021 vs. this wig in late winter/early spring 2024) or Rosco tweaking the Flexbond formula sometime in the past few years. Thankfully, I was able to remedy this issue by applying a thin coat of Mod Podge Gloss, which I found stayed temporarily tacky for about 20 minutes after drying.
If you also encounter the same issue, apply a layer of Mod Podge Gloss over your wig. Check it frequently to able to apply the powder as soon as possible once it is dry before the Mod Podge loses its tackiness. Don't be too impatient though, as the Mod Podge will smear if you try to apply the powder before it is dried.
(I’m not sure if using only Mod Podge to create this outer shell would work as opposed to using the Flexbond due to its lower viscosity and lack of flexibility in thicker coats, but I do think it’d be an interesting experiment to try! If it’s successful, it’d be a much more accessible and budget-friendly option!)
*If the Flexbond you applied is tacky enough to apply powder onto directly, you can skip this step and jump ahead to Step 9.
Step 9:
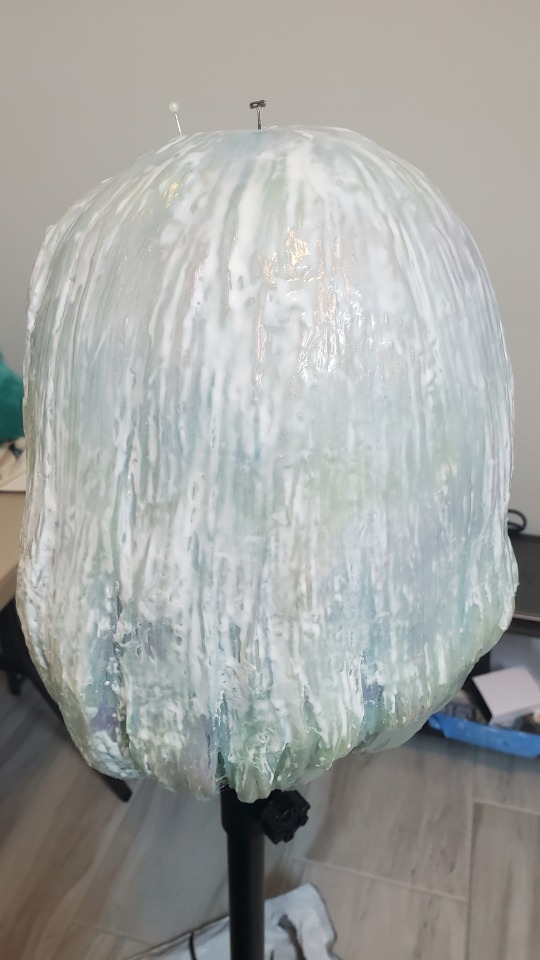
Once your wig is dry, put on your gloves and dip your finger into the nail powder to coat it with a thin layer of powder. Take this powder and buff it onto the surface of your wig, similar to how you would buff nail powder onto your nails. Buff thoroughly until the surface is smooth and looks reflective. It should look almost like metallic/iridescent paint was applied rather than a powdery glitter. Continue this process on the entire wig.
Step 10
If you feel like you need more coverage with the nail powder after applying the first layer, coat the wig with another coat of Flexbond/Mod Podge (depending on what you use to adhere the nail powder), let it dry, then apply another layer of nail powder. You can repeat this process until you satisfied with the coverage. Depending on the powder used, I find that at least 3-4 coats are needed to obtain full coverage and a smooth finish!
Step 11:
Once you are satisfied with the finish, coat the wig in one last layer of Flexbond to protect the finish and add a bit of depth to the glassy finish as opposed to varnish alone.
Step 12:
Add a final coat of gloss varnish to give your wig a beautiful glassy finish! You may notice the Flexbond turning white again underneath the varnish. Do not panic, Flexbond is known to do that when it gets wet! Once everything is dry again, it will return to being clear. :)
You Did it!
Now you have your finished Houseki no Kuni wig with a lovely iridescent finish that is not only beautiful, but also indestructible (seriously, I’ve thrown this thing at a wall and it stayed in perfect condition XD) and super easy to put on (very flexible and goes on like Lego hair XD)!
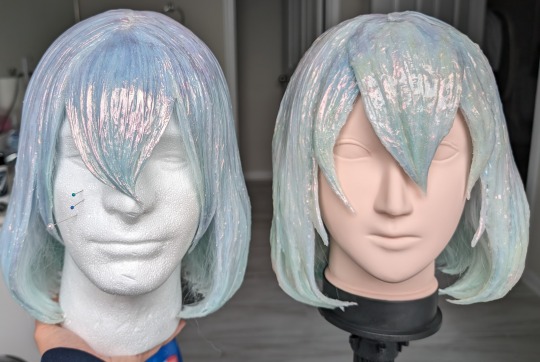


For my second Diamond wig, I wanted to be experimental and try remaking the wig with a shape more accurate to the show (less visible hair strands and more like solid shapes) and adding subtle stripes of color underneath the Flexbond. I will be honest, I actually ended up liking the first one a tad more ^^; It’s okay though, I still learned a lot, and I feel the mistakes I went through the second time around really helped me perfect the technique for this tutorial :)
Another key thing that I messed up on for the second wig is that due to lack of time, I was unable to apply as many layers of the nail powder as I would've liked. As mentioned in Step 10 above, adding at least 3-4 coats will result in a smooth lovely iridescent finish, as seen here on my first Diamond wig!
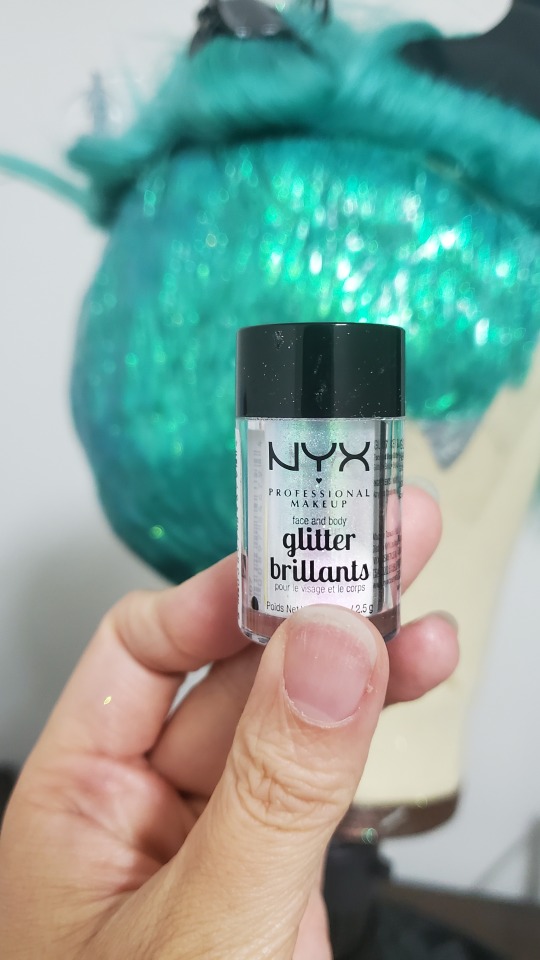
As mentioned before, this tutorial can apply to any Houseki no Kuni character! Here’s a little work-in-progress of my Phos wig! :) I actually used body glitter by Nyx Cosmetics instead of nail powder because it gave a similar smooth finish to the nail powder and gave the wig more of a blue-green-gold shift rather than a full iridescent rainbow spectrum.
Bonus tip: for characters who have multiple distinct layers/sections in their hair, like Phos in this example (undercut and top half), I suggest applying the Flexbond and nail powder in sections as opposed to all at once.
Final words
Thank you so much for taking a look at my tutorial! I can’t wait to see all the lovely wigs that can be made using it~ ^_^
I'm not very active on Tumblr these days, so if you have any questions or need any clarifications for this tutorial, feel free to reach out to me on my Instagram account @/ashtheketchup!
(This tutorial is my entry for @/cosplaytutorialchallenge on IG's Online Cosplay Tutorial Challenge 2024)
31 notes
·
View notes