#Disk Partition
Explore tagged Tumblr posts
Visit Tumblr Blog
Explore Tumblr blogs with no restrictions, modern design and the best experience.
Last Seen Tumblr Blogs


Fun Fact
The most popular pages on Tumblr are about Minecraft, GIFs, and David J. Peterson.
Text
How to shrink and create new partition on Windows Server
In this guide, you will learn how to shrink and create new partition on Windows Server. On Windows, you can decrease the space used by primary partitions and logical drives by shrinking them into adjacent, contiguous space on the same disk. Please, see how to Enable and use Sudo in Windows 11, how to Add Another Hard Drive to a Virtual Machine in HyperV, and how to Locate, Find and Grep: How to…
0 notes
Text
Up next: windows 10
#i got it with windows 8.1 and if i destroy it now i know how to do it again#so the steps are: downgrade from yosemite to mountain lion#go into info.plist and delete the word Pre from preusbbootable or whatever#add 12.1 as the model in that list#run bootcamp#if the windows says no bootable disk just press alt until its in that booting mode and then click the usb#start installing windows and custom set it to whichever partition you want#if it says the parition is in the wrong format-- theres an indian guy online who said click out and go to repair settings#and then advanced. open terminal#and then do some funny little disk list commands (forgot. FIND THE VIDEO!!!!!!!)#then try again to install windows and then chilling. and then go into usb open bootcamp and run the exe for drivers#and then youre back at windows 8.1 again on the imac12.1#indian guy is an uncle and the video is 4-5 minutes long with only a few hundred likes#my ass is never finding that video again#my work account keeps browser history on autodelete
2 notes
·
View notes
Text
Why is it that every time I try dualbooting windows and linux I expect it to go well. It never does!
#currently trying to recover windows on my thinkpad#every guide is like step one: have windows#step two: install linux#step three: :D#all i did was partition my disks#is it some new partition scheme that isnt recognized by windows 7?
13 notes
·
View notes
Text
fighting my SD card and fucking losing
#added a corrupted file to my 3DS sd card while trying to get roms#and now it's read only#disk utility doesn't work (bc it's read-only) and none of my brute force terminal commands are working either#let me overwrite the partition so help me god#mod vex
14 notes
·
View notes
Text

This is what we want to see!
Operating in full Tired Chaotic Dumbass mode last night when I was trying to get the new external disk set up, what did I manage to do? Wipe out the boot partition on the WRONG DRIVE. Because of course I did.
So yeah, everything else on the drive was fine, but I couldn't boot into anything there.
After a little internal screaming and more than a little cursing myself, the best plan forward looked like getting the system up and running to boot off the new drive as I had intended, downloading a Windows 11 install ISO from there, and then hauling my stupid ass to bed for a brain reset.
But, this afternoon I did successfully get a working EFI partition and Windows bootloader back on the internal drive!
That does work the same on 11.
And, a very similar procedure if you didn't manage to fuck up the whole partition like I did, but just the Windows bootloader files:
But yeah, I did test and it's booting fine now.
In an enlarged partition too, since I decided to migrate my existing MX install over onto the new drive. Because yeah they make it easy to do that:
Thankfully I had already written the (gigantic) ISO and burned it to a USB before I accidentally wiped the boot partition. Was trying to get the new drive set up for it when that happened.
2 notes
·
View notes
Text
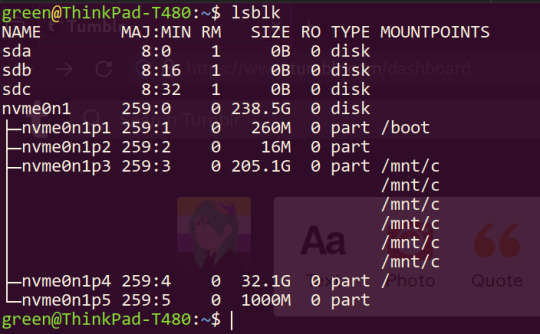
can someone explain what the fuck is happening here..? do i have /mnt/c mounted 5 separate times 0_0
3 notes
·
View notes
Text
VMware Sanal Sunucuda Bir Diskteki İki Bölümü Ayırma
Merhaba, bu yazımda VMware sanal sunucuda bir diskteki iki bölümü ayırma işleminden bahsedeceğim. VMware üzerinde tek bir sanal disk içindeki iki ayrı bölümü (örneğin D ve E sürücüleri) birbirinden ayırıp, ayrı sanal diskler haline getirmek mümkündür. Bu işlemi veri kaybı olmadan yapabilmek için doğrudan VMware seviyesinde değil, işletim sistemi seviyesinde işlem yapmak gerekiyor. Mevcut durumda…
#EaseUS Partition Master VMware#Sanal Sunucu Disk Yönetimi#VMware Disk Alanı Yönetimi#VMware Disk Bölme#VMware Komut Satırı Disk İşlemleri#VMware Partition Ayırma#VMware Partition Wizard Kullanımı#VMware Sanal Disk İşlemleri#VMware Veri Kaybı Olmadan İşlem#VMware Veri Taşıma
0 notes
Text
jesus christ i was having this issue where my pc wont recognize my sd card but i can see it in device manager and ive been at it for an hour and 30 minutes and i have probably taken it out and put it back in again like 90 times and on the last try it. it worked
#this is how i know god is real and we're in a simulation and they're fucking with us#i couldnt format/partition it/assign it a letter cus it wouldnt show up in disk management#and thats all i know to do so i was out in the wild wild west#if google still had pages i woulda been on page 3
0 notes
Text
started downloading nightshade, this thing is beefy
#tütensuppe#huge even#2.5 gig zip folder#tbh i should adjust my disk partitions lol i made them roughly even#but if were being real windows eats a LOT more space than any lnux distro ever would
0 notes
Text
Repair Your PC and Access Your Data with Active@ Data Studio
Active@ Data Studio provides you with a useful set of tools for accessing your data and repairing your PC in the event that Windows fails to start up and you cannot find any other way to access your data.
#disk utilities#disk manager#partition manager#partition recovery#bootable usb#burn cd#burn dvd#burn iso#cd burner#dvd burner#iso burner#clone disk#file recovery#data recovery#undelete#password recovery#backup#backup software#backup and restore#data backup#winpe#disk burner#burn disk#boot disk#erase disk#erase hard drive#wipe disk#disk image#create partition#unformat
0 notes
Text
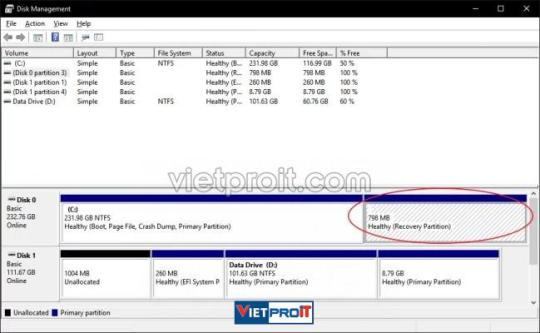
Hướng dẫn cách xóa phân vùng Recovery Partition trong Windows
Hướng dẫn cách xóa phân vùng Recovery Partition trong Windows Nếu bạn đã từng nhìn vào ổ cứng hoặc SSD của mình trong Windows Disk Manager và thấy một phân vùng có mô tả “Healthy (Recovery Partition)“, thì đó là phân vùng khôi phục của bạn. Windows hoặc nhà sản xuất máy tính của bạn (hoặc cả hai) đặt các phân vùng này ở đó để bạn có thể khôi phục hệ thống của mình về trạng thái ban đầu trong…
View On WordPress
0 notes
Text
in wake of yet another wave of people being turned off by windows, here's a guide on how to dual boot windows and 🐧 linux 🐧 (useful for when you're not sure if you wanna make the switch and just wanna experiment with the OS for a bit!)
if you look up followup guides online you're gonna see that people are telling you to use ubuntu but i am gonna show you how to do this using kubuntu instead because fuck GNOME. all my homies hate GNOME.
i'm just kidding, use whatever distro you like. my favorite's kubuntu (for a beginner home environment). read up on the others if you're curious. and don't let some rando on reddit tell you that you need pop! OS for gaming. gaming on linux is possible without it.
why kubuntu?
- it's very user friendly
- it comes with applications people might already be familiar with (VLC player and firefox for example)
- libreoffice already preinstalled
- no GNOME (sorry GNOME enthusiasts, let me old man yell at the clouds) (also i'm playing this up for the laughs. wholesome kde/gnome meme at the bottom of this post.)
for people who are interested in this beyond my tl;dr: read this
(if you're a linux user, don't expect any tech wizardry here. i know there's a billion other and arguably better ways to do x y and/or z. what i'm trying to do here is to keep these instructions previous windows user friendly. point and click. no CLI bro, it'll scare the less tech savvy hoes. no vim supremacy talk (although hell yeah vim supremacy). if they like the OS they'll figure out bash all by themselves in no time.)
first of all, there'll be a GUI. you don't need to type lines of code to get this all running. we're not going for the ✨hackerman aesthetics✨ today. grab a mouse and a keyboard and you're good to go.
what you need is a computer/laptop/etc with enough disk space to install both windows and linux on it. i'm recommending to reserve at least a 100gb for the both of them. in the process of this you'll learn how to re-allocate disk space either way and you'll learn how to give and take some, we'll do a bit of disk partitioning to fit them both on a single disk.
and that's enough babbling for now, let's get to the actual tutorial:
🚨IMPORTANT. DO NOT ATTEMPT THIS ON A 32BIT SYSTEM. ONLY DO THIS IF YOU'RE WORKING WITH A 64BIT SYSTEM. 🚨 (win10 and win11: settings -> system -> about -> device specifications -> system type ) it should say 64bit operating system, x64-based processor.
step 1: install windows on your computer FIRST. my favorite way of doing this is by creating an installation media with rufus. you can either grab and prepare two usb sticks for each OS, or you can prepare them one after the other. (pro tip: get two usb sticks, that way you can label them and store them away in case you need to reinstall windows/linux or want to install it somewhere else)
in order to do this, you need to download three things:
rufus
win10 (listen. i know switching to win11 is difficult. not much of a fan of it either. but support's gonna end for good. you will run into hiccups. it'll be frustrating for everyone involved. hate to say it, but in this case i'd opt for installing its dreadful successor over there ->) or win11
kubuntu (the download at the top is always the latest, most up-to-date one)
when grabbing your windows installation of choice pick this option here, not the media creation tool option at the top of the page:

side note: there's also very legit key sellers out there who can hook you up with cheap keys. you're allowed to do that if you use those keys privately. don't do this in an enterprise environment though. and don't waste money on it if your ultimate goal is to switch to linux entirely at one point.
from here it's very easy sailing. plug your usb drive into your computer and fire up rufus (just double click it).

🚨two very important things though!!!!!!:🚨
triple check your usb device. whatever one you selected will get wiped entirely in order to make space for your installation media. if you want to be on the safe side only plug in the ONE usb stick you want to use. and back up any music, pictures or whatever else you had on there before or it'll be gone forever.
you can only install ONE OS on ONE usb drive. so you need to do this twice, once with your kubuntu iso and once with your windows iso, on a different drive each.
done. now you can dispense windows and linux left and right, whenever and wherever you feel like it. you could, for example, start with your designated dual boot device. installing windows is now as simple as plugging the usb device into your computer and booting it up. from there, click your way through the installation process and come back to this tutorial when you're ready.
step 2: preparing the disks for a dual boot setup
on your fresh install, find your disk partitions. in your search bar enter either "diskmgr" and hit enter or just type "partitions". the former opens your disk manager right away, the latter serves you up with this "create and format hard disk partitions" search result and that's what you're gonna be clicking.

you'll end up on a screen that looks more or less like in the screenshot below. depending on how many disks you've installed this might look different, but the basic gist is the same. we're going to snip a little bit off Disk 0 and make space for kubuntu on it. my screenshot isn't the best example because i'm using the whole disk and in order to practice what i preach i'd have to go against my own advice. that piece of advice is: if this screen intimidates you and you're not sure what you're doing here, hands off your (C:) drive, EFI system, and recovery partition. however, if you're feeling particularly fearless, go check out the amount of "free space" to the right. is there more than 30gb left available? if so, you're free to right click your (C:) drive and click "shrink volume"

this screen will pop up:

the minimum disk space required for kubuntu is 25gb. the recommended one is 50gb. for an installation like this, about 30gb are enough. in order to do that, simply change the value at
Enter the amount of space to shrink in MB: to 30000
and hit Shrink.
once that's done your partitions will have changed and unallocated space at about the size of 30gb should be visible under Disk 0 at the bottom like in the bottom left of this screenshot (courtesy of microsoft.com):

this is gonna be kubuntu's new home on your disk.
step 3: boot order, BIOS/UEFI changes
all you need to do now is plug the kubuntu-usb drive you prepared earlier with rufus into your computer again and reboot that bad boy.
the next step has no screenshots. we're heading into your UEFI/BIOS (by hitting a specific key (like ESC, F10, Enter) while your computer boots up) and that'll look different for everyone reading this. if this section has you completely lost, google how to do these steps for your machine.
a good search term would be: "[YOUR DEVICE (i.e Lenovo, your mainboard's name, etc.)] change boot order"
what you need to do is to tell your computer to boot your USB before it tries to boot up windows. otherwise you won't be able to install kubuntu.
this can be done by entering your BIOS/UEFI and navigating to a point called something along the lines of "boot". from "boot order" to "booting devices" to "startup configuration", it could be called anything.
what'll be a common point though is that it'll list all your bootable devices. the topmost one is usually the one that boots up first, so if your usb is anywhere below that, make sure to drag and drop or otherwise move it to the top.
when you're done navigate to Save & Exit. your computer will then boot up kubuntu's install wizard. you'll be greeted with this:

shocker, i know, but click "Install Kubuntu" on the right.
step 4: kubuntu installation
this is a guided installation. just like when you're installing windows you'll be prompted when you need to make changes. if i remember correctly it's going to ask you for your preferred keyboard layout, a network connection, additional software you might want to install, and all of that is up to you.
but once you reach the point where it asks you where you want to install kubuntu we'll have to make a couple of important choices.

🚨 another important note 🚨
do NOT pick any of the top three options. they will overwrite your already existing windows installation.
click manual instead. we're going to point it to our unallocated disk space. hit continue. you will be shown another disk partition screen.
what you're looking for are your 30gb of free space. just like with the USB drive when we were working with rufus, make sure you're picking the right one. triple check at the very least. the chosen disk will get wiped.

click it until the screen "create a new partition" pops up.
change the following settings to:
New partition size in megabytes: 512
Use as: EFI System Partition
hit OK.
click your free space again. same procedure.
change the following settings to:
New partition size in megabytes: 8000 (*this might be different in your case, read on.)
Use As: Swap Area
hit OK
click your free space a third time. we need one more partition.
change the following settings to:
don't change anything about the partition size this time. we're letting it use up the rest of the resources.
Use as: Ext4 journaling system
Mount Point: /
you're done here as well.
*about the 8000 megabytes in the second step: this is about your RAM size. if you have 4gb instead type 4000, and so on.
once you're sure your configuration is good and ready to go, hit "Install Now". up until here you can go back and make changes to your settings. once you've clicked the button, there's no going back.
finally, select your timezone and create a user account. then hit continue. the installation should finish up... and you'll be good to go.
you'll be told to remove the USB drive from your computer and reboot your machine.
now when your computer boots up, you should end up on a black screen with a little bit of text in the top left corner. ubuntu and windows boot manager should be mentioned there. naturally, when you click ubuntu you will boot into your kubuntu. likewise if you hit windows boot manager your windows login screen will come up.
and that's that folks. go ham on messing around with your linux distro. customize it to your liking. make yourself familiar with the shell (on kubuntu, when you're on your desktop, hit CTRL+ALT+T).
for starters, you could feed it the first commands i always punch into fresh Linux installs:
sudo apt-get update
sudo apt-get upgrade
sudo apt-get install vim
(you'll thank me for the vim one later)
turn your back on windows. taste freedom. nothing sexier than open source, baby.
sources (mainly for the pictures): 1, 2
further reading for the curious: 1, 2
linux basics (includes CLI commands)
kubuntu documentation (this is your new best friend. it'll tell you everything about kubuntu that you need to know.
and finally the promised kde/gnome meme:

#windows#linuxposting#had a long day at work and i had to type this twice and i'm struggling to keep my eyes open#not guaranteeing that i didn't skip a step or something in there#so if someone linux savvy spots them feel free to point them out so i can make fixes to this post accordingly#opensource posting
122 notes
·
View notes
Text
So I've recently been finally getting around to something I've wanted to do for a few years: switching to Linux.
To safely test out this process before applying it to my main tower machine, I decided to first do the switch over on an old Mac Mini which had a lot to gain from this as it was stuck on an outdated and unsupported version of MacOS.
But of course this all involved shuffling around a lot of old data and making sure everything was backed up. And here's where the story begins.
I backed up the Mini's MacOS install to its own partition on an external backup drive shared by my Windows tower machine. Once done, I shrank it to only the used size( which was complicated in its own right for reasons I'll explain shortly,) and then wanted to move it to the end of the drive so I could expand the Windows partition back out to fill the unused space.
Problem #1: MacOS's Disk Utility is so stripped down and lacking in functionality in the name of gloss, it literally cannot work with unallocated space on a drive in any way. You cannot see unallocated space, and you cannot create it. Want to shrink or delete a partition? It automatically creates a new one to fill the space whether you wanted it or not. Want to make a new partition in unallocated space without wiping the whole drive? Gotta use a different OS to make a dummy partition first and then replace it in Disk Utility. And the real problem… Want to move a partition? Can't.
Problem #2: Windows's Disk Management doesn't know what HFS+ is and refuses to work with it. Windows can't even read the Mac backup partition, let alone move it. But wait! I can use EaseUS Partition Manager! …Aaand most of its essential functionality is locked behind one of its multiple paywall tiers, including the ability to work with non-Windows filesystems at all.
But what about that new Linux install on the Mini?
I run 'sudo apt-get install gparted', a FOSS program, and in less than a minute I've already got it moving the partition. No hassle. No BS.
And if this whole thing doesn't just sum up the operating system trio, I don't know what does.
72 notes
·
View notes
Note
as a certified Arch Transfem™, i am a big command line enjoyer. i generally prefer to use my keyboard for anything possible on my system, i have vimium installed on my browser, etc...that said...
i would be rotting in the cold hard fucking dirt before i willingly use a non-gui tool to partition a disk. fdisk can suck my cock and balls and the arch install image should include a desktop environment specifically for gparted.
enjoy
31 notes
·
View notes
Note
is there a way for me to keep stuff on my pc and switch to linux? or is everything on my pc doomed if i do?
yea this seems to be something that catches a lot of ppl up! Generally installing linux involves partitioning your disk, if you've got enough space you can always make a seperate partition for linux and then move your files over from there, otherwise I'd just either get a new harddrive/ssd and put Linux on that or get a new harddrive and store all my windows files on it.
when my windows installation broke i had Linux installed on another harddrive so i booted into that, recovered the files from my main harddrive and moved them to the Linux one, and then installed Linux onto my main harddrive and put the files I'd recovered back onto my main harddrive.
basically you'll either need to partition your drive, use something like onedrive or get a spare harddrive. for a harddrive you can either buy a dedicated storage one OR just buy an old computer harddrive and a SATA to usb cable on ebay or something and use that (which is what i did).
hopefully that's helpful! there's lots of advice online, unfortunately it's not as simple as having a "keep my files" option on the installer but it shouldn't be too hard
30 notes
·
View notes
Text
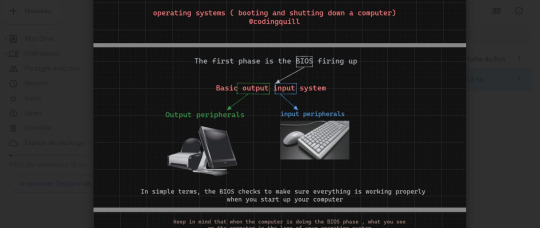
What happens when you start your computer ? ( Booting a computer )
We studied this in the lecture today, and it was quite interesting. What makes something a hundred times simpler than it is? Creating a story about it. That's why I made this super fun dialog that will help you understand it all.
I've set up a drive to compile everything I create related to the Linux operating system. Feel free to explore it for more details on the topics discussed in the conversation below. Check it out here.
Have a fun read, my dear coders!
In the digital expanse of the computer, Pixel, the inquisitive parasite, is on a microventure with Binary, a wise digital guide. Together, they delve into the electronic wonders, uncovering the secrets hidden in the machine's core.
Pixel: (zooming around) Hey there! Pixel here, on a mission to demystify the tech wonders . There's a creature named Binary who knows all the ins and outs. Let's find them!
Binary: (appearing with a flicker of pixels) Pixel, greetings! Ready to explore what happens inside here?
Pixel: Absolutely! I want the full scoop. How does this thing come alive when the human outside clicks on "start"?
Binary: (with a digital chuckle) Ah, the magic of user interaction. Follow me, and I'll reveal the secrets.
(They traverse through the circuits, arriving at a glowing portal.)
Pixel: (inquiring) What's the deal with this glowing door?
Binary: (hovering) Pixel, behold the BIOS - our machine's awakening. When the human clicks "start," the BIOS kicks in, checking if our components are ready for action.
(They proceed to observe a tiny program in action.)
Pixel: (curious) Look at that little messenger running around. What's it up to?
Binary: (explaining) That, Pixel, is the bootloader. It plays courier between the BIOS and the operating system, bringing it to life.
Pixel: (excitedly buzzing) Okay! How does the computer know where to find the operating system?
Binary: Ah, Pixel, that's a tale that takes us deep into the heart of the hard disk. Follow me.
(They weave through the digital pathways, arriving at the hard disk.)
Pixel: (curious) Huh? Tell me everything!
Binary: Within this hard disk lies the treasure chest of the operating system. Let's start with the Master Boot Record (MBR).
(They approach the MBR, Binary pointing to its intricate code.)
Binary: The MBR is like the keeper of the keys. It holds crucial information about our partitions and how to find the operating system.
Pixel: (wide-eyed) What's inside?
Binary: (pointing) Take a look. This is the primary boot loader, the first spark that ignites the OS journey.
(They travel into the MBR, where lines of code reveal the primary boot loader.)
Pixel: (in awe) This tiny thing sets the whole show in motion?
Binary: (explaining) Indeed. It knows how to find the kernel of the operating system, which is the core of its existence.
(They proceed to the first partition, where the Linux kernel resides.)
Pixel: (peering into the files) This is where the OS lives, right?
Binary: (nodding) Correct, Pixel. Here lies the Linux kernel. Notice those configuration files? They're like the OS's guidebook, all written in text.
(They venture to another partition, finding it empty.)
Pixel: (confused) What's the story with this empty space?
Binary: (smirking) Sometimes, Pixel, there are barren lands on the hard disk, waiting for a purpose. It's a canvas yet to be painted.
Pixel: (reflecting) Wow! It's like a whole universe in here. I had no idea the operating system had its roots in the hard disk.
(They continue their microventure, navigating the binary landscapes of the computer's inner world.Pixel gazes at the screen where choices appear.)
Pixel: What's happening here?
Binary: (revealing) This is where the user picks the operating system. The computer patiently waits for a decision. If none comes, it follows the default path.
(They delve deeper into the digital code, where applications start blooming.)
Pixel: (amazed) It's like a digital garden of applications! What's the enchantment behind this?
Binary: (sharing) Here, Pixel, is where the applications sprout to life. The operating system nurtures them, and they blossom into the programs you see on the screen.
Pixel: (excited) But how does the machine know when the human clicks "start"?
Binary: It's the BIOS that senses this initiation. When the human triggers "start," the BIOS awakens, and we embark on this mesmerizing journey.
#linux#arch linux#ubuntu#debian#code#codeblr#css#html#javascript#java development company#python#studyblr#progblr#programming#comp sci#web design#web developers#web development#website design#tech#html css#operatingsystem#windows 11
387 notes
·
View notes