#Markdown/HTML editor
Explore tagged Tumblr posts
Visit Tumblr Blog
Explore Tumblr blogs with no restrictions, modern design and the best experience.
Last Seen Tumblr Blogs


Fun Fact
The “We are the 99%” Tumblr blog became the slogan for the Occupy Wall Street movement.
Text
Guess who's back with the writing bs on neocities ...wait, what do you mean I never told y'all here I had started one? whoops. Well, I guess that there isn't much to pretend this is more than a little summary of stuff I've stuck my head into recently- between checking out DeviantArt again since I had started drawing stuff again these past days, checking out stuff related to Golgo 13, and, uhh, that's it?
prob gonna have some more solid writing ideas or stuff to share on this little spot of mine if university stuff doesn't chew me alive this saturday
#writing#neocities#deviantart#golgo13#i started writing this becuase I found a markdown editor that made editing easier to export to html#website
0 notes
Text
you should make a website!
"my favorite social media site is shutting down!"
"the CEO of the site i use just committed another atrocity!"
"i want a webspace that's all my own!"
if any of these sound like you (and if you're on tumblr, i know at least one applies) you should make your own website!
why make a website?
incredibly customizable
you can put whatever you want on it
it's, well, your own! like a house you build with your own hands
things you'll need
a computer. you can maybe get away with doing this on a mobile device, but i have zero experience there
a code editor. i like VScodium, which is a de-microsoft-ed version of VScode.
a will to learn ;)
site hosting
neocities. everyone knows neocities. at this point i do feel like it's become a bit too centralized, but it's a good option nonetheless. do note that there are filetype restrictions for free users, but that shouldn't be a huge issue for most. what may be an issue, though, is that there's a content security policy that prevents sites made after jan 1st, 2024 to use outside scripts. also, you have to pay to use your own domain
nekoweb. similar to neocities, but there's no filetype restrictions or a content security policy. some differences are outlined in the FAQ (thinking about moving here... i am a traitor...) i'm not sure if domain support is free or paid.
github pages or codeberg pages. you'll need an understanding of git for this
pages.gay: run by besties.house, uses git
teacake: free hosting is currently closed, but paid hosting starts at 2 bucks a month.
leprd.space: i know next to nothing about this.
a web server. don't recommend this if you don't know computer stuff but it is an option (you'll likely have to provide your own domain though)
gripes & solutions (?)
i'm not comfortable maintaining pages in pure HTML / templating with JS sucks!
with a static site generator, you can write pages in markdown and they'll be converted into HTML and (if you'd like) be put into a template of your choosing. my personal choice is 11ty but there are tons of options!
static site generators can be a bit of a learning curve (and you will have to write some html for templating) but if you're making a lot of pages or blogging regularly it's something to consider
there are starters for 11ty online but i might make a more beginner-proofed starter and/or guide in the future? don't count on it
i don't want to write/maintain CSS
simpleCSS is a tiny CSS file you can use to make semantic HTML ("naked" HTML) look nice. it's got decent customization options too. it's not particularly fancy or opinionated, but it's a good starting point if you need something
i don't know what to put on my website!
small list of ideas:
weblog
art/writing/music gallery
movie/show/book tracker
place to store bookmarks/links
scary! i'm scared!
my askbox/messages/e-mail inbox/etc. are open to anyone who'd like to ask for help!
411 notes
·
View notes
Text
Friendly reminder that Wix.com is an Israeli-based company (& some website builders to look into instead)
I know the BDS movement is not targeting Wix.com specifically (see here for the companies they're currently boycotting) but since Wix originated in Israel as early as 2006, it would be best to drop them as soon as you can.
And while you're at it, you should leave DeviantArt too, since that company is owned by Wix. I deleted my DA account about a year ago not just because of their generative AI debacle but also because of their affiliation with their parent company. And just last month, DA has since shown their SUPPORT for Israel in the middle of Israel actively genociding the Palestinian people 😬
Anyway, I used to use Wix and I stopped using it around the same time that I left DA, but I never closed my Wix account until now. What WAS nice about Wix was how easy it was to build a site with nothing but a drag-and-drop system without any need to code.
So if you're using Wix for your portfolio, your school projects, or for anything else, then where can you go?
Here are some recommendations that you can look into for website builders that you can start for FREE and are NOT tied to a big, corporate entity (below the cut) 👇👇
Carrd.co

This is what I used to build my link hub and my portfolio, so I have the most experience with this platform.
It's highly customizable with a drag-and-drop arrangement system, but it's not as open-ended as Wix. Still though, it's easy to grasp & set up without requiring any coding knowledge. The most "coding" you may ever have to deal with is markdown formatting (carrd provides an on-screen cheatsheet whenever you're editing text!) and section breaks (which is used to define headers, footers, individual pages, sections of a page, etc.) which are EXTREMELY useful.
There's limits to using this site builder for free (max of 2 websites & a max of 100 elements per site), but even then you can get a lot of mileage out of carrd.
mmm.page

This is a VERY funny & charming website builder. The drag-and-drop system is just as open-ended as Wix, but it encourages you to get messy. Hell, you can make it just as messy as the early internet days, except the way you can arrange elements & images allows for more room for creativity.
Straw.page
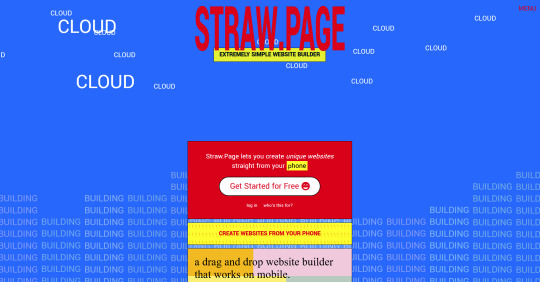
This is an extremely simple website builder that you can start from scratch, except it's made to be accessible from your phone. As such, the controls are limited and intentionally simple, but I can see this being a decent website builder to start with if all you have is your phone. The other options above are also accessible from your phone, but this one is by far one of the the simplest website builders available.
Hotglue.me

This is also a very simple & rudimentary website builder that allows you to make a webpage from scratch, except it's not as easy to use on a mobile phone.
At a glance, its features are not as robust or easy to pick up like the previous options, but you can still create objects with a simple double click and drag them around, add text, and insert images or embeds.
Mind you, this launched in the 2010s and has likely stayed that way ever since, which means that it may not have support for mobile phone displays, so whether or not you wanna try your hand at building something on there is completely up to you!
Sadgrl's Layout Editor

sadgrl.online is where I gathered most of these no-code site builders! I highly recommend looking through the webmaster links for more website-building info.
This simple site builder is for use on Neocities, which is a website hosting service that you can start using for free. This is the closest thing to building a site that resembles the early internet days, but the sites you can make are also responsive to mobile devices! This can be a good place to start if this kind of thing is your jam and you have little to no coding experience.
Although I will say, even if it sounds daunting at first, learning how to code in HTML and CSS is one of the most liberating experiences that anyone can have, even if you don't come from a website scripting background. It's like cooking a meal for yourself. So if you want to take that route, then I encourage to you at least try it!
Most of these website builders I reviewed were largely done at a glance, so I'm certainly missing out on how deep they can go.
Oh, and of course as always, Free Palestine 🇵🇸
#webdev#web dev#webdesign#website design#website development#website builder#web design#websites#sites#free palestine#long post#I changed the wording multiple times on the introduction but NOW I think im done editing it
500 notes
·
View notes
Text
Friday, August 25th, 2023
🌟 New
On /search pages on the web, we moved the search bar from the sidebar to the center/main section of the page.
For folks in the aforementioned reblog header redesign experiment, we added avatars back to posts from group blogs when the option to show author portraits is enabled.
When blocking a blog via a submission in your inbox on the web, you can now block from both your secondary (if it was the recipient) and your primary blog.
On the web, we have made some improvements to localized number formatting across all supported languages.
On the web, logged out users browsing a blog view will sometimes be prompted to log in after scrolling for some time.
We are testing out showing the “You’re all caught up!” carousel to folks with “Best stuff first” enabled.
🛠 Fixed
On the web, we’ve made some improvements to the post header in compact posts (like when they’re displayed in a grid on the Explore page, for example). Long blog names, badges, and the follow button no longer break onto a new line in the middle of a word, and each element remains properly aligned in the header.
We fixed an issue that caused a bullet point to appear next to the Blogs menu item when using Safari.
We’ve made some headway in fixing various issues relating to undo/redo in the post editor on web. You should notice improved stability when using undo and redo in the editor.
On the web, we fixed an issue where avatars from anonymous asks were empty.
On the web, we fixed an issue affecting the HTML and Markdown modes in the post editor where select all would sometimes select text outside of the editor.
We fixed an issue affecting some users where starting a search with a hashtag (#) would return search results instead of results for that tag.
🚧 Ongoing
We are hard at work updating our docs. If you see anything confusing or out-of-date, please send some feedback!
🌱 Upcoming
Nothing to share today.
Experiencing an issue? File a Support Request and we’ll get back to you as soon as we can!
Want to share your feedback about something? Check out our Work in Progress blog and start a discussion with the community.
501 notes
·
View notes
Text
I am a creature built upon pure nostalgia. I sit and I sift through the terabyte of recordings I have of my friends and I playing video games throughout the years and I go 𝓭𝓪𝓶𝓷
#extremely stupid that both the html and markdown editor have codeblocks disabled#how else am I supposed to be dramatic
5 notes
·
View notes
Text

Advice; Where to Make Rules and About Pages
If you've read my advice post about the difference between about and rules pages and why they're both important, you may not be wondering the best way to make them. The good news is, there are plenty of options!
Tumblr
The simplest choice. In the past, people would make custom pages on their theme. However, since dash view has become popular (and you can't view custom pages via it, nor can you view them on mobile), most people simply post their about/rules page as a normal text post, and link to it in their pinned post. If you have a custom theme, make sure to link the pages in the navigation bar too!
Using a plain Tumblr post increases your page's readability, but reduces the amount of formatting you can do. If you make your pages elsewhere, you will be able to customise them a lot more.
Carrd
A free website maker. You can make a small site with a free account, and the prices are pretty reasonable if you need to make a bigger site. Carrd has a minimalist aesthetic, and it will also adjust what you make to fit a mobile browser (though this may break your formatting if you have designed something complicated).
Carrd is easy to use, but it is best used for simple designs. If you want to do something more complicated than a basic Carrd layout, you're going to spend a lot of time trying to make the formatting work. If you want multiple pages for your site, you're also going to spend a lot of time formatting as you can't clone pages, therefore have to recreate each one every time instead.
It uses markdown for formatting text. If you're familiar with it, this can speed up writing, but it may slow you down if you've never used it before.
One of the benefits of Carrd is that there are lots of free templates available within the rpc! Here are resources I found with a quick Google search, but there are plenty more out there if you look for them: [x] [x] [x]
Weebly
Another free website maker. You can make more for free here than you can on Carrd. Weebly sites should adapt to work on a mobile browser.
I've never seen anybody use Weebly for about/rules pages, but I do recommend it! It's very easy to use, and, unlike Carrd, you can copy and paste entire pages. This makes it ideal if you have lots of muses that you want to make individual about pages for.
It uses a more typical text editor than Carrd. Instead of markdown, it's more like Microsoft Word - where you highlight text and click buttons to add formatting. You also have HTML/CSS options.
Weebly does offer some free templates, but you're likely to want to edit them to suit your needs more. This is okay! It isn't difficult to do!
Google Docs
A popular, completely free option. As with Carrd, there are plenty of templates and resources within the rpc (here are three examples: [x] [x] [x]). These pages will be viewable on a mobile browser, but the theme may not translate well. Keep readability in mind if you use this option.
If you use this option, also make sure the link you share is viewer only and doesn't have editor permissions!
Other Options (WordPress, Self-Hosting, etc)
Don't feel you have to follow the crowd. If you like to use WordPress, use WordPress. You could also use Neocities, or any other website builder!
Personally, I already own a web domain because I have websites for other online activities, so I use about pages that I've coded from scratch and host them myself. For my rules page, I just use a Tumblr text post that's linked in my pinned post. In the past, I've used Carrd and Tumblr pages for about pages.
If you want to write your site using HTML, some free website hosters will allow you to do this (Neocities, for example). If you're interested in coding, I do recommend this! It allows you to have full customisability, and coding can be a really useful skill. However, one downside of this is it can make your pages hard to read on a mobile browser. It's up to you to decide how important this is.
If you're interested in learning HTML (as well as CSS, JavaScript, and other coding languages), this site is a great resource!
41 notes
·
View notes
Note
poderia me ajudar a encontrar um tutorial de como upar gifs numa página, tipo as de gif pack, por favor? eu tinha salvo, mas acabei perdendo :(
Oi, anon! Eu tenho alguns tutoriais em inglês, mas vou fazer um tutorial rapidinho em português aqui pra você com a forma que eu faço.

Primeiro você precisa upar os seus gifs em um post do tumblr. Eu tenho um tumblr trancado pra fazer isso, assim não posto direto no meu principal. Com as atualizações, o tumblr só permite que você upe 30 imagens por post, e tem um limite de 250 imagens por dia.
Depois de postar (e precisa postar pra garantir que o gif não vai ser deletado), você vai abrir o post para editar, clicar na engrenagem de opções do post no canto superior direito e descer até a opção "Editor de Texto". Você vai encontrar "Rick Text" selecionado, e vai clicar.
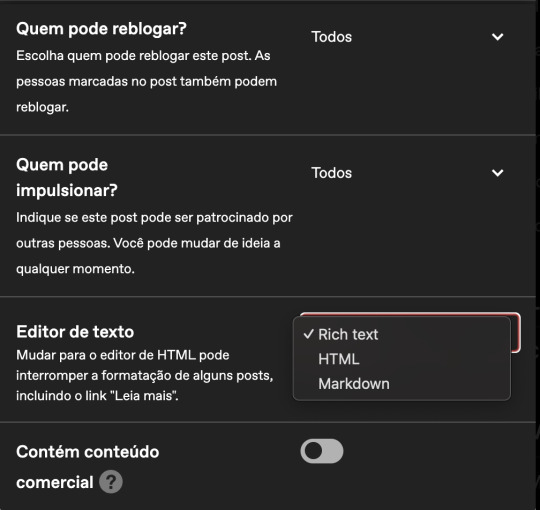
Primeiro você vai selecionar "Markdown" e seu post vai ficar assim:

Depois vai mudar para "HTML", e seu post vai ficar assim:

(Sendo bem sincero eu não sei exatamente o motivo de passar por markdown e depois para html, mas aprendi assim e sigo esses passos então não sei se vai alterar em algo. Se você reparar bem, ele retira algumas partes do código nessa alteração, então acredito que seja importante seguir esse passo.)
Depois disso, você vai abrir um site para limpar o html. Conheço o zubrag e o html washer. Eu uso o zubrag, então vou ensinar com ele.
Você vai copiar todo aquele código do seu post com os gifs, colar no zubrag e em allow tags, você vai colocar <img>. Passo importante!
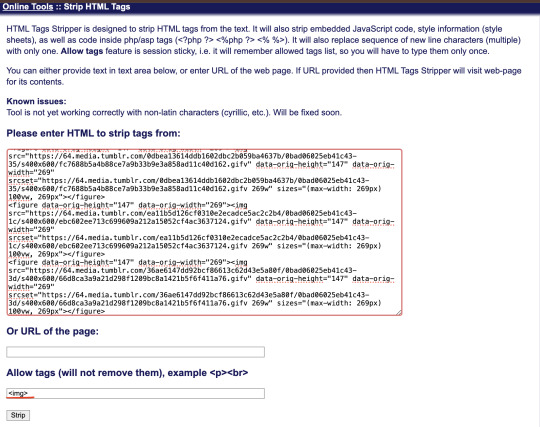
Clica em strip, e o zubrag vai limpar o html pra você. No fim vai sobrar só as imagens. Você vai copiar esse novo código e colar ele na sua página.
Pra isso você vai adicionar uma nova página, e escolher layout personalizado. Assim:
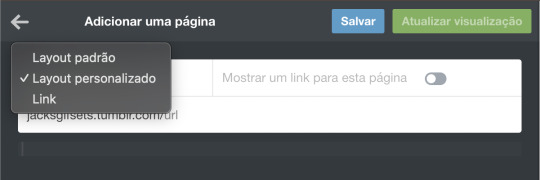
Agora você pode colar o código hmtl limpo nessa página e atualizar que eles vão aparecer certinho.

Você vai ter que fazer esse processo a cada 30 gifs, e é só repetir.
Você pode manter dessa forma mais simples, ou pode usar uma das páginas feitas para gifsets, como a que eu uso aqui no gifset do Vincent Corleone.
Se você quer usar uma página, é bem simples também. Você só precisa encontrar a página que gostar mais, e pegar o código html dela (não se esqueça de dar um like + reblog no post original para ajudar a divulgar o criador da página). Eu uso essa daqui, mas todas elas tem praticamente o mesmo processo de edição.
Você vai precisar copiar o código fornecido, copiar na sua nova página e encontrar a parte de edição e para colar os gifs. No caso da minha, encontro essa parte:
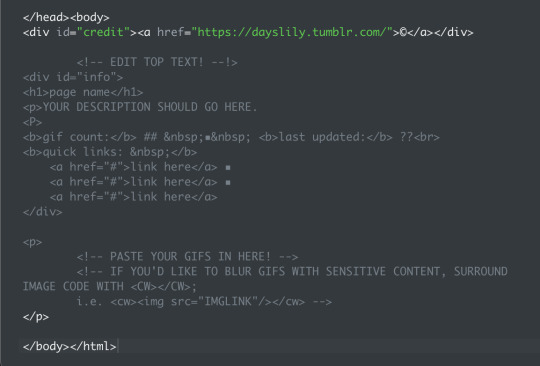
É bem auto explicativo, mas você basicamente coloca o nome do seu fc no lugar de "page name", adiciona uma descrição em "YOUR DESCRIPTION SHOULD GO HERE." (ou só apaga essa parte mesmo. Após o ## na linha de gif count é a quantidade de número, no lugar de ?? você adiciona a data em que atualizou, e embaixo de "quick links" você pode colocar links para voltar para o seu tumblr, ask, etc.
O código que você limpou lá no zubrag você vai colocar embaixo do último -->, logo acima de </p>.
Da próxima vez que for adicionar gifs, só vai precisar adicionar o código abaixo do último código que você colou, e seus gifs vão ir aparecendo em ordem. Fora isso, só atualizar a quantidade de gifs e a última vez que foi atualizado.
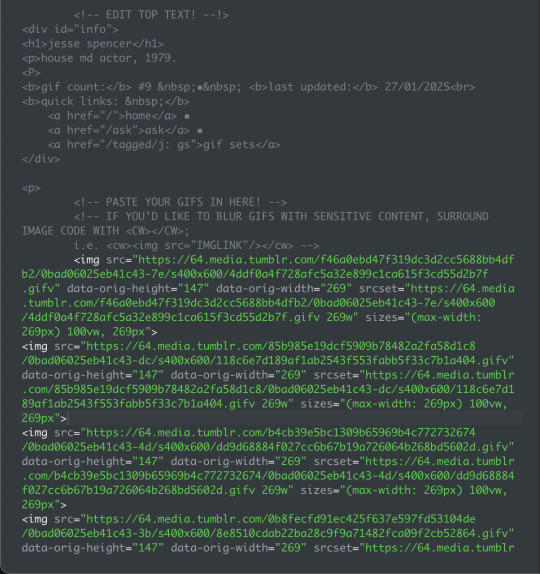
Meu código, por exemplo, ficaria assim:
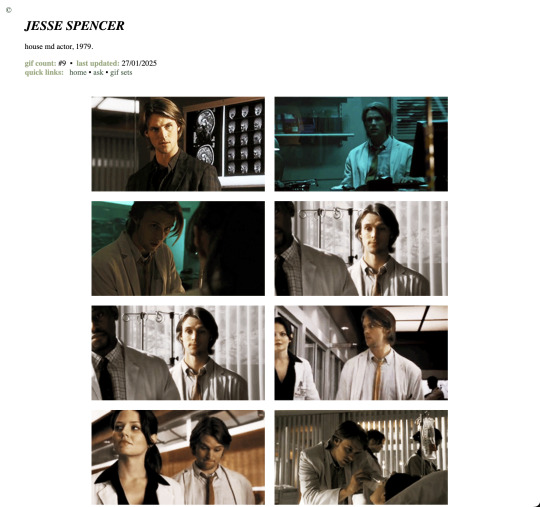
E a preview da minha página, assim:
Eu recomendo atualizar e salvar a cada passo que você fizer, para garantir que não vai perder seu trabalho.
Caso você queira, tenho outras recomendações de página de gifsets:
PAGE THEME: GIF PAGE 001
gif/icon page pack by autumn
GIF PAGE by fayechamberlins
LAZY LOADING GIF PACK PAGE THEME
FLOWERS FOR VASES ★ A GIF PACK PAGE BY FAKEHELPER
SUGAR ON THE RIM ★ A GIF PACK PAGE BY FAKEHELPER
Espero que tenha ajudado! Qualquer dúvida, só voltar aqui que tento explicar de novo!
13 notes
·
View notes
Text
No-Google (fan)fic writing, Part 5: Obsidian
Storytime
In terms of how long I’ve been using Obsidian, well. Currently, a little more than a week ^^ And I’ll be honest, I’ll probably only use it for writing fic sporadically, because it’s proprietary software and I prefer Open Source (and I also love LaTeX too much, but that’s a different question).
The reason why I decided to give it a try in terms of writing fic was that I’ve been talking with others about moving to Markdown, Obsidian is Markdown-based and I’d been playing around with it in a different context for a while already. So, out of curiosity, I decided I’d try to write a story in Obsidian and see if it could live up to my demands.
Word/Google docs versus Obsidian
Again, Word and Obsidian do not work in the same way. If anything else I have described here so far can be compared to the way Obsidian works, it’s Zettelkasten. The same principle of “one note for one idea/scene/thought” also applies to Obsidian. Also like Zettelkasten, Obsidian relies heavily on connecting these notes by way of links, using tags to categorise/find specific notes and it also has the same feature of using folders for collecting “sub-notes”, which can be used for structuring in the same way the virtual desk is used in Zettelkasten. Actually, I would say that the main difference between those two is that Obsidian uses Markdown and a folder-with-subfolders structure, whereas Zettelkasten has its own file format and relies on XML behind the scenes.
Cost
The personal use version of Obsidian is free, so technically +1 for that. However, Obsidian is not Open Source. It is not free in the same way Writer, LaTeX, Zettelkasten and Markdown (= many MD editors) are free, the code behind it is proprietary. This does not have any impact on the cost, at least not at present, but there is a chance that at some point, the developers might choose to charge for private use of it. I think it’s unlikely, but. Just so you know.
File formats
Unlike Word, however, Obsidian relies on Markdown as its file format and stores every “note” as a separate .md-file in a folder. The “notebook” where all notes are collected is called a “vault” and it’s just one big folder with lots of subfolders. In other words, even if the software is proprietary, the files can be read and used without needing Obsidian itself. Which is really great, because again, it means you have plain text .md-files with your ideas, scenes and stories, and they wil be readable even if Obsidian as an app disappears.
+1 for that!
Features
What you need Obsidian for is the features. And of those, there are many. I’ll save words and say, read about Markdown features like bold, italics etc. here, but I really do want to talk about other features Obsidian offers that plain Markdown with an editor does not.
Firstly, an important feature that I talk about a lot is the export function. AO3 needs either HTML or RTF, fanfiction.net ODT or DOC(X). Obsidian can export to all of these, provided you install the Pandoc plugin. This is not the same as installing Pandoc on your computer; you need to install the plugin in Obsidian itself to use it. But as long as you do, you can export to whatever you like.
+1
Another feature very important for me when I tried Obsidian was whether outcommenting would work (again, I’ve talked about this here). Basically, what that means is that parts of the text are not exported when you export the rest of the note – such as comments to yourself, notes on what you still need to write in a scene or simply – as I use it frequently – stuff you wrote and don’t want to delete, even it doesn’t fit anymore. Much to my delight, it works in Obsidian as well, again because it’s Markdown and it works in Markdown. [text you want outcommented]: # will do the trick.
+1
Lastly, another plugin I would recommend is Smart Typography. It “[c]onverts quotes to curly quotes, dashes to em dashes and periods to ellipses”, as the description says, and that’s really useful if you use a regular keyboard layout to write, where you get the standard ' and ".
+1
Installing both the Pandoc and Smart Typography plugins is easy. Open the Obsidian vault settings (the little wheel you can see in the left lower corner, to the right of “example”, which is the name of the vault), Third-party plugins (which you need to enable) and then browse Community plugins by name and install and enable them. Done.

Now for the most important part: putting together a story.
If you want one big vault containing all of your stories, you need to create “folders” for every story and then store the single notes for that story in that folder. Personally, I prefer to have one vault per story, because I find it a lot easier to focus on working on one story at a time if I don’t have several other stories in the same vault. This, I want to note, is different to how I used Zettelkasten, where I generally had one big Zettelkasten containing all of my stories for a specific fandom. I don’t know why that’s different with Obsidian, it’s just that way.
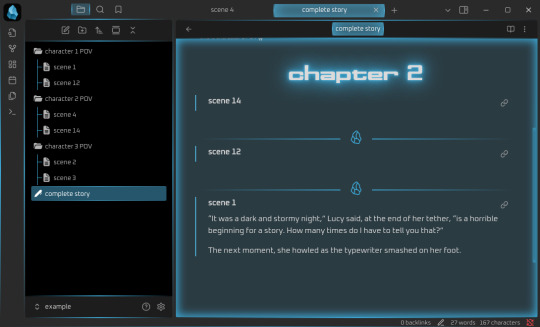
In any case, the following examples are for when you have one story per vault. In this case, I’ve decided that I’m going to write a story involving the POVs of three different characters. I’m going to keep their respective pieces sorted by character, so I always know who’s talking right now. Every scene where that character is the main narrator gets its own note within the respective character folder.

This, in theory, is no different than what I do with regular Markdown. What is very useful in Obsidian, however, is that Obsidian offers the possibility to “embed” notes in other notes.
And that, in turn, means that just like with Zettelkasten, you can use one note to put together the whole story and move around scenes without ever having to worry that you’ll accidentally delete and lose texts while copypasting.
It works like this: [[name of note]] establishes a link from one note to another (useful if you want to connect different ideas). If you add ! before the brackets, like so: ![[name of note]], it means that the whole text of the linked note will now be embedded in the note with the link. Which will give you this:

And, because you’ve installed the Pandoc plugin, this will now allow you to export the note named “complete story” to HTML, ODT or whatever, and all of the linked notes will be exported into that file. You need to change the order of scenes or move one scene from chapter 1 to chapter 2? Just delete ![[name of note]] in chapter 1 and put it in chapter 2. You can also insert horizontal rules, by the way, which I have done here. These will also be exported.
If you need your story structured in chapters rather than as a whole, the process is analogue: one note per chapter, where you !-link all the scenes that belong to the chapter in question. Then, if you want it as a whole, create a note where you !-link the notes for the single chapters, done. Export at your leisure.
Embeds are hands down in my opinion the best feature Obsidian has. They offer a distinct benefit over other Markdown editors like Ghostwriter, KATE or Notepad++, because Markdown, other than LaTeX, does not come with a feature that would make it easy to include “child files” in a “parent Markdown” file that only includes the header and the child files in the order in which they should appear in the final output document. Thus, none of the three editors I like to use for Markdown can show me the whole story if I decide to create a separate file for each of the scenes, and that is really annoying, because it means that I’m back to cutting and pasting pieces of text from one part of my Markdown document to another. Which in turn increases the probability that I will lose something, and well. See Zettelkasten as to how I feel about that.
So that is definitely an extremely useful feature deserving a big +1 because like with Zettelkasten, it means you can move the order of your chapters and scenes around without running the risk of losing the actual text.
Interface
Something I find quite enjoyable is that there are a lot of “skins” made by the community that can be applied to Obsidian. This is important to me because, as the previous instalments have probably shown, I’m a big fan of simple, clean, customisable interfaces. I’ve tried several of the community-made skins already, and my current favourite is Cyber Glow – but there are also others I’ve found quite nice.
Again, skins can be installed via the wheel/settings button, and just to show it, the below is the vault from above with Cyber Glow enabled.
Syncing
One of the big benefits of Obsidian is that it comes with a syncing service. Yes, you don’t need anything else, you can just create an Obsidian account and your notes will be synced across your devices, even on mobile devices. And file versioning is an option (I’ll get to that in due time). And that is really great, because it’s a one-in-all solution.
If you don’t need or want that, you don’t have to sign up for it. You can also continue syncing your Obsidian vaults with your preferred service (Dropbox, OneDrive, GIT, USB etc.). But you can and it’s at least nice to have the option. Downside: sync is a paid-for service, starting at 4$/month for 1GB of storage. Which isn’t a lot generally, except you’re writing plain-text/Markdown, so your files are Kb-tiny in most cases, and it takes a lot of Kb-sized files to fill up 1GB.
Personally, I will say that I’d much rather pay 4$ a month and know that my stories are not going to be scraped for AI, but it’s really a decision everyone has to make for themselves. Just remember – if you aren’t paying for the product, you are the product.
Ease of use for Word/Google doc-users
It’s not intuitive in the same way as moving from Word to LibreOffice Writer is. At least having a look at some Markdown guides (linked over there) is important if you are going to use Obsidian. But as I wrote there already, Markdown takes you about half an hour to learn, if you don’t know it already. And yes, you’ll have to wrap your brain around the concept of “one note = one thought/scene/idea” as well, but honestly? In terms of cost-benefit ratio, Obsidian is probably one of the most rewarding transitions you could make if you’re looking to get away from Word/Google docs. My only gripe with it is really that it’s proprietary software, but otherwise? Definitely recommended.
Read No-Google (fan)fic writing, Part 1: LibreOffice Writer
Read No-Google (fan)fic writing, Part 2: Zettelkasten
Read No-Google (fan)fic writing, Part 3: LaTeχ
Read No-Google (fan)fic writing, Part 4: Markdown
#degoogle#no-google (fan)fic writing#fanfiction#fic writing#fanfic writing#degoogle your fics#degoogle your writing#software recommendations#resources#obsidian
9 notes
·
View notes
Note
One of the things I enjoyed about the mobile app was how it used to let you format posts through HTML or Markdown coding. Would it be possible to bring it back? It's kinda weird that the NPF Editor is used on all different platforms, but HTML and Markdown are exclusive to desktop and the mobile website.
Answer: Hey there, @violetganache42!
Sadly, we are not going to bring it to the mobile apps. While we understand that it can be handy to a few people, we are sorry to say it is not handy enough, to not enough folks, to warrant prioritizing that work now.
Should this ever change, however, you will find this at the usual channels: here or over at @changes.
51 notes
·
View notes
Text
Cambia, todo cambia
🌟 Novedades
Del mismo modo que hicimos con ChatGPTBot de OpenAI, hemos bloqueado el rastreador de Common Crawl para que no extraiga información y contenido de Tumblr.
En el Escritorio de la versión web, hemos añadido el elemento rel="author" al enlace del nombre del blog en las cabeceras de las publicaciones para mejorar la experiencia de las personas que usan lectores de pantalla y otras herramientas de accesibilidad.
En las páginas de búsqueda de esta misma versión, hemos movido la barra que te permite buscar contenido: ahora ya no se encuentra en el menú lateral, sino en la parte central de la página.
Como sabrás, estamos haciendo pruebas con la cabecera de las publicaciones para evitar que los avatares se muestren varias veces en los reblogueos. Por ahora, los hemos vuelto a añadir para las publicaciones de los blogs en grupo que tienen la opción «Mostrar los avatares de los autores» activada.
Cuando un blog que permite colaboraciones reciba una publicación en su bandeja de entrada, ahora podrá bloquear a la persona que envía el contenido tanto desde su blog secundario (si este era el destinatario de la colaboración) como desde el principal.
Hemos mejorado el formato de los números en la versión web para que estén correctamente localizados en cada idioma.
También en esta versión, animaremos a quienes lleven un rato navegando por la vista emergente de un blog y no hayan iniciado sesión a hacerlo.
Seguimos experimentando con algunas funciones y hemos decidido mostrar el carrusel «¡Ya estás al día!» a quienes tengan activada la opción «Mostrar lo más interesante primero».
🛠️ Mejoras y solución de problemas
Hemos solventado una incidencia que causaba que el número de suscripciones a un blog que se mostraba no fuera el correcto.
Había un problema con el editor de publicaciones de la versión web y los sets de fotos no aparecían correctamente si se colocaban después de un enlace para seguir leyendo. ¡Asunto resuelto!
En esta misma versión, hemos hecho algunas mejoras en la cabecera de las publicaciones compactas (cuando se muestran en una cuadrícula en la página Explorar, por ejemplo). Si un blog tiene un nombre largo, ya no saltará a una nueva línea partiendo una palabra por la mitad y todos los elementos que lo acompañan, como los distintivos y el botón para seguir el blog, quedarán bien alineados en la cabecera.
Hemos corregido un error que hacía que apareciera una viñeta junto al menú de blogs en Safari.
Hemos seguido resolviendo varios problemas relacionados con las funciones de deshacer y rehacer en el editor de publicaciones de la versión web. Ahora deberías notar mucha más estabilidad al usar estas opciones.
También en esta versión, hemos arreglado un fallo que causaba que los avatares de los blogs que enviaban preguntas anónimas aparecieran vacíos.
Hemos solucionado una incidencia que afectaba a los modos HTML y Markdown en el editor de publicaciones de la versión web y que hacía que al usar la opción para seleccionar todo el texto, a veces se seleccionara también contenido situado fuera del editor.
Al empezar una búsqueda con un hashtag (#), algunas personas estaban obteniendo resultados genéricos en lugar de los correspondientes a esa etiqueta. ¡Problema resuelto!
🚧 En curso
Poco a poco, vamos incorporando más elementos al nuevo diseño de la página de actividad en Android.
Una semana más, nuestro equipo sigue trabajando con esmero para actualizar los documentos de ayuda. Si encuentras cualquier información confusa o que no esté al día, no dudes en escribirnos.
🏴☠️👒
🌱 Próximamente
Hemos tomado buena nota de vuestros comentarios acerca de los últimos cambios en el diseño de los reblogueos. ¡Nos van a ayudar mucho a decidir qué camino tomar a partir de ahora!
¿Tienes algún problema? Envía una solicitud al equipo de asistencia y se pondrán en contacto contigo lo antes posible.
¿Quieres hacernos llegar tus comentarios o impresiones sobre alguna función? Echa un vistazo a nuestro flamante blog Work in Progress y empieza a compartir tus ideas y sugerencias con la comunidad.
¡Y no olvides que puedes consultar todos estos cambios en cualquiera de los idiomas disponibles en Tumblr en los blogs oficiales de los equipos internacionales!
129 notes
·
View notes
Text
Regarding PierMesh work, I'm about to be back on the website/catch editor. Now's the best time to make suggestions on functionality/form.
Current main plans:
HTML/JS editor
Visual/markdown editor (grid based)
Previewer/renderer
File browser
Zip export
Single HTML file export
RSS feed generation
Blog support
Gallery support
9 notes
·
View notes
Text
writing things i do
write with no plans of publication. fanfiction is only about a third of all of the creative writing i do and i only post some of it, which means i am not that precious about it, e.g. it's not a reflection of all art i've ever made so engagement is nice but not necessary
host myself little challenges with little deadlines. february is my birthday month, so i set out to write three tiny fics for the 4th, 14th, and 24th. and you can be gentle with yourself within reason; the v-day one is a weekend-long project. but it's still a deadline, this is still something to be disciplined about no matter how silly the subject matter
first drafts in markdown. besides privacy concerns, google docs is a last destination for me. it's slow as fuck in any non-chromium browser, and the mobile apps aren't much better. there is no reason to write something with rich text formatting/the bells and whistles of a .docx or google doc that, if published, will be HTML anyway. i'm a freak who uses vim but markdown editors i can think of are obsidian, bear, and iA writer
8 notes
·
View notes
Text
When you're seeing this, my child will have gained the ability to utilize NPF formatting!
Not only does that make it more modern and more cool, but it also lets me more easily add certain cool features:
It can now use all these crazy text block subtypes that don't have a nice markdown equivalent
like this!
and this!
and even this!
It can now use fun inline formatting that isn't easily replicable by random markdown or html characters, like this and even this (it can even choose any hex color to make the text, while the post editor limits you to only a couple... I've taken the liberty to tag new posts as "eyestrain" in case it chooses a particularly painful color)
It now makes proper new text blocks instead of just making newlines
(most posts so far tend to have about 5 to 10 blocks, but it can theoretically go up to Tumblr's maximum of 1,000)
8 notes
·
View notes
Text
There is something very weird about the relatively short nature of the culture surrounding website creation. As in, like, internet-user-created websites have been around for like 30-31 years at this point, and the culture surrounding them has changed so very much.
People used to create websites left and right for their own needs, their little shops and their little blogs about what they liked. Some websites of course housing horrible content since their dawn, and some being as mundane but as unique as the person behind its code. I have seen older sites, archived, that promoted creating your own site, and that was interesting to see. That culture of creating your own website and of sharing that knowledge on a still-growing facet of communication.
And then at some point social media appeared, and that was interesting, because now everyone was able to quickly present themselves without the need of a website, but that didn't mean people stopped making websites. I mean, hell, Geocities died in 2009, so a lot of people were creating their own websites for free before that time, no need to pay for domain names or hosting. And even without Geocities, there were other website hosting things that yes, while not as customizable, were still a resource for people to work with them. There's still a website floating around that I made when I was a kid using one of these services. Cool stuff.
All this to say that I do feel a weird sense of dread looking back and cross-referencing with the present and seeing things like "website creator powered by AI" and shit like that, because just ?? How did it go plummeting so quickly. There is a weird feeling of having lost a developing culture to corporations making quick access to posting things that, as corporations' nature dictates, are used to sell data or to train models or what have you. Similarly, we get pretty same-y looking pages because of the need to be slick or whatever with designs that just leaves everything looking the same. ALSO, the loss of spaces for kids, or just the gradual lowering of them in favor of cocomelons and whatever else the devil's machine has spawned is like watching an apple decay before having ripened. I do feel like there is this phenomenon in which how to make a site has been lost in the notion of "making a website falls into the realm of evil and scary coding and I could never be a programmer, plus who would look at it, plus we have tools to make them," etc etc etc. Here is a little secret: website creation is not exactly hard to pick up at all. You might say it's very similar to using a rich text editor like Word or a notes app or whatever you use. Similarly, have you used markdown for things like messages or D iscord messages, you know, with the asterisks for bold text and the likes? Markdown is based on html's structures. And truly, you do not have to even learn to code using Javascript if you don't want to, you can just go full html + css and structure your things as you go, adding your little images and your updates. Because guess what !! Html and css are not programming languages, they're a markup language and a stylesheet language respectively, which is a fancy way to say "you make the structure of your page with the first one and make it pretty with the second one". This includes cool stuff like tables, lists, grids, colors, transitions, etc. All of that without any programming. (That being said, if you are interested in programming, Javascript isn't too bad to pick up. The language itself *is* kind of evil, but using it in conjunction with html is not too difficult). I do have to say though, I am glad that there is a push to making your own websites and things, especially with Neocities sprawling a huge community of avid website creators, as well as the huge amount of tutorials and stuff making the push forward with making sites and online spaces and experiences more widely available. Hopefully this becomes a trend that keeps going up, considering the state of seemingly every single social media that has existed since the 2000s- 2010s.
#web#website#old web#dog discourse#ramblings#internet#computer#tech#but for real what the fuck#it's very bizarre to see this just pop in and out
7 notes
·
View notes
Note
hiii i was wondering how you get ur post texts to be pastel pink :) instead of this hot pink
Hiii 💕💕 okay so it actually has to do with coding 😭 I’ll try my best to explain. So basically, I go to this website ( https://jsfiddle.net ), this is where you can make any color text you want.
— STEPS BELOW —
Step One: So, once you’re there you’ll see this screen, I’m on mobile so it might look a lil different.
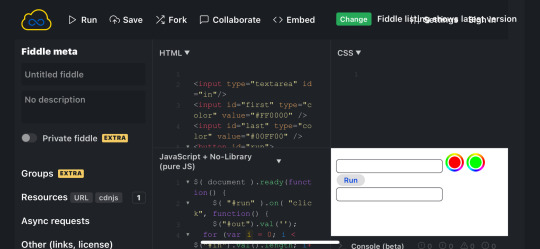
Step Two: Once there, you’ll go to the right side where the text boxes are.
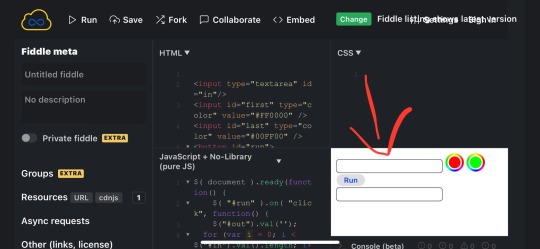
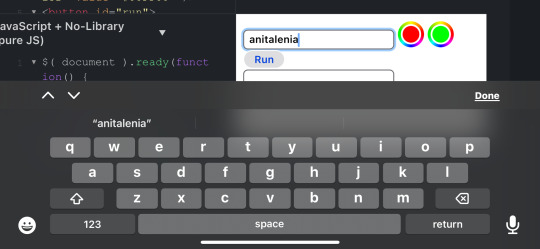
Step Three: In the top box, you’ll want to type in whatever text you want to make a different color.
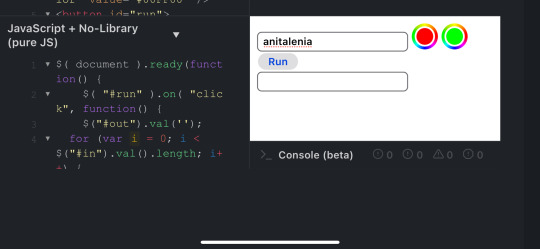
Step Four: Next, where the red and green color dots are, click on the red dot. This is going to be where the color starts. You can make the text whatever color you want.
note: you can make your text gradient, as in two different colors. I make my text just one color ( that pale pink color ), which means both the red and green dot must be the same color. For gradient, the red and green need to be whatever two colors you want to make gradient. For example, if you wanted to do yellow and purple gradient text, change the red to the color yellow and the green to the color purple.
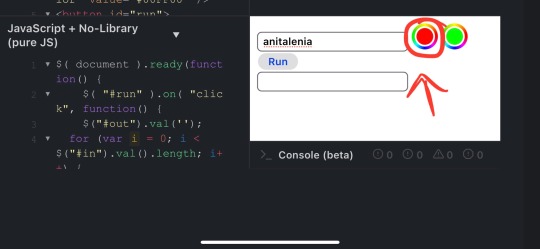


*FFE5FA is the color of my pink text.
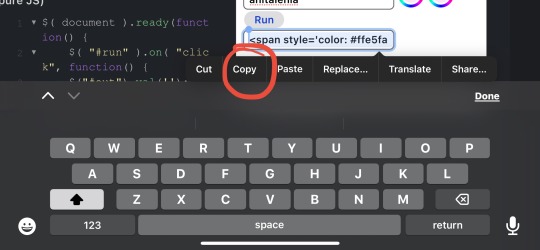
Step Five: After you’ve changed the color, hit the run button in between the text boxes.
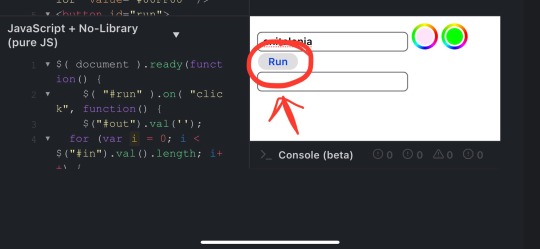
Step Six: Once you’ve hit run, the text box below will generate the coding for your colored text.
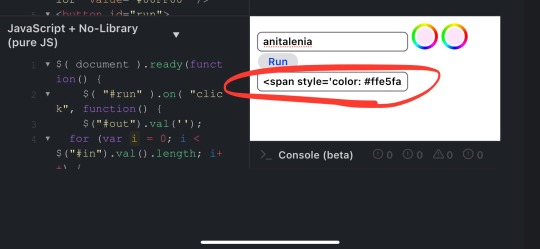
Step Seven: Once it’s there, you’ll want to click on it and hit the ‘select all’ button.
note: I am using this on an iPhone, so it may very on a Samsung or computer. Just make sure you copy the whole thing of code

Step Eight: Once you’ve hit select all, hit the copy button
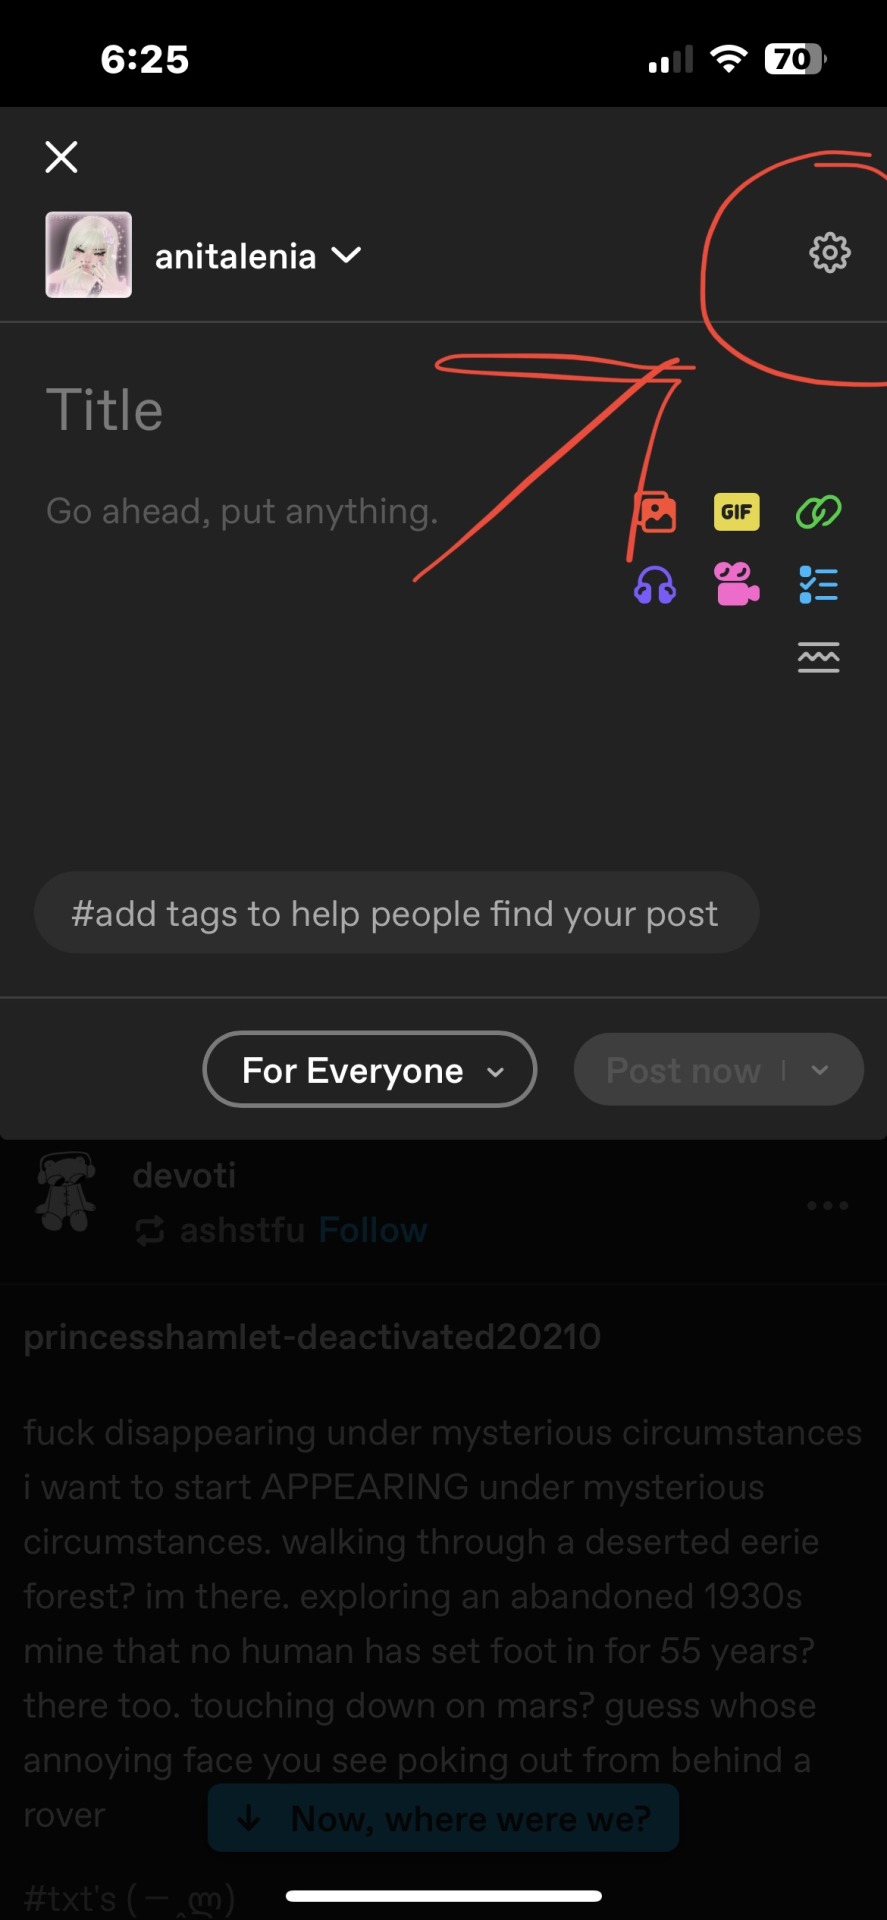
Step Nine: So now the text should be copied to clipboard and available to past where ever you want. After that, and this is an important detail or else it won’t work, you have to go to Tumblr Online, not the app.
Step Ten: Once you’re on tumblr, go to make a new post.
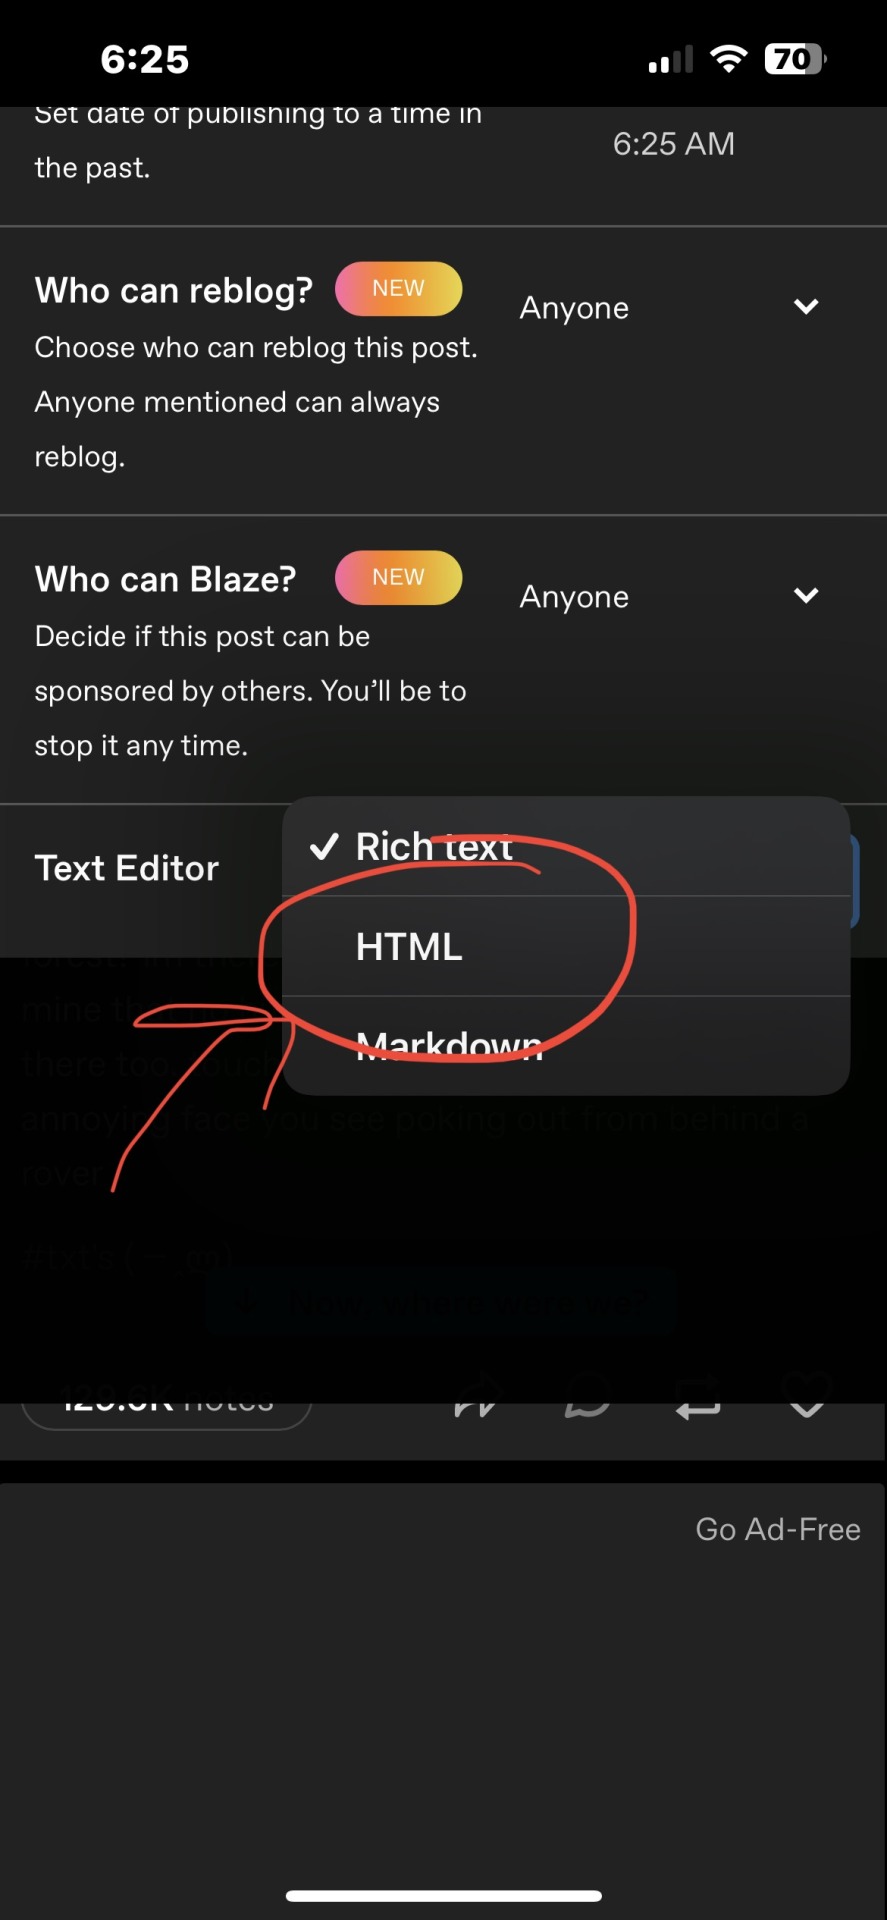
Step Eleven: Once you make the next post, you’ll want to go to the top right corner and click on the settings icon
Step Twelve: You should see a screen like the one below. At the bottom of that pop up where it says TEXT EDITOR, the icon next to it should say Rich Text.

Step Thirteen: Click on the Rich Text box, and options should pop up saying, Rich Text, HTML, Markdown
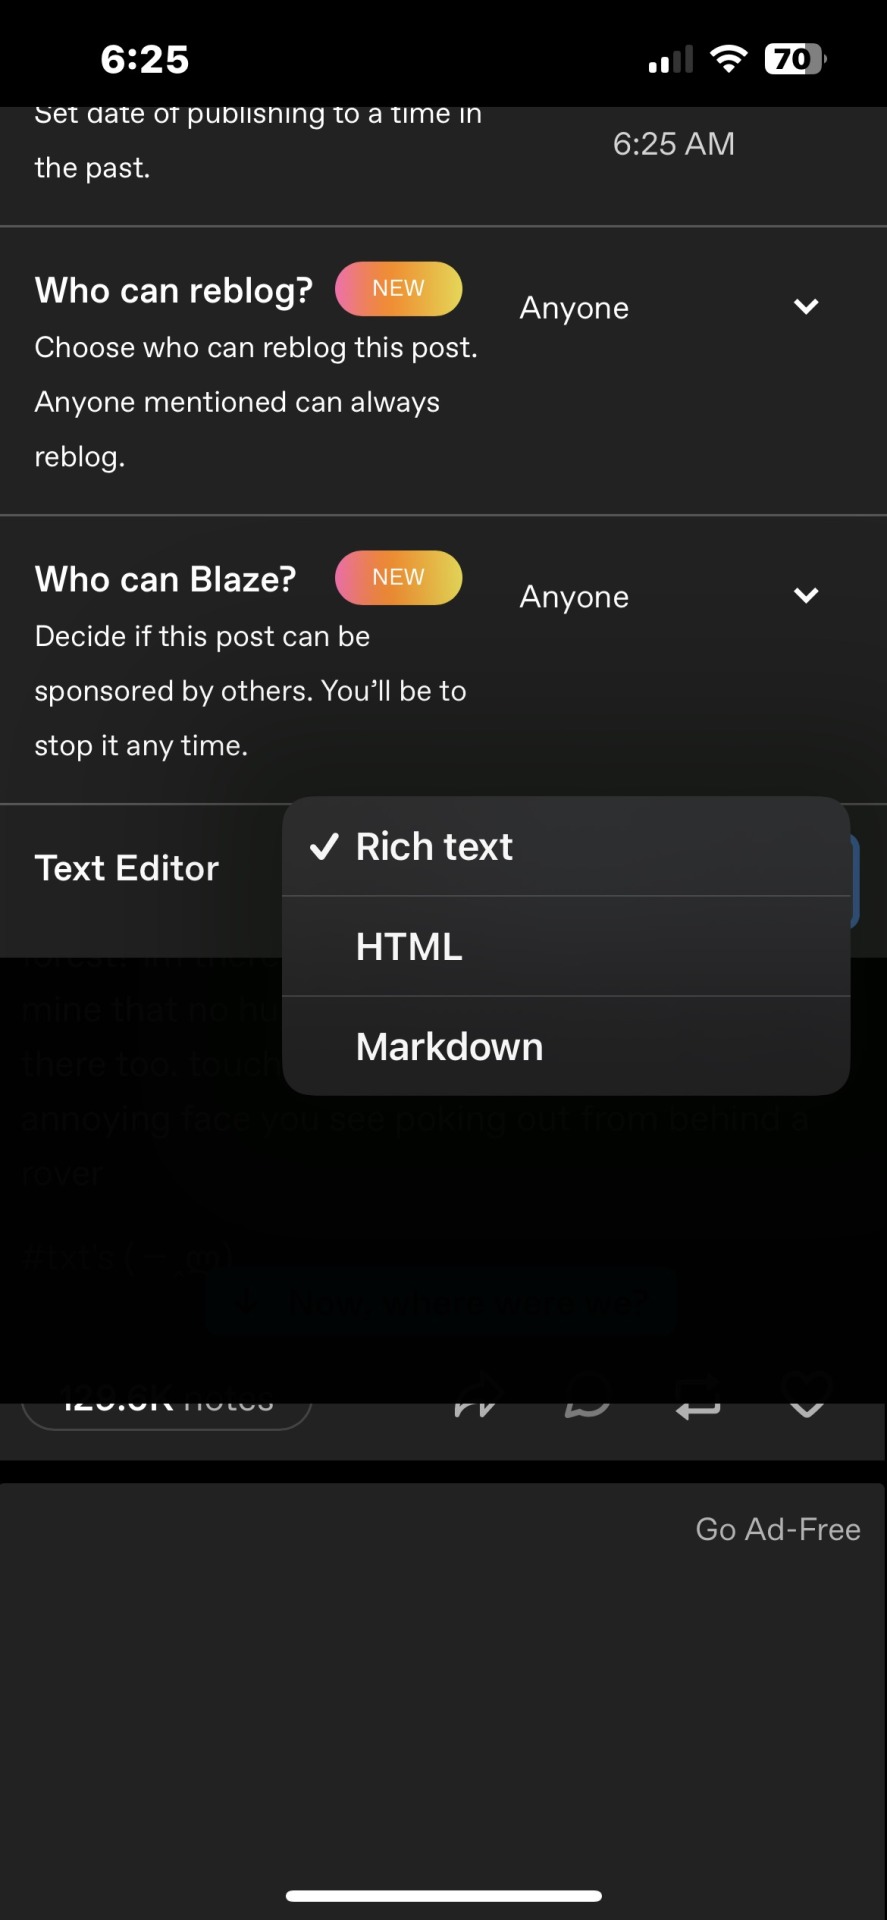
Step Fourteen: Click the HTML option
Step Fifteen: You should see this screen next

Step Sixteen: You’ll want to paste the HTML code you just copied next to or after the code already there like this

Step Seventeen: Okay then you’ll want to make sure it’s saved as a draft
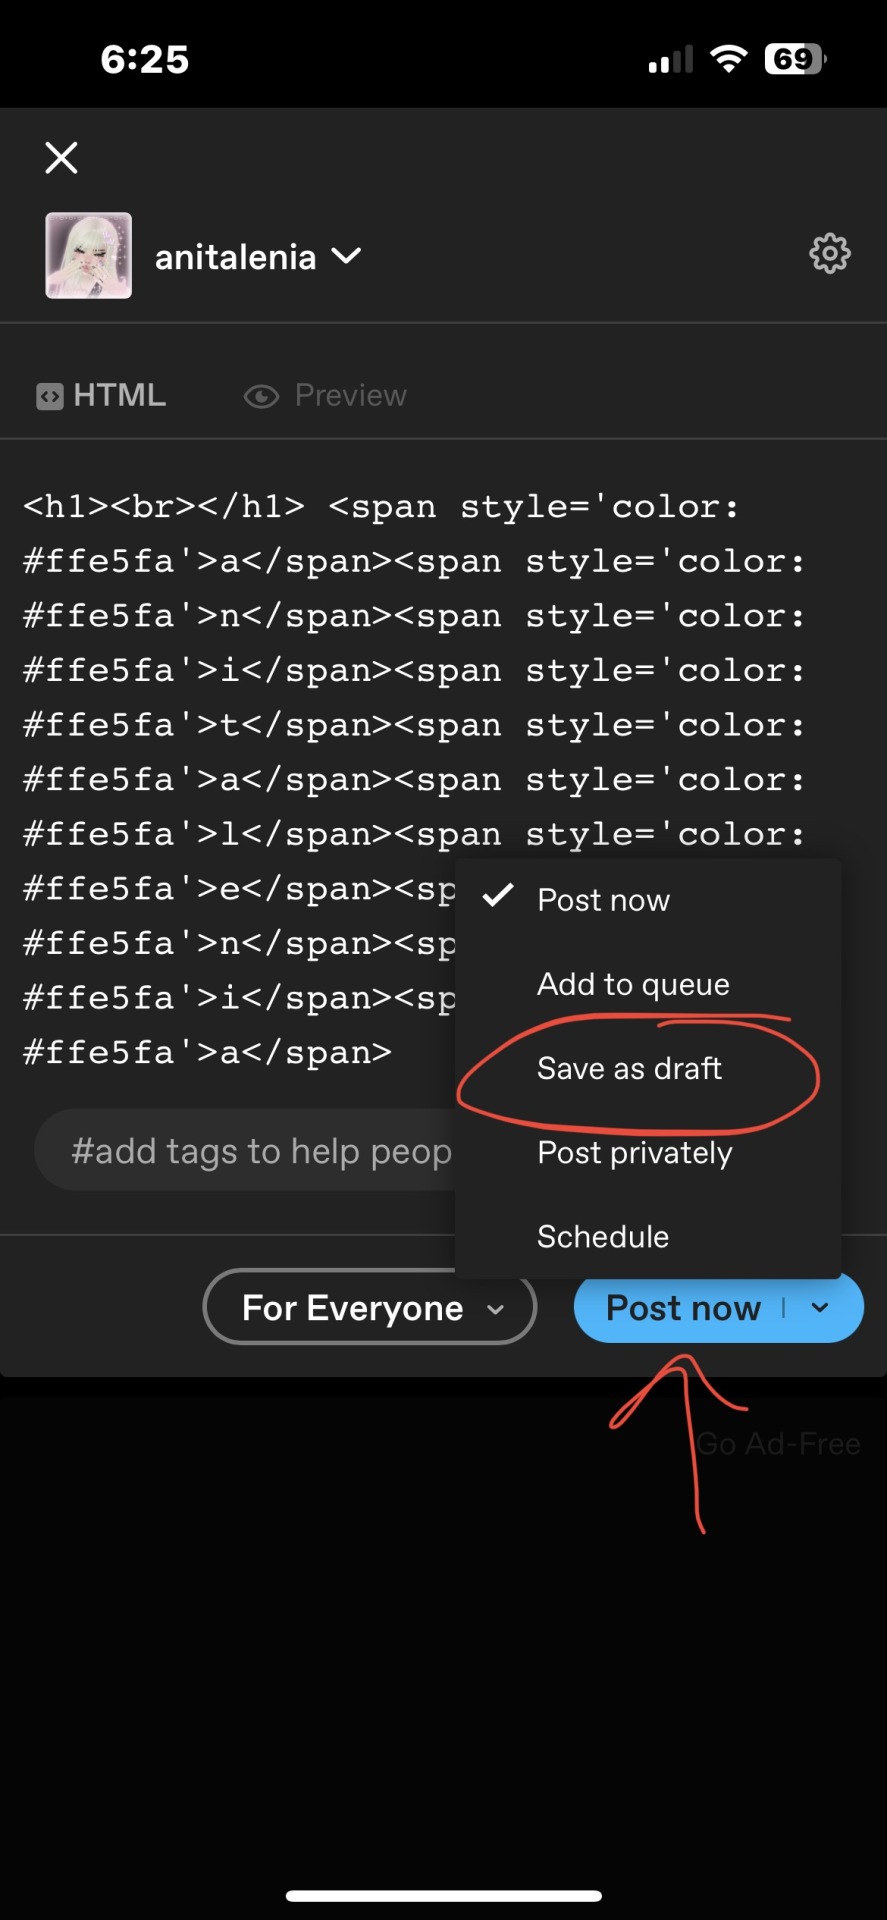
note: if you go to your drafts first and then create a new post, then it should automatically have the save as draft option at the bottom. It’s quicker than doing it like normal and having to select save as draft.
Step Eighteen: It should look like this now

Step Nineteen: Congratulations! You’ve done the hard part. Now go back to mobile or the app because it’s easier for these next steps in my opinion.
Step Twenty: In the app, go to that saved draft and make the text bold if you so choose, it makes it stand out more that way

Extras: you only need to make one colored text when you make a post, which means you don’t need to go through that whole process for each line/word you want to make colored.
— just type whatever words you want colored next to the already colored text, then move it down a space.
— however, once you delete that line of colored text it cannot be recovered, you’d have to go through this process again.
ANYWAY, I hope this helped. I tried to make it as step-by-step as possible. 😁😁💕💕
#─ ·˚꒰ 𝙍𝙀𝙋𝙇𝙄𝙀𝙎. ꒱ ₊˚ˑ#pink themes#aesthetic#pink#pinkcore#pink dividers#cute#sparkles#stars#writing prompt#writing help#colored text#text help#gradient#gradient text help#gradient text
107 notes
·
View notes
Note
9063:
Isn't the text editor just basic markdown and html? Nine-year olds can learn that in a day. I did. And that's only if you actually need to edit the text. You don't actually *write* your stories in there. Paste and go.
Posting as a response to a previous problem.
6 notes
·
View notes