#Pattern Sewing Machine
Explore tagged Tumblr posts
Visit Tumblr Blog
Explore Tumblr blogs with no restrictions, modern design and the best experience.
Last Seen Tumblr Blogs


Fun Fact
The Tumblr office adopted Tommy, an 11-year-old Pomeranian.
Text
youtube
FC-1900BMP: Bar Tack, Button Sewer and 100 Pattern Sewing Multi Purpose Sewing Machine For Details Call on +91 9811002015
#Bar Tack#Bar Tacking#Button Sewer#Button Sewing#Button Stitching#Button Sewing Machine#Button Stitching Machine#Pattern Sewing Machine#Pattern Stitching Machine#Industrial Sewing Machine#Fucen Sewing Machine#Fucen Industrial Sewing Machine#Bar Tack Sewing Machine#Bartack Sewing Machine#Fucen Bartack Sewing Machine#100 Patterns Stitching Machine#FC-1900BMP#FC-1900BMP Sewing Machine#1900 Sewing Machine#Youtube
1 note
·
View note
Text
Wednesday, November 29.
You reap what you sew.
Never have truer words been spoken. But they come as good news for Tumblr's sewing community, however, who have been sewing some absolute delights. Some real œuvres d'art. Some winner-winner chicken dinners.
As luck would have it, #sewing is trending. And it's trending right now, so we have reaped a selection of these very dinners for your eyes only. We have then asked ourselves just what did we do to deserve y'all, and your resplendent talents.
#today on tumblr#sewing#sew#sewblr#crafts#sewing machine#crafting#sewing project#textile arts#crochet#sewing patterns#sewing tutorial#sewing tag#craftblr#contemporary art#artists#artists on tumblr
1K notes
·
View notes
Text

making some porcellio scaber soon
#listen i know that pattern looks obscene but if you use your imagination to wring half of it through the embroidery machine#than it's not that bad#just gotta you know. perfectly allign everything and than pray and than cry while you sew the rest of the mochi minky (:
66 notes
·
View notes
Text
youtube
If you've ever wondered how plushies are made on an embroidery machine, here's a quick explanation!
31 notes
·
View notes
Text
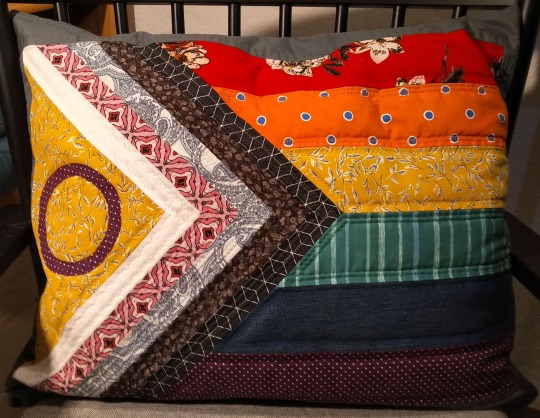
Progress Pride Flag Quilt Block Pattern & Tutorial
Don't you just love the flag of our people? Do you have an inner grandma that years to make stuff? Do you want to combine these two things and make a queer quilt?
Well, I've got you.
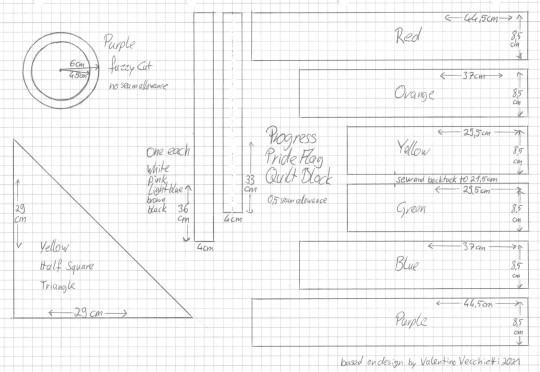
Behold the pattern! And my lack of graphic skills, so I drew it on paper!
Basically it's a bunch of rectangles, one half square triangle and a fuzzy cut circle. I don't know shit about quilting and I was able to come up with it. Why centimeter, you ask? Because I'm German and that's what I'm familiar with. Why weird measurements and not jelly rolls and layer cakes and stuff? Because I'm German and quilting is not really a thing here.
Onto the tutorial!
You'll need:
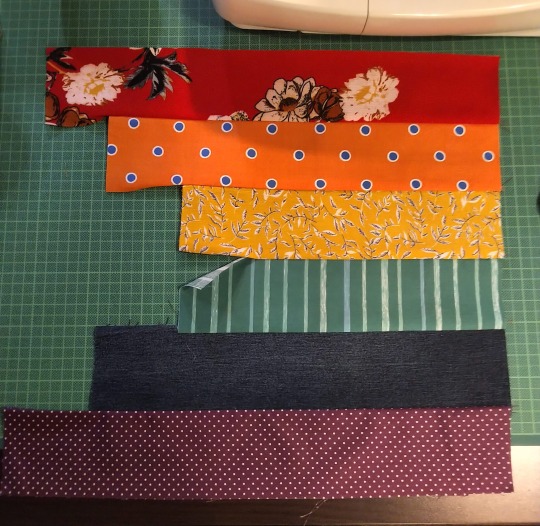
A scrap of fabric of red, orange, yellow, green, blue, purple, black, brown, light blue, pink, white each
additional fabric for the border
Cutting mat, quilting ruler, roll cutter
sewing machine
thread
pins
double sided interfacing
iron and ironing board
fabric sheers
compasses
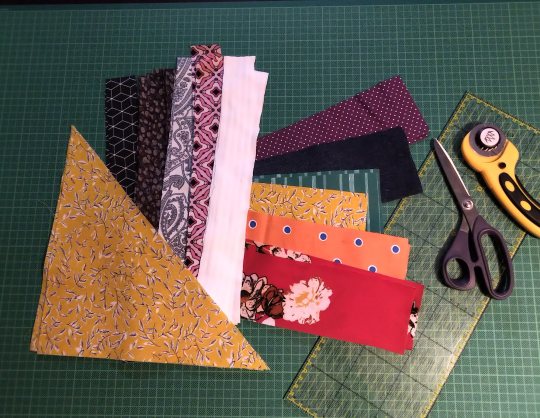
Step 1: Cut everything. Duh. We'll take care of the circle later, don't worry about that now. The half square triangle is exactly what it sounds like. A square and then you cut it diagonally. That's why I didn't give the length of the hypotenuse.
(Note: I'm making two blocks at the same time, that's why there's so much fabric. Also this is a middle of the night project, hence the lighting.)
I'm using all kinds of different fabrics, different weights and drapes, some stretchy, some transparent, so I needed to interface some of them.
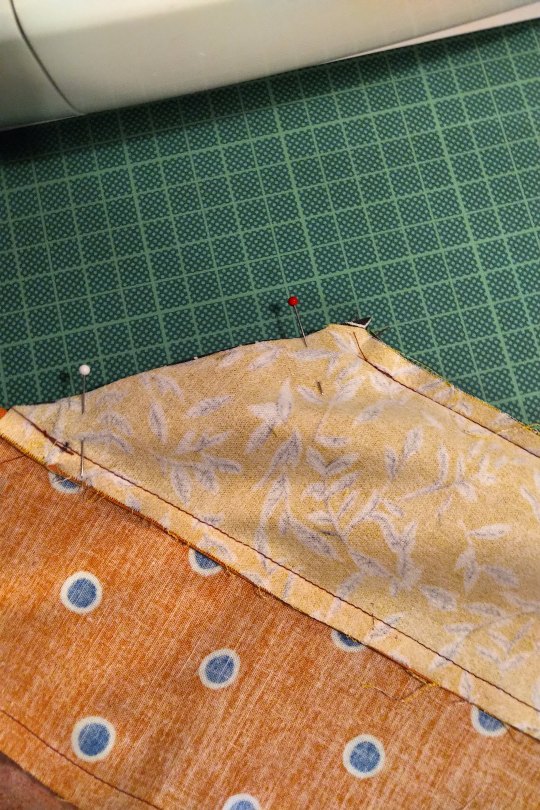
Step 2: Sew the rainbow together. 0,5cm seam allowance on everything, that's exactly the edge of the foot on your machine. Double and triple check that everything is facing the right direction before sewing. The seam of yellow and green does not get sewn fully, only 21,5 cm! That's important later! Also backtack there. Don't forget to iron.
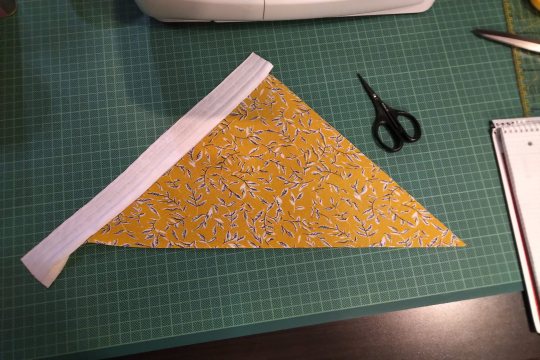
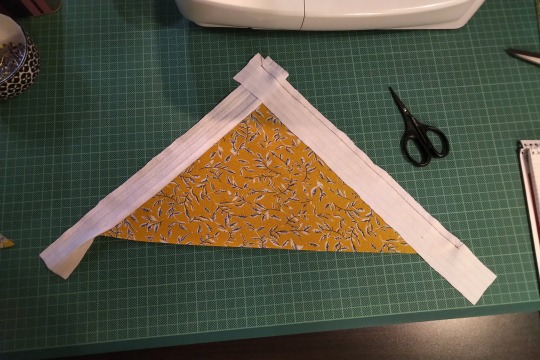
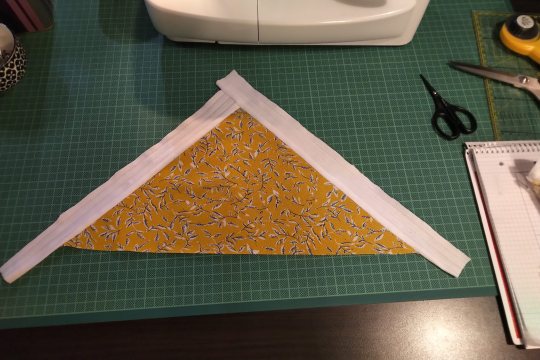
Step 3: Sew the strips to the half square triangle. For this you have to switch between the sewing machine and the ironing board constantly. Attach the shorter strip diretly to one side of the HST, iron it open. The second strip of the same colour gets attatched to the other side of the HST and the first strip. Look at the pictures closely if you're unsure how that works. Also the strips are longer than the triangle. We'll square that up later.
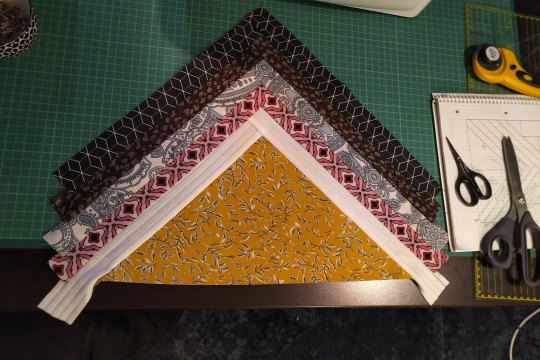
All strips attatched will look like this. See how the two strips meet at the tip!
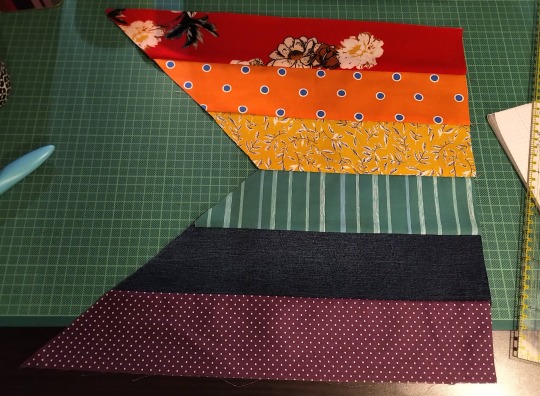
Step 4: Cut the rainbow part to size. The length between yellow and green is 22cm long. The shorter seam from before plus some seam allowance. The outsides of red and purple are 44,5cm long. These two points are the beginning and end of your cutting line. You will cut a little triangle from every single colour. Do this slowly and carefully. Maybe your fabrics have stretched a bit (mine did). Don't worry, it will be ok.

Step 5: The Y seam, part one. Y seams are tricky, but there's only one for this block. So put your strips part on your rainbow part and line them up so that the tip of the strip part overhangs the seam between yellow and green by about half a centimeter. Remember that it's not about the edges of the fabric, but where the seam will be. But don't sew all the way! Leave 0,5cm at the tip!
You can also mark on your strip piece two lines 0,5cm from the edges of the black. They should form a little square at the tip. There they meet is where the actual tip on the finished block will be. So place this spot directly on the seem between yellow and green and only sew right up to it. Not beyond.
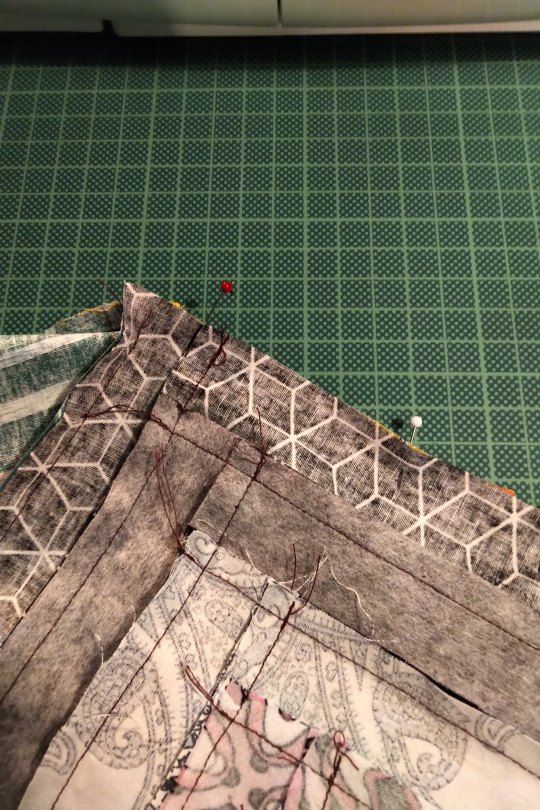
Step 6: The Y seam, part two. Now, fold both the rainbow part and the strips part in half and if you've done the last step correctly, the remaining two edges will allign. Pin and sew.
I can't explain it better than I've done here, I'm sure there are tutorias out there. Good luck!
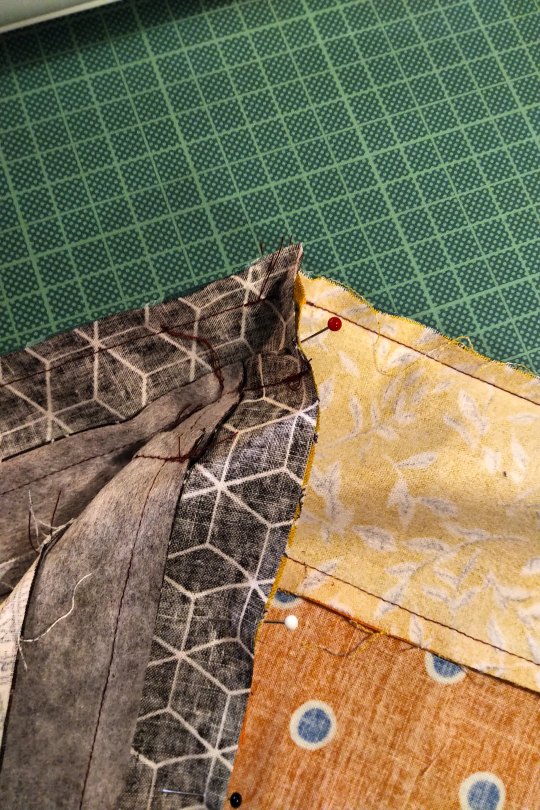
Step 7: Square up. Iron your block to that everything is nice and straight and flat. Then use the fabric edges of the red and purple to cut the remaining ends of the strips. Use the HST to cut the white. Be careful, the long side of the triangle is on the bias and likely stretched a bit.
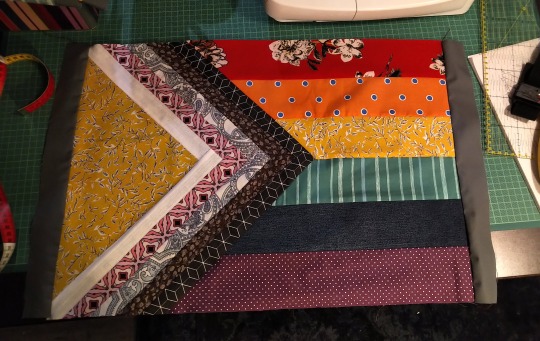
I already added borders here. I'm making a pillow case.
Step 8: Fuzzy cut and raw edge applique. Double sided iron on interfacing is essentially double sided tape. It has two types of glue, one gets activated by 2 seconds of heat, the other by 5 or so (depends on the product). The second side is also covered with a paper that needs to be removed before the second gluing. Read the instructions of the product you are using!
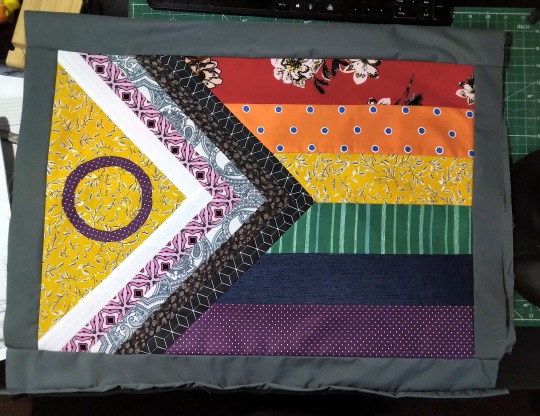
Use your compasses to draw a circle on the protective paper side of the interfacing. It's actually two circles from the same middle point, see pattern. Cut it out roughly. Then place it with the rougher side on the backside of your purple fabric and iron for 2 seconds on middle heat. If you've just ironed your fabric before and the ironing board is still hot, wait for it to cool down. Also let the fabric cool down after applying. Then cut out your circle. The interfacing will have stiffened the fabric, so that shouldn't be a problem. Then remove the protective paper, place the circle on the yellow triangle where you want it and iron for 5 seconds. Let cool.
And you're done! The applique at this point is only secured with the interfacing, but it should hold fairly well. The quilting will secure it further.
And that's it. BTW, did you know that this design was made by Valentino Vecchietti for Intersex Equality Rights UK in 2021? Now you do. Happy quilting!
#lgbt+#lgbtq+#lgbtq community#pride flag#progress pride flag#valentino vecchietti#quilting#quilt#quilt block#quilt pattern#quilt tutorial#sewing#sewing machine#sewing tutorial#sewing pattern
274 notes
·
View notes
Text

Been crafting a beautiful homunculus for two and a half days now. He will be baked soon alhamdulillah
#my art#click clack#patterns seam allowances and sewing machines are for cowards and fools#im rawdogging this project coming up with it as i go and handsewing everything and I've NEVER FELT BETTER#legitimately im having a great time this is so satisfying
26 notes
·
View notes
Text


Button bracelet, really quick project.
#art#artist#small artist#disabled artist#sewing#smallartist#kandi#sculpt#plur#beadwork#sewing pattern#hand sewing#sewing machine#fashion
20 notes
·
View notes
Text
How to Sew Own Clothes for Beginners - Free Sewing Patterns
In this post, you will learn how to sew own clothes as beginner. Love what you see ? Support me by snagging some cool items from my shop! Every purchase helps me bring you more awesome content. Thank you! Shop Now Why Sew Your Own Clothes? Sewing your own clothes is a fantastic way to express your personal preferences and style. It offers the freedom to create unique pieces that fit you…
#Beginner-friendly sewing patterns#diy clothing#Easy Sewing Projects#free sewing patterns#How to Sew#Learn to sew#Personal preferences#Sewing journey#Sewing Machine Basics#sewing skills#Sewing Techniques#Sewing Tips for Beginners#step-by-step sewing guide
73 notes
·
View notes
Text
I'm looking again at like any options for the wedding live show, bc I'm considering going as fancy Avantika, and honestly, this sort of thing is basically the vibe I was imagining, but with a nicer dress and in the right colors and perhaps a sleeveless coat if possible

#I'm looking at how people put these outfits together so I have a sense of what items individually to buy or what to search for specifically#I did find a real cute coat pattern....... what's the chances I could make a jacket. i know how to machine sew#Critical Role things
34 notes
·
View notes
Note
would you be so kind and photo plush parsley and gentle together? :3c
sure. here you go


#mail#rambles#they're not to scale unfortunately because i keep redoing the pattern every time#also i used different stuffing on gentle and im not sure i like it. but it's ok. it's their quirk now i guess#considering that i made them on my tiny ass horrible travel sewing machine. they're pretty good
21 notes
·
View notes
Text

This is a beautiful antique sewing machine!
(1868 Gold Medal Johnson Clark Hand Crank)
#crafts#gifts#decor#sewing#quilting#briar rose quilts#bedding#shopping#holiday#quilters of tumblr#sewing machine#fibre arts#textiles#crafting#hand sewing#antique sewing machine#vintage sewing machine#johnson clark hand crank#hand crank sewing machine#art quilt#quilting as art#quilt tutorial#fabric art#patchwork#quiltblr#quilt pattern#textile art#quilt#quilts
10 notes
·
View notes
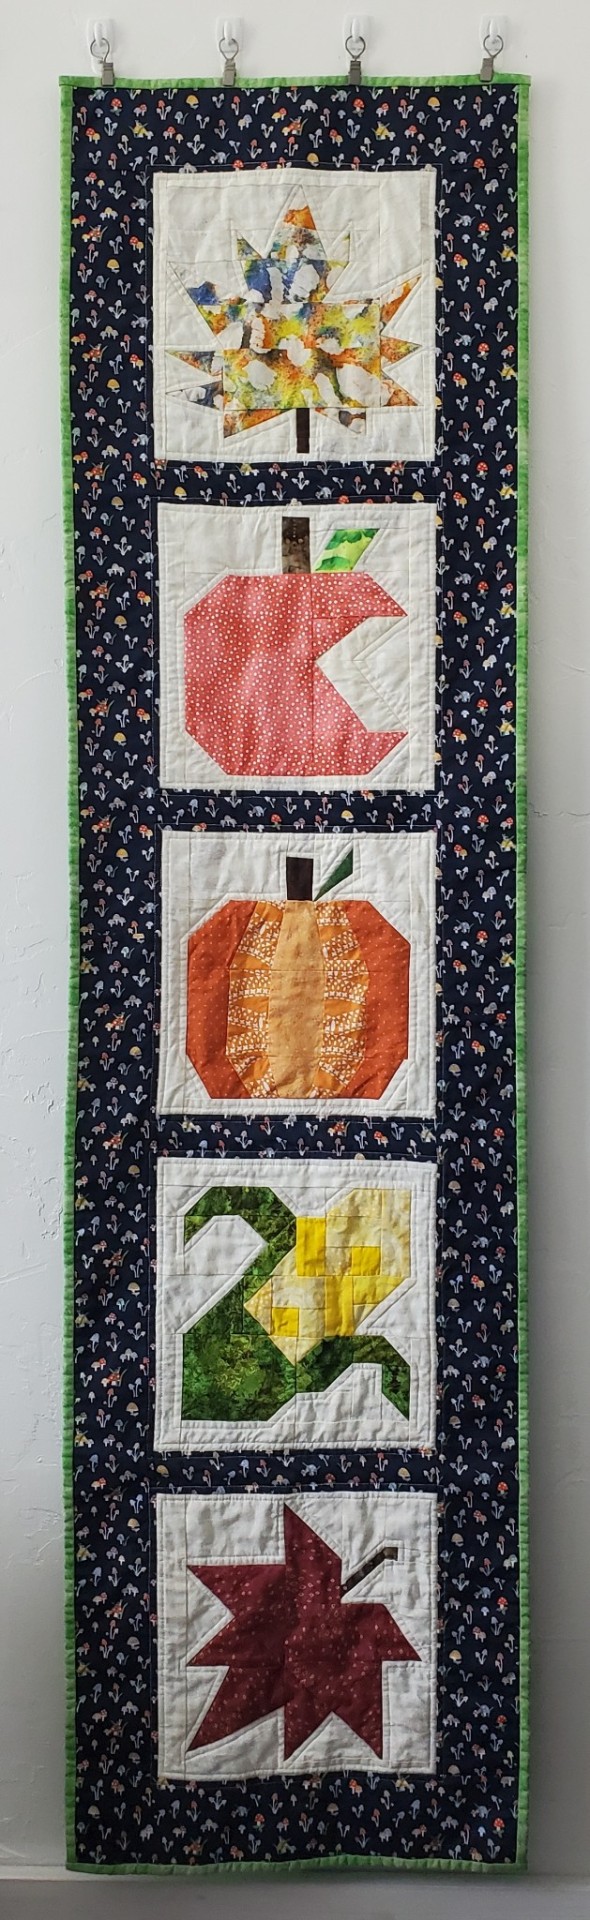
Text

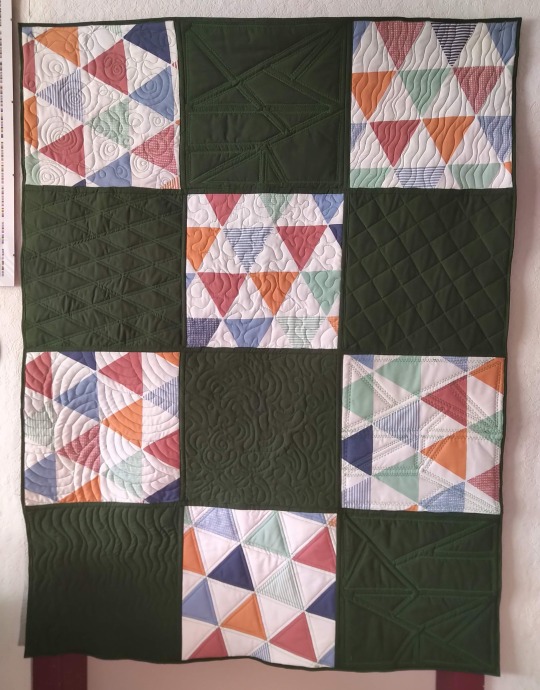
I made a thing! A quilt! It's not even half bad!
A while ago I suggested to make a quilt block out of the stomachion, an ancient puzzle. The idea being that all the same pieces can be arranged in hundreds of different ways. Endless possibilities!
Here's the pattern: https://drive.google.com/file/d/1weC-IQvsRzT-LH1NUlPDYfxV-axT-w/view?usp=sharing
Please tag me if you try it. I'd love to see someone who actually knows what they are doing, make this.
#quilting#quilt#quilt block#quilt block pattern#free pattern#free quilt pattern#sewing#machine sewing#quilt as you go#arts and crafts#fiber art
103 notes
·
View notes
Text
Peeps guess what!!?? I just finished setting up an old sewing machine my grandma got for me!!! ^0^

ISNT SHE PRETTY????
#artsy.text#sewing#sewing machine#im definitely gonna have to relearn some things with this ol machine#like firstly i need to know how to change her bobbin#BUT OMG I HAVE AN OLD SEWING MACHINE!!!! \^0^/#and!!!! she gave me a bunch of tools and fabric and patterns and even some of my great grandmother's accessories from her machine!!!!
10 notes
·
View notes
Text
One of the two quilt shops is closing its doors permanently because the owners are retiring. Anyone fancy throwing a few hundred dollars my way so I can take advantage of the massive discounts?
I have paintings and quilts listed and available here. All but one digital listing is free, and every item comes with the option to pay more than my asking price.
A few of the items listed are below:


#quilt#sewing#handmade#artists on tumblr#will i be able to take advantage of the sale? unlikely. but i can hope. they have all their longarm quilting machines on sale but those#are thousands of dollars and i don't have the space. they have quilt kits notions thread fabric batting and patterns though!
14 notes
·
View notes
Text


I made a Tailor's Ham! It's essentially a sort of hard pillow used for ironing against. It's especially useful for ironing curves and 3D construction (eg: stuff it into things like sleeves or hats).
I used the free pattern by Cornelius Quiring, and took the suggestion of zigzagging my wool together instead of sewing darts.
For the top fabric, I wanted wool. This mustard yellow coat fabric was the only 100% wool I could find at Fabricland that day. It was in the clearance area, originally $50 /m. The smallest increment the shop sells is 20 cm, which was sufficient for this pattern. With extra sale pricing and my membership discount, I paid about $5 for the 20 x 150 cm piece (they cut me a generous "20 cm", closer to 30 cm actually).
Upon closer examination, this fabric was knitted before the felting, and there was still some noticeable stretch. To reduce the stretch, I put the wool in the washer with hot water, then tumbled dry on low heat until it was bout 80-90% dry; then ironed the fabric flat and let the steam finish evaporating.
For the bottom, I used a remnant of heavy cotton canvas. I've heard that it's best to use unwashed cotton so that the ham will shrink up and pull even tighter with the heat of an iron, but this is what I had.
I applied lightweight woven cotton fusible to the entire wool piece to add stability and structure. Following Quiring's advice again, I reinforced the underside of the not-darts (the zigzag) with scraps of the cotton canvas.
(In a future make, I might try using heavyweight fusible at the not-darts, instead of fusing all over and reinforcing with canvas.)
I had difficulty sewing the not-darts, largely because of how stiff the fabric had become. I'm not sure if this just comes with practice or if I did something wrong, but after shaping the not-darts, I couldn't get the top and bottom pieces to fit together nicely. I had to really fight and pull the fabrics to line up, and in the end I opted for an imperfect ham rather than continue puncturing the fabric with my heavy needle.

For stuffing, I've learned that sawdust or wood shavings (like pet bed litter) are ideal. I didn't have any, but I had lots of fabric scraps! However, the unevenness of fabric scraps make for a lumpy ham, which interferes with a smooth ironing surface. Taking stock of what I had, I came up with a plan to stuff the ham in layers:
First, I added kapok fibre (a fluffy plant fibre, kinda similar to cotton; I already had lots of this for stuffing amigurumis), making sure there was a thick layer all around. Kapok fibre won't melt, and I think the fluffy texture would help smooth irregularities caused by the fabric scraps.
I picked through my smallest fabric scraps to remove as much synthetic fabric as possible (the high heat of an iron might melt the polyesters and nylons), then used my LDH shears to cut into as fine of ribbons as I was arsed to. I mixed these fabric scraps with dryer lint (which definitely contained synthetic fibres!) and began stuffing. I hoped the dryer lint would help smooth the texture of the fabric scraps.
Stuffing this ham tight was hard work, so I enlisted the aid of my partner. Much innuendo and amusement ensued.
Once I was satisfied with how packed it was, I hand-sewed the seam shut with a ladder stitch.

The ham is all puckered and lumpy, especially at the hand-sewn closure, but I kinda love it.

I kinda want to name him Hammy, or possibly Bentley.

It's so ugly and I love it! 💖💖
This has got to be one of the most useful things I've ever sewn. It felt like a "specialty" tool at first, but it really isn't, I use it all the time now that I have it! Ironing shoulder seams, sleeves, hats, and bags--! It's really great.
Although Hammy/Bentley will last a long time I think, I'm also kinda looking forward to making another ham. My local hardware store said I can come take their sawdust for free when the machine's full--just to phone ahead to ask how full it is.
#sewing#tailor's ham#DIY#sewing tools#free pattern#free sewing pattern#machine sewing#tailor ham#Hammy#Bentley
8 notes
·
View notes
Text
80s/90s/2000s fantasy movies with practical effects >>>
#the lord of the rings#the dark crystal#the princess bride#willow#pirates of the caribbean#honour among thieves#okay that last one is new BUT have you SEEN the behind the scenes???#sets and props and costuming my beloved#i would be a live action fantasy costume designer if i could understand patterns and sewing machines#but alas#also if anyone has good old fantasy movie recs pls send i haven’t acc watched half of those lol
37 notes
·
View notes