#Sewing Techniques for Beginners
Explore tagged Tumblr posts
Visit Tumblr Blog
Explore Tumblr blogs with no restrictions, modern design and the best experience.
Last Seen Tumblr Blogs


Fun Fact
Tumblr Inc. is using 66 technologies for its website.
Text
Babydoll Shoulder Straps: How to Draft and Sew
In this post, you’ll discover how to self draft and sew babydoll shoulder straps. Love what you see ? Support me by snagging some cool items from my shop! Every purchase helps me bring you more awesome content. Thank you! Shop Now Are you looking to add a delicate, custom touch to your sewing projects? Babydoll shoulder straps are a perfect addition to any garment, offering both style and…
#Babydoll shoulder straps#Custom garment straps#DIY Sewing Projects#easy sewing patterns#Fashion design patterns#Home Sewing Projects#How to draft a sewing pattern#How to sew shoulder straps#pattern drafting tutorial#Sewing Techniques for Beginners#sewing tips and tricks#Sewing Tutorial for Beginners#step-by-step sewing guide
4 notes
·
View notes
Text
Can You Learn to Sew Online? A Comprehensive Look at Your Options with ONSA
At ONSA - Online Sewing Academy, the world of stitching and garment construction should be accessible to everyone, regardless of location or schedule. In today's digital age, online learning has revolutionized how we acquire new skills, making it possible to master intricate crafts like sewing from the comfort of our homes. But can you truly become an expert stitcher through virtual classes alone? Let's explore the options available and how ONSA empowers you to embark on an enriching sewing journey.
The Beauty of Pre-Recorded Video Lessons
Ah, the world of pre-recorded tutorials - a treasure trove of knowledge at your fingertips! ONSA's extensive library of meticulously crafted video lessons offers a comprehensive exploration of sewing techniques, from the fundamentals of threading a needle to the intricacies of advanced garment construction. One of the most significant advantages of this format is the ability to learn at your own pace, rewinding and revisiting lessons as many times as needed until each stitch and seam becomes second nature.
Our pre-recorded videos are thoughtfully designed to cater to diverse learning styles, combining visual demonstrations with clear, concise explanations. Whether you're a visual learner who thrives on observing each step or an auditory learner who appreciates detailed verbal guidance, our lessons ensure that no aspect of the sewing process is left unexplained.
While budget-friendly and convenient, we understand that pre-recorded content may lack the human interaction that many pupils crave – the ability to ask questions, receive real-time feedback, and benefit from the personalized attention of an experienced instructor. This is where our live, interactive classes come into play.
The Magic of Live, Interactive Classes
Imagine having a seasoned ONSA instructor by your virtual side, guiding you through the intricate sewing world with patience and expertise. Our live, online classes provide an immersive, interactive experience replicating the intimacy of a physical classroom setting. Through video conferencing technology, you can follow along with your instructor, ask questions as they arise, and receive real-time feedback on your technique.
One of the most significant advantages of live classes at ONSA is the ability to learn at a pace that suits your individual needs. Our instructors are adept at adapting their teaching methods to accommodate varying skill levels, ensuring that every student feels included and supported. Whether you're a complete novice taking your first tentative stitches or a skilled stitcher seeking to elevate your art, our talented teachers can customize lesson plans to align with your unique goals and aspirations.
From mastering the art of inserting invisible zippers to acquiring advanced draping skills for haute couture designs, our live classes cover various topics, catering to hobbyists and aspiring professionals. Private one-on-one sessions and small group workshops provide ample opportunity for personalized guidance, fostering an environment where questions are welcomed, and challenges are addressed with patience and expertise.
The ONSA Edge: A Holistic Approach to Sewing Education
At ONSA, we understand that sewing is more than just a practical skill – it's an art form that combines technical precision with creative expression. Our approach to online sewing education is rooted in this philosophy, nurturing both the technical and artistic aspects of this timeless craft.
Our team of expert instructors, each with years of industry experience and a passion for teaching, has thoughtfully crafted a multifaceted curriculum that covers the entire spectrum of sewing, from understanding fabric properties and pattern drafting to mastering advanced construction techniques and exploring fashion design principles.
By combining our comprehensive library of pre-recorded video resources with live, interactive sessions, ONSA provides a 360-degree learning experience tailored to your schedule, skillset, and aspirations. Whether you prefer the convenience of self-paced learning or thrive on the dynamic energy of a virtual classroom, our blend of educational formats ensures that your sewing journey is enriching, engaging, and tailored to your unique needs.
Beyond the technical aspects of sewing, ONSA also emphasizes the importance of nurturing creativity and self-expression. Our lessons encourage students to experiment with fabric choices, color combinations, and design elements, fostering an environment where individuality is celebrated and personal style is cultivated.
Sewing Mastery: A Journey, Not a Destination
At ONSA, we firmly believe that sewing mastery is a lifelong pursuit, a continuous learning and refinement journey. Our online academy is designed to support you at every stage of this journey, from your first tentative stitches to the creation of intricate, couture-worthy garments.
As you progress through our curriculum, you can participate in virtual sewing circles, where you can connect with fellow stitchers, share your creations, and seek inspiration from a community of like-minded individuals. Our instructors are not just teachers but mentors dedicated to your growth and success, offering guidance and encouragement every step of the way.
Sewing is more than just a hobby – it's a powerful form of self-expression, transforming fabric into wearable art that reflects your unique style and personality. At ONSA, we strive to empower you to unleash your creativity, one stitch at a time, by providing a comprehensive and immersive online learning experience tailored to your needs.
Ready to Start Stitching Your Dreams into Reality?
Whether you're a busy professional seeking a creative outlet, a stay-at-home parent looking to explore a new passion, or a lifelong stitcher yearning to elevate your skills, ONSA - Online Sewing Academy supports your sewing journey.
Explore our diverse online sewing courses today, from beginner-friendly introductions to advanced masterclasses, and unlock a world of possibilities that transcends time and space. With ONSA, the art of sewing is no longer limited by your location or schedule – it's a vibrant, accessible realm where your dreams can be woven into reality, one exquisite thread at a time.
Join our virtual community of passionate stitchers, where inspiration, camaraderie, and personal growth intertwine seamlessly. Embark on a transformative journey that will teach you sewing techniques, ignite your creativity, boost your confidence, and empower you to express your individuality through the timeless art of garment construction.
The world of sewing awaits, and at ONSA, we're committed to being your trusted guide every step of the way. Unleash your inner stitching prowess, and let your creativity take flight – the possibilities are endless.
#sewing#sewing classes#online sewing classes#learn to sew online#virtual sewing lessons#sewing tutorials#pre-recorded sewing videos#live sewing classes#interactive sewing instruction#ONSA sewing academy#sewing education#sewing mastery#garment construction#fashion design#pattern drafting#sewing techniques#creative sewing#sewing community#sewing journey#sewing skills#beginner sewing#advanced sewing#couture sewing#self-paced learning#personalized instruction#sewing mentorship#sewing creativity#sewing expression#wearable art#fabric art
15 notes
·
View notes
Text
in theory there is a series of next classes on sewing machine use to take, featuring instructions on various techniques
but as far as i can tell learning to assemble a tote bag has taught me everything i need to assemble drawstring project bags, which is what i actually got into this to learn to make in the first place
so im just going to book sewing machine time for next week, pre-cut some fabric i already have at home according to a drawstring bag pattern i found, and just. try making things?
#the place where i took the class lets u rent sewing machine time so i. am just going to go for it#i like taking classes when im a complete beginner but for crafts i very quickly move to the stage where i would like to try generalizing#through a combination of Looking Online and Trying Stuff. and will come back for more direct instruction once i am truly stymied on a parti#ular skill or technique. i took one knitting class when i was 9 to make sure i could form stitches the right way round and otherwise am#committed to just finding stuff online and trying it and it always works out. and i feel this should work the same way.#box opener#feel free to recommend other things that i should feel ready to just try given that i have 'can sew a simple tote bag' capacities#is it too bold to make a run at an unlined pair of drawstring shorts? i have some to use as a model! does it definitely need elastic?? will#that be hard??? can i definitely not learn it from blogs do you think. because if i can im gonna
17 notes
·
View notes
Text
Unlocking the Power of Sergers: Elevate Your Sewing Craft
In the dynamic world of sewing, efficiency and precision are key. Discover how integrating a serger sewing machine into your toolkit can transform your projects, offering professional finishes and unmatched versatility. Embrace this game-changing tool and take your sewing artistry to new heights.
In the fast-paced world of sewing, efficiency and precision are paramount. Enter the serger sewing machine, a game-changer that elevates your craft to professional heights.
The Serger Advantage: Speed and Precision
Time is a valuable commodity, and a serger maximizes it by streamlining your sewing process. Unlike traditional machines, a serger trims seam allowances and encloses raw edges simultaneously, delivering a polished finish swiftly. Imagine completing garments so efficiently that they rival boutique-quality pieces.
Professional Finishes: Elevate Your Craft
Details distinguish exceptional work. A serger provides durable, stretchy seams ideal for knit fabrics, eliminating fraying edges. Your creations will exude a refined, professional touch, enhancing both appearance and longevity.
Versatility Unleashed
Beyond edge finishing, sergers offer a spectrum of techniques. From rolled hems to flatlock stitching, they empower you to infuse creativity into your projects. Explore ruffles, gathers, and decorative edges to craft unique, personalized designs.
Conquering the Learning Curve
Mastering a serger may seem daunting with its myriad threads and settings. However, with structured guidance, you can navigate this learning curve effectively. Online courses, such as "Make Friends with an Overlocker or Serger" by Tilly and the Buttons, offer step-by-step instruction, from threading to advanced stitches.
Investing in Excellence
Acquiring a serger and the accompanying education is a strategic investment in your craft. The enhanced quality and efficiency translate to higher-value creations, whether for personal satisfaction or commercial endeavors. This commitment to excellence yields dividends in both pride and potential profit.
Join a Thriving Community
Embarking on this journey connects you with a vibrant community of serger enthusiasts. Online forums and social media groups provide platforms to share experiences, seek advice, and draw inspiration. Engaging with fellow sewists fosters growth and camaraderie, enriching your sewing experience.
Embrace the Serger Revolution
Elevate your sewing artistry by integrating a serger into your toolkit. The fusion of speed, precision, and versatility transforms your projects, reflecting a commitment to quality and innovation. Seize this opportunity to enhance your craft and produce creations that resonate with professionalism and personal flair.
For more information visit: https://virtualmegamall.blogspot.com/

#serger sewing machine#overlocker sewing machine#online serger course#professional sewing techniques#serger for beginners#advanced serger techniques#serger threading guide#serger sewing projects
0 notes
Text
Master Your Serger and Overlocker with the #1 Online Sewing Course!
Master Your Serger and Overlocker with the #1 Online Sewing Course! Tired of tangled threads, skipped stitches, or confusion over your serger’s settings? Whether you’re a sewing enthusiast or a professional looking to refine your craft, The Number 1 Serger and Overlocker Online Sewing Course is your ultimate guide to mastering these powerful machines. Say goodbye to frustration and hello to…
#advanced serger techniques#beginner serger course#best online sewing course#cover stitch mastery#decorative serger stitches#DIY sewing projects#fabric-specific serger skills#learn to use a serger#lifetime sewing access#online sewing classes#overlocker online classes#professional seam finishes#save time sewing#serger hacks#serger maintenance guide#serger sewing course#serger tension settings#serger video tutorials#serger vs overlocker#sewing community forum#sewing course enrollment#sewing machine troubleshooting#sewing machine tutorials#sewing tips for beginners#threading a serger machine
0 notes
Text
This is the book I'm using, btw, for anyone else interested in learning to sew.
I started off with a beginner's sewing class at a local quilting store, and now I'm moving through the 12 projects in the book.
268 notes
·
View notes
Note
Do you need a sewing machine to start making shirts and vests? Is hand sewing an option worth considering, or should I invest in a machine, in your opinion?
That's really a matter of personal preference!
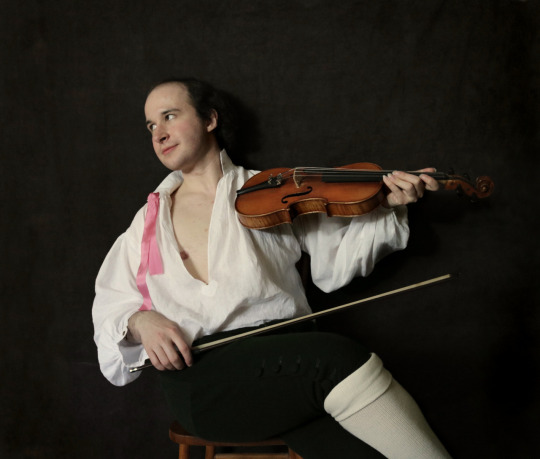
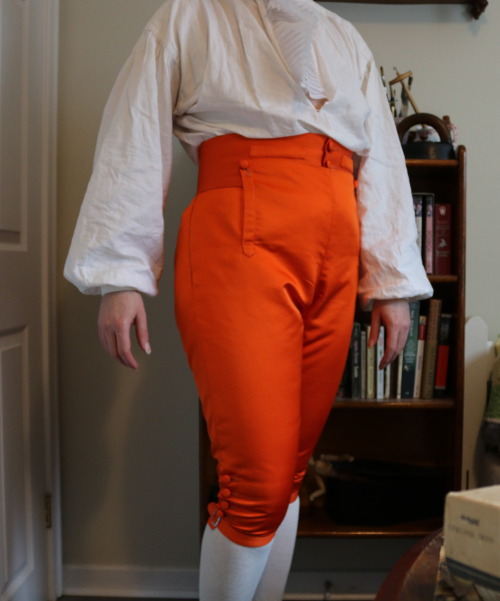
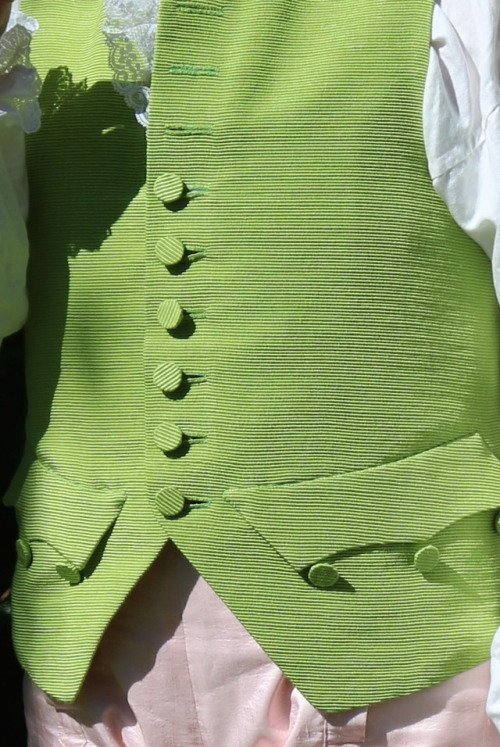
Do you need a machine? Absolutely not! Every garment ever made before the 1840's was sewn by hand, and a lot of them after that too. I've sewn many garments completely by hand, including the early 18th century tiddy-out-violinist shirt, these bright orange breeches, and this green waistcoat.
Is it nice to have a machine? I think so, but again, individual opinions vary!
One of the costumers I follow sews everything 100% by hand because she finds it meditative and isn't interested in using a machine at all. Some people hate hand sewing and prefer to do everything by machine, with maybe a bit of hand finishing if they absolutely can't avoid it.
I do about a 50/50 split overall, maybe skewing a bit more towards hand sewing. I like to do pants, shirts, and nightgowns mostly by machine with some hand finishing, but for jackets and waistcoats I usually do considerably more hand sewing than machine, because I like 18th century tailoring techniques and think they give a nicer looking result. I do most of my buttonholes by hand, or I do them by machine first and then cover them in hand stitching.
Most people who sew do at least some of it by machine, but again, I don't know which way you prefer to work, so I'd suggest trying out both to see how you feel abut them.
For hand sewing, I suspect a lot of people hate it because they're using shitty needles and/or shitty thread, and perhaps haven't found good resources for hand sewing techniques.
Here's a post of hand sewing advice that I found quite helpful a decade ago. Use good needles because the eyes of the cheap ones have jagged edges and will ruin your thread! Use nice thread because the wrong kind will be twisty and tangly and will fray more!
Thimbles are good and useful, and typically they go on the middle finger of your dominant hand, and you use them to push the needle. I prefer metal thimbles and dislike using leather ones, but some people prefer the leather ones, or rubber ones.
The metal ones come in sizes, and I don't know how to find out your size aside from trying them on in person, but I know I'm a size 11.
One very important thing is that if you're hand sewing a garment, look for hand sewing specific instructions on how to do the construction techniques you're going for. A lot of the time when someone nowadays is trying to figure out how to hand sew a thing they'll just try and copy the machine sewn version, and a lot of the time that's inefficient and more difficult and the result looks worse, because machines and hands work very differently!
This is something I'm going to briefly discuss in the outro to the very long shirt video I'm working on, because it's so very common, and I've done it too! On several of my earlier hand sewn shirts I didn't know to turn the edge in on the front slit and do a little narrow hem, so I instead sewed on a facing for the front slit and cut and turned it, just like I'd seen on machine sewn shirts. This made it about 3x more time consuming, and the result was much bulkier and looked worse.
I've got so many more things to say about sewing but it's almost bedtime and I don't want to make this post too long.
For machine sewing, again there's a lot of personal choice. Some people like newer machines, some people like vintage or antique ones. I'm one of the ones who prefers solid metal vintage machines. I grew up using an old cast iron Singer, and the newer domestic machines just feel so plasticy and insubstantial to me. I'm used to ones that just do straight stitch and can also go backwards, but some people are perfectly happy with ones that can't even backstitch.
I do think that for a beginner the vintage machines are a better deal, because if you're patient and look around for a while you can snag one for really cheap at a thrift store, yard sale, facebook marketplace, etc. Also they're mostly metal and therefore harder to break.
I recently got a Pfaff (from I think the 1960's?) at an estate sale for 25 bucks. The zig zag mechanism is stuck and needs fixing, but I cleaned & oiled it up and it works just fine for regular straight stitching.
There are SO MANY online resources for how to clean, oil, and fix vintage sewing machines, especially the more popular brands, and a lot of the time cleaning & oiling is all they need. Read the manual and get an oil bottle with a nice long pointy thing so you can reach all the parts, and get some compressed air to whoosh out the fuzz. If it's old and hasn't been used in years, turn the hand wheel and observe every single place where metal rubs against metal, and Make It Greasy There.
(If you don't have the manual, you can often find those online too. I even found the service manual for my new-old Pfaff! I have the original users manual, but this one's for the people doing repairs.)
Oh this post is getting much too long! If you don't know yet if you like machine sewing, try seeing if you can use one without owning it, perhaps at a sewing class or in a makerspace. I know some libraries can loan out machines. A sewing class would probably be a good idea actually, if there are any available where you live!
Much like how you'll have a bad time hand sewing if you've got shitty supplies and no proper instructions on good techniques, you'll have a bad time machine sewing if it's not oiled well and if the tension is uneven.
There are so so very many things to learn about sewing and I hope I'm not making it sound too overwhelming, because I promise it's not if you take it one step at a time!
Also, when someone who's been sewing for a long time says "You may think you can ignore (piece of sewing advice), but actually that's bad and you will regret it", they're usually right. Oh, how I regret not learning to use a thimble years earlier than I did...
Sorry this post is so long, I hope it's helpful!
Basically, there's no one best way to sew anything, and you should try different stuff and see what works best for you, because everyone has different preferences.
556 notes
·
View notes
Text
Amigurumi/Crochet Toy 101 + Resources
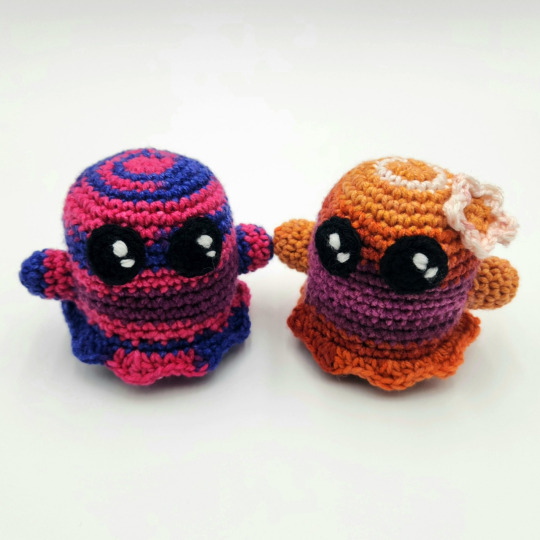
Noticed a couple folks in my tags mentioning that they wanted to learn or wished they knew how to crochet amigurumi. So here's a quick and dirty little how-to guide with resources I threw together? Hope it helps!
Tools + Materials
Crochet is one of those hobbies that is actually relatively cheap to get into. Here is a basic list of what you'll need to get started. You can find most of these at any craft store or even Walmart.
(1) Yarn (Required)
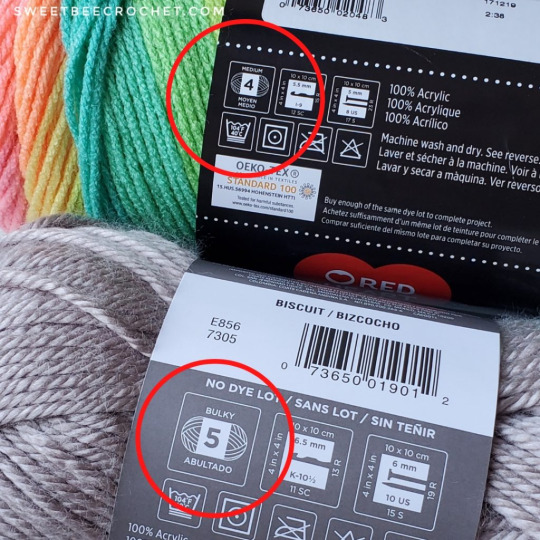
Yarns come in a variety of weights (sizes) and fibers. I recommend a soft, worsted weight acrylic yarn (indicated by a number "4" and "medium" on the yarn label) for your first few projects.
Image
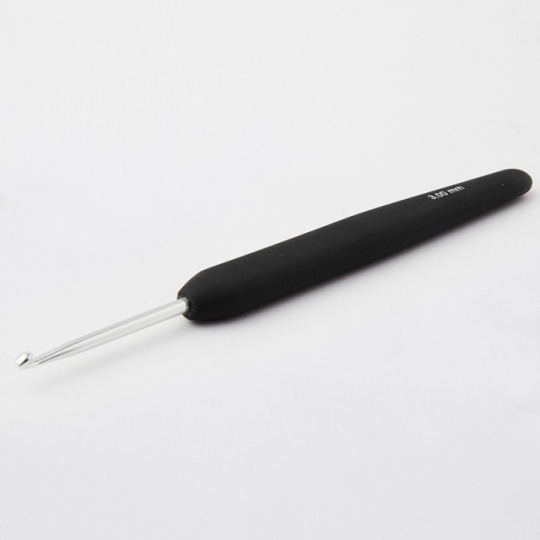
(2) Crochet Hook (Required)
These come in a lot of sizes and styles, and what size you'll use will depend on your yarn weight and how tight you want your stitches to be. I'd recommend buying just one hook to start with rather than a larger set. Metal hooks with ergonomic rubber handles are easiest for beginners (and on your wrists longterm, lol). A 5.0 MM/Size H or a 4.50 MM/Size G works best for making amigurumi with worsted weight yarn.
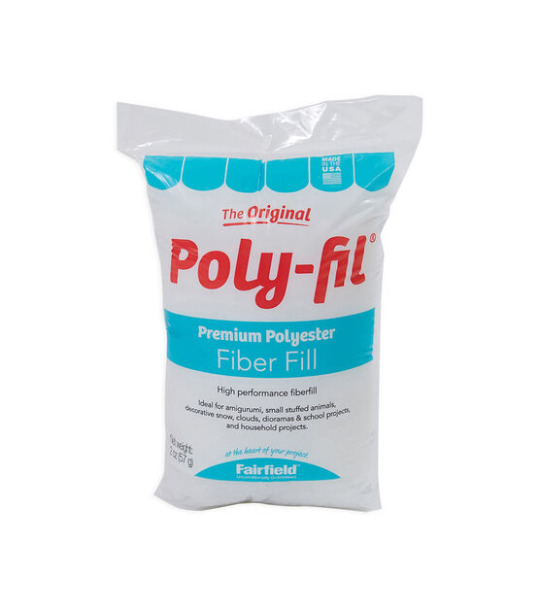
(3) Polyfil/Stuffing (Required)
For stuffing your project.
(4) Yarn Needle (Required)
Most crochet projects require sewing to one degree or another. Yarn needles are distinguished from regular sewing needles by their larger size, larger eye, and blunter tip. Yarn needles may be straight, or they may be angled at the tip (i.e. a darning yarn needle).

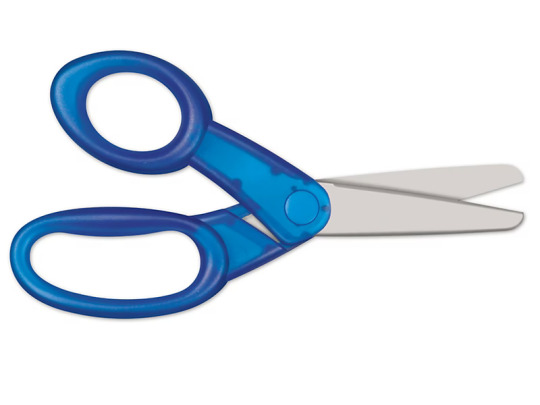
(5) Scissors (Required)
Any sharp, medium-sized pair of scissors will do for cutting your yarn.
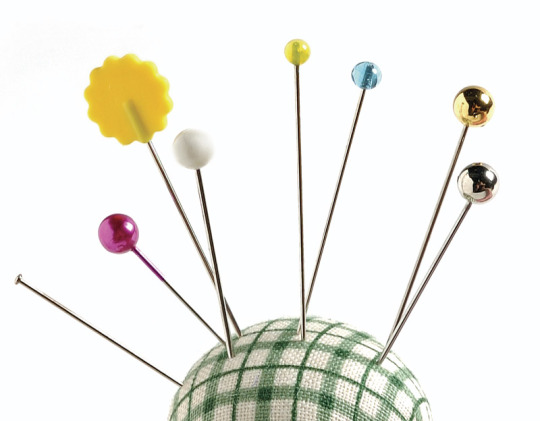
(6) Sewing Pins (Recommended)
For holding parts in place as you sew them on.
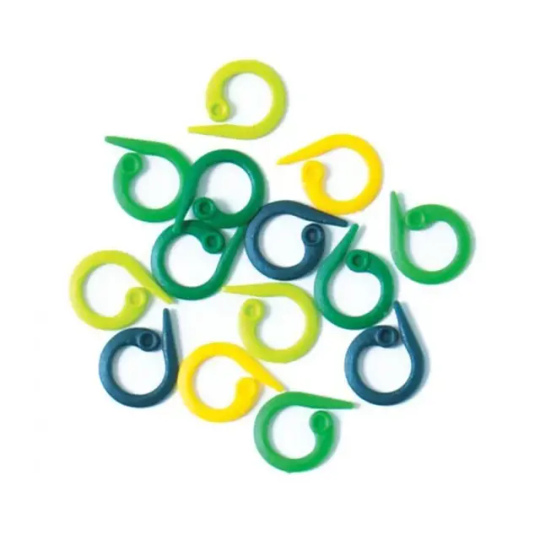
(7) Stitch Marker (Recommended)
Many amigurumi projects are worked in rows of continuous rounds, and stitch markers can be used to mark the beginning or end of these rounds. They can also be used to mark areas of interest in your project or to secure your project to keep it from becoming accidentally unraveled. I strongly reccomend getting split ring ones. Scrap pieces of yarn also work in a pinch as stitch markers.

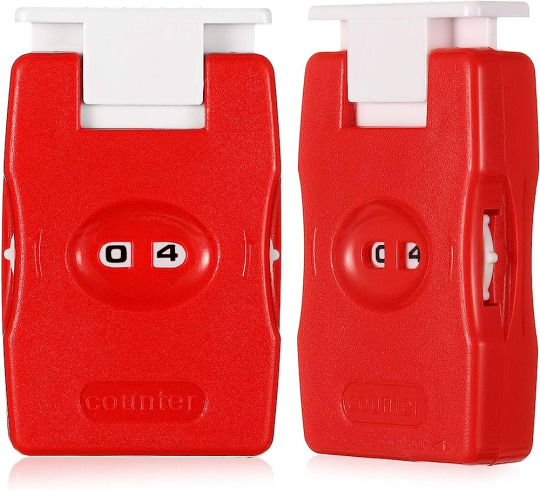
(8) Counter (Recommended)
For keeping track of your rows as you work a pattern.
(9) Safety Eyes (Recommended)
Most amigurumi will require eyes of some sort. Safety eyes (you can find these in various sizes in the doll section of any craft store) will give your project a polished look, but you can also use buttons, felt, or even embroider the eye details on your amigurumi.

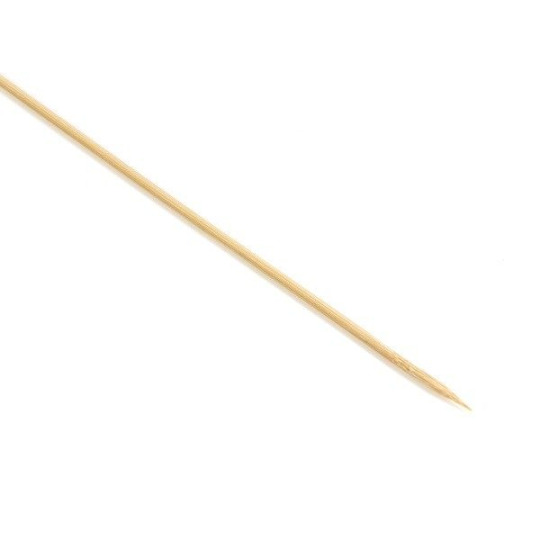
(10) Stuffing Stick (Recommended)
For getting your stuffing into hard-to-reach spots. A chopstick or wooden skewer works very well for this.
Basic Crochet Stitches + Amigurumi Techniques
Most crochet patterns are built from a few basic stitches. Before attempting any larger project, I recommend getting comfortable with these stitches by making a few small, flat pot holders out of each basic stitch. A lot of crochet is pure muscle memory and practice, and this is a great way to start.
There are also a few techniques specific to making amirugumi that will be helpful for you to know. You can find any number of free videos/tutorials online. Below are links to a few videos that I found helpful when I was learning to crochet.

Image
How to Make a Slip Knot
Single Crochet (+ Starting Chain and How to Count Stitches)
Half Double Crochet
Double Crochet
Triple Crochet
How to Keep Starting Chain from Twisting
Magic Ring
Ultimate Finish
Invisible Finish
Invisible Decrease
Beginner Amigurumi Patterns
These were the first three patterns I learned in the process of teaching myself how to make amigurumi. I recommend working them in the order they are listed. The first two links have step-by-step instructional videos and will help ease you into learning to read amigurumi patterns. All of these patterns are free, and there are many more free patterns out there as well. Have fun!
Amigurumi Ball
Amigurumi Whale
Amigurumi Stegosaurus
3K notes
·
View notes
Text

What a workout 😴😴😴 so many days of cloth stitch, so many flowers, so much sewing. This was a lot of fun to make. Definitely improved on some skills I've been working on. I think one of the biggest improvements from this piece just came from the actual approach. I found myself making decisions on how to approach different elements, when to hang in and cut out pairs for different spots, and stuff like that that was no longer written into the instructions in the book. Speaking of the book, by finishing this piece, I officially graduate from the beginner patterns chapter 🥳🥳🥳 My plan next i think is to go work on some torchon pieces again because I need a break from sewing while I work on ordering some finer thread. I want to repeat the sunflower pattern at the actual size, and then move on to the next chapter!
The Technique of Honiton Lace by Elsie Luxton- Pattern 6: Horseshoe
68 notes
·
View notes
Text
Hello Internet!
I’ve been working on a project that involves compiling a bunch of information on sewing and mending, so I’m putting it out to the world so that more people can see and benefit from it!
The best way I could figure to do this was to attach PDF links of my guides that I made, so sorry if there are technical issues with accessing them, I’m still trying to figure out how to attach them properly
This one goes over basic handsewing stitches and mending techniques
And if you know a bit about sewing and how to use a sewing machine, but are still figuring out different techniques and things, I’ve compiled a list of a variety of beginner friendly sewing projects, with instructions and pictures!
Hope this is helpful for someone!
102 notes
·
View notes
Text
Back in my sewing era because Fallout Fic Research (and also need clothes but it's ya boi No Dolla) thought I'd share a selection of videos from my research files about making & mending clothing without a sewing machine.
Humans clothed ourselves long before the advent of machine assistance. Your average Wastelander might need to take advantage of patchwork & hand- making and mending techniques - sewing machines need maintenance and would probably be a luxury. Textile making is a different problem to tackle that I'll post about later, but for now: Some videos that cover how Wastelanders might make & mend clothing without a sewing machine!
What You ACTUALLY Need to Make Clothes in an Apocalypse - Bernadette Banner please check her out if you love learning through a historical lens! You might know her from bangers such as
Some mending techniques:
Boro is a textile repair technique that uses patches. Sachiko is often associated with elaborate geometric stitching. Both make use of existing materials and are examples of visible mending that have a low barrier to entry and a high skill ceiling. A Wastelander who takes up mending as a trade would be a much-valued member of a community- not only could you repair clothing this way, but you could make new pieces as well.
"Reflow" No.18 Boro Kimono - Mutsu by Prospective Flow
Basics of Sashiko 1 | Tools, Materials and Alternatives for Beginners - Xiaoxiao Yarn
Sashiko Boro-inspired Quilt Mug Rug Made with Fabric Scraps - Xiaoxiao Yarn
Visible Mending - Scotch Darning - boukhou
A Stitch in Time: 300 Years of Visible Mending - Helen Wyld, National Museums Scotland
56 notes
·
View notes
Text
Neckline -Finish it Without Bias Tape or Facing: for Beginners
In this post, you’ll discover amazing technique on how to sew neckline without bias tape or facing. Love what you see ? Support me by snagging some cool items from my shop! Every purchase helps me bring you more awesome content. Thank you! Shop Now Are you looking to finish a neckline without bias tape and facing? This step-by-step guide is perfect for those on their sewing journey who want to…

View On WordPress
#Beginner Sewing Tips#diy clothing#Easy Sewing Projects#Neckline Finishing#Professional Sewing Tips#Sewing Necklines#Sewing Techniques for Beginners#Sewing Without Bias Tape#step-by-step sewing guide
3 notes
·
View notes
Note
That National Geographic leather binding for Yellowstone is fucking Gorgeous!!! (Pardon my Language)
How long have you been binding, and what would you recommend to someone who wants to try it for themselves?
hello and thank you so much!! I worked really hard on that one (and no pardon needed haha)!
I started binding in February of 2021, which means in a few months I'll have reached 4 years. It's been an awesome journey!!
If you'd like to try it for yourself, I'd recommenda few things!
1) You can 100% try out the basics with near free or cheap materials. People typeset in Word or Google Docs or Pages. You can print on printer paper & use regular sewing thread & scavenge board from old books or notebook backs or do a limp leather binding & use no boards at all. You can make paper pamphlets. Any comments I make following this are about my preferences for best results. The most expensive part that cannot be avoided is printing. On the other hand expenses can wildly escalate if you're committing to it; once you are doing leather it becomes somewhat unavoidably expensive.
2) Check out some tutorials from SeaLemon or DAS Bookbinding on YouTube for the physical construction. SeaLemon is really clear for a beginner starting out, but then I'd move to DAS for better technique (DAS also has a beginner series though). I watched DAS Bookbinding videos for three weeks straight before I was able to start, & while that doesn't maybe work out for everyone I do think it gave me a pretty strong basis of understanding for structural techniques. DAS is *really* good at explaining why he thinks you should do something. The structure of the NatGeo bind is basically DAS's video on a rounded & backed bradel binding (but with leather & sewn on recessed cords). There is some good stuff on Tiktok/IG, but watch short-form videos/reels with caution. They move a little fast and I've seen a couple give instructions that can result in structural flaws (not that this is unique to the form, cross-referencing on instructions from any source is a good practice). They are good for if you're looking for a specific technique (particularly modern decorative ones, like cricut use, edge gilding, HTV application). There are also published books you can buy or maybe request through your library, such as Hollander's Introduction to Bookbinding. Renegade Bookbinding Guild runs a whole bunch of technique-specific in-house zoom classes annually.
3) Look to other fanbinders for tutorials on how to format the text (this is because most pro bookbinders do not do both text design & book creation! it's a pretty unique feature of fanbinding). @renegadeguild has some publically provided resources on our website here and more typesetting tutorials for a whole host of softwares (Affinity Publisher is my choice - one time purchase, fuck you very much Adobe InDesign) located in the discord server. Anyone 18+ can join the Discord. The NatGeo inspired book (text & dust jacket) was created in Affinity Publisher.
4) Join a community of fanbinders! It's really lovely. The space has exploded & there are tons of people to be friends with, trade tips, & cheer each other on. I'm part of @renegadeguild and we do a whole bunch of events throughout the year, and we have an in-person retreat every other year. I've met with over 20 different renegaders so far, in three different countries, and it's been such a blast. Definitely the community helps keep up the motivation. Renegade isn't the only community out there though! There's groups more rooted in IG/tiktok circles that have their own discords, plus a number of FB groups. I do think most people who are comfortable on tumblr enjoy Renegade's vibe.
5) While I learned most of what I do online, some things really benefit from in-person learning. If you want to do leather binding I would really recommend trying to take an in-person class. I did two attempts at a leather binding on my own before I decided to hold off until I'd had at least one in-person class. Leather binding can be extremely frustrating, especially when you can easily end up with a book that looks worse than a cloth binding at your same skill level but for double the cost. Imo this is mostly because the leather specific skills like paring, warp management, and assessing a random piece of leather for bookbinding suitability are all pretty tactile experiences, all of which are difficult to assess through a screen and can result in an unpleasantly bulky/stiff/shapeless book if ignored. For example- while this book of mine is a pretty popular post, I don't enjoy holding it and reading it, especially in contrast to the NatGeo bind. Part of this was the material I chose; part was not being able to adhere to the instructions quite well enough; part was just not knowing enough about what I was doing; part is they're different constructions. This might just be a me thing though; I'm sure others have had success with online only tutorials for leather.
6) I'm not going to get into specific tools bc that could be a whole post, but some things are necessary (printer access), some things are necessary depending on style, some things are "makes life easier but only drop the money if it's stopping you from making books out of frustration", some things are just technique-specific tools. Examples - sewing frames are often brought up but are never necessary unless sewing on cords; cricuts & cutting machines are commonly used in fanbinding circles but I don't have one (& don't intend to atm).
7) Don't be shy to offer the author a copy!! Like other fan activities, fanbinding is part of our fandom community ecosystem. Your fanbinding is in communication with the author's story. Giving a bind to the author is a great way of keeping the ecosystem going. I tend to think of binds as a combo of comment, fic rec, and fan art inspired by the fic.
8) Paper grain sounds stupid but it IS IMPORTANT! My personal hierarchy of give-a-fuck for grain: Board grain, spine card grain, endpaper grain, cover paper grain, text block grain, book cloth grain. The only thing I personally sometimes ignore is book cloth grain; but many people will not worry too much about text block paper grain.
Gonna stop there for now. If you've got specific questions or want elaboration, feel free to ask. As with all things, YMMV, this is my own opinions/experience and may not apply in all cases. There's a whole lot of different techniques out there, and it's hard to ever say something is wrong, per se - but I think it's important to understand if a method has an outcome you may want to avoid. Prioritize your goals & adapt for them - what's your goal? Longevity, readability, aesthetics? You might make different choices depending on them. My choices influence the techniques I chose to focus on, the tools I buy, and thus the final aesthetic of my binds.
32 notes
·
View notes
Note
Since many search engines have lost their way so I cant actually find what I'm looking for, how do you find sewing patterns/tutorials on your costumes? More self taught and scrap fabric? I'm trying to make a big 20inch fabric bow for a belt similar to yours but having to scale up a tiny hair ribbon is painful 😢
Man, back in ye olde days (even now) I do still usually do quick google searches for things if theyre new/I want some background on them. most of the time if i really scour I can find something, but I do agree that its getting harder and harder. even if i can find something I almost always do a test so indeed scrap fabric mock ups are my lifeblood lol.
Also I do have some cosplay tutorials up for free on my gumroad!
In particular if you want to make big bows, I have two that talk about that, Pupet and Wadanohara. Usually what I do is cut out a similar shape to a cartoony bow, if its really big add support either via interfacing or foam, and then pinch it in place with the middle band.
25 notes
·
View notes
Note
Im obsessed with your horseshoe crab bag and wanna make my own but dont have any leather working experience or knowledge, did you have a pattern you followed or did you just free hand it? also what would you recommend to someone wanting to try leather crafts for a first time?
I'll answer both this and a related question from @chaoticspaces:
hey! I’m in love with your crab bag. you mentioned you’ve never worked with leather; do you have any tips on where/how to start learning? or did you just wing it? I must preface that I’m a beginner at any sort of crafting and will have to learn the building blocks first but damn, people can just MAKE that kinda shit? I’ll learn to sew for that.
So it must be acknowledged that I am a fairly experienced crafter, I grew up sewing and sculpting and origami-ing and all sorts of crafty things. Meaning that although the horseshoe crab is my first experience in leatherworking, it's building off of existing crafting skills and experience thinking through how materials behave and how shapes interact. I say this as a preface not to discourage anyone from diving in, but rather so anyone who's newer to crafting can go in with a bit of perspective and not get discouraged if they don't get the hang of it right away! Be patient with yourself and keep pursuing the skills you want to develop.
With that out of the way, here's a (slightly abbreviated, but still Long) walk through what my process was like for drafting the pattern and learning how to work with leather!
Drafting the pattern
I started by looking up pictures of horseshoe crabs and doing a simple drawing of one from the top and from the side to get a sense of the shapes.
Then I broke it down into sections to make things easier on myself. Reducing things to basic shapes (crescent, box, wedge, cone, etc) is a good way to start making sense of a more complex form.
To make it work in three dimensions, I'd sketch what I think the shapes should probably be; cut out a mini version in paper; tape it together; go "hmm, that's not right," and adjust the sketch; repeat until I get roughly the form I'm looking for.
Once I had a general shape that worked, I recreated those pieces on paper again, this time full-size. That involved a lot of math to make sure all the proportions scaled accurately. Then I cut out those pieces and taped them together and adjusted any basic proportions again to fix anything that I scaled wrong.
At that point, I had a shape that read fairly well as horseshoe crab, and that would have been fine. However, I wanted things to curve and flare and be more organic, which is where a lot of the trickier adjustments come in. Using paper prototypes allowed me to work quickly and make changes easily. To exaggerate a curve, I'd cut the tape "seam", bend the paper into the desired shape, and then add or remove material from the adjoining sides until that curve stayed in place when re-taped. Each piece of the pattern is responsible for helping its neighbors stay in place.
After I got my paper prototype to a point I was happy with, I got some cheap sheets of kids' craft foam and made another prototype in that, but stitched instead of taped, in order to test the pattern as thoroughly as possible without having to use my actual leather for it.
---
Learning basic leatherworking
Youtube! I searched things like "introduction to leatherworking," "leatherworking techniques for beginners," "how to attach two pieces of leather," etc. There are a bunch of videos that show very detailed but not-too-lengthy examples of basic techniques.
Once I had seen a few examples and made a list of the basic tools I would need to get started, I went out and got myself some tools and scrap leather to experiment with. I watched some more videos showing how to use my tools, and followed along with them
Some of the techniques I looked up to start:
How to use an adjustable groover, stitching chisel, beveler, and wood slicker
Saddle stitching
Box stitching
Butt stitching (Yeah, I know)
How to set rivets in leather
What kind of leather dye/what kind of leather conditioner to use
I spent some time testing techniques, even ones I didn't need for this project, because the more time you spend with your material and tools, the more you'll understand how they work and how to get them to do what you want. I have a bunch of scraps lying around that just have random burnished edges, wonky rivets, stitches that don't go anywhere, etc.
I also found it helpful to look through leatherworking subreddits and follow leather crafters on instagram and look through what they're doing for inspiration, tips & tricks, and to see how they handle unusual shapes. Those subreddits can also be a good resource for finding existing answers to questions you have, or asking questions yourself.
47 notes
·
View notes
Text
Small animal hammock!
New tutorial is up! Today's project is a hand-sewn small animal hammock, for rats, mice, ferrets, Pokemon, whatever. It's another project with simple techniques and shapes, with a lot of wiggle room for mistakes, making it a great beginner project.
(You’ll notice my stitches are a little uneven, which is because I was watching Batman, but it doesn’t hugely show in the end.)
Let me know what you think, and share if you like! Thanks for reading, and if you enjoy my work, I have a Ko-Fi and a Patreon! I also now sell personalized tarot readings.
#crafting#craftblr#sewing#ratblr#rats#beginner sewing#easy crafts#craft witch#my posts#ferret#hamsters#animal#gerbil#rodentblr
17 notes
·
View notes