#Sewing hack
Explore tagged Tumblr posts
Visit Tumblr Blog
Explore Tumblr blogs with no restrictions, modern design and the best experience.
Last Seen Tumblr Blogs


Fun Fact
The KCSC sent more than 20K requests to delete posts related to prostitution and porn to Tumblr from January to June 2017.
Text


I’ve reorganised my sewing needles using spare blood tubes from the hospital! It is such a great way of storing needles because:
1. I can stab them into the rubber thingy at the top so they stay organised and I don’t need to tip them out into my hand (the rubber is thick enough that they don’t poke out the other side)
2. They stay sealed in the container with anti-moisture beads so that they don’t go rusty
3. I can colour-code the tube lids depending on what is in them
So next time you are in your local emergency department, ask one of the doctors or nurses if you can steal some spare blood tubes!
#projects#hand sewing#handmade#sewing#needles#sewing needles#blood draw#blood test#test tubes#hand sewn#hand embroidery#hand quilting#craft hack#sewing hack#life hacks#craft storage#sewing storage#sewers want me#doctors fear me
18 notes
·
View notes
Text
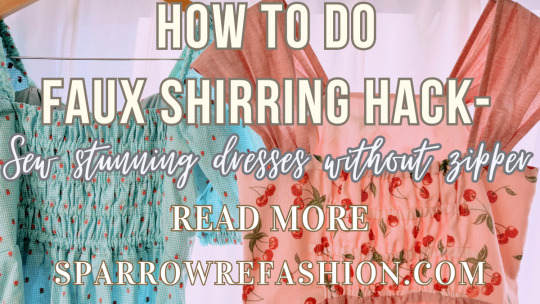
Faux Shirring Hack: How to Create Stunning Shirred Dresses with Just an Elastic Band
In this post, you will learn faux shirring hack to create dresses without the need of a zipper. Have you ever admired those shirred dresses that look so chic and comfortable, but thought they were too complicated or expensive to make? Well, you’re in luck, because in this faux shirring tutorial, I will show you how to create your own shirred dresses with just an elastic band and some…
View On WordPress
#Elastic band#Faux shirring#Faux shirring dress#Faux shirring fabric#Faux shirring hack#Faux shirring sewing machine#Faux shirring technique#Faux shirring tutorial#How to do faux shirring#Sewing hack#sewing tutorial
24 notes
·
View notes
Text
youtube
That part at 4:04
Was I suppost to learn this technique of tranferring markings to several layers of fabric from a random youtube video? How have I never seen this before? How did I not come up with this?
And how sad it is that the trade of tailoring is reduced to suitjackets?
2 notes
·
View notes
Text
Put a little piece of tape on the scissors before you put on the magnets, they'll be easier to pop off after because there will be a small barrier between the metals.
Also, don't be afraid to just get some non-magnetic to push the magnets off the edge of the scissors. Trust me, you won't lose any. They will find each other.
#magnets#sewing#actual sewing hack#sewing hack#any cosplayer with a big build has learned a lot of lessons with these magnets
42K notes
·
View notes
Text

If you want to increase your storage space, take a look at this hack with foam board by Karen Brown of Just Get it Done Quilts. Find her Video “SEWING HACK - FAST N EASY FOAM BOARD HACKS - DOUBLE YOUR STORAGE” on YouTube.
youtube
#crafts#gifts#decor#sewing#quilting#briar rose quilts#bedding#shopping#quilters of tumblr#holiday#sewing room#craft room#organization hack#foam boards#sewing hack#quilting hack#quilting room#youtube#just get it done quilts#Youtube#karen brown
1 note
·
View note
Text
Life Hack: Clothing Repair 🤔
#pay attention#educate yourselves#educate yourself#knowledge is power#reeducate yourself#reeducate yourselves#think about it#think for yourselves#think for yourself#do your homework#do your own research#do some research#ask yourself questions#question everything#life hacks#sewing#clothing repair#repair tips#diy#did you know
750 notes
·
View notes
Text

It turns out macbooks have pretty strong magnets in them, perfect for picking up spilled pins.
178 notes
·
View notes
Note
I first heard about them in the context of leaders-and-enders quilts.
It seems like a fun way to get a quilt done if you have other sewing to do, or if you want a simple-ish pattern done, but... There's that deliciously brain-tickling one that's right there, tempting you.
Edit: tumblr ate the link.
while watching your video on making shirts i noticed you had a piece of black fabric with a bunch of different threads sewn in it. i was wondering what the purpose of this was. is it to help reduce thread waste?
Partly that, but more so that I don't have to deal with thread tails on pieces where I'm starting right from the edge, and to prevent the machine from sucking them in and making a big snarl.
#quilting#sewing#leaders and enders#spider#chain piecing#it's not cheating if you can call it a specialist technique#project management#sewing hack
340 notes
·
View notes
Text
Fucking smart
#tiktok#video#tiktok video#tiktoks#sewing hacks#sewing tips#sewing#quilt hack#quiltblr#quilting#quilters of tumblr#sewblr#life hacks#life hack#sammy.turk
98 notes
·
View notes
Text
A little more quick sewing machine troublshooting:
If your machine is doing something you don't understand, engage your bobbin winder, and then disengage it.
This will probably not do anything. However, it's fast, it won't hurt anything, and a surprisingly large percentage of the time, it's actually the solution.
Notable cases: Baby Lock and Brother machines where the button turns orange. Janome machines where the LCD says "SP" or gives you a display that looks like "] [". Viking Emerald 118's where the button on the front stops working. Bernina machines where you turn it on and immediately hear a noise of a motor running. Mechanical machines where you step on the foot and hear the engine running but nothing is turning. Probably more, that's just what's in my head right now.
It's the solution rarely enough that you shouldn't expect it to fix it, but it's also the solution often enough that it should absolutely be part of your troubleshooting procedure. Go through the steps to engage your bobbin winder, make it turn for a couple rotations to make sure you've engaged it properly, and then disengage it.
It's worth a shot.
87 notes
·
View notes
Text

275 notes
·
View notes
Text
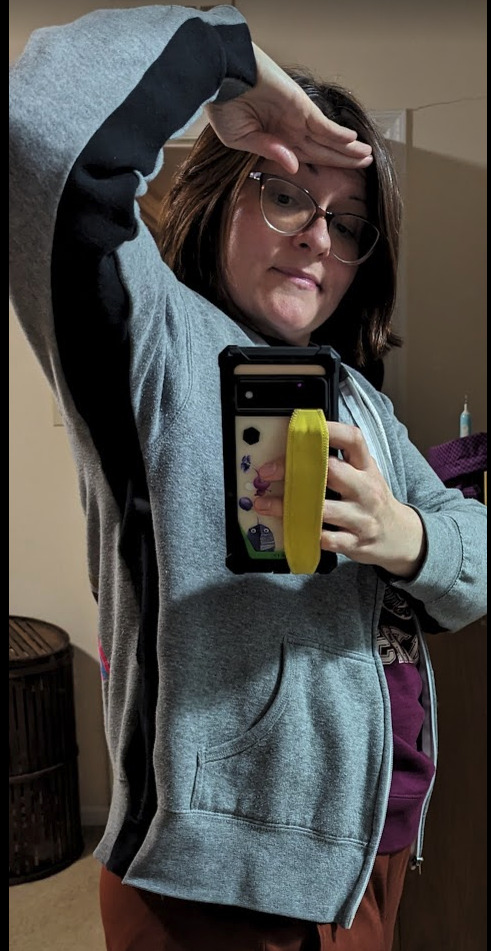
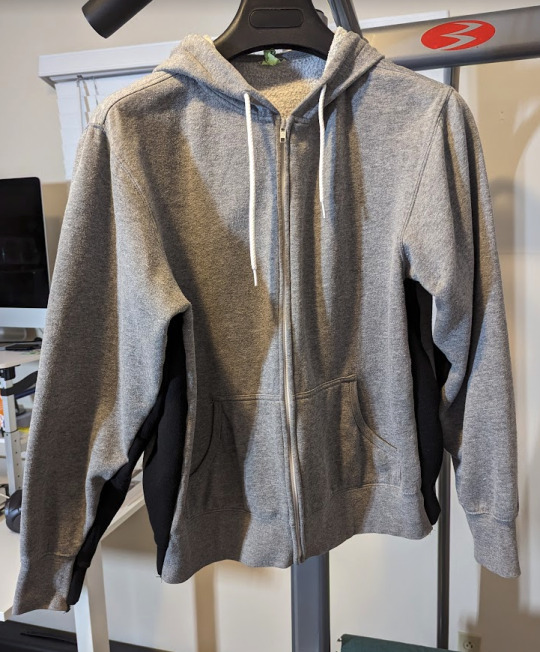
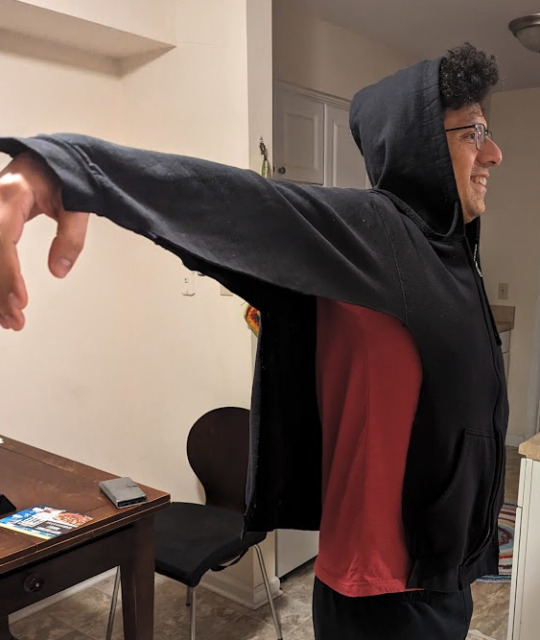
Sizing up a hoodie or sweatshirt
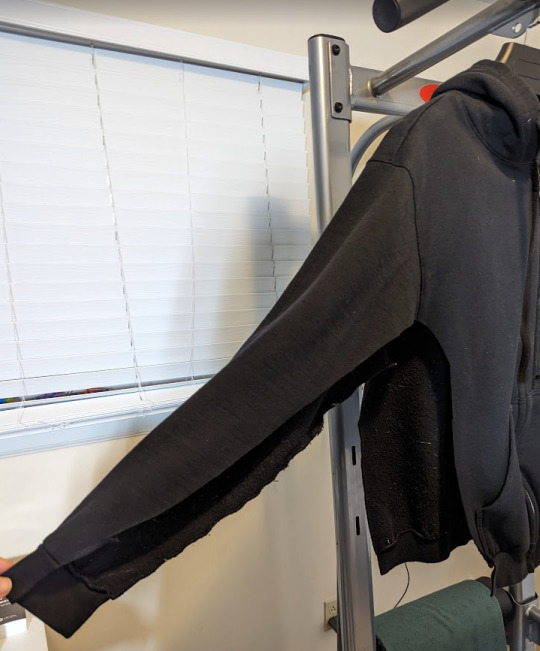
I had an old hoodie I wanted to wear more often, but it's always been a little snug (the price you pay when the merch table at a show has limited sizes remaining but you HAVE TO GET A SOUVENIR - and also support the band). I realized I had another hoodie I didn't wear very much, and decided to sacrifice it to size up the other!
The black stripe is the sacrificial hoodie bit, which overall made the original hoodie about 6 in larger all around (3 in strip added under each arm). Keep in mind, this method makes the torso larger, but also the sleeve size. I bet that's helpful to most people, but if you wanted to not size up the sleeve so much, you could probably cut your strip so it's narrower as it goes down the sleeve. But not to a fine point! Just a little narrower on one end than the other. You still need to have room to use your serger on both seams.
I looked up tips for adding a gusset under the arm. It was not an ideal solution; I ran into a pet peeve in my searching. When folks yadda-yadda over the fiddliest bit of the process. No! Please tell me how exactly you pivot around a point with a stretch stitch and then serge the rest of a seam!! I was not about to try to figure that out with no clear tips.
So, I decided to approach it with the skills and tools I was most confident using (not confident in my ability to use the right kind of stretch stitch around a corner at an armpit seam. I knew it would fall apart!).
NOTE: I used a serger for the entire process. I opt to use an embroidery needle or similar to pull the tail back up into a few stitches rather than try to sew over the tail ends. It's not as quick but I know it works and I have more control. I'm not going to cut into something by accident either!
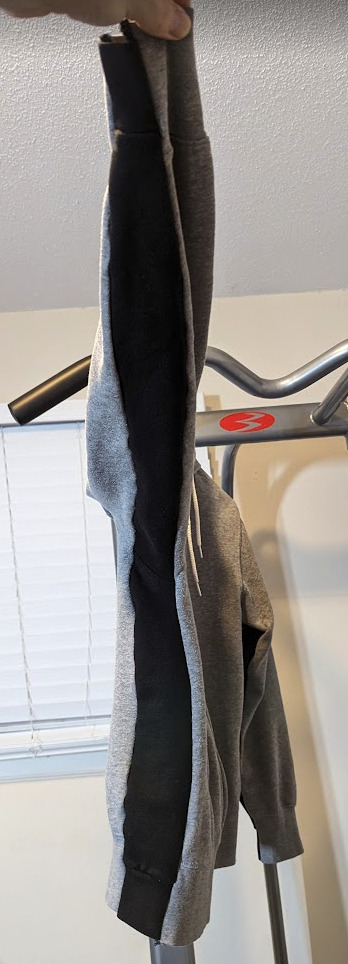
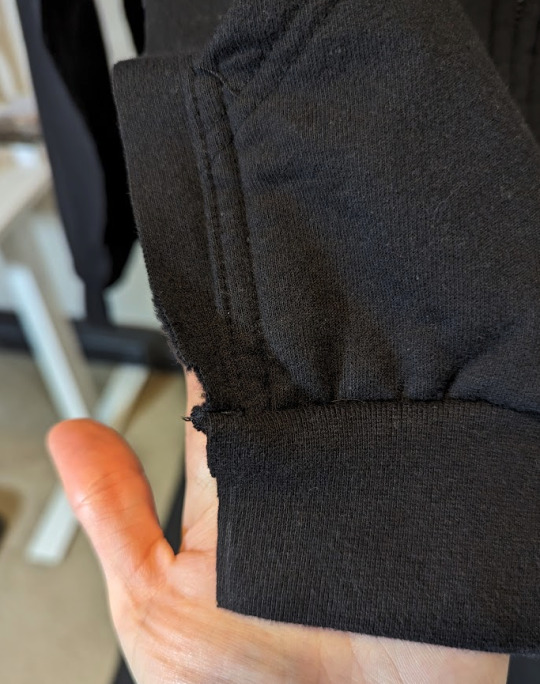
ANOTHER NOTE: You HAVE TO use 2 sweatshirts or hoodies that are the same length from the pit to the BOTTOM HEM. If the length from the pit to the arm cuff hem is somewhat off, that's okay. When you're done, you could always cut off the cuffs and serge on a new one. But you can't so easily do that on the bottom hem on a hoodie with a zipper.
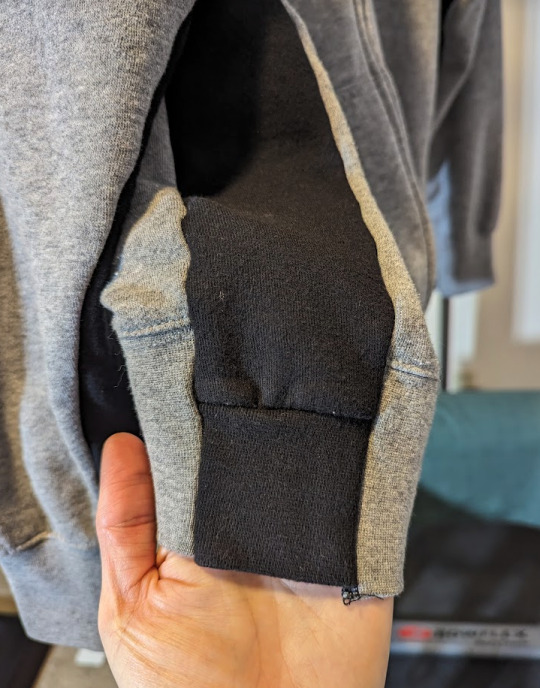
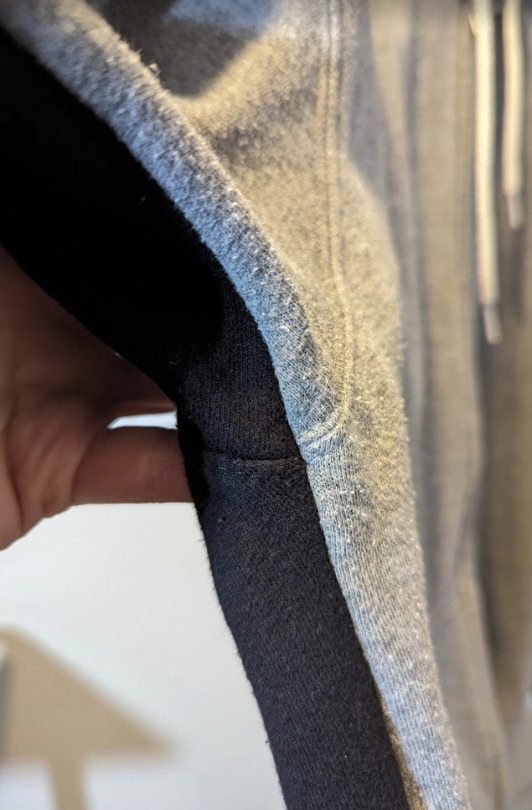
See how the cuff is misaligned here. I could cut off the cuff just above the grey seam and serge on a new strip of ribbed knit if I wanted it to look cleaner. But this was close enough, and also who wants to chop off its character? Someone who's probably no fun at parties, but probably better than me at filing their taxes, that's who.
HOW I DID IT
I essentially added a strip from one hoodie into the under arm/side of the other. If you're wanting to be precise, you can measure how much extra room you want to add, divide by 2 and that's how much you'll harvest from your sacrificial hoodie. The serging will eat some from each seam; consider how much you are comfortable serging off and add that math in for yourself. This one was about 3" wide on each side, as I feel comfortable to serge with taking off just a whisper.
I used a marking tool and a ruler to mark a consistent 3" wide cutting line from hem to cuff on the black hoodie. You'll be cutting a straight strip so don't eyeball it! If you're making it a little smaller at one end than the other, an even better reason not to eyeball it!
You can only remove up to where you come in contact with a pocket, zipper, or other component. Pick up a hoodie and look under the arms and you'll see what I mean! Here's as far as I cut due to the location of the pocket on the black hoodie:
Here's what that black hoodie looked like after I cut out the strips. Daniel was quite amused by it looking like a pelt and/or some kind of punk wizard's cape:

Mark which strip is meant for which side before you move on, so you don't get frustrated later! THIS IS IMPORTANT!
Next, you have to cut open the hoodie that will be gaining these strips. At first, I was carefully seam ripping the side seams but that is SILLY! Don't do that. Just cut it, your serger will be removing any old seam bits.
Right sides together, pin your strips in place. IMPORTANT! Make sure you're using the correct side of the old hoodie to the new one! R with R, L with L.
IMPORTANT ALSO!! Make sure the underarm pit seam intersection is aligned! Start pinning from there, and work your pinning out. AGAIN! the length from this pit junction to the bottom hem should be almost exactly the same or this will give you a headache.
(Pay attention to your pits, to avoid getting down in the dumps.)
Time to serge! You can squinch and fudge the seams a little as you serge to make them line up a little better. Just don't pull or yank on them much, or your knits will be forever wonky.
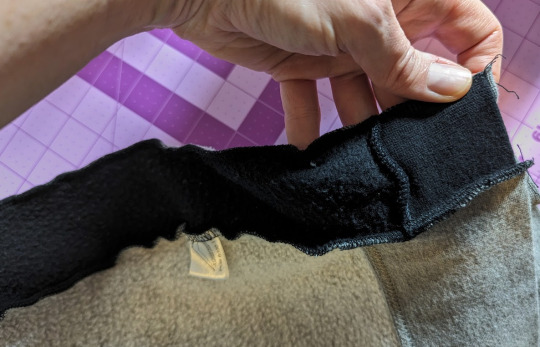
Here's what it looks like on the inside:
I hope this is helpful to others and you get more wears from things you love! If you need to find a hoodie or sweatshirt to sacrifice, hit up a thrift store. Just be sure to bring your hoodie with you as you shop, so you get one that is almost exactly the same length from hem to hem.
90 notes
·
View notes
Text


Gave him a little collar :)
#fursona plush = infinite joy hack#handmade#sewing#sewblr#plush#plushies#fursona#furry#dragon#dragons#dragon plush#crafts#stuffed animals#fantasy#clemscreatures
19 notes
·
View notes
Text

I highly recommend you remove your Selvage from your fabric before measuring and cutting your pieces. I see a lot of quilters in videos leaving their selvage on, however, the selvage is woven differently than the rest of the fabric so it will shrink at a different rate causing puckering in your quilt after it’s washed.
However, there are several ways you can use the selvage so you are not wasting the fabric. You want to cut about 1-2″ from the edge so you can see the selvage and a piece of its pretty fabric.
You can make a Scrappy Quilt or a a String Quilt using Selvages. You can also think beyond quilting and work them into sewing projects like bags, pillows and pin cushions.
Prep Well: An easy way to get your selvages sew-ready is to starch and press. Otherwise, your selvages can be pretty wavy and tricky to work with.
#crafts#gifts#decor#sewing#quilting#briar rose quilts#bedding#shopping#quilters of tumblr#fabric#selvage#fabric selvage#fabric scraps#scrappy quilt#quilt#string quilt#pillow#bags#sewing hack#sewing tip
1 note
·
View note
Text
Kaketsugi is a traditional Japanese fabric restoration technique used to repair holes, tears, or other damage in garments, especially fine fabrics like silk. It is often referred to as "invisible mending" because the goal is to make the repair indistinguishable from the original material.
The process involves weaving new threads into the damaged area by hand, carefully matching the fabric's original color, texture, and pattern. It requires immense skill, precision, and patience, making it a preferred method for restoring valuable clothing items such as kimonos or formal suits.
Kaketsugi is highly valued for preserving the appearance and longevity of garments, blending practicality with artistry.
13 notes
·
View notes