#Turn off tutorial sims 4 without origin
Explore tagged Tumblr posts
Visit Tumblr Blog
Explore Tumblr blogs with no restrictions, modern design and the best experience.
Last Seen Tumblr Blogs


Fun Fact
Tumblr Inc. has $15.1M in annual revenue.
Text
Turn off tutorial sims 4 without origin


If your eyes glazed over at all that talk of processors and graphics cards, that’s fine: go to a good PC seller like PCSpecialist, Overclockers or Chillblast, give them your budget and let them build a system that fits it. Classic point-and-click adventures, strategy titles and vintage shooters are cheap and easily available online ( Good Old Games has hundreds of them), and don’t require state-of-the-art hardware. Even an old laptop with Windows XP and 512MB of ram will let you play a variety of smaller indie games and older titles. However, you don’t have to spend big on a top-of-the-range mega beast: if you’re happy to turn some of the graphics settings down, £500-600 will get you a decent machine with an Intel i5 processor, AMD R9 280 graphics card and 8GB of memory. It would be best to have a newish Windows install too, although plenty of games support the open source alternative, Linux. Running the latest big budget action games at the absolute peak of their abilities – and ensuring you can do so for two or three more years – will require something in the region of an Intel i7 4790 processor, an Nvidia GTX 980 graphics card and perhaps 16GB of system memory (though 8GB is currently fine for games). If you’re looking for the most advanced gaming experience with the best visuals, you’ll need to buy a PC (you can play games on Apple Macs too, but there are fewer titles available – unless you dual-boot, but we are not going there). Budget models like the Motorola Moto G and older iPhone models are fine for less demanding ‘casual’ titles. If you’re looking for a new handset, the latest iPhone and Android models are the best (Windows is not so well supported by game developers): the Samsung Galaxy Note 4, Sony Xperia Z3 and LG G3 are all great options for gaming. The latest Apple, Android and Windows handsets feature powerful processors, large displays and vast app stores crammed with games (you’ll have more choice if your phone is the latest model and your operating system is up to date). If you already have a smartphone or tablet, then great, you’ve got a games machine. Photograph: UPI / Landov / Barcroft Media What you need to play video games Not wasting his life … Avid gamer Snoop Dogg. Basically, if you’re happy to watch TV for three hours a day or continually peruse celebrity gossip websites and social media streams, you cannot – with any degree of self-awareness – call video games a waste of time. Despite popular stereotypes, games are sociable and inclusive, with large, supportive communities and some brilliant events. Games have been shown to improve hand-eye coordination, cognitive flexibility, decision making, even vision. Games are respected enough for Bafta to accept them into its remit, enough for Moma to put a range of titles into its permanent collection, and enough for major art spaces like the Barbican and the Grand Palais museum in Paris to run exhibitions. Yes! The medium has matured hugely over the last five years, and there is a vast range of experiences available, from big blockbusting open-world adventures about marauding gangsters, to teeny, highly personal indie games about coming out.

So for all the potential gamers out there who are thinking about taking up a joypad but don’t know where to start, or which games to try, or what a joypad looks like, here is a quick guide: So what did they think I was going to say? “No, they’re a massive waste of time”? Secondly, a few years ago, people my age were feeling guilty about playing video games, now there are people feeling guilty that they’re not. First, I write about video games for a living that’s my job. It’s an interesting question for two reasons. Recently, several non-techy friends have sidled up to me and asked, in hushed conspiratorial tones: “Keith, should I be playing video games?”
0 notes
Text
The Brothers and Side Characters Play the Sims
I don’t know what possessed me to make this but WHATEVER. I’ve been playing the Sims since I was a wee little girl, and I’ve seen my fair share of weird Sims stuff that I feel would fit these bozos perfectly.
My Sims have a Functional Family Life Because I Don’t (Lucifer)
God dammit Levi’s obsessed with another game... ugh.
Spends 5 minutes in Create-a-Sim and hops into a starter home.
Lucifer’s the type to start with all the average stuff and then build their stuff up as his sim gets promotions.
It’s just... so peaceful...
...he’s adopting a dog.
Look at his new little virtual family... his sim-kids are self sufficient and getting A’s in school, his Sim spouse MC or Diavolo take your pick loves his Sim-self, his sim-dog-
WAIT NO- THE DOG’S AN ELDER?!
AAAAAAAAAAAAA-
...
He’s fine. It was just a virtual dog. *sniffle*
He’s now spending his free time drinking Demonus and playing the Sims.
What’s a mod? Levi why does your sim have gun?
Behold, My Gorgeous Home... It’s a Box (Mammon)
Mammon, like the rest of the HOL, is mooching off of Levi’s Origin account.
“AW SHIT! This house looks awesome! I’m gonna build it for Sim-me to live in!”
Mammon proceeds to build a box with rooms. Yay...
He just picks the funnest sounding job if he picks any job at all for his Sim. That’s how he ended up making 9 dollars an hour in the criminal career.
Didn’t stop Mammon from buying that solid gold bathroom set from Get Famous... a box with solid gold bathrooms.
His Sim is broke send help-
“Leviiiiiii my sim needs money... the people my sim kidnapped and is forcing to paint aren’t making enough money...” “Ugh... press control shift C and type ‘motherlode’.”
...Levi made a mistake.
“FUCK YEAH! MOTHERLODE!”
His sim’s life is so chaotic, he has a piranha pool that his sim has almost died in twice, the sim is carrying on several torrid love affairs, his sim got struck by lightning, his sim has nearly died in a grilled cheese making accident twice... in the same day.
At least once Sim-Mammon and Sim-MC get married things calm down a little.
Mammon finds out what custom content is and proceeds to download EVERYTHING HE CAN FIND.
And now he’s asking Levi why his computer is running so slow.
Expansion Pack King (Leviathan)
He got into it back when the Sims 2 was new, he’s a veteran fan.
“Bro remember when Agnes Crumplebottom would show up and whack the shit out of your sims if they were flirting?”
“Remember when that witch would show up randomly on the lot you were on if you had Makin’ Magic?”
“Remember when Bella Goth was abducted by aliens and we just... didn’t question it?”
He whines about the Sims4 and how crappy it is but still buys every expansion pack, game pack, and stuff pack.
This boy watches like 40 hours of built tutorials and ends up sobbing over his weird roofs.
“WHY DOESN’T IT LOOK AS NICE AS THE ONE I’M LOOKING AT?! THIS ISN’T FAIR!”
The mod folder is so full istg-
Levi gets custom content for the sole purpose of making his favourite fictional characters.
This is why Henry and the Lord of Shadows are married and Ruri-chan and Sim-Levi are roommates.
Oh my god they were roommates-
Levi also added his brothers to the world and uh... Sim-Mammon died in a tragic pool accident F.
Levi then proceeded to befriend the Grim Reaper.
He’s anxiously awaiting the release of Paralives.
Wait Gameplay? In This Build Simulator? (Satan)
Satan’s here to build and leave. Gameplay who?
Our favourite bundle of rage is a master architect and the amount of followers on the Gallery he has shows it.
He takes up those build shell challenges and always ends up making them look positively perfect.
Asmo’s always using his houses, and Satan often takes requests when he gets bored.
No Mammon, he reserves the right to refuse to build a golden castle for you- YOUR SIM HAS 40 SIMOLEONS-
No mods, no CC, he’s building with what EA gave him.
...and EA gave him debug objects, and he’s not going to explain how to get them.
The one time he did actually play with a family... it was one sim and seven cats.
He tries to play without cheats... and ends up getting frustrated and turns on cheats.
All hail the Pets Expansion Pack.
Custom Content Soap Opera (Asmodeus)
Asmo spends 5 hours in Create a Sim then just... clicks out of the game.
That’s how it goes most of the time, buuuuuut when he gets super invested in a family he’s made, boy howdy is he INVESTED.
Sim A is carrying on an affair with Sim C who’s in love with Sim B who’s married to Sim A but Sim D wants to kill Sim A and C even though they’re the illegitimate child of Sim C-
When Asmo realizes that in the Sims 4 he needs to manufacture all the drama himself and he can’t just sit back with a glass of wine and watch the fireworks, he switches to the Sims 2 and 3.
“...why is this old lady beating up my Sim..?”
He immediately recoils in horror upon seeing how ugly the Sims are pre Sims4.
HE NEEDS TO FIX THIS-
Ah, there we go, perfect. Custom Content to the rescue!
He ends up remaking the entire world just so he doesn’t have to look at weird looking Sims.
Asmo is the only one to have finished a proper Legacy Challenge, but it gets crazy chaotic after gen 3.
“My sim just got abducted by aliens and now he’s pregnant- WHAT?!”
He has about 40 saves and only two he actually plays.
Just a Big Ol’ Happy Family (Beelzebub)
Beel found the game, proceeded to make everyone in create-a-sim to the best of his abilities, and made everyone get along.
That’s why Sim-Lucifer and Sim-Belphie are on a swing set together, they’re friends :D
“Hey Luke do you think you can make this?” “I-is that a cake shaped like a hamburger?” “Yes. Please make.”
He took one look at the cooking options and decided to max out his Sim’s cooking skill to unlock all the options.
Beel proceeded to drool all over his keyboard. Gross...
Boy howdy did he have some crazy dinner suggestions!
Overall, very wholesome Sim-life, except for the time Sim-Levi died because the toilet caught fire, don’t worry, Sim-Beel knows how to make ambrosia.
All is good in the Sim save...
...until Sim-Beel ate pufferfish nigiri and fuckin died-
Wait Did I Not Pause- (Belphie)
Huh, this game looks fine... I’ll play for a little- *SNORE*
Belphie makes some sims, plops them into a starter home, plays for an hour, then falls asleep.
He wakes up five hours later to absolute carnage.
Three sims have died because someone decided to make Mac and Cheese and the oven caught fire, the kids were taken away by social services, and the dog ran away.
“...heheh, holy shit everyone look.”
He doesn’t play often, but when he does, death occurs. He has found out every death method for every game from Sims 2 to 4.
And that INCLUDES the Sims Medieval! You guys remember that game?
Sometimes it’s not intentional, but Belphie got bored with the totally normal life his sims were living and decided to spice it up.
“Why are the ghosts breaking my showers..?”
Help There’s a Bug- (Diavolo)
The Crown Prince started playing when he noticed Lucifer was playing it.
He was immediately obsessed.
Dia mostly plays the Sims Medieval because he likes the feeling of achievement after completing a quest!
“Barbatos... why isn’t my Sim completing their task? The icon won’t show up.” “My lord it appears the game is bugged.” “:(“
No one thought to tell Diavolo that EA doesn’t plan on offering bug support to a game made in like... 2009
This doesn’t matter! Look at how great his kingdom is doing- oh no his hero has the plague-
He plays through the Pirates and Nobles expansion and manages to get the peaceful ending, he’s so proud of himself.
“MC! Look! My Monarch’s sword is permanently on fire and I’m fighting an evil wizard!”
When he does play the other Sims games he’s pretty basic, though, he does a great job at furnishing!
Dia gets crazy sad when his Sims die... he turns off aging.
Builder no. 2 (Barbatos)
Barbie doesn’t have time for this... but when he does, he builds.
No create a sim.
No playing the game as intended.
Just builds.
It’s relaxing, okay? A nice little suburban house he’s never going to play in, maybe a treehouse, maybe a big Hollywood Mansion...
The only time he actually plays the game outside of build mode is when someone needs his help to fix something in-game.
He does download custom content build items if he feels bored by the current selection.
Oh Crap What Am I Doing?! (Simeon)
Help him. Please.
He’s so confused.
“Luke, why is my sim upset?” “He’s hungry, Simeon.” “Oh, how do I fix that?” “...Simeon-”
There’s a toilet in the middle of the living room.
The fridge is facing the wall.
There’s no bathtub or shower.
The house is on fire- there is no god- AAAAAAAAAAAAAAAAA-
Okay, once he gets the hang of it he’s sitting pretty. His sims have good jobs, the kids are getting good grades, everything’s fine.
...
But Simeon won’t forget the nightmares.
What Even is This Save? (Solomon)
Solomon’s save is the definition of chaos.
One sim’s a vampire, the other is a spellcaster that really wants to fight the Callientes for some reason, there’s one normal sim that’s always sick for some reason,
It gets weird, confusing, and horrible.
Just how Solomon likes it.
His house makes no sense, like, what even is architecture?
Money cheats are needed because Solomon‘a goal of chaos and confusion is proving to be kind of expensive.
Square up Mortimer Goth, Solomon’s sims are here to steal your weird knight statue that’s worth a shit ton of simoleons for NO REASON.
He joined the scientist career for the sole purpose of getting to the alien planet and kidnapping adding an alien to the household via cheats.
The vampire ended up dying on their wedding day because Solomon forgot that he gave them the sun weakness.
Oh well, the ghost got added to the household! VAMPIRE GHOST!
The Child (Luke)
Before you say Luke’s too young to play the Sims, you should know that I was nine when I first started playing, and I turned out fiiiiiiiiiine.
He’s just happy to be playing.
Look, his sims are gardening :D
Look, two of them are getting married :D
Look, they had a baby :D
Look, his sims are building a rocket ship :D
Look, his sims’s rocket just crashed-
The concept of death hit the little angel right in the face that day.
“*sniffle*... my sims...”
Don’t worry, with tears in his eyes, Luke quit without saving and everything was fine!
Speaking of My Sims, Luke played MySims Sky Heroes and that was when Luke had his first bout of gamer rage.
MC came over to hang out with Solomon and Simeon, and in the distance they could just hear:
“WHAT DO YOU MEAN MY TIME WASN’T FAST ENOUGH TO CONTINUE THE STORY!? I’LL SHOW YOU FAST ENOUGH TIME!”
Okay, maybe Simeon should take the game away... just for a bit... he should take heed not to be bitten by the incredibly angry chihuahua.
Bonus:
MC: Why are our Sims married?
*Insert Boy Here*: Uh... that’s weird... I have no clue why they’re doing that...
#Obey me#obey me headcanons#Obey me!#obey me! shall we date?#obey me! headcanons#obey me shall we date#Obey me Lucifer#Obey me Mammon#obey me leviathan#Obey me Satan#Obey me Asmodeus#Obey me Beelzebub#Obey me Belphegor#Obey me Diavolo#Obey me MC#obey me barbatos#Obey me Simeon#Obey me Luke#Obey me Solomon
562 notes
·
View notes
Text
TS2 Genetics Tutorial
Ok, so you play TS2 and want to be able to see your sim’s genetics while in game like this:

Well it isn’t well known or easy to do because first you have to know that you need to change the game’s config. It’s not enough to turn on ‘boolprop testingcheatsenabled true’ when you’re in the game - it needs to be on before you’re in the game.
But how can you do that, you may ask? It’s actually not too hard:
1. Open a notepad document
2. Write ‘boolprop testingcheatsenabled true’ in the document (you can also add in other cheats you want on by default, I have not done this but others have)
3. Save it: a) named ‘userStartup.cheat’ b) as ‘All Files’ instead of a text document c) in My Documents > EA Games > The Sims 2 Ultimate Collection (or equivalent) > Config
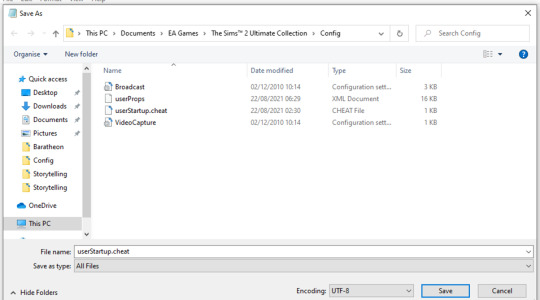
So it should look basically like the above (you can see the one I created earlier which is listed as a ‘CHEAT File’ now as a result).
4. If the above stage has worked, when you load the game and go into a lot you should have the boolprop code in the top right without having touched boolprop in-game yet.
5. With all the above working correctly, type ‘SimDNA [sim’s first name]’ (capitalisation doesn’t appear to matter, ‘simdna lyle’ works just as well) into the Ctrl-Shift-C cheatbox, and the textbox of the genetics should appear!
Additional Notes:
- It will only work with sims presently on the lot, they do not have to live there necessarily, but you can’t do it on sims who are at school or work
- I don’t know if it works on ghosts but will probably find out some day soon while playing >.>
- The first of the two genetics for eyes and hair is the one that you see, the second is the carried hidden gene
- As per my example above, a lot of genetics (especially custom) appear as a string of letters and numbers, so you kind of have to learn what those refer to so you know what it means when not visibly obvious - I have default replacements and custom eyes in, so yours may not match the ones on my example
- If having the cheat(s) on all the time is bothersome, apparently you can turn it off normally in-game once you’ve done what you have to (I don’t know if the simDNA cheat will still work if you then turn boolprop back on again in the same play session though)
- Personally I may not keep it in my files all the time, but I did go through a large neighbourhood I’ve been playing 5 gens and made a note of everyone’s genes, so it’s a nice option to have!
Thank you to the people who boosted my original question and made me aware that this is even an existing possibility, @crispsandkerosene @krabbysims @mayfairsims @rosefyrefyre this website from 2006, and my fiance who knows computers better than me <3
35 notes
·
View notes
Note
Hi! I'm also having MXAO issues. So I have both MXAO and qUINT installed, and qUINT doesn't work at all, but sometimes MXAO does?? But then it randomly turns off. Have you encountered this before?
They aren’t compatible with each other without editing. I don’t know why they’re both included in the general download without explanation, but there we are.
If you only want to use one of them, simply delete the other from the shaders folder. If you want to use them both you’ll need to edit the MXAO shader to change its technique name in a few different places. It’s not difficult, you just have to search for the correct lines to edit.
I’ve done a tutorial before, but I might as well make this an updated one for 4.x
1. Open MXAO.fx in a text editor. I like to use Notepad++ because it sets everything out quite nicely for you.
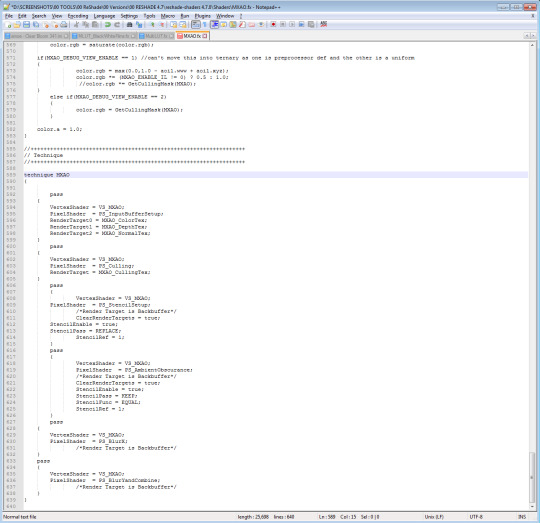
2. Scroll all the way to the bottom to the section labelled Technique.
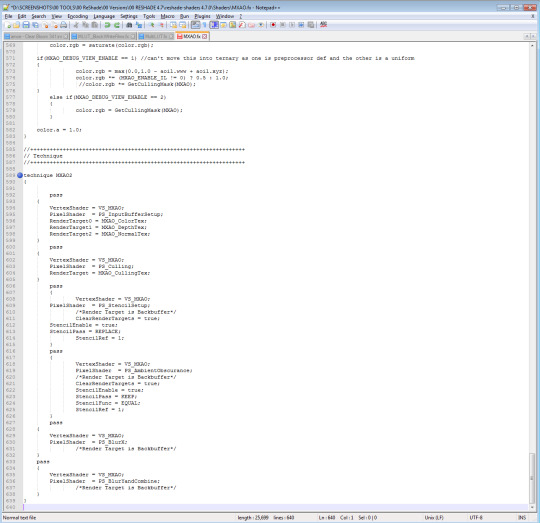
3. Find the line that says technique MXAO and change MXAO to something else. This might be MXAO2 or MyMXAO or whatever you want. For this tutorial I’ll use MXAO2.
Below are two screenshots of before and after editing the shader with these changes. (The blue dot is just to help you see which line I’ve edited.)
Before:
After:
4. Look a little further down the file and find the three lines in the section directly below, that say:
RenderTarget0 = MXAO_ColorTex; RenderTarget1 = MXAO_DepthTex; RenderTarget2 = MXAO_NormalTex;
Now change the MXAO to MXAO2 (or whatever you have chosen), so it now reads:
RenderTarget0 = MXAO2_ColorTex; RenderTarget1 = MXAO2_DepthTex; RenderTarget2 = MXAO2_NormalTex;
5. Go one section down from that and find this line:
RenderTarget = MXAO_CullingTex;
And do the same as above, changing MXAO to MXAO2, so it now reads:
RenderTarget = MXAO2_CullingTex;
Below are two screenshots showing the shader before and after these edits:
Before:
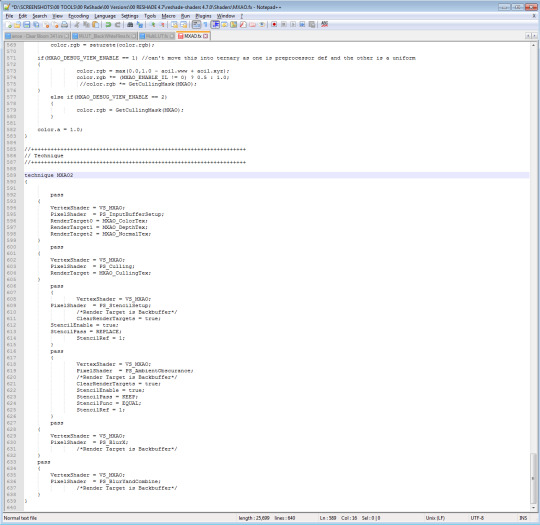
After:

6. Next, scroll up until you find the section labelled Textures, Samplers.
7. Find the lines below, that at the beginning read:
texture2D MXAO_ColorTex texture2D MXAO_DepthTex texture2D MXAO_NormalTex texture2D MXAO_CullingTex
And change the MXAO to MXAO2 so it now reads:
texture2D MXAO2_ColorTex texture2D MXAO2_DepthTex texture2D MXAO2_NormalTex texture2D MXAO2_CullingTex
8. Look directly below and find the lines, that at the end read:
{ Texture = MXAO_ColorTex; }; { Texture = MXAO_DepthTex; }; { Texture = MXAO_NormalTex; }; { Texture = MXAO_CullingTex; };
And change MXAO to MXAO2 so it now reads:
{ Texture = MXAO2_ColorTex; }; { Texture = MXAO2_DepthTex; }; { Texture = MXAO2_NormalTex; }; { Texture = MXAO2_CullingTex; };
Below are two screenshots showing the lines in steps 7 and 8 before and after editing:
Before:

After:

9. Now 'Save As...’ your file with a new name so you can tell it apart from the original unedited version should you need to revert back. It makes sense to call it MXAO2.fx since that’s what we edited the technique name to.
10. Go into your Shaders folder and remove the old MXAO.fx shader (keep it somewhere safe in case you need it again*), and replace it with your newly-edited MXAO2.fx shader. You can now use it alongside qUINT_MXAO.fx without any conflicts.
You can use this method to add additional versions of the MXAO shader if you want. In The Sims 4 I have 3 versions of MXAO.fx and 1 version of qUINT_MXAO.fx all running alongside each other with different settings for different situations. Be mindful that you likely won’t want to have them all turned on at the same time because they’ll make your PC cry.
You can also use this method with other shaders to use multiple versions. I have lots of different MultiLUT.fx files running together, for example. The exact lines you have to edit will change between shaders. The important one is the technique name, as in step 3. From there you should be able to work out, with a little trial and error, which other lines need changing to match this technique name, remembering that it’s often shared textures that can cause conflicts, so that’s where you can start looking and experimenting. Once in a while you might find a shader that only needs the technique line editing. It’s like winning the lottery.
* You should make it a habit to keep a clean, full, unedited backup of the reshade-shaders folder for every version of ReShade you use. You can also keep the dll file (called the binary, will likely either be d3d9.dll or dxgi.dll depending on the game) and the ReShade.ini file for that version together with them. This makes it easy to swap versions in and out without having to go through the installation and download process each time, and ensures should the ReShade creators change how they distribute everything you’re never left in the lurch.
82 notes
·
View notes
Photo

This is part 2 of How to Make TS4 Look Better Without Touching a Photo Editor aka stuff you can do to make the game pop without relying too much on editing photos so you can just enjoy your game.
Part 1: Environment Mods
Part 2: ReShade Installation (this one!)
Part 3: Making your first gameplay ReShade preset (soon!)
This tutorial assumes you have zero knowledge in ReShade or any other postprocessing engine.
Go under the cut to get started.
Reshade 101
First of all, what the flying hell is Reshade?
Reshade is a post-processing engine that further enhances a certain program’s or game’s graphics. Provided that you have a graphics card that can handle these effects, you can do anything like sharpen images or add depth of field, or basically anything you can do with an image editing program.
Once you get these settings tweaked to your liking, they get saved as presets that you can then activate to use that particular combination.
There are many presets you can find around Tumblr, but to keep things simple, we’ll be focusing on creating something you can turn on while you play (since some effects like are quite graphics-intensive and are mainly used for screenshots).
Requirements:
a Windows computer (sorry Mac users!)
(ideally) a dedicated graphics card. You can still probably use Reshade with integrated graphics, but hold off on the extra fancy effects and stick with the basics if this is the case.
Reshade Installation:
Step 0: Turn off the game’s SSAO
Screen space ambient occlusion (SSAO) is the fancy name for how TS4′s 3D engine adds shadows on the fly. Notice how soft the game looks without any editing going on? Part of the magic is due to SSAO!
Now, why would you want to turn off SSAO when you have Reshade installed?
SSAO is quite taxing on your computer’s resources as it has to compute for the effect in real-time.
If you intend to use more advanced effects like MXAO, the effects can clash with SSAO and you wouldn’t get the desired results.
It gets you a nice “blank canvas” to build up effects on.
How to turn off SSAO:
Navigate to your game’s Bin folder (Origin Games > The Sims 4 > Game > Bin)
Open GraphicsRules.sgr in your chosen text editor.
Look for all any lines containing prop $ConfigGroup SsaoEnabled true
Change all instances of true to false.
Save.
Note: You would have to repeat this step every time you install a new patch or do a Repair Game.
Step 1: Choose a Reshade Version
If you want the latest and greatest Reshade and plan on making the most of your graphics card (at the expense of having a more limited selection of pre-existing presets), download the latest version here.
If you plan on trying out existing presets (like wilderbees’s Sumahama preset ), or are using an older computer, I would suggest sticking to version 3.0.8 here.
Step 2: Install ReShade
1. Download your chosen Reshade version and save it to somewhere you can easily access.
2. Once you’ve downloaded the installer, click on the icon to start the process.

3. Click on “Click here to select a game and manage its ReShade installation.”

4. Next, click on Browse.

5. Look for your TS4 Bin folder and select the executable file, then select Direct3D 9 when asked what engine the game uses.

6. This screen should appear once the install is successful.
Step 3: (For Reshade 3.X) Install the Correct Shaders
If you intend on using an older version of ReShade, you will need to do some extra steps to make sure you’re using the right shaders for your Reshade version.
This is because the Reshade installer pulls the latest shaders regardless of what version you’re using. If you don’t use the right shaders, either your effects will stop working, or you won’t get the desired effect.
@pictureamoebae created a handy guide on how to do this step here with links to the correct shaders for Reshade 3.4.1 and 3.0.8 so you don’t need to hunt through the entire Github repository.
Step 4: Testing time!
Open your game, and if all goes well, you should see a black bar on top of your screen that shows that Reshade has been loaded and you will be taken to the tutorial.
And that’s all for Part 2 of this series. For the last part, we will walk through how to make your first Reshade gameplay preset.
188 notes
·
View notes
Text
2020 Videogames
In 2020 I’m newly retired, so I’ve had free time. I think it’s fun to do reviews, so without further ado here’s every video game I played in 2020!
I recommend:
(4/5) Among Us – Very fun. It’s only fun with voice chat with friends, so I’ve only gotten to play once or twice. I’ve been watching it more than playing it. Also free to play for mobile gamers–I’m tired of the “everyone buys a copy” model of group gameplay.
(4/5) Brogue. Brogue is an ascii-art roguelike. It’s great, and it has a nice difficulty ramp. It’s a good “quick break” game. I play it in preference to other roguelikes partly because I haven’t done it to death yet, and partly because I don’t need a numpad?
(4/5) Cook Serve Delicious 3. One of the more fun games I played this year. You get really into it, but I had trouble relaxing and paying attention to the real world when I played too much, haha. I own but haven’t played the first two–I gather this is pretty much just a refinement.
(4/5) Green Hell. Price tag is a bit high for the number of hours I got out of it, but I haven’t finished the story. Great graphics, and the BEST map design I’ve seen in a 3D game in a long time. It feels like a real place, with reasonable geography instead of copy-pasted tiles. I love that as you walk along, you can just spot a cultivated area from the rest of the jungle–it feels more like it’s treating me like an adult than most survival games. Everything still gets highlighted if you can pick it up. I played the survival mode, which was okay but gets old quickly. I started the story mode–I think it would be fine, but it has some LONG unskippable scenes at the start, including a very hand-holdy tutorial, that I think they should have cut. I did start getting into the story and was having fun, but I stopped. I might finish the game some time.
(4/5) Hyperrogue. One of my recent favorites. The dev has made a fair number of highly experimental games, most of which are a total miss with me, but this one is fun. I do wish the early game wasn’t quite as repetitive. Failing another solution, I might actually want this not to be permadeath, or to have a save feature? I bought it on steam to support the dev and get achievements, but it’s also available a version or two behind free, which is how I tried it. Constantly getting updates and new worlds.
(4/5) Minecraft – Compact Claustrophobia modpack. Fun idea, nice variety. After one expansion felt a little samey, and it was hard to start with two people. I’d consider finishing this pack.
(4/5) Overcooked 2. Overcooked 2 is just more levels for Overcooked. The foods in the second game is more fun, and it has better controls and less bugs. If you’re considering playing Overcooked, I recommend just starting with the second game, despite very fun levels in the first. I especially appreciate that the second game didn’t just re-use foods from the first.
(4/5) Please Don’t Press Anything. A unique little game where you try to get all the endings. I had a lot of fun with this one, but it could have used some kind of built-in hints like Reventure. Also, it had a lot of red herrings. Got it for $2, which it was well worth.
(5/5) Reventure. Probably the best game new to me this year. It’s a short game where you try to get each of about 100 endings. The art and writing are cute and funny. The level design is INCREDIBLE. One thing I found interesting is the early prototype–if I had played it, I would NOT have imagined it would someday be any fun at all, let alone as amazing as it is. As a game designer I found that interesting! I did 100% complete this one–there’s a nice in-game hint system, but there were still 1-3 “huh” puzzles, especially in the post-game content, one of which I had to look up. It’s still getting updates so I’m hoping those will be swapped for something else.
(5/5) Rimworld. Dwarf fortress, but with good cute graphics, set in the Firefly universe. Only has 1-10 pawns instead of hundreds of dwarves. Basically Dwarf Fortress but with a good UI. I wish you could do a little more in Rimworld, but it’s a fantastic, relaxing game.
(5/5) Slay the Spire. Probably the game I played most this year. A deckbuilding adventure through a series of RPG fights. A bit luck-based, but relaxing and fun. I like that you can play fast or slow. Very, very well-designed UI–you can really learn how things work. My favorite part is that because it’s singleplayer, it’s really designed to let you build a game-breaking deck. That’s how it should be!
(4/5) Stationeers. I had a lot of fun with this one. It’s similar to Space Engineers but… fun. It has better UI by a mile too, even if it’s not perfect. I lost steam after playing with friends and then going back to being alone, as I often do for base-building games. Looks like you can genuinely make some complicated stuff using simple parts. Mining might not be ideal.
(5/5) Spy Party. One of my favorite games. Very fun, and an incredibly high skill ceiling. There’s finally starting to be enough people to play a game with straners sometimes. Bad support for “hot seat”–I want to play with beginners in person, and it got even harder with the introduction of an ELO equivalent and removing the manual switch to use “beginner” gameplay.
(4/5) Telling Lies. A storytelling game. The core mechanic is that you can use a search engine for any phrase, and it will show the top 5 survellance footage results for that. The game internally has transcripts of every video. I didn’t really finish the game, but I had a lot of fun with it. The game was well-made. I felt the video acting didn’t really add a huge amount, and they could have done a text version, but I understand it wouldn’t have had any popular appeal. The acting was decent. There’s some uncomfortable content, on purpose.
(4/5) Totally Accurate Battle Simulator (TABS). Delightful. Very silly, not what you’d expect from the name. What everyone should have been doing with physics engines since they were invented. Imagine that when a caveman attacks, the club moves on its own and the caveman just gets ragdolled along, glued to it. Also the caveman and club have googley eyes. Don’t try to win or it will stop being fun. Learn how to turn on slo-mo and move the camera.
(4/5) We Were Here Together. Lots of fun. I believe the second game out of three. Still some crashes and UI issues. MUCH better puzzles and the grpahics are gorgeous. They need to fix the crashes or improve the autosave, we ended up replaying a lot of both games from crashes. It’s possible I should be recommending the third game but I haven’t played it yet.
The Rest
(3/5) 5D Chess with Multiverse Time Travel. More fun that it sounds. If you play to mess around and win by accident, it’s pretty good. Definitely play with a second human player, though.
(1.5/5) 7 billion humans. Better than the original, still not fun. Soulless game about a soulless, beige corporation. Just play Zachtronics instead. If you’re on a phone and want to engage your brain, play Euclidea.
(3/5) A Dark Room. Idle game.
(1/5) Amazing Cultivation Simulator. A big disappointment. Bad english voice acting which can’t be turned off, and a long, unskippable tutorial. I didn’t get to actual gameplay. I like Rimworld and cultivation novels so I had high hopes.
(3/5) ADOM (Steam version) – Fun like the original, which I would give 5/5. Developed some major issues on Linux, but I appreciate that there’s a graphical version available, one of my friends will play it now.
(4/5) agar.io – Good, but used to be better. Too difficult to get into games now. Very fun and addictive gameplay.
(3/5) Amorous – Furry dating sim. All of the hot characters are background art you can’t interact with, and the characters you can actually talk to are a bunch of sulky nerds who for some reason came to a nightclub. I think it was free, though.
(0/5) Apis. Alpha game, AFAIK I was the first player. Pretty much no fun right now (to the point of not really being a game yet), but it could potentially become fun if the author puts in work.
(4/5) Autonauts. I played a ton of Autonauts this year, almost finished it, which is rare for me. My main complaint is that it’s fundamentally supposed to be a game about programming robots, but I can’t actually make them do more than about 3 things, even as a professional programmer. Add more programming! It can be optional, that’s fine. They’re adding some kind of tower defense waves instead, which is bullshit. Not recommended because it’s not for everyone.
(3/5) A-Z Inc. Points for having the guts to have a simple game. At first this looked like just the bones of Swarm Simulator, but the more you look at the UI and the ascension system, the worse it actually is. I would regularly reset because I found out an ascension “perk” actually made me worse off.
(5/5) Beat Saber. Great game, and my favorite way to stay in shape early this year. Oculus VR only, if you have VR you already have this game so no need to recommend. Not QUITE worth getting a VR set just to play it at current prices.
(1/5) Big Tall Small. Good idea, but no fun to play. Needed better controls and level design, maybe some art.
(0.5/5) Blush Blush. Boring.
(3/5) Business Shark. I had too much fun with this simple game. All you do is just eat a bunch of office workers.
(3/5) chess.com. Turns out I like chess while I’m high?
(3/5) Circle Empires Rivals. Decent, more fun than the singleplayer original. It shouldn’t really have been a separate game from Circle Empires, and I’m annoyed I couldn’t get it DRM-free like the original.
(3/5) Cross Virus. By Dan-box. Really interesting puzzle mechanics.
(4/5) Cultist Simulator. Really fun to learn how to play–I love games that drop you in with no explanation. Great art and writing, I wish I could have gotten their tarot deck. Probably the best gameplay “ambience” I’ve seen–getting a card that’s labeled “fleeting sense of radiance” that disappears in 5 seconds? Great. Also the core stats are very well thought out for “feel” and real-life accuracy–dread (depression) conquers fascination (mania), etc. It has a few gameplay gotchas, but they’re not too big–layout issues, inability to go back to skipped text, or to put your game in an unwinnable state early on). Unfortunately it’s a “roguelike”, and it’s much too slow-paced and doesn’t have enough replay value, so it becomes a horrible, un-fun grind when you want to actually win. I probably missed the 100% ending but I won’t be going back to get it. I have no idea who would want to play this repeatedly. I’m looking forward to the next game from the same studio though! I recommend playing a friend’s copy instead of buying.
(2/5) Darkest Dungeon. It was fine but I don’t really remember it.
(2/5) Dicey Dungeons. Okay deck-building roguelike gameplay (with an inventory instead of a deck). Really frustrating, unskippably slow difficulty curve at the start. I played it some more this year and liked it better because I had a savegame. I appreciate having several character classes, but they should unlock every difficulty from the start.
(2/5) Diner Bros. Basically just a worse Overcooked. I didn’t like the controls, and it felt too repetitive with only one diner.
(2/5) Don’t Eat My Mind You Stupid Monster. Okay art and idea, the gameplay wasn’t too fun for me.
(2/5) Don’t Starve – I’ve played Don’t Stave maybe 8 different times, and it’s never really gripped me, I always put it back down. It’s slow, a bit grindy, and there’s no bigger goal–all you can do is live.
(3/5) Don’t Starve Together – Confusingly, Don’t Starve Together can be played alone. It’s Don’t Starve, plus a couple of the expansions. This really could be much more clearly explained.
(1/5) Elemental Abyss – A deck-builder, but this time it’s grid-based tactics. Really not all that fun. Just play Into the Abyss instead or something.
(1/5) Else Heart.Break() – I was excited that this might be a version of “Hack N’ Slash” from doublefine that actually delivered and let you goof around with the world. I gave it up in the first ten minutes, because the writing and characters drove me crazy, without getting to hacking the world.
(2/5) Everything is Garbage. Pretty good for a game jam game. Not a bad use of 10 minutes. I do think it’s probably possible to make the game unwinnable, and the ending is just nothing.
(1/5) Evolve. Idle game, not all that fun. I take issue with the mechanic in Sharks, Kittens, and this where buying your 15th fence takes 10^15 wood for some reason.
(4/5) Exapunks. Zachtronics has really been killing it lately, with Exapunks and Opus Magnum. WONDERFUL art and characters during story portions, and much better writing. The gameplay is a little more varied than in TIS-100 or the little I played of ShenZen I/O. My main complaint about Zachtronics games continues to be, that I don’t want to be given a series of resource-limited puzzles (do X, but without using more than 10 programming instructions). Exapunks is the first game where it becomes harder to do something /at all/, rather than with a particular amount of resources, but it’s still not there for me. Like ShenZen, they really go for a variety of hardware, too. Can’t recommend this because it’s really only for programmers.
(1/5) Exception. Programming game written by some money machine mobile games company. Awful.
(4/5) Factorio. Factorio’s great, but for me it doesn’t have that much replay value, even with mods. I do like their recent updates, which included adding blueprints from the start of the game, improving belt sorting, and adding a research queue. We changed movement speed, made things visually always day, and adding a small number of personal construction robots from the start this run. I’m sure if you’d like factorio you’ve played it already.
(3/5) Fall Guys – I got this because it was decently fun to watch. Unfortunately, it’s slightly less fun to play. Overall, there’s WAY too much matchmaking waiting considering the number of players, and the skill ceiling is very low on most of the games, some of which are essentially luck (I’m looking at you, team games).
(3/5) Forager – Decent game. A little too much guesswork in picking upgrades–was probably a bit more fun on my second play because of that. Overall, nice graphics and a cute map, but the gameplay could use a bit of work.
(3/5) Getting Over It – Funny idea, executed well. Pretty sure my friends and I have only gotten through 10% of the game, and all hit about the same wall (the first tunnel)
(3/5) Guild of Dungeoneering – Pretty decent gameplay. I feel like it’s a bit too hard for me, but that’s fine. Overall I think it could use a little more cute/fun art, I never quite felt that motivated.
(1/5) Hardspace: Shipbreakers. Okay, I seriously didn’t get to play this one, but I had GAMEBREAKING issues with my controller, which is a microsoft X-box controller for PC–THE development controller.
(2/5) Helltaker. All right art, meh gameplay. But eh, it’s free!
(3/5) Hot Lava. Decent gameplay. Somehow felt like the place that made this had sucked the souls out of all the devs first–no one cared about the story or characters. It’s a game where the floor is made out of lava, with a saturday morning cartoon open, so that was a really an issue. Admirable lack of bugs, though. I’m a completionist so I played the first world a lot to get all the medals, and didn’t try the later ones.
(3/5) House Flipper – Weird, but I had fun. I wish the gameplay was a little more unified–it felt like a bunch of glued-together minigames.
(2/5) Hydroneer. Utterly uninspiring. I couldn’t care about making progress at all, looked like a terrible grind to no benefit.
(1/5) io. Tiny game, I got it on Steam, also available on phone. Basically a free web flash game, but for money. Not good enough to pay the $1 I paid. Just a bit of a time-killer.
(3/5) Islanders – All you do is place buildings and get points. Not particularly challenging, but relaxing. Overall I liked it.
(3/5) Jackbox – I played this online with a streamer. Jackbox has always felt a little bit soulless money grab to me, but it’s still all right. I like that I can play without having a copy–we need more games using this purchase model.
(3/5) Life is Feudal – Soul-crushingly depressing and grindy, which I knew going in. I thought it was… okay, but I really want an offline play mode (Yes, I know there’s an unsupported single-player game, but it’s buggier and costs money). UI was pretty buggy, and I think hunting might literally be impossible.
(2/5) Minecraft – Antimatter Chemistry. Not particularly fun.
(3/5) Minecraft – ComputerCraft. I played a pack with just ComputerCraft and really nothing else. Was a little slow, would have been more fun with more of an audience. I love the ComputerCraft mod, I just didn’t have a great experience playing my pack I made.
(3/5) Minecraft – Foolcraft 3. Fun, a bit buggy. Honestly I can’t remember it too well.
(1/5) Minecraft – Manufactio. Looked potentially fun, but huge bugs and performance issues, couldn’t play.
(4/5) Minecraft – Tekkit. Tekkit remains one of my favorite Minecraft modpacks.
(3/5) Minecraft – Valhelsia 2. I remember this being fun, but I can’t remember details as much as I’d like. I think it was mostly based around being the latest version of minecraft?
(4/5) Minecraft – Volcano Block. Interesting, designed around some weird mods I hadn’t used. I could have used more storage management or bulk dirt/blocks early in the game–felt quite cramped. Probably got a third of the way through the pack. I got novelty value out of it, but I wouldn’t have enjoyed it if I had ever used the plant mod before–it’s a very fixed, linear progression.
(5/5) Minit. This is a weird, small game. I actually had a lot of fun with it. Then I 100% completed it, which was less fun but I still had a good time overall.
(3/5) Monster Box. By Dan-box. One of two Dan-box games I played a lot of. Just visually appealing, the gameplay isn’t amazing. Also, Dan-box does some great programming–this is a game written in 1990 or so, and it can render hundreds of arrows in the air smoothly in a background tab.
(3/5) Monster Train. A relatively fun deckbuilding card game. It can’t run well on my computer, which is UNACCEPTABLE–this is a card game with 2D graphics. My MICROWAVE should run this shit in 2020. Ignoring that, the gameplay style (summon monsters, MTG style) just isn’t my cup of tea.
(2/5) Moonlighter. Felt like it was missing some inspiration, just didn’t have a sense of “fun”. The art was nice. The credits list is surprisingly long.
(2/5) Muse Dash. All right, a basic rhythm game. Not enough variety to the game play, and everything was based around perfect or near-perfect gameplay, which makes things less fun for me.
(3/5) NES games – various. Dr Mario, Ice Climbers. Basically, I got some Chinese handheld “gameboy” that has all the NES games preloaded on it. Overall it was a great purchase.
(2/5) Noita. “The Powder Game” by Dan-Box, as a procedurally generated platformer with guns. Lets you design your own battle spells. Despite the description, you really still can’t screw around as much as I’d like. I also had major performance issues
(3/5) Observation. I haven’t played this one as much as I’d like, I feel like it may get better. Storytelling, 3D game from the point of view of the AI computer on a space station. I think I might have read a book it’s based on, unfortunately.
(2/5) One Step From Eden. This is a deck-building combat tactics game. I thought it was turn-based, but it’s actually realtime. I think if it was turn-based I would have liked it. The characters were a bit uninspired.
(1/5) Orbt XL. Very dull. I paid $0.50 for it, it was worth that.
(4/5) Opus Magnum. Another great game from Zachtronics, along with Exapunks they’re really ramping up. This is the third execution of the same basic concept. I’d like to see Zachtronics treading new ground more as far as gameplay–that said, it is much improved compared to the first two iterations. The art, writing, and story were stellar on the other hand.
(3/5) Out of Space. Fun idea, you clean a spaceship. It’s never that challenging, and it has mechanics such that it gets easier the more you clean, rather than harder. Good but not enough replay value. Fun with friends the first few times. The controls are a little wonky.
(1/5) Outpost (tower defense game). I hate all tower defense.
(3/5) Overcooked. Overcooked is a ton of fun.
(4/5) Powder Game – Dan-box. I played this in reaction to not liking Noita. It’s fairly old at this point. Just a fun little toy.
(1/5) Prime Mover – Very cool art, the gameplay put me to sleep immediately. A “circuit builder” game but somehow missing any challenge or consistency.
(2/5) Quest for Glory I. Older, from 1989. Didn’t really play this much, I couldn’t get into the writing, and the pseudo-photography art was a little jarring.
(4/5) Raft. I played this in beta for free on itch.io, and had a lot of fun. Not enough changed that it was really worth a replay, but it has improved, and I got to play with a second player. Not a hard game, which I think was a good thing. The late game they’ve expanded, but it doesn’t really add much. The original was fun and so was this.
(3/5) Satisfactory. I honestly don’t know how I like this one–I didn’t get too far into it.
(4/5) Scrap Mechanic. I got this on a recommendation from a player who played in creative. I only tried the survival mode–that mode is not well designed, and their focuses for survival are totally wrong. I like the core game, you can actually build stuff. If I play again, I’ll try the creative mode, I think.
(3.5/5) Shapez.io. A weird, abstracted simplification of Factorio. If I hadn’t played factorio and half a dozen copies, I imagine this would have been fun, but it’s just more of the same. Too much waiting–blueprints are too far into the game, too.
(2.5/5) Simmiland. Okay, but short. Used cards for no reason. For a paid game, I wanted more gameplay out of it?
(0.5/5) Snakeybus. The most disappointing game I remember this year. Someone made “Snake” in 3D. There are a million game modes and worlds to play in. I didn’t find anything I tried much fun.
(1/5) Soda Dungeon. A “mobile” (read: not fun) style idle game. Patterned after money-grab games, although I don’t remember if paid progress was actually an option. I think so.
(4/5) Spelunky. The only procedurally generated platformer I’ve ever seen work. Genuinely very fun.
(4/5) Spelunky 2. Fun, more of an upgrade of new content than a new game. Better multiplayer. My computer can’t run later levels at full speed.
(1/5) Stick Ranger 2. Dan-box. Not much fun.
(3/5) Superliminal. Fun game. A bit short for the pricetag.
(3/5) Tabletop Simulator – Aether’s End: Legacy. Interesting, a “campaign” (series of challenge bosses and pre-written encounters) deckbuilding RPG. I like the whole “campaign RPG boardgame” idea. This would have worked better with paper, there were some rough edges in both the game instructions and the port to Tabletop Simulator.
(4/5) Tabletop Simulator – The Captain is Dead. Very fun. I’d love to play with more than 2 people. Tabletop simulator was so-so for this one.
(2/5) Tabletop Simulator – Tiny Epic Mechs. You give your mech a list of instructions, and it does them in order. Arena fight. Fun, but I think I could whip up something at least as good.
(3/5) The Council. One of the only 3D games I finished. It’s a story game, where you investigate what’s going on and make various choices. It’s set in revolutionary france, at the Secret World Council that determines the fate of the world. It had a weak ending, with less choice elements than the rest of the game so far, which was a weird decision. Also, it has an EXCRUTIATINGLY bad opening scene, which was also weird. The middle 95% of the game I enjoyed, although the ending went on a little long. The level of background knowledge expected of the player swung wildly–they seemed to expect me to know who revolutionary French generals were with no explanation, but not Daedalus and the Minotaur. The acting was generally enjoyable–there’s a lot of lying going on in the game and it’s conveyed well. The pricetag is too high to recommend.
(0/5) The Grandma’s Recipe (Unus Annus). This game is unplayably bad–it’s just a random pixel hunt. Maybe it would be fun if you had watched the video it’s based on.
(3/5) The Room. Pretty fun! I think this is really designed for a touchscreen, but I managed to play it on my PC. Played it stoned, which I think helps with popular puzzle games–it has nice visuals but it’s a little too easy.
(3/5) This Call May Be Recorded. Goofy experimental game.
(4/5) TIS-100. Zachtronics. A programming game. I finally got done with the first set of puzzles and into the second this year. I had fun, definitely not for everyone.
(3/5) Trine. I played this 2-player. I think the difficulty was much better 2-player, but it doesn’t manage 2 players getting separated well. Sadly we skipped the story, which seemed like simple nice low-fantasy. Could have used goofier puzzles, it took itself a little too seriously and the levels were a bit same-y.
(2/5) Unrailed. Co-op railroad building game. It was okay but there wasn’t base-building. Overall not my thing. I’d say I would prefer something like Overcooked if it’s going to be timed? Graphics reminded me of autonauts.
(2/5) Vampire Night Shift. Art game. Gameplay could have used a bit of polish. Short but interesting.
(4/5) Wayward. To date, the best survival crafting system I’ve seen. You can use any pointy object and stick-like object, together with glue or twine, to make an arrow. The UI is not great, and there’s a very counter-intuitive difficulty system. You need to do a little too much tutorial reading, and it could use more goals. Overall very fun. Under constant development, so how it plays a given week is a crapshoot. The steam version finally works for me (last time I played it was worse than the free online alpha, now it’s the same or better). I recomend playing the free online version unless you want to support the author.
(1/5) We Need to Go Deeper. Multiplayer exploration game in a sub, with sidescrolling battle. Somehow incredibly unfun, together with high pricetag. Aesthetics reminded me of Don’t Starve somehow.
(2/5) We Were Here. Okay 2-player puzzle game. Crashed frequently, and there were some “huh” puzzles and UI. Free.
(3/5) Yes, your grace. Gorgeous pixel art graphics. The story is supposed to be very player-dependent, but I started getting the feeling that it wasn’t. I didn’t quite finish the game but I think I was well past halfway. Hard to resume after a save, you forget things. I got the feeling I wouldn’t replay it, which is a shame because it’s fun to see how things go differently in a second play with something like this.
These are not all new to me, and very few came out in 2020. I removed any games I don’t remember and couldn’t google (a fair number, I play a lot of game jam games) as well as any with pornographic content.
2020 Videogames was originally published on Optimal Prime
2 notes
·
View notes
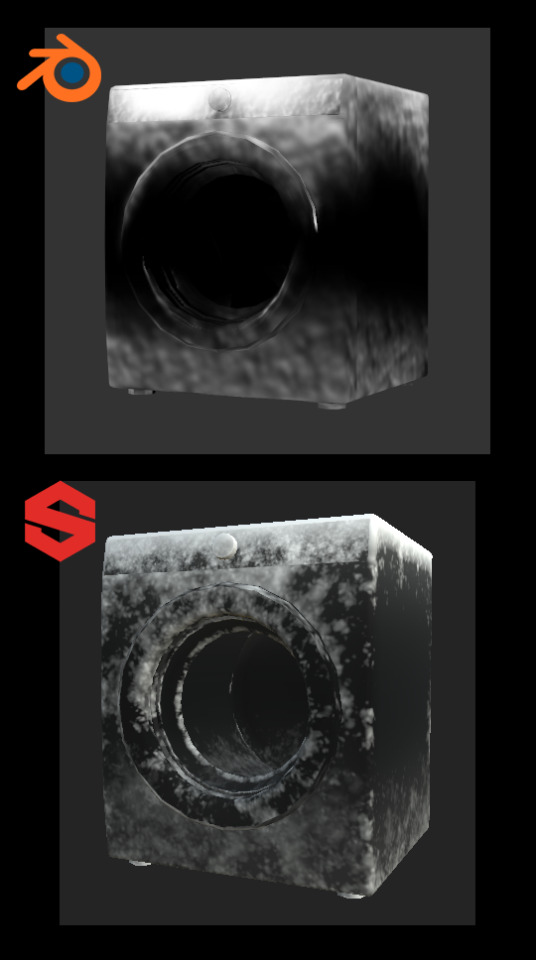
Photo
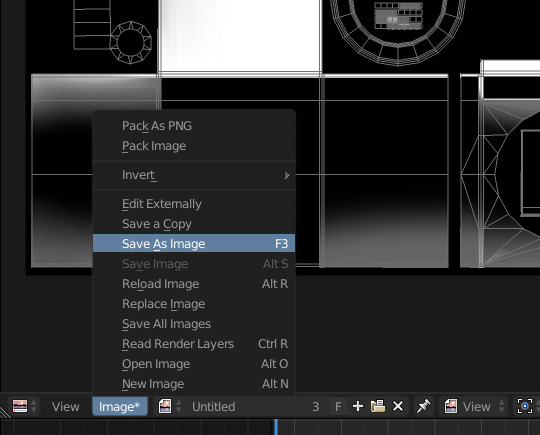
Click on Continue Reading to learn how to create Snow Masks for The Sims 4 objects.
After The Sims 4 Seasons came out, some object were provided with a Snow Mask. It’s a black and white mask with pretty high contrast, used for objects that, in real life, would have more complex snow accumulation than what the automatic accumulation can achieve. Some objects have a void snow mask, which is pretty annoying. If there is a snow mask for an object, i always use it, and these are my methods.
This tutorial teaches you some methods to make this map easily and quickly.
Hopefully, the GIFs work 🤣

Requirements: - Your mesh has to have a UV Map; - You must decide a texture size and stick to it, you can always size down but never up; - You must switch to the Cycles rendering engine.
Procedure:
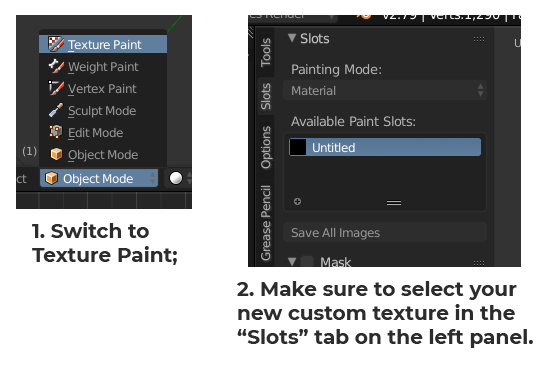
Open your Blender file with the object we’re going to design the snow mask for. Once you’ve opened the file, open yourself a UV editor tab and create a new texture with the size of your diffuse texture. The texture we’re going to create is going to be black:
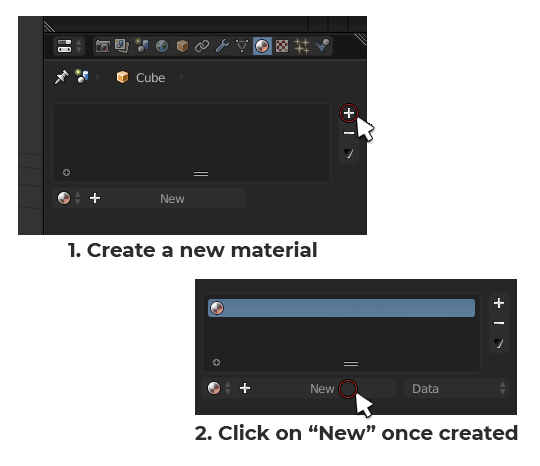
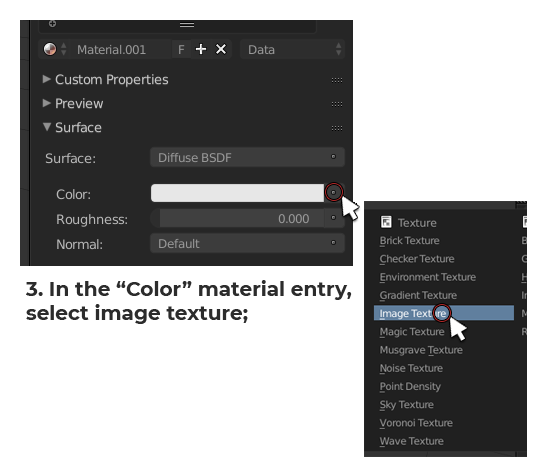
Once you have your texture, we can start painting. Let’s create a new material for your mesh. Click on your mesh and reach the materials panel:
Now that the texture is inserted into the material, we can paint on it. Let’s switch to Texture Painting. Select your mesh and press [DEL] on your keyboard Numpad to center the view on it. Once you’re done doing that, this is how to enter Texturing painting mode:
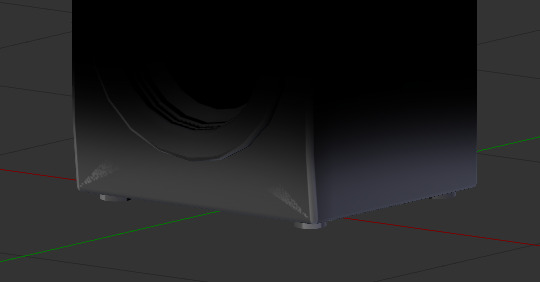
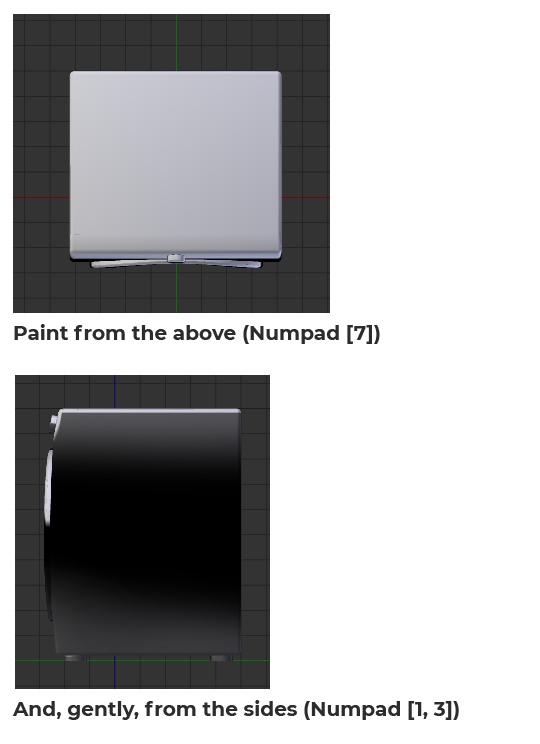
We’re ready to paint. To create a snow mask, you want to cover the base of the mesh a bit to simulate the frosting of the surface caused by the freezing snow on the ground but also the top surface to simulate the snow that has fallen onto the object from the sky. The best way to do so is, first of all, by going into Orthographic view. Having no perspective in the scene will help you minimize the bleeding of your painting. To switch to Ortho, press [5] on your keyboard Numpad.
Let’s paint the front first. Press [1] on your keyboard Numpad to switch to front view. Let’s adjust our brush before painting. Adjust your brush size and strength according to what are you’re trying to cover.
For the bottom portion of the object you want to have a big brush and a lower strenght (around 50% the original default strenght) in order to use just the feathered out end of it for a softer stroke.
Repeat this for all sides! Don’t worry too much about being too even with the height of your strokes, we’re gonna blend them together after we’re done painting them.
Once you’re done, it should look something like this:
Let’s even out these harsh edges and, occasionally, painting artifacts. Grab the “Smear” brush in the brushes toolbox:
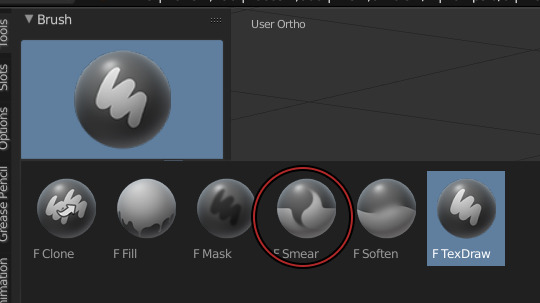
Smear the edges until completely smooth. Do this for all sides.
Once you’re done with the ground snow, paint the sky snow. To do that, grab your Texdraw brush back and follow these steps:
And then, smear it all!
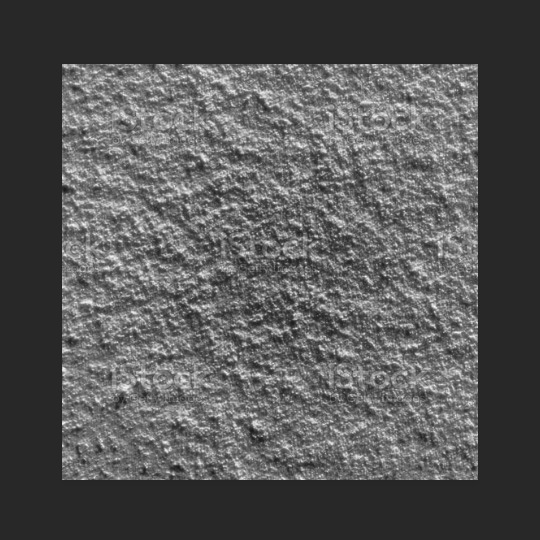
Once you’re done doing that, save the texture and open it in Photoshop. I’m assuming you know how to export a texture from Blender as a PNG and then opening it in Photoshop.
Once you have your texture open in Photoshop, i want you to google a Snow texture, fairly big (big enough to fit the size of your texture).
Insert it in your PS document as a new layer and put it over the snow texture you painted earlier. Now turn that snow texture black and white (even if it seems to be already, there’s probably some colored pixels due to compression here and there).
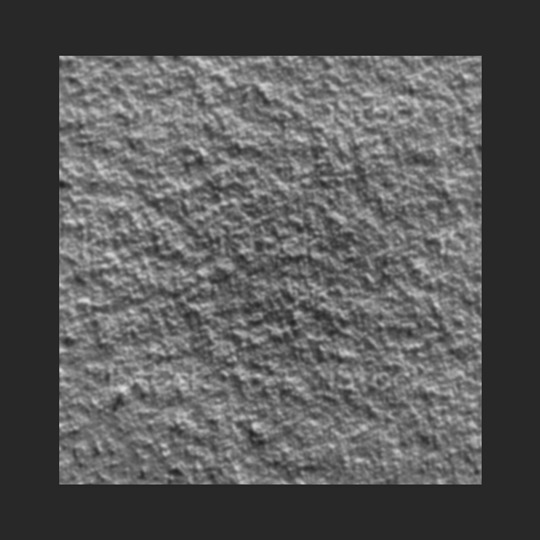
Now open the Levels sliders and achieve this look by sliding the middle slider on the right or left (depending on your picture):
Now, use gaussian blur to feather it out a bit and make it less harsh and Alpha like, we’re going for a maxis match look. If you want an alpha look, skip this step. This is how it looks after blurring it:
Now, go to the blend mode of this layer and set it to Overlay. I’m assuming you know what this means.
If it needs further smearing, go ahead and do that to remove visible seams. If it needs opacity adjusting, you can do that as well. Add a pitch black layer over everything in photoshop and adjust it’s opacity to make the snow more or less visible.

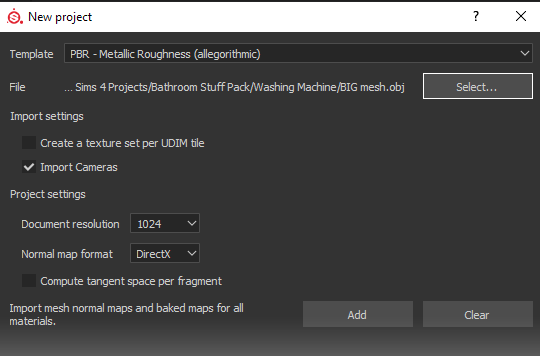
Substance Painter is a product under paid license by Adobe. My university provided me with a license, however, you can use the trial version to experiment with it.
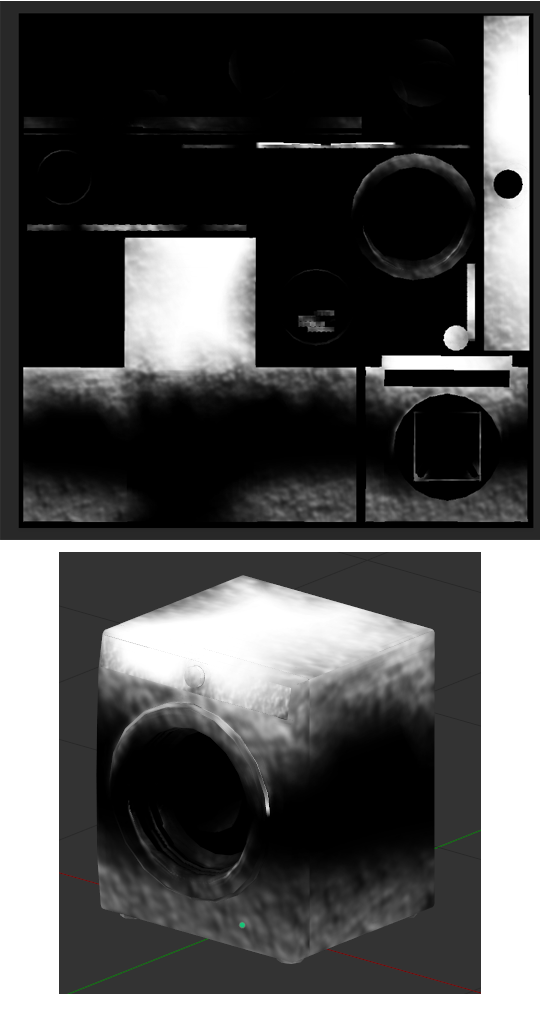
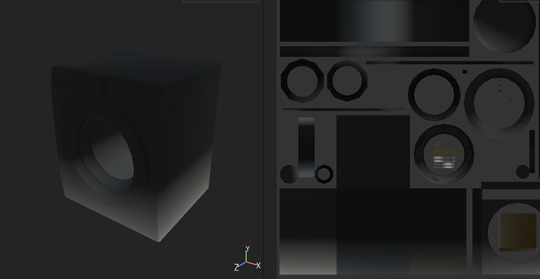
Import your mesh into substance painter, without any additional texture (don’t click on ADD):
Add two fill layers and uncheck every single material property except for “Color” and “Roughness”. The top material will be white, the bottom one will be black. Turn the roughness of both material to 100%:
You can rename your fill layers if it makes it easier for you to keep track of what you’re doing. I suggest renaming the white one “Snow” and the black one “Background”.
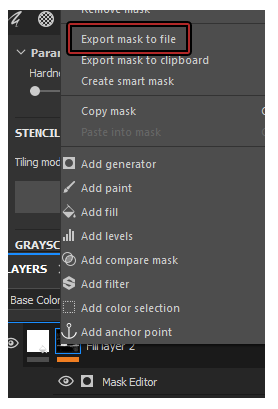
Now, let’s add a few a masks to make it look like what we’re trying to achieve. Right click on the snow material and select “Add Black Mask”. Now, right click on the mask and select “Add Generator”:
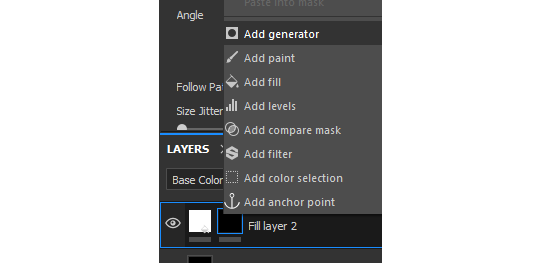
Generators are dynamic masks that can be fully controlled by the user to achieve multiple types of dirt.
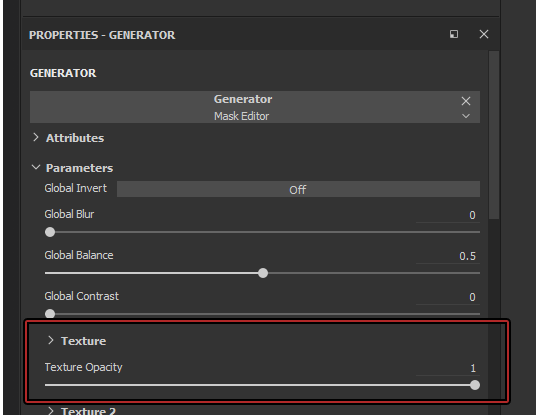
For our snow, we’ll begin with the ground generator, for the frosted surface starting from the bottom. Click on the generator entry that was created and assign it a “Mask Editor”:

If you scroll all the way down inside the Mask Editor options, you will notice our mesh has absolutely NO baked texture:
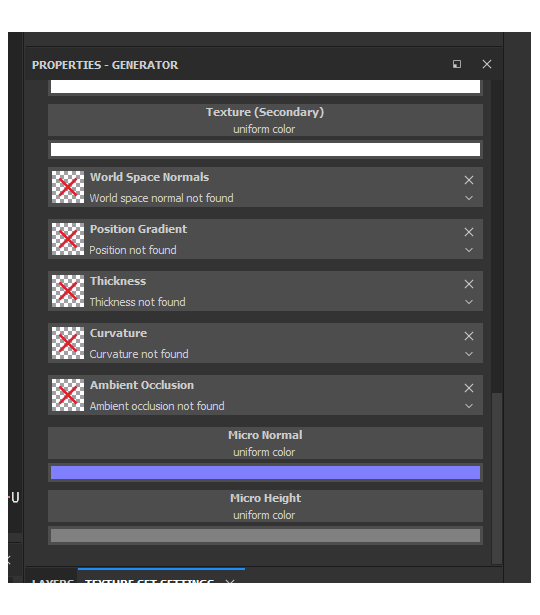
To operate, the Mask Editor needs these textures, so we’re gonna bake them. In order to do so, switch over to the “Textures” tab:

This is what your Baker window should look like:
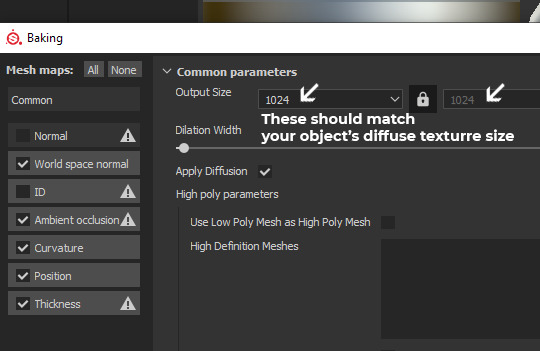
You can now click on [Bake DefaultMaterial Mesh Maps]!
Once the bake is finished, your Snow fill layer should look a little different, cause the Mask Editor received the recently baked textures. Now we can edito the Mask Editor properties. We are starting by creating the bottom frost layer, so let’s get to it.
By default, in the Mask Editor settings, the Curvature value is turned on all the way. Slide the slider to 0. Instead, activate the Position Gradient value. By default, the position gradient goes from top to bottom. To invert this flow, the handy Invert button is there for us. Switch Invert from off to on. Since we inverted the mask property, the Brightness slider will still do its job, but the other way around. Increasing the brightness will decrease the opacity of the snow mask. Now, play around with the Balance and Contrast sliders until you achieve a similar look:
Balance: 0.09; Contrast: 0.22; Brightness: 0.57;
We now have the perfect base to work on some details, a nice linear bottom to top gradient. Now, scroll down to the texture area of your Mask Editor. You’ll notice there’s two empty slots, called just “Texture”:
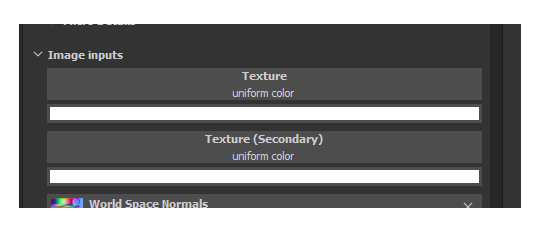
You can fill these in with “Grunge maps” (detail textures in black and white) to add variation to anything in the Mask Editor. Let’s fine one that suits our project the most.
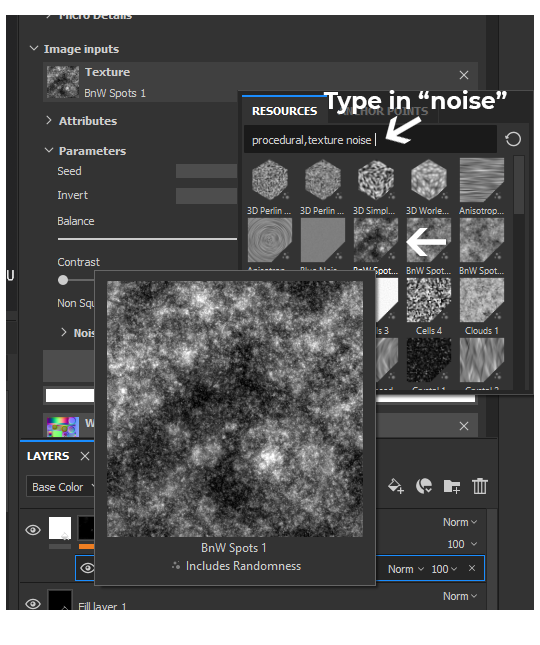
This randomizable texture called “BnW Spots 1″ seems to be a good starting point, it looks like it could be interpreted as a frosty snow, let’s click on it and add it to our “Texture” slot.
To make our “Position Gradient” influenced by the newly added texture, you’ll need to turn up the “Texture Opacity” slider in the Mask Editor global settings at the top:
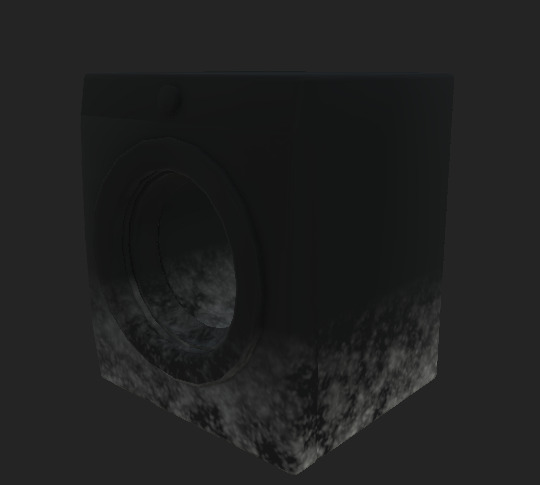
The result is now undeniably better:
Looking good so far! Now, you can play around with the Texture’s Balance and Contrast in the Texture Slot and see changes happen live:
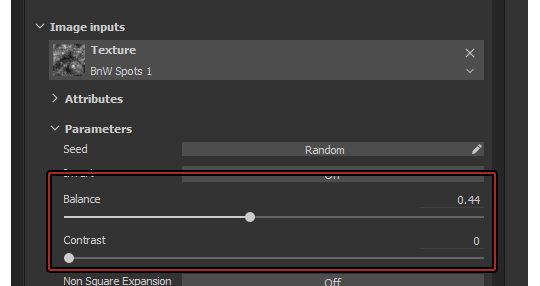
Decide what looks good to your eyes, this is 100% subjective! It’s looking really good, but you can still see a clear ending point of the gradient!

To fix this issue, you’re gonna have to play around with the Balance and Contrast of the entire Mask Editor, which are located at the top of the Mask Editor options:

Repeat the same process for the top portion of the snow (the fallen down from the sky type), just without turning on Invert obviously. You can right-click on the mask and add another Generator. Just make sure to set your second Generator to Add onto previous layers!
You can also turn on some “Curvature” (the one we previously disabled) on the top snow Generator to make it even frostier:
In my final product, i added another two generators, with no texture, to add some more gradienty frostiness to the whole texture.
Once you’re done, export your mask and save it as a file. Put “.png” at the end of the file name!
And you’re done!
#the sims 4#sims 4#ts4#s4#the sims 4 tutorial#sims 4 tutorial#ts4 tutorial#s4 tutorial#the sims 4 snow#the sims 4 snow mask#sims 4 snow#sims 4 snow mask#ts4 snow#ts4 snow mask#s4 snow#s4 snow mask#the sims 4 seasons#sims 4 seasons#ts4 seasons#s4 seasons#tutorial
71 notes
·
View notes
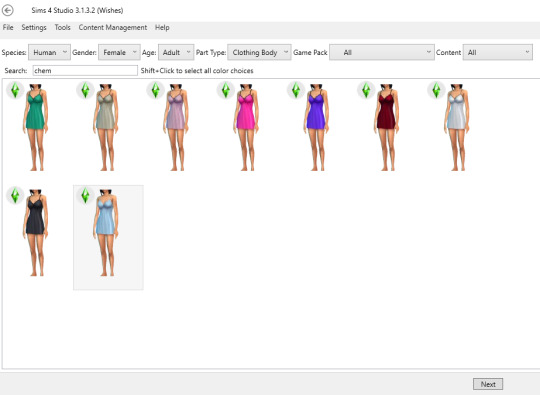
Text
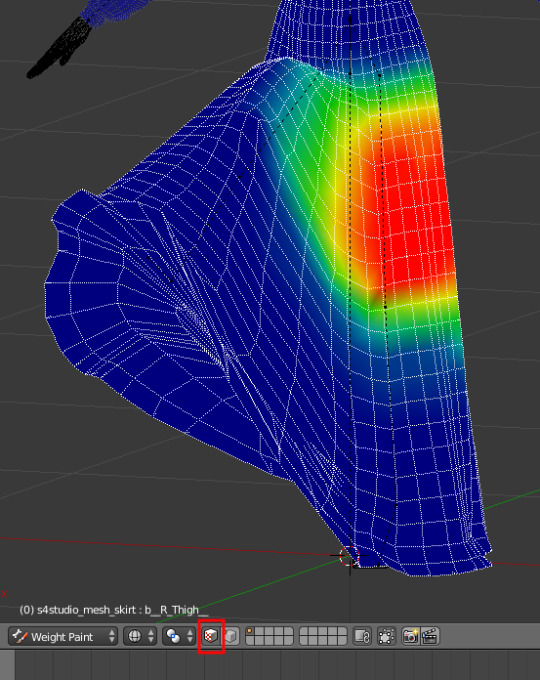
Weight Painting
Note: Please don’t reblog this, I only posted it here because someone requested it and the private link wasn’t working - it’s a WIP and I have like zero time to actually fix it. Thank you. <3
I’ve noticed a lot of people struggle with weight painting, which I empathize with – not understanding weights kept me from making the kind of CC I wanted to make for years! Most CC tutorials don’t really explain much beyond «do a weight transfer», which isn’t always sufficient, so I decided to write up what I do when I weight paint. I’m sure there are ways of doing this that work just as well (and better!), but through copious trial and error, this is what I’ve found works for me.
I’m mostly going to focus on long dresses and gowns (aka 90% of my CC), but a lot of this should be useful for other types of CC as well.
This isn’t going to be a full, detailed guide to weight painting because, honestly, I don’t actually understand Blender that well. I’m also not going to cover meshing, UV maps, basic weight transfers and stuff like that – if you need advice on those things, check out the Sims4Studio forums. :)
I use Blender 2.76 – things might work/look different in other versions!
1. Vertex groups and mesh explosions
Okay, so this was without a doubt my biggest hurdle back in the day. My meshes kept getting all spiky and deformed in game and I couldn’t for the life of me understand why.
Turns out vertex groups are, like, really important. This is probably obvious to a lot of people, but it took me about two years to figure out, so I’m gonna talk about it.
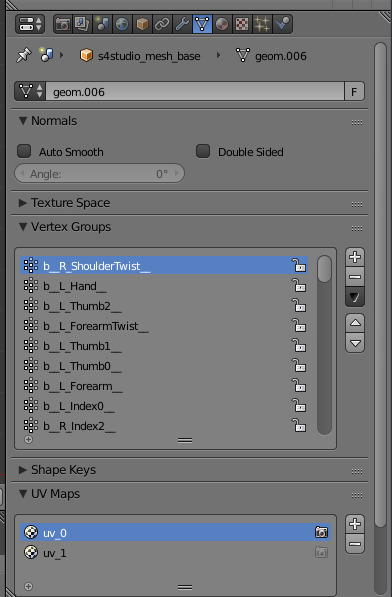
Your mesh needs to have the same vertex groups as the base mesh you’re cloning, and not all EA meshes use the same ones. If you’re doing a weight transfer from the mesh you originally cloned, this shouldn’t be a problem. Most tutorials will tell you to clone an EA package that’s as similar to yours as possible, and this is a huge part of the reason for that.
However, I don’t do that! This is because I don’t want to use too many mesh cuts (for a guide to mesh cuts, look at this Sims4Studio guide) because they confuse me. In fact, I clone 99% of my dresses from the base game chemise so that they’ll be both base game compatible and only use one mesh cut.
Now, the chemise looks nothing like a gown, so if I was going to do a weight transfer from that for a long dress, it... wouldn’t work. That means I have to use something else, and that means paying attention to vertex groups. Let me explain why.
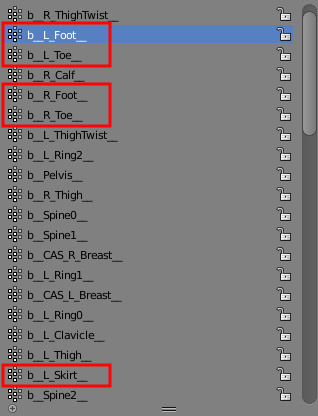
If you export the chemise and open it in Blender, you can see the list of vertex groups on the right. If you try to import a mesh that has additional vertex groups into your package, you’ll get distortions and weird spikes in-game. Most notably when it comes to making long dresses, the chemise does not have Skirt, Foot or Toe bones, but most of EA’s long dresses use one or more of these. So, for instance, if you do a weight transfer from this Holiday Celebration gown:
And import the mesh into a package cloned from the chemise...
Your result will be something like this:

This is because these vertex groups don’t exist in the original cloned mesh:
The easiest way to avoid this is, as I already mentioned, cloning and doing you weight transfer from the same mesh. A lot of the time, that’s going to work just fine. As I also said, though, I don’t do that. So what do I do instead?
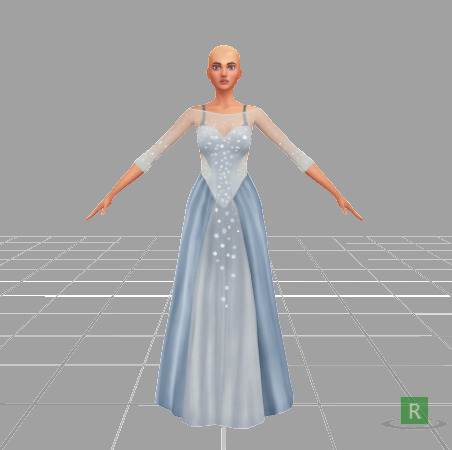
2. How to manually fix weights
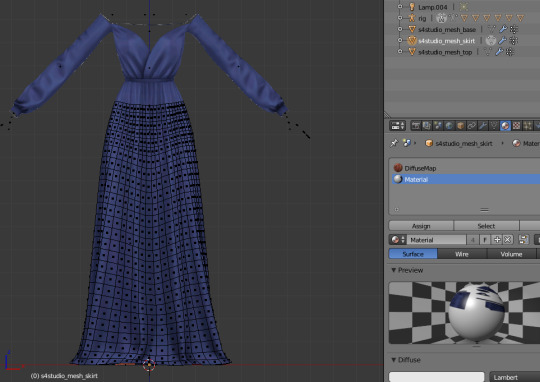
This is the dress I want to weight paint. My .package file is cloned from EA’s chemise. As you can see, they look nothing alike.

Now, I’ve been doing this for a while, so I already have an old piece of CC that I can do a weight transfer from that’s not going to have any vertex group issues (full disclosure: all my skirt weights these days are transferred from my Hannah dress and then adjusted slightly). For the purposes of this guide, however, that’s not how I’m doing it.
The first thing I’ll do is separate the dress from the body so I don’t mess up any weights unnecessarily. Then I’m going to split the mesh one more time so that I can do individual weight transfers for the top and the skirt.
I do this because it’s usually really hard to find a mesh to do a transfer from that’s similar enough to both parts to give a good result, and since I’m aware of what vertex groups I can use, this isn’t going to be a problem. Sidenote: I also recommend splitting meshes like this for UV1 transfers.
Next, I need to find base meshes to do weight transfers from. For the top, I almost always use this base game sweater because, in my experience, it works for almost anything:
Finding a long dress or skirt is harder, though. I don’t want to use the Skirt, Foot or Toe bones, but just about all EA meshes use them. So what I’m going to do is find a mesh that uses them anyway and then manually remove them.
Note: If you’re completely new to weight painting, you’re going to be much better off finding meshes that use the same bones/vertex groups! I’m doing it this way to demonstrate manual weight painting and editing in general, not the most efficient way of weight painting this particular dress.
I’m going to use the long gown from the Holiday Celebration pack because the skirt has a similar-ish shape.
Let’s take a look at the vertex groups in Blender. This has a lot of bones that I don’t want, but okay!
The next step is to do weight transfers as usual, which I’m assuming I don’t need to cover. Merge the mesh back together (if you split it), and let’s talk about the most important, magical, amazing button in all of weight painting. That’s this one:
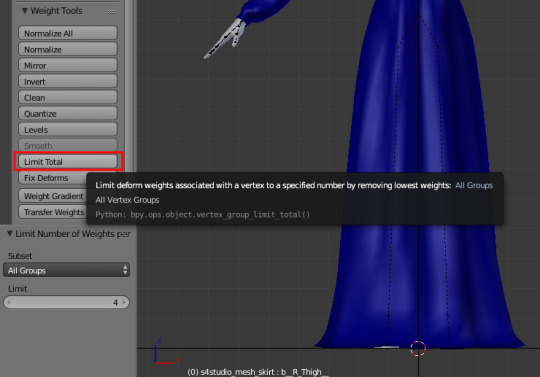
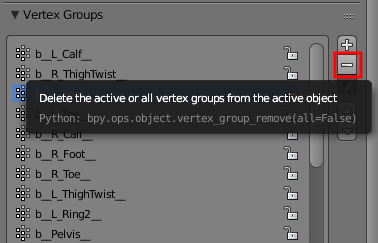
See, The Sims 4 only allows vertices to be attached to 4 bones and automatically limits them if there are too many. This can result in weird deformations and spikyness in-game. However, Blender’s «Limit Total» button will, well, limit the number of bones per vertex for you. You can do this manually as well, of course, but I very, very rarely feel the need to. Generally, using this tool regularly during weight painting will fix SO MANY problems. Click it immediately, and keep clicking it every so often.
Next, I’ll pose the rig so I can see what the mesh is going to look like when it moves. This looks pretty good right now, but of course, it’s not going to look like this in-game because it has too many bones. It also looks pretty jagged and doesn’t move very smoothly.

Let’s start with the vertex groups. What I’m going to do next is straight up delete the groups I don’t want. In this case, that would be the Skirt, Foot and Toe bones – compare it to the vertex groups in your cloned mesh if you’re not sure.
Then hit «Normalize All». We just removed a bunch of weights without replacing them with anything, which will result in a whole bunch of weirdness and deformations. Normalizing the weights will automatically make sure all the vertices have the right values to work properly.

Once I’ve got that sorted out, it’s time to do the actual painting. In this case, what I want to do is smooth out some of the jaggedness and fix some spikes that have appeared.
In this case, there appears to be a problem with the left calf. The bone related to this is named, appropriately, enough, b_L_Calf. By clicking this vertex group in Weight Paint mode, we get an view of how the weights are painted on the bone.
Note: All the vertex groups are quite reasonably named. If there’s a problem with the shoulders, for instance, the b_L/R_ShoulderTwist bones are most likely the ones that needs fixing.
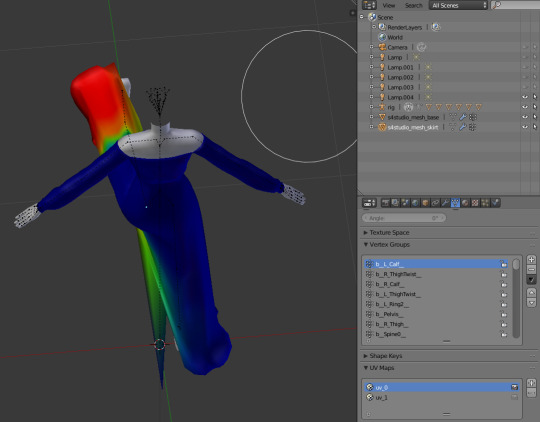
Dark blue means the vertexes aren’t weighted to the bone, red means they’re heavily weighted to it. In the image above, it looks like the weird spike should be moving with the rest of the calf, but it’s hasn’t been painted to do so.
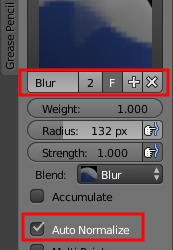
There are a couple of ways to fix this, the easiest of which is probably using the «Add» Weight Painting Tool. The exact settings aren’t super important and fairly intuitive, so go ahead and play around with them. Make sure Auto-Normalize is active, though. Then use the tool on the offending vertex, and the weird spike disappears.

The Blur tool is by far the one I use most, though, and it works great for things like this as well. It gives you less precise control than the Add/Subtract tools, though, so it’s mostly a matter of preference.
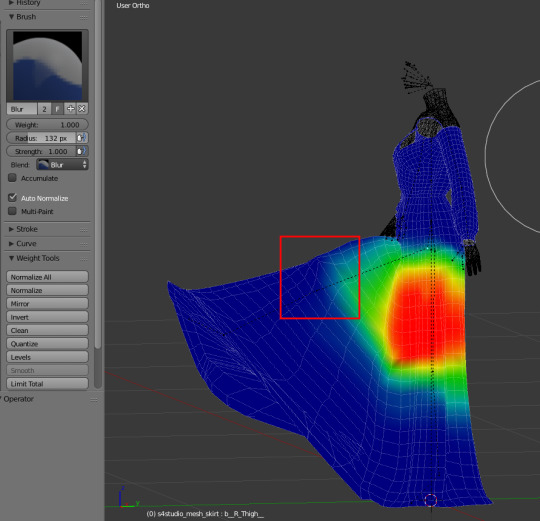
My next step is going to be smoothing out some jagged edges with the Blur tool, starting with the upper thigh area, which has some spikyness going on.
Note: The mesh I weight transferred from doesn’t use the Thigh bones at all, so with the Skirt bone gone, the skirt is purely weighted to the ThighTwist and Calf bones. This is how I weight paint long, flowy dresses as well. These types of meshes don’t really require a precise distinction between the Thigh and ThighTwist bones, and it’s easier to weight paint two vertex groups than three. Tighter and shorter dresses generally require using all three, though.
To make sure you don’t accidentally start weight painting the arms or unrelated parts of the mesh, you can select the part of the mesh you want to focus on in Edit mode and activate Face selection masking for painting by clicking the tiny red/white cube at the bottom of the screen in Weight Paint mode.
So, back to the actual weight painting – once you understand the basics, it’s really not that hard. Here, I’ve selected the different bones on the leg (b_R_ThighTwist, b_R_Calf b_Pelvis near the top) and gone over them with the Blur tool, and it looks much smoother already.
The next step is to do this, well, everywhere! This involves moving the rig into different positions to see how the mesh moves and rigorous use of the «Limit Total» button to make sure what I see in Blender is what I’m going to see in-game.
I’m not going to give a step-by-step guide here because it’s basically just the same steps over and over until I get a result I’m happy with – using the Add, Subtract and Blur tools on the appropriate vertex groups where I want to fix something, and hitting Limit Total a. lot.
Once I’m happy with how it looks in Blender, I’m going to import my mesh into Sims4Studio and test it in-game...

Aaaand we have a working dress. :)
6 notes
·
View notes
Photo


Baby Fox: A Reshade Preset [for 3.3.2.290]
about:
i wanted something to give me an autumny look without having to constantly change psds. this reshade is soft and bright, but also has a slight sepia tint.
this picture was taken in autumn in the morning. the wheather was windy.
this reshade is able to be used with gameplay depending on your pc! if you want to use it with gameplay, please make sure to turn off all the extra effects so your game will run smoothly.
hotkeys:
- depth of field - caps lock
- mxao - 9
- cartoon effect - shift + 1
- ambient light - L
- levels - shift + L
- magic bloom - B
- border - shift + B
- sharpen - shift + S
- there are also more in depth options that you can mess about with and toggle on and off for more experiences users. press shift + F2 to access them
important:
- this is not a mod!!! do not put it in your mods folder!!!
- preset goes in: C:\Program Files (x86)\Origin Games\The Sims 4\Game\Bin folder!
- you need reshade for this to work!! download the latest version here!
- a reshade installation guide can be found here!
- if you have a reshade that is an older version and you don’t want to update it, and your depth of field of mxao doesn’t work, follow this tutorial to fix it!
download - simfileshare [no ads]
721 notes
·
View notes
Text
Replies!
Sorry sorry that it has been such a long time, let‘s get straight to the point!
Anonymous asked: I just wanted to thank you so much for your great content - especially the seasonal fields! Really takes my game to 11 :)
Thank you very much! Glad to know the hard work was worth it!
atomtanned asked: I'm so excited for the Clean UI project! I use one of your loading screens and I love it. I wanted to offer to test any parts of the project if you need additional testers, or maybe I can help in another way. Regardless, thanks for your creations and helping this old game feel new and fresh!
Hey thanks for the offer! I think right now it would be easier if I test my modifications for myself. But maybe when the project comes to an end, I might be looking for some testers. Then I will come back to you!
Regarding the status of Clean UI: I’m not always working on it, but that doesn’t mean that it won’t be released. It will just take a very long time. But I’m sure that even in 5 years (don’t worry, not that long) there are still plenty of people playing Sims 2. So time is not running out! With that said, I can skip some asks :D
Anonymous asked: Hello! Do you plan to change things like the speech balloons and icons with Clean UI? Like, redraw them? Oh, and, congrats for the work! People like help to keep Sims 2 alive and equal/better than its successors!
Thanks! I’m not sure. I think redoing speech balloons won‘t be that much work, but the icons? I don’t have them right in front of me, but I‘m sure there are thousands of them. Without any automation, I won’t be up to the task I guess.
primaverasims asked: Hi! I have a similar problem with skyboxes like the anon from earlier. I have quite a few (yours, lowdeus', others), and I installed everything necessary for it to work. And they work great! My only issue is that they cut away when I'm in lot view whenever I move outside the lot boundary line (I have lowdeus' custom camera compilation). The skybox doesn't get 'eaten', it just vanishes (the regular sky shows up) unless I go back inside the boundary line. Is this normal?
Seems like you’re referring to this post. I’m a bit clueless. It sounds like you didn’t set the Fade Distance option correctly - but I’m sure you already followed the tutorial. Maybe someone who can help? Or perhaps your problem was already solved - which is not unlikely after... two months? :D
Anonymous asked: Do you use the sims 2 ultimate collection or disks?
I use the Ultimate Collection from Origin. But I also have the base game and expansion packs disks! Don’t know if it still works, but once you could chat with the Origin support to receive the UC. You just had to prove that you have some original disks.
Anonymous asked: Hey i'm recreating a NeighborHood called LittleHaven from TheSimsSocial, it's supposed to be telling what happened through the timeline and connecting it with The Sims 4 Story with a solid explanation. It's gonna have new characters but is mantaining the main ones such as Bella Goth, Chloe, Scarlett etc. do you mind if i use something of your content? The farm fields and skylines are top tier and look fantastic [...] i'm obviously gonna give you credit
Oh I’m so sorry for the late reply! Yes, anyone can upload their creations with my CC, as long as I’ll be credited for that! So go for it!
frenchifries asked: hey i was just wondering if you knew how to make certain graphic settings 'stick'? for instance i like to turn off the fade distance and disable object hiding, but when i quit the game and open it again those settings revert to their default state. i looked through the graphics rules document and i couldn't really figure out if there was a way to make any of those settings 'default' so to speak.
Huh that’s weird! Normally it will be saved when you hit the button in the options. Or do you mean a cheat like “lotSkirtSizeIncrease 120″ that enlarges your view during the game session? In that case you would have to write that cheat in the userStartup.cheat so it sticks and will be called when the game starts.
nobbin-wiv-all-the-muckety-mucks asked: Hi! I love love loove your horizons! I was wondering if you had any plans to make - or have already made or know of any, I looked but couldn't find any - a city skyline as a horizon? I make a lot of cities and I'd love to be able to have a skyline in the background :)
I would love do to that, but the 3D model is not suited for that. Everything will be stretched and look weird. It would take a new model for that. Let’s see if someone comes up with that in the future!
Anonymous asked: Hi, I have a question about your Skyline or Skyboxes in general. This is my first time using them in Sims 2 and I'm trying to figure out how to cover the gap in neighborhood. There's this dome shape mesh around my neighborhood (the skyline/skybox) and there's a gap not filled in (shows maxis blue sky). How would I go about fixing that?
You mean the gap on the ground? Hmm, I don‘t think there‘s a ‘fix‘ for that. It’s because the skylines/skyboxes are dome objects and only cover the upper half. You would have to alter the model (like clone a dome and flipping it, then applying a grassy texture to it) buut - that would be too much work for just filling the gap if you ask me!
Longest reply session ever! I hope I could satisfy your request if they didn’t get solved already. Next time I‘ll try to reply earlier. Oh and by the way: Yes, I got my laptop and it’s lovely! It even has a plumbob green keyboard lighting!
6 notes
·
View notes
Text
Wpe Pro No Virus

Download Wpe Pro No Virus
Wpe Pro Download No Virus
Wpe Pro Download No Virus
Reviews of wpepro.net from the Norton Safeweb community. Norton Safeweb is a reputation services that scans websites and reports whether they are safe for you to visit. WPE Pro (PC) Tutorial: 1. Download WPE Pro and CCProxy 7.2 (version is important) to your PC. Google Search will help you find both. Have your rooted android and download ProxyDroid 3. Open CCProxy, allow firewall and admin permission 4. Open WPE Pro AS ADMIN and Attach to CCProxy 5.
ltseoseots.netlify.com › 〓〓〓 Wpe Pro 0.9 Free Download No Virus
Usage Statistics for communitygaze.com Summary Period: May 2016 - Search String Generated 08-Oct-2017 02:08 PDT. WPE Pro Free Download. Shareware: You can try this program, but this version has some limited features or time usage restrictions. Wpe Pro 0.9A Download [2016] [Updated. A long time and there are no viruses. The antivirus may think its a virus because. Download Wpe Pro FREE. Winsock Packet Editor (WPE) Pro 0.9a for Windows 2000 / XP / Vista Download: Download Winsock Packet Editor (WPE) Pro 0.9a. My virus-scanner told me that it gots. Find related downloads to Wpe Pro freeware and softwares, download Sound Forge Pro. Free Download Search All our. Free Antivirus 2014.
Examples: • A packet sniffer for a token ring network could detect that the token has been lost or the presence of too many tokens (verifying the protocol). • A packet sniffer could detect that messages are being sent to a network adapter; if the network adapter did not report receiving the messages then this would localize the failure to the adapter. • A packet sniffer could detect excessive messages being sent by a port, detecting an error in the implementation. • A packet sniffer could collect statistics on the amount of traffic (number of messages) from a process detecting the need for more bandwidth or a better method. • A packet sniffer could be used to extract messages and reassemble into a complete form the traffic from a process, allowing it to be reverse engineered.
Free Download Music
Maybe someone can help me a little. 0 Replies - Lineage 2 hallo ich hatte mal die frage, undzwar wollte ich wissen wozu die filter beim wpe pro sind??? Also ich les nur in den tuts gelesen wie das wpe'n. 1 Replies - Ragnarok Online.
• Winsock Packet Editor (WPE) Pro 0.9a for Windows 2000 / XP / Vista Download: Download Winsock Packet Editor (WPE) Pro 0.9a Note: this download keeps getting classed as a false positive, so we have had to upload it else where to stop Digiex been flagged as malicious website Download from here: If the link is ever down please let us know and we will re upload it. WPE Pro Latest Version: 0.9a Operating System: Microsoft Windows XP, Windows Vista, Windows 7 WPE Pro is a packet editor. Super mario bros rom gba.
This is what WPE Pro is here for. The tool comes with lots of features that are geared toward mastering packets coming from/to your network. One of these features is the network analyzer. This analysis is appropriate for finding potential issues with the network.
This wideo show u how to downlaod wpe pro for free and without.viruses.Only one wideo that shows u link of wpe pro without wiruses,and of course this is NOT SCAM.When u downloaded it the your antivirus will detect trojan.All you need to do is to turn off your antivirus.and u can use it!!!!! The use depends of your antivirus if u have:-Amon nod 32,and AVG 7.5,8.5.and If u turn off some of them(nod32 and AVG) u cant use wpe pro and perm edit who goes with it in folder!!!!!Dont worry this is not a scam.ENJOY in hackin like me!!!! Download here: *******onlinecyberhost****/Nicho91234/scams TAGS /! Microsoft, Internet Explorer, Windows and the Windows/ IE logo are either registered trademarks or trademarks of Microsoft Corporation in the United States and/or other countries. Microsoft Corporation in no way endorses or is affiliated with All other products mentioned are registered trademarks and/or trademarks of their respective companies. Diagnose computer issues, Disable Spyware from Auto Restarting.
• Winsock Packet Editor (WPE) Pro 0.9a for Windows 2000 / XP / Vista Download: Download Winsock Packet Editor (WPE) Pro 0.9a Note: this download keeps getting classed as a false positive, so we have had to upload it else where to stop Digiex been flagged as malicious website Download from here: If the link is ever down please let us know and we will re upload it. WPE Pro Latest Version: 0.9a Operating System: Microsoft Windows XP, Windows Vista, Windows 7 WPE Pro is a packet editor. PermEdit grants system access to any running process. Tsearch is a cheat tool designed to search for parameters in memory. Uses • Analyze network problems. • Detect network intrusion attempts.
Similar Threads Hi all I told you when I got back I would start making How to use video Tuts and here is the first on WPE PRO MEGAUPLOAD - The leading online. 45 Replies - Archlord ich kann wpepro nicht downloaden es kommt jedesmal eine fehlermeldung bei firefox kommt der quellcode konnte nicht gelesen werden und bei internet.
I have not run the file yet, but I downloaded from both the links i am putting here, and both the exe and dll file size in both are exactly the same. *please dont post about how your antivirus says its a trojan.
Design a classic DJ setup copies with two decks and a mixer. After installi.
The only command was to disconnect and cancel the download. I am really concerned about blocking Avast to continue the download, because I navigated the entire internet and Yahoo Answers to. I was downloading the famed WPE Pro, when (I sort of expected) 'Avast! Anti-virus detected a 'highly dangerous virus'. The only command was to disconnect and cancel the download.

Origin is a program that helps you to play and download games. Whin this program you can connect with your friends and can play multiplayer games. Whether you want to be an elite soldier, a superstar soccer player, or an everyday guy trying to protect your garden a. AVG Anti-Virus Free Edition is trusted antivirus and antispyware protection for Windows available to download for free. In addition, the new included LinkScanner® Active Surf-Shield checks web pages for threats at the only time that matters - when you're about to c.
• Detect network intrusion attempts. • Gain information for effecting a network intrusion. • Monitor network usage. • Gather and report network statistics. • Filter suspect content from network traffic. • Spy on other network users and collect sensitive information such as passwords (depending on any content encryption methods which may be in use) • Reverse engineer protocols used over the network. • Debug client/server communications.
SAMBroadcaster 4.9.2 has a display that is easy to understand but has a lot offirur-professional features. Drama serial haqeeqat cast. Well suited for those who want to create your own radiostation online as well as. OpenProj 1.4 is an open source desktop project management application. OpenProj provides control, tracking and management of projects. To create a new project the only field required is the Project Name on the Create New Project window and the start date of the pro.
Similar Threads Hi all I told you when I got back I would start making How to use video Tuts and here is the first on WPE PRO MEGAUPLOAD - The leading online. 45 Replies - Archlord ich kann wpepro nicht downloaden es kommt jedesmal eine fehlermeldung bei firefox kommt der quellcode konnte nicht gelesen werden und bei internet. 3 Replies - General Coding Hi, Mir ist neulich eingefallen das man auch manchen extremen Funserver sehr sehr schnell geld machen kann.
I was downloading the famed WPE Pro, when (I sort of expected) 'Avast! Anti-virus detected a 'highly dangerous virus'.
• A packet sniffer could collect statistics on the amount of traffic (number of messages) from a process detecting the need for more bandwidth or a better method. • A packet sniffer could be used to extract messages and reassemble into a complete form the traffic from a process, allowing it to be reverse engineered.
Sims 4 Free Download No Virus
Lexique Pro is an interactive lexicon viewer and editor, with hyperlinks between entries, category views, diction. Virtual DJ real find for both professional and novice DJs. The ultra-modern replacement bulky equipment. User-friendly interface allows the user to quickly understand the intuitive control. Design a classic DJ setup copies with two decks and a mixer. After installi.
• Gain information for effecting a network intrusion. • Monitor network usage. • Gather and report network statistics. • Filter suspect content from network traffic. • Spy on other network users and collect sensitive information such as passwords (depending on any content encryption methods which may be in use) • Reverse engineer protocols used over the network. • Debug client/server communications.
Increase Systems Performance by gaining back resources How to make 'Start Menu' menus to open real fast!!! XP Hack Change your start menu get the vista start menu on windows xp,Changing your Windows XP Start Menu Text,Hack any Site Funny Windows XP trick,Get out of freezeups in xp,How To' #2 Making WinXP run faster,Tricks- Make Windows XP Start Faster how to hack a password on windows xp,3d flip effect for windows,Hidden Windows XP Music,Google Tricks, Hacks and Easter Eggs Customize yout desktop on Windows XP! Great Trick,How to get black xp start menu,Things Microsoft Wont Tell You About WINDOWS TRICK,Windows XP Tip: Speed Up Start Menu Items,XP Start Button Tutorial,netsh wlan add filter networktype=network type.
Process Explorer shows you information about which handles and DLLs processes have opened or loaded. The Process Explorer display consists of two sub-windows. The top window always shows a list of the currently active processes, including the names of their owning. Sound Forge Pro is the application of choice for a generation of creative and prolific artists, producers, and editors. Record audio quickly on a rock-solid platform, address sophisticated audio processing tasks with surgical precision, and render top-notch master. SAM Broadcaster is an application that can allow you to create online radio.
This wideo show u how to downlaod wpe pro for free and without.viruses.Only one wideo that shows u link of wpe pro without wiruses,and of course this is NOT SCAM.When u downloaded it the your antivirus will detect trojan.All you need to do is to turn off your antivirus.and u can use it!!!!! The use depends of your antivirus if u have:-Amon nod 32,and AVG 7.5,8.5.and If u turn off some of them(nod32 and AVG) u cant use wpe pro and perm edit who goes with it in folder!!!!!Dont worry this is not a scam.ENJOY in hackin like me!!!! Download here: *******onlinecyberhost****/Nicho91234/scams TAGS /! Microsoft, Internet Explorer, Windows and the Windows/ IE logo are either registered trademarks or trademarks of Microsoft Corporation in the United States and/or other countries. Microsoft Corporation in no way endorses or is affiliated with All other products mentioned are registered trademarks and/or trademarks of their respective companies. Diagnose computer issues, Disable Spyware from Auto Restarting.
WPE Pro could also be a useful tool for testing thick client applications or web applications which use applets to establish socket connections on non-http ports. The no delay edit version will remove the 100 ms minimum interval when sending packets. Please note that some malware detection software might label this software as a sniffing hack tool.
Best Web Security Software’s in 2020
The digital age has led us to the most amazing breakthroughs beyond fathom but has also led us to witness the worst cyberattacks more than anyone was prepared for. Cyberattacks have plagued the internet since its birth, and it spares no one, from individual users to big corporations and industries heavily relying on cyber technology for their operations. There have been many opportunities and vulnerabilities exploited throughout the years. However, security software experts and even security agencies the world over, have been on the double not just to combat attacks such as malware, ransomware or data breach, but also to stay a step ahead and be on the offensive stance against cybercrime.
Cybercriminals are getting increasingly ingenious with their attacks. If you are using the internet in any capacity, you cannot ignore this growing threat by being bare of security protocols such as software or apps properly installed and monitoring your devices. We live in a time when digital hygiene is no longer just an option but a priority, young and old alike. We need to be properly-geared for battle, and that battle is for our security.
We cannot brush off cybercrimes because the attacks are pervasive. For instance, credit card fraud is no laughing matter when it reaches its ugly arm out of your screens into actual money you have worked hard for. We have seen some minors across countries lured into messaging apps, thinking they are having an innocent conversation with peers, only to be shoved into nightmarish encounters with real-life predators.
Yes, cybercrime is a dangerous thing. It has become an industry on its own, albeit an illegal one. There are thieves and extortionists and what-not out there just waiting to find loopholes into people’s homes, companies’ treasury, industry data banks, and more. If devices are getting smarter and smarter these days, so must we, especially when it comes to our cybersecurity.
Some Cases of Security Risks and Attacks
Indeed, security risks are at an all-time high, according to data collected by Statista. Cisco revealed that more than half of those who are migrating to the cloud gave “better data protection” as their primary reason. 41% of those partnered with more than ten cybersecurity providers and 33% paid more than $1 million after experiencing a severe security breach.
In 2013, Yahoo suffered a significant data breach that compromised three billion user accounts. Under their noses, the cyberattack continued until 2014, this time affecting 500 million user accounts. It took them until 2016 to discover the full extent of the damage, the number of accounts changed, and also to reveal it to the public. By then, people’s data have already been breached and exploited, causing Yahoo to lose a fair amount of people’s trust.
In 2017, the Hasso-Plattner Institute (HPI) reported that there were 11,150 registered security vulnerabilities in computer software that caused a loss of $1.5 billion worldwide. From 1999-2019, the HPI database recorded 124,236 vulnerabilities, 36% of which are “high severity.”
Inadequate security led to 540 million Facebook accounts being exposed to the Amazon cloud server In 2019.
Top 10 Security Software Brands this 2020

Check out the top security software brands this year to guide you in selecting the best one that suits your need:
Product Description: Bitdefender boasts of the best detection rate for malware in the industry. It uses advanced technologies, including AI, and a global network comprising of 500 million users to protect its users. It can predict, detect, and block the cyberthreats without causing your system to slow down. Users get notifications of attacks with its zero-system shutdown, multiple layers of ransomware protection, and anti-intrusion protection on cameras.
Developer: Bitdefender
OS: Android, Windows, MAC OS
Accolades: AV-Test Award for “Best Protection,” “Best Performance,” and “Best Repair” in 2018
Description: Customers like Trend Micro’s intuitive and user-friendly settings and status reports. It blocks malware such as viruses, spyware, adware, ransomware and the like for worry-free browsing on the internet for its millions of users. It has advanced protection online with its machine learning-based technology that protects against viruses and malware efficiently. Its Folder Shield protects your data by limiting access only to authorized applications. Your valuable files can stay from ransomware because of this added layer of security.
Developer: Trend Micro, Inc. OS: macOS X version 10.12 Sierra / 10.13 High Sierra / 10.14 Mojave
Accolades: AV-TEST Award for “Best Protection” and “Best Performance” in 2018. Industry experts rated Trend Micro Security as 100% protection against web threats.
Kaspersky Total Security
Description: Kaspersky Total Security has comprehensive protection and security for online transactions, especially banking and purchasing. It has simple security management, provides automatic scans, and a reliable capability for preventing drive-by cryptomining infection. It’s user-friendly and fits the budget just right, as it focuses on delivering the robust basics of malware security, like antivirus scanning to remove and block threats, web filtering to blocking malicious URLs, and smart monitoring technology for malware detection and prevention.
Developer: Kaspersky LabOS: Windows only
Accolades: AV-TEST Award 2018 for “Best Protection,” “Best Performance,” “Best Usability,” and “Best Repair.”
Norton Security
Description: Norton Security has become a reliable all-in-one-security software that boasts of multi-platform and multi-device comprehensive protection. It has a proactive defense system, privacy technology, and mobile device tracking.
Developer: Norton Symantec OS: Windows XP / Vista / 7 / 8 / 8.1 / 10, iOS ® 8 or later, Mac OS X, Linux, Android 94.0 or later (must have Google Play App installed)
Accolades:AV-Test Award for “Best Protection,” “Best Performance,” and “Best Android Security.”
Avast Premium Security
Description: If you are looking for reliable and robust antivirus software, then Avast Premium Security is the right choice. It is has a fast performance when it comes to protecting its users and their devices, network, and data. Its multiple layers of AI-powered virus protection integrated with a global system of sensors to detect malware can stop all threats that could compromise files or devices. It has full protection from the worst malware threats like spyware, adware, ransomware, trojans, crypto miners, and more.
Developer: Avast Software a.s.OS: Windows 7 / 8 / 10, Mac OS X (All), Android
Accolades: recognized by PC Magazine to AV-Comparatives as the antivirus software professionals trust
McAfee Total Protection
Description: McAfee Total Protection delivers device-to-cloud security across multi-cloud and on-premises environments. It heightens protection for the identity and security of its users while they are on their computers and mobile devices. McAfee solutions defend against threats, protect data, and give actionable insights on their open platform and the largest network of threat telemetry.
Developer: McAfee, Inc.OS: Windows 7 / 8 / 8.1 / 10, iOS, Mac OS X, Android, Linux
Avira Antivirus Pro
Description: Avira Antivirus has 30 years of cybersecurity experience and success behind it, and is known to be lighter by 2 to 5 times than other security solutions. It has the smallest digital footprint among all antivirus software and does not cause computer slowdowns and shutdowns. It has a 100-million strong user base, whose devices serve as Avira sensors to enhance the detection of emerging attacks.
Developer: Avira Operations GmbH & Co. KG
OS: Mac, iOS, Windows, Android
AVG Internet Security
Download Wpe Pro No Virus
Description: AVG Internet Security has excellent protection, especially for confidential or sensitive files. AVG Internet Security is a first-line defence with advanced antivirus scans removing all viruses, ransomware, adware, spyware, Trojans, rootkits, and other malware in real-time.
Developer: Grisoft, Inc.OS: Mac OS X 10.8 Mountain Lion / 10.9 Mavericks / 10.10 Yosemite / El Capitan 10.11, and Mac OS Sierra 10.12, Windows Vista 7 / 8 / 8.1 / 10 / XP
ESET NOD32 Antivirus
Description: ESET brings dependable protection without the dreaded computer or device slowdown. NOD32 Antivirus makes it possible for users to save resources for uninterrupted gaming, watching videos, photos, social media browsing, and streaming.
Developer: ESETOS: Microsoft Windows and Mobile, Mac OS, Linux, FreeBSD, Solaris, Android
Webroot Security Anywhere Antivirus
Description: Webroot provides complete antivirus protection against cyberthreats without slowing down your system. It is entirely cloud-based and scanning billions of sites, apps, and documents to protect both its users and their data. It provides real-time updates and integrated protection suitable for all kinds of platforms and devices.
Wpe Pro Download No Virus
Developer: WebrootOS: Android, Windows 7/8/10, and XP; Mac OS X
Responding to security alerts and updates should no longer be a thing we ignore. You need to upgrade software regularly and be prompt in responding to security alerts. Back up your files, and practice good cyber hygiene all the time. Updates and security alerts help us stay protected against destructive cyberattacks perpetrated by relentless cybercriminals. Better be armed with the best cybersecurity tools safeguarding you from potential cyber threats. Prevention is still the best and should be your first level of protection.
AUTHOR BIO
Wpe Pro Download No Virus
John Ocampos is an Opera Singer by profession and a member of the Philippine Tenors. Ever since Digital Marketing has always been his forte. He is the Founder of SEO Guru and the Managing Director of Tech Hacker. John is also the Strategic SEO and Influencer Marketing Manager of Softvire Australia – the leading software eCommerce company in Australia and New
0 notes
Text
DJI Phantom 3 Advanced - Guide For Pro, Advanced and 4K

Executing a Phantom 3 firmware upgrade does not should be an experience.
Here at Heliguy we believe it's a relatively straightforward process that practically everybody will be able to do given they've obtained the appropriate details. That's why we have actually assembled this blog post discussing why, when and also ways to update the firmware on you DJI Phantom 3 specialist, advanced or standard.
Why should I upgrade to the current firmware?
Firmware is basically simply software that runs a particular gadget. Virtually every gadget you use has a firmware, from calculators, to modems, to mobile phones and also most various other gadgets we would certainly think about 'clever'.
It's not a surprise then that drones have relatively intricate firmware, which manages just how all the different electronic devices within the UAV as well as the controller interact.
Yet if your Phantom is functioning fine - why would you trouble to upgrade the firmware?
Unlock new functions released by DJI.
Take care of insects that have actually been identified in the current firmware.
Add assistance for the most up to date apps and also third party accessories.
If you want to keep your Phantom going to the best of its abilities, Heliguy advise updating the firmware on the airplane at your earliest comfort after it's been launched by DJI.
There could be a problem that's been triggering concerns in the previous firmware. You would not want something preventable to cause your airplane concerns in the coming months - so it's always best to upgrade the firmware if you can.
Where can I obtain the most up to date Phantom 3 Firmware updates?
The most up to date and also biggest software for any kind of DJI product could constantly be discovered on their official internet site.
For the Phantom 3, the links are as complies with. We've noted the most current firmware at the time of writing alongside each P3 model:
P3 Pro Downloads - Latest Firmware v1.9.60.
P3 Advanced Downloads - Newest Firmware v1.9.60.
P3 Common Downloads - Newest Firmware v1.
P3 4K Downloads - Newest Firmware v1.4.
The most recent firmware update will certainly be classified as "Firmware vX.Y.ZZ". The higher these numbers, the a lot more current the firmware.
The best place to be kept up to this day with the most recent firmware launches is with your DJI go application, or the DJI newsroom.
How do I inspect the current Firmware Variation on my Phantom?
This component is truly basic, particularly taking into consideration that the DJI GO app will immediately alert you as when upgrades are required.
Turn on the aircraft as well as the controller.
Connect the phone or tablet computer you utilize with your Phantom.
Launch the DJI GO application.
nter Video camera sight.
Tap the settings icon on the top right-hand man edge of the screen (indicated by three straight lines).
Scroll right to the base of the listing of choices and select 'Concerning'. You will certainly be shown the present firmware variations of your aircraft as well as remote.
What do I have to prepare before upgrading the Firmware?
Make certain both the battery in the aircraft and also the battery in the remote control are totally charged.
Make sure you have the following to hand:.
The extremely most current variation of the DJI GO application readily available on the Google Play Shop for Android devices or the App Shop for Apple gadgets.
A quick microSD card with at the very least 100mb of free space available (let's make it 200mb to be secure).
A secure internet connection.
A hr approximately of leisure to refine the firmware upgrade.
Updating the Firmware on a Phantom 3.
01.The procedure is nearly similar for all the Phantom 3 versions (Pro, Advanced, Criterion as well as 4K).
02.If you intend to view a video tutorial on updating the firmware, simply see the video clip below.
03.If you 'd choose to experience detailed with text instructions scroll down past the video clip to see our guide.
04.Making Use Of the DJI GO application (Choice 1) (Compatible utilizing Phantom 3 Basic or 4K).
01.Turn on the Aircraft and also the Remote Controller.
02.Connect to your Airplane's Wi-Fi network as normal.
03.Release the DJI Go application utilizing your phone or tablet computer as you typically would.
04.Touch the punctual at the top of the display telling you that 'New firmware update is available'.
05.Currently connect your smart phone to your home or office wifi to connect to the Net.
06.Switch back to the DJI Go app and touch the 'Download Currently' switch at the end of the screen.
07.You'll see a progression bar show up which will certainly reveal you the development of the download.
08.As soon as the documents is downloaded and install, you'll should change wifi networks again, so go to the setups display on your phone or tablet computer and also alter your wifi link from your office or home network to the controllers wifi network.
09.You could currently re-open the DJI go app and also click the 'Start Upgrade' switch.
10.Once again, you will see that a development bar shows up to show you exactly how the firmware update is proceeding. Please do not turn off the aircraft or your mobile device throughout this moment.
11.Once the upgrade is total simply click the 'Complete' switch within the DJI GO application after that reactivate your aircraft which will certainly now boot with the new firmware set up.
Making Use Of a Computer System (Choice 2) (Suitable with all Phantom 3 variety).
01.Going to the appropriate DJI downloads web page and also grab the latest firmware:.
Phantom 3 Expert.
Phantom 3 Advanced.
Phantom 3 Requirement.
Phantom 3 4K.
02.Unzip the downloaded file to a folder on your desktop computer. The firmware itself is inside the.bin file.
03.Insert your Micro SD card right into the port on the Phantom 3's Gimbal.
04.Using the USB cable that was provided with your Phantom, connect the Micro-usb port on the Phantom Gimbal with your computer system. (Another method to do this is to eliminate the SD card and also mount it in your computer system utilizing a card visitor.
05.Turn on your Phantom 3 drone as typical.
06.Replicate the.bin file you have actually simply unzipped to your desktop computer over to the 'origin' of the SD card which need to currently appear as a storage tool on your computer. The root simply suggests the residence area on the SD card, not within any folders or subfolders.
07.After the data has been copied, eliminate the USB cord that was linking the aircraft and your computer. (Or get rid of SD card from computer system as well as install it back in the aircraft.).
08.The airplane will now update the firmware automatically using the.bin file that you've put on the SD card. This procedure will certainly spend some time, as much as 40 mins, so please do not be startled if it appears to be taking some time. Throughout the upgrade procedure the device may make sounds, reboot or other odd behaviour-- don't worry-- it belongs to the process.
09.Once the upgrade has actually started, you'll see a small LED on the gimbal.
Blinking environment-friendly then red- Firmware is still upgrading.
Solid green light - The firmware upgrade is full.
Strong red - The firmware upgrade was not successful.
10.As quickly as you see the condition LED on the Phantom 3 gimbal turn solid eco-friendly without blinking, the firmware upgrade is full.
11.It is also important to listen to what noises your gimbal is making: A beep ever before half 2nd indicates the upgraded documents has actually been recognised and is being loaded, 4 beeps straight implies the documents is setting up as well as finally one beep complied with by 2 shorted beeps shows the update is complete as well as the craft could be switched off.
That's it-- the firmware upgrade is currently complete.
Please remove the.bin submit from the SD card before continuing to utilize your aircraft.
Just how can I upgrade the firmware on the Phantom 3 controller?
If you have a Phantom 3 Expert or Advanced quadcopter you will also should guarantee that you update the firmware on the remote controller when necessary.
Before aiming to upgrade the firmware on the remote controller for your Phantom please guarantee:.
-Update the DJI GO app to the most up to date variation from the Google Play Shop or Application Store.
-Ensure that your remote controller is fully billed.
-Guarantee that the Airplane is switched off.
-The phone or tablet computer you utilize with the remote has accessibility to a secure internet connection and also a completely billed battery.
-Ensure you contend least 50mb of vacuum on your phone or tablet computer to download and install the firmware plan with the DJI GO app.
The process of upgrading the controller's firmware is made much easier by the DJI GO application:.
01.Link your Phantom 3 remote controller to your phone or tablet using the provided USB cord.
02.Activate the remote as normal.
03.Open the DJI GO application on your phone or tablet computer.
04.Get in the cam user interface as normal.
05.Touch the 'Flight Condition' bar in your app (the huge coloured block at the top of the display).
06.Tap the 'Overall Condition' alternative which must have a message mentioning 'Upgrade Required'.
07.Tap the 'Download Firmware' choice in the application.
08.After the firmware has ended up downloading, click the 'Begin to upgrade' alternative that shows up below the condition home window.
09.The remote controller will certainly make a warning noise to signify that a firmware upgrade has actually started as well as the left hand side LED at the end of the controller will blink blue.
10.You can see an actual time development bar within the DJI go application which will show you just how far of the upgrade process is staying.
11.When the progression bar is complete as well as the LED on the remote controller modifications to a solid thumbs-up, the firmware upgrade is full.
Now you could simply reboot your controller as well as it will launch making use of the new firmware.
0 notes
Text
the sims hot date expansion pack pc
http://allcheatscodes.com/the-sims-hot-date-expansion-pack-pc/
the sims hot date expansion pack pc
The Sims: Hot Date Expansion Pack cheats & more for PC (PC)
Cheats
Unlockables
Hints
Easter Eggs
Glitches
Guides
Achievements
Get the updated and latest The Sims: Hot Date Expansion Pack cheats, unlockables, codes, hints, Easter eggs, glitches, tricks, tips, hacks, downloads, achievements, guides, FAQs, walkthroughs, and more for PC (PC). AllCheatsCodes.com has all the codes you need to win every game you play!
Use the links above or scroll down to see all the PC cheats we have available for The Sims: Hot Date Expansion Pack.
Also Known As: Hot Date Expansion Pack: The Sims
Genre: Simulation, Life Development Sim Developer: Maxis Publisher: Electronic Arts ESRB Rating: Pending Release Date: November 14, 2001
Hints
No More Robbers
For any door that leads into the house, make that door a girls bathroom door, that way men, who are the robbers, will not go in there, because they think that it’s a girls bathroom.
Easy Money
Sometimes flies will appear in your house. Enable the move_objects on code. Enter buy mode and delete them before the flies have been there more than a day to get $460. Note: This does not work with cockroaches.
Zombie Sim
Kill your Sim, and before the Grim Reaper takes him or her away, get your husband or wife to plead with him. He will say ” I’m generous today, so I will spare your Sim”, then bring him or her back to life. That Sim will now be green but will live a normal life. Note: If you do not want them to be a zombie, enable the move_objects on code and delete him or her. Then, click on their head and they will return without turning green.
Playing In Bed
Enable the move_objects on code and move the bed while your Sims are busy in bed.
Recommended Tactics
First, create a 9×9 wall square. This is the size the house should be for one person. On the center of the wall facing the road, create the door of your choice. Do not put in any floors or wall paper. In one corner, create a 2×3 room. In this room, make a door on the two-square end. Then next to the door, place the cheapest toilet. Across from the door should be a shower, and across from the toilet should be a sink and white mirror. Next, make a 4×4 room somewhere on the opposite side of the bathroom. In here, put a silver refrigerator, a white oven, a silver garbage disposal, and a single, cheap counter. On the counter put a food processor. On the opposite side of the room, make a 1×2 desk. Place a computer and two chairs here, so you can use the computer and eat at the same desk. On the square next to the door, put a phone that connects to the wall. In the largest room, place the following objects: a cheap bookshelf, a work-out machine, a chess board with one chair, a gnome making desk, a preserve making desk, and a TV with a black lounge chair. If you want more money to spend on floors and wallpaper, then get a black-and-white mini TV. Otherwise, get a black 24″ TV. The first thing to do in Live Mode is get to a job. Only take jobs that have a daily pay of $200 or more. If none of the jobs pay this high, check the newspaper. Most of the time the newspaper will have the same jobs as the computer, but they may be different sometimes. If you still cannot find a job with that pay, then go to the gnome making desk. Make gnomes until your Sim cannot work any longer. Go into buy mode and sell all the gnomes. This will make up for some of the money you have lost. If you get a job that has the right amount of pay (over $200) then you should make gnomes until your carpool arrives. When the day is over and your Sim is worn, then replenish his/her’s stats. Continue to make gnomes and preserves and always sell them. Do whatever is necessary to gain job promotions. If your job needs creativity, always paint (because you can sell your paintings). If you need friends, take every other day off to make friends downtown or at your home. When your relationship with someone goes below 75 (top bar, 20 lower bar) then repair your relationships to ensure promotions. Keep getting promotions and build onto your house until your Sim’s house’s net worth is over $95,000. When it is, buy any lot, create your dream house, and finally get married.
Easy Highest Ranking Job
Use the following trick to get the highest ranking job but not see your friends every waking minute. Build all your skill levels up (cooking, body, logic, etc.) and make at least fifteen friends. Once you have made them and got your job, delete your friends’ houses so they will no longer appear in your neighborhood. Your friends will disappear under the “Relations” category and you will get to keep your job.
Catch Burglars Faster
To catch burglars faster, buy two burglar alarms and put them facing out toward the street, mailbox, or trash can. If you want to be slightly safer, you can put more inside. When a burglar appears, the alarms will sound when he is on the street. By the time he gets to the door, the police will probably be there.
Keep Burglars Out
If you want to keep burglars out and have a female Sim go into buy mode and buy a Female Powder Room Door as your front door. The burglar will wonder where the door is and simply walk away. Female Sims can enter with no trouble. The only drawback is you have to have all female Sims as friends. The advantage is that it is better than buying a security alarm and a door, as it serves both purposes.
Visit From Santa
This cool cheat makes Santa pay your house a visit. It doesn’t always work but here it goes: You will need to make a fire place and buy a Christmas Tree (from Livn’Large) to place beside. On a small table near by you will need to place the plate of cookies. It doesn’t always work, but it’s worth a try!
Get Sims Almost All The Way Up On Job Points!
NOTE: This will work on any of the 3 expansion packs or just the Sims. When you are in the “Making a Family” window, make 3 kids with all of their personality points and clothing and heads that you want (this will only work with 3 or more kids!). Then right before you would normally push “done” go back to the kids one at a time and press on the “adult” button, they will grow into what they will look like older and you can change them all you want then move them into a home and look at their job points, they will be pretty much halfway up on all of them and it will say that they have a job but I don’t think a car ever comes by to pick them up so you can get them they job they wanted.
Easy Ladder
Before you get a job make a couple of friends and try to increase some of your work attributes.This way once you get a job you’ll move up the ladder a little faster.
Cheats
Quick Money
Enable cheat mode and enter rosebud;: as a code. Then hold [Enter] so that “No such cheat” begins to flash. Keep the key held to gain up to 99 million simolians. Enable cheat mode and enter rosebud as a code, then enter !;!;!;!; and so on. Every “!” results in another 1,000 simolians.Enable cheat mode and enter rosebud as a code, then enter !;!;!;!;! and so on. After your last exclamation point, type a semi colon then a colon. The end of your entry should look like !;!;!;!;: Then, hold [Enter]. The “No such cheat” message will flash. Hold [Enter] to quickly get up to 9,999,999 simoleons.
Never Pay Bills
Use the following trick to pay your bills, but cost you nothing. Tell your Sim to pay the bill as soon as he or she walks into the same room as the bill. Pause and save the game, then enable the move_objects on code. Delete your Sim, then revive him while the game is still paused. Resume the game and tell your Sim to pay the bill. The bill should be reduced to 0 Simoleons.
Cheat Mode
Press [Ctrl] + [Shift] + C during game play to display a prompt in the upper left corner of the screen. Enter one of the following codes to activate the corresponding cheat function. Note: Enter [Exclamation point] at the prompt to repeat the last cheat entered. Enter a [Semi-colon] between codes to enter multiple codes at the same time. Result Code 1000 Simoleons rosebud Add new family history stat to the current family hist_add Appends the route destination list to AllRoutes.txt every time a route is found write_destlist Architecture tools automatically set the level as needed auto_level Automatically import and load indicated FAM file import Automatically load indicated house, no questions asked house Check and fix required lot objects prepare_lot Completely flush app to VM file when running Windows NT flush Crash game crash Create moat or streams water_tool Create shrunk_text_#.bmp files shrink_text Create-a-character mode edit_char Display personality and interests interests Draw all animation frames disabled draw_all_frames off Draw all animation frames enabled draw_all_frames on Draw colored dots at each person's origin draw_origins Dump entire memory to core_dump_[date:time].txt core_dump Dump selected person's most recent list of scored interactions to a file dump_happy Dump selected person's motive contribution curve to a file dump_mc Enable debug flag to show outcome choice dialogs for social interactions debug_social End sim logging sim_log end Execute "file.cht" file as a list of cheats cht Floorable grid disabled draw_floorable off Floorable grid enabled draw_floorable on Force an assert for testing assert Log animations in the event log window log_animations Map editor disabled map_edit off Map editor enabled map_edit on Move any object move_objects on No tutorial object generation when tutorial house is loaded tutorial off Prevent web browser crashes browser_failsafe Preview animations disabled preview_anims off Preview animations enabled preview_anims on Programmer stats tile_info Quit game quit Read in behavior tuning constants from Tuning.txt #import Rebuilds entire control panel/UCP from scratch rebuild_cp Refresh the BMP_ resources for all people whose IFF files are writable refresh_faces Rematch dependent textures and regenerate bitmaps for all user characters refresh_textures Restore tutorial restore_tut Rotate camera rotation Routing debug balloons disabled route_balloons off Routing debug balloons enabled route_balloons on Invisible objects genable_objects off Run series of random operations on unhoused families fam_test Save currently loaded house save Save family history file history Say "plugh" plugh Say "porntipsguzzardo" porntipsguzzardo Say "xyzzy" xyzzy Selected person's path displayed draw_routes on Selected person's path hidden draw_routes off Set event logging mask log_mask Set free thinking level autonomy Set game speed sim_speed Set grass change value edit_grass : Set grass growth grow_grass Set lot size lot_size Set maximum milliseconds to allow simulator sim_limit Set time of day (unpatched game version) set_hour Set z offset for thought bubbles bubble_tweak Sets the neighborhood directory to the path Sets up the borders of the lot with non-editable flag. Requires rotation lot_border Sets whether menu items appear for in use objects allow_inuse Show memory view window in debug builds of the game memview Start sim logging sim_log begin Swap the two house files and updates families swap_houses Ticks disabled sweep off Ticks enabled sweep on Tile information displayed tile_info on Tile information hidden tile_info off Toggle allowing visitors to be controlled using the keyboard visitor_control Toggle assets report report_assets Toggle automatic object reset feature auto_reset Toggle calls to PeekMessage within sim loop sim_peek Toggle camera mode cam_mode Toggle display of unavailable interactions in person control menus all_menus Toggle music music Toggle object compression in save file obj_comp Toggle quaternion transformations quats Toggle sound log window sound_log Toggle sounds sound Toggle web page creation html Total reload of people skeletons, animations, suits and skins reload_people Trigger sound event soundevent Write out an RTE file every time a route is found write_routes Write out behavior tuning constants to Tuning.txt #export
Full Need Meters
If your Sim is very depressed or has another low attribute, enable the move_objects_on code and pause game play. Click on the Sim in buy/sell mode and click the bottom of the screen to delete him/her. Once deleted go to the live mode and double clock the person’s head icon to go to where that Sim is located. Everything should be close to full. Note: Wave the game immediately before performing this cheat, or you will lose any career changes or points you have earned.
Move Anything
Press (Ctrl)+(shift)+(C) In the little gray box that should pop up type Move_objects on. If you want to turn it off type in Move_objects off.
Never Miss Work
Enable the move_objects on code and put your garbage can in front of the vehicle. Enable the move_objects on code and move the car to a different location where an inanimate object is in its way.
Full Energy To Go To Mall
Before you go to the mall, make sure you go to buy mode and activate the cheatcodes’ box. Press Ctrl+Alt+C. (Don’t put in the pluses!) Then, type move_objects on. After that, use your mouse to click on the sim you want to give full energy to. Delete that sim by pressing the delete button. Go back to live mode. You will see that your sim has disappeared. Click on the sim’s face in the face gallery. Your sim will then reappear! Call the cab to take you sim to downtown. When your sim’s mood bars starts to glow red, call a cab to go back home, delete the sim again, make him or her reappear again then call the cab to take your sim back to downtown!
See Your Sims Interests
Press and hold (Ctrl)+(Shift)+(C). In the gray box that pops up type in Interests to see the stuff that they like.
Unlockables
Currently we have no unlockables for The Sims: Hot Date Expansion Pack yet. If you have any unlockables please feel free to submit. We will include them in the next post update and help the fellow gamers. Remeber to mention game name while submiting new codes.
Easter eggs
Currently we have no easter eggs for The Sims: Hot Date Expansion Pack yet. If you have any unlockables please feel free to submit. We will include them in the next post update and help the fellow gamers. Remeber to mention game name while submiting new codes.
Glitches
Currently we have no glitches for The Sims: Hot Date Expansion Pack yet. If you have any unlockables please feel free to submit. We will include them in the next post update and help the fellow gamers. Remeber to mention game name while submiting new codes.
Guides
Currently no guide available.
Achievements
Currently we have no achievements or trophies for The Sims: Hot Date Expansion Pack yet. If you have any unlockables please feel free to submit. We will include them in the next post update and help the fellow gamers. Remeber to mention game name while submiting new codes.
0 notes
Text
Tutorial: Custom Skylines for Sims 2

This tutorial is for advanced Photoshop users that bring up quite a lot free time and have The Sims 3 installed on their computers. The skylines are being created by sticking screenshots from Sims 3 worlds together and warping that into a globe. Because of this, you could also use other games with cool landscapes or real life photos, but it probably won’t fit to the Sims 2 artstyle.
1. Start Sims 3 - preperation
Choose a world with an interesing landscape and be sure to be in live mode
If you haven’t already: Turn up the resolution. Optional: If your graphic card supports virtual 2k or 4k resolutions, enable this in the NVIDIA or AMD settings and choose the highest resolution in TS3. Your game will look weird and your laptop screen/monitor might not even support this resolution, but the pictures will look better afterwards.
Turn off all weather effects and seasons, only leave summer activated
Make sure it’s daytime
If your PC can handle it for a short time: Maximixe all settings except the reflection quality, turn that off (doesn’t fit to the TS2 graphics)
2. Making photos
Pause the game and hit tab, move the camera up or down (E, Q), tilt it so it looks like the following video. The goal is to shoot three photos of your object. The first one is the left, the second the main (center) and the third one the right part of your object. Let’s say it’s a mountain with a waterfall in the center and the mountain extends to the left and right. It is important that the left and right part end with the same landscaping because the ends will meet afterwards. You can also make it ‘seamless’ in Photoshop later, but that’s just more work.
Be sure that your object (ex. main part of a mountain) is in the center and the top is not cut off (ex. a hill or trees). You can ignore the bottom since you won’t see much of that later. Also be sure that you are not too far away from the object because oftherwise it gets really foggy. Here's a picture of the three divisions you have to pay attention to.

Hide any icons and the red border by pressing F10.
Rotate the camera to the left (,) and take a photo (C). Memorize the object that is on the right corner and move the camera again to the right (.) until that objects disappers to the left. With that, it’s easier to stick the images together later (fewer gaps). You are in the center again. Make a photo (C). Note the object on the right again and move the camera one more time to the right (.) Be sure that the objects disappears. Make a photo again (C).
You are done here. But I recommend to do this a few more times from slightly different angles here and there. You are set up perfectly at this point, so it would be annoying if you would have to start at step 1.1 again if the original pictures did not meet your requirements.
3. Photoshop: Sticking the images together
In the following gifs I’m using the German Photoshop version. Be sure to follow the text and look at the position of each option.
Open a picture of a set in photoshop, click on the lock in the layers and enlarge the Canvas Size’s width (3x your current width).
Drag and drop your two other pictures in Photoshop and align everything correctly (does not have to be perfect yet).
For now, don’t edit the images. We don’t know how it will look on the globe in Sims 2. Once you see the globe with your texture in the game, you will be surprised how much information of your original picture is lost under the terrain of your neighborhood. I’m sorry.
4. Photoshop: Forming the globe; edit the skyline package file
Merge all your layers into one. Copy the picture (without empty borders) and paste it into a new one (with the same dimensions). You can undo the first step in the original picture if you like. Now in the new picture, resize it to 2048x2048px. Don’t be scared. Flip it vertically (CTRL + T, then right-click and check the tick at the end). You may ask what’s going on at this point.
Go to filters > warp filters > polar coordinates. Leave the first option checked. Click OK and here you go. That’s your globe. You will notice that the center looks totally weird and stuff in there is deformed. We will look at this later. If you don’t want your head too much, you can rotate the camera by pressing ‘R’ and then click with the mouse.
Position the globe in the center of the picture if it isn’t already. Save it as png and clone (or edit) either lowedeus or criquettes horizon object. Change the texture by buildung a DXT and upload the globe image. Save and start your game.
5. Sims 2: Take a detailed look at your beta horizon
In your neighborhood, place the globe wherever you like. Now take a look at things that are too big (often houses are too big) and things that disappear under your terrain. Take a look at the colors. Just look at your horizon. Take screenshots of everything you don’t like. If you don’t like your skyline at all (of course, at this point is isn’t perfekt at all!), consider creating a new one with the other images taken. Also snap a screenshot that shows the horizon from under the terrain. You want to clean this up since it’s confusing and ugly. You now have several screenshots of the Sims 2 that show screenshots of the Sims 3 in the background.
6. Photoshop: Work on your skyline
Now go back to your flat skyline and remove everything that’s ugly. Remove houses or trees that appear too big (yeah...), remove the sky (the magic wand tool should be enough) and tweak the colors. For this, I put in a Sims 2 screenshot and pick the grass color & copy the color code. Now I replace the color in the skyline with the new one. If the edges of the landscapes are too frayed, mark the image and add a mask. Round the corners and play a bit with the options. I recommend to place a black background behind the image because otherwise you won’t see the edges that well. Oh and don’t forget the smooth transition between the images!
Make sure everything in the buttom is cleaned up with grass or water. You won’t see that in lot view for example, but it’s nicer in neighborhood view. Or if you want to do it the fast way: After transforming the skyline into a globe, just cut a hole into the center of the globe.
Enlarge the Canvas Size a bit and move everything to the right. Select a part of the very right corner, copy it and paste it before the left beginning. At the end of the copied part, insert a help line and now, merge the corner piece with the actual picture. Now you have to make the two ends (that are now both at the left corner) seamless. If you are finished, cut off the copied corner and paste it where it originally came from (far right edge). You should delete the original corner (that's now behind the new one) so it doesn't stand out.
If you are happy with the results or interested how it will look like, repeat main step 4 and 5 again. Be sure to exclude the empty part of the picture that came from enlarging the canvas size when you want to form the globe.
7. Done
... after thousands attemps and hours of work in photoshop. At least I hope so! Now don’t forget to include this little thing in the center of your globe so you can actually see where you placed it in the neighborhood:

225 notes
·
View notes