#Windows version tutorial
Explore tagged Tumblr posts
Visit Tumblr Blog
Explore Tumblr blogs with no restrictions, modern design and the best experience.
Last Seen Tumblr Blogs


Fun Fact
In Q3 of 2020, 31% of US users access the Tumblr app daily.
Text
How to Know Which Version of Windows You Have: A Complete Guide

Have you ever wondered which version of Windows your computer is running? Whether you're a tech newbie or a seasoned user, knowing your Windows version is crucial for compatibility with software, drivers, and updates. This guide will walk you through the simplest methods to find out your Windows version, along with some extra tips and tricks to enhance your knowledge. Let’s dive in!
Understanding the Importance of Knowing Your Windows Version
Knowing your Windows version is essential for several reasons:
Software Compatibility: Ensures that applications and programs run smoothly.
Security Updates: Keeps your system protected with the latest security patches.
Troubleshooting: Helps resolve system issues more efficiently.
Methods to Determine Your Windows Version
Here are some easy ways to check your Windows version:
Method 1: Using System Settings
Open Settings:
Press Windows + I to open the Settings menu.
Navigate to System:
Click on "System" and then "About".
Check Windows Specifications:
Here, you’ll find your Windows edition and version.
Method 2: Using the Run Dialog
Open the Run Dialog:
Press Windows + R.
Type winver:
In the Run box, type winver and press Enter.
View the Information:
A window will pop up displaying your Windows version and build number.
Method 3: Using Command Prompt
Open Command Prompt:
Press Windows + X and select "Command Prompt" or "Windows PowerShell".
Type the Command:
Enter systeminfo and press Enter.
Check Windows Version:
Scroll through the information to find the "OS Name" and "Version".
Additional Methods
Using Control Panel: Navigate to Control Panel > System and Security > System to view your Windows version.
Windows Logo: On older versions like Windows 7, the Start menu logo gives a clue about the version.
Understanding Windows Version Numbers and Build Numbers
Microsoft frequently updates Windows, releasing major versions and build numbers. Here’s a quick rundown:
Windows 10: Known for its frequent updates, e.g., Version 20H2, 21H1.
Windows 11: The latest version with an updated interface and new features.
Addressing Common Questions
Q: Can I upgrade my Windows version for free? A: Yes, Microsoft often offers free upgrades from older versions to the latest one, like from Windows 10 to Windows 11.
Q: How can I find out if my Windows version is genuine? A: Check your activation status by going to Settings > Update & Security > Activation.
Tips to Keep Your Windows System Up-to-Date
Enable Automatic Updates: Ensure your system receives the latest updates.
Regularly Check for Updates: Manually check for updates by going to Settings > Update & Security > Windows Update.
Use Trusted Sources: Download updates and software from official sources to avoid malware.
External Links to Authoritative Sources
Microsoft Support: Find your Windows version - Official guide from Microsoft.
How-To Geek: How to Determine Which Version of Windows You Are Running - A reliable tech site with additional tips.
PCWorld: How to Check Your Windows Version - Another trusted tech resource.
By following this comprehensive guide, you’ll be well-equipped to determine your Windows version and keep your system running smoothly. Stay informed, and enjoy a seamless computing experience!
#Check Windows version#How to find Windows version#Windows system information#Windows version check#Identify Windows version#Which Windows do I have#Find Windows build number#Windows edition info#Determine Windows version#Verify Windows version#Windows settings check#System info Windows#Windows version tutorial#Windows version guide#Command prompt Windows version#Run dialog Windows version#Windows specifications#Windows version number#Latest Windows version#Windows upgrade info
0 notes
Text
How To Install VOCALOID 1 On a Modern Computer
Full tutorial is under the cut, but the basic steps for this process are:
Enable virtualization on your computer.
Install VirtualBox.
Use VirtualBox to create a Windows XP virtual machine.
Transfer the VOCALOID files into the XP virtual machine.
Install the VOCALOID program on the XP virtual machine.
You don't need to have a ton of space or RAM for this, it'll work on a garbage computer (like mine). It works on all common operating systems too (Windows, Mac, or Linux).
Step 1: Enabling Virtualiztion
This is the only step that varies based on which operating system you're using.
I'm covering the instructions for Windows 10 in this post (because that's what I use). If you don't use Windows 10, you'll have to look up a dedicated tutorial for enabling virtualization on whichever operating system you use.
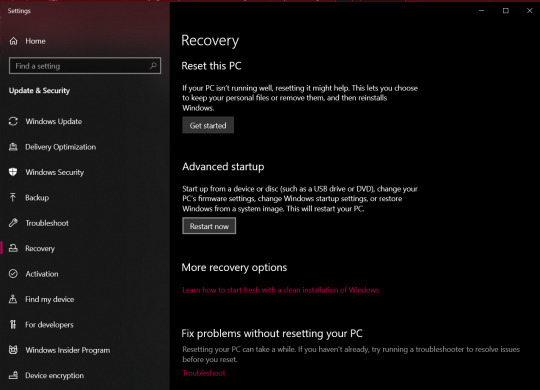
Locate "Advanced startup" in the regular system settings. Either use the start menu search bar to get there quickly, or click through "Settings" > "Update & Security" > "Recovery".
From there, hit "Restart now"
After the restart, you'll be brought to a screen asking you to choose an option.
Select "Troubleshoot" > "Advanced options" > "UEFI Firmware Settings"
You'll then be prompted to restart to change the UEFI Firmware Settings. Hit restart, and you'll be sent to your computer's BIOS.
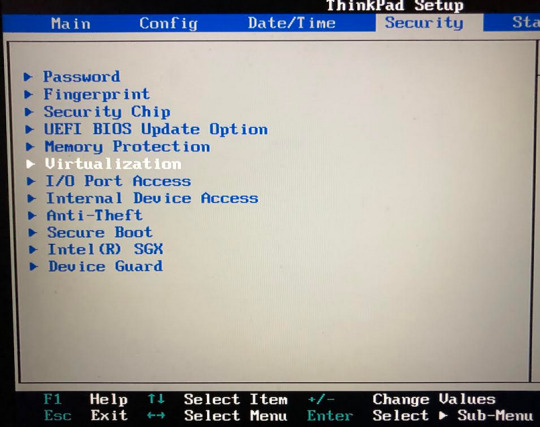
The specific menu will vary depending on what brand of physical computer you're using (Lenovo, Dell, Toshiba, etc). I'm providing the visual aide for a Lenovo here, but you can look up a visual guide to the BIOS for whatever brand computer you use.
Head over to the "Security" tab to find the virtualization setting.
Once you enter the virtualization settings, switch both the options here to "Enabled".
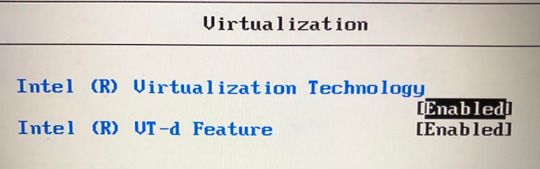
Then you just need to save and exit by hitting F10, and your computer will restart normally.
You can see whether or not virtualization has been enabled by going into "Task Manager". Get to "Task Manager" by right-clicking the task bar, or search it up through the start menu.
Once you're in "Task Manager", click over to the "Performance" tab, and it will say "Virtualization: Enabled" or "Virtualization: Disabled."

End of Windows 10 specific instructions here, everything after this will apply to all operating systems.
Step 2: Install VirtualBox
VirtualBox can be downloaded from here (on virtualbox.org). Just pick the right package for your operating system.
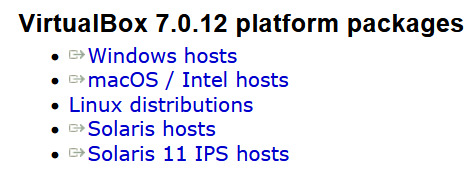
Once the EXE file is downloaded, run it to go through the VirtualBox installation process.
Step 3: Create a Windows XP Virtual Machine
First, you need to get an ISO of Windows XP. (Digital equivalent of an installation disk basically). I acquired my copy through Internet Archive here.
Just hit "ISO IMAGE" under "DOWNLOAD OPTIONS". Don't worry if it's downloading super slowly, that's normal on Internet Archive.
Open VirtualBox, and select the "New" option to create a virtual machine.
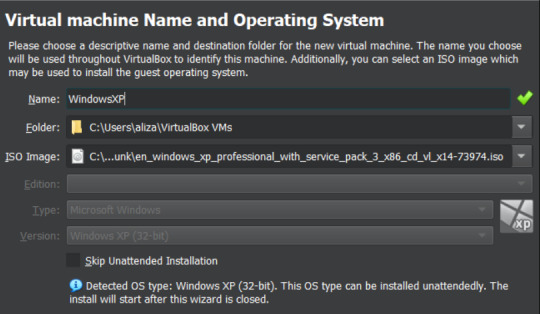
From there, go under the "ISO Image" tab and find your XP ISO. VirtualBox will be able to detect that you picked Windows XP.
"Skip Unattended Install" will be unchecked by default. I recommend keeping it unchecked so you don't have to go through the XP installation process manually.
The Internet Archive page provides this working product key you can copy-paste: MRX3F-47B9T-2487J-KWKMF-RPWBY
"Guest Additions" will be unchecked by default, but I recommend checking it. This is a surprise tool that will help us later 😉
(You could still install Guest Additions later, but checking the box here is less work).
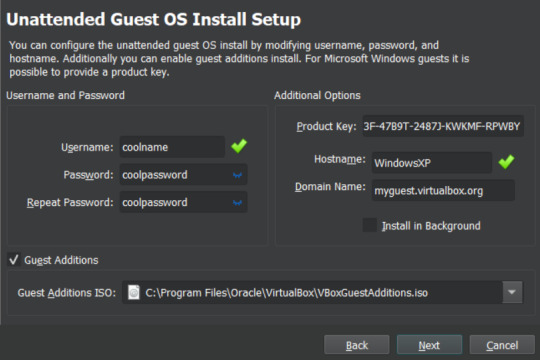
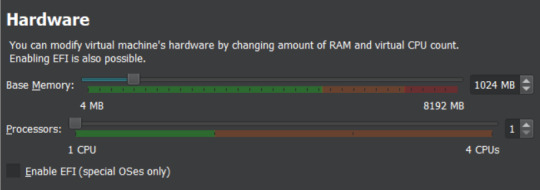
512 MB of RAM is the minimum you can away with for VOCALOID, but a full 1 GB (1000 MB) is recommended for better performance.
No need to adjust CPU count.
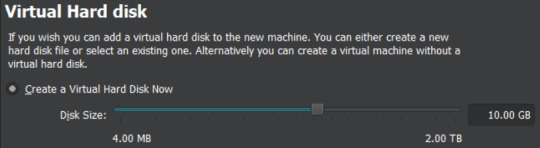
Choose "Create a Virtual Hard Disk Now".
Now you get to pick how much storage space the virtual machine will have. VOCALOID files aren't very big, so they don't require too much space.
I'm not sure about the true minimum size required for this, so I recommend just leaving it at the default of 10 GB. It's unlikely that you'll actually fill/use all of that space, it's just the maximum that the virtual machine will be hypothetically capable of holding. XP with V1 installed took up less than 4GB for me, but it won't let you install the program without extra space available.
There's an easy way to add more storage later if you accidentally make it too small in this step (info at the end of this post).
Make sure all of the settings you chose are correct.
The summary should say "Skip Unattended Install: false", "Product Key: true", "Install Guest Additions: true".

Now VirtualBox will create the machine and install XP on its own. Just leave the window open and don't interact with it until it's finished.
It'll be left on the Windows XP desktop once installation is complete.
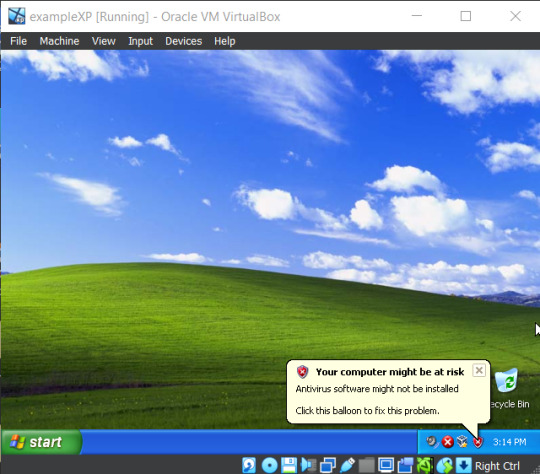
Before doing anything else in XP, I recommend changing the screen resolution so it isn't a ridiculously tiny window you need to squint at.
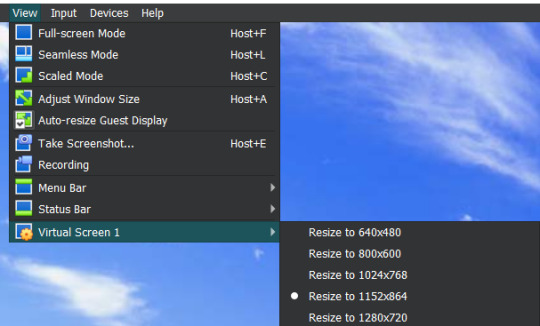
View > Virtual Screen > Resize to whatever looks best on your screen.
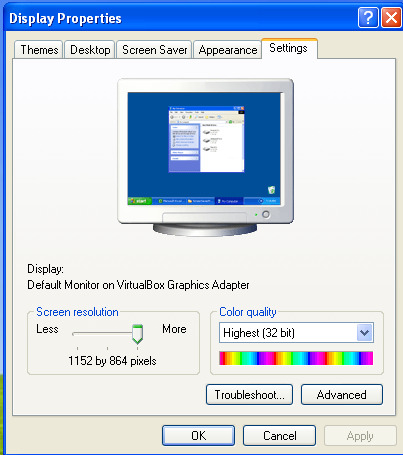
Alternatively, you can right click the XP desktop and select "Properties", then go to the "Settings" tab. Increase the screen resolution and hit "Apply" to see how it looks. You'll get a popup asking if you want to keep those changes or not.
Step 4: Transfer VOCALOID Files Into XP
I acquired a usable copy of VOCALOID from Internet Archive here. That folder includes everything you need to install and activate any V1 voicebank without an official activation code.
(I unfortunately have yet to find a similar resource for VOCALOID 2. For info on using V2 voicebanks, check the end of this post.)
Before returning to VirtualBox, go to the location you saved the VOCALOID folder too, and right-click the folder.
Select "Properties", then copy the location information.
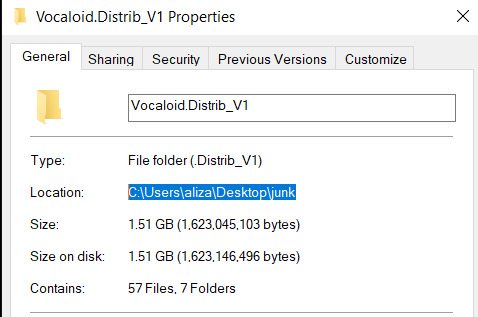
There's a really fast way to transfer small files in and out of the virtual machine (see the end of this post for an explanation on that), but the VOCALOID folder is too big for that, so you need to turn it into a VISO (virtual ISO) instead.
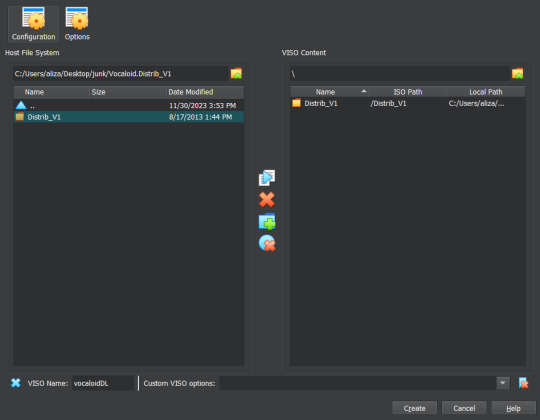
To make a VISO, open VirtualBox, and select the "Tools" icon.
Move to the "Optical disks" tab, then select the "Create" icon.

Now you can paste the location information text you copied into the textbox on the upper left side.
Alternatively, you can hit the folder icon and manually sift through your computer files to reach the VOCALOID folder, but that's annoying.
Make sure the folder is selected (just click on it), the hit the paper icon in the middle to "Add Item(s) to VISO".
Then hit the "Configuration" icon in the upper left to make a textbox appear in the bottom left. Enter a VISO name there.
Make sure the VOCALOID folder has actually appeared under "Viso Content" on the right, then you can hit "Create"
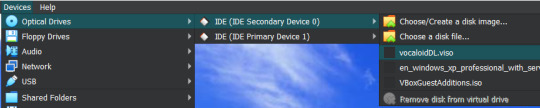
Now go back into XP to insert the VISO into the virtual disk drive.
"Devices > "Optical Drives" > whatever pops up there > "Remove disk from virtual drive" if something is currently in there > The VISO you made should appear as an option.
XP will ask what you want to do with the disk, choose "Open folder to view files".
Then drag the VOCALOID folder onto the XP desktop. It should start copying files over.
You can remove the VISO from the virtual disk drive once everything is copied over.
Step 5: Install VOCALOID In XP
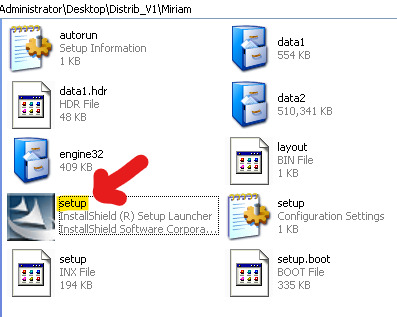
Open up "Distrib_V1", then go into the folder for whichever voicebank you want to install first. (The others can easily be added later.)
Now run the setup EXE within that folder. Windows XP doesn't show all file extensions by default, so the setup EXE file won't actually be labeled as such.
When the installer asks about "Setup Type", choose "Complete".
When it asks if you want to "Activate VOCALOID", select No. Don't say Yes.
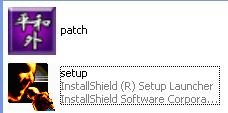
Once it's installed, open up the "Vocaloid v1.1.2 Update & Patch" folder that's inside "Distrib_V1".
Run "setup". You'll be prompted to restart XP afterwards, agree to it.
After the restart, right-click the desktop icon for VOCALOID, and select "Properties".
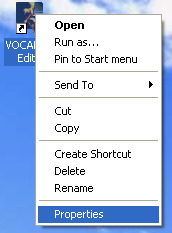
Hit "Find Target", and you be brought to the location the editor was saved to.

Open up the "Vocaloid v1.1.2 Update & Patch" again, then drag and drop "patch" into the folder containing VOCALOID.
Run "patch", hit the very obvious patch button, and then you'll be able to use VOCALOID 1 🎉
To add another voicebank, follow the same steps you went through to install the first one, but choose "Custom" for "Setup Type".
Deselect every component that doesn't have the specific vocaloid's name in it. (You don't really need to select the "SKIN" either if you don't want it, that's just an aesthetic option for the UI).
You won't need to run the updater and patch files again for each voicebank, unless you accidentally reinstalled the Editor.

Additional Info:
"How Do I Transfer Files Without Making a VISO?"
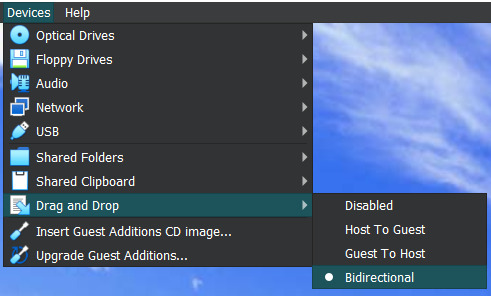
With Guest Additions installed (yes we're finally using it), you can use the super easy drag-and-drop file transfer method for most individual files. It just doesn't like transferring large folders. I recommend this method for sending instrumentals into XP and retrieving completed song files from XP.
Enable it through "Devices" > "Drag and Drop" > "Bidirectional" or select the specific direction you currently need to send things in.
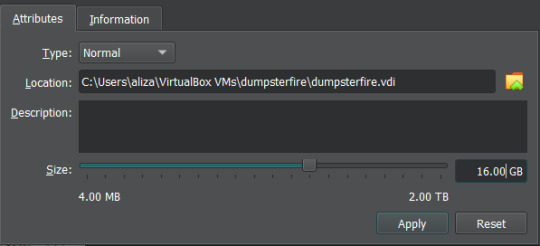
"I Didn't Give My Virtual Machine Enough Storage, How Do I Retroactively Increase It?"
In VirtualBox, hit the keyboard shortcut Ctrl+D to access the "Virtual Media Manager".
Alternatively, you can find it by clicking through "File" > "Tools" > "Virtual Media Manager"
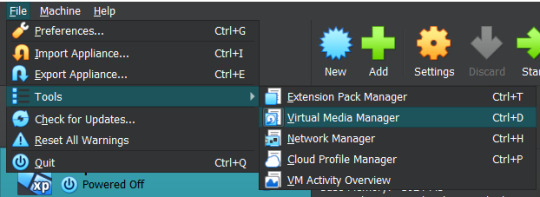
Select [whatever name you picked].vdi, and just adjust the size slider at the bottom.
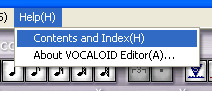
"How Do I Actually Use VOCALOID Now That I've Downloaded It?"
The manual that comes with program is actually very informative!!! You should read it!!! It's available under the "Help" tab within the program.
The only video tutorial I found for V1 is this one by Zero G.
One drawback of V1 compared to newer Vocaloid programs is that the piano keys aren't fully labeled, so you need to actually know what order notes go in. There are lots of music crash courses on Youtube which can help you in that department.
"How Can I Get a Working V2 Voicebank?"
If you just want to use a V2 voicebank and don't care about using the V2 software specifically, this site offers a cracked V4 download and compatible versions of the V2 voicebanks ("legacy" versions that have been converted to V3 voicebanks, so they work on V3 or V4).
. . .
If you want to have an awful time, you could install V2 in the virtual machine in almost the same way you install V1. However, I haven't found a reliable way to bypass the activation process for V2, so you'll be stuck with the 14 day trial period (unless you torrent Pocaloid2 instead). You can just reinstall the voicebank in a fresh virtual machine if you want to continue using it after the 14 days are up though.
Download your preferred voicebank(s) from Internet Archive. This user (haru0l) has uploaded all of the V2s (non-legacy). If the one you want isn't already in ISO form, turn it into a VISO.
You unfortunately won't be able to install Rin/Len Act2, Miku Append, or Rin/Len Append if you don't have their originals installed and properly activated (can't be using the 14 day trial).
Installing a Japanese voicebank will give you a bunch of unreadable symbols in the UI, and not all of the English voicebanks on Internet Archive are bundled with the V2 software (for some reason), so you just need to run the English updater to fix that. English V2 update available on Internet Archive here.
(There is another method where you just delete/move/rename every Vocaloid file that says JPN or Japanese in the name, but that doesnt completely translate the UI and still has some unreadable garbage).
If you're installing one of the less ancient voicebanks first, you might not be able to run the updater. It will say you already have an up to date version of the software (I had this problem with Piko). You can avoid that by simply installing an older voicebank first.
Make sure you choose the "Custom" setup for additional voicebanks, same as with V1.
"I Have Another Question OP Didn't Anticipate"
Feel free to send an ask with any questions! There's a chance that I won't know the answer either, but I'll try my best.
Also, please let me know if the links on this post ever stop working so I can replace them.
#idk how to tag this#vocaloid#windows xp#tutorial#weird how they just completely ditched the original synthesis engine and switched to a different system btwn v1 and v2#v1 voicebanks cant be accurately replicated in other versions of vocaloid because of that#v1 meiko my beloved <3#also internet archive my beloved <3 <3
6 notes
·
View notes
Text
CoPilot in MS Word
I opened Word yesterday to discover that it now contains CoPilot. It follows you as you type and if you have a personal Microsoft 365 account, you can't turn it off. You will be given 60 AI credits per month and you can't opt out of it.
The only way to banish it is to revert to an earlier version of Office. There is lot of conflicting information and overly complex guides out there, so I thought I'd share the simplest way I found.
How to revert back to an old version of Office that does not have CoPilot
This is fairly simple, thankfully, presuming everything is in the default locations. If not you'll need to adjust the below for where you have things saved.
Click the Windows Button and S to bring up the search box, then type cmd. It will bring up the command prompt as an option. Run it as an administrator.
Paste this into the box at the cursor: cd "\Program Files\Common Files\microsoft shared\ClickToRun"
Hit Enter
Then paste this into the box at the cursor: officec2rclient.exe /update user updatetoversion=16.0.17726.20160
Hit enter and wait while it downloads and installs.
VERY IMPORTANT. Once it's done, open Word, go to File, Account (bottom left), and you'll see a box on the right that says Microsoft 365 updates. Click the box and change the drop down to Disable Updates.
This will roll you back to build 17726.20160, from July 2024, which does not have CoPilot, and prevent it from being installed.
If you want a different build, you can see them all listed here. You will need to change the 17726.20160 at step 4 to whatever build number you want.
This is not a perfect fix, because while it removes CoPilot, it also stops you receiving security updates and bug fixes.
Switching from Office to LibreOffice
At this point, I'm giving up on Microsoft Office/Word. After trying a few different options, I've switched to LibreOffice.
You can download it here for free: https://www.libreoffice.org/
If you like the look of Word, these tutorials show you how to get that look:
www.howtogeek.com/788591/how-to-make-libreoffice-look-like-microsoft-office/
www.debugpoint.com/libreoffice-like-microsoft-office/
If you've been using Word for awhile, chances are you have a significant custom dictionary. You can add it to LibreOffice following these steps.
First, get your dictionary from Microsoft
Go to Manage your Microsoft 365 account: account.microsoft.com.
One you're logged in, scroll down to Privacy, click it and go to the Privacy dashboard.
Scroll down to Spelling and Text. Click into it and scroll past all the words to download your custom dictionary. It will save it as a CSV file.
Open the file you just downloaded and copy the words.
Open Notepad and paste in the words. Save it as a text file and give it a meaningful name (I went with FromWord).
Next, add it to LibreOffice
Open LibreOffice.
Go to Tools in the menu bar, then Options. It will open a new window.
Find Languages and Locales in the left menu, click it, then click on Writing aids.
You'll see User-defined dictionaries. Click New to the right of the box and give it a meaningful name (mine is FromWord).
Hit Apply, then Okay, then exit LibreOffice.
Open Windows Explorer and go to C:\Users\[YourUserName]\AppData\Roaming\LibreOffice\4\user\wordbook and you will see the new dictionary you created. (If you can't see the AppData folder, you will need to show hidden files by ticking the box in the View menu.)
Open it in Notepad by right clicking and choosing 'open with', then pick Notepad from the options.
Open the text file you created at step 5 in 'get your dictionary from Microsoft', copy the words and paste them into your new custom dictionary UNDER the dotted line.
Save and close.
Reopen LibreOffice. Go to Tools, Options, Languages and Locales, Writing aids and make sure the box next to the new dictionary is ticked.
If you use LIbreOffice on multiple machines, you'll need to do this for each machine.
Please note: this worked for me. If it doesn't work for you, check you've followed each step correctly, and try restarting your computer. If it still doesn't work, I can't provide tech support (sorry).
#fuck AI#fuck copilot#fuck Microsoft#Word#Microsoft Word#Libre Office#LibreOffice#fanfic#fic#enshittification#AI#copilot#microsoft copilot#writing#yesterday was a very frustrating day
3K notes
·
View notes
Text
// I hate that the search function doesn't work on this site because I need to find that post of Al dealing with her Florida Man accusation of the week going "who tf started a rumor that I was arrested for making a bomb tutorial for ISIS and putting it on YouTube" because I need to follow it up with "their flag is in comic sans and I have too much self respect to be associated with that"
#// if you're new here there's a funny trend of the public consciousness associating Florida Man crimes with her even if the actual reports#are out there and she can prove that it had nothing to do with her. everything from throwing a baby alligator in a drive thru window to#printing out fake money at a public library from a pinterest template. anyway some Florida man did get in trouble for making a bomb#tutorial for isis and posting it on youtube. normal shit al gets accused of. also the font isis uses on their flag looks like the arabic#version of comic sans and she will not associate with organizations who have dogshit graphic design choices#she has no reason to associate with them to begin with but doubly so because their graphic design is dogshit!! hire a designer!!
1 note
·
View note
Text

By popular demand (I saw two people asking) I thought I would throw together a quick guide to using the road editor tool in the newest version of SimPE! You'll see that this is a very easy tool to use, and best of all, goof-proof. If you do mess up (you probably will) it's very, very easy to correct.
Very, very, very important to make a backup of your hood before you ever do any tinkering in SimPE! I also recommend practicing on a test hood you don't actively play in to get a feel for it before you do anything to your main hoods.

We're starting with a vanilla Strangetown. I would recommend going in your game and taking a nice overhead screenshot of the hood like this first to look at for reference of where everything is situated the way that you're used to looking at it.

2. Open SimPE, go to Tools> Neighbourhood> Neighbourhood Browser and open the hood you're wanting to work on. If you're not so familiar with SimPE, opening your hood can take some time. Touch nothing until it's loaded!

3. Once it's all loaded, from the Resource Tree list pick Neighbourhood Terrain Geometry (NHTG). Then you'll see one file populate the Resource List - click that. Make sure on the bottom that you have Plugin View tab selected.

4. Now you should see this map of your hood pop up! There are different things you can toggle, I like to check the Show Lots box when I'm editing the roads. Then click the Road Editor button on the right.

5. To be able to see better, I've pulled this Plugin View window up a bit - it may rearrange the Resource List and Resource Tree windows a bit to accommodate. You can also press the Zoom 2x button to see closer, and then you'll have to use the scroll bars to move around the map and the road editor tool.

6. The road editing tools here will be placed down in the same orientation as the map. So the two parallel roads running through Strangetown from this perspective are the vertical straight road pieces (top row, second from left).
When you select a road tool, above it will indicate which tool you have selected.
Also - I recommend having Handle Stop Signs ticked.

7. Once you have the correct type of road selected for the spot you're working on, simply click on the map - it lays it down one tile at a time. If you miss a spot like shown here, just fill it in.

8. If you want to create an intersection, first delete the section of road where the intersection will go.

9. Then choose the type of junction for the intersection you're making, and add that piece in. You'll see a red circle appear (unsure if this is because it's an intersection or because you have handle stop signs selected, but I recommend you do have that selected either way).

10. Once you're done making all your changes, click Close Editor.

11. This is the part where you save your changes! First click Commit in the top right of the editor. Then, File> Save!

12. Load your game to check! Looks pretty good with all those new roads!

13. However, we have indeed made some mistakes! Which were absolutely for illustrative purposes and not truly an accident.

14. Never fear! Simply reload the hood in SimPE - I've deleted the spot where the T-junction should go and added one in, and deleted where the road just ended abruptly and added a proper end piece.
I have not experimented with what happens if you try to build a road through hood deco - if you have, please let us know in the comments how that went!
I also have barely touched the terrain editing tools, so that's outside the scope of this tutorial.
I hope this helped!
#the sims 2#sims 2#ts2#ts2 maxis match#ts2 simblr#ts2 tumblr#simblr#brightmaple#ts2 tutorial#simpe tutorial#simpe road editor
784 notes
·
View notes
Text
Big Awful Texture Locator

Download the latest version here
Find any texture in The Sims 2 that is too big, or is 'awful' (suboptimal texture format)
Features:
Find textures in any folder you choose
Filter by width, height, memory size, texture format, or number of mipmap levels
Preview and show details of textures the tool found
Remember 'known good' textures, which are optionally excluded from being shown in the list
Look up the path of the package, and the group and instance of the resource
Copy texture/resource details (right click)
Open the package in the default package editor (double click)
Dark mode/light mode and UI scale adjustable
Native on both Windows and Linux
Why?
The Sims 2 has had a long-standing problem known as 'pink flashing' or 'pink soup' when using too much custom content. The Sims 2 is a 32-bit program, which means that it normally has a maximum memory limit of 2GiB (2048MiB) and by using a so-called '4GB patch' you can raise this limit to -you guessed it- 4GiB, this limit might seem pretty large, but due to how the game works you might hit this limit sooner than expected!
Let's say you have 1024x2048 textures (which is the default for Sims 4 textures, and thus also often for 4to2 cc) in RGBA format, these textures will EACH take up 8MiB of texture memory! This means you could possibly only have only a MAXIMUM of 512 textures loaded in memory before you run out of memory completely. In practice, this limit will probably be lower due to other factors.
This tool will help you find textures that take up too much texture memory, and thus (hopefully) help alleviate some amount of pink flashing.
Tutorial
First, download the program from the link above and follow the instructions to open the program.
Now let's get the program looking the way you want: click on the sun/moon button on the top left of the program to switch light/dark mode and click the "UI Scale" number next to it and enter a new number to change the size of the interface.
Set the folder we want to search: at the top bar, search for the 'Downloads:' bar, then at the end click the button with the folder icon and select your folder. Once you've selected a folder the program will instantly start scanning, if you want to restart this scan then at any time you can click the text in the Downloads bar and press enter.
Currently this list will show all textures in the scan folder, which is probably not very interesting. To find some more interesting textures we can add some filters to the texture list. On the top bar, click on the 'Filter' button: this will open the filter list and it will be empty if you haven't added any filters previously.

These filters filter the texture list one by one, each filter removing more textures from the displayed list of textures. To add a filter, click the plus button, and to remove it click on the trashcan button at the start of the line.
To edit a filter, click on the first box to choose the filter type, click on the second box to choose the type of comparison, and select the number in the last box to set the number to compare with.
The comparison type can be < (smaller than), <= (smaller or equal), > (greater than), >= (greater or equal), == (equal), or != (not equal).
The Format filter is different: make a format filter, then click on the 'choose' button and choose the texture formats that you want to show in the texture list.

Let's edit some textures!
In the texture list, find a texture that you think is too big, and either double click on it to open it in the default package editor or right click on it to show a menu to copy the details of the package.
Finally, once you have the package opened in your favorite package manager, edit the texture to be smaller and/or a better texture format, save and ta-da! your game will now use less texture memory.
434 notes
·
View notes
Text
My GIF Making process: Screen capturing using MPV player, Organizing files, 3 Sharpening settings, Basic Coloring PSD + Actions set

This is a very long post so heads up.
I’ll try to be as thorough and true as much as possible to the way I make my gifs (I already use Photoshop Actions which I’ve long since set up but now for this tutorial I’m reviewing them to show you the exact steps I’ve learned to create my gifs 😃) and present them to you in a semi-coherent way. Also, please bear with me since English is my second language.
First things first. Below are the things and tools we need to do this:
Downloaded 4K or 1080p quality videos (let’s all assume we know where to get these—especially for high definition movies and tv series—so this post doesn’t get removed, okay? 😛)
Adobe Photoshop CC or the CS versions can work as well, but full disclosure I haven’t created gifs using the CS versions since 2020. I’m currently using Adobe Photoshop 2024.
mpv player. Use mpv player to get those frames/screenshots or any other video player that has a screen grabber feature. I’ve used adapter for the longest time but I’ve switched to mpv because the press to screenshot feature while the video is playing has been a game changer not to mention ultimate time saver for me. For adapter you need to play it in another video player (like VLC player), to get the start and end timestamps of the scene you want to gif which takes me ages before I can even open Photoshop.
Anyway! Please stop reading this post for a moment and head over to this amazing tutorial by kylos. She perfectly tells you how to install and use mpv player, both for Mac and Windows users.
One thing I have to share though, I had a tough time when I updated my MacOS to Sonoma since MPV is suddenly either duplicating frames or when I delete the duplicates the player seems to be skipping frames :/ I searched and found a solution here, though it didn’t work for me lol. My workaround for this in the meantime is decreasing the speed down to 0.70 then start screenshotting—it’s not the same pre Sonoma update but it works so I’ll have to accept it rather than have jumpy looking gifs.
Now, after this part of kylos’ tutorial:

you can continue reading the following sections of my gif tutorial below.
I want to share this little tip (sorry, this will only cater to Mac users) that I hope will be helpful for organizing the screenshots that MPV saved to the folder you have selected. Because believe me you don’t want to go through 1k+ of screenshots to select just 42-50 frames for your gif.
The Control + Command + N shortcut
This shortcut allows you to create a new folder from files you have pre-selected. As you can see below I have already created a couple of folders, and inside each folder I have selected screenshots that I want to include in one single gif. It's up to you how you want to divide yours, assuming you intend to create and post a Tumblr gifset rather than just one gif.

Another tip is making use of tags. Most of, if not all the time, I make supercorp gifs so I tag blue for Kara and red (or green) for Lena—just being ridiculously on brand and all that.
Before we finally open Photoshop, there's one more thing I want to say—I know, please bear with me for the third? fourth? time 😅
It's helpful to organize everything into their respective folders so you know the total number of items/frames you have. This way, you can add or delete excess or unnecessary shots before uploading them in Photoshop.
For example below there are 80 screenshots of Kara inside this folder and for a 1:1 (540 x 540 px) Tumblr gif, Photoshop can just work around with 42-50 max number of frames with color adjustments applied before it exceeds the 10 MB file size limit of Tumblr.

Sometimes I skip this step because it can be exhausting (haha) and include everything so I can decide visually which frames to keep later on. You'll understand what I mean later on. But it's important to keep the Tumblr 10 MB file size limit in mind. Fewer frames, or just the right amount of frames, is better.
So, with the screenshot organization out of the way, let's finally head over to Photoshop.
Giffing in Photoshop, yay!
Let’s begin by navigating to File > Scripts > Load Files into Stack…

The Load Layers window will appear. Click the Browse button next.
Find your chosen screenshots folder, press Command + A to select all files from that folder then click Open. Then click OK.
After importing and stacking your files, Photoshop should display the following view:

By the way, I'll be providing the clip I've used in this tutorial so if want to use them to follow along be my guest :)
If you haven't already opened your Timeline panel, navigate to Windows > Timeline.
Now, let's focus on the Timeline panel for the next couple of steps.
Click Create Video Timeline, then you’ll have this:

Now click the menu icon on the top right corner then go to Convert Frames > Make Frames from Clips

Still working on the Timeline panel, click the bottom left icon this time—the icon with the three tiny boxes—to Convert to Frame Animation
Select Make Frames From Layers from the top right corner menu button.
So now you have this:

Go and click the top right menu icon again to Select All Frames
Then click the small dropdown icon to set another value for Frame Delay. Select Other…

The best for me and for most is 0.05 but you can always play around and see what you think works for you.
Click the top right menu icon again to Reverse Frames.
I think Photoshop has long since fixed this issue but usually the first animation frame is empty so I just delete it but now going through all these steps there seems to be none of that but anyways, the delete icon is the last one among the line of feature buttons at the bottom part of the Timeline panel.
Yay, now we can have our first proper GIF preview of a thirsty Lena 😜

Press spacebar to watch your gif play for the very first time! After an hour and half of selecting and cutting off screenshots! 😛 Play it some more. No really, I’m serious. I do this so even as early (lol) as this part in the gif making process, I can see which frames I can/should delete to be within the 10 MB file size limit. You can also do it at the end of course 🙂
Now, let’s go to the next important steps of this tutorial post which I’ve numbered below.
Crop and resize to meet Tumblr's required dimensions. The width value should be either 540px, 268px, or 177px.
Convert the gif to a Smart Object for sharpening.
Apply lighting and basic color adjustments before the heavy coloring. I will be sharing the base adjustments layers I use for my gifs 😃.
1. Crop and Resize
Click on the Crop tool (shortcut: the C key)

I like my GIFs big so I always set this to 1:1 ratio if the scene allows it. Press the Enter key after selecting the area of the frame that you want to keep.
Side note: If you find that after cropping, you want to adjust the image to the left or another direction, simply unselect the Delete Cropped Pixels option. This way, you will still have the whole frame area available to crop again as needed and as you prefer.
Now we need to resize our gif and the shortcut for that is Command + Opt + I. Type in 540 as the width measurement, then the height will automatically change to follow the ratio you’ve set while cropping.
540 x 540 px for 1:1
540 x 405 px for 4:3
540 x 304 px for 16:9
For the Resample value I prefer Bilinear—but you can always select the other options to see what you like best.
Click OK. Then Command + 0 and Command + - to properly view the those 540 pixels.

Now we get to the exciting part :) the sharpen settings!
2. Sharpen
First we need to have all these layers “compressed” intro a single smart object from which we can apply filters to.
Select this little button on the the bottom left corner of the Timeline panel.


Select > All Layers
Then go to Filter > Convert for Smart Filters
Just click OK when a pop-up shows up.
Now you should have this view on the Layers panel:

Now I have 3 sharpen settings to share but I’ll have download links to the Action packs at the end of this long ass tutorial so if you want to skip ahead, feel free to do so.
Sharpen v1
Go to Filter > Sharpen > Smart Sharpen…
Below are my settings. I don’t adjust anything under Shadows/Highlights.
Amount: 500
Radius: 0.4
Click OK then do another Smart Sharpen but this time with the below adjustments.
Amount: 12
Radius: 10.0

As you can see Lena’s beautiful eyes are “popping out” now with these filters applied. Click OK.
Now we need to Convert to Frame Animation. Follow the steps below.
Click on the menu icon at the top right corner of the Timeline panel, then click Convert Frames > Flatten Frames into Clips
Then Convert Frames > Convert to Frame Animation
One more click to Make Frames From Layers
Delete the first frame then Select All then Set Frame Delay to 0.05

and there you have it! Play your GIF and make sure it’s just around 42-50 frames. This is the time to select and delete.
To preview and save your GIF go to File > Export > Save for Web (Legacy)…
Below are my Export settings. Make sure to have the file size around 9.2 MB to 9.4 MB max and not exactly 10 MB.

This time I got away with 55 frames but this is because I haven’t applied lighting and color adjustments yet and not to mention the smart sharpen settings aren't to heavy so let’s take that into consideration.
Sharpen v1 preview:

Sharpen v2
Go back to this part of the tutorial and apply the v2 settings.
Smart Sharpen 1:
Amount: 500
Radius: 0.3
Smart Sharpen 2:
Amount: 20
Radius: 0.5
We’re adding a new type of Filter which is Reduce Noise (Filter > Noise > Reduce Noise...) with the below settings.

Then one last Smart Sharpen:
Amount: 500
Radius: 0.3
Your Layers panel should look like this:

Then do the Convert to Frames Animation section again and see below preview.
Sharpen v2 preview:

Sharpen v3:
Smart Sharpen 1:
Amount: 500
Radius: 0.4
Smart Sharpen 2:
Amount: 12
Radius: 10.0
Reduce Noise:
Strength: 5
Preserve Details: 50%
Reduce Color Noise: 0%
Sharpen Details: 50%
Sharpen v3 preview:

And here they are next to each other with coloring applied:
v1

v2

v3

Congratulations, you've made it to the end of the post 😂
As promised, here is the download link to all the files I used in this tutorial which include:
supercorp 2.05 Crossfire clip
3 PSD files with sharpen settings and basic coloring PSD
Actions set
As always, if you're feeling generous here's my Ko-fi link :) Thank you guys and I hope this tutorial will help you and make you love gif making.
P.S. In the next post I'll be sharing more references I found helpful especially with coloring. I just have to search and gather them all.
-Jill
#tutorial#gif tutorial#photoshop tutorial#gif making#sharpening#sharpening tutorial#photoshop#photoshop resources#psd#psd coloring#gif coloring#supercorp#supercorpedit#lena luthor#supergirl#my tutorial#this has been a long time coming#guys. i'm BEGGING you. use the actions set - it was a pain doing all this manually again ngl LMAO#i've been so used to just playing the actions#so this has been a wild refresher course for me too 😆
772 notes
·
View notes
Text
How I ditched streaming services and learned to love Linux: A step-by-step guide to building your very own personal media streaming server (V2.0: REVISED AND EXPANDED EDITION)
This is a revised, corrected and expanded version of my tutorial on setting up a personal media server that previously appeared on my old blog (donjuan-auxenfers). I expect that that post is still making the rounds (hopefully with my addendum on modifying group share permissions in Ubuntu to circumvent 0x8007003B "Unexpected Network Error" messages in Windows 10/11 when transferring files) but I have no way of checking. Anyway this new revised version of the tutorial corrects one or two small errors I discovered when rereading what I wrote, adds links to all products mentioned and is just more polished generally. I also expanded it a bit, pointing more adventurous users toward programs such as Sonarr/Radarr/Lidarr and Overseerr which can be used for automating user requests and media collection.
So then, what is this tutorial? This is a tutorial on how to build and set up your own personal media server using Ubuntu as an operating system and Plex (or Jellyfin) to not only manage your media, but to also stream that media to your devices both at home and abroad anywhere in the world where you have an internet connection. Its intent is to show you how building a personal media server and stuffing it full of films, TV, and music that you acquired through indiscriminate and voracious media piracy various legal methods will free you to completely ditch paid streaming services. No more will you have to pay for Disney+, Netflix, HBOMAX, Hulu, Amazon Prime, Peacock, CBS All Access, Paramount+, Crave or any other streaming service that is not named Criterion Channel. Instead whenever you want to watch your favourite films and television shows, you’ll have your own personal service that only features things that you want to see, with files that you have control over. And for music fans out there, both Jellyfin and Plex support music streaming, meaning you can even ditch music streaming services. Goodbye Spotify, Youtube Music, Tidal and Apple Music, welcome back unreasonably large MP3 (or FLAC) collections.
On the hardware front, I’m going to offer a few options catered towards different budgets and media library sizes. The cost of getting a media server up and running using this guide will cost you anywhere from $450 CAD/$325 USD at the low end to $1500 CAD/$1100 USD at the high end (it could go higher). My server was priced closer to the higher figure, but I went and got a lot more storage than most people need. If that seems like a little much, consider for a moment, do you have a roommate, a close friend, or a family member who would be willing to chip in a few bucks towards your little project provided they get access? Well that's how I funded my server. It might also be worth thinking about the cost over time, i.e. how much you spend yearly on subscriptions vs. a one time cost of setting up a server. Additionally there's just the joy of being able to scream "fuck you" at all those show cancelling, library deleting, hedge fund vampire CEOs who run the studios through denying them your money. Drive a stake through David Zaslav's heart.
On the software side I will walk you step-by-step through installing Ubuntu as your server's operating system, configuring your storage as a RAIDz array with ZFS, sharing your zpool to Windows with Samba, running a remote connection between your server and your Windows PC, and then a little about started with Plex/Jellyfin. Every terminal command you will need to input will be provided, and I even share a custom #bash script that will make used vs. available drive space on your server display correctly in Windows.
If you have a different preferred flavour of Linux (Arch, Manjaro, Redhat, Fedora, Mint, OpenSUSE, CentOS, Slackware etc. et. al.) and are aching to tell me off for being basic and using Ubuntu, this tutorial is not for you. The sort of person with a preferred Linux distro is the sort of person who can do this sort of thing in their sleep. Also I don't care. This tutorial is intended for the average home computer user. This is also why we’re not using a more exotic home server solution like running everything through Docker Containers and managing it through a dashboard like Homarr or Heimdall. While such solutions are fantastic and can be very easy to maintain once you have it all set up, wrapping your brain around Docker is a whole thing in and of itself. If you do follow this tutorial and had fun putting everything together, then I would encourage you to return in a year’s time, do your research and set up everything with Docker Containers.
Lastly, this is a tutorial aimed at Windows users. Although I was a daily user of OS X for many years (roughly 2008-2023) and I've dabbled quite a bit with various Linux distributions (mostly Ubuntu and Manjaro), my primary OS these days is Windows 11. Many things in this tutorial will still be applicable to Mac users, but others (e.g. setting up shares) you will have to look up for yourself. I doubt it would be difficult to do so.
Nothing in this tutorial will require feats of computing expertise. All you will need is a basic computer literacy (i.e. an understanding of what a filesystem and directory are, and a degree of comfort in the settings menu) and a willingness to learn a thing or two. While this guide may look overwhelming at first glance, it is only because I want to be as thorough as possible. I want you to understand exactly what it is you're doing, I don't want you to just blindly follow steps. If you half-way know what you’re doing, you will be much better prepared if you ever need to troubleshoot.
Honestly, once you have all the hardware ready it shouldn't take more than an afternoon or two to get everything up and running.
(This tutorial is just shy of seven thousand words long so the rest is under the cut.)
Step One: Choosing Your Hardware
Linux is a light weight operating system, depending on the distribution there's close to no bloat. There are recent distributions available at this very moment that will run perfectly fine on a fourteen year old i3 with 4GB of RAM. Moreover, running Plex or Jellyfin isn’t resource intensive in 90% of use cases. All this is to say, we don’t require an expensive or powerful computer. This means that there are several options available: 1) use an old computer you already have sitting around but aren't using 2) buy a used workstation from eBay, or what I believe to be the best option, 3) order an N100 Mini-PC from AliExpress or Amazon.
Note: If you already have an old PC sitting around that you’ve decided to use, fantastic, move on to the next step.
When weighing your options, keep a few things in mind: the number of people you expect to be streaming simultaneously at any one time, the resolution and bitrate of your media library (4k video takes a lot more processing power than 1080p) and most importantly, how many of those clients are going to be transcoding at any one time. Transcoding is what happens when the playback device does not natively support direct playback of the source file. This can happen for a number of reasons, such as the playback device's native resolution being lower than the file's internal resolution, or because the source file was encoded in a video codec unsupported by the playback device.
Ideally we want any transcoding to be performed by hardware. This means we should be looking for a computer with an Intel processor with Quick Sync. Quick Sync is a dedicated core on the CPU die designed specifically for video encoding and decoding. This specialized hardware makes for highly efficient transcoding both in terms of processing overhead and power draw. Without these Quick Sync cores, transcoding must be brute forced through software. This takes up much more of a CPU’s processing power and requires much more energy. But not all Quick Sync cores are created equal and you need to keep this in mind if you've decided either to use an old computer or to shop for a used workstation on eBay
Any Intel processor from second generation Core (Sandy Bridge circa 2011) onward has Quick Sync cores. It's not until 6th gen (Skylake), however, that the cores support the H.265 HEVC codec. Intel’s 10th gen (Comet Lake) processors introduce support for 10bit HEVC and HDR tone mapping. And the recent 12th gen (Alder Lake) processors brought with them hardware AV1 decoding. As an example, while an 8th gen (Kaby Lake) i5-8500 will be able to hardware transcode a H.265 encoded file, it will fall back to software transcoding if given a 10bit H.265 file. If you’ve decided to use that old PC or to look on eBay for an old Dell Optiplex keep this in mind.
Note 1: The price of old workstations varies wildly and fluctuates frequently. If you get lucky and go shopping shortly after a workplace has liquidated a large number of their workstations you can find deals for as low as $100 on a barebones system, but generally an i5-8500 workstation with 16gb RAM will cost you somewhere in the area of $260 CAD/$200 USD.
Note 2: The AMD equivalent to Quick Sync is called Video Core Next, and while it's fine, it's not as efficient and not as mature a technology. It was only introduced with the first generation Ryzen CPUs and it only got decent with their newest CPUs, we want something cheap.
Alternatively you could forgo having to keep track of what generation of CPU is equipped with Quick Sync cores that feature support for which codecs, and just buy an N100 mini-PC. For around the same price or less of a used workstation you can pick up a mini-PC with an Intel N100 processor. The N100 is a four-core processor based on the 12th gen Alder Lake architecture and comes equipped with the latest revision of the Quick Sync cores. These little processors offer astounding hardware transcoding capabilities for their size and power draw. Otherwise they perform equivalent to an i5-6500, which isn't a terrible CPU. A friend of mine uses an N100 machine as a dedicated retro emulation gaming system and it does everything up to 6th generation consoles just fine. The N100 is also a remarkably efficient chip, it sips power. In fact, the difference between running one of these and an old workstation could work out to hundreds of dollars a year in energy bills depending on where you live.
You can find these Mini-PCs all over Amazon or for a little cheaper on AliExpress. They range in price from $170 CAD/$125 USD for a no name N100 with 8GB RAM to $280 CAD/$200 USD for a Beelink S12 Pro with 16GB RAM. The brand doesn't really matter, they're all coming from the same three factories in Shenzen, go for whichever one fits your budget or has features you want. 8GB RAM should be enough, Linux is lightweight and Plex only calls for 2GB RAM. 16GB RAM might result in a slightly snappier experience, especially with ZFS. A 256GB SSD is more than enough for what we need as a boot drive, but going for a bigger drive might allow you to get away with things like creating preview thumbnails for Plex, but it’s up to you and your budget.
The Mini-PC I wound up buying was a Firebat AK2 Plus with 8GB RAM and a 256GB SSD. It looks like this:

Note: Be forewarned that if you decide to order a Mini-PC from AliExpress, note the type of power adapter it ships with. The mini-PC I bought came with an EU power adapter and I had to supply my own North American power supply. Thankfully this is a minor issue as barrel plug 30W/12V/2.5A power adapters are easy to find and can be had for $10.
Step Two: Choosing Your Storage
Storage is the most important part of our build. It is also the most expensive. Thankfully it’s also the most easily upgrade-able down the line.
For people with a smaller media collection (4TB to 8TB), a more limited budget, or who will only ever have two simultaneous streams running, I would say that the most economical course of action would be to buy a USB 3.0 8TB external HDD. Something like this one from Western Digital or this one from Seagate. One of these external drives will cost you in the area of $200 CAD/$140 USD. Down the line you could add a second external drive or replace it with a multi-drive RAIDz set up such as detailed below.
If a single external drive the path for you, move on to step three.
For people with larger media libraries (12TB+), who prefer media in 4k, or care who about data redundancy, the answer is a RAID array featuring multiple HDDs in an enclosure.
Note: If you are using an old PC or used workstatiom as your server and have the room for at least three 3.5" drives, and as many open SATA ports on your mother board you won't need an enclosure, just install the drives into the case. If your old computer is a laptop or doesn’t have room for more internal drives, then I would suggest an enclosure.
The minimum number of drives needed to run a RAIDz array is three, and seeing as RAIDz is what we will be using, you should be looking for an enclosure with three to five bays. I think that four disks makes for a good compromise for a home server. Regardless of whether you go for a three, four, or five bay enclosure, do be aware that in a RAIDz array the space equivalent of one of the drives will be dedicated to parity at a ratio expressed by the equation 1 − 1/n i.e. in a four bay enclosure equipped with four 12TB drives, if we configured our drives in a RAIDz1 array we would be left with a total of 36TB of usable space (48TB raw size). The reason for why we might sacrifice storage space in such a manner will be explained in the next section.
A four bay enclosure will cost somewhere in the area of $200 CDN/$140 USD. You don't need anything fancy, we don't need anything with hardware RAID controls (RAIDz is done entirely in software) or even USB-C. An enclosure with USB 3.0 will perform perfectly fine. Don’t worry too much about USB speed bottlenecks. A mechanical HDD will be limited by the speed of its mechanism long before before it will be limited by the speed of a USB connection. I've seen decent looking enclosures from TerraMaster, Yottamaster, Mediasonic and Sabrent.
When it comes to selecting the drives, as of this writing, the best value (dollar per gigabyte) are those in the range of 12TB to 20TB. I settled on 12TB drives myself. If 12TB to 20TB drives are out of your budget, go with what you can afford, or look into refurbished drives. I'm not sold on the idea of refurbished drives but many people swear by them.
When shopping for harddrives, search for drives designed specifically for NAS use. Drives designed for NAS use typically have better vibration dampening and are designed to be active 24/7. They will also often make use of CMR (conventional magnetic recording) as opposed to SMR (shingled magnetic recording). This nets them a sizable read/write performance bump over typical desktop drives. Seagate Ironwolf and Toshiba NAS are both well regarded brands when it comes to NAS drives. I would avoid Western Digital Red drives at this time. WD Reds were a go to recommendation up until earlier this year when it was revealed that they feature firmware that will throw up false SMART warnings telling you to replace the drive at the three year mark quite often when there is nothing at all wrong with that drive. It will likely even be good for another six, seven, or more years.

Step Three: Installing Linux
For this step you will need a USB thumbdrive of at least 6GB in capacity, an .ISO of Ubuntu, and a way to make that thumbdrive bootable media.
First download a copy of Ubuntu desktop (for best performance we could download the Server release, but for new Linux users I would recommend against the server release. The server release is strictly command line interface only, and having a GUI is very helpful for most people. Not many people are wholly comfortable doing everything through the command line, I'm certainly not one of them, and I grew up with DOS 6.0. 22.04.3 Jammy Jellyfish is the current Long Term Service release, this is the one to get.
Download the .ISO and then download and install balenaEtcher on your Windows PC. BalenaEtcher is an easy to use program for creating bootable media, you simply insert your thumbdrive, select the .ISO you just downloaded, and it will create a bootable installation media for you.
Once you've made a bootable media and you've got your Mini-PC (or you old PC/used workstation) in front of you, hook it directly into your router with an ethernet cable, and then plug in the HDD enclosure, a monitor, a mouse and a keyboard. Now turn that sucker on and hit whatever key gets you into the BIOS (typically ESC, DEL or F2). If you’re using a Mini-PC check to make sure that the P1 and P2 power limits are set correctly, my N100's P1 limit was set at 10W, a full 20W under the chip's power limit. Also make sure that the RAM is running at the advertised speed. My Mini-PC’s RAM was set at 2333Mhz out of the box when it should have been 3200Mhz. Once you’ve done that, key over to the boot order and place the USB drive first in the boot order. Then save the BIOS settings and restart.
After you restart you’ll be greeted by Ubuntu's installation screen. Installing Ubuntu is really straight forward, select the "minimal" installation option, as we won't need anything on this computer except for a browser (Ubuntu comes preinstalled with Firefox) and Plex Media Server/Jellyfin Media Server. Also remember to delete and reformat that Windows partition! We don't need it.
Step Four: Installing ZFS and Setting Up the RAIDz Array
Note: If you opted for just a single external HDD skip this step and move onto setting up a Samba share.
Once Ubuntu is installed it's time to configure our storage by installing ZFS to build our RAIDz array. ZFS is a "next-gen" file system that is both massively flexible and massively complex. It's capable of snapshot backup, self healing error correction, ZFS pools can be configured with drives operating in a supplemental manner alongside the storage vdev (e.g. fast cache, dedicated secondary intent log, hot swap spares etc.). It's also a file system very amenable to fine tuning. Block and sector size are adjustable to use case and you're afforded the option of different methods of inline compression. If you'd like a very detailed overview and explanation of its various features and tips on tuning a ZFS array check out these articles from Ars Technica. For now we're going to ignore all these features and keep it simple, we're going to pull our drives together into a single vdev running in RAIDz which will be the entirety of our zpool, no fancy cache drive or SLOG.
Open up the terminal and type the following commands:
sudo apt update
then
sudo apt install zfsutils-linux
This will install the ZFS utility. Verify that it's installed with the following command:
zfs --version
Now, it's time to check that the HDDs we have in the enclosure are healthy, running, and recognized. We also want to find out their device IDs and take note of them:
sudo fdisk -1
Note: You might be wondering why some of these commands require "sudo" in front of them while others don't. "Sudo" is short for "super user do”. When and where "sudo" is used has to do with the way permissions are set up in Linux. Only the "root" user has the access level to perform certain tasks in Linux. As a matter of security and safety regular user accounts are kept separate from the "root" user. It's not advised (or even possible) to boot into Linux as "root" with most modern distributions. Instead by using "sudo" our regular user account is temporarily given the power to do otherwise forbidden things. Don't worry about it too much at this stage, but if you want to know more check out this introduction.
If everything is working you should get a list of the various drives detected along with their device IDs which will look like this: /dev/sdc. You can also check the device IDs of the drives by opening the disk utility app. Jot these IDs down as we'll need them for our next step, creating our RAIDz array.
RAIDz is similar to RAID-5 in that instead of striping your data over multiple disks, exchanging redundancy for speed and available space (RAID-0), or mirroring your data writing by two copies of every piece (RAID-1), it instead writes parity blocks across the disks in addition to striping, this provides a balance of speed, redundancy and available space. If a single drive fails, the parity blocks on the working drives can be used to reconstruct the entire array as soon as a replacement drive is added.
Additionally, RAIDz improves over some of the common RAID-5 flaws. It's more resilient and capable of self healing, as it is capable of automatically checking for errors against a checksum. It's more forgiving in this way, and it's likely that you'll be able to detect when a drive is dying well before it fails. A RAIDz array can survive the loss of any one drive.
Note: While RAIDz is indeed resilient, if a second drive fails during the rebuild, you're fucked. Always keep backups of things you can't afford to lose. This tutorial, however, is not about proper data safety.
To create the pool, use the following command:
sudo zpool create "zpoolnamehere" raidz "device IDs of drives we're putting in the pool"
For example, let's creatively name our zpool "mypool". This poil will consist of four drives which have the device IDs: sdb, sdc, sdd, and sde. The resulting command will look like this:
sudo zpool create mypool raidz /dev/sdb /dev/sdc /dev/sdd /dev/sde
If as an example you bought five HDDs and decided you wanted more redundancy dedicating two drive to this purpose, we would modify the command to "raidz2" and the command would look something like the following:
sudo zpool create mypool raidz2 /dev/sdb /dev/sdc /dev/sdd /dev/sde /dev/sdf
An array configured like this is known as RAIDz2 and is able to survive two disk failures.
Once the zpool has been created, we can check its status with the command:
zpool status
Or more concisely with:
zpool list
The nice thing about ZFS as a file system is that a pool is ready to go immediately after creation. If we were to set up a traditional RAID-5 array using mbam, we'd have to sit through a potentially hours long process of reformatting and partitioning the drives. Instead we're ready to go right out the gates.
The zpool should be automatically mounted to the filesystem after creation, check on that with the following:
df -hT | grep zfs
Note: If your computer ever loses power suddenly, say in event of a power outage, you may have to re-import your pool. In most cases, ZFS will automatically import and mount your pool, but if it doesn’t and you can't see your array, simply open the terminal and type sudo zpool import -a.
By default a zpool is mounted at /"zpoolname". The pool should be under our ownership but let's make sure with the following command:
sudo chown -R "yourlinuxusername" /"zpoolname"
Note: Changing file and folder ownership with "chown" and file and folder permissions with "chmod" are essential commands for much of the admin work in Linux, but we won't be dealing with them extensively in this guide. If you'd like a deeper tutorial and explanation you can check out these two guides: chown and chmod.

You can access the zpool file system through the GUI by opening the file manager (the Ubuntu default file manager is called Nautilus) and clicking on "Other Locations" on the sidebar, then entering the Ubuntu file system and looking for a folder with your pool's name. Bookmark the folder on the sidebar for easy access.

Your storage pool is now ready to go. Assuming that we already have some files on our Windows PC we want to copy to over, we're going to need to install and configure Samba to make the pool accessible in Windows.
Step Five: Setting Up Samba/Sharing
Samba is what's going to let us share the zpool with Windows and allow us to write to it from our Windows machine. First let's install Samba with the following commands:
sudo apt-get update
then
sudo apt-get install samba
Next create a password for Samba.
sudo smbpswd -a "yourlinuxusername"
It will then prompt you to create a password. Just reuse your Ubuntu user password for simplicity's sake.
Note: if you're using just a single external drive replace the zpool location in the following commands with wherever it is your external drive is mounted, for more information see this guide on mounting an external drive in Ubuntu.
After you've created a password we're going to create a shareable folder in our pool with this command
mkdir /"zpoolname"/"foldername"
Now we're going to open the smb.conf file and make that folder shareable. Enter the following command.
sudo nano /etc/samba/smb.conf
This will open the .conf file in nano, the terminal text editor program. Now at the end of smb.conf add the following entry:
["foldername"]
path = /"zpoolname"/"foldername"
available = yes
valid users = "yourlinuxusername"
read only = no
writable = yes
browseable = yes
guest ok = no
Ensure that there are no line breaks between the lines and that there's a space on both sides of the equals sign. Our next step is to allow Samba traffic through the firewall:
sudo ufw allow samba
Finally restart the Samba service:
sudo systemctl restart smbd
At this point we'll be able to access to the pool, browse its contents, and read and write to it from Windows. But there's one more thing left to do, Windows doesn't natively support the ZFS file systems and will read the used/available/total space in the pool incorrectly. Windows will read available space as total drive space, and all used space as null. This leads to Windows only displaying a dwindling amount of "available" space as the drives are filled. We can fix this! Functionally this doesn't actually matter, we can still write and read to and from the disk, it just makes it difficult to tell at a glance the proportion of used/available space, so this is an optional step but one I recommend (this step is also unnecessary if you're just using a single external drive). What we're going to do is write a little shell script in #bash. Open nano with the terminal with the command:
nano
Now insert the following code:
#!/bin/bash CUR_PATH=`pwd` ZFS_CHECK_OUTPUT=$(zfs get type $CUR_PATH 2>&1 > /dev/null) > /dev/null if [[ $ZFS_CHECK_OUTPUT == *not\ a\ ZFS* ]] then IS_ZFS=false else IS_ZFS=true fi if [[ $IS_ZFS = false ]] then df $CUR_PATH | tail -1 | awk '{print $2" "$4}' else USED=$((`zfs get -o value -Hp used $CUR_PATH` / 1024)) > /dev/null AVAIL=$((`zfs get -o value -Hp available $CUR_PATH` / 1024)) > /dev/null TOTAL=$(($USED+$AVAIL)) > /dev/null echo $TOTAL $AVAIL fi
Save the script as "dfree.sh" to /home/"yourlinuxusername" then change the ownership of the file to make it executable with this command:
sudo chmod 774 dfree.sh
Now open smb.conf with sudo again:
sudo nano /etc/samba/smb.conf
Now add this entry to the top of the configuration file to direct Samba to use the results of our script when Windows asks for a reading on the pool's used/available/total drive space:
[global]
dfree command = /home/"yourlinuxusername"/dfree.sh
Save the changes to smb.conf and then restart Samba again with the terminal:
sudo systemctl restart smbd
Now there’s one more thing we need to do to fully set up the Samba share, and that’s to modify a hidden group permission. In the terminal window type the following command:
usermod -a -G sambashare “yourlinuxusername”
Then restart samba again:
sudo systemctl restart smbd
If we don’t do this last step, everything will appear to work fine, and you will even be able to see and map the drive from Windows and even begin transferring files, but you'd soon run into a lot of frustration. As every ten minutes or so a file would fail to transfer and you would get a window announcing “0x8007003B Unexpected Network Error”. This window would require your manual input to continue the transfer with the file next in the queue. And at the end it would reattempt to transfer whichever files failed the first time around. 99% of the time they’ll go through that second try, but this is still all a major pain in the ass. Especially if you’ve got a lot of data to transfer or you want to step away from the computer for a while.
It turns out samba can act a little weirdly with the higher read/write speeds of RAIDz arrays and transfers from Windows, and will intermittently crash and restart itself if this group option isn’t changed. Inputting the above command will prevent you from ever seeing that window.
The last thing we're going to do before switching over to our Windows PC is grab the IP address of our Linux machine. Enter the following command:
hostname -I
This will spit out this computer's IP address on the local network (it will look something like 192.168.0.x), write it down. It might be a good idea once you're done here to go into your router settings and reserving that IP for your Linux system in the DHCP settings. Check the manual for your specific model router on how to access its settings, typically it can be accessed by opening a browser and typing http:\\192.168.0.1 in the address bar, but your router may be different.
Okay we’re done with our Linux computer for now. Get on over to your Windows PC, open File Explorer, right click on Network and click "Map network drive". Select Z: as the drive letter (you don't want to map the network drive to a letter you could conceivably be using for other purposes) and enter the IP of your Linux machine and location of the share like so: \\"LINUXCOMPUTERLOCALIPADDRESSGOESHERE"\"zpoolnamegoeshere"\. Windows will then ask you for your username and password, enter the ones you set earlier in Samba and you're good. If you've done everything right it should look something like this:

You can now start moving media over from Windows to the share folder. It's a good idea to have a hard line running to all machines. Moving files over Wi-Fi is going to be tortuously slow, the only thing that’s going to make the transfer time tolerable (hours instead of days) is a solid wired connection between both machines and your router.
Step Six: Setting Up Remote Desktop Access to Your Server
After the server is up and going, you’ll want to be able to access it remotely from Windows. Barring serious maintenance/updates, this is how you'll access it most of the time. On your Linux system open the terminal and enter:
sudo apt install xrdp
Then:
sudo systemctl enable xrdp
Once it's finished installing, open “Settings” on the sidebar and turn off "automatic login" in the User category. Then log out of your account. Attempting to remotely connect to your Linux computer while you’re logged in will result in a black screen!
Now get back on your Windows PC, open search and look for "RDP". A program called "Remote Desktop Connection" should pop up, open this program as an administrator by right-clicking and selecting “run as an administrator”. You’ll be greeted with a window. In the field marked “Computer” type in the IP address of your Linux computer. Press connect and you'll be greeted with a new window and prompt asking for your username and password. Enter your Ubuntu username and password here.

If everything went right, you’ll be logged into your Linux computer. If the performance is sluggish, adjust the display options. Lowering the resolution and colour depth do a lot to make the interface feel snappier.

Remote access is how we're going to be using our Linux system from now, barring edge cases like needing to get into the BIOS or upgrading to a new version of Ubuntu. Everything else from performing maintenance like a monthly zpool scrub to checking zpool status and updating software can all be done remotely.

This is how my server lives its life now, happily humming and chirping away on the floor next to the couch in a corner of the living room.
Step Seven: Plex Media Server/Jellyfin
Okay we’ve got all the ground work finished and our server is almost up and running. We’ve got Ubuntu up and running, our storage array is primed, we’ve set up remote connections and sharing, and maybe we’ve moved over some of favourite movies and TV shows.
Now we need to decide on the media server software to use which will stream our media to us and organize our library. For most people I’d recommend Plex. It just works 99% of the time. That said, Jellyfin has a lot to recommend it by too, even if it is rougher around the edges. Some people run both simultaneously, it’s not that big of an extra strain. I do recommend doing a little bit of your own research into the features each platform offers, but as a quick run down, consider some of the following points:
Plex is closed source and is funded through PlexPass purchases while Jellyfin is open source and entirely user driven. This means a number of things: for one, Plex requires you to purchase a “PlexPass” (purchased as a one time lifetime fee $159.99 CDN/$120 USD or paid for on a monthly or yearly subscription basis) in order to access to certain features, like hardware transcoding (and we want hardware transcoding) or automated intro/credits detection and skipping, Jellyfin offers some of these features for free through plugins. Plex supports a lot more devices than Jellyfin and updates more frequently. That said, Jellyfin's Android and iOS apps are completely free, while the Plex Android and iOS apps must be activated for a one time cost of $6 CDN/$5 USD. But that $6 fee gets you a mobile app that is much more functional and features a unified UI across platforms, the Plex mobile apps are simply a more polished experience. The Jellyfin apps are a bit of a mess and the iOS and Android versions are very different from each other.
Jellyfin’s actual media player is more fully featured than Plex's, but on the other hand Jellyfin's UI, library customization and automatic media tagging really pale in comparison to Plex. Streaming your music library is free through both Jellyfin and Plex, but Plex offers the PlexAmp app for dedicated music streaming which boasts a number of fantastic features, unfortunately some of those fantastic features require a PlexPass. If your internet is down, Jellyfin can still do local streaming, while Plex can fail to play files unless you've got it set up a certain way. Jellyfin has a slew of neat niche features like support for Comic Book libraries with the .cbz/.cbt file types, but then Plex offers some free ad-supported TV and films, they even have a free channel that plays nothing but Classic Doctor Who.
Ultimately it's up to you, I settled on Plex because although some features are pay-walled, it just works. It's more reliable and easier to use, and a one-time fee is much easier to swallow than a subscription. I had a pretty easy time getting my boomer parents and tech illiterate brother introduced to and using Plex and I don't know if I would've had as easy a time doing that with Jellyfin. I do also need to mention that Jellyfin does take a little extra bit of tinkering to get going in Ubuntu, you’ll have to set up process permissions, so if you're more tolerant to tinkering, Jellyfin might be up your alley and I’ll trust that you can follow their installation and configuration guide. For everyone else, I recommend Plex.
So pick your poison: Plex or Jellyfin.
Note: The easiest way to download and install either of these packages in Ubuntu is through Snap Store.
After you've installed one (or both), opening either app will launch a browser window into the browser version of the app allowing you to set all the options server side.
The process of adding creating media libraries is essentially the same in both Plex and Jellyfin. You create a separate libraries for Television, Movies, and Music and add the folders which contain the respective types of media to their respective libraries. The only difficult or time consuming aspect is ensuring that your files and folders follow the appropriate naming conventions:
Plex naming guide for Movies
Plex naming guide for Television
Jellyfin follows the same naming rules but I find their media scanner to be a lot less accurate and forgiving than Plex. Once you've selected the folders to be scanned the service will scan your files, tagging everything and adding metadata. Although I find do find Plex more accurate, it can still erroneously tag some things and you might have to manually clean up some tags in a large library. (When I initially created my library it tagged the 1963-1989 Doctor Who as some Korean soap opera and I needed to manually select the correct match after which everything was tagged normally.) It can also be a bit testy with anime (especially OVAs) be sure to check TVDB to ensure that you have your files and folders structured and named correctly. If something is not showing up at all, double check the name.
Once that's done, organizing and customizing your library is easy. You can set up collections, grouping items together to fit a theme or collect together all the entries in a franchise. You can make playlists, and add custom artwork to entries. It's fun setting up collections with posters to match, there are even several websites dedicated to help you do this like PosterDB. As an example, below are two collections in my library, one collecting all the entries in a franchise, the other follows a theme.

My Star Trek collection, featuring all eleven television series, and thirteen films.

My Best of the Worst collection, featuring sixty-nine films previously showcased on RedLetterMedia’s Best of the Worst. They’re all absolutely terrible and I love them.
As for settings, ensure you've got Remote Access going, it should work automatically and be sure to set your upload speed after running a speed test. In the library settings set the database cache to 2000MB to ensure a snappier and more responsive browsing experience, and then check that playback quality is set to original/maximum. If you’re severely bandwidth limited on your upload and have remote users, you might want to limit the remote stream bitrate to something more reasonable, just as a note of comparison Netflix’s 1080p bitrate is approximately 5Mbps, although almost anyone watching through a chromium based browser is streaming at 720p and 3mbps. Other than that you should be good to go. For actually playing your files, there's a Plex app for just about every platform imaginable. I mostly watch television and films on my laptop using the Windows Plex app, but I also use the Android app which can broadcast to the chromecast connected to the TV in the office and the Android TV app for our smart TV. Both are fully functional and easy to navigate, and I can also attest to the OS X version being equally functional.
Part Eight: Finding Media
Now, this is not really a piracy tutorial, there are plenty of those out there. But if you’re unaware, BitTorrent is free and pretty easy to use, just pick a client (qBittorrent is the best) and go find some public trackers to peruse. Just know now that all the best trackers are private and invite only, and that they can be exceptionally difficult to get into. I’m already on a few, and even then, some of the best ones are wholly out of my reach.
If you decide to take the left hand path and turn to Usenet you’ll have to pay. First you’ll need to sign up with a provider like Newshosting or EasyNews for access to Usenet itself, and then to actually find anything you’re going to need to sign up with an indexer like NZBGeek or NZBFinder. There are dozens of indexers, and many people cross post between them, but for more obscure media it’s worth checking multiple. You’ll also need a binary downloader like SABnzbd. That caveat aside, Usenet is faster, bigger, older, less traceable than BitTorrent, and altogether slicker. I honestly prefer it, and I'm kicking myself for taking this long to start using it because I was scared off by the price. I’ve found so many things on Usenet that I had sought in vain elsewhere for years, like a 2010 Italian film about a massacre perpetrated by the SS that played the festival circuit but never received a home media release; some absolute hero uploaded a rip of a festival screener DVD to Usenet. Anyway, figure out the rest of this shit on your own and remember to use protection, get yourself behind a VPN, use a SOCKS5 proxy with your BitTorrent client, etc.
On the legal side of things, if you’re around my age, you (or your family) probably have a big pile of DVDs and Blu-Rays sitting around unwatched and half forgotten. Why not do a bit of amateur media preservation, rip them and upload them to your server for easier access? (Your tools for this are going to be Handbrake to do the ripping and AnyDVD to break any encryption.) I went to the trouble of ripping all my SCTV DVDs (five box sets worth) because none of it is on streaming nor could it be found on any pirate source I tried. I’m glad I did, forty years on it’s still one of the funniest shows to ever be on TV.
Part Nine/Epilogue: Sonarr/Radarr/Lidarr and Overseerr
There are a lot of ways to automate your server for better functionality or to add features you and other users might find useful. Sonarr, Radarr, and Lidarr are a part of a suite of “Servarr” services (there’s also Readarr for books and Whisparr for adult content) that allow you to automate the collection of new episodes of TV shows (Sonarr), new movie releases (Radarr) and music releases (Lidarr). They hook in to your BitTorrent client or Usenet binary newsgroup downloader and crawl your preferred Torrent trackers and Usenet indexers, alerting you to new releases and automatically grabbing them. You can also use these services to manually search for new media, and even replace/upgrade your existing media with better quality uploads. They’re really a little tricky to set up on a bare metal Ubuntu install (ideally you should be running them in Docker Containers), and I won’t be providing a step by step on installing and running them, I’m simply making you aware of their existence.
The other bit of kit I want to make you aware of is Overseerr which is a program that scans your Plex media library and will serve recommendations based on what you like. It also allows you and your users to request specific media. It can even be integrated with Sonarr/Radarr/Lidarr so that fulfilling those requests is fully automated.
And you're done. It really wasn't all that hard. Enjoy your media. Enjoy the control you have over that media. And be safe in the knowledge that no hedgefund CEO motherfucker who hates the movies but who is somehow in control of a major studio will be able to disappear anything in your library as a tax write-off.
1K notes
·
View notes
Text

As storytellers, realism and continuity are important to us, and they're sometimes hard to achieve within the confines of the game. I’m personally a big fan of posing Sims in open doorways, and unless you want to be limited to the CC options that exist, you’re stuck having to make some poor Sim walk in and out and pausing at just the right moment for the desired effect. But it’s actually very easy to edit a door in Blender to make your own open version!
I initially learned about "posing" objects from surelysims' Wicked Whims posing tutorial, which I highly recommend as a whole. However, it might be a little overwhelming to learn a whole new posing system for the sake of a screenshot or two, which is where this tutorial is meant to come in. Some of my explanations might seem overly simplistic, but I wanted it to be approachable even for beginners. I am far from an authority on using Blender or making CC, and I'm sure there are flaws in this process or easier ways to achieve certain things, but it works well enough for my purposes and I hope it will work for yours too. 💗
Now, onto the tutorial...
Figure out what door or gate you want to create an open version of. If it’s from the vanilla game, all you need to do is make note of its name. If it’s CC, find the package in your mods folder, make a copy, and paste it into My Documents > Sims 4 Studio > Mods. This will allow you to find it in S4S in the next step!
Open S4S. On the main screen, make sure “Standalone Recolor” is checked under the “Object” button, then click the button.

A new window should pop up (if it’s your first time doing this, it may take a while to load). At first, it will show every single object in the game. If you know the name of the object you’re looking for, you can use the search bar to find it. You can also use the filtering options to narrow the selection down by category, game pack, and whether it’s vanilla or custom content. Here, I’ve filtered the search to only base game doors. Once I find the door I want to adjust, I click on it and hit “Next.”

This will pop up a window prompting you to save a new file. Place it somewhere you know you’ll be able to find it easily later and name it accordingly. This file will ultimately contain your mesh edit, so you don’t want to lose it! I suggest placing it in a dedicated folder, on your desktop, or in your Mods folder directly.

On the next screen, you’ll be looking at the contents of the package itself. For this tutorial, you don’t need to worry about grabbing anything but the mesh. Click on the “Meshes” tab and then “Export Mesh.” You’ll again be prompted to save.

Open the mesh file you just saved in Blender. (If the view is funky to start, I recommend hitting 1 on your keyboard’s number pad to get a forward-facing view.) [It should also be noted I’m using Blender 3.6, so my screenshots and the location of certain settings may be different than in earlier or newer versions.]
You’ll see that there are actually multiple meshes involved (and the number can vary from object to object). Right now, we’re only concerned with the “rig.” If you’re familiar with posing, you’ll know that all Sims have a rig that is used to move different parts of their bodies around. Objects also have a rig, and objects that can open will have “bones” that control their moving parts. So click on “rig” and then change “Object Mode” in the bottom corner to “Pose Mode.”


Now, if you hit A on the keyboard, it will select all bones and you can see where they’re located. As far as I can tell, all doors have two bones that control their swinging movement. They both do essentially the same thing. I tend to stick with the top bone, which is called something like “bind_doorSwing.”

Pro-tip: If you’re having trouble seeing or selecting the rig's bones, you can change the view on the right side of the screen to “dope sheet.” Then when you save the position of the bones, just like when posing a Sim, by selecting all with A then clicking I and selecting “Location & Rotation,” the list of available bones will pop up there.


Rotate the door open using this bone or bones, if it’s a double door. On double doors, I recommend rotating each side individually rather than trying to rotate them together, as you may get unexpected results. You can use the R+Z combo on the keyboard to limit the direction of movement. (You can also use this in combo with numbers to swing them more precisely. For example, if you want a 45 degree swing, you can press R+Z+45.) Specifying the Z axis allows you to only swing the doors open and closed while restricting their movement in other directions.

Once you’ve got the doors swung open to where you want them, hit A to select all bones, then hit I and select “Location & Rotation” to save the position. (If you’re a poser, this maneuver is already familiar to you - and you know how important it is! If you skip it, the new position won’t save and the doors will revert back to closed.)

That’s it! You don’t have to do anything else to the mesh. Save your file in Blender. If you want to keep it separate from the original door mesh, save as instead and name it something different. (This is why you may want a dedicated folder, since the number of files does add up!)
Reopen the package you made earlier in S4S (or simply return to it if you’ve kept it open). From the same place you exported the mesh, you will now import the edited mesh. Hit “Import Mesh,” navigate to your edited Blender file, and you should now see your edited door replace the original. Since it’s the same mesh, all the swatches will still work perfectly with it.

You’ll notice that you’ve only replaced the “LOD 0 (High)” version of the mesh. When you click the drop-down menu, you’ll see that there are also medium and low detail versions, as well as shadow meshes at all levels of detail. If you’re only making an object for personal use, you don’t have to worry too much about LODs. You can probably just import the same mesh into LOD 1 and LOD 2 and be fine (so long as your computer isn't a potato). And if this is just for you, I honestly wouldn't even touch the shadow LODs.
The only other thing you might do is go back to the “Catalog” tab and alter the object name so you can find it easily in the game catalog. You can also edit the description, price, etc. if you so desire. Hit “Save.”

Test in game! If the package isn’t already in your Mods folder, move it there. As long as you didn’t mess with any of the tags, it should still be in the door section of build mode and work perfectly as a functional door. The door swinging animation will look different, and you could probably get rid of it if you wanted, but that’s above my current skill level and I don’t think it’s really necessary for our purposes. If all you need is an open version of a very specific door for storytelling purposes, it gets the job done.


(First screenshot: doors swung open as intended, second screenshot: doors swinging in the opposite direction as they’re walked through)
These steps can also potentially be used to create open versions of other in-game objects like gates, books, chests/boxes, etc. I’m only just beginning to experiment with minor mesh edits, but once you get the hang of it they can often be faster and easier than trying to line up the best circumstances to get the perfect shot in-game. I might make more tutorials for small edits like this that help with storytelling realism and continuity in the future!
#ts4#sims 4#ts4 storytelling#ts4 tutorial#sims 4 storytelling#sims 4 tutorial#this is the first tutorial i've written so do let me know if anything's confusing!!!#*tbw
277 notes
·
View notes
Text

i told my friend i would find him some beginner’s giffing tutorials, but all the one’s i could find were either years out of date, used a method that made me go “huh”, or incorporated ready-made actions. all perfectly fine, but if i’m sending someone a tutorial i’d rather it be one for a method i understand enough to help with.
so, here is a beginner’s guide to giffing, as told by cleo, a neurotic, detailed, and organization happy individual. there will be many pictures.
this tutorial will strictly cover the gif making portion of the process, from getting your screencaps to importing in photoshop, resizing/cropping, and sharpening. i was going to briefly go over colouring, but tumblr only allows 30 images and i ran out of space, so i'll have to do a separate colouring tutorial (which also means i can go into more detail, yay).
downloading the videos, whether direct downloads or t*rrents, is also another tutorial. but make sure you’re using at least 1080p, and the bigger the file the better. a single episode of a ~45 minute show should ideally be 2gb at minimum. a full length movie should ideally be at least 5gb. imo 2160p/4k files are not really necessary; the quality increase is negligible, and it takes a lot longer to screencap them. if you do use 2160p/4k files, try and make sure it is not HDR, as those videos are often washed out and require a different screencapping program to fix.
Programs
I am using a cracked version photoshop 2022, but whichever version you use should be pretty much the same
Actions. not a program but a function inside photoshop, where you essentially record a series of steps, and then you can simple play that action when needed and those steps will repeat, which saves considerable time when giffing. I will note which parts of the tutorial are best saved as actions, and explain how to create actions at the end.
For screencapping i use kmplayer it’s free and very simple to use
not at all a necessary program, but i use freecommander instead of the regular windows file explorer as i find the dual panels very helpful when moving the frames around
Screencapping
there are many programs you can use to get the screencaps from a video, a lot are basically the same, some are better suited for particular video file types. kmplayer is a very simple program to use, but afaik the capture function only works on mkv. files (the only other file type i’ve tried is mp4, which plays but does not capture)
once you open your video file in kmplayer, we’re going to open the advanced capture window, found under capture→advanced capture, or alt+v
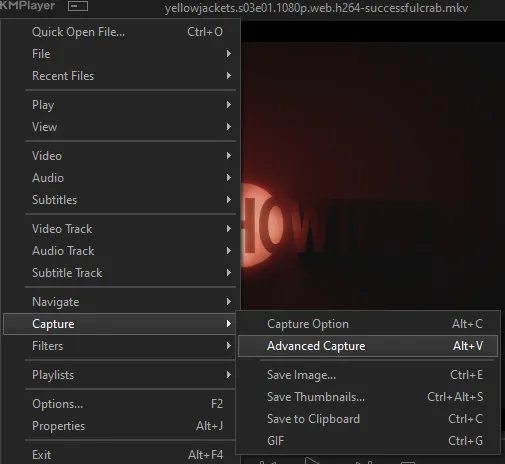
the window should look like this
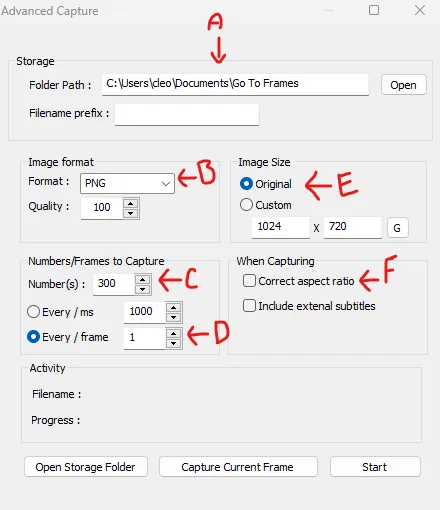
A-this is where all your screencaps will save to. i recommend making a specific folder for all your screencaps
B-make sure this is set to png for best quality
C-this is the number of screencaps you want to take, guesstimate how many you will need, keeping in mind that most videos are approx. 25 frames per second, and you should always cap a bit more than you think just in case
D-make sure “every/frame” is selected and set to 1
E-make sure “original” is selected, resizing will be done in photoshop
F-make sure “correct aspect ratio” is unselected
go to the part of the video you want to gif, and pause it just slightly before that part starts, then select ‘start’. the screencaps will start to save to the file, no need to play the video, and will automatically stop once it has capped the number of frames you have chosen
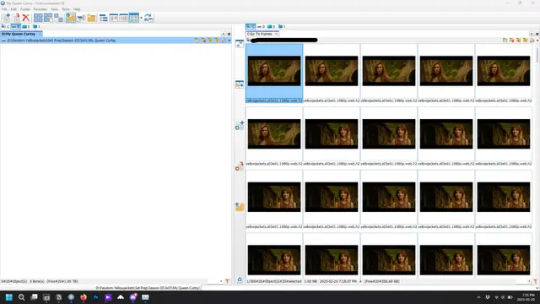
and here is how they look inside freecommander. i have already made a folder for this gifset, which is on the left. now you’re going to make a folder for each individual gif. i’ve decided this one will have four gifs, so create four folders (i just label them gif 01, gif 02, etc) and then move the frames for each gif into their respective folder
while you can always delete frames once the gif is made if it’s too big, i prefer to make sure i have the correct number of frames before i start. the gif limit on tumblr is 10mb, so it’s good to look at the scene/shots you’re giffing and decide approx. what dimensions your gif will be. full size gifs have a width of 540px and your choice of height. if you go for a square gif (540x540) you can usually fit 40-50 frames. if you’re planning for a smaller height (such as 540x400) you can usually fit more around 50-60 frames.
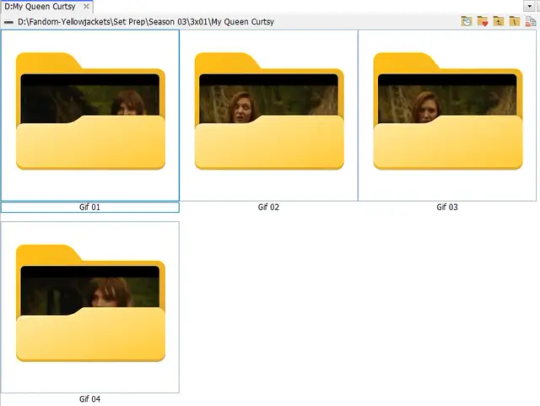
and here are the caps inside the folders. another reason i like freecommander is it’s ability to “multi-rename” files. the default file explorer can do so as well, but you have to do each folder individually and you can’t customize the new names as much. either way, i prefer to rename the files to each gif just to scratch my organization itch.
Introduction to Photoshop
NOTE: i have changed many of my keyboard shortcuts in photoshop to ones i prefer, so any you see listed in the menus of these screenshots are likely not the original shortcuts. you can see and change them yourself under edit→keyboard shortcuts

quick run-down of the photoshop interface. i have adjusted placement of some things from the default so this isn’t exactly how your photoshop will look when you open it, but everything is labelled, either on top or by hovering over the element. once you’re more familiar and have your process down i would recommend adjusting the workspace to suit your process.
A-your main tools and colour selector. almost all the tools have either several tools in one, or have alternate options which can be accessed by right-clicking the tool. you can also hover over each tool to get a pop-up with a quick explanation of the tool
B-additional “windows” such as history, properties, actions etc. can be opened from the window menu at the top and moved around with click-and-drag. history and properties should already be there by default, but probably on the right hand side instead. each window opens and closes with a click
C-the timeline window where the gif is made. the white square is a single frame of a gif, and on the row below is the play controls. this will not be there by default and will need to be opened from the window menu
D-adjustment layers for colouring
E-layers box. this is where the screencaps will show, along with adjustment layers, text layers, etc.
Opening Screencaps in Photoshop
go to file → open navigate to the folder for your first gif, select the first screencap, and check the image sequencing, and click open

a window will open labelled frame rate. set it to 23.976 and select ok
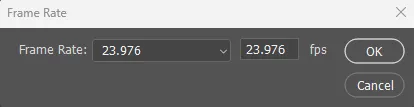
the screencaps will open in the timeline view, seen as the blue panel line at the bottom, and the screencaps are combined into video layer in the layer panel on the right.
Creating Frames
technically, you could go right into your cropping/resizing and sharpening from here, however if you do that directly then you have to keep the screencaps in the folders you have, otherwise if you save and re-open the gif it won’t move.
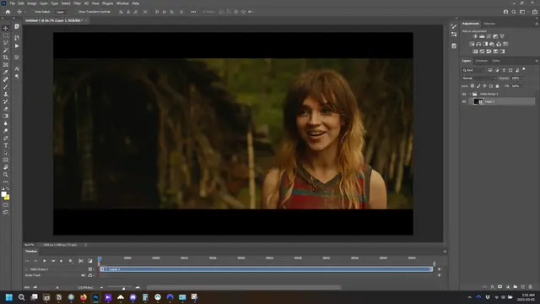
this next part should be made into an action.
at the top right of the timeline window, click four vertical lines to open the menu and select convert frames → flatten frames into clips. depending on how long the gif is, this can take a minute.

the layers panel should now look like this, each frame of the gif is now its own layer.
the very bottom layer will be the video group. this can be deleted as we’ve made the frames from it
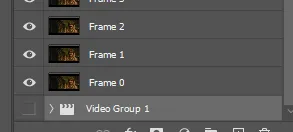
in same timeline menu as before, right under “flatten frames into clips”, select “convert to frame animation” and the screen should now look like this. this will be the end of this action.
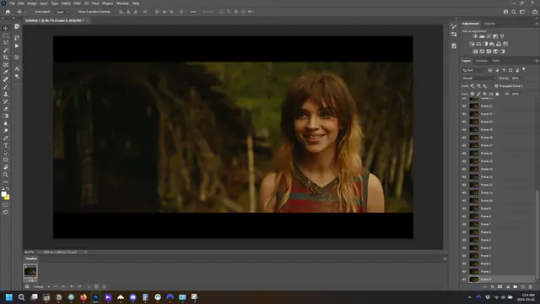
Cropping and Resizing
with widescreen footage, sometimes it’s just shorter than 1080p, but most of the time it will have the black bars on the top and bottom, and frustratingly, they’re not always the same size. it’s good to save the most common sizes as actions.
to find the size of the actual screen you turn on the rulers under view→rulers and check the height. then open your canvas size dialogue box under image→canvas size and change the height, making sure pixels are selected in the dropdown. yellowjackets is what i call “xtra wide” which is 800px. “normal” widescreen is 960px.
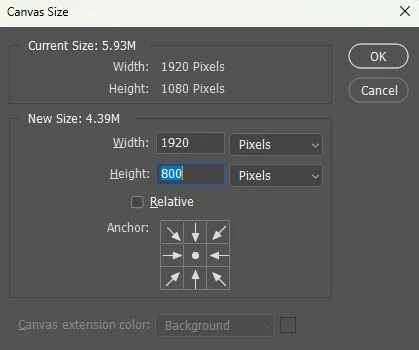
next we’re going to resize the caps. i also make actions for this, one for each potential gif size. open the image size dialogue box under image→image size and change the height of the image to your desired height plus 4 pixels. these extra pixels are to prevent a line at the top and/or bottom of your completed gif. now re-open the canvas size box, change the width to 540px, and the height to the desired, removing those 4 extra pixels. i have set this one to 540x540. this is where you would end the resizing action.
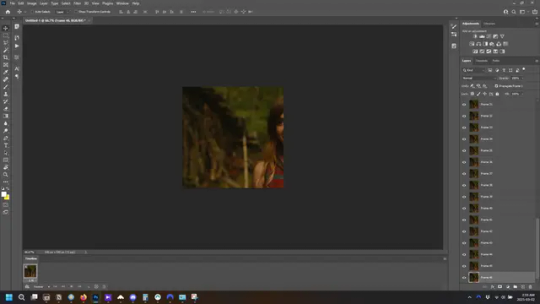
and as you can see she is off-screen. select the top layer, hold down shift and select the bottom layer to select them all, and with the move tool (the very top one) activated, click and drag to move it left to right as needed to centre the figure/s. as you move it a box will appear telling you how far you are moving it in any direction. make sure you are only moving it left or right, not up or down. to be certain of that, open the properties tab.
the y axis is your up/down, x is left/right. for this gif the y needs to stay at -98. you can also manually change the x axis number instead of dragging the image. also helpful for making sure multiple gifs of the same shot are all positioned the same.
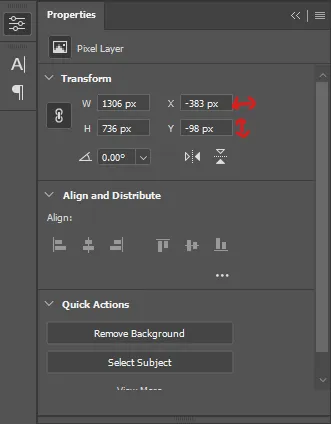
the layer are currently ordered with the 1st at the top and the last at the bottom. with all layers still selected, go to layers→arrange→reverse. the last layer will be on top now. if there is movement in your gif, check if you need to alter the position again to make sure the movement properly centred. but once you are satisfied with the position, the layers should be in “reverse” position, of last layer on top. this is to ensure that the gif plays forwards.
Converting Gif
this should also be made into an action, going through sharpening process
in the timeline menu, select “make frames from layers”
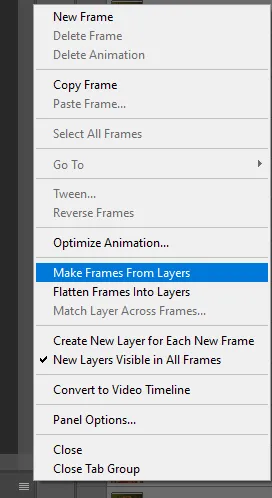
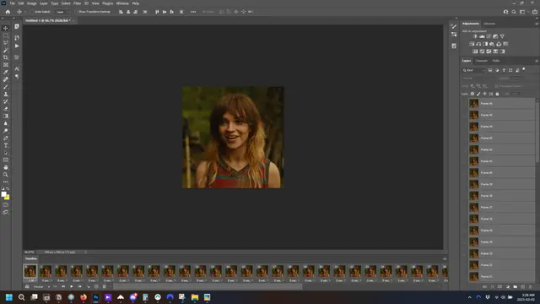
the frames are now populated in animation window. in timeline, click select all frames. go to any of the frames on the bottom and click the little arrow beneath it, select other, and enter 0.07 seconds. this is not a necessary step, as we will have to adjust the frame rate at the end, most likely to 0.05, but if we don’t change the frame rate here, then when we play the gif while working on it to check how it looks, it will play very fast.
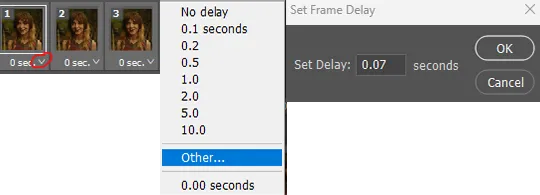
in the same menu at the right of the timeline box, select “convert to video timeline”
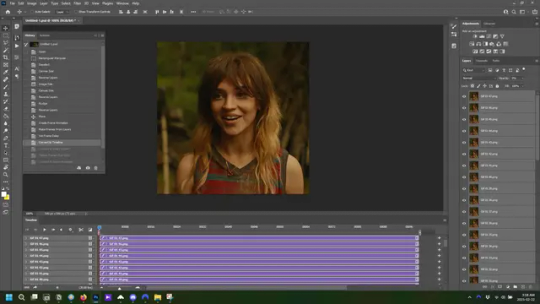
then, making sure all layers in the panel on the right are selected, go to filter→convert for smart filters. this turns all the layers into a single smart object.
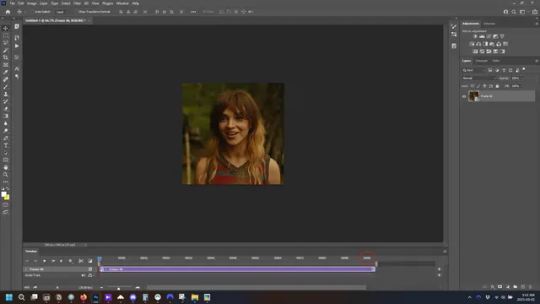
but if you look where i’ve circled, it says the gif is 99 frames long*, when in fact there are only 47. if you are making regular “scene” gifs, basic colouring and maybe a caption, this is fine and does not need to be fixed, it will play at the same speed. if you want to change it to display (approx.**) the correct number of frames, go to the timeline menu on the right, select “set timeline frame rate” and change it from 30 to 15
*if it does not list a frame number by 4 digits but instead says 5f, 10f, 15f, etc. go to the timeline menu on the right, select panel options, and change timeline units to “frame number”
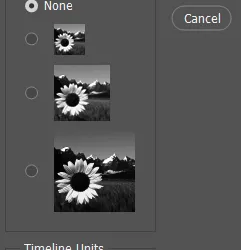
**the reason why this is only approximate is because the actual frame rate is not a a whole number, so when changing the frame rate it isn’t a 1:1, and 47 frames becomes 50 frames. the extra frames are removed at the very end, but if you are not doing any edits that require working frame by frame, there’s no need to change the frame rate here at all
Sharpening
this is, as it sounds, making the gif look sharper. to start go to filter→sharpen→smart sharpen and this window opens. play around with the dials to see what each ones does. the below settings are good for most high quality footage.
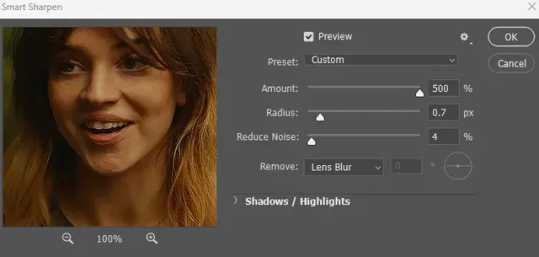
Amount-basically, how sharp do you want it
Radius-hard to explain, but this essentially sets how deep the lines of the sharpness are
Reduce Noise-smooths the pixels
once you click okay your single layer should look like this.
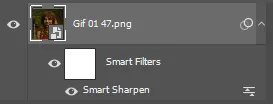
you’re going to then right click the layer and select duplicate layer. with the top layer selected, go to filters→blur→gaussian blur and set the radius to 1.0 pixels.
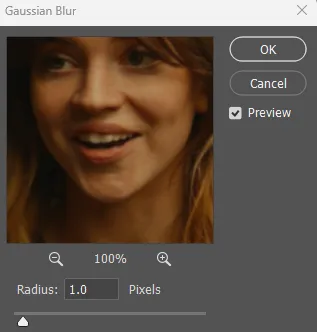
then change the opacity of the top layer to 10%. this is to essentially soften the sharpening a bit, as if it’s too sharp it can make the colouring wonky. this opacity level can also be changed depending on need.
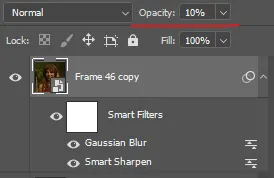
finally, select both layers, right click, and click “group from layers”. your gif is now fully made and sharpened.
Colouring
yeah. ran out of image space. but this is where you would do your colouring and add a caption or any other text.
Converting & Exporting
when all your colouring is done, you’re ready to start saving your gif. you can do it directly from your current file, but that means essentially losing your colouring, as all those layers will be merged together. i am someone who likes to save my psd’s (photoshop files), at least until i’ve posted the gifs, in case i need to fix something in the colouring. if you’d like to keep yours as well, open the history tab and select the first icon at the bottom “create new document from current state”. this will open a copy of the file in a new tab. save the original file and you can close it, continuing all work on the copy file.

select your all your layers, convert them into a smart object from filter->convert for smart filters, then follow the same steps from Creating Frames above. once you're back in frame animation, select Create Frames From Layers, and once again set the frame animation speed.
most people set the speed to 0.05. i personally set it to 0.05 or 0.06 depending on the length of the gif. check how it looks at 0.05, if it seems too fast, try 0.06.
now to save. go to file->export->save for web (legacy). the number is the lower left corner is your gif size, it needs to be under 10mb or else you'll have to delete some frames.

the right panel is your save options. the preset dropdown has some built-in settings, but you won't use them because (at least on my version) the presets only go up to 128 colours, instead of the full 256. the 3 i've highlighted in green are the only one's you'll adjust as needed. the settings below i use for i'd say 90% of my gifs. i'll sometimes change the adaptive dropdown to one of the other options, ocaissionaly the diffusion, and rarely the no transparency dither, but play around with them and see how they change the look of the gif.

when you're satisfied with the look of your gif, click save at the bottom right of the window.
voilà! you now have a gif.
Actions
this is your actions panel. the triangle on the left side is the button to open it. remember, if it's not already there, go to windows->actions to open it.
the buttons on the bottom, left to right, are stop recording, record action, play action, new folder, new action, and delete.

as you can see, i have different folders for my resizing, sharpening, captions, saving, and my 1 step (temporary) actions. to run an action is very simple; click the action, and click play.
to create an action, click the new action button, a box will pop up, give the action a name, and click record. the record button at the bottom of the action window will turn red. now perform all the steps you want it to record, and click stop recording. keep in mind it will record every single thing you do, including in other open files, so if the action you plan to record will have a lot of steps, it might help to write them down first.
to modify an action, select the step in the action above where you'd like the new step to be, hit record, perform the step, stop recording. select the step you'd like to delete, and click the delete button.
steps within the actions can be clicked and dragged, both within that action and moved to other actions. actions can also be moved between folders.
267 notes
·
View notes
Text
Luo Binghe Shimeji (Extended Version!)


a couple years ago, riladoo created an adorable binghe shime! he could be picked up and tossed around your computer screens, climb around on all your windows, multiply, and all the other cute things that come in the standard base shimeji set.
more recently, i reached out to riladoo with a commission request - more action sets for binghe! over the past couple months, riladoo has worked hard to make some adorable binghe art, and i've updated all the source code and config files to accommodate the new actions! 🎉
the extended action set includes: - a 'sit and eat' idle action - two 'head patting' actions when the mouse hovers over him - a 'fall and cry' action for when he falls from tall heights - a 'land nicely' action for when you place him down gently
the original binghe shime listing on riladoo's gumroad has been updated to have all these new actions, so go grab him now!! he's free / pay what you want! 🥰
i've put more details about the new action sets + general shimeji setup tips below the cut, but otherwise -- LET THE BINGHE COMPUTER INFECTION COMMENCE !!
**these extended actions only work on windows, not mac. sorry ;w; the original shime set has a mac version, though!
Extended Action Set Details
when you download the files from riladoo, you're looking for the .zip file labeled "Updated Shime code" !

sit and eat this is an idle action that will trigger randomly the same as any other idle action. if you want to trigger it manually, you can right click the shime -> 'set behavior' -> 'sit and eat'
head pats these are 'stay' actions that will trigger automatically when you hover your mouse over the shime. i recommend hovering your mouse over his head for maximum head-pat-effectiveness! unfortunately, this action won't play if the shime is actively climbing a wall/ceiling - maybe in the future this can be extended further, but for now there are only head patting actions for sitting and standing poses :>
falling variations (crying / default / land nicely) there are now a total of 3 'falling' actions. to see the 'fall and cry' action, allow binghe to fall from the top half of your monitor. to see the standard/original 'fall and trip' action, allow binghe to fall from the low-mid range portion of your monitor. to see the 'land nicely' action, gently place binghe down at the bottom of your monitor. this means you're rewarded for catching binghe when he falls off a window - if you catch him and set him down, he lands nicely, but if you let him fall normally, he'll start crying!! 🥰
Shimeji Installation Tips
if you've never had a shimeji before - don't worry, they're super easy to install! i recommend following this video tutorial created by the person who originally created the source code for shimeji. you can skip the parts about downloading the shimeji itself - you'll get that from riladoo's website :>
if you install everything but opening the shimeji executable does nothing, download jarfix to resolve this issue.
if you follow the tutorial and update the 'interactive windows' but the shime still doesn't stand/climb on the specified windows, restart your computer to resolve this issue. alternatively, make sure you don't have any 'unexpected' monitors plugged in - a friend of mine had their shime constantly falling down through their monitor onto their screen drawpad, which was confusing until it got figured out!
if you are on mac instead of windows.... i am so sorry i actually have no idea how to help 🙇♂️ the original/default binghe shimeji set DOES have a mac os folder in with the downloads, but i've never tested it (don't use mac), and even if it works, it won't include the extended actions (i didn't build an executable for mac with the new code).
More Questions???
feel free to hit me up! in the replies of this post / through DMs / send an ask - whatever is best for you. i'll tag any asks i get about the shime with #binghe shime chronicles so they get archived nicely. i got very familiar with all the source code / config files to get this lil guy set up with his extended actions, so hopefully i can answer any questions you have! 💪😤
that's all!! i am so happy w how the new actions turned out - the art riladoo did for them is SO cute! - and i hope y'all will be, too!
532 notes
·
View notes
Text
"versioning" your files
i have an extremely dull tutorial i want to share with you. i never think to share this advice and i think its because it's really user-unfriendly and dry. but today i can teach you how to make automated back-ups of your art files.
download freefilesync.org, a program for automating backups. its freeware and very useful if you have a lot of art to back up. everyone say "thank you freefilesync".
make a new "configuration". this is a settings file that will remember your back-up specifications.

3. make back-ups! select your files you want backed-up on the left and instruct where to put the generated back-ups on the right. save to an external drive or a google drive folder or something. just back it up! i do both just to be safest.

4. click the green gear on the top right. these are your synchronization settings. specify the type of back-ups you want. i do "mirror" because i just want them copied. you can hover over the icons for more info on what they mean to further customize your copy settings. these are mine to make basic copies.

you can also fuck around with the blue gear (where you can specify what changes should prompt the computer to make a copy) and the filter if you need to exclude something from being backed-up.
5. select "versioning" and browse/create a new folder anywhere (external drive or primary, your choice). call the new folder something that indicates the files are outdated. select "time stamp [file]" for clarity's sake.

you will now have automatic back-ups every time you make a change to your file and save it.

save your configuration settings.
6. set freefilesync to run 1x a day at a time most convenient to you using windows task scheduler. instructions here
sometimes you really fuck up a file. maybe it gets corrupted or you save it at the wrong resolution. well now you have a parachute. previous versions of your file will be saved here. every time you make a change to the file and save it, a new back-up is generated.
hopefully you will never need this.
but you might
291 notes
·
View notes
Text
How to run The Sims 3 with DXVK & Reshade (Direct3D 9.0c)

Today I am going to show you guys how to install Reshade and use Direct3D 9.0c (D3D9) instead of Vulkan as rendering API.
This tutorial is based on @nornities and @desiree-uk's awesome guide on "How to use DXVK with The Sims 3", with the goal of increasing compatibility between DXVK and Reshade. For users not interested in using Reshade, you may skip this tutorial.
If you followed nornities and desiree-uk's guide, it is strongly recommended that you start from scratch, meaning you should uninstall DXVK AND Reshade completely. Believe me when I say this: it will save you a lot of time, frustration, and make your life so much easier.
For the purpose of this tutorial, I am on patch 1.69.47 and running EA App on Windows 10, but it should work for version 1.67.2 on Steam and discs, too. This tutorial does not cover GShade.
Before we start
Backup your files, even the entire folder (Program Files\EA Games\The Sims 3\Game\Bin) if you want to be extra safe; you will thank yourself later. If you do not wish to backup the entire folder, at least backup the following:
reshade-presets
reshade-shaders
Reshade.ini
Options.ini (Documents\Electronic Arts\The Sims 3)
Keep them somewhere secure, for your peace of mind (and sanity).

Done? Great stuff, let us begin!
Step 1:
If you installed DXVK following nornite and desiree-uk's guide, go to the bin folder and delete the following files to fully uninstall DXVK, we are starting from scratch:
d3d9.dll
TS3.dxvk-cache
dxvk.conf
TS3_d3d9.log (or TS3W_d3d9.log)
Step 2:
If you already have Reshade on your PC, uninstall it using this: https://reshade.me/downloads/ReShade_Setup_X.X.X.exe (replace X.X.X with version number)
Step 3:
Perform a clean install of Reshade (I am using the latest version - 6.4.1 at the time of writing). Please note that you need a version no older than 4.5.0 or this method will not work. Choose DirectX9, click next.
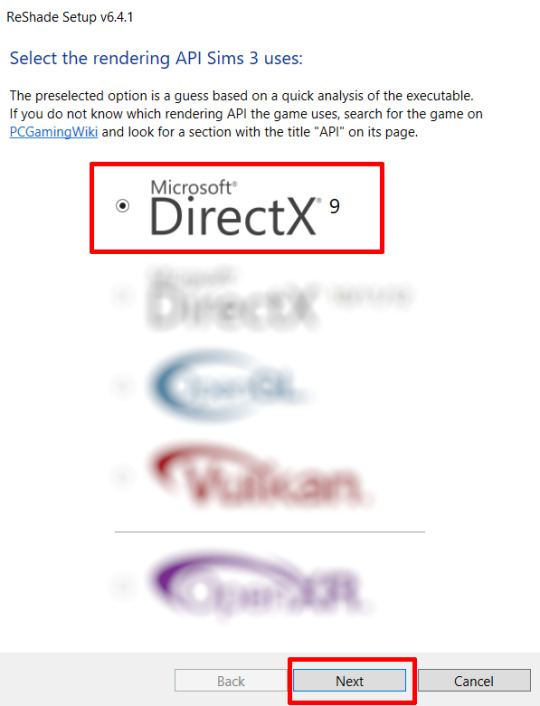
Once the installation is complete, you should see a "d3d9.dll" file inside The Sims 3's bin folder (Program Files\EA Games\The Sims 3\Game\Bin):
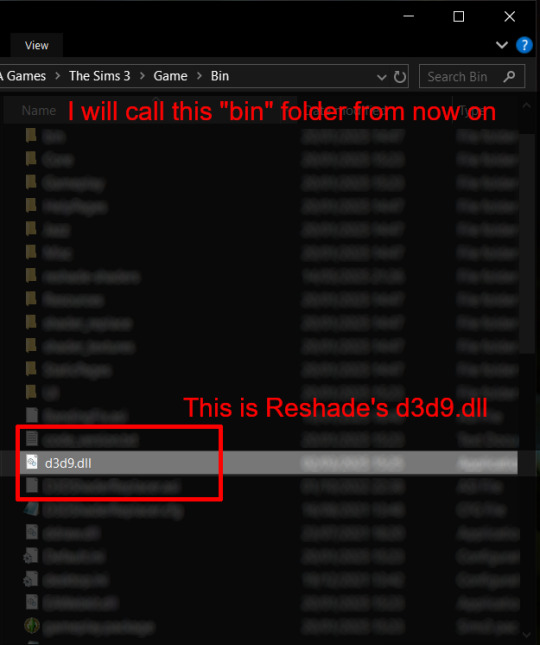
It may all seem familiar thus far. Indeed, this is how we installed Reshade in the past before using DXVK, but here comes the tricky part:
Step 4:
Create a new folder outside of The Sims 3's game folder (I created it on my C drive), name it "dxvk" or whatever else you like. Remember where you saved this folder, we will return to it later.
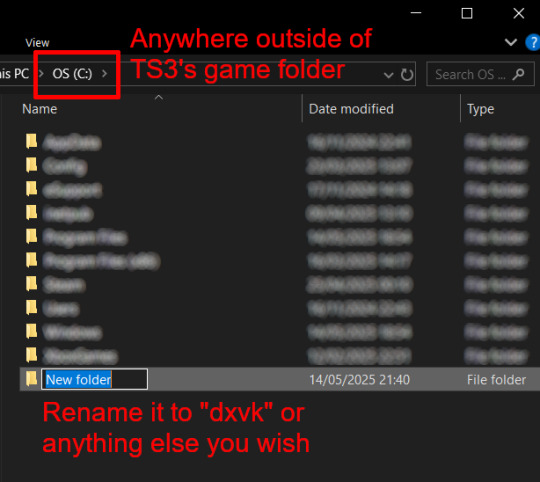
Step 5:
Now we need Reshade to load the next dll in order to chain Reshade with DXVK. Click on the search bar, and type in "View advanced system settings".
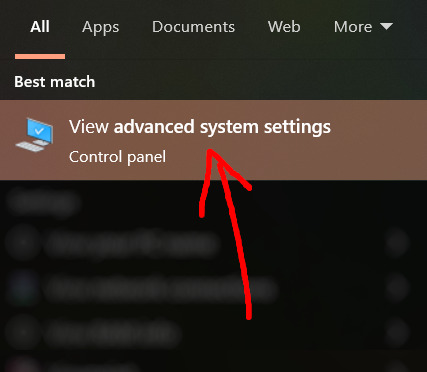
Click on "Environment Variables..."

Under "User variables", click "New..."
In the new pop-up window, find "Variable name:" and type in:
RESHADE_MODULE_PATH_OVERRIDE
for "Variable value:", paste in the directory that leads to the folder we created earlier. Once you are done, hit OK, and then hit OK again to save the changes made.
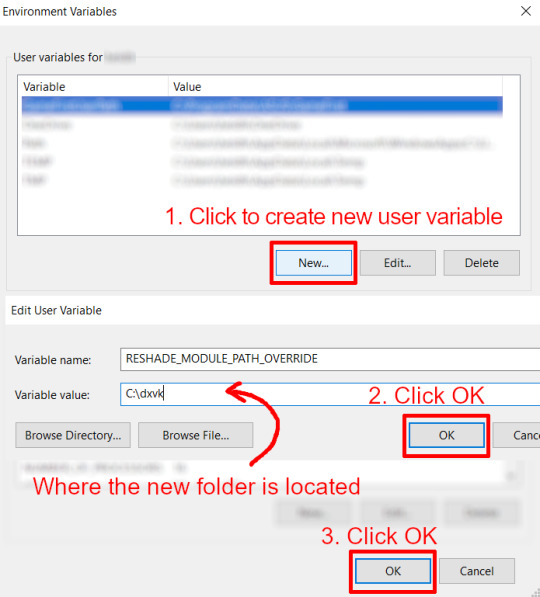
You can use Command Prompt to check if this new environment variable has been registered by entering:
echo %RESHADE_MODULE_PATH_OVERRIDE%
It should return you the folder's location. If not, make sure you have typed in the variable name correctly and confirm the folder's location.
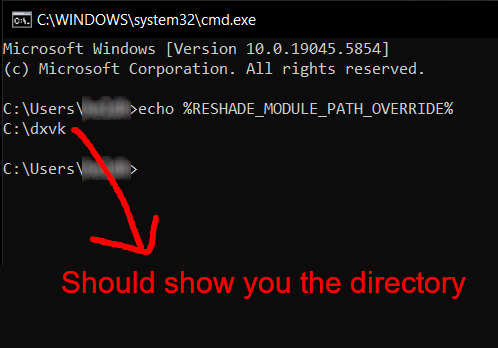
Step 6:
Download DXVK (version 2.3.1) from here: https://github.com/doitsujin/DXVK/releases/tag/v2.3.1 and unzip "dxvk-2.3.1.tar.gz" (I use 7-Zip, but winRAR works, too). Remember to choose x32, and move only "d3d9.dll" to the folder we made earlier.
Now we have two "d3d9.dll" files, one from Reshade (lives in the bin folder), and the other from DXVK (in this new folder, outside of The Sims 3 game folder).

Step 7:
Download "dxvk.conf" here: https://github.com/doitsujin/dxvk/blob/master/dxvk.conf delete everything inside, and enter the following:
d3d9.textureMemory = 1 d3d9.presentInterval = 1 d3d9.maxFrameRate = 60 dxvk.hud = devinfo
Ctrl + S to save the document.
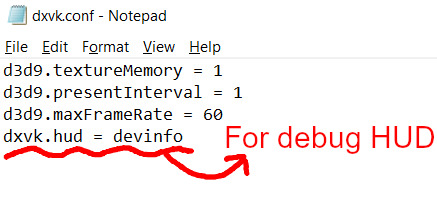
The first 3 lines are taken from @nornities and @desiree-uk's guide.
The last line is only for debugging purposes. Due to the inconvenient location occupied by the HUD (top left corner of your screen), it should be removed once the installation is successful.
Step 8:
Drag "dxvk.conf" into the bin folder, where Reshade's "d3d9.dll", "TS3.exe", and "TS3W.exe" all live.

Step 9:
Now fire up the game and check if both are showing up:

Lastly, check for “TS3.dxvk-cache” in the bin folder:
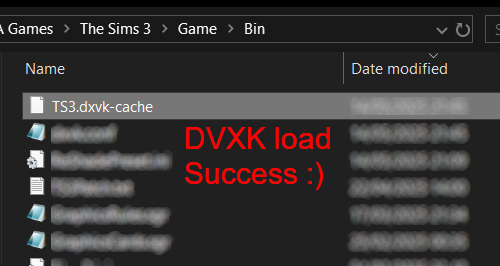
If it is there, congratulations! You have successfully installed DXVK and Reshade utilising D3D9 as API! You can now go to "dxvk.conf" and remove its last line "dxvk.hud = devinfo" and have fun! :)
Hope this tutorial isn't too confusing, the last thing I want is to over-complicate things. If you still need some help, comment down below or send me a DM/ask, I'll try and troubleshoot with you to the best of my ability.
Credits:
@nornities and @desiree-uk for their fantastic guide.
@criisolate for promulgating the usage of DXVK in TS3 community.
reddit user folieadeuxmeharder for helping me troubleshoot and informing me of this workaround.
doitsujin for creating DXVK.
crosire for creating Reshade.
147 notes
·
View notes
Text
Yet Another Package Editor

Download the latest version here
YaPe is a modern package editor for DBPF (.package) files
Features:
Edit any package - FAST
List and edit resources in a package
Filter resources by type
Easy editors for several resource types
Supports opening ANY DBPF-coded .package, .dat, or .sc4 file
Easily reduce texture size, add/remove/recreate mipmaps, change texture format
Import textures by dragging, export DDS
Native on Windows and Linux
Why make yet another package editor?
Simply said, because SimPe can be kind of cumbersome especially on Linux, and package editors other than SimPe (s3pe, s4pe, iLive's Reader etc.) do not support Sims 2 resources.
To illustrate, I timed someone shrinking a texture (convert RawARGB32 -> DXT1, shrink 2x) in both SimPe and YaPe:
SimPe + GIMP: 1m 30s
YaPe: 10s
Originally this started as just a way to easily test if my DBPF library was doing the correct thing, but over time it has grown to become a half-decent editor suitable for more general use.
Tutorial / usage tips
Here I will explain how to shrink and convert textures in YaPe because that's what I imagine most people will use this program for right now, but of course you can use it for other things as well.
Let's get started by getting the program to look the way you want to: use the options in the top left to change the scale of the interface and switch between dark and light mode.
Now drag a package file into the program (don't worry about closing the sims except when you save the package), a list of resources in the package will be visible. You can find out what the abbreviations mean by hovering your mouse over them; in general I try to add tooltips like this to buttons or options that are unclear.
Don't be afraid to mess around and make changes! The changes you make are never saved unless you press the save button, so if you simply drag your package file into YaPe again without saving you will get your original package back (there is currently no undo function, but it is a planned feature).

All these resources are great, but we're only interested in the textures for this tutorial so let's set a filter. Right click on a texture (TXTR) and select "Filter on type".

Great! Now you can only see the textures we're interested in. You can disable this filter by unticking the "filter" option at the top.

Now click on the "TXTR" to open the texture, it will open a new tab in the lower half of the window by default. If your window is not very big (like mine is for this tutorial) you might have trouble seeing the texture and all the options. You can drag the tab around and put it somewhere else in the program, I'm going to put it on the right and make it a little bigger so we can see what's going on.

Okay, now we can see all the options, and well... there's a bunch of them. We'll go over some of the options that you'll likely want to use but feel free to experiment of course.

First, let's have a look at the texture viewer at the bottom: you can zoom in on the texture by holding control and scrolling, and you can change which mipmap is displayed by clicking the radio buttons above the texture.

But wait, this texture does not have enough mipmaps to show up in game! (post by @pforestsims) Let's fix that right this instant by clicking the "Add missing mipmaps" button in the middle.

Okay, now the mipmaps will show up in game, which is good... except that this mipmap is really blurry. (post by me) Luckily we can fix this really easily, just click the "Recalculate all mipmaps" button.

Much better!... except that we've created a new hidden problem: the leaves will disappear when zooming out in game (blog by lisyarus) but even this problem can be fixed. We can actually preview what the texture will look like when zoomed out by switching the format to DXT1 since DXT1 has binary transparency, just like alpha tested textures like leaves and grass.

Right, so the leaves have a bunch of holes that don't look right when zooming out, let's change that. Above the "Add missing mipmaps" button there is the "Preserve transparency" slider: try changing it to something like 120-170 and click "Recalculate all mipmaps", you can see that the transparency changes, if it's still too thin/transparent set the value higher and recalculate again and so on.

Have a look at all the mipmaps (zoom levels) and once you're satisfied with the transparency change the format back to DXT5.

This texture will now look great in game! But it is also quite large, so we can reduce the size 2x smaller without sacrificing very much in terms of looks (sorry to all the cc authors who love their large textures). Click the "Remove largest texture" button, which will make it so that the first mipmap becomes the largest texture effectively reducing the size by 2x. Like mentioned it does use the first mipmap so make sure to fix any blurry mipmaps first.
You can repeat the same process for the other textures in the package, and then we're done. Save the package by clicking the save button in the top bar, and have a look in game at your beautiful textures.
Another option is to drag images/textures you've made somewhere else into the program (with special support for dds files), for a full lists of supported image formats you can look here. (image-rs documentation) The image/texture will currently go into the firsts open texture resource tab because of UI framework limitations.
Here's a look at some of the other editor currently implemented:


Enjoy :)
195 notes
·
View notes
Text
For everyone who asked: a dialogue parser for BG3 alongside with the parsed dialogue for the newest patch. The parser is not mine, but its creator a) is amazing, b) wished to stay anonymous, and c) uploaded the parser to github - any future versions will be uploaded there first!
UPD: The parser was updated!! Now all the lines are parsed, AND there are new features like audio and dialogue tree visualisation. See below!
Patch 7 dialogue is uploaded!
If you don't want to touch the parser and just want the dialogues, make sure to download the whole "BG3 ... (1.6)" folder and keep the "styles" folder within: it is needed for the html files functionality (hide/show certain types of information as per the menu at the top, jumps when you click on [jump], color for better readability, etc). See the image below for what it should look like. The formatting was borrowed from TORcommunity with their blessing.

If you want to run the parser yourself instead of downloading my parsed files, it's easy:
run bg3dialogreader.exe, OPEN any .pak file inside of your game's '\steamapps\common\Baldurs Gate 3\Data' folder,
select your language
press ‘LOAD’, it'll create a database file with all the tags, flags, etc.
Once that is done, press ‘EXPORT all dialogs to html’, and give it a minute or two to finish.
Find the parser dialogue in ‘Dialogs’ folder. If you move the folder elsewhere, move the ‘styles’ folder as well! It contains the styles you need for the color coding and functionality to keep working!
New features:
Once you've created the database (after step three above), you can also preview the dialogue trees inside of the parser and extract only what you need:

You can also listen to the correspinding audio files by clicking the line in the right window. But to do that, as the parser tells you, you need to download and put the filed from vgmstream-win64.zip inside of the parser's main folder (restart the parser after).
You can CONVERT the bg3 dialogue to the format that the Divinity Original Sin 2's Editor understands. That way, you can view the dialogues as trees! Unlike the html files, the trees don't show ALL the relevant information, but it's much easier to orient yourself in.


To get that, you DO need to have bought and installed Larian's previous game, Divinity Original Sin 2. It comes with a tool called 'The Divinity Engine 2'. Here you can read about how to unstall and lauch it. Once you have it, you need to load/create a project. We're trying to get to the point where the tool allows you to open the Dialog Editor. Then you can Open any bg3 dialogue file you want. And in case you want it, here's an in-depth Dialog Editor tutorial. But if you simply want to know how to open the Editor, here's the gist:
Update: In order to see the names of the speakers (up to ten), you can put the _merged.lsf file inside of the "\Divinity Original Sin 2\DefEd\Data\Public\[your project's name here]\RootTemplates\_merged.lsf" file path.
Feel free to ask if you have any questions! Please let me know if you modify the parser, I'd be curious to know what you added, and will possibly add it to the google drive.
2K notes
·
View notes
Text
how bf!dreamies would react to meeting your cat for the first time


pairing | bf!dreamies x reader
content | 100% fluff
note | i wrote each member’s section with a different one of my cats in mind (i have six 🥹). used a different i used to work with as the 7th. hope you enjoy!!

MARK
mark would be super nervous to meet your cat for the first time. not having much experience with cats would only worsen his nerves. he had heard all the horror stories and couldn’t seem to get them out of his head. he knows how much your cat means to you. and with how much you mean to him, he just wants everything to go well.
cue the cutest blob of grey fur mark thinks he has ever seen in his life. pictures just hadn’t done justice to how round and jiggly your cat was. and when she stared up at mark with her huge round eyes, how could he have not fallen for her?
he recalled what he had learned from the youtube tutorials he had watched before coming over and carefully offered out his hand for the cat to sniff. would watch the cat’s behaviour cautiously, practically sweating as his hand was being sniffed. you would watch on, smiling to yourself as you watch his face drop when she seemingly walked away.
“i don’t think she likes me very much.” mark would pout, slowly beginning to stand. as he stood, your cat would come back over, rubbing herself against his legs. he would look down in shock and adoration, signalling for you to be quiet when you went to tease him.
“i told you, she’s like the cat version of me. if i love you, she’s gonna love you too.” you smile as you picked your cat up and placed her in his arms. the pair of them would be inseparable for the rest of the night.
RENJUN
on the outside it may seem as though renjun hadn’t paid a second thought to the fact he was meeting your cat for the first time. on the inside though, he had mapped it all out. that plan soon went out the window the minute he walked through your apartment door.
a blur of orange fur zoomed past him as he let himself into your apartment. renjun thought you had an old cat? weren’t old cats always sleeping? as he continued into your apartment he was stopped in his tracks when the ginger cat ran past him again, almost tripping him over in the process.
“your cat just tried to kill me!” he would complain as he greeted you in the kitchen. as if summoning her, your cat would appear beside him, staring up at him curiously. as renjun moved to crouch down beside her, he noted none of her behaviours indicated that she was uncomfortable. hesitantly, he reached his hand out to pat him. and he immediately regretted it. the cat latched onto his hand, biting down before quickly running away.
“what the fuck! she just bit me!” he complained, holding up his hand for you to inspect. you giggled, pressing a quick kiss over the bite mark before moving past him to pat your cat.
“it’s just how she shows affection, you’ll get used to it.”renjun sent a glare the cat’s way as you picked her up and gave her a pet on the head. as much as he hated the idea of being bitten all the time, he loved the implication that you were planning on having him around long enough to get used to it.
JENO
when you had told jeno you had finally gotten the stray cat in your neighbourhood to settle down with you he didn’t believe you. what soon followed was a barrage of until countless photos showing the cat sprawled out in all sorts of positions. jeno had to see it for himself.
he was greeted by the stray the moment he entered the your apartment. the cat seemed to remember him from the times they had encountered one another on the street. he would begin to pet the cat before having a realisation. and then it would hit him, the sneezing.
“did you forget to take your allergy medication before you left?” you would ask, concerned that he hadn’t stopped sneezing. the stray had scurried away somewhere, startled by the loud noise.
“you’re lucky i’m prepared!” you scolded as you handed him some pills and a glass of water. your boyfriend was anything if not predicable. the sneezing would soon stop and noticing the lack of noise, the cat would return. jeno had taken note of how much better the cat looked, no longer underweight and dirty but well-fed with a pristine coat. all of the signs that you were caring for the cat just like how you cared for him.
“what would we do without you?” he would whisper lovingly, planting a kiss on your forehead. he now had another thing to add to the lists of reasons why he loved you.
HAECHAN
you were a bit nervous to introduce your cat to haechan. before this, every time he had come over you had put her away in a room with all her things to make sure she didn’t freak out. she’s extremely shy and easily scared. you didn’t want anything to go wrong.
standing in front of the two, you honestly couldn’t remember why you were worried. your boyfriend’s kind and caring nature really shone through as he took the time to befriend your cat. you had never seen the fluff-ball warm up to somebody so fast. the pair were cuddled up together on your couch, haechan trying to figure out where your cat preferred to be pet.
“i swear she’s never like this.” you laughed as you watched them from afar. you watched as haechan tentatively rubbed your cats shoulders, knowing that it was her favourite.
“oh my- is she drooling?” he would exclaim, wiping it off of his hand. you nodded at him, joining the two of them on the couch. your cat quickly hopped off of his lap to lie on you instead. he watched bewildered as you petted her gently, mumbling praises as you went.
“i don’t know who to be more jealous of, you or her.” he would sulk, pressing himself into you as you continue to pet the cat in your lap. you would simply roll your eyes, opting to pet his head with your other hand. you quickly picked up on how much he seemed to enjoy it. that would be something you would definitely be taking advantage of in the future.
JAEMIN
jaemin had been practically bashing your door down to meet your cat. he had heard some weird nosies on the other side of the phone on your latest call. you explained to him that they belonged to your cat.
“what do you mean you have a cat?” he gasped, slightly offended he hadn’t known sooner. you quickly cleared up that you hadn’t been hiding a cat from him every time he came over, you were simply watching the family cat while your parents were away on holiday. however, your boyfriend was still determined to meet him. which led to the situation you were currently witnessing.
“ahhh! you’re such a pretty boy yes you are!” jaemin cooed, making a weird combination of a scream and a gasp when your cat rolled over onto his belly with a meow. jaemin shot forward and began to pet the cat in a fashion you could only expect from a cat dad, absolutely enamoured by the cat who reminded him of his own.
“don’t you think that he and luna would look great together?” he looked up at you with pleading eyes. you knew this comment was coming. the second you realised both of you owned ragdolls, you knew he would suggest some kind of pairing.
“jaem, don’t you think it would be a little weird if our children were together?” you questioned, joining him on the floor with your cat. jaemin’s eyes widened comically in realisation, backpedaling on his comment. after much discussion, you ended up settling on your cats being step-siblings. with the plans jaemin had for your future, such an arrangement was only natural.
CHENLE
chenle had never really intended to meet your cat, it all sort of happened on accident. you were returning back from the vet when you got a phone call. phone calls like these weren’t uncommon, chenle had a tendency to leave problems alone until they became absolutely necessary to handle. however, a call had never come at such an inconvenient time before. still, you dragged yourself and your cat over to his place.
“please next time just call me as soon as something is wrong, don’t leave it until the last minute.” you scolded, although you knew it was bound to happen again. you both made your way back into the central area of chenle’s apartment, where you had set down your cat before your boyfriend had whisked you away jnto the other room.
“yeah yeah i know- wait… where’s your cat?” chenle stopped in his tracks, looking at an open carrier. he immediately began running around, worried he was the reason your cat had gotten out. you watched his panic in slight amusement before coming up behind him and stopping him.
“it’s okay! i let him out when i first got here. i couldn’t leave him in his carrier the entire time.” you reassured. chenle let out a sigh of relief. now the focus shifted to finding where your cat had gone in his apartment. you both searched for about 10 minutes before chenle realised exactly where your cat would have gone.
and just as he thought, there in front of him laid daegal and your cat, cuddled up together in one of her many beds. you and your boyfriend looked on adoration and how cute they were, you quietly whispering that your cat loves dogs. chenle silently cursed himself for doubting you and was quickly coming up with ways on how to ask you to make this a regular occurrence in his home.
JISUNG
standing in front of the door to your apartment, jisung would be absolutely terrified to meet your cat. mumbling silent prayers to himself on the way over, he knew his relationship was all but over if he didn’t get the pet’s approval.
it was almost as though there was no cat in the apartment when he entered. that was until he locked eyes with a shadowy figure who had perched himself on the table in your kitchen. you had picked up on the apprehension radiating off of your boyfriend.
“are you good?” you would ask cautiously, giving him a reassuring squeeze as you moved past him. jisung felt a little embarrassed at getting called out. i mean, who was scared of a cat?
“huh? yeah. he’s just a little… scary?” he muttered quietly, hoping that his choice of words wouldn’t offend you. you let out a loud chuckle at this, jisung’s face flushing slightly pink at your reaction. you walked up to him and pinched his cheek before placing a kiss on it. you continued past him over to where your cat was.
“god you’re cute! he’s literally harmless, watch this.” you picked up your cat and rotated him so that he was cradled in your arms. jisung watched on, amazed at how the cat seem to enjoy the way you poke and prodded at him in various way. when you handed your cat over to him, jisung opted simply to give the cat some pets on the head. to his surprise, the cat leaned further into his touch, purring away. he should have known that when it came to you, there was nothing to be scared about.
requests are open!
masterlist
#nct dream#nct reactions#nct dream reactions#nct dream fluff#nct dream x reader#mark x reader#renjun x reader#jeno x reader#haechan x reader#jaemin x reader#chenle x reader#jisung x reader#mark fluff#renjun fluff#jeno fluff#haechan fluff#jaemin fluff#chenle fluff#jisung fluff
183 notes
·
View notes