#also I downloaded a new brush in csp so this was me trying it out I like it
Text
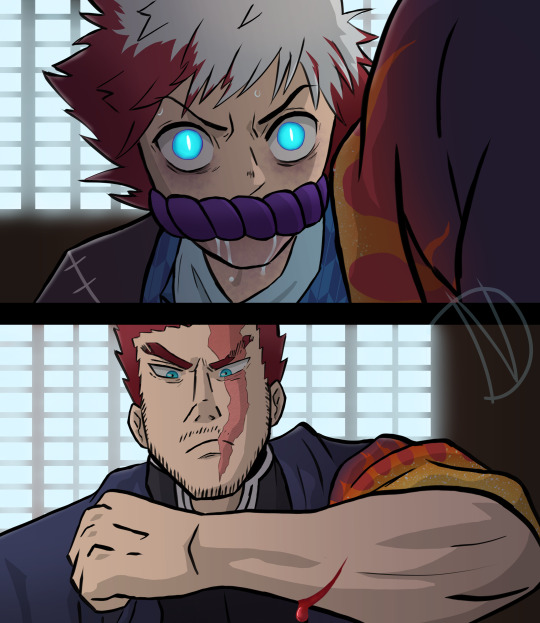
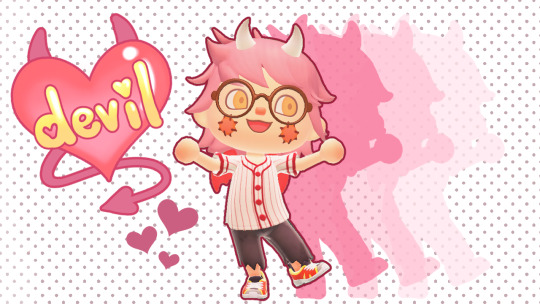
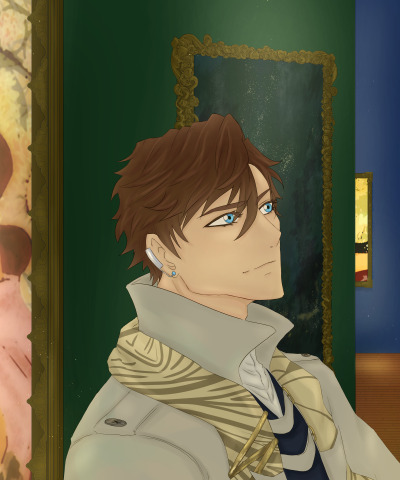
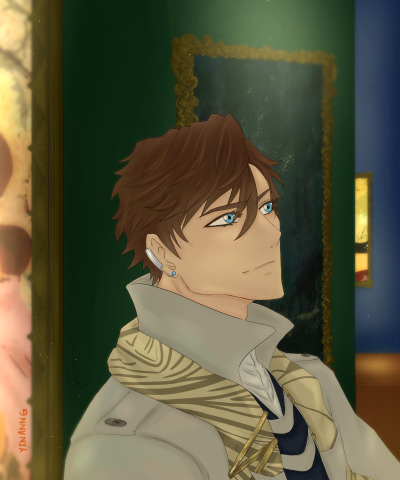
"I will prove to everyone here that this demon is not my son anymore."
More of this Todobros kny AU, feat. Flame Hashira Enji.
#demon slayer#my hero academia#touya todoroki#enji todoroki#mha#Todoroki: Demon Slayer#I have a whole backstory cooked up about just how Deliciously Messy the todoroki drama is this time around#and it doesn't end at 'Enji buggered off after Shouto nearly lost the eye' oh no that's barely the start#Yes Shouto is off to the side suddenly remembering A. He has a Dad and B. He hates his dad (the repression was Strong TM)#Extra other fact: Enji is a Marechi here and he's LUCKY Touya doesn't actually remember him#Touya's lucky too since Not Remembering Dad is giving him the self control to Not Kill#also I downloaded a new brush in csp so this was me trying it out I like it#sketches#Please Ask Me About My AUs this is my lil brain nugget child *wheeze*
35 notes
·
View notes
Text
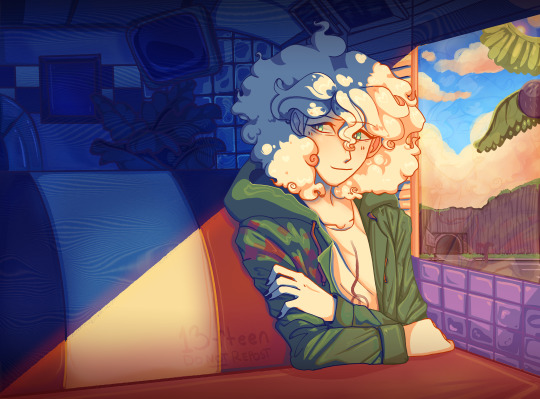
Nagito Color Study | Please do not repost, reblogs are welcome though! Brushes & Techniques & a progress pic below the cut
Uhhhh okay, how to explain this one. I was rereading “Logically Lucky” by PinkSweetSmoke and some of the visuals in the earlier chapters really struck me. The way that they write this relationship is pretty dynamic, and I wanted to see if I could use colors to talk about how Hajime and Nagito feel for each other and what they’re going through emotionally? So this is fanart for that fic, directly inspired by that fic based on the established vista(s) and also the style of writing their relationship, but it doesn’t really make sense unless I say all of that lol? But it wouldn’t exist if not for that fic, so I’d feel weird not mentioning it.
Brushes used (Clip Studio, Free):
Main: “ラフペン” from gyuukotu’s “Fill Set (塗りセット)”, content ID 1695210
Fill: Default India Ink brush pen - the rough pen is a little unpredictable, so I used this to flat the image and make sure that there were no gaps
Cloud Flat: "荒筆" from gyuutoku's “Fill Set (塗りセット)”, content ID 1695210
Cloud Blender: I downloaded it from the internet instead of the app 2 years ago and cannot find, with certainty, where it came from, since I get rid of everything on my hard drive that's not art every year :( there are lots of good cloud blending brushes out there for free, though, and I typically use the gouache blender
Misc. Techniques:
Screen Distortion: I used CSP's free cloth texture clipped above the "blue" layers and then liquified it in places for the screen distortion effect
Gradient Mapping: I cannot overstate how helpful gradient maps were for minor color corrections, you guys PLEASE try them on a finished piece of your own if you haven't used them yet. Click Layers > New Correction Layer > Gradient Map and then choose from the premade gradients before adding your own so you can see how they worked. I used a few different ones clipped to specific areas w/ lowered opacity & hard/soft light settings where I felt like the color was falling flat and it was SO helpful at giving it just that little bit more depth.
Hearts: I've discovered that you can cheat at hair and clothing rendering by just making hearts. Try and see how many you can find lol
Color Theory in General: The whole point of this piece, after it stopped being fanart (lol rip), was to be a color study focusing on the contrast between shadow and light and what I could do within the blues & the yellows to make them appear as if they're actually different colors. In the blue section, everything is p much blue, nothing is any other color. In the sunny section, a lot of the stuff is warmer variations of the standard colors, since I wanted it to be more vibrant and didn't feel like I could achieve that if everything was shades of yellow and orange. That being said, I stuck as closely to that as possible. But ANYWAY, juxtaposing the two starkly different color profiles also helps the blues in the blue side read as colors that they aren't, which was part of why I did this study.
Sneaky sneaky: I just modified the diner a bit in order to get the colors I wanted, i.e closing the blinds bc I can. As an artist it's important to remember that YOU have full control over every single part of the piece, you just should ideally have a reason to create inaccuracies/ break rules or else it can end up being a bit messy and disorganized & details/ your vision can get lost.
Aaaand finally, the sketch from TWO AND A HALF MONTHS AGO:

#trusttheprocess 😭😭😭
#nagito komaeda#sdr2#color study#super danganronpa 2#nagito fanart#my art#october 2023#jesus I started in july#but I also like let it sit for a good 2 months after the mockup#so shhhh#fav#komaeda nagito#character study#fanart
70 notes
·
View notes
Note
I love your artwork, it's so cool! I'm an amateur in art, do you have any tips? Thank you!
Thank you so much! 💕 And sure! (Have you seen my other posts as well?) It’s a bit easier when it’s more specific >< But I’ll try my best;
- Keep notes about the things you want to learn as you draw! Someone gave me a tip to have an art-goal so you know what to work on and then improve these particular things as you go, but for some reason I found it really hard to set these goals? (Am I the only one?) I kept thinking I just wanted to ‘improve’ everything, but that’s not very tangible and I can’t effectively measure whether I’ve succeeded… (it’s also not always easy to see your own improvements… at least I rarely can ><)
But when you draw and you come across these little things that make you go “hm, I wish this was easier” or “I really love this sketch I made, but I’m not sure how to go about coloring it”, anything like that— then your desires regarding your art or your process become a lot more specific, right? Write these down! What specifically would you like to improve on?
I’ve noticed for myself and many others talked about it as well that once a piece is done, it’s like you forget a lot about the process and your mind is set on a new project. (Also, yay! You were in the zone~) You can either use your current project as practice (all of them are in a sense, really) or start a new one later, research what you need (on YouTube, books, or perhaps a course from an artist you really like if you can afford it) and work on your goal!
- Also keep notes for any ideas you may have. We always think we’ll remember something and then we don’t. These sudden, often spontaneous glimpses you receive seemingly out of nowhere can be some of your best and it’s a shame if they fade back into the void. This also applies to anything that inspires you.. it can really be anything. I think I’ve said this before, but if you do this, try and organize a bit. Otherwise you’ll end up with a bunch of notes that’s more overwhelming than anything else.
You can use folders to keep images, notes, a dedicated Notion page perhaps or if you can afford it, keep an extra external SSD for this.
- Well, this also applies to research or video’s you’d like to watch. If you end up with too many tutorials or books, or they aren’t goal-oriented specific to your art desire, it may get really hard to get you started on something. If you’re like me and it’s hard to focus, I’d highly recommend taking some time to sit back, think about the thing you really want, organize and structure a way towards it and go. That way you don’t have to make all these decisions along the way— you know what to do already, it’s written right there!
- And that also applies to tools and brushes xD I know it’s really fun to download all of it because many are free and what if there’s ever a time you may need this specific texture on a brush? What if you can’t get this style that inspired you with the brushes you already have? But truth is, you don’t need them all and if you do, you’ll notice there are many you won’t even touch. And well… as you can see in my art as well, apart from the pencil ones, it doesn’t necessarily encourage consistency if that’s what you strive for. If you want to practice, most often the basic round brush will do, the less opacity or blend, the more you can practice shapes and clarity. In that case I’d stay away from the airbrush whenever possible.
- Depending on the program you use (CSP has their own), you can use these to help you with facial angles, or this if you rather prefer a basic skull. You can use the site if you can’t get the angles quite right for many things.
- For coloring I highly recommend James Gurney’s articles or book ‘color and light a guide for the realistic painter’, even if you’re not a realistic painter, it still contains most (all?) of what you need to know about color.
- A great way to experiment is to just… open a blank document and do whatever. I know it often feels like you have to draw something (preferably something good), but you can actually learn a lot by just scrabbling away. Here’s also often where you find the things you feel like you need to improve. Certain angles are especially hard for me, but I hadn't known that if I didn't try ><
Oh, I also found this site by accident and I haven't read it all, but it covers many subjects!
Hope these are helpful! 🌷
16 notes
·
View notes
Text
a long and overly detailed guide on transferring CSP brushes in between devices because i am stupid so someone out there probably is too and might need this
yeah so i spent like the past 3 days trying to figure everything out, and i figured i would save people time in case they were going through the same stuff (also in case this happens again and i Forget)
this guide is specifically for version 1.0, the discontinued version. I have no clue if it applies to any version after, but you can try it.
so let's say you draw on your laptop, and you get a new one. here is what you should do
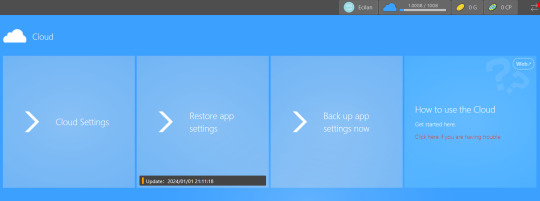
...actually before i get into the steps, make sure to back up all of your settings and brushes here. it will make your life a lot easier trust me
back up all your app settings on your old device, and then restore them in your new one once you have installed CSP onto your new device
HOWEVER STARTING FROM THE TOP...buy some sort of USB/hard drive. stick it into your new laptop and then copy and paste everything necessary into it (all CSP/CELSYS setup/files. additionally any art files or whatever else you have downloaded that you wanna bring along, but in this case, we're only talking abt the CSP app itself)
once you copy all the necessary files onto your hard drive (MAKE SURE before you eject the hard drive, that it is safe to eject. the one i used had an option where i had to click eject hard drive, and only after clicking it could i safely eject it)
okay now you have all the stuff you need. stick the hard drive into your new device and copy and paste your stuff into your new device.
These steps might take more or less time but now going back to the cloud back up thing from the beginning. if this process is successful, once you click "restore app settings", everything should be fine and you should be all good to go and this tutorial ends here
However, if you open CSP and all of your brushes have become deformed like so, and almost the entirely of your materials folder is empty, this is what this guide is for💀

As far as I know, if this happens you're basically fucked 💀 you can keep trying to backup your cloud settings, but after a couple of times, if none of your brushes are restored, you will have to use other means.
You will have to transfer brushes over to your new device individually, and during this stage, I really recommend you just download all your favorite brushes. You can redownload the other ones in the CSP assets store later
go to your old device and right click your fav brush. Let's say my fav brush is the Lan Brush. I'm going to right click Lan Brush, click export sub tool, and download it. It will naturally save as a sut file (Lan Brush.sut)
idk if other people had to do this, but I did so. basically you go to your downloads and make a new zipped file, name it whatever your brush is (so Lan Brush)
once the zipped file has been created, you now have the zipped file and the sut file. take the sut file, and drag it into the zipped file
this step kind of requires a google drive but i trust you have one. so go to your google drive. take the zipped file, and just drag it into your drive, and it should naturally upload
now, switch to your new device. if you go onto your google drive, the zipped file should be there. download that zipped file, and then right click, and click extract all.
go to CSP, right click any brush (it doesnt matter which one, it will not affect your brushes dont worry), and click import sub tool. navigate to your folder, or in my case, Lan Brush, and click on it. you should now see the sut file inside the folder
click on the sut file, and now your brush should be uploaded! Feel free to drag your brush into your CSP material folder to save it there too :) do this as many times as you need with however many brushes you want
this is also good for uploading brushes in general, so if you make a fun brush you wanna share with your friends, you can turn it into a downloadable zip file and then share it by exporting the sub tool
BUT WAIT THERES MORE !!!!! I've covered brushes, but what about 3D models? what about image materials? Sites will tell you it is currently not possible to transfer it without blender but don't believe them, i have the will of a desperate artist
For the most part, if the 3D model or the image asset is available on the CSP asset store, I would recommend just searching it up and downloading it, its the fastest way💀 however if these assets are for whatever reason deleted and unavailable, then you can do this
Let's start with 3D models. Let's say you have a 3D model or a body shape asset or something.
make a blank canvas and drag whatever model(s) you want on there. as long as theyre on separate layers, its fine.
now save the canvas as a clip studio paint file as you normally would.
go to your google drive, and drag the csp file into it. it should upload naturally as a zipped file
Go onto your new device and download the zipped file. Right click and extract all. Now you should be able to access the CSP file. Open it on CSP.
now go to your layers. you see the layer the 3D model is on? take it and drag it into your CSP materials folder.
congrats! now your 3D model is an official asset again and you can use it whenever you want
This also applies to image materials too, and basically every other asset, so you can do that with your other stuff too.
That is where this tutorial should end but if you're like me, you will struggle even more😇 this step only applies to image materials, so i cannot provide you with further advice for imported 3D assets
Let's say you try to save all of your image assets in separate layers into a CSP file to upload onto your new device. however, you are out of storage. your file keeps encountering errors, and you cannot save your file no matter what, thus you cannot upload it to your google drive
this is what i would refer to as a last resort. it is super annoying so dont do it unless you're desperate but open up a tumblr draft. yes open up a tumblr draft.
you are going to copy that layer and paste it into your drafts. save it
okay now go onto your new device, and open an empty CSP canvas. Log into tumblr, go to your drafts and click on the image.
copy and paste the image into your blank canvas and then take the layer the image is on, and drag it into your material downloads like you would in the previous process with the 3D stuff
If by any chance the image that you are copy and pasting is transparent in any way, or black and white, when you paste it onto tumblr, tumblr will provide you with a white background, which is kind of annoying
either ways once your layer has become transparent again, you can drag the layer into your material downloads, and you're done.
but continue to copy and paste it back onto your canvas, and now you should have your image material with a white background.
To get rid of the background and make it transparent again, click "edit" at the top, and then "Convert brightness to opacity". Converting brightness to opacity will make your image greyscale, but I'm kind of assuming your image is already in black in white.
If it's transparent and not in black and white, idk how to help you there, you'd have to recolor it once its transparent again ig💀 this mainly applies to lineart type images (where recoloring it is easy with the bucket tool)
That's all I have to say, but if you have any problems with any of the steps, feel free to ask me (I'm not the most tech savvy person though, hence why I'm making this guide to help myself too💀 but I will try to answer you as best as I can)!
14 notes
·
View notes
Note
I hate to bother but do you have any advice to someone who's trying to improve at drawing? Tbh you're one of my favorite artists online and every post you make is a treat so even just having a fraction of the skill you do would be a boon. Also, what art program do you use and do you have any favorite go to brushes?
AAAAA888888 you're not bothering me at all i'm gonna explode i'm really so honoured to hear that HELLO!!!!!!! thank you so much, it really means a lot to me!!! ;;;;_;;;;; I'M GONNA DO A READ-MORE JUST IN CASE i have a feeling it'll look long
i'm self taught but the process was not the best so it took a while to get here and i had no planning laid out for myself but with what i know now, i think if i could start over, i'd do it like this (since i cannot in good faith recommend u to just stumble for over a decade):
find something you really like drawing (get addicted to ocs. seriously!!!),
follow enough artists to get inspired but not discouraged (ik a lot of people who would treat it as some sort of race or competition or something that's out of reach, and it would bring them down, it's good to have inspiration and goals but u gotta keep ur mental safe!!), but also
do studies, some artists post their studies which is really nifty But it's probably better to do some on your own too bc you'll get a better understanding of things (it sounds boring but i think it's fruitful and fulfilling, i don't do them often but when i do it's a good feeling) also whether you're doing clothes studies or pose studies, do something that will make them fun for you, like drawing an oc or character you really like in that pose or clothes
have fun and take your time with things and do not be hard on yourself‼️‼️‼️‼️‼️‼️‼️‼️‼️‼️‼️‼️ pace yourself and draw for yourself!!
i use clip studio paint, it goes on sale every couple of months, every time for 50% (though you could probably yoink it somewhere for free?? but i'm not sure if that'll allow you to download new brushes)
speaking of WHICH these are the brushes (and tool) i use most often (there's a lot of brushes on csp for you to download and play around with so you should do that and test em out to see what works best for you!! there's a LOT of fun tools/brushes to test out)
download links
first: https://assets.clip-studio.com/en-us/detail?id=1746109 (50 clippy, csp sometimes gives that currency away through login bonuses like gacha (i'm not even kidding))
second: (i've been trying to find a link for over an hour now and i can't find it i'm really sorry abt that BUT i think any brush works, it looks easy to replicate or to find an alternative!!)
third: https://assets.clip-studio.com/en-us/detail?id=1759448 (it's insane and it's FREE, it also has clear instructions on how to use it within the link)
i hope that answers everything, thank u again!!!
#ask#anon#;;;;;;;;_;;;;;;;;; waht the hell......unchained kindness on this beautiful sunday morning.....
10 notes
·
View notes
Note
Hello! Would love to know which brushes you've been enjoying recently! I'm always looking for new ones to try out and mess around with.
Your art is a huge inspiration to me btw, it makes me want to push and challenge myself more!
Hey there, Anon! And thank you so much, I'm glad I can help inspire you in some way ♥
tbh ever since switching to CSP last year I've been struggling to find brushes I feel really comfortable with myself haha there are just sO MANY in the assets library and I've downloaded like a million and tried about half of them, and most are really good but I still haven't really found like. The One(s) for me. So I'm still looking too
But the ones I've been using the most recently and do quite enjoy are 2 and 3 of these (I think I've mentioned them before as well) and also this one for both sketching and lineart, and the Nong Pen 2 for shading/rendering
#anon#replies#art asks#I'm like a dragon hoarding all these brushes but only ever using like a fraction of them#case in point: while looking for the links I already downloaded three more lmao#I think I'd love to experiment more but where do I find the time ugh#anyway! thank you again#hope you find them useful!
30 notes
·
View notes
Note
hey!! what are the main brushes you use in CSP? like for lineart and coloring;; besides the blur brush
oh!!! i make my own im so so sorry!!!! i tend to download brushes and then change them so much theyre unrecognizeable, and then just recreate the new version i made more properly and those are what i use. i use the same brush for linework and shading/coloring also! i draw the outline for the shadow and use the fill in tool. the rest is just. defeault stuff tbh
i think the only “notable” thing i do is my messed up linework pressure settings. im Very heavy handed, and prefer the “cursor” around my line to be visible bc i cant fucking see so we end up with this:
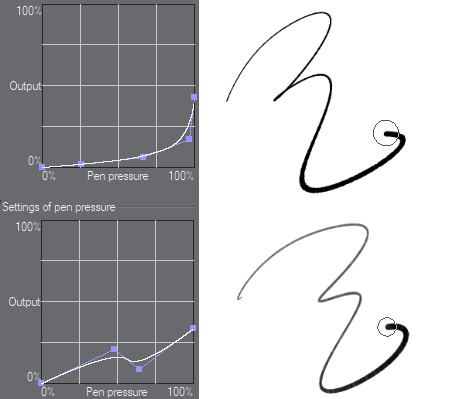
the output is really low, the thick parts of the lines is me pressing at the hardest. the upper brush is my regular linework brush, it has one of the default droplets as shape and a little random pressure as well for some grit. also a fine texture on top. the bottom one is a modified version of “Textured Ink Pens (質感スミペン) “ that im trying out currently for more sketch-like linework. another i use for that linework is the very famous su-cream pencil, but also with messed up pressure settings lol
#notmyart#process#noooo it ended up longer than i wanted#long post#also u are all allowed to judge me for my messed up and evil settings lmaooo#the art i make is industrial levels of force lol#if anybody wonders wether my wrists or anything hurt from being this heavy handed; no#im built different#anyway idk if there is any setting to make the cursor around the line bigger otherwise#i just wanna know approximately where im putting my line!!! i cant se that tiny ass dot!!#its too precise and small what the fuck!!!!
86 notes
·
View notes
Note
(on my knees) teach me how to draw mr thomas (no pressure obviously)
i think anyone can draw, just like how anyone can sing or dance or write, the biggest barrier preventing some people from trying is the concept of standards i think. why bother drawing if the end product is not "good" enough? but you should draw because you want to, even if the end product isnt exactly how you pictured, because you'll always make progress and grow with every line you draw, and you'll find joy in the process of self-expression and creation rather than just the pursuit of an unquantifiable category of "good." like that discussion in art spheres on the internet abt learning to separate your view of your art from validation online, so you dont hinge your happiness and satisfaction with drawing on notes? kinda similar to that :)
my main advice is to draw a lot. the reason i draw so fast and develop my style so much over time is because ive been drawing nonstop since i was a kid, and since ive been lucky enough to have a lot of free-time to spend on drawing, so i'm constantly developing the muscle memory for it. like just look at how my art has changed since march/april of this year (when i first started trying out csp!) it also depends on what you focus on, for instance ive spent so much time focusing on stylized body proportions and human figures, and so little on backgrounds and perspective, that i dont quite have a handle on those as much, so i almost "feel" like i have not progressed as much as an artist, but thats not true because progress isnt linear, its more like a video game skill tree in my opinion :) all i have to do is look up tutorials, trace stuff for practice, ect. and i will develop the skills for whatever i put my mind into learning.
last bit of advice... get clip studio paint if you want to draw digitally and want a really good art program to work with. its cheap (one time payment for pc), it has many many options and tutorials and guides out there, and assets has so many brushes you can download and play around with till u find your favorites. its a little overwhelming at the start, but i eventually got the hang of it and i am happy to share any tips abt it that i've learned :) make a folder or a pinterest board or whatever else to save art tutorials, art inspiration, design inspiration, pose inspiration, its very handy to inspire me when i want to try a new direction or just want to remember something for the future. and also be sure to get in the habit of stretching your wrists and hands (i use this guide for it)
9 notes
·
View notes
Note
hello!! i’ve always been a traditional artist, but i just recently got my first tablet for drawing and i’m really excited to try my hand at digital art!! i was wondering what art program you use and if you had any tips for someone just starting out with digital art? feel free to ignore if you don’t, i’m just a big fan of your art and i LOVE your little kiri doodles they really give me life <3
oh shit!!! first of all, thank u so so much!!!!! i'm pretty new at all this too, so i'm still kinda learning the ropes myself dkdjdkf digital art is a beast compared to traditional, but it's a lot of fun ;v;
second of all: i use procreate! i've heard lots of good things about clip studio paint tho--they have like 3D models which is sexy bc proportions, yknow? but i'm good with just procreate for now, it's less overwhelming than CSP looks (imo at least)!
AS FOR TIPS!! let's seeeee 🤔🤔
1. try all the brushes and mess with all the brush settings!!! u can reset and duplicate them all u want, u can also download new ones allegedly (idk i never tried KDJDJDJDJ), but definitely test them and find one that works for you! get the right flow & pressure that makes YOU feel in control of the brush. put that brush in its place. make that brush your bi-
2. use references! u probably already know this from traditional art, BUT MAN!!! i'm always looking stuff up on my phone so i can stare at a thing while i draw it. the number one take away is to get the shape of the thing you're trying to draw so that, one day, you won't need a ref anymore. ur third eye will open. u will know that a cat is just a couple of circles and some triangles 👁️👄👁️
3. COLOR PALLETTES!!! procreate is cool bc if i find a pretty picture with a dope color scheme i can turn it into a pallette. i am not good at color theory or whatev--especially with digital art--so it's easier for me to just use a pallette. it gives me colors i kNOW look snazzy together and i won't have to sit and question my life choices when i look back at a fully painted piece in a different light.
4. unfortunately, digital art will make u feel like you're relearning how to draw all over again, so really...it just takes time and practice! at first i took a lot of requests and that helped me SO MUCH. i also really like to find those expression memes and just practice with those on my own time? that helps too. draw as much as possible and don't put a lot of pressure on yourself. if a thing is too complicated, simplify it! thats why i do a lot of simple chibi-like drawings. gotta build up to the hard stuff 😤
anyways skdkdkdjf sorry for the basic advice, but i hope it helps a little!! good luck on your digital art journey, i'm rooting for u!!!
#asks#long post#i'm on mobile otherwise i'd slap a read more on this ;v;#but man i am but a worm#very humbled by the fact that u would ask me for advice#highkey made my week#thank you so much 💖💗💖💗💖#if u see a typo no u dont#its past my bedtime
22 notes
·
View notes
Note
Could we please get a tutorial on how you did your latest lookbook? Ily 💌💌
ok this is gonna be a long post so under the cut is a general tutorial, i cant go step by step exactly as i did it since i didn’t save the editing file, but here’s at least my basic process i always start out with, plus how to do the silhouette effect i used in the last example!! also i’m not sure about your experience level re: image editing or digital art so i’m going to try and explain it in a way that hopefully anyone can understand but please feel free to come to me with more questions!! Also my screen res is very wide but I wanted to be able to show off where all the menus are, so clicking on the images for full view may be necessary for you.
OK so step 0 is gathering materials- you will need a photo that you want to edit plus an image editing program. You can easily get photo’s from your switch with the switch’s built in image sharing mode, either by posting them to facebook or twittter, and then saving them to your computer from there. Or if you have a computer that can read a microsd card or you have a microsd card reader you can plug into your machine, you can transfer images that way. The only other thing we need is an image editing software. I will be showing you my process by using Clip Studio Paint but you don’t need to use this specific program. I personally recommend using a program that allows for transparency even if the end result isnt transparent because it’s easier to move layers and elements around but that being said you COULD edit images with a program as simple as microsoft paint. There are free more advanced softwares out there like krita, gimp, fire alpaca, etc.

Step 1) While this step isnt necessary, I personally run my images through a filter to reduce the JPEG noise, to smooth out edges and to make the image clearer. You can also use websites or apps that do this for you like waifu2x or yome2x if you want.
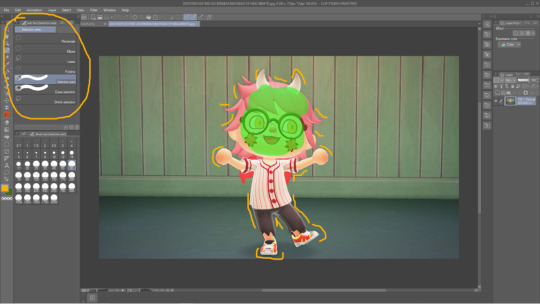
Step 2) Isolate your subject from the image’s background. You can either choose to just erase away directly on the image layer or you can use selection tools to choose the parts of the image you are going to separate first. I prefer the selection method because then I can use a masking layer which I’ll get into in the next step. You’ll want to erase or select out everything except for your character (or other photo elements you want included in there too like if you decorate a bit). There are many different ways you can use the selection tools depending on if you want to opt for speed or for the cleanest possible edges. I usually use the magic wand tool to get a good chunk of my selection and then go in with the selection brush for precision.

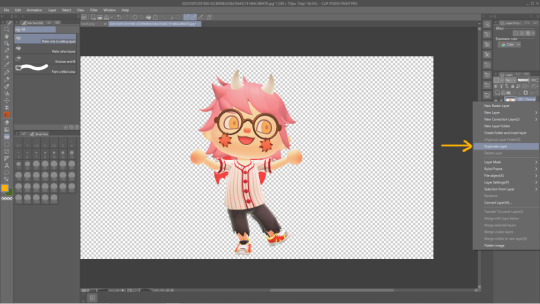
Step 2.5) If you have opted to select out your desired subject then the next step is to create a masking layer. The easiest way to do this is to finish your selection and then to hit the Quick Mask button circled in yellow, it is represented in my version of CSP as a rectangle with a dark circle inside. This will automatically create a mask including everything except your selection, making those unselected elements completely transparent. The mask if shown to the immediate right of the affected layer. The black bits are what is hidden and the white is what is shown. You can edit the mask using the brush and eraser tools- the brush will expose hidden bits of the layer and the eraser will hide. You can also create a layer mask by opening the Layer menu at the top of the window > Layer Mask> Create from Selection. This is how it works in CSP, other softwares may not make use of the eraser tool but instead only the brush tool will be needed to edit a mask. I encourage you to search the web (google, duckduckgo, etc) “masking layer + (your drawing program)” for specifics on your particular program.
Step 4) Now comes the silhouette effect specifically from my lookbook post. Duplicate the character layer. This will create an identical layer for us to edit.

Step 5) Create a new empty layer and make sure it is on Top of yhe layer we just duplicated in the above step. Then create a Clipping Layer using the empty layer. Clipping layers will chain to the layer immediately below, and allow you to create effects that only affect the layer it is attached to. You may chain multiple clipping layers to a single layer in order to layer almost infinite effects.
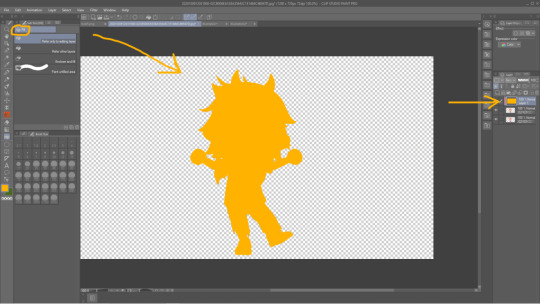
Step 6) Using the fill/Paint Bucket tool, fill the empty clipping layer with your preferred color. Notice how the layer is technically completely filled with yellow, but it only shows up in the actual image as the shape of the layer the clipping layer is attached to!

Step 7) Reorder your layers so the original layer we started with is displayed on top.

Step 8) Use the move tool to drag either the copied layer or the original layer around to a position of your liking. You can then repeat this process as many times as you want, using whatever colors or gradients or brushes or textures you like.
Step 9) Draw or import textures or clip art* or literally whatever to decorate your image how you like. Elements from this piece include a heart shaped brush that came with CSP for free, a polka dot screen tone brush I downloaded for free from the CSP shared asset website, and hand drawn elements and lettering done by me! *When using materials you find on the internet for your edit work please, please make sure you have permission to use it. Don’t take art from people’s art blogs and turn them into stickers or whatever unless u have permission. If you dont want to draw it out yourself i recommend searching the web for royalty free clip art or textures. Hopefully this tutorial was what you were looking for! If not you can always ask me more questions and if it’s helpful or interesting for anyone out there the next time I make a lookbook edit I can record that as a video so you can see my step by step process as I actually create the image,
18 notes
·
View notes
Note
Wow, your art is gorgeous. Would you be willing to talk a little (or a lot!) about your process? I really appreciate the way you draw character’s faces, they are expressive in a way I don’t feel like I see a lot. The men’s jaws are really great, too! They just look right to me. Thank you for all the art you share.
sdjfaksd thank you!!! I really like drawing men & expressions, so I’m really flattered someone noticed some of my favourite details :)
And I don’t mind at all. I’ll just put part of the process under cut to keep the post from getting too long.
Thank you again for taking the time to send me a message <3
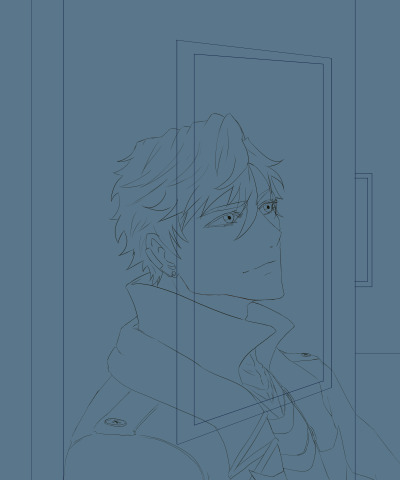
Re: my process -
I always start with my base sketch/layout of my piece. Sometimes I’ll draft it in my sketchbook/on paper, usually to try out different ideas & place things. If my BG is really complicated I tend to draw that first, then the people in the front after. I have separate layers for both just in case I screw up. My base sketch layer is always subject to change since my initial sketch is always really vague & functions as a layout. As I get into details like arms or eye placement I’ll draft more specific lines.
My linework is always on separate layers for different elements, like big structures vs. little objects, and for people I put the body, hair & face on separate layers in case I need to adjust them without erasing or messing with other lines.


From there, once my linework’s done, I’ll use masks to hide overlapping lines & then put in my flats. My canvas is never white bc I find using a colour as the base/canvas helps me pick my colours from there. Also white canvases hurt my eyes no matter how low I put my screen brightness e.e
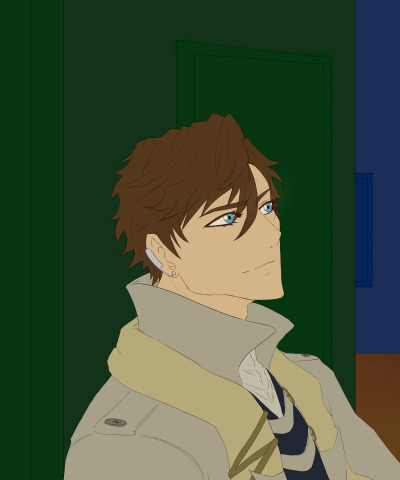
After my flats are in I make new layers & clip them to the flats & add shading. I usually go one flat layer colour at a time, working bottom up, so from the background to the foreground, which helps inform where my shadows go. I’ll fully shade like Theo’s jacket first, and then move onto the next.
I usually have about 1-2 layers for shading bc my light/highlights add contrast between my colours so I don’t have to transition too much. For small things like Theo’s earring I might only have 1, and for darker things like his sweater (or anything black in any of my other drawings) I usually have about 1 layer for shading. Any designs or patterns are also clipped.
For small things like Theo’s buttons & earring, I tend to use 1 layer for them since they’re so far apart that shading wouldn’t affect them when I’m colouring.
For people’s skin I have a base shade, a prelimary shading layer, a second darker shade, then I have either 1 or 2 layers of “soft” shading where I use a soft brush to fill in their skin & even out the tones a bit and soften up the transition between shading & base skin tone. I also always have a little bit of blush for people to add some colour to their face. Hair’s the same way, about 2 layers of shading, and then one layer (I picked this up from Yamada Shiro actually) where I take the skintone and brush it across a character’s bangs and use it as a highlight. It brightens up a character’s face around their hair, and esp. for characters like Theo who has hair in his eyes, it helps lighten up that area more.
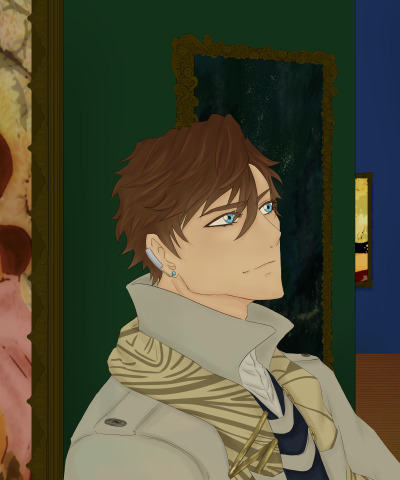
This piece with Theo is a bit different from others where I had additional pictures in there bc it’s an art gallery, so those were just other pieces of art I shoved in after editing them in Photoshop. For the frames I used brushes I downloaded from CSP. My gallery ref had top lit paintings, so when I add my light source, they hit top-down. Like my shading layers, all of my highlight layers are individually clipped to each base layer.
He’s standing in front of the light so my heavy contrast lighting isn’t used here, but since I work dark to light the highlight tends to stand out against my generally matte colours.
After I add the highlights, I add in final touches like sparkles or dust particles that look like sparkles (bc I always have sparkles somewhere lol), & then duplicate groups of layers (Theo, the background), merge them into one layer, use Gaussian blur on them & drop the opacity to something I like. I add a mask layer to the blurred layer to clear out what parts I want in focus.
Also any final colour grading/adjustment layers are used in this stage to finalize things :)
For other pieces with heavy lighting I might have a few extra layers of light and I might even clip a colour layer to my lineart, usually white, to create the illusion that the light is burning through my lines.
Thank you again anon for sending me an ask :)
6 notes
·
View notes
Text
Drawing tablet recommendation!
So a lot of you know I not only write but draw and paint as well. Digital space is my favorite to work in because it’s so forgiving, powerful, and easy to use. For a lot of people, making the move up from paper and pencil to digital is a big, scary leap that is usually also a tad expensive for most to break into.
I don’t usually post random reviews of stuff, but with the holiday season upon us and potentially having people looking for something for themselves or others and this being SUCH a good product already I had to at least drop it for anyone considering something like this. It’s a bit long, so I’ll leave the rest under the cut, but if you’re looking to gift someone the ability to draw digitally or are just trying to try it out without breaking the bank, please give this a read!
Well, good news everyone, Wacom is dead to me and let me introduce you to my new best friend the Huion H640P!
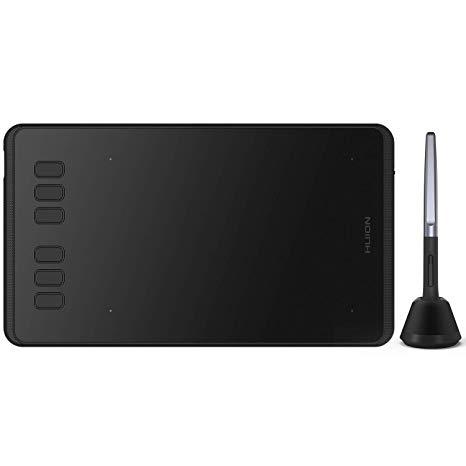
On the website it’s listed at $50, but I nabbed this buddy for $40 off of Amazon (still through the company, just in an Amazon storefront). When you compare that to the $80 Wacom’s lowest level tablet (currently Intuos, I think), it’s a clear bargain, but especially in comparison to the latest versions of the Intuos it has some major advantages!
Pen stand (you don’t know how nice this is until you don’t have it!)
4 More quick buttons than Intuos (once you get the hang of these, they’re indispensable!)
All buttons are on one side of the tablet instead of being on both sides
Android device compatible (I can’t take my laptop everywhere anymore, but now I can neatly pack this little guy and pen in my bag and draw on my phone!)
USB adapters included! (Even a Type C adapter which my phone uses!)
These alone are reasons to me to spend less and get more than going through Wacom. The active area automatically shrinks to match the ratio of the phone screen so drawing flows smoothly (this was the reason I bought it in the first place) and it requires absolutely no installation on phones - just plug and play!
On PC/Mac you will need to install the driver which will require you to go the site and select, download, and install the correct model driver to use properly, but once it’s done installing I didn’t even need to restart to be able to use it.
I have an older model of the Wacom Intuos, a Cintiq 16HD, and my first good tablet was an old Intuos model I ran into the dirt. The H640P more closely resembles the latest Inutuos model which is marketed as a beginner/hobbyist tablet, but frankly for most it’s all you’ll ever need! It draws smoothly with good pressure sensitivity and control. It’s really seamless if you already have experience using a tablet, and if it’s new to you it will take a learning curve to develop the hand-eye coordination, but this is a very friendly tablet to learn on.
If you’re concerned about the size, don’t be. Especially if you’re one to curl up with your drawing tools like I am, this fits neatly and lightly into your lap and is more than enough space to draw since it adjusts to the ratio of your computer screen after the driver is installed. You can also rotate the tablet to put the buttons on the other side if you’re left handed or if you just want to orient the tablet differently. You can use the settings to customize the function buttons, buttons on the pen, pressure sensitivity, as well as the working space.
If this tablet was available years ago I would have abandoned Wacom forever and a day ago. Competitor tablets and tablet displays from companies like Huion and XP Pen offer the same (if not better) functionality and design for literal fractions of the price now. Some people have issues with their drivers or other design choices, but frankly Wacom does not have a great track record with me, either. When all of my gear gives out I’ll be going to these companies to replace them. There’s no reason for Wacom to have such a strangle-hold on the market any more.
Bonus:
If you’re in the mood to continue saving money in terms of drawing programs my first recommendation is:
Autodesk Sketchbook
It’s a completely free program (just create a free Autodesk account) with both desktop and mobile versions, supported by Android, Windows, and IOS. You’ll get the full functionality of a paid program such as fine-tuned brush controls, custom brushes, and unlimited layers but in a layout that is easy to learn and experiment with, which for someone new to digital art can be a godsend!
There are other free programs such as IbisPaint and Krita that will work just fine, but if you’re really and truly new to this world, Sketchbook was my go-to for the longest time as a professional artist before I converted to Clip Studio Paint. I’ll always recommend CSP over anything else now because of how powerful and useful all of its tools are, but for someone just dipping their toes in on a budget, Sketchbook is your best friend.
12 notes
·
View notes
Text
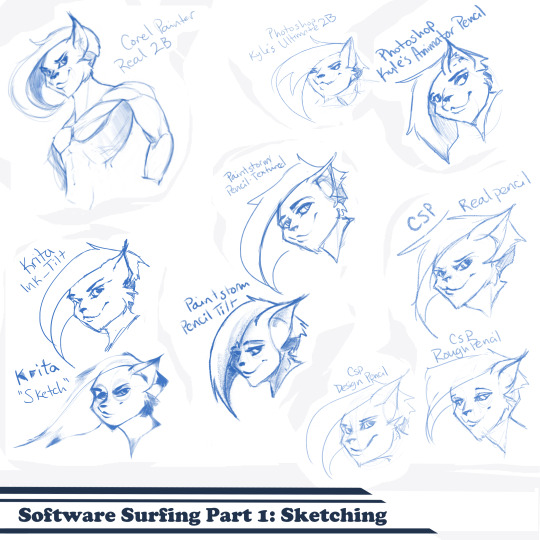
Artist’s Software Surfing P1 - Sketching
SSSo recently, after finishing (an admittedly long-overdue) a piece, I decided to download a trial of the new Corel Painter 2019. I hadn’t used Painter since my old DeviantArt days (circa 2005) and wanted to see how it felt with more digital art-veteran hands. Loaded it up, started sketching my default doodle-muse and wow, that “Real 2B” pencil feels great. I loved it so much, and wondered why.
That’s the story that is spawning this weird personal series of Software Surfing. I wanted to write little notes to future-me on how it felt using my favorite sketching tools in each program I have, and after the sixth one I thought it might be a good idea to check out inking, colouring, painting, etc. and writing those down as well.
So I’m writing this series for myself, but making it available in case anyone else can benefit as well. Thanks for sticking with the intro, let’s get into it.
Artist’s Software Surfing P1 - Sketching
Artist’s Software Surfing P2 - Inking
Artist’s Software Surfing P3 - Colouring
Artist’s Software Surfing P4 - Painting
There are many ways to sketch, but this is specifically the classic “pencil” or “drawing” form using the tools with the program’s default settings.
As an introduction, this is my doodle-muse, Cloey. She was my first original character, and though I don’t usually share my anthro art on here (I know that’s not everyone’s thing) I do have a separate blog for that stuff that you can find here if you’re so inclined. If you’re familiar with Artgerm (and you should be), she’s basically my Pepper.
Corel Painter’s “Real 2B”:
The one that started it all. The pencil just GLIDES, and I’ve always loved when you can tilt a pencil tool and it will shade just like tilting a real-life pencil. The only thing I want from a program now is to be able to bind touch to blenders so I can use my finger to smudge-blend the scribbling. (I tried drawing that fist so many times /fume)
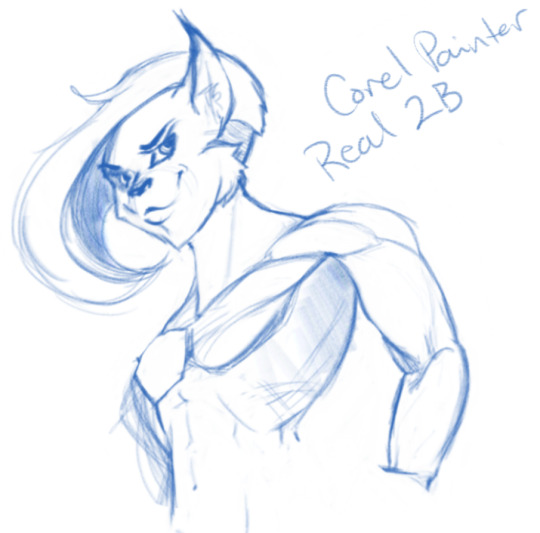
Likes: Tilt functionality, line width variance, stroke speed, eraser
Dislikes: Rebinding Rotate Canvas tool was a pain. I like Shift+Space, and that key combo is reflected in the shortcut panel, but it just continued to pan. Never worked for me, and rotating or flipping the page quickly is crucial for my sketching process. Also sometimes if I quickly resize the eraser and mash it down to use, it won’t detect any input.
Photoshop, Kyle Webster’s “2B” & “Animator Pencil”:
**Disclaimer** Firstly, I’ve used Photoshop for over 15 years now, and it’s a great digital art tool, but for drawing and painting I find it’s sorely lacking. It’s slow, expensive, and unintuitive. That being said, there are some things this program does exclusive to others so I’m still clinging to it (desperately) and while I would definitely recommend something else for budding digital artists, I have to supplement my misgivings by purchasing additional plugins and tools, such as the famed Kyle T Webster’s Ultimate Megapack for Photoshop (
which is now complementary with Photoshop CC, damnit
). Unless otherwise noted, all the brushes I use in Photoshop will be from that pack. **End Disclaimer**
Following off the heels of Corel, I remembered messing around with another “2B” (which btw is my personal favorite traditional pencil to sketch with) in Kyle Webster’s Drawing Box in Photoshop. It felt a bit similar, but with no tilt functionality and it really lacked the chunky-thickness (a scientific term) I enjoyed with Painter’s pencil. I switched to my favorite (and the favorite of MANY digital artists btw) his “Animator’s Pencil”. So chunky, but the ability to shade lightly... It’s really a fun brush to use for sketching digitally. Still one of my absolute favorites.

Animator Pencil Likes: Line width variance, texture fills in and scales perfectly
Dislikes: It’s a photoshop exclusive, a program that for some reason you can’t bind shortcuts to whatever you please, takes forever to load, and WAY too often suffers input lag while drawing. Also no tilt shading, :’( aw
Paintstorm’s “Textured Pencil” & “Pencil Tilt”
As a bit of an aside, I love Paintstorm, Paintstorm is what got me back into digital drawing and painting after doing 3D and game design for 7 years. I bought it for the very low price of entry (2 licenses for $30) and was impressed by its ability to customize literally anything in the program. You can create your own tool/brush boxes, bind any shortcut to any key combination, and every single brush tool adjustment comes with the most customization control of any program I’ve come across since Photoshop set the bar way back in the day. Out of the box a lot of the basic brushes have that old OpenCanvas or PaintTool Sai feel, but more recently they’ve added some very textured default brushes you can play around with. It’s also hands-down the FASTEST program I’ve ever worked in. I highly recommend giving it a try, it’s great for learning and experimentation. I grew a lot working in Paintstorm.

The Textured Pencil is a fun sketching brush, you can get as think or thick as you’d want and it keeps a clean outline. The Pencil Tilt really blew my mind the first time I used it. YOU CAN SHADE! It was the first time I had ever seen a program do that. The tilt has a great texture, fantastic control, and gets just as dark as you’d need. I’d recommend using them both, the Textured Pencil for a cleaner sketch, and the Pencil Tilt for something more expressive or loose.
Krita’s Ink-Tilt & “Sketch”:
I’ll be honest, I have almost no experience in Krita despite having downloaded and given it a try back in 2014. It was a hell of a time to figure out how to rebind my usual shortcuts (flip horz, rotate canvas). I couldn’t even rebind colour grab/eyedropper. Yikes. I opened up the “Sketching” brush box and there were only two options, made worse as one was a sketch pen... That lacked the flexibility of ballpoint.
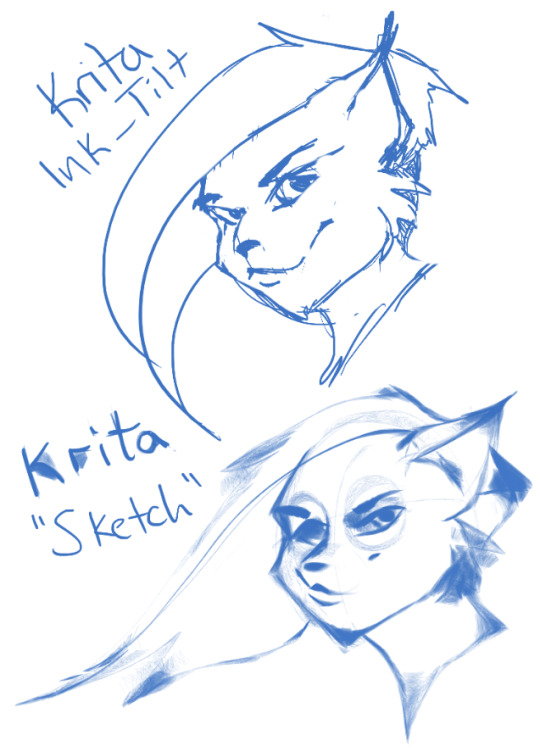
First I grabbed the pencil dubbed “Sketch” and was bewildered why the size of the circle was so large compared to the mark it made. Very confusing. Feeling intimidated, I abandoned it immediately to try out the “ink_tilt” (which by the way there’s no tilt functionality??) and hated it. I reluctantly went back to the pencil and just started trying to make marks. Wow. It’s weird, but surprisingly fun. You have to be willing to relinquish a LOT of control, but the shapes the brush makes while moving and tilting during a stroke can yield some really interesting and suggestive shapes. I would say great for early concepting or making something really loose and expressive. Fun to play with, but not really practical.
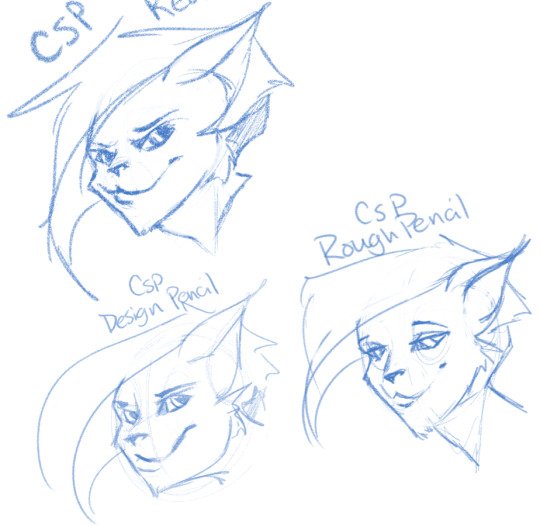
Clip Studio Paint’s Real Pencil & Rough Pencil
I’ve been wholly immersed in CSP since I purchased the program back in late 2016. It goes on sale often, so you can pick up a nice fully featured program for ~$35. I’d had my eye on it for a while and still really want to get into self-publishing comics, so I picked it up, bought a couple of brush packs for it (it’s pretty lacking in default painting tools) and I’ve been illustrating in it ever since. The brush creation isn’t as fun as Paintstorm, but brushes are quite customizable. I usually like to use the “Rough Pencil” if I want just a little texture and line variance, or the “Darker Pencil” for something cleaner. Trying to be different, I just jotted out a couple heads in ones I don’t normally use, the Real Pencil and Design Pencil. The Real Pencil has a lot of texture, but for some reason in CSP the textures don’t seem to scale with the brush, so I tend to avoid using it in most cases. I hate the design pencil, I just could never get dark enough. I guess that’s probably the point, though.
Well, that definitely wraps this digest up. I feel refreshed after trying out a lot of new digital sketching brushes. I was really reminded of how much I enjoyed drawing in Paintstorm. I hope someone other than me found this useful or otherwise inspiring! Sometimes, especially if you’re stuck in some art blockage, it’s a good idea to try something new, and for me digitally that’s hopping programs and trying new brushes.
I’m thinking about doing inks, colours, and painting at some point. Let me know if anyone’s interested in those! I’m planning on doing some for myself eventually, but I might expedite a post if anyone is interested. o/ Take it easy, y’all.
Artist’s Software Surfing P1 - Sketching
Artist’s Software Surfing P2 - Inking
Artist’s Software Surfing P3 - Colouring
Artist’s Software Surfing P4 - Painting
6 notes
·
View notes
Photo
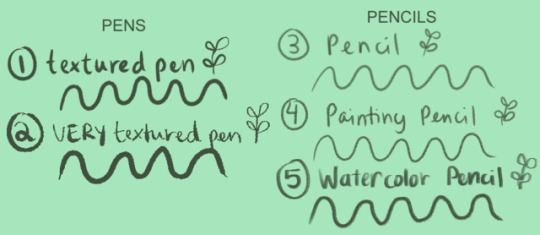
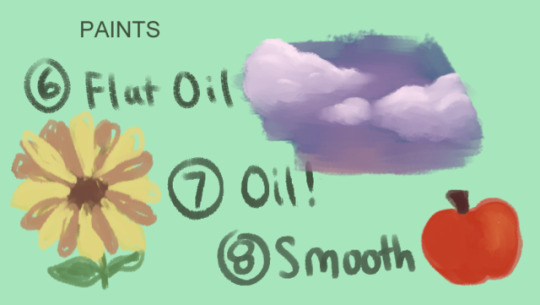
Hi! I was asked what program/brushes I use for my art, and decided to make an entire post about it!
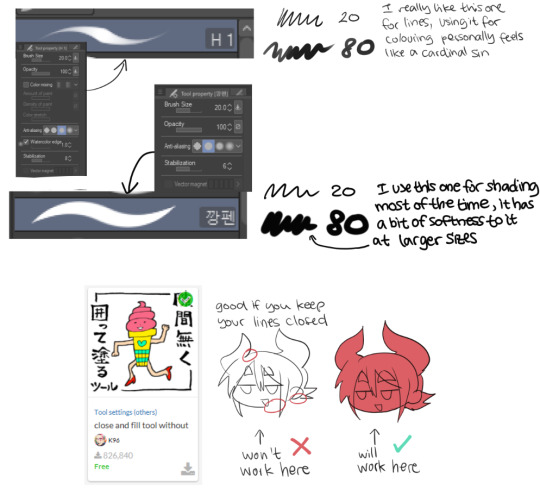
I use Clip Studio Paint and most of the brushes I get are ones you’re able to download from Clip Studio Assets, which is incredibly helpful when you wanna find some new brushes to find and use. So, here’s a list of brushes I use and the links to them if you want to download them yourselves!
1. Textured Pen
If you use CSP, go to the pens tab and there should be one called “Textured Pen”, that’s what I use!
2. 線画用ペン by imo86
Whenever I’m feeling lazy and want to make lineart, I use this pen because no matter how sketchy you get with it, the lineart looks intentional and nice. I think the pen is updated, so it might be a little different? But it might be the same!
3. Pencil
I kind of made this brush myself? It’s just another default brush on CSP that I messed around with, but not by that much. Go under the pencils tab and it should be the last brush on the list.
4. 鉛筆ブラシ by がうたま
This link goes to an entire pencil pack! I mostly use the 2nd one out of the pack (which is the one I show), but all of them are very fun to play with. I mostly use it for lineart, but sketching is also pretty good. I usually use this brush when I’m doing a painting.
5. ざっくり水彩 by 磁気
ALRIGHTY LEMME TELL YA...the brushes in this pack ARE AMAZING. Do you want your artwork to look like watercolor? Well, this pack is the perfect thing for you! The watercolor paint brushes are beautiful! If you have a hard time like me with blending colors with watercolors, it comes with a blur brush that helps blend em. But my favorite is the pen brush it comes with that I show in the picture above. I just got the pack a couple days ago, but I LOVE IT! I use it for sketching, but I’m gonna try using it for lineart soon.
6. FLAT OIL!! by yogurt_art
This is my main painting brush I use! Before I had this brush, I had such a hard time with painting brushes that never really mixed and blended the colors right. With this brush, it blends colors soooo beautifully! This brush saved my life.
7. sss oil by rompi
I don’t really use this brush for painting because it doesn’t blend as well as the Flat Oil brush, but I do love using it as lineart for painting! It’s very nice to work with and the texture really makes the art pop out more!
8. かすれ油彩 ■ by Nappo
Okay, I have a love/hate relationship with this brush because it does blend the colors, but it takes more than one try to get the type of blending you want. So, using this brush takes some patience, but the texture is great and it’s gives a nice smooth finish. It’s a fun brush to experiment with.
If you made it this far, good job! I hope this post helps you out some, and maybe you’ll find a couple new brushes to mess around with if you have CSP!
Would I recommend other artists to get CSP? Yeah, if you have the time and patience to learn the program! It comes with a lot of options for an artist that’s helped me, especially with Clip Studio Assets, because I’ve been able to download different brushes like these to mess around with and incorporate into my art. Anyway, thank you for reading all this and hope you all have fun with your art!
#clip studio paint#clip studio assets#brushes#art#I hope this helps and sorry if this post is too long aha;;
6 notes
·
View notes
Text
Calling all digital artists! I need help!
Mother’s Day is Sunday and I’ve been sick the past several weeks, recovering from surgeries, and resting. I have had major art block and depression spikes due to this and I haven’t been able to properly draw.
But Mother’s Day is so close and I need something for my mom. Made by me. I’ve always drawn or made her something. I know it sounds childish but she loves it. I also make her breakfast in bed and do all her chores for the day. I wanted to take her out to dinner this year but I don’t have enough money to do that (I’m 17, no job atm due to sucky medical stuff).
I really need to make her something. It’s my tradition that I always make and/or draw her something. This year I’ve decided to make her a wallpaper for her iPhone. I don’t have a lot of energy at all so something massive like a traditional sketch piece like last year isn’t possible for me currently.
But I need help. I use Clip Studio Paint Pro, and I wanna get a really good quality outcome. My art isn’t good but I want it to at least be high definition so it’s not blurry or pixelated. How many pixels should I use? What should I set the resolution to? She has an iPhone 6s.

Also, I really need some new Csp brushes. I only have a select few (like 2-3) I’m comfortable using, as sadly all my other downloads have felt strange to use no matter how much i play with them or try to adjust to them. I’m fairly new to Csp, (and digital art tbh) so I’m still getting the hang of some things. If anyone has free Csp brushes that they love and recommend, please send them my way!! I could really use some nice ones for sketching and lining, I really like thicker and darker ones for those. Something like some sai brushes would be great ;w;
Thank you for all your help if you do, any help is highly appreciated!
#art#art help#artists#help#digital art#artists on tumblr#digital drawing#digital sketch#mothers day#mothersday#mother’s day#clip studio paint pro#clip studio paint#clip studio paint help#digital illustration#spoonie artist#spoonie#spoonie life#cpunk artist#cpunk art#spoonie art#chronically ill#art tutorial#artwork#clip studio paint brushes#digital art brushes#paint tool sai#heeellllpppp meeeeeee pleeeeaaaasssseeeee
1 note
·
View note
Text
ok..... 3am post
im havin a crisis ovr clip studio paint bc that deal where it’s over 50% off for $25 ends today and it seems like a rly nice program, it has everything im looking for, but im not willing to pay full price for it so im kind of in crunch time rn trying to figure out if i want to buy it or not
also i hate the ambiguity w/ deadlines sometimes like the website is all “deal ends june 2nd!!” like what does that Mean what is that. this sale could end at any time today or maybe it just means midnight 12am on june 3?? and then what time zone would that be fkjgsdg god i just cant tell so im like losign my mind over here
ok and like the other thing is i know there are other programs that have the same functionality im looking for for free, like fire alpaca i know for sure has a stabilizer and some kind of perspective-related tools, and then i’ve also heard good things abt krita but i haven’t been able to look into it yet
im just like!! dam i wish i had more time to try out all these programs bc i dont want to shell out 25 bucks when it turns out i could’ve gotten the exact same shit for literally nothing hmm!!!!!!
like ok let’s just, the things im looking for in an art program are:
line stabilizer
custom brushes (w/ option to download user-made brushes)
thats p much it
the reason csp appeals to me so much is bc it has both of those things but it also has a Bunch of other shit like all the perspective tools and literal 3d models u can use for reference and a shitload of features specifically geared towards making comics which hey i happen to be v interested in, and like i know it’s all just fancy extra stuff that i could honestly get by without but man when it’s all right there in front of u ur like “damn this is really nice tbh”
and like it’s kind of a confusing program if u just drop right in & try to feel ur way around but i found a playlist on youtube of this guy (im p sure he’s affiliated w/ the creators on the english-speaking side of things at least) who goes through the program and tells u how everything works and what it all means and it’s super helpful, i really like the idea of learning a program beforehand through someone who Knows Their Shit rather than spending years and years occasionally discovering new functions on my own like i did with pse (rip)
but at the same time as i say that im also thinking “damn tho ppl make tutorials about everything on yt, u could find vids for the other art programs too” and it’s like yeah!!!! u right!!!!! i rly can’t justify this purchase other than “time is short & i have anxiety & i want the thing” ghgsldkgsldkgs
so the reason im still up at uhh 3:45 am now wow is because i can’t decide if i should just go the fuck to bed and worry abt this in the “morning” or do everything i can to keep looking into this rn since idk when the sale actually ends, like jesus christ i’ll sleep on a big essay the night before it’s due but i’d pull an all-nighter for an art program Apparently ?????
i just feel like such a Doof bc there are all these people running around with free art programs doing perfectly fine & im sitting here like “ya i’ll drop cash on this one i literally only just heard of and tried for the first time today” like what kinda dumbass maneuver..........
1 note
·
View note
Last Seen Blogs

antiquitatesromanae
Antiquitates Romanae
mashal-e-mahtaab
Gul-posh

icondumped
icons for use.
antiquitatesromanae
Antiquitates Romanae
tciddaemina
tciddaemina