#android json parsing example code
Explore tagged Tumblr posts
Visit Tumblr Blog
Explore Tumblr blogs with no restrictions, modern design and the best experience.
Last Seen Tumblr Blogs


Fun Fact
Women make up for the other 50% of Tumblr’s audience.
Text
android app fatch website data java | Project Structure, coding with full path 24 naught
Here’s a basic project structure for an Android app in Java that fetches data from a website. This example uses Retrofit for network requests and Gson for JSON parsing. Project Structure MyAndroidApp/ ├── app/ │ ├── src/main/ │ │ ├── java/com/example/myandroidapp/ │ │ │ ├── MainActivity.java │ │ │ ├── api/ApiClient.java │ │ │ ├── api/ApiService.java │ │ │ ├── model/WebData.java │ │ │ ├──…
0 notes
Text
CloudFront Now Supports gRPC Calls For Your Applications

Your applications’ gRPC calls are now accepted by Amazon CloudFront.
You may now set up global content delivery network (CDN), Amazon CloudFront, in front of your gRPC API endpoints.
An Overview of gRPC
You may construct distributed apps and services more easily with gRPC since a client program can call a method on a server application on a separate machine as if it were a local object. The foundation of gRPC, like that of many RPC systems, is the concept of establishing a service, including the methods that may be called remotely along with their parameters and return types. This interface is implemented by the server, which also uses a gRPC server to manage client requests. The same methods as the server are provided by the client’s stub, which is sometimes referred to as just a client.
Any of the supported languages can be used to write gRPC clients and servers, which can operate and communicate with one another in a range of settings, including your desktop computer and servers within Google. For instance, a gRPC server in Java with clients in Go, Python, or Ruby can be readily created. Furthermore, the most recent Google APIs will include gRPC interfaces, making it simple to incorporate Google functionality into your apps.
Using Protocol Buffers
Although it can be used with other data formats like JSON, gRPC by default serializes structured data using Protocol Buffers, Google’s well-established open source method.
Establishing the structure for the data you wish to serialize in a proto file a regular text file with a.proto extension is the first step in dealing with protocol buffers. Protocol buffer data is organized as messages, each of which is a brief logical record of data made up of a number of fields, or name-value pairs.
After defining your data structures, you can use the protocol buffer compiler protoc to create data access classes from your proto specification in the language or languages of your choice. These offer methods to serialize and parse the entire structure to and from raw bytes, along with basic accessors for each field, such as name() and set_name(). For example, executing the compiler on the aforementioned example will produce a class named Person if you have selected C++ as your language. This class can then be used to serialize, retrieve, and populate Person protocol buffer messages in your application.
You specify RPC method parameters and return types as protocol buffer messages when defining gRPC services in standard proto files:
Protoc is used by gRPC with a specific gRPC plugin to generate code from your proto file. This includes the standard protocol buffer code for populating, serializing, and retrieving your message types, as well as generated gRPC client and server code.
Versions of protocol buffers
Although open source users have had access to protocol buffers for a while, the majority of the examples on this website use protocol buffers version 3 (proto3), which supports more languages, has a little simplified syntax, and several helpful new capabilities. In addition to a Go language generator from the golang/protobuf official package, Proto3 is presently available in Java, C++, Dart, Python, Objective-C, C#, a lite-runtime (Android Java), Ruby, and JavaScript from the protocol buffers GitHub repository. Additional languages are being developed.
Although proto2 (the current default protocol buffers version) can be used, it advises using proto3 with gRPC instead because it allows you to use all of the languages that gRPC supports and prevents incompatibilities between proto2 clients and proto3 servers.
What is gRPC?
A contemporary, open-source, high-performance Remote Procedure Call (RPC) framework that works in any setting is called gRPC. By supporting pluggable load balancing, tracing, health checking, and authentication, it may effectively connect services both within and between data centers. It can also be used to link devices, browsers, and mobile apps to backend services in the last mile of distributed computing.
A basic definition of a service
Describe your service using Protocol Buffers, a robust language and toolkit for binary serialization.
Launch swiftly and grow
Use the framework to grow to millions of RPCs per second and install the runtime and development environments with only one line.
Works on a variety of platforms and languages
For your service, automatically create idiomatic client and server stubs in several languages and platforms.
Both-way streaming and integrated authentication
Fully integrated pluggable authentication and bi-directional streaming with HTTP/2-based transport
For creating APIs, gRPC is a cutting-edge, effective, and language-neutral framework. Platform-independent service and message type design is made possible by its interface defining language (IDL), Protocol Buffers (protobuf). With gRPC, remote procedure calls (RPCs) over HTTP/2 are lightweight and highly performant, facilitating communication between services. Microservices designs benefit greatly from this since it facilitates effective and low-latency communication between services.
Features like flow control, bidirectional streaming, and automatic code generation for multiple programming languages are all provided by gRPC. When you need real-time data streaming, effective communication, and great performance, this is a good fit. gRPC may be an excellent option if your application must manage a lot of data or the client and server must communicate with low latency. However, compared to REST, it could be harder to master. Developers must specify their data structures and service methods in.proto files since gRPC uses the protobuf serialization standard.
When you put CloudFront in front of your gRPC API endpoints, we see two advantages.
Initially, it permits the decrease of latency between your API implementation and the client application. A global network of more than 600 edge locations is provided by CloudFront, with intelligent routing to the nearest edge. TLS termination and optional caching for your static content are offered by edge locations. Client application requests are sent to your gRPC origin by CloudFront via the fully managed, high-bandwidth, low-latency private AWS network.
Second, your apps gain from extra security services that are set up on edge locations, like traffic encryption, AWS Web Application Firewall’s HTTP header validation, and AWS Shield Standard defense against distributed denial of service (DDoS) assaults.
Cost and Accessibility
All of the more than 600 CloudFront edge locations offer gRPC origins at no extra cost. There are the standard requests and data transfer costs.
Read more on govindhtech.com
#CloudFront#SupportsgRPC#Applications#Google#AmazonCloudFront#distributeddenialservice#DDoS#Accessibility#ProtocolBuffers#gRPC#technology#technews#news#govindhtech
0 notes
Text
Beginning Flutter: A Hands-On Guide to App Development
Introduction:
In today's digital age, mobile applications have become an integral part of our lives, serving various purposes from entertainment to productivity. Flutter, Google's open-source UI software development kit, has emerged as a popular choice for building cross-platform mobile applications with a single codebase. This hands-on guide aims to introduce beginners to Flutter apps development company noida, providing step-by-step instructions and practical examples to kickstart their journey in creating mobile apps.
Understanding Flutter:
Flutter is a framework developed by Google for building natively compiled applications for mobile, web, and desktop from a single codebase. What sets Flutter apart is its ability to deliver high-performance applications with a beautiful user interface (UI) across multiple platforms using a single codebase written in the Dart programming language.
Getting Started:
To begin your journey with Flutter, you'll need to set up your development environment. Flutter provides comprehensive documentation on setting up Flutter on different operating systems, including Windows, macOS, and Linux. Once you have Flutter installed, you can use either Android Studio, Visual Studio Code, or any other preferred editor to start coding your Flutter app.
Building Your First Flutter App:
Let's dive into creating your first Flutter app. Start by creating a new Flutter project using the Flutter CLI or your preferred IDE. Flutter provides a set of pre-built widgets for constructing UI elements, making it easy to create visually appealing interfaces. You can customize these widgets or create your own to suit your app's requirements.
Flutter follows a widget-based architecture, where everything is a widget, from buttons and text inputs to entire screens. Understanding widgets and how to compose them is fundamental to Flutter app development. Widgets can be either stateless or stateful, depending on whether they maintain any internal state.
Navigating Between Screens:
Most mobile applications consist of multiple screens that users navigate through. Flutter provides a navigation system that allows you to move between different screens within your app seamlessly. You can use the Navigator widget to manage a stack of routes, enabling users to navigate forward and backward between screens.
Handling User Input:
User input plays a crucial role in mobile applications, whether it's tapping on buttons, entering text, or interacting with gestures. Flutter provides various widgets for handling user input, such as GestureDetector for detecting gestures like taps and swipes, TextField for accepting text input, and InkWell for adding material touch effects to UI elements.
Working with APIs:
Many mobile applications rely on data from external sources, such as APIs, to provide dynamic content. Flutter makes it easy to fetch data from APIs using packages like http or Dio. You can make HTTP requests to fetch data in JSON format and then parse and display it in your app using Flutter's built-in JSON decoding support.
State Management:
Managing state is essential for building responsive and interactive applications. Flutter offers various state management solutions, including setState, Provider, Bloc, and Riverpod. Each solution has its own strengths and is suitable for different use cases. Understanding how to manage state effectively is crucial for building scalable Flutter applications.
Testing and Debugging:
Testing and debugging are integral parts of the app development process. Flutter provides a robust testing framework that allows you to write unit tests, widget tests, and integration tests to ensure the quality and reliability of your app. You can use tools like Flutter DevTools for debugging your app and analyzing its performance.
Publishing Your App:
Once you've built and tested your Flutter app, it's time to share it with the world. Flutter makes it easy to publish your app to the Google Play Store for Android devices and the Apple App Store for iOS devices. You'll need to create developer accounts for each platform and follow their respective guidelines for publishing apps.
Conclusion:
Flutter offers a powerful and efficient framework for building cross-platform mobile applications with a single codebase. This hands-on guide has provided beginners with a comprehensive overview of Flutter apps development company noida, covering essential concepts and practical examples to help you get started on your journey as a Flutter developer. With dedication and practice, you can leverage Flutter's capabilities to create innovative and impactful mobile apps for a global audience.
0 notes
Text
Develop Native Android App for WordPress Website with JSON API
We will Develop Native Android App for WordPress Website using this tutorial will be work for fetching your WordPress website data (posts & pages) to the android layout. Alternative like web view in android uses to display your website pages as it is in android app. The difference between web view and actual android app using JSON is that in web view the original website is opened like it is…

View On WordPress
#android#Android App layouts#android json parsing example code#android parse#creating android app for WordPress Website#Creating WordPress Android App Project#developing android app#get image from json android#How to Make Android App for WordPress Website#MySQL database#plugin jsonapi#WordPress JSON plugin#wordpress mobile app#WordPress plugin#WordPress to Android App Tutorial#WordPress to Android App using JSON API Tutorial#wordpress to mobile app#WordPress Website Android App using JSON#WordPress website output in JSON format#WP REST API plugin
0 notes
Text
How Post Content is Stored on Tumblr
We’re currently rolling out an opt-in beta for a new post editor on web which will leverage the Neue Post Format behind the scenes. It’s been a very long time coming -- work on the Neue Post Format began in 2015 and was originally codenamed “Poster Child”, and it was borne out of a lot of things we learned dealing with the previous new post editor we released on web around that time. Over the years, the landscape of how people make posts on different platforms across the internet has changed dramatically. But here on Tumblr, we still want to stay true to our blogging roots, while giving access to a wide creative canvas, and the Neue Post Format reflects that work.
With literally billions (tens of billions!) of posts on Tumblr, how do we move this churning engine of content from one format to another without breaking everything? It took many phases, and releasing the new editor on the web will be one of the final pieces in place. To understand how far we’ve come and the challenges we’ve had to face, you need to know the deep dark secrets of how we store post content on Tumblr. This hellsite we all love is held together by duct tape, good intentions, and luck, and we’re constantly working to make it better!
A post is seemingly a very simple data model: it has an author, it has content, and it was posted at a certain time. Every post has a unique identifier once it’s created. In the case of reblogs, they also have the “parent” post and blog it was reblogged from (more on How Reblogs Work over here). In a standard normalized database table, these columns would look like:
Post identifier (a very big integer)
Author blog identifier (an integer pointing to the “blogs” database table)
Parent post identifier (if it’s a reblog)
Parent blog identifier (if it’s a reblog)
When it was posted (a timestamp of some kind)
Post content (more on this in a minute)
Before the Neue Post Format, posts had discrete “types”, so that’d be a column here as well. But once you have these discrete “types”, you have to determine how you want to store the content of each “type”. For photo posts, this is a set of one or more images. For video posts, this is either a reference to an uploaded video file, or it’s a URL to an external video. For text posts, it’s just text, in HTML format. So the actual value of that “post content” column can change depending on what type it is.
Here’s a simple example, note how each post type has different kinds of content:
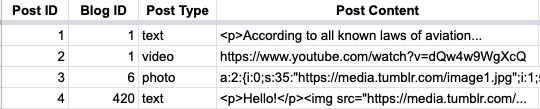
As Tumblr grew, its capabilities grew. We added the ability to add a caption to photo, video, and audio posts. We added the ability to add a “source” to quote posts. We needed somewhere to store that new post content. Because Tumblr was growing so rapidly at the time, this needed to happen fast, so we took the easiest path available: add a new column! That first “post content” column was renamed “one”, and the new post content column was named “two”. And as Tumblr grew more, eventually we added “three”. And each column’s value could be different based on the post type.

Needless to say, eventually this made it very difficult to have consistent and easy to understand patterns for how we figure out things like… how many images are in a post? Since we added the ability to add an image in the caption, it’s possible there’s images in the “one”, “two”, or “three” columns, but each may be in a different format based on the post type. Reblogs further complicate the storage design, as a reblog copies and reformats post content from its parent post to the new post. The code to figure out how to render a post became extremely complicated and hard to change as we wanted to add more to it.
Further complicating this was the fact that most (but not all) of these post content fields leveraged either HTML or PHP’s built-in serialization logic as the literal data format. Before PHP 7, HTML parsing in PHP (which is what Tumblr uses behind the scenes) was extremely slow, so rendering a post became more of a struggle as the post’s reblog trail grew or its post content complexity increased. And HTML and PHP’s serialization logic isn’t easily portable to other languages, like Go, Scala, Objective-C, Swift, or Java, which we use in other backend services and our mobile apps.
With all this in mind, in 2015, two needs converged: the need to have a more easily understandable and portable data format shared from the database all the way up to the apps, and the need for more types of post content, decoupled from post type. The Neue Post Format was born: a JSON-based data schema for content blocks and their layout. This has afforded us the flexibility to make new types of content available faster, without needing to worry necessarily about how we’ll store it in HTML format, and has made the post content format portable from the database up to the Android app, iOS app, and the new React-based web client.
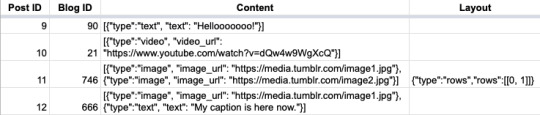
Going back to the standard, normalized database table schema for posts, we’ve now achieved the intended simplicity with a flexible JSON structure inside that “post content” column. We no longer need post types at all when storing a post. A post can have any and all of the content types within it, instead of being siloed separately with a myriad of confusing options depending on the post type. Now a post can be a video and photo post at the same time! When the new editor on the web is fully released, we can finally say that this format is the fuel powering the engine of content on Tumblr. It’ll enable us to more quickly build out block types and layouts we couldn’t before, such as polls, blog card blocks, and overlapping images/videos/text. Sky’s the limit.
- @cyle
1K notes
·
View notes
Text
Javascript rss feed reader

#JAVASCRIPT RSS FEED READER HOW TO#
#JAVASCRIPT RSS FEED READER INSTALL#
#JAVASCRIPT RSS FEED READER FULL#
#JAVASCRIPT RSS FEED READER CODE#
After that, we will have an object with the last 10 texts from, including the whole content of each one.
#JAVASCRIPT RSS FEED READER INSTALL#
You need to install a news reader or news aggregator to use our RSS feeds. So, the solution is to make the GET request on the URL and parse it into JSON. For basic styling information for your JavaScript headlines, you can download. Web design, development, javascript, angular, react, vue, php, SEO, SEM.
#JAVASCRIPT RSS FEED READER CODE#
RSS Feed URL follows this better, it was possible to get JSON from it directly, so you could handle the result in your js code in no this option was left in the past since Cloudflare will first do a captcha-check in the JSON call. Lately we have been on a constant lookout for good RSS readers to find and. The best way to do it so far, I’ve learned, is to use the RSS Feed - which is limited to the last 10 posts. Happily, on my second thought, I found more success than on my first one. So, in summary, I couldn’t use it to get my posts and show them somewhere else. It is, indeed, something interesting, but not for me - not now, anyway.
#JAVASCRIPT RSS FEED READER FULL#
Medium API is not intended to retrieve full posts but to automate your publishing process. To accomplish this, we need a server-side script to fetch the feed, jQuery’s AJAX methods and a JavaScript timer. We want to create an RSS feed rotator with jQuery. Plus, you can organize your content with categories and tags, hide stories you don. I hope that you will be able to change these params easily. Param ‘rssnum’ means how many rss elements will be displayed at the page. One of its most standout features is that when you want to read articles from your favorite websites, NewsBlur maintains the style of the original site. This is our main page code (with 2 RSS blocks). My first thought was obvious:īut my first thought was wrong. jReader is a simple, open source, jQuery and PHP based RSS reader for you to use in your site. NewsBlur is another free RSS feed reader that works on the web, iPad, iPhone, and even Android. This page was generated by GitHub Pages.I’ve been thinking about how I can retrieve my Medium posts to use them dynamically on my personal website, or somewhere else. To add RSS feeds simply add your desired RSS feeds url to the urls.json file. On a website, the URL of an RSS feed can. We need to fetch the feed with our RSS reader application.
An RSS feed has a root element called , similar to the tag found in HTML documents.
#JAVASCRIPT RSS FEED READER HOW TO#
Technologies used JQuery RSS2Json Api How To Use This application uses RSS Feeds in the XML format to get informations and news. How to Create a RSS Reader App in JavaScript Structure of an RSS feed. It also uses JQuery and the RSS2Json API. The 40-metre vessel got into difficulty about 15km off the Catanzaro Marina in Italy. Specification & Testsĭetailed code coverage is available at. RSS-Feed-Reader This is a basic web based RSS feed reader written using HTML, CSS and Javascript. Footage has emerged of the moment a superyacht completely sank into the Mediterranean Sea. Go to the news feed site you have chosen and follow their steps to add their code to the embedded news window page. To set this up, Setup the Simple News Scroller script in your template. Using other news feeds With these examples you can use an HTML or Javascript news feed from any news source. Returns as parameter the list of feed entries ordered by most recent publish date.įor further documentation see specifications. This is a Javascript feed rather than an RSS feed. (limited by feed source or Yahoo Feed API) The textContent property gets the text content of the title element. And then we call querySelector on item with 'title' to get the title element inside each item element. Then we get all the item noes with doc.querySelectorAll. Options about format of result returned from feed sources.įields to be returned from feed source(s). Next, we call parseFromString with htmlTxt and 'text/html' to parse the text as HTML. fetch ( weatherFeedUrl, addWeatherFeedItems ) Documentation nanofeed.fetch(feed_url, success_callback) parameter RSS Feed for BBC News - World Sat Aug 20 2022. fetch ( url, function ( items ) nanofeed.
0 notes
Text
New Post has been published on Strange Hoot - How To’s, Reviews, Comparisons, Top 10s, & Tech Guide
New Post has been published on https://strangehoot.com/how-to-integrate-the-application-with-google-firebase/
How to Integrate the Application With Google Firebase
The technology is all around the world but it also needs to be upgraded. The technology which is used by the user is not good enough to store data. We will be discussing about Google firebase and application integration in this article. Google firebase and its integration provides many advantages to the user. It is a platform which can be used for any purpose. It is super- obnoxious. It is a platform which helps in improving, growing and building of many applications to the user. For good experience this toolset provides services. This platform involves data configuration, file storage, push messaging, etc. According to the user, the components behind the product which are fully maintained and operated by google is Cloud hosting.
Software Development Kit provides firebase that can help in interacting with the service of backend without the establishment of middleware between the service and the application. With the firebase of Google this is how integration of application is done.
This application involved both back and front end software which makes this application unique among all. The code of the front end when gets exposed using backend it also invokes the endpoint of API and then does not work. It gets bypassed. Firebase helps in providing administrative access to the products.
Firebase is a fast building platform without any managing infrastructure. It provides you the functionalities like databases, messaging, crash reporting, etc. This application helps you to focus on user and move quickly.
Google Firebase
Google Firebase is a Google Android. It helps in building and developing applications with great speed. It is a complete solution of backend and is used for real-time database, hosting, etc. It also helps in building good infrastructure and automatic scales on Google. For amalgamating we should aware of new and existing applications. Sometimes due to the integration of applications, one can cause a lot of damage and harm to the system and user also. So, we should be fully aware of the pros and cons of doing integration with firebase.
The integration of Google firebase is done with the help of multiple web applications then it will provide a lot of benefits to the user. This can be the best means of authentication by which only users are intended to use their systems. Therefore, it is one of the biggest advantages of Google firebase.
There are also certain benefits of using firebase but before getting to the benefits you should know about its pros also. Let’s have a look at some of them:
As we know, Google firebase is authentication which says that various applications needs identification of the user to save their information over the cloud and can provide a good experience with different devices whereas Firebase provides you the SDK’s and UI libraries for clients so that the authentication can be done by web applications with the help of only user name email address and password. Here, users can integrate the new method of login in the application also. This is one of the advantages of using google firebase.
Some more advantages can be like hosting which provides production-grade, fast, and secure for application developers. It also helps the user in developing the deploying web applications and immobile content to CDN i.e., Content Delivery Network. This can be called as the best advantage of using firebase by which a user can create multiple applications for storing files like images and videos.
Another pro is that it allows us to give free notification service so that the user can develop the application according to it. This application is having a GUI console from where the notification can be sent to the user. Using the advantage of this notification the user can find about the updates of their application.
Firebase is the Real-time database platform and is also referred to as the paging software for the integration of the application. It makes the imitate of the application which increased much and makes the database faster as compared to the existing one.
On this application, a user can store their information as it is a cloud-based and real-time database software. This information is stored in JSON format which is the synchronized irregularly to the customers. As if anyone wants to create a web application, Android application, or IOS application then it gives the real time updates to the users for managing the components of the backend in the application developed by the user.
Admob feature provides its users and advertising facility which can generate the profits from client designed web application.
Many users using the application gave positive feedbacks on the advantages of integrated google firebase. Therefore, these are the major advantages of firebase.
Now, let’s have a look at some more facts about firebase such as why users should use firebase? What are the benefits of using firebase to the users? Why the integration of firebase is to be done with the developed web applications?
Google firebase is having a listing and indexing feature by which the application shows in the index of Google result search that’s why this application is having a good advertising facility.
With the help of this feature, a user can see their application on Google only by searching it. When the application will be searched on Google, they will find their application having good indexing on Google pages. People invest a lot of money forgetting application to search on Google and also to get a good result. Thus, this is one of the most important and useful features of this application.
It’s not true that big organizations have less chance of getting bankrupt. Winner also faces many failure before getting success. Here, in this topic of Firebase bankruptcy is not contextual but soon you will realize that it is interconnected with each other.
On social media Facebook blackout with its Parse platform known as Bass in the year 2017. It forced users to seek the replacement. According to the constitution, anybody can’t force anyone to do anything.
According to Firebase, this software is having a free start which means there is no payment required for its services. It is free of cost and a user can give a fresh start with it at any time. This application makes understand to its user about the fitting and peculiarities of the application. Whenever a user needs specific database memory then the user can switch to the plans also so that he/she should not face any problems. The price page is having a calculator that will be regulated with various parameters.
Another fact of firebase is that it is having a concise documentation which means the platform is very carefully documented. Firebase is having good SDK references and technical documentation and also allows its users to have access to the entire product easily and effectively.
Steps of integration of application:
Approximately there are 9 to 10 steps that need to be followed by every user so that no difficulty shall be faced by any of its users. The steps are as follows:
The very first step is to connect firebase with the application using this link.(https://firebase.google.com/docs/android/setup) Here, the project-level build Gradle is a file which includes a repository name. For example: Google’s John.
buildscript repositories // Check that you have the following line (if not, add it): google() // Google's Maven repository dependencies // ... // Add the following line: classpath 'com.google.gms:google-services:4.3.4' // Google Services plugin allprojects // ... repositories // Check that you have the following line (if not, add it): google() // Google's Maven repository // ...
Creation of the database should be there. If no database is created user needs to create the database using a firebase console.
3. After reaching the console page, the user needs to click on the add project button and further needs to follow as per the instruction continuous to popup on screen. This process is for creating a Firebase project.
4. When its navigation processes are completed then the user can prompt via selecting the project and can follow the creative workflow in the database. With this step, some security rules should be taken care of. Two modes will be mentioned named as:
Locked mode
Test mode
5. Now, the database SDK, real-time database Android library is added to the module file.
6. Till this step Real-time rules of the database is done. It also allows the user to define the data in a structured form. For example: It will help the user to index the data and can find that either in the written form or can be read.
7. Now, the process of writing the database is also completed. The next step is to provide the retrieved database and the location on which the user is willing to write. This can be done bye by getting the function “Getinstance”. With this step, the implementation of getinstance is completed.
8. With this database reading form is completed which is done by using ValueEventListener. Data change the method in which the listener is attached and is triggered.
9. With this the process of launch is completed.
This is the process of how the integration of Google firebase takes place. In the discussion above, we have talked about firebase. What is firebase? What work did it do? What are the advantages? What are the benefits? And many more. So, in the end, I just want to conclude with a single line that firebase is very useful and also has multiple benefits which will help the users in any and every manner.
0 notes
Text
A Complete Guide to Data Attributes
Table of Contents
Introduction
Syntax
Styling with data attributes
Accessing data attributes in JavaScript
Introduction
HTML elements can have attributes on them that are used for anything from accessibility information to stylistic control.
<!-- We can use the `class` for styling in CSS, and we've also make this into a landmark region --> <div class="names" role="region" aria-label="Names"></div>
What is discouraged is making up your own attributes, or repurposing existing attributes for unrelated functionality.
<!-- `highlight` is not an HTML attribute --> <div highlight="true"></div> <!-- `large` is not a valid value of `width` --> <div width="large">
There are a variety of reasons this is bad. Your HTML becomes invalid, which may not have any actual negative consequences, but robs you of that warm fuzzy valid HTML feeling. The most compelling reason is that HTML is a living language and just because attributes and values that don't do anything today doesn't mean they never will.
Good news though: you can make up your own attributes. You just need to prefix them with data-* and then you're free to do what you please!
Syntax
It can be awfully handy to be able to make up your own HTML attributes and put your own information inside them. Fortunately, you can! That's exactly what data attributes are. They are like this:
<!-- They don't need a value --> <div data-foo></div> <!-- ...but they can have a value --> <div data-size="large"></div> <!-- You're in HTML here, so careful to escape code if you need to do something like put more HTML inside --> <li data-prefix="Careful with HTML in here."><li> <!-- You can keep dashing if you like --> <aside data-some-long-attribute-name><aside>
Data attributes are often referred to as data-* attributes, as they are always formatted like that. The word data, then a dash -, then other text you can make up.
Can you use the data attribute alone?
<div data=""></div>
It's probably not going to hurt anything, but you won't get the JavaScript API we'll cover later in this guide. You're essentially making up an attribute for yourself, which as I mentioned in the intro, is discouraged.
What not to do with data attributes
Store content that should be accessible. If the content should be seen or read on a page, don't only put them in data attributes, but make sure that content is in the HTML content somewhere.
<!-- This isn't accessible content --> <div data-name="Chris Coyier"></div> <!-- If you need programmatic access to it but shouldn't be seen, there are other ways... --> <div> <span class="visually-hidden">Chris Coyier</span> </div>
Here's more about hiding things.
Styling with data attributes
CSS can select HTML elements based on attributes and their values.
/* Select any element with this data attribute and value */ [data-size="large"] { padding: 2rem; font-size: 125%; } /* You can scope it to an element or class or anything else */ button[data-type="download"] { } .card[data-pad="extra"] { }
This can be compelling. The predominant styling hooks in HTML/CSS are classes, and while classes are great (they have medium specificity and nice JavaScript methods via classList) an element either has it or it doesn't (essentially on or off). With data-* attributes, you get that on/off ability plus the ability to select based on the value it has at the same specificity level.
/* Selects if the attribute is present at all */ [data-size] { } /* Selects if the attribute has a particular value */ [data-state="open"], [aria-expanded="true"] { } /* "Starts with" selector, meaning this would match "3" or anything starting with 3, like "3.14" */ [data-version^="3"] { } /* "Contains" meaning if the value has the string anywhere inside it */ [data-company*="google"] { }
The specificity of attribute selectors
It's the exact same as a class. We often think of specificity as a four-part value:
inline style, IDs, classes/attributes, tags
So a single attribute selector alone is 0, 0, 1, 0. A selector like this:
div.card[data-foo="bar"] { }
...would be 0, 0, 2, 1. The 2 is because there is one class (.card) and one attribute ([data-foo="bar"]), and the 1 is because there is one tag (div).

Attribute selectors have less specificity than an ID, more than an element/tag, and the same as a class.
Case-insensitive attribute values
In case you're needing to correct for possible capitalization inconsistencies in your data attributes, the attribute selector has a case-insensitive variant for that.
/* Will match <div data-state="open"></div> <div data-state="Open"></div> <div data-state="OPEN"></div> <div data-state="oPeN"></div> */ [data-state="open" i] { }
It's the little i within the bracketed selector.
Using data attributes visually
CSS allows you to yank out the data attribute value and display it if you need to.
/* <div data-emoji="✅"> */ [data-emoji]::before { content: attr(data-emoji); /* Returns '✅' */ margin-right: 5px; }
Example styling use-case
You could use data attributes to specify how many columns you want a grid container to have.
<div data-columns="2"></div> <div data-columns="3"></div> <div data-columns="4"></div>
CodePen Embed Fallback
Accessing data attributes in JavaScript
Like any other attribute, you can access the value with the generic method getAttribute.
let value = el.getAttribute("data-state"); // You can set the value as well. // Returns data-state="collapsed" el.setAttribute("data-state", "collapsed");
But data attributes have their own special API as well. Say you have an element with multiple data attributes (which is totally fine):
<span data-info="123" data-index="2" data-prefix="Dr. " data-emoji-icon="🏌️♀️" ></span>
If you have a reference to that element, you can set and get the attributes like:
// Get span.dataset.info; // 123 span.dataset.index; // 2 // Set span.dataset.prefix = "Mr. "; span.dataset.emojiIcon = "🎪";
Note the camelCase usage on the last line there. It automatically converts kebab-style attributes in HTML, like data-this-little-piggy, to camelCase style in JavaScript, like dataThisLittlePiggy.
This API is arguably not quite as nice as classList with the clear add, remove, toggle, and replace methods, but it's better than nothing.
You have access to inline datasets as well:
<img src="spaceship.png" data-ship-id="324" data-shields="72%" onclick="pewpew(this.dataset.shipId)"> </img>
JSON data inside data attributes
<ul> <li data-person=' { "name": "Chris Coyier", "job": "Web Person" } '></li> </ul>
Hey, why not? It's just a string and it's possible to format it as valid JSON (mind the quotes and such). You can yank that data and parse it as needed.
const el = document.querySelector("li"); let json = el.dataset.person; let data = JSON.parse(json); console.log(data.name); // Chris Coyier console.log(data.job); // Web Person
JavaScript use-cases
The concept is that you can use data attributes to put information in HTML that JavaScript may need access to do certain things.
A common one would have to do with database functionality. Say you have a "Like" button:
<button data-id="435432343">♡</button>
That button could have a click handler on it which performs an Ajax request to the server to increment the number of likes in a database on click. It knows which record to update because it gets it from the data attribute.
Specifications
Selectors Level 4 (Working Draft)
Selectors Level 3 (Recommended)
Selectors Level 2, Revision 1 (Initial Definition)
Browser support
This browser support data is from Caniuse, which has more detail. A number indicates that browser supports the feature at that version and up.
Desktop
ChromeFirefoxIEEdgeSafari7611125.1
Mobile / Tablet
Android ChromeAndroid FirefoxAndroidiOS Safari796835.0-5.1
The post A Complete Guide to Data Attributes appeared first on CSS-Tricks.
A Complete Guide to Data Attributes published first on https://deskbysnafu.tumblr.com/
0 notes
Text
300+ TOP METEOR Interview Questions and Answers
METEOR Interview Questions for freshers experienced :-
1. What is Meteor or MeteorJS? Meteor is a JavaScript platform used for developing web and mobile applications. Applications develop using Meteor framework supports different platforms (like windows, android, ios). Meteor includes a key set of technologies such as Node.js and general JavaScript community. 2. What are the features of Meteor? Web and mobile: Meteor provide platform for developing Android, IOS and Web apps. Packages: Meteor support huge number of packages that are easy to install and use. Universal Apps: The same code is used for mobile device and web browser. Meteor Galaxy: Meteor offers Meteor Galaxy Cloud service for app development. 3. What are the advantages of Meteor? Meteor apps are by default real time. The data in the templates automatically gets updated, as soon as changes to the data are made. Coding is very simple and beginner friendly. The development process is highly simplified as frontend, backend and database all uses one language i.e. JavaScript. 4. What are the disadvantages of Meteor? Meteor is not very much suitable for large and complex application. The Meteor API is rapidly changing, so each new version may bring breaking changes. Due to newer in industry there are not as many hosting services available for Meteor apps yet (Meteor 1.0 version). 5. What are the tags used in Meteor template? Meteor template uses three important tags. These are head, body and template. Head and body tag has same function as in regular HTML, but template tag is used to connect HTML to JavaScript. 6. Which database is supported by Meteor? Meteor (version 1.5) currently support MongoDB database. Meteor API is rapidly changing, so each new version may bring breaking changes. 7. How Meteor uses MongoDB collections? And how data are saved? Following line of code create connection with Meteor with MongoDB: MyCollection = new Mongo.Collection('myCollection'); var myData = { key1: "value 1...", key2: "value 2..." } MyCollection.insert(myData); 8. Why developers choose Meteor for app development? Meteor uses JavaScript language for front end as well as backend development. It makes dramatically fast development time and great for rapid prototyping. 9. How can Meteor apps compile? Meteor apps compile by using Apache Cordova. So we don’t have to create separate codebases for Android and iOS. This results in high-quality apps that run a mix of web and native code. 10. What is session and how session can be created in Meteor? Session is used to save data while app is in use. The session data will be deleted while user leaves the app. In Meteor session are created by using Session.set() method. Once the session data is set, it can return using Session.get() method.

METEOR Interview Questions 11. What is tracker in Meteor? Tracker is a small library that is used for auto update templates once the session data has changed. Tracker.autorun() method is used for tracking on session. var data = 0 Session.set('sessionData', data); Tracker.autorun(function () { var sessionValue = Session.get('sessionData'); console.log(sessionValue) }); Template.myTemplate.events({ 'click #myButton': function() { Session.set('sessionData', data++); } }); 12. How can Meteor provide security for mobile or web application? Meteor offers large number of packages for application development. Developer need to remove some insecure or less secure packages while development. Another way to provide security of application is that, creating your methods on the server. This can be done by using the Meteor.methods() on the server and Meteor.call() on the client. 13. What is Blaze in Meteor? Blaze is a Meteor package used for building live reactive templates. 14. What is Meteor EJSON? EJSON is an extension of JSON syntax that supports Date and Binary types. The date and binary can be deserialize using the parse method. For example: if (Meteor.isClient) { var ejsonDate = '{"$date": 1455029631493}'; var myDate = EJSON.parse(ejsonDate); console.log(myDate); } 15. How and where to deploy Meteor app? Meteor provides its own server (free) to deploy and test your application with command “meteor deploy appname”. If you want to deploy application on your own server and domain, you will need VPS (Virtual Private Server) or cloud hosting like Heroku or Modulus. METEOR Questions and Answers Pdf Download Read the full article
0 notes
Text
“Create Once, Publish Everywhere” With WordPress
“Create Once, Publish Everywhere” With WordPress
Leonardo Losoviz
2019-10-28T16:00:59+02:002019-10-28T21:09:38+00:00
COPE is a strategy for reducing the amount of work needed to publish our content into different mediums, such as website, email, apps, and others. First pioneered by NPR, it accomplishes its goal by establishing a single source of truth for content which can be used for all of the different mediums.
Having content that works everywhere is not a trivial task since each medium will have its own requirements. For instance, whereas HTML is valid for printing content for the web, this language is not valid for an iOS/Android app. Similarly, we can add classes to our HTML for the web, but these must be converted to styles for email.
The solution to this conundrum is to separate form from content: The presentation and the meaning of the content must be decoupled, and only the meaning is used as the single source of truth. The presentation can then be added in another layer (specific to the selected medium).
For example, given the following piece of HTML code, the <p> is an HTML tag which applies mostly for the web, and attribute class="align-center" is presentation (placing an element “on the center” makes sense for a screen-based medium, but not for an audio-based one such as Amazon Alexa):
<p class="align-center">Hello world!</p>
Hence, this piece of content cannot be used as a single source of truth, and it must be converted into a format which separates the meaning from the presentation, such as the following piece of JSON code:
{ content: "Hello world!", placement: "center", type: "paragraph" }
This piece of code can be used as a single source of truth for content since from it we can recreate once again the HTML code to use for the web, and procure an appropriate format for other mediums.
Why WordPress
WordPress is ideal to implement the COPE strategy due of several reasons:
It is versatile. The WordPress database model does not define a fixed, rigid content model; on the contrary, it was created for versatility, enabling to create varied content models through the use of meta field, which allow the storing of additional pieces of data for four different entities: posts and custom post types, users, comments, and taxonomies (tags and categories).
It is powerful. WordPress shines as a CMS (Content Management System), and its plugin ecosystem enables to easily add new functionalities.
It is widespread. It is estimated that 1/3rd of websites run on WordPress. Then, a sizable amount of people working on the web know about and are able to use, i.e. WordPress. Not just developers but also bloggers, salesmen, marketing staff, and so on. Then, many different stakeholders, no matter their technical background, will be able to produce the content which acts as the single source of truth.
It is headless. Headlessness is the ability to decouple the content from the presentation layer, and it is a fundamental feature for implementing COPE (as to be able to feed data to dissimilar mediums). Since incorporating the WP REST API into core starting from version 4.7, and more markedly since the launch of Gutenberg in version 5.0 (for which plenty of REST API endpoints had to be implemented), WordPress can be considered a headless CMS, since most WordPress content can be accessed through a REST API by any application built on any stack. In addition, the recently-created WPGraphQL integrates WordPress and GraphQL, enabling to feed content from WordPress into any application using this increasingly popular API. Finally, my own project PoP has recently added an implementation of an API for WordPress which allows to export the WordPress data as either REST, GraphQL or PoP native formats.
It has Gutenberg, a block-based editor that greatly aids the implementation of COPE because it is based on the concept of blocks (as explained in the sections below).
Blobs Versus Blocks To Represent Information
A blob is a single unit of information stored all together in the database. For instance, writing the blog post below on a CMS that relies on blobs to store information will store the blog post content on a single database entry — containing that same content:
<p>Look at this wonderful tango:</p> <figure> <iframe width="951" height="535" src="https://www.youtube.com/embed/sxm3Xyutc1s" frameborder="0" allow="accelerometer; autoplay; encrypted-media; gyroscope; picture-in-picture" allowfullscreen></iframe> <figcaption>An exquisite tango performance</figcaption> </figure>
As it can be appreciated, the important bits of information from this blog post (such as the content in the paragraph, and the URL, the dimensions and attributes of the Youtube video) are not easily accessible: If we want to retrieve any of them on their own, we need to parse the HTML code to extract them — which is far from an ideal solution.
Blocks act differently. By representing the information as a list of blocks, we can store the content in a more semantic and accessible way. Each block conveys its own content and its own properties which can depend on its type (e.g. is it perhaps a paragraph or a video?).
For example, the HTML code above could be represented as a list of blocks like this:
{ [ type: "paragraph", content: "Look at this wonderful tango:" ], [ type: "embed", provider: "Youtube", url: "https://www.youtube.com/embed/sxm3Xyutc1s", width: 951, height: 535, frameborder: 0, allowfullscreen: true, allow: "accelerometer; autoplay; encrypted-media; gyroscope; picture-in-picture", caption: "An exquisite tango performance" ] }
Through this way of representing information, we can easily use any piece of data on its own, and adapt it for the specific medium where it must be displayed. For instance, if we want to extract all the videos from the blog post to show on a car entertainment system, we can simply iterate all blocks of information, select those with type="embed" and provider="Youtube", and extract the URL from them. Similarly, if we want to show the video on an Apple Watch, we need not care about the dimensions of the video, so we can ignore attributes width and height in a straightforward manner.
How Gutenberg Implements Blocks
Before WordPress version 5.0, WordPress used blobs to store post content in the database. Starting from version 5.0, WordPress ships with Gutenberg, a block-based editor, enabling the enhanced way to process content mentioned above, which represents a breakthrough towards the implementation of COPE. Unfortunately, Gutenberg has not been designed for this specific use case, and its representation of the information is different to the one just described for blocks, resulting in several inconveniences that we will need to deal with.
Let’s first have a glimpse on how the blog post described above is saved through Gutenberg:
<!-- wp:paragraph --> <p>Look at this wonderful tango:</p> <!-- /wp:paragraph --> <!-- wp:core-embed/youtube {"url":"https://www.youtube.com/embed/sxm3Xyutc1s","type":"rich","providerNameSlug":"embed-handler","className":"wp-embed-aspect-16-9 wp-has-aspect-ratio"} --> <figure class="wp-block-embed-youtube wp-block-embed is-type-rich is-provider-embed-handler wp-embed-aspect-16-9 wp-has-aspect-ratio"> <div class="wp-block-embed__wrapper"> https://www.youtube.com/embed/sxm3Xyutc1s </div> <figcaption>An exquisite tango performance</figcaption> </figure> <!-- /wp:core-embed/youtube -->
From this piece of code, we can make the following observations:
Blocks Are Saved All Together In The Same Database Entry
There are two blocks in the code above:
<!-- wp:paragraph --> <p>Look at this wonderful tango:</p> <!-- /wp:paragraph -->
<!-- wp:core-embed/youtube {"url":"https://www.youtube.com/embed/sxm3Xyutc1s","type":"rich","providerNameSlug":"embed-handler","className":"wp-embed-aspect-16-9 wp-has-aspect-ratio"} --> <figure class="wp-block-embed-youtube wp-block-embed is-type-rich is-provider-embed-handler wp-embed-aspect-16-9 wp-has-aspect-ratio"> <div class="wp-block-embed__wrapper"> https://www.youtube.com/embed/sxm3Xyutc1s </div> <figcaption>An exquisite tango performance</figcaption> </figure> <!-- /wp:core-embed/youtube -->
With the exception of global (also called “reusable”) blocks, which have an entry of their own in the database and can be referenced directly through their IDs, all blocks are saved together in the blog post’s entry in table wp_posts.
Hence, to retrieve the information for a specific block, we will first need to parse the content and isolate all blocks from each other. Conveniently, WordPress provides function parse_blocks($content) to do just this. This function receives a string containing the blog post content (in HTML format), and returns a JSON object containing the data for all contained blocks.
Block Type And Attributes Are Conveyed Through HTML Comments
Each block is delimited with a starting tag <!-- wp:{block-type} {block-attributes-encoded-as-JSON} --> and an ending tag <!-- /wp:{block-type} --> which (being HTML comments) ensure that this information will not be visible when displaying it on a website. However, we can’t display the blog post directly on another medium, since the HTML comment may be visible, appearing as garbled content. This is not a big deal though, since after parsing the content through function parse_blocks($content), the HTML comments are removed and we can operate directly with the block data as a JSON object.
Blocks Contain HTML
The paragraph block has "<p>Look at this wonderful tango:</p>" as its content, instead of "Look at this wonderful tango:". Hence, it contains HTML code (tags <p> and </p>) which is not useful for other mediums, and as such must be removed, for instance through PHP function strip_tags($content).
When stripping tags, we can keep those HTML tags which explicitly convey semantic information, such as tags <strong> and <em> (instead of their counterparts <b> and <i> which apply only to a screen-based medium), and remove all other tags. This is because there is a great chance that semantic tags can be properly interpreted for other mediums too (e.g. Amazon Alexa can recognize tags <strong> and <em>, and change its voice and intonation accordingly when reading a piece of text). To do this, we invoke the strip_tags function with a 2nd parameter containing the allowed tags, and place it within a wrapping function for convenience:
function strip_html_tags($content) { return strip_tags($content, '<strong><em>'); }
The Video’s Caption Is Saved Within The HTML And Not As An Attribute
As can be seen in the Youtube video block, the caption "An exquisite tango performance" is stored inside the HTML code (enclosed by tag <figcaption />) but not inside the JSON-encoded attributes object. As a consequence, to extract the caption, we will need to parse the block content, for instance through a regular expression:
function extract_caption($content) { $matches = []; preg_match('/<figcaption>(.*?)<\/figcaption>/', $content, $matches); if ($caption = $matches[1]) { return strip_html_tags($caption); } return null; }
This is a hurdle we must overcome in order to extract all metadata from a Gutenberg block. This happens on several blocks; since not all pieces of metadata are saved as attributes, we must then first identify which are these pieces of metadata, and then parse the HTML content to extract them on a block-by-block and piece-by-piece basis.
Concerning COPE, this represents a wasted chance to have a really optimal solution. It could be argued that the alternative option is not ideal either, since it would duplicate information, storing it both within the HTML and as an attribute, which violates the DRY (Don’t Repeat Yourself) principle. However, this violation does already take place: For instance, attribute className contains value "wp-embed-aspect-16-9 wp-has-aspect-ratio", which is printed inside the content too, under HTML attribute class.

Adding content through Gutenberg (Large preview)
Implementing COPE
Note: I have released this functionality, including all the code described below, as WordPress plugin Block Metadata. You’re welcome to install it and play with it so you can get a taste of the power of COPE. The source code is available in this GitHub repo.
Now that we know what the inner representation of a block looks like, let’s proceed to implement COPE through Gutenberg. The procedure will involve the following steps:
Because function parse_blocks($content) returns a JSON object with nested levels, we must first simplify this structure.
We iterate all blocks and, for each, identify their pieces of metadata and extract them, transforming them into a medium-agnostic format in the process. Which attributes are added to the response can vary depending on the block type.
We finally make the data available through an API (REST/GraphQL/PoP).
Let’s implement these steps one by one.
1. Simplifying The Structure Of The JSON Object
The returned JSON object from function parse_blocks($content) has a nested architecture, in which the data for normal blocks appear at the first level, but the data for a referenced reusable block are missing (only data for the referencing block are added), and the data for nested blocks (which are added within other blocks) and for grouped blocks (where several blocks can be grouped together) appear under 1 or more sublevels. This architecture makes it difficult to process the block data from all blocks in the post content, since on one side some data are missing, and on the other we don’t know a priori under how many levels data are located. In addition, there is a block divider placed every pair of blocks, containing no content, which can be safely ignored.
For instance, the response obtained from a post containing a simple block, a global block, a nested block containing a simple block, and a group of simple blocks, in that order, is the following:
[ // Simple block { "blockName": "core/image", "attrs": { "id": 70, "sizeSlug": "large" }, "innerBlocks": [], "innerHTML": "\n<figure class=\"wp-block-image size-large\"><img src=\"http://localhost/wp-content/uploads/2017/12/sandwich-1024x614.jpg\" alt=\"\" class=\"wp-image-70\"/><figcaption>This is a normal block</figcaption></figure>\n", "innerContent": [ "\n<figure class=\"wp-block-image size-large\"><img src=\"http://localhost/wp-content/uploads/2017/12/sandwich-1024x614.jpg\" alt=\"\" class=\"wp-image-70\"/><figcaption>This is a normal block</figcaption></figure>\n" ] }, // Empty block divider { "blockName": null, "attrs": [], "innerBlocks": [], "innerHTML": "\n\n", "innerContent": [ "\n\n" ] }, // Reference to reusable block { "blockName": "core/block", "attrs": { "ref": 218 }, "innerBlocks": [], "innerHTML": "", "innerContent": [] }, // Empty block divider { "blockName": null, "attrs": [], "innerBlocks": [], "innerHTML": "\n\n", "innerContent": [ "\n\n" ] }, // Nested block { "blockName": "core/columns", "attrs": [], // Contained nested blocks "innerBlocks": [ { "blockName": "core/column", "attrs": [], // Contained nested blocks "innerBlocks": [ { "blockName": "core/image", "attrs": { "id": 69, "sizeSlug": "large" }, "innerBlocks": [], "innerHTML": "\n<figure class=\"wp-block-image size-large\"><img src=\"http://localhost/wp-content/uploads/2017/12/espresso-1024x614.jpg\" alt=\"\" class=\"wp-image-69\"/></figure>\n", "innerContent": [ "\n<figure class=\"wp-block-image size-large\"><img src=\"http://localhost/wp-content/uploads/2017/12/espresso-1024x614.jpg\" alt=\"\" class=\"wp-image-69\"/></figure>\n" ] } ], "innerHTML": "\n<div class=\"wp-block-column\"></div>\n", "innerContent": [ "\n<div class=\"wp-block-column\">", null, "</div>\n" ] }, { "blockName": "core/column", "attrs": [], // Contained nested blocks "innerBlocks": [ { "blockName": "core/paragraph", "attrs": [], "innerBlocks": [], "innerHTML": "\n<p>This is how I wake up every morning</p>\n", "innerContent": [ "\n<p>This is how I wake up every morning</p>\n" ] } ], "innerHTML": "\n<div class=\"wp-block-column\"></div>\n", "innerContent": [ "\n<div class=\"wp-block-column\">", null, "</div>\n" ] } ], "innerHTML": "\n<div class=\"wp-block-columns\">\n\n</div>\n", "innerContent": [ "\n<div class=\"wp-block-columns\">", null, "\n\n", null, "</div>\n" ] }, // Empty block divider { "blockName": null, "attrs": [], "innerBlocks": [], "innerHTML": "\n\n", "innerContent": [ "\n\n" ] }, // Block group { "blockName": "core/group", "attrs": [], // Contained grouped blocks "innerBlocks": [ { "blockName": "core/image", "attrs": { "id": 71, "sizeSlug": "large" }, "innerBlocks": [], "innerHTML": "\n<figure class=\"wp-block-image size-large\"><img src=\"http://localhost/wp-content/uploads/2017/12/coffee-1024x614.jpg\" alt=\"\" class=\"wp-image-71\"/><figcaption>First element of the group</figcaption></figure>\n", "innerContent": [ "\n<figure class=\"wp-block-image size-large\"><img src=\"http://localhost/wp-content/uploads/2017/12/coffee-1024x614.jpg\" alt=\"\" class=\"wp-image-71\"/><figcaption>First element of the group</figcaption></figure>\n" ] }, { "blockName": "core/paragraph", "attrs": [], "innerBlocks": [], "innerHTML": "\n<p>Second element of the group</p>\n", "innerContent": [ "\n<p>Second element of the group</p>\n" ] } ], "innerHTML": "\n<div class=\"wp-block-group\"><div class=\"wp-block-group__inner-container\">\n\n</div></div>\n", "innerContent": [ "\n<div class=\"wp-block-group\"><div class=\"wp-block-group__inner-container\">", null, "\n\n", null, "</div></div>\n" ] } ]
A better solution is to have all data at the first level, so the logic to iterate through all block data is greatly simplified. Hence, we must fetch the data for these reusable/nested/grouped blocks, and have it added on the first level too. As it can be seen in the JSON code above:
The empty divider block has attribute "blockName" with value NULL
The reference to a reusable block is defined through $block["attrs"]["ref"]
Nested and group blocks define their contained blocks under $block["innerBlocks"]
Hence, the following PHP code removes the empty divider blocks, identifies the reusable/nested/grouped blocks and adds their data to the first level, and removes all data from all sublevels:
/** * Export all (Gutenberg) blocks' data from a WordPress post */ function get_block_data($content, $remove_divider_block = true) { // Parse the blocks, and convert them into a single-level array $ret = []; $blocks = parse_blocks($content); recursively_add_blocks($ret, $blocks); // Maybe remove blocks without name if ($remove_divider_block) { $ret = remove_blocks_without_name($ret); } // Remove 'innerBlocks' property if it exists (since that code was copied to the first level, it is currently duplicated) foreach ($ret as &$block) { unset($block['innerBlocks']); } return $ret; } /** * Remove the blocks without name, such as the empty block divider */ function remove_blocks_without_name($blocks) { return array_values(array_filter( $blocks, function($block) { return $block['blockName']; } )); } /** * Add block data (including global and nested blocks) into the first level of the array */ function recursively_add_blocks(&$ret, $blocks) { foreach ($blocks as $block) { // Global block: add the referenced block instead of this one if ($block['attrs']['ref']) { $ret = array_merge( $ret, recursively_render_block_core_block($block['attrs']) ); } // Normal block: add it directly else { $ret[] = $block; } // If it contains nested or grouped blocks, add them too if ($block['innerBlocks']) { recursively_add_blocks($ret, $block['innerBlocks']); } } } /** * Function based on `render_block_core_block` */ function recursively_render_block_core_block($attributes) { if (empty($attributes['ref'])) { return []; } $reusable_block = get_post($attributes['ref']); if (!$reusable_block || 'wp_block' !== $reusable_block->post_type) { return []; } if ('publish' !== $reusable_block->post_status || ! empty($reusable_block->post_password)) { return []; } return get_block_data($reusable_block->post_content); }
Calling function get_block_data($content) passing the post content ($post->post_content) as parameter, we now obtain the following response:
[[ { "blockName": "core/image", "attrs": { "id": 70, "sizeSlug": "large" }, "innerHTML": "\n<figure class=\"wp-block-image size-large\"><img src=\"http://localhost/wp-content/uploads/2017/12/sandwich-1024x614.jpg\" alt=\"\" class=\"wp-image-70\"/><figcaption>This is a normal block</figcaption></figure>\n", "innerContent": [ "\n<figure class=\"wp-block-image size-large\"><img src=\"http://localhost/wp-content/uploads/2017/12/sandwich-1024x614.jpg\" alt=\"\" class=\"wp-image-70\"/><figcaption>This is a normal block</figcaption></figure>\n" ] }, { "blockName": "core/paragraph", "attrs": [], "innerHTML": "\n<p>Lorem ipsum dolor sit amet, consectetur adipiscing elit, sed do eiusmod tempor incididunt ut labore et dolore magna aliqua.</p>\n", "innerContent": [ "\n<p>Lorem ipsum dolor sit amet, consectetur adipiscing elit, sed do eiusmod tempor incididunt ut labore et dolore magna aliqua.</p>\n" ] }, { "blockName": "core/columns", "attrs": [], "innerHTML": "\n<div class=\"wp-block-columns\">\n\n</div>\n", "innerContent": [ "\n<div class=\"wp-block-columns\">", null, "\n\n", null, "</div>\n" ] }, { "blockName": "core/column", "attrs": [], "innerHTML": "\n<div class=\"wp-block-column\"></div>\n", "innerContent": [ "\n<div class=\"wp-block-column\">", null, "</div>\n" ] }, { "blockName": "core/image", "attrs": { "id": 69, "sizeSlug": "large" }, "innerHTML": "\n<figure class=\"wp-block-image size-large\"><img src=\"http://localhost/wp-content/uploads/2017/12/espresso-1024x614.jpg\" alt=\"\" class=\"wp-image-69\"/></figure>\n", "innerContent": [ "\n<figure class=\"wp-block-image size-large\"><img src=\"http://localhost/wp-content/uploads/2017/12/espresso-1024x614.jpg\" alt=\"\" class=\"wp-image-69\"/></figure>\n" ] }, { "blockName": "core/column", "attrs": [], "innerHTML": "\n<div class=\"wp-block-column\"></div>\n", "innerContent": [ "\n<div class=\"wp-block-column\">", null, "</div>\n" ] }, { "blockName": "core/paragraph", "attrs": [], "innerHTML": "\n<p>This is how I wake up every morning</p>\n", "innerContent": [ "\n<p>This is how I wake up every morning</p>\n" ] }, { "blockName": "core/group", "attrs": [], "innerHTML": "\n<div class=\"wp-block-group\"><div class=\"wp-block-group__inner-container\">\n\n</div></div>\n", "innerContent": [ "\n<div class=\"wp-block-group\"><div class=\"wp-block-group__inner-container\">", null, "\n\n", null, "</div></div>\n" ] }, { "blockName": "core/image", "attrs": { "id": 71, "sizeSlug": "large" }, "innerHTML": "\n<figure class=\"wp-block-image size-large\"><img src=\"http://localhost/wp-content/uploads/2017/12/coffee-1024x614.jpg\" alt=\"\" class=\"wp-image-71\"/><figcaption>First element of the group</figcaption></figure>\n", "innerContent": [ "\n<figure class=\"wp-block-image size-large\"><img src=\"http://localhost/wp-content/uploads/2017/12/coffee-1024x614.jpg\" alt=\"\" class=\"wp-image-71\"/><figcaption>First element of the group</figcaption></figure>\n" ] }, { "blockName": "core/paragraph", "attrs": [], "innerHTML": "\n<p>Second element of the group</p>\n", "innerContent": [ "\n<p>Second element of the group</p>\n" ] } ]
Even though not strictly necessary, it is very helpful to create a REST API endpoint to output the result of our new function get_block_data($content), which will allow us to easily understand what blocks are contained in a specific post, and how they are structured. The code below adds such endpoint under /wp-json/block-metadata/v1/data/{POST_ID}:
/** * Define REST endpoint to visualize a post’s block data */ add_action('rest_api_init', function () { register_rest_route('block-metadata/v1', 'data/(?P\d+)', [ 'methods' => 'GET', 'callback' => 'get_post_blocks' ]); }); function get_post_blocks($request) { $post = get_post($request['post_id']); if (!$post) { return new WP_Error('empty_post', 'There is no post with this ID', array('status' => 404)); } $block_data = get_block_data($post->post_content); $response = new WP_REST_Response($block_data); $response->set_status(200); return $response; }
To see it in action, check out this link which exports the data for this post.
2. Extracting All Block Metadata Into A Medium-Agnostic Format
At this stage, we have block data containing HTML code which is not appropriate for COPE. Hence, we must strip the non-semantic HTML tags for each block as to convert it into a medium-agnostic format.
We can decide which are the attributes that must be extracted on a block type by block type basis (for instance, extract the text alignment property for "paragraph" blocks, the video URL property for the "youtube embed" block, and so on).
As we saw earlier on, not all attributes are actually saved as block attributes but within the block’s inner content, hence, for these situations, we will need to parse the HTML content using regular expressions in order to extract those pieces of metadata.
After inspecting all blocks shipped through WordPress core, I decided not to extract metadata for the following ones:
"core/columns" "core/column" "core/cover" These apply only to screen-based mediums and (being nested blocks) are difficult to deal with. "core/html" This one only makes sense for web. "core/table" "core/button" "core/media-text" I had no clue how to represent their data on a medium-agnostic fashion or if it even makes sense.
This leaves me with the following blocks, for which I’ll proceed to extract their metadata:
'core/paragraph'
'core/image'
'core-embed/youtube' (as a representative of all the 'core-embed' blocks)
'core/heading'
'core/gallery'
'core/list'
'core/audio'
'core/file'
'core/video'
'core/code'
'core/preformatted'
'core/quote' & 'core/pullquote'
'core/verse'
To extract the metadata, we create function get_block_metadata($block_data) which receives an array with the block data for each block (i.e. the output from our previously-implemented function get_block_data) and, depending on the block type (provided under property "blockName"), decides what attributes are required and how to extract them:
/** * Process all (Gutenberg) blocks' metadata into a medium-agnostic format from a WordPress post */ function get_block_metadata($block_data) { $ret = []; foreach ($block_data as $block) { $blockMeta = null; switch ($block['blockName']) { case ...: $blockMeta = ... break; case ...: $blockMeta = ... break; ... } if ($blockMeta) { $ret[] = [ 'blockName' => $block['blockName'], 'meta' => $blockMeta, ]; } } return $ret; }
Let’s proceed to extract the metadata for each block type, one by one:
"core/paragraph"
Simply remove the HTML tags from the content, and remove the trailing breaklines.
case 'core/paragraph': $blockMeta = [ 'content' => trim(strip_html_tags($block['innerHTML'])), ]; break;
'core/image'
The block either has an ID referring to an uploaded media file or, if not, the image source must be extracted from under <img src="...">. Several attributes (caption, linkDestination, link, alignment) are optional.
case 'core/image': $blockMeta = []; // If inserting the image from the Media Manager, it has an ID if ($block['attrs']['id'] && $img = wp_get_attachment_image_src($block['attrs']['id'], $block['attrs']['sizeSlug'])) { $blockMeta['img'] = [ 'src' => $img[0], 'width' => $img[1], 'height' => $img[2], ]; } elseif ($src = extract_image_src($block['innerHTML'])) { $blockMeta['src'] = $src; } if ($caption = extract_caption($block['innerHTML'])) { $blockMeta['caption'] = $caption; } if ($linkDestination = $block['attrs']['linkDestination']) { $blockMeta['linkDestination'] = $linkDestination; if ($link = extract_link($block['innerHTML'])) { $blockMeta['link'] = $link; } } if ($align = $block['attrs']['align']) { $blockMeta['align'] = $align; } break;
It makes sense to create functions extract_image_src, extract_caption and extract_link since their regular expressions will be used time and again for several blocks. Please notice that a caption in Gutenberg can contain links (<a href="...">), however, when calling strip_html_tags, these are removed from the caption.
Even though regrettable, I find this practice unavoidable, since we can’t guarantee a link to work in non-web platforms. Hence, even though the content is gaining universality since it can be used for different mediums, it is also losing specificity, so its quality is poorer compared to content that was created and customized for the particular platform.
function extract_caption($innerHTML) { $matches = []; preg_match('/<figcaption>(.*?)<\/figcaption>/', $innerHTML, $matches); if ($caption = $matches[1]) { return strip_html_tags($caption); } return null; } function extract_link($innerHTML) { $matches = []; preg_match('/<a href="(.*?)">(.*?)<\/a>>', $innerHTML, $matches); if ($link = $matches[1]) { return $link; } return null; } function extract_image_src($innerHTML) { $matches = []; preg_match('/<img src="(.*?)"/', $innerHTML, $matches); if ($src = $matches[1]) { return $src; } return null; }
'core-embed/youtube'
Simply retrieve the video URL from the block attributes, and extract its caption from the HTML content, if it exists.
case 'core-embed/youtube': $blockMeta = [ 'url' => $block['attrs']['url'], ]; if ($caption = extract_caption($block['innerHTML'])) { $blockMeta['caption'] = $caption; } break;
'core/heading'
Both the header size (h1, h2, …, h6) and the heading text are not attributes, so these must be obtained from the HTML content. Please notice that, instead of returning the HTML tag for the header, the size attribute is simply an equivalent representation, which is more agnostic and makes better sense for non-web platforms.
case 'core/heading': $matches = []; preg_match('/<h[1-6])>(.*?)<\/h([1-6])>/', $block['innerHTML'], $matches); $sizes = [ null, 'xxl', 'xl', 'l', 'm', 'sm', 'xs', ]; $blockMeta = [ 'size' => $sizes[$matches[1]], 'heading' => $matches[2], ]; break;
'core/gallery'
Unfortunately, for the image gallery I have been unable to extract the captions from each image, since these are not attributes, and extracting them through a simple regular expression can fail: If there is a caption for the first and third elements, but none for the second one, then I wouldn’t know which caption corresponds to which image (and I haven’t devoted the time to create a complex regex). Likewise, in the logic below I’m always retrieving the "full" image size, however, this doesn’t have to be the case, and I’m unaware of how the more appropriate size can be inferred.
case 'core/gallery': $imgs = []; foreach ($block['attrs']['ids'] as $img_id) { $img = wp_get_attachment_image_src($img_id, 'full'); $imgs[] = [ 'src' => $img[0], 'width' => $img[1], 'height' => $img[2], ]; } $blockMeta = [ 'imgs' => $imgs, ]; break;
'core/list'
Simply transform the <li> elements into an array of items.
case 'core/list': $matches = []; preg_match_all('/<li>(.*?)<\/li>/', $block['innerHTML'], $matches); if ($items = $matches[1]) { $blockMeta = [ 'items' => array_map('strip_html_tags', $items), ]; } break;
'core/audio'
Obtain the URL of the corresponding uploaded media file.
case 'core/audio': $blockMeta = [ 'src' => wp_get_attachment_url($block['attrs']['id']), ]; break;
'core/file'
Whereas the URL of the file is an attribute, its text must be extracted from the inner content.
case 'core/file': $href = $block['attrs']['href']; $matches = []; preg_match('/<a href="'.str_replace('/', '\/', $href).'">(.*?)<\/a>/', $block['innerHTML'], $matches); $blockMeta = [ 'href' => $href, 'text' => strip_html_tags($matches[1]), ]; break;
'core/video'
Obtain the video URL and all properties to configure how the video is played through a regular expression. If Gutenberg ever changes the order in which these properties are printed in the code, then this regex will stop working, evidencing one of the problems of not adding metadata directly through the block attributes.
case 'core/video': $matches = []; preg_match('/
<\/video>>', $block['innerHTML'], $matches); $blockMeta = [ 'src' => $matches[7], ]; if ($poster = $matches[6]) { $blockMeta['poster'] = $poster; } // Video settings $settings = []; if ($matches[1]) { $settings[] = 'autoplay'; } if ($matches[2]) { $settings[] = 'controls'; } if ($matches[3]) { $settings[] = 'loop'; } if ($matches[4]) { $settings[] = 'muted'; } if ($matches[8]) { $settings[] = 'playsinline'; } if ($settings) { $blockMeta['settings'] = $settings; } if ($caption = extract_caption($block['innerHTML'])) { $blockMeta['caption'] = $caption; } break;
'core/code'
Simply extract the code from within <code />.
case 'core/code': $matches = []; preg_match('/<code>(.*?)<\/code>/is', $block['innerHTML'], $matches); $blockMeta = [ 'code' => $matches[1], ]; break;
'core/preformatted'
Similar to <code />, but we must watch out that Gutenberg hardcodes a class too.
case 'core/preformatted': $matches = []; preg_match('/<pre class="wp-block-preformatted">(.*?)<\/pre>/is', $block['innerHTML'], $matches); $blockMeta = [ 'text' => strip_html_tags($matches[1]), ]; break;
'core/quote' and 'core/pullquote'
We must convert all inner <p /> tags to their equivalent generic "\n" character.
case 'core/quote': case 'core/pullquote': $matches = []; $regexes = [ 'core/quote' => '/<blockquote class=\"wp-block-quote\">(.*?)<\/blockquote>/', 'core/pullquote' => '/<figure class=\"wp-block-pullquote\"><blockquote>(.*?)<\/blockquote><\/figure>/', ]; preg_match($regexes[$block['blockName']], $block['innerHTML'], $matches); if ($quoteHTML = $matches[1]) { preg_match_all('/<p>(.*?)<\/p>/', $quoteHTML, $matches); $blockMeta = [ 'quote' => strip_html_tags(implode('\n', $matches[1])), ]; preg_match('/<cite>(.*?)<\/cite>/', $quoteHTML, $matches); if ($cite = $matches[1]) { $blockMeta['cite'] = strip_html_tags($cite); } } break;
'core/verse'
Similar situation to <pre />.
case 'core/verse': $matches = []; preg_match('/<pre class="wp-block-verse">(.*?)<\/pre>/is', $block['innerHTML'], $matches); $blockMeta = [ 'text' => strip_html_tags($matches[1]), ]; break;
3. Exporting Data Through An API
Now that we have extracted all block metadata, we need to make it available to our different mediums, through an API. WordPress has access to the following APIs:
REST, through the WP REST API (integrated in WordPress core)
GraphQL, through WPGraphQL
PoP, through its implementation for WordPress
Let’s see how to export the data through each of them.
REST
The following code creates endpoint /wp-json/block-metadata/v1/metadata/{POST_ID} which exports all block metadata for a specific post:
/** * Define REST endpoints to export the blocks' metadata for a specific post */ add_action('rest_api_init', function () { register_rest_route('block-metadata/v1', 'metadata/(?P\d+)', [ 'methods' => 'GET', 'callback' => 'get_post_block_meta' ]); }); function get_post_block_meta($request) { $post = get_post($request['post_id']); if (!$post) { return new WP_Error('empty_post', 'There is no post with this ID', array('status' => 404)); } $block_data = get_block_data($post->post_content); $block_metadata = get_block_metadata($block_data); $response = new WP_REST_Response($block_metadata); $response->set_status(200); return $response; }
To see it working, this link (corresponding to this blog post) displays the metadata for blocks of all the types analyzed earlier on.
GraphQL (Through WPGraphQL)
GraphQL works by setting-up schemas and types which define the structure of the content, from which arises this API’s power to fetch exactly the required data and nothing else. Setting-up schemas works very well when the structure of the object has a unique representation.
In our case, however, the metadata returned by a new field "block_metadata" (which calls our newly-created function get_block_metadata) depends on the specific block type, so the structure of the response can vary wildly; GraphQL provides a solution to this issue through a Union type, allowing to return one among a set of different types. However, its implementation for all different variations of the metadata structure has proved to be a lot of work, and I quit along the way 😢.
As an alternative (not ideal) solution, I decided to provide the response by simply encoding the JSON object through a new field "jsonencoded_block_metadata":
/** * Define WPGraphQL field "jsonencoded_block_metadata" */ add_action('graphql_register_types', function() { register_graphql_field( 'Post', 'jsonencoded_block_metadata', [ 'type' => 'String', 'description' => __('Post blocks encoded as JSON', 'wp-graphql'), 'resolve' => function($post) { $post = get_post($post->ID); $block_data = get_block_data($post->post_content); $block_metadata = get_block_metadata($block_data); return json_encode($block_metadata); } ] ); });
PoP
Note: This functionality is available on its own GitHub repo.
The final API is called PoP, which is a little-known project I’ve been working on for several years now. I have recently converted it into a full-fledged API, with the capacity to produce a response compatible with both REST and GraphQL, and which even benefits from the advantages from these 2 APIs, at the same time: no under/over-fetching of data, like in GraphQL, while being cacheable on the server-side and not susceptible to DoS attacks, like REST. It offers a mix between the two of them: REST-like endpoints with GraphQL-like queries.
The block metadata is made available through the API through the following code:
class PostFieldValueResolver extends AbstractDBDataFieldValueResolver { public static function getClassesToAttachTo(): array { return array(\PoP\Posts\FieldResolver::class); } public function resolveValue(FieldResolverInterface $fieldResolver, $resultItem, string $fieldName, array $fieldArgs = []) { $post = $resultItem; switch ($fieldName) { case 'block-metadata': $block_data = \Leoloso\BlockMetadata\Data::get_block_data($post->post_content); $block_metadata = \Leoloso\BlockMetadata\Metadata::get_block_metadata($block_data); // Filter by blockName if ($blockName = $fieldArgs['blockname']) { $block_metadata = array_filter( $block_metadata, function($block) use($blockName) { return $block['blockName'] == $blockName; } ); } return $block_metadata; } return parent::resolveValue($fieldResolver, $resultItem, $fieldName, $fieldArgs); } }
To see it in action, this link displays the block metadata (+ ID, title and URL of the post, and the ID and name of its author, à la GraphQL) for a list of posts.
In addition, similar to GraphQL arguments, our query can be customized through field arguments, enabling to obtain only the data that makes sense for a specific platform. For instance, if we desire to extract all Youtube videos added to all posts, we can add modifier (blockname:core-embed/youtube) to field block-metadata in the endpoint URL, like in this link. Or if we want to extract all images from a specific post, we can add modifier (blockname:core/image) like in this other link|id|title).
Conclusion
The COPE (“Create Once, Publish Everywhere”) strategy helps us lower the amount of work needed to create several applications which must run on different mediums (web, email, apps, home assistants, virtual reality, etc) by creating a single source of truth for our content. Concerning WordPress, even though it has always shined as a Content Management System, implementing the COPE strategy has historically proved to be a challenge.
However, a couple of recent developments have made it increasingly feasible to implement this strategy for WordPress. On one side, since the integration into core of the WP REST API, and more markedly since the launch of Gutenberg, most WordPress content is accessible through APIs, making it a genuine headless system. On the other side, Gutenberg (which is the new default content editor) is block-based, making all metadata inside a blog post readily accessible to the APIs.
As a consequence, implementing COPE for WordPress is straightforward. In this article, we have seen how to do it, and all the relevant code has been made available through several repositories. Even though the solution is not optimal (since it involves plenty of parsing HTML code), it still works fairly well, with the consequence that the effort needed to release our applications to multiple platforms can be greatly reduced. Kudos to that!

(dm, il)
0 notes
Photo

Angular 8, TypeScript 3.5, and comparing React to Vue
#439 — May 31, 2019
Read on the Web
JavaScript Weekly

Papa Parse 5.0: Fast In-Browser CSV Parsing — Complies with RFC4180, handles streaming, can both parse or convert JSON to CSV, and has no dependencies. It has a nice homepage with lots of usage examples too.
Matt Holt
Angular 8 Released — A major release of the popular app framework, featuring smaller bundles, CLI APIs, differential loading and more.
Stephen Fluin
'Why I'm Still Using jQuery in 2019' — It’s cool to disregard jQuery (we get comments whenever we link to jQuery plugins in JavaScript Weekly – which isn’t often, admittedly) but it’s still heavily used and useful for many. This post provoked an extensive discussion on Hacker News if you’re into such things.
Martin Tournoij
New Course: The Hard Parts of Servers & Node.js ☁️ — Learn the hard parts of the, "the most powerful technology to have emerged in the last 10 years for building servers: Node.js."
Frontend Masters sponsor
TypeScript 3.5 Released — It’s not a huge release but improved performance and incremental compilation and the Omit helper type will surely be welcome to the rapidly growing number of TypeScript users.
Daniel Rosenwasser (Microsoft)
React for Vue Developers — It’s always nice to see people riffing on how Vue and React approach problems and how their solutions differ. Here, Sebastian walks through Vue’s core features and how he’d approach them with hooks-flavored React.
Sebastian De Deyne
More Adventures in Functional JavaScript: Five Ways to Calculate an Average with Array reduce — Using the reduce method to calculate an average isn’t unusual but things get complicated fast if you go beyond the most basic examples. Lots to enjoy here.
James Sinclair
P.S. If you have a few minutes, Yulia Startsev of Mozilla (and a TC39 representative) asked if we'd be able to get some of you to take this survey to potentially help in the future design of JavaScript.
💻 Jobs
Join the Tech Team in Prague — Looking for developers who have grit and a thirst for learning while building a service that revolutionizes hospitality
Mews Systems
Frontend Engineers to Profitable Healthtech Startup — Stockholm, Sweden — Join our 30-person team of A-players, solve problems at global scale & help us become the most trustworthy online health company.
Diet Doctor Sweden AB
Find a JavaScript Job on Vettery — Vettery specializes in tech roles and is completely free for job seekers.
Vettery
📘 Tutorials, Opinions, and Videos
The 80/20 Guide to JSON.stringify in JavaScript — JSON.stringify converts objects to JSON and it’s used in lots of places. Here’s a brief look at how it’s used and some of the errors it can throw.
Valeri Karpov
Build a Progressive Web App with Angular — Learn how to build an Angular-based PWA and deploy it for use on mobile devices using Netflify.
John Green
12 Tips for Writing Clean and Scalable JavaScript
Lukas Gisder-Dubé
2 Hour GraphQL Tutorials - Concise, Hands-On GraphQL Tutorials for Frontend Developers — A series of open-source GraphQL tutorials with videos. Now featuring tutorials for React, Vue, ReactNative, iOS & Android developers.
Hasura sponsor
Secrets of JavaScript: A Tale of React, Performance Optimization and Multi-Threading — Lessons learned from optimizing a uniquely challenging search UI presented in an interesting, almost ‘choose your own adventure’ format on Medium.
Leo Fabrikant
Compiling C to WebAssembly without Emscripten — Know C and want to compile a function to WebAssembly so you can call it from JavaScript? Here you go. If you’re a macOS user, I created a similar simple example to compiling C to WASM with clang.
Surma
🔧 Code and Tools

VS Code Browser Preview Gets 'Inspect Element' Feature — Inspect an element and go directly to the component’s source. Handy! Works with both React and Svelte so far. Here’s the extension itself.
Kenneth Auchenberg
Normalizr: Normalize Nested JSON to a Defined Schema — For example, consider if you receive a complicated, nested JSON object from a third party service and you want to boil it down to a format that better suits your app.. this is what you need. See the example.
Paul Armstrong
Safely Roll Out New Features in JavaScript with Optimizely Rollouts — Ship faster with less risk. Get free feature flags to instantly turn on or off features without deploys.
Optimizely Rollouts sponsor
Verdaccio 4 Released: A Private npm Registry and Cache — If you need your own private package manager, cache, and proxy, look no further. GitHub repo.
Verdaccio
Puppeteer Recorder: A Chrome Extension That Creates Puppeteer Scripts — Hit record, do things in your browser, and this extension generates JavaScript code you can then run that uses Puppeteer to reproduce the actions headlessly.
Checkly
babel-plugin-macros: Allows You to Build Simple Compile-Time Libraries — If you’re a Babel user and haven’t played with this easy way to integrate compile-time compilation into your code, you’re missing out. Here’s the how and why.
Kent C. Dodds
Zdog: A Pseudo-3D Engine for Canvas and SVG — A JavaScript engine for designing and rendering simple 3D models on the Web.
Metafizzy
TipTap: A Rich-Text Editor for Vue.js — Check out the live demo. It’s based on Prosemirror and you can extend it easily using Vue components.
Scrumpy
Get the Fastest Website Deployments. Get Started Free
Buddy sponsor
Pickr: A Flat, Simple, Dependency-Free Color Picker — Live demo. It’s nice.
Simon Wep
MQTT.js: An MQTT Client for Node and the Browser — MQTT is a messaging protocol commonly associated with IoT. A new release this week adds support for MQTT 5.
MQTT.js
by via JavaScript Weekly http://bit.ly/2WyzIKt
0 notes
Text
Beginning Flutter: A Hands-On Guide to App Development
Introduction:
In today's digital age, mobile applications have become an integral part of our lives, serving various purposes from entertainment to productivity. Flutter, Google's open-source UI software development kit, has emerged as a popular choice for building cross-platform mobile applications with a single codebase. This hands-on guide aims to introduce beginners to Flutter apps development company noida, providing step-by-step instructions and practical examples to kickstart their journey in creating mobile apps.
Understanding Flutter:
Flutter is a framework developed by Google for building natively compiled applications for mobile, web, and desktop from a single codebase. What sets Flutter apart is its ability to deliver high-performance applications with a beautiful user interface (UI) across multiple platforms using a single codebase written in the Dart programming language.
Getting Started:
To begin your journey with Flutter, you'll need to set up your development environment. Flutter provides comprehensive documentation on setting up Flutter on different operating systems, including Windows, macOS, and Linux. Once you have Flutter installed, you can use either Android Studio, Visual Studio Code, or any other preferred editor to start coding your Flutter app.
Building Your First Flutter App:
Let's dive into creating your first Flutter app. Start by creating a new Flutter project using the Flutter CLI or your preferred IDE. Flutter provides a set of pre-built widgets for constructing UI elements, making it easy to create visually appealing interfaces. You can customize these widgets or create your own to suit your app's requirements.
Flutter follows a widget-based architecture, where everything is a widget, from buttons and text inputs to entire screens. Understanding widgets and how to compose them is fundamental to Flutter app development. Widgets can be either stateless or stateful, depending on whether they maintain any internal state.
Navigating Between Screens:
Most mobile applications consist of multiple screens that users navigate through. Flutter provides a navigation system that allows you to move between different screens within your app seamlessly. You can use the Navigator widget to manage a stack of routes, enabling users to navigate forward and backward between screens.
Handling User Input:
User input plays a crucial role in mobile applications, whether it's tapping on buttons, entering text, or interacting with gestures. Flutter provides various widgets for handling user input, such as GestureDetector for detecting gestures like taps and swipes, TextField for accepting text input, and InkWell for adding material touch effects to UI elements.
Working with APIs:
Many mobile applications rely on data from external sources, such as APIs, to provide dynamic content. Flutter makes it easy to fetch data from APIs using packages like http or Dio. You can make HTTP requests to fetch data in JSON format and then parse and display it in your app using Flutter's built-in JSON decoding support.
State Management:
Managing state is essential for building responsive and interactive applications. Flutter offers various state management solutions, including setState, Provider, Bloc, and Riverpod. Each solution has its own strengths and is suitable for different use cases. Understanding how to manage state effectively is crucial for building scalable Flutter applications.
Testing and Debugging:
Testing and debugging are integral parts of the app development process. Flutter provides a robust testing framework that allows you to write unit tests, widget tests, and integration tests to ensure the quality and reliability of your app. You can use tools like Flutter DevTools for debugging your app and analyzing its performance.
Publishing Your App:
Once you've built and tested your Flutter app, it's time to share it with the world. Flutter makes it easy to publish your app to the Google Play Store for Android devices and the Apple App Store for iOS devices. You'll need to create developer accounts for each platform and follow their respective guidelines for publishing apps.
Conclusion:
Flutter offers a powerful and efficient framework for building cross-platform mobile applications with a single codebase. This hands-on guide has provided beginners with a comprehensive overview of Flutter apps development company noida, covering essential concepts and practical examples to help you get started on your journey as a Flutter developer. With dedication and practice, you can leverage Flutter's capabilities to create innovative and impactful mobile apps for a global audience.
0 notes
Text
HTML5 Mobile App Development with PhoneGap : 50-75% OFF Udemy Coupon Deal
New Post has been published on https://onlinelearningdiscount.com/coupons/html5-mobile-app-development-with-phonegap-50-off-coupon-deal/
HTML5 Mobile App Development with PhoneGap : 50-75% OFF Udemy Coupon Deal
Description
So you want to make dynamic mobile applications, but you don’t want to learn the native toolkits for Android, iOS or even Windows 8? This course is what you’re looking for! With this HTML5 Mobile App Development course, you will learn to create HTML5 based mobile applications that can be sold in the Apple App store, the Google Play Store or other mobile marketplaces.
If you know the basics of HTML, CSS and Javascript, you’re ready to take this exciting course. You’ll be encouraged to code along with master instructor Mark Lassoff, as you create applications that demonstrate many of the features available in the PhoneGap (aka Cordova) library. You’ll work with applications that control audio and video, use remote data from a server, and interact with the phone’s camera and microphone hardware.
If you already know HTML, CSS and Javascript, you can be well on your way to creating engaging mobile applications that you can distribute to all major phone platforms– without coding a line of Java or Objective C. Using the PhoneGap platform and the techniques demonstrated in this course you can also write your code once and distribute to both iOS and Android easily.
This course includes hours of video lectures, dozens of code and application examples and engaging lab exercises to help you retain the material once you have reviewed it.
Features
Over 54 lectures and 7 hours of content!
After completing this course you’ll be able to create functional crossplatform mobile applications using HTML5, CSS and Javsascript
Understand how to deploy applications for iOS
Understand how to deploy Android applications
Know several techniques for testing mobile apps
Understand the HTML5 document structure as applied to mobile
Be able to create multipage and multistate applications
Know how to support several screen sizes in a single application with design degredation
Understand how to apply Service Oriented Architecture Principals to Mobile Apps
Be able to send paramaterized queries to a web service/server
Be able to parse XML returned from a server
Be able to parse JSON returned from a server
Understand how to store session data on the device
Understand how to persist data on the device between sessions
Be able to play and control audio and video content
Be able to record audio through the device microphone
Take advantage of Geolocation and Movement Hardware on the device
Interact with device contacts
Understand how to use the jQuery Mobile library to create pleasing interfaces
Understand how to use jQuery Mobile Widgets
by Mark Lassoff
0 notes
Link
Ever given Google rolled out present hunt features, it has turned a renowned trend in web design. There are some fun examples online such as Michael Hart’s Google Images app. The techniques are all sincerely candid where even a web developer with assuaging jQuery knowledge can collect adult programming APIs and JSON data.
For this educational, we wish to explain how we can build an identical present hunt web application. Instead of pulling images from Google we can use Instagram that has grown tremendously in usually a few brief years.
This amicable network started off as a mobile app for iOS. Users could take photos and share them with their friends, leave comments, and upload to 3rd celebration networks such as Flickr. The group was recently acquired by Facebook and had published a formula new app for an Android Market. Their userbase has grown tremendously, and now developers can build extraordinary mini-apps usually like this instasearch demo.
View Demo
Download Source
Obtaining API Credentials
Before formulating any plan files we should initial demeanour into a ideas behind Instagram’s API system. You will need a comment to entrance a developer’s portal that offers useful instructions for beginners. All we need to query a Instagram database is a “Client ID”.
In a tip toolbar click a Manage Clients link, afterwards click an immature symbol “Register a New Client”. You’ll need to give a concentration a name, brief description, and website URL. The URL and Redirect URI can be the same value in this instance usually since we don’t need to substantiate any users. Just fill in all a values and beget a new concentration detail.
You’ll see a prolonged fibre of characters named CLIENT ID. We will need this pivotal after on when building a backend script, so we’ll lapse to this section. For now we can start the construction of a jQuery present hunt application.
Default Webpage Content
The tangible HTML is unequivocally slim for a volume of functionality we’re using. Since many of the picture information is appended boldly we usually need a few smaller elements inside a page. This formula is found inside a index.html file.
!doctype html html lang="en" head meta http-equiv="Content-Type" content="text/html; charset=utf-8" titleInstagram Photo Instant Search App with jQuery/title meta name="author" content="Jake Rocheleau" integrate rel="stylesheet" type="text/css" href="style.css" book type="text/javascript" src="https://ajax.googleapis.com/ajax/libs/jquery/1.7.2/jquery.min.js"/script book type="text/javascript" src="ajax.js"/script /head body div id="w" territory id="sform" smallNote: No spaces or punctuation allowed. Searches are singular to one(1) keyword./small contention type="text" id="s" name="s" class="sfield" placeholder="Enter a hunt tag..." autocomplete="off" /section territory id="photos"/section /div /body /html
I’m regulating a latest jQuery 1.7.2 library along with dual outmost .css and .js resources. The contention hunt margin has no outdoor form coupling since we don’t wish to ever contention a form and means a page reload. we have infirm a few keystrokes inside a hunt margin so that there are some-more singular restrictions when users are typing.
We will stock all a print information inside a centre territory ID #photos. It keeps a simple HTML purify and easy to read. All a other inner HTML elements will be combined around jQuery, and also private before any new search.
Pulling from an API
I’d like to start initial by formulating an energetic PHP book and afterwards pierce into jQuery. My new record is named instasearch.php that will enclose all a critical backend hooks into an API.
?php header('Content-type: application/json'); $client = "YOURCLIENTIDHERE"; $query = $_POST['q']; $api = "https://api.instagram.com/v1/tags/".$query."/media/recent?client_id=".$client; function get_curl($url) { if(function_exists('curl_init')) { $ch = curl_init(); curl_setopt($ch, CURLOPT_URL,$url); curl_setopt($ch, CURLOPT_RETURNTRANSFER, 1); curl_setopt($ch, CURLOPT_HEADER, 0); curl_setopt($ch, CURLOPT_SSL_VERIFYHOST, 0); curl_setopt($ch, CURLOPT_SSL_VERIFYPEER, 0); $output = curl_exec($ch); relate curl_error($ch); curl_close($ch); lapse $output; } else{ lapse file_get_contents($url); } }
The initial line denotes that a piece of lapse information is formatted as JSON instead of plaintext or HTML. This is required for JavaScript functions to review information properly. Afterwards, I’ve got a few variables setup containing a concentration customer ID, user hunt value, and a final API URL. Make certain we refurbish a $client fibre value to compare your possess application.
To entrance this URL information we need to parse a record essence or use cURL functions. The tradition duty get_curl() is usually a tiny bit of formula that checks opposite a stream PHP configuration.
If we do not have cURL activated this will try to activate a underline and lift information around their possess functions library. Otherwise, we can simply use file_get_contents() that tends to be slower, though still works usually as well. Then we can indeed lift this information into a non-static like so:
$response = get_curl($api);
Organizing Returning Data
We could usually lapse this strange JSON response from Instagram with all a information installed up. But there is so many additional information and it’s unequivocally irritating to loop by everything. we cite to classify Ajax responses and lift out accurately that pieces of information we need.
First we can set up a vacant array for all images. Then inside a foreach() loop, we’ll lift out a JSON information objects one-by-one. We usually need three(3) specific values that are a $src(full-size picture URL), $thumb(thumbnail picture URL), and $url(unique print permalink).
$images = array(); if($response){ foreach(json_decode($response)-data as $item){ $src = $item-images-standard_resolution-url; $thumb = $item-images-thumbnail-url; $url = $item-link; $images[] = array( "src" = htmlspecialchars($src), "thumb" = htmlspecialchars($thumb), "url" = htmlspecialchars($url) ); } }
Those who are unknown with PHP loops might get mislaid in a process. Don’t concentration so many on these formula snippets if we don’t know a syntax. Our array of images will enclose during many 16-20 singular entries of photos pulled from many new announcement dates. Then we can outlay all this formula onto a page as a jQuery Ajax response.
print_r(str_replace('\/', '/', json_encode($images))); die();
But now that we’ve had a demeanour behind a scenes we can burst into frontend scripting. I’ve combined a record ajax.js that contains a integrate eventuality handlers tied on to a hunt field. If you’re still following adult compartment now afterwards get vehement we so tighten to completion!
jQuery Key Events
When initial opening a request ready() eventuality I’m environment adult a integrate variables. The initial dual act as approach aim selectors for a hunt margin and photos container. I’m also regulating a JavaScript timer to postponement a hunt query until 900 milliseconds after a user has finished typing.
$(document).ready(function(){ var sfield = $("#s"); var enclosure = $("#photos"); var timer;
There are usually dual categorical duty blocks we’re operative with. The primary handler is triggered by a .keydown() eventuality when focused on a hunt field. We initial check if a pivotal formula matches any of a banned key, and if so annul a pivotal event. Otherwise transparent a default timer and wait 900ms before pursuit instaSearch().
/** * keycode glossary * 32 = SPACE * 188 = COMMA * 189 = DASH * 190 = PERIOD * 191 = BACKSLASH * 13 = ENTER * 219 = LEFT BRACKET * 220 = FORWARD SLASH * 221 = RIGHT BRACKET */ $(sfield).keydown(function(e){ if(e.keyCode == '32' || e.keyCode == '188' || e.keyCode == '189' || e.keyCode == '13' || e.keyCode == '190' || e.keyCode == '219' || e.keyCode == '221' || e.keyCode == '191' || e.keyCode == '220') { e.preventDefault(); } else { clearTimeout(timer); timer = setTimeout(function() { instaSearch(); }, 900); } });
Every time we refurbish a value it’ll automatically go fetch new hunt results. There are also many of other pivotal codes we could have blocked from triggering a Ajax duty – though too many for inventory in this tutorial.
The Ajax instaSearch() Function
Inside my new tradition duty we are initial adding a “loading” category onto a hunt field. This category will refurbish a camera idol for a new loading gif image. We also wish to dull any probable information leftover within a photos section. The query non-static is pulled boldly from a stream value entered in a hunt field.
function instaSearch() { $(sfield).addClass("loading"); $(container).empty(); var q = $(sfield).val(); $.ajax({ type: 'POST', url: 'instasearch.php', data: "q="+q, success: function(data){ $(sfield).removeClass("loading"); $.each(data, function(i, item) { var ncode = 'div class="p"a rel="external" href="'+data[i].src+'" class="fullsize" target="_blank"img src="img/full-image.png" alt="fullsize"/a a rel="external" href="'+data[i].url+'" target="_blank"img src="'+data[i].thumb+'"/a/div'; $(container).append(ncode); }); }, error: function(xhr, type, exception) { $(sfield).removeClass("loading"); $(container).html("Error: " + type); } }); }
If you’re informed with a .ajax() duty afterwards all these parameters should demeanour familiar. I’m flitting a user hunt parameter “q” as a POST data. Upon success and disaster, we mislay a “loading” category and attach any response behind into a #photos wrapper.
Within a success duty, we are looping by a final JSON response to lift out particular div elements. We can accomplish this looping with a $.each() duty and targeting a response information array. Otherwise, a disaster process will directly outlay any response blunder summary from an Instagram API. And that’s unequivocally all there is to it!
View Demo
Download Source
Final Thoughts
The Instagram group has finished a smashing pursuit scaling such an extensive application. The API can be delayed during times, though response information is always scrupulously formatted and unequivocally easy to work with. we wish this educational can denote that there is a lot of energy operative off 3rd celebration applications.
Unfortunately a stream Instagram hunt queries do not concede some-more than 1 tab during a time. This is tying to a demo, though it positively doesn’t mislay any of a charm. You should check out a live instance above and download a duplicate of my source formula to play around with. Additionally, let us know your thoughts in a post contention area below.
0 notes
Text
March 10, 2020 at 10:00PM - The Ultimate Learn to Code 2017 Bundle (95% discount) Ashraf
The Ultimate Learn to Code 2017 Bundle (95% discount) Hurry Offer Only Last For HoursSometime. Don't ever forget to share this post on Your Social media to be the first to tell your firends. This is not a fake stuff its real.
Ruby on Rails is one of the most popular web applications development frameworks, and one that is hugely valuable for aspiring developers to learn. This course is designed for students of all levels and backgrounds, giving you an in-depth tutorial on Ruby on Rails, and specifically Rails 5, the newest release. You’ll come to grips with some of the newest features, including building real-time apps, and master some basic and more advanced development techniques.
Access 174 lectures & 20 hours of content 24/7
Learn how to build web apps using Ruby on Rails & become proficient in back-end development
Build automated test suites for complex web apps
Become a confident web app developer
Compete for the highest paying junior developer jobs
Work w/ real-time features thanks to the introduction of ActionCable in Rails 5
If you’re interested in pursuing a career in web development, then it is imperative that you become proficient in JavaScript. Almost every digital development project involves some level of JavaScript, and experts are perpetually in demand. Whether you’re a business owner, a freelancer, or seek to work in the web dev industry, this comprehensive course will get you started on the right path. Once you complete the course, you’ll be eligible to sit for the JavaScript Specialist Designation exam, and be armed with all the knowledge you need to receive a passing grade.
Access 96 lectures & 8.5 hours of content 24/7
Learn how to output to the console & to the browser window by manipulating the DOM
Understand how to use variables, perform arithmetic, use operators, numbers, & Booleans, & much more w/ JavaScript
Code for JavaScript events & callback functions
Create arrays, strings, string functions, & more
Process text w/ JavaScript regular expressions
Access web services w/ the xmlHTTPRequest() Object
Discover JSON notation & parsing JSON content
Few programming languages provide you with the flexibility and pure power of Python, which is why many professionals recommend that beginner programmers learn Python first. Due to its relatively simply syntax and extensive degree of general-purpose use, it just makes sense to know. Python is commonly used for server side programming for complex web apps or as a middle tier language providing web services or a communication layer with larger ecommerce systems. All that is to say you can do a lot with Python, and this course will show you just how much.
Access 76 lectures & 5.5 hours of content 24/7
Explore some of Python’s many libraries for everything from games & graphics to complex mathematics
Study & modify code on your own to cement each topic
Familiarize yourself w/ Python syntax & real problem solving w/ Python
Complete a comprehensive project that integrates a number of different skills that are a part of core Python
Java is the most in-demand and highest paying programming language on earth, and regardless of your coding experience, you can become an expert with it in this course. From absolute basics to advanced concepts, this course takes you through descriptions of what Java can do, and teaches you how to make it work for you.
Access 62 lectures & 9 hours of content 24/7
Create a project, compile, & execute your first Java program
Learn useful shortcuts that will cut down on your programming time
Understand variables, operators, conditions, arrays, loops, & more
Take a deep dive into Object Oriented Programming
Discuss Lambda Expressions & generic types
HTML and CSS are two of the most essential programming languages for website design, allowing users to interact with site pages seamlessly and productively. In this example-driven course, you’ll learn how to create responsive websites that clients and users will love. Whether you’re aspiring to be a professional web designer or you just want to spruce up your blog, this course is an excellent introduction.
Access 57 lectures & 4.5 hours of content 24/7
Get an introduction to the basics of HTML5 & CSS3
Learn new multimedia updates in the newest versions of HTML & CSS
Work w/ HTML5 new forms elements & the canvas tag
Build a complete, professional looking webpage using HTML5 & CSS3 techniques
Start building Angular 2 apps within minutes of this comprehensive, 7 hour course. You’ll learn this exciting new framework with hands-on lessons, and by building actual, real-world applications. Approved by Google Developer Expert, Todd Motto, this is the one-stop shop to master Angular 2.
Access 156 lectures & 7 hours of content 24/7
Master the core Angular 2 concepts & how to use them in building real-world apps
Understand & resolve common Angular 2 errors
Build single page applications (SPA)
Learn ways to write cleaner, more maintainable code, & build reusable components
Use Reactive Extensions & Observables to handle asynchrony
Connect to backend services & APIs
You don’t need to learn both Java and Swift to build apps for Android and iOS. With Xamarin, you can use the C# programming language to build fully-functional apps for iOS and Android at the same time. Because Xamarin developers can stream the app-building process so much, companies are demanding them in a big way. This is the perfect beginner course to put you on the path to making big money in Xamarin development.
Access 48 lectures & 5.5 hours of content 24/7
Learn how to install Xamarin for free
Explore basic C# programming
Create basic apps w/ code sharing tasks, hints & tips
Build complex apps like a magnet detector & music player
You do a lot with your iPhone apps, but wouldn’t it be cool to build your own apps, as well? The best way to learn is by doing and this course will throw you into the fire, teaching you how to create your own iOS 10 apps in Xcode 8 and Objective-C, from concept to submission to the App Store. You’ll utilize brand new features as well as cross-platform standards as you iron down the basics of mobile app development and start working towards new career possibilities.
Access 104 lectures & 7.5 hours of content 24/7
Understand Xcode 8, iOS 10, Interface Builder, Simulator, & project types
Get a full guide to creating full featured apps in Objective-C
Create over 20 real iOS 10 apps in both Xcode 8 & Objective-C
Discover how to build for universal device & screen size support
Earn ad revenue & incorporate in-app purchases to get paid on your apps
Learn Core Data & camera support applications
SQL is the most popular database programming language in the world today, and has been for many years. In this course, you’ll learn the fundamentals of writing SQL to perform a variety of data manipulations. Considering it’s used by many, many Fortune 500 companies and startups of all sizes across the globe, learning SQL is a major boost to your resume.
Access 35 lectures & 4 hours of content 24/7
Get a firm grasp of SQL programming fundamentals
Learn about ASP.NET, IIS, & Visual Studio
Create & change tables using SQL
Make SQL Server work w/ ASP.NET
Join tables seamlessly
When it comes to web programming, there are a lot of tools you can learn and use to make your workflow more efficient and your products more exciting. Getting started can be daunting when you know just how much there is to learn. However, the barriers to learning are lower than ever, and this immersive course will give you a crash course into a variety of languages and tools, plus how to integrate them, giving you an excellent foundation for further learning.
Access 67 lectures & 10.5 hours of content 24/7
Add dynamic features to a website using JavaScript & jQuery
Transfer information between web pages using JSON
Layout websites more efficiently w/ CSS & HTML
Power the back-end of a website w/ C#
Work w/ data more efficiently using SQL Lite
from Active Sales – SharewareOnSale https://ift.tt/2vzgc4O https://ift.tt/eA8V8J via Blogger https://ift.tt/2vgtR0W #blogger #bloggingtips #bloggerlife #bloggersgetsocial #ontheblog #writersofinstagram #writingprompt #instapoetry #writerscommunity #writersofig #writersblock #writerlife #writtenword #instawriters #spilledink #wordgasm #creativewriting #poetsofinstagram #blackoutpoetry #poetsofig
0 notes
Text
Top 10 Most Common Mistakes That Android Developers Make: A Programming Tutorial
Common Mistake #1: Developing for iOS To my great pleasure, this Android mistake is far less common nowadays (partially because clients are beginning to realize that the days when Apple was setting all the design standards are long gone). But still, every now and then, we see an app that is an iOS clone.
Don’t get me wrong, I’m not an Android programming evangelist! I respect every platform that moves the mobile world a step forward. But, it’s 2014 and users have been using Android for quite a while now, and they’ve grown accustomed to the platform. Pushing iOS design standards to them is a terrible strategy!
Unless there is a super good reason for breaking the guidelines, don’t do it. (Google does this all the time, but never by copy-pasting.)
Here are some of the most common examples of this Android mistake:
You should not be making static tabs, and they don’t belong on the bottom (I’m pointing at you Instagram). System notification icons should not have color. App icons should not be placed inside a rounded rectangle (unless that’s your actual logo ex. facebook). Splash screens are redundant beyond the initial setup/introduction. Do not use them in other scenarios. Lists should not have carets. These are just a few of the many other small things that can ruin the user experience.
Common Mistake #2: Developing for Your Android Device Unless you are building a kiosk/promo app for a single tablet, chances are your Android app won’t look good on every device. Here are a few Android programming tips to remember:
Density-independent pixels (dp) are different than normal pixels (px). Resources are included multiple times to account for different densities and orientations. 9-patch drawables are stretched to fit the screen. There are literally thousands of possible scenarios, but after a while you develop a sense for covering them all with a handful of cases.
You don’t own thousands of devices? Not a problem. The Android Emulator is super good in replicating physical devices. Even better, try out Genymotion, it’s lightning fast and comes with a lot of different popular preset devices.
Also, have you tried rotating your device? All hell can break loose…
Common Mistake #3: Not Using Intents Intents are one of Android’s key components. It’s a way of passing data between different parts of the app or, even better, different apps on the system.
Let’s say you have a gallery app that can share a download link to some images via SMS. Which of the two options seems more logical?
Option 1:
Request the SEND_SMS permission.
<uses-permission android:name="android.permission.SEND_SMS" /> Write your own code for sending SMS using the SmsManager. Explain to your users why your gallery app needs access to services that can cost money, and why they have to grant this permission to use your app. Option 2:
Start an SMS Intent and let an app designed for SMS do the work
Intent sendIntent = new Intent(Intent.ACTION_VIEW); sendIntent.setData(Uri.parse("sms:" + telephoneNumber)); sendIntent.putExtra("sms_body", x); startActivity(sendIntent); In case that you have any doubts, best solution is option 2!
This approach can be applied to almost anything. Sharing content, taking pictures, recording video, picking contacts, adding events, opening links with native apps, etc.
Unless there is a good reason to make a custom implementation (ex., a camera that applies filters), always use Intents for these scenarios. It will save you a lot of programming time, and strip the AndroidManifest.xml of unnecessary permissions.
Common Mistake #4: Not Using Fragments A while ago in Honeycomb, Android introduced the concept of fragments. Think of them as separate building blocks with their own (rather complex) life cycles that exist inside an Activity. They help a lot with optimizing for various screens, they are easily managed by their parent activity, can be reused, combined and positioned at will.
Launching a separate activity for each app screen is terribly inefficient, since the system will try to keep them in memory as long as it can. Killing one won’t free the resources used by the others.
This Android programming tutorial recommends the proper use of fragments to make your app more efficient.
Unless you want to dig deep into the Android core and read this article, advocating against fragment usage, you should use fragments whenever possible. It basically says that fragments and cursor loaders have good intended purpose, but poor implementation.
Common Mistake #5: Blocking the Main Thread The main thread has a single purpose: keeping the user interface responsive.
Although the science behind measuring the frame rate our eyes/brain can perceive is complex and influenced by a lot of factors, a general rule is that anything below 24 fps with delay greater than 100 ms won’t be perceived as smooth.
This means that the user’s actions will have a delayed feedback, and the Android app you have programmed will stop responding. Stripping the user of his control over the app leads to frustration, frustrated users tend to give very negative feedback.
Even worse, if the main thread is blocked for a while (5 seconds for Activities, 10 for Broadcast Receivers), ANR will happen.
As you learn Android programming, you will come to know and fear this message. Follow these Android programming tips to minimize this occurrence.
This was so common in Android 2.x, that on newer versions the system won’t let you make network calls in the main thread.
To avoid blocking the main thread, always use worker/background threads for: 1. network calls 2. bitmap loading 3. image processing 4. database querying 5. SD reading / writing
Common Mistake #6: Reinventing the Wheel “OK, I won’t use the main thread. I’ll write my own code that communicates with my server in a background thread.”
No! Please don’t do that! Network calls, image loading, database access, JSON parsing, and social login are the most common things you do in your app. Not just yours, every app out there. There is a better way. Remember how Android has matured and grown as a platform? Here’s a quick list of examples:
Use gradle as a build system. Use Retrofit / Volley for network calls. Use Picasso for image loading. Use Gson / Jackson for JSON parsing. Use common implementations for social login. If you need something implemented, chances are it’s already written, tested and used widely. Do some basic research and read some Android programming tutorials before writing your own code!
Common Mistake #7: Not Assuming Success Great. We have learned that there is a better way for handling long running tasks, and we are using well documented libraries for that purpose. But the user will still have to wait. It’s inevitable. Packages are not sent, processed and received instantly. There is a round trip delay, there are network failures, packages get lost, and dreams get destroyed.
But all this is measurable. Successful network calls are far more likely than unsuccessful ones. So why wait for server response before handling the successful request? It’s infinitely better to assume success and handle failure. So, when a user likes a post the like count is immediately increased, and in unlikely event that the call failed, the user is notified.
In this modern world immediate feedback is expected. People don’t like to wait. Kids don’t want to sit in a classroom obtaining knowledge that has uncertain future payoff. Apps must accommodate to the user’s psychology.
Common Mistake #8: Not Understanding Bitmaps Users love content! Especially when the content is well formatted and looks nice. Images, for instance, are extremely nice content, mainly due to their property of conveying a thousand words per image. They also consume a lot of memory. A lot of memory!
Before an image is displayed on the screen, it has to be loaded into the memory. Since bitmaps are the most common way to do this, we’re going to provide an Android programming guide for the whole process:
Let’s say you want to display an image on your screen that you just took with your camera. The total memory needed for this is calculated with the following formula: memory_needed_in_bytes = 4 * image_width * image_height;
Why 4? Well, the most common / recommended bitmap configuration is ARGB_8888. That means that for each pixel we draw, we need to keep 8 bits (1 byte) for the alpha, the red, the greed and the blue channel in memory, in order to properly display it. There are alternatives, like the RGB_565 configuration that requires half the memory than ARGB_8888, but loses the transparency and the color precision (while maybe adding a green tint).
Let’s assume you have a brand new device with full HD screen and 12 MP camera. The picture you just took is 4000x3000 pixels large and the total memory needed to display it is: 4 bytes * 4000 * 3000 = 48 MB
48 megabytes of your RAM just for a single image!? That’s a lot!
Now let’s take the screen resolution into consideration. You are trying to show a 4000x3000 image on a screen that has 1920x1080 pixels, in worst case scenario (displaying the image full screen) you shouldn’t allocate more than 4 * 1920 * 1080 = 8.3 MB of memory.
Always follow the Android programming tips for displaying bitmaps efficiently:
Measure the view you’re showing your images in. Scale / crop the large image accordingly. Show only what can be displayed. Common Mistake #9: Using Deep View Hierarchy Layouts have an XML presentation in Android. In order to draw content, the XML needs to be parsed, the screen needs to be measured, and all the elements need to be placed accordingly. It’s a resource- and time-consuming process that needs to be optimized.
This is how the ListView (and more recently the RecyclerView) works.
If a layout has been inflated once, the system reuses it. But still, inflating the layout must happen at some point.
Let’s say you want to make a 3x3 grid with images. One way of doing this is a vertical LinearLayout containing 3 LinearLayouts with equal weight, each of them containing 3 ImageViews with equal weight.
Some Android programming beginners don’t always make the best use of LinearLayouts.
What do we get with this approach? A warning that “nested weights are bad for performance”.
There is a saying in the Android programming world, that I just made up: “With little effort all hierarchy can be flattened”.
In this case RelativeLayout or GridLayout will efficiently replace the nested
Common Mistake #10: Not Setting the minSdkVersion to 14 Well, this is not a mistake, but it is bad practice.
Android 2.x was a huge milestone in developing this platform, but some things should be left behind. Supporting older devices adds more complexity for code maintenance and limits the development process.
The numbers are clear, the users have moved on, the developers shouldn’t stay behind.
I’m aware that this doesn’t apply for some big markets with old devices (ex. India), and setting the minSdkVersion to 14, on the Facebook App, means leaving couple of million users without their favorite social network. But, if you are starting fresh and trying to create a beautiful experience for your users, do consider eliminating the past. Users that don’t have the resources, or feel the need to upgrade their device/OS, won’t have the incentive to try out a superior version of your Android app and ultimately spend money on it.[Source]-https://www.toptal.com/android/top-10-most-common-android-development-mistakes
0 notes