#cell shade tutorial
Explore tagged Tumblr posts
Visit Tumblr Blog
Explore Tumblr blogs with no restrictions, modern design and the best experience.
Last Seen Tumblr Blogs


Fun Fact
Premium Tumblr themes are available from anywhere between $9 to $49.
Text
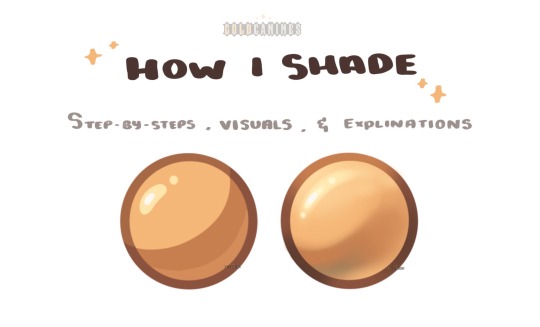
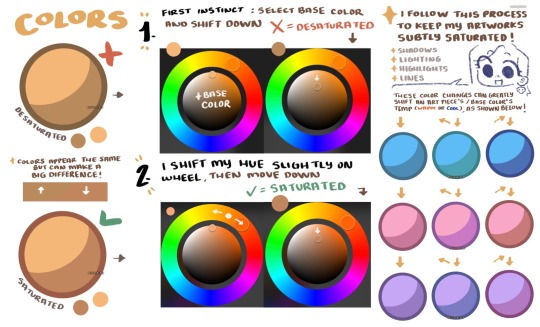
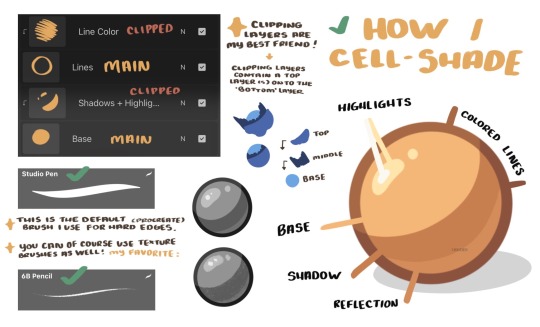
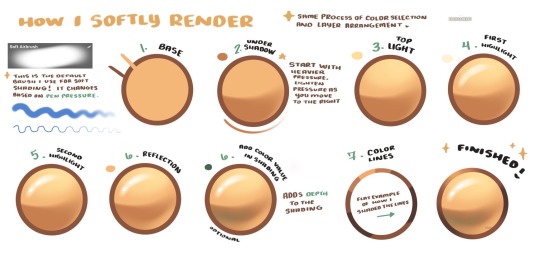
GoldCanines: “I had lots of questions on how I go about my shading ! ✨
Here is how I pick my colors, determine my layers, and lay out my shading !”
Source: GoldCanines on Twitter
#art tutorial#digital art#art reference#tutorial#art tips#illustration#drawing tips#shading#drawing color#drawing colors#color#colour#cell shaded#cell shade#cell shade tutorial
2K notes
·
View notes
Text

13 notes
·
View notes
Text
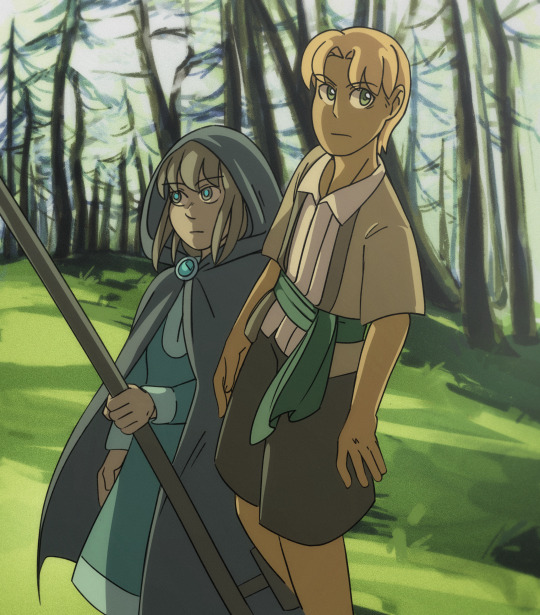
Vera and Zephyr, my oc duo of 'somewhat siblings' move around from town to town a lot. I like the bright overcast whiteblue of the sky of late fall.
#my art#my ocs#i kinda like the look of cell shading on top of complex backgrounds.. it's fresh looking#i followed a 'draw your own anime screenshot' tutorial for parts of this#perspective feels a little wonk#it never snows where my ocs live unless they go up into the mountains though i think in winter even their grass would be less green#maybe zeph would have to invest in long pants and a jacket haha he'd hate the cold.
4 notes
·
View notes
Text
Brain: The man was engrossed in that book so long he grew chest hair before he finished it -Reads text below- Oh. Yeah that makes sense.
rough // final
#LISTEN#I could see Gale reading that long#HE ADMITS to spending hours upon hours#From dusk until dawn#Slight case of lycanthopy could help explain it too#Also the way you shade folds OP is really good if you happen to have a tutorial that'd be amazing#I never quite figured out how to do lineless like that#So I just do sh*tty vector and cell shading
9K notes
·
View notes
Text

My water is so wet. Ah... Now to update the other shaders.
#I'm making shader graphs because I don't like relying on others for any aspect of my game.#So far so good! It's just slow. Very worth it though.#Next I'm redoing the cell shading and then I kill tutorial island.#addendum: Skybox needs editing for lore reasons also but that can wait.#kitbadev
0 notes
Text
Bastión X-Men 97 Timelapse Modelado 3D
Hello friends! Coffee in hand, let's enjoy together the creation of the fearsome Bastion from X-Men 97. Greetings
youtube
1 note
·
View note
Text

Watched fourleafisland’s cell shading and dynamic pose tutorials and I got inspired so I drew rivulet. Live laugh love rain world
#fandom art#2025#this didn’t come out exactly how I wanted it to but it’s ok#im still proud of it though :)#me when I’m learning and having fun#back on my rain world shit also. I made like 2 tma posts and then immediately went back to my comfort zone#I WILL post more tma art I prommy. just. not now#rivulet rw#rw rivulet#rain world rivulet#fan art#rain world fan art#rain world#rivulet#rain world downpour#rw downpour#rw downpour fanart#rain world fanart#rivulet fanart#getting all those tags in there.
439 notes
·
View notes
Note
I found your Tumblr recently and omg I love your art style., it's so inspiring :D I just subscribed to your patreon because I need more haha.
I was wondering if you have any tips for colouring your artwork?
Thanks so much for the extra support! I’ll go into rendering a face with a reference pic below (because I think that’s what people practice/look at the most) with an absolutely quick and dirty breakdown
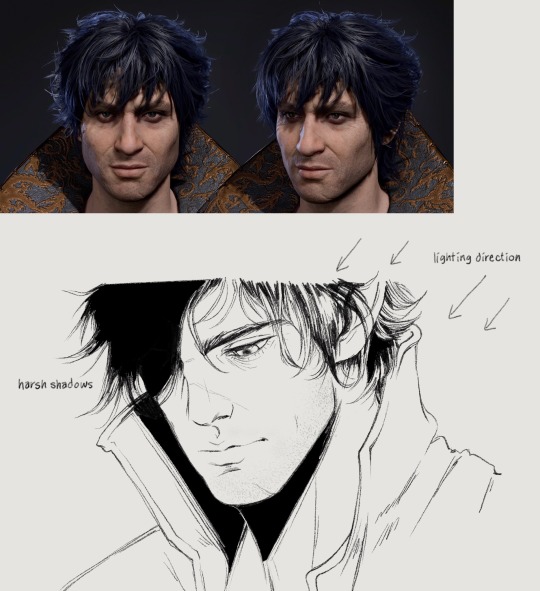
I already incorporate the heaviest shadows into my lineart a lot of the time, but I still have to think about shading where the light hits when coloring happens

Since this is coming from top right, the left half of his face will also be heavily shadowed. Understanding 3d planes and how it affects a shadow assists with getting lighting down correctly. I’ve outlined the obvious quadrants that I’ll typically shade with the darkest color. But before that you have to lay down a flat, a color I grabbed from the front of Gortie’s cheek- I think this is a very mid tone. Using a mid tone first is how I think most everyone colors/shades. I can’t say this is how I always do it, sometimes I like to work dark to light, sometimes I start coloring from the top or bottom or side, it depends on what feels good and I get distracted very easily. If I rewatch my timelapses I can see where I got bored of an area for a while and jump somewhere else/come back later

If I know I want to fully render something I don’t bother with cell shading. Not saying this is a good practice, in fact don’t do this until you have lighting practice under your belt.
Colors- go with the reference picture and grab colors from the areas of the face that you’re shading, but increase or decrease the saturation as needed
Forehead- I darken the hairline and add shadows for the loose strands of hair. This is something simple I’ve found elevates the 3d aspect
Eyes- look at eye makeup tutorials, no joke. It’ll show you where to add highlights to make the eyes pop. This is a stylistic choice, but I like my characters looking like they walked out of Sephora. I’ll give them eyeshadow and add a highlight to the upper lid and the inner tear trough. For the actual iris I shade really simply just making the lower part brighter than the top
Nose- bring the bridge forward with the lightest color, add a shine to the tip, darken the side and carry that to the cheek
Lips- upper lip dark, lower lip not, add a shine, I dunno what else to say about this sorry 💧
Chin- shade under the lip and bring the shadow down in a crescent shape
Everything else is sticking to the personal character’s features, like shading his cheekbone and laugh line. I also add a blush tone over the cheeks and nose (again stylistic)
Link to Timelapse: https://youtube.com/shorts/q7E-g05W0m4?si=shZFpHQwNuyO6Qt1
youtube
I’ll try to do an actual infographic later when I have time because I keep getting asked about coloring. Just know that I’m still learning new stuff every day and these things should be taken as a “this is what I’m doing now” sort of thing!
153 notes
·
View notes
Text
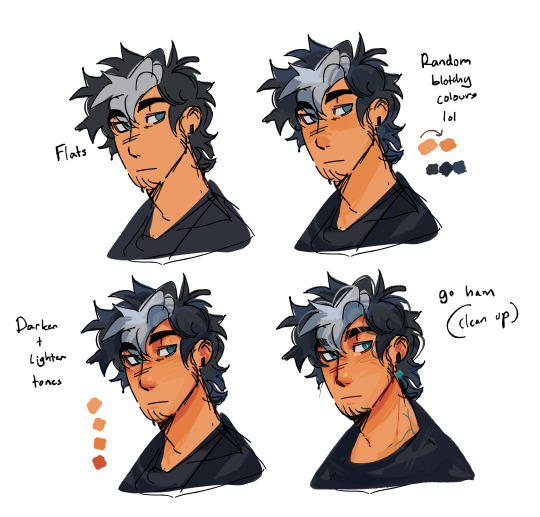
Ice's sigma TWST hair shading tutorial 🔥🔥🔥
Since like I feel a lot of ppl would like to know how I shade my hair in the twst style so well (mostly my friends lwk) here's a half-assed tutorial yayayayya /silly
ALSO I USE IBISPAINT IN CASE ANY1 NEEDS TO KNOW THAT
I'll be using uhhh Layla's hair for this soooo blah
Anw step 1: Line art !!! This isn't the best but like who gaf this is jst for a tutorial anw

Step 2: Base colours !! I usually ahh colourpick from other twst characters who have the hair colours I need but you can use your own colours if you want HAHA

Step 3: This was taught by a friend of mine but get a darker ver of the base colour and airbrush it at the ends of the hair ! (From this step on, all layers should be clipped ,,, or not, that's jst how I do it lol)

There's also the this at the back ig ? Idek ,,, LMAO

Step 4: Sharp shading / cell shading !!! "Ice, how do I do that?" You may ask ! ,,, unfortunately I have no tips to give you for that for I just draw in random lines and pray to whatever god there may be up there that it looks not horrible so uh good luck soldier 🫡🫡🫡

Step 5: Making the thingies softer and fainter or however you describe them -,,, I get the eraser tool and set it to an opacity in the 8-10% range and abuse the HELL out of it :3 Anw I jst erase at the ends jst enough so that the general shape is still mostly intact but the ends seem to get fainter (+ Erase some parts at the bangs to make the bottom ends curved ,,,? IDK HOW TO DESCRIBE IT GAH)

Step 6: Make another layer and set it to an opacity of abt in the 30-35% range, and use the exact same colours you used for the sharp / cell shading layer ! Try to uhhh fill out any leftover space

Step 7: Repeat step 5 but on the new low opacity layer !

Step 8: HAIR SHINIESSSS !! I personally jst like make vaguely diamond shaped blobs and then use an eraser (full opacity) to chip away at it until it become a sharper diamond ! When it comes to curves / the far ends of the hair make only one side of the diamond be pointed and make the other more like a half circle ,,, if you get it LOL

ANYWAY THERE'S THE FINISHED PRODUCT !!!
Ty for listening to my dumbass yap hopefully it was understandable LMAOOO
If any1 wants the whole speedpaint here it is under the cut
#Snowflakes#Freezer Thoughts#twst#twst art#twst oc#twst fanart#twst yuu#disney twst#twst wonderland#disney twisted wonderland#twistedwonderland#twisted wonderland#art#render#rendering#hair shading#art tutorial#tutorial
31 notes
·
View notes
Text
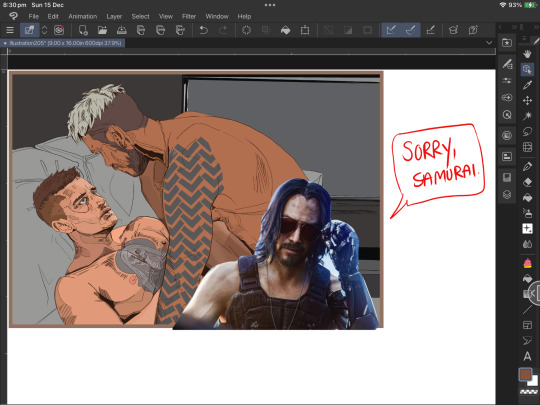
Another WIP update, trying to practice cell shading!
(I watched a bunch of tutorials on YouTube and I still don’t know if I get it tbh!)
#cyberpunk#cyberpunk 2077#v cyberpunk#cyberpunk v#male v cyberpunk#v cyberpunk 2077#v cp77#v cp2077#male v x kerry#kerry and v#kerry/v#v x kerry#kerry cyberpunk#cyberpunk kerry#kerry eurodyne#kerry x v#my art
55 notes
·
View notes
Note
for ur study buddy stream tonight i was wondering if youd be willing to do a small tutorial on how u shade/render :3
i could totally do that!! i dont do a lot of like, rendering shading so much as i cell shade, but that could be a really simple/fun tutorial to do.
do you (general) have any subject youd like to see me draw for it? preferably a single character or object/subject
98 notes
·
View notes
Note
Found you through your UT post and oh my stars your use of colors is stunning !! I want to reference your art/coloring to enhance my own, do you have any tips?
Hello :3 sorry for my late reply haha! I was putting this off cuz I don't really follow a lot of basic rules in colouring cuz im lazy BUT . I will however B] gladly show you my awfully rushed attempts at trying to show my process! Featuring my man Nick
Again, my colourings extremely stylized, if you're looking for accurate ways to study I rlly suggest looking up some tutorials on YT or smth haha When I shade, I like to jump between cool and warm tones a lot! I know people often cell shade or do black and whites but im cringe and free
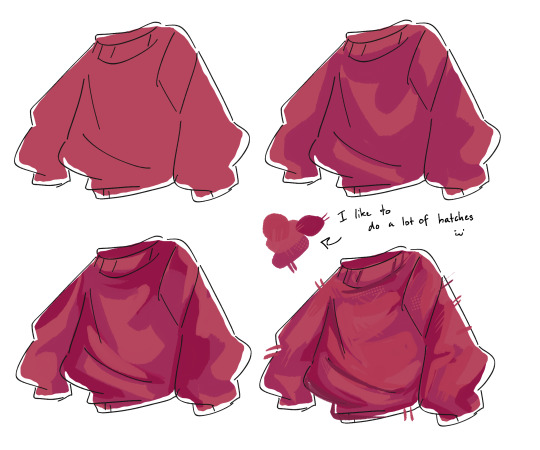
I really rely on the rendering/painting process a lot for my work <:3 Your tones are obv gonna depend on your environment and lighting, but let's pretend we're just doodlin smth random I literally just overlay colours until I'm like "Yes, this looks great to me!" (I say thru tears)

You can see in a lot of my work that I just do a lot of overlapping, usually using 3-4 different shades/tones to colour something specifically Most of the time colouring the lineart or just going over the top of everything with hatches or random lines can make a piece look really good haha I'm sorry if this is hard to understand at all! I'm no good at tutorials or explaining what I do </3 I just go ham and call it a day haha
You're more than welcome to reference my art whenever you colour! :) I think if you wanna get things more accurate though there are plenty tuts on Youtube and around Tumblr! Ty for ur kind words <3
#ask#sorry this is a word dump#anyone who makes fun of my awful spelling or grammar LEAVE ME ALONE IM DYSLEXIC AND TRYING GJRNGKJRNG#anyways#unhelpful aubs but u know we try#dont reblog my misery UHBFEJEFKJ
104 notes
·
View notes
Note
Hi! Have you ever posted any speedpaints or process walk-throughs anywhere? I’ve been doing master studies of artists I admire/want to draw like lately, which is usually massively helped by things like that!
Hello!!! i have done a couple of tutorials, theyre a liiittle old but most of it probably still applies
rendering:
anatomy
splatoon hair
That's all I've got here, and there's also this one i've never posted about how i pick colours!


as for speedpaints, there's very few on my tiktok (@ canyje11yfish), but i can post one for any of my drawings, if there's a specific speedpaint anyone wants just ask me ^_^ hope this helps!!
20 notes
·
View notes
Note
Hello!!! I love your art so much, especially the way you render!! Do you have any tips, tutorials, etc on rendering?? Be as detailed or curt as you like, I'm just hoping to improve my skills -- and I hope to see more art from you, in any form!!! You're a fantastic artist !!!! Have a good day :)
Sorry for the delay in answering this, I wanted to answer it well!!!
Here's my typical 5-step process:
flats
he has been flatted. You'll notice I also colored the lineart at this stage as well! Also, I do work with the background at the same time, but I have hidden it here for simplicity.
2. Cell shade shadows

I used to skip cell shading and just ball with my rendering, but I have found starting out like this is much faster!!
3. Airbrush shadows and colors
I did two things here, one is just a touch of airbrushing the colors into eachother, to help make everything more harmonious. The other is to airbrush colors onto my shadows! I set that layer to multiply, and mess around until something looks a little like I want.

4. Painting

This is the time sink - there's no getting around it, it just takes forever!! It's a lot about making the dark areas darker, and artifically injecting some color diversity - I like to diversify shades, and just slap on slight hue shifts as i go, and if it sucks I just paint over it some more. I draw different colors into eachother (look at the black shirt above, see how i bring in the tan and whites into the grey?) and add detail and texture. It's a little hard to explain beyond that, hmm... Do let me know if you have specific questions about it!
5. bedazzle and effects
I add extra highlights to the highlights, maybe a sparkle or two on a hard edge, hash lines for texture, and occasionally I also do screentones in shadows. Also, importantly, i blur things that shgould be out of focus! See on the arms and legs here - the bottom image has them blurred more intensely the further they are from the focal point. It's a small thing, but this effect goes a long way!
Annd done!

It's the little things that make a rendered piece sing! A balance between detailing and speed is a tricky one to figure out - I'm still working on that myself!
Also, there's two different ways I render at the moment, one is the quick-messy for sketches, which is what I've done for most of my fanart lately, but I assumed that you were asking about my full process so I went into detail on that. Tho if you're curious about my sketch rendering, anyone is welcome to ask me about that as well!
(there is little method to this madness though, haha)
Omg wait I had forgotten, a few months ago i was making a mini art guide about some tips and tricks

I lost motivation but if anyone is actually interested do let me know and maybe i'll finish it hjsdhjfghjs
Anyway, thank you so much anon!!!!! wah!!!!!!! Your kind words mean the world to me ;w; They fill me with strength and joy1!!!!!! thank you so much!!!!!!!!
54 notes
·
View notes
Text

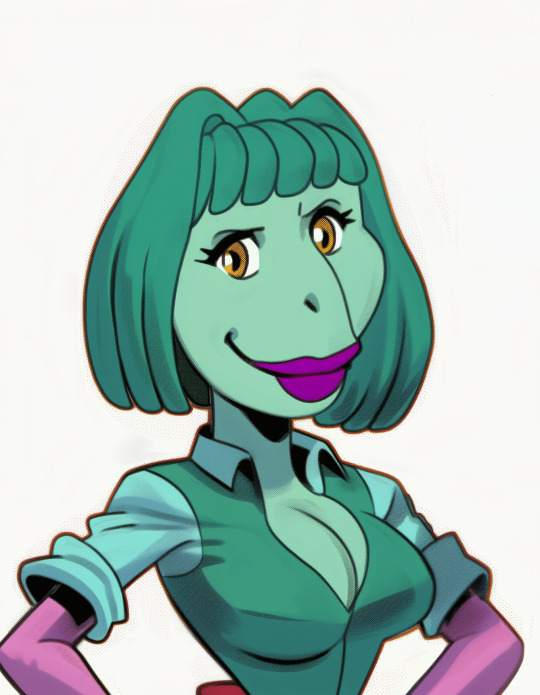
Making a Monster - A Midjourney/Photoshop Tutorial

Today, I'm going to be breaking down how I use Midjourney for character design.
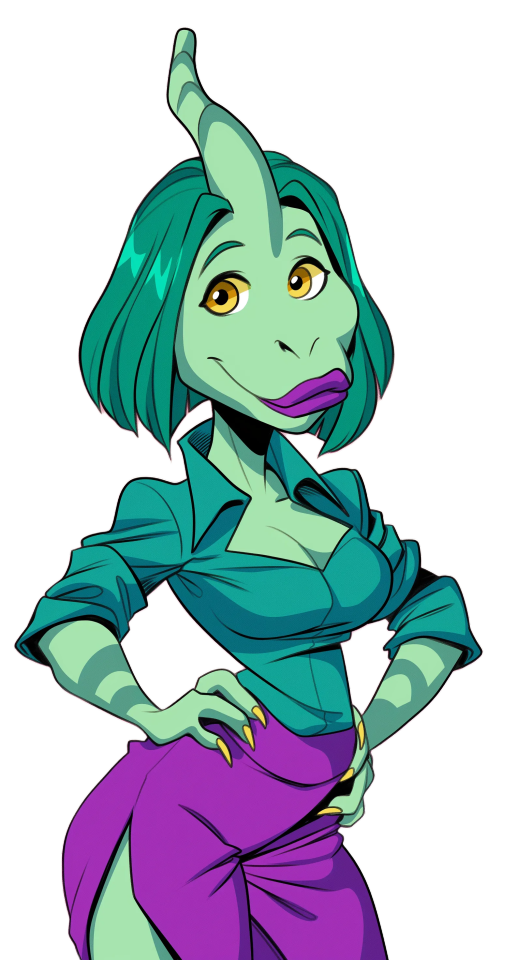
I've recently figured out what I want to do with my joust at the Poke/Digi/Rancher-of- Mon type concept. A lot will be coming from that soon, I don't have a name yet, but the mathematical formula is:
"oops, all Gardevoirs" multiplied by LadyDeviMon + the square root of MOTU over Bluth.
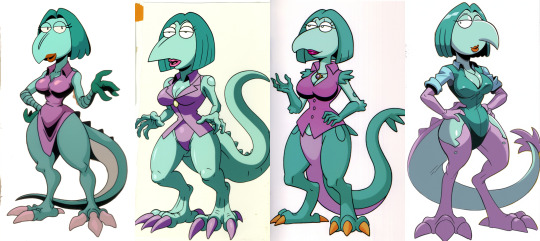
A couple of BioCritters are getting ported over to this new concept, specifically the Waifusaurus evolution branch:

Which was itself a parody of pokemon that are essentially just ladies anyhow, so its probably more accurate to say Waifusaurus spawned unnamed LadyMon Project.
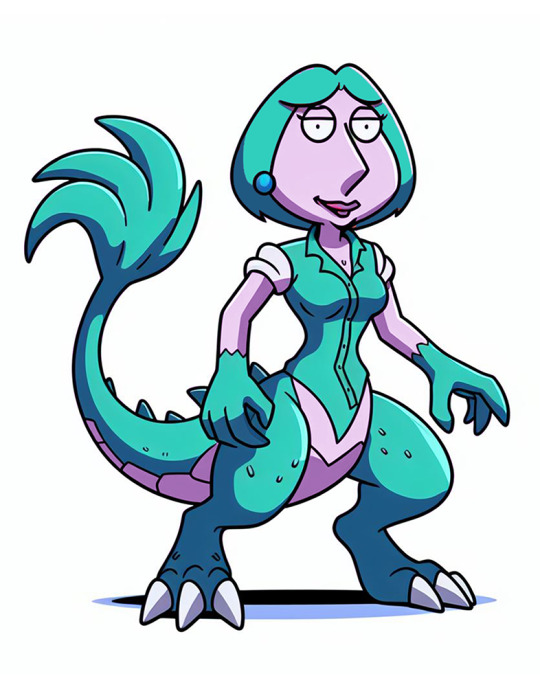
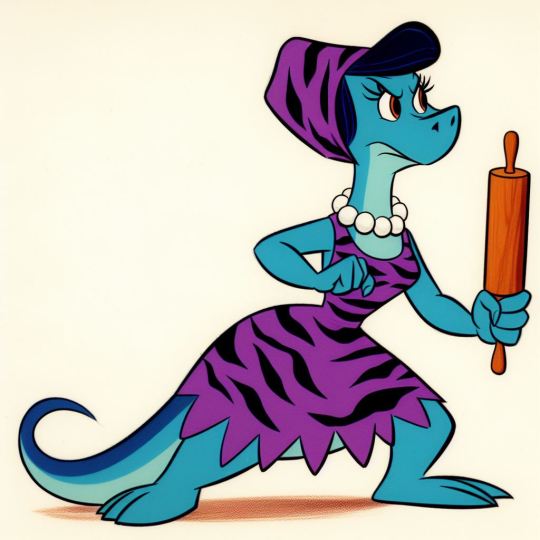
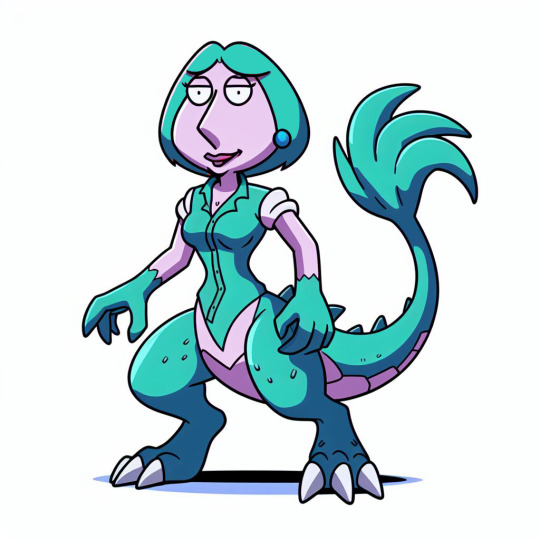
I made most of the first BioCritters in Dall-E3 through Bing Image creator, and Bing makes finding old prompts a pain, and while Straifu, the Lois Griffin parody form, is the subject of today's process, they followed the same prompt format I used with the Flintstones-inspired base Waifusaurus form:
vintage animation cell, a slender dinosaur-anthro housewife on flinstones, resembles humanoid dino the dinosaur, blue dinosaur-lady, purple tigerskin housedress, holding rolling-pin-made-of-rock 1963, in the style of 1960s hanna-barbera TV animation, character cel on white background, posed in a determined ready fighting stance
However, I have a specific look for this new project in mind, so its time to evolve the design.
Step one was to start with basic prompting. I built a new prompt that described what I wanted:
fullbody original production cel, white border all around, vintage animation cel, lavender humanoid woman-creature with large t-rex legs and tail, fan of feathers at the end, wearing teal button up blouse, bob haircut, clawed hands, lois griffin as a pokemon, female character design vintage cartoon screen capture (1993) by AKOM and TOEI , white background, beautiful variable-width black line art with cel shaded vintage cartoon color, painted backdrop, official media, UHQ 1996, official media, UHQ
I ran this in Niji 6, using the style moodboard I'd made for the purpose: --p m7298241701452185637 - largely a mix of full body character designs I'd generated in the style I wanted and 1980s animation model sheets. Moodboards are an expanded version of style prompting, which I outline here.

Examples from runs that produced nothing remotely like what I wanted. I could spend some time tinkering with the prompt to get closer but character prompting is right there, why not just load the original design in?
Yeah, Midjourney/NijiJourney cannot, as of v6, grok abstract cartoony art styles, and character reference always pulls at least a bit of art style as one of its limitations, so the general grotesqueness of its interpretations of these designs leak through.
Now, there's still several things I could do here. The easiest would be to take the straifu on the right and use a combination of in-painting and gradually swapping out the character prompt for a mix of "closer" options over a series of variations until it became something relatively close.
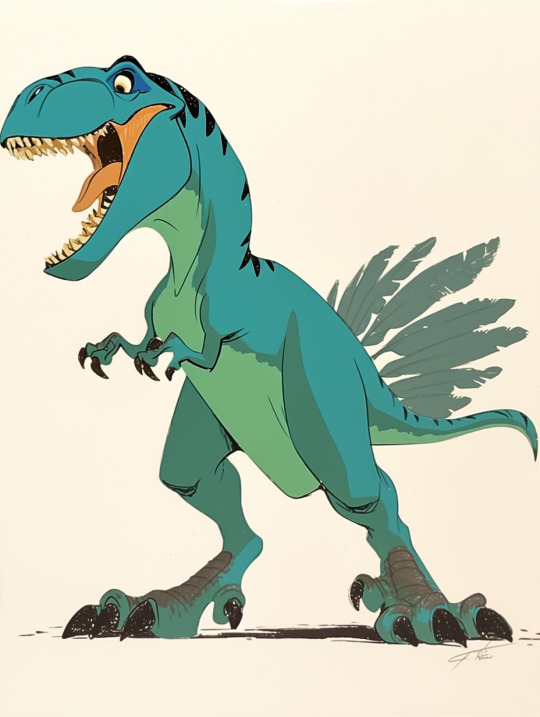
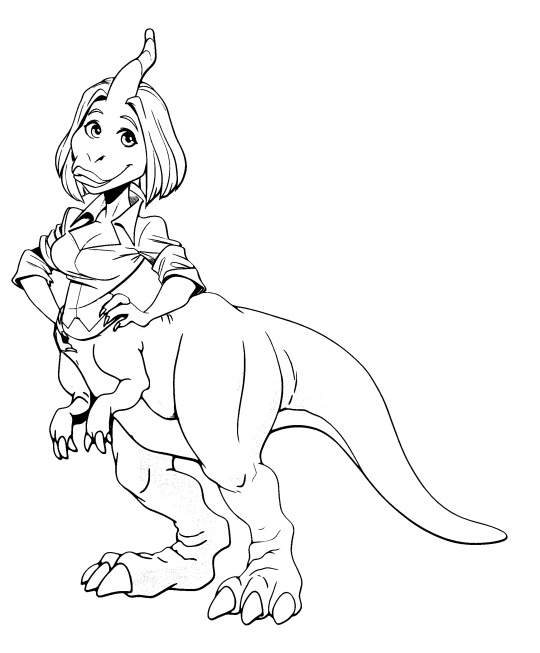
But around about now, I started getting ideas on how I wanted her to look. I liked the idea of a sort of "dinotaur", so I rendered up a regular rex, and combined it with one of the first-wave prompt-only failures and a recolored head in the style I was going for in photoshop.

This was a Q&D mockup, only intended for prompting purposes.
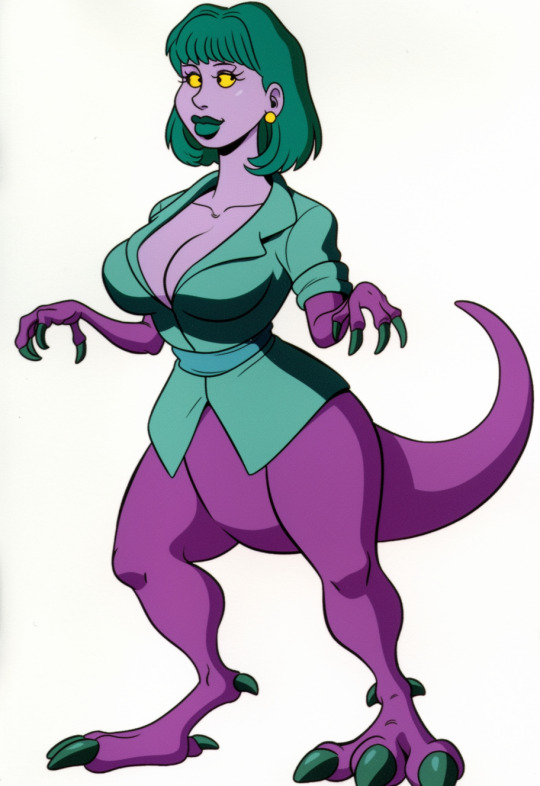


Using a combination of the mockups, the original design, and various results from their iteration-chain, I was able to get very close to the basic concept, only to run into two major issues: One, the huge lower body effect wasn't coming across as intentional (either disappearing into standard thicc-cartoon milfness or looking like AI screwups) and two: the design was boring when divorced from its bug-eyed cartoon aesthetics.
Now, you can do a lot with a flawed design, but a boring one means you need to start re-conceptualizing.
Which begins under the fold:
Straifu is a parody of Lois Griffin. In the broadest sense, that brings to mind the nasal voice, and in a battle-monster genre setting that means sonic attacks. Sonic + dinosaur means parasaurolophus to me.

Above, I mentioned I could have in-painted one of the cartoony results. I had actually done that, using the mockup face as a character prompt, and one of its results was interesting, so I started refining based on that:

You can use edit to zoom in with Midjourney, it's just you can only do it horizontally or vertically in any given go. I zoomed in using this method, and redid her eyes in the process.
I did another mockup of her with a crest and in-painted, then iterated in the in-painting result.


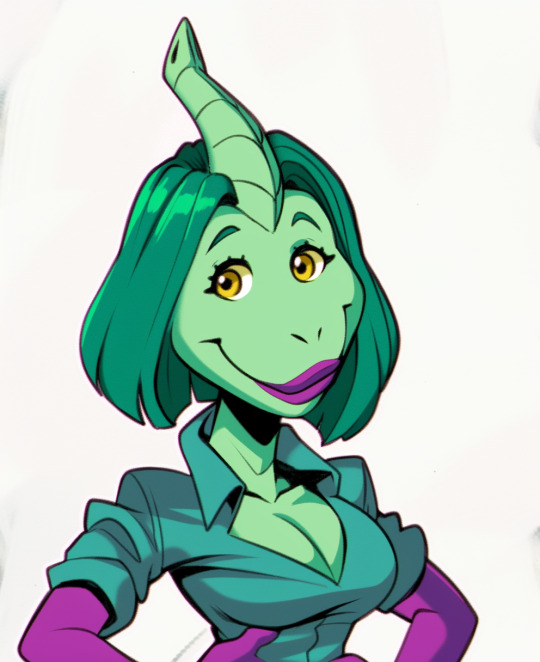
I did a lot of iterations at this stage, some as basic variations, some as full strong variations, but eventually by combining various results into the character prompt, I got the variation I liked best.


My initial thought was to restore the "beak" from those earlier versions but her duckbill face was too perfect to pass up.
I then attempted to get her a full body via outpainting.

I didn't have much luck, once again the results were either too ai-fuckup-like or too basic.
The idea that came to me to solve the problem was to make her a full on parasaurolopus-taur, forelimbs and all. Midjourney wasn't going to cooperate on that, really weird designs aren't well understood by the current character reference.
Omnireference is supposed to fix that, but to paraphrase 'Oh Brother, Where Art Thou': Well ain't version 7 a temporal miracle? Two weeks from everywhen!
Now, it was time to do things the old fashioned way. With editing.
I went through a lot of attempts to make a base dinosaur:

Eventually landing on this fellow, and this torso forming this rough-cut:


Now, there's one thing to note, the line quality on the two is completely different. Fixing that means getting at the lines.
The best way to do this in photoshop is by upscaling the image 200%, and using a fill bucket set to around 10-25% (anti-aliasing on) and white to make any dark colors gradually lighter so threshold can drop them to pure lines.
From there, I selected individual sections of thin lines and duplicated them, using a combination of 1 px strokes and nuding sections a pixel in any given direction to match the line width without it looking like a coloring book.
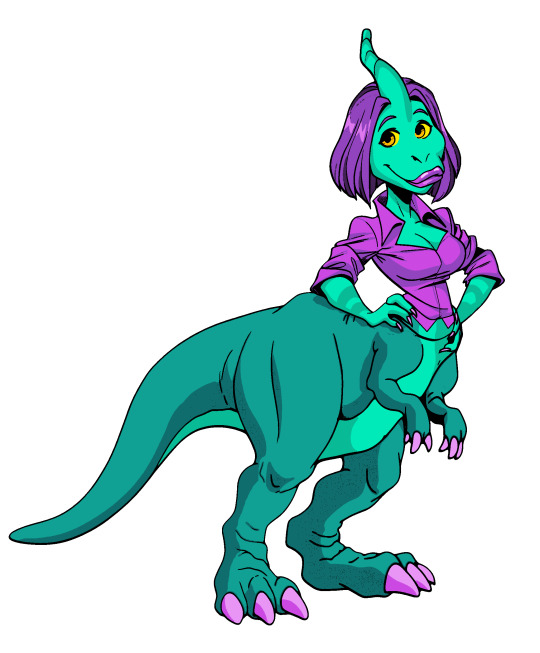
Which I then re-colored using your basic comic coloring process. I went with what is largely an inverse of the original colors because I already have a purple/lavender parasaurolophus character in DynoGuard.
Then, I started doing this tutorial, and realized one of the early versions shirt had formed a sort of plastron, and I went in and painted all that over on top.
I could go into more detail, but I'm out of images and this is already novel-length.
-
The gif at the start was made in Vidu, using the subject reference feature, the final image of Straifu, a background image, and this prompt:
a green creature with a purple shirt, she takes a deep breath and screams, the scream lasting 2 full seconds, Sakuga animation, eyecatch animation. Vintage traditional cel animation, TOEI, disney, don bluth, filmation productions, scene from Masters of the Universe (1983), ultra-high quality flawless animation sequence, Blu-Ray remaster. Every frame in focus and sharply detailed. Animated on 2s matte background painting.
#ai tutorial#midjourney#midjourney v6#nijijourney#character design#dinosaur#dinosaur-anthro#fakemon#waifu#lois griffin#family guy#parody#dinosaurs#parasaurolophus#vidu#vidu CCP#vidu AI#ai art#ai assisted art#multimedia art#art tutorial#photoshop#long post#do you like the color of the AI
16 notes
·
View notes
Text
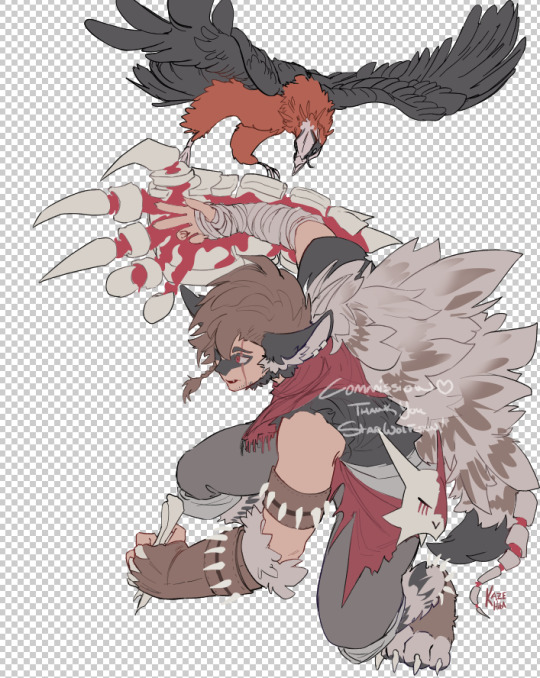
Here are some process shots for this one of Raphael from BG3! That magnificent bastard...

So I started out with a sketch of Raphael. He's got such a charismatic swagger doing the whole "What's better than the Devil you don't know? The devil you do" scene. I just wanted to do a caricature study and have a bit of fun.

Moving from rough sketch to clean line art is always challenging for me as I often get bored or what was originally loose and fun can become stiff.
I had to redo the linework twice because I didn't like how the first one turned out! Second time is always the charm.
I initially only planned to draw the character but I love the design of House of Hope too much, so I went back into the game and took a bunch of screen shots and sketched out the rough bg.
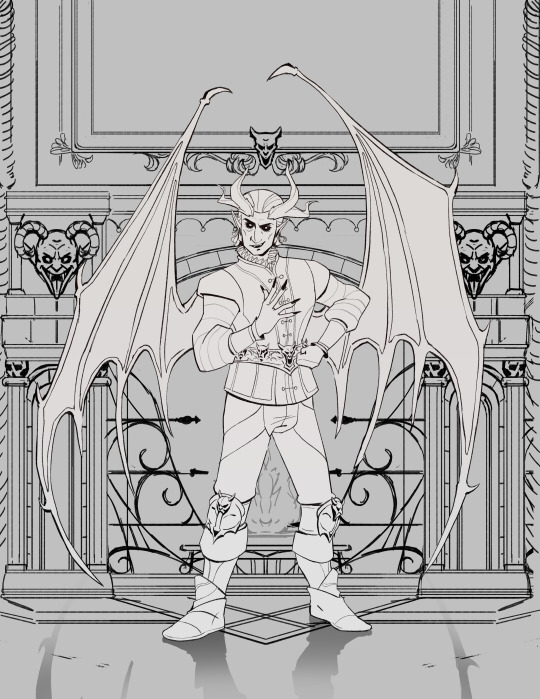
Then I went ahead and cleaned up the bg. At this point is when I group the layers properly, so there is a clear separation between foreground, and background as well setting up the layers for animation. (Making sure the fireplace guards overlaps the walls behind it.)
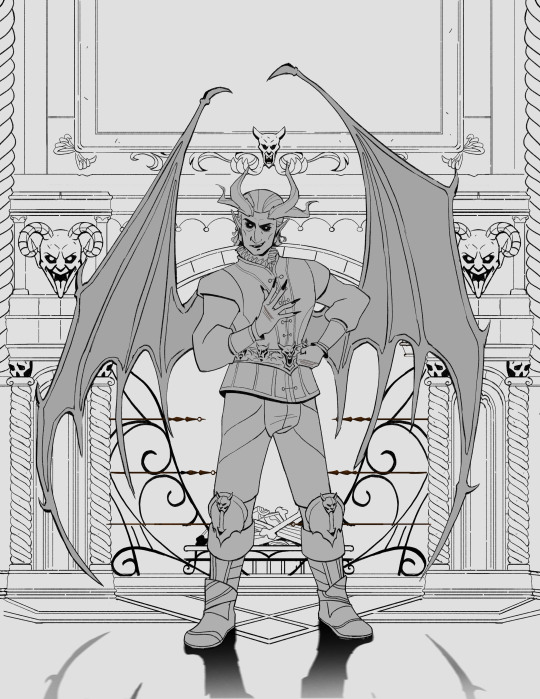
At the next stage I adding in the flat colors. I wanted to keep the style treatment of this piece more on the cell shaded/cartoony instead of super painterly. So I keep the color treatment fairly flat with a small amount of texture with the intention to add lighting as a fx overlapping treatment instead of painted in.
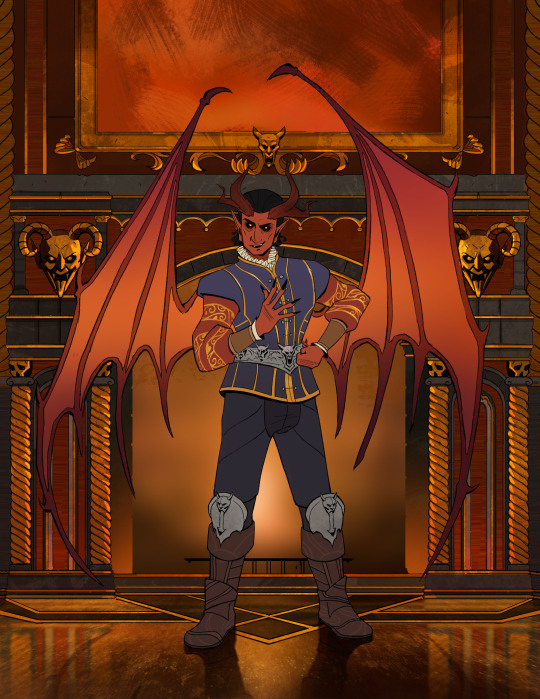
I work on the characters and the bgs at the same time to keep the values and color temp consistant, constantly adjusting as I go. From habit from work, I always paint the entire BG JUST incase I need to make changes or make adjustments to subject in from. Here is the bg all done, with fire painted in as a place holder.

And finally, adding the final lighting layers added on Raphael. I keep it simple here, just a redish/purple multiply player with the areas in the light masked out, and inverse mask on an orange/red overlay layer of the areas in the light.
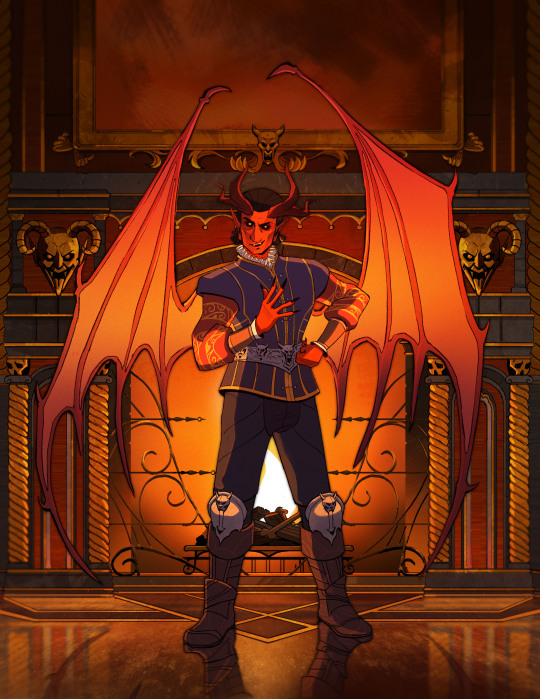
Animating the fire took ironically the longest, the animation tools in photoshop is clunky and I haven't animated since school days. I looked up a lot of references and tutorials! It's not perfect but good enough for me!
#raphael bg3#raphael baldur's gate 3#bg3 animation#bg3#badlurs gate 3#bg3 fanart#artists on tumblr#sketches#drawing#art#artprocesses#art tutorial#bg3 art#art process#art style#animation#bg3 spoilers
155 notes
·
View notes