#color gradient tutorial
Explore tagged Tumblr posts
Visit Tumblr Blog
Explore Tumblr blogs with no restrictions, modern design and the best experience.
Last Seen Tumblr Blogs


Fun Fact
1,644 Tumblr posts in 1 second.
Note
How to change text colour?
here you go !
• first use this site to get your hex codes !
• then use this site to do the following:
- step 1: enter the text you want in the box
- step 2: select the color effect you want ( i use the “three colored gradient” )
- step 3: enter your hex codes ( depending on the color effect you chose, you may need a different number of hex codes )

- step 4: copy the HTML code ( the second box NOT the BBcode )

• after that, open tumblr ( this only works on the web version NOT the app & i recommend doing it on a computer, simply because i find it easier ! )
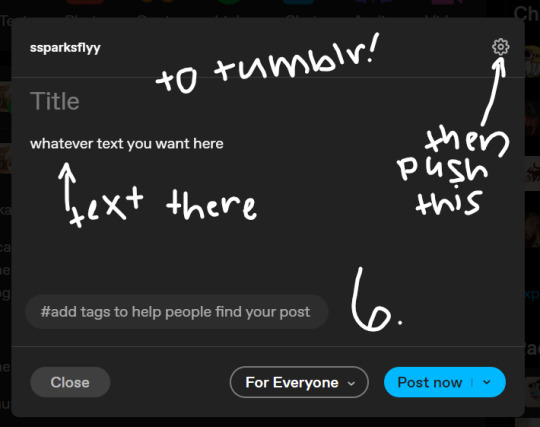
• go to your draft ( or i recommend creating a new draft specific for the gradient ) and :
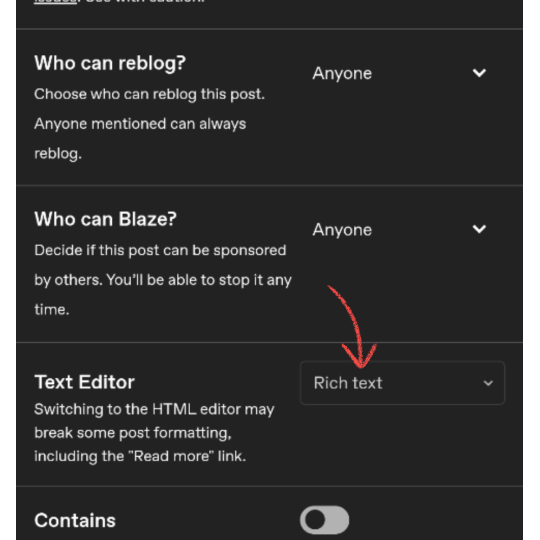
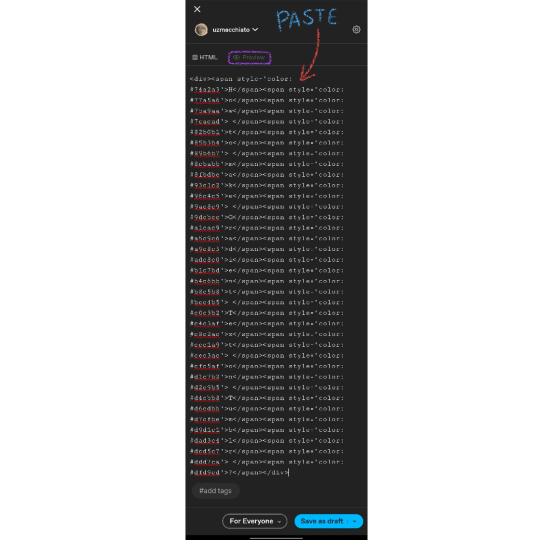
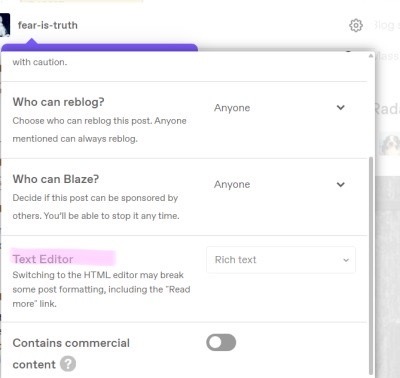
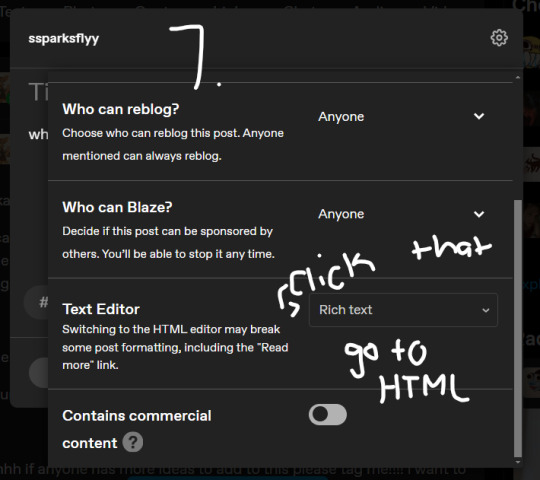
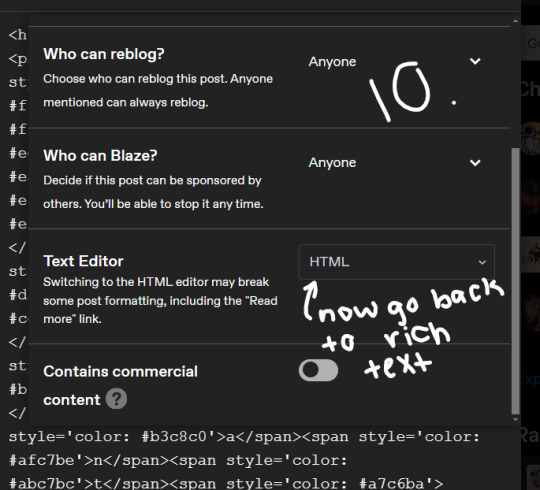
- click settings and scroll until “text editor” then switch to HTML

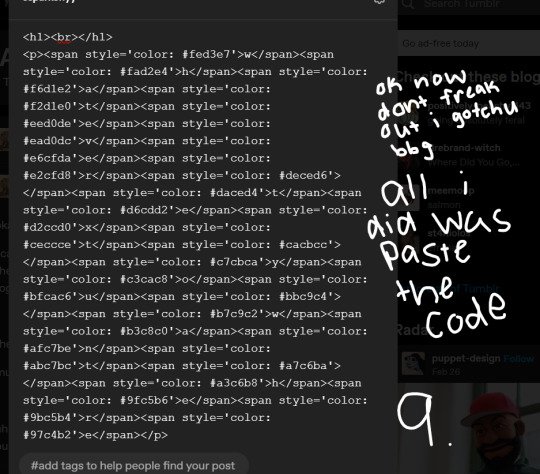
- then paste your copied HTML code and save
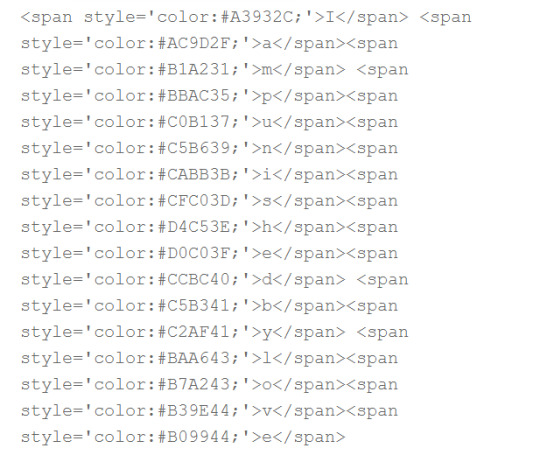
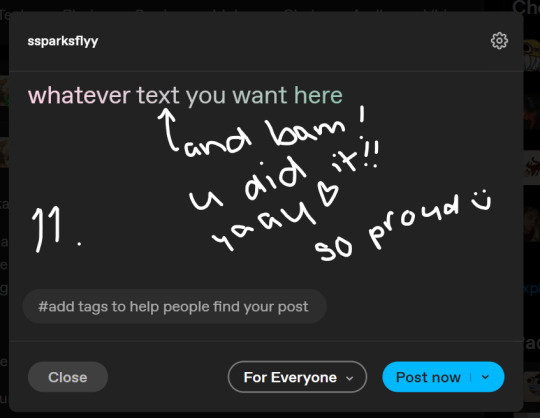
• it should result in looking like this:

• and that’s it ! if you directly added the code into an already established draft, you will need to reorganize your images, but if you created a new draft for the code, just “edit” the text draft and copy and paste the text into the correct draft !
• hope that helps !!
16 notes
·
View notes
Text
GRADIENT TEXT TUTORIAL

HOW TO GET OMBRÉ STYLED TEXT ON TUMBLR
𝜗℘ I got a request on TikTok asking to do a tutorial on gradient text — tumblr doesn’t have an in-app option on doing gradient texts. This is how.
𝜗℘ Sites you can use: image color picker / stuffbydavid (gradient text).
𝜗℘ People say that you have to use a computer for this, which isn’t true. I am able to make gradient text on my phone, but you can use a computer if you want.

color picking from an image is optional, but highly recommended.
one: put the text you want to color for your tumblr post.
two: change the color of the text to whatever color you want. there are several options on how you want it. pick whatever option you want. the text will automatically generate for you.
three: copy the entire code then press “copy”.
four: go over to tumblr (website, not the app) and click “edit post” (the pencil) or create a new post.
five: click the settings button and change it from “rich text” to “HTML.”
six: paste the code from the gradient text website in the HTML where you want it to go. (I paste it then just save the post to my drafts then edit the text on the app)
#jasper’s tutorials#tutorial#gradient text#ombré text#text#tumblr text#text post#colored text#text tutorial#tumblr blog#tumblr tutorial
426 notes
·
View notes
Note
Hi! How you doing the combination in the titles? Can you do a tutorial please! Thanks!
Hello @elvisbdoll 🫶🏻
~ Firstly, I'll share the link from where I learnt to do that. It is explained in a very easy and short way here.
~ You need to use Tumblr web on your phone or laptop for this idk why it doesn't work on the app.
~ I'll also explain below in my own detailed way, hoping that this becomes easy for anyone who follows my posts and wants to know how I do it😁

• Website for the Gradient Text :
TEXT COLOR FADER
• Detailed process of how I use customised gradient text on Tumblr :
( Pay attention to the colors that I have used in the steps as well as the screenshots to understand better. The markings on the photos are to make it easier to spot what I'm talking about. )
.
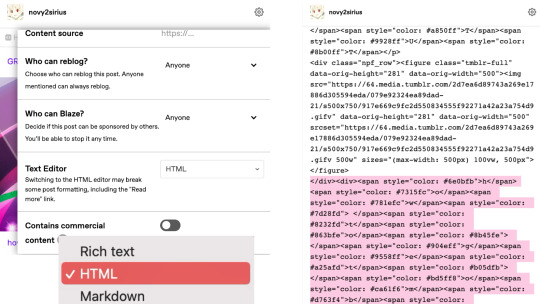
1. Create a post on Tumblr by writing the text you want to make a gradient of and save it as a draft. In the draft → Go to the Settings wheel and in the Text Editor section select HTML which is required by Tumblr to read a coded* text.
* ( The colors of the Gradient text are basically coded into text on the Website I shared above. Hence, changing into the HTML type here will help Tumblr recognise that coded text and turn it into a normal Gradient colored text. )


2. You will see a coded version of the text you wrote which is encoded between <h1>...your text...</h1> for my text in the photo below. You can toggle between HTML & Preview to see the coded and uncoded(normal) version of the text. Copy the normal version of the text from the Preview mode that you want to turn into gradient.

3. Visit the Website in the link I've shared above.
.
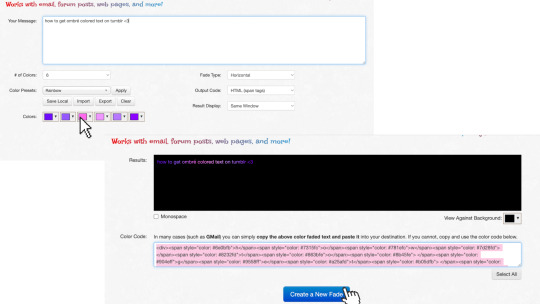
A: is the part where you paste the text you just copied and want to change into a Gradient.
B: is the number of colors you want to use in the gradient.
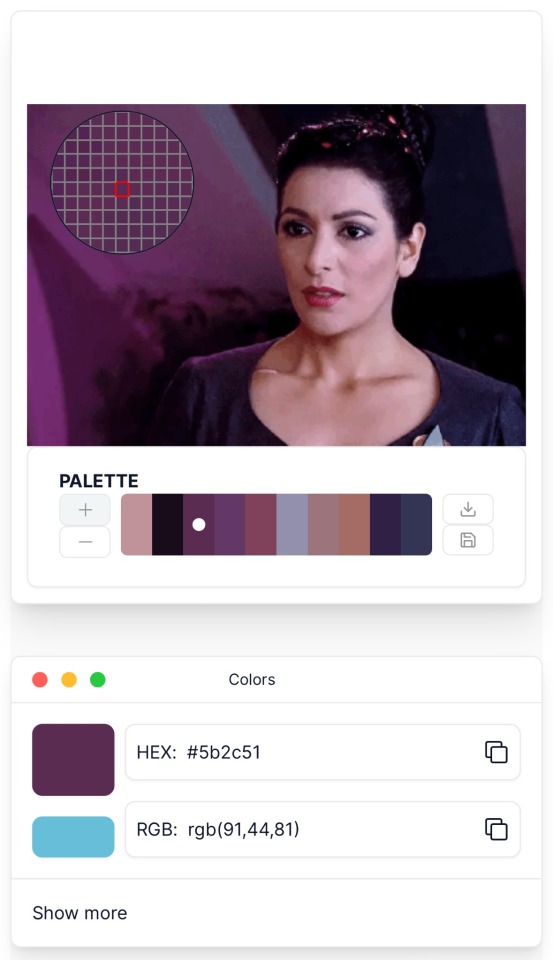
C: is the part where you put the color codes (HEX/RGB) or just swipe to get the desired color from the color wheel.

4. I pasted the text in the text box and made the changes that I need to do to get the gradient I want in the next part. I used 4 colors and put the Hex codes for the Teal and Beige colors. Once you're done click on "Generate Color Coded Text"

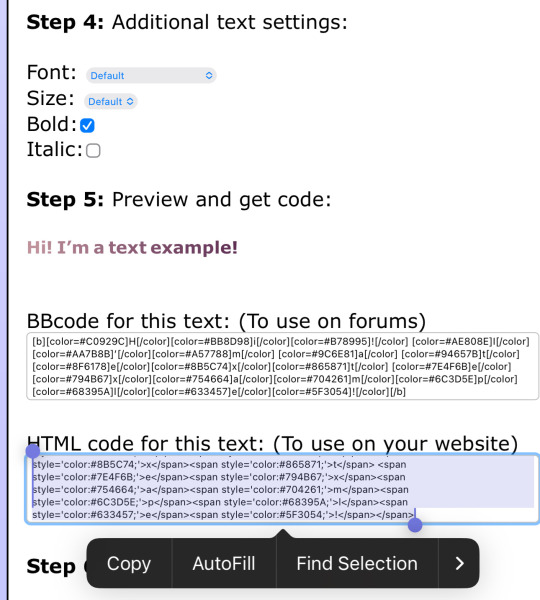
5. On the next page you'll get to see a preview of the text and the coded text in the box below. Click on Select All and Copy the coded text.
If you want to make any changes you can go back by clicking on "Create a new fade" and you will be taken back to edit the current gradient.

6. Go to the draft and delete the existing text to avoid mixing the coded text with it. Stay on the HTML mode rather than Preview mode.
Paste the coded text while you're on the HTML mode of the draft (the codes are really long depending on the number of colors and length of the text)
After pasting in HTML mode click on Preview and you're DONE.
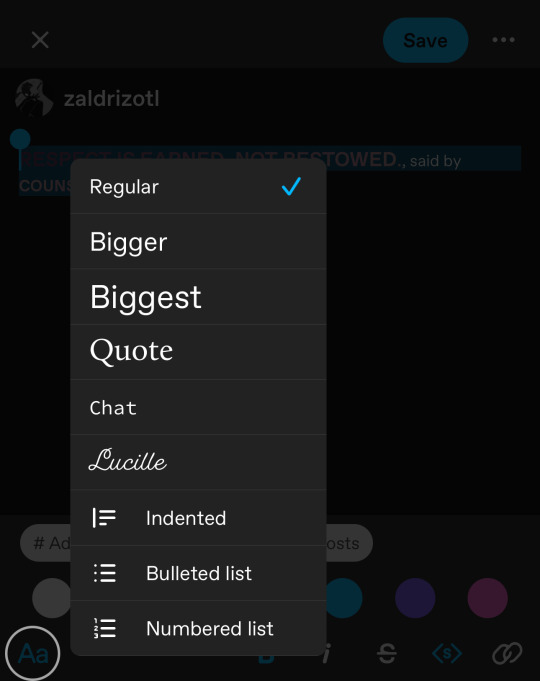
Other than that you can edit the text style after pasting here into the basic styles provided by Tumblr — bold, italic, Chat, Intended, etc.

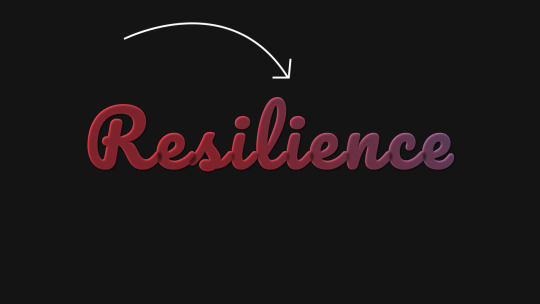
Final Result : How to make Gradient Text on Tumblr ?
I hope this was helpful😭 I love editing the text and making it match my dividers, so this is magic for me. You can DM me if you need any more help understanding this.
Thank You❤️
#gradient text#Gradient Text tutorial#asks answered#asks#ask answered#uzmacchiato_asks#custom text color#tumblr tutorial#ask
78 notes
·
View notes
Text
GRADIENT TEXT TUT

how to get ombré colored text on tumblr <3
꧞ i get a lot of dms and comments asking about how to change the color of your text to colors that tumblr doesn’t have or to an ombré text. this is how
꧞ sites you can use: the one i use // two // three
꧞ you can use your phone for this, but i prefer using the computer. just go to safari to do it instead of the app if you wanna do it on the phone


one: copy the text you want to color from your tumblr post then paste it into the websites text box
two: change the color of the text to whatever color you want. with the website i use it allows you to pick presets or you can also customize your own then click generate
three: click the “select all” button and copy the code
four: go over to tumblr and click the edit button on your post
five: click the settings button and change the text editor to "html" then find the html section at the top and click on it
six: paste the code from the color fader website in the html where you want it to go (i paste it at the top and just edit it on my phone by holding text down and moving it)
216 notes
·
View notes
Text
COLOUR TEXT TUTORIAL ⋆౨ৎ˚⟡˖ ࣪

go to this site ➤ follow the instructions & copy the code from the bottom box (the HTML one) ➤ open tumblr on a desktop browser ➤ create new post ➤ click the gear icon in the top-right corner to access settings ➤ scroll down and find the “text editor” option; switch it to “HTML.” ➤ paste the HTML code into the post editor ➤ scroll back up and switch between “HTML” and “preview” modes to edit the code and see how your post looks ➤ save draft :)
step-by-step pictures under cut :
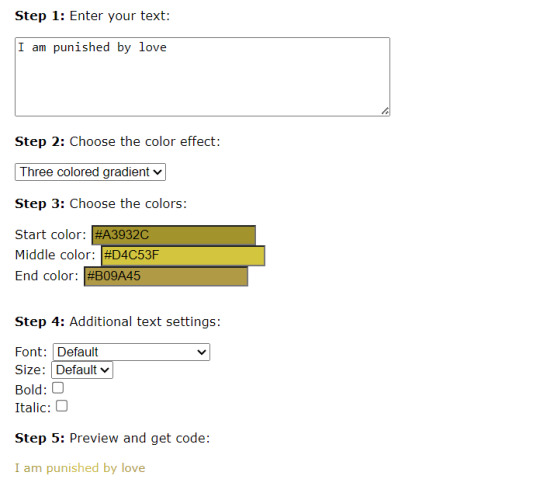

final result : I am punished by love
63 notes
·
View notes
Note
Random question, but how did you do the rainbow thing in your pinned post? Is it from something you buy on Tumblr?
the gradient, yes!!! no, it's completely free.
so, i don't remember where exactly i got the instructions as to how to do it, but this is basically how the word "welcome" from my pinned looks like in html:
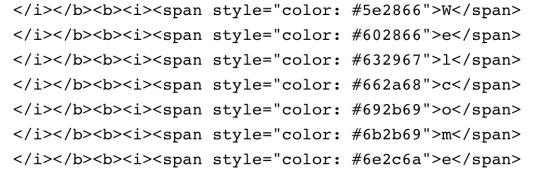
since it's a gradient, every letter is a sliiightly different hue, but i remember there was a website where you could basically write any word/sentence that you'd like gradiented, choose the starting and ending colors, and it'd automatically give you the html code for the gradiented text. i think it was this one?
and that's what you get!
you just gotta copy the code, start editing your post, make it so you're editing it as html, paste the code in, and it SHOULD work. hopefully!
#nicole answers#Anonymous#the colors work for symbols too. like hearts and arrows and stuff#i Think this is what the rainbow thing refers to??#if this is too messy i just checked and googling ''tumblr how to gradient words'' shows a few more indepth tutorials
210 notes
·
View notes
Text
(prev)

i colored that
#because i don't wanna touch that detailed asf sevagoth portrait today#and i really need to do some coloring otherwise im just gonna. be afraid of that. forever#i can't get rhino's color palette right idk why#but i had a lot of fun drawing sevagoth#especially the gold part#tbh i just yoinked the gradient map from dante's portrait#actually i think i stole that from some metal rendering tutorial while i was rendering dante but it still works i guess#okay that's enough ramble. fuck i have to remind myself to stop#warframe#warframe rhino#warframe sevagoth#warframe sevagoth prime#my art
56 notes
·
View notes
Text
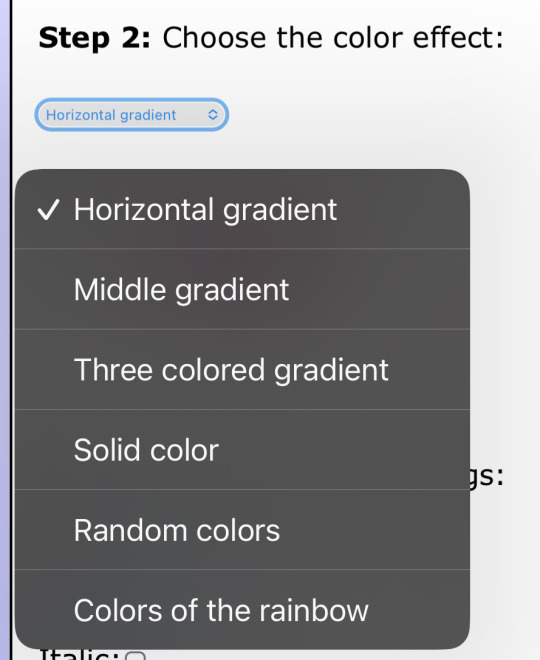
☆★ gradient effect tutorial ★☆

sooo it has come to my attention that the gradient effect i use is pretty eye catching & you guys wanted to learn how to do it yourself!
so here’s my *hopefully* quick and easy tutorial! :3
—
☆ this is the website i mainly use: https://www.stuffbydavid.com/textcolorizer ☆
it can be done on your computer (where as some may find it easier) but i just use my phone! you can use safari, google, whatever works!
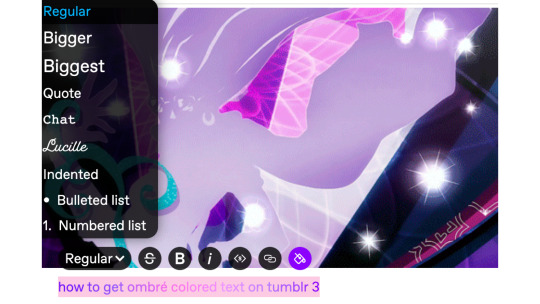
1st, type the words, sentence, characters etc that you’d like to have said color!

2nd, decide what kind of gradient you’ll like to use! there are THREE types: horizontal, middle & 3-colored. (i personally use the 3-colored often!)

3rd, choose your color scheme!! you can type in a code or just press different sections! the side bar is also to mess with the shadow of the color!
here are what each gradient looks like!
ex. three-colored gradient

ex. middle gradient

ex. horizontal gradient

4th, once tour satisfied with everything, you’re gonna go to the very last box and copy everything!

once you finish all that, you’re going to go to the tumblr website! (you can use a computer or google on your phone) go to said draft you want to edit, and click on the settings button in the corner. click on HTML, it’s gonna look CRAZY! but all you have to do is highlight the words you want to colorize and then hit paste!

hit preview ! your text should now be colorized to how you wanted it to look!

and that’s it! just make sure you hit save! then you can go back to editing or typing as normal :)
i tried to make this as simple as i could haha 🥲 hopefully it’s easy to understand 💔 i will also link the original post that i learned from as well however i do skip a few steps since i foudn they’re not needed anymore haha
☆ original tutorial i used: https://www.tumblr.com/kylos/181695757101
23 notes
·
View notes
Text

I made this to explain how I do rim light / flare effects on my concept art pieces and some portraits and I'm sharing this here too. Pretty much the image is self explanatory but it's a combo of layer modes to get that rim light effect. I use it to for high contrast glows, such as internal lava glow and stuff. Mostly flashy visual effects.
This is explained with CSP in mind, but you can do this in Photoshop as well (and I hope in Gimp and other software). Always use Clipping layers, they are key here! In Photoshop you have to put the BLACK LAYER in Linear Dodge (Add) to get the same effect. Also, you have to look for this small circle to add a Gradient Map layer.
Here's some crops to help visualize this.


I know the image says Doge but oh welp I'm not redoing anything Hope this helps. Keep drawing and creating folks!
#art tutorial#art tips#csp#clip studio paint#art resources#rim light#tutorial#gradient map#concept art#digital art#digital coloring#photoshop#my art#art#artists on tumblr#painting#keep doing art#❤️#hope this helps someone#I just want to encourage people to keep doing art in these dire times
39 notes
·
View notes
Text
HOW TO GET OTHER COLORS ON TUMBLR LIKE THIS, PHONE VERSION⬇️⬇️
updated version
HELLO EVERYONE horizontal gradient
HELLO EVERYONE middle gradient
HELLO EVERYONE three colored gradient
HELLO EVERYONE solid
HELLO EVERYONE random colors
HELLO EVERYONE rainbow
pls don’t mind my broken ass english, also idk why the quality is so bad??🫸🏽😵💫🫷🏽
click here for the website!!!

37 notes
·
View notes
Text
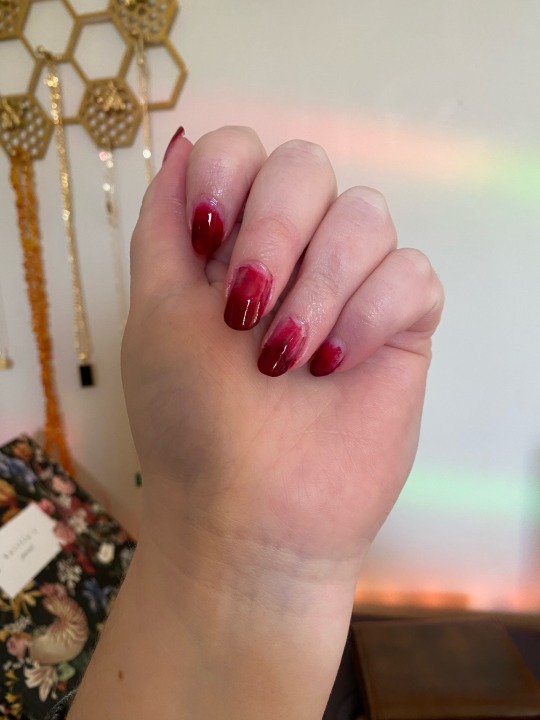
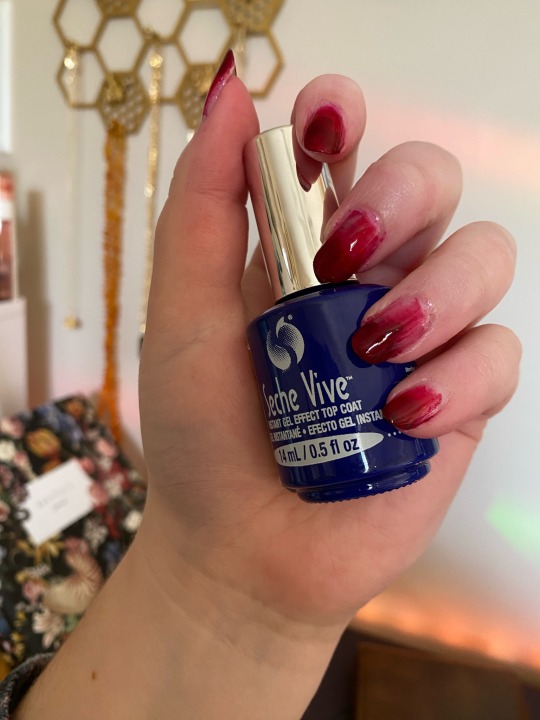
bloody nails since i’m wearing my “victorian” vampire costume to a party tomorrow :3
ok…i’m a seche vive convert…
this is ORLY rose-colored glasses, essie forever yummy, essie berry naughty. topped with seche vive which is VERY GLOSSY. also v fast drying.
so i think if you are intimidated by nail art but want a fun Halloween look, this is actually pretty easy bc if you’re going for “blood all over my nails” you don’t have to worry about it looking “nice” or anything so my technique:
1) well i do always use base coat, this time holo taco’s long lasting base
2) use a sheer pink intended for french manicures, there’s a bunch out there to choose from. apply 2 coats, and (this is v important!) wait for it to dry completely. if you don’t you’ll end up pulling it off or “wrinkling” it in the next steps
3) use a wedge shaped makeup sponge, paint some red polish on it, then dab it onto your nails with a focus on the top of your nail for opacity. wait for this to dry.
4) repeat step 3, but with a darker shade of red.
4,5) if you’re me, be unhappy with results, paint another layer of the sheer pink, attempt to do another gradient, then go back to layering the colors separately
5) apply top coat, which will immediately make any gradient nail art look much nicer sfdd
#polish posting#there’s a bunch of tutorials for gradient nail art to reference if you prefer videos!#i didn’t go w an actual gradient bc i figured layering colors on top of each other instead would look a bit more like blood lol#but you could totally just do an actual gradient
7 notes
·
View notes
Note
BBYGRL!
pregunta for ya
how the flip do you do the fancy colored text?? like the gradient stuff and like the custom colors?? bc like…i want that 🥹🥹
anyways, love ya girlie, keeping being the gorgeous gorgeous girl you are 😘😘😘
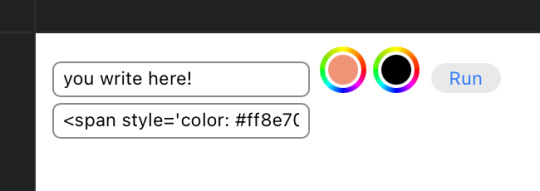
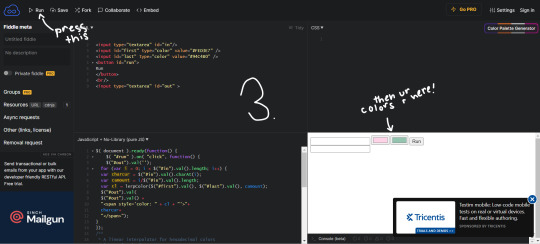
OK SO
i use this site
what ur gonna do is
get the html codes for whatever color(s) you want your text to be
put those codes where it says 'value="#FF0000"' and 'value="00FF00"'
the first one is gonna be the first color nd then the second one will be the second
once you put those codes in, ur gonna hit the 'run' button at the top left of the screen
then ur page is gonna refresh and in the bottom right corner, ur gonna see a blank box with your two colors next to it, then a run button and another blank box underneath it
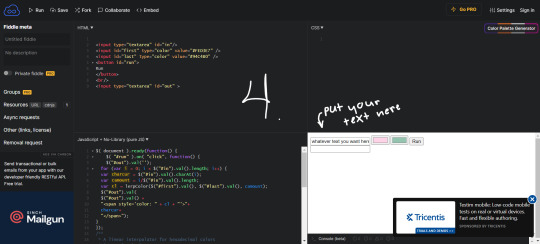
your gonna put whatever text you wish in the top box, and then click run
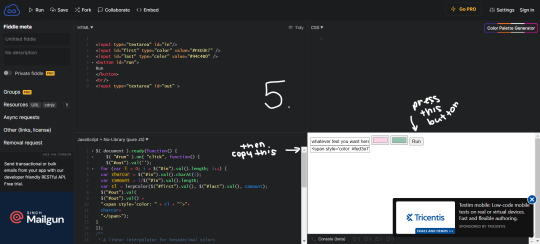
and in the bottom box some code should show up idk what it is but copy it
then ur gonna come to tumblr
put the exact same first text and then go into the html settings
then ur gonna highlight your text from the html side
and then ur gonna just paste the code that you got from the first site
that was a rlly shitty explanation but lemme give you a pic tut :,)


im so sorry for the shit quality and horrible handwriting but im on a laptop that isnt touch screen so ya girl was strugglin 😭😭
obvi click on the pic to make it bigger, nd once you have your text i recommend making it bold because then it stands out more
lmk if u have any more questions !!
have fun!!
#also if u need html codes just search up a color from image site and then imput your image and select colors from there :))#as for the little dividers i do- i just use photopea (500 x 2) and then use the gradient tool#lmk if you need / want a tutorial on that too cause ill do it :)#message in a bottle ✉︎˚ ༘ ♡ ⋆.
17 notes
·
View notes
Note
How did you achieve that glowy affect in your "Just for tonight, please let me feel wanted." Piece? (If you don't mind me asking)
here u go !! if theres any other questions u can dm me and ill help u! (sorry for the flashing & quick cuts, i thought a timelapse would be faster than me narrating a longer vid !!)
#when i did it i kinda just winged it & fidgeted with the color sliders til it looked good#u can use other colors too i just showed mine for example!#especially the soft light back layer#make that a color that fits with ur piece!#i didnt show the grad map cuz it was custom for the piece i did & wouldnt be any help#any gradient map u use should make ur blurry layers look so good!! i really recommend using one!#tutorial
8 notes
·
View notes
Link
Photoshop text effect - create gradient text effect in photoshop cs6, gradient colored text tutorial, how to create gradient text
0 notes
Text
Gradient Text Background Animation
#css text animation#css text gradient#css gradient loader#css gradient color animation#frontenddevelopment#html css#codenewbies#css animation examples#css#html5 css3#pure css animation#css animation tutorial
1 note
·
View note
Video
youtube
The only gradient generator you will ever need! Your Complete Guide to ...
#youtube#color#gradient#graphic design#graphic designer#graphic reasources#graphic design tools#graphic design resources#design tools#tutorial#design tutorial#color inspiration#online tools#online color pallet generator#free design tools
1 note
·
View note