#text gradient tutorial
Explore tagged Tumblr posts
Visit Tumblr Blog
Explore Tumblr blogs with no restrictions, modern design and the best experience.
Last Seen Tumblr Blogs


Fun Fact
28.6 is the average number of monthly visits per US mobile user.
Text
☆★ gradient effect tutorial ★☆

sooo it has come to my attention that the gradient effect i use is pretty eye catching & you guys wanted to learn how to do it yourself!
so here’s my *hopefully* quick and easy tutorial! :3
—
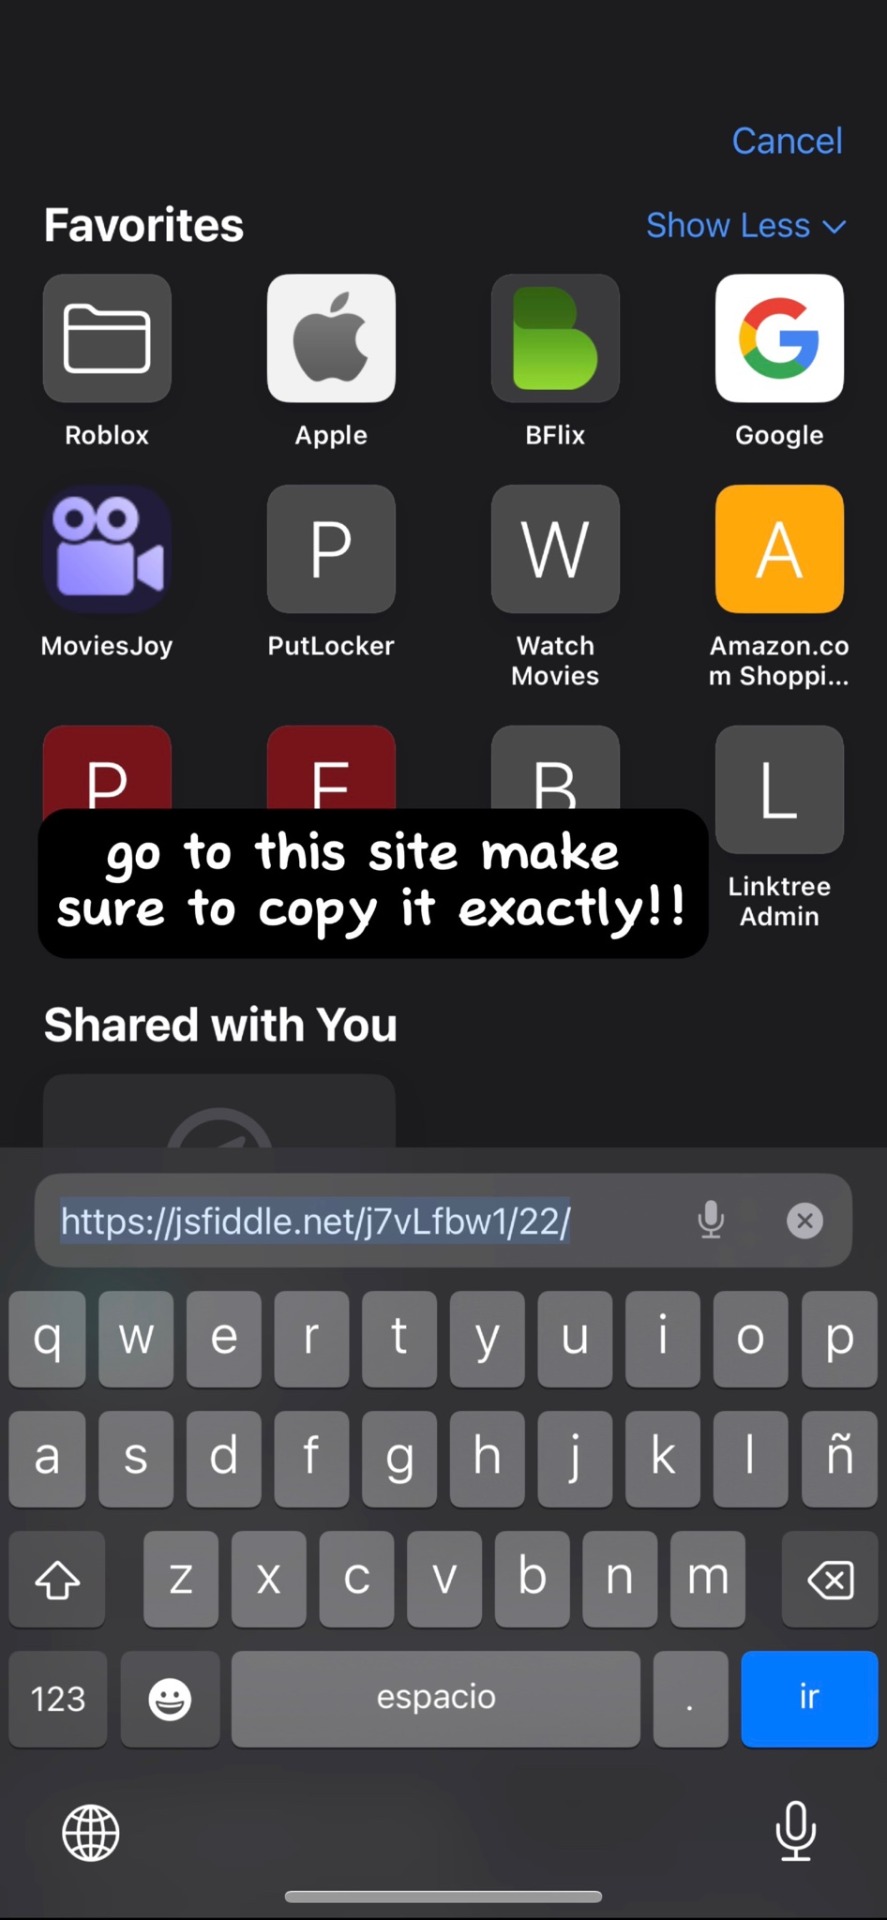
☆ this is the website i mainly use: https://www.stuffbydavid.com/textcolorizer ☆
it can be done on your computer (where as some may find it easier) but i just use my phone! you can use safari, google, whatever works!
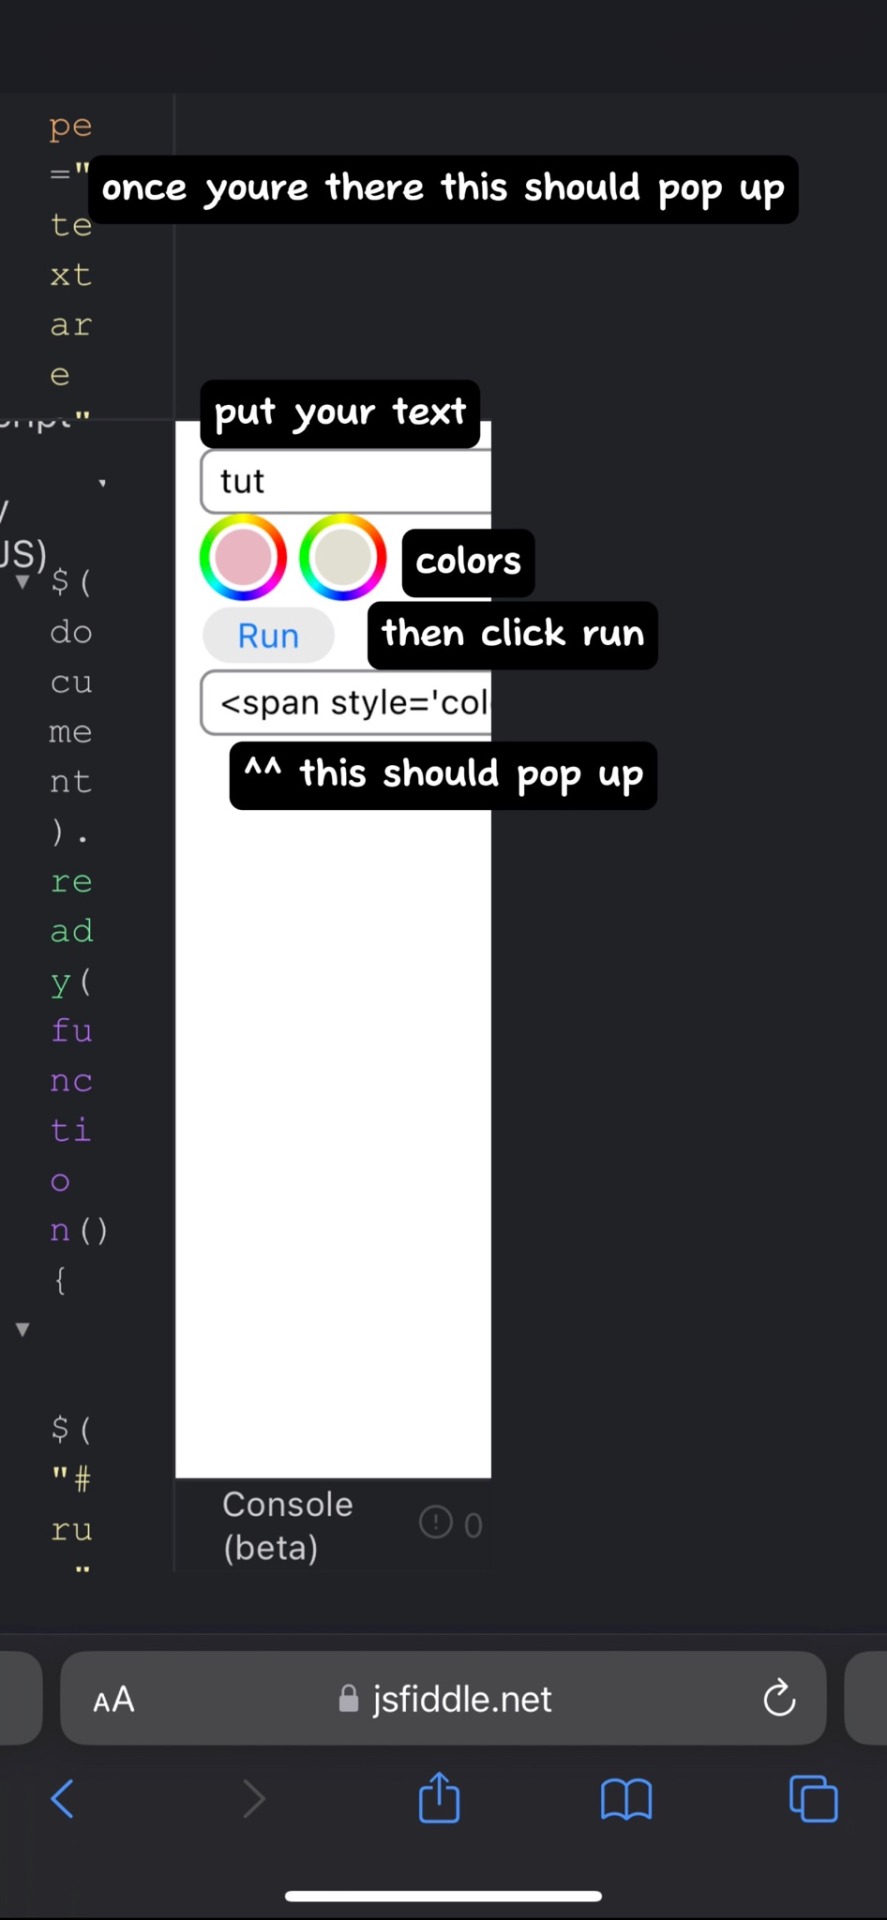
1st, type the words, sentence, characters etc that you’d like to have said color!

2nd, decide what kind of gradient you’ll like to use! there are THREE types: horizontal, middle & 3-colored. (i personally use the 3-colored often!)

3rd, choose your color scheme!! you can type in a code or just press different sections! the side bar is also to mess with the shadow of the color!
here are what each gradient looks like!
ex. three-colored gradient

ex. middle gradient

ex. horizontal gradient

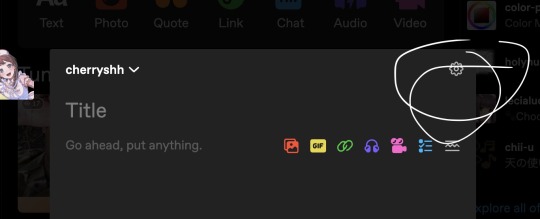
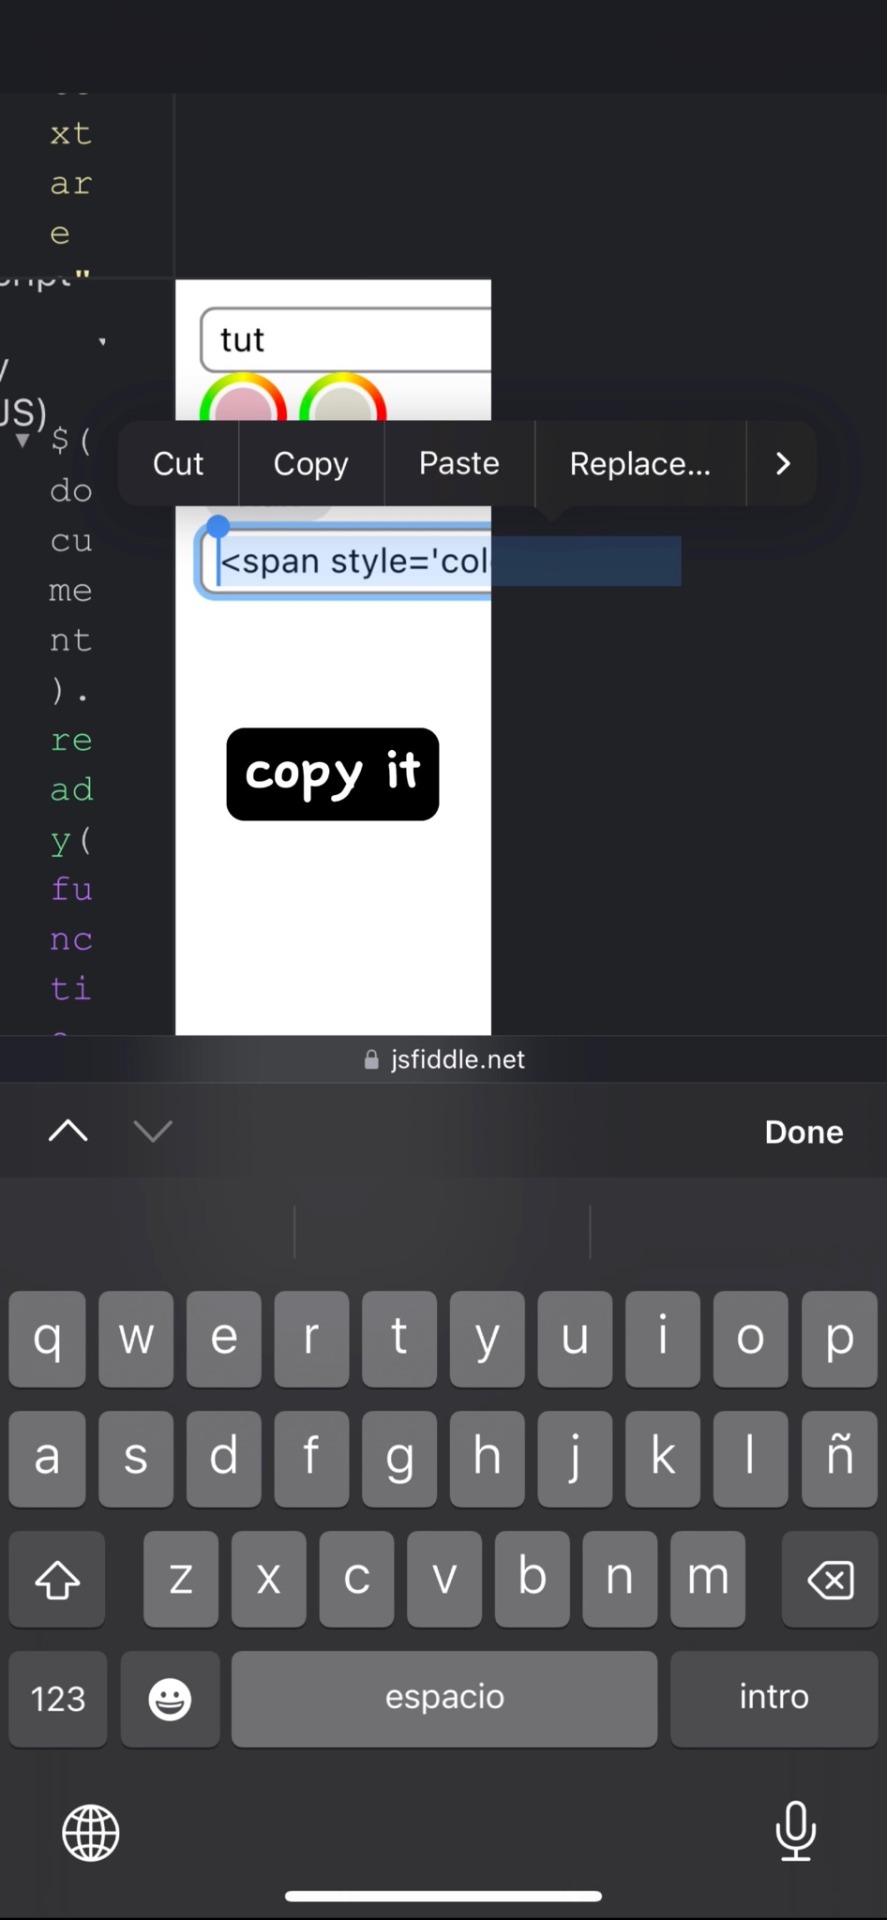
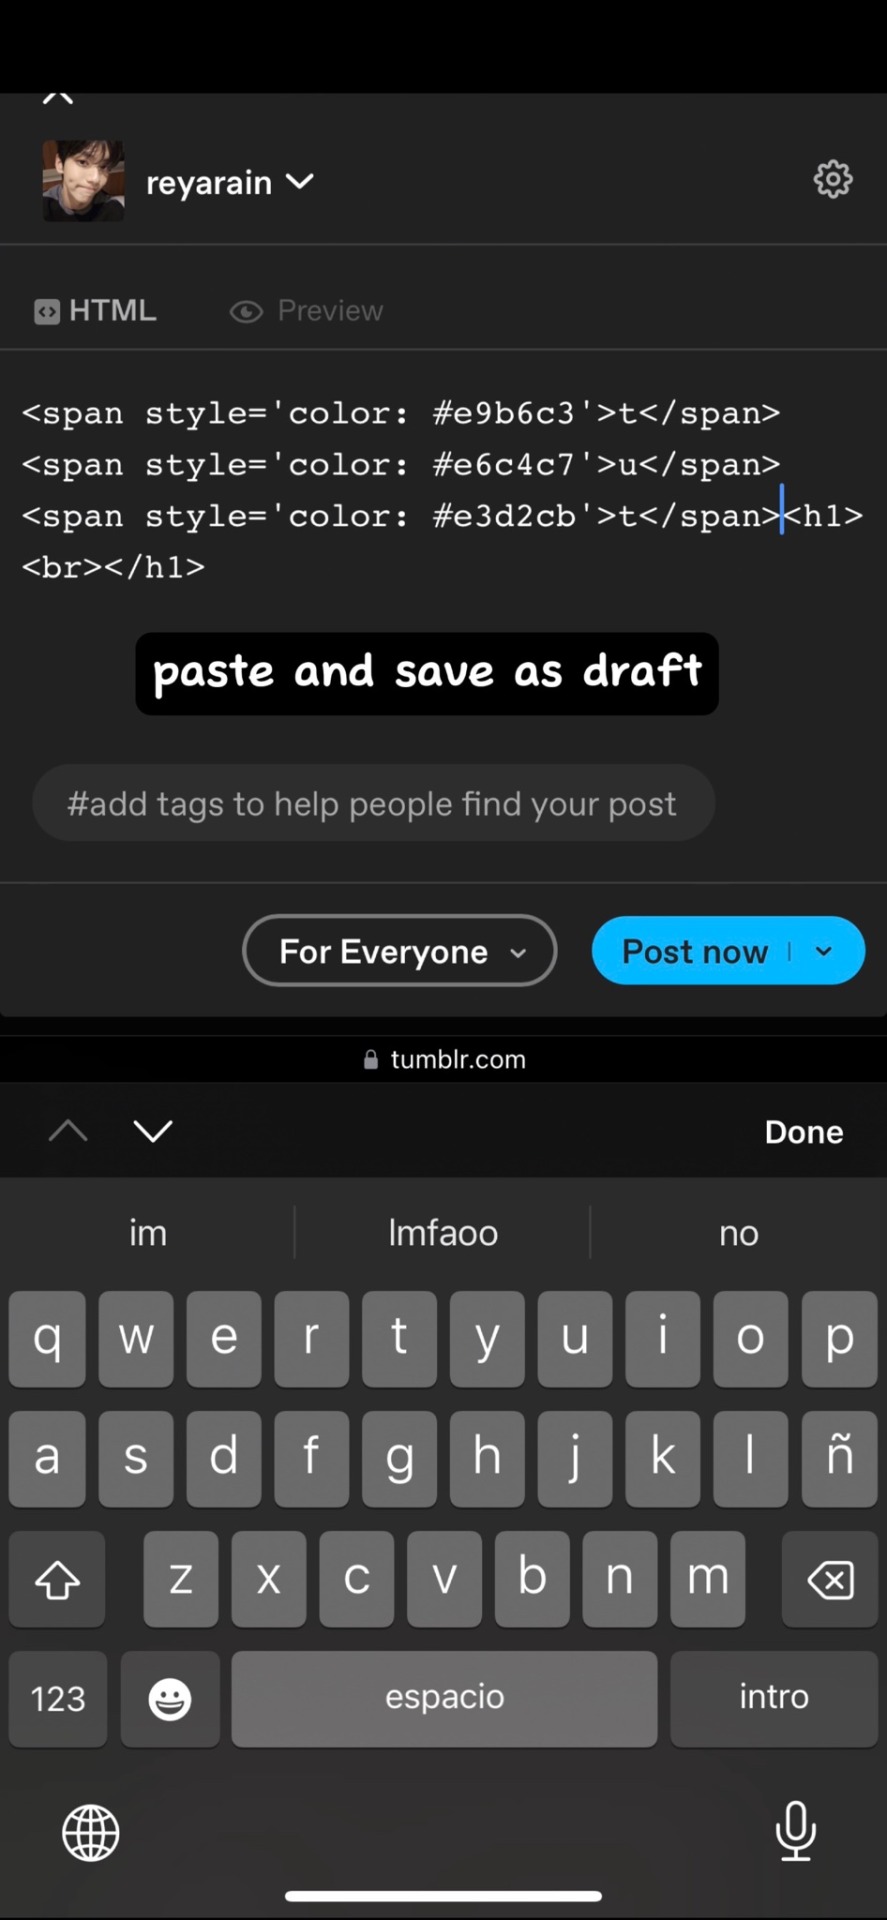
4th, once tour satisfied with everything, you’re gonna go to the very last box and copy everything!

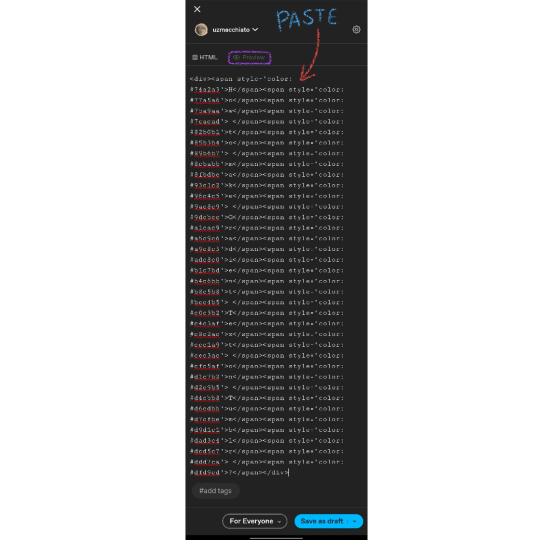
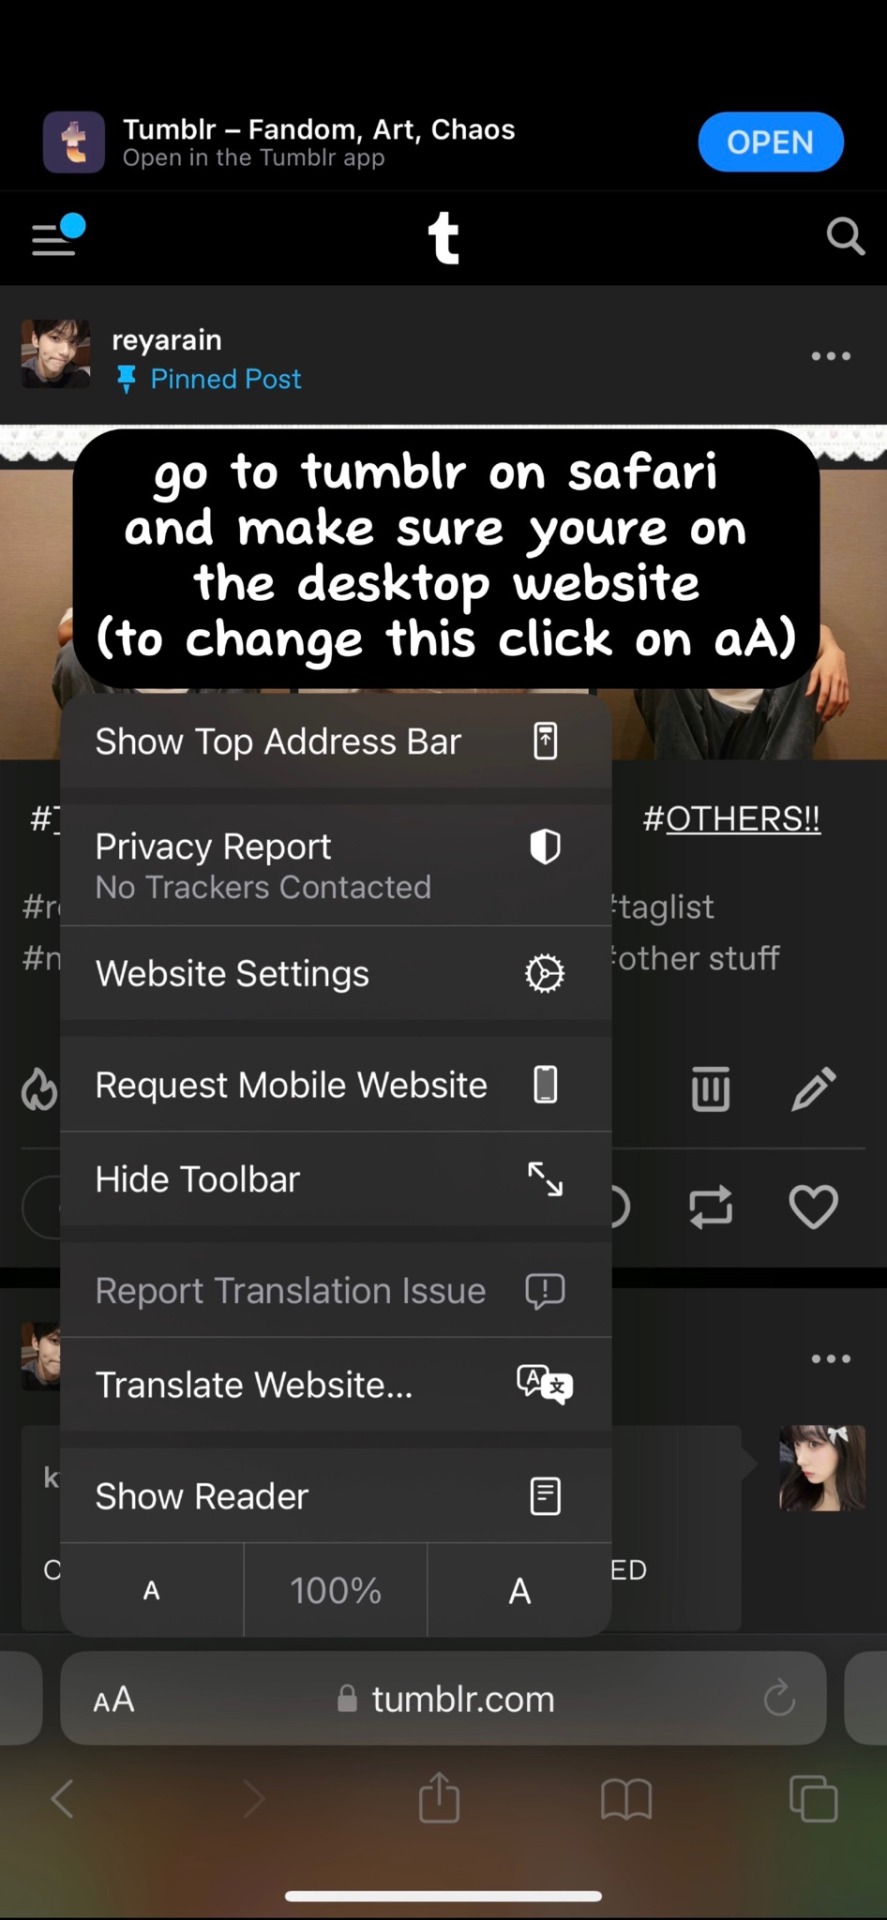
once you finish all that, you’re going to go to the tumblr website! (you can use a computer or google on your phone) go to said draft you want to edit, and click on the settings button in the corner. click on HTML, it’s gonna look CRAZY! but all you have to do is highlight the words you want to colorize and then hit paste!

hit preview ! your text should now be colorized to how you wanted it to look!

and that’s it! just make sure you hit save! then you can go back to editing or typing as normal :)
i tried to make this as simple as i could haha 🥲 hopefully it’s easy to understand 💔 i will also link the original post that i learned from as well however i do skip a few steps since i foudn they’re not needed anymore haha
☆ original tutorial i used: https://www.tumblr.com/kylos/181695757101
23 notes
·
View notes
Text
i been on this site for 4 years (i think it’s been 4????) and i just know learned how to do the gradient color text…..
2 notes
·
View notes
Text
GRADIENT TEXT TUTORIAL

HOW TO GET OMBRÉ STYLED TEXT ON TUMBLR
𝜗℘ I got a request on TikTok asking to do a tutorial on gradient text — tumblr doesn’t have an in-app option on doing gradient texts. This is how.
𝜗℘ Sites you can use: image color picker / stuffbydavid (gradient text).
𝜗℘ People say that you have to use a computer for this, which isn’t true. I am able to make gradient text on my phone, but you can use a computer if you want.

color picking from an image is optional, but highly recommended.
one: put the text you want to color for your tumblr post.
two: change the color of the text to whatever color you want. there are several options on how you want it. pick whatever option you want. the text will automatically generate for you.
three: copy the entire code then press “copy”.
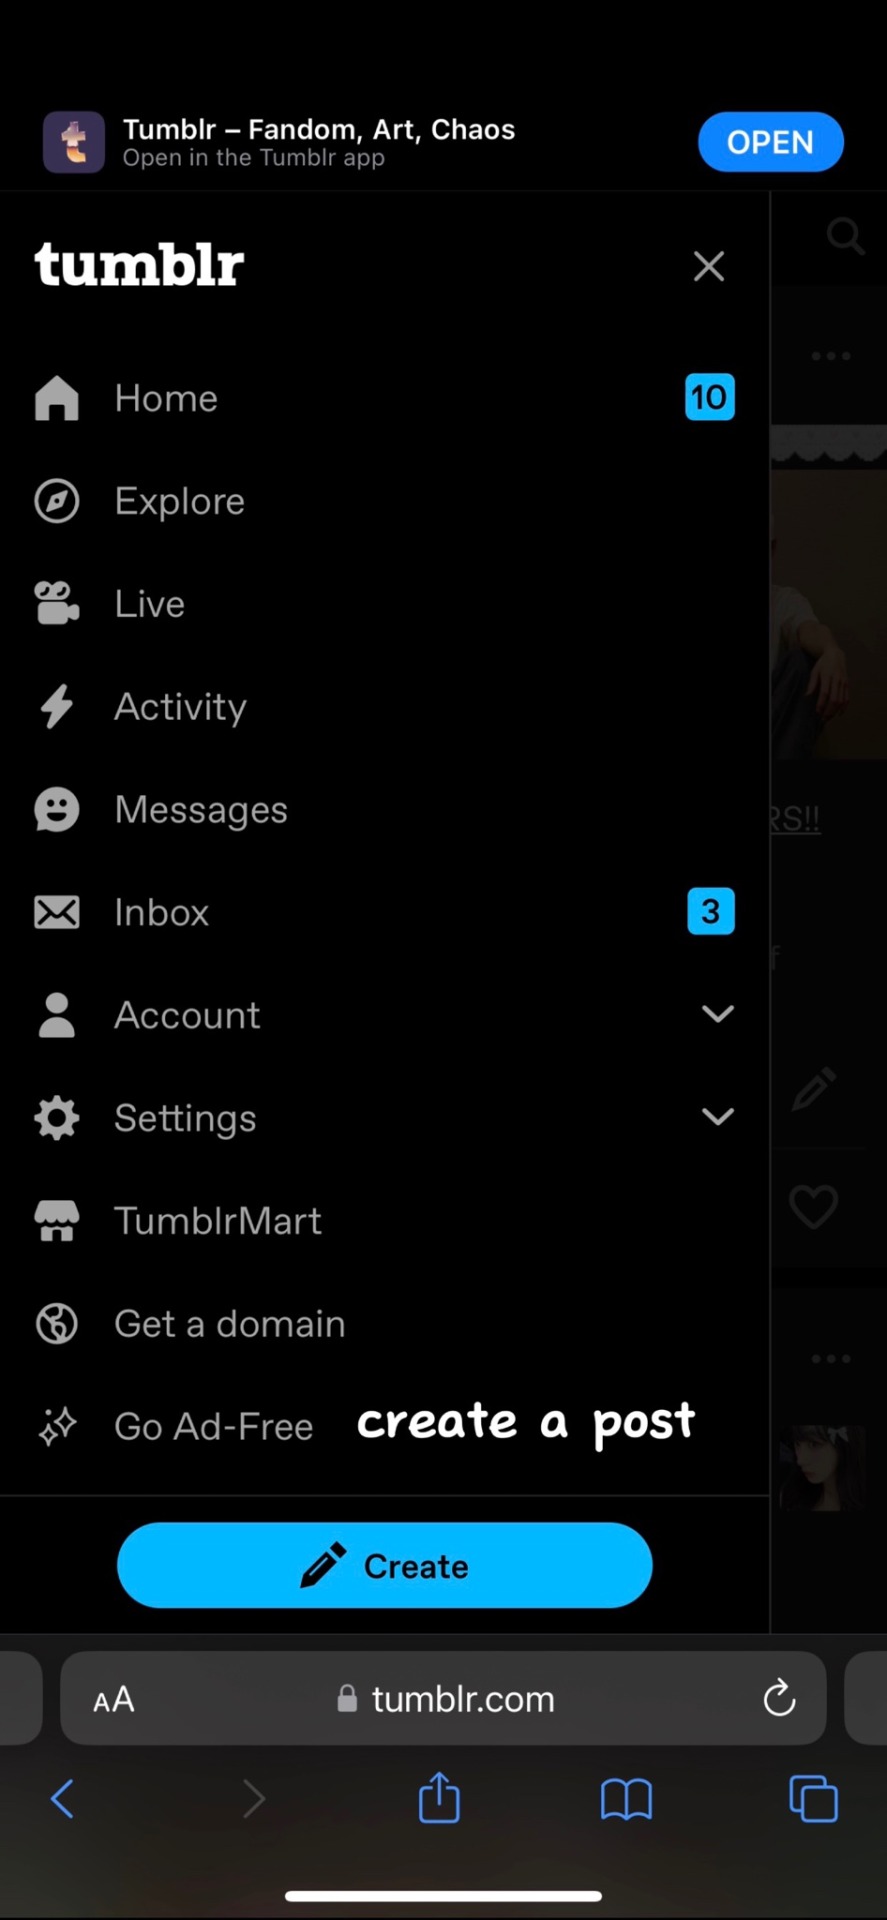
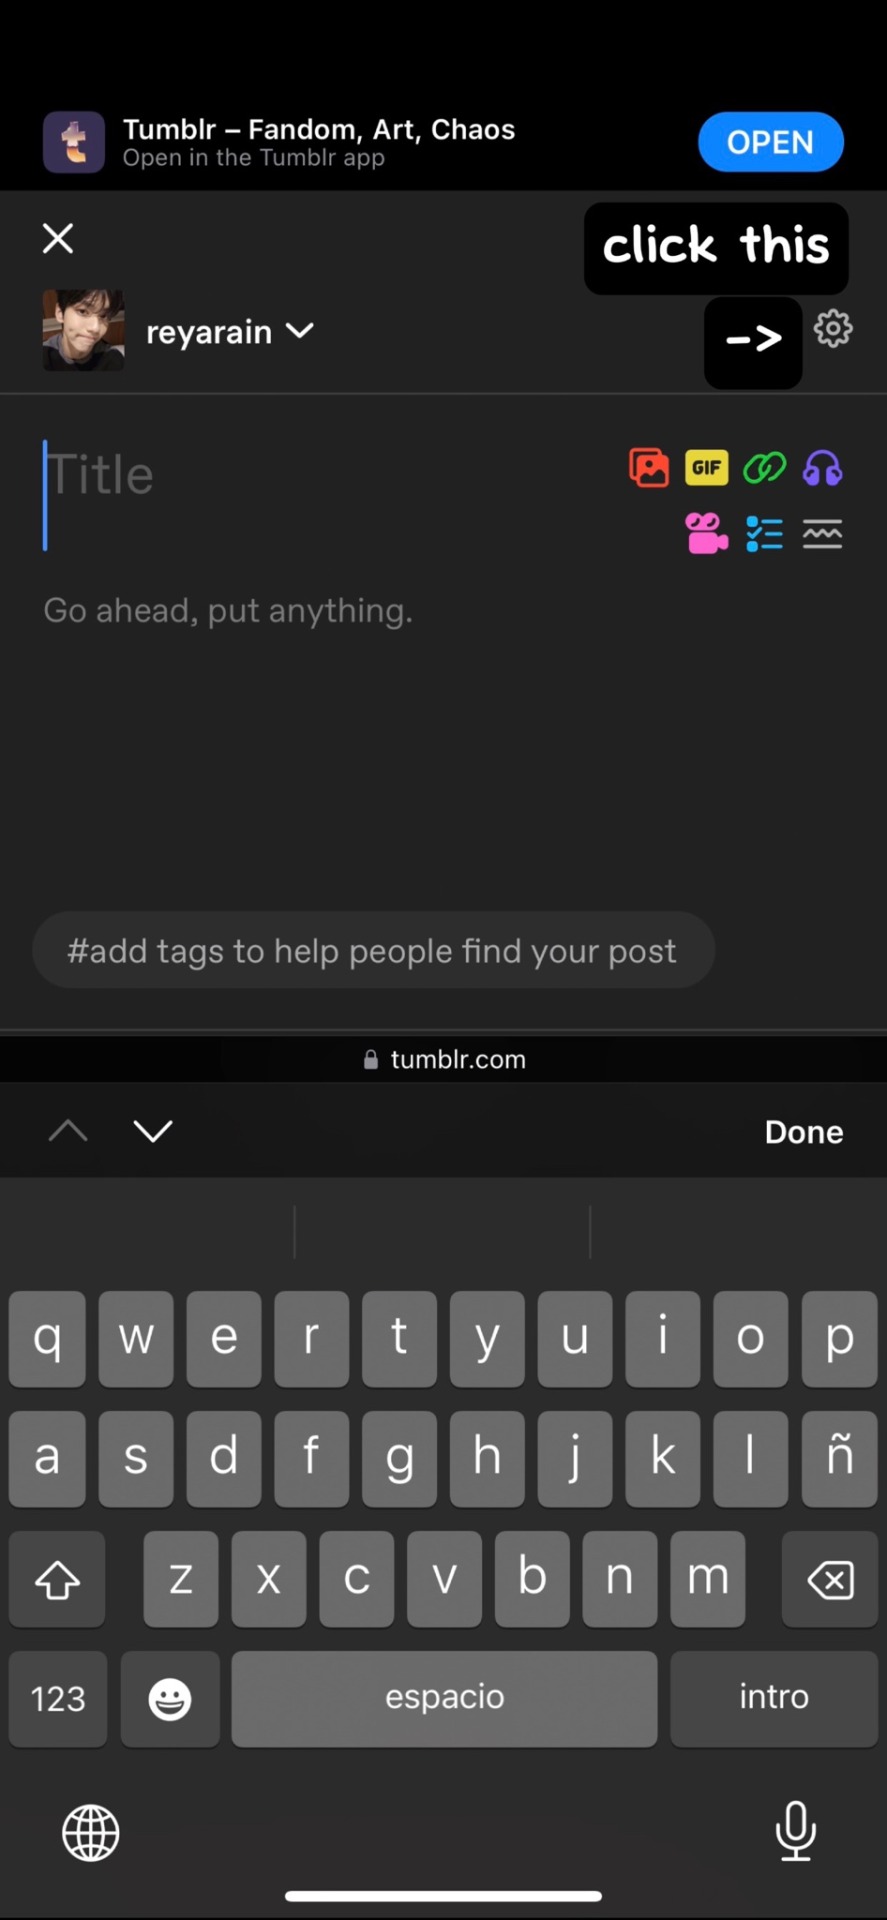
four: go over to tumblr (website, not the app) and click “edit post” (the pencil) or create a new post.
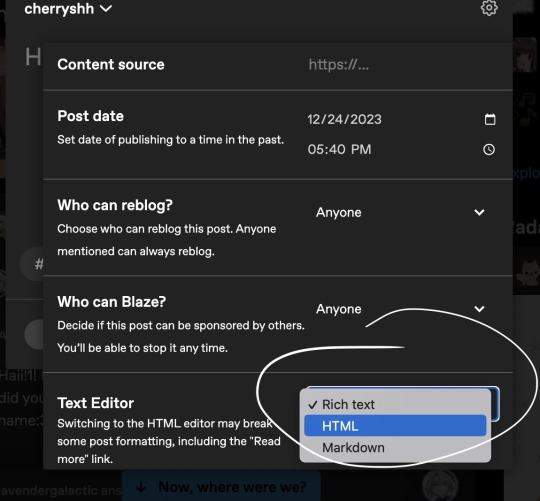
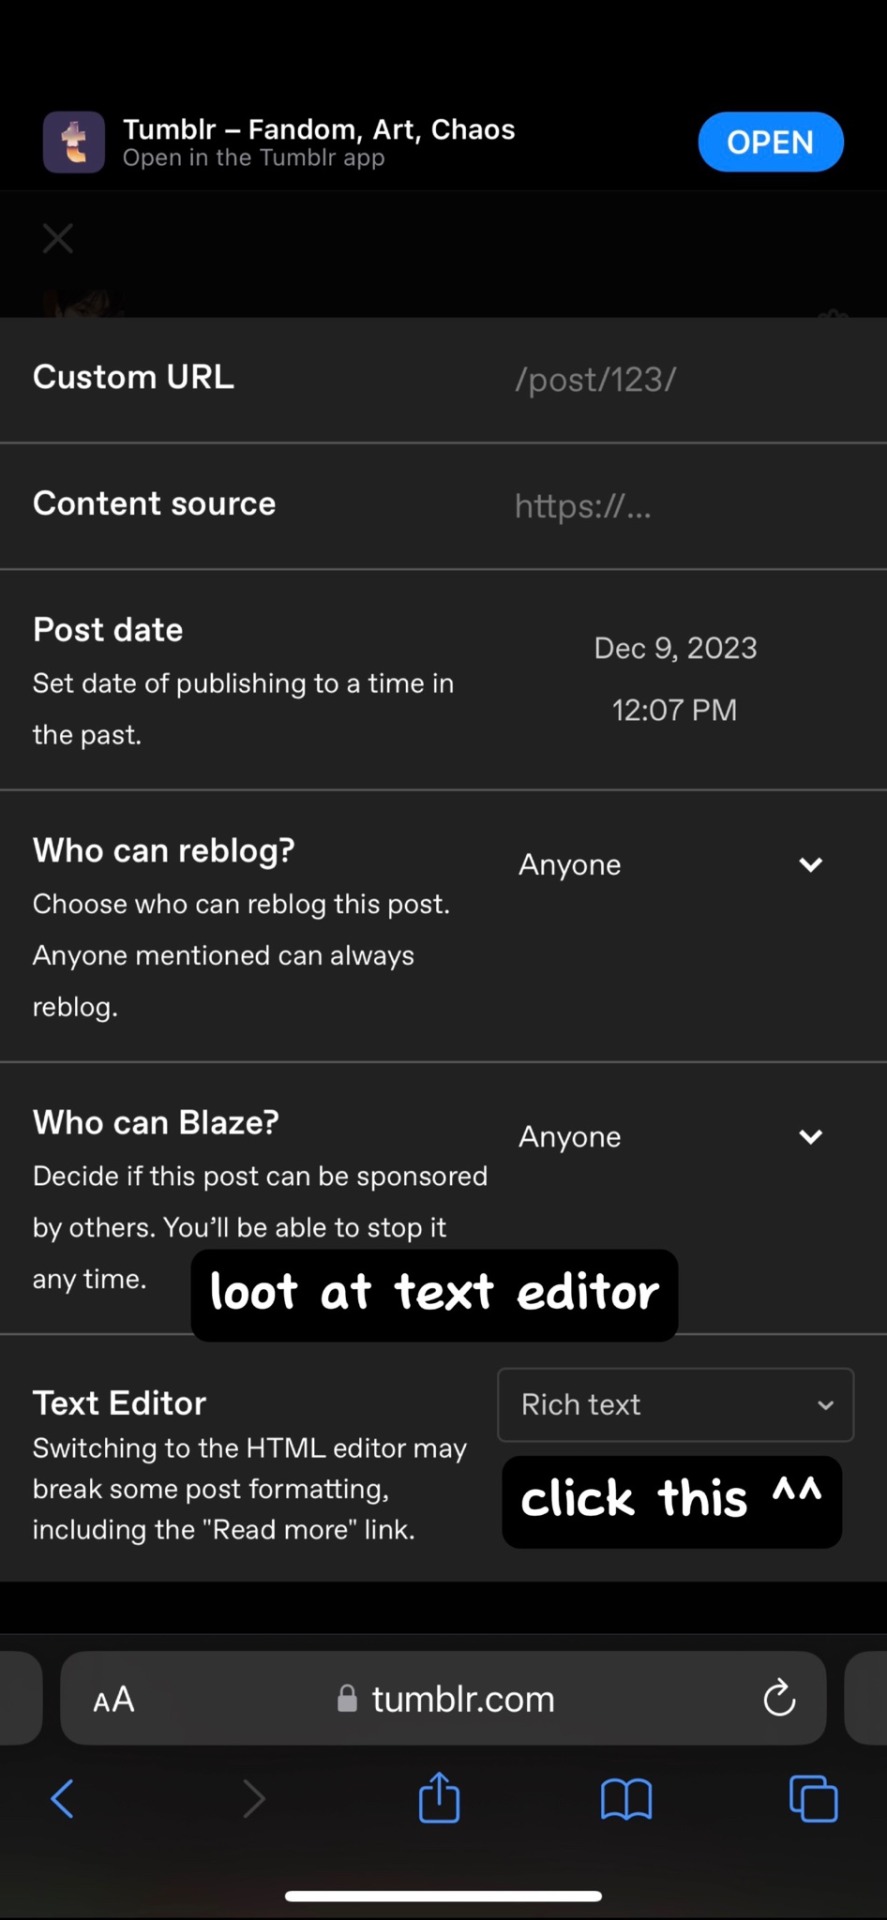
five: click the settings button and change it from “rich text” to “HTML.”
six: paste the code from the gradient text website in the HTML where you want it to go. (I paste it then just save the post to my drafts then edit the text on the app)
#jasper’s tutorials#tutorial#gradient text#ombré text#text#tumblr text#text post#colored text#text tutorial#tumblr blog#tumblr tutorial
426 notes
·
View notes
Note
literally how are you doing the gradient text thing. i need to know.
✨ Snappy's Gradient Text Tutorial
You might have seen me use gradient text in a few of my artworks, and it is a great tool to make a posts tand out! I learned from this post, but find some of the information outdated, so I am making a tutorial of my own!
To my knowledge, this is only possible via desktop mode* (mobile method at end), but not the app, as access to the HTML function is necessary. Alongside that, you need access to a text color fader! There's a few options out there, but I use:
Patorjik's Text Color Fader
Let's get to the tutorial!
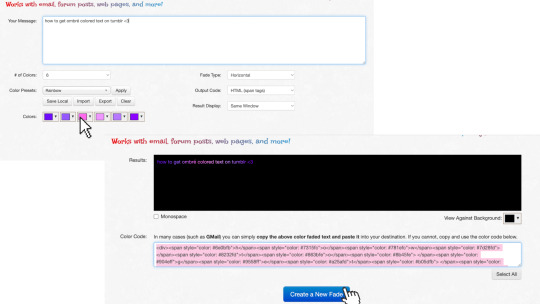
Have the text you want to turn into a gradient ready and copy it to your clipboard.

2. Open the text color fader and paste your text into the box labeled "your message".
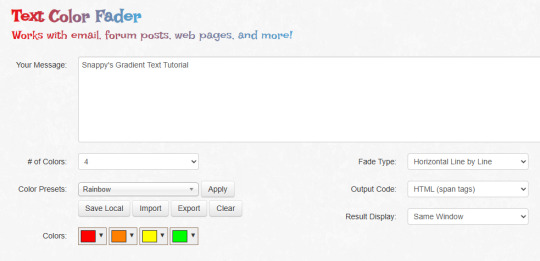
3. For the most basic gradients, you may ignore the boxes on the right. The leftmost boxes allow you to choose between preset colors or making your own colors.
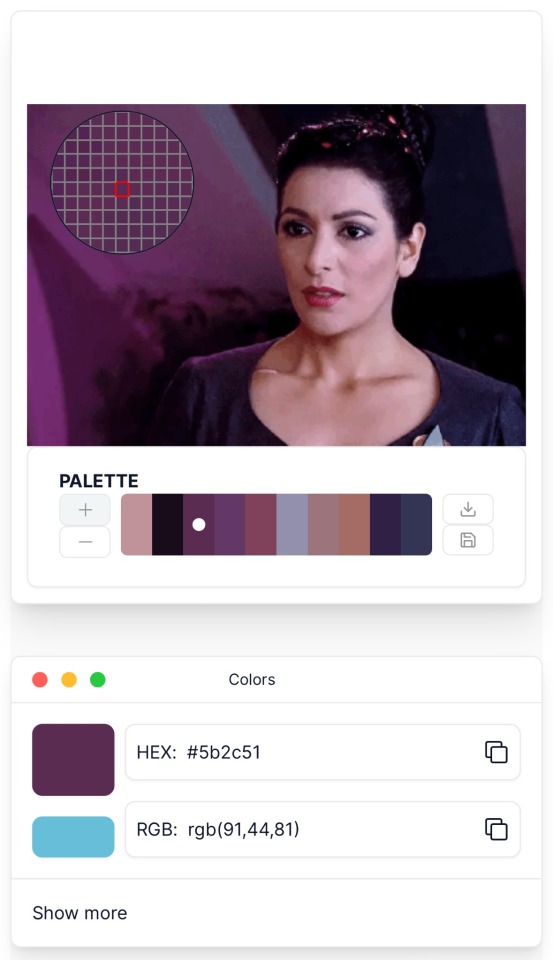
Tip: if you are making a gradient for something such as art, I reccoment grabbing a few hex codes from the image to use for your gradient. This allows you to have control over your colors. You may also save a pallet if you want to use it again


4. When you are happy with your colors, generate your text.

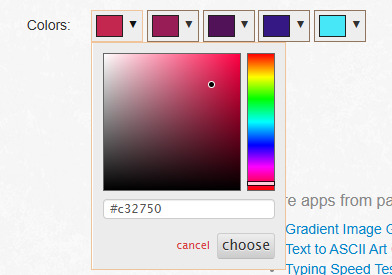
5. You will be brought to this page. If you are happy with the colors, click "select all" and copy the HTML to your clipboard.
TIP: check your text against both a dark and light background to ensure it will be readable to viewers on dark and light mode. If it is not you can tweak the colors by choosing "create new fade".

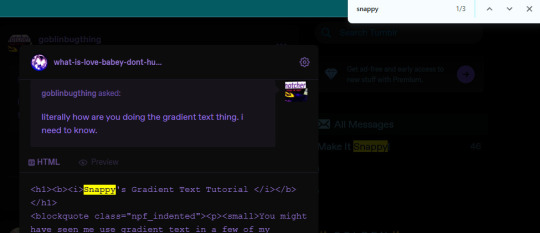
6. Open Tumblr again and open your post. At the top right there is a grear icon. Click the icon and scroll down to the text editor. Change the setting from "rich text" to "HTML"


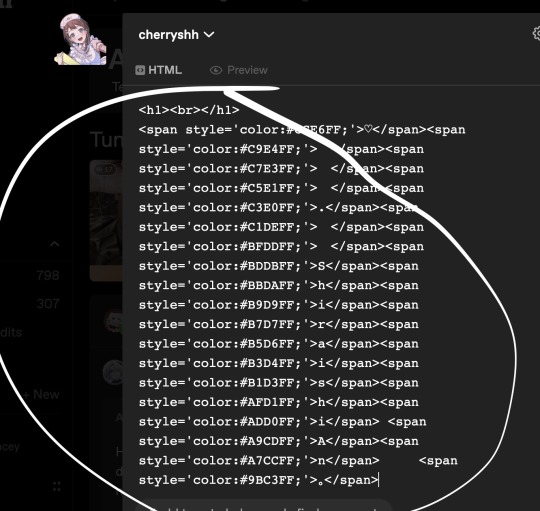
7. When you move to HTML, your post will look very different! In the HTML, your goal is to find the text you want to replace in the code.
TIP: If you can't find it, use "Ctrl + F" to open the keword search function and it will highlight your word.
8. Highlight your plain text, right click it, and paste your HTML from Patorjik into the space.
TIP: The HTML is a confusing mess to look at. Click the "preview" tab to check if your code worked


9. You should see a gradient when you swicth modes!

If the HTML broke your formatting, you can edit it in the preview mode. Once you have done a gradient a couple of times this process is very easy and takes LESS than two minutes. It looks intimidating but after you get the hang it is very achievable! I believe in you guys being able to do it. Happy gradient texting for you guys!
*EDIT: It is possible via mobile through the method of entering your account on a web browser and putting it on computer mode, then following the same process. Reportedly it is less comfortable but it works, thank you to chocokeyboard for letting me know!
#sent to snappy#asks#snappy speaks#web resources#tumblr resources#gradient text#tumblr tutorial#gradient text tutorial#loveee doing this for my posts it adds so much#if anyone DOES know if it can be done on mobile let me know! I will edit this post to include it#EDIT: mobile method found! to my knowledge not app compatable but if anyone knows how to do it via app let me know and I will include it!
213 notes
·
View notes
Note
Hi! How you doing the combination in the titles? Can you do a tutorial please! Thanks!
Hello @elvisbdoll 🫶🏻
~ Firstly, I'll share the link from where I learnt to do that. It is explained in a very easy and short way here.
~ You need to use Tumblr web on your phone or laptop for this idk why it doesn't work on the app.
~ I'll also explain below in my own detailed way, hoping that this becomes easy for anyone who follows my posts and wants to know how I do it😁

• Website for the Gradient Text :
TEXT COLOR FADER
• Detailed process of how I use customised gradient text on Tumblr :
( Pay attention to the colors that I have used in the steps as well as the screenshots to understand better. The markings on the photos are to make it easier to spot what I'm talking about. )
.
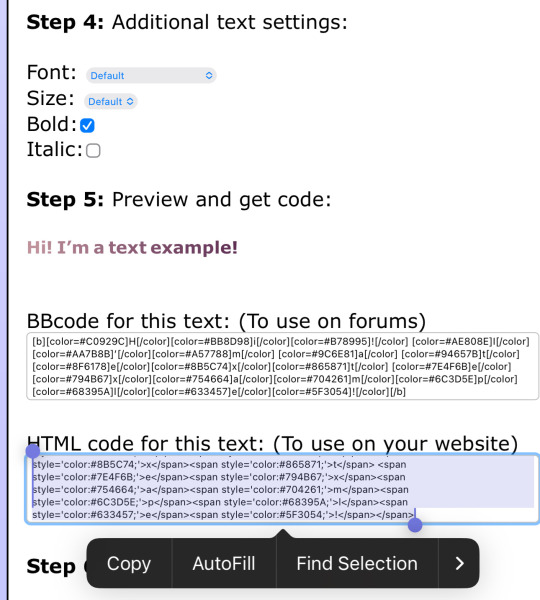
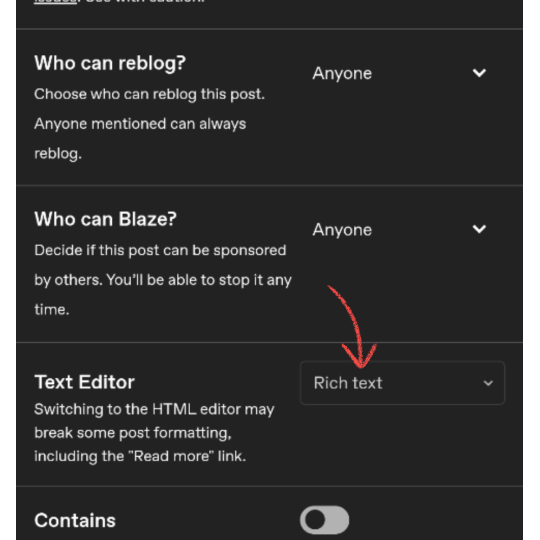
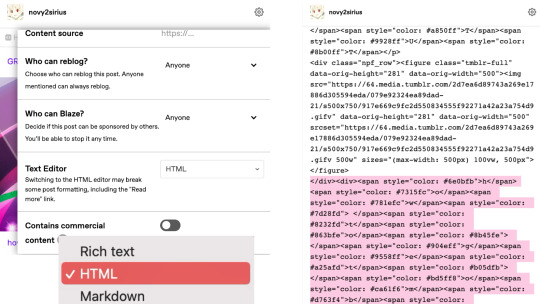
1. Create a post on Tumblr by writing the text you want to make a gradient of and save it as a draft. In the draft → Go to the Settings wheel and in the Text Editor section select HTML which is required by Tumblr to read a coded* text.
* ( The colors of the Gradient text are basically coded into text on the Website I shared above. Hence, changing into the HTML type here will help Tumblr recognise that coded text and turn it into a normal Gradient colored text. )


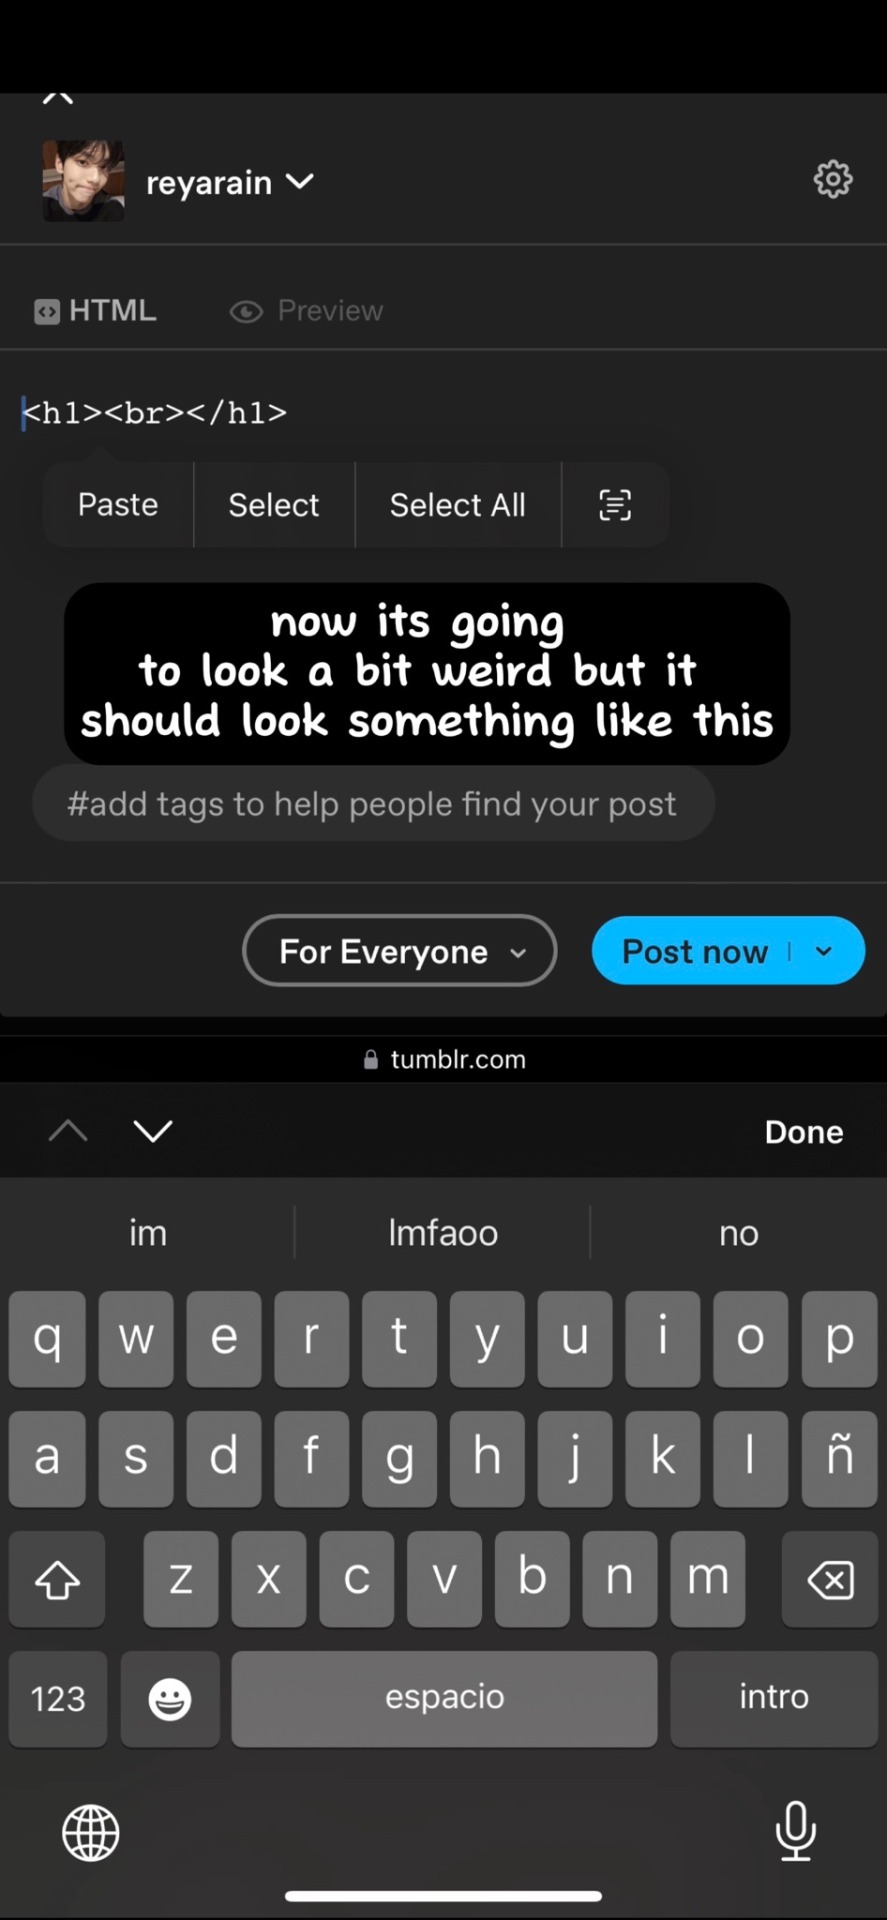
2. You will see a coded version of the text you wrote which is encoded between <h1>...your text...</h1> for my text in the photo below. You can toggle between HTML & Preview to see the coded and uncoded(normal) version of the text. Copy the normal version of the text from the Preview mode that you want to turn into gradient.

3. Visit the Website in the link I've shared above.
.
A: is the part where you paste the text you just copied and want to change into a Gradient.
B: is the number of colors you want to use in the gradient.
C: is the part where you put the color codes (HEX/RGB) or just swipe to get the desired color from the color wheel.

4. I pasted the text in the text box and made the changes that I need to do to get the gradient I want in the next part. I used 4 colors and put the Hex codes for the Teal and Beige colors. Once you're done click on "Generate Color Coded Text"

5. On the next page you'll get to see a preview of the text and the coded text in the box below. Click on Select All and Copy the coded text.
If you want to make any changes you can go back by clicking on "Create a new fade" and you will be taken back to edit the current gradient.

6. Go to the draft and delete the existing text to avoid mixing the coded text with it. Stay on the HTML mode rather than Preview mode.
Paste the coded text while you're on the HTML mode of the draft (the codes are really long depending on the number of colors and length of the text)
After pasting in HTML mode click on Preview and you're DONE.
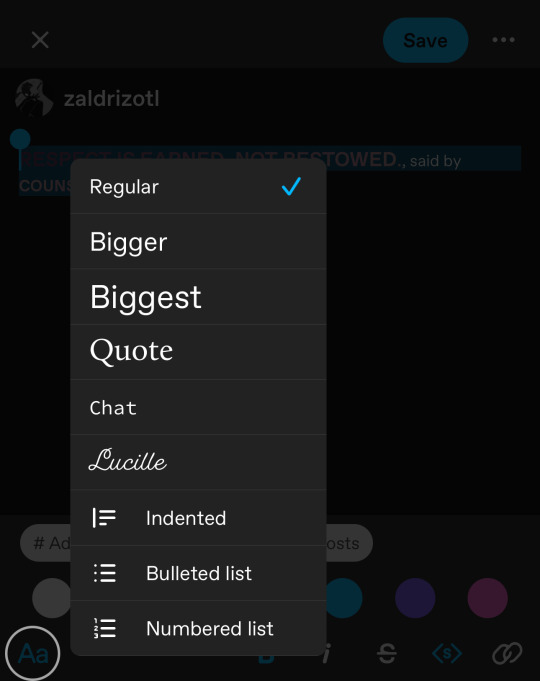
Other than that you can edit the text style after pasting here into the basic styles provided by Tumblr — bold, italic, Chat, Intended, etc.

Final Result : How to make Gradient Text on Tumblr ?
I hope this was helpful😭 I love editing the text and making it match my dividers, so this is magic for me. You can DM me if you need any more help understanding this.
Thank You❤️
#gradient text#Gradient Text tutorial#asks answered#asks#ask answered#uzmacchiato_asks#custom text color#tumblr tutorial#ask
78 notes
·
View notes
Text
GRADIENT TEXT TUT

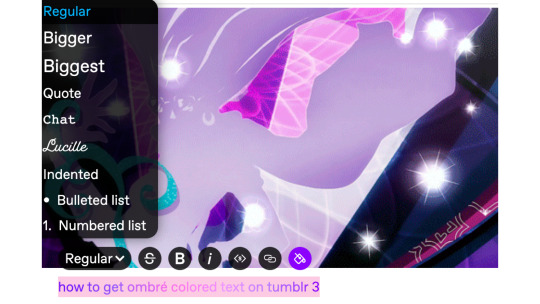
how to get ombré colored text on tumblr <3
꧞ i get a lot of dms and comments asking about how to change the color of your text to colors that tumblr doesn’t have or to an ombré text. this is how
꧞ sites you can use: the one i use // two // three
꧞ you can use your phone for this, but i prefer using the computer. just go to safari to do it instead of the app if you wanna do it on the phone


one: copy the text you want to color from your tumblr post then paste it into the websites text box
two: change the color of the text to whatever color you want. with the website i use it allows you to pick presets or you can also customize your own then click generate
three: click the “select all” button and copy the code
four: go over to tumblr and click the edit button on your post
five: click the settings button and change the text editor to "html" then find the html section at the top and click on it
six: paste the code from the color fader website in the html where you want it to go (i paste it at the top and just edit it on my phone by holding text down and moving it)
216 notes
·
View notes
Note
Hey how do you do the color gradient thing for your dialog tags?
Assuming you mean these things, I've actually been meaning to make a guide of my own for a while lol.
For one, you can only do this on computer/the website of Tumblr! There's no option to select this stuff on the app.

STEP 1: CREATE A NEW DOC / GO TO SETTINGS

It opens a dropdown menu/whole screen full of options!
From there, select the "text editor" dropdown, which starts as displaying "rich text".

Select "HTML"

And it should change how the entire post looks!

STEP TWO: CHEAT
Yeeeeeaaaaah, so I use a website for this lol

I inserted my colors for faeries (#30853C) and Cloud (#6DC1B4) for my example of "these things" earlier. To make this easier, I most often have two windows open at a time while working on uploading my scripts to Tumblr.

To get colours to insert into the Text Colorizer website, you can use any kind of hex color picker or even this one website I've used to yoink "thematic" colors from photos!


Personally, I've developed a massive library of colors over time for this exact purpose lol. Using my old colors as a "base", I can change it accordingly to the kind of "new color" that I want for a specific character or thing!


(I'll use the website to also make gradients for "in-between" colors lol)
STEP 3: INSERT TEXT / DESIRED COLORS
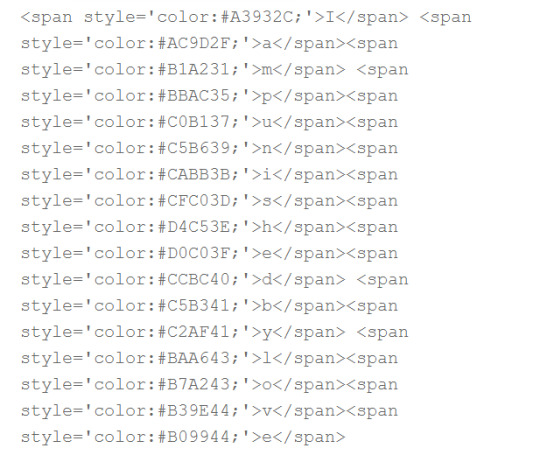
To make Nova's gradient, I start with #A600D9, my color for Magic, and end with #F56745—their individual color. However, being as it's short, I'll use a quote from them instead lol.

Once you've inserted your text and colors, you will click in the text box I highlighted in red, ctrl+a and ctrl+c to copy it all, and go back over to your new tumblr post tab!
From there, you'll ctrl+v to paste the entirety into the HTML area, which pastes the code into your post!

AND VOILA!

You have gorgeous gradient text!
However, I want to give a fair warning and a bit of advice! If you didn't notice wayyyyyyy back when...

Tumblr warns that this all can break your formatting!
It doesn't do it too often, but take it from someone who does an obscene amount of formatting... it's 100% true.
STEP 4: CHEAT SOME MORE!
For this reason, I personally have a whole separate draft post full of my characters' colors (and names lol) that I use to copy-paste them in from rather than using the "html" text editor on every post!
I mentioned earlier I often have multiple windows open while editing? Here's what that looks like!

Additionally, I'll use a separate tab off on the left (my "current wip post" side) with the "html editor" enabled for me to copy-paste stuff!
(Also here's yet another example of how many colors I have)

Once again, you can ctrl+c these things to paste them into another tumblr post with the correct colors!
And it's ONLY possible to do on the website!!!
EXTRA INFO!
WARNING:
Tumblr will only allow each "paragraph's html to be so many characters long, so you can't have too big of anything in a gradient!

And by "anything"... I mean you really can't have that big of a gradient in general. RIP lol.
It straight-up won't save the post so long as you have that "overflow" in the character block! MAKE SURE YOU'VE FIXED IT, OR YOU CAN AND WILL LOSE ALL PROGRESS ON YOUR POST!
SINGLE-COLOR TIP:
You don't need the website for a single color! If you'd like, you can just change the "color code" within the html editor to change specific colors!

MAKE SURE COLORS CAN WORK ON DIFFERENT BACKGROUNDS!
On desktop, you can use shift+p while not on any sort of textbox to change the color pallet! I always do tests to see which colors work best before settling on any!

(Tho, the blue background SPECIFICALLY is nightmarish to work around. So if that's the ONLY thing I can't make work, I often ignore it and let you guys who use it suffer lmao)
(Hopefully this'll give you guys some respect for me and how much I do to make my posts aesthetic af lol)
Also hopefully this all helps???
divider by @cafekitsune
73 notes
·
View notes
Text
COLOUR TEXT TUTORIAL ⋆౨ৎ˚⟡˖ ࣪

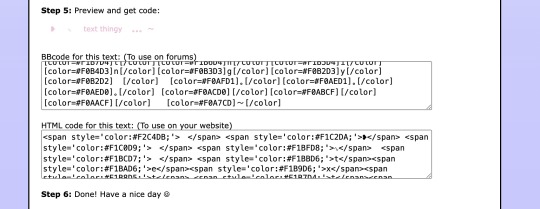
go to this site ➤ follow the instructions & copy the code from the bottom box (the HTML one) ➤ open tumblr on a desktop browser ➤ create new post ➤ click the gear icon in the top-right corner to access settings ➤ scroll down and find the “text editor” option; switch it to “HTML.” ➤ paste the HTML code into the post editor ➤ scroll back up and switch between “HTML” and “preview” modes to edit the code and see how your post looks ➤ save draft :)
step-by-step pictures under cut :
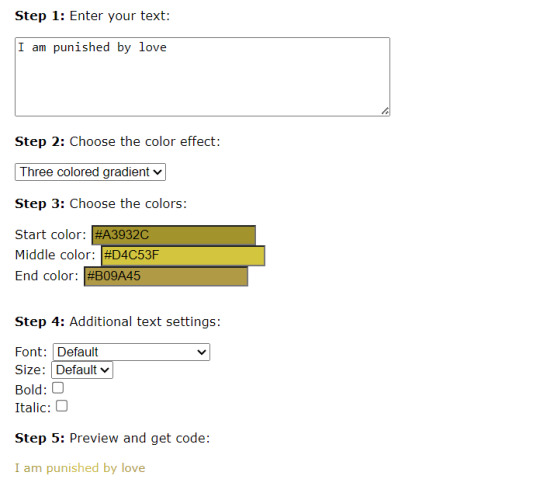

final result : I am punished by love
63 notes
·
View notes
Text
TUTORIAL: how to make gradient text for your post
I hope this helps and I hope that i didn’t explain it horribly @sylvialentina
30 notes
·
View notes
Note
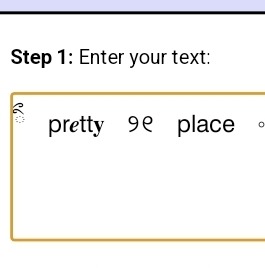
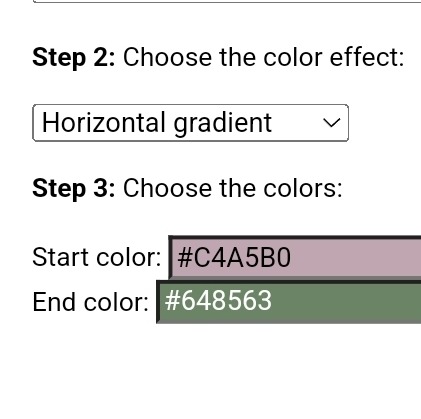
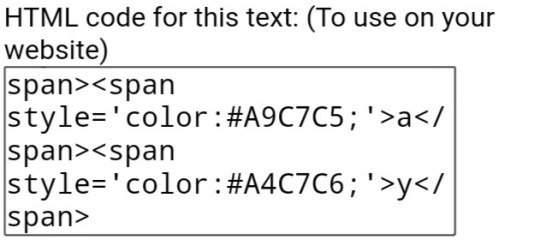
How to change text colour?
here you go !
• first use this site to get your hex codes !
• then use this site to do the following:
- step 1: enter the text you want in the box
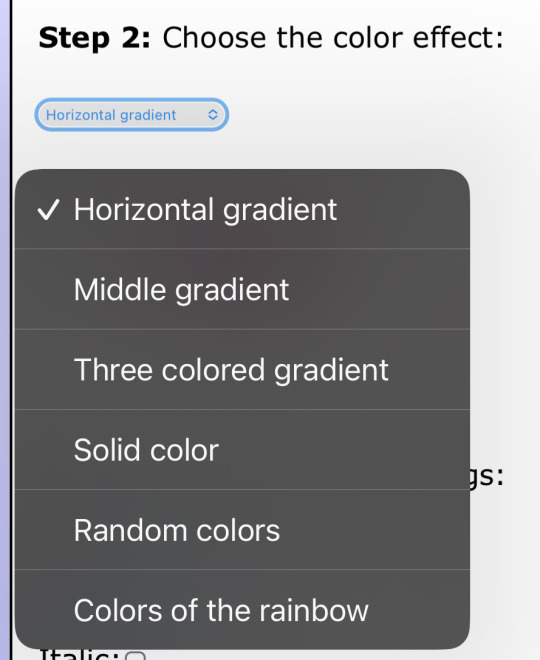
- step 2: select the color effect you want ( i use the “three colored gradient” )
- step 3: enter your hex codes ( depending on the color effect you chose, you may need a different number of hex codes )

- step 4: copy the HTML code ( the second box NOT the BBcode )

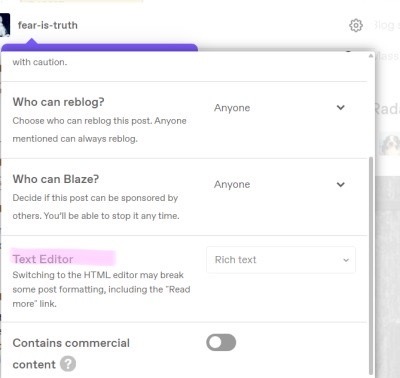
• after that, open tumblr ( this only works on the web version NOT the app & i recommend doing it on a computer, simply because i find it easier ! )
• go to your draft ( or i recommend creating a new draft specific for the gradient ) and :
- click settings and scroll until “text editor” then switch to HTML

- then paste your copied HTML code and save
• it should result in looking like this:

• and that’s it ! if you directly added the code into an already established draft, you will need to reorganize your images, but if you created a new draft for the code, just “edit” the text draft and copy and paste the text into the correct draft !
• hope that helps !!
16 notes
·
View notes
Note
how do you add the color gradient thingy to your text? i've been trying to look up tutorials but i cant find anything :(
GRADIENT TEXT TUTORIAL ꣑ৎ

hii!! i made a video cause idk how to explain!!!
here's the code website i used !!!
hopefully this makes sense!!!
enjoy jacqueline taieb in the background too lol
43 notes
·
View notes
Note
hi !! i saw that you use gradient text and just wanted to ask for an example of the html on how to do it ? online tutorials haven't been helping me but i really wanna use it .. it's ok if you don't wanna share ^_^
Haiii sweet anon ! ! The Idol isn't the best at explaining , but che will try to do so to the best of her abilities. (( remember , this is only on desktop ))
step 1 ;; go to this page & insert the txt uu want 2 be gradient

step 2 & 3 ;; select the colors uu want for the gradient , then copy the second box of cnp text

step 4 ;; do a post like u normally would & click on the lil' settings icon
step 5 ;; uu should see a screen that allows you to switch from rich text to html.
step 6 ;; just go back to where you insert the text for uur post and paste the html you got from the website earlier.
step 7 ;; click on the lil' settings icon again and switch the text editor back to rich text, and done ! < 3
69 notes
·
View notes
Note
Hello!
I just wanted to ask how did you get your text color to fade like that? Thanks!
hello hello
so you go to this website
this is what you will see

but you're only gonna work with this:
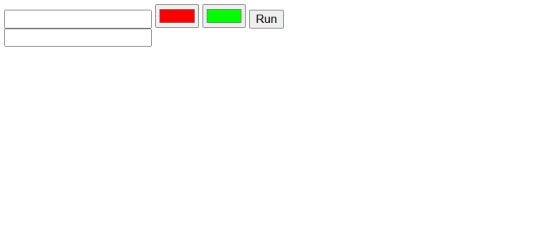
so in the top box, you will write the text you want. then change the two colors you see to the ones you want. in my case, it should be smth like this:

then you will click run, and you should get a link in the lower box. copy the link cause that's what you will use
then go back to the post you're working on in tumblr. click the cog or settings of the post
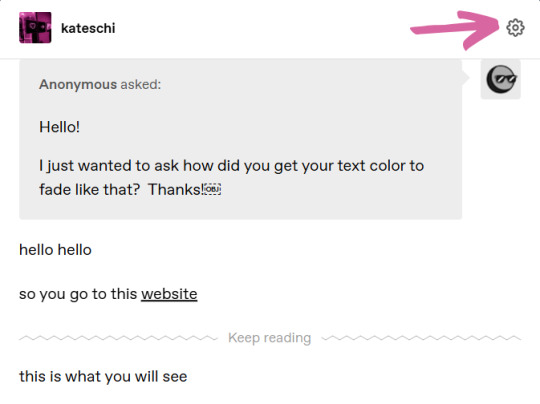
then scroll to text editor

click on rich text and choose HTML instead. it should show you the post again but in HTML format
just paste the link you got from website before onto the post and switch back to rich text and it should look like this:
the final result!
sorry i took a long time to respond it's cause i wanted to give as clear of a guide as i could
hope this helped!
11 notes
·
View notes
Text
🔎𝗚𝖱𝖠𝖣𝖨𝖤𝖭𝖳 𝗧𝖤𝖷𝖳 𝓣𝗎𝗍𝘰𝗋𝗂𝖺𝗅 ; 𝓑𝐲 𝐋𝐢𝐚
ʚ₍ᐢ. .ᐢ₎ɞ Requested by: anonymous
Resume: Two-Color Gradient Text Tutorial in Four Simple Steps (˶ᵔᴗᵔ˶) credits to @iluvrei i learned it thanks to her!♡

•Step 1
enter to Bbcode and HTML text colorizer (web) enter your text and choose 2 colors for your text ₍⑅ᐢ..ᐢ⑅₎ but you can configure if you want the gradient to be horizontal or vertical

• Step 2
Copy your code text HTML mode (scroll down to copy everything) important step
• Step 3
If you are on the phone go to the tumblr website but if you are on a computer just go to create post and we will go to the post configuration


will go to this option and activate it in the HTML editor we go back to our post and paste the previous text code

•Step 4
We save the draft and that's it ;) your text will be ready to use
Thanks for reading I hope it helps you!♡ (˙ᵕ˙ ) (just ask if you need a tutorial of something)
36 notes
·
View notes
Text
*ping* ┈➤ how to make gradient texts on iphone!

- i got requested to do this and there is no such thing as gate keeping here so here it is!! hope this helps ‼️

38 notes
·
View notes
