#gradient colored text tutorial
Explore tagged Tumblr posts
Visit Tumblr Blog
Explore Tumblr blogs with no restrictions, modern design and the best experience.
Last Seen Tumblr Blogs


Fun Fact
In 2020, 44% of users from Denmark used Tumblr daily.
Link
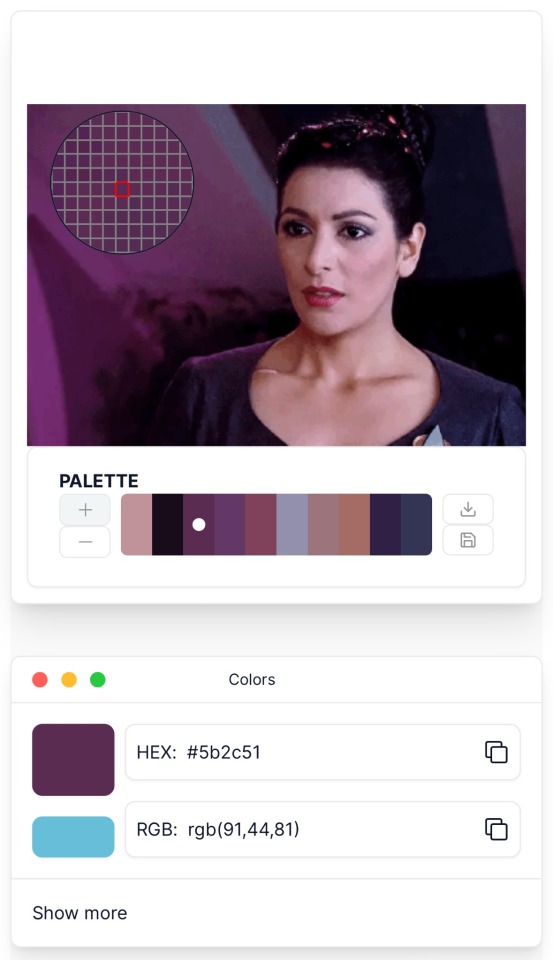
Photoshop text effect - create gradient text effect in photoshop cs6, gradient colored text tutorial, how to create gradient text
0 notes
Text
GRADIENT TEXT TUTORIAL

HOW TO GET OMBRÉ STYLED TEXT ON TUMBLR
𝜗℘ I got a request on TikTok asking to do a tutorial on gradient text — tumblr doesn’t have an in-app option on doing gradient texts. This is how.
𝜗℘ Sites you can use: image color picker / stuffbydavid (gradient text).
𝜗℘ People say that you have to use a computer for this, which isn’t true. I am able to make gradient text on my phone, but you can use a computer if you want.

color picking from an image is optional, but highly recommended.
one: put the text you want to color for your tumblr post.
two: change the color of the text to whatever color you want. there are several options on how you want it. pick whatever option you want. the text will automatically generate for you.
three: copy the entire code then press “copy”.
four: go over to tumblr (website, not the app) and click “edit post” (the pencil) or create a new post.
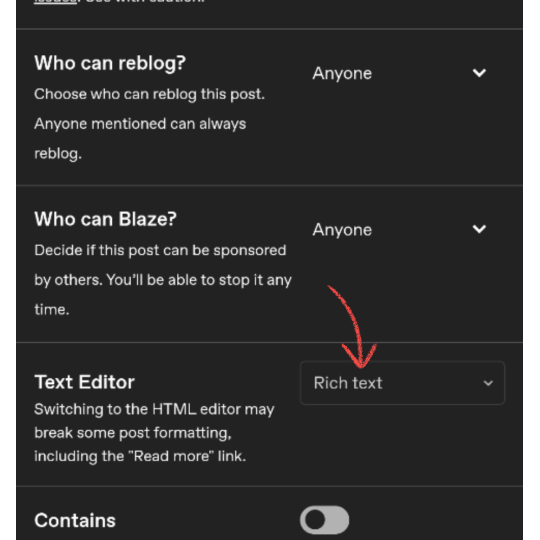
five: click the settings button and change it from “rich text” to “HTML.”
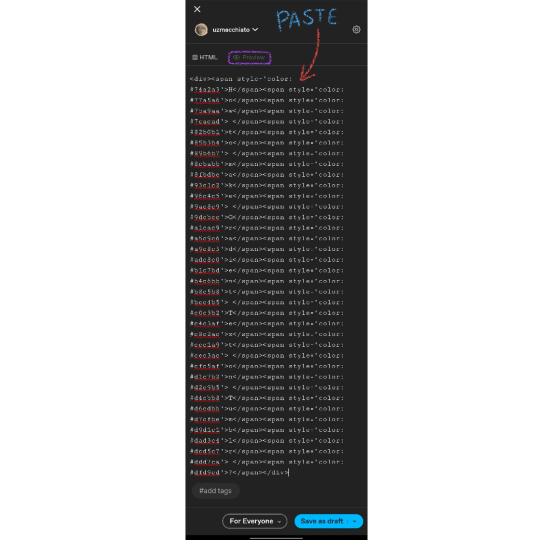
six: paste the code from the gradient text website in the HTML where you want it to go. (I paste it then just save the post to my drafts then edit the text on the app)
#jasper’s tutorials#tutorial#gradient text#ombré text#text#tumblr text#text post#colored text#text tutorial#tumblr blog#tumblr tutorial
426 notes
·
View notes
Note
Hi! How you doing the combination in the titles? Can you do a tutorial please! Thanks!
Hello @elvisbdoll 🫶🏻
~ Firstly, I'll share the link from where I learnt to do that. It is explained in a very easy and short way here.
~ You need to use Tumblr web on your phone or laptop for this idk why it doesn't work on the app.
~ I'll also explain below in my own detailed way, hoping that this becomes easy for anyone who follows my posts and wants to know how I do it😁

• Website for the Gradient Text :
TEXT COLOR FADER
• Detailed process of how I use customised gradient text on Tumblr :
( Pay attention to the colors that I have used in the steps as well as the screenshots to understand better. The markings on the photos are to make it easier to spot what I'm talking about. )
.
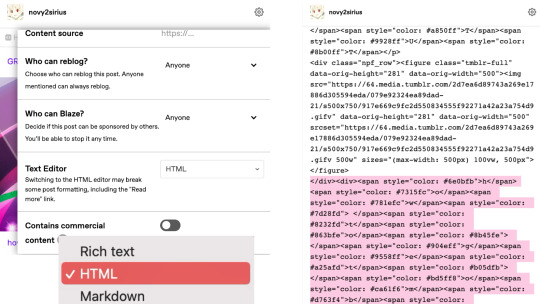
1. Create a post on Tumblr by writing the text you want to make a gradient of and save it as a draft. In the draft → Go to the Settings wheel and in the Text Editor section select HTML which is required by Tumblr to read a coded* text.
* ( The colors of the Gradient text are basically coded into text on the Website I shared above. Hence, changing into the HTML type here will help Tumblr recognise that coded text and turn it into a normal Gradient colored text. )


2. You will see a coded version of the text you wrote which is encoded between <h1>...your text...</h1> for my text in the photo below. You can toggle between HTML & Preview to see the coded and uncoded(normal) version of the text. Copy the normal version of the text from the Preview mode that you want to turn into gradient.

3. Visit the Website in the link I've shared above.
.
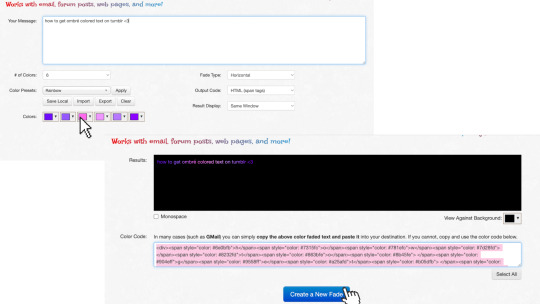
A: is the part where you paste the text you just copied and want to change into a Gradient.
B: is the number of colors you want to use in the gradient.
C: is the part where you put the color codes (HEX/RGB) or just swipe to get the desired color from the color wheel.

4. I pasted the text in the text box and made the changes that I need to do to get the gradient I want in the next part. I used 4 colors and put the Hex codes for the Teal and Beige colors. Once you're done click on "Generate Color Coded Text"

5. On the next page you'll get to see a preview of the text and the coded text in the box below. Click on Select All and Copy the coded text.
If you want to make any changes you can go back by clicking on "Create a new fade" and you will be taken back to edit the current gradient.

6. Go to the draft and delete the existing text to avoid mixing the coded text with it. Stay on the HTML mode rather than Preview mode.
Paste the coded text while you're on the HTML mode of the draft (the codes are really long depending on the number of colors and length of the text)
After pasting in HTML mode click on Preview and you're DONE.
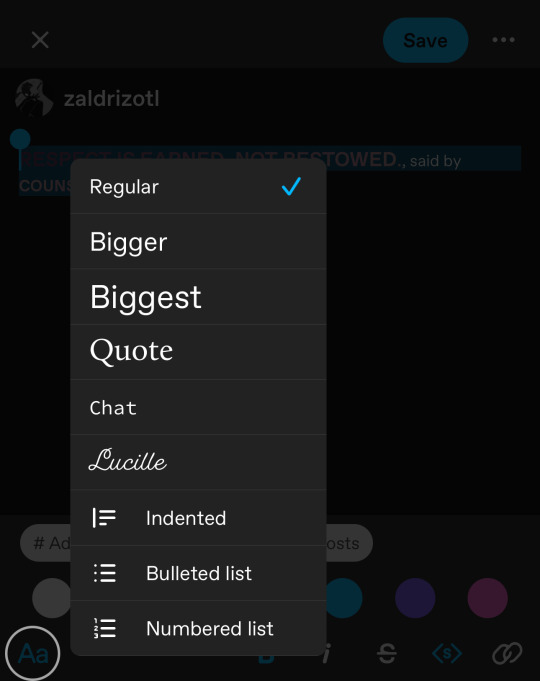
Other than that you can edit the text style after pasting here into the basic styles provided by Tumblr — bold, italic, Chat, Intended, etc.

Final Result : How to make Gradient Text on Tumblr ?
I hope this was helpful😭 I love editing the text and making it match my dividers, so this is magic for me. You can DM me if you need any more help understanding this.
Thank You❤️
#gradient text#Gradient Text tutorial#asks answered#asks#ask answered#uzmacchiato_asks#custom text color#tumblr tutorial#ask
78 notes
·
View notes
Text
GRADIENT TEXT TUT

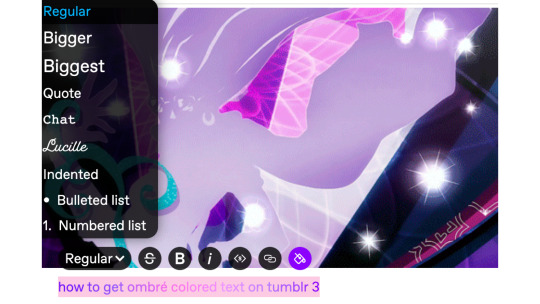
how to get ombré colored text on tumblr <3
꧞ i get a lot of dms and comments asking about how to change the color of your text to colors that tumblr doesn’t have or to an ombré text. this is how
꧞ sites you can use: the one i use // two // three
꧞ you can use your phone for this, but i prefer using the computer. just go to safari to do it instead of the app if you wanna do it on the phone


one: copy the text you want to color from your tumblr post then paste it into the websites text box
two: change the color of the text to whatever color you want. with the website i use it allows you to pick presets or you can also customize your own then click generate
three: click the “select all” button and copy the code
four: go over to tumblr and click the edit button on your post
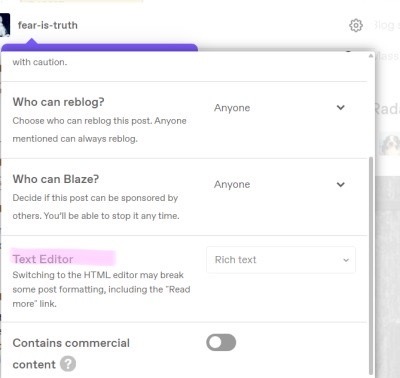
five: click the settings button and change the text editor to "html" then find the html section at the top and click on it
six: paste the code from the color fader website in the html where you want it to go (i paste it at the top and just edit it on my phone by holding text down and moving it)
216 notes
·
View notes
Text
COLOUR TEXT TUTORIAL ⋆౨ৎ˚⟡˖ ࣪

go to this site ➤ follow the instructions & copy the code from the bottom box (the HTML one) ➤ open tumblr on a desktop browser ➤ create new post ➤ click the gear icon in the top-right corner to access settings ➤ scroll down and find the “text editor” option; switch it to “HTML.” ➤ paste the HTML code into the post editor ➤ scroll back up and switch between “HTML” and “preview” modes to edit the code and see how your post looks ➤ save draft :)
step-by-step pictures under cut :

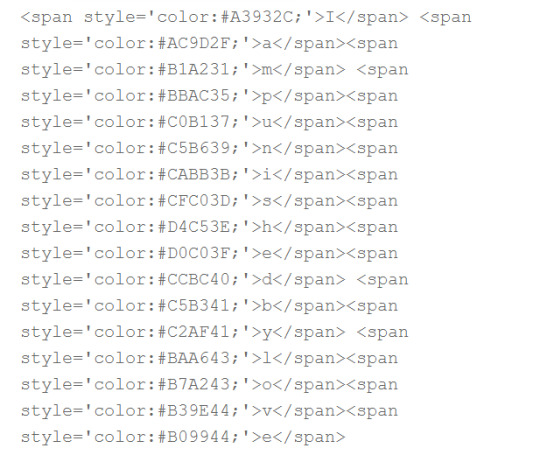
final result : I am punished by love
63 notes
·
View notes
Text
☆★ gradient effect tutorial ★☆

sooo it has come to my attention that the gradient effect i use is pretty eye catching & you guys wanted to learn how to do it yourself!
so here’s my *hopefully* quick and easy tutorial! :3
—
☆ this is the website i mainly use: https://www.stuffbydavid.com/textcolorizer ☆
it can be done on your computer (where as some may find it easier) but i just use my phone! you can use safari, google, whatever works!
1st, type the words, sentence, characters etc that you’d like to have said color!

2nd, decide what kind of gradient you’ll like to use! there are THREE types: horizontal, middle & 3-colored. (i personally use the 3-colored often!)

3rd, choose your color scheme!! you can type in a code or just press different sections! the side bar is also to mess with the shadow of the color!
here are what each gradient looks like!
ex. three-colored gradient

ex. middle gradient

ex. horizontal gradient

4th, once tour satisfied with everything, you’re gonna go to the very last box and copy everything!

once you finish all that, you’re going to go to the tumblr website! (you can use a computer or google on your phone) go to said draft you want to edit, and click on the settings button in the corner. click on HTML, it’s gonna look CRAZY! but all you have to do is highlight the words you want to colorize and then hit paste!

hit preview ! your text should now be colorized to how you wanted it to look!

and that’s it! just make sure you hit save! then you can go back to editing or typing as normal :)
i tried to make this as simple as i could haha 🥲 hopefully it’s easy to understand 💔 i will also link the original post that i learned from as well however i do skip a few steps since i foudn they’re not needed anymore haha
☆ original tutorial i used: https://www.tumblr.com/kylos/181695757101
23 notes
·
View notes
Note
How to change text colour?
here you go !
• first use this site to get your hex codes !
• then use this site to do the following:
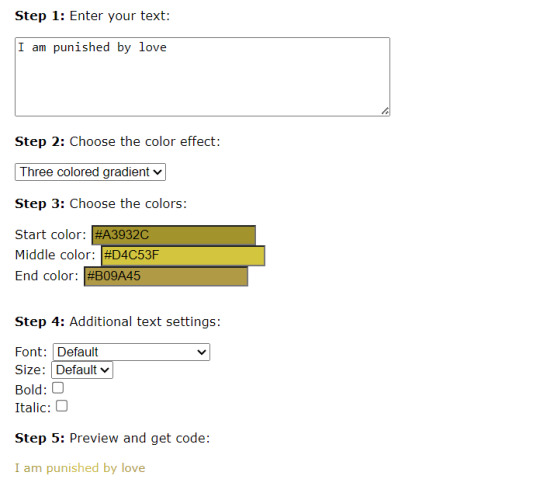
- step 1: enter the text you want in the box
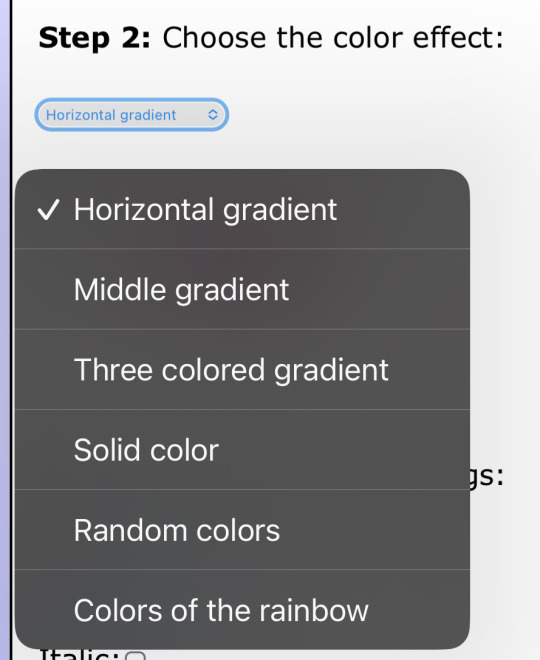
- step 2: select the color effect you want ( i use the “three colored gradient” )
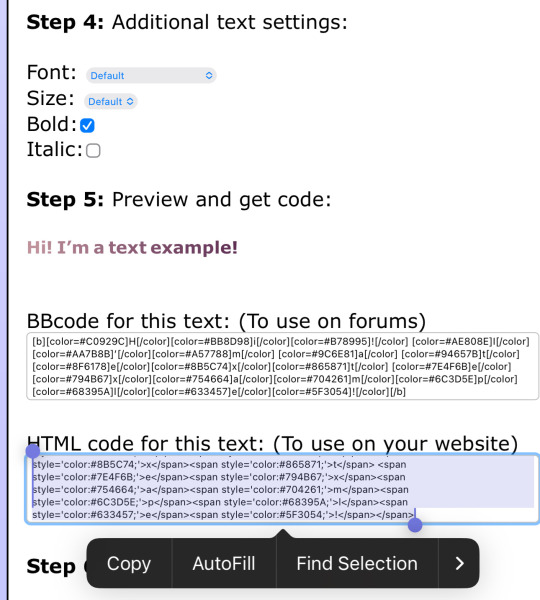
- step 3: enter your hex codes ( depending on the color effect you chose, you may need a different number of hex codes )

- step 4: copy the HTML code ( the second box NOT the BBcode )

• after that, open tumblr ( this only works on the web version NOT the app & i recommend doing it on a computer, simply because i find it easier ! )
• go to your draft ( or i recommend creating a new draft specific for the gradient ) and :
- click settings and scroll until “text editor” then switch to HTML

- then paste your copied HTML code and save
• it should result in looking like this:

• and that’s it ! if you directly added the code into an already established draft, you will need to reorganize your images, but if you created a new draft for the code, just “edit” the text draft and copy and paste the text into the correct draft !
• hope that helps !!
16 notes
·
View notes
Text
Gradient Text Background Animation
#css text animation#css text gradient#css gradient loader#css gradient color animation#frontenddevelopment#html css#codenewbies#css animation examples#css#html5 css3#pure css animation#css animation tutorial
1 note
·
View note
Text

As a thank you for so many new followers, here's a brand new edition of my editing resources masterposts ✨ (you can find the previous editions here). Make sure you like or reblog the posts below if they’re from other blogs to support their creators! A friendly reminder that some of these are free for personal use only, so be sure to read the information attached to each resource to verify how they can be used.
Textures & Things:
Collage Kits from @cruellesummer that I find myself using basically every single day
Taylor Swift Wax Seals from @breakbleheavens that I also use literally every day
Rookie Magazine Collage Kits (1, 2, 3, 4, 5, 6, 7, 8, 9, 10)
Scribble Textures & Cross-Outs (1, 2, 3)
GIF Overlays (1, 2, 3)
Film Grain & Noise Textures (1, 2, 3)
Paper Textures (1, 2, 3, 4, 5, 6, 7, 8)
PNG Overlays (Paper, Flowers, Clouds, Stickers, Lips, Vintage Paper, Misc. Symbols)
Halftone, Scan Line, & VHS Noise Textures (1, 2, 3, 4)
VHS Tape Textures by @cellphonehippie
Misc. Texture Packs (1, 2, 3, 4, 5, 6, 7, 8)
Photoshop Effects (Halftone Text Effect, Chrome Effect, Glitch Effect, Ink Edge Effect, Photo Morph Effect)
Fonts:
Badass Fonts (free fonts designed by womxn 🤍)
Open Foundry Fonts
Free Faces
Uncut Free Typefaces
Some Google Fonts I Like: Instrument Serif, DM Sans, EB Garamond, Forum, Pirata One, Imbue, Amarante
Some Adobe Fonts I Like: New Spirit, Ambroise, Filmotype Yukon, Typeka, Big Caslon CC (TTPD Font!)
Some Pangram Pangram Fonts I Like: Editorial Old, Neue World Collection, Eiko, PP Playground
Fonts In The Wild (font-finding resource)
Tutorials & Resources:
Comprehensive Rotoscoping Tutorial (Photoshop + After Effects, great for beginners!) by @antoniosvivaldi
Rotoscoping & Masking Tutorial (After Effects) by @usergif
Texture Tutorial for GIFs by @antoniosvivaldi
Color Control PSD by @evansyhelp (to enhance, isolate, or lighten specific colors)
Cardigan Music Video PSD by @felicitysmoak
Picspam Tutorial by @kvtnisseverdeen
Moving GIF Overlay Tutorial by @rhaenyratargaryns
GIF Overlay Tutorial (+ downloadable overlays!) by @idsb
Icon & Header Tutorial by @breakbleheavens
GIF Blending Tutorial by @jakeperalta
Split GIF Tutorial by @mithrandirl
Guide to Coloring Yellow-Tinted Shots by @ajusnice
Slow Motion After Effects Tutorial (useful for GIFs!)
Gradient Map Tutorial by me!
Misc:
How to Make Your Own Textures by @sweettasteofbitter
How to Report Tumblr Reposts of Your Work by @fatenumberfor
Tips for Accessible Typography
915 notes
·
View notes
Note
literally how are you doing the gradient text thing. i need to know.
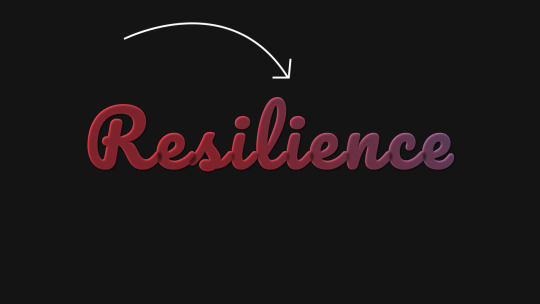
✨ Snappy's Gradient Text Tutorial
You might have seen me use gradient text in a few of my artworks, and it is a great tool to make a posts tand out! I learned from this post, but find some of the information outdated, so I am making a tutorial of my own!
To my knowledge, this is only possible via desktop mode* (mobile method at end), but not the app, as access to the HTML function is necessary. Alongside that, you need access to a text color fader! There's a few options out there, but I use:
Patorjik's Text Color Fader
Let's get to the tutorial!
Have the text you want to turn into a gradient ready and copy it to your clipboard.

2. Open the text color fader and paste your text into the box labeled "your message".
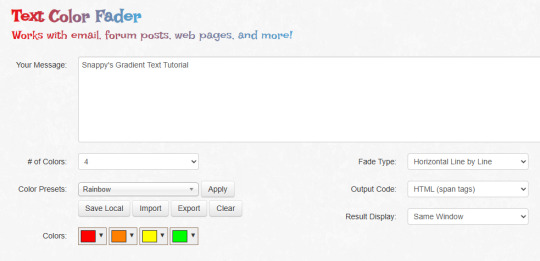
3. For the most basic gradients, you may ignore the boxes on the right. The leftmost boxes allow you to choose between preset colors or making your own colors.
Tip: if you are making a gradient for something such as art, I reccoment grabbing a few hex codes from the image to use for your gradient. This allows you to have control over your colors. You may also save a pallet if you want to use it again

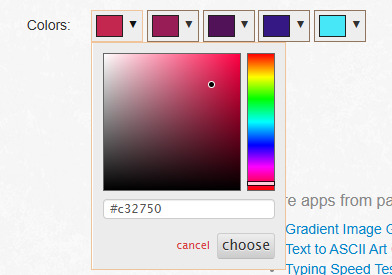

4. When you are happy with your colors, generate your text.

5. You will be brought to this page. If you are happy with the colors, click "select all" and copy the HTML to your clipboard.
TIP: check your text against both a dark and light background to ensure it will be readable to viewers on dark and light mode. If it is not you can tweak the colors by choosing "create new fade".

6. Open Tumblr again and open your post. At the top right there is a grear icon. Click the icon and scroll down to the text editor. Change the setting from "rich text" to "HTML"


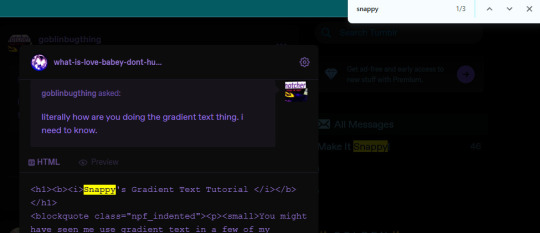
7. When you move to HTML, your post will look very different! In the HTML, your goal is to find the text you want to replace in the code.
TIP: If you can't find it, use "Ctrl + F" to open the keword search function and it will highlight your word.
8. Highlight your plain text, right click it, and paste your HTML from Patorjik into the space.
TIP: The HTML is a confusing mess to look at. Click the "preview" tab to check if your code worked


9. You should see a gradient when you swicth modes!

If the HTML broke your formatting, you can edit it in the preview mode. Once you have done a gradient a couple of times this process is very easy and takes LESS than two minutes. It looks intimidating but after you get the hang it is very achievable! I believe in you guys being able to do it. Happy gradient texting for you guys!
*EDIT: It is possible via mobile through the method of entering your account on a web browser and putting it on computer mode, then following the same process. Reportedly it is less comfortable but it works, thank you to chocokeyboard for letting me know!
#sent to snappy#asks#snappy speaks#web resources#tumblr resources#gradient text#tumblr tutorial#gradient text tutorial#loveee doing this for my posts it adds so much#if anyone DOES know if it can be done on mobile let me know! I will edit this post to include it#EDIT: mobile method found! to my knowledge not app compatable but if anyone knows how to do it via app let me know and I will include it!
213 notes
·
View notes
Text

Some answers are written in the stars. Others, you must ask to know.
How do you make your text/ titles gradient?
Patorjk’s Text Color Fader!! My life-saver frfr, I just use the steps of the tutorial provided here <3 However, this unfortunately can’t be done on mobile 😔
Where do you find the manga panels for your headers?
I usually find the panels and/ or titles on mangacap account on Twitter (eg. HornetPills, FAKKU, and lewdxvisuals). Most of my headers are from → “Lady K & The Sick Man”, “Infiltration! Agent on the Edge”, and “Hachisuka’s Family Kotoribako.”
How do you make your headers?
On Canva! I did a tutorial for getting that colorful ombré look right here <3
Where do you make your memes/ get those silly reaction pics?
I make all my memes on imgflip, and the unhinged pics - including the infamous werewolf ones - are mainly from Pinterest and stan Twitter.
What are your writing tips?
Here are the writing tips n' quirks that work most often for me, and here is for if you want something more practical/ to help with writer's block!!
Can I take inspiration from your fic/ did you take inspiration from [X]?
As long as you give credits/ tag me then yess you can take inspo lovely! It's the same thing with me - if I've taken inspiration, the author will be linked in the A/N, if not, the work n' concept is completely my own!!
What fandoms do you write for/ have you written for?
Currently, only JJK - but if you checkout my first masterlist you'll see that I have written for a lil' bit of AOT and Haikyuu.
What is your posting schedule?
9:30PM - 10PM EST on Wednesdays and Sundays for my fics; and you’ll usually catch me answering asks from 1:30PM onwards and 11:30PM onwards the rest of those days. Tiny reminder though that I don’t answer asks on days I post my writing and for 24 hours beforehand (ya girl will be busy typing away something diabolical 😩.)
Why did you miss a posting day?
I try very, very hard not too n’ I miss a posting day very rarely - I promise!! 99% of the time it’s because I’m super sick, though, and I’ll let you babygirls know prior to that. Dw, I almost always bounce back on schedule for the next posting day <3
Are you taking requests at the moment?
Noooope!! Sorry lovelies, but requests are closed. I do take suggestions and thirsts where I’ll just brainstorm or add on to the idea if I really like it, however. Something that looks like this or this.
Where are you from?
Sri Lankan through n’ through rahhh 🇱🇰 Feel free to yap with me in my inbox about it!
What is your gender/ what are your pronouns?
I’m a girlie n’ I go by she/her pronouns yup yup 😌
So then, why does everyone call you “daddy Tony”?
I DON’T EVEN KNOW WHERE IT STARTED BUT DADDY TONY IS SIMPLY DADDY TONY 😈 DOESN’T MATTER THE GENDER 😈😈 (+ Tony is just what everyone irl calls me too so.)
If that makes you uncomfortable though, you can always call me simply Tony without the daddy part, or Toe knee, or Toenail, or mommy Toenail- you get the point. My lovely babygirls love to make up a lot of names for me n’ I haven’t heard one that doesn’t make me CACKLE just yet 😭
Why do you call your followers “babygirls”?
Ah, I’m daddy Tony and you all are just my babygirls heheh. It started off as a joke at first because I tend to start most of my announcements with “bonjour babygirls” even irl, but it eventually just grew to me referring to all my gorgeous followers as Tony’s Cult of Babygirls - took a page out of Geto’s book there.
I also tend to sift through a variety of pet names when responding to individual asks/ comments - like sweetheart, lovely, ml, gorgeous. etc. Do let me know straight-up if this makes you uncomfortable, because using those is simply my default.
Why didn’t you respond to the thing I tagged you in?
*SOBS* I’m saur sorry about that, I get tagged in a lot of things so either my notifications were clogged n’ I didn’t get it, or I simply missed it amongst everything. I love responding to things y’all tag me in, though - so send me an ask to double check!!
Did you see my ask or was it eaten up – you haven’t answered yet?
Pinky-promise daddy Tony’s not ignoring you!! If I haven’t responded to an ask, it’s usually one of these reasons:
I get a LOOOT of asks daily - and while I do try my best to respond to every single one - I might take some time to get to yours. Please, please, please don’t send a follow-up ask about your previous one unless it’s really, really important, or until it’s been two weeks since I haven’t responded. That only adds more to my inbox, and I do answer before it reaches that point.
I might have gotten an ask that was very similar to yours, n’ responded to that one instead of both.
Your ask went against my rules/ it was a request (because my requests are closed, most asks like that end up written down in a doc I have. But they won’t be publicly answered until requests open up/ I just decide to write it.) Again: Thirsts and suggestions are completely okay – just no requests!
Your question was already answered in my FAQ - in that case, yippee I hope you got your answer, lovely <3
Sometimes my asks actually get eaten up by this site, and I apologize for that 😔 Like I said, if it’s been two weeks then please do resend me the ask!!
Who are the anons that you have right now?
🧃, 🐹, 🐁, 🔮, 🪦, 🍙, toji titties anon, ⛸️, scribbler anon, 🌳, ♍, medicine major anon, gojo big cock gagger anon, 🫃, 🗣️🩰, <3 anon, orgy anon, 🐝, marketing major anon, 🫶🏻💕, 🧋, 🐠, 🐛, 🗣️🎬‼️, 😼, 🐇, ✏️, 🪶🧠, 🌸, 👀, 🧝🏽, 🌦️, 🌺, 🍭, 🌙, 🔔❤️⚙️, 𝓯𝓻𝓮𝓪𝓴 anon, neuroscience anon, 🎀💄, 🫐, 💋, 🦴, 🦎, 🦩, 🌱, 🫀, 🍓, CJ anon, 🐨, 🦤, 🐚, 💃, 🦇, 🌛, 🪼, 💤, 🍫, ⭐, 😈, spooky sweet tea anon, 🧠, 🧌, 🗣️, 🐄, corpse goon anon, 🦐, tiny anon, 🌟🦈, 💧, 🎱, 🦢, dewdrop anon, 🍵, 🥗, 🥠, :) anon, 🥥, 🐩, 🌝, 🪽🦦, (≧▽≦) anon, silly anon, jester anon, 🐡, 🎀, anon H, Marchailina, 👟, horny anon, b. anon, 🍰, 🪢, 🦚, lads anon, lads anon #2, 😻, 💐, 🐢, 🍣, 🃏, ex Nanami-hater anon, ovulating anon, 🐼, 🐜, 🦗, 🚀, vet major anon, 😔, 🐦, void anon, 🦢🐚, gojo convertee anon, therapist gojo anon, 💗, 🧸, 🍄, 🐾🐕, ✨🍀, 🐦⬛, lawnmower anon, Nanami’s 𝓯𝓻𝓮𝓪𝓴 anon, 🕷️, 🍞, Nanami anon, ☀️🪵, reading sesh anon, 🐸, 🏵️, 🍄😈, 🪨🧍, law student anon, 🦶, 🔖, 🪞, 🍯, 💌, 🎧, 🪐, , Hoyoverse anon, 🐈, 🐮, 👅🍑, 🪱, 🍍, 🧪, 🥖, 🌊, 🤍, Hua Cheng anon, 🦅, ♠️, 🕷, 🫧, 🧱ed🆙, waitress anon, ❤️🌻, ⏾, 𝐹𝒶𝓃𝒸𝓎 𝓃𝒶𝓃𝒸𝓎 👹, 🪱🔥, 💠, freaky lads anon, 🤠, ❄️ 🐆, ⚜️, 🎏, 🅰️🍄, ♒️, 🎐, 🦦, 🐯, ⭐️, 🐈🐈⬛, 🍜, 🔬, ☄, 🫦, 🍸, 🦋, 🍒, (.)(.) anon, brother’s best friend!piner anon, freaky filo anon, 💢, 🦊
Why do you scare me?
I promise I don't bite unless asked to!!

226 notes
·
View notes
Text

hi! someone requested me to do a tutorial based on this gifset!
this tutorial requires an intermediate knowledge of gifmaking. i won’t teach you how to do gifs from scratch, there are other tutorials for that out there.
[tutorial under the cut]
THE BASICS
AN INTRODUCTION
first off, the gifset in question is based on this gifset by @/eddiediaaz and i got permission from them to explain the process. i won’t be sharing the template because it’s a near replica of theirs (that isn’t shared to the public) and i don’t feel comfortable doing so, but you can recreate it by yourself just like i did!
also, ESL, so please pardon any mistakes.
THE FONT
Circular ST (Medium & Black). download it here & here.
CLIPPING MASKS
clipping masks are the way i put images and gifs inside of shapes. i used that method in the first and second gif of the Spotify gifset as you can see here. what does a clipping mask do? basically, it links two or more layers together in a way it follows the “shape” of your base layer. ie, everything that is shown follows the “shape” of your main layer and nothing more. your base layer can be anything: a shape, an image, a gif, a text, an adjustment layer, really everything. let’s see an example:
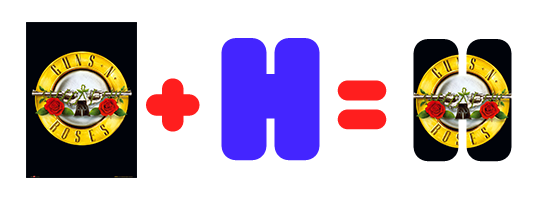
CLIPPING MASKS & SHAPES

the original image (Gun 'n' Roses logo) is intact, as in, it’s not cut like a circle, something that cannot be undone. instead, everything outside the limits of the blue circle is just hidden. if i delete the base layer (the circle layer), the original image will appear as it originally is, as an rectangle. talking about layers, let’s see my layers panel (some things are in Portuguese, but i think you can understand):
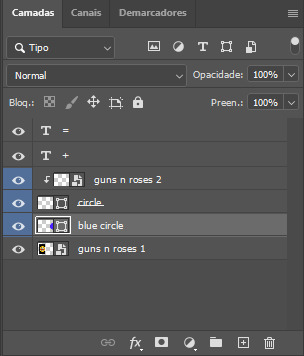
notice the little arrow pointing downwards to the “circle” layer. that is the clipping mask symbol. the base layer always needs to be below what is being clipped. if the base layer is deleted, the chain is broken and every layer clipped will now act independently and have its original shape. you can have as many clipped layers as you want. you can also have multiple chains going on in a .psd, each one with its own base layer. to clip a layer, you just need to press ctrl+alt+G or cmd+option+G while having the layer you want to clip selected (NOT your base layer). or, you can go to LAYER > CREATE CLIPPING MASK.
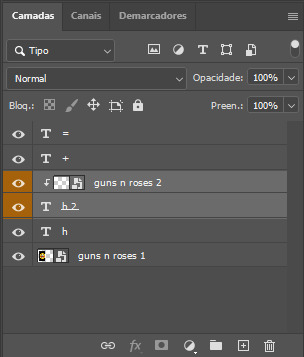
CLIPPING MASKS & TEXT
let’s see the same example, but with text instead:
A TIP
because adjustment layers are clippable, you can completely gif by using clipping masks. this is very useful when you have more than one gif inside a canvas and don’t want an adjustment layer to affect everything besides a certain layer/element.
let’s take my first gif of the Spotify gifset as an example.
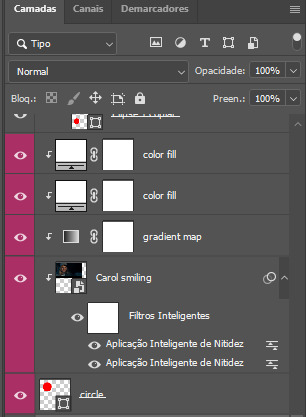
the circle is the base layer. the “Carol smiling” layer is my gif converted to a smart filter. above that “Carol smiling” layer, there is a black and white gradient map and two color fills of white so i can achieve the coloring you see. all those layers are clipping onto the circle layer, making my now b&w gif have the shape of a small circle as well. those layers are in a folder in the .psd of my first gif, so i don’t have multiple files sitting on my PC to assemble just one gif. i could have giffed that small gif separately and pasted it onto my canvas as well, but i like to do this way so i can adjust everything i want in real time instead of redoing a gif over and over every time i want to change something.
HOW TO MAKE EACH GIF
all gifs are 540x540px.
THE FIRST GIF
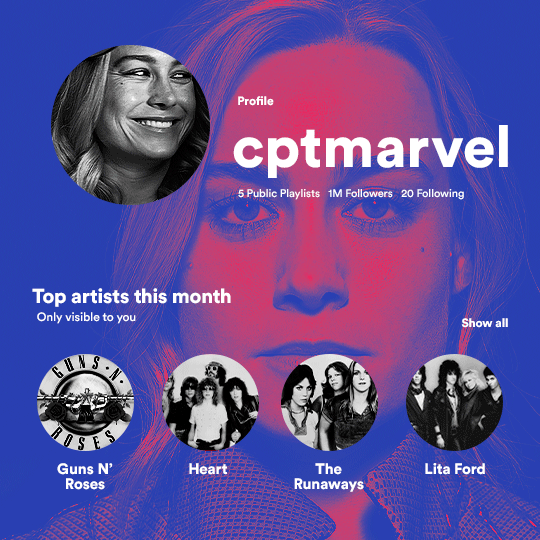
the first gif has 6 elements. the elements are: a big gif serving as a background (a close-up of Carol), a smaller gif inside a circle (a b&w gif of Carol smiling) as a profile picture and four static images for the featured artists. i giffed as i normally do (loaded screencaps, resized the gif, sharpened the gif, etc) for my background gif. to achieve the coloring, i’ve added a gradient map (layer > new adjustment layer > gradient map) purple to pink. to the profile picture, i made a 160x160px circle in the top left corner. the color of it doesn’t matter. the next step is a matter of taste: i giffed the smaller gif in the same .psd thanks to clipping masks that i explained earlier, but you can do it in a separate canvas too. for the featured artists, i made four circles with 98x98px each. for the images, i had to check Spotify for their selected PFPs. after that, i googled “[band/artist] spotify” to find the images. the PFP of bands and artists in the Spotify app are displayed in black and white, so you might have to make them b&w if you happen to find them only in color. to make the artists PFPs pop a bit more, i transformed them into smart filters and added a bit of sharpening to them (intensity 10 x radius 10). you can adjust the colors and the brightness if you want, too. the sizes of the texts in the gif are: 58px (username), 20px (top artists of the month), 15px (name of the artists), 12px (only visible to you + show all + profile) and 11px (following and follower numbers).
SECOND GIF
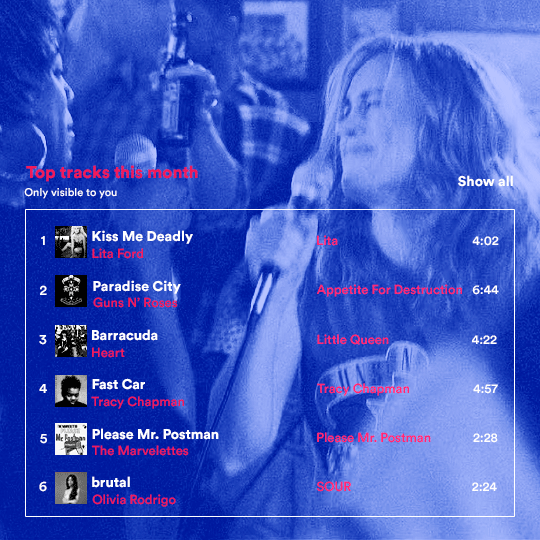
for the chart, i created a black rectangle (490x308px) that i set its blending mode to lighten (thus making it transparent) and i added an internal white stroke. i added the text and the little squares next to the top 6 numbers. the font sizes are: 17px (top tracks this month), 11px (only visible to you), 14px (song title, show all, top 6 numbers), 13px (artist/band, album title, length of the song). i added the album covers — that i made b&w — by clipping images onto 32x32px squares. for the coloring, i added a gradient map (dark purple > light purple).
THIRD GIF
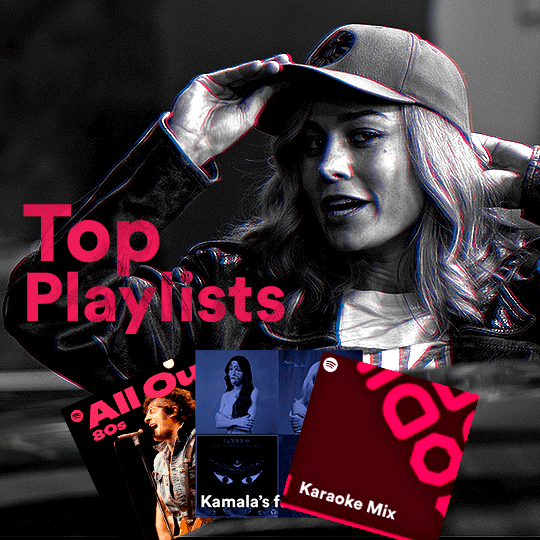
there are three types of playlists in this gif: a Spotify original playlist, a playlist made by a user and a Mix. you don’t have to follow this formula if you don’t want to, but in the case you do, here’s how i did it: browse Spotify for an original playlist of theirs. chances are, if you google the playlist’s name, you can find its cover on Google Images. at least, i found the “All Out 80s” cover that i used in my gifset. you can also create your own. for the user playlist, just pick four songs and find their (album) covers, also on Google. create a square canvas on Photoshop and make four squares, each in one quadrant of the canvas. paste your images onto your canvas and clip the images to each square. then, add a gradient map (black + whatever color you want) to all those images and title your playlist (font size: ). save that collage as a PNG and load to your gif canvas or merge all the layers+transform into a smart filter and drag the smart filter layer onto your gif canvas. now, the trickiest one. while you can invent your own Mix, i wanted to use a real one, but i had no idea on how to find them. thanks to reddit, i discovered that, if you search “made for you” on Spotify, you will find their Mixes! some of them are very whacky and specific! i just picked the Mix that made the most sense for Carol from that (gigantic) list. before doing the next step, i would advise you to google the name of the Mix you picked to see if you are able to find the cover of it with good quality. i wasn’t able to find mine (Karaoke Mix), so i just screenshotted my Spotify app, pasted that screenshot into Photoshop and cut the Mix cover and pasted that onto my canvas. the quality wasn’t great, so i transformed the cover into a smart filter, added a bit of gaussian blur and then sharpened it (intensity 10 x radius 10). the color wasn’t what i wanted either, so i used Hue/Saturation to change the hue. because the original image for the Mix was smaller than i wanted and i stretched it to make it bigger, the quality of the text and the Spotify logo was botched. i painted over the Mix cover and created a text with the font i linked earlier to replace its now pixelated title. i also painted over the little Spotify logo, found a logo in the internet and pasted over the Mix cover about the same size of the original logo. to achieve the “3D effect” of the gif, i made my b&w gif, the base. then, i duplicated all layers and added a gradient map (black > pink) and merged all the layers of that duplicate. i made a second replica of my gif, now with a different gradient map (black > blue). i set both replicas to the ligthen blending mode. you will notice that the replicas will "disappear" and only the original b&w gif will remain. if you move the replicas a bit, that colored border will appear. this doesn't work much in very bright gifs without a lot of dark areas, btw.
FOURTH GIF
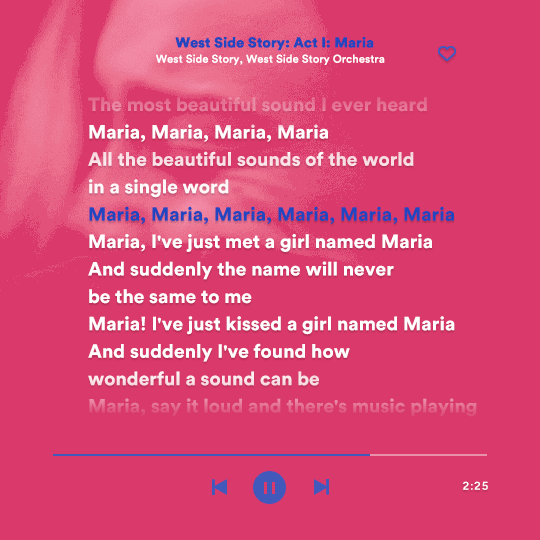
this gif used an altered (by me) version of this template. (i changed the fonts to match the rest of the gifset, too.) for the color text effect, you will have to gif with the timeline bar. take your gif’s length and do the math to find how many frames are ⅓ of it. take your lyrics’ layer and cut it into three equal parts or close to it by using the scissors icon in the timeline panel. in each third, change the color of just one line, line by line. when you play your gif, the colors of the lyrics will change like in Karaoke. you can do the same thing with frames iirc, though. i explained the timeline method because that’s the one i used in this gifset and use in general gif making. for the coloring, i added a gradient map. to make the colors pop a bit more, i add two gradient maps: the first one is in black and white, the other is in color. that adds depth to the blacks and darker colors of the gif.
FIFTH GIF
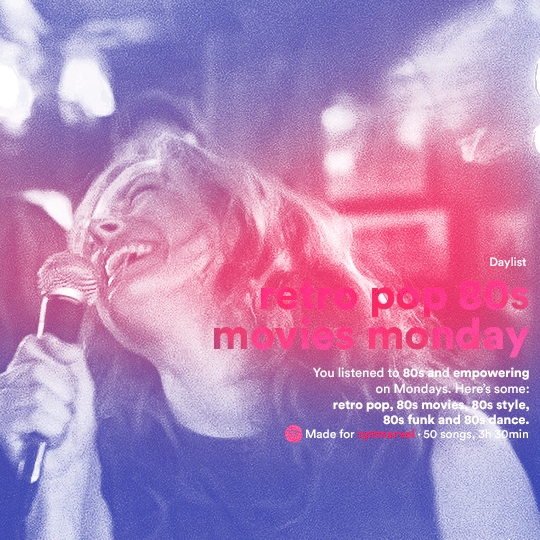
like in the Top Playlists gif, i wanted for my Daylist to be real as well. to achieve that, i listened to my Carol Danvers companion playlist (that you can listen here) for a long time until my Daylist refreshed itself. (Daylists refresh in certain times of the day — don't worry, Spotify will tell you when.) then, i just copied what it told me — the title and the genres i listened to generate such a Daylist, plus the genres i should check it out. you can invent your own Daylist if you want, but because it is generated by AI, i find very difficult to mimic its crazy titles, but you can try! you can also search in the web for other people’s Daylists if you want, but usually people don’t tell you what they listened to to get those playlists and nor what was recommended for them to listen to and i, at least, find that information important for the gifset. be aware that Daylists aren't available for every country yet (like in mine), but i found a way to work around that. the browser Opera GX offers a free "VPN" — not exactly a VPN, but it works close enough — so you can set your location to the US and listen to in-browser Spotify. i recommend not log into Tumblr while using Opera's VPN as there is a myth (that could easily be true!) that Tumblr terminates people's accounts that use a VPN. font sizes: 43px (daylist title), 13px (text), 12px ("daylist" & "made for"). for the flare effect, i searched for flare overlays on YouTube and downloaded one of those videos with 4K Video Downloader, a free software. i loaded the overlay into Photoshop and added a gradient map (purple > pink) over it, thus changing its color. i pasted the overlay onto my b&w gif and set its blending mode to screen. voila!
that's it! i hope you liked it and that i was able to express myself well. if you have any questions, feel free to contact me, i love helping people about their gifmaking questions! 💖
#*#*tutorials#gifmaker tag#dailyresources#usergif#completeresources#alielook#userairi#userhallie#userbess#userrobin#usershreyu#userzaynab#tuserju#tusermalina#tuserheidi#usertina#userabs#userbuckleys#usermagic#userjoeys#antlerqueen#userarrow#flashing gif tw
441 notes
·
View notes
Note
this a gorgeous gifset for wicked 💗
https://www.tumblr.com/tidescaller/781106467228073984/glinda-in-wicked-part-i-happy-birthday?source=share
I would appreciate a tutorial for the first gif blending and colouring

Hi anon! thank youuu, i'll leave the tutorial under the cut ૮(˶˃ᆺ˂˶)
As always, basic knowledge on making gifs is required to do this type of edits. I linked some useful guides on my previous tutorial here.
PART I: BLENDING
STEP 1, BASE GIF
I recommend getting ready the gifs you're going to use before any try on blending them. And which ones are right to blend? That's just depends on the scenes you're working on. On this gifset, I made two previous blends that didn't make it to the final version cause I didn't like how it turned out. It's all about trial and error.
For this specific blending, as I'm working with only 2 gifs, I'll start editing first the base and then the one "blended". Adjust your BASE GIF in your canvas as you want.

I sized mine like this cause I imagined the second scene of Glinda behind this one.
STEP 2: BACKGROUND
i followed becca's coloring tutorial for this part, except I didn't add any adjustments yet. only coloring the background for a later gradient blending.

STEP 3: BLENDING
Duplicate your other gif into the canvas and change its blending to screen

Now add a layer mask (the button marked with red in the picture) and, with a soft brush at 200px/300px, start erasing whatever you don't want. Remember black is 0% opacity and white is 100%.


STEP 4: THE BLENDED GIF
The problem I noticed by this point is that my background coloring on the BASE GIF was kinda irrelevant cause now the BLENDED GIF completely covered it (。•́︿•̀。) and I also wanted this one to be pink. In order to do this, I created a gradient map layer and made it as a clipping mask so it wouldn't affect my main gif.


PART II: COLORING
STEP 5: BASE
For the base coloring, I always follow this tutorial cause it's literally how I learned how to do it. Honestly, check all maziekeen's tutorials (she made A TON) cause they are so good and your learn a lot. However, I tend to give my personal touches like adding another vibrance layer if i feel like it, cause I like the colors to pop; or skipping steps if I don't think they fit my gif/style. Anyways, this is the result for now:

and these are my settings


i tried to translate as much as possible (,,>﹏<,,)
STEP 6: SMALL TOUCHES
Could leave the gif as it is, but when I was working on it, I felt like something was missing. So the last step is to apply/paint some small touches of pink (or whichever color you're working on). This trick I learned it from this beautiful and very detailed tutorial from dani (she is awesome!! and her tutorials and gifs are flawless!!)
Create a new layer, use the soft brush tool at 1000px, zoom out your gif and start painting out of the canvas (you can totally paint inside if you feel like it) Play with different opacities and blending modes of the layer, this is literally how I created all these gifs. I know it sounds stupid ajskjas but it's true!! Try what best fits the structure of the gif. The first one I made is with multiply at 60% and you can see how much the gif changed already.

The second being color at 100% and the third one hard light at 30%
STEP 7: THE CHERRY ON TOP
Finally I added an animated overlay from this post. Changed the blend mode to screen and erased a bit of it on glinda's face creating a layer mask and with a soft brush. Added my texts... and that's a wrap! :D

I used the same process on gifs 3 and 5 ⸜(。˃ ᵕ ˂ )⸝♡
#*tutorial#gif tutorial#photoshop tutorial#blending#coloring#allresources#completeresources#dreamcreations#dailyresources#gifmakerresource
74 notes
·
View notes
Text
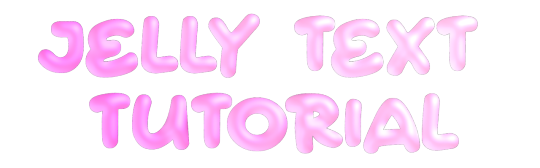
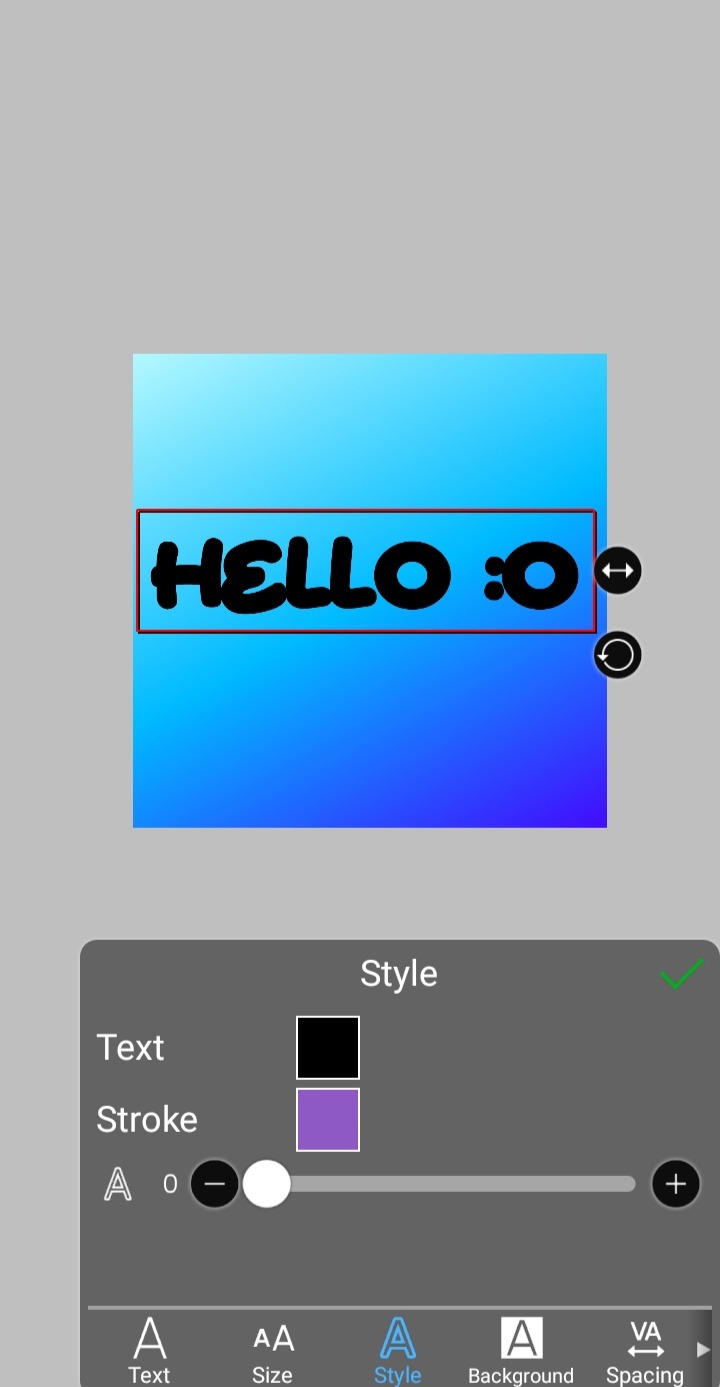
jelly text tutorial! (works with shapes as well)
what you need: ibis paint x, premium or free version doesnt matter
step 1: color
yes we're starting with color! I highly suggest using multiple colors for a prettier finish. I prefer parallel gradiation but as long as its blurry anything should look nice. pick analogous colors for the best result.

step 2: write the text or draw/import the shape.
as it says! if youre drawing it, make sure its on a new layer above the gradient! I suggest using rounder, bubblier fonts/shapes, one of my favorites to use is starborn on all uppercase. the color you use does not matter as it will be the background color in a short bit
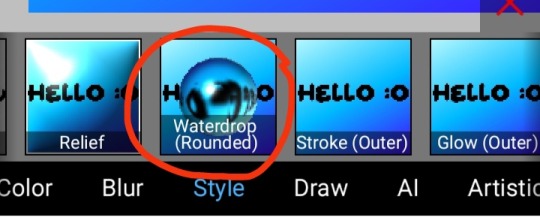
step 3, the jellificationing
this little friend called "water drop (rounded)" in effects under style is your best pal. its here to help you and make the process so much easier.
so just press it and fiddle around with it until you're happy with the result.
step 4 (optional): refracting
to help it make look more 'realistic' I tend to add another layer of the water drop. to do this I simply copy the previous one and go do the same effect on the top layer
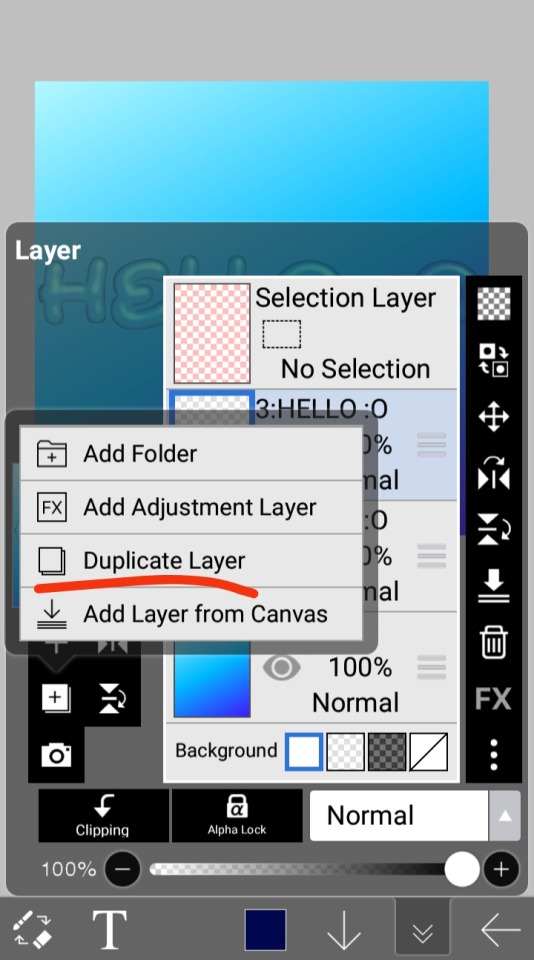
step 4.5: tips
you need to make sure the refractive index for the second one is turned down all the way, or itll look weird, streaky, etc. make sure the highlight and highlight size settings are lower than the previous time you used this effect. and make sure the little sun symbol (the light source) is on the edge of the opposite direction of the previous time you used the effect. so if the first layer of jelliness had the light source coming from the top right, the second layer should br on the very edge of the bottom left.

step 5: begone, background
yeah, we're done with that, this will also be the big reveal of the final image

and then you just crop to fit and then save as a transparent
bam! heres the final thing!

I dont know how good I am at explaining but I hope this helped! if youre confused dont be afraid to ask!
#🌫️ i know what you dread | creations#rentry#rentry inspo#rentry resources#editing resources#editing#editing tutorial#edit tutorial#edit resources#rentry decor#rentry graphics#carrd resources#web graphics
602 notes
·
View notes
Text
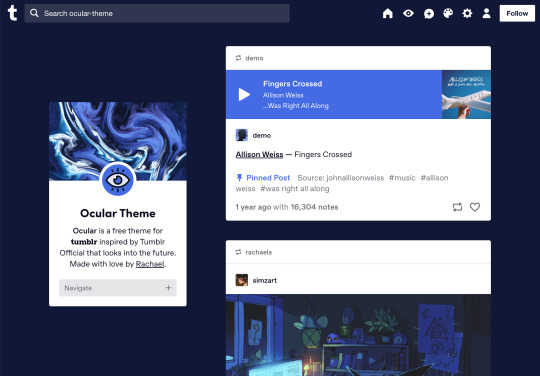


Ocular — Version 3
Preview // User Guide // More Info & Install
your favorite sidebar theme just got an upgrade, babeyyy
I went to update Ocular to make it NPF post-compliant and then my hand slipped and I redesigned the whole thing lmao. here's a brief update about Ocular 3; if you're looking for a full list of changes between versions 2 and 3, click the "Read More" below)
Ocular comes with the following features:
Colors: easily change the color scheme of your sidebar and posts using any colors you want
Post sizes: 400px, 500px, 540px, 600px, 700px
Sidebar: can be on the left, right, or above the posts. pick from a list of sidebar sizes, header image heights, and avatar shapes
Fonts: 20 different fonts, sizes 13px to 18px
Background: solid, gradient, full-size image or repeating image
Links: choose either regular navigation or drop-down navigation. unlimited custom links (visit the help desk FAQ for a tutorial) and ability to rename home, ask, submit, and archive links
Endless scroll, custom ask box text, Tumblr's full-width controls and search bar, optional header, avatar, and favicon images
if you already have Ocular installed, version 3 should be coming at you as soon as the update passes the theme garden. if you installed this theme with GitHub, you'll have to re-install manually.
now let's get to the fun stuff. what's new in version 3?
wow, do I have some updates for you!
1. goodbye color schemes, hello post background and text colors
you can now directly control the color of the posts rather than relying on color schemes to do it. want your posts to be a very specific shade of navy? all yours, buddy. go wild (make sure it's readable tho)
2. hello, color schemes! wait I thought we got rid of that guy
a lot of the color schemes I made became redundant now that the new post background/text color options exist. if you were married to the old color schemes, all of them can be recreated using those options. so the new color scheme options are as follows:
"My colors" — uses the colors you picked for post background/text
"Light preset" and "dark preset" — sets the posts to white with black text, or off-black with white text
"Translucent" — uses the colors you choose for post background/text, but makes the post backgrounds semi-transparent. there are NINE different translucent color schemes, ranging from 90% (only slightly see-through) to 10% (VERY see through)
3. navigation dropdown option
you can either use the sidebar links like they were before, or you can turn them into a cute little dropdown (helpful if you have lots of links or links with long titles!) you can enable this using the "use dropdown navigation" setting. you can also customize the label for the dropdown using the "dropdown menu label" setting. for instance, the dropdown on my blog currently says "oooh you wanna click me"
4. RIP google fonts I always hated your load times
decided to stop using Google Fonts and instead I'm providing the font files directly in the code. this will help speed up load times drastically when using custom fonts, plus I don't have to use Google. win-win! there's quite a bit of coverage overlap with the old fonts, but some of them that were too similar to each other got the ax. I also added all of the system fonts as options (hit classics like Arial, Georgia, and Comic Sans MS are now available TO YOU!)
5. more layout, sizing, and spacing options
the sidebar used to be either on the center-left, center-right, or above the posts; now it can go in the top-left or top-right! you can now control the border radius on the posts and sidebar. the header height, sidebar width, and post spacing all have additional options.
6. some options have been renamed for additional clarity
"background color 1" -> "background color"
"background color 2" -> "gradient background color"
"background" -> "background style"
"font override" -> "use body font everywhere"
"title" -> "sidebar title"
"description" -> "sidebar description"
"ask box text" -> "custom HTML above ask box"
7. removed some options
you win some, you lose some. I removed the uppercase sidebar links, theme credit, and inline media spacing options, mostly for redundancy reasons or because they produced unclear results.
8. as previously stated, now NPF-compliant
Ocular was ALMOST compliant with Tumblr's new post format, but had a few tweaks that needed to be ironed out. they're now ironed.
9: now user-friendly right out of the box
I updated the default color and content options, so new users installing this theme will have a much easier time using and customizing it immediately. no more ugly ass green background!
10. and finally, new JS
I had to rewrite some of the javascript for this theme, which turned into me rewriting ALL of the javascript. doing so meant that I could eliminate dependencies on third-party JS libraries and run the whole thing on plain JS. that should improve load times!!
bonus: custom CSS can do some nifty stuff now
want to change the size of your avatar? you can do that now! just do this to your Advanced > Add custom CSS section
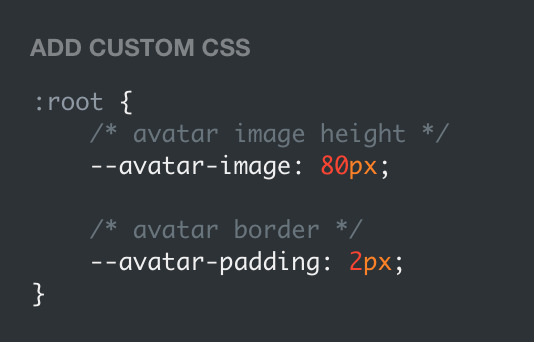

super helpful if you're using the Avatar shape: Uncropped setting and you need your image to be a specific size (like a pixelated GIF)
for more info, check out the Ocular user guide. thanks for reading my updates!! hope you all have a fantastic start to your 2024 ❤️
#tumblr theme#tumblr themes#themes by rachael#codingcabin#ocular#blog#you should've seen me writing the JS for the audio posts lmfao I was on my hands and knees begging it to work
594 notes
·
View notes
Note
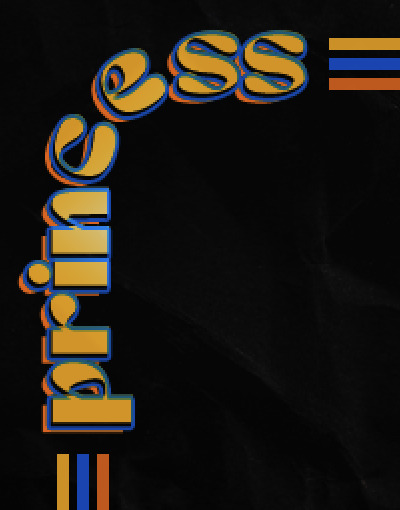
hello! I love your edits and I wanted to know, for the "Steve Robin and Nancy" Gif you posted.. How would I go about doing something like that? More specificly, the bottom two where it says "Height Difference" and where it labels them as "Princess, Jock and Loser"
Thank you! Sorry this took a while to answer. I finally had time to sit down and write this. Link to original post.

Quick notes: I'm using Photoshop 2021 on Mac and working in video timeline. Must have basic gifmaking skills and know how to use layer masks. This is primarily a gif layout and text tutorial.
Fonts used in first gif:
Pea Wolfe Tracks — link here
King & Queen — link here
Fonts used in second gif:
Kiera — link here
Post — link here
Ellianarelle's Path — link here
Heina's hurry — link here
I used a light leaks/film texture, ripped paper textures, folded paper textures, and transparent pngs (arrows + post-it notes + smiley face).
We'll start with this gif.
Make your gif! The gif here is 540x600px. I color and sharpen it to my liking. Go to image > canvas size > change height from 600 to 770px. I left the anchor in the middle, though it doesn't really matter.
I drag and drop my folded paper texture and change the layer order so it's under my gif. Then I change the blending mode on my gif to Screen so the texture shows through the gif, but I keep the texture at 100% Opacity and Fill.
Now I move my gif around and add my ripped paper textures. I wanted to give it a sort of poster-like feel to it, so I made more room on the bottom for my main text and ended up with something like this. Blending mode is set to Lighten for the ripped paper textures.
I then use layer masks to hide what I don't want shown and add my light leaks/film texture. Blending mode on light leaks/film texture set to Pin Light, Opacity: 50%, Fill: 70%.
I use Levels and Brightness/Contrast adjustment layers to darken the gif up a bit more, then I add a patterned paper texture. Blending mode for patterned paper texture set to Lighten, Opacity: 100%, Fill: 75%. Result:
Now on to the text!
I'm going to be honest here, a lot of this was clicking around until I settled on something I liked. There's three layers to create this text effect. The font used here is King & Queen.
For the first text layer, the font color is set to black (#000000), font size: 87 pt, leading: 80 pt, tracking: 25.
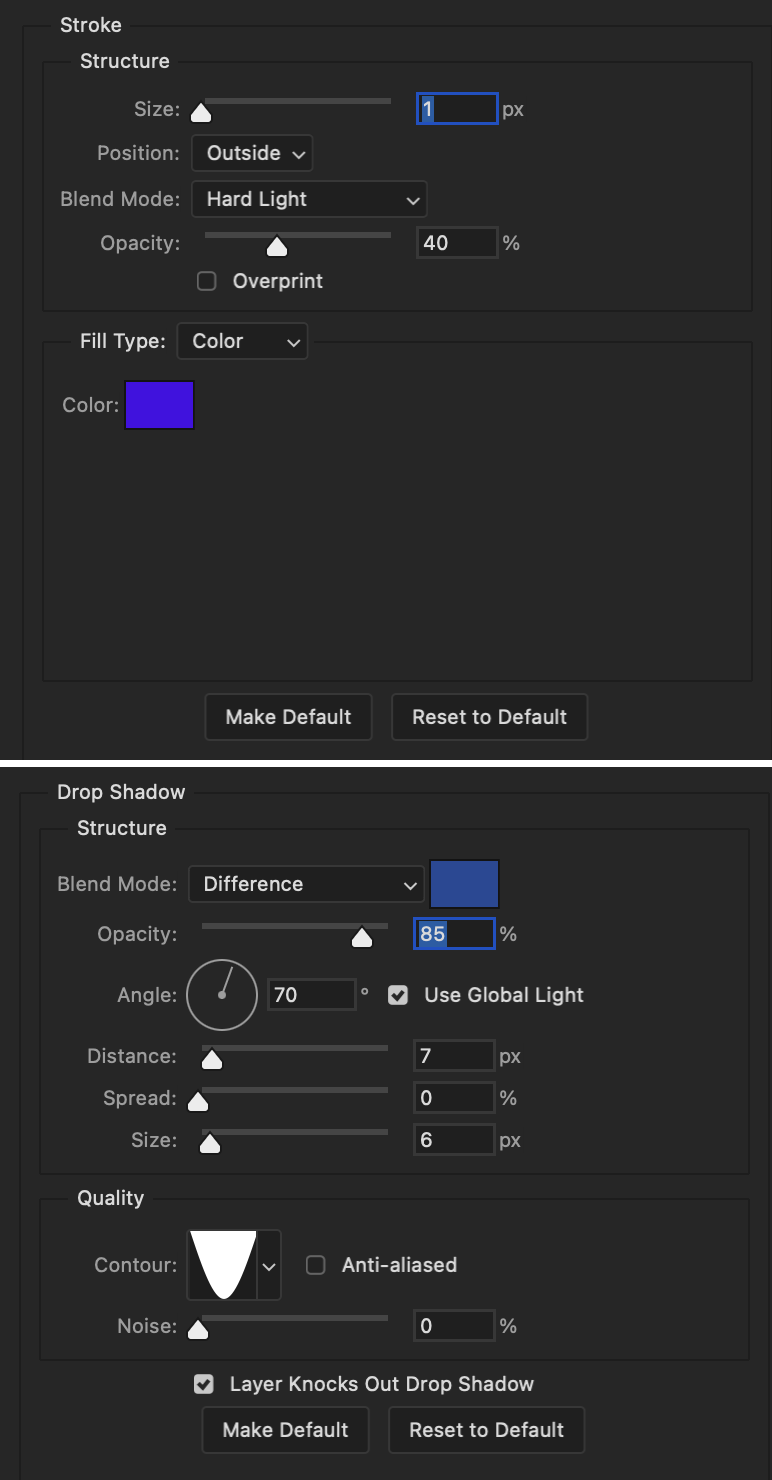
Layer styles used here are stroke and drop shadow.
Text Layer 1
Stroke settings:
Size: 1px
Position: Outside
Blend Mode: Hard Light
Opacity: 40%
Overprint: unchecked
Fill Type: Color
Color: #5911ed
Drop Shadow settings:
Blend Mode: Difference
Color: #2d5ba8
Opacity: 85%
Angle: 70°
Use Global Light: checked
Distance: 7px
Spread: 0%
Size: 6px
Contour: Cone - Inverted
Anti-aliased: unchecked
Noise: 0%
Layer Knocks Out Drop Shadow: checked
Blending mode for text layer set to Overlay, Opacity: 100%, Fill: 85%.
Warp text settings:
Style: Wave
Horizontal: checked
Bend: +60%
Horizontal Distortion: +10%
Vertical Distortion: 0%
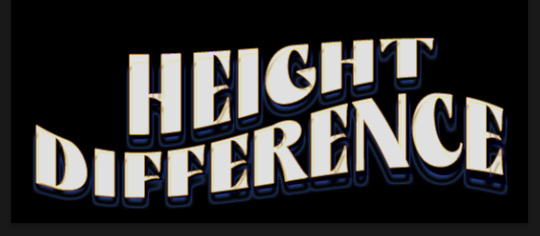
With all those settings applied, the first text layer looks like this:
Duplicate the layer, clear all layer styles, and change the color for the second text layer to white (#ffffff). All other text settings (including warp settings) should stay the same. The only layer style then applied to this text layer is stroke.
Text Layer 2
Stroke settings:
Size: 1px
Position: Outside
Blend Mode: Difference
Opacity: 100%
Overprint: unchecked
Fill Type: Color
Color: #d48f16

Blending mode for the second text layer is set to Difference, Opacity: 90%, Fill: 100%. Nudge the second text layer a bit so the first text layer is a little more visible or move to your liking.
With both those layers active, it looks like this:
Duplicate the second text layer, clear layer styles, and change the color of this third text layer to a dark grey (#1a1919). Again, all other text (and warp) settings should stay the same.
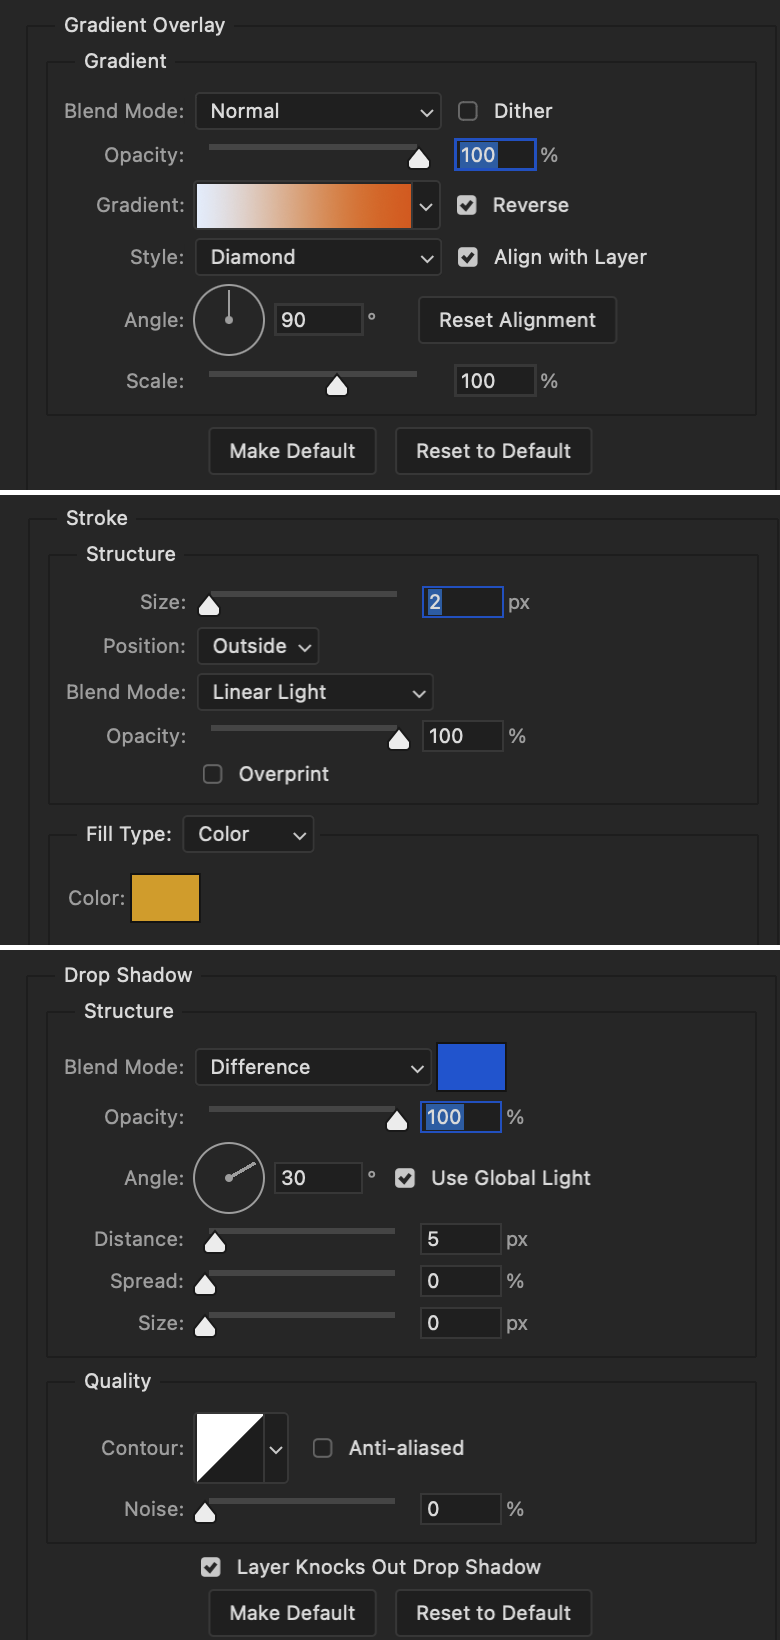
Layer styles applied to this layer are stroke and gradient overlay.
Text Layer 3
Stroke settings:
Size: 1px
Position: Outside
Blend Mode: Difference
Opacity: 100%
Overprint: unchecked
Fill Type: Color
Color: #d48f16
Gradient Overlay settings:
Blend Mode: Difference
Dither: unchecked
Opacity: 100%
Gradient: #cd3f00 > #ffdb5d
Reverse: unchecked
Style: Reflected
Align with Layer: checked
Angle: 90°
Scale: 100%

Blending mode for the third text layer set to Exclusion, Opacity: 100%, Fill: 100%. I also moved the third text layer around, down and to the right a few pixels to give it that 3-D Word Art effect.
With all three text layers active:
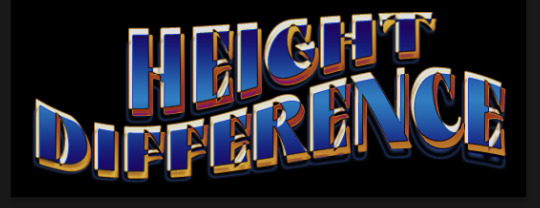
Next are the arrows.
Take your transparent pngs and place them to your liking. Blending mode for these is set to Difference, Opacity: 100%, Fill: 100%.
Command + click on an arrow thumbnail to select all the pixels in that layer. This is why the image must be transparent!
With that selection made and on a new blank layer, right click the selection and click on stroke. Settings for that are width: 2px, color: white, location: center. Move that a couple of pixels over.
Do this for all arrows for a total of 6 layers for arrows. I group them together to keep my workspace clean, then I duplicate my arrows group with no further changes made to the second group to get what you see in the final gif.
Next is the smaller text. It's three separate text layers for each word, so I can move each of them around to my liking.
Font used is Pea Wolfe Tracks, font color: white (#ffffff), font size: 24 pt, leading: 6 pt, tracking: 25. Bold and italic options checked. I set the blending mode to Difference, Opacity: 100%, Fill: 100%.
And that's it! That concludes the tutorial for this gif!
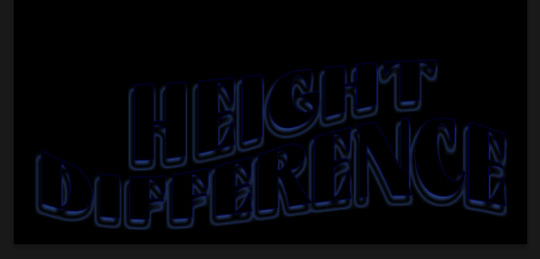
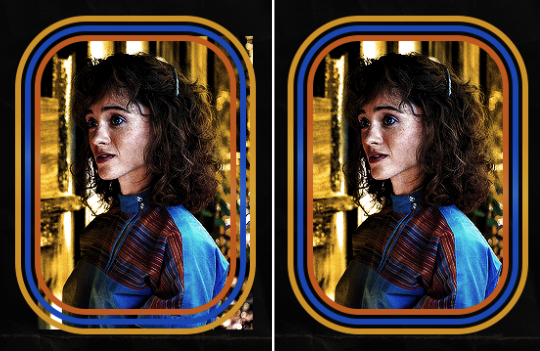
Now on to this gif.
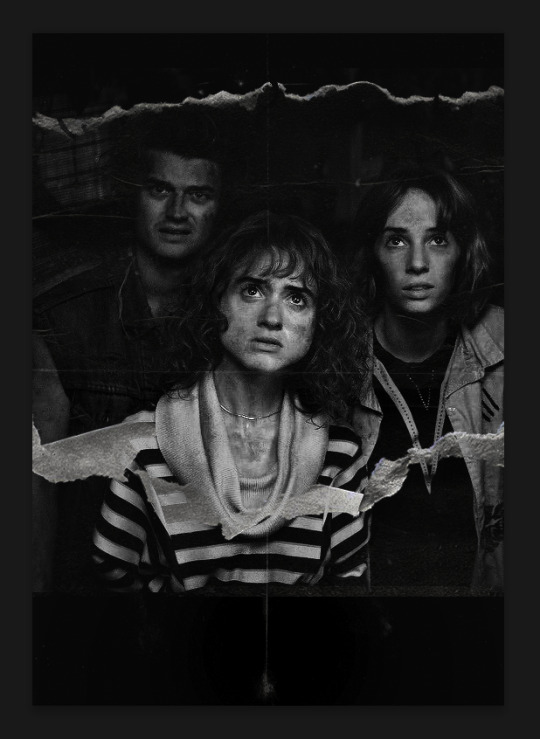
We'll start with the background gif. There are three separate gifs. You could make them one gif, but I wanted the option to order them differently if I needed to.
All gifs in the background are the size of the canvas: 540x770px. Color and sharpen to your liking, but keep them all black and white. To get the blurry effect go to filter > blur > guassian blur. Set radius to 7.0 pixels. Add this to all three gifs.
Then I add two folded paper textures. Blending mode for one set to Lighten, Opacity: 60%, Fill: 100%. The other set to Screen, Opacity: 70%, Fill: 90%.
I found this tutorial a while back for a halftone effect. They include links to the halftone pattern used here as well as textures and gradient maps not used here.
I'm only using the halftone pattern here.
Pattern fill settings:
Angle: 66°
Scale: 8%
Link with Layer: checked
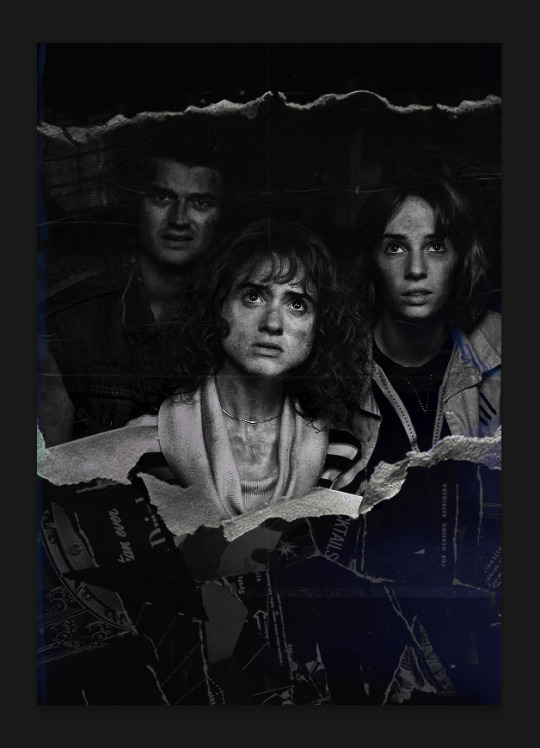
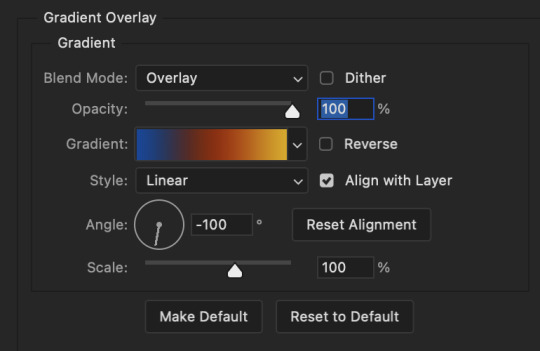
I also added a gradient overlay layer style to the halftone pattern which gives the gifs the color you see above.
Gradient Overlay settings:
Blend Mode: Overlay
Dither: unchecked
Opacity: 100%
Gradient: #0059ac > #a33600 > #e6b801
Reverse: unchecked
Style: Linear
Align with Layer: checked
Angle: -100°
Scale: 100%
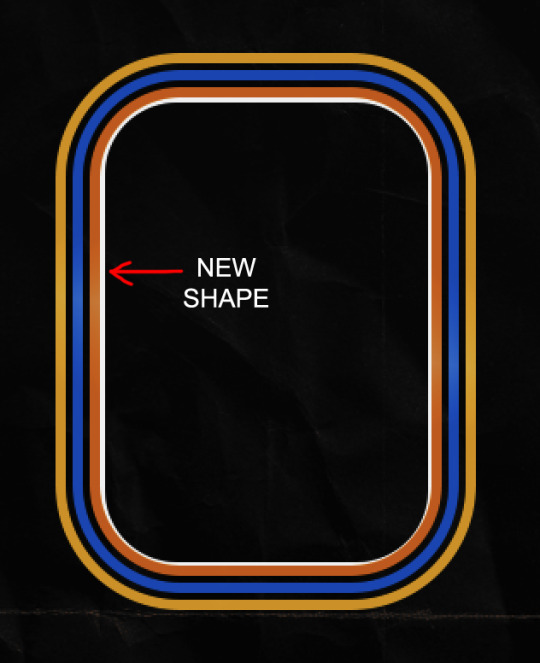
Now on to the square shapes with rounded corners. In the interest of keeping this tutorial short(er), I found this tutorial on youtube that explains how to make squares with rounded corners.
I set my stroke size to 6px, stroke color to white (#ffffff), and fill to no color. I don't use the stroke layer style to make the borders of the shape like in the video! I'm only linking the video to show how to curve corners with square shapes.
Note: Be sure you know how big or small you want these to be and how they're going to fit on your canvas in order to make all the shapes and edit them. It can be tedious to change the settings.
Duplicate and resize to your liking.
In this instance, I wanted to make three squares total, so I had to duplicate twice and resize until I had something I liked.
Settings for the shapes used here are:
Innermost shape: W: 200px, H: 280px, corners: 50px
Middle shape: W: 220px, H: 300px, corners: 60px
Outer shape: W: 240px, H: 320px, corners: 70px
Once I have the size I want for all three shapes, I group them together to make a set and duplicate that group twice, then adjust each set on the canvas for my layout.
What the sets look like all together:
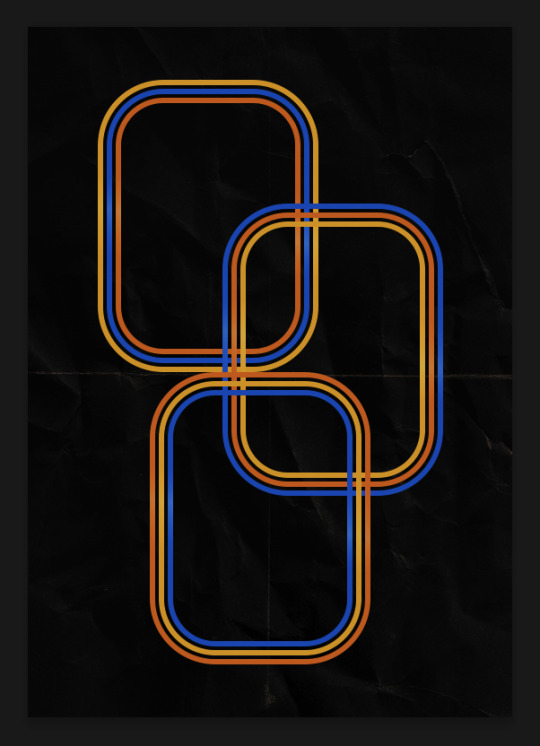
Colors used: orange #e47100, blue #0062d1, yellow #ecac00
To add color to the shapes, either change the color of the shape itself or use layer styles. I used layer styles.
Note: I didn't add the colors until the end after I knew what gifs went where and what color scheme I wanted, but I don't want to add more images than I need to here.
To keep this short, I found this tutorial on youtube that explains how to wrap text around a shape. However, I wanted the text to align on the outside where the white line is and not the green line (left image):
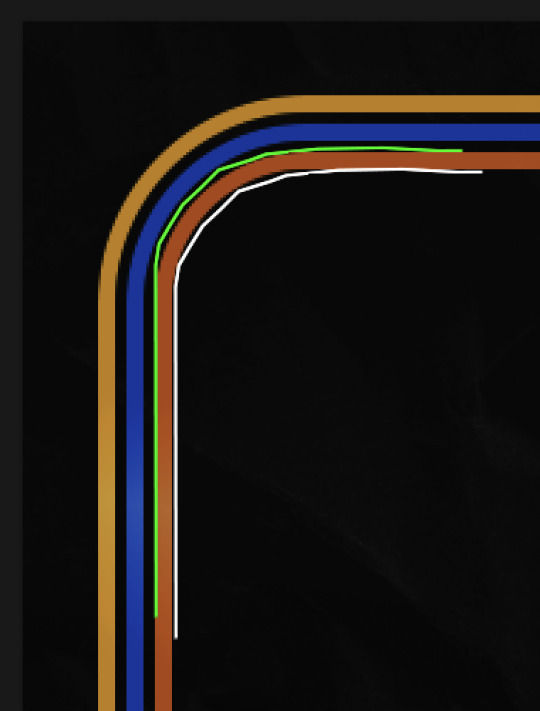
So I created another shape just inside the innermost square and used that as a path for my text (right image). Adjust the text to your liking until you have your text where you want it. Refer to the video tutorial if you need help moving the text along the path!
You don't need the shape path once you have your text where you want it, so use the layer visibility tool to hide it. You can hide your other shapes too so you can work with your text.
Do not delete your shape path!
I duplicate it once I start working with my "jock" text since all the sets are the same size. The "loser" text has to be worked a little differently, but we'll get to that later.
For the princess, jock, and loser text, there are two text layers to create the overall effect. For both layers, font used is Kiera, font color set to white (#ffffff), font size: 60 pt, blending mode set to Normal.
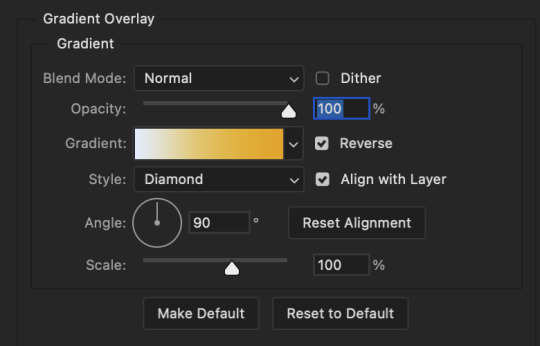
I added a gradient overlay layer style to the first text layer which I'll call the base layer. Opacity for this layer is 100%, Fill: 100%.
Base Layer
Gradient Overlay settings:
Blend Mode: Normal
Dither: unchecked
Opacity: 100%
Gradient: #f0b002 > #e7f0fd
Reverse: checked
Style: Diamond
Align with Layer: checked
Angle: 90°
Scale: 100%
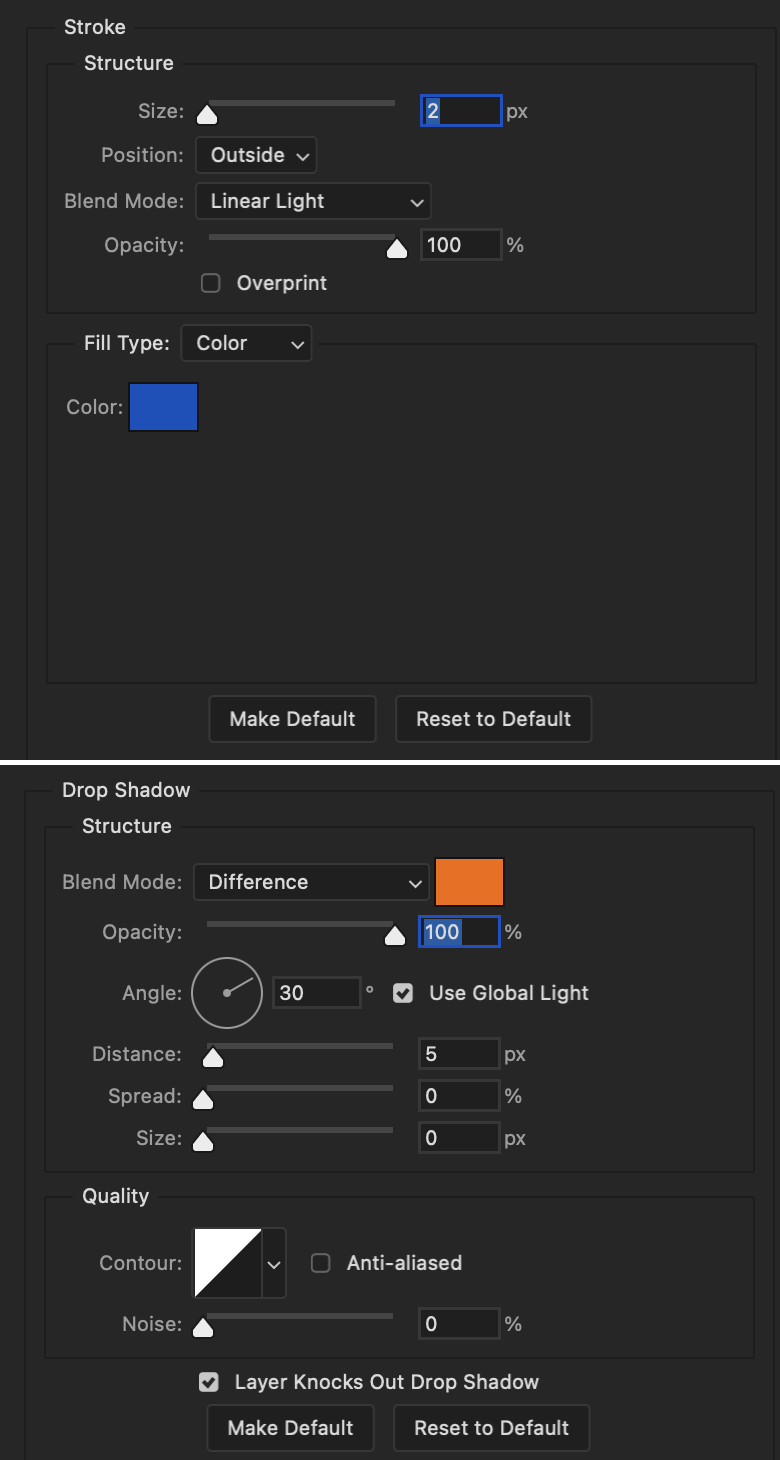
The second text layer is your stroke and drop shadow layer. For this layer, opacity is set to 100%, Fill: 0%.
Stroke and Drop Shadow Layer
Stroke settings:
Size: 2px
Position: Outside
Blend Mode: Linear Light
Opacity: 100%
Overprint: unchecked
Fill Type: Color
Color: #0064cb
Drop Shadow settings:
Blend Mode: Difference
Color: #fb7c00
Opacity: 100%
Angle: 30°
Use Global Light: checked
Distance: 5px
Spread: 0%
Size: 0px
Contour: Linear
Anti-aliased: unchecked
Noise: 0%
Layer Knocks Out Drop Shadow: checked
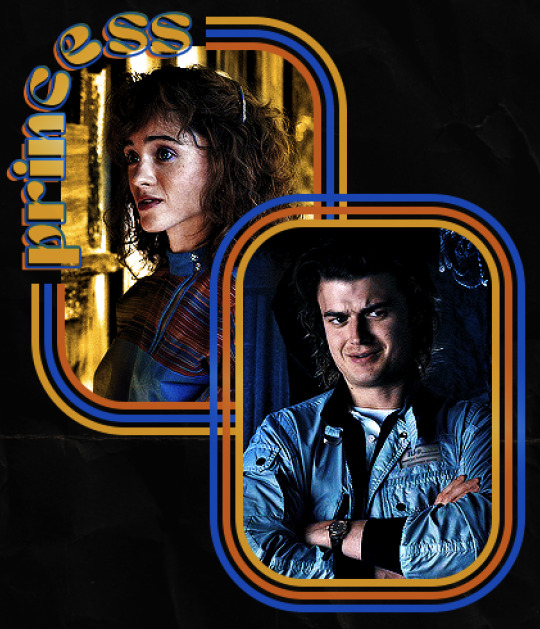
End result looks like this:

When I make my shapes visible again (minus the one I used as a path), I get this:
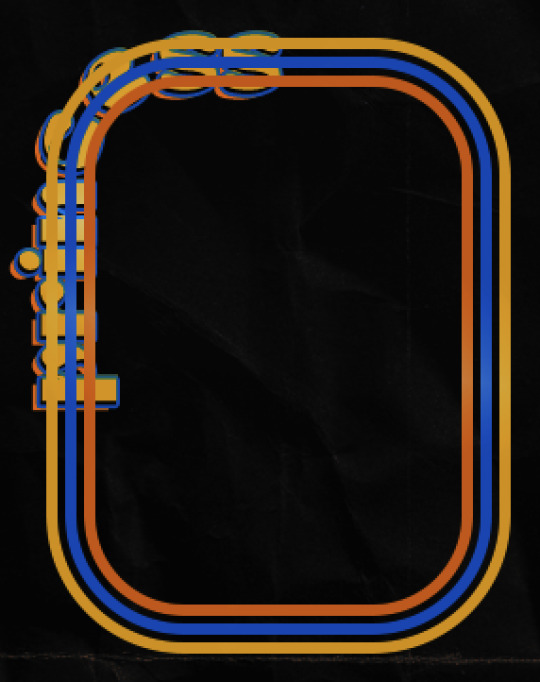
The shapes are clearly in the way of the text, whether they're above my shapes layer or under it. I use layer masks to hide what I want, so the text is legible. It looks cleaner this way and I wanted the text to be a part of the shape itself. I do that for each rounded square.
Now on to my smaller gifs. I like to crop, resize, sharpen, and color separately because my laptop and Photoshop would kill me if I tried to do it all on one canvas. I use the size of the middle shape for my gifs (220x300px), so I can have a little wiggle room when adjusting. I then use a layer mask to hide the parts of the gif that are outside of the shape.
A quick way to do this is to command + click on the thumbnail of the innermost square. With that selection made, I got to my gif layer and add a layer mask. Sometimes you need to invert it. Use command + i with the layer mask selected (not the gif) to invert the layer mask.
I repeat this process with my Steve and Robin gifs. I have to go back and forth with all the layer masks to hide parts of the gif/shapes I don't want for each set. It's kind of a long process, but not all that difficult. I label and group my layers together as I work to keep things clean and it helps me keep track of what I edited and what needs to be edited when it comes to things like this.
The picture below shows where I hid the bottom right corner of Nancy as well as the shapes that make up her set using layer masks. I also did this with the Steve and Robin sets, hiding the bottom left corner of Steve.

Similar text settings used for jock. The gradient overlay layer style for this base layer is different than that of princess because of the positioning of the text. Again, same as princess, two text layers are used here. Blending mode, opacity, and fill for both are the same as the princess text layers as mentioned before.
Base Layer
Gradient Overlay settings:
Blend Mode: Normal
Dither: unchecked
Opacity: 100%
Gradient: #007aec > move bottom middle dot to 80% > #e7f0fd
Reverse: checked
Style: Diamond
Align with Layer: checked
Angle: -140°
Scale: 100%
Stroke and Drop Shadow Layer
Stroke settings:
Size: 2px
Position: Outside
Blend Mode: Linear Light
Opacity: 100%
Overprint: unchecked
Fill Type: Color
Color: #a05700
Drop Shadow settings:
Blend Mode: Difference
Color: #ffba00
Opacity: 100%
Angle: 30°
Use Global Light: checked
Distance: 5px
Spread: 0%
Size: 0px
Contour: Linear
Anti-aliased: unchecked
Noise: 0%
Layer Knocks Out Drop Shadow: checked
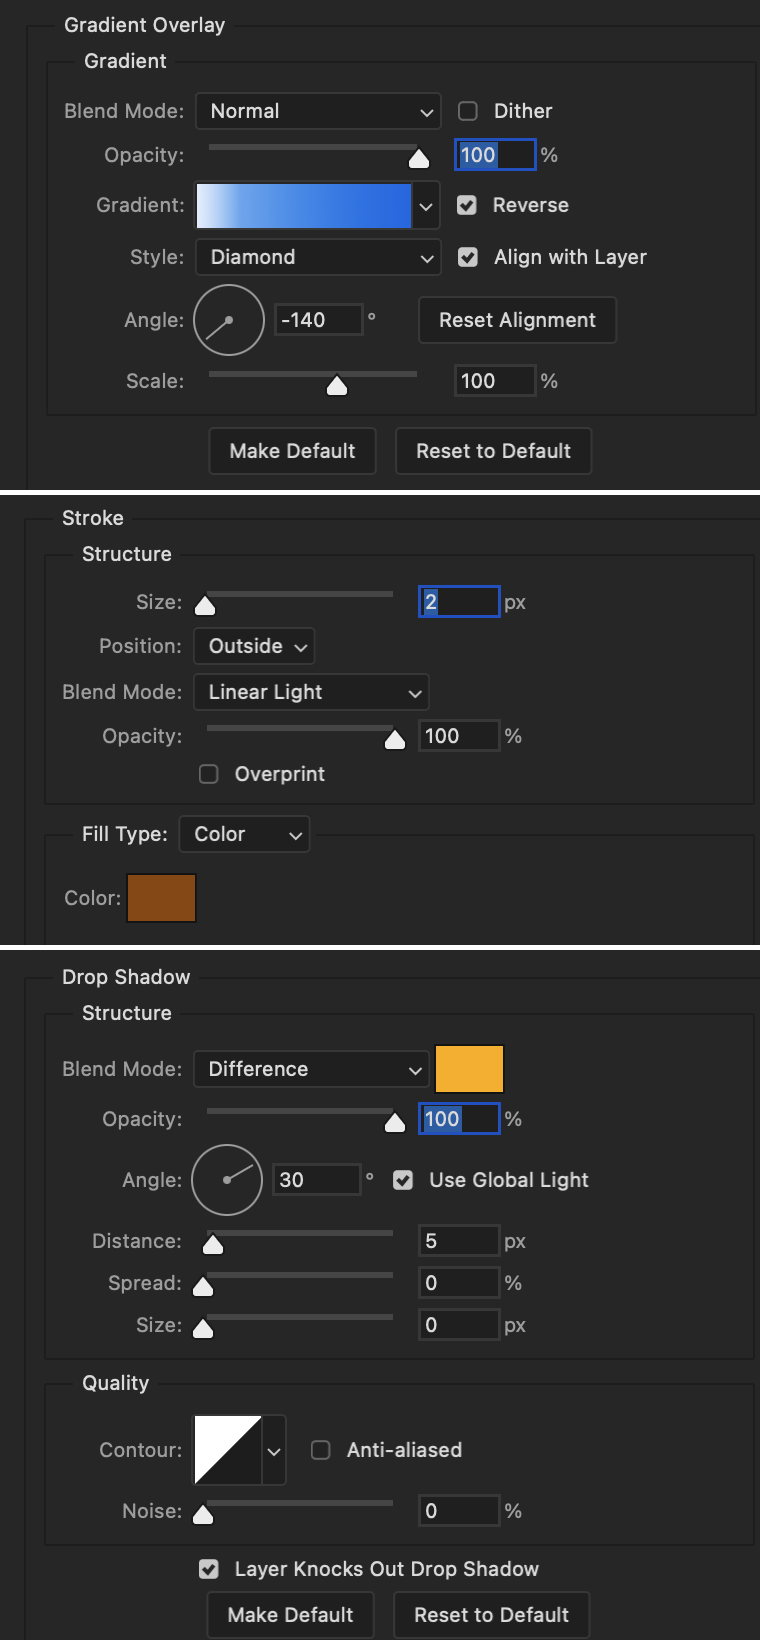
Image 1: We start with Robin.
Image 2: To make the loser text, I had to create a new path.
Image 3: I make it so the text is on the inside of the path instead of the outside. (Hint: Refer to video tutorial if you don't know how to do that.) I then adjusted the tracking between the letters in the word "loser" so they didn't look so squished together.
Image 4: Then I use layer masks to hide the parts of the shape I don't want shown.

You can then hide the path or delete it. You only need it if you want to adjust the placement of the text. I keep it (hidden) just in case.
Text settings for loser are just like those for princess. Blending mode, opacity, and fill are also the same.
Base Layer
Gradient Overlay settings:
Blend Mode: Normal
Dither: unchecked
Opacity: 100%
Gradient: #eb6400 > #e7f0fd
Reverse: checked
Style: Diamond
Align with Layer: checked
Angle: 90°
Scale: 100%
Stroke and Drop Shadow Layer
Stroke settings:
Size: 2px
Position: Outside
Blend Mode: Linear Light
Opacity: 100%
Overprint: unchecked
Fill Type: Color
Color: #e1a900
Drop Shadow settings:
Blend Mode: Difference
Color: #0068de
Opacity: 100%
Angle: 30°
Use Global Light: checked
Distance: 5px
Spread: 0%
Size: 0px
Contour: Linear
Anti-aliased: unchecked
Noise: 0%
Layer Knocks Out Drop Shadow: checked
Next are the post-it notes! This is probably the easiest part of making this gif. You just have to repeat this process for however many post-it notes you're making.
Image 1: To start, place your transparent post-it note where you want it. You can also rotate it if you'd like.
Image 2: Then create a text layer and write what you want. Font used here is Post. I wanted this text underlined to give emphasis, so I click on the underline option. I also adjusted the leading because I wanted more space between the word and the line. Rotate the text so it looks like it's written on the post-it note. Note: It looks better if you choose a font that looks handwritten.
Image 3: I wanted another line to give emphasis to the "Dingus!!" text and make it seem more handwritten. I use the line tool to create another line.
Image 4: Then I adjust that line to my liking.

Fonts used for notes: Post, Ellianarelle's Path, and Heina's hurry
Repeat this process for all post-it notes!
That finishes the tutorial! (And I hit the 30 image limit lol.) I hope this helps. If you have any further questions, feel free to send an ask or IM and I'll try to answer to the best of my ability.
Happy photoshopping!
#ask#pcocana#photoshop#photoshop tutorial#tutorials#*tutorials#userchibi#userbunneis#uservivaldi#userriel#userabs#usertiny#useralien#useraljoscha#userfanni#userraffa#tusermona#userbess#userrobin#userroza#quicklings#janielook#usernaureen#userrlorelei#tsusermels#tusermimi#userelio#usertj#userbarrow#usernolan
288 notes
·
View notes