#cooking recipe
Text
One Pot Functional for The Sims 2

This is a 4to2 conversion from Icemunmun, low poly. It's a functional pot that works like the Soup Maker I made. But in order to use it your sims must have at least 5 cooking skills point :D
15 recipes and a new plate are included and required (they will show only in the pot menù, not on the fridge). The pot has 16 recolors.

DOWNLOAD HERE
---------------------------
I also made another version of the pot (works with the same recipes) that is a 4to2 conversion from Katiesimspire, low poly.

DOWNLOAD THE CROCK POT HERE
#sims 2 cc#the sims 2#ts2#sims 2 download#the sims 2 cc#ts2 download#4to2#4to2 conversion#food#sims 2 food#buy mode#kitchen appliances#pot#recipes#cooking recipe
542 notes
·
View notes
Text


210211 Master Moon Chef
#master moon chef#taeil#moon taeil#cooking show#cooking#recipes#cook#cooking recipe#nct#nct 127#nct127#nct taeil#nct 127 taeil#NCT#NCT 127#nctinc#ultkpopnetwork#moon chef#chef#food#mukbang
27 notes
·
View notes
Photo

Hewwo! baps your face off! TODAY from the big book of Redwall cookin’, we have my fuckin favorite recipe thus far; Rosey's Jolly Raspberry Jelly Rock Cakes- The one that I've actually had ready to go for a few weeks now but I kept eating it too fast to take notes. Buckle into your buggies, hotshots.
(You can find the original recipe at the bottom if you’d like to follow along, and i plead you do)-
MY NAMES CROSS NOW LETS COOK LIKE ANIMALS
SO, “what goes in to a Jolly Raspberry Jelly Rock Cake?” YOU MIGHT ASK
All-purpose flour
Baking powder
Salt
Unsalted butter
Sugar
Eggs
Raspberry jam or jelly
Went to read this recipe and upon realizing i had every ingredient- from start to finish it took about an hour and half from deciding to make it to being able to eat it!
AND, “what does Jolly Raspberry Jelly Rock Cake taste like?” YOU MIGHT ASK
Excellence. Pure comfort. Food that heals bones and hearts. Food that laces up scars. Food you make for your lover in bed on a cold rainy day.
Not quite fluffy, but very soft, smooth center
Crumbly, again soft, outer
Tart raspberry jam is the crown jewel of the piece. Mwah. God.
Rich and refreshing
The sprinkled sugar comes out not overbearingly sweet
Do try to eat/serve these warm, they keep well, but the jam will start to absorb into the pastry
Most jam or fruit filling works here, as long as it has some tartness, the world is your oyster. Grab your oyster fork. Feel weird about having an oyster fork.
Like a molten lava cakes baby cousin-
. Used fine granulated sugar
. Used salted butter (and only a pinch of salt instead of tsp.)
. Used raspberry jam
. Served with goat cheese caramel lightly drizzled
. Bumping the cook time up from 15 to 17 minutes let the edges brown a bit more which I recommend
I think in the future I would like to also try pairing this with slices of strawberry, or perhaps fresh raspberries placed on top? Its hard to spitball pairing ideas because Most Things would pair fair!!
-----------------------------------------------------------------------------------------------------------
Gentlethems of the Jury, we here at crossy wossys kitschy kitchy, welcome our very first 10/10
I so dearly need to communicate that I've had this art made for a good week now, I first baked this almost 2 weeks ago, and am just now getting around to writing the actual review.
I like to have the food in my mouth to write about the flavor/mouthfeels section.
And I kept eating them too fast to take notes. I've used almost a whole bag of sugar making these on repeat and my teeth surely hate me but the heavens sneer enviously.
These fellas don't seem rather persnickety- I think one would have to actively try to mess up the recipe in a way where its no longer delicious. These are essentially scones with more variety in textures and flavors! The aforementioned latest batch was made at 4am halfmindedly with multiple perceived mistakes, and the only difference from the first carefully attended-to batch was that they were slightly less pretty to look at, both being absolutely mouthwatering.
The low fussy-ness, low spoons (for me!), and delicious outcome that can pair with many drinks, makes this a flawless pastry in my eyes. a proud 10/10, with 1 being food that makes one physically sick and 10 being food that gives one a lust for life again.
🐁 ORIGINAL RESIPPY TEXT BELOW 🐁
Ingredients:
1 and 1/2 cups all-purpose flour, plus additional for rolling the dough
1 and 1/2 teaspoons baking powder
1/2 teaspoon salt
6 tablespoons unsalted butter or margarine, chilled and cubed, plus additional for the baking sheet
1/2 cup sugar, plus additional for sprinkling
2 eggs, lightly beaten
Raspberry jam or jelly
Method:
Preheat the oven to 400° F and grease a baking sheet.
In a mixing bowl, whisk together the flour, baking powder and salt. Add the butter and rub it into the flour with your fingers (alternately, pulse the dry ingredients and butter in a food processor) until the mixture resembles coarse crumbs. Stir in the sugar. Make a well in the centre, add the eggs and mix well to form a stiff dough.
Turn the dough out onto a floured board and form it into a roll. Cut the dough into ten pieces, shape them into balls and place them well apart on the baking sheet.
Use your thumb to make a hole in the centre of each and fill the hole with jam or jelly.
Pinch the dough closed over the jam, sprinkle the rock cakes with a little sugar and bake them until golden brown, about 1 5 minutes.
Cool the cakes on a wire rack and eat them while fresh, preferably on the same day.
687 notes
·
View notes
Text
how to make ghe at home

a nice cooking oil alternative especially if you like butter
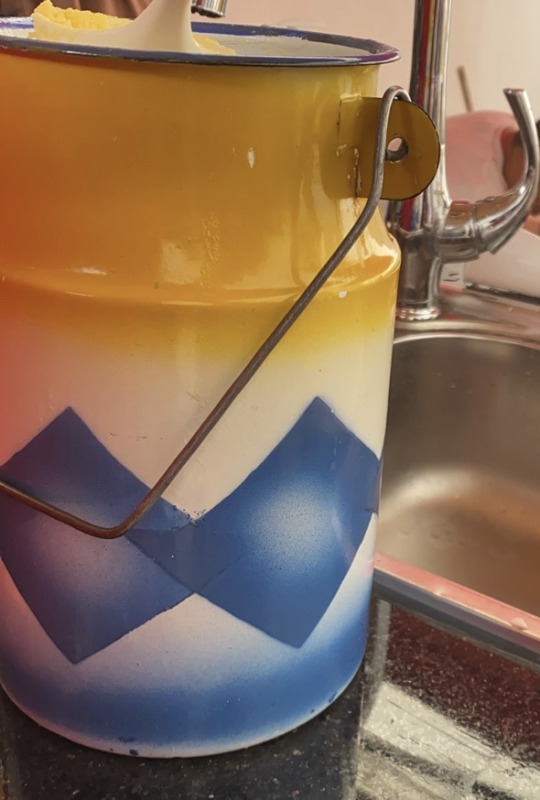
Note that this makes an amount to sort of fill up this, so you can go smaller with the portions

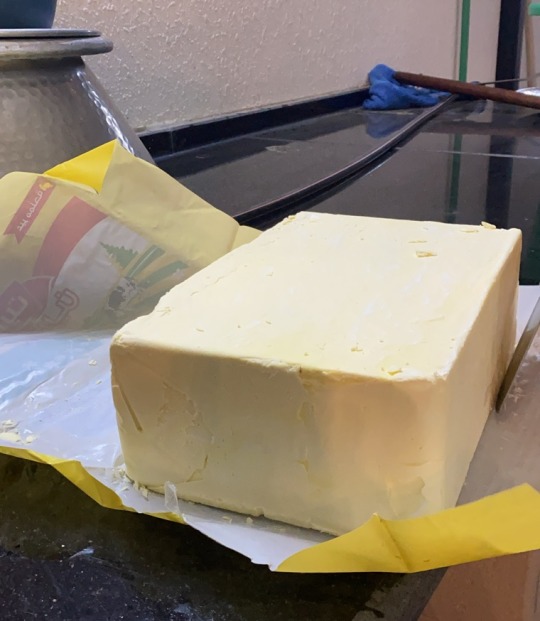
First you get a Nice Big Op Block Of Butter
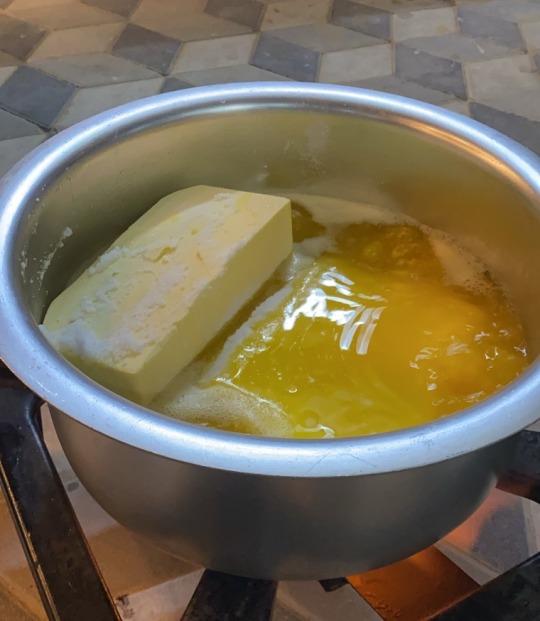
You melt that thang and add around three handfuls of salt
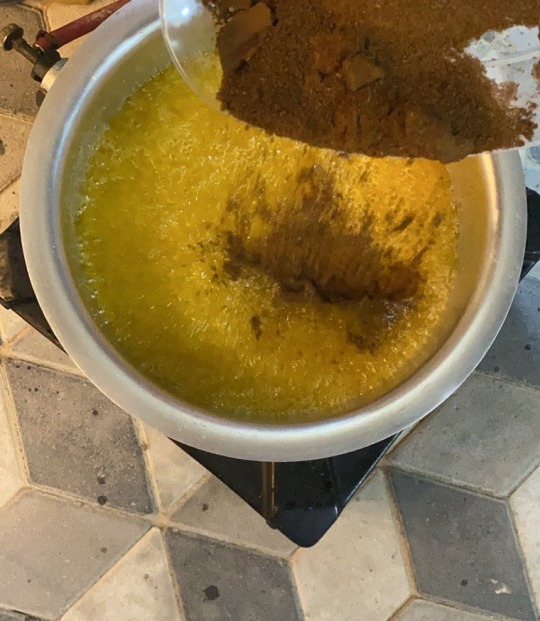
Once it melts you add in second key ingredient aka grounded cumin
( warning!! This smells really good !! )

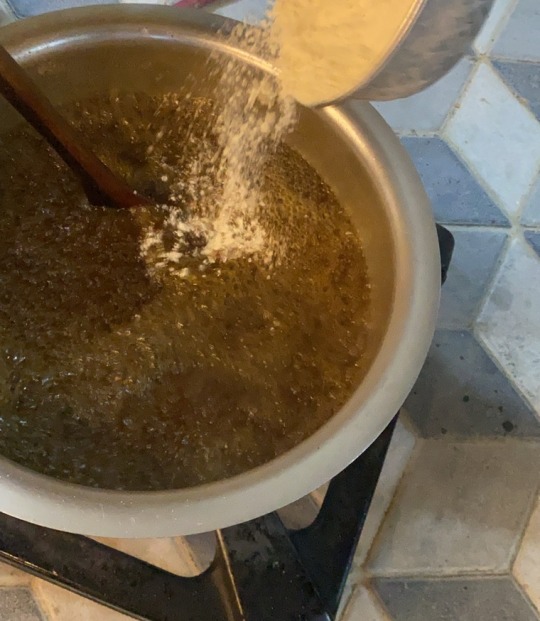
Let it cook and create small bubbles then add some flour ( around 1 cup??? )

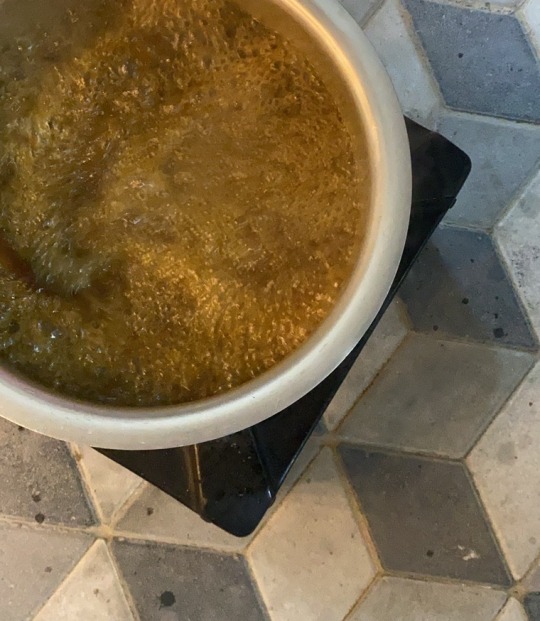
Then it cooks until big bubbles appear and you’re done keep it aside to cool down a little.
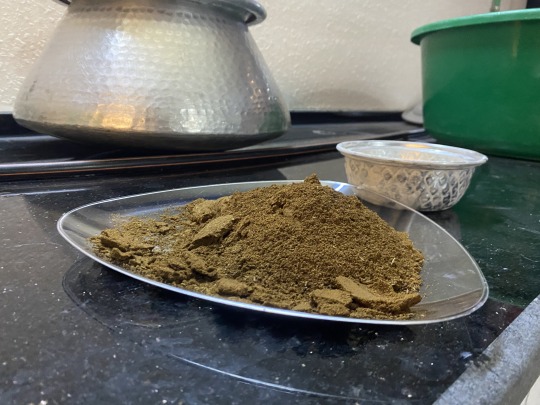
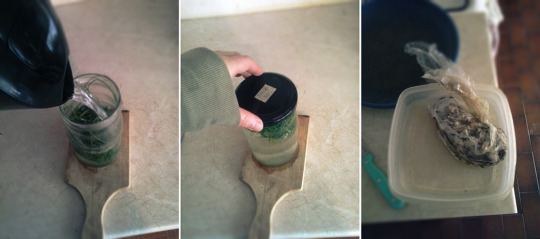
The cumin will eventually sink down and rich yellow will stay up, that’s the ghe you’ll use, the cumin residue? Keep that. That’s important

This is the residue I know it doesn’t look very appetizing but trust me just scoop a little of it, put it in a bowl and melt it in the microwave for some then eat it with rice it’s so delicious ( it tastes salty and smells so nice )
20 notes
·
View notes
Text
🍌🍞 CeCe's Honey Banana Bread 🍞🍌

Hiya there, everyone! So this is a little different from my usual post, but I've wanted to share some of my favorite recipes with you all for a while now. I figured since I can't cook for you all in person, I can at least share the recipes I love so you can make them yourselves.
So this first recipe is my honey banana bread recipe that I've been making for about a year now; I hope you all enjoy it, and if any of you make it, please send me pictures so I can see them.
I hope you all stay blessed and safe throughout your day.
Lots of Love & Wishes: Celia 💙
Wet Ingredients:
1 cup of honey
2 to 3 ripe bananas mashed (It depends on how big the bananas are.)
2 eggs
1/3 cup of vegetable oil
1 tsp of vanilla extract
1/4 cup of milk (You can use whatever type of milk you like, I use whole milk because it makes the bread fluffier in my opinion.)
Dry Ingredients:
1 3/4 cups of flour
1 tsp of baking soda
1/2 tsp of salt
1 tsp of ground cinnamon

Instructions:
Preheat oven to 325 degrees Fahrenheit.
Grease and lightly flour a 9 x 5-inch pan.
In a cereal bowl mash up your bananas until it's almost a pudding constancy, then add in your milk and whisk until combined.
In a medium-sized bowl mix together your flour, baking soda, salt, and ground cinnamon.
Then in a large bowl whisks together your honey and oil, before adding in your eggs.
When all three are mixed together add your banana milk mixture until everything is blended together.
Once all your wet ingredients have been combined continue to stir while slowly adding all of your dry ingredients.
After that continue stirring everything together until all of the dry ingredients are mixed in with the wet.
When that's done pour into your pan and sprinkle more cinnamon on top for a little more flavor.
Then put it inside the oven and bake for 55 minutes to 1 hour.

And there you have it honey banana bread!
Small Flavor Tip: You can add other things like chocolate chips, dried fruits, and nuts to have it fit your taste a little bit more. I don't really like those with banana bread so I'll usually spread honey or apple butter on a slice.
I hope you all enjoy it!
#banana bread#banana bread recipe#recipe#recipes#my recipes#my recipe#food#cooking#baking#sweet treats#sweet treat#bread#baking recipe#baking recipes#cooking recipe#cooking recipes#honey banana bread#honeycore#honey core#grandmacore#grandma core#late night baking#late night cooking#cottagecore#cottage core#cozycore#cozy core
58 notes
·
View notes
Text
All foraged soup
So, I discovered a had a bag of frozen mushrooms in the freezer, that I had previously forgotten about, and this was a welcome discovery, as I was craving a nice mushroom soup. However, to make a good mushroom soup, I'd need some onions, and generally at this time of year, I have none. This is not because I am just so bad at growing onions; it's because I don't have the space or the bulbs. I am currently trying to trick an onion into going into seed in my garden, so that I may have onion seeds the next year. But, as of right now, I do not have onions, and this is something I usually remedy by using an infusion of chives as an onion replacement! But, not even chives are currently growing because there's so few hours of the sun in the day, they cannot be bothered to grow with this scarce amount of light.
So I remembered, there's another option! Wild onions. And, should I find wild onions out there, this would be a certified 100% foraged soup, as onions and mushrooms would come from out in the wild, collected by foraging.
I had to make an elaborate plan of cycling thu the city to get to an access point to the place with wild onions, I currently just know one spot where they grow! But I made it, and was sniffing around the grass, trying to find some blue-colored clusters. Wild onions can be difficult to spot, as they look very similar to the grass; their color is slightly more blue, they're thinner and they don't have blades like grass does, their greenery grows into elongated tubes instead. Here's some I found!

Even as they look almost like grass, they smell like onions once you pick them. There are a few similar plants that do NOT smell like onions, those are fakes! True onions smell deliciously like onions. I made sure to only harvest the green parts, because this way, I can come back in a week and collect from the same plants again, onions are great at re-growing from the bulb!
First thing I'm doing with these wild onion greens is washing them, which is convenient if you do it in a big frisbee, and then I'm cutting them in half and flipping the halves on the same side, to make it easier to cut into smaller pieces. When I'm done cutting, I put them in a jar!

This is because I'm not actually going to eat the onions, I'm just making an infusion, or a broth really, that's using the onions as a base. Their texture would not be ideal in a soup, unless for a little garnish on top (which I didn't think of at the time, so what I want is just to have them in a jar, pour hot boiling water all the way to the top, then close them up. Then I wrap this closed jar in a cloth, then wrap a few towels around it, so the heat could not escape, this way the hot jar will not cool down! At this point I also realized my frozen mushrooms are not thawing fast enough, so I put the bag into a container with hot water, to make the process faster.
At this point I'm leaving this all in the kitchen for one hour, so the onion broth gets the correct flavour, and the mushrooms get properly thawed.
*an hour later*
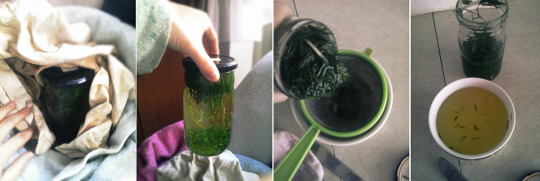
Here's how the onion broth looks like, taken out of the wrapping! It's nice and yellow. I'm going to strain the liquid I want to use, and I'm actually leaving some for another day; I don't need a ton of broth for this soup because it's supposed to be a creamy soup, so I don't want to make it too thin. The broth can stay in the fridge for 2 days, or it can be frozen for future use.
Now, to make the soup.
What I want to do first is to sautee some mushrooms on the oil, then make a roux. I wanted to put all of the mushrooms on the oil, but they were releasing a lot of liquid, and I didn't want them affecting the roux, so I just put a few, to intensify the mushroom flavour of the soup. I also added salt here! So after all of the mushrooms started smelling great, I added some flour on top, to absorb all of the oil, and stirred it until it started getting a bit more color. It's important while doing this, to have a glass with a bit of cold water in it! Putting a glass of water next to the pot was the first thing I did.

It's necessary to stir at all times because the flour burns easily, and before it starts looking bad (which is like, a minute in), I need to pour a glass of cold water on it, and stir. This will quickly make a paste! And this paste is a foundation for all thick and creamy soups.

After the paste has been established, I'm adding all of the rest of the mushrooms, and pouring all of the onion broth in. Then the soup is stirred until it's all the same thickness, and let to boil until it's really bubbly and rising up in the pot! I realized that the creamy soups only turn out okay if I let it bubble all the way up, this insures that the oil, flour and the water are properly mixed, and won't start turning back into separate mixtures.

This is basically all of the work. After it bubbles up, I'm closing the pot with a lid (or a plate, I don't have a lid), wrapping it up in the same cloth, towels and blanket as I did the onion jar, and I'm letting it sit there for 15-20 more minutes, and it can keep cooking in there, without me paying any attention to it. Otherwise you could just cook it on low heat for a bit longer, but it would take stirring and making sure it doesn't burn at the bottom and who's got that kind of patience.

After 15 minutes, I'm taking the pot out, and the last step will just be to blend it, since I have a blender and I can be fancy about it. The mushrooms taste mixes very well with flour and onion, really most of things do.

And here it is! All foraged (except for oil, flour and salt) mushroom soup! It was really good. Tasted like it had a real onion inside, even though I cheated.
#mushroom soup#roux#cooking recipe#cooking from scratch#forage soup#eating from the nature#onion alternative#wild onion foraging#soup#simple soup#soup from scratch#onion infusion#onion broth
60 notes
·
View notes
Text
I want to start baking and cooking again but I have no ideas
Does anyone have any recommendations or recipes I could try?
13 notes
·
View notes
Text

youtube
#mcdonalds#mcdonald’s#french fries#cooking#home cooking#fries#foodgasm#foodie#food#foodporn#food video#cooking video#boycott mcdonalds#free palestine#i stand with palestine#foodlover#food mention#from the river to the sea palestine will be free#cooking recipe#food recipes#tumblr recommendations#recommend#recommendation#youtube#youtube content#youtube recommendations#youtube video#video recommendation#youtube link#video link
6 notes
·
View notes
Text
CAJUN SHRIMP
serves 12
1/2 of a lemon
1/3 cup water
1/3 cup chopped onion
3 tbls of lemon juice
1 tbls cooking oil..
2 cloves garlic minced
1 tbls Cajun seasoning
1/4 tes. salt..1 1/2 pounds peeled shrimp
1/2 cup chopped red pepper and green
Lettuce leaves
Use a large skillet..and glass bowls:
Remove peel from half lemon (no white) cut in very thin strips..combine lemon peel strips/water/onions/lemon juice/cooking oil/garlic/seasonings and salt and shrimp:
bring to a full boil..then reduce heat to and simmer covered about 4/5 minutes
stir twice then add green and red pepper
transfer immedately to a glass bowl
cover and marinate in the refrigeratorfor 4 hours
stir occasionally
drain and serve in lettuce lined bowls with toothpicks
#older sibling#advice#daily life#life skills#home cooking#cooking#recipe blog#recipe book#cooking recipe#recipe box#recipes#cajun cooking
2 notes
·
View notes
Text

Spicy Bluefin Toro + Crispy Rice 🐟🍚
•8 oz bluefin toro (small cuts)
•1/4 c japanese mayo
•2-3 tbsp sriracha
•1/4 cup chives
•1 tsp tamari
•1 tsp sesame oil
•1.5 tbsp + 1/2 tsp cane sugar
•1.5 cup sushi rice
•3 tbsp rice vinegar
•pinch of salt
•serrano peppers (sliced)
Cook your rice and season with a pinch of salt, the rice vinegar and 1.5 tbsp sugar.
Press into a large mold or a couple smaller ones for about 3/4-1 inch thickness. Press in real well and let sit in the freezer for 1 hr 30 min.
Mix well. Let sit in fridge for 15 min.
Cut the rice into squares. Add some avocado oil to a pan (about 1/2 inch) and preheat on high for 2.5 min. Lower to medium and fry the rice until golden, about 10 min total. Yields about 14 squares.
Pipe the toro onto the rice, top with serrano and serve with tamari + lemon.
2 notes
·
View notes
Text
Microwave Japanese Curry Recipe
Portion: 2 - 3 servings (depend on your rice to curry ratio preference)
Ingredients:
• 1 Potato
• 1 Carrot
• 1 Onion
• Fat (can be butter, oil or margarine)
• 1-2 Garlic bulb (optional)
• Meat (it need to be microwavable so you can use ham or canned meat or thinly cut meat, this is also optional)
• Curry roux
• Milk (optional, can be substitute with water)
• White rice or noodle (i use rice bought from konbini)
• 2 microwavable bowls (big but still can be fit inside your microwave, you can use disposable bowls so you don't have to wash them lol)
• Utensils to mix the ingredients (i used a spoon and chopsticks)
How to cook:
• Chop the ingredients into 1-2 cm pieces and peel the garlics
• Set the microwave to high
• Heat the garlics and onion in one bowl with two table spoons of your choice of fat for around 8 mins
• Then add the potato and carrot in that bowl, mix them to cover the veggies in the fat then microwave for 15 mins or until the potato is thoroughly cooked (add more fat if needed)
• Melt 4 cubes of curry roux in the other bowl using boiled water
• Mix the contents of the two bowls
• Split the curry equally between two bowls
• Add milk or water to thin down the curry
• Heat up each bowl of curry for 5 more mins
• Serve the curry with rice or put them in the fridge overnight for tomorrow
Disclaimer: You might need to change the recipe to fit yourself better, especially the cooking time since each microwave work differently. This recipe worked for me but it might not work for you.
2 notes
·
View notes
Text
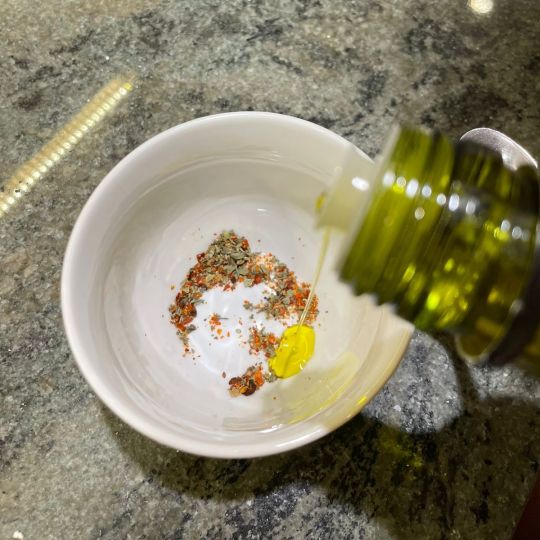
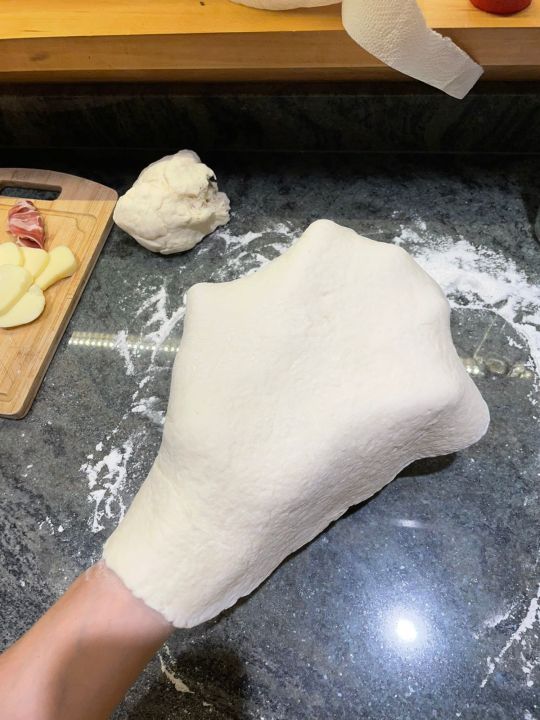
How to make pizza
Instructions and tips for home made pizza
Ingredients:
fresh yeast 50g (1.76 oz)
flour 1kg (35 oz)
water about 700ml
tomato sauce
mozzarella
olive oil
spices & herbs

Click "Keep reading" for instructions & pictures
Put the yeast inside a glass of hot water (not boiling, just tap hot water) should be about the temperature of your body, or a bit higher.
Add a spoon of sugar. Dissolve the yeast in the water and wait until you get some foam at the top. Foam should be visible after 5 mins.
Put the flour in a big bowl (or the kitchen table). Pour the yeast (with foam and water) over the flour and mix everything with your fingers. Preheat the oven.
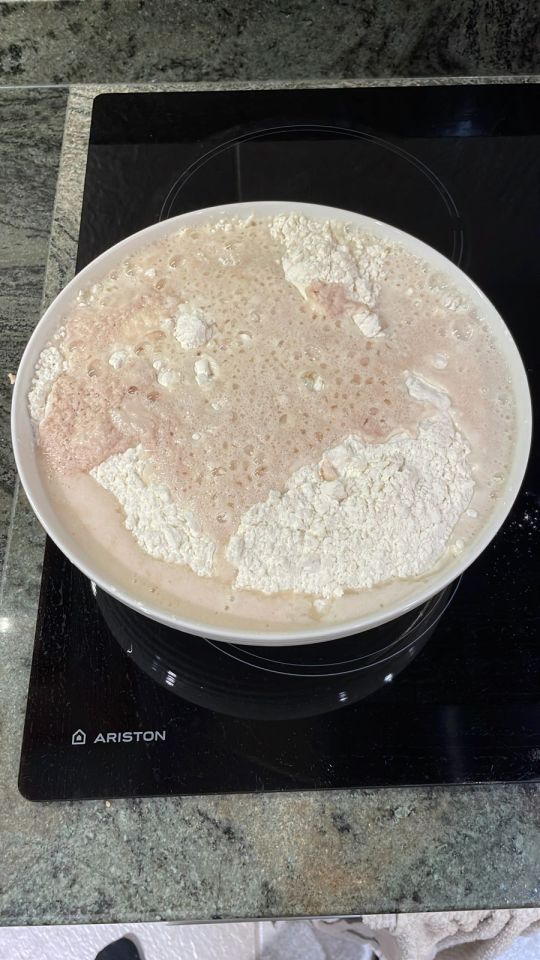
It needs more water. Add warm water bit by bit. Use both hands. It shouldn't be sticky.


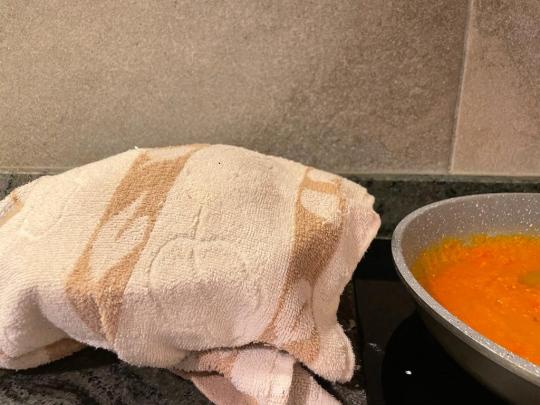
And now wait. Cover it with a clean towel. Yeast likes warm, humid weather. Avoid air drafts, close your windows. It loves if you are boiling something close by. Great spot to work on the tomato sauce.
I made some tomato sauce last weekend so now I’m just going to un-freeze it right next to the dough.

How long should you let the dough rise? Between 15 minutes and 12 hours...
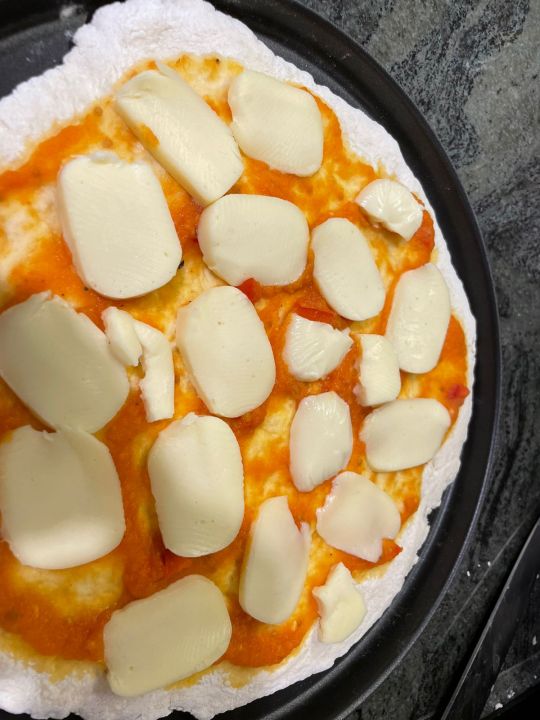
In the mean time, cut the mozzarella. And prepare the biri biri.
Vicki: What is the biri biri?
me: Translation for biri biri: 404 🤷♀️
Vicki: Is it a sauce?
me: Its a a term we made up for.... biri biri.
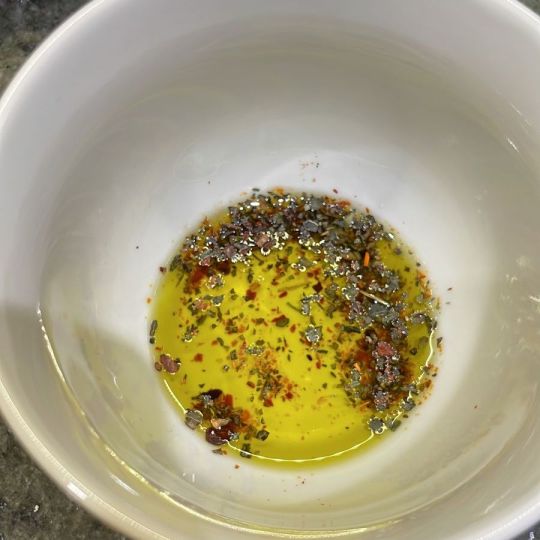
Biri biri:
Olive oil
Basil
Crushed Red pepper
Pepper
Oregano
Dried garlic. Garlic makes things better.
We’ll paint the pizza with it, when it comes out of the oven. Depends on how spicy you like it, and what you have at home, how much crushed red pepper you’ll use. I love it but my kids don’t.
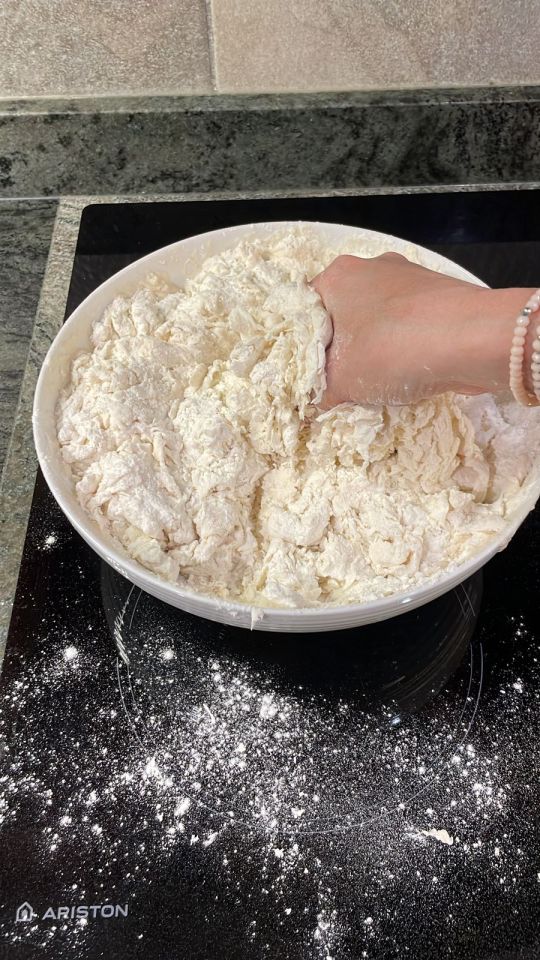
20 minutes later, it is already spongy.
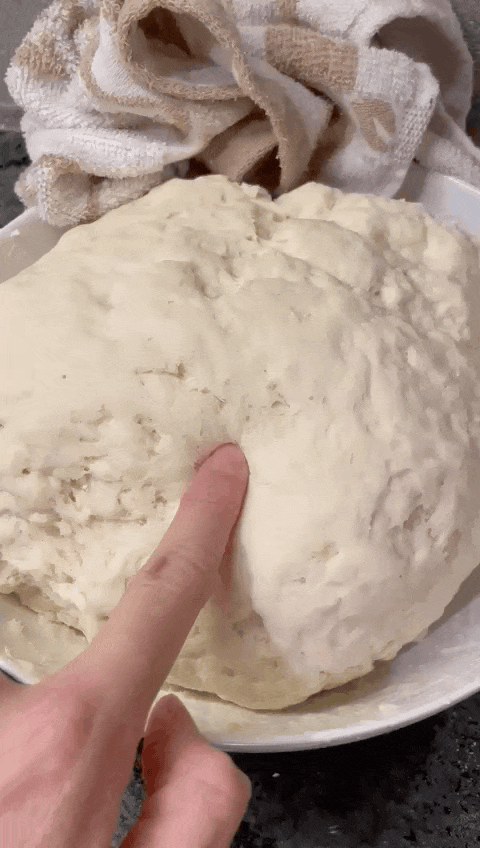
Put some salt... and knead while you listen to Italian music.
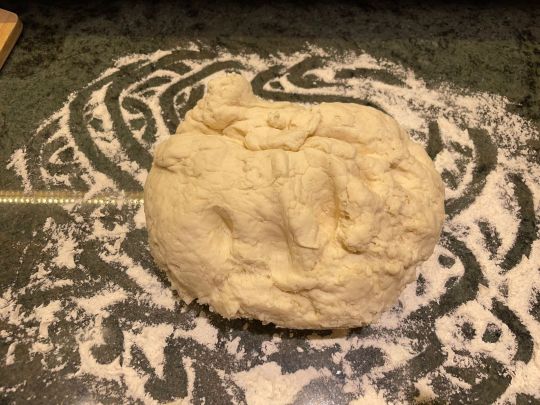
Don't let the dough get run over by a car.

It’s better for he dough to run over the car.
Stretch the dough with a bottle, if the kids stole the rolling pin.

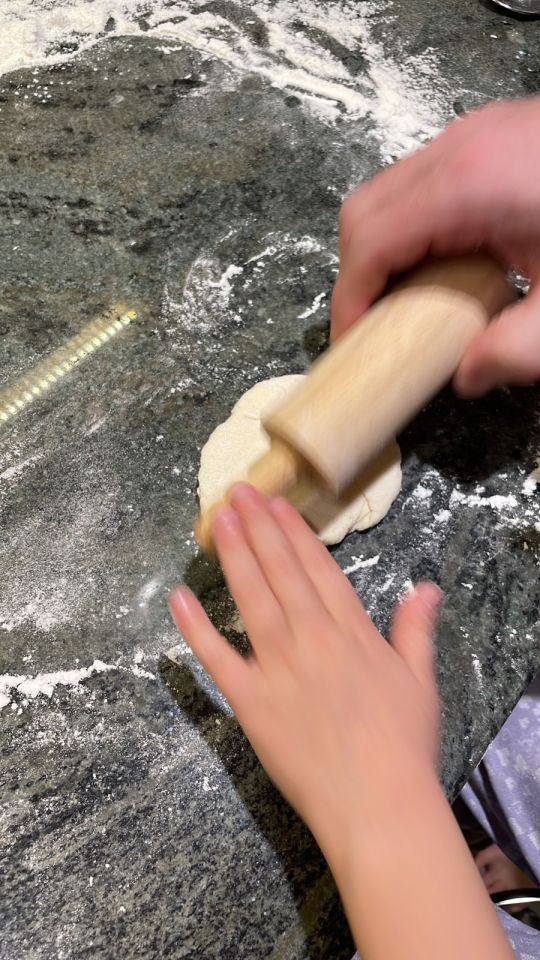
Make some art with olive oil.
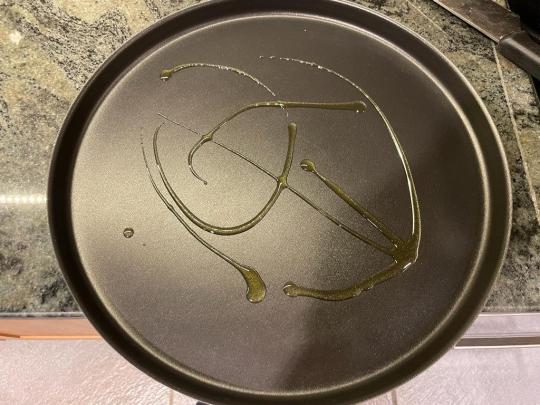
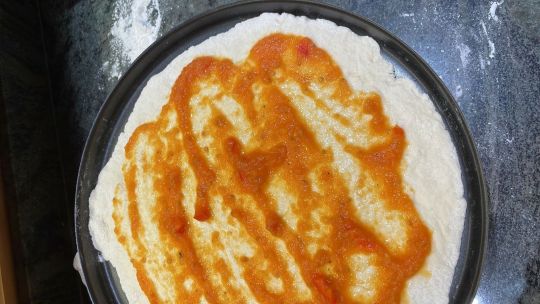
Put the dough on a roasting pan, put tomato sauce over it with a spoon, and into the oven! (220 Cº / 428 F).
Keep yourself hydrated. Cover the car in dough.

While you wait, stretch another pizza. You can put it over the roasting pan and cover it with a clean towel for extra rise.
Take the pizza out of the oven, put mozzarella over it, and back to the oven!

Take it out when ready. Paint the pizza with the biri biri.

Eat!

Happy birthday @veekaybee
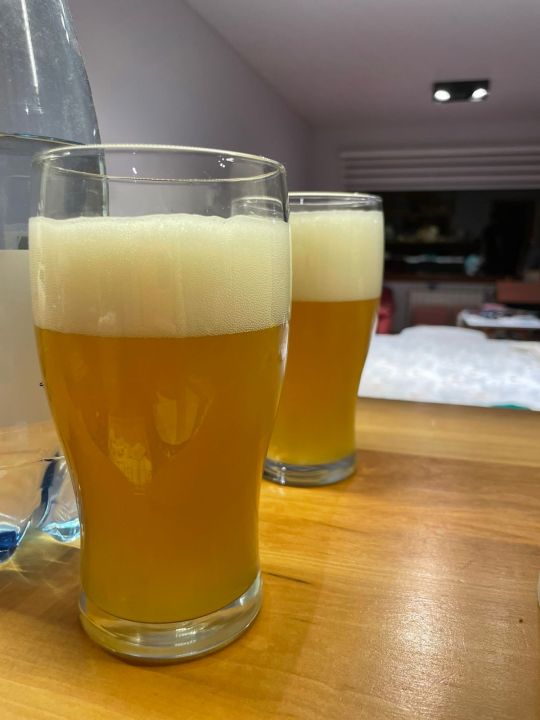
#pizza#recipe#cooking recipe#diy#cooking#cook#food#kids#parenting#beer#instructions#tips#yeast#flour
35 notes
·
View notes
Text


220421 The Avatar Apprentice
#the avatar apprentice#cooking show#cooking#moon taeil#nct#taeil#nct 127#nct taeil#nctinc#nct 127 taeil#엔시티 127#nct127#neo culture technology#cooking recipe#recipes#food#mc#judge#2022#nct icons#ultkpopnetwork#kpop#idol#nct show#idols#kpop idol
15 notes
·
View notes
Photo
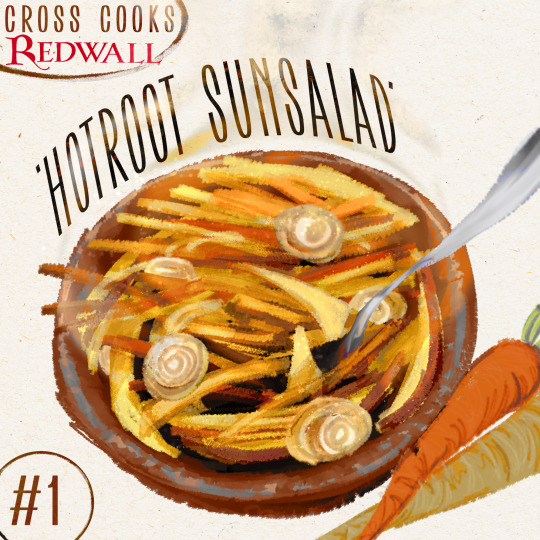
HELLO! Recently, i decided to make and draw every recipe from the Redwall Cookbook, and figured it’d be fun to share that process with others!-
(Thus you can also find the original recipe at the bottom if you’d like to follow along)-
MY NAMES CROSS NOW LETS FUCK COOK LIKE ANIMALS
SO, “what goes in to a hotroot sunsalad?” YOU MIGHT ASK
3 Medium parsnips
3 Medium carrots
4 Medium Jerusalem artichokes (Sunchokes)
1 Leek
and for the dressing;
Wine vinegar
Extra-virgin olive oil
‘Hot pepper sauce’
Salt
So first, and actually only, issue i ran into, Jerusalem artichokes. Couldnt find em! not a lick, nor whiff, nor hide or hair! Apparently not commonly stocked :( So substituted with artichoke hearts. I used roughly a jar and a half. (If possible, pls try calling them into your local store in advance lmao)
AND, “what does hotroot sunsalad taste like?” YOU MIGHT ASK
Well it tastes fuckin baller, as you might’ve guessed;
A little tangy, a little salty, very smooth
The recipe calls for just a dash of hotsauce and you cant really taste it upfront but it adds a nice warm aftertaste
Extremely hearty but not necessarily rich? if that makes sense. it relaxes without making one feel sluggish
Satisfying texture (kinda like potato roast!)
The recipe says to serve it immediately and because of how warm it is it would pair really well with an iced tea
these rodents are living a life more decadent and visceral than you or i could ever imagine.
. Used a mix of black knight, white satin, and yellow stone carrots for visual appeal
. Used 2 dashes of lousianna hot sauce for 'hot pepper sauce'
-----------------------------------------------------------------------------------------------------------
when it says it serves 4 people they are not kidding!
please be sure to have roommate(s) to shove bowls into the hands of!! Eating with loved ones makes food taste better too!!
The arty-heartys threw off the texture blend, although i Will say they did add a nice juicy refresh, flavor-wise.Id also make a bigger serving of the dressing, it was addictive, ands deservin of a good chuggin
Overall id give this a good 7/10, with 1 being food that makes one physically sick and 10 being food that gives one a lust for life again. I had a minor mental break down in the store over root vegetables and while not my proudest moment the end result did lift my spirits and send me to bed with a full tummy and soothing dreams. Hotroot Sunsalad is very much a laborers dish in the best way
🐁 ORIGINAL RESIPPY TEXT BELOW 🐁
Salad:
3 medium parsnips, peeled and cut into matchsticks
3 medium carrots, peeled and cut into matchsticks
4 medium Jerusalem artichokes, peeled and thinly sliced
1 leek, cleaned and thinly sliced
Salt
Dressing:
1/4 cup wine vinegar
2 tablespoons extra-virgin olive oil
Dash of hot pepper sauce
Pinch of salt
Method:
To make the salad, bring a large pot of salted water to a boil. Plunge the vegetables into the water and boil until cooked but still crisp, 6 to 8 minutes.
While the vegetables are cooking, place all the dressing ingredients in a screw-top jar and shake well to mix (alternately, whisk the ingredients together in a bowl).
Drain the vegetables and transfer them to a serving bowl.
Pour the dressing over the hot vegetables, toss and serve immediately.
650 notes
·
View notes
Text
youtube
Yo, check out this recipe! Tasted the food myself I can say is delicious!
The wings are moist and crispy on there own and have a beautiful flavoring to them and then add the mango sauce, truly chefs kiss! Highly recommend! Follow for more!
#cooking#baked wings#healthy#healthy eating#meal prep#sauce#cooking recipe#chicken recipe#football sunday#for the boys#blackblogger#lifestyle#black women#personal#yellow aesthetic#positivelife#blackgirlmagic#my own post#Youtube
2 notes
·
View notes
Text

⋆
#food#pasta#truffle#cooking recipe#restaurant#chefstable#truffle pasta#love#food lover#beautiful photos
2 notes
·
View notes
Last Seen Blogs

almmyrart
AM Rogers

uvercinkkaa
Üvercinka

raddb
Inside the Rabbit-Hole

pistachibow
PistachiBow

otome-ism
堕趣味庵