#cricut tutorial
Explore tagged Tumblr posts
Visit Tumblr Blog
Explore Tumblr blogs with no restrictions, modern design and the best experience.
Last Seen Tumblr Blogs


Fun Fact
Tumblr was attacked by a cross-site scripting worm deployed by the Internet troll group GNAA on Dec 3, 2012.
Text

How to Weed a Mandala with Cricut
step 1: know it's going to take forever
step 2: use a weeding pen bc it'll help SO much
step 3: have patience
svg available on Cricut.
1 note
·
View note
Text
Free Cricut Sticker Guide!

This is a niche but useful tool I made. If you use a Cricut machine for stickers and print on 8.5 x 11 paper then feel free to take this guide image and upload into cricut design space. Steps below if you wanna use this!
When you add this image to your canvas set it to about 7.4 inches width by 9.9 inches height. Add whatever stickers you wanna make together into the space and make sure they are within this shape. Turn this shape invisible in the layers section of your canvas, and attach all the stickers together. If you kept everything inside the shape I made then there should be no errors and you will be using the maximum amount of space possible with cricut's print then cut setup.
I made this because I found the corners to be fickle to work within and so far having this guide instead of guessing and checking has made it a lot easier. I hope it helps you too!
22 notes
·
View notes
Note
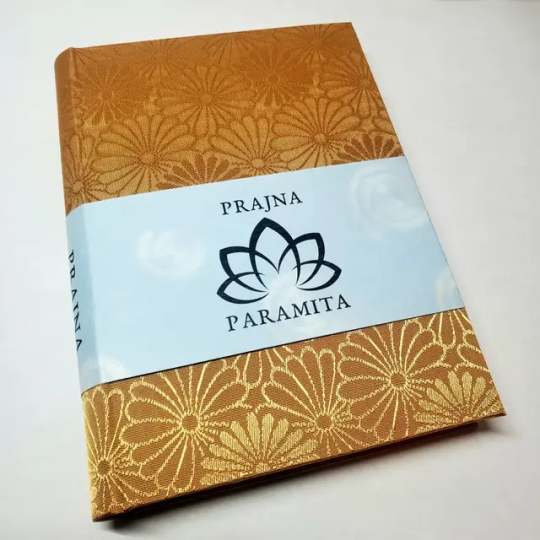
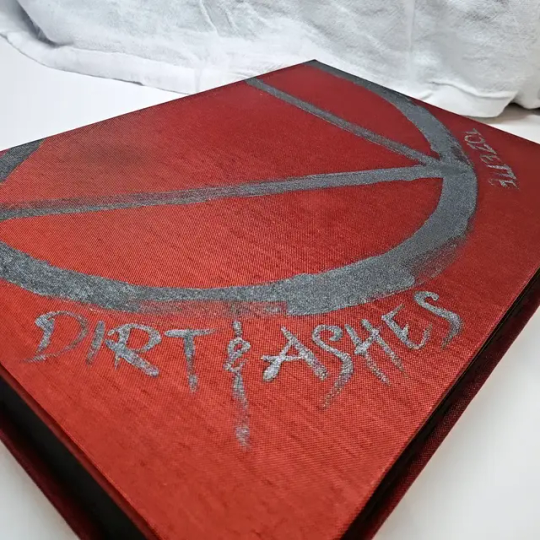
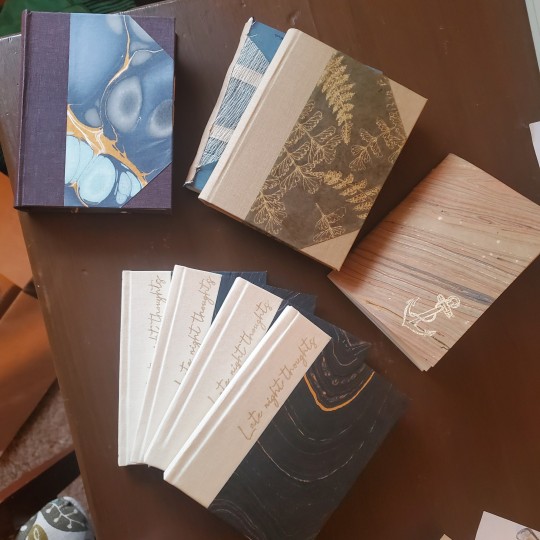
Hello! I am absolutely obsessed with your book binding! Especially your “A bright ray of darkness” the fact that it catches the sun and looks like it’s on fire is just so cool!!! If you dont mind me asking. What kind of gold vinyl do you use, and how do you get it applied it so evenly?
Hi! Oh my God thank you so much!
I used Cricut’s own iron on vinyl this time, but I normally prefer to use Vinyl Frog. It’s just easier to weed 🥰


The burnt edge was the trickiest part. I transferred the line I would need to cut along on a piece of paper and cut out a mini pattern piece so I would know where to cut both pieces of book cloth so they wouldn’t overlap. I would absolutely recommend choosing a wider gash that allows you to cut along a vertical line to save yourself the headache. Using clamps to hold it in place also helped a lot.


I have this mini cricut iron which is an absolute lifesaver. I use the lowest temperature on each part of the design for 8-10 seconds, taking it step by step. After that, I iron over it once more, making sure everything sticks. And then you gotta let it cool completely before you peel off the protective film.
I’ve once or twice made the mistake of touching the iron on foil with the hot iron without the protective film in between which caused the vinyl to ripple.
It takes a little practice but you’ll get the hang of it in no time! Oh! And here’s the link to my cover design in the cricut app, just in case! Thank you again for the question and the kind words! 🫶🥰💕
#book binding#bookbinding#bookshelf#book#bookblr#cricut#diy ideas#diy#diy projects#diy craft#books and reading#books#book cover#crafts#craftblr#tutorial
5 notes
·
View notes
Text
Cricut Hacks #2 - Template frames
Last time on Cricut Hacks we took advantage of Cricut’s scaling calibration to cut our graphics at a larger size than they were actually designed at in Cricut Design Space.
This time we’re going to use a template with registration marks to tell the Cricut where to perform cuts on a separately printed sheet of paper.
If you’re familiar with your Cricut, you probably see the below photo and have an immediate intuition about how to go about this hack! But I’ll share my method regardless.

Why?
Once again, we’re trying print larger than Cricut wants us to. This time, our reason for doing so is to avoid having to lose as much material to the registration marks as Cricut demands we sacrifice. It’s nearly 2cm around each edge, and if your printer already can’t print borderless-ly, you’re losing so much material!
Practically speaking, if you want to make A6 sticker sheets, you’d fit two on an A4 page, and if you wanted to make A5s you’d fit one, as shown in the diagram below.

I’m willing to reduce my sticker sheet to 200⨉140mm, but Cricut still won’t let me fit two of those on a page. So let’s get hacking.
Drawbacks
Before we launch into the method, here’s some things to keep in mind:
You’re no longer going to get perfectly aligned cuts, as the manual alignment introduces room for error.
If your printer has a skew, this will become particularly noticeable as you might be rotating graphics in a way that exacerbates the skewing.
You’ll have more manual overhead for preparing your sheets.
I’m pretty fast at preparing my files now, but you still need to cut out each sheet to give to your cutting machine, which feels a little silly because the machine was meant to take that work away from us.
You need more software than just doing everything in Design Space.
I mention Adobe Suite software here, but others will be able to do most of this fine! I’m just indentured to Adobe. Don’t be like me, learn your hotkeys and workflows in the Affinity Suite and support perpetual licensing in software!
Method
Step 1: Prepare your sticker graphics
I prepare my images and vector cutlines outside of design space. This means I can have areas of the sticker sheet that aren’t cut out, like my logo and social media links.
The first file you need is the one you’ll be printing. Repeat your design on your page as many times as you can fit, and then also place some marks for manual trimming. Here’s my example file (sorry about the watermarks). Notice the black lines in each corner of the page, and the lines in the middle of the page.

Print this file at 100% scale. Your printer might try to automatically scale your graphics to comply with your printer margins. Make sure that doesn’t happen!
Step 2: Prepare the cutlines
I generate the shape for each sticker by selecting the character in Photoshop, then use the Select => Modify => Expand menu item to add a border. I usually go with 20 pixels, which is a little more than 1.5mm at 300dpi.
I then pull the black and white shapes into Illustrator and use the Image Trace tool to generate the vector outlines that will be used for cutting. I generally use the “Silhouette” preset, and then apply some smoothing to the lines (Object => Path => Smooth…).
Make sure to have the outline rectangle for your graphics as a separate image object as the rest of your graphics (you may need to “release compound path” or delete the outline and replace it with a rectangle, this will also get rid of any wibble that might have come from the image trace)
After these tweaks, I have a file ready to import into Design Space. Export it as an SVG (In my experience, the scale will be accurate if you use the Export menu item rather than the Save As, but other methods can cause scaling issues so just check the size once imported)
Step 3: The Template
Import your SVG into Design Space. Then, make sure all objects are grouped in an “Attach” group so that they’ll print and cut with your pre-prepared arrangement, and mark them all as Print and Cut.

Click Make, but we’re not going to be sending this file to your Cricut yet.
In the alignment page, move your graphic about 3 inches down the page, which will be enough clearance so that you can place and remove the sticker sheets into the templates without needing to unload the cutting mat.
Then in the “Send to Printer” dialog, choose to “Add Bleed” and “Use System Dialog”. The system print dialog will pop up (or under, if you’re on macOS – drag the Cricut window away to find it) and you can print your file to a PDF.
Open your PDF in a graphics editor and make a white rectangle in the middle that matches your sheet size – in this case 200⨉140mm.
Print this file and use a craft knife and ruler to cut out the white rectangle. Try to be as accurate as you can!
PS, you could create the white void space and print the file directly from Design Space, but I like doing this because I can control a few extra things.
For example, Design Space won’t let me place my A5 graphic in landscape on an A4 page, but this way I can specify a larger paper size, then align the landscape image on the A4 page I’ll send to my printer.
Step 4: Cutting prep
Take the sheets you printed in step 1 and use your craft knife and ruler to trim them to size. Again, I’ve chosen 200⨉140mm for my sheets.
Place your template file on your cutting mat, taking note of the position of the void space.
Place your trimmed sticker sheet in your template, aligning it with the void. Use the extra border around the void to help judge how square your sheet placement is.
It’s almost time to hit Make, but we need to do one tweak in Design Space.
We don’t need to cut the outline rectangle of our sheets, because we’re trimming them to size before aligning them into the template.
Removing the rectangle, or setting it to a “Guide” line type will cause the print and cut margins to change. Instead, I denote the rectangle as a Pen line. We won’t be loading a pen, and the machine will waste a little time on this, but we’ll also be able to tell whether it’s aligned correctly while it traces the outline in thin air.
Step 5: Make
Press that make button!
Drag your graphics so that they roughly align with where you’ve placed them on the cutting mat.

Then on the next page, say “I’ve already printed” and select your paper type. The Cricut will suggest you load a pen tool and the blade – don’t bother with the pen tool
When you “Press Go”, the machine will start scanning for the registration marks.
It will then start drawing the outline of the sheet in thin air. While it does this, you can stare down the barrel of the empty toolholder to confirm that it’s aligned correctly with your page – if it appears to have misread the registration, you can cancel the job and try again. If it’s correct, your cutlines should also be correct.

And when the job is done, and all your cutlines are correct, you don’t need to unload your mat. Remove your sticker sheet from the mat by curling it away from the paper. Now you can place your next sticker sheet into the void and press the Go button again and it will cut your next sheet without reading the calibration marks again. After adding a bunch of extra steps and work into this process, it’s nice to get a little timesave!

Closing Remarks
Once you make a template for a particular sheet size, you can reuse it for all your files that share the same size. Consider cutting your template from a thicker GSM paper to extend its lifetime and make it easier to affix without skewing.
And finally, here’s the template with all its whitespace – that would have been wasted sticker paper if I cut this with the default workflow – next to the actual wasted material from my sheets. And a reminder, the sheet on the right fit two copies of the artwork vs the one on the left fitting only one!

Thanks for reading, if you found this useful please let me know!
"Cricut Hacks #2 – Template frames" was originally published on Chenonetta Creations
1 note
·
View note
Text
This weeks Craft studio video is now live, and it's a little different this week.
Come check out my first tutorial and find out I make my sticker sheets using Canva and Cricut.
Hope you enjoy and find it helpful 💜
Watch now:
youtube
#smallbusiness tutorial canva cricut learnhow howimakestickers youtubetutorial youtube channel craftyjujudesigns stickermaking#Youtube
0 notes
Text
Cricut Setup Explore Air 2: A Complete Tutorial in 4 Steps
Looking for a way to Cricut setup Explore Air 2? You are in the right place. Ever since I bought a Cricut machine, the setup has been a crucial part. I have not only setup Cricut Explore Air 2 but also setup other models such as Cricut Maker, Joy, and Venture. Although every machine setup is the same, you will need to know the proper steps to connect your Cricut to your device.
Without any further ado, let’s delve into this Cricut Explore Air 2 setup tutorial and learn things like checking the PC’s requirements, downloading Cricut Design Space, creating a Cricut account, and finally finishing the setup process, which includes further sub steps. Remember, the following steps for Cricut machine setup are only on a Windows computer. Let’s get started now.
Step 1: Check System Requirements for Your Desktop
In the first step, you must ensure that the PC you will use is compatible with your Cricut Explore Air 2 machine. This is a must for the Cricut setup Explore Air 2 because if your PC doesn’t meet the basic requirements, you won’t be able to download the Cricut Design Space, which I will discuss in the next step.
Here, I have mentioned the system requirements for Windows 10 PC to run the Cricut software:
Operating System - Windows 10 or later (64-bit)
CPU - Intel Dual Core or equivalent to AMD processor
A PC/laptop with a USB port or built-in Bluetooth
Display - Minimum 1024px x 768px screen resolution
RAM - Minimum 4 GB
Disk - 2 GB free
Step 2: Download Cricut Design Space
Above, I covered the basic system requirements to download the Cricut Design Space app on Windows 10. Now, I will show you how to download the software stepwise. Since the Cricut setup Explore Air 2 is not possible, you have to download this software on your PC.
Here’s how to download Cricut Design Space on a Windows PC:
First of all, you have to navigate to your compatible PC device.
You will see a small Windows icon on your PC desktop’s screen on a taskbar. You have to click on it.

Just start typing Chrome and hit the Enter key on your keyboard; it will open your Google Chrome browser.
Once you have opened your browser, you have to go to its search bar.
After that, you have to visit design.cricut.com, paste it into the browser’s search bar, and hit the Enter key.
Now, you will move to Cricut’s official website, from where you can download the Cricut software.
Here, you will notice a small squared checkbox. Click on it to check.
After ticking the checkbox, your Download button will be enabled. Click on it to start downloading Cricut Design Space.
Before downloading, it will open your File Explorer and will confirm where you want to save this file. By default, it will be saved to your Downloads folder.
When the download is finished, you have to go to your File Explorer > Downloads folder or wherever you have saved your downloaded file.
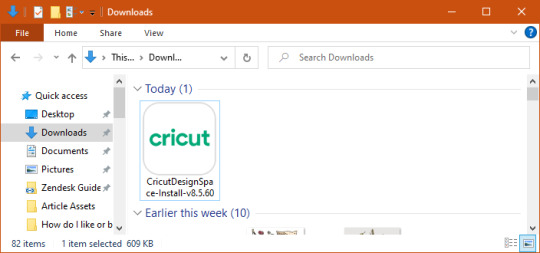
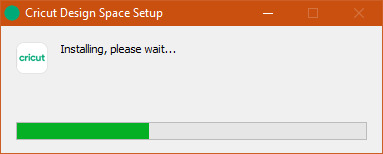
Double-click on this downloaded file to begin installation.
For installation, you can simply follow the instructions on your screen.
Step 3: Creating a Cricut Account ID
The second last step is to create a Cricut account. It is a must; without an account, you won’t be able to do Cricut setup Explore Air 2. In this method, you will learn to create an account from scratch and then log in to your Cricut ID. Let’s get started.
In the beginning, visit cricut.com/setup.
After that, hit the green Get Started button.
Enter your first and last name, including your email address.
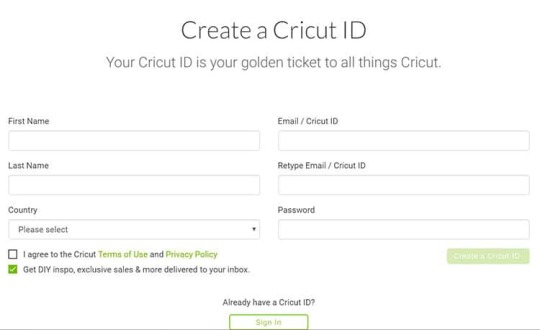
Then, you have to choose your country. (For example, the United States, Canada, or the United Kingdom.
Now, you will need to read the Cricut terms of use.
On the following screen, tick the checkbox.
Next, click on Create User ID.
You will now receive an Updated Policies pop-up window. To proceed, click the Accept button.
Step 4: Cricut Setup Explore Air 2 on Your Computer
Once you have created your Cricut ID, you will move to a Prepare Workspace screen, where Cricut displays it’s on-screen instructions. You can set up your device by following these instructions. While displaying on-screen instructions, it will ask you to connect your Cricut to your PC. To connect, follow the steps below:
Step 1: Connect Your Cricut Machine to Windows
Users can connect to a Cricut cutting machine using two methods: Bluetooth and a USB cord.
Method 1: Via Bluetooth
Switch on your Cricut Explore Air 2 cutting machine.
After that, position your Cricut machine 10 to 15 feet from your PC.
Then, open Settings on yourWindows computer.
When your Settings window is open, you have to select the Devices option.
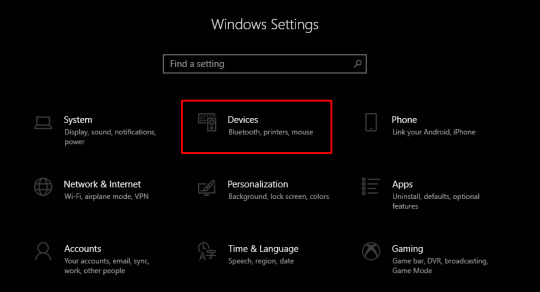
Now, confirm whether your Bluetooth is turned on. If not, then you have to turn it on.
Afterward, you will need to click on Add Bluetooth or other device.
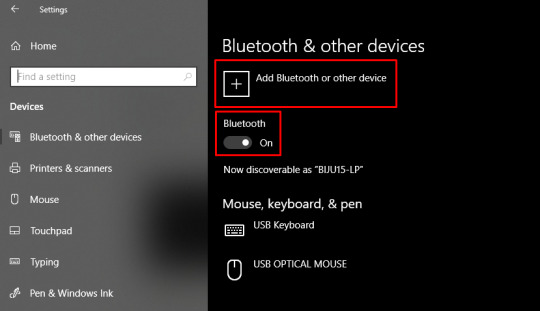
Next, you will see a pop-up to add a device; select Bluetooth.
Subsequently, you have to wait for your nearby Cricut model.

Once the PC finds your Cricut machine, select it and finish the pairing.
Method 2: Using a USB Cord
If you do not want to connect your Cricut wirelessly, you can easily do so with a USB cord. Connecting via a USB cable is a breeze. Follow the steps to connect with a USB cable:
Turn on your PC and Cricut Explore Air 2 machine.
After that, you will need to take your USB’s one end and connect it to your PC’s USB port.
Then, you have to take the other side of the USB cable and insert it into the Cricut’s USB port.
Once done, you’ve successfully connected your Cricut.
Once you have established the connection, you need to click Continue on your PC.
Step 2: Cricut Machine Updates
As you click the Continue button, it will start updating your Cricut cutting machine. Click on the Update button to start updating your machine. Once the machine has been updated, click next to proceed.
Step 3: Register Your Cricut Model
After updating the machine, the next step is to register it. To register your Cricut, click the checkbox and then click the Register button. After registration, click next.
You will see a screen for the Cricut Access Trial. If you’ve selected to try out Cricut Access, go ahead and fill out the required information. Once done, you’ll be prompted to do a test cut. Move further and follow the on-screen instructions to perform a test cut.
FAQs
Question 1: Are the setup steps similar for Mac, iOS, and Android?
Answer: Not really! Overall, the steps will be the same, but as you delve deeper into the details, they may vary. For example, connecting Cricut to a PC differs greatly from connecting it to your Mac or any other mobile device. The same goes for downloading Cricut Design Space.
Question 2: Is a Cricut account a must for machine setup?
Answer: Yes, absolutely! Without a Cricut account, you can’t use your Cricut Design Space and half of the setup uses Cricut software. So, it is a must to download the Cricut app on your compatible device. Cricut is compatible with Windows, Mac, Android, and iOS. So, make sure you download this app before setting up your Cricut.
Question 3: What is a test cut in Cricut setup?
Answer: A test cut is generally performed in the last stage of your Cricut setup. When you have almost completed your machine setup, Cricut will ask you to perform a test cut. It ensures whether everything has been done correctly or not. If any problem will be there, it will be detected right away while performing the test cut.
0 notes
Photo
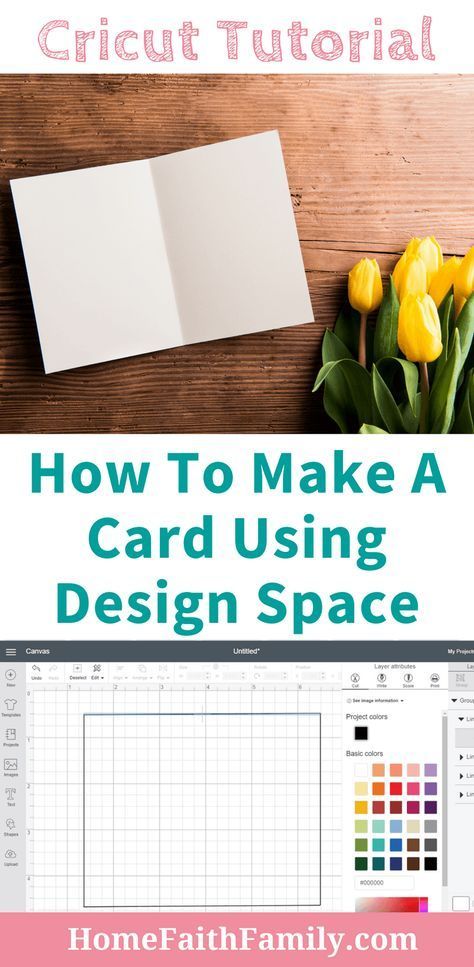
This Cricut tutorial is perfect for your next card project. Learn how to make a card using Design Space for your next Cricut project. This free guide is perfect for beginners and will show you, step-by-step, what you need to know. Continue to read your tutorial. #DIY #Cricut #CricutTutorial #CricutProject #CricutMade via @homefaithfamily
1 note
·
View note
Photo

Address envelopes and invitations with a Cricut and a Calligraphy Pen! | #weddinginvitations #calligraphy #cricut
0 notes
Text
Book Decoration: AKA All The Ways I Don't Use a Cricut
(this post is for people who don't want to buy an expensive cutting tool, or for those that do have an expensive cutting tool that would like to mix things up a little)
1. Print That Shit
If you're already printing your own textblocks, an easy step for titles is to print them. Above is a title printed onto an "obi" of decorative paper. I measured out where I wanted things on the finished book and laid it out in Affinity, then printed it on a full sheet & trimmed it down to wrap around the book. A more simple method is to print & glue on the label into a slight indent in the cover (to protect it). A third option is to do the spine in bookcloth, while you print on paper for the cover and then glue that paper onto the boards (this usually looks even better when it is a three-piece bradel bind).
2. Foil Quill / Heat Pens
The heat pen is one of my go-to tools, but it can be a bit touchy about materials. The most popular version is the We R Memory Keepers' Foil Quill (which is one of the most ergonomic), but other pens exist that can get you to a higher heat temp, finer lines, or more consistent foil. For example, I have a pen created by a local Japanese bookbinding studio that fares way better on leathers than the WRMK quill & with a finer tip, but it's hell to control. Best results in general are on paper or smooth bookcloth (starched linen, arrestox, colibri - even duo will work but its less solid). The fuzzier a bookcloth is, the less your foil quill wants to deal with it. This means the heat n bond method of making bookcloth does not play nice with a heat pen usually, but there are two solutions: 1) use this tutorial on paste + acrylic medium coated bookcloth instead that will get you a perfect surface for the heat pen, or 2) use the pen on paper & then glue onto the cloth. I did a video tutorial for both foil quill use and this type of homemade bookcloth for @renegadeguild Binderary in 2023.
You get the most consistent results by tracing through a printed template that is taped in place, as I do in the video above.
3. Paint That Shit
Acrylic paints will do you fine! The above is free-handed with a circle template, because I wanted that vibe. If you need straight lines that won't seep, lay them down with tape first & then paint over it first with a clear Acrylic medium, then your color. Same goes for stencils. Two more examples of painted bookcloth:
4. IT'S GOT LAYERS

By using layers of thinner boards, you can create interesting depths & contrasts on your cover. You can also make cutouts that peep through to the decorative paper behind. The most important part to this technique is the order in which each edge is wrapped. To get a good wrapped inside edge, you will split the turn in into tabs to get them to conform to a curve. You can also layer multiple colors of bookcloth without multiple layers of board, as seen below left, so long as you mind your cut edges for fraying.
5. Inlaid... anything
Mirrors! Marbled paper! I saw someone do a pretty metal bookmark once! The key is creating a little home for it to live in, which is pretty similar to the above layering method. On one layer you cut the shape, & glue that layer onto the bottom solid board before covering. You can do the top layer as an entire 1 mm board (like I did for the mirrors) or a sheet of cardstock, like I would use for inlaid paper.
6. Decorative Paper
Decorative paper is always helpful & adds to the paper hoard... & its effects can be layers with other techniques, as below. Marbles, chiyogami, momi, or prints & maps of all kinds can be great additions. Some papers may need a protective coating (such as wax or a sealer).
7. Stamps (with optional linocut)
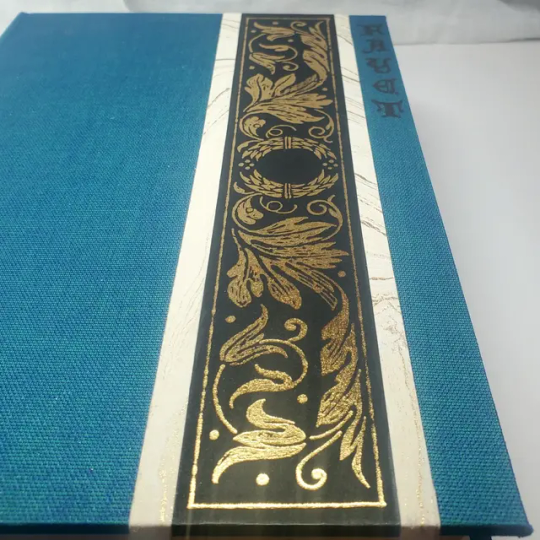
While I've not used many more regular rubber stamps, I do know some who have, successfully! And I've used one once or twice with embossing powder (see photo 3 up, the gold anchor on the little pamphlet bind). What also works is to carve your own linocut or stamp, & then use block printing ink to ink it onto your fabric (as i did above). A bit time intensive, but it was nice how easily reproducible it was, and I liked the effect I got for this particular bind.
These methods are not exhaustive, just ones I've used, and there are of course many others. I haven't gone too into detail on any of these for the sake of length (& post photo limits) but feel free to ask about more specifics. Usually I'm using them in combination with other options.
#fanbinding#bookbinding#celestial sphere press#ficbinding#in progress review#bookbinding how to#i am not particularly anti-cricut or anything#it's just a very expensive tool#and its prevalence sometimes makes new binders think they HAVE to get one#when they absolutely do not#you can make pretty books without it
1K notes
·
View notes
Text

Create Floral Sign made with Cricut using holographic vinyl. SVG available on Cricut or my website.
#cricut diy#cricut tutorial#cricut crafts#cricutprojects#cricut#cutfiles#cutfilesforcricut#office decor#create#floral decor#floral design
1 note
·
View note
Text
Cricut EasyPress
Cricut EasyPress 2 Heat Press Machine (9 in x 9 in), Ideal for T-Shirts, Tote Bags, Pillows, Aprons & More, Precise Temperature Control, Features Insulated Safety Base & Auto-Off, Raspberry
For More Details /Order on Amazon Link
#cricut easypress#🚀 Keyword Tool Pro#Do you need this information?#Keyword Tool Pro provides search volume data for English keywords.#cricut easypress mini#cricut easypress 2 vs 3#cricut easypress mini how to use#cricut easypress 3 tutorial#cricut easypress 2 12x10#cricut easypress 2 temperature guide#cricut easypress vs heat press#cricut easypress 2 unboxing#cricut easypress 2 9x9#cricut easypress mini t shirt#cricut easypress app
1 note
·
View note
Text
To help you make the most of your Cricut machine, we've compiled a list of the top 10 Cricut hacks. Whether you're a seasoned crafter or just getting started, these tips and tricks will enhance your crafting experience and unleash your creativity. Let's Get Started!
0 notes
Text
Cricut "Print and Cut" Hack - print bigger
I’ve frequently felt constrained by the registration marks that the Cricut uses.

Understandably, they need to be bold and have a quiet region around them so that the cutter can determine where to line up its cuts.
Cricut also currently only provides 4 preset page sizes to print on, and again seems to assume rather generous print margins.
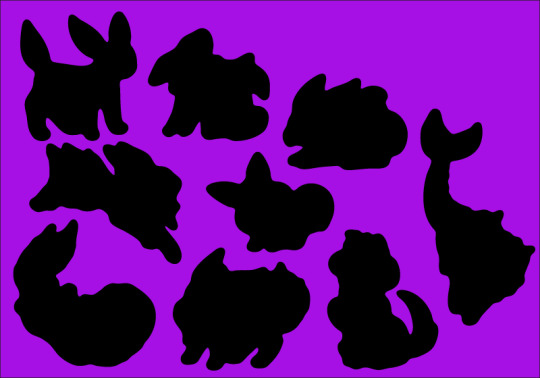
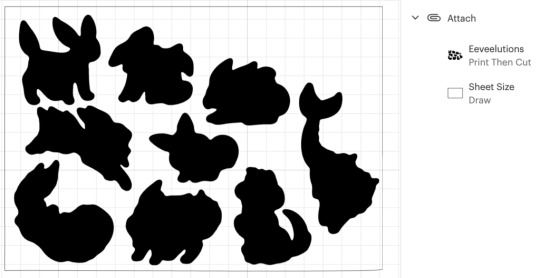
All these things added up mean that sometimes it’s not possible to place as many pieces on a page as you want. In the example above, I had to use a Tabloid paper size to convince Cricut to let me place the ten objects.
I reckon I should be able to fit even more of them in, and I should be able to do it on an A3 page. But Cricut says this layout is too large, despite the design itself being comfortably smaller than an A3 sheet.

(I��d actually love to fit even more than 11 onto an SRA3 page but making that layout work has so far eluded me, so let’s start with this hack first before trying anything more extreme.)
I discovered this hack by accident. I had taken my sheets to be printed at a print shop and they messed up the scaling. My pages came out about 3% smaller, but my Cricut didn’t complain. It happily executed the cutlines 3% smaller too. Evidently, there’s a generous margin of error for scaling.
So let’s use that to our advantage.
Step 1: Downsize the design in Cricut Design Space
Let’s humour Cricut by scaling the offending design to its recommended size.
(I suggest also keeping a copy of your original design to the side, in case you want to make changes at the original scale. To prevent the app from blocking you from proceeding to the “Make” step, hide the oversized objects.)

Step 2: Print to PDF
Click the “Make” button to proceed to the mat preview.
Do not move the designs on the mat – leaving things in their default position makes for the easiest alignment if you want to exit the Make step and return back to it again. Click “Continue”.
Open the “Print Setup” panel by using the “Send to Printer” button.
In this panel, select “Use System Dialog” to print your file to a PDF

On MacOS, the print dialog always appears behind the Design Space app, so drag the Design Space window out of the way when the “Preparing Print” spinner appears. Now save your file as a PDF instead of printing it.

Step 3: Scale up the PDF
It’s time to do some maths.
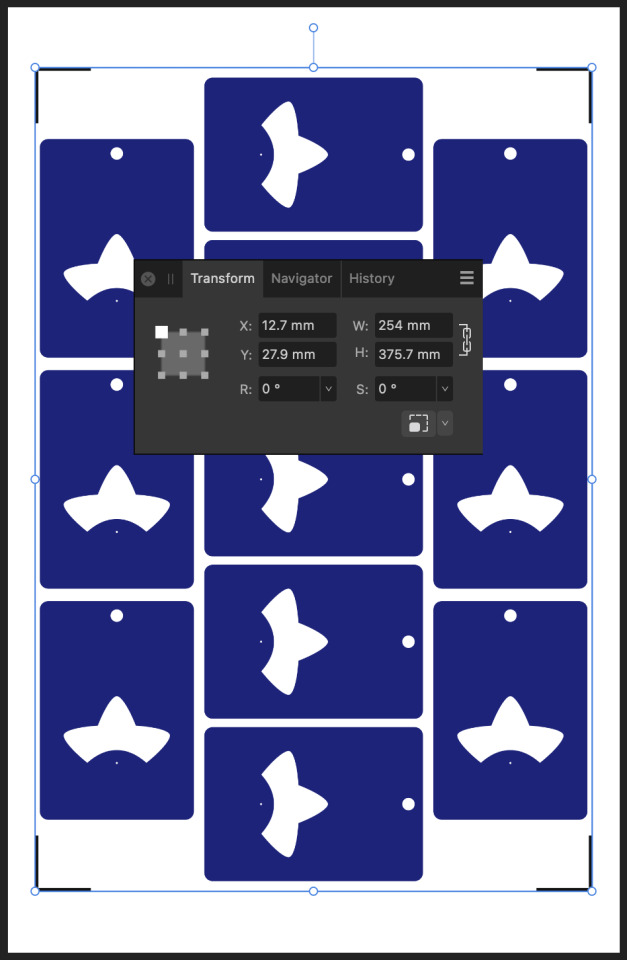
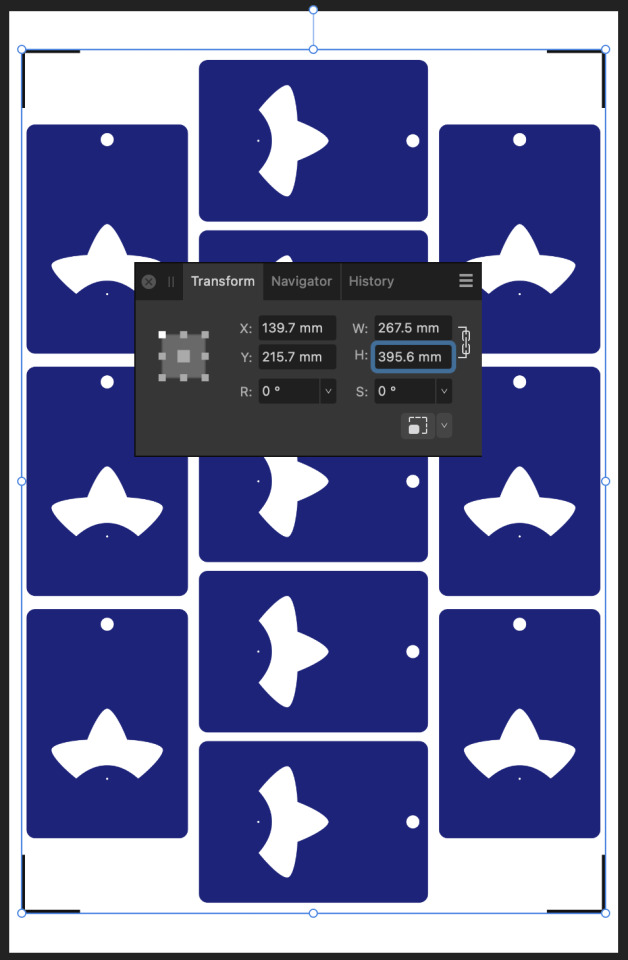
We originally had a design that was 39cm on its long edge, but we scaled that down to 37.04.
That means we now want to scale this file up again to be 39cm.
39 / 37.04 = 1.05291576674
This is a little more than 5% larger, which so far I have been able to make work. I don’t know what the upper limits of this technique are.
I’m editing the output file in Affinity Designer. The file that Cricut output has a long edge of 375.mm, so let’s type 375.7mm * 1.05291576674 into the H dimension field to get a new image of size 395.6 * 267.5mm.
While I’m here, I’m also going to set up my print graphics, allowing me to have better control of the bleed than using the normal Print & Cut workflow.
Step 4: Print
Print the file – I don’t have an A3 printer at home so I take my files to a print shop.
Step 5: Cut
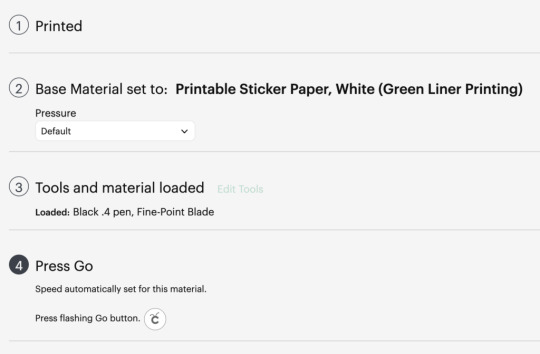
Back in Cricut Design Space, choose your material. (You may need to select “I’ve already printed” so that the app lets you do so).
Affix your printed sheet to your cutting mat and load the mat. Press “Go” on your Cricut machine and let it do its cutting magic!
Another tip: If you’ve put graphics too close to the registration corners, you can temporarily place a sheet of white paper over them while the machine does its calibration. I usually just slide the white paper around by hand so I can remove it before the cutting begins. Coincidentally, the layout I’m demonstrating doesn’t use the edges so there’s plenty of “quiet” space to distinguish the registration marks from the artwork.
All done!
Here’s my cut pieces, at the scale that Cricut claimed I couldn’t have.

Actually, the vertical axis is a little bit off but this is good enough for my purposes and the bleed areas did their job. If I wanted to be a bit fussy about things, I would try moving around some of the cut lines, but do not move any cutlines that would change the outer bounds of the print, otherwise you’ll need to update your print file and recalculate its sizing too.
In summary:
Big Cricut wants to stop you from printing big. But follow these steps to break out from their boundaries!
Step 1: Downsize the design in Cricut Design Space
Step 2: Print to PDF
Step 3: Scale up the PDF (optionally, update any graphics)
Step 4: Print
Step 5: Cut

Please let me know if this guide was useful to you! Happy cutting!
"Cricut “Print and Cut” Hack – print bigger" was originally published on Proairesis
0 notes
Text
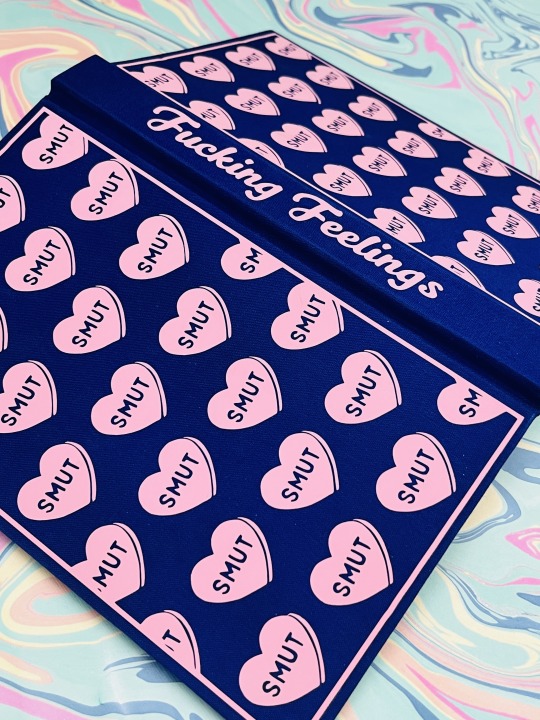
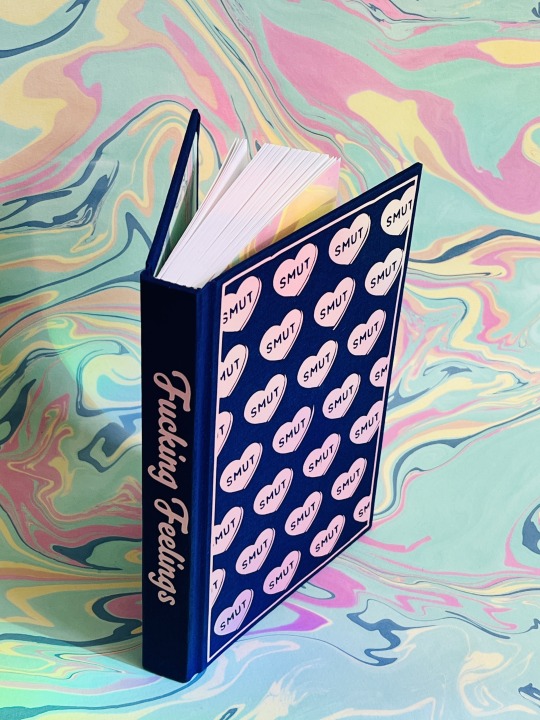
Bound: Fucking Feelings — an anthology of works by @its-the-allure
Typeset by: @sits-bound (stay tuned for typeset details from sits)
Bound by: me, @phoenixortheflame

What can I say about this bind except it was made for a beautiful human for whom I owe a lot to.
I met @its-the-allure on Reddit of all places. One post led to another and she ended up beta-reading my WIP. This is notable not only because I was new to Drarry and didn't have any fandom friends, but also because I'd never written fiction before in my life. Like truly, not a word of it.
If you've had the pleasure of Allure reading your work, you know she is a generous and delightful beta, and her enthusiasm gave me the confidence to start posting my work.

Not long after I started writing, Allure did too, and I had the immense privilege of beta-reading for her, too. In less than a year she published tens of thousands of words, including the 90s chatroom epistolary Come As You Are, which I see rec'd literally ALL THE TIME (seriously, it's amazing and if you haven't already read it, you definitely should).
A few months into binding I told Allure I'd bind her an anthology of her works for her birthday. Well, that day came and went a couple months ago, but — in my defense! — I was making four copies of 22 Cards, OUR FAVOURITE FUCKING SERIES, so I know she forgives me.
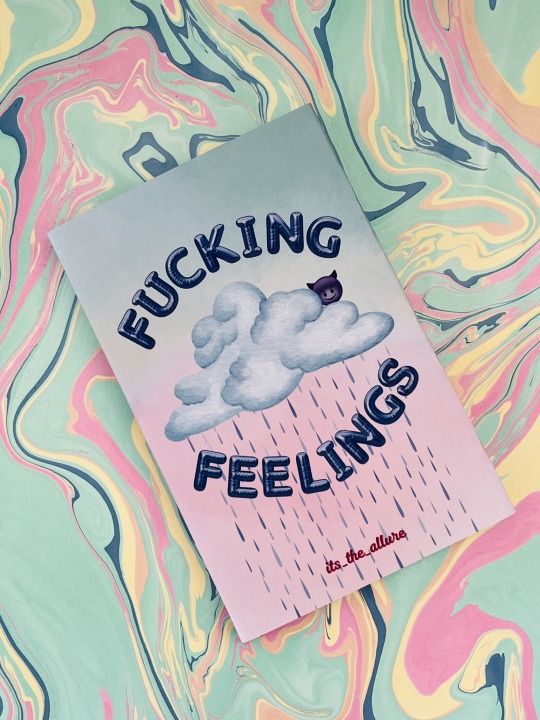
The anthology is called Fucking Feelings because this is the tagline we came up for Allure's work. There are feelings — and there's fucking.
The dust jacket is inspired by Melanie Martinez's album cover for Cry Baby. And the back table of contents is supposed to imitate a chatroom, with each work represented by a DM from the person whose POV the story is from. (If you look closely you'll even see a forwarded message, because that one is actually a Pansmione fic).
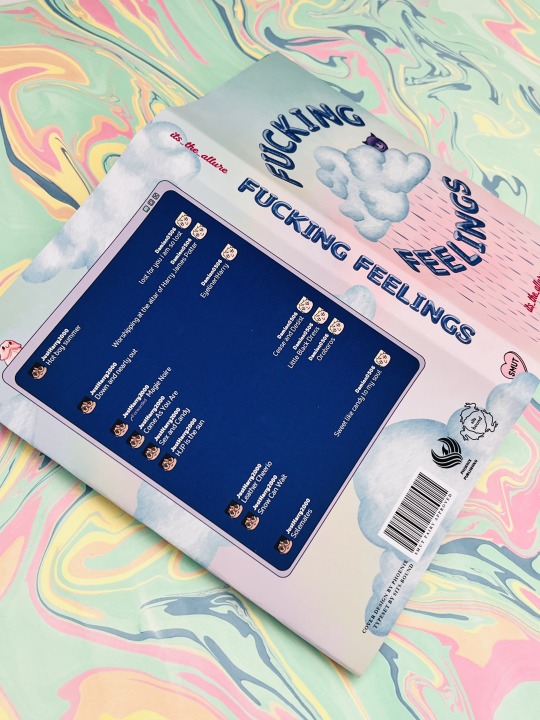
Throughout the cover design and also the typeset (all credit to @sits-bound for that part of it) are fun little nods to everyone's favourite messaging app, Discord.
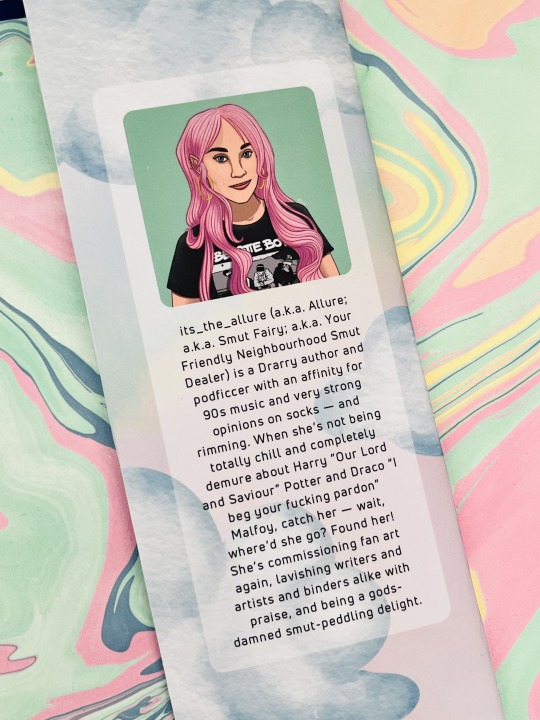
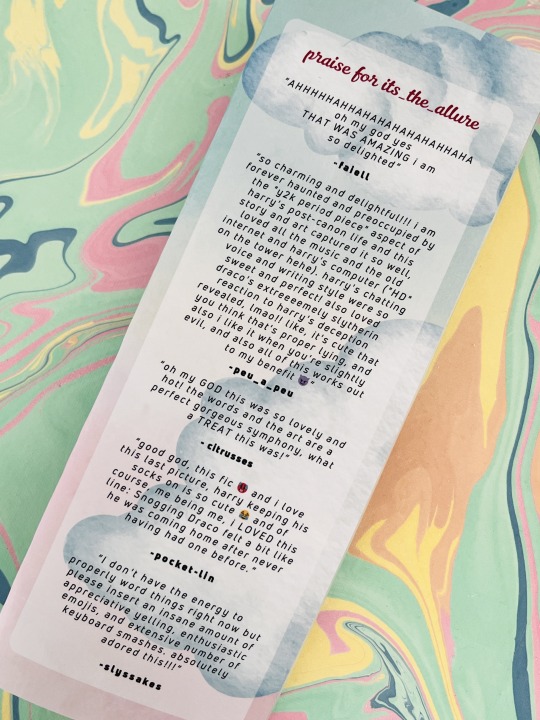
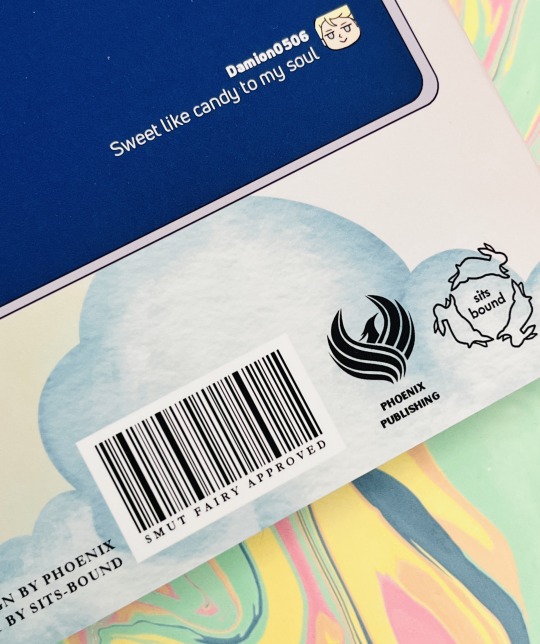
As always, Allure gets her own bio and a Praise For section with comments from some of her favourite people (shout out @faiell, @citrusses, @pocket-lin, @slyssnakes, and of course peu).
Happy birthday, Allure — I hope you love it, babe!
Materials and bind details
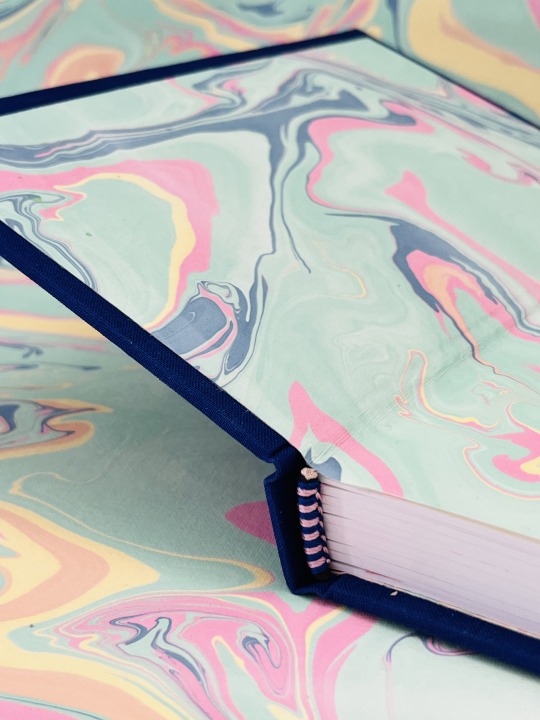
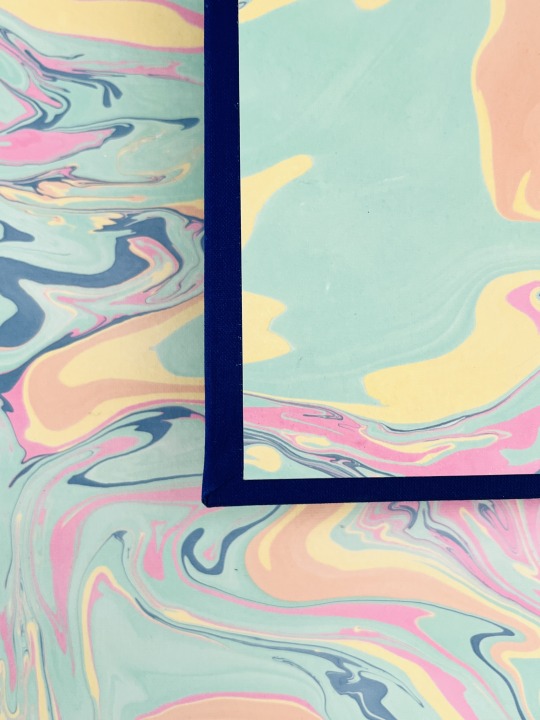
Book cloth is Verona in Amped Indigo
HTV is Cricut brand Everyday Iron-On in Blush
Endbands are Trebizond is a 3-ply silk filament thread using DAS's Two Colour Front Bead Headband tutorial here
Marbled paper from The Paper Place
Dust jacket is printed on 48-lb glossy photo paper (13" x 19") and covered with soft-touch laminate
HTV and dust jacket designs all done in Canva
162 notes
·
View notes
Text
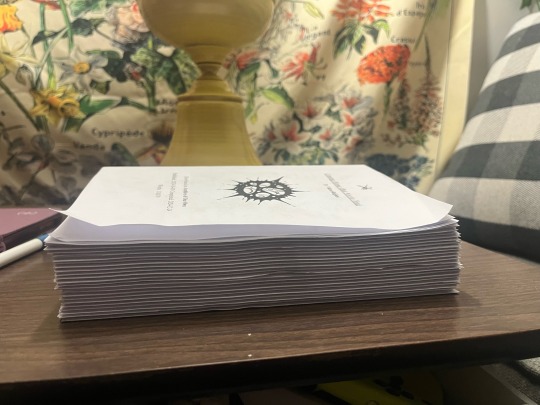
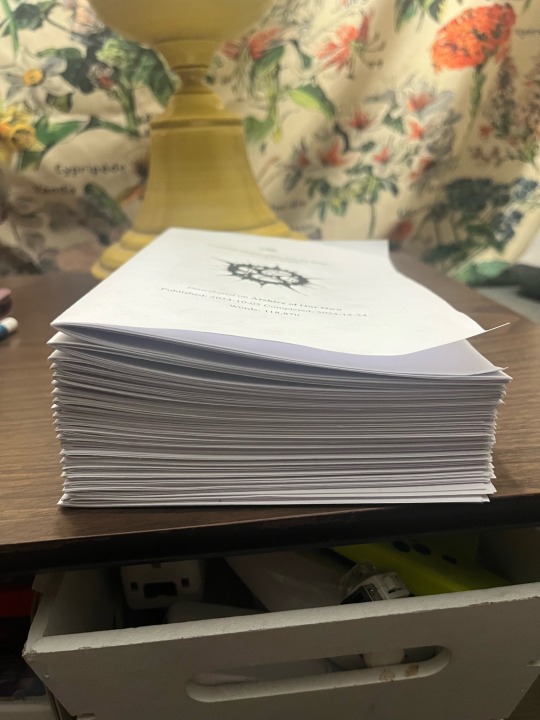
The Creation of a Physical Copy of Coming Home (But Not to You) - The complete summary
Since, I promised I would update this as soon as I started working on it and boy, has it been several hours of me trying to learn how to use Microsoft word, hundreds of songs in my Jayvik playlist and perhaps, a small minor emotional breakdown. I have gotten Coming Home (But Not to You) formatted for bookbinding.
I hope @lesbianherald knows that they have not only written about 678 pages of a glorious and beautiful story but when in book format, that comes out to be 340 pages which is bigger than Romeo and Juliet by Shakespeare (which.. you out wrote him twice). I swear, I promised to update you and that’s literally all I have besides a minor practice signature before I venture out to find a book suitable to hold the piece and paper that looks a tad more vintage.
The first draft pages in word looked like this, this was also MY final concept before I went out of my way to make a little page design in procreate. (Featured later)


The Artist featured also gave me permission to use this for this personal project. Please, check them out with this link here: X (their art is gorgeous)
[Written January 3rd, 2025]
─── ⋆⋅☼⋅⋆ ───
Okay, we’ve settled on some covers. Might be wondering why I didn’t want to make one from scratch? I didn’t want to weather it, personally. It’s a lot more work and the threading and binding itself is going to take most of my time. I’m working on A4 (Actually, it ended up being smaller than A4 at about 11 by 8.25 but when folded it’s 5.5 by 8.25) paper format, having to adjust my measurements as we go because they were drastically different in the word document. I edited some of the features of the pages and actually sketched out a design for my Cricut to use for the cover and chapter page emblems for just a little personal flare!
I actually went to the thrift store and broke apart books that werent in use to provide me a proper book board because the ones I had were too thick! Reuse and recycle, baby! (All for the power of Jayvik)
A little thing about this project is that I actually bought weathered paper for this! Yeah, that.. it didn’t end up coming LMAO. I did buy some book corners for some metal flare. The hexcore design I drew out, myself, in procreate and also cut out in Cricut (thank you, TikTok tutorials).

A little fact as well; I haven’t bookbinded in 3 years! My books when I started were actually GOD awful— which is also part of why I chose a base book frame because that was my biggest weakness when it came to this. The binding itself was actually the easiest part to me when I started! I kid you not, I did very much come out of retirement because of Jayvik. I wanted a physical book I could mark and leave notes on, so why not make it myself? I’m extremely thankful, I got permission to do this and plan on doing this with another one of my favorite Jayvik fanfictions once it is completed, so perhaps… maybe. I don’t know, after I had gotten all the signatures out I had realized that the book covers used WERE TOO SMALL! This is the book before pressing for over 48 hours and in a middle of a snowstorm!
[Written on January 6th, 2025]
─── ⋆⋅☼⋅⋆ ───
And the book is binded! I had used wax thread which is already thicker and way more durable and actually made for bookbinding. It has already had about two layers of glue on the binding but I tend to do about four just for extra strength and protection. It should be going in the book in about a day or two, which will lead to the final update of this!
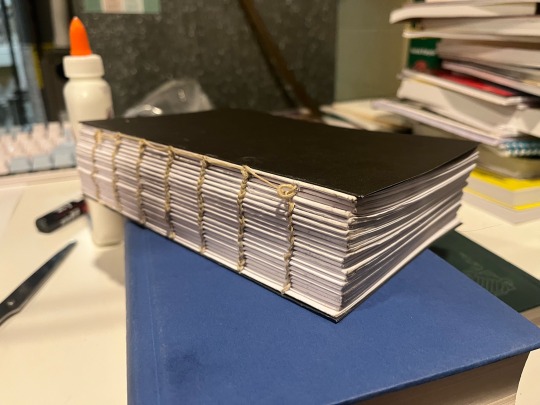
It took me about three well-spread out days, six hours of actual sewing and teaching myself how to use a curved needle without violently stabbing my skin but I was able to get the box-stitch in.. I tried to even out the layers as I had binded too fast in one part and two signatures ended up being uneven, whoops. I fixed that with a tap of a literal hammer (No pun intended) but this was truly an experience. The parts with the open black page on front is when the stitching was glued and the book pages were placed on. This also meant I had the actual book for it to sit in ready. Which was crazy to think about.
Would you believe me if I told you I measured this all by eye and had to cut the pages four different ways to make this book actually become a book. The next paragraphs will be glamor shots. Thank you for sticking with me— encouraging me on this because of my LACK of experience in this entire field and prayers for my poor fingers.
[Written on January 13th, 2025]
─── ⋆⋅☼⋅⋆ ───
And we’re here, it’s finished and settled. Here are the glamor shots. I do plan on doing more bookbinding in the future as I DID enjoy the process but folding and making signatures will forever be my enemy. Here’s the glamor shots and underneath the cut is all my reactions and build up to finishing this monster of a book.
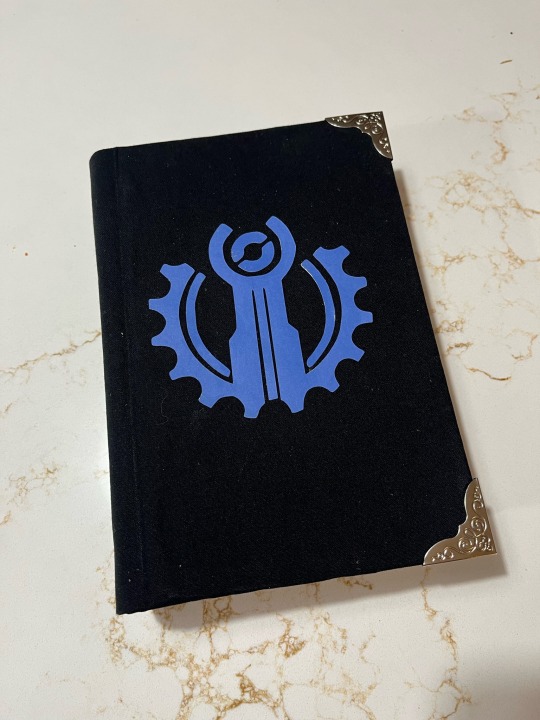
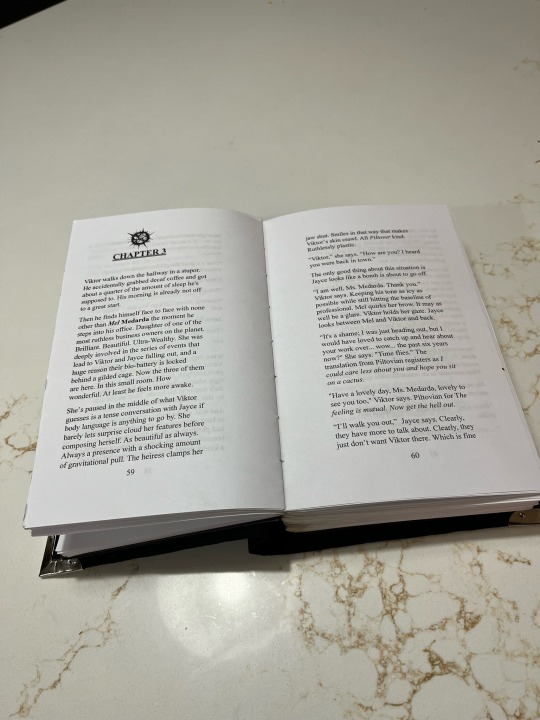
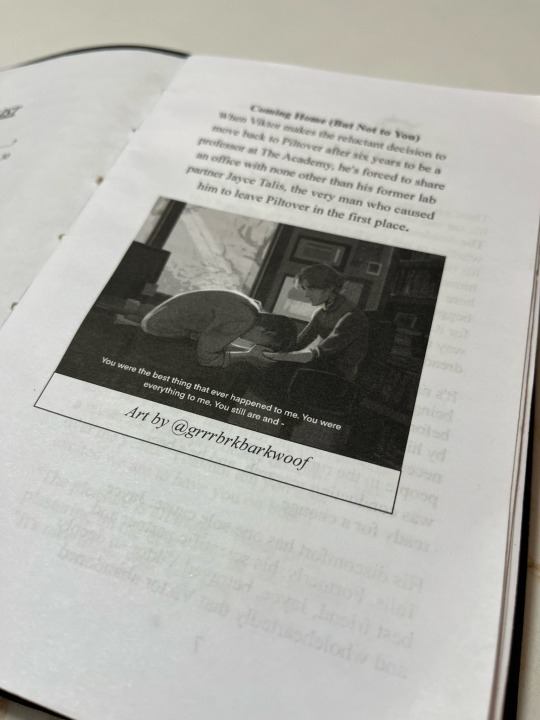
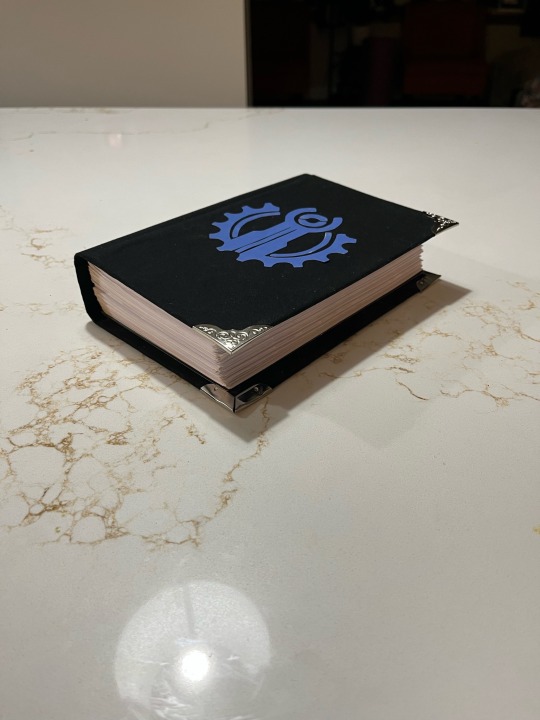
A couple things, I never want to do this again. If I ever do a fanfiction THIS big again. I’m spilting it into two books, perhaps even three depending on how big it is. The symbol on the front is the Piltover symbol, I tried to find Jayce’s Talis house symbol and THERES NOTHING, I literally tried drawing and everything. My Cricut didn’t want to cut it and trust me, I tried for over three hours with the symbol.
What only matters is that I think it’s cute. I think the simplicity and mix of tears added to the final design a lot more than I thought it would.
If I ever do this again. (Knowing me, I will.) I plan on revisiting this, probably make another version when I have more bookbinding knowledge under my belt LMAO, but enjoy this lengthy post. I’m now going to go to bed.
Also huge shout out to my Zelda art book for being my primary book press for this entire thing. I really need a book press.
[Finished, January 14th at 12:08 AM, 2025]
─── ⋆⋅☼⋅⋆ ───
#arcane#jayce talis#jayvik#viktor arcane#league of legends#jayce arcane#I’m actually more dead than a physical flat line#kloof binding#coming home but not to you#CHBNTY
155 notes
·
View notes
Text

I did a faux rebind of Dune as a birthday gift for a friend of mine. Thankfully, his girlfriend sent me pictures of his own Dune Edition (in German) and its measurements. That way he can use this book sleeve for the German edition too. He’s been complaining about that design for quite a while, basically every time we enter a book store.
I also hand-stitched this little desert design into the book cloth, because I don’t own a cricut lol
And here is how it works:
Here’s the tutorial by bindrebindery on ig
And here's the tutorial for all the tiktok kids
She's been a huge help throughout my adventures in rebinding books, and straight up just deserves more recognition.
#bookblr#bookworm#books and reading#book#booklr#books & libraries#books#dune#dune movie#dune memes#dune book#frank herbert#reading#bookbinding#book binding#embroidery#diy craft#diy projects#diy#diy ideas
727 notes
·
View notes