#digital design tutorial
Explore tagged Tumblr posts
Visit Tumblr Blog
Explore Tumblr blogs with no restrictions, modern design and the best experience.
Last Seen Tumblr Blogs


Fun Fact
China blocked Tumblr because of pornography and censorship problems in 2013.
Text
𓈒༷♪˚.✧ How to make a mockup like this for smaus, ocs, etc. (step-by-step tutorial ☆ no Photoshop, easy, free) (requested by @lovebittenbyevans) ✿
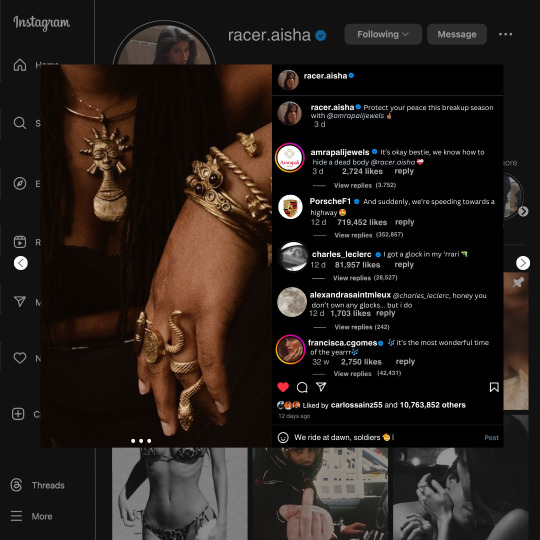
guys this took me two hours to make and you could probably get this done in like, 30 minutes :) I hope this is coherent <3 Please look back this image for comparisons, if my explanation is not well explained, etc.
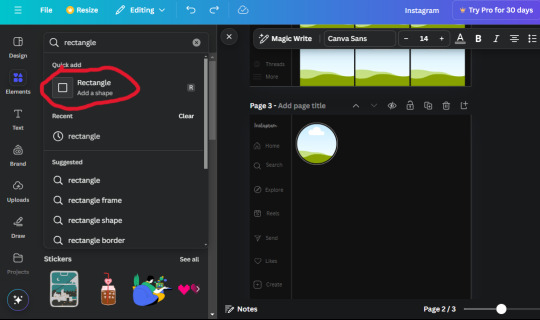
first of all, if you dont already have one, make a free canva acount. once you're signed in, hit the purple "create design" button on the sidebar. A pop-up will appear with different design template options. For this design, we want the dimentions to be 1080 x 1080, so you can either make a custom size or choose the instagram post (square) template by either searching or scrolling through the list.

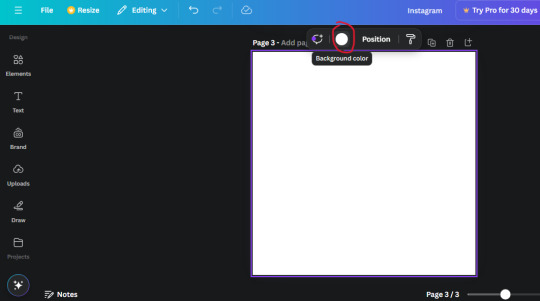
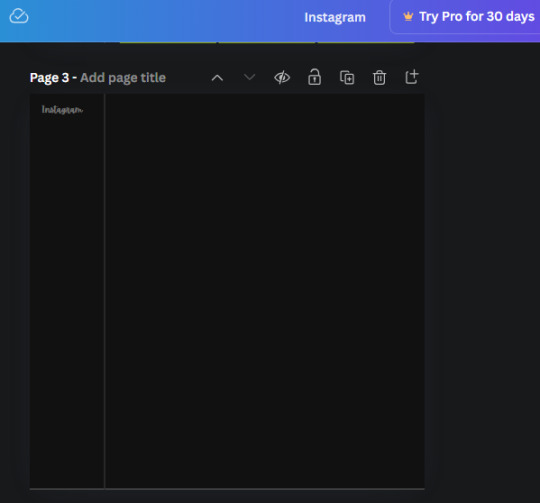
2. Now you have a blank page. Zoom in with the slider at the bottom of the page if you need to (Mine is currently zoomed in 41%). Click on the page and change the color to an off black (hex code #111111).
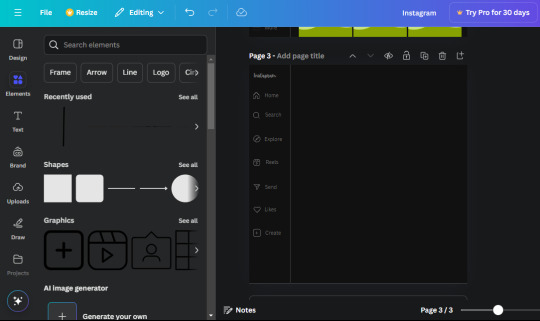
3. Now that the color is changed, click the "elements" tab and search "line". Click the shape and it will add it to the page automatically. These line are particularly hard to navigate and hard to get it at the right angle and length so this part might take a little longer than the rest.
4. stretch it from top to button and turn in a 90 angle so its straight on the left side of the page. Change the color of this as well to a grey tone (hex code #2F2F2F).
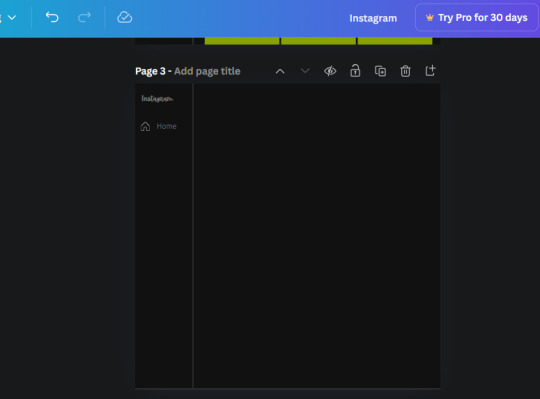
5. Now we'll add the Instagram logo. Click the "text" tab then click the purple "add text box" button. Write "Instagram" in the box and change the font to "apricots". This is the closest font I could find that resembled the logo font but if you find a better one, feel free to use that instead. Make the font size 19.3 (you can do this manually or do it in the text options). Change the color to grey color (hex code #707070). Add it to the upper left corner of the page like this:
6. now we're adding icons and a menu inside the border we just made. Click the "elements" tab again and search for "instagram home icon" and add the element by sketchify to the page. Click the home icon, an options icon with pop-up above the page. Look for the "Position" button and click it. Scroll to find the advanced options and you can manually type in the width and height at 26.6 and 28.7.
Move it inside the border, under the logo (photo below). Change the color again (the hex code is #707070).
7. Open the text tab and add a text box. Change the font to Canva Sans and write "Home" in the box. Change the font size to 18.1 and align with with the house icon. It will look something like this,
8. Go into the elements tab again and search "instagram search icon". Scroll until you find the one by sketchify and add it to the page.
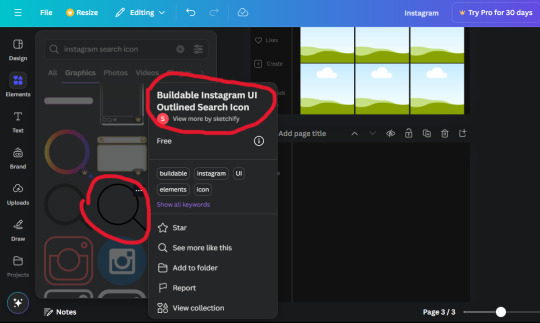
9. Shrink it so the W and H is at 36.6 and 31.3. Move it below the home icon until a purple "67" pop ups and aligns under it. Change it to the same color as the Home text and icon (#707070). Go ahead and Duplicate the the "Home" text box and clicking it and a pop-up will show up then edit the text so it says "Search" and align with the searcch icon we just added.
10. You know the drill. We are continuing to search up more icons in the "elements" tab. Search "instagram compass icon" and choose the one by sketchify (are u seeing the pattern?). Add it to the page and change the width and heigth to 33.1. align it under the search icon just like how we did before and change it to the say colors as the other icons.
11. Do the same as before and write "Explore" in a text box and align it with the icon. We're doing the same thing for all of these.
We'll be using the same search prompt for all of these icons so just change the type of icon you're looking for like we've done before hand. Next look for the Instagram reel icon and add the outlined one by sketchify and change the W and H to 31.2 x 30.9. Change the color to the ones we've used before, align it underneath the icons above and add your text ("Reels").
12. The next icon is an outlined, "sent" one. W and H is 31.1 x 27. The text will say "Send". Then an heart outline by sketchify; W and H is 34.2 x 29.1 and the text is "Likes". Next is the "create" outline icon by sketchify, W and H is 36.8.
(p.s if you are struggling to align the icons and text correctly, shoot me a message and I'll send you the X and Y positions ;D)
If you followed it through, it should look like this,
13. Now onto step 13, we'll be adding the Threads logo. You don't have to add this but to make it look more like the actual website, I will be adding it. Open the "text" tab and add a text box. Write an "@" symbol in the box and change the font to Nanum Sqaure and the size to 24.9. Add in the bottom corner below all the icons we just added to our page. We need another text box now (Color is still #707070), write "Threads" and align it to the "@" symbol.
14. We're adding another icon now. Search "Instagram menu icon" and find a wireframe menu icon by sketchify. the W and H are 42.5 x 24.6. Add a text box that says "More". It will look like this:
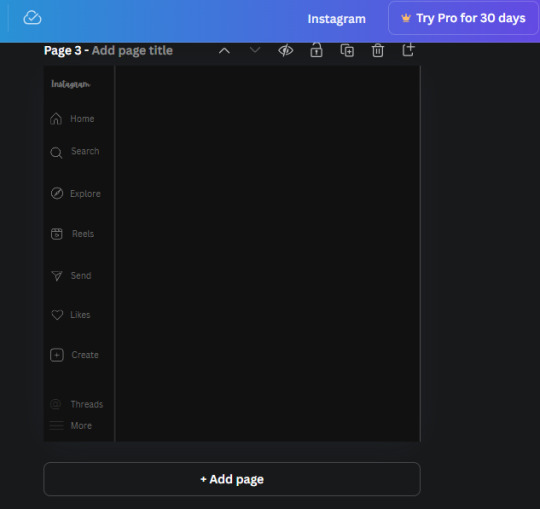
We are a quarter way done now :D
15. Search in the elements tab "circle frame" and look for the one with a little border around it.

At first, the circle will be green and inside the circle will be white. Change the white to color of the background of the page (hex code #111111) then change the green to a grey color (#8D8986).
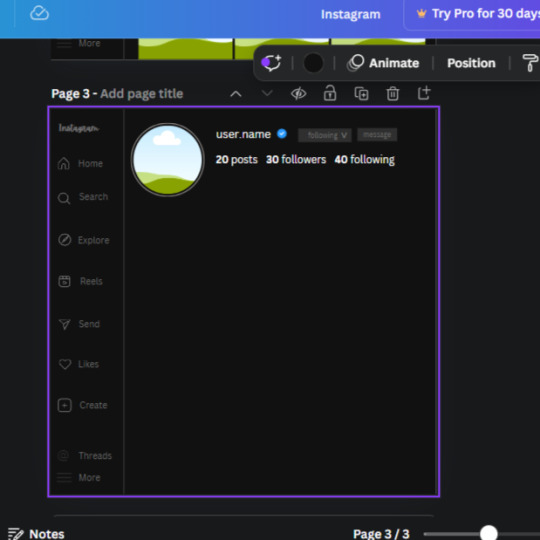
16. Add a new text box, change the font to Canva Sans and the size to 22.8 and the color is white. I just wrote "user.name" in the box. the W and H will be 153.3 x 35.7.
Enter the "elements" tab and search for a blue checkmark and find the icon by Victor Aguiar. The W and H is 28.1 by 28.
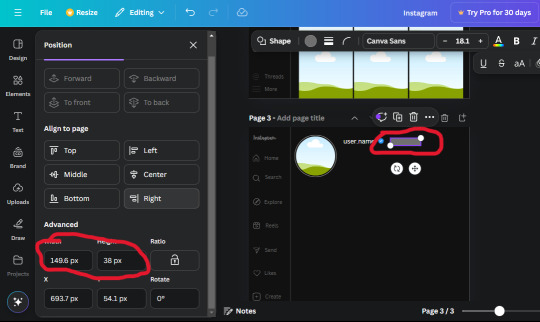
17. Search in the search box for a rectangular shape and add it to the page. Place it next to your username and checkmark icon and make the W and H to 149.6 x 38. Add another and place it next to the other rectangle shape. the W x H is 111.4 x 36.7.
Change the color of both boxes to #2F2F2F. Add a text box and write "following" then change the W and H to 82.6 x 21.8 and fit it inside the first box. Add a second text box and write "message" in it then change the W and H to 77.8 x 21.8. Change both text colors to #7A7A7A

18. Add another text box. Write "<" and turn it upside down and place it beside the "following" text inside the rectangle. Adjust the size as you need to. I also like the round the corners to around 8 so its not so pointy and square.
19. Add 3 new text boxes. Write the amount of posts, the amount of accounts you're following and the amount of followers your have. Write "20 posts", "30 following" "40 followers". Bold the numbers and change the text W and H to 116.4 x 32.7. These are just place holders that I use.
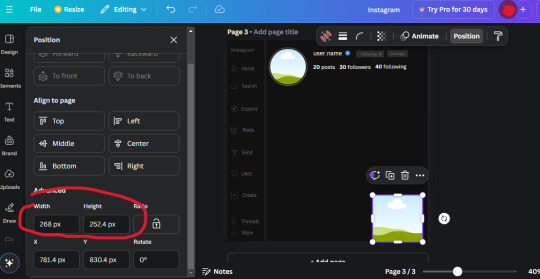
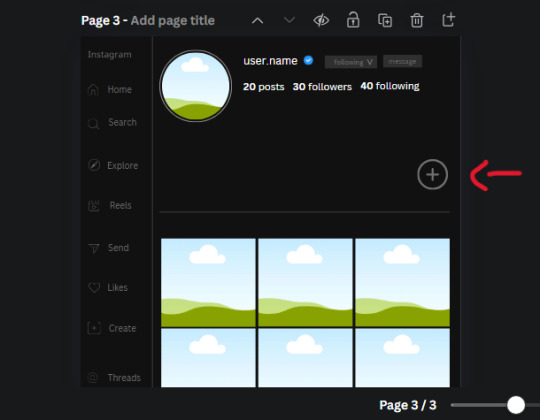
20. Open the "elements" tab again and search "frame". Choose the first one.
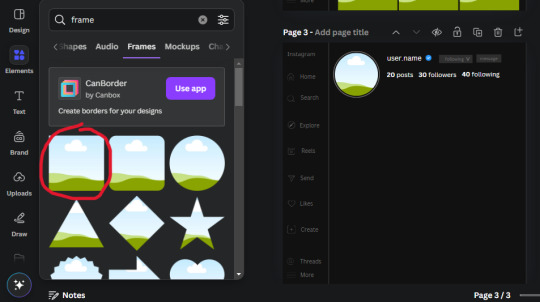
We want the height and width to be 268 x 252.4. Place it at the bottom of the page but we want some space between the frame and the page.
Now we'll duplicate the frame we just placed (the icon between the comment and trash can on the pop up above the frame). Place it next to the previous frame but we want to leave a bit of space between them like this:
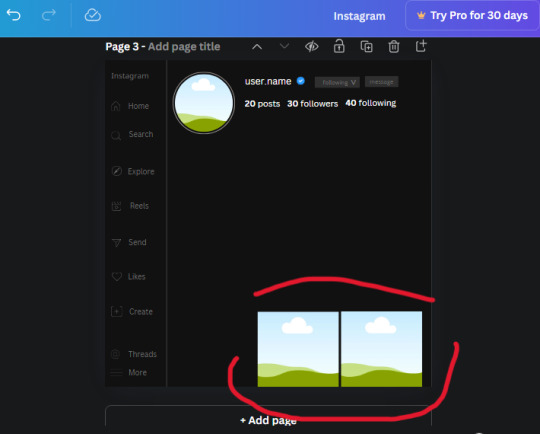
If its a little wonky, don't worry. You can always adjust it so it looks right.
Duplicate the frame again and place it next the second frame you just placed, same distance between. Make sure they're even. Now we have a row.
Select all three frames and duplicate them. Move them above our original frames but leave a little space between them.

Again, if they're uneven, adjust them as you need to.
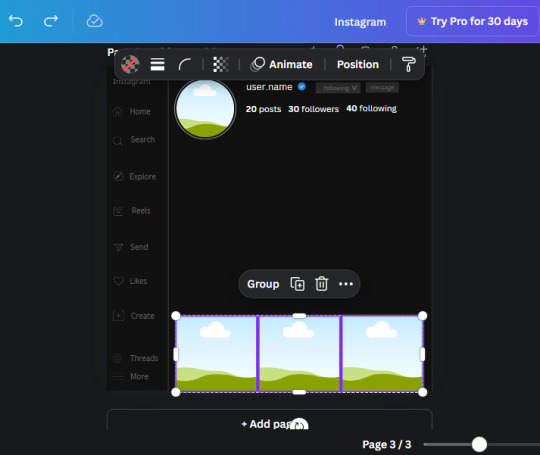
21. Select the line again from the elements tab. Stretch starting from the top frame to the last frame and make the color grey (#2F2F2F).
Because the line is stupid hard to navigate, use something like a text box to mark where you want it to end like this:


Delete the text box and the line with be where we want it.
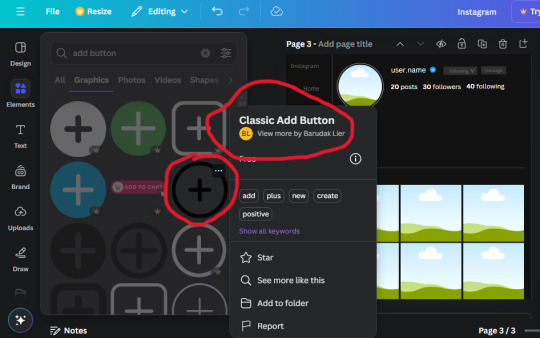
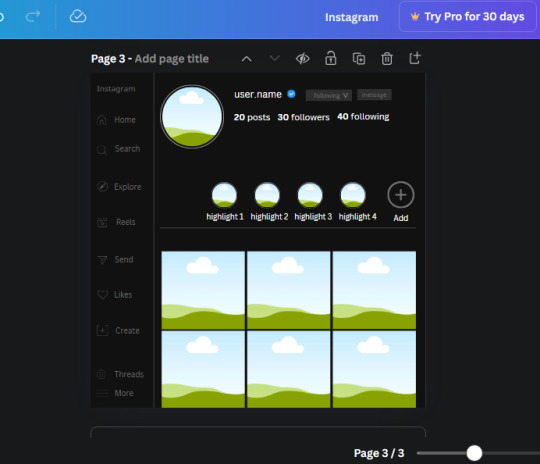
22. On to the highlight reels. Seach for "add button" and find the one by Barudak Lier.
Change the heigh and width to 81.1 and move it above the border.
Search for circle frames now and add this one to the page (The same one we used for the pfp), change the width and height to 85.4 and move it next to the add button. Since this is a generic, blank template, I add about 4 of these highlight frames but you can do however many you want. You can change the border color to a gradient or leave it grey.
Add a text box now. The font will be Canva Sans, the size will be 18.1 and the color will be white. Change the text to "Add" and place it under our add button. Make more of these text boxes to place under the circle frames. Depending on which frame its under, write "Highlight 1", "Highlight 2", etc. etc. or you can give them different names and such.
23. Add another text box, write "name" and bold it, change the size to 19.1 and the W and H to 69.2 x 28.8. The font will be Canva Sans and the color will be white. It will go under the amount of posts, followings and followers.
Add another box. The font is Canva Sans, font size to 20.1, the W and H is 40.8 x 31.3 and the color is white as well. This is our "bio". Place it under "name".

Yay!🎉🎉🎉 You're halfway done!
24. Search for a shape in the elements. Look for the rectangle again and add it. Change the width and height to 460 x 760.4 and the color to an off black/grey color (#191919), placing it like this:
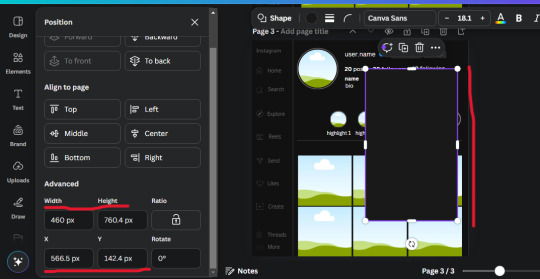
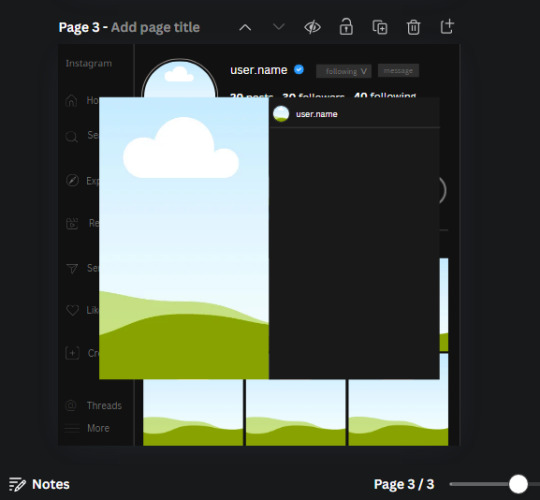
Get the same kind of square frame we used before to make the profile grid and make it the same size as the rectangle we just added. Place right up against the rectangle like it's its other half. Add another line like before and span across the upper half of the black rectangle as a border then add a circle frame inside the border.
Add a text box, "user.name" and align it with the frame. The text is white and the W and H is 111.5 x 25.9
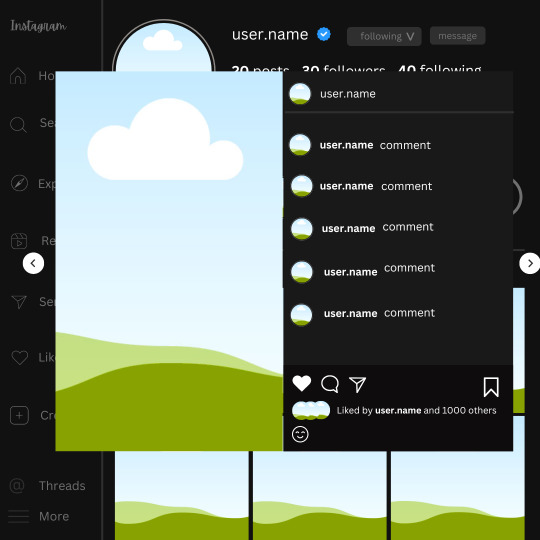
25. Add more circle frame along the inside of the rectangle to resemble the comment section. Make sure the W and H of the frames are 46.1.
Add more text boxes that align with the frames you just made and write "username" again and bold them. Add even more text boxes that align with the usernames and write "comment". These are place holders for when you decide to use this template.
Add another rectangle on the lower part of the rectangle and make the color black. and search for "instagram heart icon", "instagram comment icon" and "instagram send icon". Make sure the lines are thick. Find the heart icon by sketchify, and the the comment and send icon are by Mirazz Creations. Make the lines white and make sure the W and H are the following:
Heart icon: 38.7 x 32.9
Comment icon: 35.2 x 35. 8
Send icon: 35 x 32
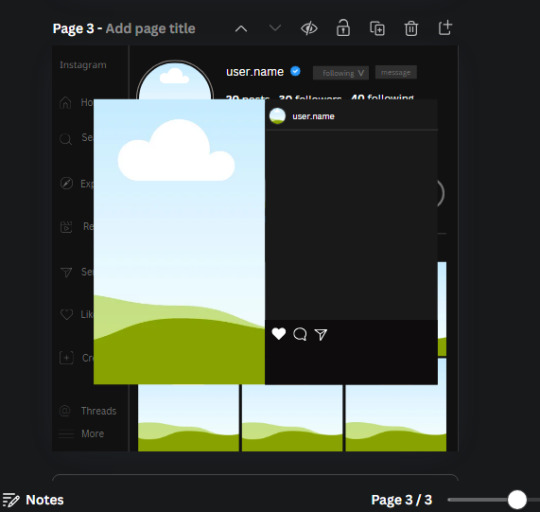
Next, look for "instagram bookmark icon" and find the one by Adricreative. Change the color to white and the W and H to 29.7 x 40.2. Move it to the other end of the rectangle.
26. Now add three circles frames and change the W and H to 37.2. Move them below the heart icon and have them overlap each other some. Then, add a text box and write "liked by username and 1000 others". Change the font size to 13.6 and change the font to Canva sans. the color will be white. Align this with the three overlapped frames.
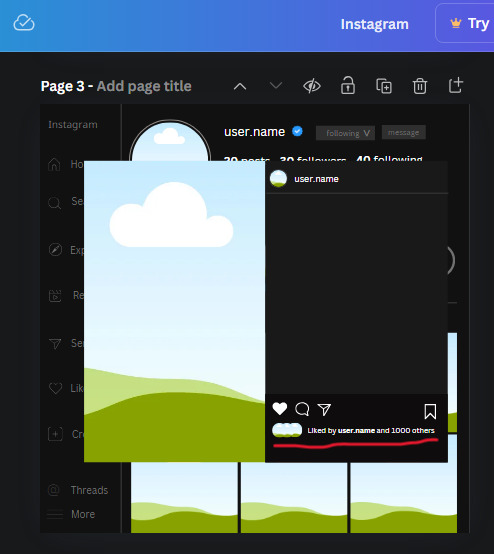
27. Look in the elements tab for an emoji icon and choose the one by Soni Soukell from Noun Project. The W and H will be 32.8 and the color is white.

Now add a another text box and write "Write a comment". The color will be white, the font size will be 14.2 and align with the emoji icon you just placed.
Search for "next arrow button" by Pixeden and make the W and H 42.8 then add it to both sides of the post.
And you're all done with your template! All that is left to do is fill it but before doing that, duplicate the page so you always have an extra blank mockup if you want to use it again.
To fill the frames, upload an image (or use a Canva stock photo), drag and hover it over the frame and it will fill the frame.
Hope this was helpful and you you successfully made one :D <3
#requests#text#smau#template#mockup#moodboard#instagram#instagram moodboard#instagram mockup#graphic design#canva#psd#free tutorial#tutorial#instagram au#social media au#free psd#photoshop#resources#fanfiction resources#graphic design resources#graphic design tutorial#psd tutorial#photoshop tutorial#au#au ideas#mockups#digital design#digital design tutorial
173 notes
·
View notes
Text
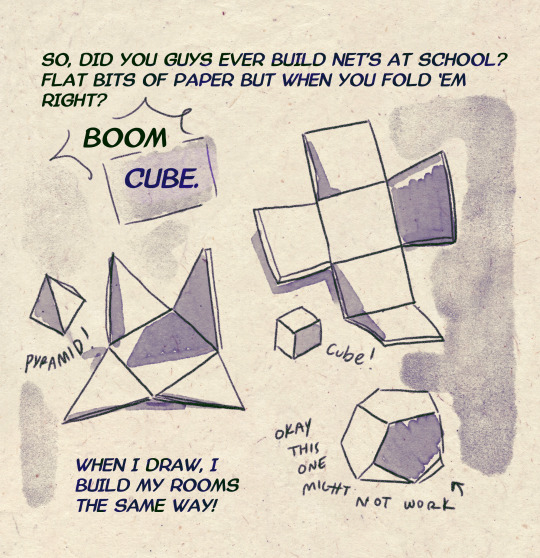
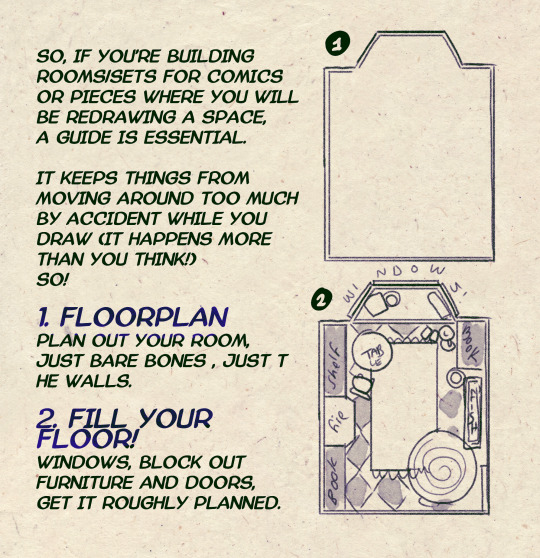
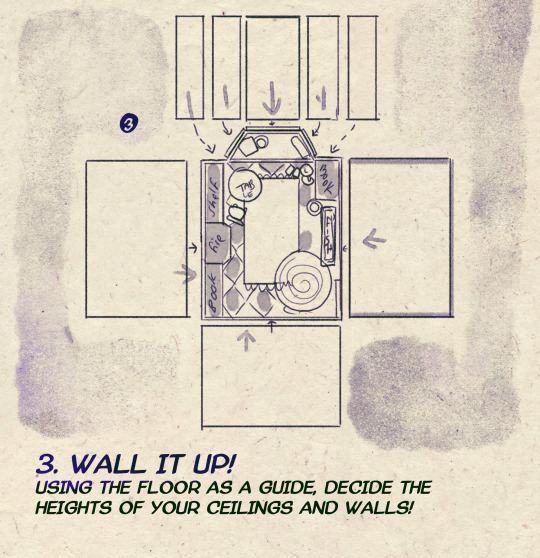


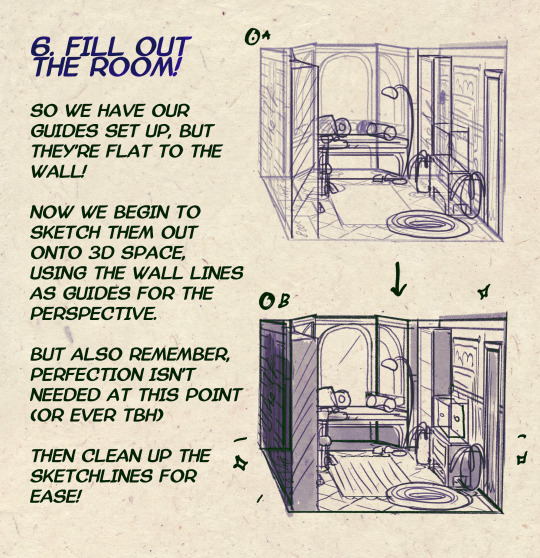

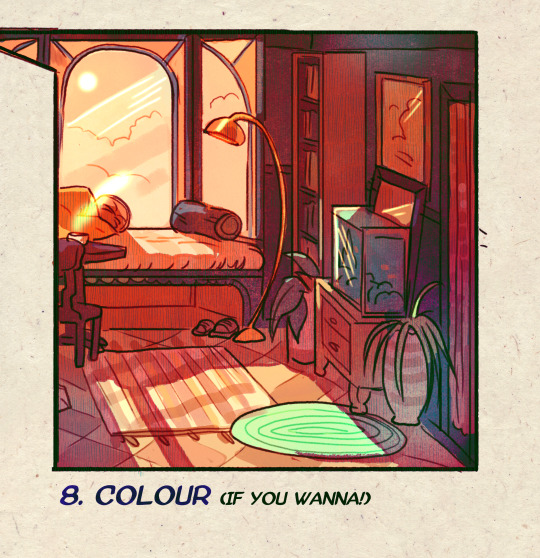
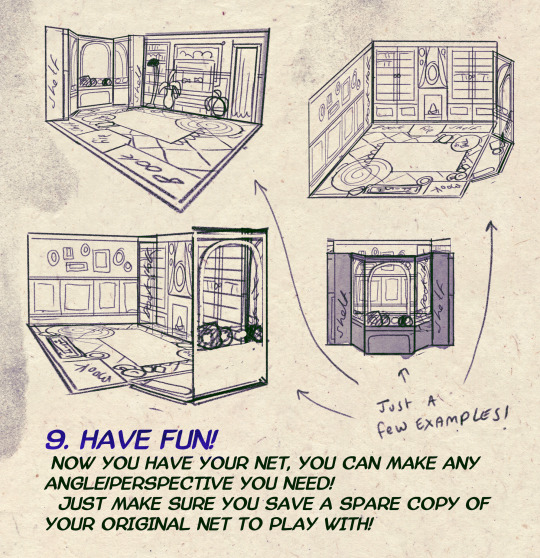
I made a Room Building tutorial! Lemme know if it helps! 🧡
Tip me here| Commission info here!
#anonbeadraws#digital#art tutorial#tutorial#room building#room design#illustration#gif#digital art#digital tutorial#art help#art resource#let me know if it helps!#tried to make it as simple as I could
42K notes
·
View notes
Text
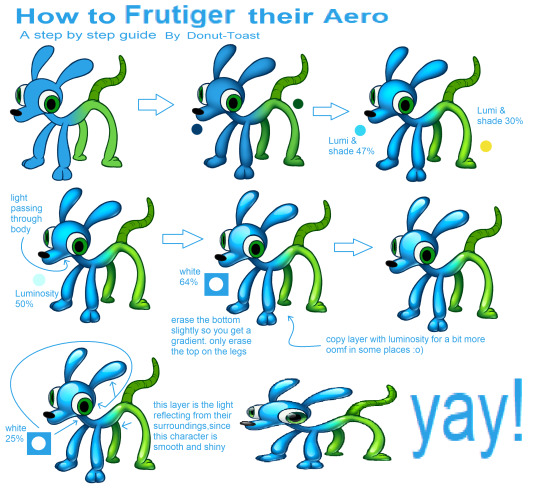
Made a quick tutorial for how to apply that Frutiger Aero Button texture to living creatures, since I made an entire design with it!
#art tutorial#frutiger aero#art tips#art help#art resources#art research#drawing tutorial#tutorial#resource#art resource#digital art#art#aesthetic tutorial#aesthetic#frutiger aesthetic#y2k#spore 2008#spore#old web#donutdrawsthings#character design
625 notes
·
View notes
Text


A knight and friends.
#art#digital art#original character#character design#2d animation#animation#oc#animated gif#cartoon#tutorial#art tutorial#animation tutorial#how to#knight#medieval#steed#horse#bird#pet#quest#adventure#dnd#d&d#fantasy#king arthur#arthurian#derp#derpy#equestrian#armor
643 notes
·
View notes
Text

Fanart ive made of @burrotello AU 🫶 (and tadc/md lol) i love the designs and concept so much 😭😭
#my art#fanart#kryzuuna#murder drones#sdn#serial designation n#murder drones n#n md#tadc pomni#pomni#the amazing digital circus#the amazing digital fight club#its a bojack horseman reference btw#i tried my best at this old anime style but im still not really good at it 😔 i need tutorial
1K notes
·
View notes
Text

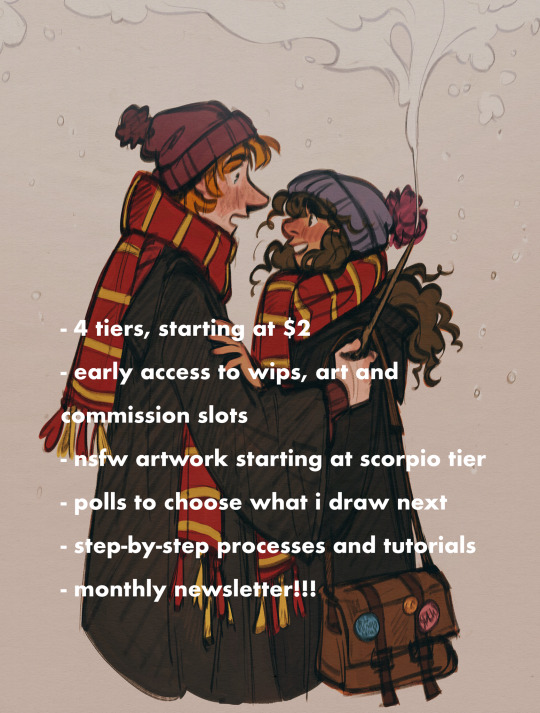


I'm launching a Patreon!!
holy crap. i've dabbled with this idea for many years and finally i feel like i've gathered enough courage and confidence to just do it!
by becoming a patron, you can
get early access to wips, completed drawings and commission slots
exclusive content (namely nsfw artwork)
polls to decide what i can draw next,
art tutorials and processes
a biweekly to monthly newsletter for all paid members - I'm calling it a newsletter for the lack of a better word as it's more like a monthly recap/elevated journal entry of what i've been working on, my thoughts on art and media, the books i've been read, etc.
like i mentioned earlier, it took me a long time to gather the courage to do this for myself and my work but really, i couldn't have done this without your guy's love and support of my art... it's mind boggling that there are people out there who admire my work and appreciate the passion i have for said work. i couldn't have done this without you.
thank you thank you thank you!
#artists on tumblr#patreon#harry potter#harry potter fanart#harry potter art#hp fanart#hp art#ron weasley#hermione granger#ron x hermione#hermione x ron#romione#ronmione#my art#illustration#character design#visdev#visual development#animation#procreate#art tutorial#digital art
317 notes
·
View notes
Text


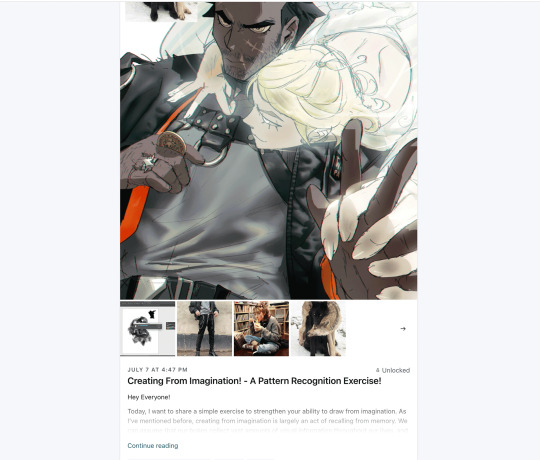
Last year, I had the amazing opportunity to create a character design tutorial for "Inspired by Nature" by @3dtotal. Here are some of the artworks included in it!
The book teaches readers how to use flowers, plants, trees, fungi, and other elements of the natural world as inspiration for character designs. My task was to choose a summer flower and design a character based on its features.
I chose the cornflower and created this little goblin, Periwinkle!
Periwinkle specializes in collecting nectar and pollen to make infusions and medicines for animals and insects in need. His friend and assistant, Bumblebee (also included on the artworks here!), helps him gather the ingredients, with the added benefit of pollinating flowers along the way.
In addition to Periwinkle, the book features 16 other incredible characters to explore and learn from. If you're interested, the book is available in the @3dtotal store!
#digital art#norapotwora#characterdesign#character art#original character#fantasy#character tutorial#design tutorial#cornflower#goblin design#goblin character#goblin#flower character
401 notes
·
View notes
Text
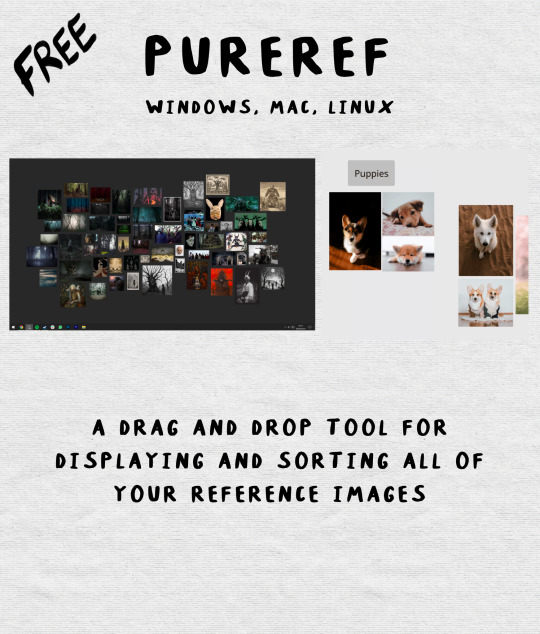
here is a master list of great art tools that can make your workflow easier! 👇 (consistently updating)


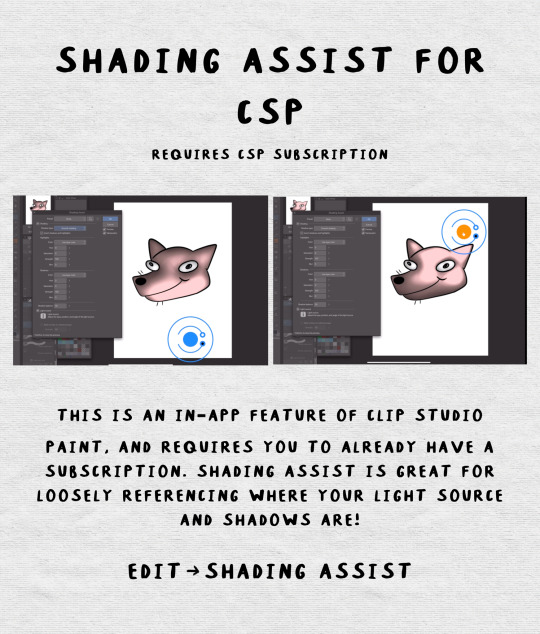
posemaniacs.com/en
if you want to learn human anatomy with the benefit of preset poses, this is for you! you can use it standalone, but as a bonus you can also import poses into the clip studio paint 3D models. (File -> Import -> 3D Pose (Posemaniacs)
line-of-action.com
great for gestures and observational sketches!
zvork.fr/vls/
browser based rig for lighting & shadows
MY FAVORITE BRUSHPACKS
truegrit texture supply - https://www.truegrittexturesupply.com
thedawner procreate & csp packs - https://ko-fi.com/thedawner/
ADDITIONAL TOOLS COMING!
#art#digital art#artwork#anthro art#character design#furry#furry art#my art#original character#furry anthro#art tools#anthro#art tutorial#tutorial#art reference#reference#art tips#oc adopt#oc artist#oc artwork#ocs#oc#oc art#my ocs
240 notes
·
View notes
Text
A narrated video i put together last night explaining how i come up with and design plants for my project!
#alien species#art process#artists on tumblr#artwork#concept art#creative#design#digital art#my art#original art#video#narration#tutorial#process#digital drawing#digital illustration#speculative worldbuilding#spec#speculative ecology#spec evo#speculative anatomy#speculative zoology#speculative fiction#spec bio#plants#botany#botanical illustration#botanical art
117 notes
·
View notes
Text


Get access to my brushes, art tips, process videos, and files here https://www.patreon.com/ramonn90
#illustration#ramonn90#art#photoshop#patreon#digital art#portrait#character design#brushes#game art#animeart#art fundamentals#tutorial#tips about art
2K notes
·
View notes
Text
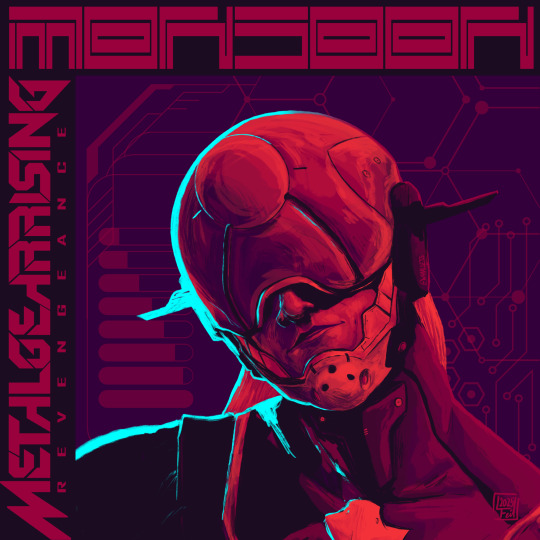
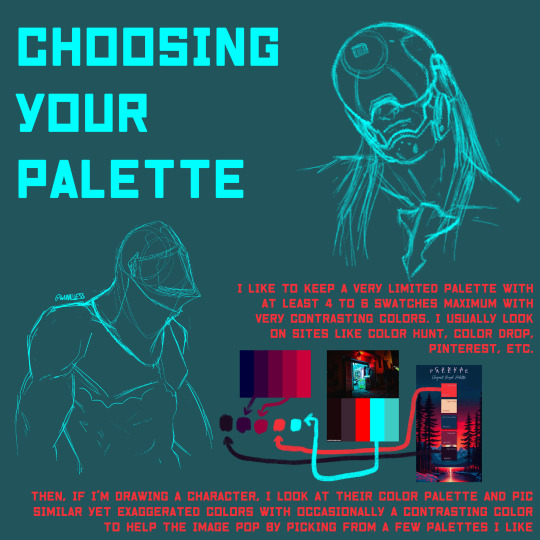
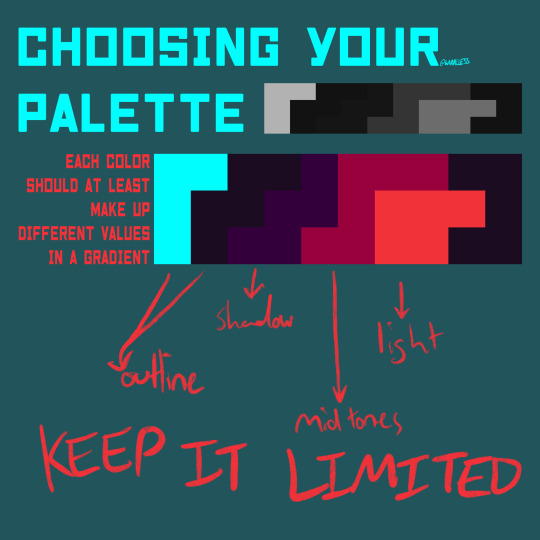


Forgot to post this omg but I made a rendering tutorial on how I render my drawings last week. I think I’ll make more of these but lmk if y’all would like to see some more tutorials and/or specific ones in general :D
#digital art#artists on tumblr#whaalless#mgs#metal gear solid#she metal on my gear till i’m solid#monsoon#metal gear#metal gear rising#metal gear revengeance#monsoon mgr#mgrr#mgr fanart#art tips#art tutorial#render tutorial#graphic poster#graphic design is my passion ahh artwork coming out of me recently lol#I loooove making graphic posters they’re so much fun#limited color palette
130 notes
·
View notes
Text
Finished up this project for one of my finals-
Riftiee’s (Unprofessional) Guide To Character Design!

Individual parts:
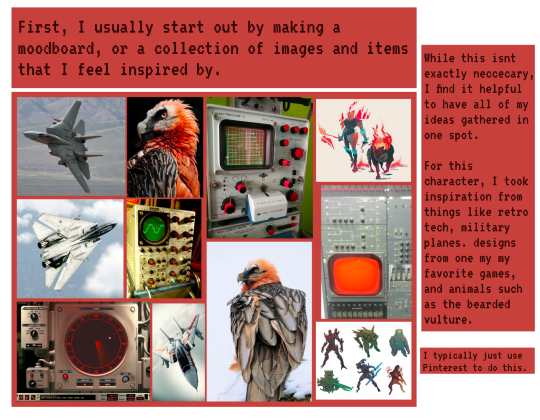


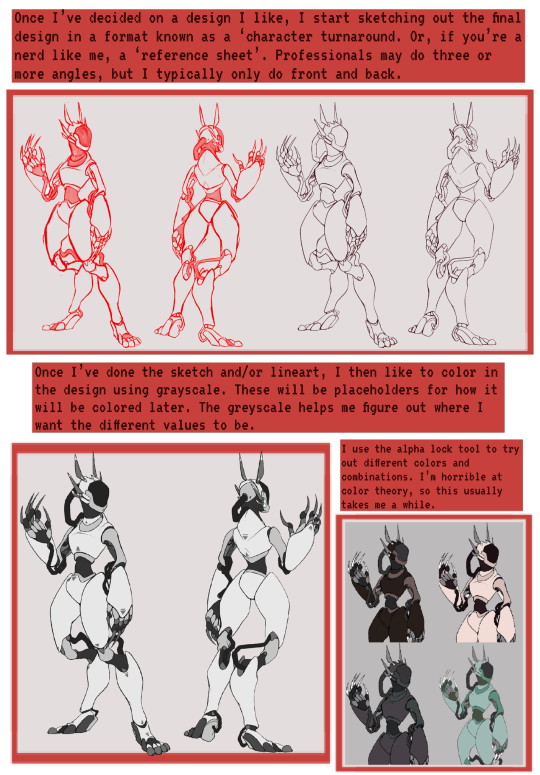
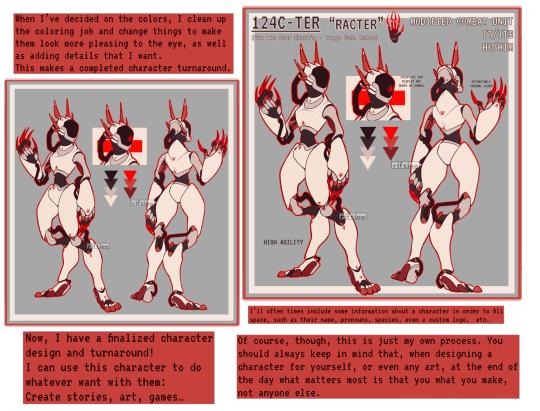
#art#digital art#oc#my ocs#oc art#character design#oc design#art tutorial#art help#robot design#robot#art process#design process#character designer#digital artist#art guide#procreate#riftiee#riftiee character#my oc
311 notes
·
View notes
Note
resident evil banners?
[REQUESTED] Resident Evil Banners


#carrd moodboard#carrd graphics#carrd inspo#carrd stuff#discord chat#discord roleplay#design tutorial#banner design#tumblr banner#banners#carrd resources#discord server discord chat discord roleplay aesthetic#resident evil#leon kennedy#ada wong#ethan winters#discord server discord chat discord roleplay aesthetic banners tumblr banner banner design template aethstetic black and white#design#diy#digital art#blinkies
110 notes
·
View notes
Text

just a bundle of ribbons and sadness...!! 🎭
inking her ribbons traditionally was such a pain but god it was worth it, like i dont think i draw enough Digital Circus art but i really should.
Gangle is my absolute fave, but tbh its hard to choose in this show... i need to draw her from ep 4 tho she was so fun there
(´▽`ʃ♡ƪ)
kofi // instagram // artfight // bluesky
#the amazing digital circus#gangle#tadc#tadc gangle#artists on tumblr#my art#traditional art#shoutout to gangle artists who have perfected drawing her whole design. and the one artist who drew a whole tutorial on her ribbons!#you guys are literal godsends!! o(^▽^)o
55 notes
·
View notes
Text
Knight Process
#art#2d animation#animation#cartoon#animated gif#digital art#artwork#original character#character design#oc#animation tutorial#art tutorial#art guide#art tips#animation tips#how to#step by step#animation process#art process#behind the scenes#creative process#process#character#character animation#walk cycle#horse animation#animated loop#looping animation#line#lineart
89 notes
·
View notes
Text
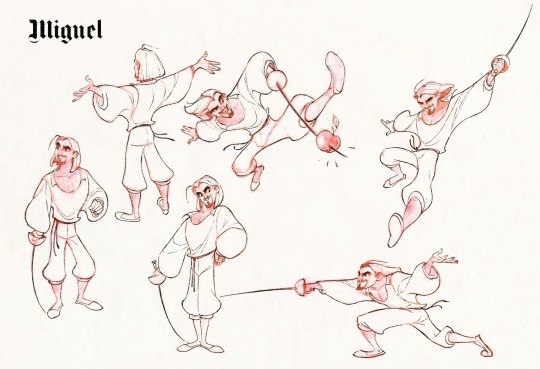
Art from The Road to El Dorado
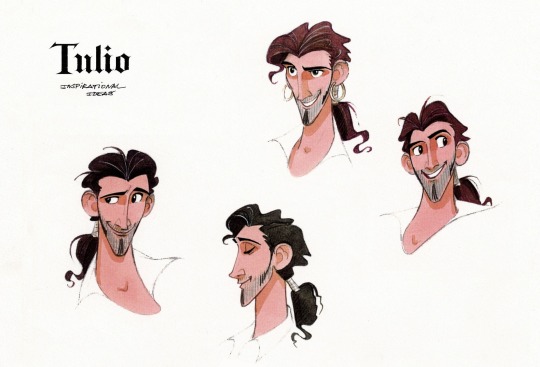


#road to el dorado#el dorado#art book#digital art#movie art#character art#character design#character design tutorial#illustration#dreamworks#dreamworks animation
196 notes
·
View notes