#disable windows 10 powershell
Explore tagged Tumblr posts
Visit Tumblr Blog
Explore Tumblr blogs with no restrictions, modern design and the best experience.
Last Seen Tumblr Blogs


Fun Fact
Users from the US are the majority of Tumblr visitors.
Text
TS4 CC not working despite installing correctly? Make sure Windows unblocked the file!
I've seen this a lot on some CC creators Patreons, where the person can't seem to get the CC working despite installing it correctly. If you're using Windows 10 or 11, it could be that Windows is blocking your downloads.
This is a security feature by Windows and AFAIK, you can't disable it but you can fix your downloads (including things you've already installed!). Though this is tedious, you only have to do this once per folder.
If you have CC that's in a zip/rar/compressed file, you can just do the first few steps on the zip/rar/compressed file and it was unblock everything within the zip file but ONLY if that file has the "unblock" notification seen in my screenshots.
You can't make things faster by tossing all of your CC into a zip/rar/compressed file and then unblocking it - you would have to use the Powershell command that's in part two of this.
A quick note: I'm using Windows 10 and a custom theme with custom-made cursors as well as custom-made taskbar and desktop icons, so my UI might look different than yours.
Read on, I have you covered in this super short tutorial.
PART ONE: UNBLOCKING SINGLE FILES.
When I download CC, I put my .package files into a folder on my desktop and name it Creator Name - Date, so that if I'm having trouble with my game being weird, I can do back and see what I last installed by looking for the date in the folder name. After I know this CC won't cause trouble, I'll just remove the date sometimes but usually I just leave it.
For this tutorial, we're going to assume your CC is in a folder like mine:

So, you can see I have a few Johnny Sims hair I've downloaded today. It's ready to go into my CC folder but first I need to 'unblock' it. Let's right-click the first file, "JohnnySims_Adriano_Hair_F.package" and left-click "properties".
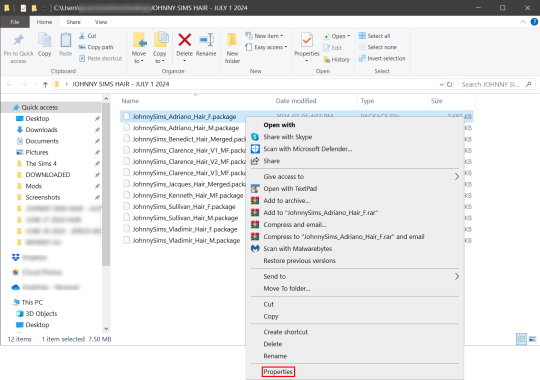
Now you're going to have a new window come up with a message:
This file came from another computer and might be blocked to help protect this computer.
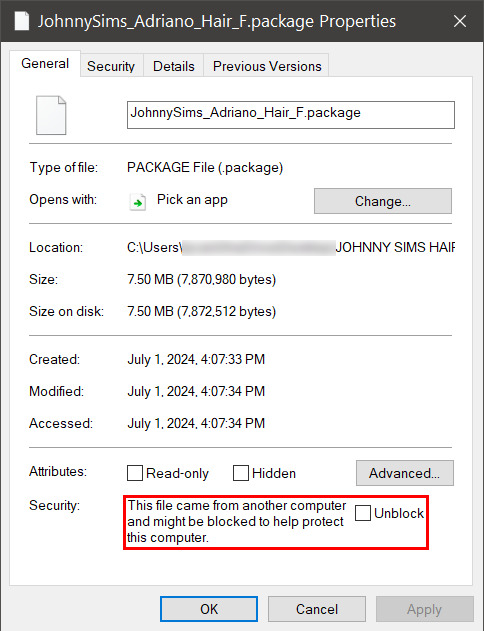
Click the checkbox (the square) next to the word Unblock that is to the right of the message, and then click "apply" and "okay". This window will now close. Do this for each of your .package files.
That's it! You're done and can now move your CC into your mods folder. You will have to do this each time you download new CC as Windows has this security feature on by default and it's not a good idea to disable it unless you really know what you are doing. It protects your computer from allowing harmful malware to run.
There is a command to use to unblock an entire folder in one go if you're wanting a quick means to do this, so read on for that.
PART TWO: UNBLOCKING AN ENTIRE FOLDER WITH WINDOWS POWERSHELL
If you want to unblock an entire CC folder, the easiest way is with a Windows PowerShell command. This requires you to be on an administrator account on your Windows machine, otherwise you will have to enter the administrator password or have some other means to bypass UAC.
I would recommend making a backup/copy of your mods folder and making a backup before doing this, as well, moving your mods folder to your desktop and executing this command there, rather than doing so within the Sims 4 folder.
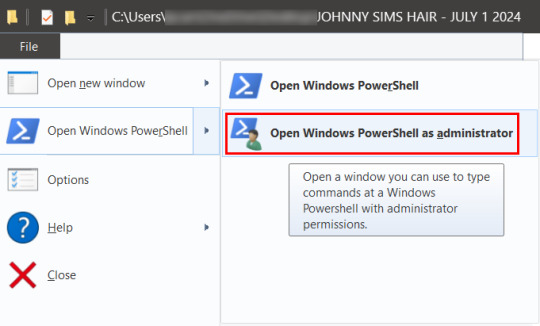
You'll want to click "file" up on the top left of your CC folder, then hover over "Open Windows PowerShell":
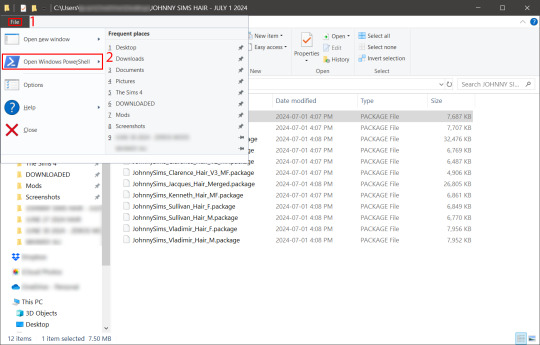
From there, a second menu should come out that gives two options: "Open Windows PowerShell" and "Open Windows PowerShell as administrator".
We want to click "Open Windows PowerShell as administrator":
You'll have a command prompt-looking window pop up then. Mine is blue, yours may be a different color depending on if you have a different Windows theme or dark mode enabled (I do not have dark mode).
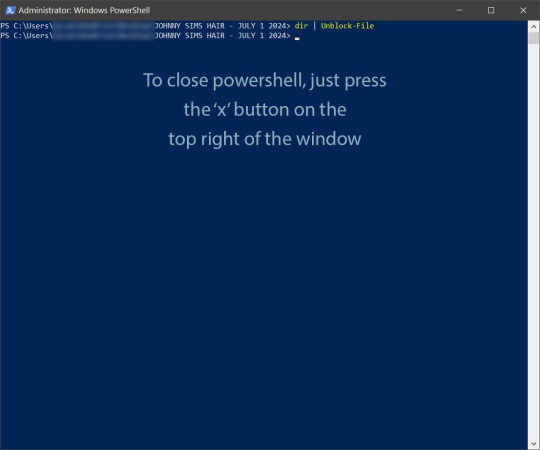
With this window open, you'll see that the directory listed is the one for your CC folder we were just in. Click at the end of the directory where the > is, and type: dir | Unblock-File (capitalization is important here, and for QWERTY keyboards, the | button is above the 'enter' key, you just have to use the 'shift' key while pressing it, otherwise you'll get a backslash):

Now hit 'enter'. You won't get any sort of message telling you the command has worked. If you get an error message, you typed something wrong. Just type correctly on the next line and hit 'enter' again.
If your user directory shows up like mine with a flashing cursor, that means Windows PowerShell is waiting for another command and you did it correctly. Close out of this window by clicking the 'x' on the top right of the window.
Check your CC by right-clicking any of the .package files as we did at the start, going to 'properties' and then making sure that message is gone:

See how it is blank under 'attributes'? The message is gone, meaning our CC is unblocked. Now we can move it into our mods folder and it should show up in the game.
If you have any questions, feel free to send me a message/ask and I'll do my best to help!
2 notes
·
View notes
Text
And now all the search engines are being replaced by AI. I have spent twenty years trying to talk people to go to libraries and check their beliefs against records, and now we face a future without libraries and endless artificially generated idiocy.

There was an argument in the Australian Parliament when Julia Gillard was PM. She accused her opponent of being a misogynist. He pointed out it was a fact that he was not. So the next day the dictionary was edited to 'correct' it, to align with her opinion of what it should be, so she could now label him a misogynist and pretend her definition had always been true.

The trouble with manually removing AI from windows is MS can undo your changes at any time.
Completely remove Microsoft Bing Chat AI from your Windows 11 PC and sidebar.
Open the PowerShell application with administrator privileges. You can do this by searching for "PowerShell" in the Start menu, right-clicking on the result, and selecting "Run as Administrator."
In the PowerShell window, type the following command and press Enter:
Get-AppxPackage bing | Remove-AppxPackage
Wait for the command to execute. This command will uninstall any app packages related to Bing, including the Bing Chat AI. Once it completes, the Bing Chat AI should be removed from your Windows 11 PC.
To remove the Bing Chat AI integration in the Taskbar search, you can disable it using the steps below:
Open the Settings app in Windows 11. You can do this by pressing the Windows key, searching for "Settings," and selecting the "Settings" app.
Click on "Privacy & Security" in the left sidebar.
Under the "Windows permissions" section, click on "Search permissions."
In the "More settings" section, toggle off the "Show Search highlights" option. This will disable the Bing Chat AI integration in the Taskbar search.
After following these steps, the Bing Chat AI should be removed from the Taskbar search and the search home interface in Windows 11.
(This did not disable it but did disable the AI use of the search results in Windows 11 See the next step below to also disable the physical button integration.
Do both steps.)
Manual removal by component:
Page 2: Remove Bing Chat integrated into Microsoft Edge Explorer:
Disclaimer: If you are not comfortable using the registry editor, stop here. If you’re unfamiliar and willing to try anyway, the simplest way to look at this is a set of folders. Each has a parent folder; each folder can contain files. The view is like the windows explorer expanding directories with different naming conventions. It’s rather complicated but simplistic in nature.
How to remove the Bing Chat integration from Microsoft Edge Explorer on Windows, first follow the instructions provided in the first source mentioned:
((Silly AI, Step 1: Back up the registry: Select the folder HKEY_LOCAL_MACHINE\SOFTWARE\ click on the menu bar file, select export, select the destination for the backup file and name the file then save it.))
Open Registry Editor on your PC.
Navigate to the following location: HKEY_LOCAL_MACHINE\SOFTWARE\Policies\Microsoft.
If the “Edge.” Folder exists go to step 5.
Right-click inside the Microsoft folder and choose New, then Key.
Name the new Key (folder) as "Edge".
Right-click inside the Edge folder and select New, then DWORD (32-bit value).
Name the new DWORD as "HubsSidebarEnabled".
Right-click on HubsSidebarEnabled and click Modify.
Ensure the Value data is set to 0.
That's all the work in the Registry. Next, open Microsoft Edge and enter "edge://policy" in the address bar.
Click on the "Reload Policies" button, and the Bing Chat button will now disappear from the Microsoft Edge Explorer window.
These steps should help you remove the Bing Chat button from your Microsoft Edge Explorer window.
Please note that modifying the registry can have unintended consequences if not done correctly, so it's essential to be cautious and comfortable with the process. Additionally, it's always a good idea to back up your registry or create a system restore point before making any changes.
Page 3: Remove Bing from the Windows Start Bar.
If "Show Search highlights" setting was already disabled, and the Bing Chat button is still visible on your start menu bar. Here's an alternative method you can try to remove the Bing Chat button:
((Silly AI, Step 1: Back up the registry: Select the folder HKEY_CURRENT_USER\Software\ click on the menu bar file, select export, select the destination for the backup file and name the file then save it.))
Open the Registry Editor by searching for "Registry" in the Start Menu and selecting the "Registry Editor" app.
Navigate to the following location in the Registry Editor: HKEY_CURRENT_USER\Software\Policies\Microsoft\Windows\Explorer
If this folder does not exist, you can create it manually by right-clicking on the parent folder “Windows” and selecting "New" > "Key." Then, name the new key "Explorer" as instructed inside the 'HKEY_CURRENT_USER\Software\Policies\Microsoft\Windows\' directory.
Right-click on the "Explorer" folder, choose "New," and then select "DWORD (32-bit) Value" from the context menu.
Name the new DWORD value as "DisableSearchBoxSuggestions" (without quotes) and press Enter.
Double-click on the "DisableSearchBoxSuggestions" value you just created and set its value data to "1."
Click "OK" to save the changes.
Restart your computer for the changes to take effect.
After restarting, the Bing Chat button should be removed from the start menu bar. If you want to re-enable it in the future, you can return to the Registry Editor and change the value of "DisableSearchBoxSuggestions" to "0" or simply delete the DWORD value.


108K notes
·
View notes
Text
Boost Your Fortnite FPS in 2025: The Complete Optimization Guide
youtube
Unlock Maximum Fortnite FPS in 2025: Pro Settings & Hidden Tweaks Revealed
In 2025, achieving peak performance in Fortnite requires more than just powerful hardware. Even the most expensive gaming setups can struggle with inconsistent frame rates and input lag if the system isn’t properly optimized. This guide is designed for players who want to push their system to its limits — without spending more money. Whether you’re a competitive player or just want smoother gameplay, this comprehensive Fortnite optimization guide will walk you through the best tools and settings to significantly boost FPS, reduce input lag, and create a seamless experience.
From built-in Windows adjustments to game-specific software like Razer Cortex and AMD Adrenalin, we’ll break down each step in a clear, actionable format. Our goal is to help you reach 240+ FPS with ease and consistency, using only free tools and smart configuration choices.
Check System Resource Usage First
Before making any deep optimizations, it’s crucial to understand how your PC is currently handling resource allocation. Begin by opening Task Manager (Ctrl + Alt + Delete > Task Manager). Under the Processes tab, review which applications are consuming the most CPU and memory.
Close unused applications like web browsers or VPN services, which often run in the background and consume RAM.
Navigate to the Performance tab to verify that your CPU is operating at its intended base speed.
Confirm that your memory (RAM) is running at its advertised frequency. If it’s not, you may need to enable XMP in your BIOS.

Avoid Complex Scripts — Use Razer Cortex Instead
While there are command-line based options like Windows 10 Debloater (DBLO), they often require technical knowledge and manual PowerShell scripts. For a user-friendly alternative, consider Razer Cortex — a free tool that automates performance tuning with just a few clicks.
Here’s how to use it:
Download and install Razer Cortex.
Open the application and go to the Booster tab.
Enable all core options such as:
Disable CPU Sleep Mode
Enable Game Power Solutions
Clear Clipboard and Clean RAM
Disable Sticky Keys, Cortana, Telemetry, and Error Reporting

Use Razer Cortex Speed Optimization Features
After setting up the Booster functions, move on to the Speed Up section of Razer Cortex. This tool scans your PC for services and processes that can be safely disabled or paused to improve overall system responsiveness.
Steps to follow:
Click Optimize Now under the Speed Up tab.
Let Cortex analyze and adjust unnecessary background activities.
This process will reduce system load, freeing resources for Fortnite and other games.
You’ll also find the Booster Prime feature under the same application, allowing game-specific tweaks. For Fortnite, it lets you pick from performance-focused or quality-based settings depending on your needs.
Optimize Fortnite Graphics Settings via Booster Prime
With Booster Prime, users can apply recommended Fortnite settings without navigating the in-game menu. This simplifies the optimization process, especially for players not familiar with technical configuration.
Key settings to configure:
Resolution: Stick with native (1920x1080 for most) or drop slightly for extra performance.
Display Mode: Use Windowed Fullscreen for better compatibility with overlays and task switching.
Graphics Profile: Choose Performance Mode to prioritize FPS over visuals, or Balanced for a mix of both.
Once settings are chosen, click Optimize, and Razer Cortex will apply all changes automatically. You’ll see increased FPS and reduced stuttering almost immediately.
Track Resource Gains and Performance Impact
Once you’ve applied Razer Cortex optimizations, monitor the system changes in real-time. The software displays how much RAM is freed and which services have been stopped.
For example:
You might see 3–4 GB of RAM released, depending on how many background applications were disabled.
Services like Cortana and telemetry often consume hidden resources — disabling them can free both memory and CPU cycles.

Enable AMD Adrenalin Performance Settings (For AMD Users)
If your system is powered by an AMD GPU, the Adrenalin Software Suite offers multiple settings that improve gaming performance with minimal setup.
Recommended options to enable:
Anti-Lag: Reduces input latency, making your controls feel more immediate.
Radeon Super Resolution: Upscales games to provide smoother performance at lower system loads.
Enhanced Sync: Improves frame pacing without the drawbacks of traditional V-Sync.
Image Sharpening: Adds clarity without a major hit to performance.
Radeon Boost: Dynamically lowers resolution during fast motion to maintain smooth FPS.
Be sure to enable Borderless Fullscreen in your game settings for optimal GPU performance and lower system latency.
Match Frame Rate with Monitor Refresh Rate
One of the simplest and most effective ways to improve both performance and gameplay experience is to cap your frame rate to match your monitor’s refresh rate. For instance, if you’re using a 240Hz monitor, setting Fortnite’s max FPS to 240 will reduce unnecessary GPU strain and maintain stable frame pacing.
Benefits of FPS capping:
Lower input latency
Reduced screen tearing
Better thermals and power efficiency
This adjustment ensures your system isn’t overworking when there’s no benefit, which can lead to more stable and predictable gameplay — especially during extended play sessions.
Real-World Performance Comparison
After applying Razer Cortex and configuring system settings, players often see dramatic performance improvements. In test environments using a 2K resolution on DirectX 12, systems previously capped at 50–60 FPS with 15–20 ms response times jumped to 170–180 FPS with a 3–5 ms response time.
When switching to 1080p resolution:
Frame rates typically exceed 200 FPS
Reduced frame time results in smoother aiming and lower delay
Competitive advantage improves due to lower latency and higher visual consistency
These results are reproducible on most modern gaming rigs, regardless of brand, as long as the system has adequate hardware and is properly optimized.
Switch Between Performance Modes for Different Games
One of Razer Cortex’s strongest features is its flexibility. You can easily switch between optimization profiles depending on the type of game you’re playing. For Fortnite, choose high-performance settings to prioritize responsiveness and frame rate. But for visually rich, story-driven games, you might want higher quality visuals.
Using Booster Prime:
Choose your desired game from the list.
Select a profile such as Performance, Balanced, or Quality.
Apply settings instantly by clicking Optimize, then launch the game directly.
This quick toggle capability makes it easy to adapt your system to different gaming needs without having to manually change settings every time.
Final Performance Test: Fortnite in 2K with Performance Mode
To push your system to the limit, test Fortnite under 2K resolution and Performance Mode enabled. Without any optimizations, many systems may average 140–160 FPS. However, with all the Razer Cortex and system tweaks applied:
Frame rates can spike above 400 FPS
Input delay and frame time reduce significantly
Gameplay becomes smoother and more responsive, ideal for fast-paced shooters

Conclusion: Unlock Peak Fortnite Performance in 2025
Optimizing Fortnite for maximum FPS and minimal input lag doesn’t require expensive upgrades or advanced technical skills. With the help of tools like Razer Cortex and AMD Adrenalin, along with proper system tuning, you can dramatically enhance your gameplay experience.
Key takeaways:
Monitor and free system resources using Task Manager
Use Razer Cortex to automate performance boosts with one click
Apply optimized settings for Fortnite via Booster Prime
Match FPS to your monitor’s refresh rate for smoother visuals
Take advantage of GPU-specific software like AMD Adrenalin
Customize settings for performance or quality based on your gaming style
By following this fortnite optimization guide, you can achieve a consistent fortnite fps boost in 2025 while also reducing input lag and ensuring your system runs at peak performance. These steps are applicable not only to Fortnite but to nearly any competitive game you play. It’s time to make your hardware work smarter — not harder.
🎮 Level 99 Kitchen Conjurer | Crafting epic culinary quests where every dish is a legendary drop. Wielding spatulas and controllers with equal mastery, I’m here to guide you through recipes that give +10 to flavor and +5 to happiness. Join my party as we raid the kitchen and unlock achievement-worthy meals! 🍳✨ #GamingChef #CulinaryQuests
For More, Visit @https://haplogamingcook.com
#fortnite fps guide 2025#increase fortnite fps#fortnite performance optimization#fortnite fps boost settings#fortnite graphics settings#best fortnite settings for fps#fortnite lag fix#fortnite fps drops fix#fortnite competitive settings#fortnite performance mode#fortnite pc optimization#fortnite fps boost tips#fortnite low end pc settings#fortnite high fps config#fortnite graphics optimization#fortnite game optimization#fortnite fps unlock#fortnite performance guide#fortnite settings guide 2025#fortnite competitive fps#Youtube
0 notes
Text
i'm genuinely considering switching to linux
i'm still using windows 10 rn, and i don't think i can upgrade to 11 because i need to enable tpm 2.0. i don't even fucking know what that is lol
on a more serious note, i genuinely want to learn everything that i can about linux, and computers in general before i ditch windows 10 (whether it'll be for linux or windows 11, only time will tell)
I really don't want that goddamn spyware that windows 11 has, and ik you have to go thru powershell to disable it. i'm good enough with computer stuff for that yet.
my dad works in IT, and he could probably do all of the important stuff, buuuuuuuuuut i don't want him touching my pc because i've got stuff on here that would make my parents very disappointed in me (just nsfw drawings that i keep on here as a backup in case my ipad dies)
even if i somehow have to lose everything on this pc when i switch, it doesn't bother me too bad, since all that i have that's worth saving is some pictures i took with my canon, and didn't save anywhere else, and those can easily be saved to a thumb drive. I've got some shows n stuff that i need to save to an external device anyways lol
most of what i do is online, and can be accessed through various accounts. i have some indie games that i've downloaded, but those can probably be transferred to thumb drive as well, since they're not very big. as much as i love video games, i don't play very many on my pc.
anyways there's my long-ass ramble about pc stuff that i don't know jack shit about lmao
0 notes
Photo

Disable Security Questions in Windows 11/10 using a PowerShell Script
0 notes
Text
As someone who works as IT in the real world, I cannot tell you how bloated Windows 10/11 are.
My recommendation for anyone who wants to improve their system and feels comfortable about it to run Windows 10 Debloater Powershell script that cleans up, disables, simplest, and stops all the crap, trackers, and memory hogs in the OS.
It does take a few steps to get going but the tutorial is pretty straight forward. Hit me up if you got questions.
i thought my laptop was on its last leg because it was running at six billion degrees and using 100% disk space* at all times and then i turned off shadows and some other windows effects and it was immediately cured. i just did the same to my roommate's computer and its performance issues were also immediately cured. okay. i guess.
so i guess if you have creaky freezy windows 10/11 try searching "advanced system settings", go to performance settings, and uncheck "show shadows under windows" and anything else you don't want. hope that helps someone else.
*yes sorry i mean usage i posted this before bed :( i do not mean the hard drive is full aaaaghhhh
229K notes
·
View notes
Text
How to Disable Windows Powershell in Windows 10
In this video tutorial you are going to learn that how to Disable Windows Powershell in Windows 10.
Windows 10 comes with pre-installed Windows Powershell and it has replaced with Command Prompt in Power User Menu. So, if you want don;t do use Powershell then you can Disable it by following simple steps below:
1. Open Control Panel
2. Click on Programs and Features
3. Then click on Turn Windows Features On or Off (now wait for list of features to load)
4. Now find Windows Powershell and then uncheck it
5. Now click on OK Now Windows Powershell in Disabled.
youtube
#disable powershell#how to disable powershell#disable powershell in windows 10#how to disable powershell in windows 10#disable windows 10 powershell#how to hide windows 10 powershell
0 notes
Text
How to unlock bitlocker without password and recovery key
How to unlock bitlocker without password and recovery key
Are you locked out of Windows? Do you have no access to your encrypted drive? We can help you unlock and recover data from your Bitlocker encrypted drive. Here is the ultimate BitLocker encrypted drive without a password and recovery key. You will learn how to unlock BitLocker encrypted hard drive or SSD without a password and recovery key in windows 10. According to the report of Acsdata, in…

View On WordPress
#aka.ms/myrecoverykey#bitlocker download for windows 10#bitlocker download windows 10#bitlocker drive encryption#bitlocker drive encryption recovery key#bitlocker encrypted drive#bitlocker encryption#bitlocker enter the recovery key#bitlocker for windows 10#bitlocker get recovery key powershell#bitlocker recovery key#bitlocker recovery key bypass#bitlocker recovery key not working#bitlocker recovery key windows 10#bitlocker unlock without recovery key#bitlocker windows 10#bitlocker windows 10 download#bitlocker windows 10 recovery key#download bitlocker for windows 10#how to disable botlocker in windows 10#how to enable bitlocker in windows 10#how to find bitlocker recovery key#how to get bitlocker recovery key with key id#how to unlock botlocker#recovery key bitlocker#what is bitlocker#what is bitlocker windows 10#windows 10 bitlocker
0 notes
Text
I used win bloat remover to remove it from my system and it's relatively painless (takes about 5 minutes).
You can also edit registry keys manually if thats more your style
A boy can dream, can't he?
176K notes
·
View notes
Text
Watch "Install hyper v on windows 10 - Install hyper-v on windows 10" on YouTube
Watch “Install hyper v on windows 10 – Install hyper-v on windows 10” on YouTube
View On WordPress
#enable hyper v on windows 10#enable hyper v windows 10#enable hyper-v in windows 10#how to activate hyper v in windows 10#how to disable hyper v on windows#how to enable hyper v on windows#how to enable hyper v on windows 10#how to install hyper v gui tools#how to install hyper v on windows#how to install hyper-v#How to install Hyper-V on Windows 10#hyper v virtual machine#Hyper v vs vmware#Hyper-V#hyper-v install#hyper-v windows 10#install docker on a hyper-v virtual mac#install hyper v on windows 10#install hyper-v on windows 10 home#install hyper-v on windows 10 powershell#install hyper-v on windows 10 pro#virtual machine
0 notes
Text
How to Optimize Windows 10 for Gaming and Performance!!!
Windows 10 is doing exceptionally well in every area. It is magnificent while working on various applications. Windows 10 is also the notch choice of gamers as it allows them to feel the zest of the game completely. The strong OS Windows 10 provides the required configuration and speed to suppose all the popular and heavy games. Here in this article, we will share with you certain ways by which you can optimize your Windows 10 for gaming and higher performance.
Optimize Windows 10 With Gaming Mode
Windows 10 has gone through several updates, and each update brings something new. The latest release of Windows 10 was a gift for gamers as it brought gaming mode optimization. To optimize Windows 10 with gaming mode, follow the below steps:
Initially, after turning your System on, you have to press the Windows key + I
This will redirect you to the Settings panel of your System. There in the search bar type game mode
Out of two options, Click Game Mode settings or Turn on Game Mode; you have to click anyone.
A screen will appear in front of you with the name ‘game mode.’
You have to switch the button of game mode to on from off to optimize it.
And here your PC is ready to function in your gaming mode.
Disable Nagle’s Algorithm to Enhance Gaming
Nagle algorithm might be the friend of your System, but it is an enemy of gaming in PC. While Nagle’s algorithm is enabled in your PC, it is going to temper your gaming speed. So it will be better if you turn off Nagle’s algorithm settings of your PC. to disable it follow the below steps:
Press Windows key + X
Out of all the other options you have to select Windows Power Shell
After that, on the appeared screen you have to Enter ipconfig
Then search for “IPv4 address” to know your PC’s IP address
Once you know your IP address, edit the Windows Registry:
To register first Click Start
Then search by Typing Regedit
Further, Select Registry Editor
Once the registry editor is opened, you have to copy and paste the following path in the address bar:
HKEY_LOCAL_MACHINE\SYSTEM\CurrentControlSet\Services\Tcpip\Parameters\Interfaces
After this step, you will find a list of folders in the left-hand pane. Every folder will have file names mixed up of letters and numbers. You have to match your IP address with t DhcpIPAddress to locate the correct file. After that follow the below steps;
Right-click on the folder
Then Select New > DWORD (32-bit) Value
You have to Name this as TcpAckFrequency
Then click on the OK button.
After that Select New > DWORD (32-bit) Value again
Again Name this one TCPNoDelay.
Double-click on each and set their parameters to 1
Complete these steps and you are done disabling Nagle’s Algorithm.
Make Online Gaming improved With Faster DNS.
Optimizing Windows 10 online gaming with faster DNS will improve your online gaming experience. It avoids network traffic as it contains faster internet. To make your online gaming fun follow the below steps;
Once you have turned your system on, you have to press Windows + I which will redirect you to the Settings page.
On the settings page you have to look for Network and Internet > Change Adapter Settings.
Then Right-click on your wireless network
Further, you have to Select Properties
And then Highlight Internet Protocol Version 4.
Later on, you have to make a note of the two DNS entries
Then replace them with 1.1.1.1 and 1.0.0.1.
After you are done with this press OK and restart your default browser.
After you finish the last step, your online gaming is going to be super fast and fun.
Turn off automatic updates.
As mentioned above, Windows 10 keeps renewing itself with several updates. The updates are to make the functioning of your System better, but it might create a hindrance for your gaming task. To ensure fast gaming, you have to disable automatic updates for better Windows 10 gaming, and to do that follow the given steps:
First of all open Open Settings either from the start button or with the Windows key + I
Then Click Update and Security and select Windows Update
There you have to search for Advanced options and after that click Update Options
You have to disable auto-updates.
Then Enable Show notification as it will hint you about every update your System is going to get
And then you are done improving your gaming quality.
Disable Notifications in Windows 10 to avoid Gaming Hindrance
Many times you have turned on notifications so that you do not miss anything important. But these notifications popping create a hindrance for your gaming.
You have to turn off pop-ups to enjoy better gaming. Follow the below steps to disable notifications in Windows 10:
First of all open settings by searching it on the start button or hitting Windows + I
Then click System and select Focus Assist
Further, you have to Select Alarms Only as it will hide all other notifications except important alarms and reminders.
And you are done disabling notification on your System which will promote faster gaming.
Prevent Steam Auto-Updating Games
People who play games on windows generally install it from steam. many a time its auto-update feature might drink up all your internet and speed resulting in lower gaming. It is better to shut its update feature off and enjoy a high gaming experience:
Initially, you have to launch the Steam client that will boost your gaming.
Then open Steam and look for Settings. There open Downloads
Lastly uncheck Allow downloads during gameplay
Windows 10 Visual Effects Needs to be altered
Graphical User Interfaces (GUI) of your System might be creating a hindrance to your gaming speed by affecting the processing speed.
Alter the settings of visual effects for better game improvements.
First, you should open Settings with Windows key + I
Then type “performance.”
You should then select Adjust the appearance and performance of Windows.
Then in the settings box, select Adjust for best performance
Click on Apply
Then click the Advanced tab
Make sure that Adjust the best performance of his set to Programs
Then click on Apply again, then OK to confirm
Alter Your Mouse Settings for better Windows 10 Gaming
It might shock you, but a little tweak in your mouse settings can create a huge impact on the overall performance of your System. When it comes to PC gaming tweak your mouse settings to optimize your Windows 10 for gaming in a better way:
Firstly, open Settings
Then click Devices and then open Mouse
Click on view to see the Pointer Options tab
Then clear the Enhance pointer precision checkmark
Then Click Apply
Lastly, click OK to exit—you can also adjust the pointer speed to suit
Power Plan Enhances your gaming experience
Alter your power settings to find out its effect on your PC. You need to follow the following steps to maximize your power plan:
First of all, you should open Settings
Type in ‘power’.
Then click Power & sleep settings and open Additional power settings
Then select the high-performance option
If it is not available, use the Create a power plan to configure a new, custom power plan
This option allows your PC to perform better at the cost of higher energy consumption and temperature levels. For this reason, it is better to have an activated Windows 10 optimization on the desktop rather than laptop PCs.
Install DirectX 12 to Optimize for Gaming
DirectX 12, is the food for faster online gaming. It enhances the support system of gaming that is CPU and GPU.
Follow the below steps To check if you have the latest version of DirectX:
First, you should open Windows PowerShell
Then type dxdiag
After that tap Enter
Soon, you will be able to see the DirectX Diagnostic Tool.
To fix the issue of non installed DirectX follow these steps:
First, you should open Settings with Windows key + I
Then select Update and security
Open Windows Update and there you have to click on Check for updates
Wait for the updates to install
Many gaming settings will be automatically optimized by DirectX12 in Windows 10.
This is all you need to do to optimize faster gaming in your System. If we missed something, let us know in the comment box.
Thanks for reading this
To your Success,
Aman Yadav
2 notes
·
View notes
Text
SSH Shell

Price: KiTTY is free to use. KiTTY is an SSH client that is based on PuTTY’s 0.71 version.
The Secure Shell extension works with non-Google HTTP-to-SSH proxies via proxy hooks, and third-party application nassh-relay can use those hooks to enable the Secure Shell extension to establish an SSH connection over XMLHttpRequest or WebSocket transport.
Ssh Shell For Mac
Ssh Shell Mac
Ssh Shell Script Example
Ssh Shell For Windows
SSH.NET is a Secure Shell (SSH-2) library for.NET, optimized for parallelism. This project was inspired by Sharp.SSH library which was ported from java and it seems like was not supported for quite some time. This library is a complete rewrite, without any third party dependencies, using parallelism to achieve the best.
This is quite a common task for Linux system administrators, when it is needed to execute some command or a local Bash script from a one Linux workstation or a server on another remote Linux machine over SSH.

In this article you will find the examples of how to execute a remote command, multiple commands or a Bash script over SSH between remote Linux hosts and get back the output (result).
This information will be especially useful for ones, who want to create a Bash script that will be hosted locally on a one Linux machine but would be executed remotely on the other hosts over SSH.
Cool Tip: Connect to a remote SSH server without typing a password! Configure a passwordless authentication! Only 3 easy steps! Read more →
SSH: Execute Remote Command
Execute a remote command on a host over SSH:
Examples
Get the uptime of the remote server:
Reboot the remote server:
SSH: Run Multiple Remote Commands
Ssh Shell For Mac
In the most cases it is not enough to send only one remote command over SSH.
Much more often it is required to send multiple commands on a remote server, for example, to collect some data for inventory and get back the result.
There are a lot of different ways of how it can be done, but i will show the most popular of them.
Run multiple command on a remote host over SSH:
– or –
– or –
Cool Tip: SSH login is too slow? This can be fixed easily! Get rid of delay during authentication! Read more →
Examples
Get the uptime and the disk usage:
Get the memory usage and the load average:
Show the kernel version, number of CPUs and the total RAM:
SSH: Run Bash Script on Remote Server
The equally common situation, when there is some Bash script on a Linux machine and it needs to connect from it over SSH to another Linux machine and run this script there.
The idea is to connect to a remote Linux server over SSH, let the script do the required operations and return back to local, without need not to upload this script to a remote server.
Certainly this can be done and moreover quite easily.
Cool Tip: Want to ROCK? Start a GUI (graphical) application on a remote Linux workstation over SSH! Read more →
Example
Execute the local script.sh on the remote server:
-->
Secure Shell (SSH) allows you to remotely administer and configure your Windows IoT Core device
Using the Windows 10 OpenSSH client
Important
The Windows OpenSSH client requires that your SSH client host OS is Windows 10 version 1803(17134). Also, the Windows 10 IoT Core device must be running RS5 Windows Insider Preview release 17723 or greater.
The OpenSSH Client was added to Windows 10 in 1803 (build 17134) as an optional feature. To install the client, you can search for Manage Optional Features in Windows 10 settings. If the OpenSSH Client is not listed in the list of installed features, then choose Add a feature.
Next select OpenSSH Client in the list and click Install.
Ssh Shell Mac
To login with a username and password use the following command:
Where host is either the IP address of the Windows IoT Core device or the device name.
The first time you connect you see a message like the following:
Type yes and press enter.
If you need to login as DefaultAccount rather than as administrator, you will need to generate a key and use the key to login. From the desktop that you intend to connect to your IoT Device from, open a PowerShell window and change to your personal data folder (e.g cd ~)
Register the key with ssh-agent (optional, for single sign-on experience). Note that ssh-add must be performed from a folder that is ACL'd to you as the signed-in user (BuiltinAdministrators and the NT_AUTHORITYSystem user are also ok). By default cd ~ from PowerShell should be sufficient as shown below.
Tip
If you receive a message that the ssh-agent service is disabled you can enable it with sc.exe config ssh-agent start=auto
To enable single sign, append the public key to the Windows IoT Core device authorized_keys file. Or if you only have one key you copy the public key file to the remote authorized_keys file.
If the key is not registered with ssh-agent, it must be specified on the command line to login:
If the private key is registered with ssh-agent, then you only need to specify DefaultAccount@host:
The first time you connect you see a message like the following:
Type yes and press enter.
You should now be connected as DefaultAccount
To use single sign-on with the administrator account, append your public key to c:dataProgramDatasshadministrators_authorized_keys on the Windows IoT Core device.
You will also need to set the ACL for administrators_authorized_keys to match the ACL of ssh_host_dsa_key in the same directory.
To set the ACL using PowerShell
Note
If you see a REMOTE HOST IDENTIFICATION CHANGED message after making changes to the Windows 10 IoT Core device, then edit C:Users<username>.sshknown_hosts and remove the host that has changed.

See also: Win32-OpenSSH
Using PuTTY
Download an SSH client
In order to connect to your device using SSH, you'll first need to download an SSH client, such as PuTTY.
Ssh Shell Script Example
Connect to your device
In order to connect to your device, you need to first get the IP address of the device. After booting your Windows IoT Core device, an IP address will be shown on the screen attached to the device:
Now launch PuTTY and enter the IP address in the Host Name text box and make sure the SSH radio button is selected. Then click Open.
If you're connecting to your device for the first time from your computer, you may see the following security alert. Just click Yes to continue.
If the connection was successful, you should see login as: on the screen, prompting you to login. Enter Administrator and press enter. Then enter the default password p@ssw0rd as the password and press enter.
If you were able to login successfully, you should see something like this:
Update account password
It is highly recommended that you update the default password for the Administrator account.
Ssh Shell For Windows
To do this, enter the following command in the PuTTY console, replacing [new password] with a strong password:
Configure your Windows IoT Core device
To be able to deploy applications from Visual Studio 2017, you will need to make sure the Visual Studio Remote Debugger is running on your Windows IoT Core device. The remote debugger should launch automatically at machine boot time. To double check, use the tlist command to list all the running processes from PowerShell. There should be two instances of msvsmon.exe running on the device.
It is possible for the Visual Studio Remote Debugger to time out after long periods of inactivity. If Visual Studio cannot connect to your Windows IoT Core device, try rebooting the device.
If you want, you can also rename your device. To change the 'computer name', use the setcomputername utility:
You will need to reboot the device for the change to take effect. You can use the shutdown command as follows:
Commonly used utilities
See the Command Line Utils page for a list of commands and utilities you can use with SSH.
1 note
·
View note
Text
You can also disable CoPilot through GPO (if you don’t have Windows Home) or the Registry (for any edition of Windows 10/11).
Group Policy
In gpedit.msc, find the following path:
User Configuration > Administrative Templates > Windows Components > Windows Copilot
Then set the following:
Turn off Windows Copilot = Enabled
Registry
In Windows Terminal / PowerShell, copy/paste the below command:
reg add HKCU\Software\Policies\Microsoft\Windows\WindowsCopilot /v TurnOffWindowsCopilot /t REG_DWORD /d 1 /f
Both methods may require a reboot/logout & login before they take effect.
So I open my laptop for class and i think it's all business as usual. But I look at the taskbar and see something odd.

I see this. I do not recognize this symbol. I right-click to see what it is. It's fucking CO-PILOT!! I still have windows 10. It's been yelling at me to update for a year now. And they just. Fucking downloaded Co-Pilot onto my laptop with no notice, warning, or consent. I literally looked at my laptop last night and it wasn't there. Now! It is! And I didn't turn it off I just put my laptop into sleep mode. So heads up everyone I guess because what the fuck!!!
316 notes
·
View notes
Text
Sqlite For Mac Os X

Sqlite For Mac Os X El Capitan
Sqlite Viewer Mac
Sqlite Mac Os X Install
If you are looking for an SQLite Editor in the public domain under Creative Commons license or GPL (General Public License) i.e. for free commercial or non-commercial use. Then here is a shortlist of the SQLite Editor that is available on the web for free download.
SQLite is famous for its great feature zero-configuration, which means no complex setup or administration is needed. This chapter will take you through the process of setting up SQLite on Windows, Linux and Mac OS X. Install SQLite on Windows. Step 1 − Go to SQLite download page, and download precompiled binaries from Windows section. Core Data is an object graph and persistence framework provided by Apple in the macOS and iOS operating systems.It was introduced in Mac OS X 10.4 Tiger and iOS with iPhone SDK 3.0. It allows data organized by the relational entity–attribute model to be serialized into XML, binary, or SQLite stores. The data can be manipulated using higher level objects representing entities. Requirements: Free, ideally open source Browse schema, data. Run queries Bonus if updated in near real time when the file is. SQLite viewer for Mac OS X. Ask Question Asked 5 years, 10 months ago. Active 4 years, 3 months ago. Viewed 504 times 3. I need to inspect an SQLite file on Mac. Since I develop on Windows, Linux and OS X, it helps to have the same tools available on each. I also tried SQLite Admin (Windows, so irrelevant to the question anyway) for a while, but it seems unmaintained these days, and has the most annoying hotkeys of any application I've ever used - Ctrl-S clears the current query, with no hope of undo.
These software work on macOS, Windows, Linux and most of the Unix Operating systems.
SQLite is the server. The SQLite library reads and writes directly to and from the database files on disk. SQLite is used by Mac OS X software such as NetNewsWire and SpamSieve. When you download SQLite and build it on a stock Mac OS X system, the sqlite tool has a.
1. SQLiteStudio
Link : http://sqlitestudio.pl/
SQLiteStudio Database manager has the following features :
A small single executable Binary file, so there is need to install or uninstall.
Open source and free - Released under GPLv2 licence.
Good UI with SQLite3 and SQLite2 features.
Supports Windows 9x/2k/XP/2003/Vista/7, Linux, MacOS X, Solaris, FreeBSD and other Unix Systems.
Language support : English, Polish, Spanish, German, Russian, Japanese, Italian, Dutch, Chinese,
Exporting Options : SQL statements, CSV, HTML, XML, PDF, JSON, dBase
Importing Options : CSV, dBase, custom text files, regular expressions
UTF-8 support

2. Sqlite Expert
Link : http://www.sqliteexpert.com/download.html


SQLite Expert though not under public domain, but its free for commercial use and is available in two flavours.
a. Personal Edition
Sqlite For Mac Os X El Capitan
It is free for personal and commercial use but, covers only basic SQLite features.
But its a freeware and does not have an expiration date.

b. Professional Edition
It is for $59 (onetime fee, with free lifetime updates )
It covers In-depth SQLite features.
But its a freeware and does not have an expiration date.
Features :
Visual SQL Query Builder : with auto formatting, sql parsing, analysis and syntax highlighting features.
Powerful restructure capabilities : Restructure any complex table without losing data.
Import and Export data : CSV files, SQL script or SQLite. Export data to Excel via clipboard.
Data editing : using powerful in-place editors
Image editor : JPEG, PNG, BMP, GIF and ICO image formats.
Full Unicode Support.
Support for encrypted databases.
Lua and Pascal scripting support.
3. Database Browser for SQLite
Link : http://sqlitebrowser.org/
Database Browser for SQLite is a high quality, visual, open source tool to create, design, and edit database files compatible with SQLite.
Database Browser for SQLite is bi-licensed under the Mozilla Public License Version 2, as well as the GNU General Public License Version 3 or later.
You can modify or redistribute it under the conditions of these licenses.
Features :
You can Create, define, modify and delete tables
You can Create, define and delete indexes
You can Browse, edit, add and delete records
You can Search records
You can Import and export records as
You can Import and export tables from/to text, CSV, SQL dump files
You can Issue SQL queries and inspect the results
You can See Log of all SQL commands issued by the application
4. SQLite Manager for Firefox Browser
Link : https://addons.mozilla.org/en-US/firefox/addon/sqlite-manager/
This is an addon plugin for Firefox Browser,
Features :
Manage any SQLite database on your computer.
An intuitive hierarchical tree showing database objects.
Helpful dialogs to manage tables, indexes, views and triggers.
You can browse and search the tables, as well as add, edit, delete and duplicate the records.
Facility to execute any sql query.
The views can be searched too.
A dropdown menu helps with the SQL syntax thus making writing SQL easier.
Easy access to common operations through menu, toolbars, buttons and context-menu.
Export tables/views/database in csv/xml/sql format. Import from csv/xml/sql (both UTF-8 and UTF-16).
Possible to execute multiple sql statements in Execute tab.
You can save the queries.
Support for ADS on Windows
Sqlite Viewer Mac
More Posts related to Mac-OS-X,
More Posts:
Sqlite Mac Os X Install
Facebook Thanks for stopping by! We hope to see you again soon. - Facebook
Android EditText Cursor Colour appears to be white - Android
Disable EditText Cursor Android - Android
Connection Failed: 1130 PHP MySQL Error - MySQL
SharePoint Managed Metadata Hidden Taxonomy List - TaxonomyHiddenList - SharePoint
Execute .bin and .run file Ubuntu Linux - Linux
Possible outages message Google Webmaster tool - Google
Android : Remove ListView Separator/divider programmatically or using xml property - Android
Unable to edit file in Notepad++ - NotepadPlusPlus
SharePoint PowerShell Merge-SPLogFile filter by time using StartTime EndTime - SharePoint
SQLite Error: unknown command or invalid arguments: open. Enter .help for help - Android
JBoss stuck loading JBAS015899: AS 7.1.1.Final Brontes starting - Java
Android Wifi WPA2/WPA Connects and Disconnects issue - Android
Android Toolbar example with appcompat_v7 21 - Android
ERROR x86 emulation currently requires hardware acceleration. Intel HAXM is not installed on this machine - Android
1 note
·
View note
Text
yourphone.exe download
Remove YourPhone.Exe the use of PowerShell Do you need to put off YourPhone.Exe completely from Windows 10 PC? I actually have double-checked our approach to take away the function from my Windows 10 machine. Yes, it labored flawlessly, and it'll work on your device, so observe my lead.
Step 1: Press Windows Key + X together after which click on on “PowerShell (Admin)” to start the process.
Now, you eventually discovered to take away YourPhone.Exe from Windows 10. Do now not neglect that it's far a Microsoft shop app that you may download once more, and it'll work usually. Let us know which solution worked for you in the remark phase underneath.
The yourphone.Exe is part of your Phone app that preinstalled in windows 10. You can also observe the YourPhone.Exe is constantly going for walks within the historical past and surprise forestall or disable yourphone.Exe process in home windows 10. Here the distinct data What is YourPhone.Exe technique in Windows 10? It’s safe to take away YourPhone.Exe or no longer.

Your Phone is a authentic App built into Windows 10 that lets in you to connect your Android or iOS mobile telephones to Windows 10 computer systems to Sync Photos and Messages. Means using YourPhone app home windows 10 users can see their android or ios cellphone snap shots and even ship textual content messages at once from their laptop. It calls for a regular internet connection for both the laptop and the cellphone on the way to operate.
No, the YourPhone.Exe Process isn't always a plague, it’s a valid app from Microsoft that enables you to sync your Windows 10 system together with your Android or iOS telephone. Can see extra information approximately this software at the Microsoft internet site here. In this article, I will be explaining all there's to recognize about yourphone.Exe Windows 10 tactics. Questions like “Is it a plague?” “Should I uninstall it?” will be responded and a guide on a way to use the yourphone.Exe Windows 10 method may also be furnished beneath inside the article. Let’s begin with the obvious.
Android connections allow extra functions than iOS, capabilities like allowing your device access to sending messages, viewing pics stored on your Android device, answering telephone calls (iOS also stocks this selection), get right of entry to for your Android tool music library, or even a display screen mirroring feature.
Your Phone app simply offers customers a stable go-tool revel in, albeit greater for Android devices than it’s iOS opposite numbers.
The cause is that Your Phone app is most effective restricted to the Windows 10 running gadget. Windows operating structures like 7 or 8 aren’t capable of use the app. This is why it's also referred to as a Windows 10 procedure/app.
Yourphone.Exe is a regular windows platform app technique, it is essentially the get right of entry to point for going for walks the manner on Windows 10.
The yourphone.Exe technique isn't always stressed to begin mechanically till you manually start it. That is why it doesn’t generally display up at the assignment manager menu.
The app is a background system so it will continue to work at the historical past once you begin it, even if you close the app. The report size for yourphone.Exe is inconsequential, best approximately 20kb. If you’re looking for its default vicinity, this is the route to follow
The direct answer to this question is that the app and method are safe. They are legitimate Windows 10 documents that help users hyperlink Android and iOS devices with their Windows 10 system.
The system is a surprisingly secure process that typically just runs within the history without the use of an excessive amount of area or CPU. Whenever the procedure is commenced, you could see it inside the mission supervisor.
The app would possibly from time to time have issues but the problems will now not definitely have an effect on your whole system, just the relationship between your system and your Android or iOS tool. Below are some pointers to restore the app if it malfunctions.
1 note
·
View note
Text
Recall is only on specific PCs. When you purchase a PC with Recall it should specify on the box that it's a PC with Copilot+ and Recall, I believe it uses snapdragon.
Normal users with their six+ year old PCs that have regular and cheap processors with windows 11 or 10 will have Copilot which is the AI thing that can be disabled via powershell or just turned removed from the taskbar in settings.
Even users who buy new PCs now are not going to get the ones with Copilot+ and Recall because they are not typically being marketed to normal users who don't use Windows features, but are being marketed to business users instead.
I understand that this is a horrible thing and I do not agree with it, but your normal core i5 PC with an Intel card that you play steam games on and watch youtube videos on is not the target of this.
Literal definition of spyware:

Also From Microsoft’s own FAQ: "Note that Recall does not perform content moderation. It will not hide information such as passwords or financial account numbers. 🤡

#sorry i dont mean to add onto this#but even at my job we have yet to come across any of these PCs at any of our clients
248K notes
·
View notes