#elements liquify tool
Explore tagged Tumblr posts
Visit Tumblr Blog
Explore Tumblr blogs with no restrictions, modern design and the best experience.
Last Seen Tumblr Blogs


Fun Fact
The “We are the 99%” Tumblr blog became the slogan for the Occupy Wall Street movement.
Text
Comcast Business Symmetrical and Neck Joint Service by Path Edit Provider
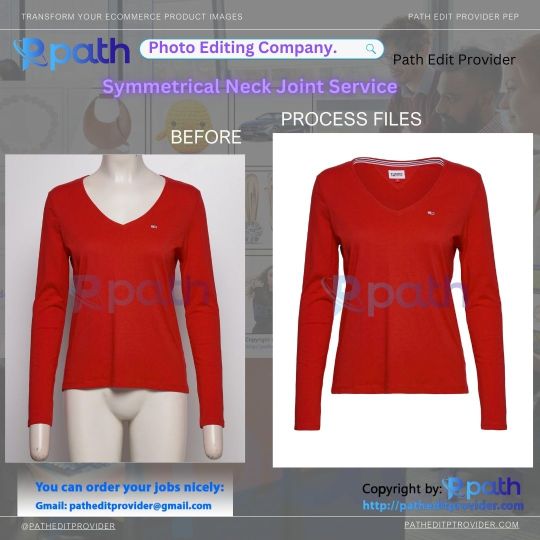
Comcast Business Symmetrical and Neck Joint Service by Path Edit ProviderAre you in need of professional symmetrical and neck joint services for your business? Path Edit Provider is here to offer top-notch photo editing solutions tailored for commercial needs. Here's a detailed look at our services:
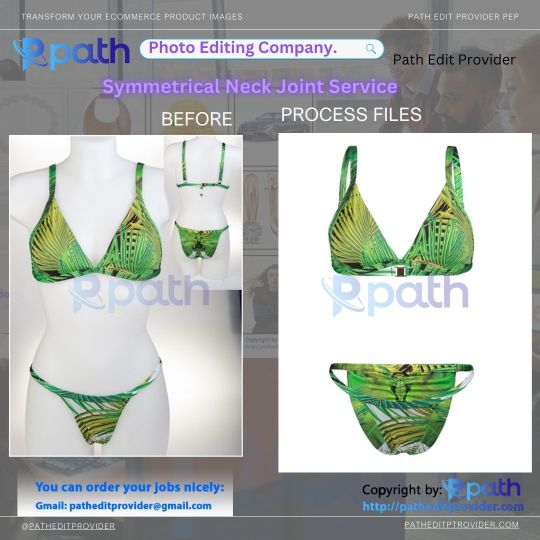
What is Symmetrical Neck Joint Service?
A symmetrical neck joint service, also known as ghost mannequin editing, is essential for creating clean and professional images of apparel. This technique helps in:
Displaying Garments Flawlessly: Show the inside labels and the full structure of the clothing without distractions.
Maintaining Uniformity: Ensure all product images have a consistent and polished appearance.
Enhancing Visual Appeal: Make your product images look more attractive and professional to potential customers.
Comcast Business Symmetrical Service
In addition to neck joint services, Path Edit Provider offers comprehensive symmetrical editing solutions for businesses, including:
Perfect Symmetry: Adjust and align images to create balanced and harmonious visuals.
Background Removal: Remove distracting backgrounds to focus on the main subject.
Color Correction: Achieve accurate and vibrant colors for a more appealing presentation.
Detail Enhancement: Enhance specific details to highlight the best features of your products.
Why Choose Path Edit Provider?
Expertise and Experience: Our team of skilled editors has extensive experience in delivering high-quality results for commercial clients.
Affordable Pricing: Get professional editing services at competitive prices.
Quick Turnaround: Receive your edited images quickly without compromising on quality.
Customer Satisfaction: We prioritize your needs and work closely with you to ensure complete satisfaction with the final product.
How to Get Started?
Contact Us: Reach out to Path Edit Provider to discuss your specific photo editing needs.
Upload Your Photos: Send your images through our secure platform.
Review and Approve: We’ll provide edited photos for your review and approval.
Receive Final Edits: Once approved, you’ll receive the final high-quality images.
Conclusion
Path Edit Provider offers top-tier symmetrical and neck joint services tailored for Comcast business needs. Enhance your product images with our professional photo editing solutions and ensure they stand out with a clean, polished, and consistent look.
#Image manipulation#Image liquefy services#liquify filter photoshop#Liquefy tool photoshop#elements liquify tool#liquify images in Photoshop#Photoshop#Graphic design#Digital art#Photo editing Visual effects#Creative editing#Image retouching
0 notes
Note
Ik vind het geweldig hoe levendig en karaktervol je gezichten zijn! – en de manier waarop je je haar tekent is ook prachtig! Zou je, indien mogelijk, wat tips kunnen delen over je proces?
Dank u!
Process:

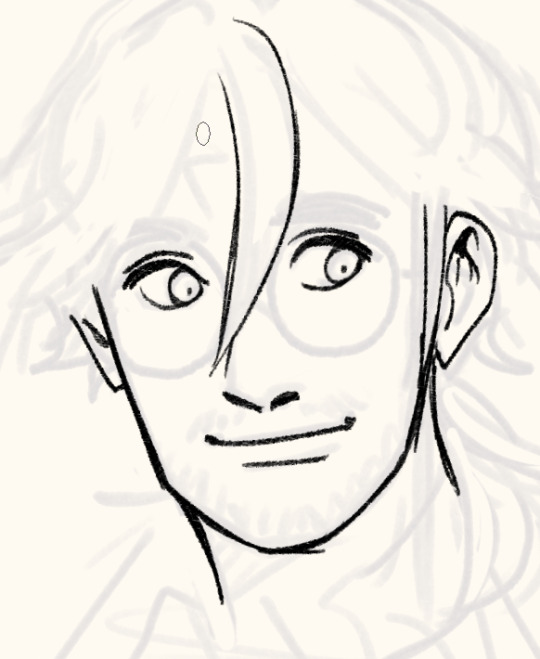
I sketch very loosely, usually using a pencil brush. Drawing quickly and lively is the priority here, but sometimes it means the drawing quality is really awful lol. I try to flip the image a few times to make sure it's not like, Wrong. Which it will be, to be clear. I hold my pen at a dramatic slant, so my faces are always distorted.
Here's a corrected face next to how I instinctively sketch it out (after flipping the image):

Bad
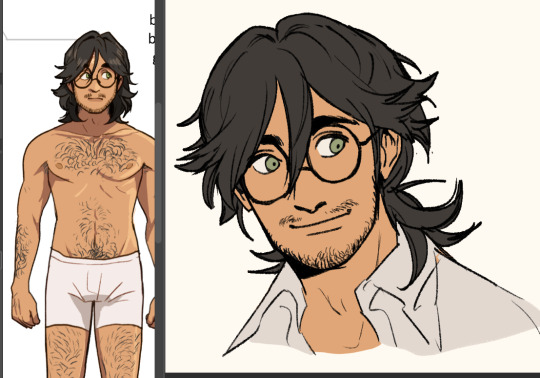
I wanted to say you can tell when I use 3D models to expedite this but actually they look identical because I not only correct my natural distortion but I also correct the 3D jank. Is correction my art style...?

Anyway, the rest of the piece.
I find it easier to use a thinner brush and go over the lines a few times to make it thicker than use a brush with thick line weight. This gives me more control and looks more natural.

I build up thickness on the beard with condensed hairs curling one direction and then in the other. Layering them makes it look thick and natural. (Mustache is more sparse, so it's just single curves.)
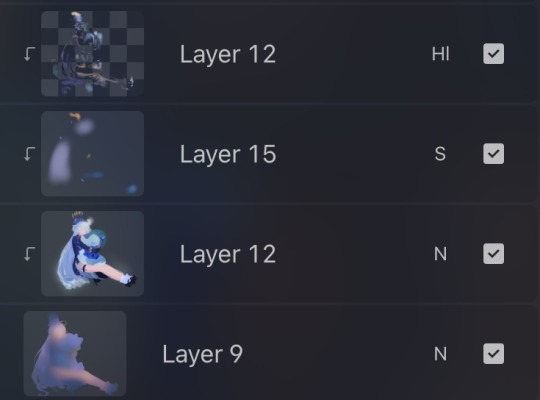
Then I pull up old colours to flat it. I usually work in only 2-3 layers, one for darks and one for lights - dark and light colours will fill differently, and splitting them like this means I can use a lasso fill faster. If there's a really detailed element, I give it its own layer for ease of lasso.

When colouring, big gloopy pen pressure is actually useful to livening up the piece. Make sure theres a light source. I always pick the one that makes the nose easier to draw. Add a second, deeper shadow in corners (like just under the chin) for some depth.

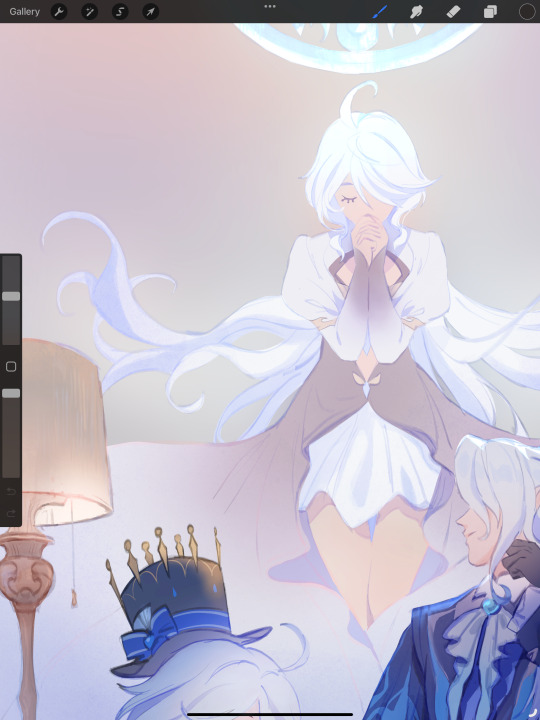
Now that he has more dimension, I can actually see there's a wee bit more to correct. What am I correcting? I don't know. It just looks wrong. I use mesh transform and the liquify tool until my brain stops hurting.

Good enough! Now for the mandatory filters.
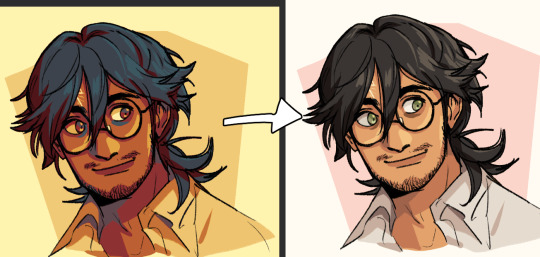
I use mzxmmz's iikanji gradient sets (all 3), because they're very drastic and make interesting colour splits. I set them to 20%~30% opacity on a soft light correction layer.

And there he is. Crazy stalker handsome rogue Harry
As for the way I draw my hair, there's actually a quick cheat:

Draw the curls like ribbons (orange). Note how the thickness varies, like the angles of a ribbon. Add texture with little accent lines (green). Fill it out by following along the edge of the curl (purple). Repeat this with a bunch of different strands. It will end up looking very full and with a strong sense of shape.
You can establish this shape by just drawing single lines of the curl pattern/shape you want and then filling out the rest with the ribbon form, detail, and following-line.
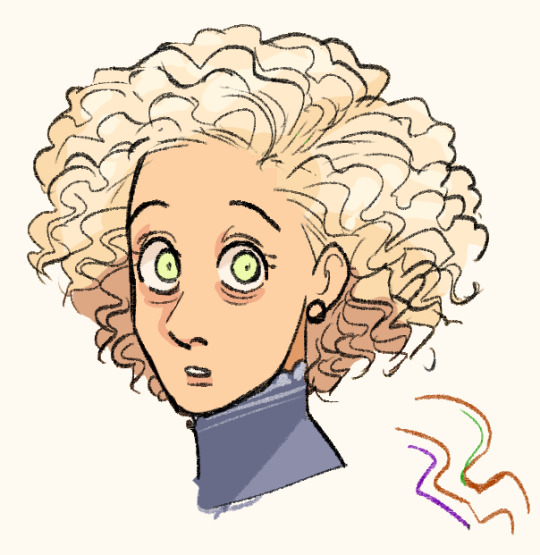
Beautiful complex-looking organic curl pattern in minutes!
60 notes
·
View notes
Text
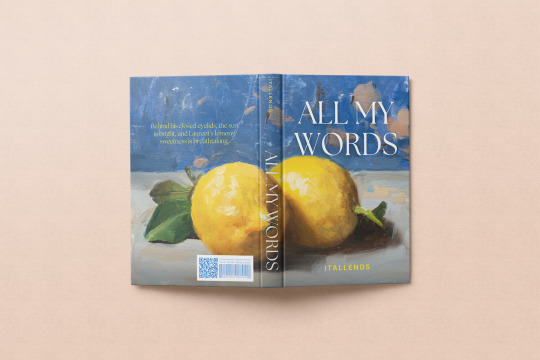
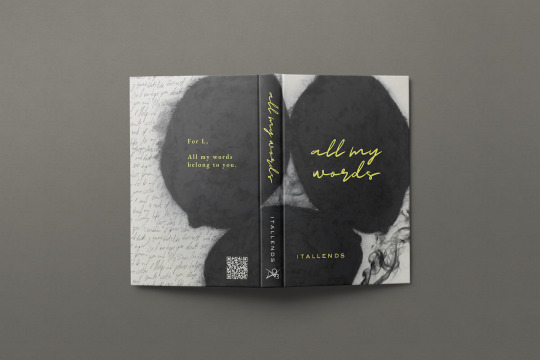
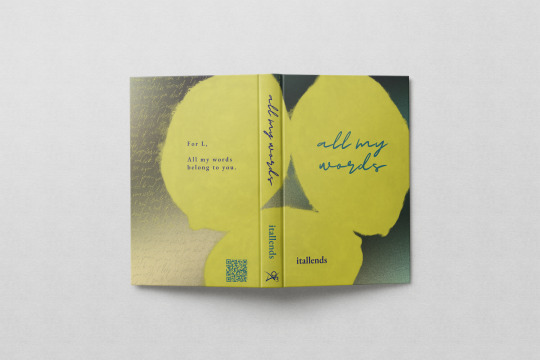
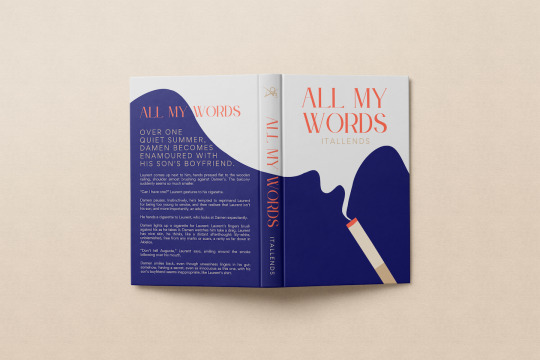
Book Design: All My Words by Itallends

I haven't been able to stop thinking about @goldencuffs's works, and while I try to cope with waiting for yngt's next chapter, I finally finished my mock-ups for All My Words (which I'm still very much not over).
I struggled a lot with this one, but I thought I'd share all my options and maybe get some feedback?
Concept 1: Paintings & Lemons
Art is very present in this fic; Damen's a writer, Laurent an aspiring one, one of their first dates it's at a museum. Art is also messy, full of emotion, often something that consumes artists – similarly to how their love consumes them.
Damen is pretty obsessed with Laurent's lemony scent, so that's a theme I kept coming back to. Beyond lemons (both the fruit and the colours), amw also makes me think of tones of blue – the sea, the depression, depth of feelings.


Concept 2: Lemons & Words
Now, this concept technically also uses a painting (Donald Sultan, Black Lemons), but it has a more gritty feeling to me and combined with other graphic elements like the handwriting or textured background it feels very different from the previous concept.
On the first version of this concept, I also used smoke on the front cover as a nod to Damen's weekly cigarettes.


Concept 3: Flat Design
A more modern take on book design, this breaks away from the lemon imagery and instead focuses in Damen's vice and guilty pleasure – which could very well be also used to describe Laurent for him.
This is the only version in which I added a long excerpt, as well as the original fic's description. I ended up liking it a lot more than I thought I would...
Concept 4: Liquified Lemons
There's no much thought behind this one other than I really wanted to try the liquifying tool and the lemon obsession served me well for this one. It looked a bit empty so I also added some of the handwriting to the background. Not my fave, but it was fun to work on it.

Also, if anyone wants to see these in higher quality or get one of the designs for your own use, let me know and I can share :)
#these aren't even all#I have 7 more but for digital so front cover only#is this overkill?#i have no chill#it's 3:40 am#I really should be sleeping#or working#but the brainrot is real#Ruby why is your writing so good#I'm simply obsessed#I'm normally much better at deciding#please tell me which one's your favourite#all my words#itallends#capri fanfic#fanfiction bookbinding#captive prince#capri bookbinding#my design#mine
50 notes
·
View notes
Text
Playing whiteboard with Oomfs is rather fun. Only issue is the proportions are kinda off cuz there isn't a liquify tool 🥀🥀🥀
(+Fire spirit Circassian Headcanon, tried incorporating his fire elements into the outfit but I got lazy and only did it to the hat 🥀)


#drawing#sketch#artists on tumblr#artwork#my art#art#character art#digital art#digital drawing#oc#fire spirit cookie#whiteboard#digital artist#digital illustration#original character#oc art#circassian#cookie run kingdom#cookie run fanart
20 notes
·
View notes
Note
Hi, I'm sure you get this often but I really love your recent genshin artwork, do you think you could explain your painting process? I love the colouring effect in that piece especially. Thank you.
Thank you so much! I got a few messages like this from my previous piece (thank you guys for the staff pick & blaze btw, I really didn't expect all the support😭) so I thought I'd share a bit of my process below as thanks.
I always do my lineart first because it feels less daunting to me when applying colours. I will do some rough colours first so I can easily adjust it to my liking.

Next, I make sure to separate each character into different layers when I clean it up. I like to work one character or object at a time, it's less overwhelming for me that way, and I can use clipping masks for ease of rendering.

I'll usually apply some adjustment layers on top of the base layer for shadows and highlights. When I say base layer, I just mean a layer of the colour without any effects.
I like using 'hard light' for shadows, and 'screen' for highlights, but you can really use whatever clicks with you.
Rinse & repeat this process for every character in the illustration. Note that I make Furina the focus so everything behind her will be less rendered than the elements in front of them (Neuvillette is a lot less rendered compared to Furina, and the painting in the back barely has much shading).
Once I render out each asset in the illustration and add shadows & highlights to my liking, I then to merge foreground/ midground/ background elements so I can make the overall illustration clearer to read. I don't want it to feel messy or overcrowded, and I think it's easy to get tunnel-visioned in small details and lose the clarity of the entire illustration.
Make sure to zoom out constantly and make your illustration B&W to check the values to see if the drawing is clear.

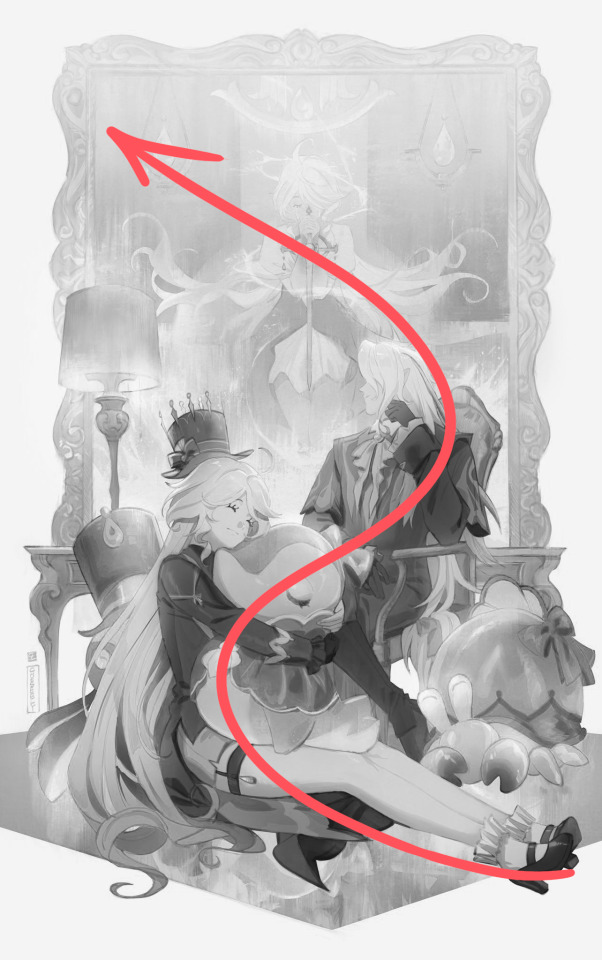
I created a simple S curve with the values for readability, and have the foreground elements have darker values & contrasts.
As for the BG, I wanted to add more textures into the drawing, particularly the painting in the back. Here's an image of it when I only added in the base colours.
I use the smudge tool to create more texture once I fill in the base colours. Since I don't really 'paint' anything with the textures in, I just put in the base colours and take a textured brush to smudge it. However, over-smudging can lose the painterly texture I want, so I usually smudge vertically or horizontally in a single stroke to create a sense of movement.
Another thing to note is that I only textured the BG, I thought it would help it blend into the background a bit better. I usually wouldn't do this for the foreground because I want those elements to be clearer.
At the very end, I tend to spend a fair bit of time just fiddling with more adjustment layers, various filters (such as blur, or noise), or liquify small details to really finalize the piece. Just vibes...basically this is me

Anyway, I hope that was helpful & it made sense!! Feel free to message me if you have any other questions & I'll try my best to answer! I might've glazed over a lot since I didn't wanna make this too long.
239 notes
·
View notes
Text
i mean the salad fingers section opened up with mandela catalogue and i am notoriously sensitive to anything mandela catalogue so you cant blame me you cant blame me
anyways the last two were fuckin. salad fingers n dhmis. i refuse to do those rn so im learning about the downfall of neopet nfts instead
#its a miracle the characters in twf are this good and that it has arg elements because i wouldnt be able to watch it if they werent#liquify tooled faces always haunt me whenever im trying to fall asleep their faces show up in my mind's eye and i cant drive them out kms#uh. thats an ocd thing. but thats the only symptom i have so idk#v#ig?
1 note
·
View note
Text
Grimiore Gemstonia: entry II: Bismuth 🌈⚒️
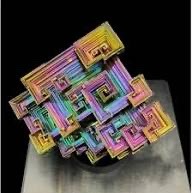
A rainbow stone that many may know from the modern tv show Steven universe, a show which I myself am a fan of, the lore and history of bismuth actually isn’t that unlike the character in the show: archeological digs in Egypt dating to the 4th dynasty suggest that they had known about bismuth, and used it as an alloy in smithing, which they used to construct tools and weapons. Natural bismuth is typically dull and silver in color, but due to its very low melting point, many modern artists and crystal collectors and witches have found ways to liquify and recrystalize the mineral, which causes it to take an incredible shape of a rainbow hopper like pattern! An innie, if you will! Bismuth is a great mineral for promoting unity, creativity, and transformation, both physical and spiritual, and is often associated with deities of smithing, such as Hephaestus, or queer gods, such as Dionysus! Its transformative nature has also made it a stone that is often seen as allegorical for the medical transitioning of trans people!
<><><><><><><><><><><><><><><><><><><>
- MOHs scale: 2-2.5
- Chemistry: Bi
- Occurrence: worldwide
- Discovery: possibly as early as 4th dynasty Egypt (3rd millennium BCE)
- Species: native elements
- Rarity: common
- Etymology: from modern Latin “Bissmutum” meaning “bismuth”
~~~~~~~~~~~~~~~~~~~~~~~~~~~~~~~~~~~~~~~~~~~
- Elements: all
- Zodiacs: ♒️
- Chakra: all
- Deities: Hephaestus 🇬🇷, Iris 🇬🇷, Dionysus 🇬🇷,
- Correspondences: unity, focus, transformation, faith, creativity.
- Birthstone: none
<><><><><><><><><><><><><><><><><><><>
#gems#gemstones#gemology#gemstone#crystals#geology#crystaloftheday#crystal collection#geologist#anthropology#archaeology#bismuth#male witch#green witch#paganism#hellenism#witchcraft#druidism#hellenic worship#baby witch#pagan witch#hellenic deities#crystal magic#crystal witch#pagan magic#mineralogy#natural history
9 notes
·
View notes
Text
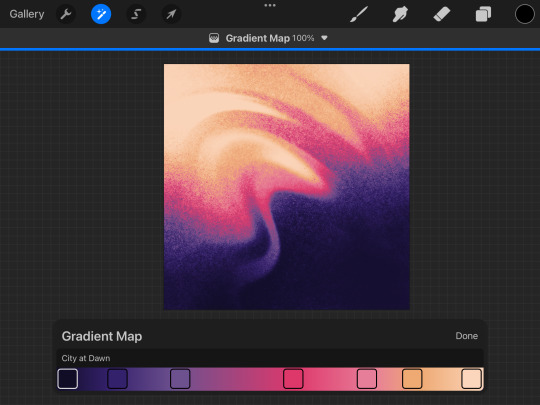
Abstract Grainy Background Tutorial for Procreate

Requirements:
★ Procreate app (version 5.3 or newer)
★ Soft brush (default; found in "Airbrushing" set)
★ Custom grain brush
Step 1:
Start with a blank canvas of your preferred size. Fill a layer with white.
Step 2:
Select a medium shade of gray. With the Soft Brush, lay down random scribbles;⁽¹⁾ then, repeat this step with black.
⁽¹⁾ Different marking styles can produce unique results. If making multiple backgrounds, try experimenting with the scribble shape and placement on each piece.

Step 3:
Apply a Gaussian Blur. Anywhere between 5-10% works— go high for a softer look, or low for a more solid look.

Step 4:
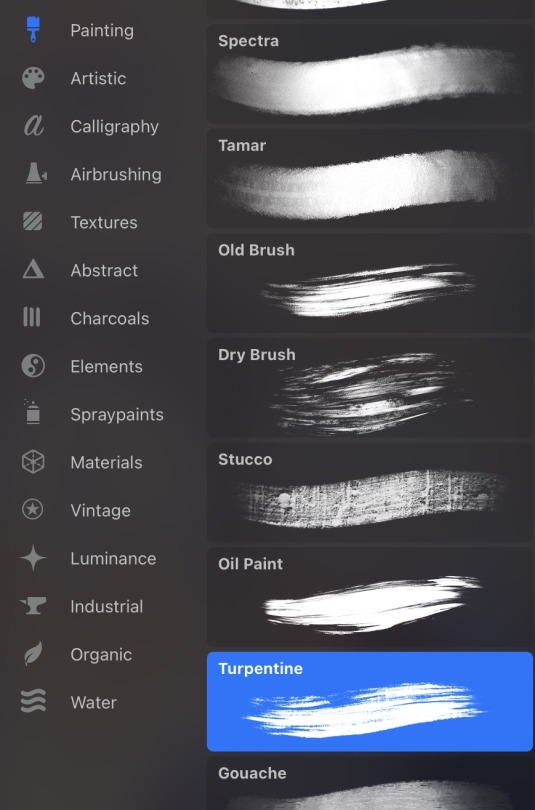
Open the Liquify menu. Select the Push tool, and copy the following settings:
★ Size: 70-85%
★ Pressure: 90-100%
★ Distortion: 0%
★ Momentum: 0%
Step 5:
Use the Push tool to swirl the scribbles around the canvas. Start at a larger size as you block out general shapes, and shrink the tool down for refinements and detail work. Once satistfied, finalize your changes and exit the Liquify menu.
Expect a lot of trial and error on this stage— you'll probably go through a few renditions before you settle on a final design. If you're not happy with how a Liquify attempt is turning out, hit the Reset button and give it another go.
Step 6:
Create a second layer. Set your brush color to white, and use the grain brush to lighten a portion of the design.⁽²⁾
Next, create a third layer. Change your brush color to black, and use the grain brush to darken a different portion of the design.
(Your goal in this process is twofold— adding texture and creating a broad, gradiated spectrum of grayscale values.)
⁽²⁾ Try to place grain strategically. Use it to obscure flaws and accentuate the strongest elements of your design.

Step 7:
Merge all layers together. Create a duplicate of the design layer for safekeeping.
Step 8:
Open the Gradient Maps menu. Apply a pre-existing color map, or design your own.
17 notes
·
View notes
Note
🥦 & 🧠 ? 👀
Hey quaksi, thank you for asking!
-
🥦 Can you share an old piece of work next to a newer piece and say what you've learned?
I did this first picture in 2019 when I was still pretty experimental with the mediums I was using. The background was made in MagicaVoxel and then I painted some extra bits in there with the free drawing programme I was using at the time.
The second picture is from 2023, when I had settled into an illustration workflow.

One of the things I learned is how to lead the eye around the image more effectively using lighting. In the 2023 picture, I believe the viewer will naturally perceive all the important elements in about the right order (e.g. reporter's face, hand+notebook, interviewer's face, background character's face). In the 2019 picture, there's actually a second figure close to the centre of the image, but I think it's too easy to miss. These days, I would consider adding some extra elements to the climber so they stand out more from the background, and probably use some more wires to draw the eye to the character!
-
🧠 What is a drawing tool you can't live without?
I really, really like the liquify tool to correct anatomy (particularly facial anatomy) - to the extent that I only started using Rebelle as my main programme when they added a proper liquify function!
-
Take good care of yourself! ^_^
5 notes
·
View notes
Text
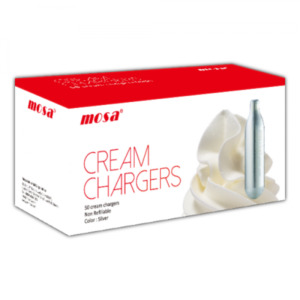
Comparing CO2 vs N2O: Picking the Right Charger for Your Needs
Introduction
In the world of cooking arts, specifically when it pertains to producing wonderful whipped creams, the choice in between utilizing CO2 and N2O can feel frustrating. Both gases serve particular purposes in the cooking area, especially Visit this page in the realms of dessert creation and drink enhancement. In this extensive guide, we will delve deep into Comparing CO2 vs N2O: Picking the Right Charger for Your Needs, breaking down every element of these two gases to help you make a notified decision.
youtube
youtube
youtube
Understanding Cream Chargers What Are Cream Chargers?
Cream battery chargers are small canisters filled with gas that are used in conjunction with a whipped cream dispenser. They are important tools for anyone seeking to create light and fluffy whipped cream rapidly and effectively.
Types of Cream Chargers N2O Cream Chargers: These consist of nitrous oxide, which is mainly used for whipping cream. CO2 Cream Chargers: These consist of carbon dioxide, which is more suited for carbonating beverages. Comparing CO2 vs N2O: The Basics What Is Laughing gas (N ₂ O)?
Nitrous oxide, commonly referred to as N ₂ O, is a colorless gas known for its ability to produce a velvety texture when used in whipped cream dispensers. This substance likewise has applications beyond just cooking uses; it's often utilized in medical settings as an anesthetic.
What Is Carbon Dioxide (CO ₂)?
Carbon dioxide is another colorless gas but serves different purposes. Primarily known for its role in carbonation, CO ₂ creates bubbles in beverages like soda or shimmering water.
The Main Differences Between CO2 and N2O Functionality in Cooking Applications N ₂ O is ideal for producing whipped cream because it liquifies quickly into fat particles, producing a steady foam. CO ₂ , on the other hand, works best for carbonating liquids but does not whip cream effectively. Flavor Impact Using N ₂ O doesn't alter the taste profile of your whipped cream-- it's neutral. Conversely, CO ₂ can impart a slightly tangy taste due to its acidic nature when liquified in liquid. Choosing Between Whipped Cream Chargers: N2O vs CO2 What's Your Goal?
Before deciding in between N ₂ O and CO ₂ cream chargers, you should clarify your culinary objectives. Are you aiming to produce delectable desserts or carbonated beverages? Comprehending your end goal can streamline your choice considerably.
Applications of Laughing gas Cream Chargers Whipping Up Delightful Desserts with N ₂ O
Nitrous oxide cream chargers are essential if you're wanting to work up airy desserts or garnishes rapidly.
Example Utilizes: Whipped cream Mousses Foams Using Laughing gas in Beverages
You can also utilize nitrous oxide chargers to instill cocktails with frothy textures or perhaps develop whipped garnishes for coffee-based drinks.
1 note
·
View note
Text
YUP

This outfit imagines Critter as a treasure hunter and traveling artist. Its primary target is stolen loot - amulets, jewelry, and money - buried on remote shores, sequestered to the depths of the ocean, hidden by thieves to collect dust. It returns these treasured items to their original hands, and only accepts a return of favor in the form of room and board, and a token of good luck to bring with. Its personal motivation is to voyage afar to learn from artists across the seas!
The star ✦ marks design elements intended for customization, if you're so inclined!
- - Gear, Textiles & Paint - -
Sail Cloak - A weighty and sturdy cloak repurposed from a small sailcloth, waves sprawling across its weave. It can still be used as a raft sail in a pinch. (Drawing it in this pose was ill-considered so apologies for the liquify-tooling. enjoy this nice reference of it instead:
Wavetree Shawl - A soft, thick shawl. It depicts the beautiful Pohutukawa tree of Aotearoa, rooted in the earth and reaching out to the sea. Clouds roll over the water, and a sandy shore incubates the eggs of a sea turtle. It can unfold to become longer.
Greenbone Cuffs - A pair of tail cuffs, carved of bone scavenged from the whalefall of a Great Monster. Its symbol is etched into the cuffs with both respect to the origin of the flesh and as appeal to its spirit for protection and guidance at sea. "Protruded from the vertebral column of the Great Monster was a vast mantle of bone. From the oceans abundance of magnesium, the bone has a high presence of chlorophyll. This allowed it to photosynthesize to supplement filter feeding, and is responsible for the green hue, faded on artifacts by the weathering of sun and time. Preserved chunks of bone still maintain a vivid green color. The fat content is high, and when used for broth it has a rich, nutty flavor. It has been occasionally observed to shift in shape when subject to pressure, much in the way live bone would. Perhaps it's still… no… it couldn't be…"
Tail Paint - Mother-of-pearl is ground and mixed into black ink to give it a pearlescent glint. The blue and green are the bleed of the ink into the fur, and are meant to look like the tide of the beach, critters fur color being the sand. The sparkles are the the stars, used as directional guides, reflected off the dark ocean of the night.
Bamboo Paper Holder - A container made of a sturdy shoot of bamboo, lid fastened tight with rope and a natural rubber gasket to seal the contents from water. It's stuffed with many maps, notes, and pieces of artwork.
Kelp Stipe Wrappings - Patterned fabric strips to affix the Bamboo Holder to the body. The pattern is of the kelp's stipe, and the gas bladders that give it buoyancy.
Pickle Jar - A mix of vegetables, fruits, roots and spices - convenient nutrients on-the-go! In the jar is:
cucumber, okra, carrot, bell pepper, watermelon rind,
onion, garlic, pepper corns, mustard seed
ginger, turmeric, and galangal
✦ Customize the ingredients to your tastes!
- - Tail Charms - -
✦ The good luck charms that hang on the links can be any, such as personal charms you own in real life, ones made by friends, or community submitted designs.
Daruma Hanging Charm - My take on the striking visage of the Daruma, maintaining the key features but with a more gentle, curious expression. While commonly paper mache, this one is made of wood to resist water. Only one eye is painted in, meaning the goal it watches over is still being worked towards. To paraphrase from the illustrious scholars of gogonihon.com, a blue Daruma represents wishes made for an ambition in skill and knowledge, which I chose for critters artistic pursuits. The kanji adorned is 叶 ('kanau' meaning "a wish coming true/being realised"), one of the more common kanji on daruma. ✦ The color and kanji can be personalized to relate to the wish you impart on it. The Daruma on the model can be swapped out for a new one when you've achieved your wish and have a new one.
Ladybug Charm - Considered a sign of good things when one lands on you, ladybugs are seen as lucky in many places. This charm is made of metal, the elytra an inlay of red stone, and the wings are a mosaic of bone shards, scraps leftover from the carving of the tail cuffs.
Jade Jin Chan Charm - Carved jade of the Chinese three-legged Money Frog. Though not the more common gold, jade also has auspicious connotations.
Cowrie Charms - Cowrie shells were historically used as currency in Africa and other countries, and that legacy persists as a symbol of fortune, still commonly used in clothing and jewelry. The cowries in this charm are a money cowrie, a purple-back cowrie, and a deer cowrie. ✦ You can change it to any number of cowries, in any size and any species
- - Nautical and Decorative Knots - -
Carrick Bend Links - The bracelets on the tails and wrists are comprised of a sailors knot called the carrick bend, linked together to create a chain of triple helixes. I designed it this way as a symbol of community - separate loops intertwined with each other. :] The design also harkens to the auspicious connotations of symbols like Solomon's Knot and the Endless Knot.
Monkey's Fist - Another sailors knot, this is the ball shaped knot on the front of the bamboo holder. One strand of the rope goes into this knot, and the other hangs as a tassle.
Lucky Knot - Hanging from the bamboo holder is a variation on the Good Luck Knot, or Chrysanthemum Knot. ✦ Can be retied to any decorative knot
Mathew Walker - Tied just above the Good Luck Knot is a simple Mathew Walker knot, and on the back of the bamboo holder a triple-tied version holds the lid shut. It unties from this end to open the container.
sorry it's rough aroun the edges. can clarify on any design details if anything's unclear. hope u enjoy 👍
0 notes
Text
How to Use Photoshop in Fashion Designing: A Beginner’s Guide to Creative Editing

Introduction
Fashion designing has evolved significantly with the rise of digital tools, and Adobe Photoshop has become an essential software for designers. Whether you are a student enrolling in a fashion designing course in Yamuna Vihar or someone exploring digital fashion, Photoshop can help you bring your creative ideas to life. From sketching designs to fabric visualization, Photoshop allows designers to experiment with colors, textures, and patterns before producing final garments.
If you are studying at a Fashion Designing Training Institute in Yamuna Vihar or taking fashion designing classes in Yamuna Vihar, mastering Photoshop can enhance your design skills. Let’s explore the key ways Photoshop can be used in fashion designing and how it benefits students and professionals alike.
1. Digital Sketching and Illustration
Gone are the days when designers relied solely on paper sketches. With Photoshop, fashion students and professionals can create digital sketches with precision. The use of tools like the Brush Tool, Pen Tool, and Layers allows designers to create seamless designs.
If you are part of a Fashion Designing Coaching Centre in Yamuna Vihar, you will learn how to refine your illustrations and add intricate details like shadows, highlights, and textures. This helps in presenting fashion concepts in a more professional and appealing way.
2. Pattern and Fabric Designing
One of the most exciting features of Photoshop in fashion designing is the ability to create patterns and textures. Using the Clone Stamp Tool, Pattern Fill, and Layer Styles, students can design unique prints and experiment with different fabric textures.
If you are enrolled in a Dress Designing Training Institute in Yamuna Vihar, you will learn how to apply these tools to create customized fabric patterns. This skill is valuable for textile designers and those interested in the technical side of fashion.
3. Fashion Mood Boards and Portfolio Creation
A well-designed fashion mood board is essential for presenting design concepts. Photoshop helps students at fashion designing institutes in Yamuna Vihar to create visually appealing mood boards that include color palettes, textures, inspirations, and clothing elements.
For those taking a Dress Designing Course in Yamuna Vihar, Photoshop provides an efficient way to compile and edit portfolio images. A strong portfolio helps fashion students showcase their best work when applying for jobs or internships.
4. Editing and Enhancing Fashion Photos
High-quality fashion photography is crucial for designers, and Photoshop plays a significant role in retouching and enhancing images. Features like Dodge and Burn, Liquify, and Layer Masks help in refining garment images and improving their presentation.
If you are attending a Dress Designing Coaching Centre in Yamuna Vihar, you will learn how to edit raw images and enhance colors to make designs stand out. Whether it’s removing wrinkles from fabrics or adjusting lighting, Photoshop makes every detail perfect.
5. Fashion Mockups and Draping Visualization
Photoshop allows designers to visualize how fabrics will drape over the body. By using smart objects and displacement maps, students in Fashion Designing Coaching Institutes in Yamuna Vihar can see how different materials will look on models before physically creating garments.
This technique is particularly useful for those studying at a Dress Designing Coaching Institute in Yamuna Vihar, as it helps in saving time and reducing fabric waste while ensuring a perfect fit for designs.
6. Color Manipulation and Swatch Creation
One of the most valuable skills for a fashion designer is color theory. Photoshop enables students in Fashion Designing Training Institutes in Yamuna Vihar to create custom color palettes and swatches. The Hue/Saturation Tool allows for experimenting with different color variations on a single design.
If you are part of a Dress Designing Centre in Yamuna Vihar, you will find this tool useful for testing multiple color combinations and selecting the best hues for your collection.
Conclusion
Mastering Photoshop is a must for fashion students, whether they are enrolled in a Fashion Designing Course in Yamuna Vihar or a Dress Designing Training in Yamuna Vihar. The software provides an excellent platform for illustration, pattern-making, retouching, and visualization, making the design process more efficient and creative.
With the right training from a Fashion Designing Coaching Centre in Uttam Nagar or Dress Designing Classes in Uttam Nagar, students can develop the technical skills required to excel in the industry. By learning Photoshop, future designers can turn their ideas into reality, enhance their portfolios, and prepare for a successful career in the fashion world. For that Visit Us
Suggested Link
Learn Fashion Styling
Dress Design Expert
Learn the art of Hand Embroidery
#fashion designer#fashion design#fashion designing#adobe photoshop#photoshop tricks and tips#education#skills development
1 note
·
View note
Text
Blog Prompt 5 - GLITCH in Photography


Image 01: Architectural Wave
For my first glitched image, I decided to choose a photo I took of the Santa Maria delle Grazie in Milan, Italy, as it showcases both exterior and interior views. I wanted to keep it simple and not overcrowd the original composition with "glitching", so I mainly focused on the top half of the architecture. I first duplicated the image's layer and locked the base so that I could begin selecting the portion I wanted to distort with the magnetic lasso tool. Then, I applied -180 hue, 67 saturation, and kept the lightness the same with a hue/saturation adjustment layer. With the same layer, I did a distort>wave filter. I slightly adjusted the curves, brightness/contrast, and hue/saturation of the overall image.
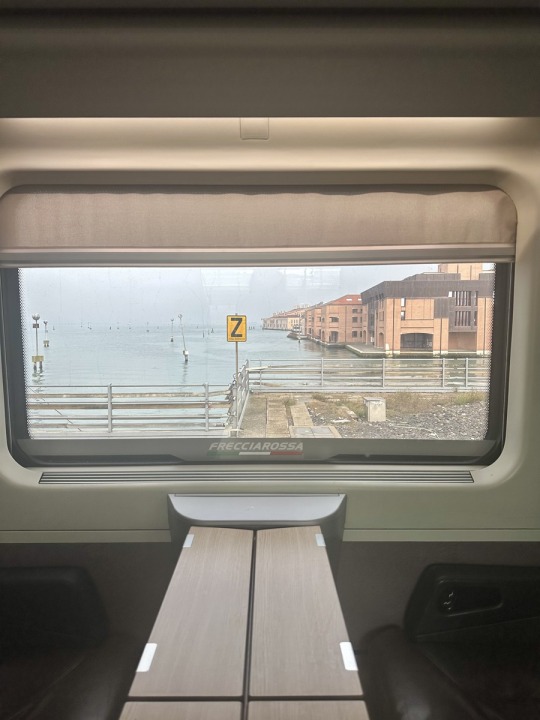

Image 02: Digital Melt
For my second glitched image, I chose a picture I took on a Frecciarossa train entering Venice, Italy. I wanted to create a subtle melting effect at the bottom of the train's window, and I did this by duplicating the image layer and adding a liquify filter that I manually stretched/dragged around the edges and from the bottom. I then added a 3D filter with Normal Mapping, manipulating the color with selective color manipulation focusing on blue/purple tones. This created an embossed/digital corrupting effect. I would've liked to reduce the noise on this particular image, but for now, I brought the brightness of the overall image down a bit.
Changed Meaning or Content?
The almost psychedelic or modern distortion I created, especially with the turquoise, pink, and purple tones, challenges the original peacefulness of historical Italian architecture. The untouched elements serve as a contrast or balance to this, like the original ground-level trees in the first edit and the train's interior in the second edit. This anchors to reality as central components of each photograph are heavily distorted: the architecture appearing to be living and breathing, and the train's view appearing flattened and melting. It adds a bit of surrealism to traditional Renaissance/Gothic/Byzantine architecture blending in the Santa Maria delle Grazie and the general architectural style in Venice.
0 notes
Text
Personal Contribution Update
-Yu Jie, Huang
After being assigned different tasks, Yash and I discussed the script for 2D Paper cutout universe. As we all want the theme to be delightful, the elements of memes are also in this universe. Then, I started to draw what is needed for the visuals.
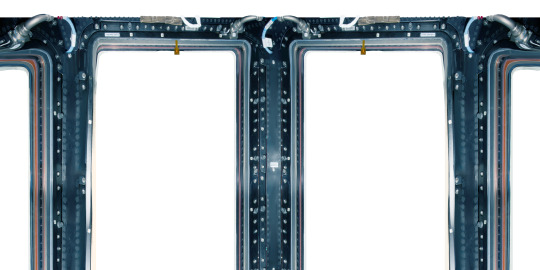
I am responsible for 2D artwork and the photobash for the spaceship in the early stages of production.
Since the spaceship is viewed from the inside looking out, it needs to have a realistic, 3D-like texture. To find suitable references, I searched NASA’s image library, as their official photos are usually free to use. I used the keyword “window”and successfully found images that could be used for photobashing. I imported the images into my drawing software, removed the unnecessary background, and used the liquify tool to adjust and straighten the frame. I also painted missing parts, such as pipes and structural details.
During testing, my teammates noticed that the handles on the window frame looked too large when projected into the dome, which broke the sense of immersion. To fix this, I removed the handles and focused on keeping the metallic texture of the main frame.
I also created two paper cutout universe planets/stars:
Hourglass Planet – I found the idea of time flowing like sand interesting and thought it would look great as an animation. The design has two layers: the front layer is an hourglass (with different shapes of falling sand to show movement), and the background layer is a soft, flowing planet to represent the passage of time.

Punk Planet – This was inspired by Spider-Punk from Spider-Man: Across the Spider-Verse. His bold, sharp lines and cutout animation style were key influences. To match this style, I used textured brushes with sharp edges and highly saturated colors to create a punk-like energy. The outer ring of the planet has a radio wave effect, adding a dynamic visual element. Another group member later animated these planets, and the final effect looks great!
Stars: Similar to the art styles of two planets, I created two kinds of stars to use in the background of the universe.

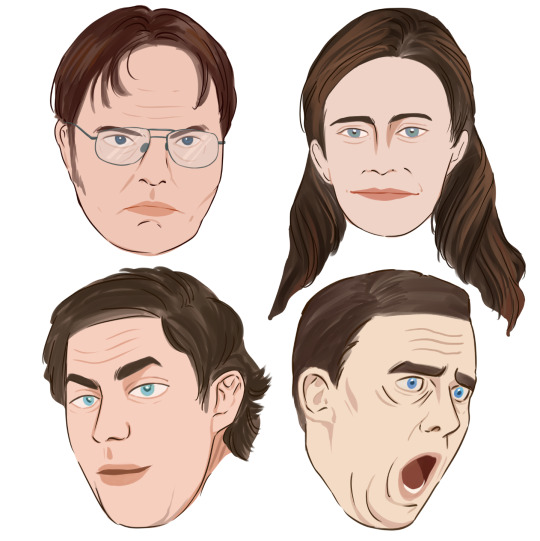
I also worked on character heads for a meme sequence based on The Office. We chose four main characters (Michael, Jim, Pam, Dwight) and designed their faces using simple colors and lines to highlight their most recognizable features.
Finally, I created the text effects that appear as speech from the character heads. My computer and Photoshop unexpectedly crashed during the process, but I was able to recreate the effect using Clip Studio Paint’s blur tools to add a glowing outline. We decided to keep the text black and white for clarity, since it will flash quickly across the screen and should remain easy to read.
Overall, I am happy with my contributions so far, and I look forward to seeing everything come together in the final animation!
Reference:
Nasa.gov. (2020). {{ngMeta.title}}. [online] Available at: https://images.nasa.gov.
0 notes
Text
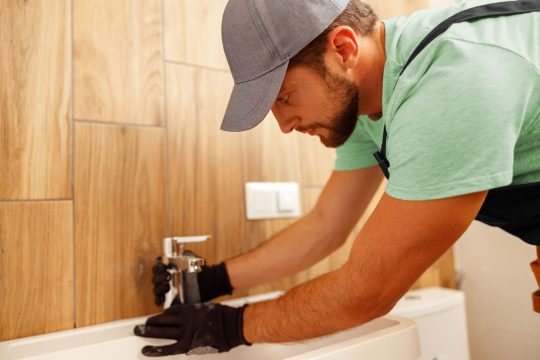
The Benefits of Routine Drain Cleansing in Denver Pipes
Introduction
In the dynamic city of Denver, where the majestic Rocky Mountains offer https://emiliouomj.bloggersdelight.dk/2024/11/06/preventative-maintenance-tips-from-top-denver-plumbers/ a spectacular backdrop, keeping your plumbing system is not almost visual appeals; it's about functionality and comfort. Property owners often neglect one important element of plumbing maintenance: routine drain cleaning. This short article explores The Advantages of Routine Drain Cleansing in Denver Plumbing, clarifying why it's necessary for every household. Whether you are looking for a "plumbing technician near me" or require an "emergency situation plumbing technician in Denver," comprehending the significance of drain cleansing can save you time, money, and a great deal of hassle.
What is Drain Cleaning? Understanding the Process
Drain cleaning describes the approaches and methods utilized to remove blockages and accumulation within plumbing systems. This procedure can include various techniques, consisting of:
Mechanical Techniques: Using tools like snakes or augers to physically get rid of blockages. Hydro Jetting: A high-pressure water jet approach that clears pipes by blasting away debris. Chemical Solutions: Applying specialized chemicals to liquify grease and clogs. Why Regularity Matters
Regular drain cleansing guarantees that your plumbing system runs efficiently and efficiently. Scheduling routine upkeep with local plumbing services in Denver can avoid minor problems from intensifying into major problems.
The Value of Routine Drain Cleaning Preventing Obstructions Before They Start
Preventative upkeep is key when it concerns pipes systems. By engaging in regular drain cleansing, homeowners can significantly reduce the danger of unforeseen blockages. This proactive method can conserve you from frenzied searches for an "emergency plumbing in Denver."
Enhancing Your Home's Plumbing Efficiency
Over time, particles such as hair, soap residue, food particles, and grease collect in pipelines, leading to decreased flow rates. Regularly arranged cleanings boost your home's general pipes performance, which implies much better performance from all your fixtures.
Cost Savings Associated with Routine Drain Cleaning Avoiding Major Repairs
Ignoring drain upkeep can cause extreme blockages that need expensive repairs or replacements. By buying routine cleansings, you're likely to save significant amounts on emergency repairs.
Lowering Water Bills
When drains pipes run effectively, they help keep optimum water pressure throughout your home. This performance translates into lower water costs since your pipes won't have to work as hard.
Health Benefits of Clean Drains Reducing Undesirable Odors
Clogged drains pipes frequently produce nasty smells due to stagnant water and decomposing raw material. Routine cleaning removes these unpleasant odors from your home.
Preventing Mold Growth
Moist environments are breeding grounds for mold and mildew. By guaranteeing your drains are tidy, you considerably lower moisture levels
0 notes
Note
how much more does csp slap than procreate? wanna know if i should buy it
hmmm i haven't used csp pro as much recently cause of how busy i am, only for achelous's banner and the new references for my ocs, but if you're currently using procreate or any other drawing app that doesn't have a complicated-looking interface, the interface and controls for csp can be difficult to understand. there's kind of a learning curve to get over, i had to look up a youtube tutorial on how to edit the interface to my liking when i first bought it lmfao but the brushes are SUPER nice with all the different textures, and the blending is so interesting to learn how to use since i rarely use the blending/smearing tool in procreate cause i have a difficult time understanding how to use it. the pieces i made so far come out crispy clear on my phone when i send it, which is personally amazing cause i always zoom in and inspect each little detail to see if i missed anything. AND YK HOW IN PROCREATE WHEN YOU BARELY ADJUST THE LINE DURING TRANSFORMING, IT BLURS TO SHIT???? IT DOESN'T REALLY DO THAT AT ALL FOR CSP, THAT SHITS GENUINELY A BLESSING. also i found out how to kinda use the 3d models, so i can do more dynamic poses AND practice my anatomy. genuinely, i really find csp quite an upgrade from procreate due to how many features it contains, BUT i still enjoy using procreate.
i don't have csp on my ipad and as much as i want to for accessibility purposes (i don't have the ability to bring my drawing tablet on me all the time + the wires are a hassle to set up, just imagine setting up in public when you already don't like being in public spaces for a long time, esp with what you draw 😭), you got me immensely fucked up if you think i'm doing a subscription instead of a one and done payment like procreate and csp on my laptop. procreate is mad convenient, i can doodle whatever i want with it, even while taking notes at the same time if i am using it for notes. i use gumroad to find most, if not all my brushes and it's so fun shopping for them like the csp brushes. i'm also super used to how each brush i use works cause i've been using it for nearly 4 years now, and ik how to work around certain elements to my liking, esp the liquify tool cause the liquify tool on csp lags and sometimes does not "listen" to what i'm trying to do with the drawing. i feel like procreate is sorta beginner friendly for digital art, ik other people say otherwise cause it is pretty lackluster compared to other professional digital art programs, but that's just what i think. also i like speedpainting process videos, i just watch them whenever i want to and remember what i was thinking or feeling during a particular moment in it.
all in all, i heavily believe that it's just personal preference on what feels the best and works right for you, because i went through many different drawing apps/prgrams before i finally settled on csp, procreate, and sai (on occasion lol). you also gotta make a heavy financial decision on csp if you're choosing to do either the pro or the ex version, but i'd wait until the discounts come out again if you choose to purchase csp. i think there's the free trial for csp to see if you rock with the interfaces/controls as well before settling on one or the other ‼️‼️
i ain't a big professional or particularly nit-picky on what i think is overall the best, i simply love making art with whatever media i'm using 🙇♂️
0 notes