#enable wifi on windows
Explore tagged Tumblr posts
Visit Tumblr Blog
Explore Tumblr blogs with no restrictions, modern design and the best experience.
Last Seen Tumblr Blogs


Fun Fact
1,644 Tumblr posts in 1 second.
Text
#wifi adaptor is not working#can't enable wifi adapter windows 10#how to fix wifi adapter not found in windows 10#cannot find wifi adapter windows 10#error code 10 wifi adapter#how to fix missing wifi adapter in windows 10#pc wifi adapter problem#pc not recognizing wifi adapter
0 notes
Text
Guys, my workplace gifted me a macbook pro (the one I formerly forced @ubuntu-official on) and now that she's really mine forever and I don't mind any data loss, please give me some ideas on what I can do to her :3
Stats down below:
Stats: Macbook Pro 13,3 | A1707 | 2016 info_dump.txt (Pastebin) - contains all hardware info 12.7.6 Monterey. No app store, no xcode, no support from Apple.
Ubuntu barely boots, Kubuntu even less, and even then most of the time the display blacks out right away after boot or after just ONE ACTION. The system "techinically works" as there are things on the screen, but THERE IS NO SCREEN for me to see. Display dies.
I kinda wanna do things to work. Play some games with someone and have a little tinker station when I'm on the go
Poor thing is beaten and hurt, her battery is moody and her touch bar numb. One port is broken and Linux kills her wifi and ability to speak. (There is a patch to enable sound but it either that or the broken network driver made the display issue worse somehow??? Windows works up to Windows 10(needs boot camp drivers and at that point I could just use Boot Camp and debloat afterwards))
Oh yeah, and liquid damage :/
14 notes
·
View notes
Text
I DID end up getting an old-ish but still newer than my current phone phone specifically for big storage and micro SD slot for even bigger storage and going to not get a sim card for it and use it solely as an MP3 player with wifi specifically for lastfm scrobbling and not as an upgrade from my phone since that's using degoogled android out of a deep burning personal loathing for google as a company, because I am possibly the only organism with that specific use requirements lol
And I gotta admit it is kind of satisfying, too, going in and enabling developer options and then plugging my phone into my computer and typing in ADB commands to uninstall bloatware and bullshit and literally anything I want, I could make the phone unusable without a factory reset if I wanted to, reminds me of when I was a kid messing around changing all of the settings and exploring system files in fuckin' windows 98 hand-me-down family computer turned my first very own computer goddamn sudden swell of nostalgia sidetracked oops
What's not satisfying is the reminder of how fucking bad things have gotten when, before doing this whole "gutting android like a fish and ripping out its unnecessary internals" process, I was getting fucking ads in the notification space? Preinstalled unremovable apps for facebook shit and google shit? The fact that after a system update, suddenly the USB cable connected to my computer that had been working perfectly fine five seconds ago suddenly stopped being in file transfer mode, instead showing a "check your charger cable! you're on slow charge mode!" notification and nothing else, and upon looking this shit up found threads of people saying the same shit happened to them, sudden slow charging and not transferring files after an update, with replies ranging from "same thing happened to me! any updates? no!" to "buy specifically a samsung cable! :)"
only to finally find an article saying that a "security update" blocked USB connections except for charging, like holy fuck removing the headphone jack wasn't obnoxious enough, no longer including disc drives in desktop computers wasn't obnoxious enough, are they seriously trying to turn USB into phone charging only and not data transfer, like there's not already an option that popped up when you plugged a phone into a computer confirming that you wanted to be able to transfer data between the computer and the phone, because tech companies are for SOME FUCKING REASON... AAAALLLL about taking all autonomy and ability to customize and FUCK AROUND with our OWN TECHNOLOGY, away from individual users, and...
...people just live like this? The majority of people who didn't happen to gain the technological know-how to be aware that they might be able to disable or remove or mitigate this bullshit, and be comfortable actually attempting it... just fucking. Live with it?
Hooooly fuck
3 notes
·
View notes
Text
How to ensure your kitchen remodel adds value to your home
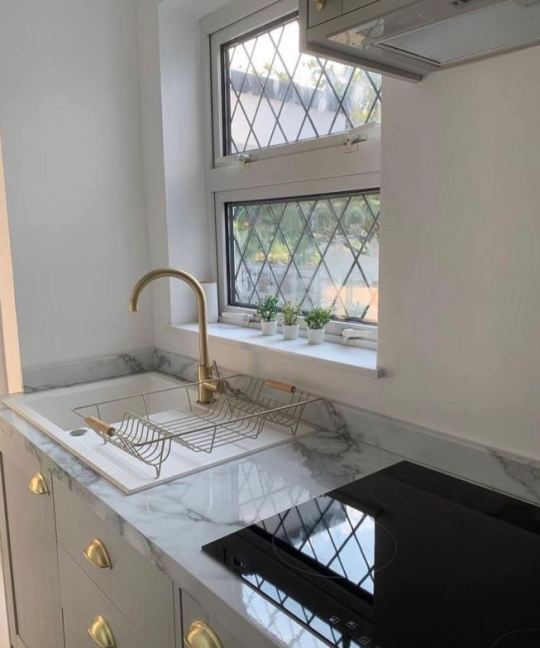

A well-planned kitchen remodel can significantly boost your home’s value, making it one of the best investments for homeowners. However, achieving a return on this investment requires thoughtful planning and smart choices. Here are some expert tips to ensure your kitchen remodel adds value to your home.
1. Layout and flow
Efficient flow ensures your kitchen is easy to navigate and enjoyable to use, which buyers find appealing. Aim for the "work triangle" rule, where the fridge, stove, and sink are easily accessible to one another. A functional layout also makes cooking and cleaning easier, adding practical value to the space.
2. Invest in quality materials
Quality materials not only look better but also last longer. Focus on durable countertops, solid cabinetry, and high-grade flooring. Engineered quartz countertops, for example, are both resilient and stylish, while soft-close cabinets bring that premium touch that buyers appreciate.
3. Focus on energy efficiency
Energy-efficient appliances and lighting appeal to environmentally-conscious buyers and help lower utility bills. Choose appliances with ENERGY STAR ratings, and consider installing LED lighting throughout the space.
4. Choose neutral, timeless design elements
Trendy designs date quickly. Choose neutral colours - whites, greys, or beiges - which have broad appeal and allow future homeowners to envision the space as their own. Timeless materials like subway tiles or classic shaker cabinets can ensure the kitchen feels stylish for years to come.
5. Add ample storage
Buyers love storage, especially in the kitchen. Consider pull-out shelves, deep drawers for pots and pans, and built-in solutions for maximum efficiency. Kitchen islands with built-in storage are a great way to add space without compromising on style.
6. Improve lighting
Lighting can dramatically change the feel of a kitchen. Ensure there’s a combination of task lighting, ambient lighting, and accent lighting to create a welcoming, functional space. Under-cabinet lighting can make food prep easier, while pendant lights over an island add a designer touch.
7. Smart kitchens
Modern buyers appreciate technology. Consider adding a few smart kitchen features. Touchless faucets, smart lighting and WiFi-enabled appliances make the kitchen feel more contemporary. These additions are relatively low-cost and enhance the appeal.
Are you considering a refurb? Chat to General Refurbs, London’s trusted refurbishment company. General Refurbs is a specialist, multi trade team with over 15 years’ experience covering a range of renovation and contracting services, including plumbing and electrical, windows and door installations, bathroom and kitchen design and installation, roofing, flooring and decorating.
With a focus on quality materials and craftsmanship, and ensuring a seamless customer journey, we bring years of expertise to each project, offering tailored solutions that combine functionality with style. We don’t just do one job, we build lasting relationships and our customers return time and again. Work with us and you will see why!
For a free quote, or to discuss your ideas, please contact us—we’d love to help make your dream space a reality. [email protected]
#kitchen#home improvement#property refurbishment#handyman#bathroom#generalrefurbs#decorating#kitchendesign#refit#refurbslondon#londonrefit#diy#multitrade
2 notes
·
View notes
Text
ok for those of you who are in school but wanna access blocked websites, this is for you! i've tried all of these methods, they work pretty well
for microsoft/windows/edge/teams users
method 1: highlight something. anything. (this means hold down your mouse and drag it over words to make them highlighted in blue.) a little menu should pop up once you do so and let go. press the magnifying glass or the "search with bing" option. this should create a little sidebar for you. you can access anything on here, and i mean ANYTHING once you're off school wifi. certain things may be blocked by the wifi but most will be accessible.
method 2: (this method only works for a few things! i have only ever used it to get minecraft education edition and netflix on here!) go to the microsoft store. search for what you want. if your school didn't cover their bases, whatever you searched for should be unblocked. install it, pin it to start, and you're all set.
for google/chrome/classroom users
method 1: go to google.com. right click anywhere just on this page, the main google page. there should be an option to open in sidebar. click it. boom. it's essentially the same as the bing sidebar i mentioned above with the added ability of being extendable to almost cover the whole screen. (this also works on microsoft computers! i am using it to make this post right now!)
method 2: search up what you want to access, for example just search netflix. see that first result that shows you the "netflix.com" url in tiny print above the page title? highlight that as best you can and copy it. now go to google translate. paste this into the "detect language" slot. copy it from the output section to the right. paste this new, google-translated url into your search bar in a new tab. it should work. (note: when i went to a school that used google, they used software called aristotle to block things. i am not sure how this would play out with goguardian. the others work with goguardian enabled.)
those are my tips and tricks! please reblog or reply with more and specify if it works for windows or chrome. thanks for reading y'all!!
#em rambles#school#school tips#school tricks#school hacks#life hack#by the time y'all see this i will be in double period english but that's ok
9 notes
·
View notes
Text
Multiple days later, I've actually managed to get Debian 12 running on my old MacBook. I'm going to throw my troubleshooting into the world, just in case. Not like anybody comes to Tumblr for tech support, but I'd be remiss if I didn't at least present this information in a public way.
Solved
GPU Drivers
Apparently this whole time, the thing causing the black screen on boot was the AMD dGPU. These things are known for failing in this generation of MacBook. Mine, however, has not failed, so I didn't even think to suspect it. I know it's okay because OCLP macOS, Zorin OS, and Pop!_OS were all capable of booting with it still enabled.
For some reason, though, Debian absolutely shits its pants when presented with the AMD Radeon 6490M. I followed this guide for Ubuntu 20.04 LTS and disabled the AMD dGPU, forcing Debian to only see the Intel HD 3000 iGPU, and everything booted–no problem.
Wi-Fi Drivers
Debian won't install the necessary Wi-Fi drivers for this machine during install, but I got the Wi-Fi working, regardless. However, apparently the "b43" open-source driver really hates the Broadcom BCM4331 chip that 2011 MacBook Pros have (despite claiming to support it). Not only did it not detect 5 GHz networks, but it also would just randomly stop working. The network would stay connected, but stuff would just get super slow and eventually start timing out. The fix was to purge "firmware-b43-installer" and install the "wl" (broadcom-sta-dkms) drivers instead (I did this in reverse order because I didn't want to lose connection and have to get up and plug the thing into Ethernet. Nothing bad happened as far as I can tell). Now the WiFi works perfectly.
Custom Cursors
The cursor I use (A Linux Conversion of the Posy Cursor for Windows) did not like being placed in [ ~/.local/share/icons ]. That wasn't enough for it. The arrow and pointer would work, but only in some apps. The loading hourglass was nowhere to be seen. Apparently, you also have to place a copy of the cursor folder in [ /usr/share/icons ]. Which is weird because Debian doesn't allow you to move files into that directory without using the "sudo cp" command in terminal, but whatever. The folder's there, and my cursor's fixed.
Partially Solved
Custom Theme
On Debian (although I think this is more specifically a GNOME issue), custom shell and GTK themes just love to be inconsistent. I still haven't fixed everything. Some apps still disobey my custom theme's macOS-like window control buttons, but it's whatever. They were always a luxury, so I can deal with some apps (like Firefox) not having them.
This isn't, however, the only thing that's still broken with my Custom Theme. For the record, I'm using Orchis. Apparently GNOME's auto dark/light mode just doesn't work anymore. The option is still there in Settings, but setting it to "Default" (which clearly shows an icon of both a dark and light window, indicating it'll change on its own) will do nothing. It just picks one theme and stays that way. I tried using GNOME extensions to fix this. Specifically, I tired "Night Theme Switcher" and "User Theme X." Both would properly switch the Shell Theme. However, they wouldn't change the GTK4 theme, which meant apps like the GNOME Files App would just not obey the new system theme unless I manually added the theme's files to [ ~/.config/gtk-4.0 ] and then logged out and in again.
So: bummer. Auto Light & Dark mode doesn't work, and for now I don't think it's possible to fix. Not the end of the world. I just set everything to dark mode for now, but it is a bummer. I do like using Light Mode during the day, and on the low contrast screen this 14-year-old laptop has, it really helps, but oh well. It's not a deal breaker.
Not Solved
Debian 13 "Trixie"
During my escapades and attempts to make Debian work, I ended up trying to install Debian 13 RC1 to see if newer packages and kernels would fix the AMD GPU issue. I tried both the Netinst ISO and the DVD ISO. Both of them would not work, period. I would select the EFI boot from the Mac Boot Picker, and the installer would immediately black screen and freeze. Debian 12 at least let me install the operating system before failing. Why Debian 13 RC1 did this, I have no idea. I haven't tried installing it since I disabled the dGPU, and I won't be trying until Debian 13 is the main stable release. So for now, Debian 13 is completely unrunnable and uninstallable on this hardware (in it's default form, anyway), and I can only hope the dGPU disable fixed it, or whatever they do between now and it's first stable release does.
#rambles#tech#technology#we're back baby#linux#debian#debian 12#debian bookwork#debian 13#debian trixie#computer#computers#linux help#troubleshooting#gnome#gtk#macbook#planned obsolescence#preservation
0 notes
Text
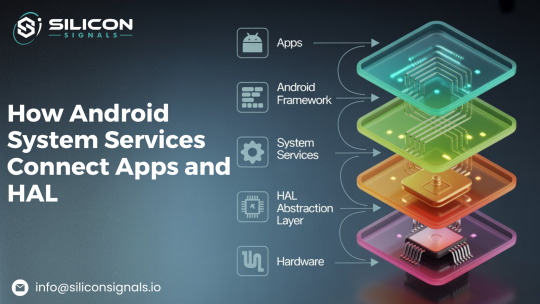
How Android System Services Connect Apps and HAL: A Deep Dive
Android is more than just a mobile operating system—it's a powerful middleware that seamlessly connects apps to the underlying hardware through a layered architecture of frameworks, services, and abstraction layers. The Android System Services, which control essential features like window handling, power management, telephony, and more, are at the core of this framework. By serving as a bridge, these services guarantee seamless communication between the hardware abstraction layer (HAL), the framework, and user applications.
The internal operations of Android System Services are examined in this blog, along with how they interact with HAL and apps.
Understanding Android System Services
Essential parts of AOSP, Android System Services oversee fundamental features like power, connectivity, phone, and security. Through Binder IPC, these services enable smooth communication between applications, the framework, and hardware while operating inside SystemServer. Because each service is registered in ServiceManager, it is available throughout the system, including ActivityManagerService, PowerManagerService, and TelephonyService. By serving as go-betweens, system services make sure that applications communicate with hardware through the Hardware Abstraction Layer (HAL) without requiring direct access.
Comprehending these services aids developers in extending AOSP functionalities, improving performance, and troubleshooting issues while preserving security and modularity within the Android ecosystem.

Key Components of Android System Services
SystemServer: The process in charge of launching and overseeing essential system functions.
ServiceManager: A central registry that maintains a record of every system service that is available.
Binder IPC: Applications, framework elements, and system services can interact thanks to the communication mechanism known as Binder IPC.
HAL (Hardware Abstraction Layer): System services can communicate with hardware through the Hardware Abstraction Layer (HAL), which offers a common interface for hardware-specific implementations.
System Service Types
System services can be divided into groups according to how they work:
Core Services: ActivityManagerService, WindowManagerService, and PackageManagerService
Hardware Services: SensorService, AudioService, and PowerManagerService
Connectivity Services: Bluetooth, WiFi, and Telephony Services
Security Services: SELinuxManagerService and KeystoreService
Each system service registers with ServiceManager for worldwide accessibility and operates as a distinct thread or process inside SystemServer.
How System Services Interact with Apps and HAL
To understand system service interactions, let’s break it down into three communication flows:
1. Applications to System Services (Interaction at the Framework Layer)
Through the Android Framework APIs, an application can interact with the appropriate system service to carry out system-level tasks (like adjusting brightness or connecting to WiFi).
For instance, determining the battery level:
The BatteryManager API's getBatteryPercentage() method is invoked by the application.
BatteryManagerService receives the request and retrieves the most recent battery status.
The data is returned to the application by BatteryManagerService.
Important Takeaway: The application never communicates with the kernel or HAL directly. It always passes via the system services and framework APIs.
2. HAL (Hardware Interaction) System Services
The HAL is necessary for system services to communicate with hardware. In order to guarantee that system services function independently of particular hardware implementations, HAL acts as an abstraction layer.
For instance, Changing the Screen's Brightness:
App Request: The user adjusts brightness through the user interface.
System Service Interaction: DisplayManagerService receives the request and notifies PowerManagerService.
HAL Communication: Power HAL, which has direct hardware control, is called by PowerManagerService via Binder IPC.
Hardware Execution: By interacting with the display driver, the Power HAL modifies the brightness.
Feedback Loop: The system service updates the user interface after the HAL verifies the brightness change.
Key Takeaway: Android is flexible and adaptable because HAL guarantees that system services can function across various hardware implementations.
3. From System Services to System Services – Inter-Service Exchange
Frequently, several services collaborate to complete a task. Android's system service interactions are smooth because services communicate via Binder IPC.
Example: Intent Processing for Launching a Camera App:
An intent is triggered when the user launches the camera app.
After processing the intent, ActivityManagerService makes a request to CameraService.
Permission Validation: CameraService uses PackageManagerService to verify app permissions.
HAL Interaction: Camera HAL sets up the hardware and communicates with CameraService.
Data Processing: MediaService processes the captured images before FileManagerService ensures storage.
Key Takeaway: To effectively handle a single request, several system services work together.
Practical Example: How a Phone Call Works in AOSP
A call is initiated by the user (app layer interaction) To start a call, the Dialer app asks TelecomManager to do so.
TelephonyService receives the request from TelecomManager.
RIL and TelephonyService Interact at the Hal Layer After processing the request, TelephonyService sends it to the Radio Interface Layer (RIL). As a component of HAL, RIL is in charge of interacting with modern hardware.
RIL Gives the Modem a Command The request is converted by RIL into AT commands that the modem can comprehend. A connection is made between the modem and the network.
The call status has been updated The modem notifies RIL of the call status. TelephonyService notifies the user interface by updating the CallState.
Audio Routing & Call Connection AudioService uses the speaker or earpiece to route audio. Signal quality and LTE/VoLTE switching are managed by NetworkService.
Call Terminations: Procedure for Cleaning TelephonyService notifies RIL to end the connection when the user hangs up. TelephonyService modifies the user interface while RIL tells the modem to end the call.
Important Takeaway: Without direct app-to-hardware communication, the entire process—which includes hardware control, HAL interactions, and multiple system services—operates without a hitch.
Debugging Techniques for AOSP
Debugging AOSP builds requires an understanding of these interactions. The following are some essential debugging techniques:
Using Service Status with Dumpsys To see a list of all active services, run: adb shell dumpsys activity services
Using logcat to check logs For service activity monitoring, use: adb logcat -s ActivityManager
Verifying the Service Registration To see if a particular service is operating, run: adb shell service list
Following HAL Strace calls To monitor system calls from a service to HAL, use: strace -p
Conclusion
The framework, hardware, and apps all work together seamlessly thanks to Android System Services. They oversee essential features like connectivity, power, and security, making sure the system runs smoothly. These services maximize performance while preserving modularity and security by utilizing Binder IPC. From resource management to facilitating seamless app experiences, Android's well-organized design enables it to effectively handle complicated tasks.
Knowing these interactions demonstrates how reliable Android's architecture is across a range of devices. As we learn more about AOSP, these services continue to be essential to preserving Android's adaptability, dependability, and scalability in the rapidly changing technological environment.
#embeddedtechnology#embeddedsoftware#AOSP#HAL#Android Framework#Binder IPC#Android Telephony Stack#Android System Service
0 notes
Text
Price: [price_with_discount] (as of [price_update_date] - Details) [ad_1] Compatible file formatMusic: M4A / AIFF / CAF / MP3 / WAV(Due to DRM (Digital Rights Management), we cannot download Music or Video files by the 3rd APP to the iPhone USB flash drive)Image: GIF / JPG / PNG / JPEGImage: GIF / JPG / PNG / JPEGDocument: DOC / PPT / XLS / XLSX / PDF / HTML / TXComputer systems supported: Windows xp/vista/win7/win 10,mac os 9.x and above,linux 2.4.x,ios 8/9/10,Android 5.1.Due to the inner system and procedure data will occupy some space and the real capacity will reduce lightly.Warning tips:1.For iPhone or iPad,you need to install a free App "Y-disk" after connecting the iPhone flash drive to your device,but Android Phone not.2.If there is no response after connecting the photostick, please remove the iPhone protective cases before using (because the phone case will affect the connection between the phone and the usb flash drive)3.Before ordering,please check if your Android phone has OTG function,because the flash drive only support OTG function for Android ;Most Android device with OTG function, can use flash drive directly when inserting, can find the iPhone storage drive on your device in : File Manager. (The flash drive is equipped with a type-c adapter for the latest Android phones) If your phone doesn't work, please enable OTG function in the other setting of your phone.4.Due to RM (Digital Rights Management), we can’t download Music or Video files in iTunes or by the 3rd APP directly to the iphone photostick.When using usb flash drive for iphone,please do not remove it,otherwise data may be lost.5.If the product cannot keep the original date of the photo, please connect the iphone external storage to the computer and format it as "EXFAT". (Please download the highest version of the App 1.4.7) 【Instantly Expand Mobile Phone Capacity,Just Use iPhone Flash Drive 256GB External Storage 】Are you still worried about your phone was full of storage? And don’t know what to do with all the precious pictures of your family or friends?The photo stick has multiple ports:iPhone port,Micro USB,Type-C and USB ,so you can share and transfer data between various devices(iPhone/iPad/Android phone and Computer) to keep your device more memory. 【Unique Design of Photo Stick & Support Passward-protected File】The iphone usb flash drive adopts 360°rotation and 90°stuck point design which is very easy to use and carry around with you.Besides,as we all know,everyone has their own secret,the iphone external storage drive is very reliable to protect your privacy.You can protect the entire storage file on the iphone’s ios flash drive by touch id and passward via Y-disk APP. 【Share your Data to iPhone Photo Stick Anytime and Anywhere ,Even If no WiFi or Internet】Feel free to store your favorite music,movies,pictures ,videos or important files to the photo stick ,so that you can not only play music or watch movies directly from the photo stick mobile for iphone to relax your mind when feel tired ,but also one-click backup important office files anytime and anywhere.Even if there is no WiFi or internet,you can also share pictures or videos with your friends. 【High Speed Data Transmission,USB 3.0 Flash Drive For iPhone】LANSLSY usb memory stick adapts usb 3.0 port,which saves your time by avoiding repeated loading while transferring large files.You can move your photos or videos from mobile phone or computer to the iphone flash drive rapidly .Transfer Speed of USB 3.0 Flash Drive 256GB can reach up to 40-80MB/s(Read ),20-40MB/s(Write) 【24 Months Warranty of The Photo Stick for iPhone】We have been pursuing good quality and provide the best service for our customers,so the USB stick will provide you with 100%satisfactory service and 24 months warranty .If you have any problem with our products,welcome to contact us anytime. [ad_2]
0 notes
Text
Boot partition scare…
I installed Solaris 11.4 on my used x250 and it hosed my reserved area that starts Windows 10. Thankfully someone online knew the bcd commands and I’m up and running again. My ThinkPad has 3 OS but Solaris has no wifi support for its modem. Have to resort to ethernet.
Besides Windows and Solaris, I run Ubuntu, that Swiss army knife of OSes. A must have. I’ve also been tuning my Acer’s Win 11 memory usage, disabled compression, and enabled big disk cache. Runs really well, even on a dual Celeron 1.1 gHz. But I have 12gb RAM
Wrote some mini songs for guitar and vocals. Been keeping busy. Last night we tried to bring the telepathy under control leniently. This morning it blew up again. We were more forceful and still kind so it is now peaceful once more. Good that I’m a healer too.
Going to the mall soon. Nothing much to buy, Maybe drop by the old place later to get my ethernet cable and guitar B string.
0 notes
Text
WiFi laptop bị gạch chéo đỏ - Nguyên nhân và cách khắc phục
Hiện tượng WiFi laptop hiển thị biểu tượng gạch chéo đỏ là lỗi phổ biến, gây khó khăn cho công việc và học tập. Bài viết này sẽ giúp bạn hiểu nguyên nhân và cách khắc phục lỗi này nhanh chóng.

Nguyên nhân WiFi laptop bị gạch chéo đỏ
Lỗi gạch chéo đỏ trên biểu tượng WiFi có thể do:
Lỗi hiển thị biểu tượng: Biểu tượng WiFi hiển thị sai dù mạng vẫn hoạt động.
Tính năng WiFi bị tắt: Chế độ dò WiFi bị vô hiệu hóa vô tình hoặc do cài đặt.
Driver WiFi lỗi thời/hỏng: Driver không cập nhật hoặc bị lỗi gây mất kết nối.
Card mạng bị vô hiệu hóa: Card WiFi không hoạt động hoặc bị tắt trong hệ thống.
Chế độ Bridge Connection: Cầu nối mạng gây xung đột với kết nối WiFi.
Cấu hình BIOS: WiFi bị vô hiệu hóa trong BIOS sau khi cập nhật hệ điều hành.
Router/Modem lỗi: Thiết bị mạng gặp sự cố, không cung cấp tín hiệu WiFi.
Cách khắc phục lỗi WiFi laptop bị gạch chéo đỏ
Dưới đây là các phương pháp khắc phục lỗi WiFi laptop bị gạch chéo đỏ mà bạn có thể thử:
1. Kiểm tra và kích hoạt lại WiFi
Tính năng WiFi có thể bị tắt vô tình. Để bật lại, nhấn tổ hợp phím:
Acer, Lenovo: Fn + F5.
Asus, Dell: Fn + F2.
Các dòng khác: Tìm phím có biểu tượng WiFi (F1-F12) kết hợp với Fn.
2. Sửa lỗi hiển thị biểu tượng WiFi
Nếu WiFi vẫn hoạt động nhưng biểu tượng bị gạch chéo:
Khởi động lại laptop.
Vào Settings > Personalization > Taskbar > Select which icons appear on the taskbar, bật/tắt mục Network.
3. Cập nhật hoặc cài đặt lại driver WiFi
Driver WiFi lỗi thời/hỏng có thể gây lỗi. Cách khắc phục:
Nhấn Windows + X > Device Manager > Network adapters.
Chuột phải vào WiFi Adapter, chọn Update Driver > Search automatically.
Nếu cần cài lại: Chuột phải WiFi Adapter, chọn Uninstall device, sau đó khởi động lại laptop.
4. Kích hoạt lại card mạng WiFi
Card mạng bị tắt có thể gây lỗi. Kiểm tra:
Vào Device Manager > Network adapters, tìm card WiFi (Wireless/WiFi Adapter).
Nếu bị vô hiệu hóa, chuột phải và chọn Enable. Nếu đã bật, thử Update driver.
5. Tắt chế độ Bridge Connection
Chế độ Bridge có thể gây xung đột:
Nhấn Windows + R, nhập ncpa.cpl, nhấn Enter.
Tìm Network Bridge, chuột phải, chọn Delete, sau đó khởi động lại laptop.
6. Bật WiFi trong BIOS
WiFi có thể bị tắt trong BIOS:
Khởi động laptop, nhấn F2/F10/DEL/ESC để vào BIOS.
Tìm Wireless Configuration, bật Wireless LAN, lưu và khởi động lại.
7. Khởi động lại router/modem
Router/modem lỗi cũng gây mất kết nối:
Tắt router/modem, đ��i 30 giây, bật lại.
Kiểm tra kết nối sau 2-3 phút. Nếu không ổn, thử reset router (lưu ý sẽ xóa cấu hình).
Lưu ý
Nếu đã thử các cách trên mà lỗi vẫn không khắc phục được, liên hệ VoHoang.vn hoặc mang laptop đến trung tâm sửa chữa để được hỗ trợ chuyên sâu.
Xem thêm chi tiết: https://vohoang.vn/wifi-laptop-bi-gach-cheo-do
1 note
·
View note
Text
Avoid Blind Spots: Expert Tips for Placing CCTV Cameras Effectively

When it comes to safeguarding your home or business, installing CCTV cameras is one of the most effective security measures you can take. But simply mounting a few cameras isn’t enough; strategic placement is key to eliminating blind spots and ensuring full coverage. Poorly positioned cameras can leave vulnerable areas exposed, defeating the purpose of having a surveillance system in the first place.
Whether you’re setting up security for a home or a commercial space, knowing where and how to place your CCTV cameras can make all the difference. Let’s dive into expert tips that will help you get the most out of your security system.
Identify High-Risk and Entry Points
The first step in any CCTV installation is identifying areas that are most at risk. Focus on main entry points such as front doors, back doors, windows, and driveways. These spots are often the primary targets for intruders and should be closely monitored.
For homes, a residential CCTV installation Brisbane service can help assess your property and determine the best camera positions to keep your family safe. In commercial spaces, prioritise entry and exit points, loading docks, and customer-facing areas like reception or retail floors.
Eliminate Blind Spots with Strategic Angles
One of the most common mistakes in CCTV setup is failing to account for blind spots. Mounting cameras too high or at awkward angles can create unseen areas where intruders can hide. Position cameras at strategic angles that maximise coverage without obstructing views.
For businesses, working with a commercial CCTV installation Brisbane expert ensures that every key area is visible, reducing security risks and helping in loss prevention.
Consider Lighting and Weather Conditions
Lighting plays a huge role in camera effectiveness. Place cameras in areas with adequate lighting or opt for night-vision-enabled models for poorly lit spaces. Avoid pointing cameras directly at bright lights or reflective surfaces, as glare can wash out footage.
For outdoor cameras, weather resistance is crucial. Ensure your equipment is rated for rain, dust, and extreme temperatures to maintain clear visuals year-round.
Don’t Overlook Less Obvious Areas
While entry points are essential, don’t forget about areas like side gates, backyards, stairwells, and blind alleys. These spots often go unmonitored and can provide intruders with hidden access. Parking lots and storage areas in commercial spaces are also common targets for theft and vandalism.
• Consider Professional Installation
While DIY CCTV setups can work for small spaces, professional installation guarantees optimal coverage and proper setup. Experts can assess your property, recommend the best equipment, and ensure all potential blind spots are covered.
If you’re in Brisbane, CCTV installation Brisbane services can provide tailored solutions for both residential and commercial properties, helping you stay one step ahead of potential threats.
Final Thoughts
An effective CCTV system does more than just record—it deters crime, provides peace of mind, and ensures that your home or business is fully protected. By carefully planning your camera placements and consulting with experts, you can avoid blind spots and maximise your security. Invest in the right setup today and gain the confidence that comes with knowing your property is always under watch.
The author offers tailored WiFi solutions for homes and businesses across Brisbane. With expertise in both residential and commercial WiFi installation, their team ensures seamless connectivity, optimal coverage, and secure networks for every space. Visit https://smart-wifi.com.au/ for more details.
#cctv installers near me#residential cctv installation near me#home cctv installers near me#cctv installation companies near me#cctv installers brisbane
1 note
·
View note
Text
Why Install Digital Deadlock on Your Property? Check Advantages!

Nowadays, most people prefer to use digital deadlock or smart electronic door locks to increase the overall security of their homes or places of work. One of the best and simplest justifications for choosing these locking systems is the keyless feature.
One of the most user-friendly security locking systems, it works over WiFi and eliminates the need for keys and the risk of them being lost or stolen. Another reason for favouring smart electronic deadlock is the availability of sliding doors with smart locking systems that offer remote access and keyless entry.
Reputable smart lock manufacturers usually offer a variety of advanced models with advanced identifying features, such as identification of fingerprints or numeric keypads, for unlocking and entering the building.
Motives for Increasing Security with Smart Locks:
WiFi-enabled smart door locks allow for remote programming and monitoring are useful features that enable owners to remotely lock or unlock their windows and doors using their phones.
Furthermore, these respectable facilities only use cutting-edge security methods that improve the area's safety and security while protecting families, property, and possessions.
Reputable top smart lock companies offer a wide range of sophisticated electronic WIFI locks, which are quite popular in Australia. Advanced features like PIN passwords, cards, physical keys, Bluetooth and Wi-Fi app accessibility, and biometric and non-fingerprint smart locks are all within their reach.
Furthermore, slim panel smart locks from reputable suppliers are typically the best choice for all types of wood and aluminium doors. People should visit trustworthy local smart lock retailers both online and offline to buy high-quality, long-lasting smart locks for their homes, offices, or commercial locations.
Additionally, locate these reputable vendors by conducting thorough market research, providing customer service, and communicating openly about installation, warranties, costs, and continuing maintenance services.
Check to see if they employ the best security locking systems that adhere to the required standards. To make sure the supplier provides dependable products, it is also critical to look at reviews, client testimonials, and industry certifications.
Lastly, take these actions, compare them, and choose a reputable provider that offers the ideal smart key solution for your requirements.
Source: https://ausmartlock.blogspot.com/2025/04/why-install-digital-deadlock-on-your.html
0 notes
Text
Achieve Seamless Coverage With TP Link Extender Setup
Got your hands on TP link range extender and thus want a simplified and straightforward setup steps? If the answer is yes, then you are surely at the right destination. In this guide we'll share two most commonly used TP link extender setup methods. One is extremely quick that just takes less than 10 minutes. It is the WPS method. Whereas if you want a more hands on approach then Web GUI method is for you. Both the setup methods are extremely easy and can be performed without any expert help. So let's not waste any more time and dig straight into the process.
✓ Quick Setup Via WPS
Begin the process of TP Link extender setup by activating the range extender. Make sure you do this activation nearby to the host router. Meanwhile the extender is booting up, check the status of the host router. It should be actively working.
Moving further, first push the WPS key on the TP link range extender. In case the WPS LED didn't blink then push and hold the WPS key until the LED starts blinking.
Now it's time to push the WPS key on the host router. Here also make sure the WPS LED starts to blink. As this is the indication that the WPS function is enabled and the device is looking for its pair. Additionally remember, as soon as you push the WPS key on the TP link extender do not wait. Rather immediately push the WPS key on the router as well.
Now let the gadgets complete the synchronisation. As the TP Link extender setup process completes the wireless signal LED will light up. In case it doesn't light up, then it means the WPS connection has failed. So you need to redo the setup all over again. But in case everything went smooth, then it's time to relocate the extender to its desired location.
For placement select the area which is halfway from the host router and the area where you need coverage. Now as you replug the range extender, you’ll see both WPS LED as well as wireless signal LED light up. This indicates a successful setup.
✓ Manual Setup Using Web Browser
For conducting a smooth TP Link extender setup first collect the basic components and details. You need a smart gadget for initiating the setup. It can be anything like your smartphone, laptop, computer or an iPad. Next for a stable connectivity to the extender you need an Ethernet wire. Additionally, collect the username and password of your existing wifi network whose reach you want to extend. Further we advise you to keep the user manual by your side as it contains every little detail that you might need during the setup process. As you collect all these components and details, feel free to start with the setup steps:
✓ Activate The TP Link Extender
Begin the process by first bringing in the range extender to the same area where your host router is placed. Now avoiding any physical barriers plug in the range extender to activate it properly. Once done, now bring in the smart gadget. For the TP Link extender setup you need to connect this smart gadget to the extender. Now there are two methods for the same.
Either you can connect wirelessly or through ethernet wire. The details for wireless connection are written clearly on the product label which is stuck on the back panel of the extender. Additionally the details are written in the quick user manual as well. Once you build a connection between the TP Link extender and smart gadget, you can move to the next step which is Log In.
✓ Log In
To login first launch a web browser of your choice. You can go with Internet Explorer, Safari, Firefox or Google Chrome as well. Now hop on to the address field of the browser. In it fill up http://tplinkrepeater.net and press Enter. In case the web address doesn't work, then use another alternative which is http://192.168.0.254. As you press the enter key, a window pops up asking you to give in some details. So you need to enter your username and password. By default it is set to admin which you need to use in lower case only.
✓ Follow The Prompts
To complete the TP Link extender setup, now you need to follow the on-screen prompts one by one. So start by selecting the Quick Setup option and hit Next. Moving further, pick your region and hit Next. Now the web interface will automatically start scanning for the available networks. From the list choose your network name and give in its security key (password). Finally review all your settings and tap on Finish if it's appropriate. As you do so the extender will reboot itself. As it applies the changes.
Lastly, check the wireless signal LED to know whether the setup is successful or not.
0 notes
Photo

Lenovo ThinkPad L15 Gen 3 Core i7 Laptop Business-class performance The ThinkPad L15 Gen 3 laptop inspires productivity. Powered by Intel vPro® with 12th Gen Intel® Core™ U or P Series processors, this 15.6" device also boasts remarkable graphics options, including NVIDIA® GeForce®. Plus, with a choice of larger batteries, you’ll enjoy all-day power on this high-performing work-from-anywhere partner. Security that works for you When it comes to security, the ThinkPad L15 Gen 3 laptop delivers. A power button that’s activated by a fingerprint reader boots up the system and logs you in fast. ThinkShield hardware and software components with integrated discrete Trusted Platform Module (dTPM), the added security of Windows 11, Microsoft Secured-core PC enablement, and up to the Intel vPro® platform deliver protection from every angle. Stay online, wherever & whenever Like a smartphone, the ThinkPad L15 Gen 3 laptop offers optional 4G LTE WWAN* connectivity, as well as speedy WiFi 6E** coverage. It also features Dolby Voice® AI-based noise suppression, and when combined with the optional FHD camera, videoconferencing will seem like you’re all in the same room. * Optional WWAN availability varies by region and must be configured at time of purchase; it requires a network service provider.** 6GHz WiFi 6E operation is dependent on the support of the operating system, routers/APs/gateways that support WiFi 6E, along with the regional regulatory certifications and spectrum allocation. Digital wellness Health and productivity go hand-in-hand with the addition of Glance by Mirametrix® software. This functionality supports wellness for both posture and eye health. You’ll get posture alerts, as well as reminders to look away for 20 seconds to allow your eyes time to refocus, thereby alleviating fatigue. Takes reliability to the next level We use the US Department of Defense's MIL-STD 810H standards to create a balance of reliability and durability for our ThinkPad laptops. We test against 12 standards and more than 200 quality checks to ensure they run in extreme conditions. These tests cover harsh variables like Arctic wilderness and desert dust storms, including temperature, pressure, humidity, vibration, and more. Features: 15.6" laptop with numeric pad, ideal for finance, accounting, & data-entry Powered by up to Intel vPro® with 12th Gen Intel® Core™ performance. Enhanced videocalls with optional FHD camera, Dolby Audio™, & Dolby Voice® with AI-based noise suppression Remarkable Intel® & NVIDIA® graphics options Up to WiFi 6E & optional 4G WWAN to stay connected. Microsoft Secured-core PC enabled. Specifications: Brand: Lenovo Series: ThinkPad Model: ThinkPad L15 Gen 3 Core i7 Part#: 21C3002JZA General Color: Black Operating System: Windows 10 Professional (64bit) CPU Type: 12th Gem Intel Core i7-1255U Processor Screen: 15.6" FHD 1920x1080 Anti-Glare IPS Display Memory Size: 8GB DDR4 Memory Hard Disk: 512GB Ultra-Fast NVME SSD Optical Drive0: No DVD Drive Included Graphics Card: Integrated Intel UHD Graphics Dimensions: 360.2 x 237 x 19.93 mm Net Weight: 1.76 kg CPU CPU Type: 12th Gem Intel Core i7-1255U Processor CPU Speed: i7-1255U 3.50GHz - 10x Cores - 12x Threads CPU Support: 12MB Cache, Turbo Boost up to 4.70GHz Display Screen Size: 15.6" FHD 1920x1080 Anti-Glare IPS Display Wide Screen Support: Yes + FHD 1080p IR with Privacy Shutter Resolution: FHD 1920x1080 IPS Operating Systems Operating System: Windows 10 Professional (64bit) Graphics GPU/VPU: Integrated Intel UHD Graphics Video Memory: Shared system memory Graphic Type: Integrated Graphics Hard Drive HDD: 512GB Ultra-Fast NVME SSD HDD RPM: SSD HDD Interface: NVME PCIE SSD Memory Memory: 8GB DDR4 Memory Memory Speed: DDR4 Memory Spec: 8GB x 1 Memory Slot (Total): 2 Memory Slot (Available): 1 Max Memory Supported: 64GB Optical Drive Optical Drive Type: No DVD Drive Included Communications WLAN: Dual Band Intel AX201 Wi-Fi 6E Wireless LAN LAN: 10/100/1000M Gigabit Ethernet Bluetooth: v5.1 Ports Audio Ports: 1 x Mic-in/Headphone-out Combo Jack USB: 2x USB Type-A + 2x USB Type-C Thunderbolt 4 HDMI: 1 x HDMI Video Port: USB Type-C Thunderbolt 4 Display Audio Audio: Dolby Advanced Audio Speaker: 2x 2W Speakers Input Device Keyboard: White Backlight Keyboard Touchpad: Multi Touch + MicroSD Card + 4G LTE SIM Power Battery: Standard Internal Laptop Battery Battery Duration: May vary depending on usage. Physical Specifications Dimensions: 360.2 x 237 x 19.93 mm Weight: 1.76 kg Warranty Warranty: 3 YEARS WARRRANTY
0 notes
Link
0 notes
Text
Benefits of Ceramic Window Tint In Texas

Benefits of Ceramic Window Tint In Texas
Ceramic tint is a popular upgrade for European SUVs, sedans, and sports cars. It blocks the sun’s heat and harmful UV rays, while also protecting passengers from dangerous glare. Its ceramic particles also reject infrared rays, keeping the car cooler and more comfortable for passengers. This type of tint also improves visibility and reduces glare under different lighting conditions.
Improved Aesthetics
Precut ceramic tint offers a sleek look that enhances the aesthetic of your vehicle. This tint is available in a wide variety of shades, allowing

drivers to customize the appearance according to their preferences. Aside from providing optimal heat rejection and UV protection, ceramic tints also reduce glare. This enables you to drive safely and enjoy the scenery without having to strain your eyes or squint. Ceramic tints are also shatter resistant, which means they can withstand sudden impacts without cracking or chipping. This provides peace of mind, especially if you often park your car in crowded areas or leave valuables inside your vehicle. Unlike metallic tint, ceramic window tint doesn’t interfere with cellphone or radio signals. This feature allows you to make phone calls or listen to music on your device without interruption.
Heat Resistance
This premium tint is one of the most effective upgrades available for controlling cabin heat and UV protection. It allows the most light to pass through while rejecting a high percentage of infrared heat, keeping your car’s interior cool and comfortable on the hottest days. Additionally, ceramic tint helps reduce glare to improve visibility. It also prevents your eyes from becoming fatigued, making it easier to focus while driving in traffic or in a bright environment. Unlike traditional tint, which uses dyes, this type of window film is made with nano-ceramic particles infused into its layer. This technology enables the tint to provide UV protection and heat rejection without the need for darker shades that can be illegal in some areas. It also resists scratches and fading and doesn’t interfere with radio or cell phone signals.
UV Protection
Ceramic tints feature a sleek, glossy aesthetic that can add to your car’s resale value. They also offer superior UV protection, allowing you to enjoy the sun without worrying about it damaging your upholstery or dashboard materials. When sunlight hits windows coated with ceramic tint, the metallic particles within the film reflect a portion of the light’s energy before it passes through your vehicle’s glass. This significantly lowers the temperature inside your car, reducing your need for excessive air conditioning usage and fuel consumption. Furthermore, ceramic window tinting films do not contain any metal particles, so they won’t interfere with your phone reception or WiFi signal. However, it’s crucial to always use a non-ammonia cleaning product when cleaning your tint to prevent it from deteriorating or developing a hazy appearance over time.
Increased Privacy
Unlike regular tint, ceramic window tint contains no dyes or metals. Rather, it uses nano-ceramic particles to create a solid barrier that blocks out the sun’s harmful rays while offering enhanced UV protection. This helps prevent your car’s interior from fading in the sunlight and can help protect passengers from cancer-causing UV exposure. In addition to heat rejection, ceramic tint also reduces glare while offering increased privacy. This feature is especially useful if you have young children or carry valuables in your vehicle, as it makes it more difficult for passersby to see into the vehicle. It’s important to note that ceramic tint is highly durable and will last for years with proper care and maintenance. For example, be sure to avoid using ammonia-based cleaners as they can damage the film over time. It’s also recommended to consult with a professional installer for proper cleaning and maintenance techniques. They can offer recommendations for safe and effective products to use. Read the full article
0 notes