#gimp script
Explore tagged Tumblr posts
Visit Tumblr Blog
Explore Tumblr blogs with no restrictions, modern design and the best experience.
Last Seen Tumblr Blogs


Fun Fact
If you dial 1-866-584-6757, you can leave an audio post for your followers.
Text


#furry#mind control#mine#digital#gimp alien map#little glitch script in java#and procreate! but in the opposite order.#as with everything this is for the website first and foremost
126 notes
·
View notes
Text
back in the Superwholock days there was this post getting passed around my corner of tumblr about "teflon writing vs velcro writing," ostensibly as a nutshell summary of why fandom reacted so differently to Steven Moffat and Russell T Davies as Doctor Who showrunners: slick and polished and easier to admire (when done well) or coolly assess its flaws (when botched) than to get a grip on or pull apart & tinker with, vs. messy and prickly and grippy and tinkering-friendly and prone to getting its hooks in you whether or not you ever wanted that
and that's very funny to look back on with the distance of hindsight, because to this day--a full decade after peak Superwholock--RTD-era Who and Kripke-era SPN remain THE most insane, crazymaking, irreversible-brain-damage-inducing, "compelling in the way where they make me INCREDIBLY ANGRY and ITCHY TO FIX THEM because i am so stupid-invested that they still have me by the balls, even when my engagement is just picking apart the frustrations of how and why they SUCK" turbo-examples of velcro writing i have ever encountered in my LIFE
hell, they aren't even so much like velcro as they're like snagging the folds of a lace circle skirt on a whole branch of actual cockleburs and trying to wash the shrapnel out with fucking gorilla glue
.....and then there's BBC Sherlock. which was neither velcro writing nor teflon writing but an elaborate many-year con, targeted at the EXACT kinds of people who maintain a secret good Supernatural that lives in their heads, whose one neat trick was to bait its marks into collectively hallucinating a brilliant show so that Steven Moffat and Mark Gatiss never had to put themselves to the trouble of writing one.
#computer tinkerers hear me out: if spn is microsoft windows and doctor who is various *nix distros and moffat-era who is macOS#then bbc sherlock is a fucking chromebook that reply guys SWEAR you can do full-stack software development and advanced image editing on#....if you root it and use some horrible 3rd party script to bolt a linux distro on top of chromeOS and physically install 32gb extra RAM#and even then the filesystem access is all screwy and *you're still doing your image editing in the GIMP*#fandom#superwholock#meta
82 notes
·
View notes
Text
who knew making gifs would involve writing so much code 😵💫
#possibly mostly because i don't have ps#and gimp is atrociously slow with gifs#so i'm writing python for vapoursynth#and for batching some imagemagick calls#because batch file syntax is a nightmare. who designed this.#i spent over an hour trying to write a bat script and it didn't work#and i did it in 15 min in python despite not having used py in a decade#ok /rant thanks for listening#personal
7 notes
·
View notes
Text
Retro Gaming Scripts For Gimp
The retro gaming scripts for Gimp manipulate images to give them, naturally enough, a retro gaming look. Or to describe them from another perspective, these scripts add different styles of dithering to your images.
Altogether there are eleven different scripts, and each one imitates the style of various retro computers. For instance, there are three scripts dedicated to retro Amstrad graphics, four to the old BBC computers, and others that adopt the graphic styles of the ZX Spectrum, Commodore, as well as a few others.
To find out more including how to download, install and use these scripts visit the Lusus-Studio blog.
#gimp#gimp tutorial#gimp tutorials#gimpart#secondlifeblogger#slblog#secondlife#slblogging#secondlifeblog#slblogger#second life#gimp scripts
4 notes
·
View notes
Text
I've been fighting Windows' API trying to make a simple program before tomorrow night because I volunteered to do a trivia thing for my family, and I thought it would help with organising the questions and scores. I already have the questions, so it's not a huge problem if it's not finished in time.
I just wanted some form controls, like buttons and stuff, but I'm not that familiar with doing that in Visual Studio with C++. And the information on Microsoft's site is extensive, but... convenient (missing a lot of important information). I learned Win32 programming about a year ago, so I might have also forgotten something important that wasn't mentioned in the documentation I'm using at the moment.
And I could not get a control defined in the code to show up. I didn't want to use the resources for a lot of reasons, even once I figured out how to bypass the kind of stripped down visual editor, but I also couldn't seem to program a button in directly and have it appear in the window when I ran the program. It seemed to be created fine, but I couldn't see it anywhere.
I finally found some example code on Stack Overflow or somewhere, and the reason the button wasn't showing up was because... I hadn't specified the WS_VISIBLE flag when I created it. (WS stands for Window Style. Win32 has a very broad definition of a window that includes buttons) Apparently it's programmed in a way that assumes that an object invisible until you tell it that it's not? I would've done it the other way around.
I had to sit there for a few seconds after I added it in and the button finally showed up. At least it's progress?
#programming#The real challenge of programming in my experience is figuring out how the programming language works from the vague documentation#Microsoft is better about it than Blender though#And both are a million times better than when I was trying to write Script-Fu extensions for GIMP#That one could've been replaced with just the words 'skill issue' and been about as helpful
3 notes
·
View notes
Text
Ramblings, #2
OK, so... I've gone down a real rabbit hole...
Lemme explain: A few days ago, I decided to make my own Inkscape palette. I thought: "How hard could it be to take 1,545 colors in HSV notation and turn them into hex codes to use with a Python script to make a GIMP palette for Inkscape?"
Yeah. Not very bright.
Because I need 32 windows open, two pages per split-screen tab. And I need to configure shit manually.
What an idiot I am.
AND NOW I'M REALIZING I COULD POTENTIALLY JUST CODE A BUNCH OF COLOR BLOCKS INTO AN EMPTY HTML PAGE FOR FUCKS SAKE AAAAAAAAAAA-
AND I COULD HAVE SAVED SO MUCH TIME DOING THAT INSTEAD OF FUCKING AROUND WITH THE BROWSER!
#ramblings#graphic design#inkscape#gimp#color palettes#murphys law#idiot#fml#whyyyy#fucking why#foss#python#palettegen#scripting#hex code#hsl to rgb#shenanigans#tag overdosed
0 notes
Text
I'm currently editing a loooooot of pics for my simblr and ended up browsing to understand how to write my own scripts in Scheme for GIMP. Sometimes coding just catches me when I didn't even think it could. Like... Just stop dear brain, I didn't mean that. But now I kinda do, so anyone has good Scheme and Script Fu tutorials?
0 notes
Text

Date Night Dinner & Dessert by Twinsimming 🍷
This mod adds the Rack of Lamb and SimCity Cheesecake recipes from The Sims 4, and a new custom Lamb ingredient to The Sims 3!
The recipes and ingredient can all be placed in your Packages folder. They were created and tested on 1.69, but should work fine on 1.67.
Merry Christmas to everyone who celebrates!! 🎄🎄🎄
Requirements
This mod requires CCLoader to function.
Overview
New Recipes
Lamb Ingredient
New Recipes
The Rack of Lamb recipe is for dinner and the SimCity Cheesecake recipe is for dessert, but they’re both enabled to be prepared at any time of day. The cheesecake is also Vegetarian safe!
Rack of Lamb (Level 6): Lamb, Onion, and Potato
SimCity Cheesecake (Level 5): Cheese, Egg, and Any Fruit
Lamb Ingredient
Lamb is a new, non-plantable ingredient that can be purchased at the grocery store for §30.

Conflicts & Known Issues
This is a new script mod so there shouldn’t be any conflicts.
Credits
EA/Maxis for The Sims 3 and The Sims 4, Blender, s3pe, TSRW, Gimp, Milkshape, Notepad++, and CCLoader.
Thank You
To everyone in the Sims 3 Creators Cave discord!
If you like my work, please consider tipping me on Ko-fi 💙
Download @ ModTheSims
432 notes
·
View notes
Text
Robbert egers just leaked the script for nosfera2 starring jack black as the royal gimp
156 notes
·
View notes
Note
I do love how Astarion, lovingly, tells DU Drow to stfu about his breeding kink lol
Astarion, for the first time in two hundred years can have sex the way he likes. Do you have any headcanons about him and DU Drow discovering what he actually likes?
(I'm pretty positive this was in reference to this, (un)fortunately my inbox is a little hard to keep up with so I must have missed this one at the time)
Kind of! I try not to overthink his internal processing of sex following everything that has happened, as I feel like that runs the risk of setting too clear a line between good and bad recovery and experimentation - y'know, that concept I have delved into a few times by now about how I assume he continues to do things that make him uncomfortable/that he doesn't necessarily wants to do, not to self-harm but simply because he doesn't want to be held back by by his experiences and (mostly) has the ability to deal with the emotional consequences of it, as long as it was a choice he made of his own free will.
Which is to say that I think Astarion was willing to try a lot of things with his partner. Especially after "vanilla" sex became normalized between them past the end of the campaign (as they weren't really fucking during it at all) and things like putting small fantasies of his own the table started to feel like a strange, but tempting excursion. This is a trigger for the both of them to be much more blatant about their desires with each other, especially once DU drow gets over his perception of Astarion as some kind of wounded bird who needs to be handled with kid gloves.
While Astarion doesn't strike me as someone who'd ever get into wizard sex inflation or whatever gimp parties the Loviatar people are throwing, I do think he likes it when sex is injected with a degree of weirdness, even awkwardness. Keeps him from the temptation of defaulting back to a script like he used to do - even if whatever they got up to wasn't particularly titillating, at least he was present all throughout it, which would be a priority. I think it will take decades for Astarion to figure out what he's actually into into.
In the meantime, he is very fond of his partner's body, his general behavior in bed and of taking his time, also a bit of an oral fixation. Unless purposefully leaving his comfort zone, Astarion prioritizes his own fun and enjoyment because he knows DU drow gets off on being the source of it. This is a very body-worshippy couple overall, but Astarion is the main perpetrator since it is an invigorating experience to not be in the role of the Desired after having his identity revolve around that very concept for so long. Naturally, DU drow lets him do whatever the hell he wants to him and doesn't even demand that he finishes, or that it escalates to actual sex at all. It works out well for them.
315 notes
·
View notes
Note
Do you have a tutorial of where you convert objects after and make them function?
Hi! Yes and no, LOL. 😅
☽✶•.¸(✶•.¸★¸.•✶´)¸.•✶´☾ ☆«´¨`•°°•´¨`»☆ ☽.¸.•✶(¸.•✶´★`✶•.¸)`✶•.☾
Welcome to Murf’s School of Crap and Crap-Making!
School Motto: Prepare to be tortured! For Science!
Lesson #28: FUNCTIONALITY (I love the way you move~! 🎶)
☽✶•.¸(✶•.¸★¸.•✶´)¸.•✶´☾ ☆«´¨`•°°•´¨`»☆ ☽.¸.•✶(¸.•✶´★`✶•.¸)`✶•.☾
Quick Tid-Bits about Buy Mode CC Functionality
At its most basic level, object conversion follows the same basic steps from this tutorial I made here (for TS2 to TS3 converting). Once you have an .obj mesh and your .png/.dds textures, it's really just a matter of Exporting the mesh from a 3d modelling program (Blender or Milkshape), plus the textures into an image program (Gimp, Photoshop, etc), and Importing all of them into whichever TS3-compatible program you wanna work with (I always use TSRW cuz I can't stand Blender).
But when it comes to FUNCTIONAL CC, it really does depend on what the specific function is. Anything that's not Decor is Functional (anything sims can actually use/interact with; or that you can toggle specific options on). But the Buy Mode object types were NOT created equally--some are WAY more complex than others. Some functional objects are static--they don't move around much or do anything fancy (a table, a lamp, etc), and if they do move, it's very limited and doesn't require a bunch of finagling to make them work right. But some of these turds have pieces that are mobile/etc. 😰 When a sim interacts with the object, there's animations & bits moving all over the place & lights flashing & noises beeping & all kinds of crap happening. So objects tend to get more complicated to make as their functionality increases and there are a lot more moving parts.
LEVEL 1: SCRIPTED (Decor) Objects
Scripted objects are fun(ny), cuz that's when you're changing the base function of an object, by giving it a new Script in TSRW/S3PE (The Transmogrifier mod at MTS basically does this for you in-game). For ME, I'm usually turning a decor object into a functional one. Sometimes that's as simple as taking Wall Decor and giving it a script that makes it ACT like a functional wall tv/mirror/etc instead). Other times I'm making my Edible foodstuffs & Drinkable beverages. These often REQUIRE Arsil's Beverages Mod or something, cuz the script is from a 3rd party mod not built in the game itself. So it depends, but most of the time it's super easy & simple (which is why I tend to make these a lot 😅); just a matter of copy/pasting one script into another.
LEVEL 2: VERY simple functional static objects
There's some basic functional CC that follow the exact same steps as the 2t3 tutorial I already linked above--just swap the meshes & textures, adjusting the mesh sizes/positions as needed, and you're DONE (barring any finagling with Shaders (if you want the mesh to be see-thru or have a neon glow or whatever)):
Surfaces & Comfort (tables & chairs/sofas ONLY*)
Lighting (all lighting categories)
Electronics (Radios, Alarms, Clocks ONLY*)
Hobbies & Skills: LN pianos/keyboards
Toys (SN 8-ball, basegame/AMB crafted toys)
Plumbing (toilets, sinks, & SOME tubs)
Appliances (firepits)
Party (the dance rugs, SN fairy houses, FX Machines from LN/SHT ONLY*)
Debug/Transportation: Teleporter, IP Jet-skis
Plumbing (toilets, sinks, & SOME tubs)
* there's likely exceptions I'm forgetting about, but for the most part these are the "Only" super-reliably simple functional objects sims can use AFAIK
LEVEL 3: More involved functional objects
But then there's garbage that either require you to mess with their Joints/Bones (cuz the objects move / have animations when sims use them); or Geostates (the object changes shape/state when sims interact/use them & move them around). Or worse: you have to edit BOTH. 💀
More Involved (but not bad once you get the hang of it)
Electronics (TV screen meshes need careful positioning, computers have joints/bones on the mouse)
Appliances (stoves--the oven doors have joints/bones)
Storage (toy/treasure chests -- the lid has a joint/bone IIRC)
Sports (WA training dummies have joints/bones IIRC)
Debug (WA incense has geostates)
Hobbies & Skills (SN wands have geostates)
Transportation (ITF hover boards & SN magic brooms have geostates)
Toys (teddy bears have a lot more joints, that pretty much use similar steps as CAS CC--the Mesh Toolkit is your friend!)
None of these are really complicated, once you get the basics of how joints/bones & geostates work.
IMO, other than the teddy bear, you can easily & quickly assign joints/bones to meshes manually, without needing the Mesh Toolkit to do it for you at all. But be careful when manually assigning them! If you mess up assigning the joint/bones, the object mesh will move around in effed up ways during the animations.
OR, it might not move at all--which NGL is sometimes a blessing in disguise! 😅 Sometimes--not always!--it really doesn't matter if an object doesn't have bones/joints, esp. when converting super busy meshes that don't really "FIT" within TS3--like medieval/fantasy/sci-fi meshes with all kinds of fancy bits. In those cases, it's easier to say EFF the animations and just make it a static mesh instead--the dresser/chest/oven/etc doors/lids don't open, the car/bike wheels don't turn, but the object still FUNCTIONS properly--the sim can still USE it as intended, which is all that REALLY matters. 😌
Geostates though? That's a bit different. Cuz making geostates mean you have to make multiple different version of the mesh, cuz the object has different States that show up: full/empty, broken/fixed, up/down, messy/neat, finished/incomplete, on/off, open/closed states. Wands & guitars & brooms & beds & boats etc. NEED geostates in order to act right. They're either supposed to move around with the sim a certain way; or change depending what state they're in when interacted with versus left alone/idle. And those states can be freaking annoying to work with, esp. in TSRW. 🤦 Ofttimes it's easiest to break the mesh into multiple individual groups, Import them all into TSRW separately, and then manually assign the geostates group-by-group, not vertices-by-vertices--(guitars & rowboats, I'm looking at YOU).
LEVEL 4: Harder / More Complex (frikkin irritating)
Hobbies & Skills (guitars--too many effing geostates)
Toys (dollhouses, sandcastles, etc have geostates)
Storage (bookcases have geostates) dressers & armoire/wardrobes have annoying joints/bones for opening the drawers/doors/etc)
Pets (basegame fishbowls have a lot of geostates IIRC)
Transportation (IP rowboats have TOO MANY frikkin geostates & joints--I always say never again! and then I make another one, LOL 🤡🤥)
This is where my patience gets frikkin tested.
LEVEL 5: Too Effing Intimidating / Annoying / Hard For ME*
Appliances (pretty much everything else, I don't go here)
Comfort (beds, cribs, etc. have geostates I'm too lazy for)
Plumbing (showers/tubs with moving doors/screens)
Entertainment, Hobbies & Skills (I don't go here)
Transportation (bikes, cars--absolutely not)
Pets (my rabbit mod--never again and I mean it)
* I am notoriously LAZY--once there's one too many steps or things start acting funny or going wrong, I give up HELLA quick, cuz chile, I HATE making CC. Simming is a hobby that helps me relax; not a job I'm required to do for my livelihood--I'm not tryna be stressed over frikkin pixels. There's objects I've never made before; or only made ONCE and swore to NEVER make again cuz I love myself; or I've tried to make and completely failed at and don't care enough to figure out. So I'm not saying these objects are impossible, I'M just not messing with them. 🤣
TL;DR: Your Mileage May Vary!
So yeah, your question is actually harder to answer than it seems, cuz it really depends on what functional object you wanna convert. There's objects I have no idea how to make--I see way too many moving parts, and I run in the opposite direction.

25 notes
·
View notes
Text


granthes' OMSP & Buckley's Resizers Updated
The Changes:
Edited the mesh; it's now slightly smaller with new UVMap. Somewhat a cosmetic change.
Edited the script; 2m up & down is replaced with 5cm up & down. STBL's are also edited to accommodate the said change.
Edited the preset to use the solid colour in miscellaneous patterns to reduce the wait time. And MOST IMPORTANTLY added a second INVISIBLE preset. I personally think this was much needed, since these OSMPs are notorious for not staying invisible.
Now, the important things you need to know before using this:
These will replace granthes' and @buckleysims' files. You need to remove those and install mine instead. Also you CAN NOT mix & match those with mine. You need my edit of OMSP with my edit of Resizers. After installation all you need to do is go to your lots with OMSPs and use the design tool to get the invisible preset.
I added my creator name to files for convenience so you guys will know where you get these or at least that they are altered. Although, I realise that my tumblr name and creator name doesn't match so that's a fallacy on my part. Anyway, I didn't remove Buckley's original credits in the STBLs so there is that.
I tested these in a relatively clean The Sims 3 folder and save that I use for testing stuff, so everything should be okay. If not, do tell.
- Credits -
granthes for the OSMP and the script
Buhudain and @buckleysims for the resizers
Made with: GIMP, s3oc, s3pe, Texture Tweaker 3 and Blender
@kpccfinds @sssvitlanz
- DOWNLOAD -
:: MEDIAFIRE | SFS ::
226 notes
·
View notes
Text
Some PSO memes I edited and/or redrew earlier this year!
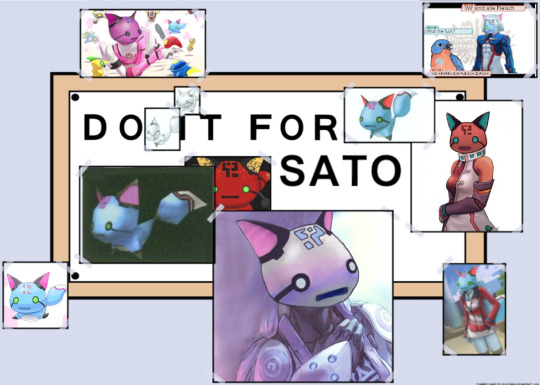
Firstly, the "Do it for Sato" meme, where I tried to fill up all the squares with different pictures of Sato... then VERY QUICKLY ran out of them and had to improvise.
I'm not entirely sure whether the Vivienne, Karen, or Rico pictures are official art or not. The one of Elenor up top isn't, but I can't seem to track down which site it was on (the only thing I remember is that it was in Japanese), but that little red Sato in the center is a t-shirt design that looks to be from -Aye on Redbubble, considering they have other similar designs available.
Then, afterwards, as celebration, I made a Pioneer 2 script captioned version of the "[Sato intensifies]" meme that pops up everywhere, which no joke, led to be making enough goofy small animation edits that I ended up with a cheap 3 month gig helping someone do website graphics.
More below the cut!

Then I started editing together a "Pioneer 2 mentioned!" (With a "No Heals, We Die Like Newmen" hoodie) meme out of that K-on pic... then realized the art wasn't going to mesh together at all, traced the edit for lineart, then figured out that, once I had the lines down, I'd been editing enough to not be half bad at texture and painting, which led to this:
"When you get the Phantasy Star Meme Autism instead of the Good at Math autism."
A total paintover of the same screenshot as above, which I believe came from this gallery, though there's another large dropbox of excellent high-res screenshots posted on Reddit that I'll link just in case.
Then a variation of this meme provided the pose reference for the FOnewearl, though at this point I was still straight-up tracing the area from the fingers to the shoulders, but on the rest of the outfit I started actually trying to sketch things out myself, which led to the Sato version of the hat I use in-game and the Sato to the side mimicking the same pose, but also the knowledge that I was dangerously close to learning how to make art properly...
But also these were all done in GIMP with a mouse, so this picture took like fifteen fucktrillion years, so I decided to animate it and go feed my mags for a while.
#PSO#Phantasy Star Online#Ephinea#PSO:BB#Sato#SEGA Dreamcast#FOnewearl#newman#Force#BTW in the vague lore I've put together for my FOnewearl Kepler#Her main Sato is named Chat#Purely to occasionally say “Chat is this real?”#Kepler memes
36 notes
·
View notes
Note
Do you have any tips/useful information for people who want to start making audio rps?
(Also love ur content sm!!! Mitch is the most lovable little guy)
Aw thank you so much! Love him too!
This is a great question, had to think about it for a bit;
If you want to dabble with making audios, feel free to start off with public scripts! I think there's subreddits like ASMR script haven (IIRC?) that has public scripts that can be filled by anyone. Just be sure to read the author's conditions carefully i.e. credit, terms of use, what can be changed etc. Right at the start I recorded a public script to try and get started, it's a great way to just jump right into making something to learn the ropes of it without also first having to write an entire script for it too. Filling public scripts is a fantastic way to start off, however I reckon writing your own stories is a major part of the fun!
You don't need an expensive mic, but audio quality is a very important factor. Do some test recordings and listen back to them (with headphones!) and see how it sounds. This is especially important for whispered scenes (DO NOT get too close to the mic or breathe on it!) or loud scenes (DO NOT peak the mic!). If your mic has a gain / input dial, play with that before recording! Just start with mono to begin with, play with stereo if your mic supports it after you become familiar with it. Aim for your recording to be no louder than -6db at the highest, if you can keep your voice roughly between like -20 and -6 that tends to sound reasonably natural.
Do your best to eliminate external sounds! If you have AC or anything like that on, turn it off. I have to shut down my main PC and record with only my editing Mac on because the PC fans are much louder and my mic is very sensitive! There'll pretty much always be background fuzz, some mics will just have some, but try to make your room as quiet as you can. Your software may have some background noise removal tools, I use filters for that (expensive so I can't recommend them), but DO NOT use the noise removal tool in Audacity! It's terrible!
Speaking of, Audacity is decent to get started with. It's good basic recording software, plus multiplatform. For a while I preferred recording on Windows with Audiodope, also very simple, plus I liked that it asks me whether I wanted to record in mono or stereo first in case I forget to switch, I currently record on Mac with ocenaudio which does the same, while Audacity won't ask, you have to go into settings. Anyway Audacity is okay to start with for editing, it's free, but from what I understand it's a "destructive" editing software in that after you make a change like adding a filter, you can't then go back in and change it other than just undoing, which I really don't like, plus changing the timing of things looks fiddly. I don't know what to recommend to move up from, I've heard good stuff about Reaper but it looks very complicated. Avoid Adobe unless you have a free subscription from somewhere else. I edit entirely in Final Cut Pro so I can't recommend that unless you're on Mac, plus it's my old work software and expensive! If you need sound effects, I use freesound.org, there are other great free resources as well, but make sure you check each individual sound effect's license before use.
Once you've edited the audio and want to turn it into a video, I've heard good stuff about Da Vinci Resolve and Kden Live, both are free! Make a video canvas of 1920 x 1080, FPS doesn't especially matter if you only have a still thumbnail, 25 or 30 is fine, and render it out as a h264 mp4 if you're not sure what to select! Good compression for internet video, good for streaming. Try to record and export your audio as wav if you have enough space, wav is uncompressed audio so it maintains full quality but they can get large.
I also make my thumbnails in-edit but you may want to use external software like Gimp to make them. Avoid getting random stuff of google especially anime boys / girls, and definitely don't ever use an artist's stuff without asking for permission + giving proper credit. Using pre-built generators like Picrew is totally fine, just be sure to credit where you got it from, but 100% avoid AI generators, obviously. Be careful with Adobe stock images, apparently there's AI slop in there too. You don't need art for audios though, they're a nice to have bonus, but many of my most viewed videos have no art at all. If you need background images, I like unsplash.com because it has a free license! Read over it yourself but basically you're able to use pretty much any image they have in your videos!
Just jump in and try making something small, never start with your magnum opus! I started with the introverted incubus character because I'm a very shy person myself, it was an easier role to get started with! If you want to start writing your own scripts too there's a lot we could talk about there as well, just try to picture the scene from the perspective of the listener, what they may be thinking or feeling at any given moment, not just the perspective of the character you're going to be playing!
This was a lot and I don't think I covered much, I hope some of it helps though!!
49 notes
·
View notes
Text
ACNL CUSTOM VILLAGER/NPC/NPC VILLAGER GUIDE 2025
PLEASE READ THROUGH EVERYTHING BEFORE ATTEMPTING!!!
I AM NOT RESPONSIBLE FOR ANYTHING THAT HAPPENS WITH YOUR 3DS OR GAME!!!
PLEASE BACKUP YOUR FILES BEFORE ATTEMPTING!!!
Hi! I'm here to make a guide on how to make a custom villager/switch an npc to a villager in 2025, since there are not a lot of guides, and any guides out there are now old and obsolite
WHAT YOU'LL NEED:
A hacked 3DS with CFW
Computer
7-Zip or Winrar
Animal Crossing: New Leaf (cartridge or digital)
Any Image Editing Software (i.e FireAlpaca, Gimp, Photoshop)
Ohana 3DS [link]
Ohana 3DS Rebirth [link]
HxD [link]
First things first- you're gonna need the romfs files of your game. The way to get them is through GM9 (GodMode9) The way to acsess GM9 is to turn on your 3DS, and as it boots up, hold down the START button.
Besides editing the sprites, this will be the LONGEST part out of this entire process. The romfs has EVERY SINGLE GAME ASSET, so youre basically dumping every single thing from the game onto your SD. For me, this took ALMOST 2 HOURS, so be ready!
FOR CARTRIDGE
Go to [C:] GAMECART ()
Go to the file that has .3ds (NOT THE .trim.3ds)
Click NCSD image options…
Click Mount image to drive
Click yes when prompted
Click content0.game
Go down to romfs and hit Y to copy the romfs files
You can now paste the romfs files to any folder on your SD, but if you want to be organized, created a designated folder for your romfs on the root of your SD
To get to your SD, go back by hitting B until you get to the first page
Go to [0:] SDCARD and click on it, and you'll be in your SD card.
Find the folder you'd like to paste your romfs in
Open the folder and hit Y to paste the romfs, and now you wait
FOR DIGITAL
Hit the Home Menu button in GM9
Go down and click on Title manager
Click [A:] SD CARD
Find Animal Crossing: New Leaf
Go to Open title folder and click it
Click 00000000.app
Click NCSD image options…
Click Mount image to drive
Click yes when prompted
Click content0.game
Go down to romfs and hit Y to copy the romfs files
You can now paste the romfs files to any folder on your SD, but if you want to be organized, created a designated folder for your romfs on the root of your SD
To get to your SD, go back by hitting B until you get to the first page
Go to [0:] SDCARD and click on it, and you'll be in your SD card.
Find the folder you'd like to paste your romfs in
Open the folder and hit Y to paste the romfs, and now you wait
When that is finished, power off your 3DS, eject your SD, and put it into your computer.
Move your romfs to your computer or a USB, that way you don't have them clogging your 3DS' SD and you have a backup of the vanilla files
To keep things organized, make a folder to copy any files you're going to edit to that folder.
Finding NPC files
FOR VILLAGERS
romfs> Npc> Normal> Model
There you can find the .bcres files of every villager
FOR NPCs
romfs> Npc> Special> Model
There you can find the .bcres files of every NPC
Open Ohana3DS rebirth to open and view the .bcres files so you can find the villager or NPC you're looking for
Once you find them, copy them to your desiganted folder
If you want to edit a villagers name you'll need the STR_NNpc_name.umbst file
To find the file go to romfs> Script> Str and find the file, then copy it to your designated folder
If you want to edit your villager's icon go to
romfs> Item> Model
the file will look like brm_(villager id).bcres , FOR EXAMPLE brm_mus17.bcres
When making an NPC into a villager, you're going to have to find a villager to replace. FOR EXAMPLE I edited Sabel and replaced Penelope, so I renamed Sabel's file, hgc.bcres, to mus17.bcres
EDITING THE VILLAGER/NPC
use this guide when it comes to editing the textures and renaming your villager [link]
LOADING YOUR FILES
Now that you have finished your character, heres how you'll put your files on your SD so they'll load into the game
Put your 3DS's SD card into your computer
on the root, located the luma folder
now go to luma> titles> and find Animal Crossing: New Leaf's title ID
US title ID's are
0004000000198F00 for New Leaf
0004000000086300 for Welcome Amiibo
If there is no title ID folder for ACNL, make one
Inside the title ID folder make a romfs folder
In the romfs folder, make a folder for whatever files you edited, so if you edited an NPC, the script, and the NPC icon make 3 folders and name them: Item, Npc, Script
Lets start with Npc first, if you edited a villager or replacing a villager with an NPC, open the Npc folder, make a folder named Normal, open the Normal folder, and make a folder named Model, and in the Model folder put your .bcres file
So luma> title> (title ID)> romfs> Npc> Normal> Model
If you edited an NPC open the Npc folder, make a folder named Special, open the Special folder, and make a folder named Model, and in the Model folder put your .bcres file
So luma> title> (title ID)> romfs> Npc> Special> Model
Now with the script, open the Script folder, and in the Script folder, make a folder named Str, and in the Str folder is where you'll put the .umsbt file
So luma> title> (title ID)> Script> Str
Finally, the villager icon. In your Item folder, make a folder named Model, and in your Model folder, put in the .bcres file that is the villager's icon
So luma> title> (title ID)> Item> Model
Once you have finished that, put your SD back into your 3DS, turn on your console, boot up Animal Crossing, and your custom villager should be there waiting!!
That's All!!
#fan#fandom#animal crossing#animal crossing new leaf#animal crossing hacking#hacking#hack#acnl#ACNL#custom#customs#3DS#3ds#CFW#cfw#rom hack#rom hacking#guide#animal crossing hacks#mod#modding#tutorial#nintendo#Nintendo#Nintendo 3DS#nintendo 3ds#villager
17 notes
·
View notes
Text
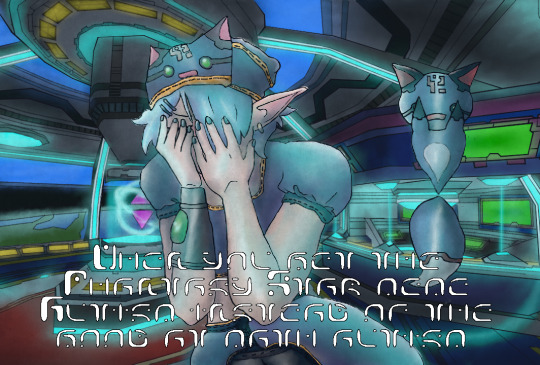
how i (try to) make my text readable
so as a lifelong glasses wearer north of 25, i cannot see shit! I love the look of text on screenshots, but also i have spent a nonzero amount of time squinting at pale text on a busy background and thought "i cannot fucking read that."
there are lots of ways to do this. my method is not perfect. I am constantly tweaking things to try and make the text more readable. if you have suggestions about making the text more readable, please share!
Step One: Open the screenshot in your photo editor
I start with a screenshot and a script. I use Gimp, a free and open-source photo editor, and I pretty much only use it to put captions on my screenshots, so please do not ask me how to actually edit pictures, I do not know. also, please do not ask me how to do this in any photo editor, i prefer to use this one because it is free, ad-free one that I can own legally and download safely.
open-source software RULES, btw.
Step One: Add a text layer with your dialogue

I use the text tool to add the dialogue to the image, copying and pasting from my script. This is not legible. My eyes hurt. I cannot read that, so I can't tell if I've made any typos.
Step Two: Add a black background to the text.
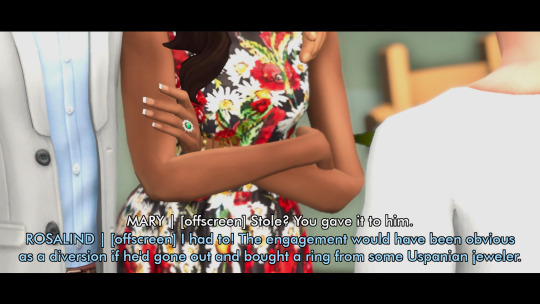
In, Gimp: Right click text layer > "Alpha to Selection." In the top menu, Selection > Grow > 3 pixels. Top menu: Layer > New Layer. (I name the new layer "Text BG ##") Use the bucket tool to fill the selection on the new later.
There's probably a shortcut to doing this in other photo editors (hell, might be a shortcut in Gimp.)
Step Three: Blur the background

In Gimp: Top Menu > Effect > Blur > Gaussian Blur. This may be a step backward in terms of readability, but I like how it looks. Let's try a few other things to help the reader, shall we?
Step Four: Drop Shadow
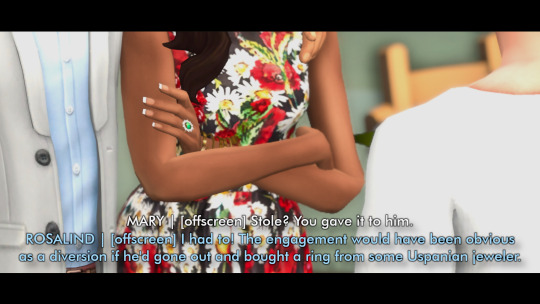
In Gimp: Top Menu > Light & Shadow > Drop Shadow. Makes the text stand out a bit more. Still not particularly readable, especially the blue on blue on the left side of the image.
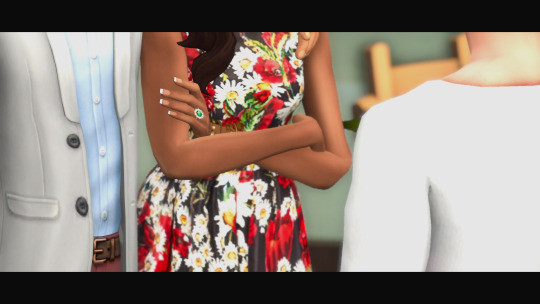
Step Five: Gradient layer
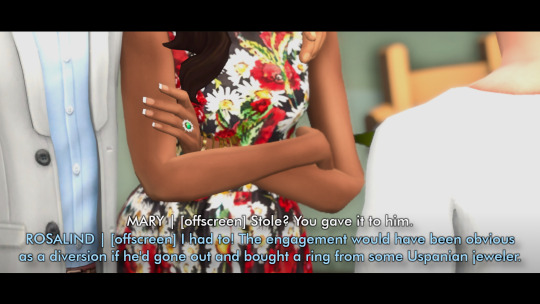
Create a new layer underneath the Text BG, and then add a transparent gradient over the entire image.
This is step is slightly more involved, so I'll just link you to a guide instead of explaining myself: "How to create a gradient transparency in GIMP."
Step Six: Further Tweaks

I still wasn't satisfied with the readability of the text. I duplicated the gradient layer to create a darker background underneath the text. I also repeated the drop shadow step on the Text BG layer. You could also make the text larger or bolder, change font colors, grow the selection by 4 or 5 pixels instead of 3, or skip the blurring step. I change my method frequently to try to get the best look for each individual image, and I don't always do a perfect job.
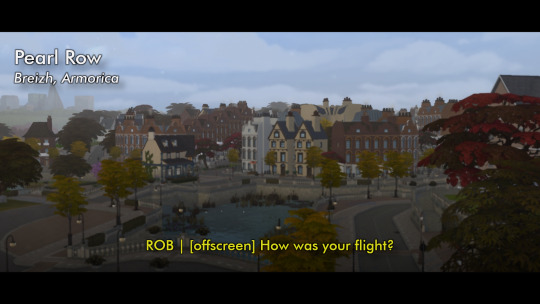
This is an area where I constantly innovate. I want people to be able to actually read my text, so I try not to let myself be satisfied with "good enough." When I take screenshots, I try to do it with an eye for compositions that give me a nice, blank space on the bottom for text, ex.


132 notes
·
View notes