#gimp tips and tricks
Explore tagged Tumblr posts
Visit Tumblr Blog
Explore Tumblr blogs with no restrictions, modern design and the best experience.
Last Seen Tumblr Blogs


Fun Fact
Tumblr was named as a finalist in Lead411’s New York City Hot 125 in Aug 2010.
Video
youtube
GIMP - How To Make Images Brighter
A short tutorial showcasing how to make your images a bit brighter using GIMP, a free photo editing software.
#youtube#gimp#how to use gimp#gimp tutorial#tutorial#free to use#free to use software#gimp tips#gimp tricks#gimp tips and tricks#gimp editing#gimp tools#photo editing#photo editing tips#photo editing hacks
12 notes
·
View notes
Text

I've only got gimp to work off of but omg there has to be a better way to get rid of this pattern than just smudging it around to look like folds for an hour
#wish I had photoshop but I aint giving adobe money#i need to learn lil tips and tricks for gimp#i mean theres gotta be an easier way right??#anyway heres a preview of some new recolors coming soon~#sims 4 recolor
0 notes
Text
How to fix transparent PS2 textures in Gimp Tutorial.

After experimenting different methods found from forum sites & YouTube, here are my methods. Keep in mind, these methods depend on which texture you're dealing with.
0 notes
Text
How to take screenshots and edit (when it's just not your thing)

Alright-y!
So, I have over the years learned how to use reshade and to edit my pictures. I am really not a natural on these things, so this is very much to help others who are as aesthetically challenged as I am. I have to have certain "rules" to follow, because I can rarely just see if a picture will turn out well or not.
We all need to realize where I started. We're talking using FRAPS to take screenshots and then running holy colours batman! to get some sort of effect.
Now, I'm not one to buy fancy stuff and to pirate certain programs isn't really my thing either. So we mend and make do!
Also, I am by far very good at taking screenshots and edit, but I have learned things and hope that it might be useful for someone!
A word on light
One thing I've learned is to work with is light. Where the light is is where the focus will go. This doesn't mean that a person has to be in the spotlight, but if they aren't - try to make that a more conscious choice. I am no pro at this, but I have to say that some of my favorite screenshots are where the light is just good. It focuses the eye or it just give a vibe.


(and yes, for some reason all of my faves are of Agnes, which is a bit annoying since Amanda is my fav-character, lol)
This is also where reLight comes in handy. Yes, it's behind a paywall but there are ways that you will have to figure out yourself.
Great tutorial here on reLight by @pictureamoebae! (if you want to really understand reshade, do check out their tumblr. So many helpful tips and tricks!)


Posing
Posing is fun! I don't fully story-tell with my sims, most of it is gameplay. But I do like to pose for family pictures or to enhance something that is going on.
What you need is Andrew's Pose Player and Teleport Any Sim or Wicked Whims.
Now, I haven't figured out how to use WW for children and younger to pose, so I use both. And I like @ts4-poses to find poses. Eventually, you'll find your favorite creators and can follow them directly.


Angles and vibes
Here's a trick. Work with angles. I am a master of pictures with zero vibe, just a face. Those can be ok, and sometimes that's what you have - but try to angle your shot a little.
Or add clutter, focus on that and let something out of focus happen in the background.
Or just go higher, take the screenshot from above.
Or don't focus on your sim at all, focus on something else that adds to the story/post.


Take the screenshot
The light is good, the angle great, the poses are in place and now, we need to take the actual screenshots.
I am a huge fan of reshade, I use version 4.9.1 because that works for me and the presets I use. No need to update reshade unless it becomes too old.
It can be really difficult to to find a preset that you like. I mostly use birdie by @monasims, tawhay by @windslar and paperbacks by @literalite. But I have tried many.
I like this youtube-tutorial on how to make your own preset, which also helps if you wish to modify one that you've downloaded. I do always recommend learning how to use ADOF and CinematicDOF to help focus the image on what you want to capture. I also strongly recommend @pictureamoebae's Foundation.
To take pictures, use the tab-key to leave the UI behind and use Q and E to go down/up in your game and then the mouse to angle. I use print-screen to take my screenshot, but that's something you set up when installing reshade so that's different for everyone.
And now you have your screenshot and it's time to open an editing program. Cheap as I am, I open GIMP.
Let's edit!
I don't use many steps. Since I can't use fancy photoshop actions I have to make all the steps by myself and well - I am human and therefor lazy.
Resize and start to think of a post
First things first. I cut my pictures to work for the tumblr ratio. I actually don't resize them smaller anymore - because when I change layout on my tumblr I just feel as if it messes it up. Now, I don't have a huge screen and my screenshots aren't massive, so it's not necessary either.
My images will be 1017x1017, 1525 x 1017 or 678 x 1017.
Once this is done, I also try to look at how they will go together. If I want a post of just squares I need to have an even number of images. Sometimes I want a landscape image as a sort of heading, or one in the middle with squares around it. It depends on what I want to convey.
This is by no means something that comes natural to me - I am aesthetically challenged after all. Sometimes, I just have 5 images and have to make do.

Resized
Topaz Clean
Yup, it's awesome. No, it doesn't come with GIMP. Yes, there are ways to work around this. You will have to find those ways on your own.
But I have to say, it does makes wonder for the images. I have completely stolen @sojutrait 's settings because I really like her style and therefor - I copy. I have added a bit more sharpening, but otherwise it's completely hers.

Topaz Clean:ed
Curves
Curves my beloved! I use curves for two things! Take out the yellow (aka increase the blue) and to brighten/darken the image!
I do sometimes matte the image too and here's a good tutorial for GIMP users on how to use curves in GIMP (for a matte look)

Less yellow/more blue

Brighten the brights (but I did not brighten the darker parts)
Layers, curves and increase the light where needed
Now, remember that we need light? Sometimes, a screenshot just doesn't have the right light. So I duplicate the layer, use the free marking tool around what I wish was brighter and put that on a new layer.
Then I use curves to lighten the layer with what I want to brighten and to make darker the layer with what I want to put less focus on (here's an ok youtube video on the subject).
Below, you can see the effect on my images.


Sharpen
Pretty basic. I subtly sharpen the image again. Even if I use the sharpening in topaz clean I do like to add an extra touch before it's time to save and move on.

So sharp!
PSD and UI
I do like to use psd's now and then. I mainly use @windslar's psd-collections and @deathbypufferfish's Build-a-Sim Icon Pack.
It's mostly to help give some info about the post or when my sims age up and I want to show their traits.
I do use the UI-info sometimes. If I do, I go into Game Options in the game > Accessibility > UI-scale and just drag that up a bit. Then I copy/paste that part onto the image I'm using.


Done!
That's pretty much it. Thing is, to post good edits you have to actually take good screenshots. As annoying as it is, it's like cooking: it all comes down to the ingredients. I hate cooking Yes, editing does help but I think my main journey has been to learn to take better screenshots from the start.
The picture below is from resized to done.
Hope this might help someone! I will probably learn more and more as I continue to post, but this is where I am so far in my journey!
151 notes
·
View notes
Note
hi tumblr wip! is there anything that can be done about images stretching to the full width of a tumblr post? i make art and images that are sometimes under 540px, and there seems to be a point where they will stretch automatically to 540px. it makes things like pixel art or otherwise small images look terrible!
Answer: Hi there, @moxley!
We’re really glad you asked this question, as we love getting the opportunity to share the tips and tricks that are applicable in this area.
First off, here are the rules of our image stretching:
On mobile apps and mobile sites, we always stretch images to the full width of the post—since a small image on a small screen doesn’t make for an easy viewing experience.
On the desktop site, we only stretch images to the full width of the post if the image is at least 300px wide and/or 600px tall.
Any images that are placed side-by-side are always stretched to fit their frames, no matter the image’s dimensions or the viewer’s platform.
However, the vast majority of devices and browsers use antialiasing in their default image scaling algorithms. This, as you point out, doesn’t play nicely with pixel art at all. Boooooo!
So, how can you preserve your sharp pixels with 100% consistency for your viewers? The answer is simply to upscale the image yourself before uploading. To keep the pixels square, you’ll need to resize by factors of 100% (200%, 500%, etc.) and use a simple upscaling algorithm that doesn’t use antialiasing. For example, in Paint.NET’s image resize dialog, you can use “Resampling: Nearest Neighbor”, or in GIMP’s, “Interpolation: None”.
The trick here is to resize your pixel art to dimensions above 540px wide so that every viewer’s device is actually forced to downscale the resultant image instead. That way, instead of the resizing algorithm making up details by blurring the pixels, each original pixel is preserved as a perfect square.
We really hope this helps you and the other pixel artists out there. Please, have a great day, week, and month. No, in fact—a great rest of your Tumblr experience, however long it may last. Of course, if you have any other questions on this subject, we will be happy to answer those too!
466 notes
·
View notes
Text
October Week 5 - Getting Crafty
This week is all about getting our hands dirty and working on those fantastic books we’ve been making. Papercrafting and decorating and fancy writing, if that is your chosen medium. Or even how to make pretty digital pages! This week is about bringing the grimoires to life! Lots of links and ideas this week for inspiration (grimspiration?) on ways to put our books together!
Monday - Digital Mediums
I know some of these require payment and subscriptions, and there are plenty of other free options out there if anyone knows of them feel free to add them in a reply or reblog!
Gimp - Photo/ Image Editing
Adobe Photoshop - Photo/ Image Editing
Word/ Excel (Or wordpad, cause its free) -
Tuesday - Papercrafting
Scrapbooking
1 - Tips and Tricks
2 - Ideas
3 - Witchy Ideas
A general search on the internet, Youtube, or Pinterest will give a bunch of other ideas! Some things I've done in my own include pages with envelopes and scraps of paper with sigils on them, s bit of foil on a page dedicated to mirror magic, and a functioning, turning wheel of the year!
Junk Journaling
Pinterest - Witchy Junk journal Ideas
Youtube - How to Junk Journal
Bullet Journal
How to
Witchy Themed
Witchy Ideas
Journal
How to
Guide to Journaling
Wednesday - Stickers and Ephemera
This kind of speaks for itself. But like anything on the crazy old internet, its all about tags and searching. Think about the tags you follow here on tumblr. Witch, witchy, grimoire, dark academia, vintage, plant and flower, magic, magick, wicca, paganism etc. Be as specific in some cases as you can be, though a vague search will sometimes lead you to what you're looking for. Below are a few places I've found things to use in my papercrafted grimoire journey.
Amazon/ Temu
Etsy/ Bigcartel/ Depop any of those!
Small business/ Artists
Art from friends
Thursday - Other things to add and other links
No draw art ideas!
So you want to build a grimoire - Patheos
Laurel's Guide -Tumblr
Cauldron and Brew - Wordpress
Don't hesitate to add anything you can think of both written/ typed or physical trinkets to your grimoire. It doesn't have to be neat and trim, unless that's what you're going for. It can be overstuff and gritty. Whatever works for you! Add twigs in the shape of runes, charms, crystals, leaves or flowers, plants, anything! Locks of hair, photographs, charts and graphs, anything and everything you can think of. It is literally yours to create how you wish!
Friday - do the thing!
Now that we’ve covered a bunch of links with all kinds of ideas, get crafty! Make your pages! Or take the pages you’ve started and decorate them! Make them your own! Whether your grimoire is form over function or function over form, make it yours!
Don't let these be the limit of your creative searches! Find more online tools, find more physical books, find inspiration for your creation anywhere and everywhere, but most importantly, express yourself freely within your grimoire!
-Mod Hazel
#2024 grimoire challenge#grimoire#grimoire challenge#witchcraft#paganism#witchblr#2024 gc#book of shadows#dark academia#occultism
19 notes
·
View notes
Text
Tiny cc making tips
Over the years of making cc i've picked up some tricks along the way. These are just some of them in a tiny format. So not a tutorial of any kind, just some tips and tricks! I'm sure many are already doing some of these things and some might require you to Know things already. This is NOT the only one way to do things, it's just how I do things. I wont go in to super detail since it's not a tutorial but i'll try to add as much info as possible and then let you figure it out. Or send an ask.
When naming things, images, packages, blends, whatever files in relation to cc making, create a naming system! Trust me when i tell you it will make your cc making process a lot more streamlined. My system is as follows: "BG maxi dress flower on shoulder pink fem". What we learn here is that it's a base game maxi dress with a flower on the shoulder, and it's the pink swatch. This way, if it's a blender file, i know i can export the diffuse map directly inside blender if i need it later without having to locate the dress in s4s. Fem is there to show what frame the mesh is from without having to open it. Same goes for "masc" items. For example "CL open jacket long sleeves turtleneck camo blue". This tells us it's city living and an open jacket with long sleeves in camo blue and has a turtleneck. Note: sometimes a pack name will have a similar abbreviation, like Cottage Living. My way is just adding another letter or two, COL. Or if the pack only has one word like Toddlers or Strangerville, you could then call it TOD and SV for example.
Make folders! One thing i find that makes things a little easier is that i make folders separating things. So first i have the project folder inside my cc making folder. Let's say i'm making a short satin dress, i'll make a folder "Short satin dress". Inside there i'll make a folder for blender files and one for image files. Inside blender folder i make a folder for lods and inside image folder i make folders for swatches and one for maps. If you're making a fem and masc framed version of the same thing, separate folders by frame as well, so you have a main folder inside "Short satin dress" for fem and one for masc etc and so on. This is so you don't mix textures and blend files up, because for example, sometimes the diffuse map sits differently on a masc frame mesh compared to a female framed mesh.
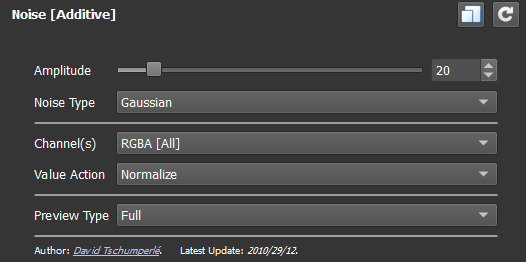
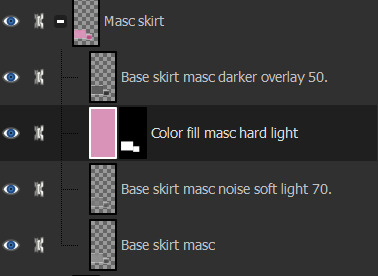
One thing i hate about making cc (other than MAKING cc.........) is making textures. I'm not good at it and this d.o.a game eats textures like it's the last can of catfood in the world, compressing it to hell and back. One thing i've learned and my friend @faaeish told me about is that adding a bit of noise helps! What i like to do, once i have finished my base layer i know i will recolor later, i make a noise layer out of it using "Noise [Additive] with this plugin and i do Output mode: New layer(s) at the bottom. I use gimp but this plugin can also be used with nearly every program under the sun, including ps. It's also online based. You can play around with the settings but i like to use something like below. One thing i realized well, just the other day is that, if you use RGBA noise instead of gray noise, it adds a bit more depth and texture. But not too much! Just a smidgen, to give the texture and the color fill layer more pixels to cling to and it will minimize the risk of artifacts. Ugly blobs, essentially. Once i have that noise layer i alpha to selection on my base layer, invert and sharpen and click the noise layer to remove the access around that the filter adds. I'll also clean up any alpha channels, filling them with white if i need to. Then i play around with layer modes on the noise layer, add a color fill above that and maybe i'll duplicate the base layer and put above the color fill layer. Like below is an example.
Next is a thing for blender, tiny miniature tip but that i find helps me. And that's this little plus sign button when you "Save as.." in blender. So what you need to do when you FIRST save some edits on your mesh, say you swapped the sleeves out. You "File-Save as..-bg no pockets tshirt rolled up sleeves blue fem LOD0_edit0. 0. Zero is important. You need to save the very first save as 0. Next time you make any changes you Save As and click the plus and it will just change 0 to 1. Next time 1 to 2 etc etc. To me this makes it easier to go back in case i mess up. Which i sometimes do. Like the other day i noticed fingers were messed up and i had to go back to nearly the beginning of my edits to pull original fingers and sleeves from. And i always save right before i make any major edits.

That's all i can think of right now. I'll put a read more in case i think of more later. Hope this helps!
ooo 👻 welcome to under the cut aaaa 👻. But look at this photo i took of a photo i found among my grandmas old stuff. I guess the crops were hung that year.
30 notes
·
View notes
Text
So to anyone who's downloaded my cc and thought 'omg why are there weird lines on everything and why's it so shiny', I'm very truly sorry. My old computer ran Sims 4 begrudgingly and on fairly low settings. Having recently gotten a new computer that actually has a graphics card, I was entirely clueless as to the travesty I was unleashing by not paying enough attention to normal maps and speculars.
I'm drawing up a list of everything that needs to be re-released, but if you've noticed issues or want something in particular moved to the front of the queue, drop a message and I'll attempt to work on it sooner rather than later.
Oh, and if anyone has tips and tricks on how to do specular and normal maps in GIMP, I would be quite grateful.
#sims 4#simblr#sims#the sims 4#ts4#my cc#sims 4 cc#ts4cc#ts4 custom content#i hate speculars and normal maps#but i now understand why everyone else does too
24 notes
·
View notes
Text
How to Create Designs That Work for Your Print-on-Demand Business
Running a print-on-demand business is both exciting and challenging. Whether you're selling on platforms like Redbubble or managing your own store, creating designs that resonate with your audience is the key to success. But how do you craft designs that not only look great but also sell? In this blog post, I’ll guide you through the process of creating designs that work for your print-on-demand business, with tips and tricks tailored to help you stand out in a competitive market. Let’s dive in!
Why Design Matters in Print-on-Demand
In the world of print-on-demand, your designs are your product. Unlike traditional retail, you’re not selling physical inventory—you’re selling ideas. Your customers are drawn to your creativity, so your designs need to:
- Capture attention: Bold, unique designs stand out in search results.
- Resonate with your audience: People buy designs that align with their personality, values, or interests.
- Fit the product: A design that looks great on a t-shirt might not work on a mug or phone case.
Understanding these principles is the first step to creating designs that work for your business.
Step 1: Know Your Niche
The most successful print-on-demand businesses are niche-focused. Instead of trying to appeal to everyone, target a specific audience.
- Research your audience: Who are they? What are their interests, hobbies, or values?
- Find trending niches: Use tools like Google Trends or Redbubble’s trending searches to discover what’s popular.
- Create for your passion: If you’re passionate about your niche, it will show in your designs.
For example, if your niche is cozy, minimalist designs, you could create products that appeal to people who love hygge-inspired aesthetics.
Step 2: Brainstorm Unique Design Ideas
Once you’ve identified your niche, it’s time to brainstorm ideas. Here’s how to get started:
- Use keyword research: Tools like Redbubble’s search bar or Pinterest Trends can help you find popular themes.
- Look for inspiration: Check out competitors, social media, or even nature for fresh ideas.
- Think seasonally: Holidays, seasons, and special events are great opportunities for themed designs.
Pro tip: Keep a notebook or digital folder for design ideas. Inspiration can strike at any time!
Step 3: Master the Tools of the Trade
You don’t need to be a professional graphic designer to create stunning designs. With the right tools, anyone can make high-quality artwork.
- Free design tools: Canva, GIMP, and Inkscape are great for beginners.
- Professional software: Adobe Photoshop and Illustrator offer advanced features for experienced designers.
- Mockup generators: Use tools like Placeit to see how your designs will look on products.
If you’re new to design, start simple. Minimalist designs with clean lines and bold typography are often bestsellers.
Step 4: Optimize Your Designs for Products
Not all designs work on every product. To maximize sales, tailor your designs to fit specific items.
- Consider placement: A design that looks great on a t-shirt might need adjustments for a mug or sticker.
- Use high-resolution files: Print-on-demand platforms require high-quality images to ensure sharp prints.
- Test your designs: Upload them to mockup tools to see how they look on different products.
For example, if you’re creating a design for a phone case, make sure the key elements aren’t cut off by the edges or camera hole.
Step 5: Write SEO-Friendly Titles and Tags
Even the best designs won’t sell if no one can find them. That’s where SEO comes in.
- Use relevant keywords: Include terms your audience is searching for, like “minimalist phone case” or “funny coffee mug.”
- Write descriptive titles: Instead of “Cool Design,” try “Retro Sunset Design for T-Shirts and Stickers.”
- Add detailed tags: Use a mix of broad and specific tags to improve your visibility.
For example, if your design is a cozy winter illustration, your tags might include “winter mug,” “cozy vibes,” and “holiday gift ideas.”
Step 6: Promote Your Designs
Creating great designs is only half the battle—you also need to market them.
- Leverage social media: Share your designs on Instagram, Pinterest, and TikTok.
- Engage with your audience: Respond to comments and messages to build a loyal following.
- Collaborate with influencers: Partner with creators who align with your niche to reach a wider audience.
You can share behind-the-scenes content, like your design process or mockups, to connect with your audience on a personal level.
Step 7: Analyze and Improve
Finally, track your performance to see what’s working and what’s not.
- Check your analytics: Platforms like Redbubble provide insights into your sales and traffic.
- Experiment with new designs: Test different styles, themes, or niches to see what resonates.
- Listen to feedback: Pay attention to customer reviews and comments to improve your designs.
Remember, success in print-on-demand is a marathon, not a sprint. Keep learning and adapting as you go.
Final Thoughts
Creating designs that work for your print-on-demand business takes time, creativity, and strategy. By understanding your niche, mastering design tools, and optimizing your listings for SEO, you can build a successful shop that stands out from the crowd.
You have the power to turn your ideas into products that people love. So, what are you waiting for? Start creating today and watch your business grow!
Looking for unique, cozy designs that inspire and stand out? Visit my Redbubble shop to explore a collection of creative products made just for you!
#Print-on-demand business#Redbubble tips#How to create designs#Print-on-demand design tips#Redbubble design ideas#Niche marketing for POD#How to sell on Redbubble#Print-on-demand success#Redbubble SEO tips#Best tools for POD#Graphic design for beginners#Trending print-on-demand niches#How to optimize designs#Print-on-demand marketing#Redbubble product ideas#Cozy design inspiration#Minimalist design tips#Seasonal design ideas#How to use Canva for POD#Redbubble mockup tips#Passive income with POD#How to sell art online#Redbubble shop strategies#Print-on-demand trends#How to grow a POD business#Print-on-demand branding#Redbubble keyword research#Social media for POD#Redbubble artist tips
3 notes
·
View notes
Note
heyy jo!! first off let me just say, i LOVE your whole theme it’s so prettyyy!!!
your yt channel legacy is too cute!!
and your cc is sooo beautiful, whether it’s sims, lots, b&b cc, or cas cc!!!
i recently saw the patterns you uploaded and i have been wanting to make patterns for myself and upload some for others but, i don’t know where to start!! lolz
do you have any tips or tricks? thank youu!! 🤍
hellooo~ thank you so much for the kind words, you're so sweet 🥰
theres a few different ways to make patterns, but the easiest way is to download the sims 3 create a pattern tool (its free and installs like sims 3) that allows you to make patterns with the stickers it has or import your own stickers/images that you make on another program like photoshop or gimp, set the category to find them in, and export them into sims3packs. you can watch this video by gruesim if you wanna learn how to use it, it's really easy to use :)
then this video also by gruesim shows you how to turn them into packages as a way to reduce some lag and avoid sims3packs in general
i don't really make recolourable patterns bc i think its a lot of work lol but the first video i linked shows how to make one! i hope this helps, if you have any other questions i can probably help you out :)
7 notes
·
View notes
Text
♤♡◇♧
GREETINGS!!!
My name is Jester (pronouns he/they), a college student majoring in Art History (with a minor in Metalsmithing and Japanese). I'm both an artist and writer who spends a great deal of my time creating fanworks (and also tumblr posting every thought I have on my favorite characters).
Welcome to my semi-professional portfolio blog, where I am basically reposting the best of my own work in order to showcase my skills.
▪︎▪︎▪︎▪︎
In this humble blog you will only find un-rebloggable reposts of my own art, both fanart and original pieces. If you happen to be interested in my art, you can Dm me for my main blog. I'll be happy to share!
I'm currently using the art program ibis paint. I know how to use procreate (just don't have an ipad) and have used gimp, medibang, and various online photo editor sites in the past.
▪︎▪︎▪︎▪︎
My ask box is also open to anyone seeking art (or even writing) advice. I'm still a student myself but I've dedicated my conscious life to creative efforts and I'm confident that I am able to advise my fellow creatives.
I have a strong grasp on anatomy and composition and am able and willing to offer feedback over it.
I also have ample knowledge on drawing scenery and the use of perspective in a way that enhances said scenery, which gives me good insight into backgrounds.
My understanding of color theory is mostly instinctual, I understand the basics and am skilled enough to create color palettes and give color related advice by eye.
I'm full of tips and tricks for both digital and traditional art, helps with learning new techniques and solving "art hang-ups". (I also have links to art resources).
▪︎▪︎▪︎▪︎
Navigation
Art: #jesture drawing
Writing: #jester's scripture
Advice: #jesters privilege
▪︎▪︎▪︎▪︎
Current zine/project(s) I'm apart of:
@bsdhalloweenzine
@ffbwwb
♤♡◇♧
2 notes
·
View notes
Text
Essential Image Editing Tricks to Better Attract Visitors
Imagery is an excellent way to capture and retain your visitors' attention. Whether you manage a website, blog, or e-commerce platform, using high-quality and engaging visuals is essential to creating a lasting impression. In today's digital space, image editing goes beyond making photos look appealing; it plays a key role in guiding users, strengthening brand identity, and improving website performance.
Why Choose UK Clipping Path?
Creating visually appealing content is vital for connecting with your audience. This tutorial shares 5 essential image editing tricks to boost your visuals, attract more visitors, and drive conversions. From enhancing photos to refining compositions, these tips will help you stand out.
1. Perfect Exposure and Contrast
Exposure and contrast determine the initial impression of your image. A well-balanced photo reveals highlights, midtones, and shadows while maintaining visual appeal.

Steps to Refine Exposure and Contrast:
Open the Photo Editing Tool: Use Photoshop, Lightroom, GIMP, Canva, or another photo editing tool.
Adjust Exposure:
Locate the exposure slider.
If your image is too dark, slide it to the right; if overexposed, move it left.
Ensure skin tones and other elements look natural.
Adjust Shadows and Highlights:
Brighten darker areas by increasing shadows.
Reduce over-bright areas using the highlights slider to reveal hidden details.
Fine-Tune Contrast:
Use the contrast slider to make light and dark areas stand out. Higher contrast creates a dramatic effect.
Review and Adjust: Check if the image looks balanced, rich, and visually appealing.
Key Tip: Use histograms to monitor exposure levels and avoid unnatural edits.
2. Emotionally Convey with Color
Color has the power to influence emotions and shape perceptions. From bright, energetic tones to calming shades, subtle color editing can help align your visuals with your message.

Steps to Enhance Colors:
Load the Image in Your Photo Editing Tool.
Use Hue, Saturation, and Lightness (HSL):
Hue: Adjust overall color tones to warm (yellow/orange) or cool (blue/teal).
Saturation: Increase vibrancy for vivid colors or reduce for a subtle, retro effect.
Lightness: Brighten or darken specific colors.
Apply Color Grading:
Use color grading tools to adjust shadows, midtones, and highlights.
Add warmth or coolness to match the desired mood.
Curate an Aesthetic: Align colors with your brand identity.
Warm tones (reds/yellows): Best for urgency and promotions.
Cool tones (blues/greens): Ideal for corporate or health brands.
Pastels: Perfect for beauty, wellness, or calming visuals.
Review and Finalize: Ensure the colors enhance the image and resonate with your audience.
Key Tip: Use color psychology to connect emotionally with viewers.
3. Improve Composition with Cropping
An image with poor composition can distract your audience. Cropping helps eliminate unnecessary elements and guides focus to the most important parts of the image.

Steps for Effective Cropping:
Open the Image in Your Photo Editing Tool.
Apply the Rule of Thirds:
Use gridlines to divide the image into thirds (horizontal and vertical).
Position key elements at the intersections for a dynamic composition.
Crop for Focus:
Eliminate distractions that don’t add value.
Reposition the subject to draw attention to the center.
Adjust Aspect Ratio: Tailor the image size for its purpose, such as squares for Instagram or landscape for banners.
Use Leading Lines: Incorporate natural lines (roads, edges) to guide the viewer's eye to the main subject.
Key Tip: Leave breathing space around your subject to prevent a cluttered look.
4. Professional Quality with Retouching
Retouching enhances images for a clean, polished finish, whether you’re working on product photography, portraits, or landscapes.
Steps to Retouch Images:
Load the Image in a Retouching Tool (e.g., Photoshop or GIMP).
Remove Imperfections:
Use the healing brush or clone stamp tool to eliminate blemishes or distracting marks.
For portraits, smooth skin while preserving natural texture.
Enhance Details:
Sharpen the Image to emphasize fine details like hair, eyes, or product textures.
Lighten eyes and teeth using the dodge tool for a natural yet polished look.

Refine Background:
Blur distracting backgrounds for a professional bokeh effect.
Use image background removal techniques or ghost mannequin service for clean e-commerce images.
Finalize and Review: Ensure the retouching looks natural and subtle.
Key Tip: Avoid over-retouching; it should look professional but realistic.
5. Optimize Images for Speed and Performance
Even the best-edited images won’t serve their purpose if they slow down your website. Optimizing images ensures faster load times, better user experience, and higher SEO rankings.
Steps to Optimize Images:
Resize the Image:
Use tools like Photoshop, Canva, or TinyPNG.
Tailor dimensions to the platform (e.g., 1200x800px for banners, 500x500px for social media).
Choose the Right Format:
JPG: Best for general use (good quality, small file size).
PNG: Ideal for transparent backgrounds.
WebP: Excellent for compression without quality loss.
Compress the Image:
Use tools like TinyPNG or ImageOptim to reduce file size without sacrificing quality.
Enable Lazy Loading:
Load images only when they appear on the screen to reduce initial page load times.
Test Page Speed: Use tools like Google PageSpeed Insights or GTmetrix to ensure your site loads in under 3 seconds.
Key Tip: Implement a Content Delivery Network (CDN) for faster image delivery worldwide.
Conclusion
Image editing combines art and science to create visuals that attract, engage, and convert visitors. By mastering the top 5 techniques—enhancing photos, adjusting colors, cropping compositions, retouching for professional quality, and optimizing for speed—you can elevate your website’s performance and strengthen your brand.
For professional ecommerce image editing services, ghost mannequin service, or outsource jewelry photo retouching services, UK Clipping Path offers expert solutions, including image background removal and optimization. Try a free trial today to make the most of your visual content and enhance your brand presence!
0 notes
Text
Enhancing Scanned Photo Quality: Tips & Tricks
Scanning old photos can be a wonderful way to preserve precious memories, but the quality of scanned photos may not always meet your expectations. To enhance the scanned photo quality, consider the following tips and tricks:
1. Clean Your Scanner and Photos
Before scanning, make sure both the scanner glass and the photos themselves are free from dust and smudges to avoid any interference in the final quality.
2. Use High Resolution Settings
Opt for higher resolution settings while scanning to capture more details and ensure a sharper image. This will allow you more flexibility when editing the scanned photo later on.
3. Adjust Brightness and Contrast
After scanning, experiment with adjusting the brightness and contrast levels to bring out the best in your photos. Be mindful not to overdo it, as it can lead to unnatural-looking results.
4. Employ Image Editing Software
Take advantage of image editing software like Photoshop or GIMP to fine-tune your scanned photos. You can remove blemishes, correct colors, and enhance details with these powerful tools.
5. Save in a Lossless Format
When saving the enhanced photos, choose a lossless file format like TIFF instead of JPEG to prevent any loss of quality through compression.
Conclusion
By following these tips and tricks, you can significantly improve the quality of your scanned photos, bringing your cherished memories back to life with clarity and precision.
Villa Park IL Photographers, Photo Restoration Villa Park IL, Photo Studio Villa Park IL, Photographers Villa Park IL, Best Villa Park IL Photographers
1 note
·
View note
Text
How to Create Stunning Graphics: Easy Tips and Tricks

Are you a student looking to kickstart a career in computers? Graphic design might be the perfect choice for you! It’s a blend of creativity and technology that can open doors to numerous opportunities. Here’s a beginner’s guide to get you started with graphic design:
1. Understand What Graphic Design Is
Graphic design involves creating visual content using software tools.
It’s used in advertising, branding, web design, and more.
2. Identify Your Interest
Are you more interested in digital illustrations, branding, or web design?
Knowing your focus can help you choose the right path and resources.
3. Learn the Basics
Start with fundamental concepts like color theory, typography, and layout.
Many online resources and tutorials can help you get started.
4. Choose the Right Software
Adobe Photoshop, Illustrator, and InDesign are industry standards.
There are also free options like GIMP and Inkscape.
5. Take a Course
Enroll in a graphic design course to gain structured knowledge.
Graphic Designing Classes in Yamuna Vihar offer great options for students.
6. Practice Regularly
The more you practice, the better you get.
Try redesigning existing posters or creating new ones.
7. Build a Portfolio
Collect your best work and showcase it in a portfolio.
This is essential when applying for jobs or internships.
8. Seek Feedback
Share your work with others to get constructive criticism.
Join online forums or local design groups for support.
9. Stay Updated
Graphic design trends and tools evolve constantly.
Follow design blogs, watch tutorials, and keep learning.
10. Join a Community
Engage with other designers for inspiration and advice.
Consider joining a Graphic Designing Centre in Uttam Nagar to connect with like-minded individuals.
11. Work on Real Projects
Start with small freelance projects or internships.
Real-world experience is invaluable and can significantly enhance your skills.
12. Specialize in a Niche
Once you have a good grasp of general graphic design, consider specializing.
Whether it’s web design, animation, or branding, specialization can make you stand out.
13. Network Professionally
Attend design meetups, workshops, and seminars.
Networking can open up job opportunities and collaborations.
14. Understand the Business Side
Learn about pricing, contracts, and client management.
This is crucial if you plan to freelance or run your own design business.
15. Get Certified
Certifications can boost your resume and credibility.
Look for certification programs offered by Graphic Designing training Institute in yamuna vihar and other reputable institutions.
16. Focus on Quality Over Quantity
Always aim for high-quality work rather than churning out multiple mediocre designs.
Quality work will leave a lasting impression on potential clients and employers.
17. Explore Different Styles
Experiment with various design styles to find your unique voice.
This can make your work more versatile and appealing.
18. Use Social Media
Share your designs on platforms like Instagram, Behance, and Dribbble.
Social media can be a powerful tool for showcasing your work and attracting clients.
19. Be Patient and Persistent
Becoming proficient in graphic design takes time and effort.
Stay committed and patient with your learning process.
20. Enjoy the Journey
Have fun with your designs and enjoy the creative process.
Passion and enthusiasm will reflect in your work and help you succeed.
By following these steps and utilizing resources like Graphic Designing Training in Uttam Nagar, you can build a strong foundation in graphic design and embark on an exciting career in computers. Happy designing!
0 notes
Text
Mastering Your Photo Editor: Tips and Tricks for Beginners
Mastering the use of a photo editor can significantly enhance the quality and visual impact of your photographs. Whether you are a photography enthusiast or a professional looking to elevate your images, understanding how to effectively use photo editing software is essential. In this comprehensive guide, we will explore various tips and tricks tailored for beginners to help you navigate through the complexities of photo editing software with confidence. From basic editing techniques to advanced tips for enhancing your photos, this article aims to equip you with the knowledge and skills needed to make the most out of your editing process.
Introduction to Photo Editing Software
What is Photo Editing Software?
Photo editing software is a powerful tool used to enhance, modify, or retouch images to achieve desired results. Whether you're a professional photographer or an amateur enthusiast, photo editing software allows you to unleash your creativity and transform your photos.
Popular Photo Editing Software Options
There are numerous photo editing software options available, catering to various skill levels and requirements. Some popular choices include Adobe Photoshop, Lightroom, GIMP, and Canva. Each software has its strengths and weaknesses, so it's essential to explore different options to find the one that best suits your needs.
Getting Started: Navigating the Interface
Understanding the Workspace Layout
When you open a photo editing software, the interface may seem overwhelming at first with various panels, tools, and menus. Take your time to familiarize yourself with the layout, including the toolbar, layers panel, and adjustment options. Understanding how these elements work together will help streamline your editing process.
Customizing Preferences and Settings
To make your editing experience more efficient, customize the preferences and settings according to your workflow and preferences. Adjusting settings such as default file formats, color profiles, and keyboard shortcuts can save you time and enhance your overall editing experience.
Basic Editing Techniques for Beginners
Adjusting Exposure and Color
One of the fundamental editing techniques is adjusting exposure and color to improve the overall look of your photos. Experiment with tools like brightness, contrast, saturation, and white balance to enhance the colors and tones in your images.
Cropping and Resizing Images
Cropping and resizing images allow you to focus on the main subject, remove distractions, and prepare your photos for various platforms. Use the crop tool to adjust the composition, and resize images to meet specific dimensions for online sharing or printing.
Understanding Tools and Functions
Overview of Essential Editing Tools
Familiarize yourself with essential editing tools such as the brush tool, selection tool, and clone stamp tool to make precise edits to your photos. Each tool serves a unique purpose, so practice using them to master their functions.
Working with Layers and Masks
Layers and masks are powerful features in photo editing software that allow you to make non-destructive edits and blend multiple elements seamlessly. Learn how to work with layers to organize your edits and use masks to control the visibility of certain areas in your images. Experimenting with layers and masks can take your editing skills to the next level.
Enhancing Your Photos: Advanced Editing Tips
Alright, buckle up, because we're diving into the deep end of photo editing. Think of yourself as a digital Michelangelo, sculpting your images to perfection.
Utilizing Advanced Filters and Effects
Don't be afraid to get fancy with your editing tools. Explore advanced filters and effects to transform your photos into works of art. Just remember, subtlety is key. You don't want your picture screaming, "I've been edited!" Keep it classy, folks.
Mastering Selective Editing Techniques
Selective editing is like being a surgeon but with pixels instead of scalpels. Learn how to pinpoint and edit specific areas of your photo without affecting the rest. Say goodbye to those unwanted distractions and hello to a polished masterpiece.
Tips for Efficient Workflow and Organization
Let's be real, ain't nobody got time for a messy editing process. Time to get your editing game on point with some organization and efficiency tips.
Creating and Saving Editing Presets
Save yourself some precious time by creating editing presets. One-click wonders that can instantly transform your photo with just a touch. It's like magic, but with pixels.
Organizing Your Editing Projects
Don't let your editing projects turn into a digital jungle of chaos. Stay organized by keeping your files, folders, and edits in check. Your future self will thank you for not having to play detective every time you open your editing software.
Exploring Creative Effects and Filters
Time to unleash your inner artist and get experimental with your editing. Mix it up, try new things, and let your creativity run wild.
Using Textures and Overlays
Textures and overlays can add depth and dimension to your photos. Play around with different textures to give your images that extra oomph. It's like adding a sprinkle of fairy dust to your pictures.
Experimenting with Creative Filters
Who says filters are just for selfies? Get adventurous with creative filters to give your photos a unique and eye-catching look. Think of it as adding a fancy Instagram filter, but on steroids.
Troubleshooting Common Editing Issues
Editing isn't always smooth sailing. Sometimes, you hit a bump in the road. But fear not, we've got some tips to help you navigate those editing hiccups.
Fixing Image Quality Problems
Blurry photos, pixelated nightmares, oh my! Learn how to tackle common image quality problems like a pro. No more tears shed over a less-than-perfect photo.
Resolving Editing Software Errors
Software errors can be a real buzzkill. But fear not, we've got your back. Learn how to troubleshoot and resolve those pesky editing software errors so you can get back to creating masterpieces in no time.In conclusion, mastering your photo editor can unlock a world of creative possibilities and allow you to transform your images in ways you never thought possible. By familiarizing yourself with the tools, techniques, and tips outlined in this guide, you are well on your way to becoming proficient in editing your photos with precision and artistry. Remember, practice makes perfect, so continue to experiment, learn, and refine your skills to achieve stunning results in your photography endeavors. Embrace the journey of mastering your photo editor, and let your creativity shine through each edited masterpiece you create.
0 notes
Text
How to Edit Photos like a Pro: Tips and Tricks for Stunning Images

In today's visually driven world, the importance of high-quality images cannot be overstated. Whether you're a professional photographer, a social media influencer, or a business owner, stunning images can make all the difference in how your work is perceived. At PHOTO EDITING SERVICES COMPANY, we understand the power of visual impact. Our trendsetting photo editing services, image masking, and photo retouching services ensure your images are not only beautiful but also maintain their integrity and detail. In this comprehensive guide, we'll share tips and tricks to help you edit photos like a pro, ensuring your images captivate and impress every time.
Understanding the Basics of Photo Editing
1. Choosing the Right Software
Before diving into editing, it's essential to choose the right software. Popular options include Adobe Photoshop, Lightroom, and GIMP. Each software has its strengths, with Photoshop being renowned for its versatility and precision, Lightroom for its efficient workflow, and GIMP for being a powerful free alternative.
2. Learning the Tools
Understanding the tools at your disposal is crucial. Basic tools include:
Crop Tool: For adjusting the framing and composition.
Adjustment Layers: For non-destructive editing of brightness, contrast, saturation, and more.
Healing Brush: For removing blemishes and imperfections.
Clone Stamp: For duplicating areas of an image to cover up unwanted elements.
Layer Masks: For blending different parts of an image seamlessly.
Essential Editing Techniques
3. Cropping and Straightening
Start with cropping to improve the composition. Ensure the horizon is straight, and apply the rule of thirds for a balanced image. Cropping can also help remove distractions from the edges of the frame, keeping the viewer’s focus on the main subject.
4. Adjusting Exposure and Contrast
Proper exposure is key to a good photo. Adjust the exposure to brighten or darken the image as needed. Increase contrast to make the image pop by enhancing the difference between light and dark areas. Use the histogram to guide your adjustments, ensuring you don't lose detail in shadows or highlights.
5. Color Correction
Colors can significantly affect the mood of an image. Adjust white balance to correct any color casts and ensure natural-looking colors. Use hue, saturation, and luminance adjustments to fine-tune colors. PHOTO EDITING SERVICES COMPANY specializes in color masking, which allows for precise control over specific colors in an image, enhancing its vibrancy and appeal.
6. Sharpening and Noise Reduction
Sharpening enhances the details, making the image appear crisper. However, be cautious not to over-sharpen, as this can introduce artifacts. Noise reduction is crucial for images taken in low light. Balance the noise reduction to smooth out graininess without losing too much detail.
7. Image Retouching
Retouching is an art. Use the healing brush and clone stamp tools to remove blemishes, spots, and unwanted objects. For portrait retouching, smooth skin while preserving texture, whiten teeth, and enhance eyes. Our expert retouching services at PHOTO EDITING SERVICES COMPANY ensure a natural yet polished look.
Advanced Editing Techniques
8. Using Layers and Masks
Layers and masks are fundamental for advanced editing. They allow for non-destructive edits and enable complex compositions. Use layer masks to blend multiple exposures, create composites, and apply adjustments selectively. PHOTO EDITING SERVICES COMPANY’s expertise in alpha and color masking ensures flawless edits with no detail loss.
9. Dodging and Burning
Dodging and burning are techniques used to lighten (dodge) or darken (burn) specific areas of an image. This helps in adding depth and dimension, enhancing the overall look. Use a soft brush and work on a low opacity to build up the effect gradually.
10. Frequency Separation
Frequency separation is a powerful technique for retouching portraits. It involves separating the image into high-frequency (texture) and low-frequency (color and tone) layers. This allows you to retouch skin texture and tone separately, achieving professional-level results.
11. Composite Photography
Creating composite images involves blending multiple photos to create a single, cohesive image. This can be used for adding elements, creating surreal scenes, or enhancing backgrounds. Mastery of selection tools and layer masks is crucial for seamless composites.
Enhancing Creativity
12. Adding Filters and Effects
Filters and effects can transform an ordinary photo into something extraordinary. Experiment with different filters to find the style that best fits your vision. Use effects like vignetting to draw attention to the subject or lens flare to add a sense of realism.
13. Black and White Conversion
Converting images to black and white can add a timeless quality. Focus on contrast and texture to create compelling black-and-white images. Use the black and white adjustment layer to control the conversion process, ensuring the tones are balanced.
14. Creative Masking Techniques
Masking allows for creative possibilities. Use gradient masks for smooth transitions, and experiment with texture and pattern masks to add artistic elements. PHOTO EDITING SERVICES COMPANY excels in creative masking, ensuring your images stand out with unique and innovative effects.
Workflow and Efficiency
15. Batch Processing
For large volumes of photos, batch processing can save time. Programs like Lightroom allow you to apply the same adjustments to multiple images simultaneously. This is particularly useful for maintaining a consistent look across a series of photos.
16. Using Presets
Presets are pre-configured settings that can be applied to images with a single click. They help speed up the editing process and ensure consistency. Create your own presets or use ones available online to achieve the desired look quickly.
17. Organizing Your Workflow
An organized workflow improves efficiency. Use a consistent file naming convention and folder structure. Utilize software features like catalogs in Lightroom to manage and organize your images effectively.
The Role of Professional Photo Editing Services
18. Why Choose Professional Editing?
Professional photo editing services, like those offered by PHOTO EDITING SERVICES COMPANY, bring expertise and experience that can take your images to the next level. Our 10+ years of experience, combined with advanced technical capabilities and a world-class team of Photoshop professionals, ensure that every image meets the highest standards.
19. Services Offered by PHOTO EDITING SERVICES COMPANY
Photo Masking: Precise masking for complex subjects like hair, fur, and feathers.
Portrait Retouching: Enhancing facial features while maintaining a natural look.
Image Clipping: Accurate cutouts for product photography and composites.
Digital Photo Restoration: Reviving old or damaged photos with expert restoration techniques.
Alpha Masking: Advanced masking for transparent and semi-transparent objects.
Color Masking: Enhancing or changing specific colors without affecting the rest of the image.
20. Global Reach and Expertise
PHOTO EDITING SERVICES COMPANY serves clients worldwide, including the USA, UK, Australia, Canada, Dubai, Saudi Arabia, UAE, Germany, Italy, India, Singapore, France, Finland, and Ireland. Our global reach ensures we understand diverse client needs and deliver tailored solutions that exceed expectations.
Conclusion
Editing photos like a pro requires a blend of technical skills, creativity, and an understanding of the tools at your disposal. By following the tips and techniques outlined in this guide, you can elevate your photo editing game and produce stunning images that captivate and impress. For those seeking professional results without the learning curve, PHOTO EDITING SERVICES COMPANY offers a range of expert services to meet all your photo editing needs. With our dedication to excellence and innovative approaches, we ensure every image is a masterpiece.
0 notes