#cc making tips and tricks
Explore tagged Tumblr posts
Visit Tumblr Blog
Explore Tumblr blogs with no restrictions, modern design and the best experience.
Last Seen Tumblr Blogs


Fun Fact
Celebrities use Tumblr as well.
Text
Tiny cc making tips
Over the years of making cc i've picked up some tricks along the way. These are just some of them in a tiny format. So not a tutorial of any kind, just some tips and tricks! I'm sure many are already doing some of these things and some might require you to Know things already. This is NOT the only one way to do things, it's just how I do things. I wont go in to super detail since it's not a tutorial but i'll try to add as much info as possible and then let you figure it out. Or send an ask.
When naming things, images, packages, blends, whatever files in relation to cc making, create a naming system! Trust me when i tell you it will make your cc making process a lot more streamlined. My system is as follows: "BG maxi dress flower on shoulder pink fem". What we learn here is that it's a base game maxi dress with a flower on the shoulder, and it's the pink swatch. This way, if it's a blender file, i know i can export the diffuse map directly inside blender if i need it later without having to locate the dress in s4s. Fem is there to show what frame the mesh is from without having to open it. Same goes for "masc" items. For example "CL open jacket long sleeves turtleneck camo blue". This tells us it's city living and an open jacket with long sleeves in camo blue and has a turtleneck. Note: sometimes a pack name will have a similar abbreviation, like Cottage Living. My way is just adding another letter or two, COL. Or if the pack only has one word like Toddlers or Strangerville, you could then call it TOD and SV for example.
Make folders! One thing i find that makes things a little easier is that i make folders separating things. So first i have the project folder inside my cc making folder. Let's say i'm making a short satin dress, i'll make a folder "Short satin dress". Inside there i'll make a folder for blender files and one for image files. Inside blender folder i make a folder for lods and inside image folder i make folders for swatches and one for maps. If you're making a fem and masc framed version of the same thing, separate folders by frame as well, so you have a main folder inside "Short satin dress" for fem and one for masc etc and so on. This is so you don't mix textures and blend files up, because for example, sometimes the diffuse map sits differently on a masc frame mesh compared to a female framed mesh.
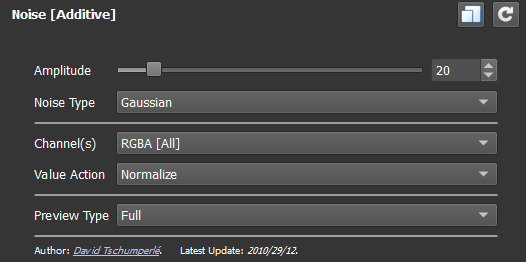
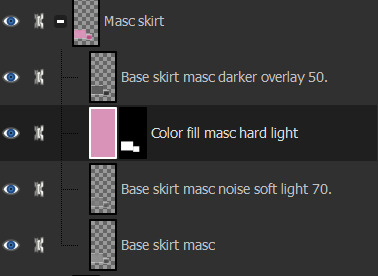
One thing i hate about making cc (other than MAKING cc.........) is making textures. I'm not good at it and this d.o.a game eats textures like it's the last can of catfood in the world, compressing it to hell and back. One thing i've learned and my friend @faaeish told me about is that adding a bit of noise helps! What i like to do, once i have finished my base layer i know i will recolor later, i make a noise layer out of it using "Noise [Additive] with this plugin and i do Output mode: New layer(s) at the bottom. I use gimp but this plugin can also be used with nearly every program under the sun, including ps. It's also online based. You can play around with the settings but i like to use something like below. One thing i realized well, just the other day is that, if you use RGBA noise instead of gray noise, it adds a bit more depth and texture. But not too much! Just a smidgen, to give the texture and the color fill layer more pixels to cling to and it will minimize the risk of artifacts. Ugly blobs, essentially. Once i have that noise layer i alpha to selection on my base layer, invert and sharpen and click the noise layer to remove the access around that the filter adds. I'll also clean up any alpha channels, filling them with white if i need to. Then i play around with layer modes on the noise layer, add a color fill above that and maybe i'll duplicate the base layer and put above the color fill layer. Like below is an example.
Next is a thing for blender, tiny miniature tip but that i find helps me. And that's this little plus sign button when you "Save as.." in blender. So what you need to do when you FIRST save some edits on your mesh, say you swapped the sleeves out. You "File-Save as..-bg no pockets tshirt rolled up sleeves blue fem LOD0_edit0. 0. Zero is important. You need to save the very first save as 0. Next time you make any changes you Save As and click the plus and it will just change 0 to 1. Next time 1 to 2 etc etc. To me this makes it easier to go back in case i mess up. Which i sometimes do. Like the other day i noticed fingers were messed up and i had to go back to nearly the beginning of my edits to pull original fingers and sleeves from. And i always save right before i make any major edits.

That's all i can think of right now. I'll put a read more in case i think of more later. Hope this helps!
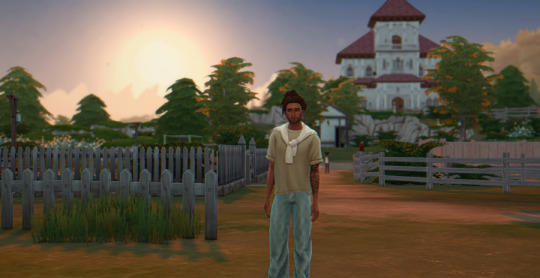
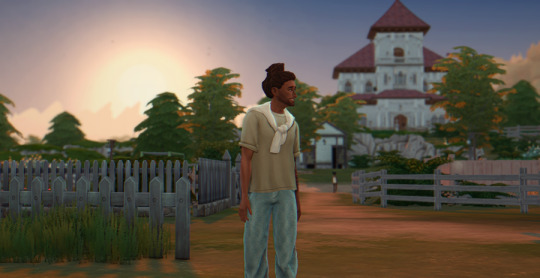
ooo 👻 welcome to under the cut aaaa 👻. But look at this photo i took of a photo i found among my grandmas old stuff. I guess the crops were hung that year.
30 notes
·
View notes
Text
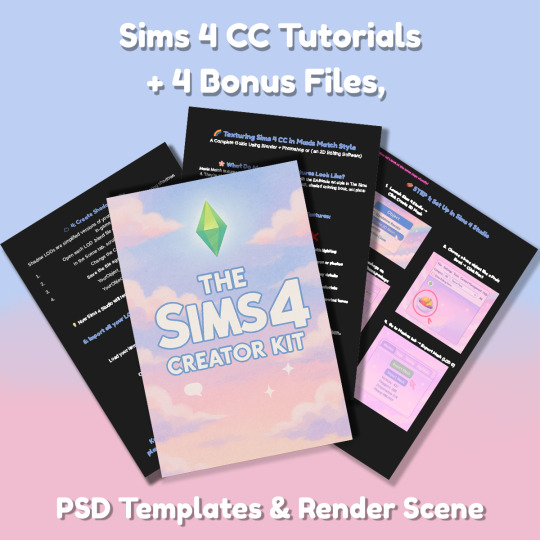
Sims 4 CC Kit — Make Your Own Lights, Decor, Clutter & Textures
Ever wanted to create Sims 4 clutter or decor CC but got stuck?
This kit is for you.
It’s a step-by-step guide that shows you how I make my own Sims 4 decor CC — lights, clutter, textures — in a way that I found works for me. You get guides, cheatsheets, templates, and my personal workflow that I’ve figured out through trial & error.
This probably isn’t the “proper” way of creating CC — but it’s how I learned, and it works and I use it every single time I create something new.
⚠️ Just to be clear:
This is a written tutorial kit, not a video or image course.
BUT — I’ve included some visuals, some screenshots & cheatsheets to help you follow along but its alot of written stuff. It would also be beneficial for you to have some basic knowledge of blender.
✅ What You Get:
Decor, clutter, lights CC Creation Guide
Shadow Mesh Tutorial
Mesh Cleanup Workflow
LOD Creation Steps
Maxis Match Texturing Cheat Sheet
Alpha Textures Basics
Vertex Paint for Lights Guide
Custom Thumbnail Tutorial
Normal & Specular Map Basics
Blender Basics Recap
Sims 4 Studio Quick Fix Cheatsheet
Blender Hotkeys Cheatsheet
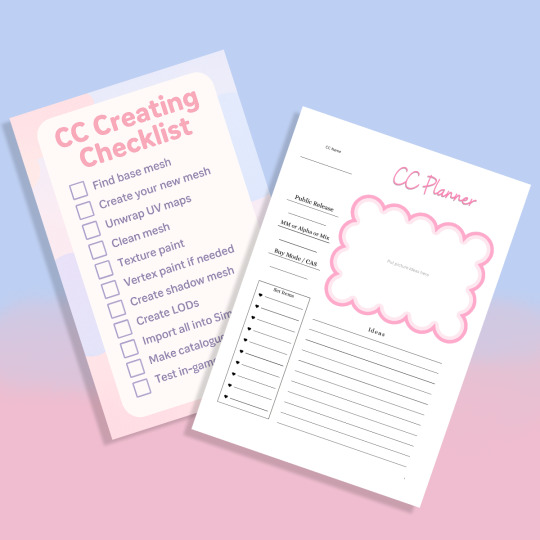
CC Planner to organize your ideas
CC Creating Checklist
PSD Thumbnail Templates (Decor)
Blank Normal & Specular Maps
Blender Render Setup File for Catalog Thumbnails
Texture Tips & Tricks
🎯 Why You’ll Love This:
No fluff — real steps, real help
Written for beginners who know basic Blender but need a hand
Includes a little bit of visual guides, printables & templates
Saves you HOURS of googling random problems
Helps you actually finish your CC & get it in-game
🖤 This is for you if:
You know basic Blender stuff (grab, rotate, edit mode) Got 3D Models you want to put into The Sims 4
You want to make clutter, decor CC and lights (not clothes or CAS yet)
You’re tired of tutorials that make you more confused
PS: Accessories & Clothing Creator Kits are coming soon.
If you get stuck, you can always join my Discord
(link’s on www.simmerkate.com).
Get Here (xx)
180 notes
·
View notes
Text
Quick GIF tutorial (Photoshop)


#holy shit this is perfection!!#i am so jealous of this set!#the coloring op THE COLORING!!! (original post)
alright @dontyouknowemma-itsyou and anyone interested, this was really easy to colour so I'm gonna give you a quick breakdown. (i didn't save the psd file?? so i'm redoing this i guess, but i did it on autopilot in the first place. i've been making gifs for over 15 years.)
GONNA INCLUDE A VIDEO AT THE END SHOWING OFF THE SETTINGS!!
General GIF stuff
This is in Photoshop CC. I extract a clip from a video as an MP4 file, which photoshop can open. (I use AviDemux for this, which is free, because it lets you save clips using 'copy' encoding for video output and still change from MKV to MP4 format - without losing any video quality, cause you're not re-encoding.)
Open that shit directly in photoshop as a video layer (just drag and drop), that lets you scan through it to check the colouring works overall. Convert the video layer to Smart Object, that lets you resize and edit it. (Do NOT open a full movie in Photoshop, it'll probably die and it has a max length anyway.)
Also all the colour adjustments are gonna be adjustment layers you can tweak and turn on/off whenever. There's a lil button at the bottom of the Layers window to add them quickly.
When we're done we're choosing a section of the video in the Timeline window and we're doing File->Export->Save For Web. 'Adaptive' (or selective) palette selection, 'pattern' style dithering.
Colouring
Curves layer to lighten. Just pull the curve up. Curves seem to give a much smoother lightening, since it mostly affects the middle, leaving the brights and the darks where they are.
Levels to make the darkest darks pure black, and the lightest lights pure white. Good for limiting GIF size. Don't overdo it though.
Colour balance!! My beloved, most important. So for the Shadows and Highlights, you're gonna move the sliders towards Cyan and Blue, but for the Midtones you're gonna do the opposite - towards Red and Yellow. This means you don't shift the overall colour of the picture, but trust me it does SO MUCH for the contrast and colour. I swear I do this for almost any edit, and also my art tbh. Also if the original clip is like very green or whatever, you can correct that here.
Selective colour. For this I did one thing. For 'Black' dropdown, I upped 'black' and 'yellow' sliders (the latter to counteract the blue in the darks). This in combination with:
Levels again. Bring in those darks, turn them pure black. Basically this does a couple things. It preserves GIF file size, by making sure the dark areas are static (file sizes mostly depends on pixels that are CHANGING). It ALSO makes the palette much more optimized, meaning you don't waste palette on the darks no one sees anyway, and instead uses them in the mid range colour variation, giving much smoother gradients. That's it!! That's all the colouring!!
EDIT: Uh I probably also had a Vibrance layer?? Idk. This just ups the saturation, but it's softer than upping Saturation. Makes the colours pop without overdoing it.
Other tips and tricks
Often I'll put a Smart Sharpen (50% amount, 0,5px radius) filter on the video layer, just to make it a bit crisper. Subtle but effective.
You can manually edit the palette when you save as a GIF, either to reduce file size, or because some colour areas look pixelly. See the video for how.
If your file size is huge but you don't want to shorten or resize, you can reduce the frame rate manually. To do this, FIRST save the GIF, then open the GIF you just saved. Go through in the Timeline window (which is now a Frame Animation rather than a Video Timeline), select every other frame, and delete them. When you do this, remember to select the rest of the frames and double their Frame Delay so you don't end up with a super speedy GIF. (You can also make a GIF slow-mo like this.)
Since the video is a smart object, I literally just resized it in between saving the different GIFs, to change composition between the different shots.
Selective Colour layer can be used for a lot of image tweaking. For example, if something is overly yellow or green, I may go to the Yellow and Green in dropdown and just reduce the yellow slider. (I usually then go to Red in dropdown and ADD some yellow to that, to balance out the reds to be less pink.) Or maybe the overall colours are nice but the blues are dull, so I'll just go to Blue/Cyan and tweak those specifically.
If you have a colouring you like that you want to use on lots of things, remember you can drag-and-drop layers between different images. You can also save a photoshop file with nothing but those layers, to use on later gifs and just tweak as needed. (You can also make Actions to automate stuff, but I won't go into that.)
How easy or hard something is to colour HUGELY depends on the original video, both lighting/colouring and video quality.
Finally the video showing settings!
This is like 5 minutes long and has no commentary or anything. This is mostly to show off where you find each individual thing, and what difference it makes in the colouring.
ANYWAY hope someone found this useful!!! ♥
#next to normal#gif making#photoshop#gif tutorial#photoshop tutorial#my posts#my gifs#art things#tutorials#PS if you can't afford Photoshop then just you know.... yo ho ho and all that
119 notes
·
View notes
Text

Plumbob Pictures Museum | Movie Museum
Ever wonder how your favourite movies got made? Well at Plumbob Pictures you can find all the tips, tricks, props and sets that were used for the most renowned silver screen adaptations. From sci-fi to Westerns: there's something for every Sim to enjoy
MOO and debug used
World: Del Sol Valley Type: Museum Origin ID is TheSeptemberSim
If you would like to download this build please use the links below, or via my origin ID above. Although all my builds are no CC, I use a custom thumbnail so make sure 'modded' is checked to see this in your game.
Download (sfs)
If you would like to support me, use creator code:
THESEPTEMBERSIM
when purchasing on the EA app or thesims.com. Please note, this is not a discount code
youtube
#ts4#the sims 4#sims 4#ts4 nocc#sims 4 no cc#sims 4 build#the sims community#sims 4 buy mode#ts4 build#ts4 edit#museum#del sol valley#Youtube
475 notes
·
View notes
Text
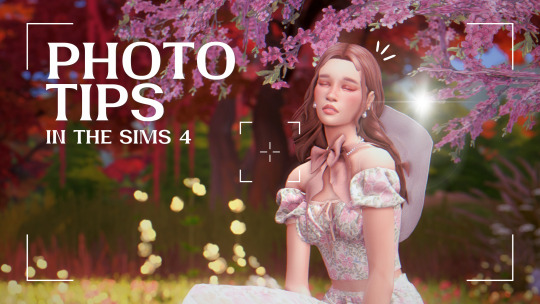
15 Best Sims 4 Photoshoot Lifehacks: Tips, Mods, Poses & Screenshot Editing
We’ve all been through situations with ruined photos because someone photobombed, we missed the perfect sunset, or had to round up party guests who wandered off... The list of little things that can go wrong during a photoshoot is endless. We already wrote a detailed guide on how to take pictures in The Sims, but now we want to share a collection of quick lifehacks to help speed things up.
1. How to make your sim look the right way for a photo
Want your sim to look right at the camera or at a certain spot? Here’s a simple trick:
1) Hit pause in the game
2) Switch to first-person mode with Shift+Tab
3) Turn your sim’s head with the mouse in the direction you need
4) Unpause so your sim turns their head
5) As soon as their head is turned, hit pause again
6) Exit first-person mode with Shift+Tab
7) Snap the screenshot!

Plus, it’s a great way to get more “alive,” imperfect shots :)
2. Better camera
Better Camera Overhaul-V6 by @sulsulduck fixes common camera issues in The Sims 4 gameplay: removes camera bounce off objects, tweaks movement speed on upper floors, lets you flip the camera upside down and bring it all the way down to ground level, makes movements smoother, adds click-and-drag movement, and fixes sim tracking bugs.
youtube
3. You can ask friends to lend their characters for photos
If a big event is coming up (a wedding, graduation, etc.), you’ll definitely need a lot of sims. Finding them for photos is, of course, no problem: you can always hit up Pinterest and download a bunch of decorative sims.
But if these characters need to be active participants in the shot, not just standing around in the background, the search gets a bit trickier. Especially if it’s not just a huge event, but something really important to you. Everything has to be just right :)
First off, we recommend looking for the right sims among your friends in the community – chances are some of them share your taste in aesthetics.
4. Looking for sims in themed groups
Another way to find sims is through various themed groups and channels. Totally obvious tip, but sometimes we forget about these huge archives.
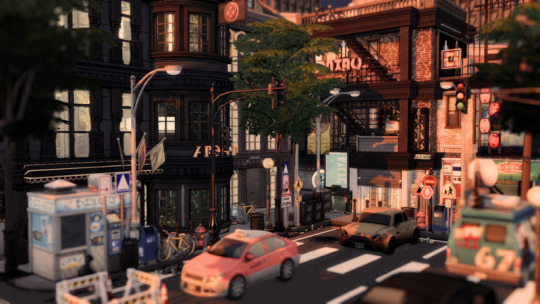
5. Lots for shooting in the street
If you need to do a shoot on a busy street, it’s definitely easier to find a ready-made lot. Even better if those lots don’t use CC content. We're sharing links to two great CC-free options for you. Perfect for city photoshoots.
Street without CC + Decorative Sims + Traffic Accident Location by LiZok
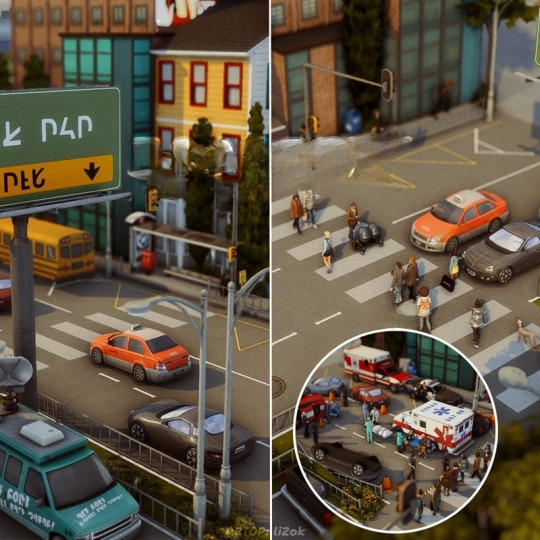
New York Street by emeraldstories
6. Separate save for photos
If you set up photoshoots for your sims a lot and often, you know that very often afterwards you need to shoot something else. In your main game, you might have already moved on from that scene, changed everyone’s outfits, and sent them home, but in a special save just for photos everything stays right where you need it.
We suggest getting everything ready for the event in your main game (dress the sims, place the lot, gather all the participants), then make a copy of that save just for screenshots.
7. Check out ready-made saves for cool lots
For your game, not every save from another creator has to be perfect: you can just save the lots you like and use them as locations for your shoots.
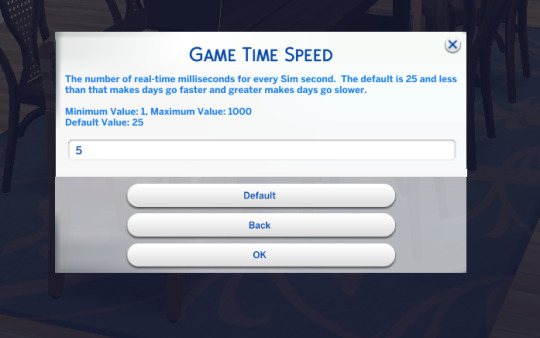
8. Slow down time in the game
One of the most important parts of a photo is lighting. While you’re searching for the right angle, moving things and posing everyone, the best light can be gone. Instead of messing with the in-game clock, you can slow down the passage of time using the Command Center.
Click any computer in the house – MCCC Settings – Gameplay Settings – Game Time Speed
Set it to 100–200 for comfortable shooting.
9. Don’t forget to take photos with the in-game camera too
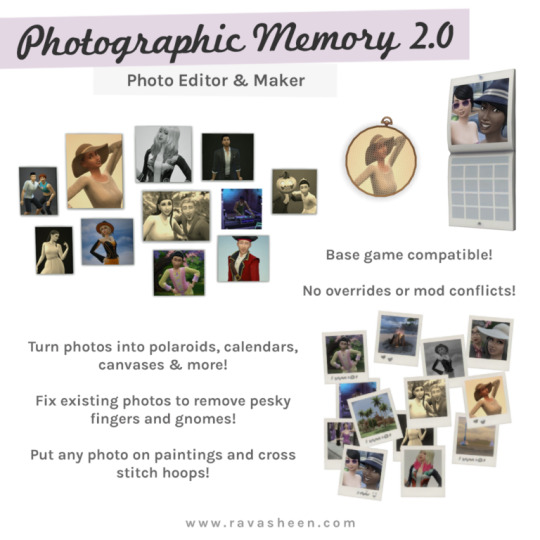
Sometimes we take tons of screenshots, but forget that it can be nice to keep memories of certain events right in the sims’ own house. Use the in-game camera to take photos that’ll stay in your sims’ inventory. After that, you can turn them into fun home decor. You can make them into paintings, calendars, and more. For this, use the Photographic Memory 2.0 mod by @ravasheencc.
10. Clubs for background characters
Basic tip: group other sims into clubs. This helps keep them together so they don’t wander off. Plus, they’ll look great on camera in the background, doing something interesting and bringing life to your photos.
11. How to pose mermaids underwater
To figure it out, check out this clear video.
youtube
12. Make sure styles in the shot match
We’re talking about the characters, of course. If all your sims in the photo are made in Maxis style, one Alpha sim next to them will look odd. Try to keep the style consistent for each shoot. If everyone is styled the same way (doesn’t matter if it’s all Maxis, all Alpha, or a mix on everyone) – that’s perfect.
13. Adjusting character height
If you’re not happy with how the sims look next to each other in terms of height during a shoot, it’s easy to fix using positioning in Wicked Whims. Just turn on positioning and use the up-down arrows.
Click on the sim – Wicked – Actions – Enable Positioning
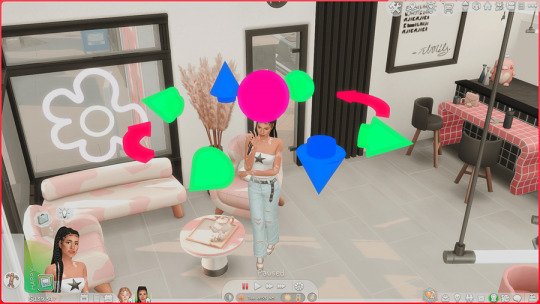
This also helps solve issues with poses that mess up the height.
14. Put sims in poses so they don’t wander off
If you don’t need certain sims in the shot at the moment, the easiest way to control them is to put them in a pose. This keeps them from leaving the lot too early, or photobombing the background. Once they’re in a pose, use Wicked Whims positioning to move them out of the way so they don’t get in the shot.
15. Post-processing screenshots
Screenshots done up like polaroids look super cozy. If you like that style too, check out the Photokako site. It really streamlines and speeds up the process.
For even more editing options, there’s the DAZZ CAM app. It lets you enhance screenshots right from your phone. By the way, that can be a lot more convenient for getting pics ready for social media.
🌱 Create your family tree with TheSimsTree
❓ Support 🌸 Our Blog
#TheSimsTree#simslegacy#legacychallenge#sims4#sims2#sims3#simsfamily#simstree#sims#sims4legacy#sims4roleplay#sims4stories#thesims4#ts4#ts4cc#plumtreeapp#simsta#simstagram#sims ideas#inzoi#ts4 mods#sims photo#sims graphic#sims tips#Youtube
69 notes
·
View notes
Text
Q&A
Hi ! I am making this post because I'm not very active here, not to say not active at all here and I see some of you have questions or experiencing some different bugs.
First of all I want to thank you for the kind messages I have received, it really means a lot even if I see your messages only once in a while <3
I will update this post if new issues occur with time so don’t hesitate to check this if you have issues, maybe the answer is already here :)
I have been through all your notes and try to report the issues that happened to several players. If not mentioned underneath, it may be something of a personal issue that comes from conflict with other cc you have installed or just from the game itself as we all know sometimes The Sims 4 can be a little funny !
And also for several reasons like not enough time etc, I am not making submission for cc unfortunately !
TIPS & TRICKS
Appliances disappearing when placed on counters :
You have to make sure the ‘Auto Counter’ is off because it makes disappear cc appliances
- “packages ending by “texture” ” :
To make the cc set take less space in your hard drive, I try to make some similar objects sharing the same textures. The game will only load one set of textures for several items instead of multiple times the same texture for each item. This technique requires the package file having the textures in your mod folder if you use the unmerged version. To make it easier to spot it, I added “texture” at the end of the name of it. If you use the merged version, you don’t have to worry about anything.
If the package with the textures is missing, you will have the items in purple with question marks in your game.
TECHNICAL ISSUES
- Purple items with question marks :
As mentioned above, make sure to have the packages ending by “textures” in your mod folder.
- Wallpapers with question marks :
After the DirectX 11 update, a lot of wallpapers broke. I have updated all of them and reuploaded my Patreon and CurseForge. If you encounter this issue, try to redownload them.
Also, for some reason, the merged version keeps this issue for some players. Try the unmerged version to see if it solves the issue. Unfortunately for some people there is no solution found for this issue as it works fine for the majority of players.
- Windows with question marks :
Auntie Vera’s windows has no solution found as it works for a majority of players but is not working for some without any reason..
The other windows with purple and question marks can happen if you use the merged version. Often, the unmerged version solves the issue.
- Domaine du Clos Kitchen :
I have made some tests with the cabinets and dishwashers and everything works fine on my side. Maybe you can try downloading the unmerged version if that is not the one you’re using. Otherwise I don’t have any clue on what can cause this issue.
- Auntie Vera Plumbing :
while creating the plumbing, I’ve made a mistake on the texture size which happened to create loading issues or stuff like that. The problem has been solved since, you can redownload it for updated plumbing !
RANDOM
- Extensions from previous sets :
I won’t do extra items for the past sets as, but you can do them for yourself if you want too !
- Missing items:
If some items are missing, it may be because they require a specific stuff pack. I tend to make them base game as much as possible, and if not, I will mention it in the description of each set. Also, I can make mistakes so make sure to search by the name of the set in your game just in case.
- Beddings score :
I won’t update previous beddings scores but I took this comment in consideration and the recent and future beddings have higher scores.
- Dark Shadows on cabinets or similar items :
While creating items like fridges etc, I delete occluders so it doesn’t cast strong shadows on elements above like the cabinets. The occluders are used by the game to create more realistic shadows with lights if I’m right, but for some specific items like fridges I use to delete them. That’s why you may have hard shadows while placing fridges from the game under fridge nook cabinets for example.
63 notes
·
View notes
Text
Some tips for The Sims 3 Buy/Build
Install LazyDuchess’ Smooth Patch to alleviate lag, esp in Buy/Build and CAS.
Keep your CC merged and organized, esp your patterns, this will also alleviate a lotta lag across all modes.
When building on community lots, or any lot rlly, avoid going to the edit world menu, and just put testingcheats enabled into the cheat window, then shift+click the ground of the lot to enter Buy/Build mode. This makes leaving it to save a lot easier, with less “preparing” screens to possibly get hung up in.
Lower your settings, you don’t need any adjacent lots loaded, and you certainly don’t need super water on either. You can always switch these back on when you’re done.
While you’re at it, remove your HQ mod, and turn off your Reshade/Gshade preset, or at least turn off your depth shaders. I only ever turn on my depth shaders when I’m taking screenshots for better fps while playing. The DoF shader esp requires a lotta resources your game could be using to simulate all those 78 townie sims instead.
Save as… vs Save, I Save as… at least every third save. It’s also just good habit to keep backups.
When using the CASt tool, set down everything you plan to CASt first, then switch to a category like the wall tool to avoid eventual lag and drag when using it a lot. Love yourself. You don’t have to suffer using CASt tool in an overpopulated category like misc deco.
Utilize the clone option through testing cheats to duplicate already CASted objects, it’ll keep your design just like the dropper tool, but it’s a lot less time consuming, I promise.
Don’t be afraid to use the swatch save tool for objects you use often, esp community lot objects, as it helps to keep your aesthetic consistent. I also keep all of my favorite streetlamps, benches, and public trash bins etc in a convenient custom collection folder to speed up the process of doing multiple lots in one sitting. These handy tools are there, use them.
The issue with custom counters. They mess up sometimes, if you can’t recolor it suddenly, here’s how to fix that. Now if you can’t place down a cupboard suddenly, even though nothing’s in the way, and you’ve got moveobjects on activated, try putting it on the wall a tile over, and then try adding it to your desired spot again. Lastly if you set down counters or cupboards at a corner, and it messes up the textures, but you can still recolor it, you could do what the video I linked above does, or you could simply pull out the CASt tool, and switch it back to any of its original swatches and click the check, then feel free to recolor it as you want.
Railings will also do the “can’t recolor” trick too, but this is a simple fix, just delete it, and replace it, and you’re good.
“Oh no, I switched between buy and build mode, and now my catalogue won’t load, and I can’t click on anything at all!” Don’t panic, hit F2 and/or F3 on your keyboard, these are shortcuts for switching between them, and if you’re lucky it’ll load properly again. Should you get the bug where you load a category and it’s somehow empty, don’t fret, just click on a different category and this should fix it. Then if you get the bug where all the objects you put down disappear suddenly, sorry your game is haunted. Call an exorcist, or just reload, they might reappear if you do.
Tbh, if you run into any kind of major bugs, it’s likely a sign to either save immediately or just restart your game. These only ever show up when you’ve been at it a while ( at least for me ), therefore starting fresh wouldn’t hurt. Probably also wouldn’t hurt to check whether you might’ve installed something the game didn’t agree with by running Dashboard, or put it through the ol’ Save Cleaner.
Honorable Mention: Keep an eye on the texture sizes and poly counts of objects. I know it’s tempting to build these ultra hyperrealistic lots with clutter at every inch, but unless you’re just doing it for screenshots, or for your story, or using it very sparingly, it is not by any means recommended purely for gameplay. This is just the truth when it comes to any Sims game. You don’t want lag, or max memory crashes, or save errors? The Sims 3 is a 32bit game, that’s almost old enough to drive, be easy on it.
483 notes
·
View notes
Note
Love the comics so much JNSSNHS, I love all the panelling and how well it’s structured. I remember you talked about the thumbnails before, but I’d just like to ask… What font do you use for texts? Any tips for making the speech bubbles?
Ooooooh a lettering question!!
I use the "Might Makes Right" font purchased from Blambot! I wanted that classic comic book look, but without the worry of getting in trouble for using a pirated font like "CC Wild Words" haha.
Blambot is an awesome site, I highly recommend giving it a look through if you are interested in the lettering side of comics!! They have some fonts that are free for use for non-profit / indie comic projects (only for comics, check out the licensing page) and so much advice on balloons and sound effects. I've learned so much from this site alone!
The "Better Letterer" and "Comic Book Grammar & Traditions" pages have personally taught me So Much about lettering and balloons. Its a good insight into all the little tips and tricks the industry has developed from so many talented people over the decades.
ANOTHER GREAT LOOK INTO LETTERING is "this video" by Strip Panel Naked (my favourite youtube channel). The creator explains the thought and process behind choosing the style of balloon and fonts to suit the comic!
I use Clip Studio Paint and it has a lot of great options for balloons with the Balloon Tools and many more options to created by other artists out there to download! I don't use any of them.
I like to either draw the circles by hand for a more natural look, or I'll use the ellipse tool to create the circle and mesh transform it to be more imperfect.


I personally think all comic creators should look into learning more about lettering, not because I think everything needs to look "professional", but because it's honestly such an interesting and overlooked part of the comics medium!!
There is so much history and tradition behind it, and it's so cool that when done right the balloons almost become invisible to the reader, just another part of the art!! There are also so many things you can do to match the lettering with the art style of the comic!
I just think it's neat ( ◕_◕)
139 notes
·
View notes
Text
To anyone who is thinking, “man I wish I could create cc”
Short answer: You can.
Long answer: It’s going to be an uphill battle of a learning process. For some people the hill will be like a mountain and for others it might be more of a bump. The process is still the same.
What I need people to understand when it comes to creating cc is that, your first mesh edit, it’s going to be Trash™. I know it, you know it, we all, Know it. See the thing is, if you go in to something like this with the mindset of “I need this done yesteryear and it needs to be PERFECT”, whew are you in for ride. It wont be. You can’t go in expecting it to be good, or even decent! No one is good at things the first time they try it. And if they say they are, they’re probably lying lmao.
My process was, my mija @moontrait helped me get in to simple mesh editing and when she wasn’t around to answer my questions, I would poke at blender and reading tutorials on my own. Let me tell you. It was Trash™. I don’t even have the first mesh edits I started anymore, I knew that they we’re ruined beyond repair. It would’ve been faster to redo the edits after I had learned more about blender.
I wrote above sometime in 2020. And now, 4 years later, my cc still isn't perfect but its okay! I'm proud of many of the things Ive created. I just make things to have something to do and to share it all for free. And i have learned a lot and i want others to learn too! The best thing you can do is to make small simple edits. Not for use, but just to make Something. Literally just take a skirt or a top and chop it off. You don't even have to finish the item, it doesn't have to have lods or even swatches. Just by simply opening meshes in blender and poking at it and testing shortcuts and things, you’ll learn. That’s what i did. I have so many small tips and tricks, some i posted here. I by no means know everything, in fact, i know VERY little. There are things about blender i legitimately *i pretend i do not see it* because i’m scared of it lol. For questions about cc you can nicely ask over at @thefoxburyinstitute or check out this post about my cc help desk! I also made a poll about cc making that’s got a little less than 2 days left on it lol.
So yeah. You CAN learn to make that One Specific Thing you want in your game, but you need to learn the basics first. It will help you in the long run. Trust me. I’ve had some experience teaching people how to make simple edits throughout the years and it’s always difficult when they’re Set on a specific end result and won’t listen to my advice. Please listen to my advice lol.
I wish you all the luck! ✨
#ive had this post in drafts for 4 years#i havent even seen my drafts etc cus#i didnt realize i ublockorigined it away along with some other things lmao#but this still stands!#just some tweaks to it and up it goes lol#ts4
152 notes
·
View notes
Text

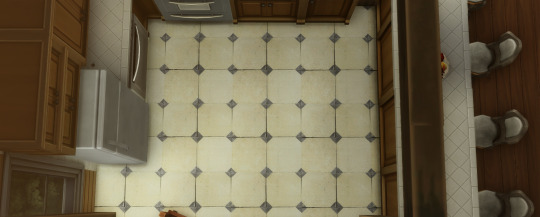
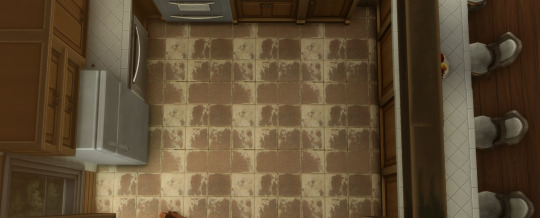
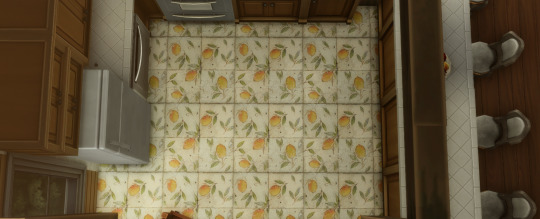
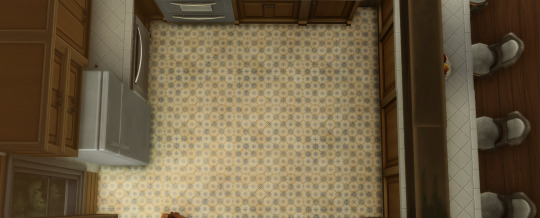
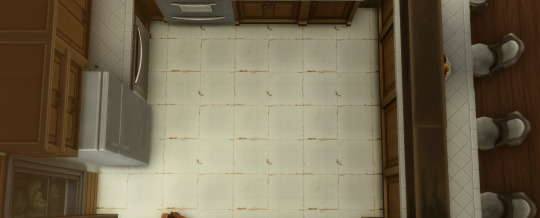
[TS4 CC] Etta Otto - Worn Tiles Pack
Helloooo loves!~ I've been learning some more custom content tips and tricks and decided I wanted to make some worn floor tiles ツ
Reminder ! These are base game and can be found under flooring - tiles ��� Enjoy your game 💌
Showcase:
🌾) Tiles Showcase


Download on Patreon
47 notes
·
View notes
Note
hey amelie! i just wanted to ask, how long did it take for you to learn how to build? did you watch youtube tutorials or anything like that? idk, i’ve always wanted to build a house for my own sims but it’s so hard for me to like what i’ve made. did you feel this way too? do you have any tips? sorry i’m such a yapper 😭 have a great day! <3
Hello! Watching simmers like bojanasims, lilsimsie and simlicy on youtube helped me a lot especially when I started building lots myself about one and a half years ago! I listed a few tips for you below!
I also received a similar message from another anon so I'll be answering both here. 🤍
'hiii i recently discovered your yt channel and i love your builds. how did you improve your building skills and how do you make your builds so realistic? 🩵'

Study Real Architecture: Look at real-life houses, apartments, and buildings to understand architectural styles, layouts, and details. This can give you inspiration and ideas for your own builds. My favorites are pinterest and real estate/architect websites.
Plan Your Build: Before starting, come up with a plan and layout for the build. Decide on the overall style (modern, traditional, etc.), number of rooms, color scheme and any special features you want to include.
Get Acquainted with The Basics: Understand the basic tools and controls in Build Mode. Practice using the wall tool, room tool, roof and terrain tools to create a solid foundation for all your builds. There are a lot of really informative tutorials on youtube! (important for beginners)
Pay Attention to Scale and Proportions: Ensure that rooms, windows, doors, and furniture are proportionate to each other. This helps in creating a realistic and cohesive look.
Use Realistic Colors and Textures: Choose colors and textures that are realistic and complement each other well. Consider the overall color scheme of the house and how different materials blend together.
Add Detailing: Pay attention to small details like trim around windows and doors, roof overhangs, and landscaping. These details can make a big difference in the overall appearance of your build.
Experiment with Roofing and Terrain: Roofs and landscaping can significantly impact the realism of your build. Experiment with different roof shapes, angles, and materials. Use terrain tools to create realistic slopes and landscaping features.
Furnish Thoughtfully: When furnishing your builds, think about how real people would use the space. Arrange furniture in a way that makes sense functionally and aesthetically.
Utilize Custom Content (CC): Explore custom content to expand your options for building, furniture and decorative items. This can often help to create a more realistic look as well.
Seek Feedback and Learn from Others: Share your builds in sims discord groups or on Simblr to ask for feedback and look for inspiration. Look at tutorials and speed builds by other players/creators to learn new techniques and tricks. (please don't copy or steal other people's builds to post online though)
Practice Regularly: Like any skill, building in The Sims 4 improves with practice. Experiment with different styles and challenge yourself with more complex builds over time.
Have Fun and Be Creative: Building in The Sims 4 is a creative outlet, so enjoy the process and don't be afraid to try new things in your designs.
139 notes
·
View notes
Note
Do you have any tips or tricks for animating? I’ve been wanting to try getting into it but find it overwhelming to start
An easy way to cut corners is to just copy a frame and move things slightly


with the last two frames, theyre almost the exact same, except I've moved CC's head, arms, and hair all slightly, so when playing it, while not as smooth as it may be if i actually made a full inbetween frame, it still gives the look that he was transitioning from one pose to the next
When it comes to lipsyncing, it might be tempting to try and put all of the mouth shapes and syllables you know would be there in real life, but a lot of the time in animation, especially with fast speaking/singing, doing so looks odd, too slow, or too much on the eyes. having a program that can show you playback of your animation + audio while you're working on it can help you figure out if you might be making things take too long mouth wise.
Generally, these are the shapes I tend to go for when lipsyncing
A lot of looking natural may come down to making sure your proportions stay consistent (not accounting for squash and stretch frames, which will stray from proportion on purpose). a good way to prevent your character from starting long and ending short is to start with keyframes, and slowly work your way inwards with inbetween frames. but i am a naughty animator and often find this process boring, so i sometimes just do straight ahead animation where i figure it out as I go. this is probably a bad idea but i dont really care that much, sometimes having fun is all I'm looking for out of a drawing experience!
speaking of squash and stretch, they can matter a lot and are kind of similar what I did at the beginning with my CC frames. squash frames can give your character the illusion of weight, and stretch frames give the illusion of moving quickly


theyre a type of "smear" frame, but smear frames also come in more traditional, euh, smeary looking ways


uhhhh im not sure if any of this is properly explained, as I'm certainly not a professional, but I hope you can find it less of an overwhelming process! I think a good thing to do especially as a beginner is to start small. maybe even just practice ball drops and head turns before getting into anything with a huge amount of movement
61 notes
·
View notes
Text
Marauders era characters playing the sims
✧・゚: *✧・゚:*✧・゚: *✧・゚:*✧・゚: *✧・゚:*✧・゚: *✧・゚:*
Barty- the definition of torture. Literally makes them suffer in every way the game allows, including murder mods. He also has wicked whims installed for his sim and his little Evan sim to use right on top of his crime scenes
Evan- tortures them but in a different way. He sets up multiple rooms, one sim each. And it's a test. Who can survive the longest. Each room includes one way to die. The last sim standing gets to live
Sirius- lives out his rockstar dreams via sim. Secretly makes wolfstar for his sims, but not without drama. His sim is a player that's banged half the town, until he unexpectedly falls in love with a werewolf he met in a bar
James- makes all his friends as sims. Makes wolfstar happen bc he's their number one shipper. (He also makes jegulus happen but hides it from sirius bc even just in a game, he knows sirius would chase him down)
Regulus- makes a sim of himself and takes over the spellcaster world, vampire world, and is working his way to control the werewolves next. Why? Bc he can
Remus- simply just plays the game. As intended. He lives out a calm little life with sirius where he's not a werewolf
Lily- 100 baby challenge. Now don't twist this into something let me explain. I think she would love a challenge, plus I think Lily likes kids. So doing a sim based challenge sounds right up her alley. And she'd succeed ofc. She'd learn all the tips and trick and have to completed within the month. And once she's done with that, she'd move on to a legacy challenge
Marlene- runs a crime mafia with a little sim dorcas at her side. She fights every sim who looks at her wrong and wins
Dorcas- doesn't play the game alone, instead she does download a fuck ton of cc and helps marlene with her mafia empire
Peter- plays the game as intended. Has a little cottage where he grows plants and sells them
Pandora- lures in townies with her kindness and them traps them in the basement of her house, never to be seen again. She experiments on them ofc, and when they can't handle it anymore they simply perish
Mary- maxes out every career in the game for fun. She has one sim and that sim has taken over the business world in every sense. She owns a 5 star restaurant, is a famous celebrity, and she's the best politician the sims world has ever seen
#marauders#regulus black#james potter#jegulus#starchaser#barty crouch jr#evan rosier#rosekiller#sirius black#remus lupin#wolfstar#pandora rosier#lily evans#mary macdonald#marylily#pandalily#dorcas meadowes#marlene mckinnon#dorlene#peter pettigrew
55 notes
·
View notes
Text
🌈The Olivia Dress 🌈
Hi my babies!!!
As promised, here she is...
To be honest, I've been wanting to make clothes cc for a while since I released my first ever clothes cc a couple of years ago. The process is fun but it can take a long time, especially when you're new to CC creation. I can't lie...creating this dress was challenging and time consuming, but being able to share it with my fellow simmers made it all worth it.
With that being said, I hope you enjoy this dress as much as I have in game and in Blender.
Fair disclaimer: I've noticed that the dress has some clipping when the sims walk. I've tried fixing it but I haven't had much success. I promise to upload a newer version of this dress once I figure out what's going on. If anyone has any tips/tricks, I'm open to hearing them!
✨The Olivia Dress✨
6 swatches
Available for female young adult - elder
Enabled for Seasons
Disabled for Random
With gratitude always,
Baby Cakes 🩷
Download on Curseforge for free
#cc finds#ts4#blacksimmer#black simblr#black sims#sims 4 cc#the sims 4#ts4 simblr#sims 4#sims 4 custom content#urban sims#sims 4 gameplay#the sims#sims 4 mods#sims 4 download#ts4 custom content#ts4 cc#ts4 download#ts4cc#ts4 cas#ts4ccfinds
65 notes
·
View notes
Note
I'm a newer CC creator and am trying to figure out how to make some doors from scratch and some doors bigger in size. I can't find any tutorials anywhere :( Do you have any tips/ tricks?
They probably don't exist because the process varies from door type to door type, then door size to door size. They are one of the more involved items to create. My best advice would be export a door that is close to the format you want to make (i.e. a glass double door, a sliding door etc) and make sure it's basegame (if you want it to work for people). Export the mesh and have a look at what each meshgroup is. Then you can tackle making it. I also advise that if you are making a door, keep the swinging door section as a separate group up until you make your import blend file because you will need to assign the door bones to those sections (and regular transform bones to the other parts). I usually do this process by having my base blend file (what I am using as my base for the cc, export it then duplicate one of the groups with all the bones. I delete all the mesh parts in that group via edit mode so it is empty, tab out of edit mode, then merge my new mesh into it. I can then assign the bones (make sure they are not assigned to multiple areas), then I separate into their groups based on the base mesh, then merge then into empty groups. There should be some tutorials on assigning a bone to a model on the s4s forums if you aren't sure.
As for making doors bigger, that is tough. If you are making from scratch it is something you need to plan for in advance, and it's not really something that can be taught, it mainly comes from experience. If the size difference it's too drastic, you can 'stretch' the mesh to accommodate the larger height, otherwise you may have to make a new texture for any additional heights you have. It really depends. For edits like I do for my addons, it is dependent on the mesh and the texture and it's assessed on a case-by-case basis.
On a side note, the first door (or window) can be intimidating, but just break it into steps and you should be fine. As long as you make sure you are taking into account the thickness of a wall (0.15 total, or 0.075 each side) you should be fine. Also give yourself plenty of frame width to hide the cutout.
31 notes
·
View notes
Note
would this be annoying question to ask (hopefully not) but how did you learn your sim style! I’m currently wanting to learn a new style that doesn’t look 🤢 and i love the way you create your sims! tips and tricks - I would love to learn from you!
There are NO annoying questions! Ask as many as you like. To preface I am much better at making feminine sims than I am at masculine sims (imho). Also, get ready for me to yaaaaaap :D
expose yourself to a lot of different sim styles and get yourself inspired, make sure if you take too much inspiration that you give proper credit!
do yourself a favor and if you're able - download as many sliders and presets you can find. This includes body presets too!! THIS single handedly got me better at making sims what the game has is good but you're pretty limited.
Give your sims a favorite feature- this will help you with making your sims look different. I'm a nose girl, idk why but I usually give my sims some cool and different nose shapes.
If possible get yourself a few good skins/skin details. I like to think it's the little details that make a sim really appealing. Like with Charlie I had a mole detail which put a mole on her lips and I was like THATS it. lol. I'll list some creators I use frequently below
DONT GIVE UP ON THEM. If you're like me you're going to hit that point in CAS where you are like WTF is going on. Keep adjusting features it will eventually work itself out.
BONUS: Have a purpose for them. What are they like? What career will they have? Do they have any little quirks like they have a favorite pair of jeans they wear a lot. Are they a shoe person? Are they fashionable? Are they bold? Are they messy or put together?
BONUS 2: I always ask myself do I have something I already purchased before I use CC. This is just for us peeps that use too much cc and not the stuff we actually paid for. Cause in this economy.... I better be using what I paid for.
I hope this helps and sorry for the yap session, your millennial granny likes to share. Under the cut are some creators I use a lot!
Skins: I mostly use northern siberia winds and nesurri. Some faves in the community are sims3melancholic and mossy lane.
Skin Details:
little details by @nesurii all about face by @pyxiidis face kit 2 by miiko face details by @okruee
24 notes
·
View notes