#how to setup cricut maker 3
Text
How to Setup Cricut Maker 3: A Complete Guide for Beginners
Have you purchased a Cricut Maker 3 and want to learn how to setup Cricut Maker 3? In this case, you have reached the right place. Here, you will learn about the basic procedure for your machine setup. To start using the machine, you should follow the steps below and set your machine up accordingly.
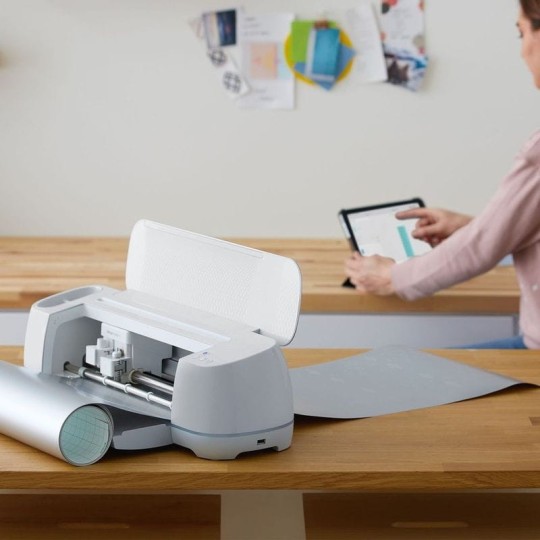
This machine has advanced features since it is the latest tool in the Cricut family. It can cut more than 300+ materials, including smart materials that do not need a mat. In this blog, I will discuss how to connect your machine to a computer and then download the Design Space software. So, let’s get started.
Preparing Your Cricut Machine for Setup
To begin learning how to setup Cricut Maker 3, you should start by preparing the machine. Before you go on to the setup process, you need to do the following things.
First, unpack the machine and remove all the items inside the box.
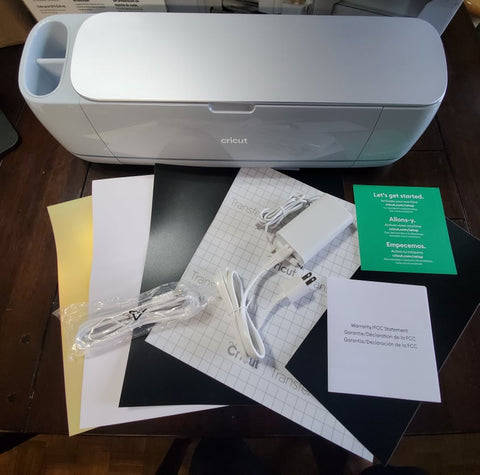
Next, you should check them all and ensure that all the materials are there and nothing is missing.
Then, you have to place the machine in a safe place on a flat surface.
Now, the machine is ready to setup. You can start the process by following these steps.
The first thing you need to do is plug the machine into a socket using the power adapter.
After that, press the power button on the machine and hold it for a while. When the machine is on, it will be ready to connect.
Now, connect the machine to your computer using Bluetooth. Although you can connect them using USB as well.
Also, download the Design Space software on your computer and sign in.
If you are a new user, you may have to create a new account.
How to Connect Cricut Maker 3 to Computer via Bluetooth?
When you want to learn how to setup Cricut Maker 3, one of the most important things you need to do is connect the machine to your computer, either a Windows or Mac. Here, you will see the connection process for a Mac computer.
To initiate the connection, plug the machine’s power adapter into the wall socket and press the power button of the machine.
Next, the distance between the machine and your system does not have to exceed 10-15 feet so that your computer can easily detect the machine.
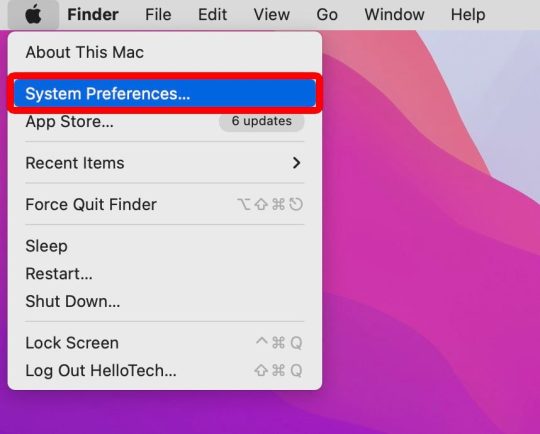
Then, go to the Apple menu, System Preferences, and Bluetooth.
After that, turn on Bluetooth and start searching for your machine’s name.
Now, you will find the machine on your screen; you have to select it and wait.
The machine will be paired to your computer in no time.
In the end, you should go to the app and check New Product Setup. The machine will appear to be connected.
How to Download Cricut Design Space on Computer?
The final step in learning how to setup Cricut Maker 3 is downloading the app. The app is a must for your machine as it operates on your computer. It is also important to start creating projects. To download this software on your Mac, follow the steps below:
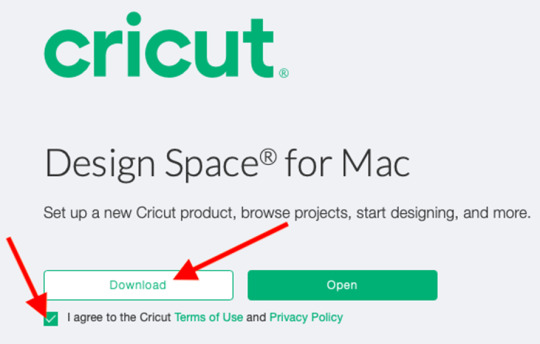
To begin, open your Mac computer and go to cricut.com/setup.
Then, you should look for the Design Space app and click Download. Before downloading the file, you will have to agree to Cricut’s Terms and Conditions.
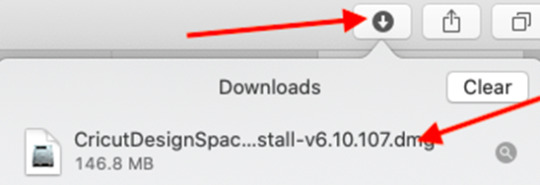
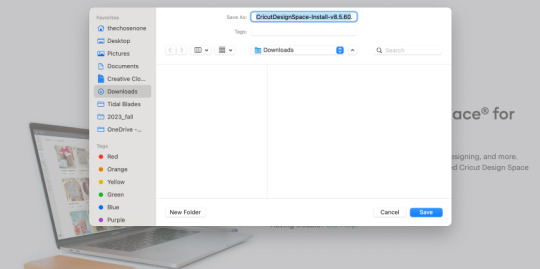
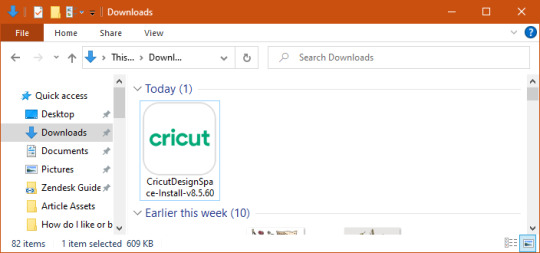
Next, the file will be saved in the Downloads folder, although you can choose a folder where you would like to download it.
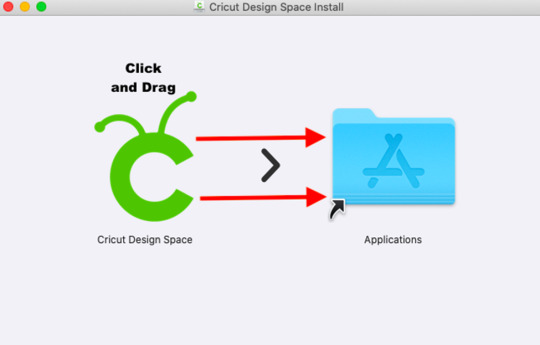
After that, you have to go to the folder and double-click on the file.
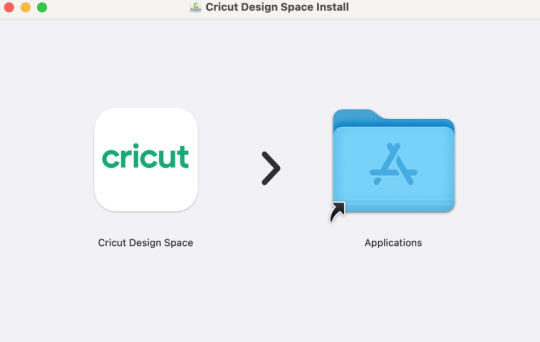
Now, a new window will pop up on the computer screen. The window has two icons: the Cricut icon and the Applications icon. You have to drag the app icon into the Applications icon.
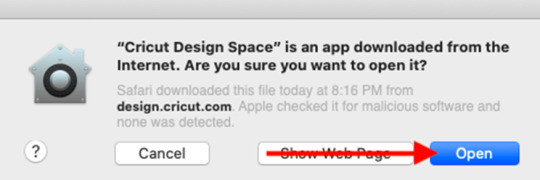
Also, you need to open the Applications folder and click on the software to launch it.
Click on Open,and the Design Space will be installed on your computer.
Log into your account, and the app will be ready to use.
Finally, you learn the full process of how-to setup Cricut Maker 3. Now, you can easily setup your machine and work on your projects.
0 notes
Text
How to Setup Cricut Maker 3 on a Computer: A Complete Guide
Congratulations if you have got your brand-new Cricut Maker 3. This machine is the most advanced and versatile crafting cutting machine I have used in my crafting career. The tool has both wired and wireless connectivity options. If you are curious to learn how to setup Cricut Maker 3, then I will guide you through every method and step.
You can set up the Cricut Maker 3 machine on both Windows and Mac computers. In addition, you have to download the Cricut app and connect both devices via Bluetooth/USB. So, keep reading this blog till the end to gain in-depth information about the whole process.
How to Connect Cricut Maker 3 to Your Computer via Bluetooth?
If you want to know how to setup Cricut Maker 3 on a Windows/Mac computer, it is necessary to connect it via Bluetooth or USB cable. Here is the complete guide you have to follow.
Windows
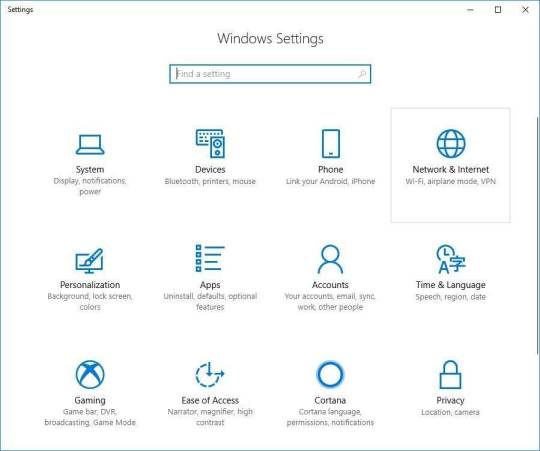
For the first step, you have to open the Settings window on your Windows.
After that, move to the Devices page and select the Add Bluetooth or other device after turning on the Bluetooth toggle.
Then, select the Bluetooth option on the next page to search for your Cricut Maker 3 machine.
When the Cricut Maker machine name appears on the screen, then click on it.
Now, Bluetooth pairing of your Maker 3 and Windows computer will be complete.
Mac
Make sure that your Cricut Maker 3 machine is On and located within a 10-15 feet range.
Next, go to the Apple menu on your device and then click on the System Preferences option.
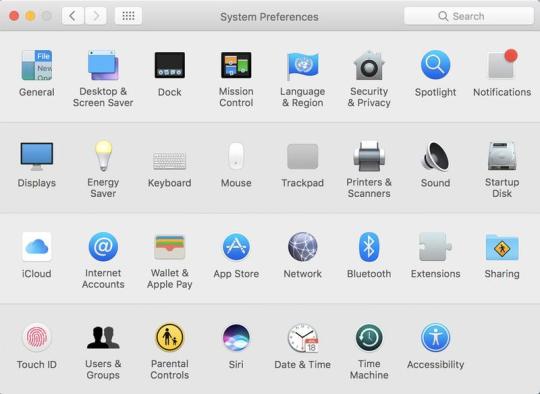
On the option System Preferences page, click on the Bluetooth option.
Check if the Bluetooth option is On, and then click on your machine name from the list.
Finally, the machine and Mac computer Bluetooth pairing will be complete.
Apart from that, you can also use a USB cable provided with the Cricut Maker 3 machine. For that, you have to attach one end of the cable to the computer and the other end to your machine. Now, follow the procedure to complete the connection process.
How to Setup Cricut Maker 3 on Your Computer?
The first step is complete if you have connected your Maker machine to your device via Bluetooth/USB. Now, you have to complete the setup process by downloading the Design Space app.
Windows
For the first step, access the Cricut official web page on your PC.
Next, access the Design Space for Windows option and then click on the Download option. (If you see the Download option greyed out, then you might have to click on the terms and conditions checkbox.)
Now, the download process will start on the screen; when the download is complete then open the file in the browser.
You can also move to the Downloads folder to access the file.
If a prompt appears to you if you trust this application, then select the right option to move forward.
Now, the installation progress will appear on the screen.
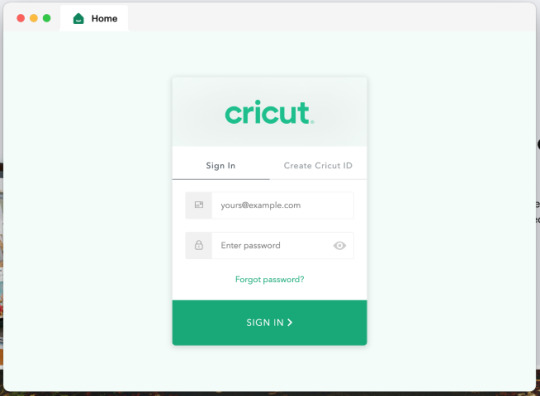
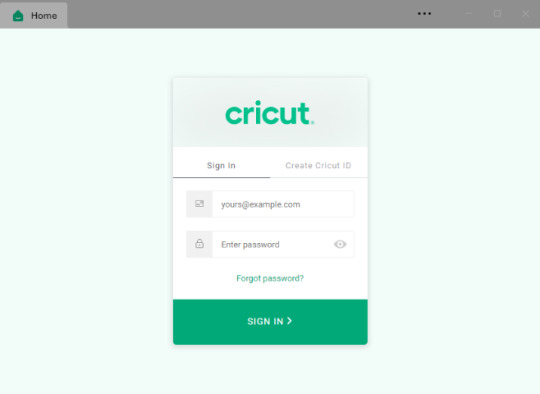
When the Cricut app installation is complete, then type your account details to sign into your account. (If you do not have an existing account click on the Create Cricut ID option and make a new account.)
Furthermore, you have to click the Machine Setup option; now, the device will start searching for your Maker 3 machine.
Click on the right machine name when it shows up on the screen.
Finally, the machine setup process will be complete, and you will be ready to create amazing DIY projects.
If you are a Mac user, you can complete the steps in the section below on how to setup Cricut Maker 3 on your Mac computer.
Mac
On your macOS web browser, visit the official Cricut website and move to the Apps section.
Then, access the Design Space for Mac and select the Download option under it.
A new page will appear on the screen then choose a folder to store the downloaded file.
Specify the folder and then click on the Save option.
Now, the downloading process will begin.
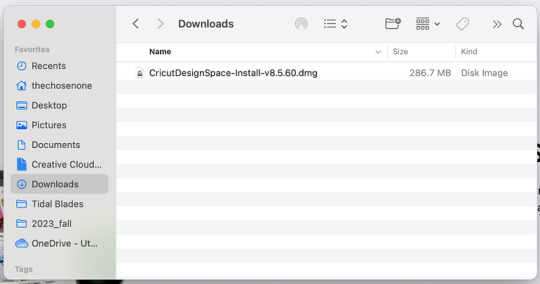
When the download is complete, go to the Downloads folder on the browser and then double-click on the file.
Also, you can go to the folder in which you have chosen to store the file.
Once you double-click on the .dmg file, the installation wizard will appear on the screen.
Then, you will see the Cricut icon on the screen; drag the Cricut icon to the Applications folder to start the installation.
Moreover, from the Applications folder, launch the Cricut app by clicking on the ‘cricut design space’ option.
A Mac notice will show up on the screen; click on the Open option to open the app.
Once the account sign-in page displays, enter the Cricut ID and password to log in. (You can also create a new account if you want.)
Next, choose the option to set up the machine and then connect Maker 3 by following the on-screen prompts.
Enjoy creating beautiful crafts using the Design Space app and Maker 3 machine.
Frequently Asked Questions
How Do I Setup Cricut Maker 3 on My iOS?
These are the quick steps to follow and set up the Maker 3 machine on iOS.
For the first step, keep your Maker 3 machine and iOS device within the connection range.
After that, turn on both devices and establish the connection process.
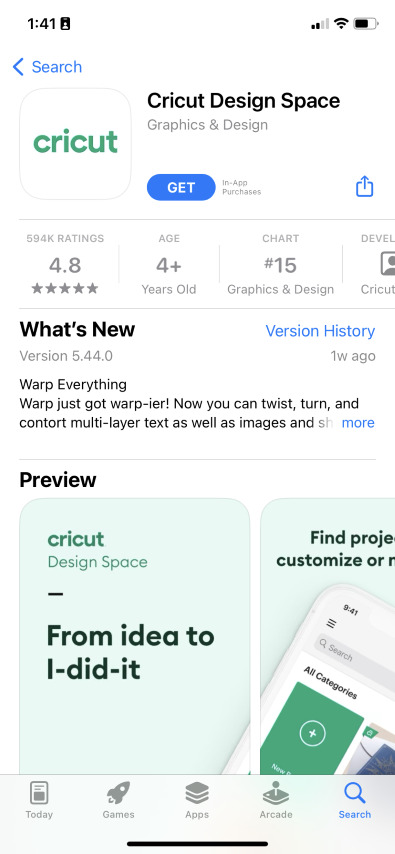
Then, open the App Store on your mobile phone and download the Cricut Design Space app.
Once the download and installation of the app are complete, sign in to your account.
Afterward, choose the New Machine Setup option and connect your Cricut machine.
Now, you can enjoy creating jaw-dropping designs with your Cricut machine and app.
How to Setup My Cricut Maker 3 on a Mac?
Want to know how to setup Cricut Maker 3? The below guide will help you establish the connection between the Maker 3 and Mac computer.
Turn on the Mac system and Maker 3 machine and make sure they are in the connection range.
After that, connect both devices using the USB cable or via Bluetooth connectivity.
Next, open the official Cricut website on a web browser and locate the Cricut app.
Then, select Download under the Design Space for Mac option.
Wait for the app download to complete, and then complete the installation process.
Then, sign in to your account using the Cricut ID and password.
Also, choose the option to complete the Cricut machine setup process.
What Are the System Criteria for Setting up the Cricut Maker 3 Machine?
There are no system criteria to set the Cricut Maker 3 machine. But, you have to keep the system requirement in mind when you are downloading the Cricut app. To avoid the system requirement issue, make sure your computer or phone device is running on the latest OS version. Also, ensure that your device has Bluetooth connectivity or a USB port for connecting the device. If you want more help then you can visit the system requirement page on the official website.
Read more: cricut.com/setup mac
install cricut design space app
Cricut Design Space
Source: How to setup Cricut Maker 3
#How to setup Cricut Maker 3#Cricut Design Space#cricut.com/setup#cricut new machine setup#cricut software app#cricut.com/create#cricut.com sign in
0 notes
Text
How to Make Christmas Cards With Cricut Maker? [Beginner's Guide]

Well, Thanksgiving is over, but Christmas is in full effect! If you are also excited about Christmas, then you can learn how to make Christmas cards with Cricut with me. Creating handmade cards for various occasions is an old tradition that everyone loves to follow. But this year, I decided to come out of my shell and try to make cards out of my craft machine. Greetings! To all my enthusiastic DIYers, I am Stephan, an investor and part-time crafter.
Being an owner of a Cricut machine, I’ve made tons of projects that not only upgraded my crafting skills but also helped me in starting my own business. As a business person, I made and sold various kinds of Xmas cards in all these years. But this year, I am going to design not only for business but also for my loved ones.
What Supplies Are Needed to Make Cricut Christmas Cards?
Being an expert in creating customized cards, I must make you aware of every detail that comes under how to make Christmas cards with Cricut. All DIYers must come across the supplies that will play a vital role in transforming their idea into reality. To ease your work, I have made a list of the supplies that will be required while forming the card for this festival.
Cricut machine
StandardGrip cutting mat
Cricut Scoring Wheel/Scoring Stylus
Cardstock
Cricut Pen
Scraper Tool
Tape
After discovering the final list of materials, let’s come directly to the point and come across the most critical part. While going through the coming section of the blog, you will get to learn about the complete guide to designing a personalized Christmas card this year.
How to Make Christmas Cards With Cricut?
Equally important, this segment is going to play an essential role for each of you. As a blogger, I guide you to go through the content mentioned here very carefully. For a better understanding of how to make Christmas cards with Cricut, have a look at the below-shared details.
Step 1: Cricut Design Space Sign-In & Draw Design
Initiate the process of creating a customized card by signing into the Cricut app.
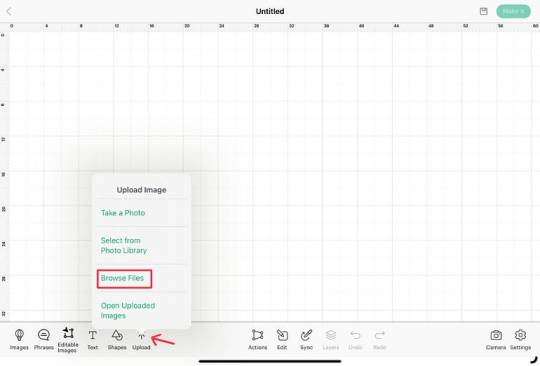
After the app is open, press the Upload icon given under the Menu panel.
Following this, click Browse and upload your image from your system folder.
Now, press the Insert Image button and tick the Ungroup icon given under the Layers panel.
Next, I will select the design and then choose the Draw option appearing under the Linetype layer.
Further, I can also change the color of the design by choosing the color from the color tab.
Afterward, I am going to select the fold line and change it to the Score line from the Linetype box.
Now, I will choose the whole card and then press the Attach option visible at the bottom of the screen.
Next, I will head upto the Make It option to take a step towards the next step.
Step 2: Insert Cricut Mat & Cut Material
On the new project page, I am going to hit the Continue button and then load my material into the machine.
After doing this, I will place my cardstock into a StandardGrip cutting mat using a scraper tool.
Next, I am going to insert the mat into the machine and then add the scoring wheel and fine point pen into both Clamps.
After the cutting and drawing process comes to an end, I am going to unload the mat and shape my card.
Step 3: Design Your Merry Christmas Card
In this last step of how to make Christmas cards with Cricut, I will gently fold the card from the score line area.
Now, I will use my scraper tool and press the fold area for the crisp fold line area.
Next, I can also add the message inside the card or slip the card inside the envelope.
Are you on board for designing handmade Christmas cards this year? If you’ve made up your mind, then I wish you luck and pay special attention while forming it with this crafting machine.
Frequently Asked Questions
Can I Make Business by Selling My Custom-Made Christmas Cards?
It doesn’t matter whether you are a beginner or a professional crafter; you can surely start your business by selling customized Christmas cards. However, to make your identity in the business, you need to know about your customer’s needs and how to access the craft machine. Besides, you should also buy the tools that will help you in forming the craft as per your choice.
Is It Necessary to Use Design Space While Making Cards?
Yes, all DIYers need to get Design Space on their respective devices. It is a digital app that works together with the cutting machine and helps the crafters draw designs by using images, fonts, and ready-to-use projects. Without the app, the user won’t be able to turn their DIY idea into reality. Apart from that, Design Space keeps adding new features, allowing you to improve your crafting skills.
How Can I Make My Christmas Cards With My Cricut Machine?
Get to know about how you can make Xmas cards with your craft machine:
First, you need to open the Cricut app and log in with your Cricut ID & password.
Second, start creating your design by using the tools given under the Menu bar.
After making the design, make the relevant changes and press the Make It option.
Next, insert your material and start your craft machine by pressing the Go button.
After the process is complete, unload your card and properly fold it.
Finally, gift it to your friends or family members as a Christmas gift.
For more information visit: Cricut.com setup mac
cricut new product setup
Cricut Design Space Software
www.cricut.com/setup login
cricut explore air 2 setup
Source: How to Make Christmas Cards With Cricut Maker
#how to make christmas cards with cricut#Cricut Maker Setup#Cricut Machine Setup#cricut design space download#cricut machine set up#Cricut Design Space Software#how to setup cricut maker 3#cricut maker 3 setup#Cricut Design Space software
0 notes
Text
How to Use a Cricut Explore 3: Easy Tutorial for Beginners
Learning how to use a Cricut Explore 3 is important in order to complete any project with this machine. The Cricut Explore 3 is a versatile cutting and crafting tool that can cut more than 100 materials, like paper, cardstock, vinyl, iron-on, fabric, leather, wood, and many more. With the help of these materials, you can work on a variety of craft projects. If you do not know how to use this machine, read this blog to learn everything you need to know.
To use this Cricut machine, you need to do certain things. You will have to connect your machine to a computer and download the Cricut Design Space app. This app will help you manage your projects and make the most of your machine. So, let’s start with the tools and supplies you will need for your project.
Tools and Materials for Using Your Cricut Explore 3
Before learning how to use a Cricut Explore 3, you should know about the supplies you will need for your DIY project. What supplies you will need depends on the project you are working on. Here, we are going to talk about using a Cricut machine to cut material to make a beautiful butterfly. You will need the following supplies on your machine:
How to Use a Cricut Explore 3 for Making a Project?
Once you know about all the supplies you will need for your project, you can move towards working on it. So, these are the steps you have to follow:
Step 1: Create a Design in Cricut Software
The first step is to create a design on the Cricut Design Space app. It offers many features that you can use to make your design. The first option you have is you can pick any design from the thousands of options you have. The other option is to create your own design by clicking on the New Project section on Canvas. You have one more option: you can choose any design from your computer and upload it to the software. After that, you can use that image for your project. Once your design is ready, you can move on to the next step.
Step 2: Load Your Material
When you have selected a design, and then load the material on your machine. To do this, you must take the material and put it on the cutting mat. Next, place the mat inside your machine and press the Load button on the machine.
Step 3: Select the Material
When learning how to use a Cricut Explore 3, the next step is to select your material on the Design Space app. Afterward, go to the app and select the material you will use to cut on your machine.
Step 4: Cut Your Design on Your Cricut Machine
Once you have selected the material on the app, you can cut the design. To do so, you will need to click on Make It. The machine will cut the design in the exact shape that you have selected on the Cricut software.
Step 5: Unload Your Material and Reveal Butterflies
Once the material is cut, you have to unload it and remove it from the Explore machine. Then, you have to weed the design from the material. You can use a weeding tool for that. When the design is out, you have to glue it to the canvas, and your beautiful butterfly is ready to beautify your room.
Conclusion
In short, I am sure you have learned how to use a Cricut Explore 3. With this machine, you can create many DIY projects like cards, flowers, coasters, keychains, etc. In this blog, you learned how to make a beautiful butterfly by using your cutting machine. To complete your project, you must know about the essential supplies you will need and the basic process. Reading this blog, you understand how the Cricut machine works, and now you can create any project you want.
FAQs
Can I Use Cricut Explore 3 as a Beginner?
For sure! Cricut Explore 3 is an easy-to-use machine, and it is great for beginners to learn how to use it. This machine allows you to cut more than 100 materials, like paper, cards, and many other projects. If you want to use the machine, you will have to do a few things, like connecting it to your device and downloading the Design Space software.
How Do I Set Up Cricut Explore 3?
To work with this machine, you will have to complete the setup. For the setup, you will have to do the following things:
How Can I Connect Cricut to My Computer via Bluetooth?
To connect your computer to the machine via Bluetooth, you will have to do the following things:
Visit: install cricut design space app
www.cricut.com setup login
Source: https://cricutmakermachines.com/how-to-use-a-cricut-explore-3-easy-tutorial-for-beginners/
#How to Use a Cricut Explore 3#cricut.com/setup#install cricut design space app#cricut.com setup mac#install cricut design space#cricut create connect to computer#setting up my cricut maker#cricut setup create account#setting up new cricut maker#cricut setup on computer#cricut cutting machine setup#cricut setup#cricut design space setup
0 notes
Text
How to Download Cricut: Installation Guide for Computer/Phone
Are you looking to learn how to download Cricut? Look no further than this guide. Cricut Design Space is an important software if you want to use your Cricut machine. When I first purchased my Cricut, I had a lot of tasks to do, such as downloading the Cricut app, setting up my machine, and connecting it to my desktop or smartphone.
After years of use, I also started assisting many novice crafters using my online platform, which I used to guide them regarding Cricut. I provided details for the Cricut setup and troubleshooting issues. Hence, I am doing the same thing here with this write-up. Let’s get into it and learn how to download the Cricut software on your operating system.
How to Download Cricut on a Computer?
You can easily download the Cricut software on the computer, whether you have to download it on Windows or Mac. So, if you want to download the Cricut Design Space for Windows and Mac, you have to follow the steps below:
For Windows
In the beginning, power on your Windows PC.
You have to click on the Start menu from the taskbar on your taskbar.
Then, you will have to type Chrome or another internet browser name. I use Google Chrome, but you can choose any browser you want.
Also, navigate to the browser search bar and type the URL design.cricut.com.
After that, you need to hit the Enter key on your keyboard.
Next, you will go to a page where you should navigate to a checkbox and click on it.
Now, you must click on the Download tab and begin downloading the software right away.
Once you have downloaded the app, you need to navigate to the Downloads folder.
There, find the downloaded file and double-click on it to install it.
Afterward, you will be asked whether you trust the application. Select Yes to accept.
Wait for the installation and sign in with your Cricut ID and password.
For Mac
To start, you have to open the Chrome browser on your Mac computer.
Then, you will be required to enter the link design.cricut.com on the browser’s search bar.
Once you reach Cricut’s page, you will need to click the checkbox.
Hit the checkbox, and it will enable the Download tab.
Further, you click on the Download tab and start downloading the Cricut app on your Mac.
Once it is downloaded, go to your Downloads folder and find the .dmg file.
Then, double-click on the .dmg file and begin to install the software.
To start the installation process, you will need to drag the Cricut icon to the Applications folder.
How to Download Cricut on a Mobile Device?
Cricut Design Space is easy to download on mobile phones as well. This easy-to-download software is used to operate the Cricut Design app and can help you setup your Cricut machine. To download and install the app on iOS and Android devices, follow the steps given below:
For Android
First, switch on your Android smartphone.
After that, you will need to find the Google Play Store icon on your device.
In the search bar, you will need to type Cricut Design Space software.
Now, you will need to look for the apps offered in the given result below.
Once you find them, you need to click on them.
And then you will need to press the Install button and begin installing the software.
Once your Cricut app has been installed, you will notice your software is available on your home screen.
For iOS
First, navigate to the App Store on your iPhone/iPad device.
Next, you should type Cricut Design Space in the search bar.
Now, look for the app and select the Cricut app from the visible results.
Here, you need to hit the Get tab to install the app on your iPhone or iPad.
If asked, you will need to verify the download using an iTunes password.
Once you start your Cricut machine, you will need to set it up in no time.
You might have understood how to download Cricut on various platforms, like Mac, Windows, Android, and iOS. Download the software and create wonderful, intricate designs that capture everyone’s attention.
FAQs
Question 1: Why is my Cricut Design Space not working?
Answer: There are various reasons that can hinder your Cricut software from working. The reasons are:
Unmet minimum system requirements.
Unstable internet connection.
Damaged or corrupted cache files.
Outdated versions.
However, you can easily fix them by cleaning the app cache, installing the application that is compatible with your OS, resetting the Cricut account password, and forcing the application to be reloaded.
Question 2: Why do I need Cricut Design Space?
Answer: Cricut Design Space is used to setup a Cricut machine. Therefore, users need to install it on their systems or devices. Besides, the software is mainly used to create, edit, and modify the design you want to cut on the machine. Therefore, you will need a Cricut software.
Question 3: How to download Cricut Design Space on an ASUS laptop?
Answer: Go through the steps below to download the Cricut app on an ASUS laptop:
First, you will need to launch an internet browser.
After that, visit design.cricut.com.
Now, you should agree to the Terms of Use and Privacy Policy.
Then, you have to click on Download.
Here, double-click the downloaded file downloaded into your Downloads folder
Lastly, you have to follow the on-display steps to install the Cricut Design app.
Source: how to download Cricut
Visit here For More Information: Cricut.com/setup
Pinterest
0 notes
Text
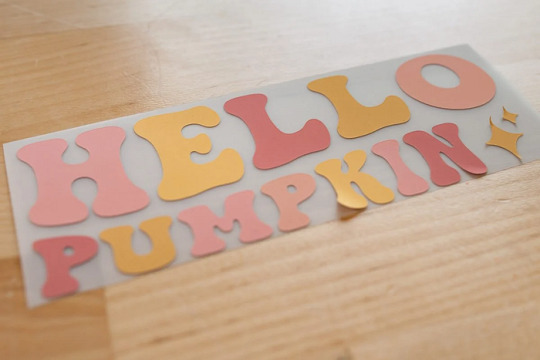
How to Use Cricut Maker: Create a Siser Easy Color DTV Project!
Have you just bought a new Cricut Maker and are wondering how to use Cricut Maker? This brilliant Cricut machine may be overwhelming for beginners, but it is simpler than you think. You get many amazing features with this crafting machine. Let’s get ready to use it and make creative DIY projects with it. I will tell you how to prepare a desired project using this Cricut cutting machine.
Cricut Maker offers various adaptive features that help you create unique and beautiful projects effortlessly. Plus, you get a slot for inserting pens and a number of Cricut tools and supplies. It will be all fun to create something with this ultimate machine. Here, I’ll tell you the best methods to prepare personalized apparel using Siser EasyColor DTV. You’ll learn more about it later in this blog. So, let’s get started.
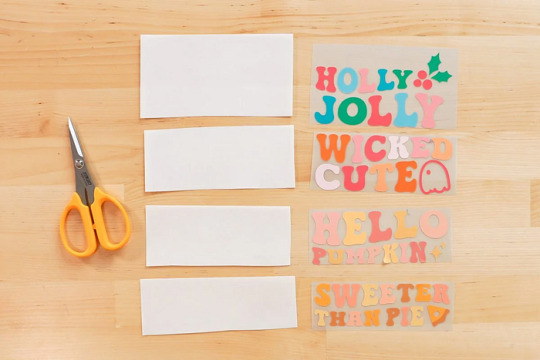
Supplies and Tools You Will Need for Your Cricut Project
Before we get started to learn how to use Cricut Maker, you must gather some important accessories. I’m listing all of the best accessories here. Use them and follow my step-by-step instructions to create your own project. Check the steps below.
● Brand new Cricut Maker or Explore
● Siser EasyColor DTV
● Siser Easy Mask
● An inkjet printer
● Cricut StandardGrip mat
● A weeding tool
● A Cricut EasyPress
● A Cricut scraper tool
Let me tell you what a Siser EasyColor DTV is. It is an iron-on vinyl type that is typically used on lighter blanks such as garments, T-shirts, etc. This unique vinyl is very convenient and useful for creating better designs and sublimation projects. Let’s check the complete method to create the best project.
How to Use Cricut Maker to Make Personalized Apparel?
Finally, we are here to learn the process of creating personalized T-shirts. So, before we move on to the final steps, measure your blank so that you can create an appropriate design. So, let’s check how to use Cricut Maker for beginners.
Step 1: Upload an SVG File to Cricut Design Space
In the first and foremost step, you’ll need to upload your SVG design file to the Cricut software. If you want, you can create a design manually as well. Once you’re ready, just resize your design and make it fit to your blank.
As you’ll have to print this image, ensure that your Cricut machine will recognize it as a printable file and not a file to be cut. To ensure this, choose your image and hit the Flatten option beneath the Layers Panel.
After that, your Cricut machine will show a preview of the image. When you’re ready, just click the Make It button. And now, this design will go through a Print Then Cut feature. To access it, hit the Continue button.
In the next step, you’re allowed to send that image to your inkjet printer and select the paper type you want to print on. I prefer specialty matte. You can select one based on your printer. Get ready with your printer and insert the Siser EasyColor DTV into it.
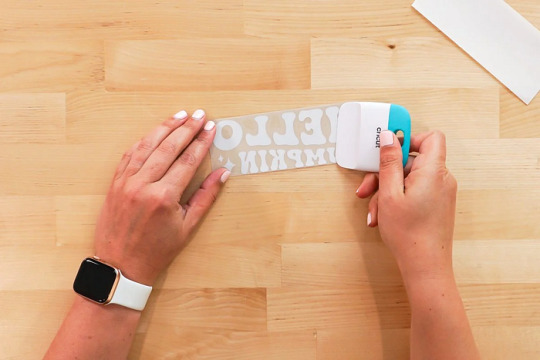
Step 2: Start Cutting the Siser EasyColor DTV
In the following step, you’ll need to cut your material. On your Cricut machine, select your material as Premium Vinyl Permanent Glossy and set the pressure to More using the drop-down menu.
Next, load your vinyl material on the Cricut mat at the left-side corner and make it stick to the mat using a brayer tool. Now, load the mat with vinyl into the Cricut machine and hit the Play button to allow your Cricut to cut the image. Continue with the steps to learn how to use Cricut Maker.
Once the cut is done, take off the paper sheet from your mat, turn the mat over, and take the mat away from your DTV. Please note that you don’t have to peel off the DTV from the mat. You can also use a pair of scissors to cut the design if necessary.
Step 3: Weed Out the Excess Vinyl
Once you cut your design, you should weed out the excess vinyl from your design. Do this carefully, so that your design doesn’t ruin. This step will add more detail to your project.
Step 4: Cover Your Image With a Mask
Moving forward, cut your mask to the size of your design. Now, take off the transparent film from the mask and then apply the mask alone to your DTV image. Moreover, ensure that the final design is flat and that there are no air gaps between the mask and the design.
Step 5: Transfer Your Design to Apparel
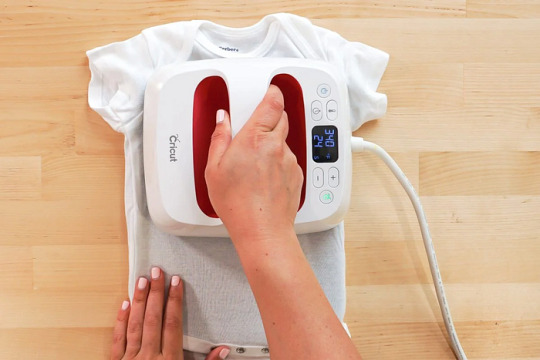

This design is so amazing; I love making it. This is how to use Cricut Maker to reap good results. All the best to all of you who are keen to make something unique and precise.
FAQs
How to Use a Cricut Maker to Make Shirts?
To create a shirt with your Cricut cutting machine, you’ll need to use the Cricut Design Space and a heating press to create a desired design. Get started with the Cricut software, make a design, resize it, and then print and cut it with your Cricut machine. Now, weed away the excess vinyl, and then preheat it with your Cricut heat press, and give a final heat to it.
Which Heat Press Is Suitable for Making an Iron-on Cricut Project?
As there are many options to create an iron-on Cricut project, you can use any of them depending on your requirements. So, the common machines are Cricut EasyPress, Cricut EasyPress 2 & 3, Cricut EasyPress Mini, etc. You can utilize a heat press to transfer the design to your apparel effortlessly.
Can You Use Regular Iron With a Cricut Machine?
Yes, you can. A regular iron is also effective for your minimalist iron-on projects. However, a regular iron may not deliver the results you want and not give a permanent design. Overall, we can say you can use a household iron for normal, sensitive projects but not for complex projects.
Read more: install cricut design space app
cricut.com/setup
cricut.com/setup mac
Source: How to Use Cricut Maker
#How to Use Cricut Maker#How to use cricut maker for beginners#how to use a cricut maker to make shirts#cricut.com/setup mac#cricut explore 3#www.cricut.com setup login#cricut design space#cricut explore air 2#cricut.com/setup#cricut new machine setup#cricut.com setup mac#cricut setup on computer
0 notes
Text
Cricut Machine Set up: Essential Guide for Beginners
Are you wondering about the Cricut machine set up on computers and smartphones? Don't worry, as I am going to help you with everything. If you remember, last time, I taught you what exactly a Cricut is and what its models are. But this blog will teach you how to set up your machine on computers and smartphones. As mentioned in the previous blog, Cricut is a cutting machine that can cut 100+ materials with ease and accuracy.
Before starting the crafting process, all users are supposed to set up their respective systems on the Cricut machine. After completing the setup process, you must connect both devices. Besides, you need a Cricut Design app that will help you make a variety of DIY projects. This post will provide all the details on downloading and installing the Cricut software and setting up the Cricut machine with different systems.
How to Download Cricut Design Space on Mac?
As shared in the introductory paragraph of the Cricut machine set up blog, Cricut Design Space is one of the most essential tools for all DIYers. You can easily make numerous customized projects through its various features and tools within a few minutes. To get the app on your Mac, you are instructed to have a look at the below steps:
Start the process by visiting Cricut Design Space's official portal, design.cricut.com.
After arriving at the portal, tick the Terms to Use and Privacy Policy box.

Next, choose the folder to save the Design Space downloaded file.
Then, click the Start button, and the file will download to your system.
When the download is finished, minimize the window and go to the Downloads folder.
Now, double-click the .dmg file, and a small pop-up window will appear on your system screen.
Following this, move the Cricut software to the Applications folder to start the installation process.
At this point, launch the app by double-clicking the Cricut app, which is available inside the Applications folder.
A small Mac window will appear, and you must click Open to continue the process.
In conclusion, sign in or create your Cricut account using your login details.
As a result of this process, you can now use the Cricut app to make uncountable DIY designs.
Cricut Machine Set up on iOS Smartphones
Answer: If you are an iPhone user and want to create your DIY ideas from a cutting machine, you must set it up with your mobile device. Have a look at the below steps to learn about the method:
First, plug your machine power cord into the nearby wall socket.
After that, pair your smartphone with the Cricut product via Bluetooth.
Next, install the Cricut Design Space app and create your account.
Now, launch the app, create your Cricut ID, or sign in by entering the details.
Following this, open the Menu tab and select the Machine Setup section.
Choose your model and complete the setup by following the on-screen instructions.
Cricut Machine Set up on Mac Computers
Simultaneously, you can set up your devices to get the appropriate craft out of the cutting machine by setting it up with your Mac computer. If you aren't aware of the stages that are part of the setup process, then follow these steps:
Initiate the process by plugging in the Cricut model and turning it on.
Afterward, unpack your device and connect it via USB cable or pair it up with Bluetooth.
Next, go tocricut.com/setup and download the Cricut Design Space app.

Now, follow the instructions to create your Cricut account and set up your machine.
Finally, you will learn that the setup was made when you were invited to cut a material.
At the end of the Cricut machine set up blog, it's pretty evident that to create your favorite DIY project, you need to set up & connect the craft plotter to desktop and mobile devices. Without performing the process, you won't be able to start the machine and work on the Cricut Design app.
Frequently Asked Questions
Question: How Can I Pair Cricut to My Windows?
Answer: With the help of the following details, you can easily pair up your cutting machine with Windows:
Begin by checking that your machine is on and comes under your computer's 10-15 ft. range.
After that, enable Bluetooth on your device and look for your model name inside the list.
Next, choose your model name from the list and enter the password.
Finish the process by clicking the Pair button in the middle of your screen.
Question: How to Install Cricut Design Space on Android?
Answer: To get the Cricut app on your phones, to get this designing app you need to follow the steps available below:
First, you need to open the Google Play Store and look for Cricut Design Space.
Next, press the Install button visible on the right side of the page.
After the installation is done, open the app and tick the Machine Set up or Sign In.
Finally, you can create various DIY projects on your canvas.
Question: What Do I Need to Use Cricut?
Answer: To use a Cricut machine, you need to have several supplies that will help you create the project as you wish. The names of certain supplies are:
Cricut machine
Cricut ID and password
Computer or mobile device
Materials
USB cable
#how to setup cricut maker#install cricut design space app#Cricut.com/setup#cricut.com/setup windows#cricut.com/setup pc#cricut.com/setup mac#cricut design space#install cricut explore air 2#cricut maker bundle#cricut new machine setup#cricut explore 3#cricut machine set up
0 notes
Text
How to Add Fonts to Cricut for Your Crafting: Stepwise Guide
Fonts are a great way to create designs with your Cricut. But, have you ever wondered How to Add Fonts to Cricut? All the old fonts are overrated and sometimes even boring. Luckily, some websites offer some good fonts for your everyday needs. So, you can add these fonts to your Cricut to create various projects such as shirts, coffee mugs, etc.
I will show you all those websites where you can get newer fonts and download them for Cricut. Therefore, this guide will help you understand the download process for all the newer fonts you are looking for. Let’s get started!
What Are the Top Websites to Get the Latest Fonts for Cricut?
When you are looking for the best Cricut font online, you might come across several websites. But how do you know which is best? Basically, there are many top websites you can directly search for on your browser.
For instance, you can search for Creative Fabrica, Dafont, Fontspace, Font Freak, Creative Market Font Bundles and many more such websites. All these are top sites for getting the latest fonts for Cricut. Hopefully, you will get your desired fonts on these sites easily.
How to Add Fonts to Cricut on Windows 10?
If you have a desktop computer like Windows, you can easily access the newer fonts on your Cricut. There are some easy steps you need to go through to download and install them correctly. Have a look at them.
Go to your browser, search for the website, Cricut.com/setup and download its file.
Then, find the downloaded file in the Downloads section.
Now, navigate to your downloaded file and open it by right-clicking on it.
After that, select the Extract option to open the file you downloaded.
At last, right-click on your file and hit the Install button.
That’s how you’ll get the new fonts for Cricut.
How to Add Fonts to Cricut on Mac?
When you are using a Mac computer, you can follow these steps to access your new fonts for Cricut. Learn the steps from here.
In the first step, download a font file on your desktop.
Then, head to the downloaded folder and double-click on the file to extract it.
Now, choose your fonts and open the Menu.
After that, choose Open with and then hit the Font Book option.
Next, a pop-up option will appear to install the latest fonts.
At last, hit the Install button to begin the installation process.
Finally, you got the Cricut fonts on your Mac device. Let’s learn the steps for smartphones.
How to Add Fonts to Cricut on Android/iPhone?
If you don’t have a desktop computer and you want to download the latest Cricut fonts on Android, use these steps to do it correctly.
For Android
First of all, you need to install a font manager app through the Play Store.
Then, download the desired fonts from it.
Now, move to the Downloads section where these files are stored.
After that, extract that file and unzip it.
Next, open the font app and head to the My Font option.
Then, click on the My Font option.
At last, click on the Set option to complete the installation.
Now, you can use your new fonts in the Design Space.
For iPhone
You can easily download fonts for Cricut on your iPhone or iPad. Use the steps below to get it.
Firstly, head to the App Store and install a font manager app.
Then, download that font on your system.
Now, your file will be downloaded in .zip format.
After that, unzip your file and open your font manager app.
In the following step, hit the Font Finder option.
Next, choose the Open Files option and move to the font file you like to install.
Click on the Installer tab and hit the Install button.
Hit the Continue button and select the Allow option.
Then, you can close the app and head to your Settings.
Afterward, tap on the Profile Downloaded.
Also, hit the Install button.
You will receive a message saying Profile Installed.
In the last step, click on the Done button.
Now, you can freely use your new fonts in the Design Space.
Conclusion
I have shared the process of how to add fonts to Cricut?. If you are bored of using old fonts every time, it’s time to give yourself a new start with the latest Cricut fonts that you can download from the best websites on the internet. I am sure you’ll get some of the best fonts for everyday use. All you need to do is browse a website to download your desired fonts, and then you’re all ready to access them on your Design Space software.
FAQs
How to Add Fonts to Cricut Online?
If you want to add new fonts to Cricut online, you can do it easily in a few simple steps. You need to select a top website that offers all the latest Cricut fonts like Dafont, Fontspace, Creative Fabrica or any website and download the font from them. Once you have the downloaded file, you can extract it and add it to your Design Space.
How to Upload New Fonts to Cricut?
If you have to use a new font in your Design Space, you can use these steps.
In the first step, download a font you like from any top website.
Then, extract your downloaded file and unzip it.
After that, double-click on your file.
Continue with the on-screen prompts to install the font file on your desktop.
Next, launch your Cricut Design Space software.
Then, select the New Project option.
Now, you need to add a new text box.
At the end, you can hit the drop-down menu to select a font.
How to Unzip My Downloaded Font File?
To unzip your downloaded font file, use these steps.
First, right-click on the .zip file.
Then, hit the Extract option.
After that, choose the TrueType or OpenType file.
Next, right-click on the file and click to install it.
Finally, tap on the Yes option to allow changes.
Source: How to Add Fonts to Cricut
Visit here for more Information: Cricut.com/setup
Cricut explore 3
Cricut Design Space
#How to Add Fonts to Cricut#cricut.com/setup#cricut explore 3#cricut maker bundle#design space cricut#Cricut Design Space
0 notes
Text
How to Make Cards on Cricut Maker: A Complete Guide
If you haven’t tried creating stunning cards with your Cricut Maker machine yet, now is the time to start! This guide will show you step-by-step how to make cards on Cricut Maker. It is perfect for beginners and covers everything you need to know to get started with card-making.
When I first got my Cricut Maker, I felt a little daunted by the idea of making cards. But after learning the process, I made over five cards in just one weekend, and it was a blast! Over time, I have discovered a lot of tips and tricks for card-making with Cricut, and I will be sharing them all with you in this guide.
I will cover how to use Cricut Design Space to design your card, what supplies and tools you'll need, and step-by-step instructions for making the card. Just follow along with the guide until the end, and you will be all set!
Step 1: Supplies and Tools Required
Here are the main supplies you will need to create cards with your Cricut Maker machine:
● Cricut Guide
● Cricut Maker
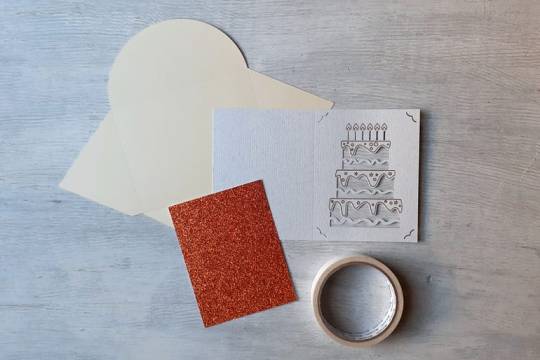
● Cardstock (white, copper glitter, and cream color cardstock)
● standard grip cutting mat
● Adhesive or double-sided tape
● Cricut Fine Point Tip
● Cricut Design Space
Now that you have collected all the essential tools and materials to make your Cricut paper card at home let's move on to the process of creating this project.
Step 2: Upload an SVG Card Design to the Cricut App
As explained below, you have to use the Cricut app to learn how to make cards on Cricut Maker.
First, download and unzip an SVG of the card design, then open the Cricut software.
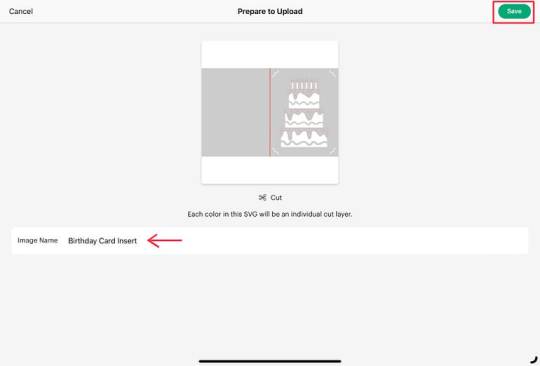
After completing the process of uploading an SVG card design in the Cricut Design app, now proceed to the following step.
Step 3: Change the Cut Score and Pen Settings
Let’s make some changes before sending your design to cut.
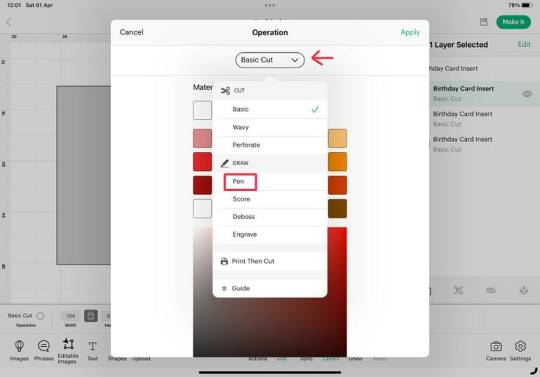
Tap the Layers panel and select the title that shows the cake tires. After that, open the Edit menu and then choose the Basic Cut>Pen option from the drop-down menu.
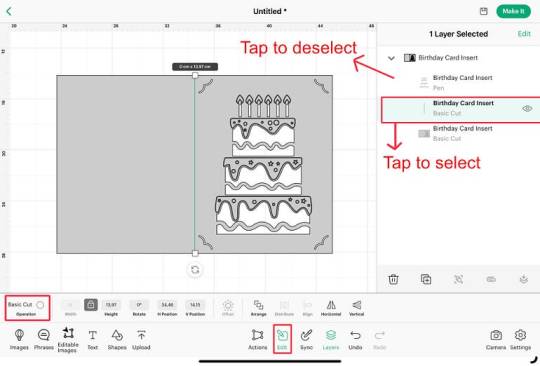
3. Select the entire design and tap the Attach button from the Layers panel. Once everything is in place, click Make It.
Once you have adjusted your settings according to your DIY project, you can proceed to the next step.
Step 4: Cut the Card Design on Your Cricut Maker
To learn how to make cards on Cricut Maker, follow these steps to select the appropriate cut settings and load materials onto your machine.
After tapping the Make It button, select the Mat option if prompted.
2. After that, select the option Browse All Materials and search for cardstock.
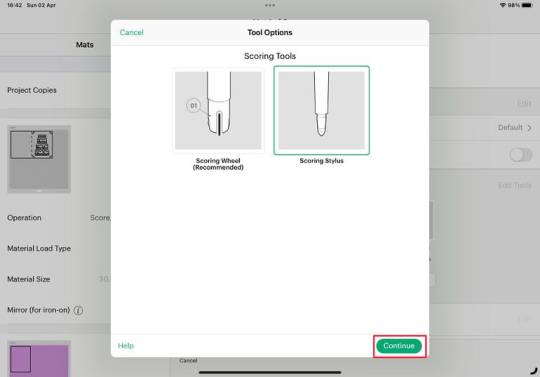
4. Follow the prompts to load the stylus into Cartridge A and the Fine Point Blade into Cartridge B.
5. Insert the cardstock onto the cutting mat and press the “C” button to start cutting.
After cutting the card design on your Cricut Maker machine, proceed to the next step to complete the procedure for this project.
Step 5: Assemble the Card
So far, I have almost covered how to make cards on Cricut Maker. Let’s finalize the card. First, fold the card right side out from the score line.
Apply the red cardstock on the card.
2. Use the Cricut trimmer to cut cream-colored cardstock to create an envelope.
Final Words
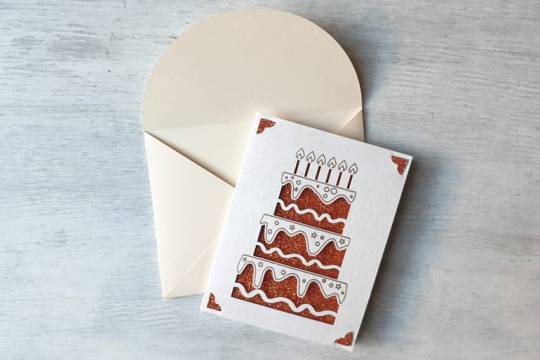
The Cricut card project is incredibly popular for different occasions, like birthdays, weddings, anniversaries, etc. Anyone with a Cricut machine will likely want to make cards. If you’ve followed this guide from the beginning, you now have a good idea of how to make cards on Cricut Maker. Keep practicing these instructions to create card projects on Cricut Maker like a pro!
Frequently Asked Questions
Can you make a card on Cricut without a mat?
Yes, you can make your favorite card without a mat on Cricut Maker; you just have to follow the instructions below.
First, insert the desired card design into the Cricut Design Space.
2. After that, select the size of the card design and click on the Make It option.
3. Then, choose without a mat, and then Browser All Materials & Cardstock.
4. Finally, cut out the design with a Cricut Maker and assemble it.
How do I write on a card with Cricut Maker?
You can try following these steps to write on the card with Cricut Maker:
Open Cricut Design Space, select the font and type your text.
2. Change the Material Load Type to On Card Mat and select the material.
3. Insert the Cricut pen into clamp A and start writing.
Can I use the Print Then Cut function on Cricut Maker to make cards?
Yes, the print-then-cut function on the Cricut Maker is perfect for creating colorful designs on your cards. Simply create your design in Cricut Design Space, select Print, then Cut, and print out your design. After that, cut it out and assemble the parts to create your cards.
Source: how to make cards on Cricut Maker
how to make a card on Cricut
Visit here For more Information: Cricut.com/setup
Cricut explore 3
download Cricut design space
#how to make cards on Cricut Maker#how to make a card on Cricut#cricut.com/setup#cricut maker 3 bundle#cricut explore 3#design space cricut#download cricut design space#2024
0 notes
Text
How Do I Set Up My Cricut Maker? [Ultimate Guide]
Buying a new Cricut Maker can be overwhelming for all of us. Initially, setup can be daunting, but once you do it, you will love the overall process. However, you can easily set up any Cricut machine without needing much assistance.
The post is all about how do I set up my Cricut Maker. Through this write-up, we will see the items while unboxing the new Cricut Maker. Further, you will explore the Cricut Maker and its types. Afterward, we will explain the complete process of setting up your Cricut Maker machine.
What Do You Get in the Cricut Maker Box?
Unboxing a new product is always an exciting task. While unboxing the Cricut Maker machine, we got several items that we will be discussing here. However, you always have the option to select the bundles when you buy the machine from Cricut's official website.
Following are the items that you get in the box of the new Cricut Maker:
Apart from these, you will get the following:
The best thing is that we get the blades and tools along with the new Cricut machine. These blades allow us to try various products before buying more blades.
How Do I Set Up My Cricut Maker on a Computer?
When we talk about setting up Cricut Maker machine, it means we want to connect it to our devices like computers or mobile phones. However, there are certain ways to connect these machines to our devices. For example, we can connect our Cricut Maker to our computer or phone via Bluetooth or USB cable. So, it is the users’ choice to choose which way is the most suitable for them.
Below, we explain how to set up Cricut Maker. This method is only applicable for Windows or Mac users only:
How Do I Set Up My Cricut Maker on a Mobile?
Here's how to set up your Cricut Maker on Mobile devices with iOS or Android operating systems:
Cricut Maker is the most advanced and versatile in Cricut's lineup. However, the box contains various items that you can use to make several projects uninterruptedly. In this write-up, we explained the Maker and its features in detail. It helps the users to get an overview of machines so that they can use them without any hassle. After exploring the Maker cutting machine, the blog found out how do I set up my Cricut Maker.
FAQs
Question 1: Can I set up the Cricut Maker easily?
Answer: People think the setup is daunting, but this is not the case. Cricut machines are just like printers. The only difference is that Cricut has blades to cut. However, when you go through the notice period, you will find the setup is too easy and complete in less time. While setting up, you will need to download and install the Design Space app. This app will guide you through the further setup process, making it easy for beginners to set up the machine in one go.
Question 2: How do I connect my mobile phone to my Cricut?
Answer: Here, we are going to show you the method to connect your mobile device to the Cricut machine. Here, we are using iPhone or iOS devices. So, ensure you have an iOS device.
Question 3: Can I use the Cricut without its software?
Answer: No, you must use the Cricut Design Space app to send your design to your Cricut device. The machine is the companion for your Cricut cutting machine. Without this machine, you can't cut anything. However, the Design Space is essential for creating intricate designs and then sending them to the machine. Also, the app is the only way to maintain communication between your computer and Cricut.
Visit: cricut.com/setup
cricut.com/setup
Source: https://cricutmakersetup.wordpress.com/2023/10/21/how-do-i-set-up-my-cricut-maker-ultimate-guide/
#cricut explore air 2#design space setup#cricut maker#cricut.com/setup#cricut.com design space#cricut.com/create#cricut.com sign in#design cricut.com download#digital design
2 notes
·
View notes
Text
How to Install Cricut Design Space on Windows [Beginners Tutorial]
We all know that you should have a device if you want to use a Cricut machine. It can be a phone or a computer. One such device is a computer with Windows 11 on it. It is an excellent choice for a Cricut machine. To use your crafting machine, you must learn how to install Cricut Design Space on Windows 11. For that, I would suggest you read this blog till the end. This guide will help you not only download the app on a computer but also connect the machine to your device wirelessly. You will also be able to check the computer’s system requirements.
You can download the Design Space software from the Internet for free. To download it on Windows 11, you have to visit the official site. This blog explains the process for downloading the app. So, let’s dive into it to start the crafting journey today.
Minimum System Requirements for Cricut App on Windows 11
If you want to use a Windows computer on your machine, you have to first make sure that it is capable of downloading and running Design Space. The computer will require certain features that are essential to run the app. The features that the computer requires for Design Space are mentioned below:
How to Connect Cricut Machine to Windows 11?
Once you make sure that your computer has the required system features in the process of learning how to install Cricut Design Space on Windows 11, you should connect it to the machine. Here, we will see the connection process of the Windows PC to a machine via Bluetooth:
How to Install Cricut Design Space on Windows 11?
By now, you have checked the features of your computer and have learned the Bluetooth connection process on the machine. Now, you have to download the app on a Windows 11 computer. But before downloading the software on your computer, you have to connect it to a stable Wi-Fi network. To download the app, you have to follow the steps written below:
Conclusion
To conclude, I would say this blog helped you learn how to install Cricut Design Space on Windows 11. Windows 11 is one of the newest operating systems and has the ability to run the app on it. But before you download the software on a computer, you must know about the minimum features any computer needs to run the app on it. Once you are sure of your computer’s compatibility, you can connect it to the machine. You read about the Bluetooth connection on the computer. Finally, you saw the Design Space installation process. Now, you can easily set up a machine on a Windows PC.
FAQs
Is Cricut Design Space Available for Windows?
Yes, it is! Design Space is an official app, and it is essential for Cricut machines. It works with multiple devices, including a Windows computer. If you want to use the machine on a Windows PC, you will have to download the software from the Internet. It is available on the official site. After installing the app, you can start crafting on your desktop.
Why Is Cricut Design Space Not Installing on My Computer?
If you are trying to install the app on your computer but are unable to do so, you should do a few things. First, you must ensure that your computer is connected to good internet broadband. After that, you will have to check the compatibility of your computer. If the computer lacks the required features, you might have trouble downloading the app. Also, you have to check the browser you are using to download the app. If it is an outdated browser, you must update it.
Is Windows 11 Compatible With Cricut Design Space?
Windows 11’s operating system is good enough to download the Design Space software on it. A Cricut machine requires Windows 10 or newer. But to make sure that it is actually compatible with the machine, you also have to check its features. The computer should have at least 2 GB free disk space and 4GB RAM. It needs to have a resolution of 1024 x 768 pixels and 2-3 Mbps of internet speed.
Visit: cricut com setup
www.cicut.com setup login
setting up my cricut maker
install cicut design space app
Source: https://cricutspaces.blogspot.com/2024/09/how-to-install-cricut-design-space-on.html
#cricut.com/setup#cricut.com/setup login#cricut setup#install cricut explore air 2#cricut.com setup mac#www.cricut.com/setup login#www.cricut.com/setup#cricut install setup#install cricut design space app#cricut design space setup#cricut design#setting up new cricut maker#setting up your cricut maker#cricut design space app#cricut explore air 2
0 notes
Text
How to Pair Cricut Maker: Easy Steps for Connection
Cricut Maker is one of the best crafting machines available for creating stunning projects. In order to use this machine, it is essential to know how to pair Cricut Maker with any device you prefer—whether Windows, iOS, Mac, or Android. In this blog, I will explain how to connect your Cricut machine to each of these devices easily.
You can pair the Cricut Maker with your device using Bluetooth or USB. USB offers a wired connection, which some professional crafters prefer for its reliability. However, Bluetooth is more popular among individual users due to its wireless flexibility. With Bluetooth, you can move around freely without being limited to one place while using the machine.
How to Connect Cricut Maker to Windows?
If you have a Windows computer and want to work with your Cricut cutting machine, you should pair it with your Cricut Maker machine. Here is how you can pair them using Bluetooth:
To start the process, first, plug the Cricut machine into a power source and turn it on.
After that, place your computer within 10-15 feet of the machine.
Then, go to the computer’s home screen and click on the Start menu.
From the Start menu, navigate to Settings and choose the Devices option.
There, you will see Bluetooth; turn it on.
Now, click on Add Bluetooth or other device and select the Bluetooth option.

Your Windows computer will begin detecting available Bluetooth devices.
When you see the Cricut model listed, click on it to connect, and that’s it. Your pairing process is done.
How to Pair Cricut Maker With Mac?
In case you have a MacBook instead of a Windows PC, you can add it to your Cricut cutting machine using the same method. Here is how to pair your MacBook to your Cricut Maker via wireless Bluetooth.
Initially, connect the Cricut product to a power socket and press the power button.
Next, maintain a distance of 10-15 feet between the MacBook and the machine.
After that, you have to open the MacBook and go to the Apple menu.
In the Apple menu, open System Preferences and then go to Bluetooth settings.

Now, turn Bluetooth on and wait for the MacBook to detect the machine.
When you see the machine listed, click on it to connect.
You can ensure the connection by returning to the Cricut Design Space app.
If you go to New Product Setup, you will see the connection there.
How to Pair Cricut Maker With iOS?
In case you do not have a computer, you can use a Cricut machine with your smartphone. To connect your iPad or iPhone to Cricut using Bluetooth, follow this procedure.
To start, turn on the Cricut product by plugging it in and pressing the power button.
Then, keep the device within 10-15 feet of the machine.
Next, go to your phone’s Settings and navigate to Bluetooth.
Moreover, you also have to make sure Bluetooth is on.

After that, search for your Cricut model machine.
When it appears on the list, tap on it to connect.
The connection will be completed. You can verify the wireless Bluetooth connection by opening the Cricut Design Space app on your device.
How to Pair Cricut Maker With Android?
In case you have an Android device, you can pair it to your Cricut cutting machine as well. Here is how to connect your Cricut to your Android device using Bluetooth:
First of all, connect the Cricut machine to a power source using a power adapter and press the power button to turn it on.
In addition, ensure the machine and your device are within 10-15 feet of each other.
Next, open the Settings on your phone and navigate to Bluetooth.
After that, you will need to turn Bluetooth on and search for your Cricut model.
When it appears on the list, select it to connect.
You can confirm the Bluetooth connection by checking in the Cricut Design app.
Apart from Bluetooth, you can also use a USB cord to add a Cricut product to your mobile device. To do this, pair one end of the cable to your phone or computer and the other end to the machine. Then, make sure the cable is in good condition; it is better to use a new or less-used cable for a stable connection.
Conclusion
In the blog, you learned how to pair Cricut Maker to your device. Pairing your operating system with the Cricut machine is simple, and once you know how to do it with any of your devices. This connection is important because it allows you to use the Cricut cutting machine with the Cricut Design Space app. Cricut offers two connection options: Bluetooth and USB. Most users prefer Bluetooth for its wireless flexibility.
FAQs
What Should I Do if My Cricut Maker Bluetooth Is Not Connecting?
There are a few things you can do to prevent Bluetooth connection errors. First of all, check if your Cricut machine is on or not. Also, make sure Bluetooth on your device is turned on. Keep the distance between the machine and your device within 10-15 feet. If the issue is still not resolved, try resetting Bluetooth, and the problem should be fixed.
What Is My Cricut Bluetooth PIN?
When connecting your Cricut product, you may need to enter a Bluetooth PIN code. In case prompted, you can input 0000, the default PIN for wireless Bluetooth connection. This is usually required only during the initial setup. Later, the device will remember it, but you may need to re-enter the PIN code if you reset Bluetooth.
Can I Pair My Cricut Maker With a Wired Connection?
Yes, you can use wired and wireless connections with Cricut machines. A wireless Bluetooth connection is more common among Cricut users for its convenience. However, if you want, you can also use a wired USB connection. USB is often preferred by professional crafters who need a more stable connection.
#Cricut Maker Setup#Cricut Maker#cricut maker 3#Easy Steps#Connect Cricut Maker#How to Pair Cricut Maker
0 notes
Text
Cricut Maker Software Download: Easy Guide for Beginners
Hey, Cricut folks! Are you looking for a guide on Cricut Maker software download? If so, then you have come to the right page! Do you know when I have to download Cricut Maker software? I get very excited. I don’t know why, but I love easy steps that I can perform again and again. Downloading is quite satisfying for me. Sounds weird, right? I can understand, but it is what it is.
In this write-up, I will explain how to download Cricut Design Space on Windows, Mac, iOS, and Android. This post will be helpful for new crafters who want to get started with their Cricut Maker machine!
Cricut Maker Software Download on Windows
Cricut Design Space is the best software to create, modify, and personalize your projects. However, if you are a Windows user and want to download Cricut Maker software, then you need to follow the steps described below:
Open your browser on your PC and type the URL design.cricut.com on the search bar.
Then, click a checkbox saying, “I agree to Cricut Terms of Use and Privacy Policy.”

After that, the Download control will be clickable to download.
Once you finish the download, navigate to the Downloads folder.
Get the file you downloaded.
Then, double-click on it to install the Cricut Design app.
Once you complete the installation, you need to register to a Cricut account.
Cricut Maker Software Download on Mac
Okay, here comes the other computer, i.e., a Mac. Downloading from the browser is completely the same as downloading from the Windows computer, but the only difference you will notice is in installation. Let’s see how to download and install the software below:
Enter the URL — design.cricut.com on your browser and check the box to accept Cricut’s Terms & Conditions.

Second, you will be asked to go to a page where to select the location to save the file.
After saving, you will see that the download has started.

Then, head to the Downloads folder to discover the .dmg file.
Double-click on it to install.
When installing, drag the Cricut icon to the Applications folder.
Finally, your Cricut software will be added to your folder.
To open the app, you have to double-click on the app and then start creating what you love.
Cricut Maker Software Download on Your iOS Device
Now, let me show you the steps to download the Cricut app on your iOS devices. The app is fully compatible with your iOS device, and you don’t need to download it using your browser. All you need is a pre-installed App Store app. So, without giving it a second thought, let’s begin downloading:
Launch the App Store app.
On the App Store, enter Cricut Design Space on the search bar.
Now, hit the Get button to download the app and verify your download with your iTunes password (if prompted).

When you have the application on your device, you need to open it.
Afterward, you can start a Machine Setup or Sign In to proceed with crafting.

Cricut Maker Software Download on Android
Last but not least, we are going to download the Cricut app on an Android machine. To download the software, head to the Google Play Store. Now, follow the steps described below to install the software:
Go to your Android phone’s home screen.
And find the Google Play Store icon on your device.
On the Play Store, search for Cricut Design Space.
You will find a Cricut app in the suggested apps below.
Select the app from the suggested results.
Then, press the Install button given below to begin installing the app.

After installation, the Cricut software will be added to your phone’s home screen.
Open the application and set up your machine right away.
FAQs
Question 1: Which software does Cricut Maker use?
Answer: The Cricut Maker is a robust machine in the Cricut lineup that cuts more than 300 materials in no time. However, the software used with this machine is the same as that used with others. This is nothing but a Cricut Design Space, which is a companion app to all Cricut cutting machines.
Question 2: What are the Windows system requirements for Cricut?
Answer: In order to run the Cricut software on a Windows computer, you will need to meet the following needs:
● Windows 10 or later (64-bit) operating system
● Disk: 2 GB free
● A USB port/Bluetooth
● Minimum 4 GB RAM
● CPU with Intel Dual Core or equivalent to AMD processor
● The display should have a minimum 1024px x 768px screen resolution
Question 3: How to use the Cricut software to setup the machine?
Answer: To set up your Cricut machine on your computer, you have to follow the steps below:
Plug in the machine and power it on.
Then, you need to connect your Cricut to the computer via Bluetooth.
Now, download and install the Cricut Design app.
After that, open the Cricut app and sign in to your Cricut account.
Select the Menu and select Machine Setup.
Finally, choose the model and follow the instructions on your screen.
Read more: Cricut New Machine Setup
install cricut design space app
cricut.com/setup mac
Cricut Design Space
Source: cricut maker software download
#design space signin#cricut maker software download#install cricut design space app#install cricut explore air 2#cricut.com/setup#cricut explore 3#how to setup cricut maker#cricut design space
0 notes
Text
How to Connect Cricut Maker 3 to Bluetooth: Ultimate Guide

Cricut Maker 3 is one of the latest machines by Cricut and is popular among its users. It is a powerful crafting machine and is great for cutting heavy materials like leather, wood, and metal. To use this machine, you need to connect it to a phone or computer. You will also have to download the Design Space app for it. If you want to learn how to set up this machine, then you should keep reading this blog. You will learn how to connect Cricut Maker 3 to Bluetooth and how to download the essential application, and then you will be ready to use your machine.
To connect both devices, you can use a wireless Bluetooth or wired USB connection. However, most users prefer Bluetooth as it gives them much more flexibility. With a wireless connection, you can choose your operating system and roam around while still working on your DIY projects.
Unboxing and Setting up a Cricut Machine
Before you learn to connect Cricut to Bluetooth, you should prepare your machine for the setup. When you want to start the Cricut machine setup, you have to unbox it and remove all the items from the box. You should check the tools and supplies because you will need them later to use the machine.
These are the accessories and tools you get inside the machine box:
Cricut cutting machine
Fine-point blade
Power cord with adapter
Safety document
Quick Start Guide
Warranty document
USB cable
Accessory adapter
Material for the test cut
Some materials for your projects
After unboxing the machine and collecting the tools, you have to follow this procedure to prepare the setup and complete it on your device.
To start the setup, you need to place the machine on a flat surface and plug it into an electric source.
When the machine is ready, you have to connect it to your device.
After that, download the Design Space on your device.
Then, install the app on the computer following the on-screen instructions.
After that, you can log in with your account.
Once the setup is complete, you can start with your test cuts.
How to Connect Cricut Maker 3 to Bluetooth?
Once you have completed the machine setup, you have to add the machine to a device. The connection helps you in using the machine with the help of the Design Space app. Here, you will read about the Bluetooth connection of the machine with a Windows computer.
To begin with the connection, you will have to give the machine a power supply through the adapter and keep the machine in the range of 10-15 feet.
The machine is now ready for the connection. To do so, go to the computer’s Start menu and open Settings.
After opening the settings, you have to select Devices.
Now, the Bluetooth setting is open. You have to turn it ON. and then click Add Bluetooth or other device.
Next, click on the Bluetooth toggle. The computer will start searching for the machine afterward.
When you see the machine’s name on the list, you have to click on it.
The desktop computer will be connected to your machine.
You can make sure of the connection by checking it in the software.
How to Download Cricut Design Space?
Once you have completed the process of how to connect Cricut Maker 3 to Bluetooth, you can download the Design Space app. It is necessary software for working on any DIY project and using the machine. To download the app on your PC, you should follow the below-written steps.
First, you have to open the internet browser on your computer and go to cricut.com/setup.
Then, you will see the app on your screen. Just below that, you will see a checkbox. You have to tick that box to agree to the Cricut Terms and Conditions.
After ticking the checkbox, you need to click on Download.
After that, the app will be downloaded and saved in the Downloads folder. You should go to that folder and double-click the software file.
Now, agree to the computer that you trust the application.
Next, the Design Space will start to install on the computer.
Once the app is installed, you can proceed to log in with your user ID.
Conclusion
After reading this blog, you know it is important to know how to connect Cricut Maker 3 to Bluetooth if you want to use the machine to work on any project. This post did guide you through this topic, but before that, you learned about the machine setup process, which is essential to start working on your craft project. Apart from these, the write-up also helped you in learning how to download the Design Space app on your device. Now, you can connect your machine to an operating system and start crafting projects.
FAQs
How Can I Connect Cricut Maker 3 Using USB?
If you want to use a USB cable to connect your machine to your desktop, then you can do it very easily. You just have to take the cable and insert it into the machine and your device. After that, you must turn on both devices and check the Cricut New Product Setup on the Design Space application for the connection status. You will see that the connection is complete.
How Can I Detect a Cricut Machine for Bluetooth Connection?
To detect a machine on a computer, you first have to turn on the machine and keep it within a 10-15 feet range. Now, the machine is ready for wireless connection. You should go to the computer and open the Bluetooth and other devices section from the Start menu. After that, turn on Bluetooth, and the computer will start looking for the machine’s name. Your crafting machine will be detected on the computer very soon. When you see the machine, select it, and it will connect to your machine.
Why Is My Cricut Maker 3 Light Turning Red?
While using a machine, sometimes you may find the light on the machine blinking red. It happens mostly when the machine faces any kind of irregularity. For example, the blade of the machine faces an oddly thick or dense material; in that case, the machine can blink red. If your machine is facing such a problem, you should stop cutting and clear all the debris. Now that your machine is ready, resume the cutting process.
Source: How to Connect Cricut Maker 3 to Bluetooth
#How to Connect Cricut Maker 3 to Bluetooth#cricut machine setup#cricut new product setup#cricut maker 3 setup#how to set up cricut maker#cricut design space download#cricut design space app
0 notes
Text
How to Set Up Cricut Maker 3: A Beginner’s Guide
Cricut Maker 3 is an exceptionally amazing machine for working on your DIY projects. It is the latest inclusion in the Cricut Maker series, and with the help of this machine, you can cut almost any material you want. You can now cut paper, cardstock, vinyl, fabric, plastic, leather, wood, and even metal with this machine. However, to use the Cricut machine, you need to learn how to set up Cricut Maker 3 on your computer. So, keep reading the blog, and you will know everything regarding the machine setup. You will learn how to unpack and prepare the machine for the setup. Plus, you will learn about connecting a Cricut machine to your computer and how you can download Cricut Design Space.
Let’s start with the unpacking procedure right away.
Unpacking and Preparing the Cricut Maker 3 Machine
In order to learn how to set up Cricut Maker 3, you have to first unpack the machine and remove all the taps. Then, you have to prepare the machine for the setup. Once the machine is prepared, you can continue with the necessary actions. To know them all, keep reading the blog:
For a detailed guide to connecting your Cricut cutting machine to your desktop, please continue reading this post till the end.
Connecting Cricut Maker 3 to Your Computer
Once you have learned the procedure to set up Cricut Maker 3, you can connect it to the computer. Complete the steps in the section below for the connection using Bluetooth:
Important Note: You can also use a USB cable to connect a Cricut machine and the computer.
Downloading Cricut Design Space on a Computer
To set up Cricut Maker 3, you have to download the Cricut Design app and log in with a Cricut ID. To learn how to do it, follow these simple steps:
Conclusion
After reading the blog, I am sure you have learned everything about how to set up Cricut Maker 3 on your computer. You saw how you had to unbox and prepare the machine for setup. When the Cricut machine is ready, you should connect it to your computer, download the Cricut Design Space app, and log in with a Cricut ID. Now, the Cricut Maker machine is ready, and you can create amazing projects with the help of the machine.
FAQs
Why Does My Cricut Maker 3 Won’t Connect via Bluetooth?
There may be a few reasons why you are unable to connect your Cricut machine to your computer via Bluetooth. Maybe the computer you are using has disabled Bluetooth, so you should enable it in this case. The other problem is that you have kept the computer too far away from its range of detection. So, keep the computer within 10-15 feet.
What Features Should My Computer Have to Use Cricut Maker 3?
If you are using a Windows computer, it has to be either Windows 10 or later versions. Apart from that, it should have an Intel Dual-Core processor, 4GB RAM, and 2GB free disk space. Its display should have a resolution of a minimum of 1024x768 pixels. Its broadband connection should have a downloading capacity of 2-3 Mbps and an uploading capacity of 1-2 Mbps.
How Can I Connect Cricut Maker 3 to My iPhone?
You can connect a Cricut cutting machine to your iPhone with a USB cable or Bluetooth. To connect them through USB, you should take a USB cable and connect it to both the iPhone and the Maker 3 machine at both ends. To connect with Bluetooth, you should turn on the machine and then go to the Bluetooth setting on your phone. After that, search for the machine in the Bluetooth settings, and when you see it, click on it.
Visit: install cricut design space app
cricut.com setup mac
www.cricut.com setup login
Source: https://spacecricut.wordpress.com/2024/06/08/how-to-set-up-cricut-maker-3-a-beginners-guide/
#cricut setup#cricut setup on computer#cricut setup create account#cricut setup for pc#cricut setup explore air 2 setup#cricut setup maker#cricut.com/setup#cricut.com/setup app#cricut.com/setup login#cricut.com/setup windows#cricut create connect to computer#setting up my cricut maker#setting up your cricut maker#cricut cutting machine setup#cricut com setup#cricut crafts#cricut.com setup mac#install cricut design space app#How to Set Up Cricut Maker 3
0 notes
Text
How to Connect Cricut Maker to Computer: All Devices Covered!
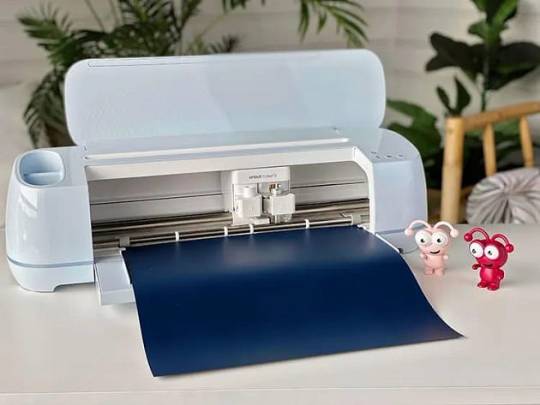
I hope you are ready to learn this process. Well, before I start, I want to tell you that Cricut machines are incredible and deliver faster results than any other conventional machine. Without further ado, let me tell you the steps.
How to Connect Cricut Maker to Computer (Windows/Mac)?
Here, I’m concluding the steps for a Windows and Mac computer. One thing I want to tell you is that you can use these steps for your Cricut Explore as well. As I have set up these machines many times, I’ve become an expert in them. So, you can trust me! Let’s learn how to connect Cricut Maker to computer via Bluetooth.
As the first step, complete the unboxing of your machine.
Now, connect your machine to a power switch.
After that, use a USB cord to connect the machine to your computer (Both machines have a USB port for connection).
If you find that the USB connection is not suitable for you, go for the Bluetooth connection.
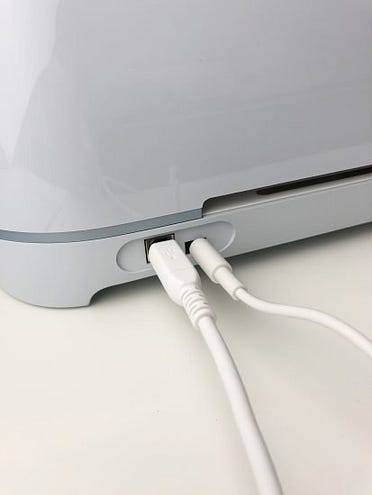
5. To start with the Bluetooth connection, enable the Bluetooth option on both devices.
6. Now, make sure that your devices are 10–15 feet apart from each other, not more than that.
7. Next, your PC or Mac computer will start detecting the available Cricut Bluetooth device.
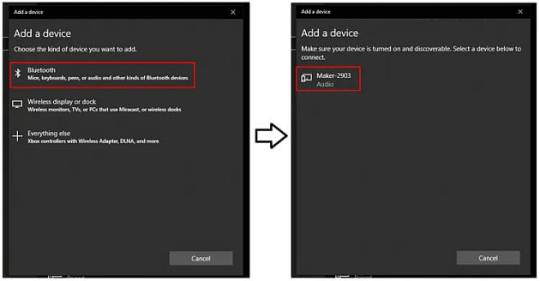
9. Now, follow all the on-screen steps and continue with the connection.
10. Finally, your Cricut cutting machine is paired with the computer.
11. Then, you can install Cricut Design Space on your PC or Mac.
12. After installing the Cricut software, you can proceed with the sign-in process.
That’s how to connect Cricut Maker to computer. When you complete the setup process, you’re free to utilize your machine and computer devices to create the beautiful projects you want.
Moreover, you must ensure that if you are setting up your devices with a USB connection, your PC should have the USB drivers. If not, you can download them very easily. And if your Cricut machine doesn’t have a Bluetooth feature, you can get a Bluetooth adapter.
How to Connect Cricut Maker to Phone (Android/iOS)?
Once you’ve learned how to connect Cricut Maker to computer, have a look at the mobile setup process as well. If any user doesn’t have a desktop or their device is damaged for any reason, they can still use their Cricut machine via their mobile phone. So, let’s go through the steps to connect a Cricut product to a phone.
Initially, hit the Pair button on your Cricut to turn it on and keep it closer to your mobile phone.
Now, head to the Settings option and click on the Bluetooth option.
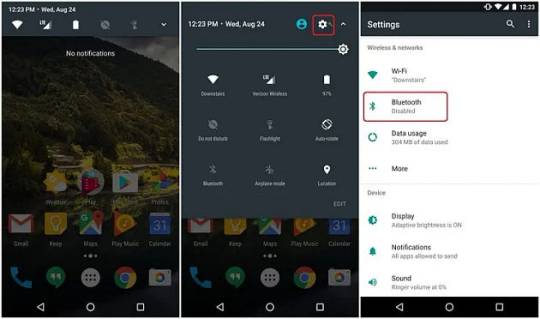
Thereafter, toggle on the Bluetooth if it is off.
3. Next, your screen will show you the Cricut machine’s option.
4. Then, click on your Bluetooth machine from the on-screen list.
5. When the screen asks you for a password, type “0000” and click on the Pair option.
6. Lastly, your Cricut machine will connect to your phone.
That’s it for connecting the Cricut cutting machine to your phone, like Android and iOS. When you know the steps, you can move forward to set up your brand-new Cricut machine.
Conclusion
Finally, you’ve learned how to connect Cricut Maker to computer and mobile devices. To connect your device, you can use the USB or Bluetooth connection method. Once you connect your Cricut to a device, you can get the Cricut Design app on your device to start making your projects. If you don’t know about the Cricut Design Space, it’s a special software designed for Cricut that allows you to design your favorite projects. So, don’t wait; start creating something unique.
Source: how to connect cricut maker to computer
Visit here For more Information: Cricut.com/setup
Pinterest
#how to connect cricut maker to computer#Cricut.com/setup#Cricut maker bundle#Cricut explore 3#Download Cricut design space#Design space Cricut#Cricut Design Space
0 notes
Last Seen Blogs

i-mxrixna
-MXRIXNA

system-of-twilight
Hi hi all!
system-of-twilight
Hi hi all!

dlma-me
🐰

messy444chic
୨ৎsaddest girl in town୨ৎ