#html col tag
Explore tagged Tumblr posts
Visit Tumblr Blog
Explore Tumblr blogs with no restrictions, modern design and the best experience.
Last Seen Tumblr Blogs


Fun Fact
Tumblr.com is the 103rd most visited website in the world.
Text
Day 6 [Forms In HTML]
Introduction To HTML
Day 2 [Multimedia Elements In HTML]
Day 3 [Table in HTML]
Day 4 [Link Tag In HTML]
Day 5 [Lists In HTML]
Forms are basically used for collecting user information. And they are really important to learn. Here's a simple form in HTML:
Code:


Line By Line Explanation:
<form>: Used for creating forms. All the form elements go in this tag. Action: When submitted, data is sent to this file or URL [index.html] Method="post": Sends data
<label> : This describes the input tag for="___": Connects the label to the input with id="name" id : gives a unique identification to the tag <input>: It's used to make the form elements
<input> Type Elements :
type="text" : A simple text box is created.
type="email" : A box to input email.
type="checkbox" : A small square that users can tick. Can select multiple options using this.
type="radio" : A small circle, you can only select one option.
type="submit" : A button that submits the data to the server.
<textarea>: Accepts multiple lines of text. rows="4": It creates 4 lines cols="30": It creates 30 characters
<select> : Creates a drop-down list <option>: Creates an item in the dropdown. value="colorname": This is the data sent to the server if chosen.
Output For The Code:

_______________________
Hope This Helps !!
#code#codeblr#css#html#javascript#python#studyblr#progblr#programming#comp sci#web design#web developers#web development#website design#webdev#website#tech#html css#learn to code#school#study motivation#study aesthetic#study blog#student#high school#studying#study tips#studyspo#website development#coding
34 notes
·
View notes
Text
PODFICCER (and fic author) RESOURCE: things i learned about HTML today
-> from this reference work on ao3: A Complete Guide to 'Limited HTML' on AO3 by CodenameCarrot (please go leave a comment if you find anything here useful !!!)
EDIT: OMG Y'ALL I HAVE BEEN HAVING SO MUCH NERDY GEEKY FUN TWEAKING MY PODFIC HOW-TO GUIDE WITH THIS STUFF
headings, blockquote, div

----

-----
html currently allowed by ao3 html sanitizer

a. abbr. acronym. address. b. big. blockquote. br. caption. center. cite. code. col. colgroup. details. dd. del. dfn. div. dl. dt. em. figcaption. figure. h1. h2. h3. h4. h5. h6. hr. i. img. ins. kbd. li. ol. p. pre. q. rp. rt. ruby. s. samp. small. span. strike. strong. sub. summary. sup. table. tbody. td. tfoot. th. thead. tr. tt. u. ul. var.
-----
in-line (text) formatting tags supported by ao3


-----
OMG LOOK AT THIS !!! IDK WHEN I WOULD EVER USE THIS BUT LOOK HOW COOL !!!

-----
paragraphs & p formats: archiveofourown.org/works/5191202/chapters/161901154#AddParagraphs

-----
omg I'VE ALWAYS WONDERED HOW TO GET THAT LINE BREAK THINGY IN THE MIDDLE OF THE PAGE !!!

-----
end post
#podfic resource#podficcer resource#fic author resource#ao3 writer resource#ao3 fanfic#ao3#html resource#html reference#html#reference#resource#html tutorial#basic html guide#CodenameCarrot
6 notes
·
View notes
Text
HTML Forms

HTML forms are used to collect user input and send it to a server for processing. Forms are essential in web development for tasks like user registration, login, surveys, and more. Here’s a guide to understanding and creating HTML forms.
1. Basic Structure of an HTML Form
An HTML form is created using the <form> element, which contains various input elements like text fields, checkboxes, radio buttons, and submit buttons.<form action="/submit-form" method="post"> <!-- Form elements go here --> </form>
action: Specifies the URL where the form data will be sent.
method: Defines how the form data will be sent. Common values are GET (data sent in the URL) and POST (data sent in the request body).
2. Text Input Fields
Text input fields allow users to enter text. They are created using the <input> tag with type="text".<form action="/submit-form" method="post"> <label for="name">Name:</label> <input type="text" id="name" name="name"> <label for="email">Email:</label> <input type="email" id="email" name="email"> <input type="submit" value="Submit"> </form>
<label>: Associates a text label with a form control, improving accessibility.
type="text": Creates a single-line text input field.
type="email": Creates a text input field that expects an email address.
3. Password Field
A password field masks the input with dots or asterisks for security.<label for="password">Password:</label> <input type="password" id="password" name="password">
4. Radio Buttons
Radio buttons allow users to select one option from a set.<p>Gender:</p> <label for="male">Male</label> <input type="radio" id="male" name="gender" value="male"> <label for="female">Female</label> <input type="radio" id="female" name="gender" value="female">
type="radio": Creates a radio button. All radio buttons with the same name attribute are grouped together.
5. Checkboxes
Checkboxes allow users to select one or more options.<p>Hobbies:</p> <label for="reading">Reading</label> <input type="checkbox" id="reading" name="hobbies" value="reading"> <label for="traveling">Traveling</label> <input type="checkbox" id="traveling" name="hobbies" value="traveling">
type="checkbox": Creates a checkbox.
6. Dropdown Lists
Dropdown lists (select boxes) allow users to select one option from a dropdown menu.<label for="country">Country:</label> <select id="country" name="country"> <option value="bd">Bangladesh</option> <option value="us">United States</option> <option value="uk">United Kingdom</option> </select>
<select>: Creates a dropdown list.
<option>: Defines the options within the dropdown list.
7. Text Area
A text area allows users to enter multi-line text.<label for="message">Message:</label> <textarea id="message" name="message" rows="4" cols="50"></textarea>
<textarea>: Creates a multi-line text input field. The rows and cols attributes define the visible size.
8. Submit Button
A submit button sends the form data to the server.<input type="submit" value="Submit">
type="submit": Creates a submit button that sends the form data to the server specified in the action attribute of the form.
9. Reset Button
A reset button clears all the form inputs, resetting them to their default values.<input type="reset" value="Reset">
type="reset": Creates a button that resets the form fields to their initial values.
10. Hidden Fields
Hidden fields store data that users cannot see or modify. They are often used to pass additional information when the form is submitted.<input type="hidden" name="userID" value="12345">
11. File Upload
File upload fields allow users to select a file from their computer to be uploaded to the server.<label for="file">Upload a file:</label> <input type="file" id="file" name="file">
type="file": Creates a file upload input.
12. Form Validation
HTML5 introduces several form validation features, like the required attribute, which forces users to fill out a field before submitting the form.<label for="username">Username:</label> <input type="text" id="username" name="username" required>
required: Ensures the field must be filled out before the form can be submitted.
13. Grouping Form Elements
Fieldsets and legends can be used to group related form elements together.<fieldset> <legend>Personal Information</legend> <label for="fname">First Name:</label> <input type="text" id="fname" name="fname"> <label for="lname">Last Name:</label> <input type="text" id="lname" name="lname"> </fieldset>
<fieldset>: Groups related elements together.
<legend>: Provides a caption for the group of elements.
14. Form Action and Method
action: Specifies the URL where the form data should be sent.
method: Specifies how the data is sent. Common methods are GET and POST.
<form action="/submit" method="post"> <!-- Form elements here --> </form>
Key Takeaways
Forms are a crucial part of web development for gathering user input.
HTML provides a wide range of input types and elements to create various kinds of forms.
Properly labeling and grouping form elements enhances accessibility and usability.
Form validation helps ensure that the data submitted by users meets certain criteria before being sent to the server.
With these basics, you can start building functional forms for collecting data on your website!
Read More…
0 notes
Text
Using the <colgroup> Tag in HTML
This topic delves into the <colgroup> tag in HTML, a powerful tool for defining groups of columns within a table for styling and layout purposes. The <colgroup> tag, often used in conjunction with the <col> tag, allows you to apply styles or set attributes to multiple columns simultaneously. This topic covers the syntax and proper usage of the <colgroup> and <col> tags, explaining how to span columns and apply styles such as width, background color, and borders. Practical examples illustrate how to enhance the appearance and functionality of HTML tables by grouping columns, ensuring a consistent and organized presentation of tabular data.
4o
0 notes
Text
HTML colgroup Tag
The HTML <colgroup> tag is used to specify a column group within a table.It used to apply style or add classes to a column instead of each cell.Using different properties in a column we use the <col> tag inside the <colgroup> tag. Syntax <colgroup>Column...</colgroup> Example <!DOCTYPE html> <html> <head> <title>HTML colgroup Tag</title> </head> <body> <br> <table border="1"> <colgroup> <col…

View On WordPress
#col and colgroup tag in html#col and colgroup tag in html5 hindi#col tag#col tag in html#colgroup#colgroup and col#colgroup html#colgroup html hindi#colgroup in html#colgroup tag#colgroup tag by njtech#colgroup tag in html#colgroup tag in table#how to add col tag and colgroup tag#html col tag#html colgroup#html colgroup tag#html5#what is colgroup tag in html
0 notes
Text
hi reddit. here are some tips.
i will be putting these below a "readmore" - which is the first lesson. on desktop there is a button for this. on mobile you type :readmore: followed by a linebreak. it is considered common ettique to shorten your long posts in this way.
by the way, are you reblogging a long post that isn't under a readmore? tag that as #long post so users can blacklist it and not have to scroll for five years.
(weird gaps in bullet points due to character limits lmao)
Title. Icon. Banner. blog description. (look around if you need an idea for what to put in your blog description.) Blogs without this information (ESPECIALLY the no icon + no title combo) gets you blocked immediately. This is because tumblr has always had a severe bot problem. Just grab a meme from your camera roll or a picture of a character you like from google.
also, because most users have their pronouns in their bio, it is expected that you will look there to check before addressing them, out of courtesy. don't just default to "they" - only do that if a person's pronoun's are unclear or if the pronouns listed ARE "they."
Disable public likes. the like button is for personal bookmarking. very often, people will like posts they have not read yet, so that they can read them later. a person's likes is not always reflective of their stances, and if your likes are public, people may use them against you in an argument. think of your likes as your browser history. tumblr users value privacy in this instance.
unrelated to the above point: likes are also used to show compassion for a user going through a tough time, or to say "hey, i thought this joke you made was funny." this use of likes is more for friend-to-friend communication.
Disable anything in your settings that is algorithmic including seeing posts based on other people's likes (one, because algorithms exist to make you mad and two, as part of respecting privacy)
set "following" to appear before "for you" (and overall avoid "for you")
Snooze Tumblr Live (sorry. you have to do this once a week bc tumblr sucks.)
Open your askbox so people can communicate with you. Decide if you want to allow anonymous asks and/or public DMs.
Enable the desktop version of your blog. This makes it so that when you use a computer and go to [yourusername].tumblr.com you can have a website with HTML and CSS. tumblr has tried very hard to kill blog personalization but you can find many helpful users posting in the tags, as well as pre-made themes you can install. tumblr users are the ones making the bulk of neocities websites, and in general tend to be friendly in redirecting you to resources.
enabling your desktop blog also allows you to insert links and do very basic editing (like inserting line breaks) in your blog description (we call "bio") which translates to the mobile version of your theme. you have to do this in the editor for the desktop on a computer. also, editing your theme on mobile (like changing color, font) will undo your HTML. your best bet is to edit your mobile theme first and THEN do the HTML/link stuff on a computer. i know it sounds a bit convoluted but you'll figure it out. (this website is made of duct tape)
also while you are on desktop: download xkit rewritten. it won't work on mobile but it gives you a lot of helpful features. also consider installing ublock origin if you haven't already, because tumblr will sometimes add annoying widgets to their website and that tool will allow you to block them. i also use "palettes for tumblr" to customize my dashboard color. tumblr DOES have built-in dashboard themes but i do not like them personally.
pinned posts. you can pin any post you make or reblog. some people use this to pin a funny meme, and other people use the pinned post as an extended bio (or otherwise an alternative to it). a tumblr post made on desktop can hold up to 30 images (the limit is 10 on mobile.) you can also embed links, a video, and even audio. you can change text color, have bullet points, and increase font size. as such, you can express yourself much more in a pinned post than in your mobile blog description. a typical pinned post may include information about the user, a link to an external website (like a carrd, neocities, or linktree), and sometimes an image or two. tumblr allows you to disable reblogs for a post, so most pinned posts are set this way so it just stays on a user's blog.
DNIs (also called "BYF"). not everyone uses them, and they can be divisive. it stands for "Do Not Interact" - and is a boundary set to keep people away. this may include age (example: "minors DNI"), political opinions (example: "prolifers DNI"), and sometimes deeply niche online discourse. DNIs are also sometimes a joke (example: "DNI if you like tuna salad"). there is actually a meme where someone will write a post with a very long, unreasonable DNI and users will count how many apply to them.
If you would upvote a post on reddit, you would reblog it here. If you see something and you think it is cool, you think it is funny, or you think it is helpful, reblog it. Some users have sideblogs (you can have infinite sideblogs attached to your main account) to organize all of the posts they reblog. Others simply use a tagging system for organizational purposes (and so users can blacklist ("filter") those tags in their settings if they don't want to see the post). For example, if I followed a user for Star Trek, but they also posted a lot of Star Wars, I might add "#star wars" to my list of filters. This way, I am only seeing the Star Trek posts. Tumblr's default way of handling this is to display a box that says "this post contains #Star Wars" and you can choose whether or not to open it. on desktop with xkit rewritten, you can have it hide those boxes entirely. please use filters. your sanity will thank you.
In a reblog, Organizational Tags are for /you./ I see a lot of confusion about this from new users. If you reblog someone else's post and add 500 tags..... it's not going to get picked up in tumblr search. You're not going to get any sort of exposure. Because it is not your post. Those tags are only for /you/ - if you want to find the post again.
tags are also used for commentary. most tumblr users do /not/ talk in post replies or in the comments of a reblog. most of them talk in tags. tags have a character limit so these messages are broken up in fragments. tumblr uses a comma (,) to make a new tag, so users often use either no punctuation or a period (.) or a hyphen (-) to break up thoughts. two apostrophes ('') are used instead of quotation marks (because they dont work in tags). this is also where "tumblr writing style" comes from. we all began to write in lowercase and use punctuation in. a weird way. like. for emphasis. there is also the Tumblr Comma, a special unicode character that resembles a comma and works in tags when copy+pasted or put there with a keyboard shortcut. but this is often not used. here it is: ‚
also here's an example of tags. you will notice that commentary goes before organizational: #GOD DHSHSKDDJDL #i cannot BELIEVE i forgot about this. what the fuck #star trek #spock
when leaving tags, most users talk to themselves. but please remember that tags can be seen by anyone, including the original poster. in general, it is discouraged to traumadump or be rude.
"prev tags" (which tumblr staff is trying their damnest to erase sadly) is when a user reblogs a post from another user and tags it simply ''prev'' or ''prev tags" (meaning "i agree with the previous user's tags"). sometimes it's because a thoughtful observation was made, but usually it's a way of saying "hey! that was a funny joke!" without putting the user on blast by screenshotting the tags. it's most common between friends and mutuals (users following each other). i would say it is equivalent to users whispering to each other and giggling rather than getting up on a table and shouting. "prev tag chain" is when users reblog "prev tags" "prev prev tags" - and so on. however, sadly, tumblr has removed the feature of moving backwards in a reblog chain on desktop. i have not updated my app and refuse to, so i so not know if it is gone on mobile as well, but it probably is. EDIT: the browser extension Xkit Rewritten has an option now, in "tweaks" called "restore links to individual posts in post header." it should be the first option. prev tags, on desktop at least, is saved!
screenshotting someone elses tags and adding the image in a reblog is known as "passing peer review." it is, however, considered to be Greatly Annoying to accompany those tags with unnecessary commentary (ex: "these tags pass peer review!" "WHY WOULD YOU LEAVE THIS IN THE TAGS" "LMAAOO THIS IS SO FUNNYYY"). the tags can stand on their own. the only instance in which this is different is during a serious discussion, when you want to build off of another user's perspective. in which case, you address them as normal. some people credit taggers, some people don't. crediting tends to occur in discussions.
when making an original post, do not use irrelevant tags for Exposure. this is Greatly Hated by the userbase and is also against the TOS. you will get blocked at best, reported or yelled at at worst. only add relevant tags, and do not go overboard.
reposting other people's artwork is highly discouraged and is considered the Highest Offense. if you do any sort of reposting, you should credit and link to a creator directly. however, tumblr loves reposted videos, especially ones from tiktok. there are entire accounts dedicated to posting those.
sideblogs! it is possible to have multiple blogs under one email address. tumblr treats these blogs as proxies of your main blog. this means that sending someone an ask/commenting in the replies of a post will always appear with the name of your main blog, your likes will appear with the name of your main blog, and that if you follow someone you will appear on their followers list as your main blog (so you may be mutuals with someone and not even know it because their sideblog interacts with you, but isn't on your follower's list... because their main blog is listed there instead.) however, DMs DO appear as the sideblog name. you cannot swap your main blog with your sideblog. and right now, there is a bug where deleting a sideblog will delete your entire tumblr account so. don't do that lol. anyway, the amount of sideblogs you can make is literally infinite and i think there's just a Daily Limit of creating 10 of them or something. some users make a sideblog for each interest they have. others have no sideblogs and reblog everything to main. and then you have people like me that do both. somehow. some users will make sideblogs to hoard URLs. also sorry i'm just introducing this now, but that is what our usernames are called. because when tumblr was more desktop-oriented, every blog was literally a Personal Website. so ya. we call them "URLs." anyway, if someone wants to hang onto a URL for later, they might save it on an empty blog. this usually pisses people off. a "canon URL" is when someone has a URL that is like One Word or a Company Name or a Fictional character. hypothetical examples: "ketchup" "burgerking" "lukeskywalker." these are highly rare, coveted, and you look cool as hell if you have one.
tumblr's /\/SFW policy (/\/ is an N. i've censored it.) is best described as ???. posts that are safe for work get marked as /\/SFW and hardcore p0rn somehow persists. in general, be very wary of posting even artistic nvdity (even though it is supposedly permitted.) never deliberately mark your own posts as Mature. this is essentially like walking directly into a bear trap and waving a big sign at tumblr staff saying "hey! make it so people can't find my blog and i'm far more likely to get banned!" also do not tag posts with "/\/SFW." too many of those will get your entire blog marked as mature (which makes your posts pretty much invisible to other users.) tumblr users used /\/SFT (/\/ot safe for tumblr) for a long time, but staff caught on. there is now no consensus and people use their own personal tags for it. just pick something and people will catch on and blacklist it if need be. (btw you CAN type whatever you want on this website. i am only censoring in the hopes that this will allow my post to appear in the tags. this isn't tiktok lol)
while it is possible to disable reblogs on a post, this is a very RECENT addition and most users forget it exists. as such, please use common sense. if someone has written a post about, say, how sad they are feeling because they got in a fight with their family... that's not a good post to reblog. a like would be better here, like a pat on the back.
we LOVE polls. we love them. they are like sports to us. most of them are popularity polls - who is the better character? but people also use polls for, say, making bug emojis "race" each other. or "lets build a cake." other people use polls to write poetry, or learn about regional differences, or even to draw a pen!s. if you tag a poll as "poll" it will most likely be seen and voted in, because users look in the tag to find buttons to click.
there is unfortunately a T3RF (this one censored specifically to protect my notifs lmao. 3 is E) presence here. report, block, ignore, move on. common courtesy for users to inform each other if one is accidentally reblogged from. it also helps to blacklist tags related to them to avoid them. use shinigam! eyes browser extension on desktop.
there is NO equivalent to reddit awards on this website. as the userbase hates the staff, it is considered blasphemous to spend your money on checkmarks, etc. - buying them as a gift for another user is seen as a hostile act. it's like receiving a "kick-me" sign. once owned, badges cannot be deleted. thankfully, tumblr now allows you to disable checkmarks and other badges from appearing publically. that said, some users also give checkmarks unironically to show appreciation??? and others buy checks for themselves???? so yeah. tumblr doesnt actually have a verification system - these exist to mock twitter and to make a quick buck.
tumblr blaze. essentially, tumblr has a system in place to showcase user posts instead of advertisements sometimes. this is done by the user paying money. the higher the amount, the more impressions. tumblr users can now also blaze OTHER PEOPLE'S POSTS. MAKE SURE YOU HAVE BLAZE DISABLED!!! blazing another person's post (without asking first) is seen as a hostile act. why? because most blazed posts result in rude comments from strangers who are annoyed to see the post on their dashboard. unless it's like, a cute picture of a cat. or something genuinely helpful. boosting your soundcloud or a selfie or a rant about fandom does not typically garner positive responses. you can blaze just like. watch out. and also always ask the OP if you want to blaze someone else's post. (there is a reason this feature is called "blaze pvp")
tumblr merch is also frowned upon, as tumblr staff steals ideas from the userbase and profits off of them without financially compensating or crediting the users. there was a meme on here, "vanilla extract", that tumblr turned into water bottles while the person who made the meme was having to fundraise to survive :(
BLOCK. LIBERALLY.
umm i think thats it for now. but like if you have questions feel free to launch them into The Void with some tags and users are pretty quick to help out! hopefully i covered some stuff that other ppl haven't
175 notes
·
View notes
Text
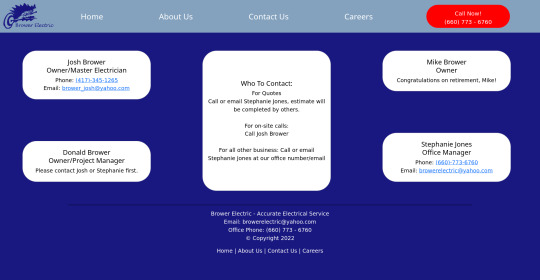
Brower Electric - Commit #6 - Contact Us
This push, I added the Contact Us page.
On Desktop:
On Mobile:

The HTML:
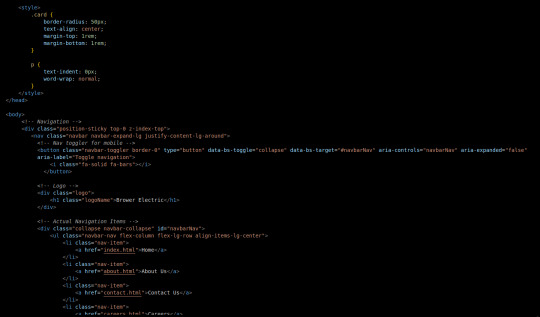
I used some internal CSS in the head tag because I wanted the cards and text on this page to look a little different.
Our nav bar (and this is standard on all pages) is contained in a div that sticks it to the top of the page, even as you scroll. The z-index-top class makes the z index 100 so it overlaps everything.
The rest of the navbar is the same as other pages.
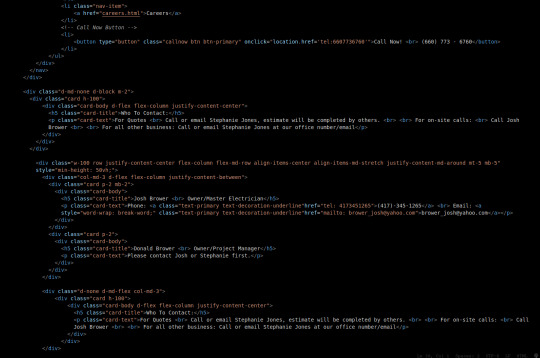
So the first div you see after the nav bar is only visible on medium screens and below. This div contains a card that has been flexed to center it's content. This card is the instruction card for who to contact. On bigger screens, a nearly identical one will appear in the center of the Contact Us grid.
Our Contact Us grid uses Bootstrap rows and cols. The row has a 100% width and a minimum height of 50% of the viewport. It justifies it content to the center of the column on mobile but otherwise it justifies content by the space around in a row. It aligns items center on mobile and stretches them out on other devices. It also has a margin on the top and bottom.
The cols are flex columns that justify their content based on the space between. That's how we get the vertical spacing on desktop.
The cards have some padding and a bottom margin, and the contact links are formatted.
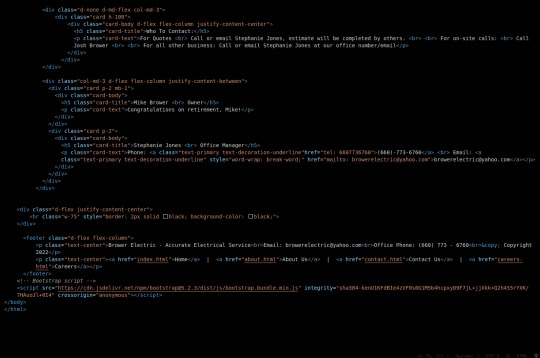
The middle col only contains the who to contact div that reveals on medium devices and up.
The footer is the same as the other pages.
The CSS:
I did not add any external CSS for this page besides the z-index-top class I mentioned earlier. I'm pretty proud of this because it means that I am getting better at utilizing Bootstrap 5 classes.
Conclusion:
I should learn more about Grids. Their responsiveness is powerful because you can manipulate more than one direction at a time but I always find myself using Flexbox tools. Maybe it is because Bootstrap is built on flexbox or more likely because I like my comfort zone. Either way, I need to branch out.
12 notes
·
View notes
Photo


Bucky self care for @totheendofthe-line
Let me know if you want anything changed ~ modmat
Key chain- https://www.etsy.com/listing/703629590/stucky-till-the-end-of-the-line-hand?gpla=1&gao=1&utm_campaign=shopping_us_SoulmatesDesigns_sfc_osa&utm_medium=cpc&utm_source=google&utm_custom1=0&utm_content=17594079&gclid=Cj0KCQjw3uboBRDCARIsAO2XcYBEh8E_HKsbef3PCNPfExrM1fHAvMr-3I30-dRBYOLyOqdQ9hYJ2UUaAvVAEALw_wcB
Candle- https://www.etsy.com/listing/571837265/winter-soldier-8oz-soy-candle-bucky?ga_order=most_relevant&ga_search_type=all&ga_view_type=gallery&ga_search_query=winter+soldier&ref=sr_gallery-1-35&col=1
Blanket- https://www.amazon.com/JML-Throw-Blanket-Microfiber-Multi-Purpose/dp/B0789DBX5L/ref=asc_df_B0789DBX5L/?tag=hyprod-20&linkCode=df0&hvadid=242005912984&hvpos=1o1&hvnetw=g&hvrand=11326997141061428341&hvpone=&hvptwo=&hvqmt=&hvdev=c&hvdvcmdl=&hvlocint=&hvlocphy=9010055&hvtargid=pla-428372705519&psc=1
Bath bomb- https://www.etsy.com/listing/711277717/avengers-bath-bomb?ga_order=most_relevant&ga_search_type=all&ga_view_type=gallery&ga_search_query=marvel+bath+bomb&ref=sr_gallery-1-4
Pillow- https://www.aliexpress.com/item/WZ4194-Hot-Sale-Keep-Clam-Cotton-Linen-Pillow-Case-For-Wedding-Decorative-Square-18x18-inches-Pillow/32815291279.html
5 notes
·
View notes
Text
HTML Forms: Building Interactive User Input

HTML forms play a vital role in web development, allowing users to input and submit data on websites. Whether it's a simple contact form or a complex registration form, understanding how to build interactive user input forms is essential for creating engaging and dynamic web experiences. In this blog post, we will explore the fundamentals of HTML forms and discuss best practices for building interactive user input.
<form> Tag:
The <form> tag is the foundation of HTML forms. It acts as a container for all form elements and defines the boundaries of the form. The "action" attribute specifies the URL where the form data will be submitted, and the "method" attribute determines the HTTP method to be used (GET or POST).
<input> Tag:
The <input> tag is the most commonly used form element. It allows users to input various types of data, such as text, numbers, email addresses, and more. The "type" attribute defines the input type, and additional attributes like "name" and "placeholder" provide further context and guidance for users.
<textarea> Tag:
The <textarea> tag is used to create a multiline text input field. It's ideal for capturing longer messages, comments, or descriptions from users. The "rows" and "cols" attributes can be used to define the size of the textarea.
<select> and <option> Tags:
The <select> tag creates a dropdown menu, while the <option> tag defines individual options within the dropdown. This combination allows users to select one or multiple choices from a list. Attributes such as "selected" and "disabled" provide additional functionality and user experience enhancements.
<label> Tag:
The <label> tag is used to associate a label with an input field, providing a clear description or prompt for the user. It improves accessibility and helps users understand the purpose of each input field. The "for" attribute should match the "id" attribute of the corresponding input field.
<button> Tag:
The <button> tag creates clickable buttons within the form. It can trigger form submission or perform other actions using JavaScript. The "type" attribute can be set to "submit" to submit the form, "reset" to reset form values, or "button" for custom actions.
<fieldset> and <legend> Tags:
The <fieldset> tag groups related form elements together, providing a visual and semantic grouping. The <legend> tag is used to provide a caption or title for the fieldset. This combination improves form structure and readability, especially for complex forms.
Form Validation:
HTML5 introduced built-in form validation, allowing developers to validate user input without relying solely on server-side validation. Attributes like "required," "min," "max," and "pattern" can be used to enforce specific rules on input fields. HTML5 also provides the "pattern" attribute, which accepts regular expressions for custom validations.
Handling Form Submissions:
When a user submits a form, the data is typically sent to a server for processing. Server-side scripts, such as PHP or JavaScript, are used to handle form submissions and process the data accordingly. The server-side script specified in the form's "action" attribute receives the form data, which can be accessed and processed further.
Styling and Enhancing Forms:
HTML forms can be customized and styled using CSS to match the website's design and branding. Additionally, JavaScript libraries and frameworks like jQuery and React can be used to enhance form interactivity, provide real-time validation, or create dynamic form elements.
Conclusion:
Building interactive user input forms is an essential skill for web developers. HTML provides a range of form elements and attributes to collect user input and create engaging web experiences.
To streamline the development process, leveraging online HTML compilers can be incredibly beneficial. online html compiler offer a convenient way to test and validate forms in real-time, allowing developers to see the immediate results of their code. These tools provide an interactive environment to experiment with different form elements, input validation, and styling, enabling faster iterations and bug detection.
Remember to combine HTML forms with server-side scripting, such as PHP or JavaScript, to handle form submissions and process the data effectively. Additionally, css compiler online can be utilized to style and customize form elements, ensuring a cohesive and visually appealing user interface.
By mastering the art of building interactive user input forms and utilizing html compiler online, developers can create seamless and user-friendly experiences that enhance engagement and facilitate data collection on websites. Embrace the power of HTML forms and leverage the convenience of online HTML compilers to elevate your web development skills.
0 notes
Text
MASTER DICIONÁRIO HTML
Tags estruturais
<!– –>
Cria um comentário
<html> </html>
Envolve todo um documento html
<head> </head>
Envolve o cabeçalho de um documento html
<meta>
Fornece informações gerais sobre o documento
<style> </style>
Informações de estilo
<script> </script>
Linguagem script
<noscript> </noscript>
Conteúdo alternativo para quando a linguagem script não for suportada
<title> </title>
O título do documento
<body> </body>
Envolve o corpo (texto e tags) do documento html
bgcolor – Cor de fundo #RRGGBB
background – Imagem como plano de fundo
text – Cor do texto principal
link – Cor dos links existentes na página
vlink – Cor do link já visitado
alink – Cor do link que foi ativado
marginheight – Elimina a margem esquerda apenas no Netscape
marginwidth – Elimina a margem no topo da página apenas no Netscape
topmargin – Elimina a margem no topo da página apenas no Internet Explorer
leftmargin – Elimina a margem esquerda apenas no Internet Explorer
Cabeçalhos
<hn> </hn>
Cabeçalho nível n para n de 1 a 6
Parágrafos
<p> </p>
Um simples páragrafo
align – Alinhamento do parágrafo: left, right, center e justify
Links
<a> </a>
Cria um link e inclui atributos em comum
href – O URL do documento que será vinculado a este. Para e-mail: mailto e link externo: http
name – O nome da âncora
target – Identifica a janela ou local em que o link deverá ser aberto: blank, self, top, parent
rel – Define os tipos de link que avançam
rev – Define os tipos de link que revertem a ação
acesskey – Atribui uma tecla de atalho para este elemento
shape – Para uso com formas de objeto
coords – Para uso com formas de objeto
tabindex – Determina a ordem das guias
onclick – É um evento JavaScript
onmouseover – É um evento JavaScript
onmouseout – É um evento JavaScript
Listas
<ol> </ol>
Uma lista ordenada
start – Define a partir de qual número a listagem começa
type – Tipos de caracteres ordenados: A, a, I, i, 1
<ul> </ul>
Uma lista não ordenada
type – Tipos de caracteres não ordenados: disk, square, circle
<li> </li>
Um item da lista
value – Numeração individual do item da lista
type – Tipos de caracteres ordenados: A, a, I, i e 1 para listagem ordenada e disk, square e circle para não ordenada
<menu> </menu>
Um menu com uma lista de itens
<dir> </dir>
Uma listagem de diretórios
<dl> </dl>
Uma lista de definições ou glossário
<dt> </dt>
Marca o texto especificado como um termo de definição de um glossário
<dd> </dd>
Especifica o texto referente a um termo criado pela tag <dt> dentro de uma lista de definição
Formatação de caracteres
<em> </em>
Maior ênfase em itálico
<strong> </strong>
Maior ênfase em negrito
<code> </code>
Amostra de código
<kbd> </kbd>
Texto a ser digitado
<var> </var>
Uma variável ou espaço reservado para um outro valor
<samp> </samp>
Texto de amostra
<dfn> </dfn>
Aplica um formatação no texto definido como termo de um glossário
<cite> </cite>
Uma citação
<b> </b>
Texto em negrito
<i> </i>
Texto em itálico
<u> </u>
Texto sublinhado
<tt> </tt>
Fonte monoespaçada (texto semelhante à maquina de escrever)
<pre> </pre>
Texto pré-formatado
<strike> </strike>
Texto riscado
<s> </s>
Texto tachado
<sub> </sub>
Texto subscrito
<sup> </sup>
Texto sobrescrito
<big> </big>
Texto em fonte maior do que o padrão
<small> </small>
Texto em fonte menor do que o padrão
<blink> </blink>
Texto piscando somente no Nestcape
<marquee> </marquee>
Texto animado no Internet Explorer
Outros elementos
<hr>
Uma régua horizontal
size – Espessura da linha em pixels
width – Largura da linha em pixels ou porcentagem
align – Alinhamento da linha em center, left, right
color – Cor da linha em #RRGGBB
noshade – Linha sólida
<br>
Uma quebra de linha
<center> </center>
Centralizar
<div> </div>
Conteúdo
align – Alinhamento: left, center e right
<blockquote> </blockquote>
Texto com mais margem
<address> </address>
Assinaturas ou informações gerais sobre o autor de um documento
<font> </font>
Alterna tamanho , cor e tipo de fonte exibida
size – O tamanho da fonte varia de 1 a 7
color – A cor da fonte #RRGGBB
face – O tipo da fonte
<basefonte>
Define o tamanho padrão para a fonte na página atual
size – O tamanho da fonte varia de 1 a 7
Imagens
<img>
Insere uma imagem in-line no documento e inclui atributos comuns
usemap – Um mapa de imagens do lado cliente
src – O URL da imagem
alt – Uma string de texto que será exibida em navegadores que não possam suportar imagens
align – Determina o alinhamento de uma determinada imagem: top, middle, bottom, left e right
height – É a altura sugerida em pixels
width – É a extensão sugerida em pixels
vspace – O espaço entre a imagem e o texto acima e abaixo dela
hspace – O espaço entre a imagem e o texto à esquerda e à direita dela
border – Largura da borda
Tabelas
<table> </table>
Cria uma tabela
background – Imagem de plano de fundo
bgcolor – Cor de plano de fundo
border – Largura da borda em pixels
cols – Número de colunas
cellpadding – Espaçamento nas células
cellspacing – Espaçamento entre as células
width – Largura da tabela
align – Alinhamento da tabela: left, center, right
bordercolor – Cor na borda da tabela
<caption> </caption>
A legenda para a tabela
<tr> </tr>
Uma linha na tabela
align – O alinhamento horizontal do conteúdo das células dentro dessa linha com os valores possíveis left, right, center, justify e char
bgcolor – Cor de fundo
valign – o alinhamento vertical do conteúdo das células dentro dessa linha com os valores possíveis top, middle, bottom e baseline
background – Figura como plano de fundo
<th> </th>
Um cabeçalho de célula da tabela
align – Alinhamento horizontal
valign – Alinhamento vertical
bgcolor – Cor de plano de fundo
rowspan – O número de linhas pelo qual essa célula se expandirá
colspan – O número de colunas pelo qual essa célula se expandirá
nowrap – Desliga o enquadramento de texto em uma célula
<td> </td>
Define uma célula de dados da tabela
align – Alinhamento horizontal
valign – Alinhamento vertical
bgcolor – Cor de plano de fundo
rowspan – O número de linhas pelo qual essa célula se expandirá
colspan – O número de colunas pelo qual essa célula se expandirá
nowrap – Desliga o enquadramento de texto em uma célula
width – Largura da célula
height – Altura da célula
Formulários
<form> </form>
Define um formulário
action – Responsável por determinar o exato local para onde as informações coletadas no formulário deverão ser enviadas
method – Método de empacotamento dos dados do formulário: get, post e enctype="multipart/form-data"
name – Nome do objeto
<input>
Caixa de texto
type – Tipo de dado: text, file, radio, checkbox, hidden, password, submit, reset, button, image
name – Identificação do campo
size – Largura
maxlength – Número máximo de caracteres permitidos
value – Texto que aparece dentro da caixa ou nome do botão
checked value – Valor assumido quando este campo for selecionado
<textarea> </textarea>
Permite criar elementos de entrada com características de texto
rows – Tamanho da linha da caixa de texto
cols – Tamanho da coluna da caixa de texto
name – Identificação do campo
wrap – Quebra de linha da caixa de texto: off, virtual, physical
<select> </select>
Seleção
name – Identificador
<option> </option>
Opção
value – Valor do campo
Se te foi útil, por favor, dê like ou reblog. /Gabi
Créditos: Codigofonte.
79 notes
·
View notes
Text
HTML col Tag
The HTML <col> tag is used to define column properties for each column within the <colgroup> element .This tag is used to set the style properties into column or group columns.This tag has no closing tag. Syntax <col span=""> Example <!DOCTYPE html> <html> <head> <title>HTML col Tag</title> </head> <body> <table border="1"> <colgroup> <col span="2"…

View On WordPress
#col#col html tag#col tag#col tag html#col tag html 5#col tag in html#col tag in html5#col tag kya hai#colgroup tag#colgroup tag in html#how to add col tag#how to add col tag and colgroup tag#html col tag#html colgroup tag#html5#html5 col#what is col tag#what is col tag in html#what is colgroup tag in html
0 notes
Text
line break in html - vertical line in html
In HTML, the <br> element creates a line break. You can add it wherever you want text to end on the current line and resume on the next.
If you want to prevent a line break in html between two words, use a non-breaking space. If you want to insert a line break, use the HTML break tag, written as <br>. You don't need a closing tag here — just writing <br> adds a line break.
To create a multi-line text input, use the HTML <textarea> tag. You can set the size of a text area using the cols and rows attributes. It is used within a form, to allow users to input text over multiple rows. Use block-level elements to break the line without using <br> tag. There are many ways to break the vertical line in html without using <br> tag. The used properties are listed below: white-space: pre; It is used to make elements acts like <pre> tag.
0 notes
Text
How Web Scraping Of Zomato Can Be Done By BeautifulSoup Library In Python?

Introduction
Web scraping, also known as data scraping, is a kind of data extraction used to gather information from different websites. The software of web scraping uses a web browser or HTTP to access these websites. The software user performs web scraping manually but web scraping is generally known for automated procedures done by bots or by a web crawler. This is a type of process where specific data from the websites and the internet are copied and stored into a local dataset or spreadsheet to retrieve the data later.
Here, we will use Zomato data scraper to gather information on the best restaurants in Bengaluru, India. HTML website pages will be used in accessing and reading the information.
Scraping the Website Content
The web address is typed in the browser and the HTTP request is made to visit the webpage. If a request is successfully completed, the web page will be displayed by the browser otherwise or it will show an error. The same kind of request is made for accessing a Zomato web page.
Some of the tools that are available with us help us use Python to access a web page.
import requests from bs4 import BeautifulSoup
Let us understand the uses of libraries before using them as well as functions in accessing a web page.
Making a Request
It is created for humans who are dependent on the language. It eliminates the need of adding query strings manually to the URLs or encrypting the post data. The Requests allow you to use Python in sending requests of HTTP/1.1. You can use simple Python libraries to add material like headers, multipart files, form data, and arguments. Similarly, Python's response data can be retrieved.
BeautifulSoup (BS4)
BeautifulSoup4 is a package of Python for data extraction from XML and HTML files. It integrates with your preferred parser to offer navigation, search, and modification of a parse tree. This is normal for programmers to save hours or even days of effort.
After knowing the tools, we shall now try to access the web page of Zomato.
The data of the best hotels on Zomato has now been put in the variable. However, it is not in the readable format for everyone except computer scientists. Let's see the uses of scraped data.
Here, we are looking for the name of restaurant, address of a restaurant, and the category of cuisine. To start looking for all these characteristics, we need to locate the HTML elements that contain this data.
By looking at the BeautifulSoup material mentioned above, or by using a review on your Web Browser called Chrome to check which tag holds the gathering of the best restaurants, as well as additional tags with more information.
top_rest = soup.find_all("div",attrs={"class": "bb0 collections-grid col-l-16"}) list_tr = top_rest[0].find_all("div",attrs={"class": "col-s-8 col-l-1by3"})
The preceding code will look for any div HTML tags with the class="col-s-8 col-l-1by3" and return data for collecting lists of hotels. We need to use a loop for accessing the list items, i.e., a restaurant information at a time, for extracting additional information using loop.
list_rest =[] for tr in list_tr: dataframe ={} dataframe["rest_name"] = (tr.find("div",attrs={"class": "res_title zblack bold nowrap"})).text.replace('\n', ' ') dataframe["rest_address"] = (tr.find("div",attrs={"class": "nowrap grey-text fontsize5 ttupper"})).text.replace('\n', ' ') dataframe["cuisine_type"] = (tr.find("div",attrs={"class":"nowrap grey-text"})).text.replace('\n', ' ') list_rest.append(dataframe) list_rest
The tr variable in the preceding code holds various details about the hotel, such as its name, cuisine, address, prices, reviews, and menu. Each piece of information is saved in its particular tag, which can be identified by looking at the tr called each item’s data.
Before looking for tags in the HTML, we should take a look at how the restaurant's menu appears on the website.
You can see in the above images that the data required to get scraped is shown in several formats. Returning to HTML content, we have discovered that data is kept within the div tag in the modules defining the kind of formats or fonts used.
The dataframe is developed for collecting necessary information. We go through each detail of data one after another and save it in diverse DataFrame columns. Because HTML data utilizes ‘n’ to split data that cannot be saved in a DataFrame, we will have to employ a few String functions. As a result, we can substitute ‘n’ with “to prevent any issues with space.
Results obtained from the above-mentioned code would be like-
Saving Data in a Readable Format
Presume the situation where you need to deliver data to a person who is not familiar with Python. They will not understand any information. The dataframe data will be saved in a readable format like CSV.
import pandas df = pandas.DataFrame(list_rest) df.to_csv("zomato_res.csv",index=False)
The code above will generate the Zomato res CSV file.
Conclusion
In this blog, we have learned to make Requests for accessing a web page from Python and BeautifulSoup4 for extracting HTML data from the available content. Then, the data was formatted in a dataframe and saved in a CSV format.
Looking for Web Scraping Service to scrape Zomato data? Contact Web screen Scraping now! Request for a quote!
#zomato data scraper#zomato food delivery app data scraper#web scraping service#web data extraction#web screen scraping
0 notes
Text
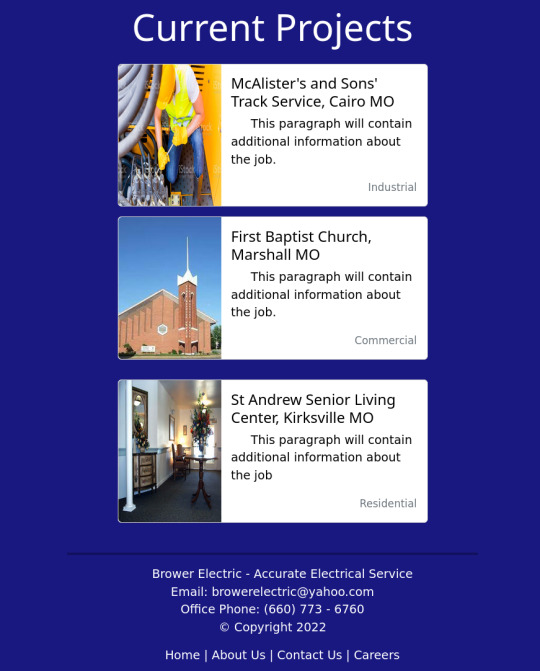
Brower Electric - Commit #4 - Current Project Cards
This commit (or series of commits), I built the current project cards and the small footer on the bottom of the page, as well as some minor changes for typos and such.
On Desktop:

On Mobile:

(If you're viewing this post on desktop, sorry about the image quality here)
In Between:
The HTML:
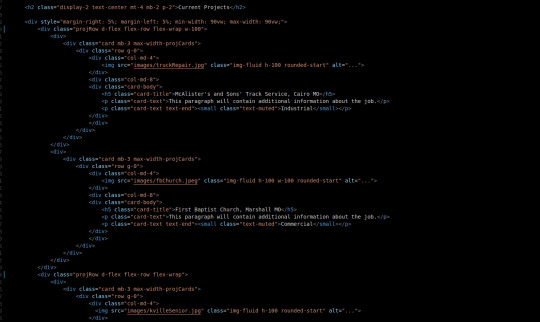
Our Current projects will be contained in a div that is always 90vw wide with 5% margins on either side.
Originally, I wanted to keep everything in a Bootstrap Grid, but they occupy the space between CSS Tables/Grids and Flexboxes. For this particular situation, Flexboxes will be the best utility because the justify-content-between tool sounds like it will be useful for the way I want the responsiveness to work.
There are currently 2 projRow divs with 2 unstyled "col" divs in each that contain one bootstrap card.
The rows are flexed with flex wrap enabled and they take up 100% the width of their parent section.
The cards are the basic Bootstrap 5 card components. They use a grid and have several pre-made breakpoints in the cards and pre-styled classes for card content.
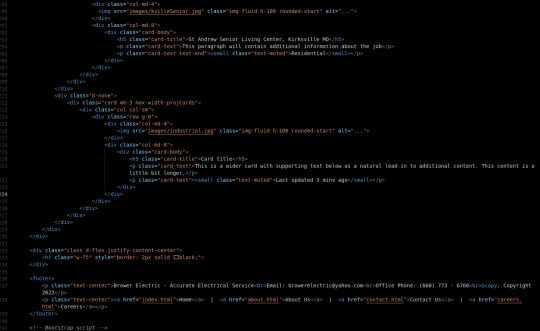
The max-width-projCards helps me control the width of the cards.
We have a div that centers its content. It contains an <hr> (horizontal line) tag that is 75% the width of the page and has a 2px black border.
Then we have our footer. 2 centered <p> tags one has the footer paragraph with <br> tags separating the lines. One is a simple footer nav.
The CSS:
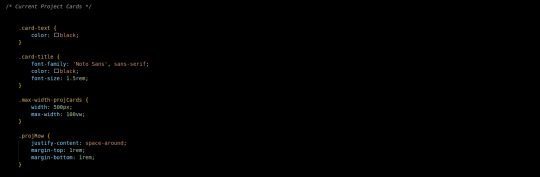
I did not write much custom CSS here. I changed the card-text to black since my default <p> color is white. The title also got some styling to match the page.
The .max-width-projCards sets the max width to 100% of the viewport. But by default it is 500px.
The projRow contains that space around justify content thing I was talking about earlier. It keeps all the divs organized equally apart.
Conclusion:
This commit, I learned more about the peculiarities of the Bootstrap Grid and a situation where a more traditional flex-box is appropriate. I think it is important that I learn more about these core code-design decisions as I improve in my skills as a developer.
You can visit the site's github repository here: https://github.com/Xacheri/BrowerElectric
6 notes
·
View notes
Text
Custom item URL’s in Django v3_1
This article explains how to setup custom item URL’s such as /poem-My%20Favorite%Place-1 in order to allow Search Indexes such as Google to get to your website from the root / directory for all the content. I am running a test right now to see if this is more efficient for the Search Indexes or not.
Get the app started in your webserver so you can do changes and check immediately
1. Start the Hyper-V in the Windows Search bar
2. Double click the icon that looks like a screen under the Ubuntu Server 20.04 LTS tab in the middle
3. Login if required
4. Launch the server
5. Change into the ~/OneDrive/code/example.com/git
6. python3.8 manage.py runserver 0:8000
7. Load the site in your browser
8. http://192.168.0.12:8000/
Build the poems app
1. python3.8 manage.py startapp poems
2. Modify the poems/views.py
a. from django.shortcuts import get_object_or_404
b. from .models import Poem
c. def index(request):
d. poems_created = Poem.objects.exclude(hidden=True).order_by('created').reverse()
e. options = {
f. 'poems': poems_created,
g. }
h. return render(request, 'poems/index.html', options)
i.
j. def item(request, poem_id):
k. poem = get_object_or_404(Poem, pk=poem_id)
l.
m. options = {
n. 'poem': poem,
o. 'poem_id': poem_id,
p. }
q. return render(request, 'poems/item.html', options)
3. Add a new directory called templates in the root of the project at the same level as poems
4. Create a file called templates/theme.html
a. {% load static %}
b. <!doctype html>
c. <html lang="en">
d. <head>
e. <title>My Poems</title>
f. <link rel="stylesheet" href="https://stackpath.bootstrapcdn.com/bootstrap/4.5.0/css/bootstrap.min.css" integrity="sha384-9aIt2nRpC12Uk9gS9baDl411NQApFmC26EwAOH8WgZl5MYYxFfc+NcPb1dKGj7Sk" crossorigin="anonymous">
g. <script src="https://stackpath.bootstrapcdn.com/bootstrap/4.5.0/js/bootstrap.bundle.min.js" crossorigin="anonymous"></script>
h. </head>
i. <body class="d-flex flex-column h-100">
j. {% block content %}
k. {% endblock %}
l. </body>
m. </html>
5. Modify the poems/models.py
a. from django.db import models
b.
d. class Poem(models.Model):
e. title = models.CharField(max_length=255)
f. body = models.TextField()
g.
h. def str(self):
i. return self.title
6. Make the migrations and run them
a. python3.8 manage.py makemigrations
b. python3.8 manage.py migrate
7. Create a template for the poems app index page at poems/templates/poems/index.html
a. {% extends 'theme.html' %}
b. {% load static %}
c. {% load poem_tag_extras %}
d. {% block content %}
e. <main role="main" class="flex-shrink-0 pt-2">
f. <div class="container-md">
g. <h1>My Poems</h1>
h. <ul class="list-group">
i. {% for poem in poems %}
j. <li class="list-group-item d-flex justify-content-between">
k. <span class="bold"><a href="{{ poem|poem_item_url:request }}">"{{ poem.title }}"</a></span>
l. </li>
m. {% endfor %}
n. </ul>
o. </div>
p. </main>
q. {% endblock %}
8. Create a template file for each Poem item at poems/templates/poems/item.html
a. {% extends 'theme.html' %}
b. {% load static %}
c. {% load poem_tag_extras %}
d. {% block content %}
e. <main role="main" class="flex-shrink-0 pt-2">
f. <div class="container-md">
g. <h1><a href="/">My Poems</a></h1>
h. <div class="col mb-4">
i. <div class="card h-100 my-2 mx-3">
j. <div class="card-body" id="poem-{{poem.id}}">
k. <a name="poem-{{poem.id}}"></a>
l. <h5 class="card-title">{{ poem.title }}</h5>
m. <div class="card-text">{{ poem.body|linebreaks }}</div>
n. </div>
o. </div>
p. </div>
q. <h4><a href="/#poems">View All Poems</a></h4>
r. </div>
s. </main>
t. {% endblock %}
9. Create a new directory for the custom template tag used in the poems/index.html document at the poems/templatetags/poem_tag_extras.py. Also don’t forget to create a init.py document so it loads the directory properly.
a. from django import template
b. import re
c. import urllib
d. from poems.models import Poem
e.
f. register = template.Library()
g.
h. @register.filter(takes_context=True)
i. def poem_item_url(poem, request):
j. if type(poem) == Poem:
k. poem_id = poem.id
l. poem_title = poem.title
m. else:
n. return False
o.
p. host = request.META['HTTP_HOST']
q.
r. if "inlovelike" in host:
s. host = "https://" + host + "/"
t. else:
u. host = "http://" + host + "/"
v.
w. return host + "poem-" + urllib.parse.quote_plus(poem_title)[:255] + "-" + str(poem_id)
10. Modify the poems/admin.py to include the Poem model
a. from django.contrib import admin
b. from .models import Poem
c.
d. admin.site.register(Poem)
11. Modify your project name’s app urls.py file (Eg. /myapp/myapp/urls.py) so that it includes the shorthand (Eg. /poem-My%Title-1)
a. from django.urls import include, path, re_path
b. from poems import views as poem_views
c.
d. urlpatterns = [
e. …
f. re_path(r'^poem-.*-(?P<poem_id>\d+)$', poem_views.item, name="poem_item"),
h. # path('poems/', include('poems.urls')),
i. ]
12. Create a fixture for the import of some dummy data to play with in the interface at /myapp/fixtures/poems_poem.json
a. [{"model": "poems.poem", "pk": 1, "fields": {"title": "My First Poem", "body": "Here\r\nI\r\nStart"}}, {"model": "poems.poem", "pk": 2, "fields": {"title": "My Second Poem", "body": "This\r\n\Is\r\nA\r\nPoem"}}}]
13. Run the loaddata command to get your content into the database
a. python3.8 manage.py loaddata poems_poem.json
Now here is a project that has poems linked to the nested pages off the root directory of the homepage.
PS. This is live in action on https://inlovelike.com, please do take a look.
PSS. The file paths mentioned now have links to code so you can copy/paste them more simply. I do not have a template yet for Tumblr to create an article. If and when I do, they will be inline code example.
#python3#django3#django#python#poems#poem#programming#tutorial#howto#json#fixtures#urls#regular expressions#regex#bootstrap
0 notes