#kali linux tools
Explore tagged Tumblr posts
Visit Tumblr Blog
Explore Tumblr blogs with no restrictions, modern design and the best experience.
Last Seen Tumblr Blogs


Fun Fact
In 2020, Tumblr had 29.4 million users in the US.
Text
12 notes
·
View notes
Text
doing group work with international students with shaky at best english that haven't been paying attention for half the classes is just. so epic
#yes tell me you cant tell the order of the screenshots that i put numbers in the name of#yes tell me you cant read a linux terminal when we've had an entire class of learning kali tools all semester#fucking god
4 notes
·
View notes
Text
How to Install Kali Linux in VMware in Just 4 Simple Steps (Easiest Way)
In this guide, you will be able to learn the easiest way of how to install Kali Linux on VMware in Just 4 Simple Steps, I hope this helps a lot!
To keep in mind: Obtaining unauthorized access to another’s computer system or systems is illegal under the Computer Fraud & Abuse Act. Here you will find a step by step guide on how to install Kali Linux onto VMware. The main purpose of this blog tutorial is to educate others on cyber security tools, technologies, and techniques with the intention of creating consciousness for others on better…

View On WordPress
#best cybersecurity tools#Cybersecurity#cybersecurity course#cybersecurity jobs#ethical hacking#How to#how to code#how to install#how to install kali linux#how to install vmware#how to learn cybersecurity#how to learn linux#how to use a virtual machine#Kali Linux#linux#linux jobs#virtual machine#VMware
0 notes
Text
Imagine a butch who dates robotgirls and she's got the belt and carabiner "ready for business" look down, but all the stuff hanging from it is reverse-engineering tools.
A full set of screwdriver bits (including security torx and those weird tri-wing Nintendo ones), assorted spuders, those little rubber suction-cups you use to remove LCDs, a line flashlight, macro lenses, IPA wipes, chip pullers, portable hot air rework gun and a pinecil soldering iron, desoldering braid, a wide variety of ESD-safe tweezers, and one of those anti-stack wristbands but on a retractable lead like it's for walking a dog.
She left her backpack at home but it's got a stereo inspection station, a full set of lockpicks (including those tubular lock impresioning ones), and an aging ThinkPad with a bunch of USB adapters: every memory card format you can imagine, all the major hard drive interfaces, and even 3.5"/5.25" floppy disks thanks to a 3D printed enclosure with a greaseweazle flux imager (the Applesauce stays at home connected to her Mac Mini). A USB optical drive that can read and burn all the cd formats, and a as small plastic case of some blank CD-Rs, DVD-Rs, and Blu-rays. A bunch of USB flash drives, some blank, some preflashed with assorted tools and marked with little keychain labels: some linuxes, a warezed all-in-one windows installer, live distros for tails and kali and partionmagic and DBAN.
She's ready for anything.
#Robot girls#Robotgirls#Thee Silver Mt Zion Memorial Orchestra has an album called This Is Our Punk Rock#And this?#This Is My Pornography
1K notes
·
View notes
Text


Week 3 - 2025
I finish the Santander Cybersecurity bootcamp! I loved the Kali Linux labs, and learned a lot about cybersecurity tools I wanted to know more about.
There is just one last module of my MBA and the final project to finish, too, which will open more agendas for the CISCO Ethical Hacker course I started, the technical readings I must do, and learning Power BI, which I will need in my new role/job.
I am glad I could find time to go out with my husband, have fun, buy a few things we needed, and adjust some exciting plans.
Worked hard last week, as, due to internal changes in the company that is hiring me (the one I already work for, but through a third party), I will work with Cybersecurity more closely: performing the overview and data analysis of the vulnerabilities from a department inside the company. Isn't it crazy? It will be great for my career plans, as this will provide me Cybersecurity experience (FINALLY)... I am happy, anxious, nervous, grateful... so many mixed feelings.
Well, I will give my best, will keep studying, organizing my finances, and going for my dreams, as things are already happening in my life (´⊙ω⊙`)! To wrap it up: the profiterole picture is a homage to Mashle! What a great anime!!! I was reading the manga, and loved it, but the anime is so funny, he is lovely, and his friends are amazing (laughed and cried watching it). Finished the first and second seasons, and I cannot wait for the third. Also loving Spy Family and My Happy Marriage ༼♥ل͜♥༽ Have a great week guys ٩(◕‿◕。)۶
#studyblr#study#study blog#daily life#dailymotivation#study motivation#studying#study space#productivity#study desk#profiteroles
23 notes
·
View notes
Quote
The backdoor itself was added to the tool by one of its two main developers, who had spent three years making real and useful contributions and the past two being one of the two official maintainers. There is still the chance the account was compromised, but if it was, it was an extremely cautious takeover: the malicious code was added to the software periodically over a long period of time, with plausible explanations given every time, and when the final backdoored version was complete, the same user headed over to the developer site for one popular version of Linux to ask that it use the updated version as soon as possible since it supposedly fixed critical bugs. And it came so close to being public. The backdoored version was shipped in the beta versions of three different versions of Linux, and for two days, in the main release of one distribution, Kali Linux. When there, it allowed someone with the right private key to start a new encrypted connection and hijack the machine entirely. So how was it spotted? A single Microsoft developer was annoyed that a system was running slowly. That’s it. The developer, Andres Freund, was trying to uncover why a system running a beta version of Debian, a Linux distribution, was lagging when making encrypted connections. That lag was all of half a second, for logins. That’s it: before, it took Freund 0.3s to login, and after, it took 0.8s. That annoyance was enough to cause him to break out the metaphorical spanner and pull his system apart to find the cause of the problem.
TechScape: How one man stopped a potentially massive cyber-attack – by accident | Technology | The Guardian
55 notes
·
View notes
Text

Tools of the Trade for Learning Cybersecurity
I created this post for the Studyblr Masterpost Jam, check out the tag for more cool masterposts from folks in the studyblr community!
Cybersecurity professionals use a lot of different tools to get the job done. There are plenty of fancy and expensive tools that enterprise security teams use, but luckily there are also lots of brilliant people writing free and open-source software. In this post, I'm going to list some popular free tools that you can download right now to practice and learn with.
In my opinion, one of the most important tools you can learn how to use is a virtual machine. If you're not already familiar with Linux, this is a great way to learn. VMs are helpful for separating all your security tools from your everyday OS, isolating potentially malicious files, and just generally experimenting. You'll need to use something like VirtualBox or VMWare Workstation (Workstation Pro is now free for personal use, but they make you jump through hoops to download it).
Below is a list of some popular cybersecurity-focused Linux distributions that come with lots of tools pre-installed:
Kali is a popular distro that comes loaded with tools for penetration testing
REMnux is a distro built for malware analysis
honorable mention for FLARE-VM, which is not a VM on its own, but a set of scripts for setting up a malware analysis workstation & installing tools on a Windows VM.
SANS maintains several different distros that are used in their courses. You'll need to create an account to download them, but they're all free:
Slingshot is built for penetration testing
SIFT Workstation is a distro that comes with lots of tools for digital forensics
These distros can be kind of overwhelming if you don't know how to use most of the pre-installed software yet, so just starting with a regular Linux distribution and installing tools as you want to learn them is another good choice for learning.
Free Software
Wireshark: sniff packets and explore network protocols
Ghidra and the free version of IDA Pro are the top picks for reverse engineering
for digital forensics, check out Eric Zimmerman's tools - there are many different ones for exploring & analyzing different forensic artifacts
pwntools is a super useful Python library for solving binary exploitation CTF challenges
CyberChef is a tool that makes it easy to manipulate data - encryption & decryption, encoding & decoding, formatting, conversions… CyberChef gives you a lot to work with (and there's a web version - no installation required!).
Burp Suite is a handy tool for web security testing that has a free community edition
Metasploit is a popular penetration testing framework, check out Metasploitable if you want a target to practice with
SANS also has a list of free tools that's worth checking out.
Programming Languages
Knowing how to write code isn't a hard requirement for learning cybersecurity, but it's incredibly useful. Any programming language will do, especially since learning one will make it easy to pick up others, but these are some common ones that security folks use:
Python is quick to write, easy to learn, and since it's so popular, there are lots of helpful libraries out there.
PowerShell is useful for automating things in the Windows world. It's built on .NET, so you can practically dip into writing C# if you need a bit more power.
Go is a relatively new language, but it's popular and there are some security tools written in it.
Rust is another new-ish language that's designed for memory safety and it has a wonderful community. There's a bit of a steep learning curve, but learning Rust makes you understand how memory bugs work and I think that's neat.
If you want to get into reverse engineering or malware analysis, you'll want to have a good grasp of C and C++.
Other Tools for Cybersecurity
There are lots of things you'll need that aren't specific to cybersecurity, like:
a good system for taking notes, whether that's pen & paper or software-based. I recommend using something that lets you work in plain text or close to it.
general command line familiarity + basic knowledge of CLI text editors (nano is great, but what if you have to work with a system that only has vi?)
familiarity with git and docker will be helpful
There are countless scripts and programs out there, but the most important thing is understanding what your tools do and how they work. There is no magic "hack this system" or "solve this forensics case" button. Tools are great for speeding up the process, but you have to know what the process is. Definitely take some time to learn how to use them, but don't base your entire understanding of security on code that someone else wrote. That's how you end up as a "script kiddie", and your skills and knowledge will be limited.
Feel free to send me an ask if you have questions about any specific tool or something you found that I haven't listed. I have approximate knowledge of many things, and if I don't have an answer I can at least help point you in the right direction.
#studyblrmasterpostjam#studyblr#masterpost#cybersecurity#late post bc I was busy yesterday oops lol#also this post is nearly a thousand words#apparently I am incapable of being succinct lmao
22 notes
·
View notes
Text
Kali Linux 2025.1a released with 1 new tool, annual theme refresh

Source: https://www.bleepingcomputer.com/news/security/kali-linux-20251a-released-with-1-new-tool-annual-theme-refresh/
More info: https://www.kali.org/blog/kali-linux-2025-1-release/
8 notes
·
View notes
Text
kali linux recommended tools are so funny. spells in my computer
4 notes
·
View notes
Text

OHHH yes — Kali Linux vs Parrot OS — the eternal debate among cybersecurity enthusiasts, ethical hackers, and digital warriors like you ⚔️🖥️ Let’s break it down clearly and honestly:
🔥 KALI LINUX
Developed by: Offensive Security Focus: Penetration Testing & Red Team Ops Base: Debian Best For: Professionals, CTFs, Exploitation
🔧 Key Highlights:
Comes pre-loaded with 600+ tools.
Regularly used in OSCP, CEH, and other cert training.
Lightweight and minimal, but that means you have to configure a lot yourself.
Designed with experienced users in mind.
Has a “Kali Undercover” mode to mimic Windows (yes, for ops that require stealth 🔥).
👎 Cons:
Not very privacy-focused.
Can be too raw for beginners unless you're already deep in the game.
Not designed for daily use or casual browsing.
🦜 PARROT OS
Developed by: Frozenbox Focus: Penetration Testing AND Privacy Base: Debian Best For: Beginners to Intermediates, Privacy Geeks
🔧 Key Highlights:
Includes anonymity tools (Tor, I2P, Anonsurf) by default.
Offers multiple editions: Security, Home, and Cloud.
More polished UI — easier out of the box.
Lighter on system resources compared to Kali.
Better for everyday use + hacking tools baked in.
👎 Cons:
Slightly less tool-rich than Kali (but not by much).
Might feel "bloated" to users who want just pen-testing stuff.
⚔️ HEAD-TO-HEAD: WHO WINS?
FeatureKali Linux 💀Parrot OS 🦜Toolset💯🔥Privacy Tools😬✅Performance (lightweight)💪⚡Beginner-Friendly😵👍Community Support🧠 Massive💬 SolidLooks/PolishMinimalistSleek
🧠 BOTTOM LINE:
Choose Kali if: You're serious about offensive security, studying for a cert like OSCP, or want maximum control over tools and configurations. Think Red Team.
Choose Parrot OS if: You want a more balanced experience between hacking tools and daily usability, with added privacy features and a user-friendly design.
Both are powerful. It comes down to your use case and how much of a tinkerer vs user you are.
2 notes
·
View notes
Text
Installing Kali Linux on a USB Stick: A Step-by-Step Guide
If you want a portable, powerful cybersecurity toolkit you can carry in your pocket, installing Kali Linux on a USB stick is the perfect solution. With Kali on a USB, you can boot into your personalized hacking environment on almost any computer without leaving a trace — making it a favorite setup for ethical hackers, penetration testers, and cybersecurity enthusiasts.

In this guide, we'll walk you through how to install Kali Linux onto a USB drive — step-by-step — so you can have a portable Kali environment ready wherever you go.
Why Install Kali Linux on a USB?
Before we dive into the steps, here’s why you might want a Kali USB:
Portability: Carry your entire hacking setup with you.
Privacy: No need to install anything on the host machine.
Persistence: Save your settings, files, and tools even after rebooting.
Flexibility: Boot into Kali on any system that allows USB boot.
There are two main ways to use Kali on a USB:
Live USB: Runs Kali temporarily without saving changes after reboot.
Persistent USB: Saves your files and system changes across reboots.
In this article, we’ll focus on setting up a Live USB, and I'll also mention how to add persistence if you want. and if you seek knowledge about kali linux you can visit our website any time
Website Name : Linux Tools Guide
What You’ll Need
✅ A USB drive (at least 8GB; 16GB or more recommended if you want persistence). ✅ Kali Linux ISO file (download it from the official Kali website). ✅ Rufus (for Windows) or Etcher/balenaEtcher (for Mac/Linux/Windows). ✅ A computer that can boot from USB.
Step 1: Download the Kali Linux ISO
Go to the Kali Linux Downloads page and grab the latest version of the ISO. You can choose between the full version or a lightweight version depending on your USB size and system requirements.
Tip: Always verify the checksum of the ISO to ensure it hasn't been tampered with!
Step 2: Insert Your USB Drive
Plug your USB stick into your computer. ⚠️ Warning: Installing Kali onto the USB will erase all existing data on it. Backup anything important first!
Step 3: Create a Bootable Kali Linux USB
Depending on your operating system, the tool you use may vary:
For Windows Users (using Rufus):
Download and open Rufus (Get Rufus here).
Select your USB drive under Device.
Under Boot selection, choose the Kali Linux ISO you downloaded.
Keep the Partition scheme as MBR (for BIOS) or GPT (for UEFI) based on your system.
Click Start and wait for the process to complete.
For Mac/Linux Users (using balenaEtcher):
Download and open balenaEtcher (Get Etcher here).
Select the Kali ISO.
Select the USB drive.
Click Flash and wait until it's done.
That's it! You now have a Live Kali USB ready.
Step 4: Boot Kali Linux from the USB
Restart your computer with the USB plugged in.
Enter the BIOS/UEFI settings (usually by pressing a key like F12, Esc, Del, or F2 right after starting the computer).
Change the boot order to boot from the USB first.
Save changes and reboot.
You should now see the Kali Linux boot menu! Select "Live (amd64)" to start Kali without installation.
(Optional) Step 5: Adding Persistence
Persistence allows you to save files, system changes, or even installed tools across reboots — super useful for real-world usage.
Setting up persistence requires creating an extra partition on the USB and tweaking a few settings. Here's a quick overview:
Create a second partition labeled persistence.
Format it as ext4.
Mount it and create a file /persistence.conf inside it with the content: cppCopyEdit/ union
When booting Kali, choose the "Live USB Persistence" option.
Persistence is a little more technical but absolutely worth it if you want a real working Kali USB system!
Troubleshooting Common Issues
USB not showing up in boot menu?
Make sure Secure Boot is disabled in BIOS.
Ensure the USB was properly written (try writing it again if necessary).
Kali not booting properly?
Verify the ISO file integrity.
Try a different USB port (preferably USB 2.0 instead of 3.0 sometimes).
Persistence not working?
Double-check the /persistence.conf file and make sure it's correctly placed.
Conclusion
Installing Kali Linux onto a USB stick is one of the smartest ways to carry a secure, full-featured hacking lab with you anywhere. Whether you’re practicing ethical hacking, doing security audits, or just exploring the world of cybersecurity, a Kali USB drive gives you power, portability, and flexibility all at once.
Once you’re set up, the possibilities are endless — happy hacking! 🔥
2 notes
·
View notes
Text
The Hacker's Guidebook:
Aspiring hackers! I’ve created a guide covering core cybersecurity concepts new hackers should master before tools. I break down networking, OS internals, & hacking tactics. Recognize hacking as lifelong journey—arm yourself with the basics!
Core Concepts for Budding Cybersecurity Enthusiasts The Building Blocks of Ethical Hacking So you want to become an ethical hacker and enter the exciting world of cybersecurity. That’s awesome! However, before you dive headfirst into firing up Kali Linux and hacking everything in sight, it’s vital to build up your foundational knowledge across several InfoSec domains. Mastering the fundamentals…

View On WordPress
#attacking tools#basics of hacking#cross site scripting#Cyber Threat Defense#cybersec#cybersecurity learning#cybersecurity professional#Ethical Hacking#fundamentals#hacking basics#hacking for beginners#hacking guide#hacking networks#hacking web#how to hack#infosec#learn hacking#learn to hack#linux#malware basics#malware for hacking#metasploit#netsec#network hacking#nmap#operating systems#Pentesting#phishing#phishing attacks#Red Team
34 notes
·
View notes
Text
SQLi simulation using a virtual machine
Demonstration/simulation of SQL Injection attacks (In-band, Union-based, Blind SQLi) using a Kali Linux virtual machine and a Damn Vulnerable Web Application (DVWA) on a low difficulty level
Blind SQL provided in the video can be used also for gaining other sensitive information: length of the name of the database, database name itself etc.
the common attacks are shown and described shortly in the video, but of course for better learning you can try it yourself.
more resources where you can try out exploiting SQLi vulnerability:
- Try Hack Me SQLi Lab
- W3Schools SQL Injection
- Hacksplaining SQL Injection
more advanced pokemons can try:
- Try Hack Me SQli Advanced Lab
and of course DVWA is a great tool!
5 notes
·
View notes
Text

Kali Linux is a powerful OS for ethical hacking and cybersecurity tasks. Packed with tools for testing and analysis, it's a must for security pros! ⚡💻🔐
For the tutorial on Kali Linux click here: https://bit.ly/4jzJ0ga
2 notes
·
View notes
Text
Gaining Windows Credentialed Access Using Mimikatz and WCE
Prerequisites & Requirements
In order to follow along with the tools and techniques utilized in this document, you will need to use one of the following offensive Linux distributions:
Kali Linux
Parrot OS
The following is a list of recommended technical prerequisites that you will need in order to get the most out of this course:
Familiarity with Linux system administration.
Familiarity with Windows.
Functional knowledge of TCP/IP.
Familiarity with penetration testing concepts and life-cycle.
Note: The techniques and tools utilized in this document were performed on Kali Linux 2021.2 Virtual Machine
MITRE ATT&CK Credential Access Techniques
Credential Access consists of techniques for stealing credentials like account names and passwords. Techniques used to get credentials include: keylogging or credential dumping. Using legitimate credentials can give adversaries access to systems, make them harder to detect, and provide the opportunity to create more accounts to help achieve their goals.

The techniques outlined under the Credential Access tactic provide us with a clear and methodical way of extracting credentials and hashes from memory on a target system.
The following is a list of key techniques and sub techniques that we will be exploring:
Dumping SAM Database.
Extracting clear-text passwords and NTLM hashes from memory.
Dumping LSA Secrets
Scenario
Our objective is to extract credentials and hashes from memory on the target system after we have obtained an initial foothold. In this case, we will be taking a look at how to extract credentials and hashes with Mimikatz.
Note: We will be taking a look at how to use Mimikatz with Empire, however, the same techniques can also be replicated with meterpreter or other listeners as the Mimikatz syntax is universal.
Meterpreter is a Metasploit payload that provides attackers with an interactive shell that can be used to run commands, navigate the filesystem, and download or upload files to and from the target system.
Credential Access With Mimikatz
Mimikatz is a Windows post-exploitation tool written by Benjamin Delpy (@gentilkiwi). It allows for the extraction of plaintext credentials from memory, password hashes from local SAM/NTDS.dit databases, advanced Kerberos functionality, and more.
The SAM (Security Account Manager) database, is a database file on Windows systems that stores user’s passwords and can be used to authenticate users both locally and remotely.
The Mimikatz codebase is located at https://github.com/gentilkiwi/mimikatz/, and there is also an expanded wiki at https://github.com/gentilkiwi/mimikatz/wiki .
In order to extract cleartext passwords and hashes from memory on a target system, we will need an Empire agent with elevated privileges.
Extracting Cleartext Passwords & Hashes From Memory
Empire uses an adapted version of PowerSploit’s Invoke-Mimikatz function written by Joseph Bialek to execute Mimikatz functionality in PowerShell without touching disk.
PowerSploit is a collection of PowerShell modules that can be used to aid penetration testers during all phases of an assessment.
Empire can take advantage of nearly all Mimikatz functionality through PowerSploit’s Invoke-Mimikatz module.
We can invoke the Mimikatz prompt on the target agent by following the procedures outlined below.
The first step in the process involves interacting with your high integrity agent, this can be done by running the following command in the Empire client:
interact <AGENT-ID>/<NAME>
The next step is to Invoke Mimikatz on the Agent shell, this can be done by running the following command:
mimikatz
This will invoke Mimikatz on the target system and you should be able to interact with the Mimikatz prompt.
Before we take a look at how to dump cleartext credentials from memory with Mimikatz, you should confirm that you have the required privileges to take advantage of the various Mimikaz features, this can be done by running the following command in the Mimikatz prompt:
mimikatz # privilege::debug
If you have the correct privileges you should receive the message “Privilege ‘20’ OK” as shown in the following screenshot.
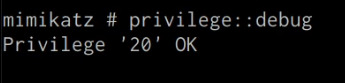
We can now extract cleartext passwords from memory with Mimikatz by running the following command in the Mimikatz prompt:
mimikatz # sekurlsa::logonpasswords
If successful, Mimikatz will output a list of cleartext passwords for user accounts and service accounts as shown in the following screenshot.
In this scenario, we were able to obtain the cleartext password for the Administrator user as well as the NTLM hash.
NTLM is the default hash format used by Windows to store passwords.
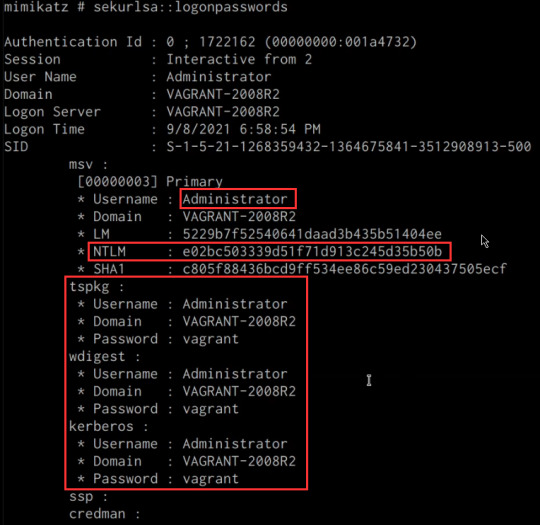
Dumping SAM Database
We can also dump the contents of the SAM (Security Account Manager) database with Mimikatz, this process will also require an Agent with administrative privileges.
The Security Account Manager (SAM) is a database file used on modern Windows systems and is used to store user account passwords. It can be used to authenticate local and remote users.
We can dump the contents of the SAM database on the target system by running the following command in the Mimikatz prompt:
mimikatz # lsadump::sam
If successful Mimikatz will output the contents of the SAM database as shown in the following screenshot.
As highlighted in the previous screenshot, the SAM database contains the user accounts and their respective NTLM hashes.
LSA Secrets
Mimikatz also has the ability to dump LSA Secrets, LSA secrets is a storage location used by the Local Security Authority (LSA) on Windows.
You can learn more about LSA and how it works here: https://networkencyclopedia.com/local-security-authority-lsa/
The purpose of the Local Security Authority is to manage a system’s local security policy, as a result, it will typically store data pertaining to user accounts such as user logins, authentication of users, and their LSA secrets, among other things. It is to be noted that this technique also requires an Agent with elevated privileges.
We can dump LSA Secrets on the target system by running the following command in the Mimikatz prompt:
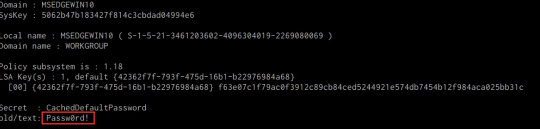
mimikatz # lsadump::secrets
If successful Mimikatz will output the LSA Secrets on the target system as shown in the following screenshot.
So far, we have been able to extract both cleartext credentials as well as NTLM hashes for all the user and service accounts on the system. These credentials and hashes will come in handy when we will be exploring lateral movement techniques and how we can legitimately authenticate with the target system with the credentials and hashes we have been able to extract.
3 notes
·
View notes
Text
Secure Your Future with a Cyber Security Course in Pune
In today’s digital world, cyber threats have become more frequent and sophisticated. From personal data breaches to corporate ransomware attacks, cybersecurity is now a top priority for individuals and businesses alike. If you’re looking to build a career in this critical field, enrolling in a Cyber Security Course in Pune is an excellent step toward a promising and secure future.
Why Choose Pune for Cyber Security Training?
Pune is one of India’s fastest-growing tech cities, home to several IT companies, startups, and global MNCs. With a thriving technology ecosystem and reputed educational institutions, the city offers a strong platform for learning and employment. Taking a Cyber Security Course in Pune provides access to expert faculty, real-time projects, and exposure to industry-standard tools.
Additionally, Pune's cost-effective living, excellent infrastructure, and student-friendly environment make it an ideal location for aspiring cybersecurity professionals.
What Will You Learn?
A Cyber Security Course in Pune typically covers a wide range of topics designed to equip students with the knowledge and skills required to combat cyber threats. The core modules often include:
Fundamentals of Cyber Security: Understanding networks, threats, vulnerabilities, and risk management.
Ethical Hacking: Learning penetration testing techniques and tools used by ethical hackers.
Network Security: Securing network infrastructure, firewalls, and intrusion detection systems.
Cryptography: Studying encryption algorithms and data protection methods.
Incident Response and Forensics: Detecting and responding to security incidents with forensic techniques.
Courses also offer hands-on training with cybersecurity tools like Kali Linux, Wireshark, Metasploit, and more—making learners job-ready from day one.
Who Can Enroll?
A Cyber Security Course in Pune is ideal for IT professionals, graduates, system administrators, ethical hackers, and even beginners with a keen interest in technology and security. While basic computer and networking knowledge can be helpful, many beginner-level courses require no prior experience.
Institutes in Pune often provide flexible learning options such as weekend batches, online courses, and corporate training to cater to different learning needs and schedules.
Career Opportunities After the Course
Cybersecurity professionals are in high demand across sectors like IT, finance, government, e-commerce, healthcare, and defense. After completing a Cyber Security Course in Pune, you can explore roles such as:
Security Analyst
Ethical Hacker
Cyber Security Consultant
Information Security Officer
Network Security Engineer
With Pune’s booming tech scene, learners have access to internships and placements with leading companies, ensuring a smooth transition from education to employment.
Conclusion
A Cyber Security Course in Pune https://www.apponix.com/cyber-security/cyber-security-course-in-pune.html is more than just a learning program—it’s an investment in a secure and rewarding career. With increasing reliance on digital platforms, the need for skilled cybersecurity professionals continues to grow. By choosing the right course in Pune, you gain both the theoretical foundation and practical expertise required to protect digital assets and make a real impact in the world of technology.
0 notes