#like my options are to make it myself or buy a frozen microwavable version
Text
I hate cooking at home because my parents always want to taste what I'm making and then I spend the whole time terrified it'll taste bad
#if it tastes bad and its just me thats okay! ive eaten worse lol ill live#but esp when im making food my parents have never had#like im making indian butter chicken for dinner (for ME to be clear) and they want to try it#but they've never had indian before and im worried this recipe won't be very good and they'll try it and not like it#and thus judge me everytime i cook indian food in the future#i live in a super white and super tiny town so i can't just. order indian food or anything to show them it tastes good either#like my options are to make it myself or buy a frozen microwavable version#god i fucking hate it here#i realize this seems a bit dramatic but when you're making something for the first time and it turns out badly#and your mom calls you stupid for thinking it would taste good#it makes me quite afraid to try new things in the future!!!!!!!!!! i cant wait to fucking move out#and it wont even be anytime soon. jfc
1 note
·
View note
Text
When I’m feeling depressed, it can be nearly impossible to take care of myself, and that includes eating. Here’s a list of some foods that require little to no effort (aka: can be eaten right out of the package or just need to be microwaved), mainly for my personal reference, but also so others can find easier alternatives when they’re struggling.
Water bottles or canned water - stay hydrated!!
vegetables - green beans, peas, corn, black/kidney/pinto beans, chickpeas (all canned or microwaveable frozen bags) - I’ve also tried Harvest Snaps, which are baked snap peas & they’re v good
Fruit - grapes, raisins (or any other dried fruit like apricots/dates), mandarin oranges, apples, applesauce cups, bananas, pears, peaches, etc. (most fruits require no prep anyway, but especially if they’re canned - you can also buy frozen bags)
Canned soup or chicken, beef, or veggie broth
Pasta (ramen, spaghetti, mac and cheese, chow mein) or instant rice are my go-tos. You can buy these in individual cups or bulk packs.
Any microwaveable food - frozen/tv dinners, burritos, toaster strudels (they make an egg bacon & cheese version too!), mini pizzas, breakfast sandwiches… there’s a lot you could do here :)
Dairy - Yogurt, cheese sticks, (or just straight up eat cheese slices, there are no rules here), cottage cheese, almond/oat/soy milk, powdered milk (if you want something shelf-stable)
Grains & carbs - cereal, crackers, chips, popcorn, toast or bagels (I’ve eaten plain bread before tbh and it kinda slaps), Oatmeal (these packets are dinosaur themed & have little sugar eggs!! - https://www.quakeroats.com/products/hot-cereals/instant-oatmeal/dinosaur-eggs)
Nuts - peanuts, peanut butter, almonds, cashews, walnuts, trail mix, etc.
Meat - deli turkey, trail bologna, spam, jerky, frozen chicken strips or nuggets, Morningstar vegetarian corn dogs, canned tuna
Eggs
Fast food or take-out is also a good option if you don’t feel like making anything yourself.
A little tip - most foods you would take on a camping or hiking trip are great! for some, all you need to do is add water & heat it up. they are usually on the expensive side, though!! here’s some I’ve found that are decent:
https://mountainhouse.com/
Things to keep on hand for particularly bad days:
Boost/ensure/Soylent - liquid meals for when the idea of chewing or mixing anything is too much.
disposable cutlery/bowls/utensils so you don’t have more dishes to worry about.
Multivitamins
Liquid IV, Gatorade, or some other form of electrolytes. It’s too easy to get dehydrated!
If you do have a little energy to cook or make something, here’s some ideas:
If you have a blender: frozen spinach + frozen banana + shelf stable almond milk + peanut butter makes a great smoothie.
frozen fruit + frozen spinach/kale for smoothies
Adding whey protein makes it more filling.
dried pasta + jarred pasta sauce (Rao’s is low sugar and awesome, but pricey) + frozen meatballs
Boil tortellini on hand. Its as easy as boiling water. You can eat it plain, add a spoonful of pesto, sprinkle with a little olive oil or butter and some garlic salt, or pour it back in the pan after draining and add a little pasta sauce
frozen fried rice + frozen stir fry veggies
favorite frozen protein and veggies for sheet pan meals
canned refried beans with a tortilla and some cheese to microwave, can add extra toppings too
oatmeal + pb + dried fruit of choice
rice cakes + pb + jam (or substitute bread if you have it)
Rotisserie chicken in a salad, soup, sandwich or wrap
Frozen salmon with some veggies
air fryer foods - chicken nuggets, tenders, fries, etc. You can also toss different vegetables (baby carrots, Brussels sprouts, etc.) in a little olive oil and throw them in there
chicken broth & frozen dumplings - you can dress it up a little with some miso, soy sauce or other seasonings. You could also add some frozen vegetables.
snack type food - a combination of canned Garbanzo beans and black olives. The olives are salty enough that you can get low sodium beans and it will still taste good.
A lot of these ideas I stole from the good people of Reddit (particularly r/depressionmeals)!Here’s the post I referenced if you’d like to look further into it:
#tw depression#food mention#depression meals#meal ideas#major depressive disorder#major depression#depressive episode#depression episode#mental heath support#mental health#mental health awareness#mental health advice#mental health and wellbeing#coping
32 notes
·
View notes
Text
Nigella's Bhorta, Amended
hello, sweet void. i've missed you.
the past two years (i keep reminding myself as i face my next birthday, two years) have taken its toll on us all, demanding payment after so long of getting through it, keeping it together, being brave. cooking hasn't been a feasibility for me lately, with exhaustion finally taking over, folding my body in half and demanding time, time. on the nights i have been able to drag myself off the couch and stand at the stove, i have been making what i like to call Kids Menu Dinners, where I cook a bunch of frozen stuff in the oven, heat up some peas in the microwave and enjoy the soft comforts of beige kinda-food.
lately, i've been trying to listen to the exhaustion, instead of trying and failing to shuck it off, and trust that this isn't forever. part of that is being okay with eating off the Kids Menu most weeknights. another part of it is learning how to make Kids Menu food secretly grown up, nutritious and fancy.
i've been making Nigella's Fish Finger Bhorta, Amended, for the past year and I want to share my heartier version. it's a cheap and versatile make, leaving behind minimal dishes. My favourite part is that it takes no longer than my last-resort oven dinner, and it gives me something chill and noodly to do while i'm waiting.
The result is a warm salad of sorts. it is unfailingly comforting, with flavour in every bite and packed with so much colour- dark green, gold, orange, bright pink. it honestly makes me happy.
I have listed some ingredients below- please know that this is an approximation, my interpretation of nigella's original. for instance, i call for red onions because i never buy brown onions because i like the colour of red onions. i am a nonsense person. please feel free to use this as a base for a dish suited to your life, your nonsense.
Ingredients (serves 2)
4 frozen breaded fish fillets
two big sweet potatoes, roughly chopped/diced
two red onions, sliced so so thin
a big pinch of chilli flakes
a load of squeezy ginger
a load of squeezy garlic
a little yellow mustard/some mustard seeds
salt and pepper
a big big handful of leafy greens (spinach is my go-to)
Optional: Pickled Pink Onions That Taste Like Meanies
one more red onion, also sliced very thinly
vinegar (any, in my experience, will do).
The Recipe
1. pre-heat your oven to the heat specified for your fish
2. prepare your potatoes. i dice my sweet peets, spread them out on a baking sheet with a bit of oil, salt and pepper and it goes into the centre of the oven for about ten minutes before the fish.
3. You can use these ten minutes to prep your onions! slice your onion lengthways, right down the middle. with each half, you'll see the rings now form lil semicircles. gently slice tiny crescents, taking your time- the thinner these slices, the easier they'll caramelise, which is what we'll be looking for. take one of the sliced onions, and pop it in a jar/bowl with vinegar (i use white wine vinegar, because it's what i have.) set this aside.
4. When both onions are sliced, put your fish in the oven and set your timer for them according to the package. During this time, we will be engaging in some low-level alchemy.
5. Get yourself a wide pan or a wok, and pop it on a medium heat. get your spices ready while the oil heats up, and when it just barely starts to shimmer, dump in the onions, chilli flakes, garlic and ginger. Turn your heat all the way down low.
6. Stir, and stir. listen to the sizzling, enjoy the acrid scent of the onions as it gives way to a soft, fragrant sweetness. Open a can of beer, or a fizzy situation, and enjoy this time. be mindful of sticking- the aim here is to cook these babies on low so that they become incredibly soft and sweet. check on your sweet peets every now and again, occasionally shaking the tray a bit.
7. Keep on mooching until your timer is nearing its end. Then, get your spinach and add it to the pan, stirring and allowing it to wilt into all the flavours of the onions. Keep your pan on low, this is not a high-pressured cook. Once your spinch is wilted, taste and season to your liking. I sometimes pop in some more garlic here, because i am a straight-up fiend.
8. Once your sweet-peets are cooked, add them to your pan, stirring them through the spinach and the onions.
9. Once you are happy with your fish and the coating is lovely and golden, use a spatula/butter knife to chop them up a lil bit, being mindful of the baking tray. then dump them into the pan and stir again.
10. Look at your beautiful mess!! lump it into two big bowls. Serve with your pink pickled onions, lemon juice and mayonnaise. Enjoy this amazing thing you have made!
#oats#writers#writblr#recipes#cooking#baking#food#food writing#breakfast#dinner#nigella lawson#bhorta#pescatarian
2 notes
·
View notes
Text
Homecookings [Apr. ed]
Hi friends~
Due to the home-cation during the 1st little bit of April, I actually had time to do more ‘extensive’ cooking/posts so the content in this post will be quite limited...
But here we go!

Good ol’ spaghetti + PC brand flatbread (the chicken one that I didn’t enjoy......)
This was an interesting snack. Have you tried shrimp crackers by Nongshim brand? This had similar vibes to that but thinner chips & a diff ‘taste’ bcos it’s fish-flavoured haha I got a bag for myself, & also gave a bag to the nieces so try. They did not like this! I thought it was okay; not my favourite but I finished it all anyway. It was my Penthouse snack :P
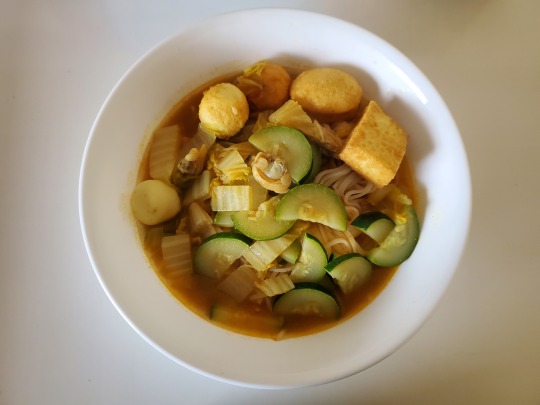
I don’t know why I thought this package of zucchinis was cute. ..

I have deonjang (Korean soy bean paste) soup with the zucchini, tofu, imitation lobster meat, & underneath that, there was also some napa cabbage. To add some extra flavour, I added gochu powder & some salted shrimp sauce.
Another zucchini in soup lunch.. . no, I’m not on a diet haha I actually had more of this soup in my pot; I just scooped out this much for the photo. For this soup, I had zucchini, tofu, imitation lobster meat as well as fish cake. I personally liked this one better than the previous. Some ppl may not like it bcos of the added fish cakes, making the soup “fishy” but I am a huge fan of the fish cakes! Paired it with some radish & injeolmi!
[where my injeolmi came from] This was from the small bakery section at the U of A location of Hmart. I haven’t had injeolmi for such a longgggg time.
Breakfast after a long stretch >.< I needed to reward myself haha
Jjajang-ddeokbokki. Instead of the traditional spicy version of ddeokbokki, I’ve been making this more often nowadays (aka the black bean sauce version). This has become one of my regular lunches bcos I’ve figured out a way to cook this so that when I microwave it the next day, the rice cakes are still chewy (not soaked/soggy). I have tried bringing the regular spicy ddeokbokki for lunch before & for some reason, it just. .. never worked out the way I wanted it to be. I’ve tried diff brands of rice cakes etc... I’ve experimented with it a handful of times. However, it seems to work with the black bean sauce o_O I’m not sure why. This is the day-off lunch version but basically if I’m making some for work lunch the next day, I actually undercook the rice cakes & save the extra sauce in a separate container. Before I head out to work, I pour the sauce into my rice cake-containing container (to prevent overnight soaking). & while I’m at work, I heat it up like.. . hardcore! For like 3mins... (bcos some microwaves at work are old & not very ‘strong’). The rice cakes are bouncy & while it’s being microwaved, they actually take up some of the liquid/sauce! SUCCESS!!!
Another drama snack~ This was my snack while I was watching the Kdrama “Cheat On Me, If You Can.” Not as good as Penthouse but I was also really into it & finished it in a few days. This snack was interesting- while the flavour was meh, I was actually in love with the shape/texture. It was rotini-shaped, & the texture was puffy!

Beef seasoning~
Yes, more zucchini. .. I legit ate all 3 by myself over the span of 4-5 days haha oh no, my mom used about half in a stir-fry one evening so I guess I ate 2.5 zucchinis. Anyway, I used the above beef seasoning for this soup that consisted of zucchini, napa cabbage, regular green cabbage, minute amount of onion. Yes, it was vegetarian.
Laksa vermicelli noodles. YES MORE ZUCCHINI! I swear this is the last one lol but I needed to use it up bcos prior to cracking open the saran wrap/packaging, it was actually sitting in the fridge for almost a week already so I needed to use it all up like fast! Anywho, I threw away the package of laksa soup base that I used here but it was by the Asian Home Gourmet brand. I used the entire package, diluted with half:half chicken broth & water for my soup. It was delicious! For toppings, I had my zucchini, napa cabbage, baby clams & a variety of fish balls.

This was interesting. I will likely make this again NOT bcos it was particularly “tasty”, but iuno. .. the combo of textures was just great! I had buttered toast, a single layer of yellow radish, mashed up imitation lobster meat (did not add anything to it), & then furikake. It was like crunchy & soft, & just, overall, a burst of diff flavours in one bite!

Korean fried chicken by MEEEEEEE~ I have gotten rid of the double-frying practice bcos it takes too long & too much effort. Now I do the wet-dry batter method, & the outcome is equally as crispy! ^^
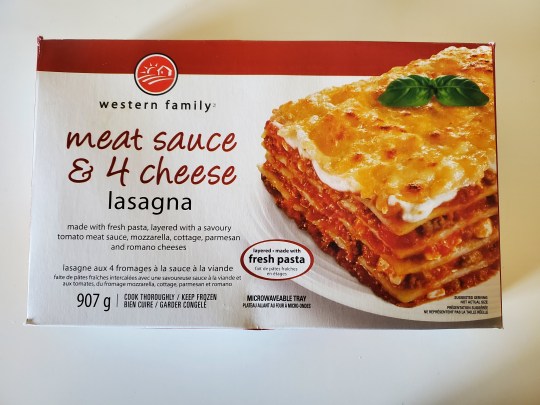
If we buy these frozen lasagnas, it’s always the PC brand, but we have this Western Family brand this time.
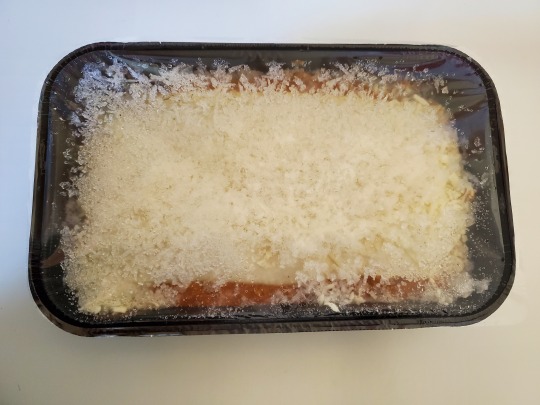
Looks like this... o_O wasn’t impressed.. . Why is there so much ice!?
I don’t have a finished photo bcos it was so sad... why?

I used microwave method, & . .. it turned out to be such a big mess =( it become so liquid-y & everything was just. .. melted down. I think it was bcos of the water content, plus the extra ice that dripped onto the pasta. Anyway, flavour was good but nothing crazy! Will be sticking to the PC brand :P

My version of mapo-tofu. I have satay sauce + bulgogi sauce, diced green cabbage, eggplant & tofu! Topped with a gochu powder~ YUM!
& now I wanna talk about my vaccine with you all~ if you’re not interested, check out my Etsy shop here instead! https://www.etsy.com/shop/OneOfAKo
Okay, so my vaccine story.. .
1st of all, a little bit of background in regards to my province’s C*vid situation .. . long story short, it’s NOT good. To be fair, I’m in-and-out of tuning in to the daily updates; I look once every few days &. .. yeah, it’s just NOT good! We are hitting record numbers; surpassing the worst numbers in the 2nd wave.. . I don’t get it >.< I’m not sure why the numbers are so high despite ppl are getting vaccinated *shrugs* but I think everyone should go get vaccinated if you are eligible to!
Right now, in this province, there are 2 routes of getting vaccinated: select pharmacies & via provincial health services.
When I was eligible to book (I’m in health care but not front line so I just got the eligibility this month!), I went thru the pharmacy options that were closest to me. Why? Bcos it was convenient by location. I read into it a little more, & realized that I’ll be placed on a general waiting list. I ended up signing myself up for 1 pharmacy, where the location was TBD until they actually confirm my appointment, which they say, could be weeks to months down the line! O_O In any case, I just left it as is bcos there was no way to cancel being on the wait list.
In the meantime, immediately after I did the pharmacy registration, I went on the AHS website. Did the questionnaire & got the ‘final page’, where they gave a date/time option with a 10minute timer running so you have 10 minutes to finalize your booking. Except when I hit “confirm”, the next page said, “this time has been taken”. So I had to go thru the whole process again. And again. I clicked the “confirm” 3 times, & finally got a date/time for my vaccination! YAY!
Went to my vaccination appointment ~10mins before my scheduled time. There was a "greeting” table, where I was required to change into a new (provided) medical mask. Then I was instructed to line up for the sign-in table, where the staff at the desk asked for my 2 pieces of ID. I was also given the vaccination record form. After that, I went into another line to actually enter the vaccination room. At my location, it was a small-ish room with about 10 vaccine administrators. There was a girl who was monitoring the “ppl flow” from the line to the vaccination station. A little more info was given by my administrator, & a final “do you want to get the vaccine today?”. The shot itself was short, & to me, painless. Then everyone had to move to a waiting room, where we had to wait around for 15mins to make sure we don’t get an allergic reaction. This room was the PROBLEM! It was SO small & spaces between chairs was only about a meter! It was stuffy in the mask AND in the room. I could FEEL it. It was very bad! & worse of all, the number of ppl who got their vaccines exceeded the number of ppl exiting the room, so when I was there in a chair, there were ppl standing along the wall & the room got even more crowded. This part was the worse part of the experience =/ 15mins done, & I was able to leave!
So yeah, glad to have the privilege to be vaccinated (about time!), but I don’t know why our numbers keep climbing >.< Cooperate, ppl!!!
2 notes
·
View notes
Text
Avengers PSAs: On the COVID-19 Pandemic 5: Food!
Clint was leaning back against the kitchen island in purple argyle pajama pants and a black T-shirt.
“Hey,” he said, making the salute-like ASL sign for hello as he did. “Clint Barton, AKA Hawkeye or 'that random guy with the bow an arrow who hangs out with the Avengers' here to talk about grocery shopping and cooking during these quaran-times.”
He grinned at his own pun, then continued, signing to the camera to follow him. He pushed off from the island and walked over to the pantry and the two large refrigerators that flanked it. “Whether you're ordering your groceries for delivery or suiting up in your mask and gloves to brave the stores, you need to shop according to what kind of storage you have and you preferences as far as what you'll actually cook and what you'll actually enjoy eating.
“Now what I mean by shopping according to your storage is things like, if you have a lot of freezer space—maybe you have a freezer chest in the garage because you hunt, or you have a minifridge leftover from college that you can set cold enough to use as a freezer—then stocking up on frozen food is a good idea. If you don't have a lot of freezer space, then you can't stock up as much on frozen food and need to focus more on shelf-stable things like dry good and canned goods.
“The point is to be able to have enough food in your home that you can make three meals a day for your whole household for at least a week without having to go shopping and without things going bad before you can eat them. That kind of big stock-up grocery run gets expensive fast, and a lot of people aren't working right now or have their hours cut, so it can be hard to afford the kind of stocking up we all need to be doing. To help mitigate that and make things easier for others in your community, if you can afford to buy the more expensive versions of some foods, do so. Leave the less expensive options on the shelves for the people who can't afford anything else.”
He moved farther into the pantry and he segued subjects a little. “If you're not much of a cook or if you're particularly busy right now—working in essential industries, working from home, trying to homeschool your kids, whatever—then you need to focus more on prefab food, stuff you can just shove in the oven or the microwave or stick on the stove for a minute and be done. If you do like to cook or you've decided your quarantine activity is gonna be learning to cook and you have more time, then you should focus more on getting ingredients for cooking from scratch. Everyone should have a mix of both, though, and there are certain stables everyone oughta have on hand.”
He grabbed a box off a shelf, tossed it over his shoulder, caught it as he turned around, and held it out for the camera to see. “Noodles. You want noodles. It doesn't really matter what noodles. Dry pasta is great because it's extremely shelf stable, it keeps forever. I've eaten pasta that was a year past the date on the box and it was fine.
“I know a lot of stores are running low on boxed pasta, so maybe now's the time to try that lentil based pasta you've been eyeing suspiciously for a while, or get some tiny pasta like orzo, stelini, or even couscous that you usually avoid because they're not really noodles.” He put the box of pasta back on the shelf. “You can even make your own pasta if you really want to or you're really desperate. But if you have noodles—or pasta, same difference—you have a meal. Cook a whole batch to eat with sauce for spaghetti night, then save the leftover noodles, fry them up in a pan with some butter, scrambled eggs, and cheese tomorrow for lunch.
“On that note, you want eggs unless you're allergic—or vegan, I guess—and you want your dairy staples: butter, cheese, and milk. Butter and cheese both keep a long time in the fridge, especially hard dry cheeses, but milk is iffier. You canfreeze milk to make it last longer, just shake it up real good when you thaw it out, but you can also get UHT milk—ultra high temperature—that's been heat-treated so you don't have to refrigerate it at all until it's opened so you can keep it on the counter or in the pantry.” He looked around a little. “I don't think we have any UHT milk for me to show you or I would. Stark's bankrolling us, as usually, and we're doing what I mentioned earlier about buying the more expensive stuff if you can afford it, and, well, Tony can afford anything, so we've been getting direct delivery from a local dairy farm once a week—it's in glass bottles, Steve and Buck are thrilled, it's cute. Anyway, another thing you can do is buy a gallon of milk, buy some powdered milk, once you've used half of that gallon, mix up half a gallon worth of that powdered milk with cold water, add it to the half gallon you had left. Boom, whole gallon of milk again, and I promise it's not weird and watery seeming like if you just reconstitute powdered milk by itself. It's good.
“You also want rice, shelf-stable protein like canned tuna, or these funky little packets,” he held up a pouch of lemon-pepper flavored tuna, “stuff to snack on like crackers and whatever you like on crackers, and bread—which is something else you can make yourself, seriously buy some flour and get your bake on, kneading bread is a great way to work out your frustrations.” He smacked a large bag of flour, caught it as it threatened to fall off the shelf, resettled it, and flashed a thumbs up.
It cut back to Clint in the kitchen, sitting at the island now. “For the sake of your own sanity, it's also important to make it where feeding yourself isn't just a chore and you actually enjoy your food. There's a lot of little things you can do that will help with that a lot even if you're not up to much more than throwing some ramen in the microwave.”
A package of Yaki Soba slid quickly across the counter right past Clint—a slivery blur flashed behind him, kicking up a breeze that ruffled his hair, and Pietro caught the package before is skidded right off the end of the island. “Sorry,” Pietro grinned sheepishly as he handed the Yaki Soba to Clint, “my bad.”
“I knew I should have asked your sister,” Clint teased. He rolled his eyes as Pietro ducked back out of frame, then held up the Yaki Soba for the camera. “If you're gonna have one of these, take two seconds before you make it, dig through your fridge, add a little soy sauce or teriyaki sauce to the water before you cook it, give it some flavor. Toss some shredded carrots, coleslaw mix, or even canned chicken in there. Make this stuff be real food instead of I'm-trying-to-feed-myself-in-my-dormroom sadness with minimal effort.”
He tossed the Yaki Soba out of frame, presumably to Pietro, and a plushy hotdog got tossed back to him. He caught it easily. “Hot dogs are great, easy and fast to fry up in a pan, but kinda meh on their own, so have some potato chips or shove fries or tater tots in the oven. Make some chili and have chili dogs.
“Speaking of chili….” He tossed the plushy back and a jar of Prego pasta sauce slid to him—it stopped a little short and he leaned forward to grab it. “We should have practiced this. Anyway. Jarred pasta sauce is totally fine, but you can use it as a spring board for excellent homemade sauce. Brown some ground meat in the bottom of a pot, put some onion through a food processor, cook it in a big pan, add some garlic, process some more veggies, any veggies, add them and some wine to the onions, once that's cooked down, add it all in with the meat, pour in some store bought sauce, feast like a god. I'm not even kidding, Thor loves this stuff, I made a whole vat of it last week. It's easier to do in bulk and it freezes well. Andyou can split some off, add beans and spices, make yourself some damn good chili. I'll post a recipe with actual measurements and stuff.”
He slid the jar of sauce back and caught a box of dry noodle soup mix that had been thrown directly at his face. “Make this stuff with more noodles—if your extra noodles take more than 5 minutes to cook, put them in the water first, then add the soup mix when ther's five minutes to go. When it's almost done cooking, like a minute left, pour in a scrampled egg or three. You've got egg drop soup, white people style.”
He tossed the soup box back and Pietro threw a pack of premade pizza crusts to him like a frisbee. Clint fumbled it a little but didn't drop it. “Make your own pizza! You can get these flatbread rounds to use as crust, or you can make your own dough—if you have a bread machine, it will make the dough for you. Then, put whatever you want on your pizza. You can go traditional with red sauce, cheese, and pepperoni, or you can get feta, pre-cooked grilled chicken, olives and artichoke hearts—Tony likes that.” He gestured off camera. “The wonder twins over here like carrots on their pizza; I'm not gonna question it. Natasha made herself a bacon mac'n'cheese pizza for breakfast today.”
He flung the pizza rounds away and, judging by the thwap sound, no one caught them. “Just, think about your food. Have fun, experiment, sing while you cook, plan before you go shopping, don't feel like you have to settle for spaghetti-o's and cereal just because you're stuck at home. And, hey, tell me what you're cooking, what you like on pizza. Stay home, stay safe, stay well fed. From me, and Pietro, and the rest of the Avengers—thank you.”
He signed thank you as well and waved before the video went black.
#PSA#Avengers#Marvel#coronavirus#covid19#covid-19#covid_19#clint barton#HOH!Clint#hawkeye#food#cooking#quarantine#quarantimes#advice
1 note
·
View note
Text
How I Ate During College
Since winter is here, the government shutdown is happening, new semesters have started and the like, I thought I might share what helped me during my time at college when money was low and food needed to be eaten. I’ll put it under a read more just in case.
I also implore everyone to look around their campus for some sort of Dollar Tree/General/Dollar Store type place. Never be ashamed to shop here. Based on my personal experience, most of the items I talk about here are available at these places (sometimes even in sets or small bulks) and... well, it’s food.
Please keep in mind, these are the methods that worked for me (and my roommates.) I can’t promise this is a “fix all” situation, but it may help you save money and give you meals when you need it most.
I didn’t mention frozen/tv dinners from the Dollar Store on here, but keep in mind, those aren’t bad ideas either if you have a proper means of storing them.
Ramen Noodles - just the noodles (the important information is in the details)
I know this is a bit of a “staple” but hear me out. When my family lived in California, we were broke as fuck. We didn’t have a lot of money and spending it was a long, coupon-intensive, very careful thing. Ramen noodles are a god-send. The noodles are cheap, and no rule says you need to use the salty flavour packet that comes with them.
If you buy a few packets of ramen noodles (that generally retail somewhere between 10-30 cents, you’ve got a single meal in that packet of noodles. Sometimes two if you’re like me and have a tiny stomach.
Things that can be added to ramen noodles:
- Spaghetti sauce: any jar of spaghetti sauce can make you about 10 servings of spaghetti if you’re using Ramen noodles. If you’ve got a microwave (or your roommate does) then you can even warm it all up a second time once it’s done. (To my knowledge, most universities offer some sort of kitchen/warm water access/microwave in a lobby and/or kitchen area of some sort. But again, assuming you or your roommate have one, that’s a bonus and one less trip.)
- Cheese: shredded cheese, if you watch it, goes on sale a lot. I never really noticed this UNTIL college, but it makes a surprisingly good addition to noodles. Cheese is, of course, by your choice and by a sale if you do not like the spaghetti sauce method.
- Fruits and/or veggies: Canned or fresh. Again, this is up to you. A lot of times, you can buy quite a few of the “choose your own” veggies for a decent price. I know green beans aren’t exactly the “go to” for favourite veggies, but they are lightweight and you can get quite a few for cheap. Veggies mix well into noodles, and that’s more nutrition for you.
- Canned Tuna or Chicken: This is another one that’s nice; especially when you only use a portion of the can in your serving of noodles. It fills you up a little more while giving the noodles some flavour and still sticking to something you can preserve in your roommate’s fridge (i.e - the tuna/chicken you don’t use for one meal.) This is, admittedly, a little more time sensitive. You’ll be having tuna/chicken noodles for a few days, but it IS food and it is something more filling than nothing at all.
Hot Beverage of choice (Dollar Store recommended)
Never underestimate the value of a warm drink. Especially in the cold. Hot cocoa, tea, coffee, etc. These can almost always be bought at Dollar Stores in some sort of “instant” form. Even if that hot cocoa tells you to make it with milk, fuck that. Yes, it’s “creamier” but it works just as well with hot water. It warms you up, helps fill you up, and it does give you something other than just water to drink. Tea and coffee will always be the healthier choices, but chocolate has always proven to be a comfort, especially when it’s warm.
Warm drinks make a perfect study companion or even just something gentle and warm to hold and sip while you’re stressed. This one is, of course, optional, but I can’t tell you how many times a hot drink helped me calm down or saved my sanity during a stressful time or study binge. Not to mention it’s easy -- water, mug/cup, powder, stir, good.
Malt-o-Meal Cereal (I.E - generic cereal)
No matter where you shop, generally, if you go to the cereal aisle and ignore all the name-brand boxes, you’ll stumble across these big-ass bags of cereal with familiar shapes and looks, but weird-ass names.
Trust me when I say, this bag is worth if if cereal is your game. Not only are they MUCH bigger than those cardboard boxes (and usually go for the same price or even lower) there is a LOT of cereal in those bags. Yes, it’s generic, and yes, it may taste slightly different, but I promise you, it’s rarely ever bad. If it LOOKS like Cinnamon Toast Crunch, the biggest difference may only be that it’s slightly less cinnamon-y.
Cereal can be eaten with or without milk (almond milk, soy milk, etc.) Granted, some cereals taste better dry than others, but in the end, it is a meal and I would frequently say “forget it” toss a bunch of cereal into my Dollar Store ziploc baggy and I’ve have something to snack on during classes for most of the day.
Water Bottle - Hard, reusable, plastic, etc.
This one will be a little more pricey at times, but trust me when I say this item is so very worth it. All university campuses have water fountains. All bathrooms have sinks. I know that some areas (coughcoughFLINTPLSHELPFLINTcoughcough) don’t have access to fresh water right now, but if your campus offers it, get yourself a good water bottle that you can safely reuse. Water will keep you hydrated. Don’t neglect this. I ended up in the ER twice during my university years (thank you parent’s insurance) because I neglected liquids and ended up dehydrating myself. It was terrible.
Powder Drinks (following up the above)
This goes hand-in-hand with the suggestion above. Dollar Stores (and grocery stores) always carry something like this Country Time lemonade thing here. This one happens to retail for $2.50. However, when you are only using a 1-3 spoonfuls (depending on the size of your water bottle) you’re going to have that container for a VERY long time. (And they don’t spoil for a SUPER very long time. Perks.)
I once made one of these amazing little containers last me three semesters (1.5 years.) I didn’t need to use it sparingly either. I just happened to enjoy a lot of lemonade during that time when water was driving me wild. The same rule goes for things that come in a similar container -- strawberry Lemonade, some Kool-Aids, fruit punch, etc.
MAC AND CHEESE!!!
This one SAVED me. If you want to go with the boxes, that’s fine. Individual Microwave Cups? Those work too. Even if you just use the box version, it can all be prepared in a microwave and, holy shit, does it work.
Personally, I was lucky enough I had access to the individual microwave cups. Those were easier for me. Even if you don’t use the cheese powder, you’ve got noodles and you can follow the same idea as Ramen (hot water and something to mix in.)
When I was in college, I would buy canned tuna (sometimes chicken) and mix it into the individual cups with the cheese. not only was it more nutritious, it was more filling. Yes, it sounds REALLY WEIRD, I get looks of disgust every single time I try to mention it to someone, but damn, it’s better than it sounds and it works so well.
Generally, I would either portion the tuna/chicken can into halves or quarters per-cup, depending on how hungry I was. The meat would go in after I got the mac & cheese ready, mix it all together, good to go.
OPTIONAL ADDITIONS:
- packet of mayo and/or mustard to taste.
- a little salt if that’s your gig.
Most of the time, I would put some condiments or swipe packets of sugar/salt from the cafeteria. Generally they had some sort of cup you could put ketchup or mustard or whatever in for taking to the table with you. I’d fill one up with what I needed and sneak it out carefully in a pocket, wrapped in a napkin. (or just walk boldly out and no one stopped me because it was literally just a condiment, but.) I don’t know your campus rules/how your eatery is set up.
Also, I know some campuses use like... glass/reusable sauce cups. Please return those after you empty them. It’s good for the environment and... polite. I know my campus used ALL washable dishes. I ended up swiping an entire set of silverware (a fork, knife, and spoon) to use in my dorm and then at the end of the year I returned them. But that’s off topic.
PEANUT BUTTER AND BREAD
Never underestimate the filling value of peanut and/or nut butters. Peanut butter tends to run cheaper, but I know nut allergies are out there and sometimes almond butter or another type of “nut butter” is better for you.
Dollar Stores generally have several different types of bread, with the more generic brands running you $1.00-$1.50.
Most loaves of bread get you about 18/19 slices of bread. That’s 9 sandwiches. Put some nut butter in there, not only are you getting proteins, but nut butters are very filling. And they last quite a while. You can slather some nut butter on both sides of the bread, and BOOM. You have a filling sandwich.
Though... you will need a drink with it. Nut butters DO tend to make you thirsty. A small bummer, but it will fill you up.
(Nut butters and breads also do not require refrigeration if you and/or your roommate don’t have one. Or if the house doesn’t have one working in general, but you catch my drift. Jellies/jams are also available at Dollar locations, but that is a bonus if you can afford it and/or want to treat yourself. They tend to need the chill, however.)
OATMEAL
Personally, not my favourite because I don’t like the texture, but it has a shitload of flavours, only needs hot water to prepare, and can be bought for cheap in bulk. It can be bought in a container (usually 18oz or bigger) or in boxes of packets (7-10ct seems the average for non-value packs.) Which you buy is a matter of preference. I found the packets easier since it wasn’t my favourite or a “go-to” meal.
Oatmeal is fairly self-explanatory though, so I apologise this section is small.
(It is, however, another thing you can add “extras” into such as a sliced banana, strawberries, and various fruits. Even a dash of cinnamon can help make and oatmeal fantastic. These are, however, extras, and something to consider if your budget allows it. Though I stress the ‘extra’ part. They are not required to make oatmeal good.)
Also there is still that oatmeal out there where the heat of your water can make the little sugar-eggs hatch into dinosaurs. DINOSAURS!
Bananas and apples can be bought for a few cents as a single item (one banana, one apple, etc) and with apples especially, you can split them between two bowls. Yes, your apple will turn a little brown, but store it in a Dollar Store Ziploc and you’ll have some extra to add to your next bowl. Brown just means it has gotten oxygen. I would not stretch the same apple across more than a day or two, however.
(Again, this is an “extra” to the oatmeal, but it can be more filling.)
Grain/Chewy Bars.
For me, I generally went with Nature Valley and Fruit & Grain bars. Nature Valley especially because those tend to come in counts of 24 for somewhere between $3-$5. I don’t know the generic version of Nature Valley off the top of my head, but by all means, if that is cheaper, go for it. Generic is good. Generic is just as tasty as name brand. The only major difference is the name. Don’t be ashamed of it.
These are good snacks or sides to any of the above mentioned ideas. They give you a little more in the nutrient department and they’re easy to grab and go if you need something quick to eat. (These are also wise choices to add nut butters on if the flavour allows it. Even MORE filling. And filling is what we want.)
29 notes
·
View notes
Text
11 staple recipes from sports bloggers who work from home A LOT
SB Nation staff have spent years working from home. Here are some of our favorite recipes, for the laziest cooks AND the more ambitious.
We here at SB Nation have been preparing for social isolation for years, in a way. We work all over the country (in fact, the world), and so have gotten quite good at feeding ourselves, thank you very much. To work remotely at an often fast-paced job, it helps to have a repertoire of cheap, easy, fast and most importantly good recipes at hand.
So without much further ado, here’s a look at how SB Nation likes to feed itself so that you can too. These recipes are sorted beginning from low effort* to high, so you can find exactly the meal you need for whatever your situation.
* Not including frozen pizzas and/or fistfuls of chips, which SB Nation also considers part of a healthy diet.
If you need something REALLY easy
Freshly meal service
OK, if you landed on this page looking for easy meals because you can’t or don’t like to cook, I am here for you. About a month before the pandemic hit, I tried out Freshly meal service. Freshly provides single-serving meals that heat up in the microwave in three minutes and I promise you that these actually taste good.
All of Freshly’s meals are gluten free, peanut free, and contain no refined sugars. They’re pretty healthy and my body honestly felt better after eating these meals for two weeks compared to what I typically eat. I promise no one paid me to write this, I just like these meals so much.
Freshly also has tons of meals options to choose from, and the app is so easy to use it’s almost fun. And the best part? No cooking. Just throw these in the microwave and you have a truly tasty meal. I put them on a plate afterwords just to make myself feel like I cooked.
I can’t advocate for it enough if this fits your lifestyle.
— Whitney Medworth
Just throw a bunch of stuff in an Instant Pot
Do you have zero patience for cooking? Do you like tender, pull-apart meats and poultry that falls off the bone? Do you appreciate the danger of using deadly atmospheric forces to imbue flavor to bland meats?
Hoooo buddy, then the Instant Pot is for you. It’s basically a pressure cooker/crock pot hybrid that can give you slow-cooked tenderness in one hour instead of six. Since my cooking philosophy boils down to “chop stuff, put it in a pot, stir occasionally,” this magic food cylinder quickly became a trusted ally in my battle against poorly cooked meals.
Here’s my go-to chicken burrito bowl recipe.
Ingredients
2 pounds chicken thighs (can be boneless or skinless, your call)
2 cans corn
2 cans black beans
2 cans diced tomatoes (adding some salsa here is optional. I throw a bunch of salsa verde and sour cream into the mix after everything’s cooked)
2 cans green chiles (the little ones)
1 white onion
Maybe some chopped bell peppers
A bunch of taco seasoning (or get creative)
Approximately 1/4 cup chicken broth
Start with the broth, then add the chicken to the pot. Coat the chicken liberally with seasoning. Add the vegetables. More seasoning. Stir the mix on top of the chicken. Then seal the lid and pressure cook on high for 12 minutes. It will take longer than that because the machine needs to heat up and then, later, release all the pressure that just made your chicken a juicy damn delight.
If you get the “burn” notice on the machine, transfer everything to a big pot, clean out the instant pot, and try again with more broth at the bottom of the cooking vessel. In the end, you should get chicken that shreds apart when you stir your finished product with a little force. Ladle that beautiful mess over rice (which you can also cook easily and masterfully in an Instant Pot), or in tortillas, or over tortilla chips.
Plus, it reheats well, so you can glean two to three meals for a three- or four-person household. Feel free to play around with the recipe, too. Add what you like. It’s incredibly hard to screw up with an Instant Pot.
— Christian D’Andrea
Simple, good salad dressing
This is the salad dressing that mom my made almost every day when I was growing up, and that I still make because I’m a creature of habit and somehow still haven’t gotten sick of it after 30-plus years.
Ingredients
Diced shallot (to taste, really. I like lots, but let’s say half a medium bulb)
Approximately 3 tablespoons of balsamic vinegar (I eyeball)
A little more than that of olive oil
Salt and pepper to taste
Optional: 1/2 tablespoon (approximately) Dijon mustard
Throw diced shallot at the bottom of your salad bowl. Pour balsamic on top. Sprinkle with salt. You can let this sit as you make the rest of your meal. The vinegar will dissolve the shallot and salt in the mean time.
Whisk in olive oil and crack pepper on top. I do a bit more oil than vinegar, let’s say a 1.2:1 ratio, but really it’s to your taste; some people like the pucker. Throw lettuce in the bowl, mix, and hey look you have a salad. I like to mix in a big dollop of Dijon mustard into the dressing, too, which also helps bind the dressing to the lettuce.
— Louis Bien
If you want to feel like you cooked
Fooch’s spaghetti sauce
Ingredients
2 cans diced tomatoes (14.5 ounce cans — can cut in half for smaller serving)
2 to 3 cans tomato paste (6 ounce cans — depending on thickness you want)
Roughly 1/2 a green bell pepper, chopped
Roughly 1/2 a small yellow onion, chopped
6 to 10 cloves of garlic, minced (feel free to add more)
Some red wine or sherry
Mix of seasonings: Garlic powder, salt, black pepper, chili powder, red pepper flakes, Italian seasoning (can try whatever seasonings you’ve got)
Olive oil
I don’t use precise measurements for the seasonings, the wine or the total amount of green peppers and onions. Pour enough olive oil to coat the bottom of your sauce pan. Heat it up on medium, then drop in the green peppers and onions. Simmer it a bit and then add in the garlic and let simmer a bit longer. Add the mix of seasonings, nothing too crazy in terms of amount. Don’t let the garlic burn.
Add the diced tomatoes, paste and some wine/sherry and mix everything. Add some more of the seasonings. Mix it all together and once you see it bubble a little, turn the heat as low as possible while still keeping the burner on. Stir every 10 to 20 minutes. If I do one of each can, I cook the sauce for a little over two hours. If I cook two of each can, I cook the sauce 2.5 to three hours.
If you have meatballs, drop them in with about an hour left of cooking, and let them cook up in there.
— David Fucillo
A James-Fooch interlude
James: omg i had something planned to write but im reeling at fooch using 2-3 CANS of tomato paste in his red sauce
Fooch: James, worth noting they’re smaller cans. Let me get the oz total
James: i dont care the can size, david. that is too much paste
Fooch: not even a little bit
James: YOU MADE IT WORSE FOOCH.... 12-18 OUNCES OF PASTE ... that’s a either just unde or over a POUND of tomato paste
Fooch: I’m curious to see what kind of runny sauce you roll out there
James’ spaghetti sauce (AKA, the one not cooked up in a lab by a monster)
I had planned to share a unique recipe to separate myself from my colleagues, but after reading how much tomato paste Fooch puts in his sauce I felt an intervention was needed.
When I make a red sauce I like to make a lot of it. It freezes well, and when you put the time and effort in that this sauce requires, you deserve to be able to have some on-hand whenever you need it.
Ingredients
2 cans of whole San Marzano tomatoes (28 ounces each)
1 can of tomato paste (6 ounces)
4 cloves of garlic, crushed
1 yellow onion, diced
1 Parmesan cheese rind
Red wine
2 cups fresh basil
Salt
Pepper
Olive oil
Red pepper flakes
Heat a Dutch oven, or heavy-bottomed large saucepan over medium heat. Add olive oil until it’s shimmering, but not smoking. You can use whatever you have on hand, but I prefer light olive oil for this because it has a higher smoke point. Add the onions and cook until they’re translucent (roughly three to four minutes). Add the garlic and cook until fragrant.
At this point you want to add the tomato paste and red pepper flakes. Stir continuously and watch for the paste to deepen in color. It’s likely you will have some stuck to the pan, and that’s OK — that’s good. Deglaze the pan with red wine, roughly one cup.
Add the tomatoes, reduce the heat to medium-low, and put a lid on the pot — slightly ajar to let out steam. Simmer for 45 minutes to an hour.
Use a potato masher to break up the tomatoes, which at this point should have collapsed and mash easily. Stir the sauce together and add the rind of a piece of Parmesan cheese, which sounds fancy but you’ll have it from any decent hunk you buy. This is also the point when you can add any meat, should you so desire. Brown meatballs, Italian sausage or ground beef in a separate pan, add to the sauce. Simmer for another 30 to 45 minutes.
Remove 10 to 12 leaves of fresh basil, chop and reserve them. Put what remains of your bunch of basil, stalk and all, into the pot and let the sauce simmer for another 15 minutes. Taste, add salt and pepper as needed. Remove the basil stalks and Parmesan rind, remove the sauce from the heat and add the remaining chopped basil just before plating.
If you find the sauce is too thick from reducing, reserve some pasta water from the noodles you’re cooking and use it to thin the sauce. Do not use stock or regular water.
— James Dator
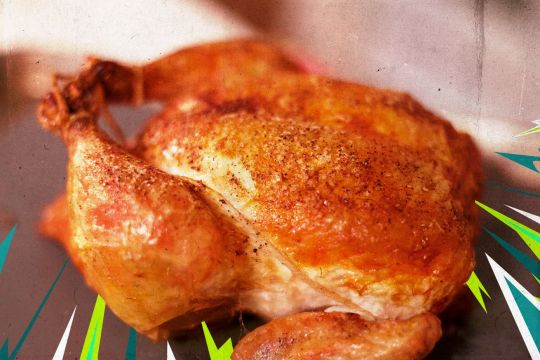
Simple, good roast chicken
The New Best Recipe from America’s test kitchen is cheap, MASSIVE and has taught me a helluva lot about cooking. It doesn’t just list recipes, it explains how those recipes were created by telling the story of failed variations that came before, going into minute detail about almost every ingredient.
The recipe for roast chicken is the most abused page in my copy. Their version solves for a common problem: How do you get the white meat and the dark meat both tasting good on the same bird? Too often, you have to choose: perfect chicken breasts and underdone legs; juicy legs and dry, overdone breasts.
You don’t have to sacrifice anymore. This recipe works best with a v-rack, but if you don’t have one a simple pan will do fine. Just check out the alteration below.
Ingredients
3.5 to 4 pound whole chicken
2 tablespoons melted butter
Salt and pepper to taste
Vegetable oil
With v-rack
Set oven to 375 degrees. While it preheats, pat chicken dry then brush the outside with butter. Season with lots of salt and pepper.
Brush v-rack with vegetable oil and place it in a shallow roasting pan (you can line the pan with foil for easier clean-up). Place chicken wing-side up in the v-rack and place in the oven for 15 minutes. Then, flip the chicken so the other wing is up, and give it another 15 minutes in the oven.
Turn the oven nob up to 450 degrees (no need to wait for the temperature to rise unless you know your oven is particularly slow) and place the chicken back in the oven breasts up. For a chicken on the smaller end, 20 to 25 minutes may be enough. On the bigger end, you may need 30 to 35 minutes. Thermometers are your friend: white meat should be at approximately 160 degrees when it’s done, while dark meat should be at 165 degrees.
Once your chicken’s done, take it out of the oven, let it rest for 10 minutes, carve, and eat. I made this last night and can confirm that both the white meat and dark meat were damn juicy and delicious.
Without v-rack
Total roasting time should be approximately the same, but you’ll want to roast the bird starting breast-side down for 20 minutes at 375 degrees. Then crank the nob to 450, flip the chicken so it’s breast-side up, and cook until done — another 30ish minutes for a smaller bird, 40ish minutes for a bigger bird. The skin probably won’t be as crispy, but you should still have a tasty roast chicken at the end of the process.
Addendum
Butter, salt and pepper is all I need most of the time, but feel free to rub on whatever herbs and spices you’d like into the skin after you’ve buttered it. It’s hard to go overboard. Also shout out to Cervo’s in New York City. I used their Piri Piri rub on my last roast chicken the other day and it was :chefkiss:
— Louis Bien
Spinach-pecan pesto (vegan)
Ingredients
2 cups spinach
1/4 cup raw pecans
1/3 cup extra virgin olive oil
2 to 3 garlic cloves, depending on your taste
Salt and black pepper to taste
The biggest issue many of us have in isolation: How do I eat pasta differently for the seventh day in a row? And how do I make meals that don’t require 5,000 different ingredients, especially if grocery stores are out of stock?
You’re in luck. You can prepare my variation of this pesto as a marinade for chicken or as a pasta sauce.
Toast raw pecans over low-medium heat until fragrant, then allow to cool.
Food processor pecans, spinach, and garlic until minced.
Slowly add olive oil until blended to your preferred consistency.
Salt and pepper to taste.
Optional: My preferred way to eat this is sautéing onions or shallots in 1 tablespoon of butter or oil, adding shrimp, and tossing it altogether with the marinade and whole wheat pasta.
— Brittany Cheng
Vegetable fried rice
Serious Eats is one of my go-tos when I’m trying to cook something I’ve never done before, for two reasons. First, they don’t just explain how to make a dish, they get into why you take certain steps. Second, Serious Eats recipes understand that you, the humble home cook, may not have every preferred ingredient or piece of equipment available, and adjust when they can by showing you where you can substitute or change course in the recipe and still make something delicious.
Their guide for vegetable fried rice is no exception. You can make this with fresh rice or leftover rice. You can use a wok or a cast iron skillet. You can add meat or eggs if you like, but you also don’t have to. The result is delicious and comforting. I offer only these pieces of advice as you set out on your fried rice journey.
Read the whole recipe through beforehand and do your prep work ahead of time (cut your onions, your carrots, and so on, and put them off to the side so they’re ready to go). You don’t want to be racing to chop things.
Open a window and get your oven hood fan cranking. You’re gonna be working with very high heat and probably end up with some smoke.
If you add a fried egg to yours, go ahead and add a second. You deserve it!
— Ryan Nanni
Sweet potato black bean tacos with guac (vegan)
Ingredients
1 sweet potato
1 can of black beans, rinsed and drained
1/3 an onion, chopped
Chopped Red pepper
Garlic salt, smoked paprika for taste
For the guac:
1 avocado, ripe
1 lime
Red onion or shallot
2 cloves of garlic
As a runner I live on sweet potatoes. They’re packed with nutrients and taste great. What more do you need? Sweet potatoes are also incredibly versatile. They can be roasted, boiled or nuked and added to any dish. For a simple, and super healthy, alternative to regular old tacos, swap out the meat for a can of black beans and pack the tortilla with sweet potatoes.
To microwave the sweet potato, rinse thoroughly and prick the exterior with a fork. Wrap the potato loosely in a wet paper towel and put in the microwave on high for six minutes, or until tender. (Many microwaves have a setting for potatoes. Use that if available.)
Rinse and drain the black beans and set them aside. Chop the onion and pepper and drop them into a skillet over medium heat with a tablespoon of olive or canola oil, giving the onion a chance to caramelize. Add the black beans and flavor with a dash of garlic salt and smoked paprika. (You can use any spices you like. Get creative and funky.)
Cook for about two to three minutes, or until tender.
Guacamole is my go-to in almost every situation, but you can use any other topping you like. To make your own guac, slice an avocado and scoop out the filling into a bowl, mashing lightly with a fork. Add salt, onion and garlic along with the lime and stir until you get your desired consistency.
Throw everything into a tortilla and enjoy.
— Paul Flannery
If you have some time on your hands (LOL) and want to go all-out
Homemade dumpling recipe
Ingredients
2 packages of dumpling wrappers
Dumpling filling:
1/4 cup vegetable oil (no substitute)
1 1/4 pound ground meat (or vegetable filling of choice, such as cabbage and carrots)
1 egg (remove if allergic)
2 bunches of Chinese chives or scallions
3 tablespoons sesame oil (no substitute)
1/4 cup soy sauce
Egg wash:
1 egg
1 tablespoon water
Egg wash substitute, if allergic:
1/2 cup water
1 tablespoon cornstarch
Warning: Making dumplings usually takes me about three hours, but if you’re up for the task, it’s so rewarding. The hardest part about making dumplings is finding the wrappers. If you don’t live near an Asian grocery store, you can sometimes find them in Giant or Safeway, which carry Nasoya gyoza wrappers in the tofu section. Do not use wonton wrappers.
If you have two extra hours on your hands, you can make homemade wrappers by following these instructions by Woks of Life, whose pork-chive dumplings were the original version of my recipe.
Heat vegetable oil over medium-high heat, roughly seven minutes. Cool to room temperature. I can attest this does create a “nuttier” and deeper flavor.
Mix the ingredients of the dumpling filling together. I use ground pork. You can stir-fry the mixed filling to sample the taste before assembly and make adjustments.
Make egg wash or my egg-free substitute by whipping those ingredients.
Assemble about 150-200 dumplings using 1 teaspoon to 1 1/2 tsp of meat per wrapper, using the wash to seal. Keep most of dumpling filling in the fridge and take portions out as needed.
To store:
Line a baking pan with parchment paper and put dumplings on there. Stick batches into the freezer as you go. This freezes the dough so dumplings won’t stick to each other.
After each batch spends 30 minutes in the freezer, they can be tossed into gallon freezer bags for storage.
To pan fry:
Heat 2 tablespoons of cooking oil (vegetable, canola) to non-stick skillet over medium-high. Do not let oil burn.
Arrange dumplings and cook for four minutes, or until the bottoms of the dumplings are light golden brown.
Add 1/4 cup of water, immediately place lid over skillet, and turn to low to low-medium heat to steam for about four minutes.
Remove lid and cook until the water is mostly evaporated.
To boil:
Bring salted water to a rapid boil.
Cook dumplings in boiling water for about five to six minutes (add two to three minutes if they’re frozen) until they float. Stir occasionally.
— Brittany Cheng
Simple, good cassoulet
Cassoulet is my favorite dish in the world, and I’m on a mission to perfect it. The hardest part may be acquiring all the ingredients. You may need to visit a bougie grocery store to find duck confit and duck fat, for example. But once you have the goods, cooking cassoulet is a trial of patience more than anything.
Here’s my great, relatively simple recipe that I adapted from a French cookbook called Connaître la cuisine du sud-ouest by Francine Claustres. If you can read French or are willing to put in some effort translating, it has multiple variations of cassoulet, from Toulouse, to Carcassonne, to Castelnaudary and beyond. Trust me, once you try one cassoulet, you’ll want to try them all.
— Louis Bien
0 notes
Text
How to Eat Healthy When Money’s Hard to Come By
For quite a while, I was on food stamps/SNAP. I also have several chronic health conditions that, if I didn’t eat an extremely healthy diet, I probably wouldn’t be able to get out of bed.
This forced me to do some problem solving. How could I eat healthy, stay full, and enjoy the food I ate while spending less than $180 a month? Whole Foods was the only accessible grocery store--not a cheap place! I’m also gluten intolerant, so I can’t rely on affordable staple wheat products. All additional dilemmas.
I was able to do it (at least darn close to it each month!).
Here’s how:
Look up inexpensive recipes! Here’s one of my favorite websites.
This tumblr is great for easy recipes too
Pick three recipes every week and double them, then put them in the fridge and put the portion you need in a pot or microwaveable bowl to warm up when it’s meal time! This also saves time and energy (as someone with three disabilities and running two businesses, this was crucial.)
For these three recipes, I’d recommend making one pasta dish, one rice-based dish, and one vegetable based dish (stew, salad, soup, etc). Rice and pasta are affordable staple foods that are easy to make many diverse recipes with. (Brown rice, btw, is healthier but a tad more expensive.)
When shopping, aim to have 80-90% of the food as produce (veggies, fruits) or canned ingredients (like canned beans). This is a win-win intention: you increase health and decrease grocery cost (fresh food is, actually, quite inexpensive.)
Don’t hesitate to buy frozen veggies and fruit. Really the only time you need fresh is when you’re not cooking it at all. Most cooked dishes work just fine if you use frozen food. It’s cheaper and often pre-chopped too!
Look for the cheapest version of the food you’re buying and make logical substitutes. For instance, most stores sell bagged yellow onions (about 5-6 of them) for less than $2. If a recipe called for Vidalia onions, I’d just buy these instead of spending $4 bagging the same amount of the specific type. I’ll even swap out red onions for white bagged onions! It barely makes a difference (not enough to matter when budgets are tight).
Skip dessert foods. For a while, I went without treating myself at all because I couldn’t afford to, but a cheap dessert option is frozen fruit and almond milk smoothies! Explore inexpensive desserts when you do feel a need to treat yourself (like batches of cookies, bulk candy, etc).
Go to the store with a shopping list. Plan your recipes ahead of time and buy only what you need. Impulse buying or not having a clear idea of what to make are two of the greatest cost-inducing activities.
Bean-based meals are a great staple! Two cans of beans (about $1.50-2) can make a delicious and filling chili, rice and beans dish, etc. Dried beans are even cheaper than canned ones.
Make sure to eat breakfast! It’s crucial for health, but it will also help prevent overeating or persistent hunger later in the day that can make your meals not last as long.
When preparing foods, take the cut ends of carrots, onions, celery, parsley stems, leeks, scallions, and similar veggies and keep them in a freezer bag. When the gallon bag is full, add about 16-20 cups of water to it, some spices (salt, pepper, basil, oregano, garlic powder) and boil for around two hours. Strain the liquid and you’ve made like three quarts of veggie broth! This is totally free (you just save your kitchen scraps). Typically, one quart costs $3-4. This saves a TON of money. (To do this, you need at least carrots, onions, and celery scraps--these are an essential broth base.)
Focus on cooking, not baking. Baking can be pretty costly, but cooking is much cheaper.
Buy store brand items. For instance, Whole Foods canned beans are like 99 cents, but another brand is like $2-3. The little costs add up when it comes to food.
Plan in-season recipes. Produce is often cheapest when it’s in season. Also, if you like a particular food, try hitting the sales right after it goes out of season (I love oranges, and April-May is when all the ones produced and stored during winter start to go bad so the stores sell them really fast, for like 25 cents an orange.) Buying on-sale fruit can be a great dessert substitute.
Cut down on meat consumption. Medically, I can’t be vegan/vegetarian, but limiting meat has been really helpful! For instance, if a stew calls for meat and I’m doubling the recipe, I won’t double the meat. It saves a ton on cost, is still super filling, and is better for our own bodies and the environment too! Think of meat as a side component, more for flavor, than the bulk of what you eat. You can also buy meat on sale and freeze it for up to six months.
Slowly invest in spices. When you purchase spices, they can seem expensive, but they last a really really long time. They will also help you make every recipe absolutely delicious!
If you’re making a meal that requires a specific less-common spice mix (i.e. Garam Masala), try seeing if you have spices that can make a substitute. I do this a lot, by just looking up substitute spices on google and making a very similar spice mix. It works in a pinch (no pun intended).
Bookmark recipes based on cost. If you had a low cost grocery shopping week, save those recipes in a low cost folder!
Grocery shop every week (this makes sure the fresh and affordable produce you buy doesn’t go bad!).
Whenever possible, don’t buy pre-prepared things. It’s always cheaper to do the work yourself (like using dried beans, cutting heads of lettuce yourself, etc.).
If you haven’t usually eaten a produce/veggie heavy diet, it may take you a couple weeks of feeling a bit like you haven’t eaten enough (not real hunger, but like a strange almost hunger). This will subside after a couple weeks, since fresh food actually fills our stomachs up the best!
These are tips based on living alone and being able to cook, for reference. Hopefully they can be adapted to be more accessible.
Best wishes with this!
Please share and feel free to add on your tips too.
#food#food stamps#recipes#affordable food#groceries#poverty#classism#grocery shopping#cheap food#cheap recipes#text post#important
303 notes
·
View notes
Text
Low-Carb No-Noodle Lasagna with Sausage and Basil
posted by Kalyn Denny on April 1, 2019
Low-Carb No-Noodle Lasagna with Sausage and Basil was inspired by a series of grocery store finds and this lasagna was so tasty! Use Casserole Recipes to find more low-carb casseroles like this one!
Click to PIN Low-Carb No-Noodle Lasagna with Sausage and Basil!

It’s no secret that I love Low-Carb Casseroles because of the way they create leftovers for the freezer, and other people must like that too because casseroles are some of the most popular recipes on this site! But usually I wouldn’t share a new casserole recipe like this Low-Carb No-Noodle Lasagna with Sausage and Basil at this time of year, just when the weather is starting to heat up.
It was three fun grocery store finds in a row that inspired me to create this recipe, and after we worked on it a few times to get it right the final version was so tasty I just couldn’t convince myself to wait until fall to share the recipe! In fact, yesterday I pulled a container of this low-carb lasagna out of the freezer and heated it up for an amazing dinner. So please make this NOW before it gets too hot to turn on the oven and I promise you’ll be glad you tried it!
The Folios Parmesan Cheese Wraps I found at Costco were the first thing that inspired this lasagna. Normally I’m not inclined to create a recipe using a product that some people might not be able to find, but when I shared about Folios on Instagram I was so intrigued by the comments and how many people liked them. Folios are firm wraps made of cheese, about the thickness of a tortilla and they’re gluten-free and have only one carb each.
When the idea of making no-noodle lasagna and using these parmesan wraps as the “noodles” popped into my mind, I might not have done it right away except the very next time I went to the grocery store I found Rao’s Tomato Basil Sauce (affiliate link) that had half the carbs as the low-sugar sauce I’d been using. And then on that same shopping trip I discovered the store had fresh basil plants! I love fresh basil and it added so much flavor to the sauce for this low-carb lasagna!
But if you can’t find Folios Parmesan Cheese Wraps or Rao’s Sauce or don’t have fresh basil, please don’t let that stop you from making this tasty lasagna! Use a firm sliced cheese like Provolone to replace the Folios; it will probably melt a bit more but it’s still going to be delicious. Pick the lowest-carb sauce you can find if your store doesn’t carry Raos. And you can use dried basil or chopped basil in a tube for the sauce if you don’t have or don’t want to buy fresh basil. (I don’t accept money to promote products, and none of the companies mentioned in this post have any idea that I’m featuring them.)
(This is just a summary of the steps shown in the photos. Scroll down to the complete recipe for full instructions.) Preheat oven and spray casserole dish with non-stick spray. Heat oil in a large deep frying pan and saute chopped onion; then push onion over to the side and cook the ground beef and Italian sausage in the same pan.
Add the Rao’s sauce to the meat mixture and simmer until the sauce is thick. While the sauce simmers, chop basil (or use Herb Scissors like I did if you have them!)
Stir the chopped basil into the sauce. Mix the cottage cheese or ricotta, beaten eggs, 1/2 cup Parmesan, garlic powder, and dried herbs. (We tested the recipe with both cottage cheese and ricotta and we preferred the cottage cheese, but take your choice on that!)
I used a wonderful Le Creuset baking dish that I bought at Williams Sonoma with a generous gift certificate I got from my brother Dave and his wife Amy, thanks guys! Cut the Folios in half and cover the bottom of the dish. (I only needed two Folios per layer for my size dish, if your dish is a bit wider or longer you might need three.) Spread half the meat sauce over the Folios.
Then make a layer with half the cottage cheese mixture, followed by half the Mozzarella.
Make another layer each of Folios, meat sauce, cottage cheese mixture, and Mozzarella. Sprinkle the grated Parmesan over the top. Bake Low-Carb No-Noodle Lasagna with Sausage and Basil for 40-45 minutes. (We cooked the lasagna in the photo 45 minutes but I’d start to check after 35 or 40 minutes.)
Serve hot and enjoy! This freezes well and reheats beautifully in the microwave or in the oven.
Make it a Meal:
I’d serve Low-Carb No-Noodle Lasagna with Sausage and Basil with a salad like Low-Carb Caesar Salad or Kalyn’s Favorite Baby Arugula Salad for a low-carb meal!
More Low-Carb Lasagna to Love:
Grilled Zucchini Low-Carb Lasagna with Italian Sauce, Tomato, and Basil Sauce ~ Kalyn’s Kitchen
Keto Chicken Lasagna Cups ~ A Spicy Perspective
Low-Carb Sausage and Kale Mock Lasagna Casserole ~ Kalyn’s Kitchen
Low-Carb Lasagna Stuffed Peppers ~ Recipe Girl
Low-Carb Mock Lasagna Spaghetti Squash Casserole ~ Kalyn’s Kitchen
Low-Carb Pesto Zucchini Lasagna Rolls ~ All Day I Dream About Food
Low-Carb Sausage and Roasted Peppers Mock Lasagna Casserole ~ Kalyn’s Kitchen
Weekend Food Prep:
This recipe has been added to a category called Weekend Food Prep to help you find recipes you can prep or cook on the weekend and eat during the week!

Low-Carb No-Noodle Lasagna with Sausage and Basil
Yield: 8 servings
Total Time: 1 hour 15 minutes
Prep Time: 30 minutes
Cook Time: 45 minutes
Low-Carb No-Noodle Lasagna with Sausage and Basil was inspired by three fun things I found at the grocery store, and this lasagna was so tasty!
Ingredients:
1 T olive oil
1 medium onion, chopped small
1 lb. lean ground beef
1 pkg. (19.5 oz.) Hot Turkey Italian Sausage, use pork Italian Sausage if you prefer (see notes)
1 jar (24 oz.) low-sugar pasta sauce (see notes)
1/2 cup chopped fresh basil (or use a few teaspoons of dried basil or a few tablespoons of basil from a tube if you don’t have fresh basil.)
2 cups cottage cheese or Ricotta cheese
4 eggs, beaten well
1/2 cup coarsely grated Parmesan cheese (probably optional, but good)
1 tsp. Italian herb blend
1 tsp. garlic powder
4 Folios Parmesan Cheese Wraps (Use firm sliced white cheese like Provolone if you don’t have Folios. You may need a total of 6 Folios to cover the dish if you use a larger, less deep dish than we had.)
2 cups grated Mozzarella cheese
additional 1/3 cup coarsely grated Parmesan cheese to sprinkle over the top (probably optional, but good)
Directions:
Preheat oven to 375F/190C and spray a deep rectangular casserole dish with non-stick spray. (See notes about the dish I used.)
Heat olive oil in a large deep frying pan over medium-high heat and saute chopped onion just until it’s starting to brown, then push onion over to the side of the pan and crumble in the ground beef and Italian sausage, squeezing the sausage out of the casings. Cook the ground beef and Italian sausage, breaking apart with the turner until it’s nicely browned and all the released liquid has evaporated.
Add the Rao’s sauce to the meat mixture (rinse out the jar with a little water if you’d like) and simmer on low until the sauce is thick, about 10 minutes.
While the sauce simmers, chop basil (or use Herb Scissors like I did if you have them!)
Stir the chopped basil into the sauce and turn off the heat.
Mix the cottage cheese or ricotta, beaten eggs, 1/2 cup Parmesan if using, garlic powder, and dried herbs.
Cut the Folios in half and cover the bottom of the dish, putting the straight edge along the edge of the dish. (I only needed two Folios per layer for my size dish but bigger casserole dishes might need three.)
Spread half the meat sauce over the Folios.
Then make a layer with half the cottage cheese mixture, followed by half the Mozzarella.
Make another layer each of Folios, meat sauce, cottage cheese mixture, and Mozzarella. Sprinkle the grated Parmesan over the top if using.
Bake Low-Carb No-Noodle Lasagna with Sausage and Basil for 40-45 minutes. (We cooked the lasagna in the photo 45 minutes but I’d start to check after 35 or 40 minutes.)
Serve hot. Leftovers can be frozen and reheated later.
Notes:
I used an amazing Le Creuset baking dish that was 7.5″ x 11.5″ x 3 inches deep; try to use a deep dish if you can but anything close to that size will work.
I used my favorite hot turkey Italian sausage for this recipe, but pork sausage would also be good!
I was excited to find Rao’s Tomato Basil Sauce (affiliate link) at my grocery store; this sauce has only about 20 carbs in a whole jar.
This recipe inspired by Folios Parmesan Cheese Wraps that I found at Costco and I experimented with Jake and Kara until we thought it was a keeper!
Low-Carb Diet / Low-Glycemic Diet / South Beach Diet Suggestions:
Low-Carb No-Noodle Lasagna with Sausage and Basil is a great dish for low-carb and low-glycemic diet plans, and for any phase of the South Beach Diet. South Beach would recommend lean ground beef, low-fat turkey sausage, low-fat cottage cheese, and reduced fat cheese for this recipe.
Find More Recipes Like This One:
Use the Recipes by Diet Type photo index pages to find more recipes suitable for a specific eating plan. You might also like to Follow Kalyn’s Kitchen on Pinterest to see all the good recipes I’m sharing there.
Nutritional Information?
If you want nutritional information for a recipe, I recommend entering the recipe into this nutrition analyzer, which will calculate it for you. Or if you’re a member of Yummly, you can use the Yum button on my site to save the recipe and see the nutritional information there.
posted by Kalyn Denny on April 1, 2019
Don’t Miss a Recipe!
subscribe to receive new recipes via email:
We are a participant in the Amazon Services LLC Associates Program, an affiliate advertising program designed to provide a means for us to earn fees by linking to Amazon.com and affiliated sites.
Source: https://kalynskitchen.com/low-carb-no-noodle-lasagna-with-sausage-and-basil/
0 notes
Link

For my first Product review I’m going to go into a HUGE topic that is consistently debatable as far as “The Best Food” whats best for one may not work for another so please keep that in mind in the grand scheme of things. However when your talking Kibble, Wet food, or Raw (which can break down to several other options) in general my personal belief and experience has lead me to place Raw Pet Food at the very top of this list. Now please keep in mind I am not a nutritionist or a vet...I’m much worse I’m a concern parent who only wants the best for her babies. I want to know what’ going in them and what they get from their foods and treats.
Please keep in mind raw food does not necessarily mean you go out to your local grocery store and feed whatever your cooking tonight and giving your dog a slab of it raw... although some pet parents, with the help of their vet and the knowledge of whats safe and nutritionally sound for their pet might but I do not recommend that option for the average person, and honestly I don't even recommend that option for myself...its more work than is needed especially when there are so many pre-made balanced diets out there. Raw comes in a few different varieties from Frozen, Freeze-dried, Dehydrated, etc. I buy both Frozen for my dog (Jack Murdoc) and Freeze-dried for my cats (Winston, Ming, and Kasey.) Why do I buy two different types? Jack is a 50 pound Bulldog who if I fed freeze-dried I’d go through a bag within a few days and for most dogs 30 pounds or more I’d suggest going with frozen just purely for expenses. With my cats I can purchase 4 bags at a time and not have them go bad and it usually last me 2 months.
All types require a bit of work or planning on our part as the pet parent, however all types can be modified to work with any lifestyle. The frozen (depending on your dog) could be fed frozen especially on hot days...it would provide as more of a chew and take a bit longer which again could work for your dog especially if they gulp everything down without chewing. Jack, my dog prefers his thawed, he has a very pronounced under bite (to put it nicely) and I think you’ll find for most dogs thawed or mostly thawed is best. Who has the time to wait for it to thaw? you can’t microwave it cause that will just counter act the whole reason raw is so great (I will address this later) and all other methods take time. For me I use containers as I feed one feeding I clean it out and put the next feeding in and place it in the fridge, I do 2 feedings a day depending on the thickness of the nuggets/patties I may need a few more containers to rotate in between but all the time required is to clean it out with a bit of soap and pull out another from the freezer. Freeze-dried and dehydrated foods need to be prepared usually just with a little water and a few minutes to absorb.
As a side note most people don't realize that cats have drinking problems...I know i didn’t know that...but its not what your thinking. Cats are obligate carnivores meaning in the wild they get all their food by hunting and killing their prey, which means all their vitamins, nutrients and most of their hydration comes from its prey. Your probably thinking but wait I see my cat drinking from its water dish all the time, and while that's probably true, the truth of the matter is a cat cannot get nearly the amount of water a dog can get merely through drinking and lapping water. It all comes down to their tongues. So while feeding your cat kibble has probably been ok for many years (decades in fact for some) as time and knowledge of better understanding cats and their anatomy its not the optimal food choice in our markets today. And I’m sure many of you are saying “Lucky for me I feed my cat can food” which is better for your cats hydration by far when compared to kibble.
What it all comes down to with why Raw is so radical is ultimately what you get out of it. Maybe that isn't enough to hear just that so let me break it all down for you. When you feed kibble (a cup to a few cups a day) your dog absorbs at best (let me repeat that... at best) 70% the vitamins and nutrients from its kibble, the US pet food standards (AAFCO aka The Association of American Feed Control Officials require all pet foods to be “complete and balanced” but let me tell you there is a huge difference between Old Roy and Canidae... however the AAFCO probably couldn't tell you that.) are not in my opinion as high as they ought to be... but neither is our education system so like the education system we need to be good parents and do all we can to find the right fit for our kids...the same goes for our pets nutrition. Kibble will take all the the ingredients, some by the way sound pretty amazing too, and then cook the crap out of all of it to make it into a crunchy nugget, a process called extrusion (minus a few new comers like Lotus who bakes theirs like a dog biscuit is made, which explains why dogs love it so much.) Once the extrusion process is complete the vitamins and minerals that were naturally in the food which were cooked off are then many times synthetically reapplied by mixing it in a liquid form of fat and then spraying it back on the kibble...light bulb...that's why the kibble bags always feel so greasy...eww. Ok so whats all this mean, while your dog is absorbing the vitamins and nutrients mainly from its now sprayed in fatty layer all that other stuff ...well its shit...literally. Ever wonder why or how your dogs poop is so big? While in the moment kibble may seem like the best bang for your buck your paying to feed more and pick up more waste in the long run. Maybe its time to consider a better alternative.
Finally we are here...Why raw? With Raw Pet foods through the AAFCO again yes they are complete and balanced (as long as they are not just a supplement or treat there are some out there that are meant to just add some meat or vegetable matter in so please read the labels, they do legally have to state it.) While its true nothing is cooked, which is why its “Raw” so it does come with a side of slight warning, while dogs and cats are built different to withstand higher levels of bacteria, humans are not so caution: please be sure to wash your hands thoroughly after handling any raw product. With raw none of the natural vitamins and minerals are cooked out and with it being 60-70% moisture loaded (YAY for the kitties out there eating raw!) So while your out buying food and you see the price tag of raw verses that of kibble remember the big stinky poop we discussed now imagine half if not less than that as your out come (haha pun intended) no shit...ok ok I think I’ve gotten it all out of me (haha) honestly its one of the best perks along with way less gas (and having a bulldog that's super important to me!) What else is raw so good at...glad you asked! Besides being so highly digestible/absorb-able and being biologically appropriate (excuse me but do you see wild dogs and cats eating kibble ...besides the ones closed to the little old lady with all the cats?) Raw is typically more limited ingredient and over all better for your pet if they have allergies, again bulldogs are typical for having allergies and while Jacks not allergic to anything yet (knock on wood) he is very sensitive to yeast and will get ear infections from kibble all the time, even when its a high end supplement with brewers yeast in it. Raw does wonders with their skin, coat and teeth which means less money over all with dental problems and oh yes not to mention less shedding! Increase in energy thanks to the ability to easily absorb the vitamins and nutrients, and of course the big winner for me is its a natural weight control thanks to its high levels of moisture. Everyone pictures the same thing when they hear bulldog...wrinkly smooch face, low to the ground and FAT. I am here to help change that... bulldogs are not meant to be fat, nor is any other breed of dog...its horrible on their joints and breathing just as it is on us. Minus the ear infections and the fact Jack was born blind in one eye he has been the picture perfect healthy boy I know him to be and at 6 years old not many bulldog parents can say that. Take a look at his picture hes all muscle with a curvy little waste and we work very hard to maintain that, but with an all raw diet it has been a breeze!
I have linked one of the Raw choices here called “Primal” its made in the San Francisco Bay Area (where we are from so even a better perk for me to support local business) and it includes organic vegetables and fruits. I will tell you one thing especially after the pork version came out I would use these for all the picky eaters that would come into the store as a treat and it would be a rare dog not to want to eat it. They absolutely love primal! Jack never refused his Primal and the cats the cat version as well (Turkey and pork only because what’s a cat if not picky.) Another perk with this particular company...and quiet a few other Raw brands...if your feeding the frozen at home but want to travel with your pet, the freeze-dried is the exact same formula minus the water content...which you would have add when on the go but water is a much easier thing to find out and about then a freezer...especially camping. Please don't take my word for it...do the research click on the primal link via Amazon and look for yourself, and by all means fire any questions my way and I will do my best to answer them. I cannot talk enough about raw and all the many benefits you and your dog are about to receive!
#dog#dogs#cat#cats#Primal#Raw#dogfood#catfood#Amazon#kibble#dogkibble#catkibble#catcans#vitamins#nutrients#hydration
1 note
·
View note
Text
A College Celiac's Favorite Gluten Free Frozen Meals
New blog post! Sometimes, I love cooking a delicious gluten free meal from scratch. But during especially busy times of the year, having a gluten free frozen meal waiting for me in my kitchen makes life with celiac disease a whole lot easier. And since my life has been extra crazy the past few years due to working two jobs while also being a full-time grad student, I’ve tried my fair share of gluten free frozen meals recently.
So considering that the holidays is certainly one of the busy seasons of the year, I thought I would round up eight of my favorite gluten free frozen meal brands that I often rely on for busy days. And whether you’re looking for the best gluten free frozen pizza, easy gluten free and vegetarian pre-made meals or paleo freezer meals, I have a yummy option for you on this round up!
1. Real Good Foods
We’ll begin with a grain free and gluten free brand that consistently blows my mind: Real Good Foods. I first learned about them through a sponsored partnership opportunity, but can honestly say that I love their food. Their products range from gluten free frozen pizza made with cauliflower to grain free Italian-like entrees to stuffed chicken breasts. All of their products are gluten free and grain free (they do contain dairy, FYI!) and I’ve loved every version that I’ve tried.
My personal favorites are the Pepperoni Grain Free pizza, which are single-serve size, and the Spinach Artichoke Stuffed Chicken Breasts. Most of their products are completely pre-cooked so you can whip them up super fast in the microwave or oven. If you’re looking for delicious gluten free and low carb freezer meal options, Real Good Foods is a tasty brand to start with.
2. Saffron Road
Saffron Road is another gluten free company that was kind enough to reach out to me on Instagram and even surprised me with a few samples during an especially crazzzzy week at grad school. I’m often a bit cautious with trying pre-made curries since I’m a baby when it comes to spice, but even their medium spicy Madras Curry with Chicken Meatballs was mild enough for my taste buds to handle. But there was still tons of flavor.
Besides all of their gluten free frozen foods being certified gluten free, Saffron Road’s entrees also include a few vegan options like (one of my favorites) the Vegetable Biryani and a Vegetable Pad Thai. I haven’t ever tried any of their enchiladas or lamb dishes, but all of the Saffron Roads frozen foods I have eaten have impressed me with how tender the meat tasted (if it was included), how well everything was spiced and the soft, pillowy texture the basmati rice. I also love that these gluten free meals are suuuuper convenient since you can just pop them into the microwave for a few minutes and dig in.
3. Scott and Jon's Shrimp Bowls
I’ve never considered myself a huge shrimp lover but Scott and Jon's Shrimp Bowls have definitely put me on the path to conversion! They do sell some pasta bowls that are not gluten free, so be sure to grab their rice bowls if you’re interested. And note that these gluten free freezer meals are indicated gluten free, but are not certified gluten free if that is a trait you look for in all your meals.
However, their gluten free shrimp and rice bowls are very delicious. Again, I was a bit worried that their Shrimp Jambalaya bowl would be too spicy for me, but the fluffy white rice was the perfect mild accompaniment to the spiced shrimp and crunchy bell pepper, celery and onion. I liked their Cilantro Lime Shrimp Rice Bowl even more since it basically tasted like a burrito bowl with a seafood twist.
I’ve seen these meals on sale pretty often at local grocery stores like Hy-Vee and if you are interested in lower-calorie options, these gluten free freezer meals are 300 calories or less each. I think the meals could definitely do with some more shrimp and toppings, as sometimes I ended up with a bowl of rice near the end of eating, but when I’m craving seafood and don’t have time to cook, I greatly appreciate Scott and Jon’s for providing a gluten free option.
4. Path of Life
Whether you’re looking for a full gluten free frozen meal or just easy sides to make cooking a lot quicker, Path of Life’s frozen quinoa mixes are one of my favorite products to keep in my freezer. Path of Life also offers frozen cauliflower rice and roasted cauliflower blends, and all their products are certified gluten free.
My personal favorite are their Southwest Mango Quinoa Blend, which has black beans, fire-roasted corn and cilantro and lime, and their Deep Roots Quinoa Blend with root veggies (yay for sweet potato!) and kale. You can eat these frozen quinoa meals on their own, but I find them even tastier when paired with other odds and ends I already have in my kitchen, like avocado, leftover salmon or hummus, added to a wrap, etc.
5. Beetnik Foods
If you’re looking for certified gluten free freezer meals or paleo frozen meals, Beetnik Foods is one brand that should be on the top of your list. All their foods are also certified USDA organic and they’ve recently added even more meal options to their line-up.
Beetnik Foods offers frozen meals ranging from Fire Roasted Pepper Steak with Whipped Potato to Grassfed Beef Meatballs to Sesame Ginger Chicken. My personal favorites include their Lemongrass Chicken (I could smother the thick lemongrass sauce in this meal on basically any savory dish and live happily!) and their Chicken Meatballs in marinara sauce.
Again, these meals are super convenient to make since they come out delicious just from the microwave. I also love that they include more vegetables than most freezer meals and that all the meat is always super moist and tender.
All of Beetnik Foods’ meals do contain meat, so they aren’t a good option for everyone. However, if you eat paleo or just want an easy certified gluten free meal, Beetnik Foods is definitely a quality buy.
6. Feel Good Foods
Finally, a gluten free freezer meal that can help satisfy your take out cravings! I again discovered Feel Good Foods via Instagram, and was sold at first bite. All of their products are certified gluten free, non-GMO and they also use antibiotic-free proteins. My favorite part, though, is that Feel Good Foods offer gluten free alternatives that are often in limited supply: in particular, egg rolls, taquitos, potstickers, empanadas and snack bites.
So far, one of my surprise favorites has been their Chicken and Chipotle Taquitos. I wasn’t expecting too much from a stuffed corn tortilla, but the chicken was super tender and flavorful and the tortilla got deliciously crispy in the oven. The taquitos were on the edge of being too spicy for me (I am team mild), but the flavor was worth it and I appreciated that the onions mixed in with the chicken were very subtle. I’ve actually never had an empanada, potsticker or egg roll since my celiac diagnosis, so I’m hoping to try some of those soon!
7. Mikey's
Whether you're gluten free, grain free or just want a healthy freezer meal to keep for busy days, Mikey's is a brand you need to know about. I'm an ambassador of theirs and was immediately blown away by how all their products are gluten free, grain free, soy free and dairy free. Then I taste tested a bunch of products and soon found myself addicted to Mikey's fluffy, grain free English muffins, soft and chewy cassava tortillas and dairy free pizza pockets that take me back to bagel bites and after-school snacks.
I also love that all of Mikey's products can be defrosted quickly, and Mikey's also offers goodies like paleo muffin tops, a grain-free pizza crust and egg pockets, all made of simple ingredients.
8. Blake’s Chicken Pot Pie
If you’re craving gluten free comfort food and don’t have the time or energy to make it yourself, you might love my mom’s go-to Walmart treat: Blake’s Gluten Free Chicken Pot Pie! This gluten free freezer meal is also milk free, and Blake's offers a cornbread crust version too. Since Blake's regular chicken pot pie is nearly identical to the gluten free version, make sure you look for the gluten free symbol on the front of the box.
As for how it tastes, I actually haven’t given it a try yet. However, my mom is a huge fan of the flaky crust and tender chicken, and appreciates that it’s still light enough to not upset her sensitive stomach. My mom usually bulks it up with some extra rice and chicken, but you can eat it on its own for a lower calorie meal as well.
The Bottom Line of Gluten Free Freezer Meals
When you have celiac disease or a medically restricted diet, it can be hard to find safe, easy and quick meals. I know that in college, I definitely felt jealous about how easy it was for my friends to grab a frozen pizza or ramen cup while my gluten free food typically took more work and time.
Luckily, even just since my celiac diagnosis six years ago, there are a lot more delicious gluten free freezer foods out in the world - and whether you’re craving Asian, Italian, Indian or classic comfort food, there is a gluten free freezer meal out there for you. And hopefully this round up gave you some solid places to start your yummy, convenient gluten free eating!
Which of these freezer meals sounds yummiest to you? Tell me in the comments!
via Blogger https://ift.tt/36hsFXU
0 notes
Last Seen Blogs

mayokorea
MAYOKOREA

death-x-core-x-daisies
AlyssaSadie

jilublack
Sin título

moviemagistrate
The Movie Magistrate

musicistheair-blog
Music Is The Air