#linux find file size
Explore tagged Tumblr posts
Visit Tumblr Blog
Explore Tumblr blogs with no restrictions, modern design and the best experience.
Last Seen Tumblr Blogs


Fun Fact
Tumblr has 411 employees.
Text
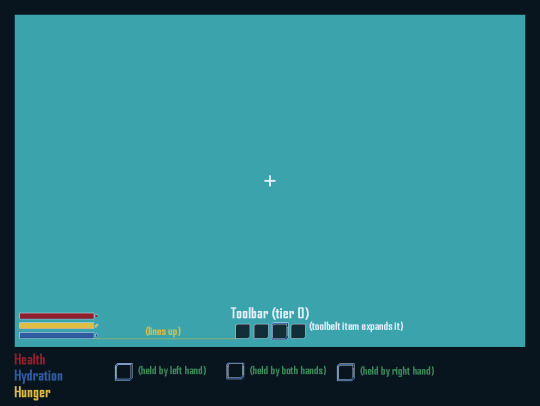
Yet Another Package Editor

Download the latest version here
YaPe is a modern package editor for DBPF (.package) files
Features:
Edit any package - FAST
List and edit resources in a package
Filter resources by type
Easy editors for several resource types
Supports opening ANY DBPF-coded .package, .dat, or .sc4 file
Easily reduce texture size, add/remove/recreate mipmaps, change texture format
Import textures by dragging, export DDS
Native on Windows and Linux
Why make yet another package editor?
Simply said, because SimPe can be kind of cumbersome especially on Linux, and package editors other than SimPe (s3pe, s4pe, iLive's Reader etc.) do not support Sims 2 resources.
To illustrate, I timed someone shrinking a texture (convert RawARGB32 -> DXT1, shrink 2x) in both SimPe and YaPe:
SimPe + GIMP: 1m 30s
YaPe: 10s
Originally this started as just a way to easily test if my DBPF library was doing the correct thing, but over time it has grown to become a half-decent editor suitable for more general use.
Tutorial / usage tips
Here I will explain how to shrink and convert textures in YaPe because that's what I imagine most people will use this program for right now, but of course you can use it for other things as well.
Let's get started by getting the program to look the way you want to: use the options in the top left to change the scale of the interface and switch between dark and light mode.
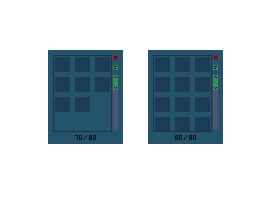
Now drag a package file into the program (don't worry about closing the sims except when you save the package), a list of resources in the package will be visible. You can find out what the abbreviations mean by hovering your mouse over them; in general I try to add tooltips like this to buttons or options that are unclear.
Don't be afraid to mess around and make changes! The changes you make are never saved unless you press the save button, so if you simply drag your package file into YaPe again without saving you will get your original package back (there is currently no undo function, but it is a planned feature).

All these resources are great, but we're only interested in the textures for this tutorial so let's set a filter. Right click on a texture (TXTR) and select "Filter on type".

Great! Now you can only see the textures we're interested in. You can disable this filter by unticking the "filter" option at the top.

Now click on the "TXTR" to open the texture, it will open a new tab in the lower half of the window by default. If your window is not very big (like mine is for this tutorial) you might have trouble seeing the texture and all the options. You can drag the tab around and put it somewhere else in the program, I'm going to put it on the right and make it a little bigger so we can see what's going on.

Okay, now we can see all the options, and well... there's a bunch of them. We'll go over some of the options that you'll likely want to use but feel free to experiment of course.

First, let's have a look at the texture viewer at the bottom: you can zoom in on the texture by holding control and scrolling, and you can change which mipmap is displayed by clicking the radio buttons above the texture.

But wait, this texture does not have enough mipmaps to show up in game! (post by @pforestsims) Let's fix that right this instant by clicking the "Add missing mipmaps" button in the middle.

Okay, now the mipmaps will show up in game, which is good... except that this mipmap is really blurry. (post by me) Luckily we can fix this really easily, just click the "Recalculate all mipmaps" button.

Much better!... except that we've created a new hidden problem: the leaves will disappear when zooming out in game (blog by lisyarus) but even this problem can be fixed. We can actually preview what the texture will look like when zoomed out by switching the format to DXT1 since DXT1 has binary transparency, just like alpha tested textures like leaves and grass.

Right, so the leaves have a bunch of holes that don't look right when zooming out, let's change that. Above the "Add missing mipmaps" button there is the "Preserve transparency" slider: try changing it to something like 120-170 and click "Recalculate all mipmaps", you can see that the transparency changes, if it's still too thin/transparent set the value higher and recalculate again and so on.

Have a look at all the mipmaps (zoom levels) and once you're satisfied with the transparency change the format back to DXT5.

This texture will now look great in game! But it is also quite large, so we can reduce the size 2x smaller without sacrificing very much in terms of looks (sorry to all the cc authors who love their large textures). Click the "Remove largest texture" button, which will make it so that the first mipmap becomes the largest texture effectively reducing the size by 2x. Like mentioned it does use the first mipmap so make sure to fix any blurry mipmaps first.
You can repeat the same process for the other textures in the package, and then we're done. Save the package by clicking the save button in the top bar, and have a look in game at your beautiful textures.
Another option is to drag images/textures you've made somewhere else into the program (with special support for dds files), for a full lists of supported image formats you can look here. (image-rs documentation) The image/texture will currently go into the firsts open texture resource tab because of UI framework limitations.
Here's a look at some of the other editor currently implemented:


Enjoy :)
195 notes
·
View notes
Text
It's a common misconception in the amateur Linux/Unix world that "Control C", AKA "intr" or "interrupt" (not to be confused with the CPU concept of an interrupt) is a keyboard shortcut. It isn't, really. Not ostensibly.
This all goes way back the very very early days of ASCII, when it was both a character set and a communications protocol. (Remember that the "II" stands for "Information Interchange".)]
ASCII defines a series of seven-bit codes, each of which has some fixed meaning. For the "printable" subset of these codes, we commonly describe this relationship as though a given code 'means' some character; but from the communications protocol point of view it's more like they 'mean' to print some character. i.e. 61h doesn't just mean 'a', it means "print 'a' and advance the cursor".
Actually, "cursor" is the wrong word to use here. We think of ASCII as something computers and only computers use, but this wasn't the case in the early days. ASCII is a telegraph code. Helpful for computers, yes, but built from the ground up to allow operators to control typewriters (teletypewriters, AKA TTYs) from across the world over the telegraph network.
That's why there are more than just printing codes. These are the "non-printing" or "control" codes, designed to control the typewriter on the other end. You're probably familiar with some of them: 20h, AKA "Space", which advances the type head but prints nothing; 0Dh, AKA "Carriage Return", which puts the type head back the start of the line; 0Ah, AKA "Line Feed", which advances the paper one line; and 09h, AKA "Tab", which advances the type head some configurable amount.
Some of them you're probably less familiar with. 07h is "Bell". It rings a bell on the receiving end, perhaps to wake them up and let 'em know a message is coming. There's 06h and 15h, Acknowledge and Negative Acknowledge. There's 01h, 02, 03h and 04 -- Start of Heading, Start of Text, End of Text, and End of Transmission. There are codes to turn on and off the receiver's peripherals like a tape punch recorder or reader. There are codes to delimit files and records. There's a backspace code! Everything you could want as a telegrapher in 1963.
We run into a problem when trying to type these control codes, though. By definition they don't really print anything, so what are we gonna put on the keys? Furthermore, there are a lot of control codes. Even if we figure out what should be on the keys it'll double the size of our typewriters to include them all! (I mean we can do it for some of 'em, like "Space" which already has a key, but "BEL"? "ACK"? "X-ON"?)
Fortunately, there's an existing solution to this kind of problem. Here's a picture of the keyboard of a Teletype Model 33, one of the first products to use ASCII, and it shows this solution:

See that "CTRL" key? Forget how you think it works.
Y'know how when you press "shift" on an old mechanical typewriter, it physically "shifts" the type basket down so you can use capital letters and punctuation marks? Like, shift-g isn't a "keyboard shortcut" for 'G" so much as "how you type 'G'". It selects between map layers, makes it so you don't need to have two keys for every letter.
Control does the same thing. Control-g is not a "keyboard shortcut" for ringing the bell, it's how you type "ring the bell".* Control-f is how you type "Acknowledge", control-s is how you type "turn off the tape reader", and so on and so on. All in the same way that shift-4 is how you type '$', and w is how you type 'w'.
So what's control-c? ^C is "End of Text". That's why it's used to end processes, alongside counterpart ^D "End of Transmission". You're not telling Linux you pressed "'control' and 'c'", you're telling you pressed "End of Text", and it knows "End of Text" means "end this process".†
If you take a look at the stty tool, you'll find that you can rebind some of these default actions. Maybe you want ^Y to be your interrupt instead of ^C. You can do that! Run stty intr ^Y in a terminal it'll do it. But you can't bind, say, control-9, because that's not a control character. Or control-., or control-page down, or "enter" on the numpad. The Linux line discipline has no idea what those are. It deals in characters, not keys.‡
That's why ^C isn't a keyboard shortcut.
*You'll commonly see these control characters transcribed with so-called "caret notation", where BEL is ^G, ACK is ^F, etc. The ^ means control, the letter indicates what key you'd press to type it.
†That's not to say that Linux interprets every control character like the spec says. ^W ("End of Transmission Block"), for example, is used for "word erase". Presumably because it starts with the letter 'w'. Under the hood it's still interpreting the keys you pressed as "End of Transmission Block", though.
‡You might wonder how the arrow keys work, then. You can think of them like macros. "Up" for example will type "^[[A" -- that's three characters, '^[' AKA "Escape", '[' AKA "Left Square Bracket", and 'A' AKA "Latin Capital Letter A". "Down" is "^[[B", "Right" is "^[[C", and "Left" is "^[[D". These work...sorta like printf formatting strings. '^[' tells Linux that next couple characters contain control information and not their usual meanings. Read more about this here.
103 notes
·
View notes
Text
Shinsouban Heart Build - 07/2024 - New Menus, Fonts and Bugfixes Update

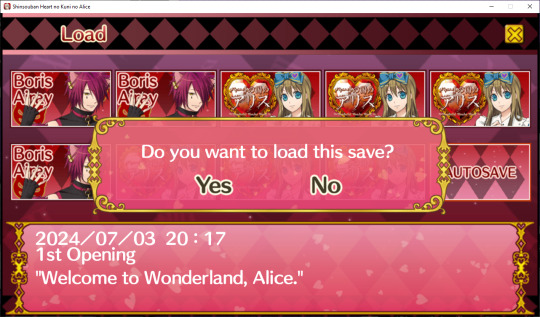


This update is mostly bugfixes, new menus, new fonts, and better multi-language support. A different group expressed interest in translating the game to Spanish so placeholders have been added for them. English is still only fully translated up to OP3 (after that some JP will appear). Most recent builds can be downloaded HERE Windows, Mac, Linux, Android are supported Project introduction Video Installation Guides
Project Discord https://discord.gg/vsQ2ZDah5r We can still use more volunteers! JP -> EN Translators and Proofreaders are most needed but any help is appreciated! (Most of the translation comes from the Anniversary fan patch, but there is new content in this version)
Detailed Changelog Below:
Changes: * New Options menu * New Credits menu * Better side button assets on main menu * Added more fonts with more supported character sets * Replaced video files with higher quality ones from the PS Vita version * JP is used as a fallback if other languages are missing an asset * Asset loading now handled by JSON files that are easily modifiable * Placeholder added for Spanish Language pack (A separate team is looking to translate this game in the future) Bugfixes: * Name input should no longer fail when valid name is input * Videos should no longer be skipped if they take longer to load Known Issues: * Font size defaults to small - change it in the menu and it should save and not be a problem again * Possible conflicts with player prefs from previous versions of the game (if the game doesn't boot please let me know) * Possible color inversion on Android (not sure the cause) please report any bugs or typos you find!
85 notes
·
View notes
Text
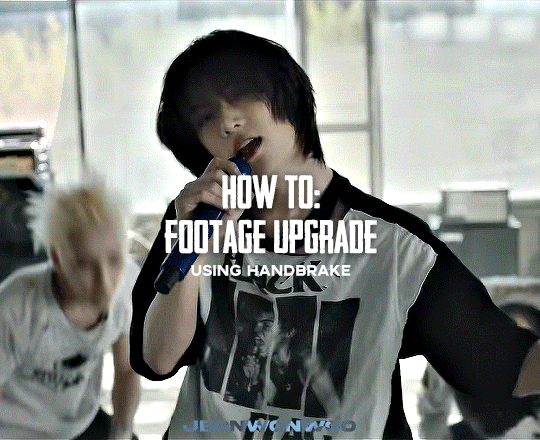
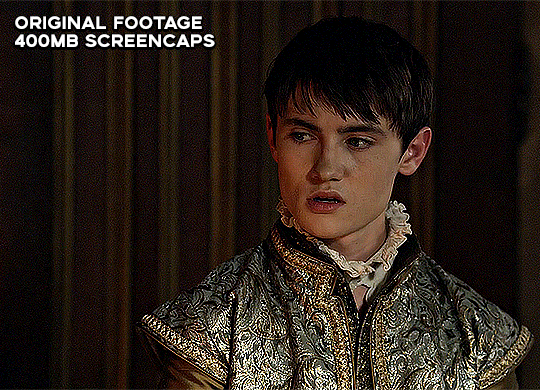
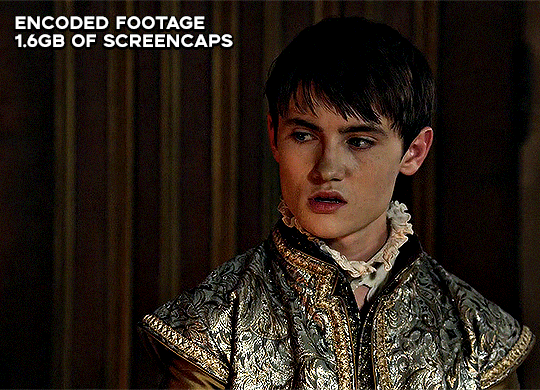
☆ UPSCALING LOW QUALITY FOOTAGE
what i used: • 2021 macbook pro with m1 chip (390/500gb storage used she's hanging in there) • photoshop 2020 • mpv (for screencaps but this isn't needed!) • handbrake (available for linux, mac and windows here) • video source to gif
what is handbrake? basically its a software that helps you change the format of videos, such as for certain devices or screens, or in the case that we're going to utilise, quality and frame rate!
disclaimer: handbrake is super easy to use and very beginner friendly for this procedure and it can make a video go from 30fps to 60fps however it does not replace the quality of true 4k/blue/master-pro res files. in the gif below, this is the level of detail in a master pro-res file.

getting started it's easiest first to note the timestamps of the video you want to encode, and keep in mind that unless your computer is incredibly powerful, i wouldn't try to encode an hour worth of footage in one run! my laptop could handle about 30 seconds in one go before she started toasting.
using handbrake: once you've downloaded the software, open the software and it will come up with a pop up window asking you to open the video source (that is presumably saved within your folders) and go ahead and do so!
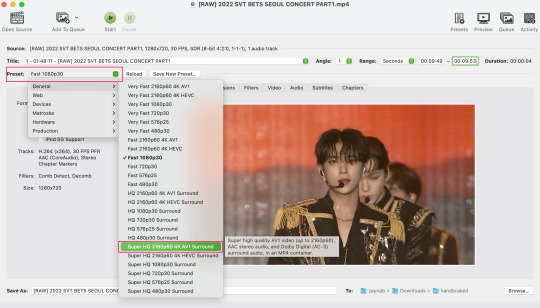
in the range section, use the drop down button to navigate to seconds and enter your timestamp. the duration on the side will show how long of the footage you're gonna encode is!

then go down to the save as, and give your footage 'to be snipped' a name. this isn't necessary but useful because if you're planning to say, encode 3 or 4 small parts of footage in one sitting, each encoding instance will overwrite the previous one. so i just call mine 'cut 1', 'cut 2' and so on.

next go to preset, and there you'll see such a wide variety of options that you can play around with, with differing qualities, frame rates, sound options, and so on. for the sake of this tutorial, i'm using 'superhq 2160p60 4k av1 surround' and i've used the drop down menu to select it! then go ahead and press start! the time taken to complete depends on the duration of footage that you sent to encode! you'll find your encoded video as an .mp4 file in your designated folder (which you can change via browse at the bottom)
what next? • if you prefer to open footage directly into photoshop (my ps can't handle it), then go for it! • if you screencap as i do, then just use mpv or whatever screencapping program you prefer to make the screencaps and open in ps in your usual manner. • you can use the timestamps to further process the video through vapoursynth to denoise, but i've yet to try that!
the results for this first set of example footage, i used footage from the be the sun concert file, which is almost 2 hours in length and 4gb in file size.

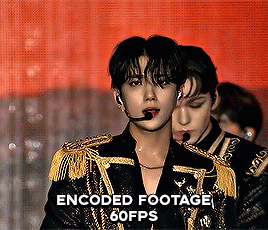

you can see the difference in the smooth frame rate of the footage, as well as the quality of the sharpening!
and to utilise the bane of gifmaking, a gose episode, notorious for dodgy pixelated frames and less hd quality in 1080p on youtube, i ran it through the same settings!

these are the exact same files, downloaded using 4k video downloader and with the same sharpening, but see how on the original file, the sharpening looks a bit more harsh and 'outlined' while it seems to sit softer on the encoded 4k version!
so i mainly use handbrake for dvd files, or not-so-hd 1080p youtube videos or videos that seem a bit clunkier but i had never tried them on a tv/film file so take a look below! i used a 1gb (so not very good quality) of a show (as compared to its 4gb files).
as i said at the start in the disclaimer, handbrake can't replicate true file quality, as you'd expect to see in a proper hd bluray/t*rrent file of a show but there's an interesting difference in the frame rate. personally it's not something i would utilise much there but its all up to individual preference on how someone prefers to have their gifs <3
this is a very basic run-through of how i used handbrake, as i haven't really explored all its features and i use this as a quick process when i'm running through seventeen dvd/dl files but i feel like it would work well on general youtube videos (such as interviews, episodes, behind the scenes) and feel free to send an ask/message for any help/clarification! <33
#ps help#usergif#gif tutorial#kpop gif tutorial#seventeen#completeresources#2605#userace#niniblr#emification#usershreyu#heymax#arieslofi#tusermlee#userbloomingwarrior#uservivaldi#userzil#userfanni#userrozza#usermoonchild#userraffa#tuserjen#usernik
374 notes
·
View notes
Text
GIMP

Ironically the most replies I ever had on Imgur.
OK look here's the skinny on why I don't like GIMP: A long discussion with screenshots
To start with, there's two classes of users:
A: People who never use art apps, don't make art, and maybe tweak a couple of photos for colour balance every couple of years: They love GIMP. They hardly use it or never use it but it's FREE and OPEN SOURCE and they heard Adobe was BAD SOMEHOW because they CHARGE MONEY. They love GIMP. They will die on that hill. GIMP is the best. One day they may even use it.
B: People who are enthusiasts and professionals who actually want to make something and have graphics tablets, strong opinions on CMYK and whether Kyle Webster is over-rated or not. And they don't use GIMP because they tried it and it doesn't do the job.
To go for a comic analogy It's like bystanders telling EMTs their technique is wrong because they saw this Spongebob episode where he used bandaid.
Anyway: Who the hell amI? I feel like I should establish some Bona Fides: not just some random shouty dude. I started out with MS Paint in 1989, then Deluxe Paint Enhanced for PC. I started doing Desktop Publishing with CorelDraw and some non WYSIWYG layout engines. Spent a miserable few years with Quark, moved on to Photoshop... 3 I think. Jettisoned that after it got too bloated (It has a 3D print system inside it!!) In amongst I've tried GIMP, Krita, Clip Studio (Now and back when it was Manga Studio and really didn't want you to use colour), ProCreate, Adobe Fresco, ArtRage, Kai's powertools, 3D Studio (Back before it was Max), Maya, Blender, Inkscape, Serif Studios, Art Studio Pro... I was a graphic designer for several companies, self employed, and worked for Anthrocon doing colour on their badges for around 15 years, as well as creating designs for thier printed work and occasionally keycards, and t-shirts, and designs for badges when they didn't have any art from a GoH. To put it simply I'm not an Adobe Fanboy screeching about people using non-Adobe software. I've seen people who wanted to move to digital give up after buying hundreds of dollars of hardware because they got told GIMP was TEH GOODEST. Anyway...
But every time someone wants to get into art to paint the picture they have inside them, or do some fanart or mess with graphics design, group A crawl out from their bog of incompetence and demand that people use GIMP. Not just suggest it, but actively shout down group B, the people who have experience.
Because Group A would rather push their dogma that paid software is always the wrong solution, than accept that GIMP's frankly shit.
It's just hit version 3.0 after only 30 years. Go team.
Points to note: If you need support for GIMP, the answer is always "Runs OK for me LOL" or "I don't use it but all your problems are because you used Photoshop once." or the good old "Switch to Linux."
In the interest of fairness I'm going to install this new amazing version of GIMP and see if it's any better.

Infamously, the software is so awful that almost all images on Google that you find are pictures of people re-creating the GIMP Logo in GIMP to prove that it is on a par with MS Paint. And it's not a good logo.
First boot:
OK so it opens up a giant panel that tells me I installed GIMP. Presumably a warning. You can't access the actual app unless you've first navigated the splash screen. The app assumes your'e still on an 800x600 monitor. Nice. I suspect the splash screen was supposed to laod over the top of GIMP because... uh... ANYWAY.
Select create Select Make a new image Select a size... hit OK and voila.
Just as a note: Other apps do this in a single panel, or just open the app and let you hit File > new > Select size and bit depth & colour space... which GIMP also skipped.
OK so I'm using a mouse. so let's do a test line then find and turn on the stroke smoothing. Wow!
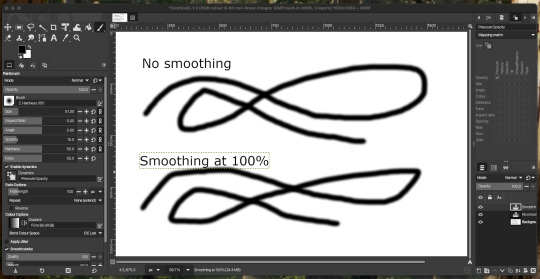
... This is worthless! Looks like the smoothing amount doens't do anyting, you have to tweak the other option on a scale of 0 to 1000.
For those of you playing at home: That makes no sense, because everything else is 0-100.
Also brave choice to make sure that when you pull up the settings they replace the brush palette... on the opposite side of the screen, and give you no way to switch back.
The setting which are incidentally locked, making them... double worthless.
Fun trivia! If you mis click at the bottom of the brush palette, on the left, it just deletes your tool preset! Genius. Sticking a button for a process you'd almost never do, next to the Undo/redo icons. Chef's kiss. Perfect UI design.
I hear they're making a car. The 'explode fuel tank' button is next to the switch that turns the headlights on. You may ask why they have an 'explode fuel tank' button. Yes. You may ask.
Now having created a text label, I somehow am not allowed to draw outside the text label. This is not normal.
There is no Unselect option at all in the selection menu. Escape does't do it. Hitting option/alt pops up a messages saying there's no selection to remove:
... despite there being a selection to remove.
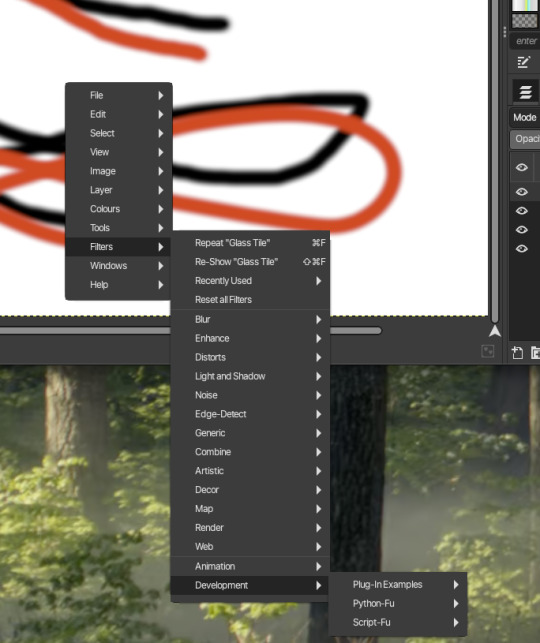
GIMP's infamously mazelike right click menu that copies the taskbar menu is still around:

Why have one set of menus when you can have two of every menu?
Not pictured: The giant tooltip that pops up and covers the thing you're trying to click on. Seriously, I couldn't get a screenshot of it.
Back to drawing...
Apparently the solution is to create a new layer. One text object is still text, the other randomly rasterised itself and locked the selections to it's own boundary box. That is sub-optional or "entirely stupid, who wrote this garbage?" if you're being formal.

These guys. That's who.
Still got a maze of options including 'Y not use PYTHON to make a pic‽"
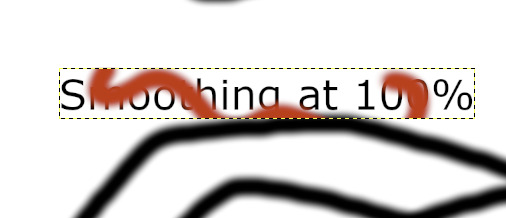
At this point I notice that the vibrant red I pick in the colour picker is showing as desaturated orange in the screenshots. Which is weird because it's supposed to be 8 bit sRGB, aka the basics. But somehow this has been fucked up - GIMP: "Colour accuracy? But Why?"
Let's try an export. a mere four or five clicks later...
... where the hell is it? Let me try that again...
OK. Uh. Great. A third visibly different shade of red to the one I drew with.
At this point, I'm done. I could learn to use the tools easily. I could dig through the manual and look for whatever ass backward UI decision lets you resolve it's inherent flaws like rasterising text at random...
... but if I tell it to use 100% red and it insists on using some buggy kludged system that outputs it to a different shade, then why bother? Nothing you do will come out looking the way you intended.
Meanwhile Clip Studio's over here doing 100% of everything you need for amateur or enthusiast or even pro level art (I created one of Anthrocon's T-shirts in Clip Studio), and it'll run on a tablet and let you draw on $400 of hardware or a desktop and a graphics tablet.
And if by some goddamn chance you got all the way through this, send me a boop in the notes!
16 notes
·
View notes
Text
UBUNTU TOUCH | DAY ONE
If you didn't see one of my previous posts, I've got a phone to experiment with, and I'm gonna be trying out various mobile operating systems! (Primarily linux based! Not that android isn't linux but lets be real.) please ignore my greasy ugly hand Installation Process: The installation actually wasn't that bad! Was kinda awkward trying to get the phone updated to the correct version without upgrading too far, but after that was dealt with everything else was taken care of very smoothly and easily with the UB Ports custom installer! Didn't have a fail state, nor did the phone brick! I'd rate this an 8/10! Setup and Tutorial: Setting up the phone after the install was very fast, frankly there wasn't much to set up. Thankfully it's not like Google or Apple where they ask for your firstborn son before even asking for your SIM card. Just needed to set up a password/passcode, set up my SIM (Which was thankfully automatic kinda, details later) and confirm a Wi-Fi connection if I wanted to!) Tutorial however, was a bit lackluster. While it was descriptive, it also only popped up on my first time seeing each screen. (E.g. I didn't get the tutorial for the phone app until I opened the phone app.) While I don't think this is necessarily a bad thing, it also means I would need to walk through every inbuilt app to make sure the tutorials are all done. kinda annoying in my personal opinion. Overall I'd rate this 6~7/10. Usage and Experience: For day one this isn't super important, however first impressions do matter for most people. The OS as a whole was very snappy, and never froze or lagged in any of my testing. Additionally, the pull-down shade is very nice! Could be simplified a little more so that you don't need to scroll sideways, and it would also be nice to see more settings overall since the system seems to be quite bare for settings at the moment. However one of the things that really bothers me as a button-enjoyer is the OS not having a button navigation method. The only way to navigate between screens is to swipe from the sides, top or bottom as gestures, similar to Apple and the recent Android iterations. These gestures don't even work perfectly either, which makes it more annoying that I don't have a home button or back button. If there is a home-swipe or back-swipe, then the tutorial did not detail it, and I cannot find it anywhere in the settings. Overall, it's a 4/10 but with LOTS of potential! Functionality: This focus' almost entirely on how it functions as a phone, and if it's problematic for any reason. So far it seems great outside of one issue, as commented on earlier (This is the details later bit lmao). Plugged an active SIM card into the phone and it automatically logged the APN and other important information which was very nice. Tested the mobile data and texting, and found no issues except for maybe being unable to send MMS (Need to double check that it was not a file size issue.) However, this entire time I've not had the ability to make or take calls. I'm not sure why, the APN, provider, and everything in the settings is correct to what I can tell. I may attempt to either reinstall the dialer application, or erase and manually set the APN in the event that might fix it. If I cannot get calling to work this score will look a lot uglier. Overall, it's a 7~8/10! for now.
App Availability: Seems great! The built in app-store, or "OpenStore" is pretty cool, and seems to have a lot of useful apps. I did notice a small fraction of android apps that I could use (Like Slack, thanks workplace -ﻌ-) but they were just WebUI apps, which isn't bad, but it's bad. I haven't attempted to set up or use Waydroid, but I will not have that change the score at all since using Android apps (kinda barely) defeats the purpose of an alternative operating system. Overall score, 8/10, but needs a deeper dive.
I'll likely put out another update at either 15 days or 30 days!
Whenever you guys think you want one!
8 notes
·
View notes
Text
Dungeon Meshi Miscellaneous Monster Tales 2
This felt a bit more comically purposed than the last one.
Golems
I complained about how golems were only used for combat purposes and this ended up giving a justification for why they aren't used for general purposes. And it's an explanation I felt in my soul.
It was because of programming errors.

This is like the equivalent of writing "if (x = 0)" when you were supposed to write "if (x == 0)". The first will set variable x to the value 0 and then return true because the operation succeeded. The second will check the value currently stored in variable x and return true if the value is 0 and false otherwise.
This also reminds me of a personal story trying to debug an issue I had with a spreadsheet I needed to analyze. I wanted the program to run a certain task for every line in the file but it kept having some odd error where the first line worked correctly, but every other line would act as if there was an extra field at the beginning and shift over by one.
Eventually I found that the issue was certain versions of Windows defined a new line differently from the linux OS I was using. The end of every line in the spreadsheet had a "\r\n" that I could only find by converting the spreadsheet into ASCII and then I had to remove every "\r" in the file to get it working.
Orcs
Kinda strange how orcs have upward facing teeth in their upper jaws. That seems impractical. Also, the teeth sticking out of the chief's mouth when it's closed are the upper teeth.

I wouldn't be surprised if those upper canines were rootless similar to a boar's tusks. In a hand-to-hand fight, orcs probably prefer grappling and then slashing their opponents with those teeth. It would keep them safe from getting something in their mouth they don't want.
I've seen posts of people commenting on Ryoko Kui's artbooks and I have to strongly agree that she knows how to draw women of all sorts of body types. And this section is just her indulging in the beauty of large women.
And Laios being Laios, he didn't realize where the line talking about physical attraction becomes uncomfortable and ended up angering the chief because the chief thinks Laios is leering at his wives. He also made Marcille uncomfortable because he had to bring up people's attraction to ears.
Mimics
All the info we get here is stuff from chapter 0. These things are just hermit crabs that grow to cocnut crab size and will use anything they can find. The one using a bottle cap is adorable.
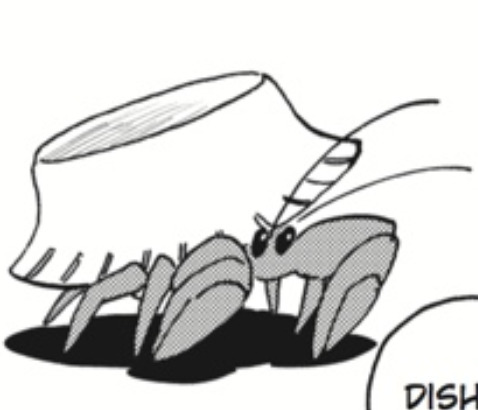
They probably ambush small bugs and lizards when they're that tiny.
Treasure Insects
Nothing much to say here. Turns out the party ended up not only throwing away super valuable jewels, but they also ate super valuable specimens. Maybe the value of a treasure insect is related to how similar to an actual jewel they are.
Just as a reminder, I offered a hypothetical exchange rate of 1G = $0.05 USD when talking about the price of a book in the last Miscellaneous Monster Tales. Even at that rate, those bugs would go for fairly high prices. The diamond one would end up at $2,500, which is what an actual diamond like that could cost.

Ghosts
I'd heard of the thing Marcille mentioned about the weight of the soul and did some digging into it.

The whole thing comes from a 1907 study by physician Duncan MacDougall who wanted to see if souls have weight. He measured the weight of six patients at the moment of their deaths and found that one of them lost 21 grams when they died. The study is considered utterly bogus since he had such a small sample size and only reported on the single sample that fit his hypothesis. MacDougall himself even said that the results he got shouldn't be taken as conclusive of anything, but the newspaper that released the story did a horrible job actually reporting it as they usually do.
Calling brewing a type of necromancy is definitely a fascinating way to think about it.
Living Pictures
If Living Pictures are just illusion spells, then Laios's attempts to get food from them were doomed from the start no matter what. Even though he got to eat in that third painting, the food wasn't real which explains why he still felt hungry after and why he couldn't pull food from the second painting.
This is supposed to be silly but this one is just an existential nightmare. Laios's self-doodle seems to have all the memories of the real Laios and is just trapped in that painting forever.
Love how bad Laios's artwork is.

Kelpies
This is more informative than anything. I'd heard of kelpies before this chapter and decided to do a quick look into them because I was curious about the liver bit.
Kelpies originate in Scotland and they can shapeshift, though they usually can't transform their hooves.
It's probably just one of those things parents told children to keep them from playing in the deep rivers. "Don't play there. You'll drown" implies that the child's incompetence will kill them. But children are the most overconfident, egoists you'll ever meet. So you instead have to tell them there's a monster that will lure you in and drown you.
Now I'm curious if there were native horses or horse-like animals in Scotland that inspired Kelpies. Maybe the general origin is horse-riders would try to wade through rivers on their horses only to drown when the horse panicked and it spun into the kelpie myths.
I never found anything about them not eating livers.
back
16 notes
·
View notes
Text
I got really excited when I read this post where @snowssims explained how to extract The Sims 2 .xa audio files.
The problem is, sound files lack description and there are hundreds of those :/. I started with SFX1.package and I intend to plough through that because I NEED to get rid of barking dog environment sounds (if you manage to find it, let me know!).
While browsing for it I've found bed woohoo sfx and replaced it right away - I might as well share.
💕🎵🚫
No Bed Woohoo Cutscene Music
Download (SFS)
*This will replace bed woohoo cutscene music/sfx with another ALMOST silent ts2 audio file that I've found in game files. Please note there's a single very quiet muffled sound at the beginning.
*Not sure if it will work in every TS2 game.
I still have no idea how to replace game sound files with brand new mp3 files - SimPe gives me errors when I try to do this. Update: not sure what was wrong, maybe frequency was too high - I've tried to replace in-game MP3 with custom MP3 file coded at 32000 Hz /48kbs and it works - please note the sound duration has to match animation (or it will get adjusted if it's too short).
Apparently FFmpeg can open/convert audio to .xa format but it requires some extra steps to make it work on Win10 and I didn't get through that part yet. Apparently it's easier to run it on Linux.
I went through around 100 TS2 audio files inside Sfx1.package by now - I sorted resources by size and started from the largest. If you intend to find particular music files I recommend this method.
There are loads, LOADS of car and water sounds for some reason. Lots of almost silent files as well. Most audio files seem to be 6 sec long or shorter.
81 notes
·
View notes
Text
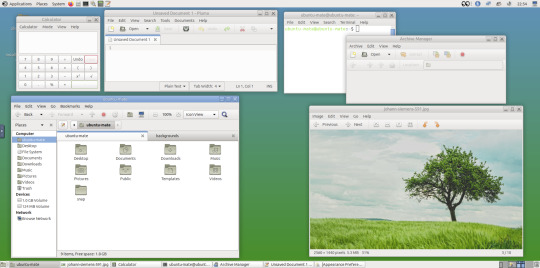
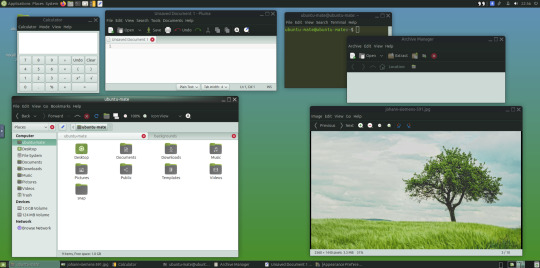
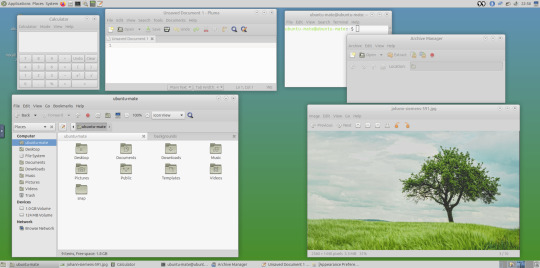
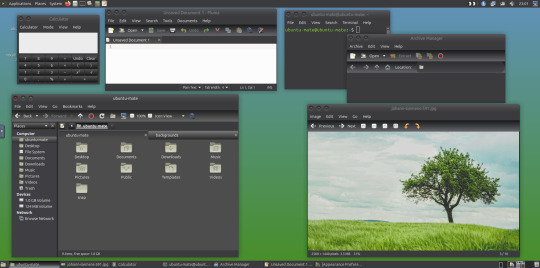


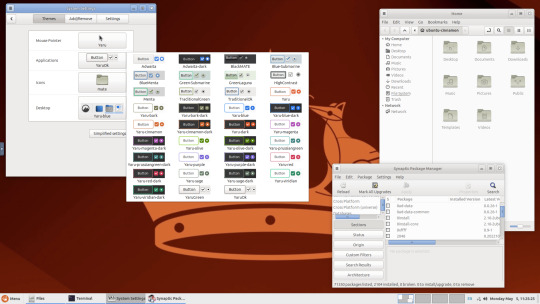
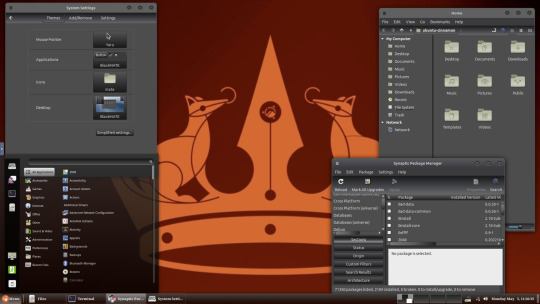
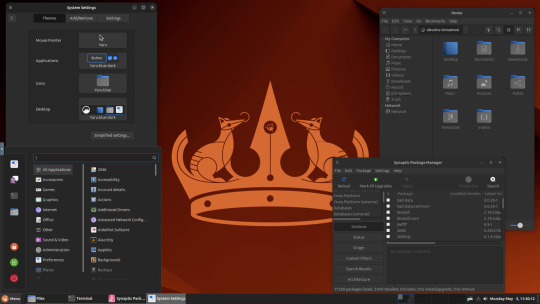
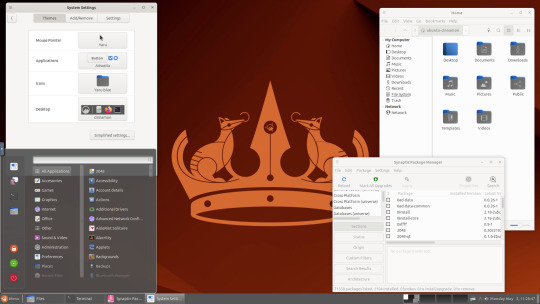
May 2025.
I tried installing a set of themes on Ubuntu MATE 24.04.1 LTS in Distrosea today.
https://distrosea.com/
These themes are provided as a theme package found in vanilla MATE desktops such as Debian and Fedora.
MATE is the modern day continuation of GNOME 2, a very popular, efficient and functional desktop environment from the early 2000s.
The theme pack I selected are compactable GTK3/4 (Graphical Toolkit) versions based on classic GNOME 2 era themes.
Ubuntu MATE website:
https://ubuntu-mate.org/
Debian Linux website:
https://www.debian.org/
Fedora Linux website:
https://fedoraproject.org/spins/mate
See MATE Desktop website here:
https://mate-desktop.org/blog/
About the Graphical Toolkit user interface:
https://en.wikipedia.org/wiki/GTK
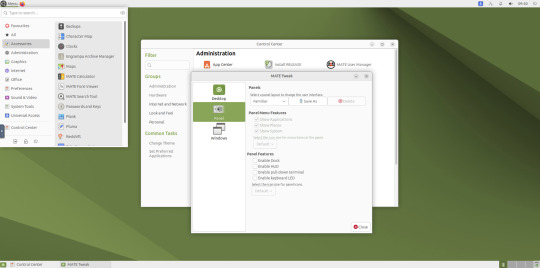
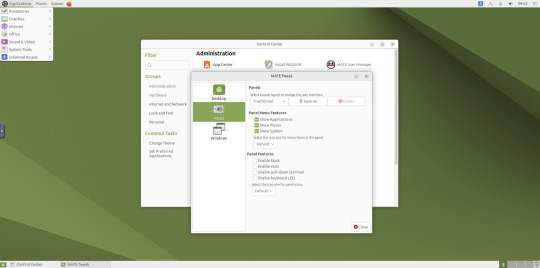
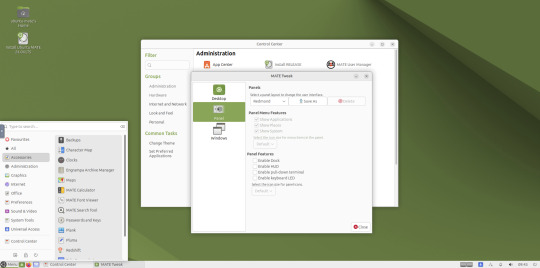
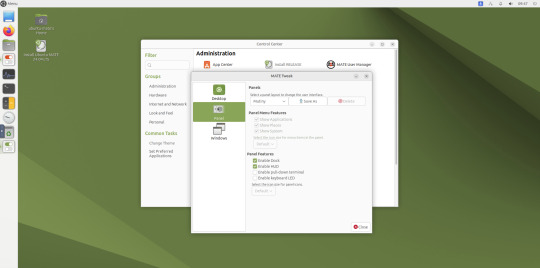
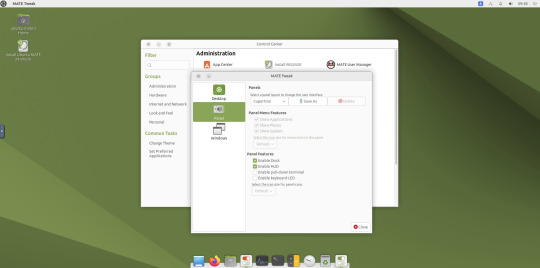
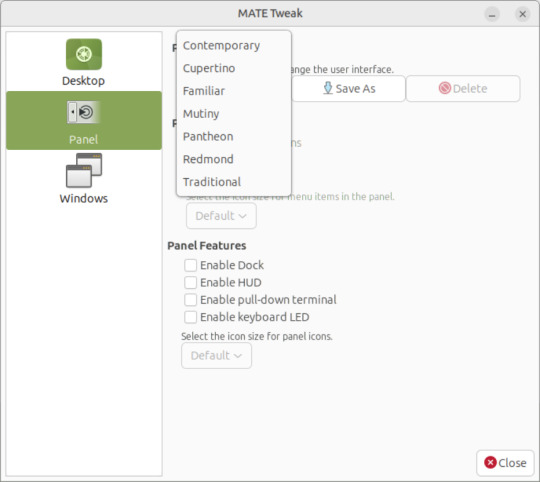
I used the MATE Tweak tool to adjust the panels from the 'familiar' layout to the 'traditional' layout. Here are many of the layouts available.
MATE Tweak can change the panel layout between Traditional (GNOME 2), Unity, Redmond (Windows) contemporary (Mac OS) style.
Here are many of the layouts available.
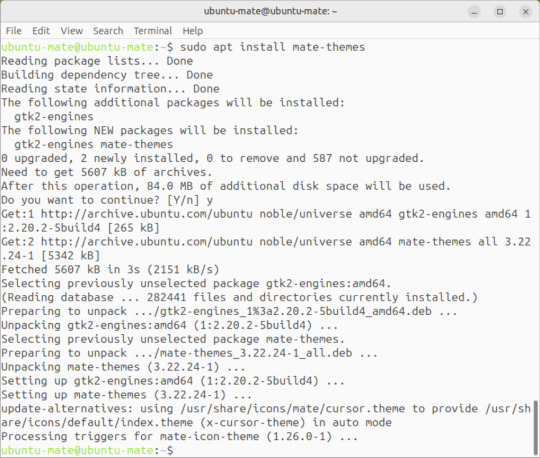
Afterwards, I used the command line to install the themes with the command: sudo apt install mate-themes.
This command then prompted me to agree the system changes and then it installed the required theme files to the list.
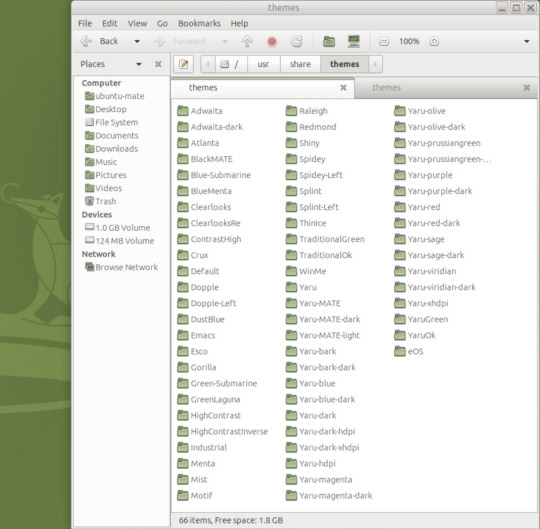
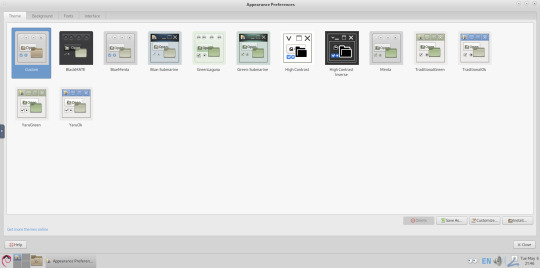
I opened up the theme folder in the Caja file manager. This shows all the ones installed on the system.
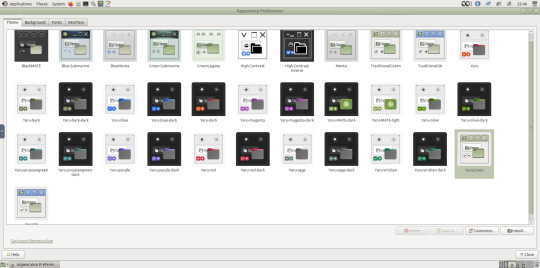
Next I opened the appearance preferences and cycled through each theme. There are a total of 12 new themes it added alongside the existing Yaru Colour theme collection for Ubuntu.
This package couldn't be installed graphical so this is why I installed it through the terminal. It is also available to install through the Software Manager on Linux Mint.
The theme package can also be installed on the Cinnamon desktop and other linux distributions.
I like these themes as they provide a more 3D feel and is refreshing to see themes for a desktop environment that hasn't moved towards flat design. It themes all the desktop elements from the windows, panels, drop down menus, CSD apps and widgets.
My favourite one is called YaruOK (blue), as it provides resizable window controls, 3D controls and provides a familiar look to the desktop. The theme is also called TraditionalOK.
This theme is a fork of a GTK2 theme called Clear-looks, which was created by Red Hat developers.
YaruOK is a modern variant that uses GTK3 & 4. The theme is rendered in SVG instead of PNG format which improves HiDpi scaling and features themed client side decorations for header bar windows such as the Disks utility.
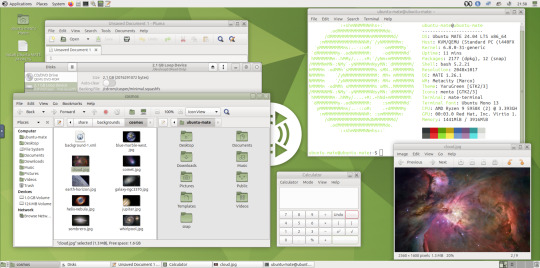
I also added a GNOME Eyes widget onto the panel!
These fun set of eyes follow your mouse cursor around the screen and can help you find the cursor amongst the clutter of windows. It is built to be very lightweight.
I also like the workspace switcher on the bottom left, which allows you to switch between as many desktop workspaces as you want.
The little square windows within each desktop can be clicked on and moved to another workspace.
Like with other desktop environments, you can also right click a window and move it onto another workspace. Each desktop can be named for a assigned task.
A System Monitor widget can also be added to the panels to display CPU, Memory, Swap and Network processes.
There are many other very interesting widget to play around with on the desktop and panels as well!
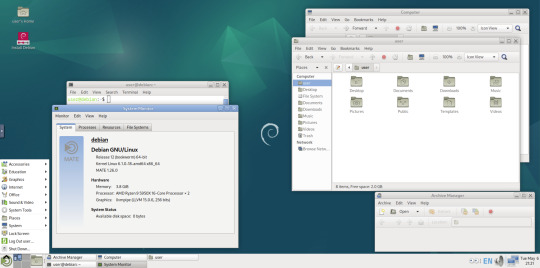
Here are the MATE themes in Ubuntu Linux 24.04.1, integrating with the Cinnamon desktop.
Below are some theming screenshots from Debian MATE 12 Linux.
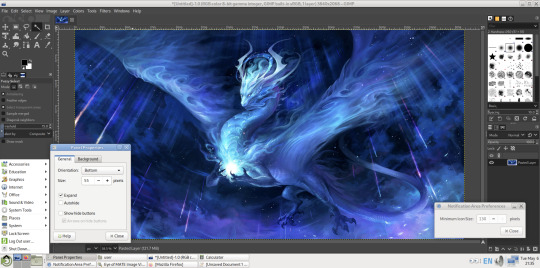
I've customised the panel, selected the compact menu and changed notification sizes to make it more clearer. The window lists stack onto each other with the increased size.
The MATE panels have adjustable transparency and can be re-coloured and textured very easily through its own preferences box.
See screenshots below!
A very interesting look at the user interface elements found in GNOME 2, MATE and Cinnamon Linux desktop environments!
5 notes
·
View notes
Text
How I download fics and give them covers before sending them to my Kindle.
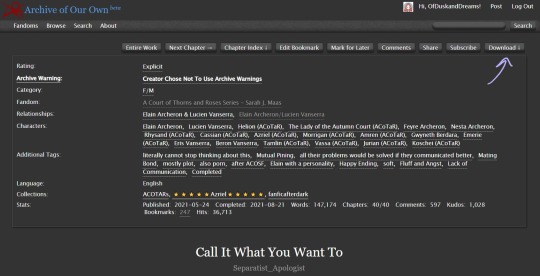
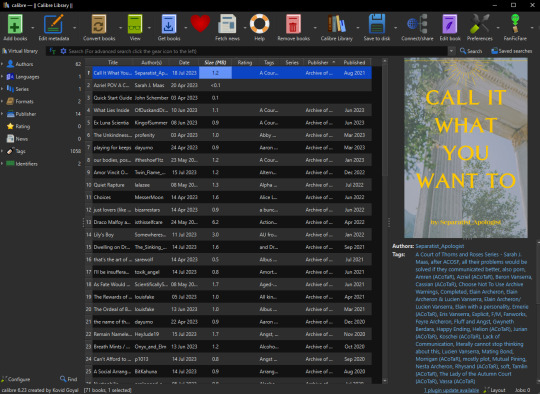
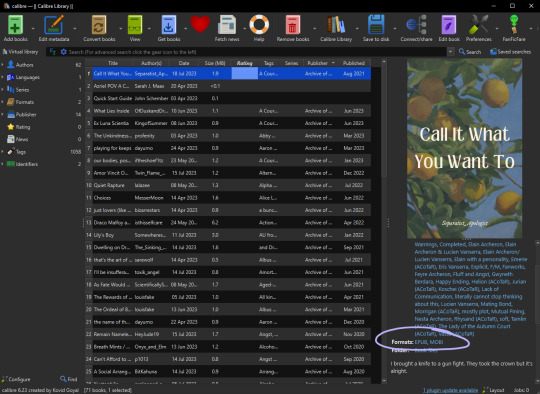
Hi all, I've been considering making a post about this for a while and now seems as good a time as any. I'm not an expert, and there is more than one way you can do this; I'm just going to show you my process using "Call It What You Want To" by @separatist-apologist as an example. [This will only work on computers FYI.]
Part One — Getting Started
Download Calibre (it's free.) Calibre for PC. Calibre for Mac. They also have it for Linux but idk if that's still relevant.
Follow the program's setup instructions, and then those for wirelessly connecting Calibre with your Kindle account. Alternatively, you can connect your Kindle/e-reader to your computer with a cable and transfer files manually or download the file to your hard drive and share it another way. I highly recommend taking a few extra minutes to set up the wireless sharing as I think it's far more convenient.
Create a folder in which to store fanfiction downloads so that you can be an organized human.
Part Two — The Fanfiction
Find the fic you want to download on ao3 and click it so that you're on the fic's first page.
Above the box of metadata (ratings, warning, tags, etc.) on the far right click the "download" option. When prompted to select a file type, choose "MOBI."
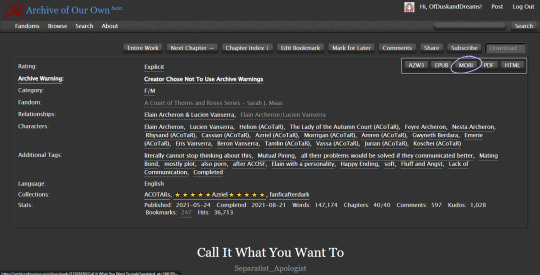
Note: Though ao3 has an "EPUB" option I've noticed a bug that removes the chapter navigation from the fic when downloading the EPUB directly from ao3. If you enjoy the "x minutes left in this chapter/book" feature on your e-reader, you will want to download "MOBI" and we will be converting it later in Calibre.
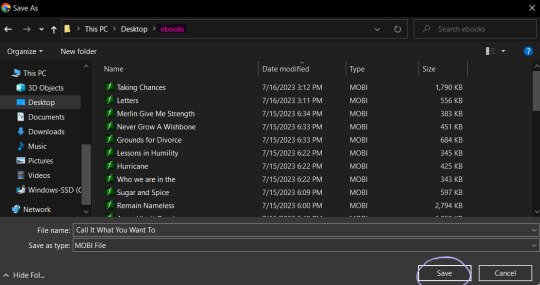
Save the file to the folder you created.
Launch Calibre if it isn't already running.
In Calibre, click "add books" on the toolbar at the top of the screen.
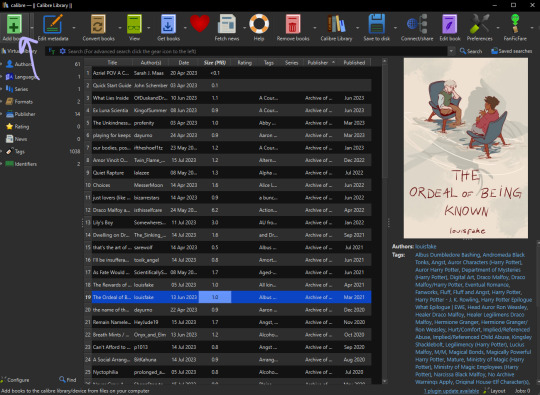
Navigate to the folder you saved the fic in, select the fic, then click "open." Calibre will import the MOBI file to your library.
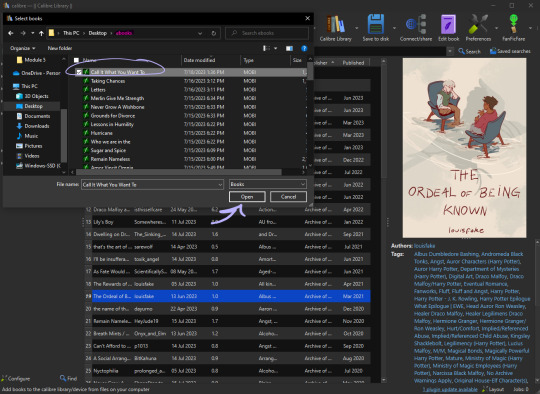
Now as you can see, "Call It What You Want To" already has a cover when we imported it to the library. That is because the cover image is embedded in the fic on the archive. Some fics will already have covers embedded such as this one.
Calibre is not a genius. If there are multiple images in the fic it will usually take the first one and default it to the cover. In the next section, I will go over how to add/change the cover of a fic in Calibre and how I like to create them.
Note: Even if the fic doesn't have embedded images, covers may have been made by readers and linked to the fic either in the notes or related works sections so it's worth checking if a cover already exists. If a fic is popular enough, a Google search of the fic's title + "cover" or "cover art" will show you if there have been covers already created for it.
Part Three — Making The Cover (I use Canva)
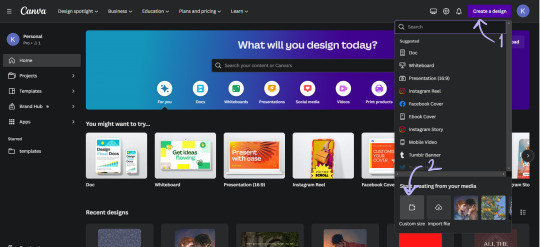
On the Canva homepage click "create a design" then select the "custom size" option. Canva does have a book cover template but I've found that it's awkwardly tall compared to the default size for Kindle books so I make my own.
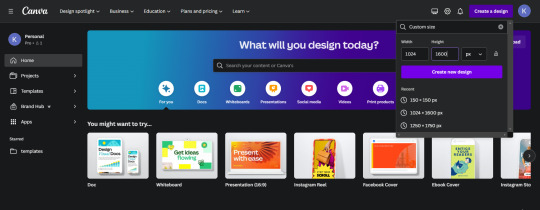
I set the dimensions of the design to be 1024 pixels wide, and 1600 pixels tall, then click "create new design."
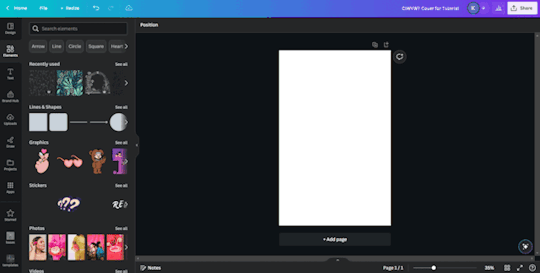
This is where you can get creative, make whatever you want. These basic steps are shown in a gif at the bottom of the section:
One: Choose a background image (you'll want to make sure it's a high enough quality that it won't be pixelated.) I used an image I had already uploaded into Canva, but you can use whatever you would like.
Two: On the sidebar, select "elements" and then "rectangle."
Three: Make sure the rectangle covers the whole design, then change the color. I like using the colors from the photo that Canva suggests and then making them a darker shade. Once you have the color that you want, reduce the transparency of the rectangle to anywhere between 40-50%. (This step ensures that the text we put on top of the image is easily legible, play around with it a bit.)
Four: On the sidebar, select "text" and then "add a text box." Then type in the author's username and change the font, the color, and the size until you like it. Repeat the same steps for the fic's title. I like to center the title on the page and put the author toward the bottom but that's just my preference.
Once your cover looks the way you want it to, click "share" at the top right and follow the steps to download the file as a PNG. I usually just save the image to my desktop so I can grab it easily once I'm in Calibre.
Part Four — Adding the Cover in Calibre
In your Calibre library, hover over the fic and right-click. Then hover over "edit metadata" and click "edit metadata individually."
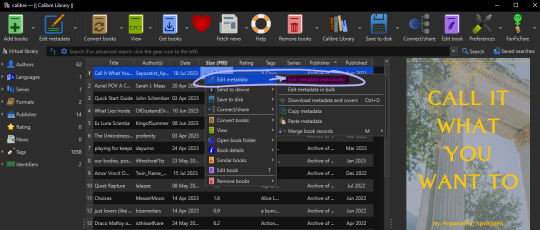
On the "edit metadata" screen, find the section that says "change cover" and click "browse."
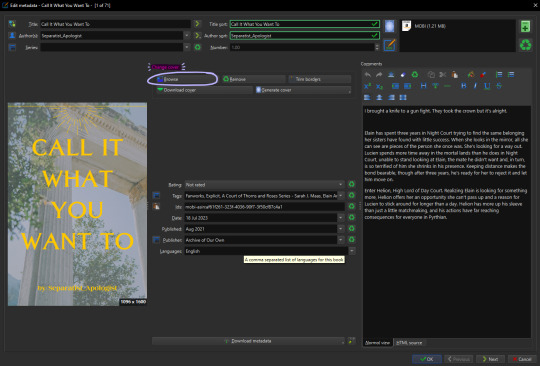
When the file upload dialog box appears, navigate to the PNG you just saved from Canva, select it, and click "open." This will add your cover to the fic. You can use these same steps to add any cover image that you've saved to your computer.
Make sure to click "ok" at the bottom of the screen to save your new cover and navigate back to the library page.

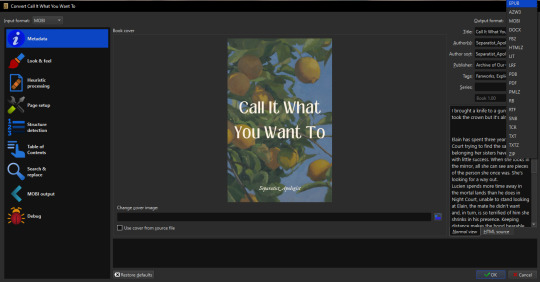
Part Five — Converting to EPUB
In your Calibre library, select the fic and then click "convert books" on the toolbar. At the top right of the converting screen, set the "output format" to "EPUB."
Now, the following steps are unnecessary little things I do to make my reading experience more seamless.
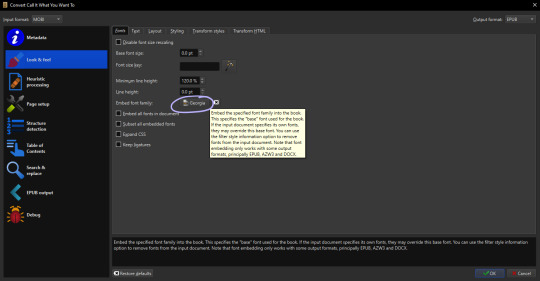
Click "Look & Feel" on the left sidebar. Under the "fonts" tab, I embed the "Georgia" font family. I do this because I prefer reading in Georgia which is not a default option on my PaperWhite*. I have my Calibre conversion settings in place to do this automatically. You can embed any font that you have on your computer.
*It might just be me, but when opening a downloaded fic (following the methods in this post) for the first time on my Kindle the font is always weird. The trick to fix it is to go and change the font from whatever is selected (Baskerville in my case) to "publisher's font" and then I've found that switching it back to "Baskerville" on the font selection screen activates the embedded Georgia... even though it will say that it's Baskerville? Idk why this is, I just wanted to let you know how I fix it.
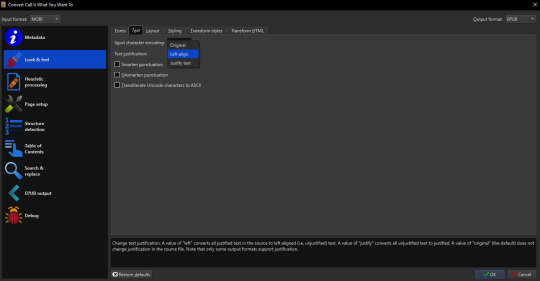
Calibre defaults to a justified text alignment unless you change the default settings. This appears as "original" in the alignment options. The random too-large spaces between words of a justified alignment give me the ick so to make everything left aligned, I stay on the "look & feel" page but move to the "text" tab where I can change the alignment.
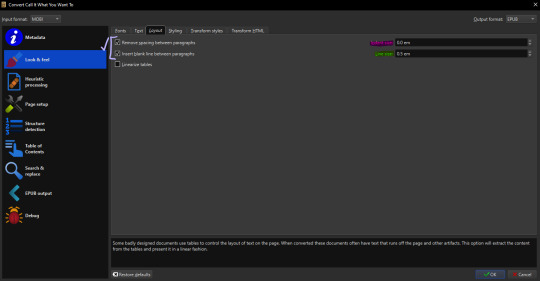
Staying on "look & feel," move to the "layout" tab. To ensure even paragraph spacing regardless of how it appeared on the archive, I select both the "remove spaces between paragraphs" and "insert blank line between paragraphs" options.
On this page, you can also change the indent size of the first line of every paragraph (highlighted pink,) and the size of the blank lines Calibre will insert between paragraphs upon conversion (highlighted green.) I set the indent to 0.0 and leave the line size 0.5 which is the default.
The last thing I do is go to "EPUB output" on the left sidebar and check the box labeled "insert inline table of contents." This just means that Calibre will add a table of contents to the beginning of the EPUB. (By default it puts the TOC at the end which I don't like.)
When everything is set as you'd like it, click "ok" on the bottom right and Calibre will convert the MOBI file you downloaded from ao3 to an EPUB containing the settings we just changed. Both file types will appear in your library when you click on the fic and scroll within the right-side window. I usually delete the MOBI format after I have the EPUB because I don't need it any longer.
And you've done it! Now all you have to do is either right-click and share it to your Kindle, or you can "save to disk" and download the EPUB file to transfer to your e-reader by a method of your choosing.
I hope someone finds this marginally helpful. In truth, I was just bored so I made this post but in light of the recent DDoS attacks against ao3, I think everyone should look into downloading their favorites so that you're never left out in the cold again.
Happy fanfic downloading <3
#fanfiction#acotar fanfiction#ao3#archive of our own#download fanfiction#downloading fanfic#calibre#fanfic#fanfiction cover#how to guides#fanfiction on ao3#fanfiction on kindle#read fanfiction#fandom things
126 notes
·
View notes
Text
No-Google (fan)fic writing, Part 3: LaTeχ
Storytime
Just like I used Zettelkasten for fic parallel to Word for work for a long time, I used LaTeX alongside Zettelkasten for a few years. The reason why I made the switch to LaTeX in the first place was precisely because I’d been forced to use Word at work, and Word is just about the shittiest application you could possibly choose if you have to make text look pretty. As in, print-worthy pretty, not just “this assignment needs to look somewhat good so my professor doesn’t grade me down”.
So I badgered an acquaintance to show me LaTeX, which he did, which is when I started down that road – that I’m still on, although I am fairly certain it leads to hell. There were a number of reasons why I started using LaTeX for writing fanfic as well:
I ditched Dropbox for GIT, which is way better in terms of version control and allows you to directly compare changes between plain text files. With Zettelkasten’s bespoke .zkn3 file format, the direct comparison unfortunately doesn’t work because it’s not plain text, and I became increasingly frustrated with that.
I got into Raspberry Pis, and while it is possible to work with Zettelkasten on the small screens, even that simple interface became a bit much for the screen size.
I fell into the Transformers fandom with its plethora of canon and fanon terms for body parts, time units and even different curse words.
Boiling all of that down, I made the decision to switch to a system that would allow me to write plain text at all times because plain text is great for direct comparisons of files, for working on your stories regardless of which operating system your computer runs on – and because LaTeX has an amazing package called “glossaries” that I’ll talk about later on.
Word/Writer/Google docs versus LaTeX
Hoo boy, where to even start! Because, you see, LaTeX is NOT “What You Get Is What You See”. LaTeX is “What You Get Is What You Want (but that also means that while you’re writing your document, it looks nothing like the finished version will look)”.
Let me be plain and clear from the start: If you’re looking into an easy and convenient replacement for Word/Writer/Google docs, I can almost assure you that LaTeX is not what you’re looking for, at least not plain LaTeX. Learning LaTeX requires you to completely rethink how you approach text, because
where in Word, you’ll have boldface and italics and a mixture of both,
in LaTeX, you must write \textbf{boldface} and \textit{italics} and \textbf{\textit{a mixture of both}} and put \chapter{around every single one of your chapter headings} and never, ever forget to close a curly bracket or you’ll (temporarily) break your document.
It ain’t for the faint of heart or those unwilling to learn how to write plain text with code that is actually instructions to your computer on what you would like pieces of your text to look like in your output file.
And for 99.9% of stories, LaTeX is completely overpowered. Seriously.
But I love LaTeX and use it for writing fanfic, so I’ll include it here.
Cost
On the pro side, LaTeX is free. On Windows, you can either install MiKTeX or TeX Live, on Linux, only the latter.
+1 for being free. Just make sure you have enough bandwidth and time when you install, because it’ll take time. Hours, if your computer is old or you have little bandwidth.
Interface
Here comes the first catch:
You will almost never interact directly with LaTeX, especially if you’re new to it. Becaus LaTeX runs in the background and you need an extra interface to interact with it, unless you’re comfortable using the command line.
Fortunately, there are very good LaTeX editors: TeXstudio and TeXMaker are probably the most popular, and either is good and free. Or you can use any plain text editor, really: Notepad++, KATE, whatever Mac has.
Which I sort of want to give +1 for, because it’s not difficult to find a good LaTeX editor, buuut you actually have to download and install an extra editor to use it.
File formats
Still, there is the +1 I’ll give it for being plain text. You can open a LaTeX document in any editor you like and you’ll be able to read the file contents. The official file extension is .tex, but it’s basically the same as opening a .txt-file.
That is actually great. Genuinely, really great, because regardless of which computer you’re using, every computer, any operating system will come with an editor that can open .tex-files.
Even better, if your documents aren’t too complicated, they can be exported into HTML, which is what I usually do. Write story in LaTeX, export to HTML via make4ht, then copypaste into the AO3 HTML or Rich Text editor.
But the main output format for LaTeX is actually PDF. To use make4ht, you need to use the command line, so it’s actually a bit more complicated than with Zettelkasten or LibreOffice Writer to get your story out of LaTeX and into AO3.
Features
As far as features are concerned, there are an insane number of things you can do with LaTeX, layout-wise. I could spend a whole year writing an entry every day on something LaTeX can do and I still wouldn’t have covered even half of it.
LaTeX requires you to have proper document structures, meaning chapters, sections etc. It lets you outcomment text that you want to keep, but don’t want printed in the final version. It lets you load entire chapters or scenes from other .tex-files if you want to keep them separated like the “notes” in Zettelkasten. There’s a package that allows you to include fancy coloured To-Do notes just to annoy your beta with whiny comments about how you’re struggling with a particular scene. (I do that a lot.)
In other words, it is extensive. So I’m going to just focus on what was my main reason to move to LaTeX to write fanfic: the “glossaries” package. Remember what I said above about all the different terms in Transformers? Canon and fanon terminology is, in fact, so diverse and extensive that people write whole lexica for it.
Hands can be servos. Feet can be pedes or peds. And the time units in different continuities (there’s at least seven) make you want to break down, hit the floor with your fists and scream “why?!?” as your neighbours call 112.
The glossaries package in combination with what are called “conditional switches” in LaTeX allows me to create a sort of “dictionary” including all of those different time units while using the same “keyword” for the same concept.
Let’s pick “year” as an example. The entry for that looks approximately like this:
\ifDreamwave \newglossaryentry{year}{name={ano-cycle},description={probably meanting a year in the Dreamwave continuity}} \fi
\ifEnergon \newglossaryentry{year}{name={cycle}, description={year in the Energon continuity}} \fi
\ifIDWTwo \newglossaryentry{year}{name={kilocycle}, description={year in IDW 2019}} \fi
I could go on, but I think the principle has become clear. All of these have in common that I “call” them by entering \gls{year} in the actual text. What the \if does is switch between the different versions, depending on which I enable by adding, for example, \Energontrue.
Every time \gls{year} appears in the text, LaTeX will now automatically replace it with “cycle”, and I can stop trying to remember which word the particular continuity I’m writing for uses.
Does this blow the whole issue of different terminology entirely out of proportion?
Yes, yes, it does. But if you think that will dissuade me, you can’t have met many fanfiction authors. I do not care in the slightest that it is entirely bonkers to go to all that effort just to make sure I’m using the right terminology for the continuity I’m writing in. You’re missing the point.
Syncing
Unless you’re using Overleaf (I’m going to laugh my arse off if any of you tells me you’re using your university-sponsored Overleaf licence to write fanfiction), syncing your .tex-files across machines requires the use of another service – Dropbox, OneDrive, but actually, GIT is the best, either online via GitHub or GitLab or with a USB. I will get to the differences between those services in due time.
Ease of use for Word/Google doc-users
XD
I said it above already, but if you’re coming straight from Word or Google docs to LaTeX, you’re going to have to invest time into understanding how LaTeX works. You’ll have to get used to writing code in your document and being unable to immediately see what your text looks like in the output, unless you use LyX, which is a LaTeX-editor that was built specifically to make it easier for Word-users to switch to using LaTeX. But even so, you’ll need to learn how to structure documents.
If you’re thinking of using LaTeX for other purposes as well – uni, publishing actual books, anything where it’s useful to be able to layout your documents professionally yourself, absolutely. At least give it a try.
In order to just write fanfic? In franchises that haven’t decided to come up with new time units every time they create a new continuity?
It’s probably not worth it. The only reason I’m using it to write fanfic is because I already knew all of that stuff. I didn’t have to invest time in learning LaTeX in the first place, I just started using LaTeX for writing fanfic as well.
Don’t get me wrong. I love LaTeX. It is just a huge time investment if you can’t also use those skills somewhere else, and if it’s the plain text you’re after, the next part will feature Markdown – which has by and large the same benefits as LaTeX, but takes about half an hour to learn.
Read No-Google (fan)fic writing, Part 1: LibreOffice Writer
Read No-Google (fan)fic writing, Part 2: Zettelkasten
Read No-Google (fan)fic writing, Part 4: Markdown
Read No-Google (fan)fic writing, Part 5: Obsidian
#fic writing#no-google (fan)fic writing#fanfiction#fanfic writing#degoogle#degoogle your writing#degoogle your fics#software recommendations#resources#typesetting#because Tumblr thinks typesetting software is dangerous for minors ^^
4 notes
·
View notes
Text
BEHOLD, THE WORLD'S SMALLEST CAT PROGRAM!!!

This is a program that takes in one argument, that being a filename, and prints out the contents of that file. But why is it in a QR code? That's because it's so goddamn tiny. This program is 417 bytes, which is way below the limit of 2953 bytes a QR code can hold. Therefore, I can encode the entire binary file in one QR code.
You can do a surprisingly large amount of stuff in Linux assembly. For one, OS functions are syscalls, meaning you don't need to link to an external library, which completely eliminates symbol tables, link information, and all sorts of other unneeded metadata. The syscalls this program uses are read (to read the file), write (to write to the console), open (to open the file), lseek (to get the file's size), and mmap (to allocate memory).
Not only that, but on Linux, there is an entire /dev/ directory containing pseudo-files that you can open and read/write from to do all sorts of controls and querying. For example, reading from /dev/psaux will return raw PS/2 mouse data which you can parse and interpret.
This was inspired by MattKC's video (https://www.youtube.com/watch?v=ExwqNreocpg) where he made and fit an entire Snake game into a QR code. He had to link to system libraries, so my program isn't directly comparable, but if I can find out how to do linking (i can't use ld because the file is compiled in a raw binary format to get it so tiny) I might do something similar using XLib.
i feel like i should say that you should NOT actually decode and run this as an executable unless you know what you're doing because i have no idea if it'll actually work on your computer or what'll happen if it fails
6 notes
·
View notes
Text
Update Log #2
Rushing /right/ into things since I am ever-so slightly approaching the midnight of 5/24/2024 (im so sorry) here's the new/fixed tools and fixed copper color :)
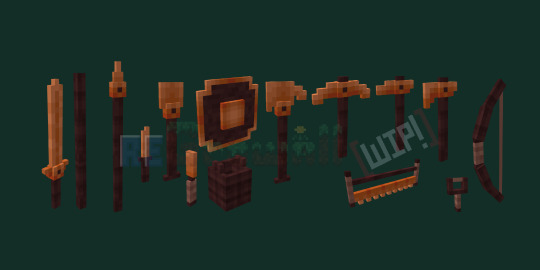
(left to right: claymore, staff, spear, knife, shovel, chisel, rounded shield, bucket, paxel, pickaxe, hoe, axe, bow saw, sling shot, and bow)
Now that I've caught your eye, time to quickly go over the huge technical stuff that doesn't have any fancy images to show *yet*: 1. It now is supported on Linux! (Windows and Apple too obviously) 2. Controller support! Play using whatever controller you'd like, or a standard mouse and keyboard. 3. There's now a saving state when quitting the game to ensure no file corruption when quitting to main screen
4. WE'VE STARTED THE SURVIVAL MODE AND WEIGHT-BASED INVENTORY SYSTEM LETS GOOOOOOO
Here's the WIP design of the HUD, followed by the concept draft for the inventory system:
Basically, as items are added to your backpack/player/whatever, they add to the total weight vs possible storage weight. similar to games like Fallout or Skyrim, but with the visual grid layout of inventories like Stardew Valley or Minecraft or Terraria. obviously as that list grows, itll expand the size of the GUI but if its *too* large itll have a scroll bar. no more worrying about having 347353 different flower types or random knick knacks. so long as you have the STR stat for it you're good to go!
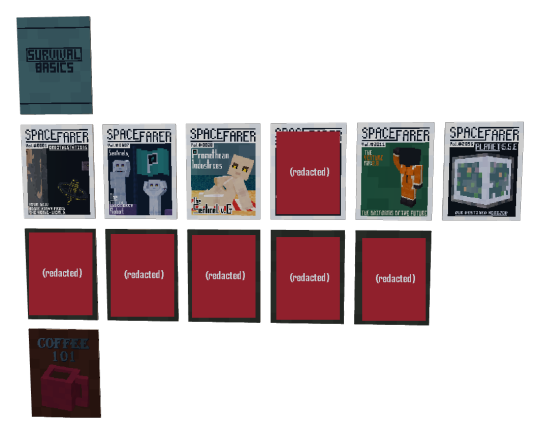
Magazines/books are in the work now too! You can find and read tidbits of these across the world, ranging from top secret training manuals which give you permanent stat bonuses to learning how to make coffee or bits of lore and new customization options, they've got it all!

(also ignore the sentinels standing in as the temporary player models for now but i felt like including this image from a past update preview to visually explain what i meant by stats and STR/strength/carrying weight/leveling those things up and whatnot)
AND FINALLY THE REST
Updated Textures!
New textures and models
New unique items/tools/weapons/blocks
Implemented more blocks
About 15 new lore entries/logs to discover
2 new in game corpo logos and some related items, Daemonik Energy and NUD - Neural User Display (aka the brand that made the user HUD)
A bunch of new skybox elements such as the distant Orbital Satellites, Planets, and more
....a few more things i cant remember right now (i swear ill get better at these summaries - @recusantalchemist)
We are working on the details to have a musician now to work on our soundtrack with us.
All in all, a fantastic 2 weeks of progress that wouldn't have been possible without @andeditor7, like seriously this dude is a genius and I will hype my friend's technowizardry forever. P.s. we are thinking of changing the title to ReGrowAll instead of ReGrowal, let us know what you think. all in all im tired and missed the deadline by 16 minutes (sorry!!!) and im gonna pass out for the night. See yall with a more coherent summary on 6/8/2024! - @recusantalchemist
#pixelart#3d artwork#aseprite#blockbench#game dev blog#pixel art#pixel graphics#game dev stuff#indie dev#indiegamedev#game development#game dev update#indie game#indiedev#game developers#voxelart#voxel game#indie games#regrowal#regrowalthegame#dev update#dev log#dev blog#farming sim#farmcore#farm#farming#farming game#geology#my art
9 notes
·
View notes
Text
HOW TO BACK UP YOUR SHIT ON A FUBAR PC
So, I have a lil linux know how. Someone I know's Windows Boot SSD died on em. I helped unfuck it, but it still got me thinkin. "Do people know how to back up stuff after their PC commits seppuku?"
So What you'll need is:
-A friend's PC to create the usb tool -A USB drive (preferably USB 3.0) with 16 GB or more of storage -An external hard drive to store the backup image -An internet connection.
FIRST
Borrow your friend's pc or laptop.
Download balena-etcher or Rufus
Download a copy of ubuntu linux. Get a coffee, eat a sandwich. This'll take a while.
Once it's done, use Etcher or Rufus to install Ubuntu on the flash drive. Eject the usb, thank your friend, and go back to your malfunctioning compy and plug the usb in.
NOTE: THIS PRESUMES THAT THERE IS A SOFTWARE ERROR PREVENTING YOUR MACHINE FROM BOOTING. IF THE HARDWARE ITSELF IS BROKEN, THIS WONT WORK.
Ok, you're going to boot your PC into BIOS. How? Depends on who made the computer. Google "How to open bios on a [Blank] pc", and you should be able to find the answer pretty quick. Its usually by either spamming the delete key or f10 while your computer turns on.
Once you're in the BIOS, there should be a menu with boot options. Select the usb. It will boot your computer into ubuntu linux, running off that lil usb stick. Neat, huh? You'll get the option to try or install ubuntu as an operating system. You want to click "try".
Plug in the external drive you're putting the backup image of your drive on.
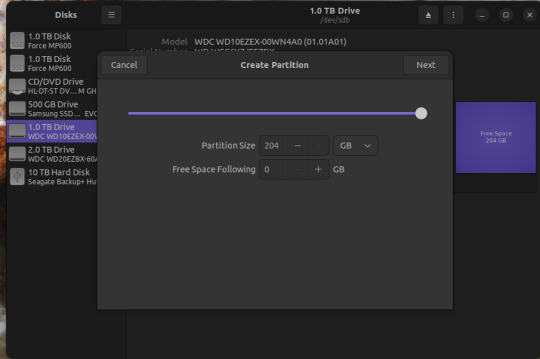
Hit the windows key and it should pull up a search bar. type "Disks" or "Gparted". it's the same program either way so, open it.
You should see something like this.
Depending on the size of your Boot SSD in windows, you may need to shrink the partition a bit. like If you have a 500gb drive handy, but the drive you need to back up is 1TB. So click on the bit that says "basic data partition"
click the gear icon
Click "Resize..."
Resize. if the external drive you're backing up to is BIGGER than the boot drive you're trying to back up, you can skip this.
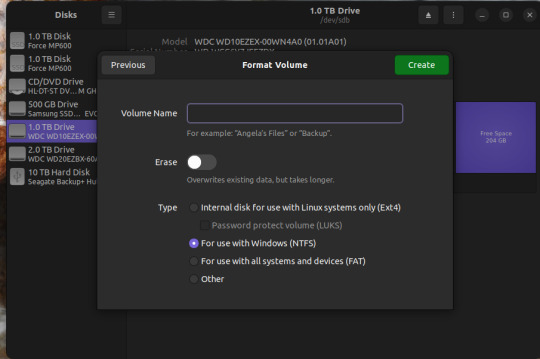
Now there's two things you can do. The first is to simply create an image of the basic data partition where all your files are. The second is to back up the whole disk.
To back up the partition,
Select the basic data partition, click the gear icon, and select "create partition image"
Name it whatever you want, save it on the external drive. Go get another coffee and a sandwich, this may take awhile as well.
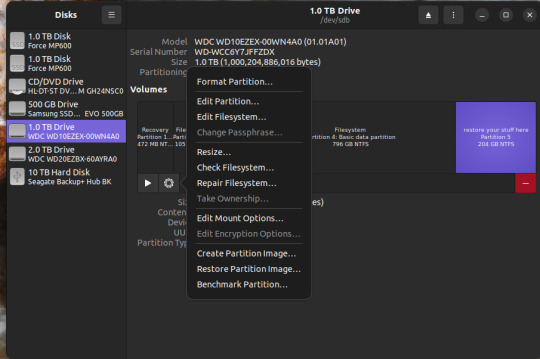
To make a backup of the whole disk, click on the three vertical dots in the upper right corner, and select "create disk image"
Same as before. name it what you want, save it to the external drive.
There you go.
To access the data, you need to restore that image to a new SSD or hard drive. You can do this using the same program. I recommend doing this AFTER you've done whatever was needed to fix windows.
if you're just restoring a partition image, not the whole disk, here's what you do.
If you have FREE SPACE on a drive, or new drive, you can click on the "+" button, create a new empty partition
and click "restore partition image" to make it readable. Then you can mount it as a new drive in windows and copy your stuff over. WARNING: THE PARTITION YOU'RE RESTORING TO MUST BE AS BIG OR BIGGER THAN THE PARTITION IMAGE
For a disk image, similar steps.

Three vertical dots on the upper right, select "restore disk image".
Select the full disk image from wherever you saved it and restore.
WARNING: Restoring a disk image will nuke anything already on the drive you're restoring it TO. So don't restore the disk image to your fixed boot drive, or to the drive you saved the disk image on.
Anywhomst. I hope this helps someone save their stuff or avoid being charged out the nose by a computer repair shop.
16 notes
·
View notes
Text
Hi
So, for the like 3 of you that maybe have wondered where have I been the last weeks, well, basically playing FF7 Rebirth and chilling on cohost.
Thing is, after the whole tumblr selling our data to train ai models fiasco, I was kinda in shock and decided to leave this place. I uninstalled the app from my phone, did backups of my blogs (which I wasn't gonna delete, just stop uploading), went to cohost and started posting there (it's super chill btw, it's like early tumblr mixed with old twitter, in case you're wondering). All while processing what to do next, because frankly, we've all felt that tumblr is somewhat on decline and seeing all the bad stuff it's CEO has done as of late -including threats of nuking the site this year-, the last few years always felt like there was an invisible countdown on this website all the time.
But still, I'm not gonna pretend I'm not gonna miss it, if not tumblr per se, certainly some of the people I've met here who are my mutuals of many years, many of which I've become friends with. Also, despite everything, I still think this is a good platform for posting art. Cohost has its good things (like being WAY more relaxed about NSFW stuff), but there are more file size restrictions, photosets are limited to fewer pictures, etc. There might be some ways to improve that besides what the staff there is doing, since cohost lets you edit posts in many more ways than tumblr (read somewhere that it was tumblr, but for hornier and more linux savy people), so there's also that.
Anyway, after processing everything that happened, and understanding that one way or another, my art's probably gonna be scraped from the internet nevertheless, even if tumblr offers an opt out option (that doesn't even consider the people that tumblr decides to sell our stuff to, let alone the fact that it also arrived so late that we probably everything was already scraped to begin with) even if I glaze it or whatever, I kinda made peace with what happened. I'm still weary about uploading, or where to do it. Yes, I know that I don't have huge numbers or a distinctive enough style for people to copy, but I also know that, nevertheless, not only my art, but the things I've written, the photos I've taken, etc., all has been fed into that slot machine of generating content. If anything, with the days I've noticed I'm way more angry at techbros as usual, and especially tumblr ceo and part of it's staff -I know that not everyone agrees with him and that there are good people in the staff, but there's also sycophants, professional "yes man"s and the like-.
So, after all that, I thought, well, might as well go back. But the thing is that, after spending a couple of weeks away (and missing the posts I imagine came up here both about the Cerveza Cristal meme and about Toriyama's death, among other things), coming back here has been weird, like, for better or worse, it has lost its appeal. I've read a couple of posts before writing this one and I was like "has it always been like this here?".
So, what now? I have no clue. I don't think I'm gonna download the mobile app again, if anything, I've noticed how much time it consumed to just check tumblr with the frequency I used to, so I don't feel like doing that anymore. I think I might pop up here from time to time, maybe return to live blogging Critical Role and Candela Obscura. Will probably like more stuff than the one I post and reblog. Still deciding if I should post new art stuff here, we'll see.
Anyway, if any of you have cohost, you can find me there
2 notes
·
View notes
Text
How To Install VOCALOID 1 On a Modern Computer
Full tutorial is under the cut, but the basic steps for this process are:
Enable virtualization on your computer.
Install VirtualBox.
Use VirtualBox to create a Windows XP virtual machine.
Transfer the VOCALOID files into the XP virtual machine.
Install the VOCALOID program on the XP virtual machine.
You don't need to have a ton of space or RAM for this, it'll work on a garbage computer (like mine). It works on all common operating systems too (Windows, Mac, or Linux).
Step 1: Enabling Virtualiztion
This is the only step that varies based on which operating system you're using.
I'm covering the instructions for Windows 10 in this post (because that's what I use). If you don't use Windows 10, you'll have to look up a dedicated tutorial for enabling virtualization on whichever operating system you use.
Locate "Advanced startup" in the regular system settings. Either use the start menu search bar to get there quickly, or click through "Settings" > "Update & Security" > "Recovery".
From there, hit "Restart now"
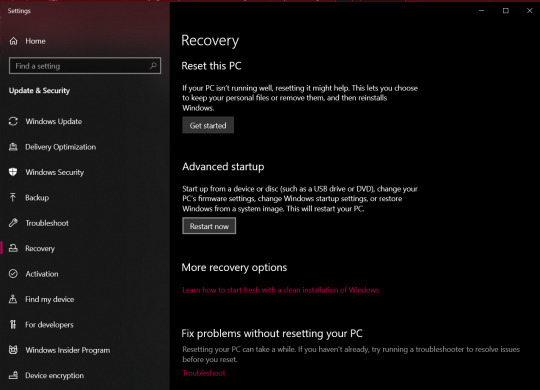
After the restart, you'll be brought to a screen asking you to choose an option.
Select "Troubleshoot" > "Advanced options" > "UEFI Firmware Settings"
You'll then be prompted to restart to change the UEFI Firmware Settings. Hit restart, and you'll be sent to your computer's BIOS.
The specific menu will vary depending on what brand of physical computer you're using (Lenovo, Dell, Toshiba, etc). I'm providing the visual aide for a Lenovo here, but you can look up a visual guide to the BIOS for whatever brand computer you use.
Head over to the "Security" tab to find the virtualization setting.
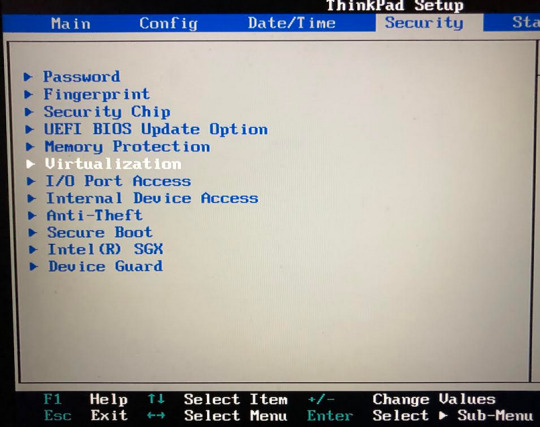
Once you enter the virtualization settings, switch both the options here to "Enabled".
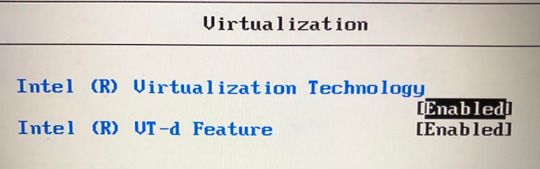
Then you just need to save and exit by hitting F10, and your computer will restart normally.
You can see whether or not virtualization has been enabled by going into "Task Manager". Get to "Task Manager" by right-clicking the task bar, or search it up through the start menu.
Once you're in "Task Manager", click over to the "Performance" tab, and it will say "Virtualization: Enabled" or "Virtualization: Disabled."

End of Windows 10 specific instructions here, everything after this will apply to all operating systems.
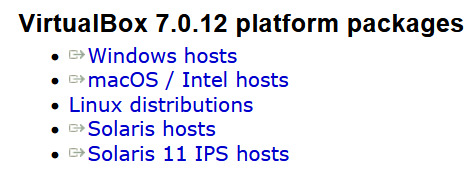
Step 2: Install VirtualBox
VirtualBox can be downloaded from here (on virtualbox.org). Just pick the right package for your operating system.
Once the EXE file is downloaded, run it to go through the VirtualBox installation process.
Step 3: Create a Windows XP Virtual Machine
First, you need to get an ISO of Windows XP. (Digital equivalent of an installation disk basically). I acquired my copy through Internet Archive here.
Just hit "ISO IMAGE" under "DOWNLOAD OPTIONS". Don't worry if it's downloading super slowly, that's normal on Internet Archive.
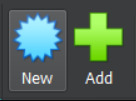
Open VirtualBox, and select the "New" option to create a virtual machine.
From there, go under the "ISO Image" tab and find your XP ISO. VirtualBox will be able to detect that you picked Windows XP.
"Skip Unattended Install" will be unchecked by default. I recommend keeping it unchecked so you don't have to go through the XP installation process manually.
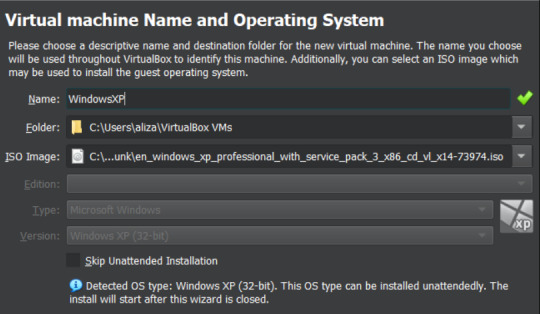
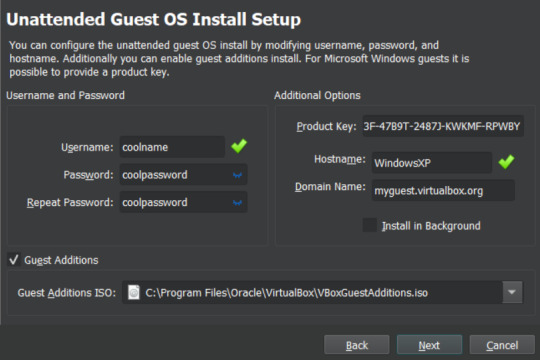
The Internet Archive page provides this working product key you can copy-paste: MRX3F-47B9T-2487J-KWKMF-RPWBY
"Guest Additions" will be unchecked by default, but I recommend checking it. This is a surprise tool that will help us later 😉
(You could still install Guest Additions later, but checking the box here is less work).
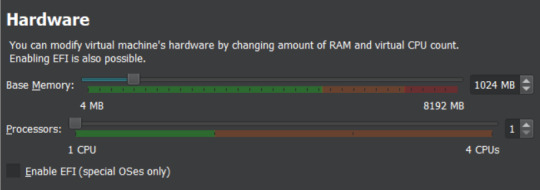
512 MB of RAM is the minimum you can away with for VOCALOID, but a full 1 GB (1000 MB) is recommended for better performance.
No need to adjust CPU count.
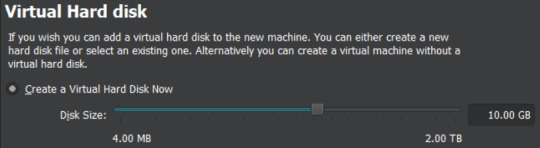
Choose "Create a Virtual Hard Disk Now".
Now you get to pick how much storage space the virtual machine will have. VOCALOID files aren't very big, so they don't require too much space.
I'm not sure about the true minimum size required for this, so I recommend just leaving it at the default of 10 GB. It's unlikely that you'll actually fill/use all of that space, it's just the maximum that the virtual machine will be hypothetically capable of holding. XP with V1 installed took up less than 4GB for me, but it won't let you install the program without extra space available.
There's an easy way to add more storage later if you accidentally make it too small in this step (info at the end of this post).
Make sure all of the settings you chose are correct.
The summary should say "Skip Unattended Install: false", "Product Key: true", "Install Guest Additions: true".

Now VirtualBox will create the machine and install XP on its own. Just leave the window open and don't interact with it until it's finished.
It'll be left on the Windows XP desktop once installation is complete.
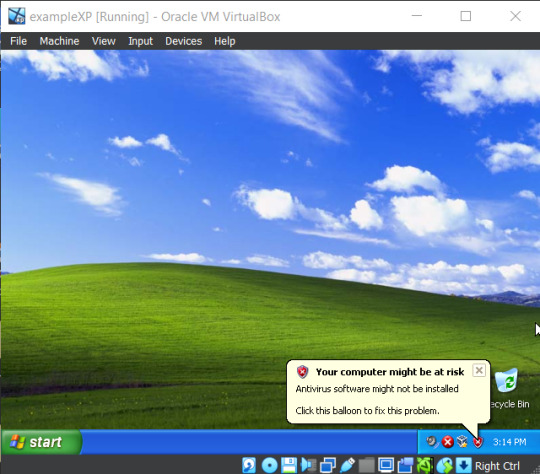
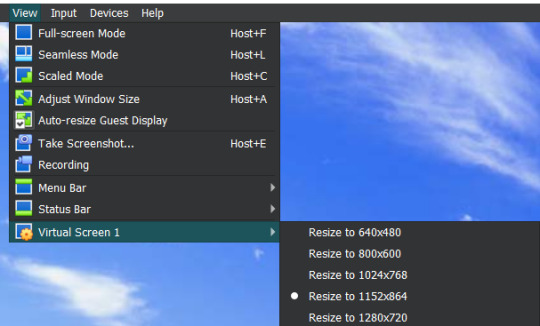
Before doing anything else in XP, I recommend changing the screen resolution so it isn't a ridiculously tiny window you need to squint at.
View > Virtual Screen > Resize to whatever looks best on your screen.
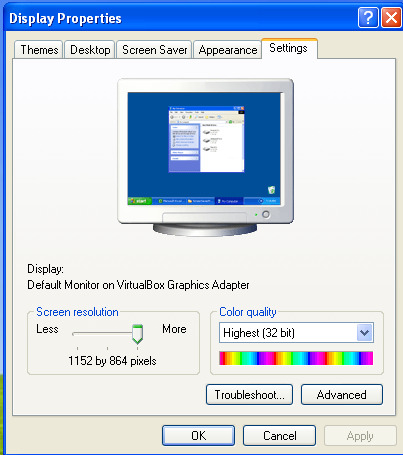
Alternatively, you can right click the XP desktop and select "Properties", then go to the "Settings" tab. Increase the screen resolution and hit "Apply" to see how it looks. You'll get a popup asking if you want to keep those changes or not.
Step 4: Transfer VOCALOID Files Into XP
I acquired a usable copy of VOCALOID from Internet Archive here. That folder includes everything you need to install and activate any V1 voicebank without an official activation code.
(I unfortunately have yet to find a similar resource for VOCALOID 2. For info on using V2 voicebanks, check the end of this post.)
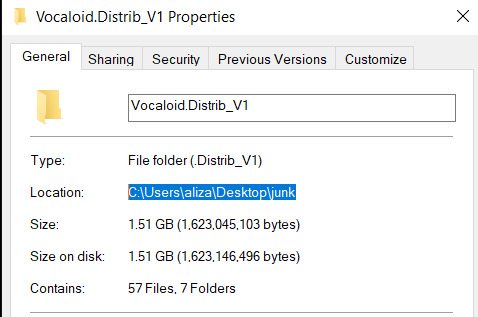
Before returning to VirtualBox, go to the location you saved the VOCALOID folder too, and right-click the folder.
Select "Properties", then copy the location information.
There's a really fast way to transfer small files in and out of the virtual machine (see the end of this post for an explanation on that), but the VOCALOID folder is too big for that, so you need to turn it into a VISO (virtual ISO) instead.
To make a VISO, open VirtualBox, and select the "Tools" icon.
Move to the "Optical disks" tab, then select the "Create" icon.

Now you can paste the location information text you copied into the textbox on the upper left side.
Alternatively, you can hit the folder icon and manually sift through your computer files to reach the VOCALOID folder, but that's annoying.
Make sure the folder is selected (just click on it), the hit the paper icon in the middle to "Add Item(s) to VISO".
Then hit the "Configuration" icon in the upper left to make a textbox appear in the bottom left. Enter a VISO name there.
Make sure the VOCALOID folder has actually appeared under "Viso Content" on the right, then you can hit "Create"
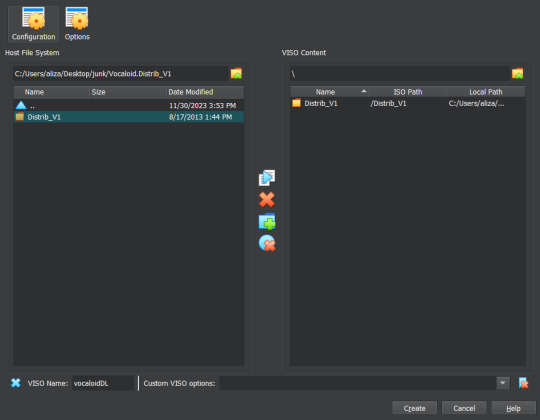
Now go back into XP to insert the VISO into the virtual disk drive.
"Devices > "Optical Drives" > whatever pops up there > "Remove disk from virtual drive" if something is currently in there > The VISO you made should appear as an option.
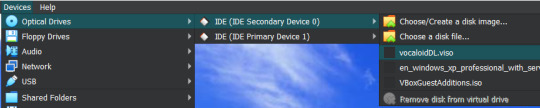
XP will ask what you want to do with the disk, choose "Open folder to view files".
Then drag the VOCALOID folder onto the XP desktop. It should start copying files over.
You can remove the VISO from the virtual disk drive once everything is copied over.
Step 5: Install VOCALOID In XP
Open up "Distrib_V1", then go into the folder for whichever voicebank you want to install first. (The others can easily be added later.)
Now run the setup EXE within that folder. Windows XP doesn't show all file extensions by default, so the setup EXE file won't actually be labeled as such.
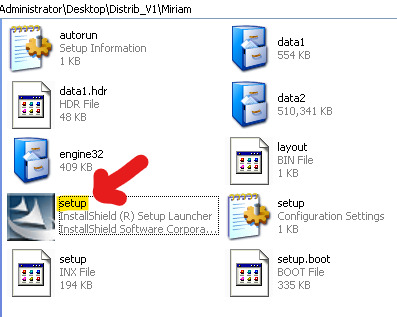
When the installer asks about "Setup Type", choose "Complete".
When it asks if you want to "Activate VOCALOID", select No. Don't say Yes.
Once it's installed, open up the "Vocaloid v1.1.2 Update & Patch" folder that's inside "Distrib_V1".
Run "setup". You'll be prompted to restart XP afterwards, agree to it.
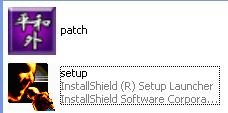
After the restart, right-click the desktop icon for VOCALOID, and select "Properties".
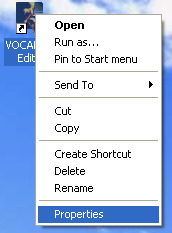
Hit "Find Target", and you be brought to the location the editor was saved to.

Open up the "Vocaloid v1.1.2 Update & Patch" again, then drag and drop "patch" into the folder containing VOCALOID.
Run "patch", hit the very obvious patch button, and then you'll be able to use VOCALOID 1 🎉
To add another voicebank, follow the same steps you went through to install the first one, but choose "Custom" for "Setup Type".
Deselect every component that doesn't have the specific vocaloid's name in it. (You don't really need to select the "SKIN" either if you don't want it, that's just an aesthetic option for the UI).
You won't need to run the updater and patch files again for each voicebank, unless you accidentally reinstalled the Editor.

Additional Info:
"How Do I Transfer Files Without Making a VISO?"
With Guest Additions installed (yes we're finally using it), you can use the super easy drag-and-drop file transfer method for most individual files. It just doesn't like transferring large folders. I recommend this method for sending instrumentals into XP and retrieving completed song files from XP.
Enable it through "Devices" > "Drag and Drop" > "Bidirectional" or select the specific direction you currently need to send things in.
"I Didn't Give My Virtual Machine Enough Storage, How Do I Retroactively Increase It?"
In VirtualBox, hit the keyboard shortcut Ctrl+D to access the "Virtual Media Manager".
Alternatively, you can find it by clicking through "File" > "Tools" > "Virtual Media Manager"
Select [whatever name you picked].vdi, and just adjust the size slider at the bottom.
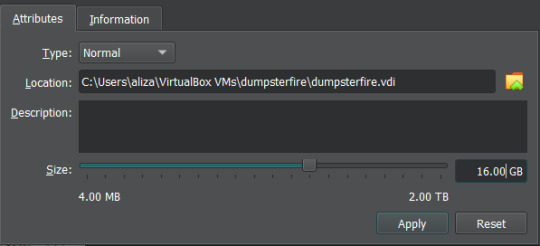
"How Do I Actually Use VOCALOID Now That I've Downloaded It?"
The manual that comes with program is actually very informative!!! You should read it!!! It's available under the "Help" tab within the program.
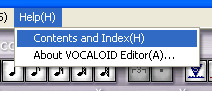
The only video tutorial I found for V1 is this one by Zero G.
One drawback of V1 compared to newer Vocaloid programs is that the piano keys aren't fully labeled, so you need to actually know what order notes go in. There are lots of music crash courses on Youtube which can help you in that department.
"How Can I Get a Working V2 Voicebank?"
If you just want to use a V2 voicebank and don't care about using the V2 software specifically, this site offers a cracked V4 download and compatible versions of the V2 voicebanks ("legacy" versions that have been converted to V3 voicebanks, so they work on V3 or V4).
. . .
If you want to have an awful time, you could install V2 in the virtual machine in almost the same way you install V1. However, I haven't found a reliable way to bypass the activation process for V2, so you'll be stuck with the 14 day trial period (unless you torrent Pocaloid2 instead). You can just reinstall the voicebank in a fresh virtual machine if you want to continue using it after the 14 days are up though.
Download your preferred voicebank(s) from Internet Archive. This user (haru0l) has uploaded all of the V2s (non-legacy). If the one you want isn't already in ISO form, turn it into a VISO.
You unfortunately won't be able to install Rin/Len Act2, Miku Append, or Rin/Len Append if you don't have their originals installed and properly activated (can't be using the 14 day trial).
Installing a Japanese voicebank will give you a bunch of unreadable symbols in the UI, and not all of the English voicebanks on Internet Archive are bundled with the V2 software (for some reason), so you just need to run the English updater to fix that. English V2 update available on Internet Archive here.
(There is another method where you just delete/move/rename every Vocaloid file that says JPN or Japanese in the name, but that doesnt completely translate the UI and still has some unreadable garbage).
If you're installing one of the less ancient voicebanks first, you might not be able to run the updater. It will say you already have an up to date version of the software (I had this problem with Piko). You can avoid that by simply installing an older voicebank first.
Make sure you choose the "Custom" setup for additional voicebanks, same as with V1.
"I Have Another Question OP Didn't Anticipate"
Feel free to send an ask with any questions! There's a chance that I won't know the answer either, but I'll try my best.
Also, please let me know if the links on this post ever stop working so I can replace them.
#idk how to tag this#vocaloid#windows xp#tutorial#weird how they just completely ditched the original synthesis engine and switched to a different system btwn v1 and v2#v1 voicebanks cant be accurately replicated in other versions of vocaloid because of that#v1 meiko my beloved <3#also internet archive my beloved <3 <3
6 notes
·
View notes