#macOS Sonoma Download
Text
youtube
#macos 14#mac#macos#macosSonoma#sonoma#macOS Sonoma Beta2#macOS Sonoma Download#macOs Sonoma Install#macos tips#macos update#macapps#macos monterey#macos ventura 13.4#macos 12.4#macinstosh#macOS tips and tricks#macOS Sonoma tips#macOS Sonoma Tricks#macOS Tutorials#mac os 9#beste macos spiele#datahoarders#datahoarding#appledatahoarding#Youtube
0 notes
Text
Have you got an old Mac that is no longer supported by Apple? It's time to give it a new life.
How to install the latest MacOS on Mac hardware that is no longer officially supported using OpenCore Legacy Patcher.
I recently discovered this and it has been a game changer. Recently my partner needed a Mac for her music course, so we bought a 2012 Macbook Pro as it was cheap and on paper still had decent hardware for working with music. We were then disappointed to find out that it is no longer supported by Apple, and therefore can't run the latest version of Logic, which she needed to inter-op with the school comptuers. Just as we thought we had bought a less than useful computer, I found this video about OpenCore Legacy Patcher from Youtuber Action Retro.
It's a community made piece of software that allows you to install the latest version of MacOS on any Intel Mac, from the late 2000s onwards. All you need to do is download the application on a mac, it will then allow you to make a bootable USB drive for any version of MacOS you want, and you just need to choose the specific mac you are targeting from a list, and it "blesses" the bootable drive, allowing you to install it on your unsupported mac using the normal install process.
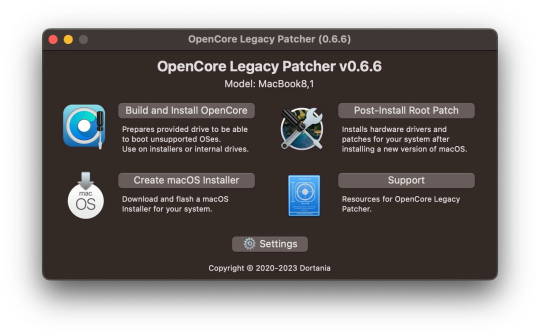
I tried it and it it worked perfectly on the 2012 Macbook Pro, and the latest version of MacOS Sonoma is running perfectly well on the 12 year old hardware. It also allowed us to install the latest version of Logic, so it's working great.
Props to the team for making this and allowing hardware that would otherwise be e-waste to continue to be usable with the modern internet and software. If you end up using it, please consider donating to the team as apparently they had to jump through some serious technical hoops to get this working. Here is the link again if you need it: https://dortania.github.io/OpenCore-Legacy-Patcher/
#mac#MacOS#Computers#OpenCore Legacy#OpenCore Legacy Patcher#Software#hardware#Apple#computer recycling#Action Retro
3K notes
·
View notes
Text

COLORING + SHARPENING TUTORIAL
someone asked for a coloring tutorial and my sharpening settings, so here it is! there are also a few tips to achieve more HQ gifs. :)
tutorial under the cut!
FOR HIGH-QUALITY GIFS
FILE SIZES
it doesn’t matter what your sharpening settings are if the file you’re using to gif is too low quality, so i tend to look for the best that i can get when downloading stuff.
usually, movies (+2h) look better if they’re 5GB or more, while an episode (40 min/1h) can look good with even 1GB. the minimum definition i try to find is 1080p, but i gif with 2160p (4k) when available. unfortunately, not every computer can handle 4k, but don’t worry, you can gif with 1080p files just fine if they are big enough. contrary to popular belief, size does matter! which means sometimes a bigger 1080p file is better than a smaller 2160p one, for example.
SCREENCAPPING METHOD
this can too influence the quality of your gifs. as a gifmaker, i’ve tried it all: video frames to layers, directly opening video clips, loading files into stack, and i’ve finally settled down with opening screencaps as an image sequence. with bigger files, it doesn’t matter much what technique you use, but i’ve noticed with smaller files you can do wonders if you screencap (either by loading files into stack or opening as an image sequence) instead of using video clips. for example, this gif’s original video file was only 4GB (so smaller than i’ve usually go for), if you can believe it!

here’s a tutorial for setting up and screencapping with MPV, the media player i use to screencap. again, you can keep using video clips for bigger files, but you’ll find this useful when dealing with dire causes. i don't file loads into stack, though, like the video does. i open as an image sequence (open > screencap folder > select any image > click the image sequence button). just select OK for the speed. this will open your screencaps as a video clip (blue bar) in timeline mode (i'm a timeline gifmaker, i don't know about you). you will need this action pack to convert the clip into frames if you're a frames gifmaker. i suggest you convert them into frames even if you're a timeline gifmaker, just convert them into a timeline again at the end. that way you can delete the screencaps right away, otherwise you will delete the screencaps and get a static image as a "gif".

ATTENTION if you’re a Mac Sonoma user, MPV won’t be an option for you unless you downgrade your system. that is, if you have an Intel chip. if you have M1 Max chip (or even a better one), here’s a fix for MPV you can try while keeping that MacOS, because nowadays MPV is skipping frames in its latest build. or you can use MPlayer instead for less hassle. here are two tutorials for setting and using MPlayer. Windows users are fine, you can use MPV without trouble.
FOR EVEN MORE QUALITY
ADD NOISE
here’s a tutorial for adding noise as a way to achieve more HQ gifs if your original material is too low quality.
REDUCE NOISE WITH CAMERA RAW
instead of adding noise, you can reduce it, especially if your gif is very noisy as it is.
the path is filter > camera raw > detail > nose reduction. i do this before sharpening, but only my video file isn't great to begin with. because it’s a smart filter, you can reduce or increase its opacity by clicking the bars next to its name in the layers panel.
TOPAZ AI
i use Topaz Photo AI to increase the quality of my screencaps when i need to. it’s paid software, but there are… ways to find it for free, usually on t0rrent websites. if someone’s interested, i can make a tutorial solely about it in the future.
SHARPENING SETTINGS
here are my sharpening settings (filter > sharpen > smart sharpen). i sharpen things twice: 500% 0.4px + 10% 10px. here's an action for it, for more convenience. here's a tutorial on how to use Photoshop actions. for animated stuff, i use this action pack.

COLORING
here’s the gif i'm gonna use as a base. it’s already sharpened like the way i always do it.

LIGHTNING THE SHOTS
half of the secret of a good coloring is good lightning. i always useCurves (layers > new adjustment layer > curves) and Brightness & Contrast (layers > new adjustment layer > brightness & contrast). the settings depend on the scene you’re giffing, but i always try make my gifs bright and with high contrast to make the colors pop.
CURVES
besides lighting your scene, the Curves adjustment layer has four automatic options that will color-correct it for you. it’s not always perfect and it doesn’t mean you won’t need to do further coloring, but it’s a great start. it’s a lifesaver for most ridiculously yellow scenes. look at the difference! this gif uses the 3rd automatic option (the screenshot below isn't mine btw so that's why the fourth option is the chosen one), from top to bottom. what automatic option you need to choose depends on the gif.


sometimes i like to tweak my Curves layer. not everybody does that, it’s not that necessary and if you’re not careful, it can screw your gif up. to modify your layer by hand, you will need to click and drag points of that straight line in the position you desire. this is the concept behind it:

basically, the lower part of the line handles the shadows, while the upper part handles the highlights of the image. if you pull a highlight point up, the image’s highlights will be brighter. if you pull it down, it will make them darker. same thing for the shadow points. you should play with it to get a grasp of it, that’s what i did when i first started giffing.
BRIGHTNESS & CONTRAST
then i added a bit of brightness and contrast.

CHANNEL MIXER
the scene looked a bit too yellow, so i used the Channel Mixer (layer > new adjustment layer > channel mixer) adjustment layer. here’s a tutorial of how it works. not every scene needs the Channel Mixer layer though, i mostly use it to remove heavy overall tints. in this particular case, the Curves layer got rid of most of the yellow, but i wanted the gif to be just a bit more blue so the Channel Mixer tweaks are very minimal.

SELECTIVE COLOR
now, this adjustment layer i always use: Selective Color (layer > new adjustment layer > selective color). this is THE adjustment layer to me, alongside the Curves one. this is how it works:

ie, you can separately edit a color this way, giving it tints. for this gif, i wanted to make the colors more vibrant. to achieve that, i edited the selected colors this way:

for the reds, i added even more red in them by moving the first slider to the right, making the color more vibrant. for his hat to have a more warm tint, i added yellow to the reds (third slider, moving it to the right). finally, to make the reds stronger, i moved the last slider to the right (more black).
for the yellows, i made them brighter by adding white to them, thus making the tile wall and Paddington more bright as well.
for the cyans and the blues, i just added the maximum (+100) of black that i could.
i wanted for Paddington's nose to be brighter, so i added more white to the whites.
lastly, i added depth to the blacks by increasing their own blackness.
you should always play with the Selective Colors sliders for a bit, before deciding what you want or need. with time, you will automatically know what to change to correct the color grading. it all takes practice!
HUE/SATURATION
i don’t know if you noticed, but there are some green spots on the blue wall behind Paddington. to correct that, i added a Hue/Saturation adjustment layer (layer > new adjustment layer > hue/saturation) and made the saturation of the greens 0%, making that unwanted green disappear from the background.

while the green spots on the wall are specific for this gif, i use hue/saturation a lot to tweak, well, hue and saturation. sometimes someone’s skin is too yellow, i made it redder by tweaking the reds and the yellows, or vice-versa. the hue bar follows the rainbow bar, so the maximum settings (+100 and -100) give the selected color to change its hue to something more red or pink (the rainbow extremities). changing hue can give pretty whacky results, like turning someone’s skin tone to green, so you will need to play with it to get the hang of it. you can also tweak the opacity of your hue/saturation layer to further improve your gif’s coloring. i didn’t do it in this case, the opacity is still 100%. the reds and the blues had their saturation increased to make them pop just a bit more, without affecting the other colors.
COLOR BALANCE
the highlights of the gif still had a green tint to it due to the automatic correction of the Curves layer, so i used Color Balance. this is how it works: instead of giving specific colors some tints, you can give them to the shadows, highlights, and mid-tones. if your shadows are too blue, you counterbalance them with the opposite color, yellow. same thing with the cyan-red and magenta-green pairings. in my case, i added a bit of magenta.


B&W GRADIENT MAP
now, if this gif was a dish, it’s time for the salt and pepper. i always add a Gradient Map (layer > new adjustment layer > gradient map) (black to white gradient) with the Soft Light blending mode, thus giving my shadows more depth without messing with the mid-tones and highlights. it also doesn’t “deep fry” (you know those memes?) the gif too much by adding even more contrast. usually, the opacity of the layer is between 30% to 70%, it all depends on the gif. it always does wonders, though!

COLOR FILTER
finally, i like to add Color Filters (layer > new adjustment layer > color filter) to my gifs. it’s very handy when giving different scenes for the same minimalistic set because it makes them kind of match despite having completely different colors. in this gif’s case, i added a “deep blue” filter, opacity 50% density 25. you can change the density and the opacity of the layer for further editing, again, it all depends on the gif.

VIBRANCE
if i feel like it, i add a vibrance layer (layer > new adjustment layer > vibrance) to make the colors pop. this can ruin your coloring sometimes, especially when regarding skin color, so be careful. i didn't do it in this gif because i felt i didn't need it.
TA-DA! 🥳
AN OTHER EXAMPLE
the color grading of the original scene it’s pretty good as it is, to be honest. let’s see a worse scenario, a VERY yellow one:


no channel mixer this time because the automatic curves option dealt with the yellowness, but you can see it made the gif too green. i needed to correct that with the following adjustment layers:
curves (automatic option) (gif 2) >> same curves layer (tweaks) (gif 3) >> brightness & contrast (gif 4) >> hue/saturation (tweaked cyan+blue+green) >> selective color >> color balance (gif 5) >> b&w gradient map >> (sepia) filter >> vibrance (gif 6)
i added a hue/saturation layer to remove the blues & greens before my selective color layer because i thought that was more urgent than tweaking the tint of all colors. color balance (gif 4) was the real hero here, though, by removing the green tint. the selective color layer was meant to make the red pop more than anything else, because the rest looked pretty good, especially her skin tone (despite the green tint). you can notice that tweaking the curves layer (small gif 3) also helped A LOT with the green problem.
tl;dr 😵💫😵💫😵💫
here's a list of my go-to's while coloring and lightning gifs. it's not a rule, just a guide. there are gifs in which i don't use all these adjustment layers, or use them in a different order. it all depends!
1. curves (automatic option + tweaks)
2. brightness & contrast
3. channel mixer
4. selective color
5. hue/saturation
6. color balance
7. b&w gradient map
8. color filter
9. vibrance
i'll suggest that you study each adjustment layer listed for more info, either with other Tumblr tutorials or YouTube ones. the YouTube ones focus on images, but you can translate what they teach to gif making very easily. you can ask me to further explain any adjustment layer, too! i was brief to keep this short (which i kinda failed lol).
feel free to ask me for clarification or something else about gifmaking wise, i always like to help. ❤️
#*#*tutorials#gifmaker tag#resources#resource: tutorials#ps help#uservivaldi#tuserjen#userrin#userelio#useralien#userzaynab#userchibi#userbuckleys#usertj#userbess#tuserlucie#useraljoscha#userdavid#usershreyu#usernolan#userhallie#userisaiah#tusergio#tusergeo#userjesslynn
541 notes
·
View notes
Text
My GIF Making process: Screen capturing using MPV player, Organizing files, 3 Sharpening settings, Basic Coloring PSD + Actions set

This is a very long post so heads up.
I’ll try to be as thorough and true as much as possible to the way I make my gifs (I already use Photoshop Actions which I’ve long since set up but now for this tutorial I’m reviewing them to show you the exact steps I’ve learned to create my gifs 😃) and present them to you in a semi-coherent way. Also, please bear with me since English is my second language.
First things first. Below are the things and tools we need to do this:
Downloaded 4K or 1080p quality videos (let’s all assume we know where to get these—especially for high definition movies and tv series—so this post doesn’t get removed, okay? 😛)
Adobe Photoshop CC or the CS versions can work as well, but full disclosure I haven’t created gifs using the CS versions since 2020. I’m currently using Adobe Photoshop 2024.
mpv player. Use mpv player to get those frames/screenshots or any other video player that has a screen grabber feature. I’ve used adapter for the longest time but I’ve switched to mpv because the press to screenshot feature while the video is playing has been a game changer not to mention ultimate time saver for me. For adapter you need to play it in another video player (like VLC player), to get the start and end timestamps of the scene you want to gif which takes me ages before I can even open Photoshop.
Anyway! Please stop reading this post for a moment and head over to this amazing tutorial by kylos. She perfectly tells you how to install and use mpv player, both for Mac and Windows users.
One thing I have to share though, I had a tough time when I updated my MacOS to Sonoma since MPV is suddenly either duplicating frames or when I delete the duplicates the player seems to be skipping frames :/ I searched and found a solution here, though it didn’t work for me lol. My workaround for this in the meantime is decreasing the speed down to 0.70 then start screenshotting—it’s not the same pre Sonoma update but it works so I’ll have to accept it rather than have jumpy looking gifs.
Now, after this part of kylos’ tutorial:

you can continue reading the following sections of my gif tutorial below.
I want to share this little tip (sorry, this will only cater to Mac users) that I hope will be helpful for organizing the screenshots that MPV saved to the folder you have selected. Because believe me you don’t want to go through 1k+ of screenshots to select just 42-50 frames for your gif.
The Control + Command + N shortcut
This shortcut allows you to create a new folder from files you have pre-selected. As you can see below I have already created a couple of folders, and inside each folder I have selected screenshots that I want to include in one single gif. It's up to you how you want to divide yours, assuming you intend to create and post a Tumblr gifset rather than just one gif.

Another tip is making use of tags. Most of, if not all the time, I make supercorp gifs so I tag blue for Kara and red (or green) for Lena—just being ridiculously on brand and all that.
Before we finally open Photoshop, there's one more thing I want to say—I know, please bear with me for the third? fourth? time 😅
It's helpful to organize everything into their respective folders so you know the total number of items/frames you have. This way, you can add or delete excess or unnecessary shots before uploading them in Photoshop.
For example below there are 80 screenshots of Kara inside this folder and for a 1:1 (540 x 540 px) Tumblr gif, Photoshop can just work around with 42-50 max number of frames with color adjustments applied before it exceeds the 10 MB file size limit of Tumblr.

Sometimes I skip this step because it can be exhausting (haha) and include everything so I can decide visually which frames to keep later on. You'll understand what I mean later on. But it's important to keep the Tumblr 10 MB file size limit in mind. Fewer frames, or just the right amount of frames, is better.
So, with the screenshot organization out of the way, let's finally head over to Photoshop.
Giffing in Photoshop, yay!
Let’s begin by navigating to File > Scripts > Load Files into Stack…

The Load Layers window will appear. Click the Browse button next.
Find your chosen screenshots folder, press Command + A to select all files from that folder then click Open. Then click OK.
After importing and stacking your files, Photoshop should display the following view:

By the way, I'll be providing the clip I've used in this tutorial so if want to use them to follow along be my guest :)
If you haven't already opened your Timeline panel, navigate to Windows > Timeline.
Now, let's focus on the Timeline panel for the next couple of steps.
Click Create Video Timeline, then you’ll have this:

Now click the menu icon on the top right corner then go to Convert Frames > Make Frames from Clips

Still working on the Timeline panel, click the bottom left icon this time—the icon with the three tiny boxes—to Convert to Frame Animation
Select Make Frames From Layers from the top right corner menu button.
So now you have this:

Go and click the top right menu icon again to Select All Frames
Then click the small dropdown icon to set another value for Frame Delay. Select Other…

The best for me and for most is 0.05 but you can always play around and see what you think works for you.
Click the top right menu icon again to Reverse Frames.
I think Photoshop has long since fixed this issue but usually the first animation frame is empty so I just delete it but now going through all these steps there seems to be none of that but anyways, the delete icon is the last one among the line of feature buttons at the bottom part of the Timeline panel.
Yay, now we can have our first proper GIF preview of a thirsty Lena 😜

Press spacebar to watch your gif play for the very first time! After an hour and half of selecting and cutting off screenshots! 😛 Play it some more. No really, I’m serious. I do this so even as early (lol) as this part in the gif making process, I can see which frames I can/should delete to be within the 10 MB file size limit. You can also do it at the end of course 🙂
Now, let’s go to the next important steps of this tutorial post which I’ve numbered below.
Crop and resize to meet Tumblr's required dimensions. The width value should be either 540px, 268px, or 177px.
Convert the gif to a Smart Object for sharpening.
Apply lighting and basic color adjustments before the heavy coloring. I will be sharing the base adjustments layers I use for my gifs 😃.
1. Crop and Resize
Click on the Crop tool (shortcut: the C key)

I like my GIFs big so I always set this to 1:1 ratio if the scene allows it. Press the Enter key after selecting the area of the frame that you want to keep.
Side note: If you find that after cropping, you want to adjust the image to the left or another direction, simply unselect the Delete Cropped Pixels option. This way, you will still have the whole frame area available to crop again as needed and as you prefer.
Now we need to resize our gif and the shortcut for that is Command + Opt + I. Type in 540 as the width measurement, then the height will automatically change to follow the ratio you’ve set while cropping.
540 x 540 px for 1:1
540 x 405 px for 4:3
540 x 304 px for 16:9
For the Resample value I prefer Bilinear—but you can always select the other options to see what you like best.
Click OK. Then Command + 0 and Command + - to properly view the those 540 pixels.

Now we get to the exciting part :) the sharpen settings!
2. Sharpen
First we need to have all these layers “compressed” intro a single smart object from which we can apply filters to.
Select this little button on the the bottom left corner of the Timeline panel.


Select > All Layers
Then go to Filter > Convert for Smart Filters
Just click OK when a pop-up shows up.
Now you should have this view on the Layers panel:

Now I have 3 sharpen settings to share but I’ll have download links to the Action packs at the end of this long ass tutorial so if you want to skip ahead, feel free to do so.
Sharpen v1
Go to Filter > Sharpen > Smart Sharpen…
Below are my settings. I don’t adjust anything under Shadows/Highlights.
Amount: 500
Radius: 0.4
Click OK then do another Smart Sharpen but this time with the below adjustments.
Amount: 12
Radius: 10.0

As you can see Lena’s beautiful eyes are “popping out” now with these filters applied. Click OK.
Now we need to Convert to Frame Animation. Follow the steps below.
Click on the menu icon at the top right corner of the Timeline panel, then click Convert Frames > Flatten Frames into Clips
Then Convert Frames > Convert to Frame Animation
One more click to Make Frames From Layers
Delete the first frame then Select All then Set Frame Delay to 0.05

and there you have it! Play your GIF and make sure it’s just around 42-50 frames. This is the time to select and delete.
To preview and save your GIF go to File > Export > Save for Web (Legacy)…
Below are my Export settings. Make sure to have the file size around 9.2 MB to 9.4 MB max and not exactly 10 MB.

This time I got away with 55 frames but this is because I haven’t applied lighting and color adjustments yet and not to mention the smart sharpen settings aren't to heavy so let’s take that into consideration.
Sharpen v1 preview:

Sharpen v2
Go back to this part of the tutorial and apply the v2 settings.
Smart Sharpen 1:
Amount: 500
Radius: 0.3
Smart Sharpen 2:
Amount: 20
Radius: 0.5
We’re adding a new type of Filter which is Reduce Noise (Filter > Noise > Reduce Noise...) with the below settings.

Then one last Smart Sharpen:
Amount: 500
Radius: 0.3
Your Layers panel should look like this:

Then do the Convert to Frames Animation section again and see below preview.
Sharpen v2 preview:

Sharpen v3:
Smart Sharpen 1:
Amount: 500
Radius: 0.4
Smart Sharpen 2:
Amount: 12
Radius: 10.0
Reduce Noise:
Strength: 5
Preserve Details: 50%
Reduce Color Noise: 0%
Sharpen Details: 50%
Sharpen v3 preview:

And here they are next to each other with coloring applied:
v1

v2

v3

Congratulations, you've made it to the end of the post 😂
As promised, here is the download link to all the files I used in this tutorial which include:
supercorp 2.05 Crossfire clip
3 PSD files with sharpen settings and basic coloring PSD
Actions set
As always, if you're feeling generous here's my Ko-fi link :) Thank you guys and I hope this tutorial will help you and make you love gif making.
P.S. In the next post I'll be sharing more references I found helpful especially with coloring. I just have to search and gather them all.
-Jill
#tutorial#gif tutorial#photoshop tutorial#gif making#sharpening#sharpening tutorial#photoshop#photoshop resources#psd#psd coloring#gif coloring#supercorp#supercorpedit#lena luthor#supergirl#my tutorial#this has been a long time coming#guys. i'm BEGGING you. use the actions set - it was a pain doing all this manually again ngl LMAO#i've been so used to just playing the actions#so this has been a wild refresher course for me too 😆
122 notes
·
View notes
Note
How do u like jellyfin? I've been using kodi since i've been looking for something more featured than VLC for browsing media but it feels bloated and makes wayyy to many internet connections automatically for me to really enjoy it or feel safe running it on any device that seeds torrents. I'm strongly considering jellyfin since I despise plex and ember is proprietary.
It’s the only media server software I’ve ever used, so I don’t have any points of comparison. Also, a transparency preface, the device my server is hosted on is an M1 Apple iMac that's running up-to-date macOS (as of the time of writing, that’s macOS Sonoma 14.1), so as always, your mileage could always vary on other operating systems and chipset architectures.
I also view content exclusively via the iOS app, Apple TV app, and Firefox for Linux x86-64, all of which I’ve never had a problem with.
For the most part, however, I haven’t had any complaints. I keep all of my content on a 2TB USB External HDD that I bought from Walmart. It stays plugged into the computer 24/7, and all I had to do was tell Jellyfin where the files were, which you have to do regardless of where they are.
I’m not an advanced user by any means. I’d love to get outside network support going, but even that is proving too intimidating for me. I probably don’t take advantage of most of the advanced features, either. From my experience with Jellyfin, though, it does what I wanted it to: allow me to view my videos and photos without having to download them onto my phone. I have three users set up (including the one mandatory admin profile), and that’s probably the most non-out-of-the-box thing I’ve done.
The only issue I’ve had is that if your host device loses power (or somehow force shutsdown or crashes without first properly quitting the Jellyfin app) during a library sync (which can take a long time if you’ve added a lot of data at once and are running it off an external HDD), the on-device database file seems to corrupt easily. When this database file gets corrupted, it makes the Jellyfin app panic and shutdown without actually closing the app. As a result, the app looks like it’s running properly, but when you try to access it from anywhere, it’ll fail to load. You have to check the .txt file logs to actually see the panic code and shutdown command. I’ve had that happen twice, and it isn’t very pleasant. Luckily, I also use macOS’s Time Machine feature, so I had plenty of backups. However, it is annoying to have to sort that out, and if you didn’t have backups, you’d basically have to restart the server from scratch. Your content would be fine, but all of your manual IMDb data, custom thumbnails, reported file locations, etc. would be factory reset.
Of course, if you’re running the server on something with a backup power supply or a built-in battery, that eliminates a lot of the risk. The iMac I run my server on also acts as a secondary computer, for me. So I'm also at a heightened risk of crashing and whatnot. If you had a dedicated server computer that did nothing but act as your Jellyfin server, that'd also probably help alleviate some risk.
The extent of my daily use of Jellyfin is constantly playing ambient music from an old iPad next to my stereo, and occasionally viewing images and videos from my phone or laptop. I’m certainly not a power user, but for me, I’ve never had any reason to dislike Jellyfin, so I don’t exactly have a desire to go looking for an alternative. It does what I need it to do, and it does it smoothly, simply, and reliably.
If you're looking for a more advanced user's opinion, however, I'm afraid you've come to the wrong blog.
13 notes
·
View notes
Text
So I just took the LSAT today and to be completely honest… wasn’t as bad as I thought it’d be. Somehow finished every section with time leftover to doublecheck my work! Feeling pretty good about it 🥰 even though I pulled an all-nighter before it and still haven’t slept… 🫠
Not intentionally, mind you—LSAC’s new online LSAT Proctor software isn’t compatible with the new MacOS Sonoma 14.0… so spent all night trying to learn how to downgrade my MacOS version in order to download the testing/proctoring software before my 7am exam.
Turns out, on silicon-chip Macs (M1+), you can’t just simply downgrade or restart/reboot your laptop to the software it originally came in. That’s apparently only an available option on Intel Macs.
Instead, if you have a silicon Mac, you have to go through the complicated process of:
1. Backing up your Mac using Time Machine on some other external hard drive or disk (since downgrading completely wipes your startup disk and erases all data)
2. Setting up a Bootable Installer—also on an external hard drive (separate)
3. Downloading the version software from Apple’s App Store (the easiest part of the entire process! Though, of course, you can’t even run it until you’ve done everything else first)
4. Using the Terminal app and running the specific (in my case, Ventura) command as found on Apple’s website and proceeding with the rest of the commands to get it working.
which… don’t get me started on figuring out how to set up a Bootable Installer. This was all completely foreign to me and honestly I was two “error” messages away from a complete mental breakdown.
At 5am, I gave up and woke up my poor friend to beg her to let me use her laptop for my LSAT.
If anyone can send me a crash course on using the Macbook’s Terminal app, it would be more than welcomed!
At this point, I gotta set up a Bootable Installer just for the spite of it. Never letting myself get blindsided like this again! Will always have a backup version. Learned my lesson lol
#macos sonoma#lsat#technology#programming#coding#macos#macos 14#LSAC#silicon#macbook#personal#lialifelounge
5 notes
·
View notes
Text
Aight so yesterday Apple finally released their new operating systems for their devices. IOS 17, WatchOS 10, and MacOS Sonoma. What I was most excited about was WatchOS 10 since IOS 17 is mid and I don't own a MacBook. Sorry Apple cultists. (Do I still count as an Apple fanboy though?)
Anyways, the Apple watch desperately needed an OS revamp as it was lacking in comparison to rivals like Samsung. And boy did it not disappoint. So the first thing you'll see is that the side button is binded to the all-new control center which is transparent to your current watch which is a nice touch aesthetically. (In fact most UI elements are actually) You'll also notice that swiping down will open up the all-new smart stack which are widgets you can scroll through to get access to critical information (like your boarding pass and calendar) quicky. And this by far is my favorite feature with this iteration of watchOS. Another big thing you'll notice is that when you press the digital crown your app icons are grouped closer together so you can find your apps easily. I had a problem with WatchOS 9 where I couldn't find a specific app due to how zoomed in the app cluster was but with WatchOS 10 you can scroll through the icons much faster to find the one you're looking for. And lastly, first party apps made by Apple have a much better look and functionality like maps, (which now has terrain, walking distance ratio, and offline download capability) activity, and weather (which functions similarly to the iPhone counterpart now. You can view detailed forecasts such as feel like temperatures, distance visible, UV radiation, and more on an hour to hour basis). And last but not least when you are in an app on your Apple watch the app no longer blacks out top portion of your screen therefore it uses all of your screen size.
There are many more features here that I didn't list. You can check out the detailed list of new features of WatchOS 10 here.
If you have an iPhone and want a smart watch then you should really consider getting an Apple watch now. With WatchOS 10 it looks and functions better tan ever before. I would recommend the Apple Watch SE (2nd generation), Series 9, or Ultra (2nd generation since its the same price as the 1st lol) depending on your budget and needs.
Wow, you're still here? Impressed that you've read through my little infodump. Thanks for reading and here's an meme from last week's Apple event as thank you.

2 notes
·
View notes
Text
Download macOS VMware Image and Set Up Your Virtual Machine
Creating a virtual machine with macOS on VMware is an excellent way to experience Apple's operating system without needing a physical Mac. Whether you're a developer testing apps, a tech enthusiast exploring macOS, or a Windows user who wants to try macOS before committing to new hardware, setting up macOS on VMware is a practical solution. This guide will walk you through the process of downloading a macOS VMware image and setting up your virtual machine, making it a straightforward and accessible project.
Why Use VMware for macOS?
VMware is a leading virtualization software known for its robust features, reliability, and ability to run multiple operating systems simultaneously. By using VMware to create a virtual machine, you can run macOS on your existing hardware without needing to dual-boot or risk any data loss. This method is particularly useful for developers, testers, and users who want to experiment with macOS without investing in a Mac.
Step 1: Download the macOS VMware Image
The first and most crucial step in setting up your macOS virtual machine is obtaining a VMware-compatible macOS image. This image is essentially a snapshot of mac os sonoma that you can load into VMware to create your virtual machine. Here’s how you can get it:
Official macOS Installation Files: If you have access to a Mac, you can download the official macOS installer from the App Store. However, converting this installer into a VMware-compatible image requires some technical know-how.
Pre-built macOS VMware Images: For a more straightforward approach, you can download pre-built macOS VMware images available online. These images are typically configured and ready to use, making the setup process much easier. Be sure to download from reputable sources to avoid corrupted files or potential security risks.
Compatibility Considerations: Ensure that the macOS version in the VMware image is compatible with your version of VMware Workstation or VMware Player. Also, check that your hardware meets the minimum requirements to run macOS as a virtual machine.
Step 2: Install VMware Workstation or VMware Player
If you don’t already have VMware installed on your system, you’ll need to download and install VMware Workstation (for Windows/Linux) or VMware Fusion (for macOS). VMware Player is also an option if you're looking for a free solution, though it has fewer features than Workstation.
Download VMware: Go to the official VMware website and download the appropriate version for your operating system.
Install VMware: Follow the installation prompts. The process is straightforward, but make sure you have sufficient disk space and system resources to run a virtual machine.
Install VMware Tools: VMware Tools is a suite of utilities that enhances the performance of the virtual machine and improves user interaction. It’s recommended to install this once your virtual machine is up and running.
Step 3: Create a New Virtual Machine
With VMware installed and the macOS VMware image downloaded, you can now create your virtual machine.
Open VMware: Launch VMware Workstation or VMware Player.
Create a New Virtual Machine: Click on "Create a New Virtual Machine." You’ll be prompted to choose the installation media. Select "I will install the operating system later," then proceed.
Select macOS as the Operating System: In the "Guest Operating System" section, select "Apple Mac OS X" and choose the version corresponding to your VMware image.
Name Your Virtual Machine: Give your virtual machine a name like "macOS Sonoma" and choose a location to store the virtual machine files.
Allocate Resources: Allocate sufficient memory (RAM) and CPU cores to the virtual machine. For macOS, at least 4GB of RAM is recommended, but 8GB or more will provide better performance. Allocate at least two CPU cores, but more can improve performance if your system allows.
Attach the macOS VMware Image: In the "Virtual Hard Disk" section, select "Use an existing virtual hard disk file" and browse to the macOS VMware image you downloaded.
Step 4: Configure and Start the Virtual Machine
Before starting the virtual machine, a few configuration tweaks can help ensure smooth operation.
Adjust Virtual Machine Settings: Go to the virtual machine’s settings and make any necessary adjustments. For instance, you might want to increase video memory or enable 3D graphics acceleration.
Modify VMX File (Optional): For some macOS versions, you might need to add specific parameters to the VMX file (the virtual machine's configuration file). These settings can improve compatibility and performance.
Start the Virtual Machine: Once configured, click "Start" to boot the virtual machine. If everything is set up correctly, the macOS installation screen should appear.
Complete macOS Installation: Follow the on-screen prompts to complete the macOS installation. This process is similar to installing macOS on a physical Mac and involves setting up your user account, configuring settings, and finalizing the installation.
Conclusion
Setting up macOS on VMware using a VMware image is a powerful way to explore macOS without the need for Apple hardware. Whether you’re a developer, a tech enthusiast, or simply curious about macOS, this method allows you to run macOS in a controlled, virtual environment. By following the steps outlined in this guide, you can effortlessly download a macOS VMware image, set up your virtual machine, and start enjoying the macOS experience on your existing hardware. With VMware's flexibility and the power of macOS, your virtual machine setup can serve as a valuable tool for testing, development, and exploration.
VIsit us:
mac virtual machine
0 notes
Text
How bad are Resident Evil 7 sales on iOS? Worse than you think
Dhruv Bhutani / Android Authority
TL;DR
New sale estimate suggests that under 2,000 iPhone gamers have bought Resident Evil 7 from Apple’s App Store.
In recent keynotes, Apple has been showcasing the hardware and software features that theoretically make its platforms great for gaming.
From introducing Game Mode on macOS Sonoma and iOS 18 to highlighting its chipsets’ gaming capabilities during keynotes — Apple has been trying too hard to make serious gaming on its platforms a thing. While its latest devices may indeed be capable of running AAA games reliably, serious gamers are seemingly uninterested in doing so. A recent sale estimate reveals that under 2,000 iOS users have purchased Resident Evil 7 from the App Store.
Resident Evil 7 launched on iOS as an exclusive mobile port two weeks ago. The game runs on the latest iPhone 15 Pro models, in addition to M-powered iPads and Macs. While anyone can download it from the App Store for free, a one-time, $20 in-app purchase (IAP) is required to unlock the base game.
According to Mobilegamer.biz, an Appmagic estimate suggests that over 83,000 iPhone users have already downloaded Resident Evil 7 from the App Store. However, the data also indicates that no more than 2,000 of said users have actually bought the IAP to play the full game.
Given Capcom’s popularity and reputation, these numbers are pretty poor — to say the least. For reference, Resident Evil 7 is the second best-selling title in the franchise with over 13.3 million copies sold since its 2017 debut.
Some may argue that the iOS port has flopped due to its iPhone 15 Pro exclusivity. However, the game’s listing is shared across the iPad and Mac App Store pages, too. This reflects that most serious players may not see Apple’s App Store as a valid AAA game market. And since the game is priced similarly on consoles, it makes very little sense to pay a premium for an inferior gaming experience on tiny screens. Maybe mobile games and AAA titles should each stick to their traditional platforms.
Got a tip? Talk to us! Email our staff at [email protected]. You can stay anonymous or get credit for the info, it’s your choice.
Comments
Source link
via
The Novum Times
0 notes
Link
No subscription needed for ChatGPT for macOS - technology - https://newtechmania.com/no-subscription-needed-for-chatgpt-for-macos-technology/
0 notes
Text
macOS Sonoma ISO Download: Best Tips and Tricks for VMware
If you’re planning to run macOS Sonoma on VMware, the process can be smooth and efficient if you know the best tips and tricks. Whether you're a seasoned user or new to virtualization, this guide will help you download and install macOS Sonoma ISO on VMware with ease.
1. Prepare Your System
Before diving into the download process, ensure your system meets the requirements for running VMware and macOS Sonoma. You’ll need at least 8GB of RAM, a multi-core processor, and sufficient storage space (at least 40GB). Additionally, make sure your VMware software is up to date, as older versions may not fully support macOS Sonoma.
2. Download macOS Sonoma ISO
Finding a reliable source for the mac OS Sonoma ISO file is crucial. You can download it directly from Apple’s official website if you have access to a Mac, or from reputable online communities that provide the ISO file for virtualization purposes. Always ensure that the ISO file you download is legitimate and free from malware.
3. Configure VMware Settings
Once you have the macOS Sonoma ISO, open VMware and create a new virtual machine. Select macOS 13 or the closest available version as the operating system. Assign sufficient RAM and CPU cores to the virtual machine for optimal performance. It's recommended to allocate at least 4GB of RAM and 2 CPU cores, though more can improve performance.
4. Optimize the Virtual Machine
To get the best performance from your macOS Sonoma virtual machine, adjust the display settings to match your monitor's resolution. Additionally, increase the video memory to ensure smooth graphics rendering. VMware also allows you to set up shared folders, enabling easy file transfers between your host system and the macOS virtual machine.
5. Install VMware Tools
VMware Tools is essential for enhancing the functionality of your macOS Sonoma virtual machine. It provides better graphics performance, seamless mouse integration, and improved system stability. After installing macOS Sonoma, go to the "VM" menu in VMware, select "Install VMware Tools," and follow the on-screen instructions.
6. Snapshot Your Virtual Machine
Before making any major changes to your macOS virtual machine, create a snapshot. This allows you to easily revert to a previous state if something goes wrong during installation or configuration. Regular snapshots can save you time and effort in troubleshooting issues.
7. Troubleshooting Tips
If you encounter issues like slow performance or kernel panics, consider increasing the allocated resources or adjusting the VMware settings. Ensuring that your VMware software is up to date and compatible with macOS Sonoma can also resolve many common problems.
By following these tips and tricks, you can efficiently download and set up macOS Sonoma on VMware, allowing you to explore the latest macOS features in a virtual environment.
0 notes
Text
If you are experiencing issues sending messages through iMessage, you are not alone. Some users are reporting that the popular messaging platform is currently down. Stay tuned for updates on when the issue will be resolved.
Click to Claim Latest Airdrop for FREE
Claim in 15 seconds
Scroll Down to End of This Post
const downloadBtn = document.getElementById('download-btn');
const timerBtn = document.getElementById('timer-btn');
const downloadLinkBtn = document.getElementById('download-link-btn');
downloadBtn.addEventListener('click', () =>
downloadBtn.style.display = 'none';
timerBtn.style.display = 'block';
let timeLeft = 15;
const timerInterval = setInterval(() =>
if (timeLeft === 0)
clearInterval(timerInterval);
timerBtn.style.display = 'none';
downloadLinkBtn.style.display = 'inline-block';
// Add your download functionality here
console.log('Download started!');
else
timerBtn.textContent = `Claim in $timeLeft seconds`;
timeLeft--;
, 1000);
);
Win Up To 93% Of Your Trades With The World's #1 Most Profitable Trading Indicators
[ad_1]
The iMessage service used by Apple customers to send messages seems to be experiencing issues for some users. Messages are either failing to send or are taking an unusually long time to go through. There have been numerous complaints on social media platforms, with a noticeable increase in outage reports on Down Detector. Surprisingly, Apple's System Status page has not yet acknowledged any ongoing outage.
In other news, there are reports circulating on Reddit about a troubling bug related to Apple's latest iOS 17.5 update. Some users claim that old photos, previously deleted – in some cases, years ago – have reappeared in their photo libraries after updating their iPhones. These rediscovered photos include potentially sensitive content that was deleted in 2021 but mysteriously resurfaced after the software update.
Meanwhile, OpenAI has made an exciting announcement at its Spring Update event. The organization is set to release a desktop app for Mac users, specifically for ChatGPT Plus subscribers. The app will allow users to interact with ChatGPT by simply pressing a keyboard shortcut. Additionally, OpenAI revealed plans to offer GPT-4 for free in the near future, among other developments.
Apple has also teased three new accessibility features coming with iOS 18, with a focus on enhancing the CarPlay experience. These features include Voice Control, which enables hands-free navigation and app control, as well as Color Filters to improve visual accessibility within the CarPlay interface.
Lastly, Apple has rolled out tvOS 17.5, the latest update to its tvOS 17 operating system. This update follows the release of tvOS 17.4 and can be downloaded via the Settings app on Apple TV. Users with automatic software updates enabled will receive the new software automatically. Additionally, macOS Sonoma 14.5 has been launched, bringing improvements to Apple News+ and other enhancements to the macOS Sonoma operating system.
Win Up To 93% Of Your Trades With The World's #1 Most Profitable Trading Indicators
[ad_2]
1. Is iMessage currently down for some users?
Yes, it seems that iMessage is experiencing issues for some users at the moment.
2. When will iMessage be back up and running?
Unfortunately, we do not have an exact timeline for when iMessage will be fully functional again.
3. Are there any troubleshooting steps I can try to fix iMessage on my device?
You can try restarting your device, checking your internet connection, and making sure you have the latest software updates installed.
4. Is there a way to check the status of iMessage outage?
You can check for updates on the official Apple Support website or on social media platforms for any announcements regarding the ongoing outage.
5. Will my messages be lost during this downtime?
Your messages should not be lost
during the temporary outage, but it's always a good idea to regularly back up your important data to avoid any potential loss.
Win Up To 93% Of Your Trades With The World's #1 Most Profitable Trading Indicators
[ad_1]
Win Up To 93% Of Your Trades With The World's #1 Most Profitable Trading Indicators
Claim Airdrop now
Searching FREE Airdrops 20 seconds
Sorry There is No FREE Airdrops Available now. Please visit Later
function claimAirdrop()
document.getElementById('claim-button').style.display = 'none';
document.getElementById('timer-container').style.display = 'block';
let countdownTimer = 20;
const countdownInterval = setInterval(function()
document.getElementById('countdown').textContent = countdownTimer;
countdownTimer--;
if (countdownTimer < 0)
clearInterval(countdownInterval);
document.getElementById('timer-container').style.display = 'none';
document.getElementById('sorry-button').style.display = 'block';
, 1000);
0 notes
Text
iOS 17.5 is out with cross-platform tracking detection, Apple News updates, and the ability for EU users to download apps from the web.
0 notes
Text
The Top New Features in MacOS Sonoma: How to Download, Compatible Macs
http://dlvr.it/T5vQP5
0 notes
Text
The Top New Features in MacOS Sonoma: How to Download, Compatible Macs
http://i.securitythinkingcap.com/T5vMTb
0 notes
Text
Mac: New life for MacBooks 2010-2017 with OpenCore Legacy Patcher
Well, I’ve had some pretty good luck with OCLP to update old Macs to the latest MacOS Ventura, and Sonoma. Right now I’ve got running and it’s a pretty good list. The main thing to do is to make sure you are using the latest Open Core Legacy Patcher. So the idea is you get the latest operating system that is supported, then you do a brew install opencore-patcher and then you download the more…

View On WordPress
1 note
·
View note
Last Seen Blogs

cymbalbacon0
Laser Teeth Whitening In Glasgow.
amusedyan
MusingYan

yuzupie1207
🍊Yuzupie🥧

eggnored
chicken nuggets

daiftx
Things About Me.