#macOs Sonoma Install
Text
youtube
#macos 14#mac#macos#macosSonoma#sonoma#macOS Sonoma Beta2#macOS Sonoma Download#macOs Sonoma Install#macos tips#macos update#macapps#macos monterey#macos ventura 13.4#macos 12.4#macinstosh#macOS tips and tricks#macOS Sonoma tips#macOS Sonoma Tricks#macOS Tutorials#mac os 9#beste macos spiele#datahoarders#datahoarding#appledatahoarding#Youtube
0 notes
Text
Have you got an old Mac that is no longer supported by Apple? It's time to give it a new life.
How to install the latest MacOS on Mac hardware that is no longer officially supported using OpenCore Legacy Patcher.
I recently discovered this and it has been a game changer. Recently my partner needed a Mac for her music course, so we bought a 2012 Macbook Pro as it was cheap and on paper still had decent hardware for working with music. We were then disappointed to find out that it is no longer supported by Apple, and therefore can't run the latest version of Logic, which she needed to inter-op with the school comptuers. Just as we thought we had bought a less than useful computer, I found this video about OpenCore Legacy Patcher from Youtuber Action Retro.
It's a community made piece of software that allows you to install the latest version of MacOS on any Intel Mac, from the late 2000s onwards. All you need to do is download the application on a mac, it will then allow you to make a bootable USB drive for any version of MacOS you want, and you just need to choose the specific mac you are targeting from a list, and it "blesses" the bootable drive, allowing you to install it on your unsupported mac using the normal install process.
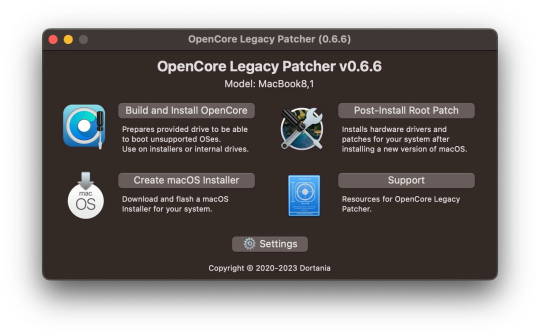
I tried it and it it worked perfectly on the 2012 Macbook Pro, and the latest version of MacOS Sonoma is running perfectly well on the 12 year old hardware. It also allowed us to install the latest version of Logic, so it's working great.
Props to the team for making this and allowing hardware that would otherwise be e-waste to continue to be usable with the modern internet and software. If you end up using it, please consider donating to the team as apparently they had to jump through some serious technical hoops to get this working. Here is the link again if you need it: https://dortania.github.io/OpenCore-Legacy-Patcher/
#mac#MacOS#Computers#OpenCore Legacy#OpenCore Legacy Patcher#Software#hardware#Apple#computer recycling#Action Retro
3K notes
·
View notes
Text
My GIF Making process: Screen capturing using MPV player, Organizing files, 3 Sharpening settings, Basic Coloring PSD + Actions set

This is a very long post so heads up.
I’ll try to be as thorough and true as much as possible to the way I make my gifs (I already use Photoshop Actions which I’ve long since set up but now for this tutorial I’m reviewing them to show you the exact steps I’ve learned to create my gifs 😃) and present them to you in a semi-coherent way. Also, please bear with me since English is my second language.
First things first. Below are the things and tools we need to do this:
Downloaded 4K or 1080p quality videos (let’s all assume we know where to get these—especially for high definition movies and tv series—so this post doesn’t get removed, okay? 😛)
Adobe Photoshop CC or the CS versions can work as well, but full disclosure I haven’t created gifs using the CS versions since 2020. I’m currently using Adobe Photoshop 2024.
mpv player. Use mpv player to get those frames/screenshots or any other video player that has a screen grabber feature. I’ve used adapter for the longest time but I’ve switched to mpv because the press to screenshot feature while the video is playing has been a game changer not to mention ultimate time saver for me. For adapter you need to play it in another video player (like VLC player), to get the start and end timestamps of the scene you want to gif which takes me ages before I can even open Photoshop.
Anyway! Please stop reading this post for a moment and head over to this amazing tutorial by kylos. She perfectly tells you how to install and use mpv player, both for Mac and Windows users.
One thing I have to share though, I had a tough time when I updated my MacOS to Sonoma since MPV is suddenly either duplicating frames or when I delete the duplicates the player seems to be skipping frames :/ I searched and found a solution here, though it didn’t work for me lol. My workaround for this in the meantime is decreasing the speed down to 0.70 then start screenshotting—it’s not the same pre Sonoma update but it works so I’ll have to accept it rather than have jumpy looking gifs.
Now, after this part of kylos’ tutorial:

you can continue reading the following sections of my gif tutorial below.
I want to share this little tip (sorry, this will only cater to Mac users) that I hope will be helpful for organizing the screenshots that MPV saved to the folder you have selected. Because believe me you don’t want to go through 1k+ of screenshots to select just 42-50 frames for your gif.
The Control + Command + N shortcut
This shortcut allows you to create a new folder from files you have pre-selected. As you can see below I have already created a couple of folders, and inside each folder I have selected screenshots that I want to include in one single gif. It's up to you how you want to divide yours, assuming you intend to create and post a Tumblr gifset rather than just one gif.

Another tip is making use of tags. Most of, if not all the time, I make supercorp gifs so I tag blue for Kara and red (or green) for Lena—just being ridiculously on brand and all that.
Before we finally open Photoshop, there's one more thing I want to say—I know, please bear with me for the third? fourth? time 😅
It's helpful to organize everything into their respective folders so you know the total number of items/frames you have. This way, you can add or delete excess or unnecessary shots before uploading them in Photoshop.
For example below there are 80 screenshots of Kara inside this folder and for a 1:1 (540 x 540 px) Tumblr gif, Photoshop can just work around with 42-50 max number of frames with color adjustments applied before it exceeds the 10 MB file size limit of Tumblr.

Sometimes I skip this step because it can be exhausting (haha) and include everything so I can decide visually which frames to keep later on. You'll understand what I mean later on. But it's important to keep the Tumblr 10 MB file size limit in mind. Fewer frames, or just the right amount of frames, is better.
So, with the screenshot organization out of the way, let's finally head over to Photoshop.
Giffing in Photoshop, yay!
Let’s begin by navigating to File > Scripts > Load Files into Stack…

The Load Layers window will appear. Click the Browse button next.
Find your chosen screenshots folder, press Command + A to select all files from that folder then click Open. Then click OK.
After importing and stacking your files, Photoshop should display the following view:

By the way, I'll be providing the clip I've used in this tutorial so if want to use them to follow along be my guest :)
If you haven't already opened your Timeline panel, navigate to Windows > Timeline.
Now, let's focus on the Timeline panel for the next couple of steps.
Click Create Video Timeline, then you’ll have this:

Now click the menu icon on the top right corner then go to Convert Frames > Make Frames from Clips

Still working on the Timeline panel, click the bottom left icon this time—the icon with the three tiny boxes—to Convert to Frame Animation
Select Make Frames From Layers from the top right corner menu button.
So now you have this:

Go and click the top right menu icon again to Select All Frames
Then click the small dropdown icon to set another value for Frame Delay. Select Other…

The best for me and for most is 0.05 but you can always play around and see what you think works for you.
Click the top right menu icon again to Reverse Frames.
I think Photoshop has long since fixed this issue but usually the first animation frame is empty so I just delete it but now going through all these steps there seems to be none of that but anyways, the delete icon is the last one among the line of feature buttons at the bottom part of the Timeline panel.
Yay, now we can have our first proper GIF preview of a thirsty Lena 😜

Press spacebar to watch your gif play for the very first time! After an hour and half of selecting and cutting off screenshots! 😛 Play it some more. No really, I’m serious. I do this so even as early (lol) as this part in the gif making process, I can see which frames I can/should delete to be within the 10 MB file size limit. You can also do it at the end of course 🙂
Now, let’s go to the next important steps of this tutorial post which I’ve numbered below.
Crop and resize to meet Tumblr's required dimensions. The width value should be either 540px, 268px, or 177px.
Convert the gif to a Smart Object for sharpening.
Apply lighting and basic color adjustments before the heavy coloring. I will be sharing the base adjustments layers I use for my gifs 😃.
1. Crop and Resize
Click on the Crop tool (shortcut: the C key)

I like my GIFs big so I always set this to 1:1 ratio if the scene allows it. Press the Enter key after selecting the area of the frame that you want to keep.
Side note: If you find that after cropping, you want to adjust the image to the left or another direction, simply unselect the Delete Cropped Pixels option. This way, you will still have the whole frame area available to crop again as needed and as you prefer.
Now we need to resize our gif and the shortcut for that is Command + Opt + I. Type in 540 as the width measurement, then the height will automatically change to follow the ratio you’ve set while cropping.
540 x 540 px for 1:1
540 x 405 px for 4:3
540 x 304 px for 16:9
For the Resample value I prefer Bilinear—but you can always select the other options to see what you like best.
Click OK. Then Command + 0 and Command + - to properly view the those 540 pixels.

Now we get to the exciting part :) the sharpen settings!
2. Sharpen
First we need to have all these layers “compressed” intro a single smart object from which we can apply filters to.
Select this little button on the the bottom left corner of the Timeline panel.


Select > All Layers
Then go to Filter > Convert for Smart Filters
Just click OK when a pop-up shows up.
Now you should have this view on the Layers panel:

Now I have 3 sharpen settings to share but I’ll have download links to the Action packs at the end of this long ass tutorial so if you want to skip ahead, feel free to do so.
Sharpen v1
Go to Filter > Sharpen > Smart Sharpen…
Below are my settings. I don’t adjust anything under Shadows/Highlights.
Amount: 500
Radius: 0.4
Click OK then do another Smart Sharpen but this time with the below adjustments.
Amount: 12
Radius: 10.0

As you can see Lena’s beautiful eyes are “popping out” now with these filters applied. Click OK.
Now we need to Convert to Frame Animation. Follow the steps below.
Click on the menu icon at the top right corner of the Timeline panel, then click Convert Frames > Flatten Frames into Clips
Then Convert Frames > Convert to Frame Animation
One more click to Make Frames From Layers
Delete the first frame then Select All then Set Frame Delay to 0.05

and there you have it! Play your GIF and make sure it’s just around 42-50 frames. This is the time to select and delete.
To preview and save your GIF go to File > Export > Save for Web (Legacy)…
Below are my Export settings. Make sure to have the file size around 9.2 MB to 9.4 MB max and not exactly 10 MB.

This time I got away with 55 frames but this is because I haven’t applied lighting and color adjustments yet and not to mention the smart sharpen settings aren't to heavy so let’s take that into consideration.
Sharpen v1 preview:

Sharpen v2
Go back to this part of the tutorial and apply the v2 settings.
Smart Sharpen 1:
Amount: 500
Radius: 0.3
Smart Sharpen 2:
Amount: 20
Radius: 0.5
We’re adding a new type of Filter which is Reduce Noise (Filter > Noise > Reduce Noise...) with the below settings.

Then one last Smart Sharpen:
Amount: 500
Radius: 0.3
Your Layers panel should look like this:

Then do the Convert to Frames Animation section again and see below preview.
Sharpen v2 preview:

Sharpen v3:
Smart Sharpen 1:
Amount: 500
Radius: 0.4
Smart Sharpen 2:
Amount: 12
Radius: 10.0
Reduce Noise:
Strength: 5
Preserve Details: 50%
Reduce Color Noise: 0%
Sharpen Details: 50%
Sharpen v3 preview:

And here they are next to each other with coloring applied:
v1

v2

v3

Congratulations, you've made it to the end of the post 😂
As promised, here is the download link to all the files I used in this tutorial which include:
supercorp 2.05 Crossfire clip
3 PSD files with sharpen settings and basic coloring PSD
Actions set
As always, if you're feeling generous here's my Ko-fi link :) Thank you guys and I hope this tutorial will help you and make you love gif making.
P.S. In the next post I'll be sharing more references I found helpful especially with coloring. I just have to search and gather them all.
-Jill
#tutorial#gif tutorial#photoshop tutorial#gif making#sharpening#sharpening tutorial#photoshop#photoshop resources#psd#psd coloring#gif coloring#supercorp#supercorpedit#lena luthor#supergirl#my tutorial#this has been a long time coming#guys. i'm BEGGING you. use the actions set - it was a pain doing all this manually again ngl LMAO#i've been so used to just playing the actions#so this has been a wild refresher course for me too 😆
122 notes
·
View notes
Text
Adobe has no fix yet for the issue with gif previews in photoshop with macOS 14 Sonoma and so I’ve spent literally all day trying to downgrade back to Ventura which Apple makes it very difficult to do. I’m finally in the home stretch and hoping that once it’s done the bug is gone. 🤞 At which point I will go back to almost never updating my shit. The one time I decided to update and it broke a bunch of stuff and Adobe is dragging their feet on resolving the issue. 😩
After backing up my computer, creating a bootable installer of Ventura on a USB flash drive (I had to go buy a fucking USB because I haven’t had to use one in like 5 years???), formatting my drive completely, and then installed Ventura from the USB—I’m now restoring my files. There’s so many other hoops and trial/error shit I had to deal with but this is the short version (yeah, THIS is the short version.) and if this doesn’t work I will lose it


EDIT: IT WORKED 😭
4 notes
·
View notes
Text
It seems that Zorin OS 17 finally fixed compatibility issues with a third-party Cirrus Audio driver that caused certain MacBook models to have no audio, so now my mid-2017 MacBook Pro 13-inch can have a modern, updating, OS that gets new features and active development.
Apple sold this laptop, new, until 2019 (which is when I bought mine, none-the-wiser), and they discontinued support in 2023 with the release of macOS Sonoma 14. I'll be damned if I let a 4-year-old laptop get turned into eWaste, though.
I had previously wiped the SSD and installed Windows 11 because of the aforementioned issues with the audio drivers. Now that I can have audio, though, this computer lives on as Linux machine, as it's 2011 15-inch counterpart does.
#rambles#zorin#zorin os#zorin os 17#macbook#macbook pro#2017 macbook pro#apple#fuck apple#macos#ewaste#software#update#software update#planned obsolescence#linux#tech#technology#computer#computers#laptop#laptops
5 notes
·
View notes
Text
So I just took the LSAT today and to be completely honest… wasn’t as bad as I thought it’d be. Somehow finished every section with time leftover to doublecheck my work! Feeling pretty good about it 🥰 even though I pulled an all-nighter before it and still haven’t slept… 🫠
Not intentionally, mind you—LSAC’s new online LSAT Proctor software isn’t compatible with the new MacOS Sonoma 14.0… so spent all night trying to learn how to downgrade my MacOS version in order to download the testing/proctoring software before my 7am exam.
Turns out, on silicon-chip Macs (M1+), you can’t just simply downgrade or restart/reboot your laptop to the software it originally came in. That’s apparently only an available option on Intel Macs.
Instead, if you have a silicon Mac, you have to go through the complicated process of:
1. Backing up your Mac using Time Machine on some other external hard drive or disk (since downgrading completely wipes your startup disk and erases all data)
2. Setting up a Bootable Installer—also on an external hard drive (separate)
3. Downloading the version software from Apple’s App Store (the easiest part of the entire process! Though, of course, you can’t even run it until you’ve done everything else first)
4. Using the Terminal app and running the specific (in my case, Ventura) command as found on Apple’s website and proceeding with the rest of the commands to get it working.
which… don’t get me started on figuring out how to set up a Bootable Installer. This was all completely foreign to me and honestly I was two “error” messages away from a complete mental breakdown.
At 5am, I gave up and woke up my poor friend to beg her to let me use her laptop for my LSAT.
If anyone can send me a crash course on using the Macbook’s Terminal app, it would be more than welcomed!
At this point, I gotta set up a Bootable Installer just for the spite of it. Never letting myself get blindsided like this again! Will always have a backup version. Learned my lesson lol
#macos sonoma#lsat#technology#programming#coding#macos#macos 14#LSAC#silicon#macbook#personal#lialifelounge
5 notes
·
View notes
Text
Download macOS VMware Image and Set Up Your Virtual Machine
Creating a virtual machine with macOS on VMware is an excellent way to experience Apple's operating system without needing a physical Mac. Whether you're a developer testing apps, a tech enthusiast exploring macOS, or a Windows user who wants to try macOS before committing to new hardware, setting up macOS on VMware is a practical solution. This guide will walk you through the process of downloading a macOS VMware image and setting up your virtual machine, making it a straightforward and accessible project.
Why Use VMware for macOS?
VMware is a leading virtualization software known for its robust features, reliability, and ability to run multiple operating systems simultaneously. By using VMware to create a virtual machine, you can run macOS on your existing hardware without needing to dual-boot or risk any data loss. This method is particularly useful for developers, testers, and users who want to experiment with macOS without investing in a Mac.
Step 1: Download the macOS VMware Image
The first and most crucial step in setting up your macOS virtual machine is obtaining a VMware-compatible macOS image. This image is essentially a snapshot of mac os sonoma that you can load into VMware to create your virtual machine. Here’s how you can get it:
Official macOS Installation Files: If you have access to a Mac, you can download the official macOS installer from the App Store. However, converting this installer into a VMware-compatible image requires some technical know-how.
Pre-built macOS VMware Images: For a more straightforward approach, you can download pre-built macOS VMware images available online. These images are typically configured and ready to use, making the setup process much easier. Be sure to download from reputable sources to avoid corrupted files or potential security risks.
Compatibility Considerations: Ensure that the macOS version in the VMware image is compatible with your version of VMware Workstation or VMware Player. Also, check that your hardware meets the minimum requirements to run macOS as a virtual machine.
Step 2: Install VMware Workstation or VMware Player
If you don’t already have VMware installed on your system, you’ll need to download and install VMware Workstation (for Windows/Linux) or VMware Fusion (for macOS). VMware Player is also an option if you're looking for a free solution, though it has fewer features than Workstation.
Download VMware: Go to the official VMware website and download the appropriate version for your operating system.
Install VMware: Follow the installation prompts. The process is straightforward, but make sure you have sufficient disk space and system resources to run a virtual machine.
Install VMware Tools: VMware Tools is a suite of utilities that enhances the performance of the virtual machine and improves user interaction. It’s recommended to install this once your virtual machine is up and running.
Step 3: Create a New Virtual Machine
With VMware installed and the macOS VMware image downloaded, you can now create your virtual machine.
Open VMware: Launch VMware Workstation or VMware Player.
Create a New Virtual Machine: Click on "Create a New Virtual Machine." You’ll be prompted to choose the installation media. Select "I will install the operating system later," then proceed.
Select macOS as the Operating System: In the "Guest Operating System" section, select "Apple Mac OS X" and choose the version corresponding to your VMware image.
Name Your Virtual Machine: Give your virtual machine a name like "macOS Sonoma" and choose a location to store the virtual machine files.
Allocate Resources: Allocate sufficient memory (RAM) and CPU cores to the virtual machine. For macOS, at least 4GB of RAM is recommended, but 8GB or more will provide better performance. Allocate at least two CPU cores, but more can improve performance if your system allows.
Attach the macOS VMware Image: In the "Virtual Hard Disk" section, select "Use an existing virtual hard disk file" and browse to the macOS VMware image you downloaded.
Step 4: Configure and Start the Virtual Machine
Before starting the virtual machine, a few configuration tweaks can help ensure smooth operation.
Adjust Virtual Machine Settings: Go to the virtual machine’s settings and make any necessary adjustments. For instance, you might want to increase video memory or enable 3D graphics acceleration.
Modify VMX File (Optional): For some macOS versions, you might need to add specific parameters to the VMX file (the virtual machine's configuration file). These settings can improve compatibility and performance.
Start the Virtual Machine: Once configured, click "Start" to boot the virtual machine. If everything is set up correctly, the macOS installation screen should appear.
Complete macOS Installation: Follow the on-screen prompts to complete the macOS installation. This process is similar to installing macOS on a physical Mac and involves setting up your user account, configuring settings, and finalizing the installation.
Conclusion
Setting up macOS on VMware using a VMware image is a powerful way to explore macOS without the need for Apple hardware. Whether you’re a developer, a tech enthusiast, or simply curious about macOS, this method allows you to run macOS in a controlled, virtual environment. By following the steps outlined in this guide, you can effortlessly download a macOS VMware image, set up your virtual machine, and start enjoying the macOS experience on your existing hardware. With VMware's flexibility and the power of macOS, your virtual machine setup can serve as a valuable tool for testing, development, and exploration.
VIsit us:
mac virtual machine
0 notes
Text
~What I use on my PC~
My machine is running 3 OSes.
Endeavour OS on an nvme partition running gnome desktop with blur my shell and windows taskbar.
Setting up endeavour OS was a must after receiving many errors on Fedora Silverblue using flatpaks to run steam. I enabled dkms using linux-lts-headers and installed the xone drivers off the medusa github repo and the steam runtime using the sudo packman -S command as Valve intended. Its boot loader was installed on a usb drive though so that I could preserve another EFI partition.
Windows 11 - my default OS on a separate SSD contains some games I play like XCOM and GTA.
I use Windows mainly cause of wallpaper engine though. It runs mydockfinder for the macOS aesthetic.
macOS X Sonoma - On my other nmve partition containing it so I can play with GarageBand sometimes. Setting it up required me to downgrade to a compatible gpu and using the reverse platform id method (intel) on opencore.
The main use of my computer is for gaming and music listening. It is connected to a 4K TV and an Xbox controller (wired)
The main browser is zen and the music app is cider sometimes, but zen is pretty good.
The speaker is an always on one, simply I connected it to a usb hub and it kicks ass.
0 notes
Text
3 notes
·
View notes
Text
macOS Sonoma ISO Download: Best Tips and Tricks for VMware
If you’re planning to run macOS Sonoma on VMware, the process can be smooth and efficient if you know the best tips and tricks. Whether you're a seasoned user or new to virtualization, this guide will help you download and install macOS Sonoma ISO on VMware with ease.
1. Prepare Your System
Before diving into the download process, ensure your system meets the requirements for running VMware and macOS Sonoma. You’ll need at least 8GB of RAM, a multi-core processor, and sufficient storage space (at least 40GB). Additionally, make sure your VMware software is up to date, as older versions may not fully support macOS Sonoma.
2. Download macOS Sonoma ISO
Finding a reliable source for the mac OS Sonoma ISO file is crucial. You can download it directly from Apple’s official website if you have access to a Mac, or from reputable online communities that provide the ISO file for virtualization purposes. Always ensure that the ISO file you download is legitimate and free from malware.
3. Configure VMware Settings
Once you have the macOS Sonoma ISO, open VMware and create a new virtual machine. Select macOS 13 or the closest available version as the operating system. Assign sufficient RAM and CPU cores to the virtual machine for optimal performance. It's recommended to allocate at least 4GB of RAM and 2 CPU cores, though more can improve performance.
4. Optimize the Virtual Machine
To get the best performance from your macOS Sonoma virtual machine, adjust the display settings to match your monitor's resolution. Additionally, increase the video memory to ensure smooth graphics rendering. VMware also allows you to set up shared folders, enabling easy file transfers between your host system and the macOS virtual machine.
5. Install VMware Tools
VMware Tools is essential for enhancing the functionality of your macOS Sonoma virtual machine. It provides better graphics performance, seamless mouse integration, and improved system stability. After installing macOS Sonoma, go to the "VM" menu in VMware, select "Install VMware Tools," and follow the on-screen instructions.
6. Snapshot Your Virtual Machine
Before making any major changes to your macOS virtual machine, create a snapshot. This allows you to easily revert to a previous state if something goes wrong during installation or configuration. Regular snapshots can save you time and effort in troubleshooting issues.
7. Troubleshooting Tips
If you encounter issues like slow performance or kernel panics, consider increasing the allocated resources or adjusting the VMware settings. Ensuring that your VMware software is up to date and compatible with macOS Sonoma can also resolve many common problems.
By following these tips and tricks, you can efficiently download and set up macOS Sonoma on VMware, allowing you to explore the latest macOS features in a virtual environment.
0 notes
Text
317 - That's a lot of Apple Services
The latest In Touch With iOS with Dave he is joined by guest Guy Serle, Marty Jencius, Jeff Gamet, and Ben Roethig. Apple’s recent financial performance, new iOS features, and industry trends. Apple reported a record-high quarterly revenue of $85.8 billion. Growth was driven by services. iOS Updates: iOS 17.6: Introduces emergency SOS via satellite expansion. iOS 18.1 Beta: Exclusive iPhone 15 Pro including:Privacy enhancementsNew call recording and transcription functions Hardware Updates: Personalized spatial audio for AirPods. CarPlay on driving safety and accessibility. Comparison of Apple CarPlay’s popularity to Android Auto.Insights into the future of in-car technology.
The show notes are at InTouchwithiOS.com
Direct Link to Audio
Links to our Show
Give us a review on Apple Podcasts! CLICK HERE we would really appreciate it!
Click this link Buy me a Coffee to support the show we would really appreciate it. intouchwithios.com/coffee
Another way to support the show is to become a Patreon member patreon.com/intouchwithios
Website: In Touch With iOS
YouTube Channel
In Touch with iOS Magazine on Flipboard
Facebook Page
Mastodon
X
Instagram
Threads
Spoutible
Topics
Quarterly Earnings Report today Apple results: Quarterly record, all-time high in Services
This is Tim: Q3 2024 analyst call transcript
Apple's Q3 2024 Earnings Call Takeaways
New Updates iOS 17.6
Apple Releases iOS 17.6 With Bug Fixes and Security Improvements
iOS 17.6 and iPadOS 17.6 are now available, here’s what’s new
Install iOS 17.6 to protect your iPhone against these 30 vulnerabilities
iOS 17.6 continues Emergency SOS via satellite expansion
Apple releases visionOS 1.3, macOS 14.6, tvOS 17.6, and watchOS 10.6
Apple Releases watchOS 10.6 With Bug Fixes]\
Apple Releases tvOS 17.6 With Bug Fixes
Apple Releases macOS Sonoma 14.6 With Security Updates
Beta this week. iOS 18.1 Beta 1 adds Apple Intelligence features Apple Intelligence Now Available in New iOS 18.1, iPadOS 18.1, and macOS Sequoia Developer Betas
Report: Apple Intelligence Delayed to iOS 18.1 in October
This is every device that will support Apple Intelligence at launch
Here Are All of the Apple Intelligence Features in the iOS 18.1 Developer Beta
All of the Apple Intelligence Features Not Included in the iOS 18.1 Beta
iOS 18.1 Beta Includes Call Recording and Transcribing
PSA: Apple Intelligence and macOS installations on external drive
Safari gets Apple Intelligence upgrade in iOS 18.1 with new summarize feature
Apple Intelligence provides detailed privacy reports on user requests
iOS 18 Beta 4 continues
Apple Seeds Updated Fourth Betas of iOS 18 and iPadOS 18 to Developers
Apple Releases Second iOS 18 and iPadOS 18 Public Betas
Six New Features iOS 18 Brings to the AirPods Pro
Vision Pro this week. Apple Releases visionOS 1.3
Apple Vision Pro Can Now Be Controlled With Brain-Computer Interface
News
Google Maps and Waze Updated With New iPhone and CarPlay Features
Apple CarPlay Contributes to Higher Vehicle Satisfaction in Latest Survey
iPhone Driver's Licenses Now Available in Ohio
Apple Fixes iCloud Private Relay After Extended Outage
Apple Agrees to Follow President Biden's AI Safety Guidelines
Announcements
Macstock 8 wrapped up for 2024. But you can purchase the digital pass and still see the great talks we had including Dave talking about Apple Services and more. Content should be available in August - September. Click here for more information: Digital Pass | Macstock Conference & Expo with discounts on previous events.
Our Host
Dave Ginsburg is an IT professional supporting Mac, iOS and Windows users and shares his wealth of knowledge of iPhone, iPad, Apple Watch, Apple TV and related technologies. Visit the YouTube channel https://youtube.com/intouchwithios follow him on Mastadon @daveg65, and the show @intouchwithios
Our Regular Contributors
Jeff Gamet is a podcaster, technology blogger, artist, and author. Previously, he was The Mac Observer’s managing editor, and Smile’s TextExpander Evangelist. You can find him on Mastadon @jgamet as well as Twitter and Instagram as @jgamet His YouTube channel https://youtube.com/jgamet
Ben Roethig Former Associate Editor of GeekBeat.TV and host of the Tech Hangout and Deconstruct with Patrice Mac user since the mid 90s. Tech support specialist. Twitter @benroethig Website: https://roethigtech.blogspot.com
Marty Jencius, Ph.D., is a professor of counselor education at Kent State University, where he researches, writes, and trains about using technology in teaching and mental health practice. His podcasts include Vision Pro Files, The Tech Savvy Professor and Circular Firing Squad Podcast. Find him at [email protected] https://thepodtalk.net
Here is our latest Episode!
0 notes
Text
Apple has just rolled out the latest version of its macOS operating system, Sonoma 14.5 RC. This release comes packed with several new features and enhancements to improve user experience. To find out more about what's new in this update, be sure to check out the official release notes from Apple.
Click to Claim Latest Airdrop for FREE
Claim in 15 seconds
Scroll Down to End of This Post
const downloadBtn = document.getElementById('download-btn');
const timerBtn = document.getElementById('timer-btn');
const downloadLinkBtn = document.getElementById('download-link-btn');
downloadBtn.addEventListener('click', () =>
downloadBtn.style.display = 'none';
timerBtn.style.display = 'block';
let timeLeft = 15;
const timerInterval = setInterval(() =>
if (timeLeft === 0)
clearInterval(timerInterval);
timerBtn.style.display = 'none';
downloadLinkBtn.style.display = 'inline-block';
// Add your download functionality here
console.log('Download started!');
else
timerBtn.textContent = `Claim in $timeLeft seconds`;
timeLeft--;
, 1000);
);
Win Up To 93% Of Your Trades With The World's #1 Most Profitable Trading Indicators
[ad_1]
Apple has released the macOS 14.5 RC to testers, following the release candidate versions of iOS and other operating systems earlier this week. This version may be the final one that reaches customers soon. The macOS Sonoma 14.5 update includes improvements and bug fixes, such as the new Quartiles daily word game available in Apple News+ and access to new player data for Crossword, Mini Crossword, and Quartiles in News+ Puzzles.
It is important to note that some features may not be available in all regions or on all Apple devices. macOS 14.5 is expected to be available to all users in the coming days. Additionally, Apple is also testing macOS Monterey 12.7.5, which includes important security fixes recommended for all users.
For more updates, you can follow Zac on Twitter, Threads, and Instagram. Stay tuned for the latest news and developments from Apple.
Win Up To 93% Of Your Trades With The World's #1 Most Profitable Trading Indicators
[ad_2]
1. What is macOS Sonoma 14.5 RC?
The macOS Sonoma 14.5 RC is a beta version of the latest update for Apple's operating system for Mac computers.
2. What are some key features of macOS Sonoma 14.5 RC?
Some key features of macOS Sonoma 14.5 RC include bug fixes, performance enhancements, and new security updates.
3. How do I download macOS Sonoma 14.5 RC?
You can download macOS Sonoma 14.5 RC through the Apple Developer Center or by enrolling in the Apple Beta Software Program.
4. Can I upgrade to macOS Sonoma 14.5 RC from an older version?
Yes, you can upgrade to macOS Sonoma 14.5 RC from an older version of macOS, but it is recommended to back up your data before installing the update.
5. When will macOS Sonoma 14.5 RC be officially released?
The official release date for macOS Sonoma 14.5 RC has not been announced yet, but it is expected to be available to the public in the near future.
Win Up To 93% Of Your Trades With The World's #1 Most Profitable Trading Indicators
[ad_1]
Win Up To 93% Of Your Trades With The World's #1 Most Profitable Trading Indicators
Claim Airdrop now
Searching FREE Airdrops 20 seconds
Sorry There is No FREE Airdrops Available now. Please visit Later
function claimAirdrop()
document.getElementById('claim-button').style.display = 'none';
document.getElementById('timer-container').style.display = 'block';
let countdownTimer = 20;
const countdownInterval = setInterval(function()
document.getElementById('countdown').textContent = countdownTimer;
countdownTimer--;
if (countdownTimer < 0)
clearInterval(countdownInterval);
document.getElementById('timer-container').style.display = 'none';
document.getElementById('sorry-button').style.display = 'block';
, 1000);
0 notes
Text
0 notes
Text
How To Create Safari Web Apps In MacOS Sonoma
To create Safari web apps in macOS Sonoma, you can follow these steps:
Set Up Your Development Environment: Ensure you have Xcode installed on your Mac. You’ll use Xcode to create and manage your Safari web apps.
Create a New Safari Web App Project: Open Xcode and choose “Create a new Xcode project”. Select the “Safari Web Extension” template under the “macOS” section.
Configure Your Project: Give your project a name and specify its location on your filesystem.
Design Your Interface: In Xcode, you can design the interface of your Safari web app using Interface Builder. This includes creating the user interface elements and defining their functionality.
Write Your Code: Implement the functionality of your Safari web app using Swift or Objective-C. You can add event handlers, make network requests, and interact with the Safari browser using the Safari App Extensions API.
Test Your App: Use the Xcode simulator or deploy your Safari web app to a real device for testing. Ensure that your app behaves as expected and handles different scenarios gracefully.
Publish Your App: Once you’re satisfied with your Safari web app, you can distribute it through the Mac App Store or other distribution channels. Make sure to follow Apple’s guidelines for app distribution and submission.
Update and Maintain Your App: Regularly update your Safari web app to fix bugs, add new features, and ensure compatibility with the latest macOS and Safari versions.
By following these steps, you can create Safari web apps in macOS Sonoma and provide users with a seamless browsing experience tailored to their needs.
#create#safari#webapps#macOS#macOSSonoma#Macbook#foryou#trendingnow#viralpage#imacgeeks#ShareMyPost#SharePost#trendingtopic#foryourpage#viralfb#viralpost#viral
0 notes
Text
MacBookPro 13" M2 hat KernelPanics nach Installation/Update von macOS 14.4.1
Seitdem ich gestern mein MBP13“ M2 auf #Sonoma 14.4.1 upgedated habe, bekomme ich ca.alle 20 min eine Kernel-Panic. 😦 Grund/Auslösung momentan noch unbekannt.
Heute morgen mal #macos drüber installiert (über die Mac-Bootoptionen), da die #KernelPanics immer noch auftraten. Hat nur leider nach dem ersten Neustart ca. 5 Minuten gedauert, bis der Mac wieder abstützte. Ich hab nach wie vor #Sonoma…
View On WordPress
0 notes
Last Seen Blogs

bshs-332-blog
BSHS 332

oleholehkhassurabaya-blog
Oleh Oleh Khas Surabaya Online 0856.4596.8088 HP/W

enanabrip-blog
Langdetect ListIdentifiableLanguages

r-eleasethebeast-blog
release the beast.

pottermorehousepride-blog
Pottermore House Pride!