#mine*7g
Photo


7 gifs for every monsta x title-song (1/?): love killa
+ bonus:

#monsta x#monstaxedits#monstaxgifs#mx7net#maleidolsedit#monsta x gifs#mxgif#mxedit#mx#gifs#flashing tw#mine*gif#mine*7g#gif*100#minhyuk ate this era
133 notes
·
View notes
Text
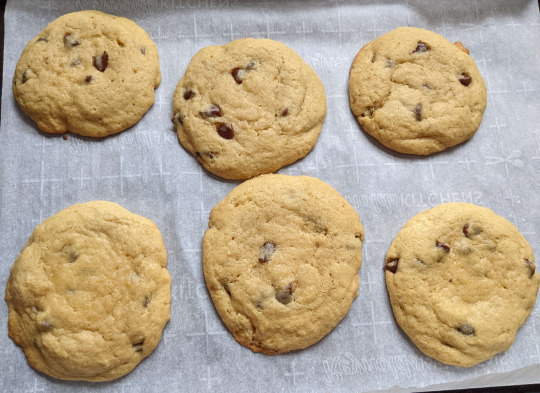
Made chocolate chip cookies from my sourdough discard, since I had a lot. They are soft and fluffy, with a little bit of tang, I am enjoying them immensely.
Recipe under the cut!
14 tablespoons unsalted butter, slightly softened
100g granulated sugar
125g brown sugar
1 large egg
250g sourdough starter, unfed
1 1/4 tablespoon vanilla extract
1/4-1/2 teaspoon almond extract
260-300g all-purpose flour
7g salt
1 teaspoon baking soda (add a little for more floof)
1-2 cups large chocolate chips (to taste)
In a large bowl, combine the softened butter, sugars, and salt.
Add the egg to the mixture, stir until mixed.
Stir in the vanilla and almond extracts.
Stir in the sourdough starter and baking soda.
Stir in 260g the flour until just mixed. It will seem a little goopy.
Mix in the chocolate chips. If it's still Very goopy, add a more flour, but bear in mind it will firm up in the fridge.
Refrigerate for at least 20 minutes (can go overnight if needed!)
Preheat the oven to 350°F while cookies are in the fridge.
I use a standard ice cream scoop to grab fairly large portions of dough and roll into ball. Can lightly flour your hands in order to make a smoother ball. Set on a parchment-lined baking sheet.
Recipe should make 16-24 cookies; if you have more than 24, your cookies are too small and idk what will happen. If you have less than 16, your cookies are too big, which isn't a problem necessarily, but you'll need a longer cook time probably. You can test if they're done by sticking a chopstick in the middle to see if it comes out clean.
Bake 20-25 minutes, depends on your oven/location I guess. Mine takes 23 minutes for most variations
Let them cool on the baking sheet for at least a few minutes after taking them out of the oven. They will get a little bit of a crisp on their crust if you do, and it's REALLY delicious. After 5-10 you can put them on a cooling rack if you want. 100% suggest eating one while it's still warm (not burning but warm).
Cookies are best eaten on the first day. Dough can be frozen or fridged if you want to just bake a few at a time. Thaw dough overnight before baking if you freeze it.
209 notes
·
View notes
Text
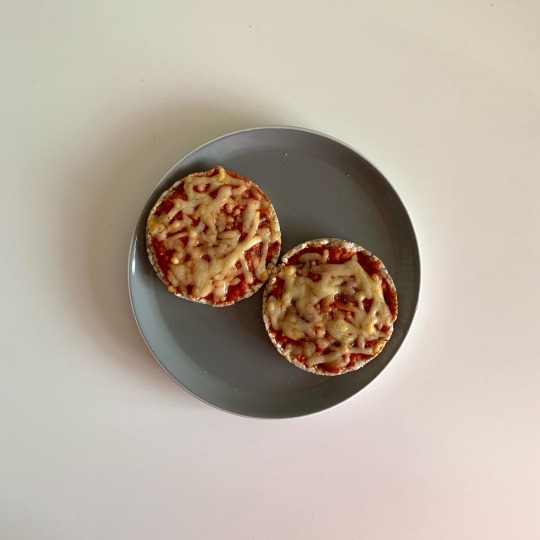
Rice cake pizza
35g no added sugar bolognaise sauce, two rice cakes, 17g cheddar cheese
Macros
Cals: 144
Protein: 6g
Carbs: 15g
Fat: 7g
(I saw a lot of people making pizza bagels again, but these have no extra grease so it’s much easier to eat. I put mine in the air frier for 5 minutes at 190C)
#ana trigger#ana dairy#tw ana diary#low cal diet#ana meal#ana rant#low cal breakfast#low cal dinner#meal log#mealspø#mean$po#tw skipping meals#ana vent#tw ana fast#low cal dessert#low cal drinks#low cal meal#notpro4n4#notprojustusingthetags#ana recipe#4n0r3xia#ed vent#i want to ⭐️ve#🦋diary#i wanna be weightless#low cal ideas#i wanna be tiny#thlnspo#th!n$p0
49 notes
·
View notes
Text

I finally got paid, so I had the money to purchase the CADILLAC of forearm crutches! I'm so hype. Let me infomercial at you.
Welcome... to the Ergobaum 7G Ergonomic Forearm Crutches! They've got everything your heart could ever desire. They are purple. They can hold up to 360 pounds comfortably (good). They have comfy hand grips equipped with an LED light, a reflector thing for night, and a panic alarm! They also allow you to kick stand this thing out the side and rest one knee to completely take the weight off one foot while at rest. Dude. I'm so pumped. They cost approximately one arm and one leg, but mine are already thinly held together by bad collagen and a dream. So.... let's try it!
They'll be here on Friday. YUS!
117 notes
·
View notes
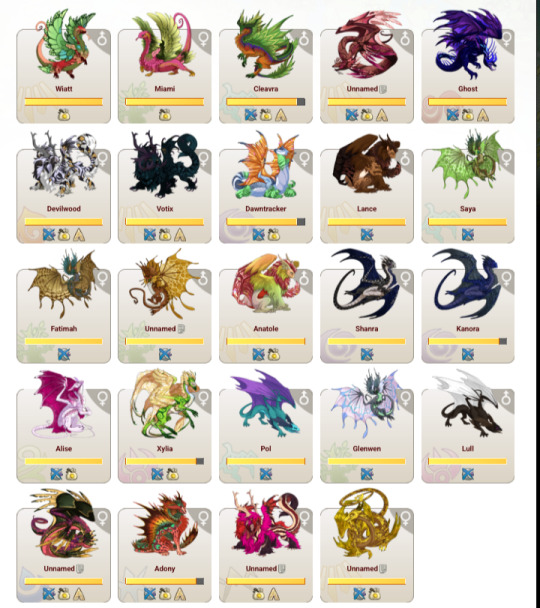
Text


these are gened g1s that ive taken from fodder floor recently-ish. first one is here, the rest are here (i might take offers on others on that page too). if you'll be nice to them, you can have them for 7g/kt, or some food cuz mine is depleted.


these 2 are very old mother and daughter and i want them to stay together, but have no ideas for them. so lmk if you like them <3 they and other rehomes are here.
12 notes
·
View notes
Note
7G for the asks 👀👀👀
Office AU with G. "Do you want me to stay?"
George Russell/Lewis Hamilton. Uhhh… so this is not a healthy dynamic. No sir, not at all. Angst. Mind games. Rated M.
***
Lewis dropped the bombshell on Monday morning. He didn’t waste time, squeezing the office into the one too small conference room, promising big news. Packed in like sardines, they held their breath, waiting for what their boss had to say.
“I will be leaving Mercedes to join Ferrari,” Lewis said calmly, ignoring the gasps, the looks of outrage and disbelief. “Today will be my last day. Thank you, back to work.”
George let everyone filter out of the boardroom, anxiously hanging back in the corner. Lewis Hamilton couldn’t be leaving Mercedes, Lewis was Mercedes.
Everyone was gone. It was just the two of them left.
“What is it, Georgie?” Lewis asked kindly, as George blushed.
It was a nickname that had started years ago, when George was just a young kid, fresh out of university, looking for his big break. He’d been wandering around some conference or other, when he’d spotted Lewis. Lewis Hamilton. CEO of Mercedes Enterprises.
Lewis had looked him up and down as George shook his hand. “George Russell, pleasure to meet you.”
“Georgie,” Lewis mused, feeling his name out on his tongue. “Good name. I assume you have all the qualifications, or you wouldn’t be here wasting my time?”
“Yes, I do,” George said proudly. He’d worked hard to earn his degree, honours, with an impressive profile of extracurriculars on top.
“Good boy,” Lewis said, patting his shoulder. His hand lingered, trailing down George’s shoulder, making him shiver. “How badly do you want this job?”
“I’ll do anything,” George answered truthfully, voice laced with enthusiasm. He’d come this far. He wouldn’t let an opportunity like this slip between his fingers.
Lewis smiled at that, sharp and dangerous. “Good.” He slid a business card into George’s breast pocket. Patted it once. “You start tomorrow. My office. Top floor.”
“Thank you,” George said, beaming.
“Please,” Lewis waved him off. “The pleasure is all mine.”
George had expected to be given a brief hello before being pawned off to the lowest employee on the food chain for his training. Instead, Lewis had closed the door, offered him a seat at his side, walked him through everything he would be expected to do. George nodded along eagerly, making small notes for himself as he went. Lewis was calm with him, patient, answering all his questions with a soft smile.
Finally Lewis slammed his laptop shut. “Enough of that boring stuff. Did you get all that, Georgie?”
George nodded seriously. What he didn’t remember, he would ask another employee once Lewis showed him to his desk.
“Good boy,” Lewis said, laying a hand on his neck. “Now, do you want me to show you how you really get what you want around here?”
George barely had time to nod before Lewis was kissing him. The hand on his shoulder slid up to cup the back of his head as Lewis kissed him hard. George froze, but Lewis didn’t stop, just ran a soothing hand down his side.
Tentatively, George let himself relax into it. “Good boy,” Lewis mumbled against his lips, “that’s it.”
Lewis was a good kisser, and George let himself be swept away in it, lost track of time between gasps for air. He was starting to get dizzy with it, when Lewis pulled away abruptly.
“Do you understand?” Lewis asked softly, cradling his jaw. George’s mind was reeling, but he nodded slowly. “Alright, off you go. We’ll finish your training tomorrow.”
The next day they went further. Further than George had ever gone before. But Lewis was soft with him, gentle. Whispered praises in his ear, even when he cried.
“Good boy, Georgie,” he whispered as George gasped beneath him.
The next day was the same. And the day after that. Between the reports, and the meetings, and the hours of senseless monotony, there was Lewis.
A simple, “Georgie, my office please,” and he was there. He had always been there. Had given everything, done anything. Just like he’d promised.
Now, Lewis was watching him from across the boardroom. “Why are you so far away, Georgie?”
George didn’t move. “Why are you leaving?” He wasn’t going to cry. Not in front of Lewis. “Was I not enough?”
“Aww, Georgie, come here,” Lewis said, opening his arms as George ran into them. He held him gently, wiping his tears away with the pads of his thumbs. George melted against his chest, let Lewis pull him into a tender kiss, soft and familiar.
“You know you’ve always been my favourite,” Lewis smiled and George sniffled. “But it’s time to move on.”
“But- but who will replace you?” George asked, eyes glistening. Lewis kissed him again.
“I thought you could, Georgie. You’ve been so good for me,” Lewis said. “You worked hard for this chance. You deserve it.”
George shook his head desperately. “No. No. Not without you. Please. I- I can’t.”
“Of course you can,” Lewis said. “You’ve done incredibly well here. We never would’ve won that grant without you last year. The team is lucky to have you. You’ll do so well.”
George just sniffled and shook his head harder. “No, please don’t make me. Not without you.”
“Aww Georgie,” Lewis said softly, running his hands through George’s gentle curls, “do you want me to stay?”
George nodded desperately. “Please don’t leave me here. I can’t- I need you.”
“I know Georgie,” Lewis mumbled, holding him to his chest. “But there’s still one more thing you have to learn.”
George watched him with wide eyes, clinging on to his every word like gospel.
“Never love someone more than they love you. They’ll only use it to hurt you.”
Lewis gave him one last peck on the lips, before slipping out of his arms towards the door. He paused at the threshold.
“Good luck George. Don’t fuck it up.”
#gewis#george russell/lewis hamilton#whoof don’t know where this came from but here we are#hope u weren’t expecting something fun and cute#but then again…. it is me
12 notes
·
View notes
Note
I want to get in to beaking bread, could you share the recipe?
Absolutely!
Disclaimer: This is going to be a kind of "choose your own adventure" type of recipe in order to make it as accessible and beginner-friendly as possible. Also, I'm not an expert by any means! This is what works for me, but questions and suggestions in the notes are welcome :)
Ingredients:
4 3/4 c. (594g) All-purpose flour, plus a little extra
2 1/2 tsp (7g) Instant yeast or active dry yeast
2 c. (472 mL) Warm water, about 100°F/38°C
2 tsp (12g) Salt
2 tsp (9g) Sugar (or maple syrup or honey) plus a pinch more
1 tsp (5g) Oil - I like to use olive oil
Equipment:
Small bowl or cup
Large bowl
Cloth, plastic wrap, or lid for large bowl
Wooden spoon or spatula for mixing
Parchment paper
Dutch oven (or a baking sheet and a large, metal, oven-safe pot)
Knife (the sharper the better)
Cooling rack
Food scale, if you're using the metric measurements
Instructions:
Part 1: Combine the Ingredients
Add 1/2 c. (118g) of warm water to a small bowl or cup. Add a pinch of sugar and your yeast, stir gently until combined. Let rest for about 5 minutes until the yeast mixture gets bubbly. This indicates that your yeast is alive and ready to go!
In a large bowl, whisk together the flour, salt, and sugar
Create a well in the center of your flour mix, and pour in the yeast mixture, the remaining 1 1/2 c. (354g) of water, and the oil. Mix together until you get a shaggy ball of dough. It should be a little sticky, but if it's too sticky, add more flour.
Part 2: Kneading
This step is optional. I find that kneading gives it a chewier texture and keeps the loaf from getting crumbly for longer, but the no-knead method is still delicious and easier. Skip to Part 3 if so desired.
I suck at kneading so I use my handy dandy stand mixer. But you can knead by hand if you want, or you can opt to not knead it at all! You're looking for a nice smooth, stretchy ball of dough.
Part 3: Rise
Lightly grease the inside of your bowl. Put your dough back into the bowl and cover with a lid or a damp cloth or plastic wrap and let rest in a warm location.
I like to put mine in the oven--make sure it's turned off, and make sure everyone you share the kitchen with knows there's dough having a little nap in the oven. Not everyone checks to make sure the oven is empty before turning it on, ya know?
Let rise until the dough has doubled in size and there are tiny bubbles on the surface. Time will vary--if you're using instant yeast, this will likely take 1-2 hours. If you opted for active dry, the rise time will be longer, anywhere from 3-6 hours. If you did the no-knead, method, it may take even longer than that. You could even leave it overnight if you want!
Part 4: Preheating and Shaping
This bread is meant to be baked in a Dutch oven. Dutch ovens trap steam, which helps create a nice crust. But if you don't have a one, don't fret! You can place your loaf on baking sheet, and then place a metal pot over the loaf for the same effect.
When your dough is done rising, take your dough out of the oven and then preheat the oven to 450°F 230°C. Add your Dutch oven or sheet and pot to the oven to allow them to heat up.
Punch down the dough to get rid of the air bubbles, and then place the dough on a lightly-floured surface. Pull the edges of the dough in toward the center. You should see the shape becoming more spherical and feel the surface getting tighter. Here's a quick visual: https://www.youtube.com/watch?v=IWA0RAAsBHg
Transfer your beautiful dough baby to a sheet of parchment paper. Gently flour the surface of the loaf, and then use your knife to score the top. (Don't go too deep!)
Part 5: Baking and Cooling
When the oven is heated, remove your Dutch oven and transfer your dough and parchment paper inside. Make sure the parchment paper is completely inside to prevent it from burning.
Bake for 30 minutes. After this time, remove the Dutch oven lid and let your loaf bake for 10-15 more minutes until the crust is nice and golden brown
Transfer the loaf to the cooling rack and let it cool for at least an hour before cutting into it. I know it's tempting to dig in right away, but I promise it's worth it.
Your bread should be good for about a week. I like to store mine in tin foil or in a large zip lock bag. To keep your crust nice and crispy, don't wrap it up until it's completely cool.
Enjoy!

56 notes
·
View notes
Text

So I was in the AH looking at eternal hatchlings and found this child listed for 7 gems. I wasn't thinking enough and bought them without looking at the seller. They are a darling hatchling and I already have gene plans for them, but before I do anything like that I would like to try and make sure it wasn't a mistake that they were sold. So if Aster here was yours and you didn't mean to sell them, please message me! (Evernite #66797)
And to maybe others willing to share their thoughts...if nobody comes forward and confirms it was a mistake or not in..like a week? Would I be okay to gene them and consider them mine? I am just really unsure someone would put an eternally youthful dragon for 7g? So it's given me worries if later someone finds their hatchling changed. .
7 notes
·
View notes
Text
Fiz os cálculos do que comer, espero que dê certo, só pra ter uma base e uma meta melhor.

Comidas que costumo comer e suas informações:
Almoço'
Carne de soja (frango); [ 1 xícara: 141 kral, 8g carb, 25g prot, 1g gord ]
Frango grelhado; [ 1 pedaço médio: 147 kral, 0g carb, 16,79g prot, 8,36g gord ]
Molho de tomate; [ 1 colher: 7 kral, 0g carb, 0g prot, 0g gord ]
Arroz; [ 1 colher: 32 kral, 7g carb, 0g prot, 0g gord ]
Feijão; [ 6 colheres: 132 kral, 23,71g carb, 8,86g prot, 0g gord ]
Farofa; [ 1 colher: 133 kral, 26g carb, 0g prot, 3g gord ]
Frutas' unidade
Banana; [ 87 kral, 0g gord, 22g carb, 1g prot ]
Morango; [ 4 kral, 0g gord, 0g carb, 0g prot ]
Kiwi; [ 46 kral, 0g gord, 11g carb, 0g prot ]
Maçã; [ 72 kral, 0g gord, 19 carb, 0g prot ]
Saladas'
Pepino; tomate, alface, couve, repolho: calorias negativas pra quantidade que eu consumo.
Cafés'
Aveia; [ 2 colheres 109 kral, 17 carb, 2 gord, 4 prot ]
Pão francês; [ unidade 137 kral, 25 carb, 1 gord, 4 prot ]
Pão de forma; [ fatia 139 kral, 26 carb, 2 gord, 4 prot ]
Margarina; [ 1 colher 79 kral, 0 carb, 8 gord, 0 prot ]
Iogurte natural; [ 1 copo 170g 117 kral, 6 carb, 7 gord, 6 prot ]
Nescau; [ 1 colher 35 kral, 8 carb, 0 gord, 0 prot ]
Doce de leite; [ 1 colher 62 kral, 12 carb, 1 gord, 1 prot ]
Besteiras'
Pipoca; [ 1 xícara 31 kral, 6 carb, 0 gord, 1 prot ]
Mine churros; [ unidade 56 kral, 8 carb, 2 gord, 0,8 prot ]
Rissoles de frango; [ unidade 209 kral, 22 carb, 10 gord, 2 prot ]
Coxinha de frango; [ unidade 141 kral, 17 carb, 5,90 gord, 6 prot ]
Batata frita; [ porção P com oléo 145 kral, 20 carb, 6 gord, 2,8 prot ]
Batata frita Air Friyer; [ 12 unidades 104 kral, 16 carb, 3 gord, 2 prot ]
Bebidas'
Leite; [ 100ML 57 kral, 3g gord, 4,5g carb, 3g prot ]
Suco verde; [ 1 xícara 85 kral, 0g gord, 20g carb, 2,8g prot ]
Suco de laranja; [ 200ML 91 kral, 0g gord, 21g carb, 2g prot ]
Suco de beterraba; [ 200ML 85 kral, 0g gord, 20g carb, 1g prot ]
Caneca de nescau pronto; [ 200ML 150 kral, 7g gord, 20g carb, 6g prot ]

16 notes
·
View notes
Note
Clothing and fighting style: Shaw Han
Fighting:
This can be based on lore because we do have a pretty detailed description of his fighting style, mostly in the SWARM lore.
When we first meet him he's just making sure that that Hive knight he just fought is dead so I imagine that he always double taps.
"He had bled out from open wounds before and was in no rush to relive the experience."
Trip mines. Trip mines everywhere.
Trip mines that can kill a Hive Lightbearer or a Gladiator, mind you
"You're fast on your feet, son. You'll be fine. - Saladin motions the advance"
Now this entire part because it pretty much explains it:
"Flame licks down the Ahamkara spine lashed to his arm until it meets the hammer of his weapon and ignites his Golden Gun. He singles out several enemy flak cannons and skewers them with Solar points, incinerating nearby Cabal."
Note: He's canonically left-handed!
"He pushes the bulk of his Light into his weapon, spreads its influence to reach the nearby Redjacks, and reignites his gun before touching the barrel to the ground and firing. The ground bubbles with hot magmatic Light; a warmth envelops the Redjacks as Solar flame imbues and empowers their rifles with golden power."
So… golden gun of radiance, I guess? Pretty cool in my humble opinion.
Also worth mentioning that he uses Khvostov 7G-0X, most likely the exotic one.
Bonus:
"Damn it!" - did you know that he's on my list of Destiny Characters Allowed to Swear
"Shaw wasn't sure if he'd call this a plan—maybe a Titan plan."
Clothing:

It took me ages to find some good references of what people wear in the Last City and here's the result. His armor is in bright, saturated colours so I imagine that his civilian fashion fashion would be similar. He wears normal clothes over his under suit since the Red War. My references are under the cut:

18 notes
·
View notes
Photo


7 gifs for every monsta x title-song (2/?): fighter
#monsta x#monstaxedits#monstaxgifs#mx7net#maleidolsedit#monsta x gifs#mxgif#mxedit#mx#kihyun gifs#flashing tw#mine*gif#mine*7g#you just had to be there
49 notes
·
View notes
Note
Hello :3 If you are okay with drawing other's OC I would love to see you make mine in your style, please ❤️ I admire all the faces from the card you've posted, my favorites are 1G ; 3H ; 6G ; 7G ; 8G ; 8H ; 10J but, any face would be lovely ^^ Here are some references ^^


btw I love your comic :3
I've decided to start with OC requests, so here it is❤️
Hope you like it!
Version with and without backgroud :)


47 notes
·
View notes
Text
responses to: /post/694126265196773376/
Like what if a pair you nested had 5 babies? Doesn’t that ruin your plans more than receiving your pair back
...No, they get the extras. Is this deal really that confusing for people? To reiterate: this project is for one specific color combination. Literally any dragon that isn't that, isn't mine to keep. The breeder keeps them for their own profit so no, it wouldn't ruin my plans if they had a 5 egg nest.
I still feel like this shouldn’t ruin your plans. You knew your den/lair space was limited yet didn’t think to keep some extra spaces somewhere incase something like this happened? What if a nest had more eggs than you could take?
I did, that's the thing. I had everything planned so this pair wouldn't be an issue for at least two months. The allotted space I had was for another pair that the other breeder's been really understanding about. (Big thank you to them! I can't name you, but you're awesome!) As for why I didn't simply expand...
I guess I just don’t understand why you can’t expand your lair/den and/or den 2 dragons.
I ran out of gem slots ages ago and my remaining "free" slots all require expensive items like genes or eggs. I've been spending my currency on gene projects that need to get done for this Halloween instead as that's more time sensitive. (Not that space is a problem anymore, thank you Undel!)
Not sure if losing this specific pair would've been worse though. It's a semi-rare color combo, yes, but I'm confident I could find more to breed down the line. It's the miscommunication (explained below) and messing up my plans that angered me more than the threat of losing them.
My only confusion is would you rather have had them go inactive with your dragons?
No, of course not, but he didn't tell me it was urgent nor did I know he'd have to stop playing. I found all that out after he denned my dragons. If he had just said that from the start, "Hey man, an emergency came up and I gotta stop playing for an indefinite amount of time," I'd be like "okay, I have no room but I'll work on it" and make room as quickly as possible, but, initially, he just said I needed to take my dragons back. When I said I didn't have room, he told me to take my time before getting angry & denning less than 24hrs later. I get now that he was just being polite, but that doesn't seem like the thing you should say in a crisis.
This just sounds like a cautionary tale to not embark on more than one breeding project at the same time if space is an issue.
Yes, well, with breeding projects taking weeks to months, sometimes even years (my record is nearly two years,) I don't have that luxury. Plus the issue was the other person bailing suddenly then being coy as to why it had to happen. It's never happened to me before so I've never had to waste spaces on emergency scenarios like this. Either way, it's happened and thanks to some lucky circumstances, I'm no longer in crisis myself. I still regret the way I handled things but 🤷 c'est le vie
As someone who host nests a lot, I probably wouldn’t accept this job as you described unless this pair was really likely to give out what you’re after. 2 stacks of food only lasts so long and depending on how likely it is to get what you’re after, someone could be breeding long after the dragons have eaten through those stores and now into what I’m personally having to pay for. Regardless of how many dragons I got from this, I don’t have the time to grind and level them. I can’t see this even braking even on my side in the end.
And that's totally okay. ❤️ I get that not everyone has time for exalting, but even if you were to sell them as fodder at 7g, that's anywhere from 7-35g per nest. I don't think I've ever seen anyone charge that much for a nest rental so there's profit to be had if you ever consider it.
As for the food situation: I know they don't last forever so I offered to buy more food stacks later down the line, they just needed to tell me when they need it. I try to be conservative with what I offer because I don't want to waste 5+ stacks on a miracle first timer or something like that.
3 notes
·
View notes
Photo
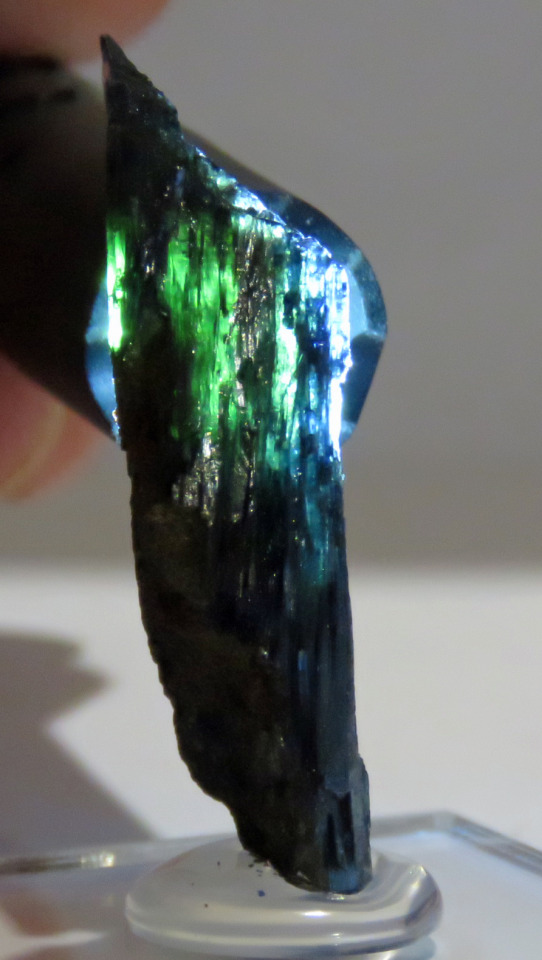
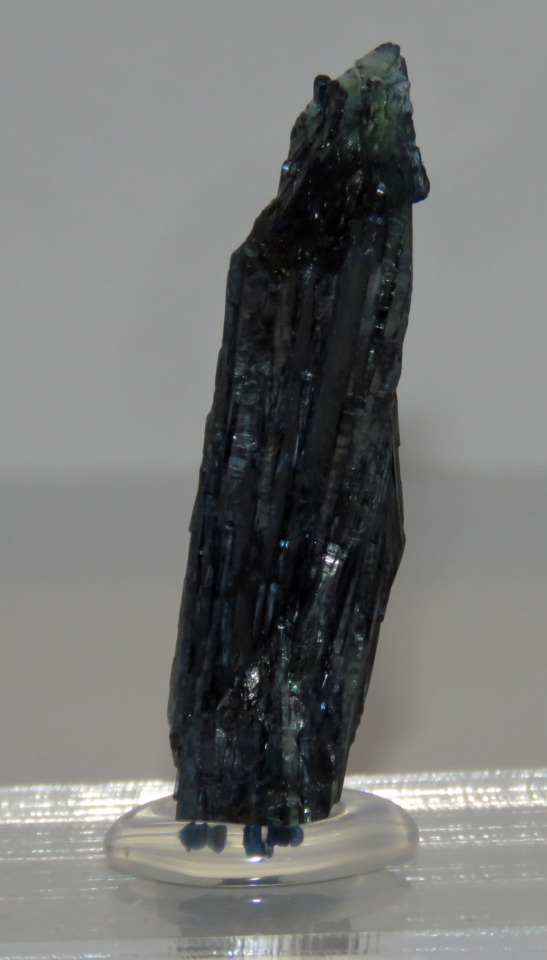
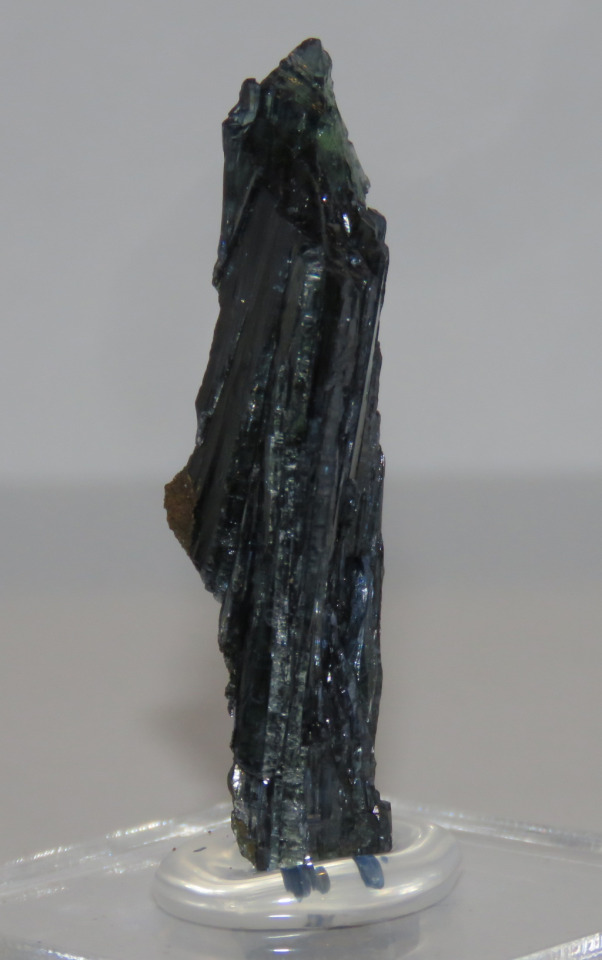
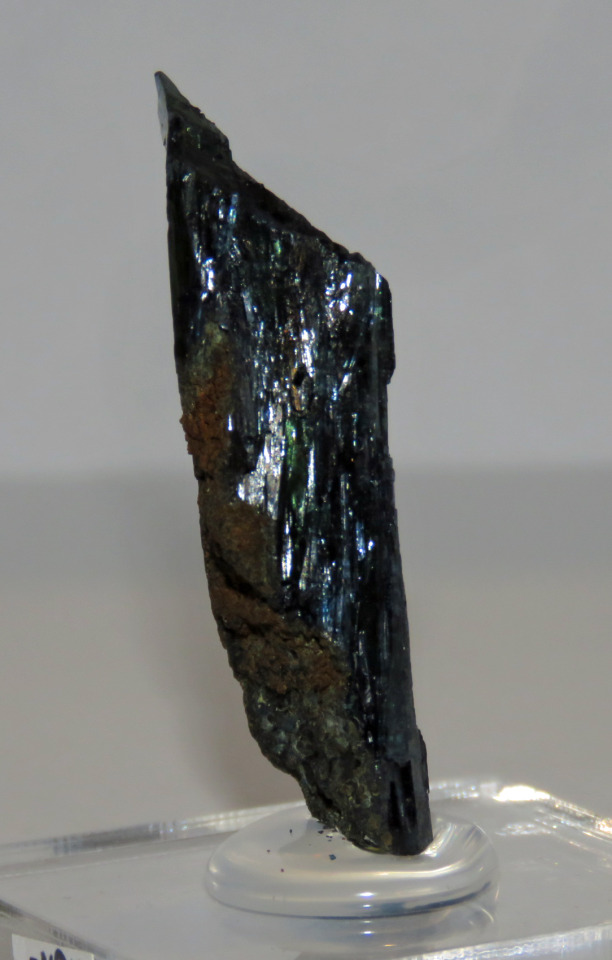
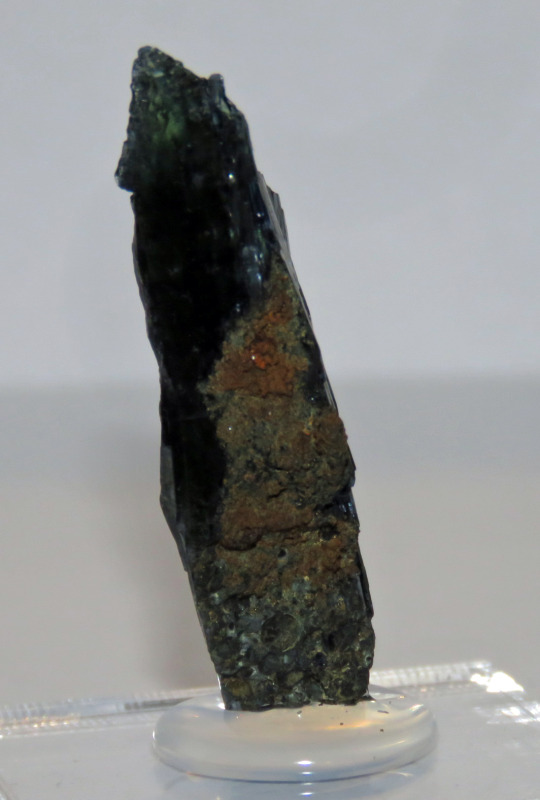
Vivianite (BB-M-0494)
Huanuni Mine, Pantaleón Dalence Province, Bolivia
13*12*49mm // 7g (Miniature)
10 notes
·
View notes
Text
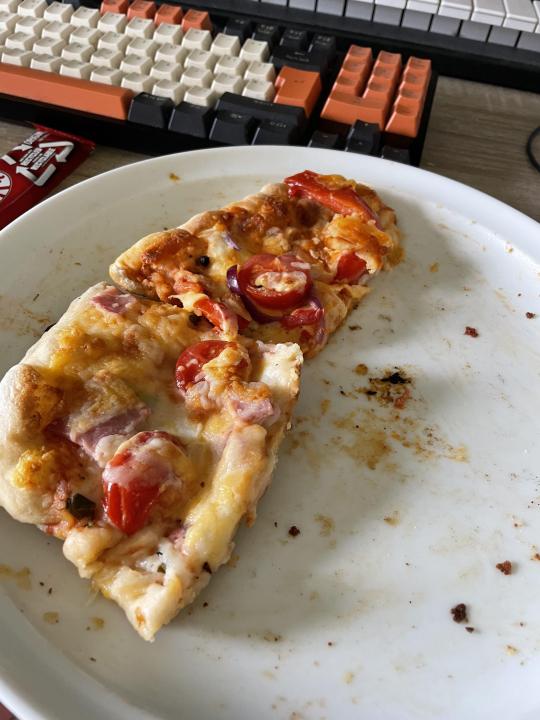
how to make pizza at home (that doesn't suck)
it was my little brother's 17th birthday yesterday and he wanted to order pizza, but we don't have much money so I said I'd make it instead. it's incredibly simple, and just requires a bit of prep to make it work.

dough
the dough is one of the easiest things about this whole recipe - you need a ratio of five parts bread/strong/00 flour to three parts lukewarm water. I used 1kg of bread flour and 600g (600ml) water, which was enough for eight pizzas.
weigh out your flour into a mixing bowl.
to one side of the bowl, add a teaspoon of sugar and a sachet of dried yeast (7g). on the opposite side, add a teaspoon of salt. [note: it's one teaspoon of sugar/salt per ~500g, so you may need to scale up/down]
add the lukewarm water to the bowl, either by weight or volume.
mix with a butter knife or spoon until it's reasonably well-combined, then mix with your hands until it leaves the bowl clean. you may need to add more flour or water if the dough is still too sticky or dry.
once the dough is fully combined, you have a choice: to knead or not to knead, that is the question.
a no-knead dough has more developed and nuanced flavours, and requires less effort, but it needs time. leave the dough, covered, in the fridge overnight (around eighteen hours). this arguably makes a better dough.
if you need your dough in a pinch, though, kneading speeds up the process. turn the dough onto a lightly floured surface and knead for ten minutes. roll the dough into a ball and return to the bowl to prove (rise) for at least an hour. this is the method I used.
once the dough has risen, it can be portioned into balls (around a handful) for use in pizza.
tomato sauce
the sauce is one of the most important components of a pizza, and it is also very simple.
find the most expensive can of whole, peeled tomatoes you can. the quality of tomato is incredibly important here.
pick the tomatoes out with a fork (o.e.) and place them in a bowl. save the excess liquid in the can - you may need some to thin the sauce, or it can be used for soup.
use the fork to gently mash the tomatoes. they should be in small pieces with a saucy consistency.
you can leave it here and it will be delicious with good quality tomatoes, but you can also add a number of other ingredients to compliment the tomato flavour. it is very important not to overpower the tomato though - I slightly over-salted mine and I added less than a teaspoon of salt... some ingredients include finely chopped fresh basil or oregano, sugar, and salt.
assembly and cooking
it is safe to assume that most home-cooks do not own a wood-fired pizza oven. luckily, this is not an issue. in fact, you don't need any specialist equipment to cook a good quality pizza at home - a grill and a frying pan will suffice (though a crepe pan would be preferable!)
before cooking, ensure you have all of your toppings prepared and pre-cut, otherwise you could end up with a burnt bottom on your pizza!
preheat a grill on its maximum setting.
take a portion of your dough (again, about a handful) and make it into a pizza shape. you can either use a rolling pin, or use your fingers: first, flatten the ball into a disc with your palm, then pinch the dough between your thumb and index/middle fingers to stretch it out. rotate the dough slightly and do the same again. keep repeating until you have a vaguely-circular disc of dough.
preheat a frying pan (or flat crepe pan if you have it) till it is searing hot. if you're not using non-stick, you can add a thin coating of olive oil too.
once the pan is hot, carefully transfer the dough into the pan, laying it flat. give the pan a shake to make sure it doesn't stick.
now, work quickly but carefully to add your toppings. your toppings should be things which are pre-cooked (eg. ham, fried peppers) or will cook very quickly (eg. thinly sliced onions, cherry tomatoes).
once you see the bottom of the edges start to brown, turn off the heat and stick the pan under the grill for around five minutes, or until the crust starts to brown.
once browned, transfer the pizza to a chopping board to slice, then plate up.
when reading the recipe, you may have thought it strange to put the pizza in a pan, but this is actually vital to the method's success; oven-baked pizzas often have a soggy or soft bottom which doesn't crisp up like it should. a pizza stone or steel can remedy this to some extent, but most home ovens simply do not get hot enough to work well with pizza. the pan emulates the searing hot base of the pizza oven, crisping the bottom, while the grill emulates the hot air which cooks the top.
leftovers?
if you have leftover pizza, that can keep in the fridge for a day or two as you would a normal pizza.
if you have leftover dough, you can also keep that in the fridge for up to three days, and use it to make pizzas later in the week, or make a garlic pizza bread or sweet pizza bread (I'll let you experiment with those yourself as this post is already too long...)
if you have leftover dough and toppings, you can freeze a full uncooked pizza for later. here's how:
roll out your dough as described in step two above, then place it on a plate.
add all your toppings as normal.
put the plate on a level surface in the freezer for a couple of hours to firm everything up.
take it off the plate and wrap in cling-film to prevent freezer burn and maintain freshness.
this will last around a month in the freezer. when you're ready to cook, fully defrost it and use the pan/grill method as described above.
========
I hope this recipe is of use to someone, because it does make delicious pizza. the dough recipe and pan/grill combo is an idea I got from watching a SortedFood video a few years ago - it has served me well since. I made the tomato sauce recipe by combining a few reddit posts and comments into something I thought would taste nice (and it did!)
and finally, an interesting aside: I bought a lot of toppings for the pizzas, so my fridge was very full. this meant that one of the packs of mozzarella was touching the back of the fridge, which froze the brine it was in. it was quite amusing when I tried to get it out of the packet to use it...
#pizza#grill#cooking#home cooking#mozzarella#tomato#i love pizza#dough#basil#it's really easy to make though#you should try it
1 note
·
View note
Text
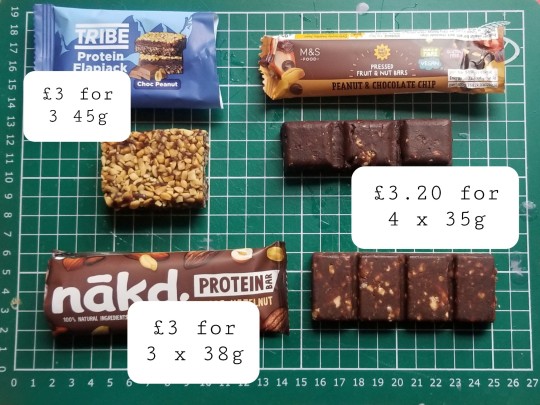
Chocolate nut raw protein bars
OK here's today's line up AND the at-home version.
No LIDL version available, sadly for my wallet. They do have a cocoa orange nakd knock off but I don't like those so there you go.
All are GF but none are soy free.
Clockwise from top right we have:
M&S
80p per 35g bar, 4g protein. Good moisture to bite ratio and strong, rich almost coffee like chocolate taste, with a treacle note that is coming from the raisins in the mix. Density managed via chicory fibre which seems to be the go-to for a lot of things. A slightly more attractive product to look at than the Nakd bar but that is not a high bar. Addition of peanuts and actual chocolate chips makes this much tastier and interesting than the nakd bar it is a copy cat of, but gram for gram it is actually pricier.
TREK PROTEIN
£1 per 45g bar, 7g protein. The answer to "what if we made nutella miserable?" A chonky literal brick of a product with substantial heft and 0 joy. Paler than the M&S version as it has more nuts and no raisins. Peanut flour and chicory fibre make up almost 20% of this and it shows. I have a lot of time for nakd as they were the only vegan treat in town for a while but this thing is a sad dry lump. Eating it is an experience in dutiful chewing and leaves your jaw sore. Honestly you are better off just eating nuts. I pity the hazelnuts in this product.
TRIBE PROTEIN
£1 per 38g bar, 5g protein. The objectively tastiest of them all, basically a layer of soft date paste on a slightly crunchy chocolate flapjack-esque base (probably cold pressed but could be baked not 100% sure) then topped with nuts making it feel like the fanciest. Protein comes from "soya protein crispies" which sounds like a terrible breakfast product. Addition of oats makes it not-like-the-other-ones but it sits in the same taste zone so I included it. Different textures make it interesting and it is my current fave for with afternoon coffee.
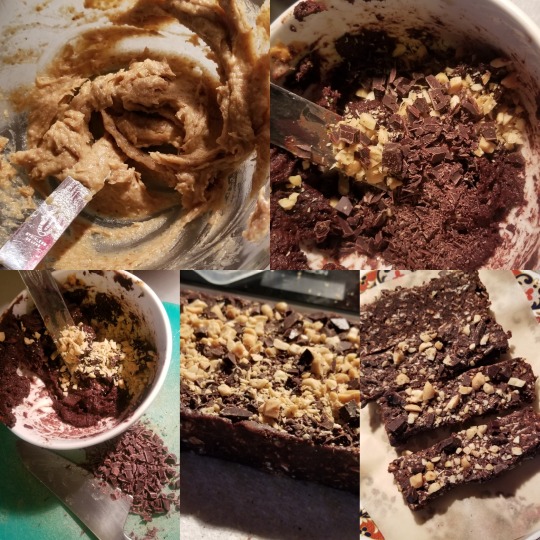
THE AT HOME VERSION
Goals here were to keep the chocolate goodness, make it soy free and improve on the cold-pressed bars by making them moist and softer. Getting the hard texture that the packet versions have probably involves a level of dehydration that I have no interest in.
I included oats as chicory fibre isn't particularly available and I needed a dry binding agent. I had jumbo oats in and they needed a bit of crumbling to make them finer but I refuse to keep multiple grades of oat in the house as my flat is small and I am not quite that obsessed.
I added a chopped chocolate and peanut top because it makes the final thing look nicer as well as giving it variety in texture. Initial versions I mixed these in like the M&S bar but I prefer it with them on top.
I didn't bother with hazelnuts and stuck with peanuts but obviously you can substitute.
Final texture is akin to a chocolate brownie - it has that gooey chew.
Makes approx 12 40g bars at 16p each - price will flex depending on how cheap you can get your dates, I am blessed with a large turkish store on the corner.
200g chopped stoned dates (buy cheap ones this is not the time for fancy medjool)
100g peanut butter - I had smooth but crunchy will work
100g GF oats
15g cocoa
Vanilla essence
Pinch salt
15g chopped dark chocolate (LIDL)
15g chopped roasted peanuts (I used salted, YMMV)
* soak dates in boiling water (just enough to cover) for 10 mins, drain and smush dry
* blend dates into a pale creamy paste
* add other ingredients except chopped chocolate and peanuts
* stir well to break up oats
* press firmly into a container, mine was 16cm x 9 cm giving a mix height of 2.5cm
* leave in fridge overnight
* next day cut into 12 bars and press chopped nuts and chocolate on top - first version I topped the big block pre slicing then realised this would only be one edge of the bar so don't do that
1 note
·
View note
Last Seen Blogs

marederia
☞Maredería ☜

6mous
stucky

guam
🌴hafa adai🌴

greyspe
Untitled

pennytrayshun
Blogs and pictures i love