#modern sewing tutorial
Photo

🌸 DIY Bustier Dress: Turning a Bed Sheet into Fashion Magic! 🌺
Hey there, lovely fashion enthusiasts! Are you ready for a thrilling sewing adventure? Today, I'm excited to share with you a fantastic project: transforming a humble bed sheet into a stunning bustier dress!
In this step-by-step tutorial, I'll guide you through the process of creating your very own bustier dress, complete with cups, a shirred back, bubble sleeves, and a pleated midi skirt. It's a beautiful blend of comfort, style, and sustainability, perfect for those who embrace conscious fashion.
But wait, there's more! I'm providing you with a free printable PDF pattern for the bustier dress, making it even easier to follow along. Plus, I've included a pattern for side pockets because who doesn't love functional fashion?
What makes this dress even more special is the fact that I've crafted it from a repurposed bed sheet. By upcycling materials, we're not only reducing waste but also adding a unique touch to our wardrobes. Sustainability meets style!
So, gather your sewing tools, unleash your creativity, and let's embark on this fashion journey together. The tutorial video is packed with tricks, tips, and innovative sewing techniques. You'll learn new ways to construct sleeves and achieve a perfect fit that flatters your figure.
Don't forget to share this video with your sewing buddies. Spread the love for DIY fashion and sustainable practices! Together, we can make a difference in the world of fashion and encourage others to embrace their inner creativity.
Stay tuned for more exciting tutorials and free patterns on my channel. Let's continue to reimagine and transform fabrics, one stitch at a time.
Happy sewing! 🌟✂️
youtube
#diy bustier dress#sustainable fashion#upcycled fashion#conscious fashion#sewing tutorial#creative sewing#fashion adventure#diy fashion#modern fashion#modern sewing tutorial#sewing pattern#pdf pattern
16 notes
·
View notes
Text
fun things I'm doing this weekend
catching a local roller derby match for the first time since 2020
aro/ace meetup at a local tea shop
reading an essay comparing Jadis and Galadriel
a little sport. a little social. and a little nerd. that's the triforce babey
#I'm also trying to finish sewing a vest but the welt pockets CONFOUND me#a modern day sorcerer (me) struggling with arcana (sewing) looking through tomes (youtube tutorials) for information#Idle Chatter
3 notes
·
View notes
Text
Need to rant for a minute because even though I have very much been enjoying the fruits of my efforts learning how to sew vintage style clothes, I just swapped out old fatphobia (nice plus size vintage clothes never making it to stores) for new fatphobia (trying to find patterns). Cause it doesn't end at what clothes you're able to buy already made.
I finally bought a Friday Pattern Company pattern the other day, and man it made the bare minimum feel like I was being spoiled. The sizes go up to 7X (that's XL, XXL, 1X, 2X, etc, so there's 9 sizes above L) they had a thin and a fat model on the cover! Usually I'm barely lucky enough to get an XL, and I'm just expected to guess how it's going to look on my body. The majority of their patterns have two differently sized models on the covers, and all of them have that full range of patterns inside.
It is so hard to find good plus size patterns, even if they're available, many companies just scale up their mediums and I can't guarantee they're actually sized correctly for a different shape. As good as Friday is, them and other modern indie pattern companies aren't easy to find.
Okay well what if I went another step deeper, what if I forgo patterns all together and decide to be completely independent and draft things myself?
Then I'll need a plus size dress form. I got lucky and found one at an antique mall for 50$ but these are incredibly rare and more expensive than smaller ones. I'll need to learn how to draft patterns, something that was taught to me on a XS form by my college and nearly every tutorial out there. Drafting close fitting clothes for fat bodies is a completely different skillset, because all that extra fat is much squishier and shifts more. Measuring yourself correctly and getting the shape you're looking for is far more important. Before I even got there I'd need to sketch out what I wanted to make, right? Well the patterning book my family got me only shows you how to draw tall, skinny people. A beginner would have to look up their own drawing references and tutorials because what what supposed to be a super accessible beginner's guide to fashion has decided their body isn't normal enough for the baseline tutorial.
We're expected to be the ones who put in the extra effort. Digging to find the pattern companies that fit our shape and actually prove they can, paying extra in shipping or driving farther to pick them up. Having to search specifically for plus size tutorials for drafting and sketching. It's always treated like it's not part of the beginner's experience to be working with a fat body, that's just going to make people more frustrated and lost and less likely to pursue something they're excited about! Especially if it's in response to already being frustrated about the lack of clothing options.
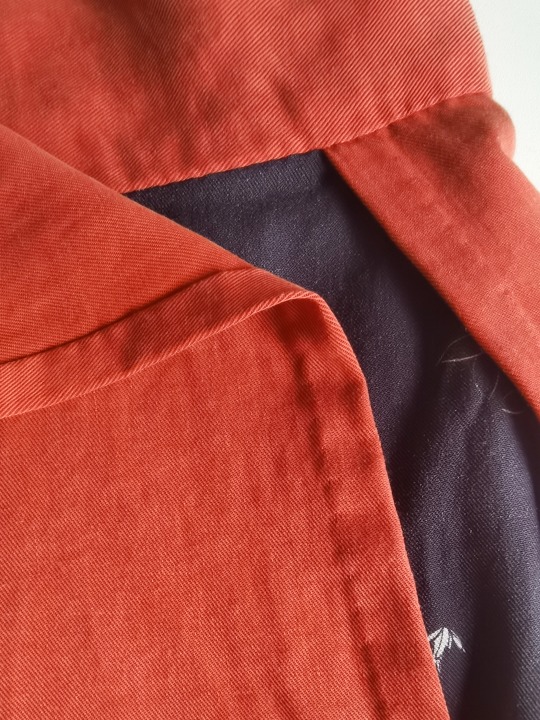
We need a little positivity to this post so to end on a high note, here's me modeling the blazer I just finished with a shirt I made a couple years ago!
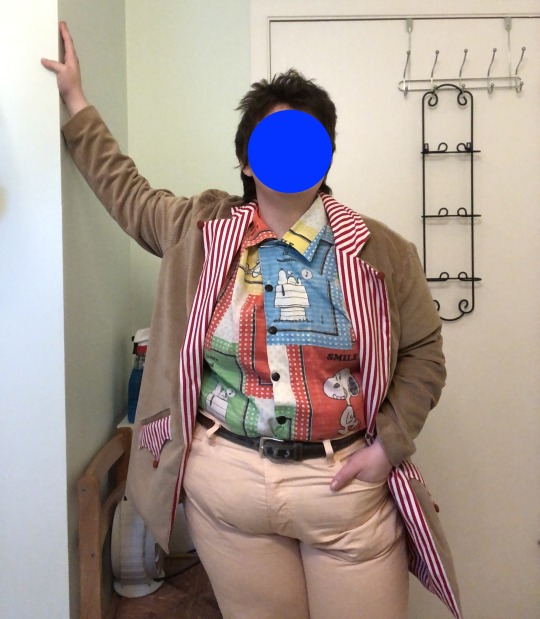
Being able to finally wear clothes I really feel like me in has been an amazing confidence boost. It's not fair that there's so many roadblocks in the way for someone who looks like me who just wants to wear things they enjoy.
#fatshion#cw fatphobia#fatphobia#body posititivity#fat positvity#how the fuck is it hard to find clothes to fit MY body I see people with my body type all the damn time#stay strong out there#fashion#clowncore
1K notes
·
View notes
Note
You've mentioned before that it is acceptable to sew the sleeve onto the torso of a garment before sewing into a tube, and also that construction for something may be different when done by hand vs machine. So far, all the tutorials about sleeves w/ gussets I've seen involve sewing the gusset onto the sleeve, making a tube, and then attaching it to the body. If I do it by hand, can I get away with putting the sleeve on before I turn it into a tube?
Oh nonono that's not just an acceptable way to do it, it is THE way to do the sleeves on certain types of garments!
Obviously with anything tailored it doesn't work - fitted jackets and coats are too structured and the seams there usually don't line up anyways.
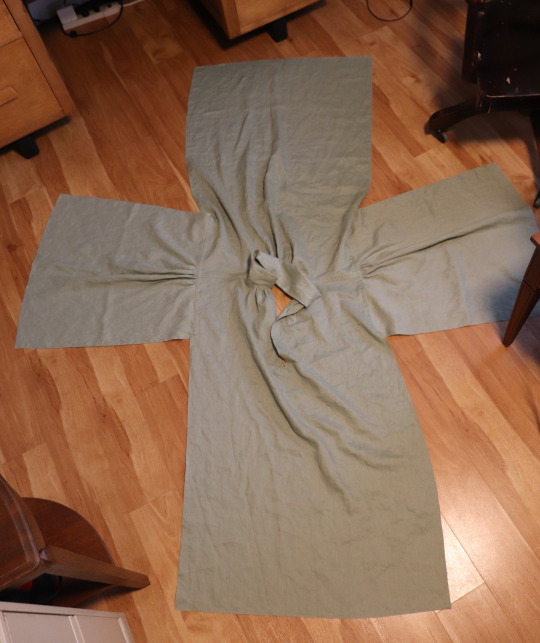
But if you're making a shirt or shift or nightgown, or basically anything unstructured, one layer, and with sleeve seams and side seams that line up, put the sleeve on first!!! Your shirt should resemble a large + right after the sleeves go on.
It doesn't matter if there's a gusset or not, or if you're doing it by hand or machine, this method is objectively better either way.
Attach the sleeve, finish the seam allowance, and THEN close the side and sleeve up as one. If there's a gusset then sew it in on all 4 sides before closing up the rest of the side and sleeve.
(And trim down the seam allowances of the sleeve and body pieces next to the gusset, and then fold the edges of the gusset outwards around them when you fell the seams. I'm still chugging along on my extremely long shirt tutorial and I'll go over all of this thoroughly in it.)
I know I like to say that there's no one right way to sew things, and that's true a lot of the time, and technically you can sew the sleeves on second but. please never do that. It's so so much easier to do it while they're nice and flat. Please don't make your life that much harder for no reason.
It's been about 13 years since the first and only time I used a commercial sewing pattern, but I'm pretty sure the sleeves went on in that order in the instructions for it, and commercially made shirts are done the same way!
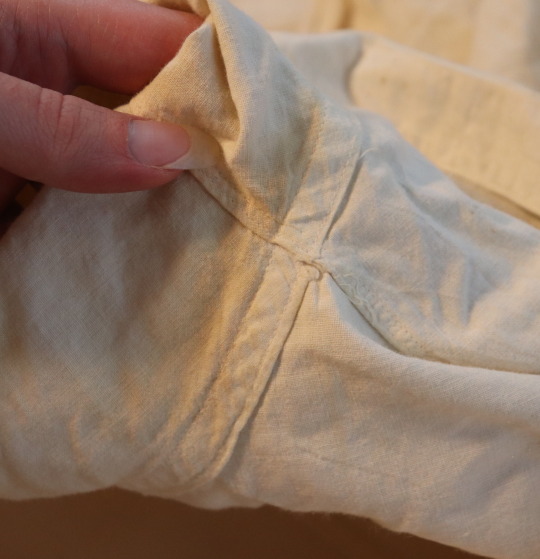
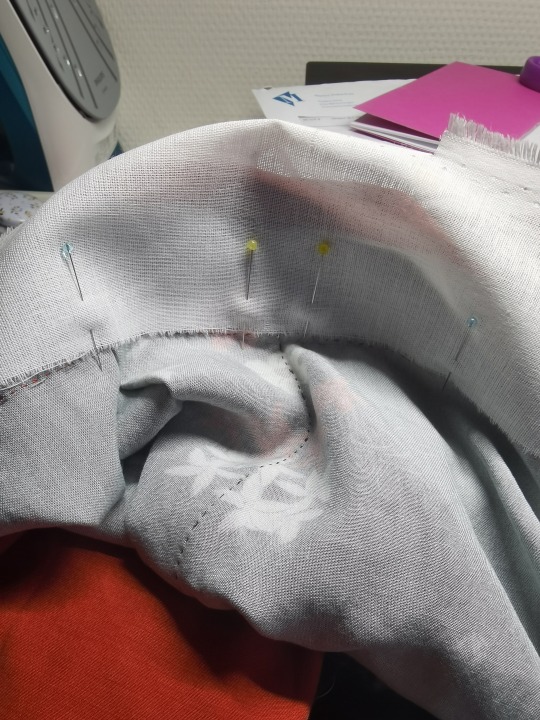
(This one's antique from maybe the 1910's-20's because it's the only shirt I own that I didn't make myself, but you can see that the sleeve was sewn on and felled first, and I promise the modern button ups I alter at work are done the same way.)
300 notes
·
View notes
Text
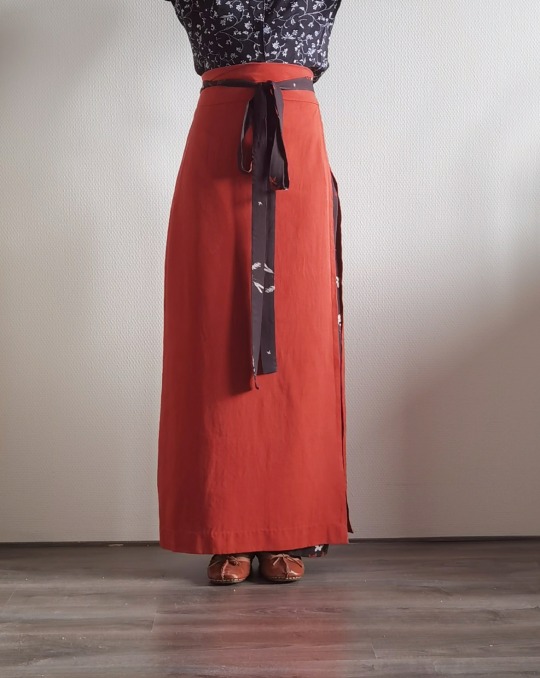
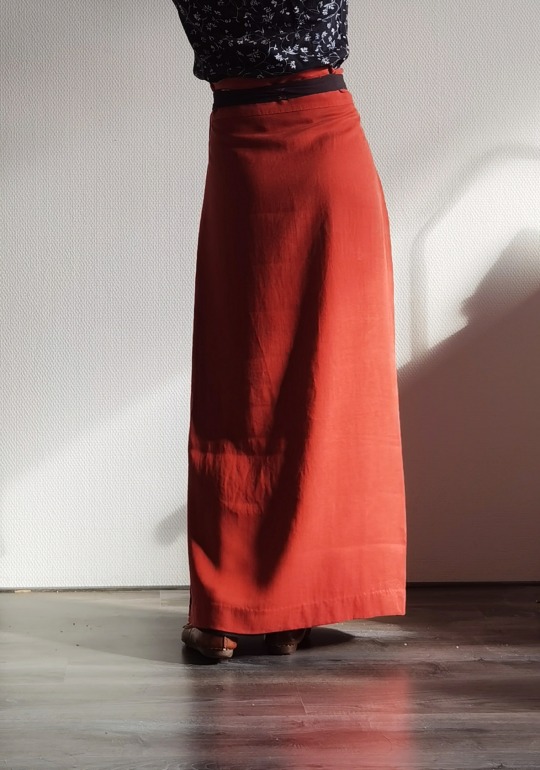
October, 2023 | Two-pieced skirt from Southern Song Dynasty (intro+tutorial)
Introduction
(Note: for now I’m not making a bibliography for this article, but if you are interested I’m more than happy to send the sources.)
The two-pieced skirt (liǎng piàn qún) is a type of skirt from the Southern Song Dynasty (1127-1279). It is also known as xuàn qún (literal translation: circle/swirl skirt). As far I know, there are two sets of surviving samples of these skirts, one from the tomb of Ms Huang Sheng (this was her full maiden name - she died at 17, one year after getting married, in 1243) and the other from the tomb of Ms Zhou (also her maiden name - she died possibly at 35 and was buried in 1274). The main stylistic difference between these two sets of two-pieced skirts is that those of Ms Zhou had a relatively large difference between the hem and waist measurements (the hem is 15~20cm wider than the waist circumference), whereas those of Miss Huang Sheng had a small difference (approx. 10cm).
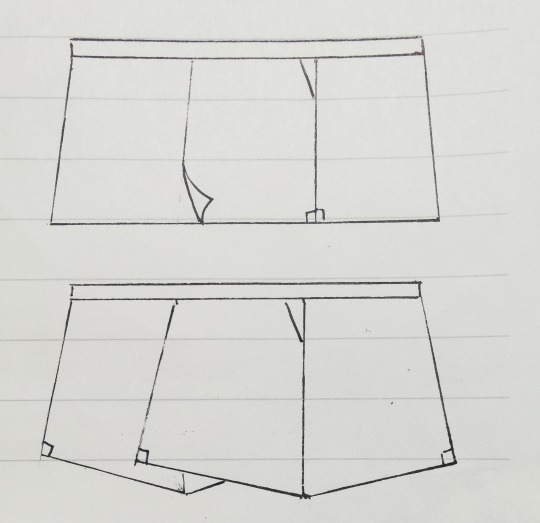
Below is a diagram showing the construction. The skirt is composed of one upper piece and one under piece. Each piece consists of two panels which are trapezoids or (roughly) rectangles. For the sake of convenience, we shall call them the centre panel and the side panel. You can see that the centre panels of the two pieces overlap, and the whole thing is fixed onto a waist band. All surviving samples have relatively wide waist bands—about 10-14cm in width. One strip on each side of the waist band is used to tie the skirt.
Pattern details
The modern common agreement is that the panels are usually right trapezoids (trapezoids with two right angles). I don’t know whether this is historically accurate, as some people think they were pentagons, but I doubt we can ever find out from what is currently available, just because the fabrics had been damaged and distorted over time. Assuming that they are right trapezoids, there are two different ways to piece the panels: you can sew the edges with two right angles together, or you can sew together the opposite edge with two non-right angles together (see diagram). They yield different results. A skirt made with the first method would have more of an A-line and more flowy. One made with the second method would wrap more snugly around the torso and give an H-shape.
You might have noticed that the centre panel is a bit wider than the side panel. This is because the centre panel would be worn in the back and the side in the front. A good starting point is to make the centre panel 10cm wider, but this of course depends on one’s body shape.
Another modern agreement is that the skirt better compliments a flat body shape with gentle curves (as has been the mainstream high-class aesthetics for the female body for a very, very long time right up to now). The most prominent issue with a difference between waist and hip measurements is that the skirt will bunch up at the lower back. To alleviate this issue, darts are used on the sides. Another way is to wear a petticoat, some underpants, or just something around the waist to enlarge the waist measurement. The skirt is not designed to accommodate a large difference between waist and hip circumferences (>30cm probably, though it starts to get difficult at 25cm).
Applying your measurements
(Numbers, when applicable, are in centimetres.)
You need your waist and hip circumferences. The skirt is usually full length. I like to make it as long as possible without the danger of tripping. It could be made shorter for thicker stiffer fabrics or a more modern look. Keep in mind that the skirt has a very high waist.
The length of the waistband is usually 1.7-1.9*waist circumference. In any case, it cannot be shorter than 1.3*hip circumference or it won’t close properly.
Now that you have the length of the waistband, you can calculate the upper edges of the panels. Let a be the length of the waistband, b the finished upper edge of the side panel. Then the finished upper edge of the centre panel is roughly b+10. Using the information discussed in the previous section, we have an equation: a=2b+b+10. This is your starting point—adjust as needed.
Triangular darts. There are a few ways to make them and this is just one of them. Let c be the width on each side of one dart. c=(hip-waist)/4. This means each dart will eliminate half of the (hip-waist) difference, and there are two darts.
c+b= total width on the upper edge of the panel. The bottom edge (i.e. the hem) of the same panel would be about 5cm wider than the upper edge.
The width of the waistband. If you would like to wear it without folding, 6-8cm is good. If wearing with a fold (which sometimes also helps reducing the bunching at the lower back), make it 10-14cm. Note that you need to cut the waistband doubling the width plus allowance.
The ties are usually 2-3cm wide. As for the length, try start from waist circumference+0.6*skirt length. I like to make it 20cm longer because I like long billowy ribbons. Like the waistband, you cut the ties doubling the width since you will fold it in sewing.
Then you would have something like this:
(measurements used: waist 65, hip 89)
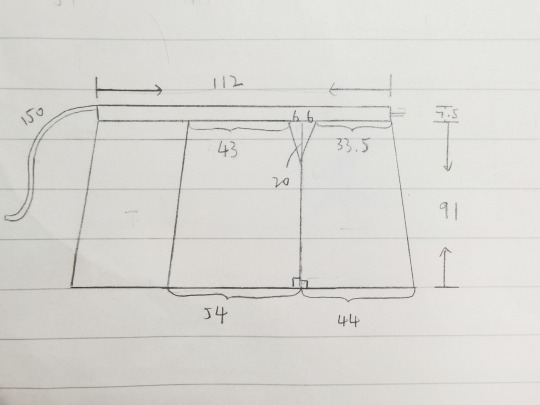
Be careful that you need extra fabric because of the fold created at the dart. (You’d need less fabric if you cut away the excess fabric in the dart.)
Fabric suggestions
This is important. Very very important. Because only the right fabric is worth your time and produces the desired result.
In general, choose something soft, drapey and that conforms to your body. Two or three centimetres of difference in calculation hardly matters when you use a good silk.
Silk: a Chinese specialty called Luo is probably one of the best. Other types of soft drapey silks of medium weights are all fine. I don’t like the right side of silk charmeuse because it reflects the body curves a bit too much.
Viscose: use silk as a guide. I find that twill weave or crepe tends to be more drapey than plain weave.
Cotton/linen/wool: some of these are fine too. If using a thicker wool, only use it for the top piece and use a thin fabric for the under piece of the skirt.
An extra note on cutting out the pieces:
If you are making a skirt with contrasting colours/prints, pay attention to where you cut so that the best part of the pattern of the under piece can actually show through the slit.
Construction
Piece together the side panel and the centre panel, using French seams to make the side seam. Sew all the way from top to bottom.
Sew the dart and press it towards the back. (Alternatively, you can cut away excess fabric, or even make a pocket at the side seam.)
Do Steps 1 and 2 for both the upper and under pieces. Finish the allowances on the sides by folding twice and doing an invisible edge stitch. Leave the hem unfinished.
Lay the upper and under pieces together, baste and check fit. Sometimes the centre panel don’t overlap perfectly and that’s fine.
Finish the ties, including the shorter edge not attached to the waistband.
Sew the outer side of the waistband to the skirt panels by laying them right sides together. Press open.
Fold the waistband right sides together and sandwich the tie in between. If wearing the waistband unfolded, you need to attach the tie along the top of the waistband on the under wide and in the middle of the waistband on the upper side (see picture). Sew. Do this for both short edges of the waistband.

(You can interline the waistband if the fabric is too soft. I used a non-adhesive cotton interlining and cut it without allowance and stitched it onto the allowances of the skirt panels. Whatever method suits you should work.)
Turn the right side out and finish the inner side of the waistband by folding in the allowance and using an invisible stitch/felting stitch.
Finish the hem. For the corner, I prefer to do a three-fold corner so that I don't have to trim away the excess.
Wash and press. Et voilà!
395 notes
·
View notes
Text
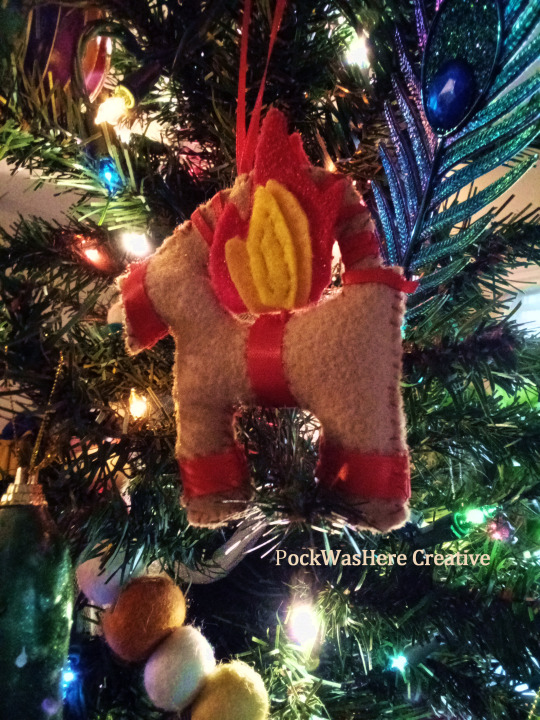
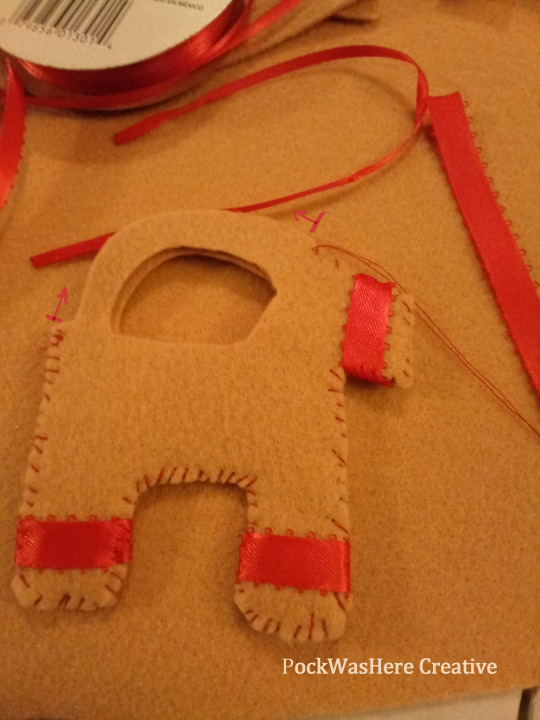
Flaming Gavle Goat Ornament Tutorial
You Will Need:
Craft felt in light brown or 'straw' color of choice, red, yellow and orange
Red ribbon in 2 widths
Thread- I used red and yellow; brown, orange or white would give different effects
scissors
Needle for hand sewing
pins or quilter's clips
polyfill stuffing or fabric scraps
a poking implement
a lighter or Fray check glue
paper and pencil
patience / approx 2 hours to waste making a meme for the holidays
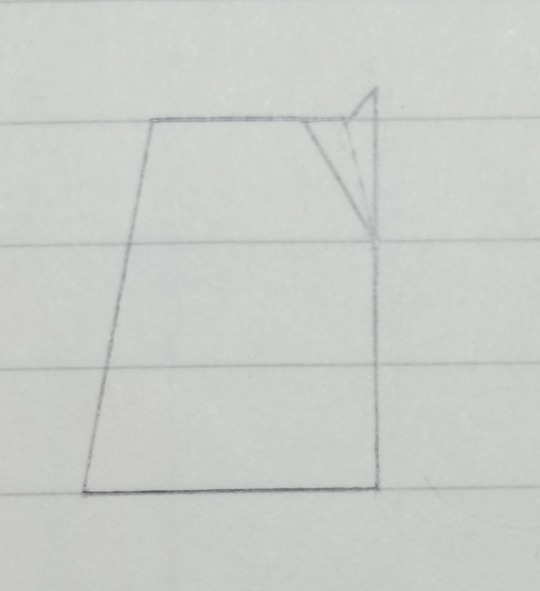
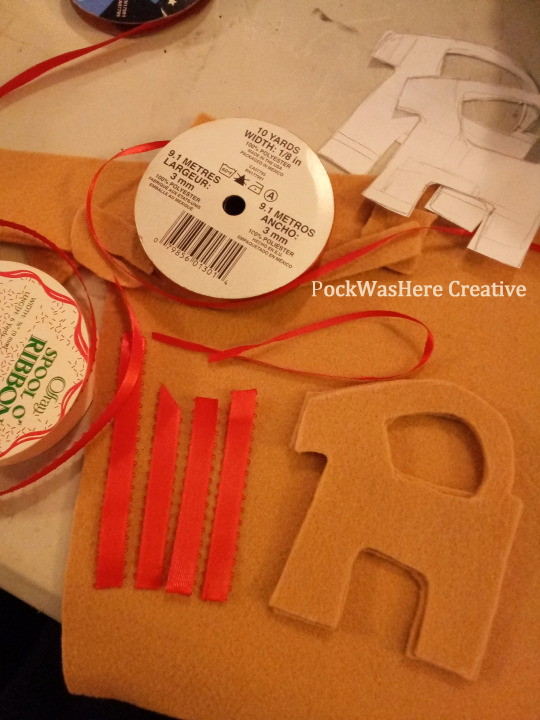
To start, I drew a rectangle approx 3.25 in wide by 4 in high and sketched out a geometric goat shape. You could go a bit larger, but if you go much smaller it will be difficult to stuff. Remember that the sewing and stuffing will eat up some of your edges.
Cut out your goat template and trace it on your light brown felt. I used chalk, marker may work depending on how neatly you cut.
(I'll add a nice vectored template to this tutorial later, but I'll have to fight with the scanner first. )
Cut 2 of your goat. It doesn't matter if they're not exactly the same, as you can fudge the edges a little when you sew. If your felt has a front and back you can tell apart, you'll need to pick a "right" side of the fabric and mirror one of the goat base pieces.
I cut my ribbon decorations in advance, wrapping it around the stacked bases to check the length - remember you'll be stuffing this later so you may need to add a tiny bit more to accomodate.
Out of the wider ribbon, you'll need one for each leg, one for the tummy and one for the bridle. The thin ribbon will be to hang the ornament with and to wrap the horns- I did not pre-measure the horn wrapping because I wasn't sure how long it would need to be. Finish the cut edges of the ribbon as you like- I used a lighter to heat seal them but fray check or white glue will work. Glue will be more difficult to sew through.
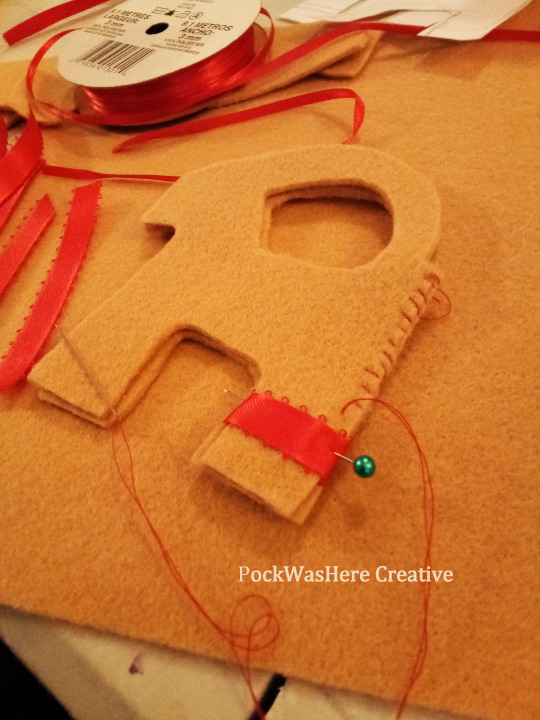
Start sewing the goat bases together. I used red thread and a basic whip stitch, but you could get a couple different effects by using white or brown thread, or by sewing a blanket stitch.
Here's where I made life difficult for myself- stop when you get to the legs and wrap the ribbon in place, tucking the ends in between the layers. This secures them and hides the edges but is fiddly to pin and sew. You can also wait until you have sewn most of the way around and tack or glue the ribbons on top if you're less fussy about the ends showing.
Continue sewing around the legs and body, catching the ribbons in your stitches and repeating for the bridle ribbon. Stop at the base of the horns so you have room to stuff.
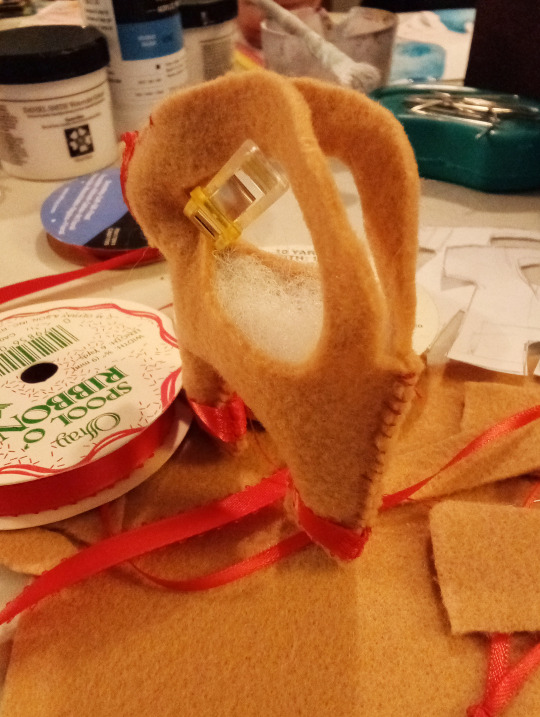
I'm working with modern plastic materials, so sadly (or not) this goat isn't terribly flammable, just meltable. If you want to be eco friendly you can stuff him with scrap fabrics. I'm using polyfill.
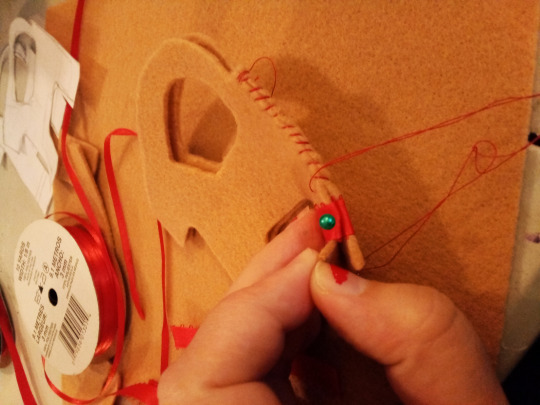
Use a chopstick, paintbrush handle or empty mechanical pencil to poke your stuffing into place. Smaller lumps of fluff are better and more maneuverable.
For firmer limbs stuff chopped up bits of your felt into the legs and head and follow it up with the polyfill.
My original plan for the removable flame was to do clever things with magnets, so if you want to give that a try this would be the point to toss one in before you close up the body. I was on a roll and didn't remember until I was working on the horns. ¯\_(ツ)_/¯

Remember you still need to put the tummy ribbon on and curse your clumsy giant fingers!! Getting everything situated and laying nicely may take a couple attempts. Once you've stabbed yourself with the pins a couple times, sew up the inner curve from the base of the horns on the neck to where the horns meet up again on the butt.
Be careful of where your thread tail goes and the direction of your stitches, it's easy to accidentally loop around the whole body or catch the horns.
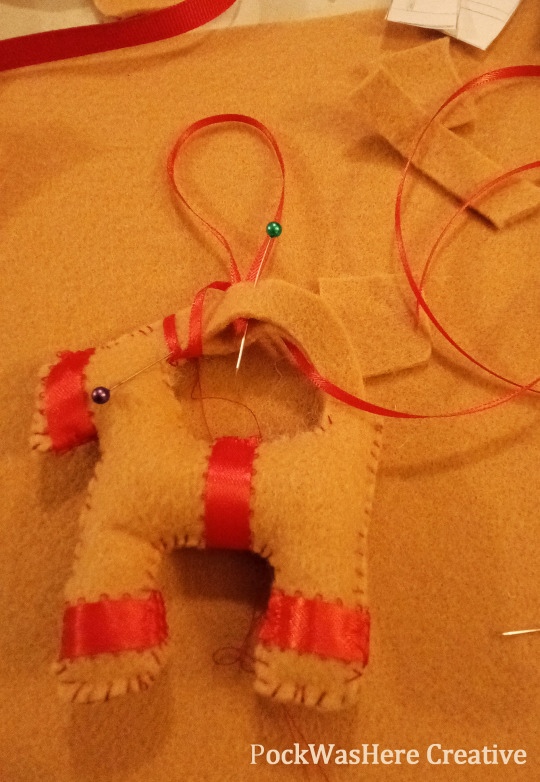
There should still be a bitty opening at the base of the horns and at the butt (giggle here), if you flattened your stuffing during the last step and need to poke a teensy bit more in.
Tie your length of hanging ribbon into a loop and set aside.
This is another step where my need to hide the edges made life stupid and fiddly. Tuck the edge of a length of the thin ribbon between the layers on the bottom of the horns and wrap it around, and tack in place with a couple stitches. Loop it a couple of times until you get to the point you want to hang the ornament: I chose dead center, you may want him at a jaunty angle.
Fiddle with bendy felt, slippery ribbon and pins until your hanging ribbon's knot is sandwiched between the 2 layers of the horns and continue wrapping with the loose long piece, securing with pins or clips as needed and hopefully not making a big tangled mess of ribbon.

When you get to the end wrap it around a couple times and cut off any extra length, seal your ribbon and pin or clip into place.
Sew along remaining curves of the horn, making sure not to yank the hanging ribbon out of place and to catch the wrapping ribbon as you go. Accept there's no good way to tuck in this !$@!%%^$ slippery 1/8th BS ribbon and tack the butt end down with a few extra stitches.
Alternately, tack the hanging ribbon in place between the layers, sew the edges and then wrap and secure the horn ribbon with stitches or glue at either end. You could also skip sewing the edges of the horns together before wrapping them, but it will be more sturdy and secure with them sewn.

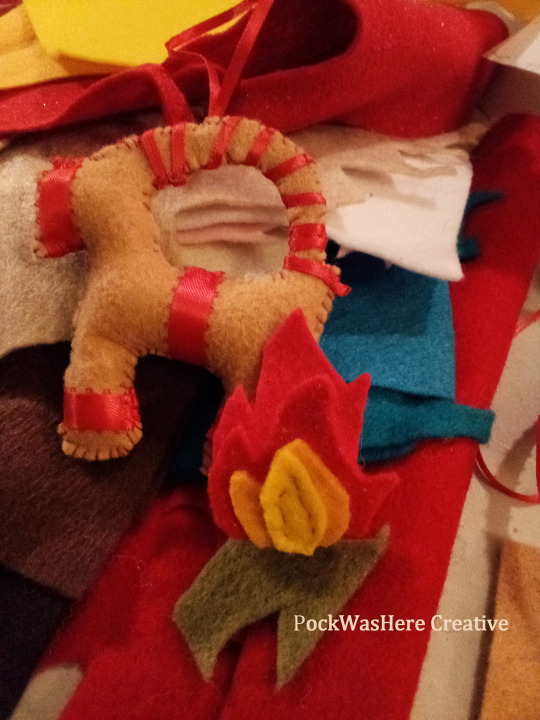
The fun part! fold some paper in half and draw your flames on the fold. Mine were a little over 2 in tall, and they should be a little smaller than the back of your goat at the base in order to fit in place. Cut out your fire and use it as a template for your felt.
The base layer will need to be on cut on the fold but the rest can be separate. Use as many or as few layers and colors as you like, it doesn't have to match exactly on both sides. You'll be folding this up so that you have 2 decorative sides facing out and a plain inside, so you'll be making two mirrored flames while it's still flat: one pointing up and one pointing down. Sew or glue the layers together.
I used a hidden stitch about a third of the way up from the bottom on the inside of the flame to pinch the sides together and pull it up into a V shape. This can be tucked up into the gap between the body and the horns and will hold itself in place pretty well if you have thick felt.
For more security/ shaping you could sew a loop of craft wire or an opened paperclip to the back side of the flame, or as previously mentioned do clever things with magnets.

Hang him on the tree with or without flames and enjoy!
Options for enjoying your handcrafted goat:
Pin the Flame on the Goat: Hide goat ornament on tree and give your participant (s) the flame (s), first to put them together wins.
Art Imitates Goat: Keep the flames to the side until/ if the real goat burns, and then apply to ornament. Celebrate with hot cocoa or warm winter drink of choice.
Voodoo Goat: Real Gavlebocken hasn't burned yet? Summon the flames by setting your ornament on felt fire! Celebrate with hot cocoa or warm winter drink of choice.
#holiday craft#gavle goat#gavlebocken#christmas ornament#tutorial#hand sewing#also please show me your goats if you make one!
1K notes
·
View notes
Text
List of Online Embroidery/ Sewing / Needlework Resources
Hello my name is Cleo and this is my masterpost full of resources and information that will help you in your stitching journey.
Taglist Form
Invite link to my community Fibre Artists on Tumblr
My Tags
Intermittent Stitcher Recommends
I don’t go here but I wanted to pass it on
Intermittent Stitcher Thoughts
Intermittent Stitcher Opinions
Intermittent Stitcher Poll
I love myself a beautiful gradient
Intermittent Stitcher PSA
Intermittent Stitcher FO’S
Intermittent Stitcher Tips
Cats of Craftblr
My Perchance Generators
Random Things to Stitch
Needle Type generator
Random Textile Craft and Technique generator
Random Thread Colour Generator - DMC .
Random Thread Colour Generator - DMC Colour Variations
Embroidery Website randomiser
Embroidery Hoop Size randomiser - in inches
Embroidery pattern Design Prompts
Random Embroidery stitch Generator
Aida Fabric Count generator
Embroidery Styles
Embroidery Project Generator
Other resources that I have made
My Goodreads book recs
Needle Organisation System
Embroidery Organisation Bingo Card
My Embroidery Pinterest board
Songs to Stitch To - my Spotify playlist for when I’m crafting
Orchestral Crafting Music - for when you really want to focus on your projects.
Crafting Acronyms - a list of acronyms used in the crafting community.
Videos to embroider to - videos that I like to put on in the background whilst I’m stitching.
Other Resources that I have found
Threadcolors.com - colour matching for DMC threads
Thread - Bare Stitching - tools and calculators
Flossmaxx - colour conversion for major floss brands
Needle N’ Thread - blog with useful tricks and tips.
Royal School of Needlework Stitchbank - has a wide variety of modern and historical stitches.
Sarah’s hand Embroidery Tutorials - a visual dictionary of embroidery stitches
StitchLifeStudio - an Etsy store that sells custom frames for embroidery hoops
Colour Scheme - good for helping you to select fabric/ thread colour palettes for your projects.
Color Designer - a website that has a wide variety of tools that can help you develop colour palettes for your projects.
List of colours ( alphabetical)
List of colours by shade
List of Crayola crayon colors
The symbolism of flowers
Sew What Podcast - A podcast where the host Isabella Rosner talks about historical embroidery and interviews a wide range of guests
Sarah Homfray Embroidery - YouTube channel
Antique Pattern Library
Bernadette Banner - Historical recreation YouTube channel
Sewstine - a historical recreation YouTuber that specialises in machine embroidery
Danielle Clough - A South African embroidery artist who produces beautiful pieces with bright colours. I have linked her Instagram.
Quilter’s Paradise - free online quilting calculators
ImageColorPicker - allows you to pick colours from photos
Loose Ends Project - This allows crafters to sign up to finish the craft projects of those who have passed away or have become disabled.
DMC - A well known embroidery supply brand. They produce high quality stranded cotton as well as a litany of kits and free patterns.
The DMC Youtube channel- has lots of tutorials and information. 
Sylko thread colour inventory list - for those who have inherited their grandmother’s thread stash
Omni calculator - allows you to convert various lengths
Thread colour palette generator - allows you to generate colour palettes to use in your projects
Stitchpoint - allows you to write phrases in 7 different cross stitch fonts
FlossCross - a free online cross stitch pattern maker
Hours Tracker - the app I use to keep track of the hours I spend stitching
r/Embroidery - the embroidery subreddit is a really good source of information, encouragement and inspiration
r/CrossStitch - the cross stitch subreddit is a really good source of information, encouragement and inspiration
Code Crafters Quilt Generator - allows you to generate a random quilt design
Freebloss - a Amazon store that produces kits for many crafts including embroidery and they are affordable and high quality
prettycolors - a Tumblr blog that posts random colours along with the hex code and this can be a helpful resource for fibrecrafters when they are trying to pick a colour for their project(s).
colour-palettes - a blog that posts user submitted colour palettes and I think that this blog can also be used as inspiration for fibrecrafters when selecting colours to use in their project(s).
Swatches - this app allows you to swatch colours from photos as well as being able to swatch colours in real time.
John James Needle Guide - a guide to different types of needle and their uses.
Cable Patterns - allows you to make your own cable patterns for knitting
RSN collection and archive- photographs of objects in the Royal School of needle work collection. The first 100 objects have just been digitised and put online.
Hand exercises for knitters- these can also be used by other crafters in general
Things that I suggest you buy
I have not received anything in exchange for recommending these products
A colour wheel - this will enable you to choose the best colours for your projects
Multicoloured cases - this box filled with multicoloured cases will help you to organise your threads ant to easily take them on the go.
Plastic embroidery hoops- I find that plastic hoops are able to maintain tension and keep your projects drum tight.
Embroidery Floss Organisers- these help you to keep all of the various colours that you are using in your projects in one convenient place.
Pellon Stick-N-Washaway Embroidery Stabilizer - allows you to trace or print out your design and stick it onto your fabric, stitch over it and then wash it off once you’re done.
#hand embroidery#online resources#masterpost#Intermittent Stitcher Recommends#reference#quilting#cross stitch#my online resources#fibercraft#textile art
63 notes
·
View notes
Text
A Young Person's Introduction to Early 20th-Century Western Fashion
am i hip with the kids yet
General information
Dotschkal, Janna. "1920's." FOUND. October 21, 2016.
English Heritage. "Fashion Through History: Episode 3 – 1930s." YouTube. April 16, 2023.
Rudolph, Nicole. "The History of Standardized Sizes in Womens Fashion and Why They FAILED." YouTube. May 16, 2021.
Vintagebursche. "100 Years of Classic Menswear - and what we can learn from each decade." YouTube. February 29, 2020.
Zebrowska, Karolina. "1920s Fashion Is Not What You Think It Is." YouTube. May 20, 2018.
Accessories
Cox, Abby. "Flappers, Y2K, & Capitalism are Why Women "Don't" Have Pockets." YouTube. January 12, 2023.
Cox, Abby. "The Disappointing Truth On Why We Don't Wear Hats Anymore..." YouTube. December 18, 2022.
Rudolph, Nicole. "The History of the Iconic Cloche Hat: Making 1920s Fashion." YouTube. September 18, 2022.
Rudolph, Nicole. "When Hats were Illegal: Sewing a Goth Edwardian Hat." YouTube. February 21, 2021.
Sheehan, Sarah. "Neo-Egyptomania." PatternVault. December 31, 2022.
Zebrowska, Karolina. "Why Did We Stop Wearing Hats?" YouTube. April 28, 2020.
Cosmetics
Banner, Bernadette. "Making and Testing a Victorian Skincare Routine." YouTube. April 8, 2023.
English Heritage. "1930s Makeup Tutorial | History Inspired | Feat. Amber Butchart and Rebecca Butterworth." YouTube. December 18, 2018.
Holland, Evangeline. "On How to Be Lovely." Edwardian Promenade. April 15, 2010.
Rudolph, Nicole. "The Controversial History of Color Season Analysis." YouTube. November 4, 2023.
Fabrics
Rudolph, Nicole. "The History of Elastic." YouTube. July 4, 2021.
Rudolph, Nicole. "Wearing Overalls to Boycott Fashion Greedflation? Weird History of 1920." YouTube. March 16, 2024.
Gowns and formal wear
Banner, Bernadette. "I Redesigned Mary Poppins' Jolly Holiday Dress Based on REAL Edwardian Lingerie Gowns." YouTube. February 20, 2021.
Banner, Bernadette. "I Remade Mary Poppins’ Dress to be Actually Edwardian." YouTube. July 9, 2022.
Cox, Abby. "Alexander McQueen & the Patriarchy Problem in Modern Fashion." YouTube. October 20, 2023.
Cox, Abby. "What Makes a Gown Haute Couture (like House of Worth) in Victorian and Edwardian Eras?" YouTube. September 19, 2021.
Lady Rebecca Fashions. "An Edwardian Woman's Fashion Evolution." YouTube. June 4, 2022.
Oakes, Leimomi. "Terminology: what is a lingerie dress or lingerie frock? (and blouse, and skirt)." The Dreamstress. July 21, 2018.
Rudolph, Nicole. "Stop Idolizing Coco Chanel: a shocking history of theft." YouTube. January 13, 2024.
Rudolph, Nicole. "The Truth about the Fringed Flapper: Making 1920s Evening Dresses." YouTube. November 6, 2022.
Vintagebursche. "1920s Theme Party - How to dress." YouTube. December 9, 2023.
Zebrowska, Karolina. "1920s Fashion Encyclopedia, Pt 1: Daywear." YouTube. November 27, 2019.
Hair care and styling
Banner, Bernadette. "I Tried Following a Real Edwardian Hair Care Routine." YouTube. May 12, 2020.
Lady Rebecca Fashions. "Getting Dressed in the Edwardian Era / Gibson Girl Hairstyle Tutorial." YouTube. June 12, 2020.
Lady Rebecca Fashions. "Titanic-era Hair Tutorial // Getting Dressed in the 1910's." YouTube.September 4, 2020.
SnappyDragon. "Historical hair myths debunked : How often should you wash your hair—daily shampoo or no shampoo?" YouTube. August 12, 2022.
Zebrowska, Karolina. "Weird Edwardian Beauty Tips." YouTube. February 11, 2017.
Laundry and starching
Banner, Bernadette. "Ok but how did the Edwardians WASH these dresses?" YouTube. August 3, 2022.
Outerwear
Cox, Abby. "Athleisure: Destroying Fashion & the Environment." YouTube. January 18, 2024.
Rudolph, Nicole. "150 years of Masc Women causing a Moral Panic." YouTube. June 17, 2023.
Rudolph, Nicole. "The History of Jeans, T-shirts, and Hoodies: Time Travel 101." YouTube. March 20, 2022.
Zebrowska, Karolina. "SPRING/SUMMER FASHION TRENDS REVIEW but it's 1936 (ft. original fabric samples!)." YouTube. April 22, 2022.
Shoes
Rudolph, Nicole. "I Made Witchy Edwardian Shoes by Hand!" YouTube. March 14, 2021.
Rudolph, Nicole. "Making 100 year old Comfy Slippers: Free Pattern!" YouTube. December 30, 2023.
Rudolph, Nicole. "The Myth of Tiny Feet "Back Then"." YouTube. September 26, 2021.
Rudolph, Nicole. "The True History of Stiletto Heels : the battle between Ferragamo and Dior." YouTube. August 26, 2023.
Zebrowska, Karolina. "Why Is No One Talking About 1930s Shoes?" YouTube. September 15, 2020.
Undergarments
Banner, Bernadette. "1903 Patented Bustle Pad Reconstruction." YouTube. June 8, 2019.
Banner, Bernadette. "Achieving That Classic Edwardian Shape: Reconstructing a 1902 Bust Bodice." YouTube. April 16, 2020.
Lady Rebecca Fashions. "So What are Guimpes Anyway? // Examining Antique Edwardian Guimpes." YouTube. August 21, 2020.
Lady Rebecca Fashions. "They Wore Corsets in the 1920's?!" YouTube. January 29, 2022.
Rudolph, Nicole. "Did Brassieres End the Corset?" YouTube. February 28, 2021.
Rudolph, Nicole. "Dressing in Edwardian Clothing: Undergarments and Layers of 1907." YouTube. November 1, 2020.
Rudolph, Nicole. "How Flappers got their Figure: the 1920s Silhouette." YouTube. July 10, 2022.
SnappyDragon. "How pin-up photos fooled dress history : the making and marketing of lingerie pictures." YouTube. April 1, 2023.
#1920s#1910s#roaring twenties#fashion#menswear#flapper#gibson girl#reference#1930s#1900s#early 1900s#coco chanel#brassiere#high heels#youtube#video#cosmetics#hairstyle#hair care#shampoo#nicole rudolph#abby cox#bernadette banner#lady rebecca fashions#snappydragon#karolina zebrowska#fashion history#history#art history#edwardian era
70 notes
·
View notes
Text
i'm not gonna be one of those "sewing your own clothes is cheap and accessible for everyone!" type of people (because it's not lol) but I will say sewing machines are by and large cheap and accessible to everyone. Personally I think everyone should have one, as long as you have a place on a shelf to put it. You can get decent ones that work for $10 at Goodwill or on Facebook Marketplace. If it's modern, the upkeep is pretty much nothing. Even on the old ones, all it takes to keep them running is some oiling ever now and then. And what they allow you to do is incredible. No pockets on a skirt? Add them! Pockets too small on your jeans? Make them bigger. Waist too big? Shorten it. Pants too long? Hem them. You can do it by hand if you want, and honestly that's a nice choice if you want something to do with your hands while you watch a movie, but some things only take 5 minutes to do on a machine. I was able to make the curtains I bought shorter to fit my windows. I was able to make an apron for my mother out of custom fabric. You can make little cute costumes for your pets.
Sewing isn't so much about making your own clothes as it's about expanding your ability to fix things. There are so many tutorials on youtube that can teach you how to do stuff. And to me it's kind of heartbreaking to see so many vintage sewing machines end up on FB because "it was my grandmother's and I don't know how to sew". A whole generation of people post 1980s knew how to sew, and now no one does. It's kind of sad, because it's an easy and cheap skill to acquire.
#i firmly believe you need to have two things as an adult with your own home#you need an electric drill#and you need a sewing machine
14 notes
·
View notes
Photo

🌟 New Video! 🧵✨
I am thrilled to share a fantastic tutorial today: sewing a trendy and functional fanny pack. This stylish accessory is a must-have for those who want to stay fashionable while keeping their essentials close at hand.
In this tutorial, I provide a step-by-step guide on how to sew your very own fanny pack. The best part? I'm offering a free printable PDF pattern to make the process even easier. With detailed instructions, you'll be able to create a fanny pack with a lined interior, keychain detail, zipper closure, detachable strap, and even a coin purse.
The beauty of this fanny pack lies in its versatility. Wear it around your waist or across your body for a chic and hands-free experience. Plus, with the included coin purse, you'll never lose track of your loose change again.
This project is beginner-friendly, and I've included sewing tips and tricks to ensure your success. Whether you're new to sewing or a seasoned pro, you'll find this tutorial both enjoyable and rewarding.
I encourage you to watch the full video tutorial to see each step in action. Don't forget to share your thoughts and creations in the comments section – I love seeing the amazing work from you.
If you're excited about this project, be sure to share it with your sewing friends. Let's spread the joy of sewing and inspire others to unleash their creativity.
Stay tuned for more exciting sewing projects and creative ideas.
Happy sewing! 🌈🧵✂️
youtube
#fanny pack sewing#diy fanny pack#bum bag#waist bag#crossbody bag#pdf pattern#sewing pattern#sew with me#sewing community#handmade accessories#fashionable#versatile#share#modern sewing tutorial
5 notes
·
View notes
Text
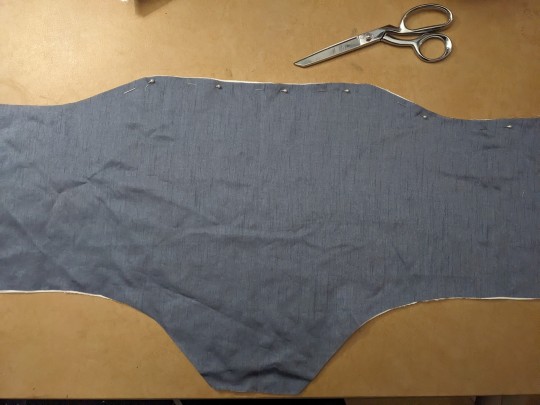
Ren Faire progress is slow but steady as I stumbled through a bunch of failures before biting the bullet and deciding to tackle the very intimidating process of drafting and making my own bodice.
I had initially planned on using a pattern, but I didn't anticipate the fact that my pattern is old (as in no longer in print) and the sizing is way off. I would need to go up six sizes, and that would require an entirely different pattern.
This was pretty discouraging, but I ended up trying to draft my own pattern from a bodice I already own. It didn't go well, to say the least.
A few hours of frustrated sobbing later, I reached out to the Sewing for Ren Faires group I'm in on Facebook, and was pointed to some tutorials. One suggested covering an existing bodice with fabric, and I tried that too... but modern corset tops have a vastly different silhouette than the Tudor gown ~*vibes*~ I'm going for.
I was once again very discouraged.
Then someone pointed me to this website that allows you to input your measurements and tells you step-by-step how to draft your own bodice/corset pattern. I got some butcher paper, some duck canvas, and some Featherlite Boning in casing channels (so that I don't have to try to make/sew them myself), and set to work.
I made a basic mockup with scrap fabric to make sure I had the measurements right, and I could already tell it was miles ahead of what I'd tried to do before.
I laid out the three layers of my chosen fabric, traced out the pattern, cut them, pinned them, marked out where my boning would go, and started stitching it in.
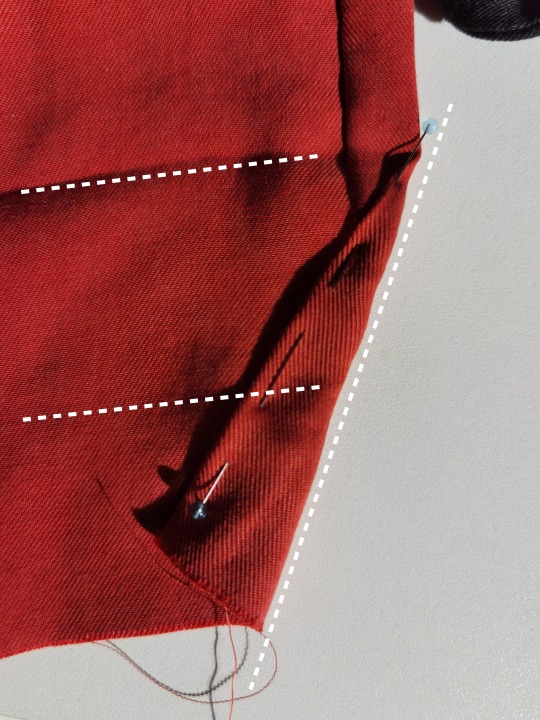
The progress below doesn't look like much, but I am very pleased with it. I've actually sewn in three of the strips of boning, but since I'm doing everything by hand it's slow going. I'm actually starting to have hope that I may be able to finish this outfit by the end of May when I have my first Ren Faire of the season. Fingers crossed, and please send a prayer to the costume gods!

#sewing#projects#ren faire#tudor#let me be very clear I have no idea what I'm doing#but I'm pleased with this so far!
21 notes
·
View notes
Note
Pink!! Thank you for all you do. I’m not in Lolita yet (lack of funds so severe even your guides cannot penetrate it), but I can’t wait to make use of your tutorials.
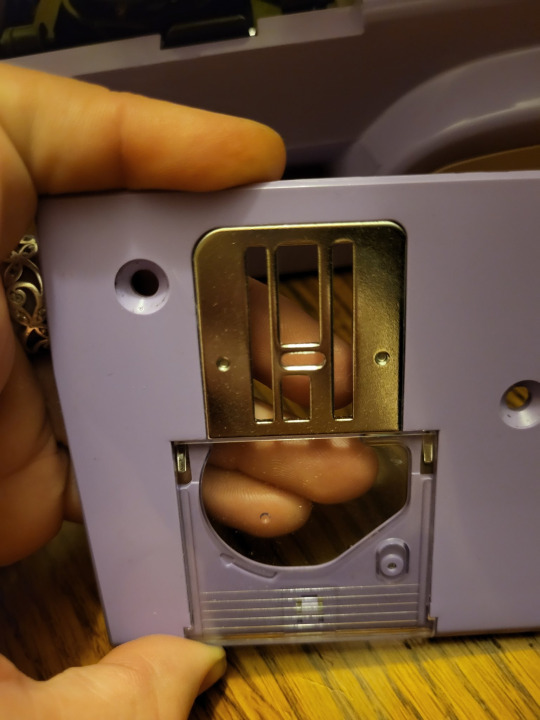
In the meantime, I have a question! I was given a sewing machine for Christmas in 2021, an Ever Sewn Sparrow 20. Unfortunately for my birthday in 2020, I was given Horrific Depression, and I still haven’t managed to find the receipt for it. My sewing machine has been in its box, never used, for a year and a half.
Recently I got some clothing from goodwill that I need to alter so that I can wear it, and I’d like to use my sewing machine. I know how to thread it and wind a bobbin and do all the normal setup things, but I wanted to ask: is there anything else I should check in addition to the normal setup things? Am I going to need to get it serviced before I can use it?
Thanks!
The most common problems that people have when they take a machine out of storage are problems based around the fact that the machine was in storage. Baby, they are born to run. You won't start a car up for the first time after leaving it alone for years, and expect it to be perfect. Your machine is the same.
So there's two main concerns: dust, and locking up. If the machine was somewhere that dust could get on it, make sure dust didn't get in it. Generally, most machines have holes near the bobbin winder where things could get messy. If there's a lot of dust in the machine, you might want to take the plastic cover off and see if you can clean it. Otherwise, vacuum is your friend. Take your vacuum's hose and vacuum the dust out as best you can. It won't get everything, but better is better than nothing.
Locking up can be a bigger problem. Even if your machine was greased and oiled before it sat, sitting doesn't things to the oil. If it's gotten hot and then cold and back again, the oil and grease could have melted into weird locations. Sometimes, you will try to turn the hand wheel, and it just won't go. First, stick a flashlight up to the thread uptake lever, and see if there's any thread in there. If it looks clean, then it's probably an oil bind. (if there is thread, you're going to have to take that out first. Info on that in a minute). Patience is your secret here. Even if it won't turn much, if you can get a little bit of movement, you can usually get a locked up machine un-stuck. Rock your hand wheel back and forth for a few minutes. Remember that your eventual goal is to turn it forward, but get whatever movement you can however you can. Once it's free, turn it by hand for several full cycles. I like to go with about 20, but it's really until it feels pretty free. Then, plug in your machine and run it for a few minutes. I put a piece of paper under the foot and "sew" along the paper until I've filled the whole paper up with holes.
If you've tried and you really just can't get it free, try putting it in a hot car for about five minutes and then coming back to it. Melty oil turns better than cold oil. Try to run it while it cools so that you don't have pooling oil in strange places.
If the machine is locked up, there's a good chance that the presser foot had gotten sluggish or locked as well. Movement is key here, as well. You might need to put the foot down and then physically pull the foot down, but just like breaking the machine free, you can break the presser foot free with repeat motion.
So that's the first things I check: dust, wheel turning, presser foot going up and down. If it looks clean from out of the box, good news!
I then generally do a fast oil. Most modern machines don't need the user to oil it, and you can get into trouble if you oil it where you shouldn't. We usually tell customers at my work to never oil their machines, and let the service tech do it. However, if you're not going to, here's some info on it. Most importantly, you only want to oil metal-on-metal joints. Oil plus plastic isn't long term good.
I'm using a Janome Derby here because it was the easiest machine for me to get that wasn't a Viking or a Pfaff. Those both use security screws and make getting into it a pain (and my Viking is still under warranty and don't want to void it). The parts are the same in most machines.
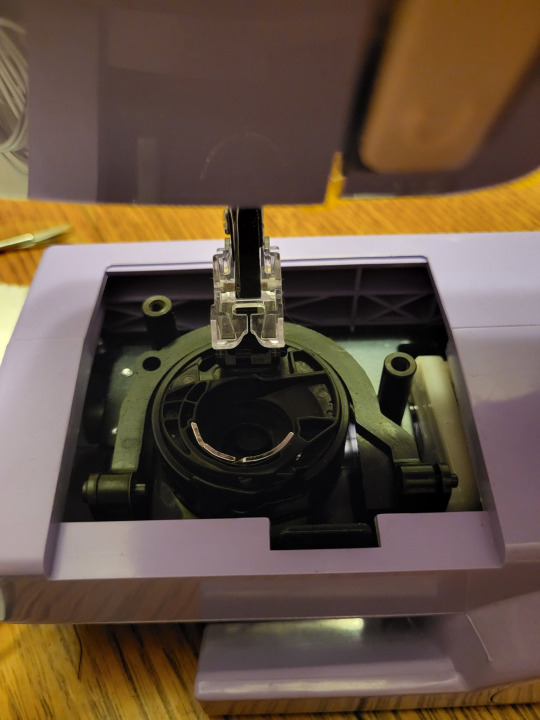
Take off your metal plate so that you have access to your feed teeth and your bobbin case.
Make sure there's nothing stuck in the bobbin case, like thread. Especially check your tension spring.
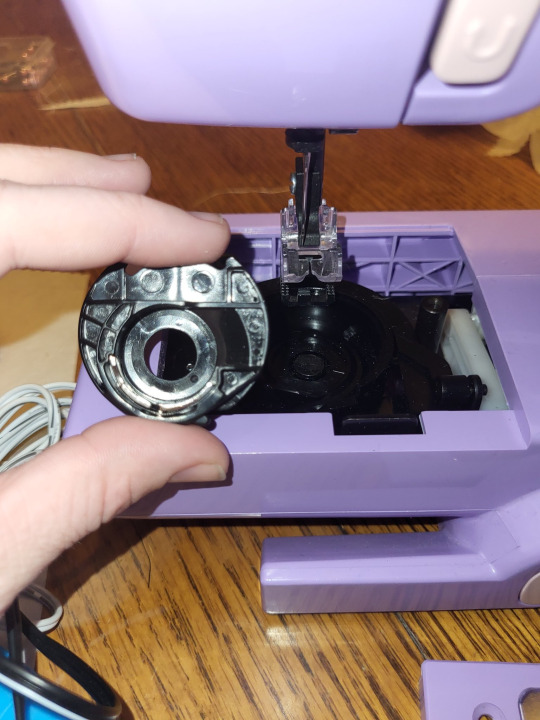
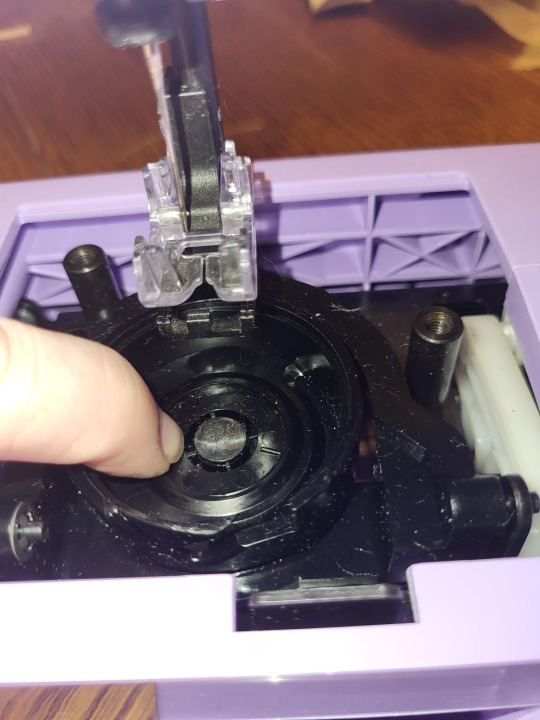
Under the bobbin case is a joint you want to oil. Many machines have a felt pad here to hold and dispense oil. If you have a felt pad, you want to put however many drops on it as you need to get it full of oil. If you do not have a felt pad, you will want to do one drop of oil, right in the center.
On this machine, because all of this is plastic, you don't want to use any oil. However, any competent machine will have metal down here.
Check the top of your bobbin case for needle strikes. If there's a really bad strike, you might need a new bobbin case. If you have any plastic burrs sticking out from a needle strike, you can usually carefully shave the sharp parts off with a sharp razor blade.
Check the plate for needle strikes around the needle hole. If there's any burrs, you can use a nail file or some high grit sandpaper to remove them.
BTW, your bobbin case has Batman ears on it. Batman's ears point up. If the bobbin case is in the machine properly, Batman's ears will be point upward and the case won't be able to rotate when you try to turn it counter-clockwise. There's a little finger on the 5 o'clock position of the bobbin case, and that usually rests against a stop or sensor to stop the case from turning.
If you have a Brother or a Baby Lock, your machine may have a metal throat plate, and then a little L-shaped plastic collar. If it does, put the metal plate on first, then the bobbin case, then the plastic part. This will help make sure the bobbin case is straight.

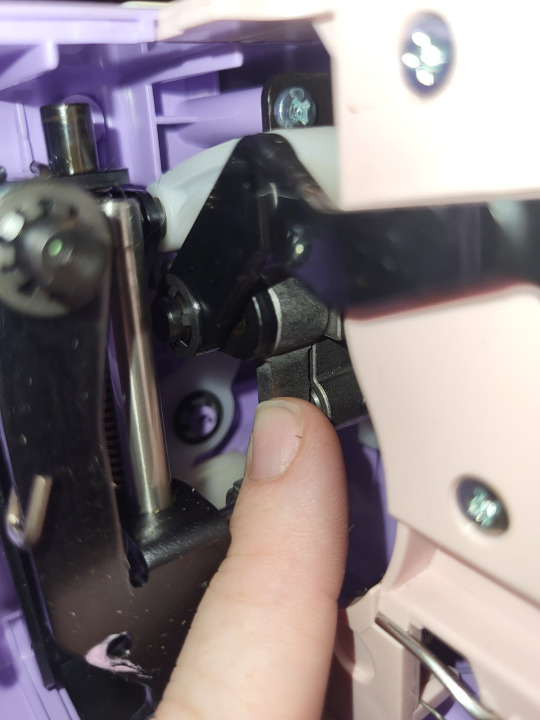
Most machines will let you take off the front cover here. This gives you access to two important places.
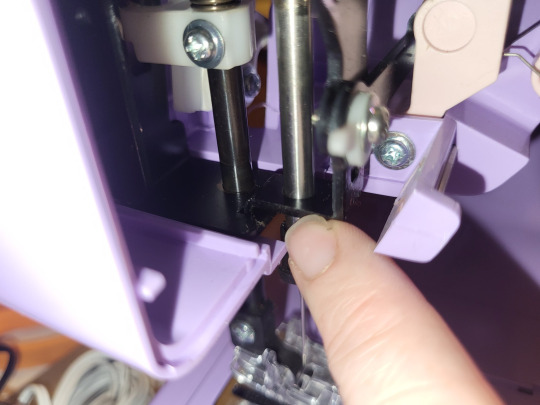
If your presser foot is sluggish, cleaning and oiling the presser foot bar will free it. I like acetone on a q-tip for this, just cleaning all the parts of the bar that I can reach. There will be two metal sleeves that the bar passes through. Put one drop of oil on the top of each with the foot up, and then put the foot up and down to get the oil in the sleeve. You'll want to oil this even if your foot isn't sluggish.
Your thread uptake is the part that goes up and down when you thread the machine. It's the thingy that's the reason why you need to put your needle up before you thread your machine.
Thread loves to get wrapped around this. Take some time to see if there is thread, and if there is to unwind it. You usually have to turn the wheel backwards to get the thread off.
You'll also want to oil the piece that connects to the uptake. It's a big part. If your machine has a little hole on the front of the crank that turns the uptake, you will want to fill that up with oil. If there's no hole, put a drop on the seam between the two pieces and hope that some of it gets down there.
And that's about all I do. Stick the front plate back on (if it's a Brother, make sure you're getting the needle threader lined up with the little lever on the face plate that moves the threader). You should be good to go.
Remember: only sewing machine oil should go in your sewing machine. No other oils, just good old sewing machine oil. NOT three in one oil, no matter what the can says. You also only want to put a single drop on any space, unless there's a felt pad or a hole to hold more than a drop.
And plenty of people will pull their machine from storage and use it with no problem. I'm just sharing this info in case you or someone else wants to do this. A lot of machines are considered disposable or not worth professionally servicing, and knowing how to do this can add some life to your machine. Just remember the number one rule, no oil on plastic parts.
90 notes
·
View notes
Note
hello! i am a longtime huge admirer of your clothing/fashion sense, as well as a longtime backreader of your #victorian and #goth tags. i am really interested in what you've written about Victorian dress, and i am looking to get more into 19th and 20th century clothing for gender + diy craft reasons. i'm so sorry if you've answered similar questions before, but do you have any tips for where a newbie should start researching? either way, thank you thank you, your blog opens my mind wide and brings me much joy and reflection!
General research:
Spend some time searching the 'net, museum websites, and archive sites for fashion plates (such as archive.org—link leads to a date-restricted query for "fashion"—or the Smithsonian—link leads to fashion plates in their image collection). Take note of what you like, as well as which styles correspond to which decade. Karolina Żebrowska has a good rundown of English fashion over the decades.
The undergarments are what does the most work creating the necessary silhouette to make Victorian & Edwardian womenswear fit properly. If you've figured out a decade you want your outfit to draw on, doing a quick search for "[decade] undergarments" should bring up plenty of blog posts, which may or may not cite primary sources (such is the fickle nature of the historical blogosphere). Bustle pads and sleeve supports can be purchased or made; they're both pretty simple, and tutorials abound.
Purchasing clothing:
Reproduction made-to-measure clothing can be readily found on etsy, but can be in the several-hundred USD range. I've had some luck finding vintage reproduction clothing (like, a skirt someone made by hand in the 1980s to a 1900s walking skirt pattern), which tends to be much cheaper.
Men, women, and children wore stays and corsets. As far as I know, Orchard Corset has the cheapest OTR corsets that are good quality and safe to wear. If you get a corset in the style of a specific decade handmade or made to measure, make sure that the seller tells you what the boning material is, what construction the boning is (spiral steel is sturdiest and most flexible), how many bones there are, what the corset material is, &c.—otherwise it's an indication of an unserious maker. Follow general advice for wearing corsets at a waist reduction (lace up slowly, break it in, &c.).
Antique Menswear on youtube gives a lot of good, practical advice for wearing late 19th-century and early 20th-century men's clothing (including where to buy reproductions and how to treat them, how to modify modern shirts to 19th-century standards with basically no sewing skills, &c.).
Actual antique clothing can be found and purchased online or at estate sales—usually in very small sizes, but I've seen Edwardian skirts and petticoats in an XL (also a small size, but...). You can also just simply browse this kind of thing for inspiration and save photos of anything you think you'd like to recreate.
Even clothing that was not "meant" to be worn by re-enactors can be clearly historically influenced (e.g. the huge boom in Victorian- and Edwardian- style blouses in the 1980s), so keep an open mind when shopping for vintage clothing! A lot of 1970s dresses that look "hippy" on their own can look very Victorian with the right undergarments and an updo. A lot of 1980s men's trousers also approach the right silhouette for the 1910s-inspired three-piece suit I'm trying to put together. Witness also the recent trend for big puffed sleeves!
Making or modifying clothing:
Victorian and Edwardian manuals for garment drafting and sewing can be found online—go to archive.org and search for "sewing," "drafting," or "dressmaking," then use the filters on the left to chuse which year(s) you want to see results from. Most of these have patterns that are sort of vibes-based: The work-woman's guide is one manual that claims to have patterns laid out strictly according to a grid.
I don't sew garments, but if Victorian pattern-writing for sewing is anything like it is for knitting, that may not be super useful. People do sell updates and graded 'translations' of antique patterns (which tend to be written in only one size) on etsy and ebay—just make sure from the description that it's 'deciphered' and translated rather than a scan of the original pattern!
One of the easiest things that you can do to add some Victorian or Goth flair to an otherwise plain-looking garment is to add trim. You can knit, crochet, or tat your own trim from Victorian lace-making patterns; purchase antique trim from resale sites; or buy braided or lace trim very cheaply at any craft store. Trim doesn't just have to go around the hems and cuffs of a garment: lace "insertions" between two pieces of fabric, as well as raised geometric patterns over the surface of a garment, are common in 19th-century clothing.

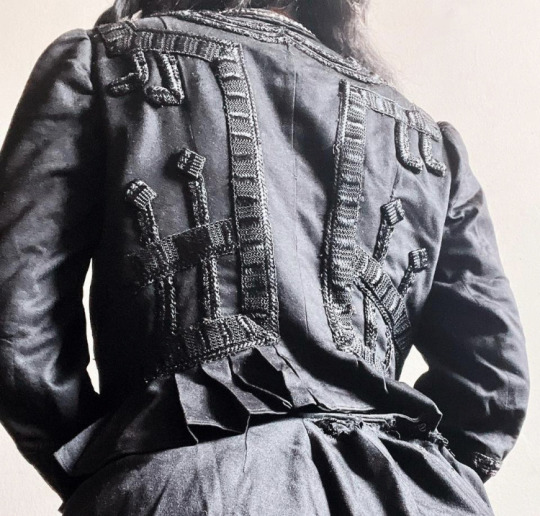
[ID: first image shows a black overdress showing lace insertions between strips of fabric of equal width, creating a striped effect. second image is the back of a black blouse with trim in a geometric design centred around right angles and parallel lines. end ID]
Jewellery (women's and men's):
Actual antique jewellery (including men's jewellery and fastenings) is not as expensive as you might think. Even if you're not willing to spend a lot of time learning what to look for and scouring estate sales for people who don't know or care what they have, late Victorian mass-manufactured costume jewellery often goes for sub-$50 or even $30 prices at auction on ebay (USD, in the US—in my experience it is even more plentiful and cheaper in the UK).
Specifically, I've lucked out with lots ("lot" as in, a bunch of small things being sold together) of "vintage men's accessories" going for $20 or so that contained Victorian cufflinks (in low-karat gold, mother-of-pearl, and jet), collar studs (in low-karat gold and base metals), and shirt studs (in low-karat gold, with garnets and seed pearls, &c.). Searching for lots of accessories is generally a good idea since by and large people do not know what these things are... but if you're willing to spend a little more for something that has been identified and is more likely to still be with its set, use the specific search term for that item (e.g. "antique collar studs").
Answers to Questions About Old Jewelry (though aimed at estate sellers and, if memory serves, full of regrettable pæans to Queen Victoria) is a good reference text to dating antique jewellery. I also recommend Miller's Illustrated Guide to Jewelry Appraising. Both of these texts are available on libgen.
Feel free to ask me follow-up questions if you want more detail on any of these points. As you can see I am perfectly happy to blather away on this topic
85 notes
·
View notes
Text
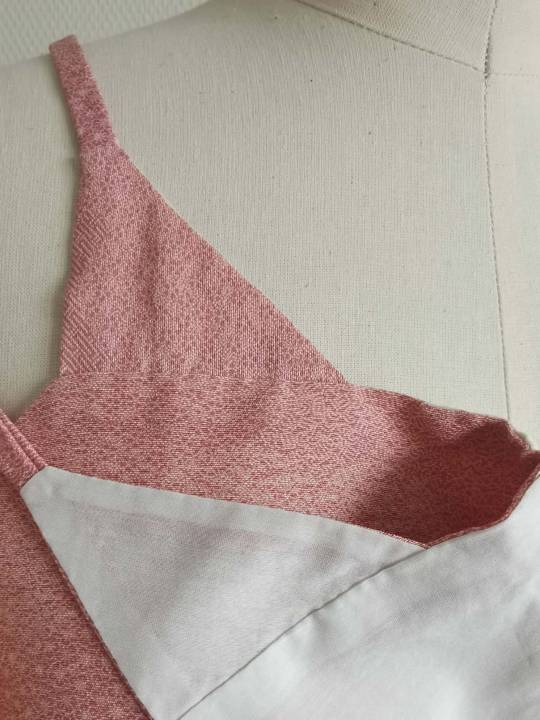
Song Camisole, intro + tutorial | December, 2023
(Text below)
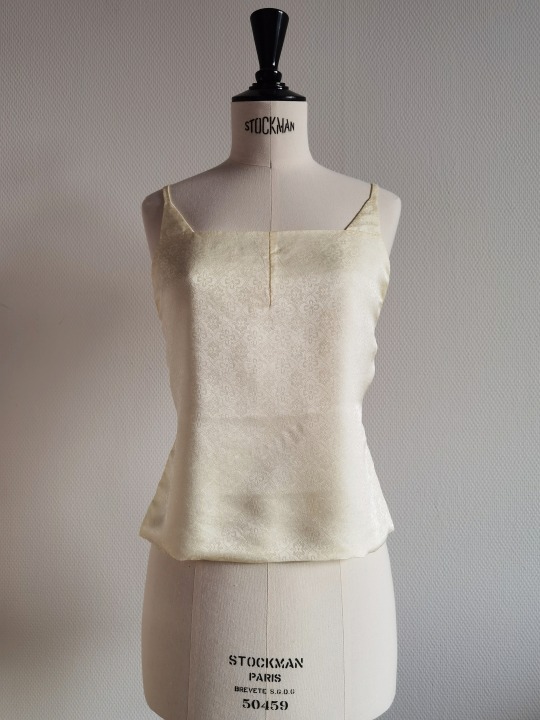


A camisole was the inner most layer of a Song lady’s outfit. Camisoles from the Song dynasty are simply named 宋抹sòng mǒ by modern historians (literal translation: Song camisole). The little camisole discussed in this post is based on the sample excavated from the tomb of Ms. Huang Sheng (full maiden name; she died at 17 in 1243 after being married for one year) in Fuzhou, China, hence it is in late Southern Song style. As far as I know, this is the only surviving sample of Song camisole in this style.
From the excavation report:
The artefact has one seam down the centre front. It has an outer layer and a lining, both in plain silk. It is 55cm long and 39-40cm wide. The shoulder ribbons are 34-35cm long, and the waist ribbons are 35-36cm long. From the report and the photograph which I can access, there doesn’t seem to be any dart. Perhaps Ms. Huang Sheng was flat-chested so a dart was unnecessary; nowadays traditional costume makers and wearers usually like a dart in the middle (usually via shaping on the CF seam) to better fit the bust.
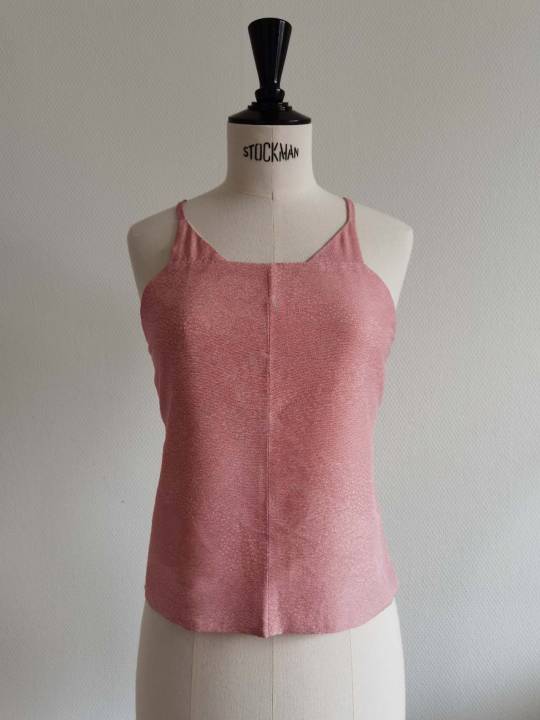
I made this pink one nearly two years ago. You might be able to see a little bit of fabric being taken in on the top of the CF seam, which is the dart/shaping I was talking about.

Below is a tutorial for making one of these. It works for smaller bust sizes – you can add darts on the sides to do a full bust adjustment.
Pattern
You need two measurements:
The front half of your chest circumference (which is NOT the full chest circumference divided by two). If you want, you can add 1~2cm of positive ease to this.
The desired length. It has to be long enough to be tucked into a skirt.
The dart (for me) is usually 1~1.5cm on each side of the CF seam. If your fabric is wide enough, you can just make a dart and eliminate the CF seam. I’m not sure why the shoulder ribbons on the artefact are so short, since the common way of wearing this camisole the ribbons need to be at least 80~90cm. The depth of the armscye apparently depends on your body shape, but it shouldn’t be too low—usually the little side loops are on the same level as the bust point or just a little bit lower. The shape and size of the little triangles depend on your taste.
All figures in the sample below fit a pretty standard European size 36 with a total height of 160cm. (EDIT!! I made a mistake. It should be European size 34 i.e. bust circumference 80)

(Also: how you would arrange the pattern pieces on a traditional kimono bolt, if using kimono silk for this.)
Fabric
You’ll want something drapey and smooth that feels nice on bare skin. I’d always recommend silk, but a cotton/silk blend or a soft cotton also works fine. For synthetic fabrics, some viscose fabrics (or their eco-friendly relatives such as tencel) could work. For the pink one I made, I used repurposed kimono silk. The yellow one is a Chinese jacquard from a blend of silk and viscose.
If you are using redeemed kimono silk (or new kimono silk) with a width of approx. 33cm, one meter is about enough. This is very convenient because one meter is a common length of kimono sleeves and you can find fabrics sold in individual lengths in stores that specialise in this. If you are using a Western fabric, you only need to consider the length of the ribbon and whether you are willing to cut it on the weft. If cutting on the warp, you’ll need one meter. (They don’t need to be cut on bias though you can.)
You also need a lining fabric for the main body. I usually use a half-half cotton/silk blend about 12momme thin (I buy it in bulk because I use it for a lot of things.)
Sewing
First, sew the ribbons.
I starched the yellow fabric for the ribbon part because it was just so slippery and refused be folded. After I starched it, I was able to fold it right side out and sew with an invisible stitch. However, I would recommend starching as little as possible and making your starch as diluted as possible, because starch can be SUPER hard to wash out and leave your silk stiff.

Sew the CF and the dart, if any, respectively for the lining and for the shell.


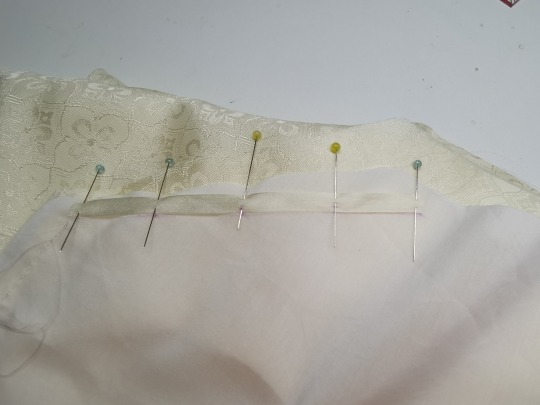
Sew the little triangles. If you cut your triangles on grain, the hypotenuse edge is likely on bias, which means it is likely to be stretched out, leading to a gaping neckline (which is a pet peeve of mine). There are two ways to prevent this. A) Since you have a lining and a shell, you can cut the lining with its hypotenuse edge on grain, so that each of the three edges of the triangle is stabilised by one layer of fabric, which is what I did for the pink camisole. B) You can add a tape to the seam allowance, which is what I’m showing in the yellow camisole. I used a thin silk ribbon (usually used for silk ribbon embroidery) and pinned it to the seam allowance, making sure not to stretch the seam so that it’s at the right length. You can sew it down to both layers of the allowance or just one.
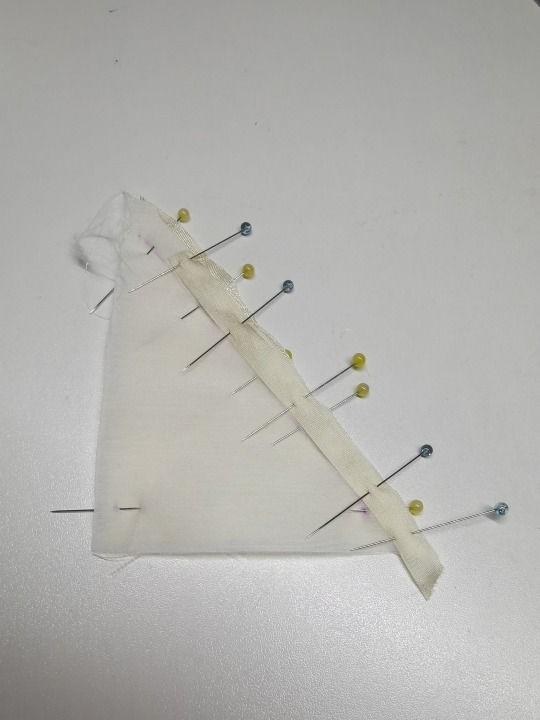
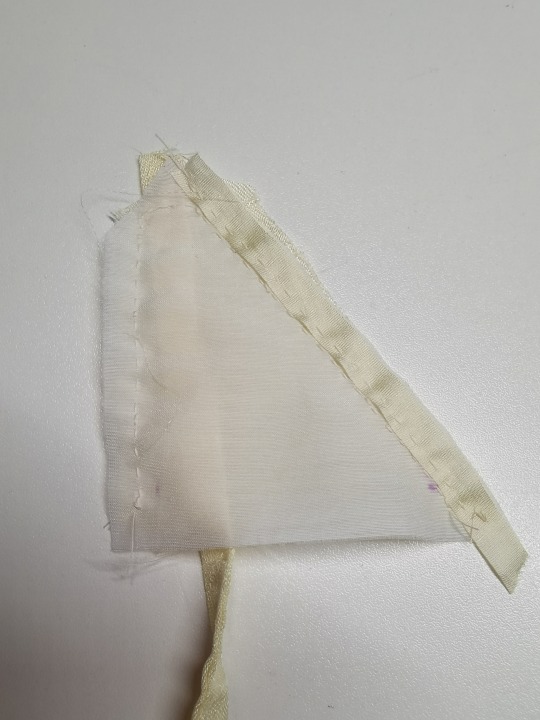
After stablising the hypotenuse edge, you can sew the triangle by placing the fabrics right side together and sandwich the shoulder ribbon in-between. The bottom edge needn’t be sewn. Turn it right side out when you finish.
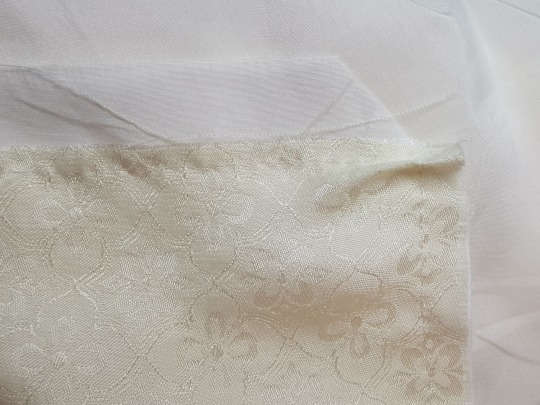
I also add tapes to the underarm edges, which are also on bias.
Place the body layers right side together, sandwiching the triangles, loops and waist ribbons between them (baste in place if needed). Sew all around, leaving only a small opening on the bottom edge so that you can turn the whole thing right side out.
I do a little fold for the bottom edge so that the lining fabric does not show.
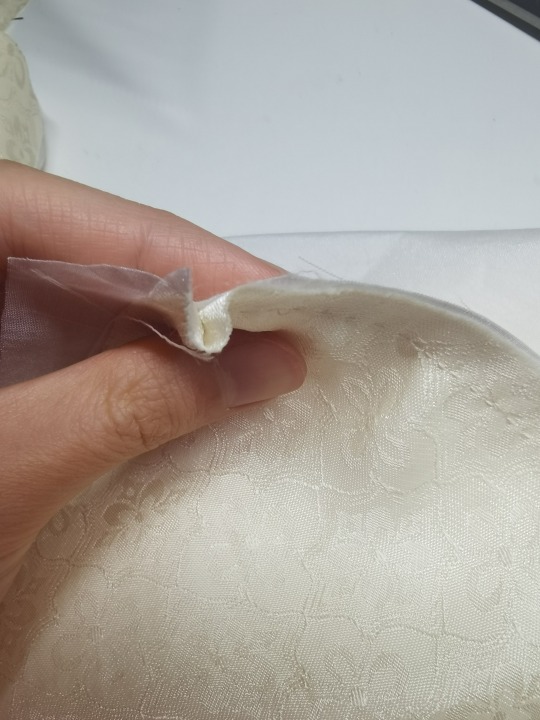
I whip-stitched close the small opening. It is also possible to do an invisible stitch, if your fabric is stable enough.

And there you have it~
When I wear the camisole, it is never without an outer layer of clothing that covers my back, which is mostly for historical accuracy, and unfortunately for safety and privacy too because I can never know if someone decides to pull the ties loose. So that’s my last bit of suggestion!
78 notes
·
View notes
Text
TOTK REIMAGINED
First of all, the Link and Zelda from Skyward Sword are named Sky (Link) and Sun (Zelda) to distinguish them from Link and Zelda (botw/totk)!
The nicknames are borrowed from Linked Universe!!
MAJOR TOTK PLOT SPOILERS!!
- That Ganondorf? He's not Ganondorf, but another man. Maybe gerudo, an evil king. But not Ganondorf.
- Rauru is a Hylian, the son of Sky and Sun, first king of Hyrule and first sage
- the constructs are ancient Sheikah tech infused with holy power from Sun/Hylia! They look so magical and advanced because they are full of Sun's power nobody else has.
- Sonia is a Sheikah, and she isn't the descendant of Sun and Sky.
(spoilers ahead)
- Before leaving the world of the living, Sun created the sacred stones, taking 7 amber relics and adding her power to them, and explained her and Sky's son (Rauru) their purpose, though there was a collateral effect, the draconification, if one was to eat the stone.
- Link didn't start from the sky islands when he woke up after the accident under the castle, but Rauru's hand took him in the depths, in an enclosed area containing the Sealed temple and the huge goddess statue temple from sksw, that got buried with time under what's now the Great Plateau. The tutorial is both in the depths and, when Link reactivates the 3 stone tablets and the last remaining bird statue, he gets his paraglider back and is sent to the sky thanks to the bird statue, the only access to the sky other than using the rewind functionality if the hand.
- Link's arm is NOT Rauru's (that so strange, chopping an arm off a dead body and sewing it to Link... eww) but one of those ancient constructs. Rauru reactivates the hand but it's not fully ready, Link had to reactivate its functionalities (ultrahabd, rewind, autobuild, fuse etc)
- Mineru isn't Rauru's sister but his and Sonia's daughter, and she's half Sheikah half Hylian. When her mother passed away, and Zelda, a Hylian, took her place, Mineru was considered the Sheikah sage. Her parents didn't want her to get a stone though, she took it by accident out of curiosity maybe, or maybe I'll find a more fitting story/reason. Also, she doesn't die or turn into a spirit. She lives and the royal bloodline continues with her and most likely an Hylian as the royal family has always been known as Hylian. In modern times, her stone is passed to Josha.
- It's the power of all the new sages, the great fairies, the 3 dragons and Link together to bring Zelda back, and not the ghosts of Rauru and Sonia.
- The first group of sages was created by Rauru, giving the secret stones to wise people of different populations. He's the sage of light. The others are Sonia (sheikah), a goron, a "zora" (primitive zora, blue colored probably, a mix of oot looking zora and parella from sksw), a gerudo (oot style and nomad), instead of the Rito who didn't exist yet we get a member of the Wind Tribe, and Mineru. When Sonia is killed, Zelda takes her place, but with her own stone, as the enemy has taken Sonia's.
- Link won't get his arm back, but the construct arm will get esthetic upgrades to look less metallic and easier to use, smoother to move. The holy power inside will most likely fade after the whole adventure that used and "drained" it, so at the end Link will have a working prosthetic arm and hand but no special powers. He will as well learn to use both the hands to fight.
#lionesswrites#lionessposts#linked universe#zelda#linkeduniverse#the legend of zelda#nintendo#link#zelda totk#totk#zelda tears of the kingdom#tears of the kingdom#skyward sword#zelda skyward sword#zelda sksw#sksw#zelda breath of the wild#botw
30 notes
·
View notes
Note
Hey girl!!! Can you tell me more about your oc? I think shes one of my favorite BES ocs but you don't post about her often :( I'd especially like to know about Acharas modern teenage version (like the one you did about Mizu)
OMG HIII😝😝😝😝 So, I don't think so much about modern teenage Achara😞, but I can try a little harder to answer😆 (I'm also glad you liked her!!)
Modern teenage Achara <3
Her parents are divorced, she lives with her father and grandmother, and she met Mizu a few days after moving to a nearby neighborhood. Her father took the motorcycle to the concert, at Eiji's mechanic and Achara accompanied her father, a few days later she went to school and discovered she was Mizu's classmate.
Eiji was talking something to the man, Mizu even tried to pay attention, she understood that he was a new police officer in the city and that he lived nearby. He wanted Eiji to fix his bike. Mizu tried to concentrate on the conversation, but her gaze shifted to a girl next to the man. She must have been her age and about her height, being just a little taller, she was smiling. Mizu's stomach turned and turned. It was strange to have someone of the same age group so close to her. Eiji and the man entered, when Mizu was going to enter the mechanics, her adoptive father spoke to her
— Mizu, stay with Achara while Hoshikki and I talk. -her voice rumbled. She nodded as she tried to remember when that girl and her father had introduced themselves, she missed that part.
When Mizu got closer to Achara, the strangeness increased.
— Mizu, right? - She smiles like a mischievous rabbit.
— Yes...Achara right? - Mizu speaks in a low voice, she wasn't used to socializing with other people. Especially when she was someone her age.
The girl smiled and nodded positively.
- Can we be friends. I live nearby, how old are you? Why do you live here? What is Mr. Eiji yours?- That burst of questions left Mizu stunned.
Achara was considered a very pretty girl at school, but as she hung out with Mizu a lot, boys didn't come near her to flirt, as many thought Mizu was a boy and they were dating.
She loves music, having extensive knowledge of musicals and pop divas.
Even without singing well, Achara had this habit of putting on music and getting on the coffee table or sofa while dancing and singing, using the remote control or the broom as a microphone. Her grandmother is not very pleased with this behavior, saying in a soft voice that she does not behave like a lady
She had average grades, being practically impeccable in grammar and foreign languages and terrible in mathematics and physics. At least she was good at chemistry too.
Achara has her own style, she is not the type of person whose wardrobe fits into just one style. She wears what she likes, even pink or pastel tones always remaining in some way. She really likes miniskirts and customizing clothes, so she learned (at great expense) how to embroider, sew and knit, as it was very difficult to find a piece of clothing that fits her crazy outfits, so she makes them. Her presence in the city's thrift stores is extremely normal.
Her grandmother taught her how to cook, but she only really used this skill when trying to befriend Mizu, trying to win her over with sweets (LMAO😆)
She ties up the bangs of her long black hair with large, colorful barrettes.
Her school bag makes noise when she walks with it. With several keychains and buttons on it
Achara learned how to apply makeup at an early age, finding tutorials on YouTube. She follows many influencers in this field, including some drag queens, which is where she became familiar with the slang of this community.
Achara's hair has slight waves and is very long, she also likes to cut the ends of it when she's bored and she happens to have scissors nearby, leaving her hair chopped up (although not too much, since if her grandma notices she'll get angry). Her hair is also full and voluminous, so it's not as well-behaved as Mizu's.
Finally, Achara has two cats, Sabrina (homage to Sabrina Carpenter) and Gaga (homage to Lady Gaga)
Thanks for reading! and sorry for any spelling mistakes, as I said before, this is not my native language🫶🏻
Sabrinas song that I think Achara would love:
#blue eye samurai#mizu#mizu blue eye samurai#blue eye samurai mizu#mizu bes#modern mizu#blue eye samurai oc#bes x reader#ocs#bes mizu
8 notes
·
View notes
Last Seen Blogs

makaylajade-author
Makayla Jade

snapcracklepoprox-blog
💖 TAV 💖

peterdevera
Untitled

diningpageantry
away with you

rpreview
RP Reviews