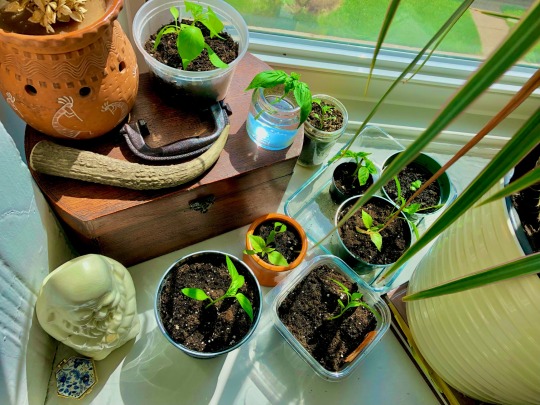
#most of them are 3 different pepper types and there are also oregano + basil + parsley
Text
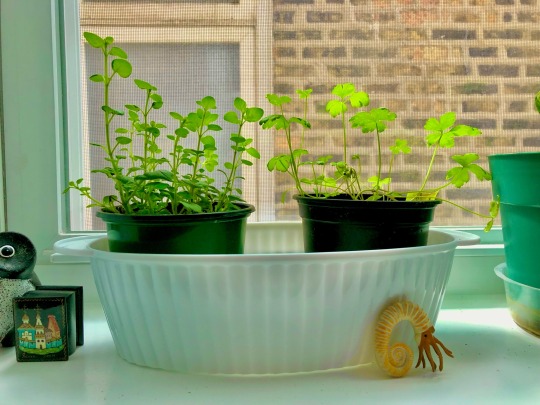

I’ve been doing some indoor gardening in the most chaotic way possible but things are growing anyways! 🌱
21 notes
·
View notes
Text
SOUP TIME, Party Edition: Minestrone
Monday is my birthday (!!!!!), and as such I thought it would be excellent to post PARTY SOUP. This, of course, means soup that makes enough for a party--not that most of us are doing very much partying, at this juncture, unfortunately. But one can dream of a future time when such a thing might be more advisable.
Minestrone is one of those extremely versatile soups that everybody makes slightly differently. This particular recipe, from the Bakery Lane Soup Bowl cookbook, is one I am VERY fond of, and can only make when feeding a crowd. Even halving it produces more minestrone than one can feasibly eat in a week--even myself, battle-hardened leftovers-for-lunch veteran that I am--and unfortunately it doesn’t freeze very well. Once, memorably, one large-ish batch of this soup and a loaf of bread fed four hungry college students for a week straight.
Alas, I will stop reminiscing. Recipe for minestrone under the cut. Warning: it’s a long one. Party soup involves Many Ingredients.
- 1/2 pound (8 oz) great northern beans. You can use canned or dry. If you’re using dry keep in mind that you’ll need to 1) soak them overnight and then 2) cook them just covered in FRESH water until they’re tender. I just use canned, because that’s a lot of mind load for a soup that also includes so many other ingredients.
- 1/4 cup olive oil. You can sub butter for this
- 1/4 cup butter (half a stick, in the US). You can sub olive oil for this.
- 1 1/4 cups chopped carrots (I recommend chopping baby carrots. One of the half-sized packages will give you enough for this. You can also use regular-sized carrots but they require peeling, and...again, a lot of mind load)
- 2 1/2 cups chopped celery. This will be the equivalent of 4-5 stalks. WASH YOUR CELERY WELL, MY CHILDREN.
- 1 1/12 cups chopped onion (1 large onion should work for this. Again, watch out for onions at this point in time. You’re going to be cooking the shit out of these but there’s no use tempting fate.)
(At this juncture, may I make a suggestion?? If you have a food processor or a blender, this is its time to shine. Cut your baby carrots in half, cut your celery into 2-3 inch sections, and quarter your onions. Throw them all into your chopper of choice. Pulse until they’re as small as you like. Et voila.)
- 3-4 cloves garlic, crushed or chopped very finely
- 16 oz can chopped tomatoes
- 4 quarts beef/chicken/veggie stock, or equivalent water&bouillon combo of your choice
- 2 cups diced potatoes. This is usually about 2 large potatoes.
- 1 1/2 tbsp salt
- 1/4 cup roughly-chopped parsley, or 2 tbsp dried parsley
1 tbsp dried basil leaves
1/2 tsp dried oregano
1/2 pound diced cooked ham. You can use deli ham, which often comes in a handy dandy pre-apportioned container, or honestly any other ham you like. You could also use chicken or turkey in this, although if you do this you’ll probs want to add another 1/2 tsp or so of salt at the end. You can also use a 1/4 pound prosciutto if you’re feeling Decadent.
- 1 pound frozen green beans (or, like, fresh!!! I make this in fall & winter when there’s No Fresh Produce so frozen it is.)
- 1 pound zucchini or other summer squash (or eggplant), diced
- 1/2 cup dried elbow macaroni. The original recipe specifies macaroni, but you could use any type of sufficiently small noodles. Wheels would be SUPER fun in this.
- 2 cups shredded cabbage (coleslaw mix is *chef’s kiss* for this)
- Black pepper to taste
Grated parmesan cheese, for garnish
Heat your fat/oil combo in a medium saucepan over medium heat until it’s JUST hot enough to not want to hold your hand near. Add all your veggies & cook until the onions are translucent. Add garlic and toss around a little until it’s toasty.
Add tomatoes and bring to a boil. Simmer 10 min.
In a BIG soup pot (I once used a lobster pot for this and it filled it 1/3 of the way full) combine stock and potatoes over high heat. Bring to a boil, turn down the heat to medium and simmer until potatoes are just tender.
Add your simmering vegetables, beans, seasonings, ham, and green beans. Bring to a boil and simmer 20 minutes.
Add zucchini, macaroni, cabbage, and pepper. Simmer another 15 minutes.
Serve garnished with grated parmesan cheese. You can also eat this with grilled cheese, if you like, or put croutons in your bowl or dip crusty bread into it. Or just eat it plain. It is a VERY substantial meal on its own so no need to worry about getting extra food groups in there.
Makes 24-ish cups of soup. PARTY TIME.
#the wonderful world of food#soup season#soup#minestrone#news now: local cryptid chirps info the void
9 notes
·
View notes
Text
Dollar Tree Witch Tips
I am proud to say that I am a broke ass witch and I love Dollar Tree more than I love most things. I have made a post previously about items from Dollar Tree that you can use for witchy purposes but I wanted to add some more ideas. Link to the very first post right hereee. Hopefully you all will enjoy this post and find it useful.
1.) Reed Diffusers
I bought a sage and citrus reed diffuser that smelled so nice and I was so in love with it but eventually it was fresh out of juice-- the container was completely empty. What I was left with was an empty, glass container, its lid, and the bamboo sticks. Don’t throw these items away so easily. You can use the bottle to hold moon water, rain water, sun water, or anything else (take off the sticker on the bottle, looks nicer). You could even turn it into a spell jar. The bamboo sticks could be turned into a pentagram craft or used as small wands, if you wanted. [Pictured is the actual sticks and a craft I made already with bigger sticks, to show a general idea of what you could do! Pretty sure they also have small wreaths to put around your small star! I hope to finish this craft myself soon.]


2.) Chalices, Corked Bottles, Cauldrons, & Sigil Burners
There are so many glass items at the Dollar Tree, from corked bottles to coffee mugs. From decorative plates to wine glasses. You could easily find your chalice here for your altar. Not only this, I found two round bowls-- they looked similar to fish bowls. Using air dry clay, rhinestones, and acrylic paint I turned one bowl into a cauldron (non-safe for food or your stove!). I use it to hold spare items and have even burnt sigils in it. The other bowl I filled with black sand, that I also bought from there, and made it’s purpose to be a space to burn sigils specifically.


3.) Runes, Pendulums & Scrying Mirrors
Dollar Tree has fish aquarium stones that can easily be painted to be runes. If you’re feeling particularly sea witchy, they also sell sea shells that can be turned into runes. Sea shells, rocks, and others items similar could also be used to make a pendulum. They sell twine and small sewing kits with thread. If you want to make a pendulum board, they have canvases and paint for you to get artsy.
They also sell picture frames, paint brushes, and paint-- all that you’ll need to create your very own scrying mirror. Pictured is a small one I made for travel but they have bigger picture frames.


4.) Crystals
Can’t afford crystals? That’s alright. I have found growing crystal sets in the toy aisles before. Use color magic to figure out properties of your crystals or see what sort of vibes you feel. Worth noting that you can always not use crystals or use other items; Intention is everything.
5.) Herbs, Spices, & Garden Growing
Can’t afford herbs? You’re preaching to the choir. I already touched on this a little with the last post. Dollar Tree has sea salt, Himalayan Pink Salt, cinnamon, basil, cayenne pepper, rosemary, and so on. It also happens to have tea to drink which is witchy in itself; You can also use the contents of those tea bags in your spell work. Some different types of tea I have found are green tea, peppermint tea, chamomile tea, black tea, and etc. You can also find gardening tools, soil, pots, and seeds to grow your own sage, lavender, basil, strawberries, oregano, and so on.
6.) Random Items Worth Mentioning
I saw a post a while back with this beautiful tray in bed, herbs and a small vase with flowers inside-- witchcraft in bed. Oh, how I ached to be that witchy and aesthetically pleasing. Guess what I found at the Dollar Tree? A small metal tray. You could also put candles on top of it, use it on your altar, or for your kitchen witchery. Whatever feels right.
Did ya know there are oil blends there too? I’ve seen peppermint and tea tree oil with my own four eyes. They already have their carrier oils in there and you can use them as you see fit. They’re in the beauty and hygiene aisles, if your local store has them.
Outside of that, there are plenty of beauty items that have essential oils inside them. I recently found bath salts (lavender, rose, and chamomile) that have the essential oils and even some of the flowers/herbs inside their package. Read labels!
This one’s for all my broke ass death witches because I love you, how’s your day going? Halloween has lots of trinkets and funsies to make your altar really have that, “death” aspect covered. I have found these small coffin boxes that I have used for banishing bad habit spells. You could turn them into a small altar for on the go. Paint them if they have something you don’t like. Need a representation for a skull? Take a peek, you might be surprised.
Need spare cloth to make poppets, a tarot deck bag, a charm bag, an altar cloth, dream pillows, or etc? They have scarves, towels, pillow cases, bandannas, and sometimes even plain shirts.

#pagan#wicca#witchblr#witch community#beginner witch#witch aesthetic#witchcraft#magic#witches#witch#grimoire#book of shadows#witch tips#witch crafts#witch blog#witchery#baby witch#cheap witchcraft#cheapwitch#wiccan#paganism
647 notes
·
View notes
Text
Plant growing from seeds for urban witches
Day 2/333
#333DaysofMagick
I’m gonna start this off with a warning that I am just a baby green witch with a little green thumb. This is my first year growing plants from seed all by myself.
Here is what I did to get started and also *try* to be cost friendly.
1. I looked at what plant hardiness zone I’m located in. This will let you know what plants you can and can’t grow as well as when times to plant and harvest. (this was a little heart breaking for me. I’m somewhere awkwardly between zone 4 and 3 but probably leaning towards 3).
2. I look at what plants grow well in containers. This was also pretty heart breaking, but ultimately you want what will make your plants thrive. Herbs: How to grow, use. and enjoy herbs from your own garden by Publications International, Ltd. is a book that I love to use, but always refer to your instructions on your seed packet or the guide that your seed vendor gives you.
Here are some herbs suited for container growth:
Aloe, Basil, Calendula, Catnip, Cayenne Pepper, Chives, Geranium, Ginger, Horsetail, Lavender, Lemon Balm, Marjoram, Oregano, Nastutium, Parsley, Peppermint, Rosemary, Rue, Sage, Summer Savory, Spearmint, Thyme.
Here are all of the other ones I’ve personally reasearched if they can container grow & I currently am growing. (this includes some flowers).
St. John’s Wort, Hyssop, Wormwood, Feverfew, Borage, Rue, Comfrey, Stinging Nettle, Dandelions, Milk Thistle, Morning Glories (pink variation), Morning Glories (blue variation), Mugwort, Shepherd’s Purse, Purple Basil, Echinacea, Horehound, Black Petunas, Chives, Plaintains, Sweet Peppers, Elderberries, pennyroyal, red clovers and sunflowers. (I haven’t planted the red clover or sunflowers cause I gotta wait till May).
Elderberries are typical shrubs--I got these seeds for free from my vendor and their seed life span is only a year so I’m growing them for family and friends that can have them transplanted in yards.
A lot of these plants can have deep roots, and so I understand that deep containers will be needed. I understand that $$$ is going to hurt a bit there.
3. Buying Seeds. Check MULTIPLE local stores and online to find the best prices and type of seed that I wanted. This part is fun, but I ended up with 29 different plants. Yeah I bit off more than I can chew, but I’m out of a job until further notice so I have time. :)
I ended up paying probably...60 dollars on seeds. Obviously, you could always start out with 3 or 4 plants. That would maybe be 10 dollars.
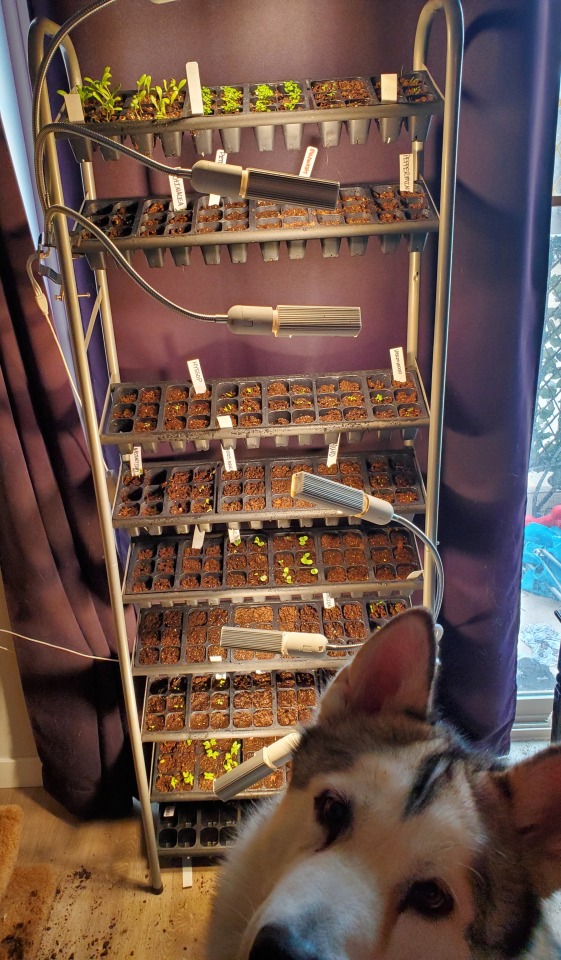
4. Containers, soil and storage. I could only dream for a proper seedling growing indoor greenhouse equippe with lights, but i’m not about dropping 200-400 dollars on that am I. I already owned this shoe rack (hence why one row is missing). But, i did actually order another rack because my cats are messing with the bottom 3 rows heavily.
I ordered the Mainstays 10_tier Narrow Shoe Rack off of walmart. It is only available in stores or online for about 25 dollars.
For the containers I bought Seedling Starter Trays, 720 Cells: (120 Trays; 6-Cells Per Tray), Plus 5 Plant Labels off of amazon.
I also bought some labels, because with this many seeds...yeah labels are good.
For soil, I used Jiffy Natural and Organic Seedling Starter Soil though a few of my plants did require more Peat moss, which I bought at a local nursery. I’m growing some edible herbs, flowers, and veggies so i wanted something well rounded and not geared towards one thing specific. All of the containers you see used two 12 Qt sized bags for 5 dollars each.
5. Lighting. This one was a lesson learner for me. So, I live in nowhere South Dakota and we have had only 4 days full sun in 4 weeks. Yup. Seedlings need 8-12 hours of full sun to grow properly. I’ve had to replant a few trays because they got pale, thin, and limped over and died overnight from lack of light. I bit the bullet and knew I was going all in this year and bought some full spectrum plant lights from amazon. There are soooo many options, I would pick ones that work best for you. I bought a total of two and they cost 35 dollars each. Yikes.
Increasing the lighting has made all the difference for many of the seeds. A lot of them require the seeds to be lightly scattered on the surface because they germinate with the sunlight.
6. Planting your seeds. This was the hardest for me to do tbh. I wasn’t sure how compact the soil should be, how wet, etc. I also had some plants that required more steps before planting so take note of that! For example, morning glories need either a nick to the shell or to be soaked overnight before planting because of how hard the seed coat is. My comfrey was planted in cells, and put in a ziploc bag for 1 month to stratify. Stratification is when the plants need a period of coldness to emulate winter to then germinate. I also had to do this with mugwort and elderberry.
Date to Plant by: Always read how many weeks before your regions last frost you can plant the seeds. I made a chart with the plants and the dates they should be planted. Sometimes they can be 3-4 weeks before last frost or 6-8. My regions last frost is May 1st at the latest.
Seed Depth: Pay attention to the depth of the seeds as well. Some required light soil and some require 1/2 inch and some just require to be loosely scattered.
Number of seeds per cell: Now the spacing and # of seeds per cell is still something I need to work on. Most instructions for seed packets tell you spacing for out doors or when the seedlings get big enough and need to be separated. They also don’t always tell you the rate of germination. A long time ago when i started planting seeds, I would either only place 1 seed per cell or a shite ton. Now if you do 1 seed, and the germination rate is 75%, there is a chance it may not survive. If you do 10 seeds per cell, the plants will have spacing issues and some may die or it will be a pain to separate later. I did 3-4 seeds per cell depending on the average germination rate of the seeds. My morning glories had a really high rate so I did 2 seeds for cell.
Soil tightness???: Early on, I used to press the soil in the containers and leave little to no air in the soil (oops). Now, how I prep my soil. I will pour the soil into a large bowl or container and pour in some water to moisten it but not soak it. I will stir it to break the large chunks apart with my hands and just pour them into each cell. Then I will take the container and tap it against the grow so that the soil will compact itself together, but it leaves space for air. Repeat.
Watering: I personally duel wield two spray bottles of water and go ham over the cells, but it leaves so much pain in my wrists. I don’t use a watering can because it can mispalce your lightly scattered seeds or drown your really small seedlings. I even tried watering bottom up. That’s when I would dip the container in a bowl of water or even my tub (haha don’t do that srsly) and the water would come up from the bottom to water the roots. This was a pain in the booty and made a mess for me... if it was outdoors...sure. I will just spray them twice a day heavily.
~~~~~~~~~~~~~~~~~~~~~~~~~~~~~~~~~~~~~~~~~~~~~~~~~~~~~
This is all I know for now, yall. I’ll try to keep everyone here updated on the progress. I probably spent $250 total on everything, but i’m also growing a lot. (^_^#)
#witchcraft#green witch#urban witch#celtic wicca#333daysofmagick#witch herbs#herbs#growing herbs#indoor plants#isolation#celtic witch
2 notes
·
View notes
Text
How to Cast a Jar Spell: Witchcraft for Beginners
Jar spells, also known as bottle spells or container spells, are an old form of folk magic. While this form of magic is mostly found in cursing and curse-breaking, it’s not just for baneful magic. The Hoodoo ‘honey jar spell,’ for example, is common in love magic. The jar spell is versatile overall and can be custom-designed for a variety of needs.Note: If you prefer to use magical timing, you might look up the most effective day, and planetary hour to lend power to your spell.Here’s how to design and cast a jar spell.
How to Cast a Jar or Bottle Spell in 7 Steps:
Define Your Intent
Select a Container
Choose Your Jar's Contents
Fill Your Jar
Seal Your Jar
Meditate on Your Intent
Finish Your Spell
Step 1: Define Your Intent
The first and most logical step in a jar spell is to define your intent. Your intent is what everything in your spell will revolve around. As per usual with magic, your intent should be:
Specific: Focus on precise goals (i.e. no wishing, no generalizing, no multi-purpose spells for 12 different things).
Realistic: Make sure those goals are attainable (no Dungeons & Dragons or Harry Potter fantasy stuff).
Ethical: I'm not going to say what is or isn't ethical, but you should certainly consider your spiritual ethics and think about the consequences of your actions.
Once your intent is determined, you can begin to design your jar spell—namely, what kind of things you need to put into it to achieve your goal.
Step 2: Choose a Container for Your Jar Spell
Basically, any kind of container can be used for a spell. I have to admit up front that I’m not entirely comfortable using containers made of plastic, but opinions vary on its effectiveness. I prefer glass, though people use clay and other materials. As long as it has no cracks and a tight-fitting lid or cork, you’re golden.
To find a suitable bottle, scrounge around the house or at thrift shops. Consider using anything from mason jars, baby food jars, and mayo or pickle jars to old salad and oil bottles.
Note: Make sure you cleanse and consecrate the container you’re going to use, as well as all the items you plan to fill it with.
Paint Your Jar (Optional)
If you want, you can paint your jar in a color that corresponds with your intent or with symbols and images. This is not necessary, but any little help can give you a boost—plus, it keeps anyone who might stumble upon your jar from seeing the contents.
Step 3: Choose Your Jar Spell Contents
Deciding on the contents is basically the ‘meat’ of this magical working. While there is no limit to what you can choose to include, it’s important to select things that will help you work toward your ultimate magical goal. I like to choose things from the following categories:
A Personal Item
A photograph, hair, nail clippings, blood or other personal item is crucial to your spell. You could also use a name written on paper. This should be of the person you are casting the spell on—so if you’re casting the spell for yourself, you’d use your own picture, item or name. If casting the spell for a friend or on someone else (such as a spell to get a bully to leave you alone), you would use their photo, name or item.
Written Intent or Prayer
There is a lot of power in words, so I always find it helpful to write my intent on something and slip it into the jar. If you are seeking the aid of a deity in your jar spell, you can write a note to them asking for their assistance.
Liquids
Generally, the bottle should contain some liquid, but which liquid you choose depends on your intent.
Urine is used for protection jars and jars to break a curse, but can also be used for manipulative spells over others.
Vinegar is used to curse or harm others or to ‘spoil’ something. Safety note: vinegar jars can explode—so don’t fill it to the top, and keep the jar wrapped in cloth or towels (unless you’re burying it).
Honey, sugar water or some kind of nectar is used when you want to compel someone or something. This is because if you were seeking to make friends, to be more persuasive, to soothe over hurt feelings, etc., you’d want to ‘sweeten’ their disposition.
Ammonia is used for ‘cleansing’, when you want to banish negativity or malevolent entities, or when you wish to start anew with a ‘clean slate’. Safety note: never burn candles on ammonia and do not place ammonia jars near heat, as it can be explosive and flammable.
Tinctures, infusions, oils, etc. can be used for a multitude of purposes, such as blessings for health or prosperity and the like. Naturally, you should choose something based on your intent—for example, a money spell might include a tincture, infusion or oil made from money-drawing herbs like cinnamon or mint.
Water can be used, but I don’t really recommend plain water. At the very least, you can make an herbal infusion with it to give it more of a boost. I personally think heavily salted and blessed water can be good for purification purposes, but beyond that, I would avoid plain tap water.
Solids
Like with liquids, there are different types of solids that you can choose from based on your intent. You can be pretty creative with this! Here are a few examples:
To break a curse, jar spells usually include items like rusty nails and glass shards.
To break up a couple, the caster might add some cat hair and some dog hair to the mix—to make the people fight like ‘cats and dogs’ (again, though, think about your ethics!).
Heart-shaped glitter or confetti might go into a jar spell to draw love. You might even tie a ribbon around the whole jar to hold on to love, or to bind someone.
In a money-related jar spell, you might include some coins (preferably with the year of your birth printed on them).
If I wanted to break writer’s block, I might make a jar spell with a small pencil and roll of paper wrapped around it.
Herbs and Crystals
Two items that are both magically powerful and easy to come by are crystals and herbs. You can find a variety of them anywhere, and they are able to carry the energy that you’ll want to put into your spell. Below, I include a quick reference chart for herbs and crystals that you can refer to if you’re new to working with them.
That said, I highly recommend studying up and familiarizing yourself with some basic herbs and/or crystals you might have access to (my chart only scratches the surface). The more you work with herbs and crystals and get a feel for them, the more skilled you will become at spellcraft.
At the end of the day, just use your noggin and think of things that give off the kind of energy you’re interested in raising. They'll be even better for your spell if they're personally meaningful to you (vs. only using items that are commonly associated with your goal).
Note: Remember, just as you cleansed and consecrated your spell jar, so you must do with the items that you plan to fill it with. If the objects you have chosen are not spiritually clean (i.e. on an energy level), your spell will be less likely to help you attain your goal.
What Crystals and Herbs to Use for Spells
Banishing: obsidian, jet, black tourmaline, smokey quartz, clove, dragon's blood, garlic, hot pepper
Binding: jet, agrimony, knotweed, spiderwort, witch hazel
Communication: sodalite, tiger eye, turquoise, mint, orris root
Curse-Breaking: onyx, clear quartz, selenite, angelica, bloodroot, boneset, mandrake, salt, sage, rue
Fertility: agate, emerald, garnet, malachite, peridot, apple, cucumber, fig, ivy
Health: agate, amethyst, jade, sunstone, coriander, dogwood, eucalyptus, galangal root, ginger, rosemary, sage, thyme
Intellect: aventurine, flourite, benzoin, dittany of Crete, nugmeg, rosemary,
Love: amber, calcite, copper emerald, lapis lazuli, moonstone, rose quartz, Adam & Eve root, apple, basil, beet, catnip, clove, laurel, lavender, marjoram, rose
Money: gold, malachite, moss agate, pearl, cinnamon, ginger, orange, patchouly, vervain
Peace: amazonite, blue lace agate, rhodocrosite, silver, cumin, lavender, violet
Productivity: fuschite, gold, hematite, ruby, allspice, oregano, vanilla
Protection: amber, carnelian, citrine, malachite, petrified wood, angelica, cypress, frankincense, mugwort, sandalwood, wormwood
Psychic Abilities: lolite, jet, malachite, moonstone, quartz, turquoise, silver, acacia, gardenia, mugwort, tuberose, yarrow
Relationships: moss agate, pearl, peridot, rhodocrosite, sapphire, turquoise, pansy, rose, valerian
Step 4: Fill Your Jar
After having grounded and centered yourself, pick up one item at a time (or place it on your pentacle) and charge it. Charging empowers the item with your personal intent while stirring and stimulating the item’s own natural energy that you’re trying to tap into.
Note: You do not need to cast a circle for this spell, but if you wish to do it within a ritual circle, you may. If you wish, you may also invoke a deity for assistance.
As you add items to your jar, chant to raise power. For example, while filling your jar, you might say something such as, "By the power of Earth, Air, Fire and Water; By the Power of the sun, moon and stars; With the blessings of the Goddess Aphrodite, I charge you, rose quartz, to attract love to me."
Words of Power
When I prepare a spell, I always like to plan a chant to say while I’m casting it. Chanting is a great way to raise energy. You can find a chant in a book or online, or you can make up your own. It doesn’t have to be Shakespeare to be effective. Something simple works just fine, like:
Money, money, come to me;
Help me pay these bills I see.
As long as it suits the occasion and is meaningful to you, it’ll work.
Rhythm and rhyming can help you memorize it quickly before you start, and then you can really get into it like a mantra when you’re casting. By letting it spill from your lips effortlessly, it bypasses that conscious part of your brain and taps into your source of power—that part of the mind that sends the energy toward your goal.
Step 5: Seal Your Jar
When you’re finished filling your jar, you can seal it right away (and then burn a candle on it if desired), or you can burn a candle in the open mouth of the jar and seal it that way.
Note: Candles are not necessary in jar spells, but I find it adds yet another boost of power if you combine it with candle magic. If you choose to incorporate a candle into your jar spell, find one of the appropriate color and dress it (see the article above for more details) before burning it in the mouth of the jar or on top of the sealed jar, letting all the wax melt down. You can burn multiple candles on a jar over a course of time for an ongoing project.
Step 6: Meditate on Your Intent
Meditate on having acquired your goal. Don’t envision yourself wanting your goal, or you leave yourself in a perpetual state of wanting; envision yourself having your goal. What will life be like, how will you feel, when it is done?
Hold onto your visualization for about 20 minutes, or as long as you can.
Step 7: What to Do With Your Spell Jar Now?
There are a few different options now that you’ve cast your jar spell. Basically, you can bury it, hide it, toss it in water, keep it on your altar, or dismantle it. Which you choose depends on what you’re trying to accomplish.
Bury the jar if . . .
You are seeking permanent protection or to break or repel a curse. This will stand sentry on your property and protect you (or on the property of the person for whom you cast the jar spell). If you don’t have land of your own, you can bury it in a flower pot of soil left by your doorstep.
You want your jar to be a ‘magnet’ of sorts to continue to draw things to you (attention, health, wealth, etc.). Bury it on your property or the property of the person you’re casting for and be done with it.
You are trying to rid yourself of something (or rid the person you’re casting for of something), like a disease or bad habit. Bury the jar at a crossroads, don’t look back, and (ideally) never return.
You are casting a spell on another unbeknownst to them (but remember your ethics!). Bury it on their property—ideally somewhere they cross over every day, like beneath their doorstep.
Note: If you were doing some major cursing to harm another, you could bury it in a graveyard (not something I personally recommend, by the way; but I’m just passing on the information).
Hide the jar if . . .
You want to bury it, but burying it is not an option. Hey, I am originally from New York City—I understand you can’t bury a jar easily when you live in an apartment. If this is the case, just hide it deep in the home somewhere—inside a wall, in the junk closet, or wherever it won’t be disturbed.
You plan on dismantling it sometime in the future, which will disengage the spell when done properly.
Toss the jar in water if . . . *
Using it to banish or exorcise any entities, or if you are working with any ‘questionable’ entities (again, not recommended, just passing on the information). Running natural water sources will purify it and protect you from their return.
It’s successfully removed a curse, a disease, a bad habit, etc.; this is an alternative to burying it at a crossroad. Keep in mind you could be fined for littering if you’re just tossing stuff into local waters.
*Tip: If it floats, puncture the cap with a hole or tie it to a weight.
Keep the jar on your altar if . . .
. . . your goal is an ongoing one that you’d like to keep working on. You can continue to burn candles over the mouth of the jar or shake it while saying your chant to keep it working for you.
Alternatively, if you have a shrine to your God/dess and sought their aid, you can keep it there. Again, shake it occasionally while chanting to keep the power going.
This is actually a good option for spells that are going to require a great deal of time and effort—for example, if you were to do a jar spell to help you pass tests, you might keep it on your altar all through college. You might repeat your chant, burn a candle or shake it the night before exams. This is better than making a new spell for every exam.
Dismantle the jar if . . .
. . . the spell's power is no longer necessary and you’d like the effects to stop. For example, if you cast a jar spell to attract love, you might have had many interests for a while. Now, you are getting married and you don’t want to attract any more potential lovers. So you would dismantle the spell.
To do this, remove the contents and bury them at a crossroads or into running water, clean the container and dispose of it. With a proper cleansing, you could re-use it.
Warning: It’s not generally a good idea to dismantle a jar used for cursing or hexing, or one for breaking a curse or hex, unless you really know what you’re doing. Just bury it at the crossroads or in running water and be done with it.
Do Not Burn Your Spell Jar
One thing I do not recommend is throwing it into a fire, as is mentioned in some sources. This was, in particular, a method of cursing and curse-breaking; the Witch would throw the jar into the fire and when it burst, it meant the curse was working (torturing the person it is cast on) or it meant the curse you were lifting has broken.
This is not necessary, and not a safe option at all. However, if you do dismantle a jar spell and have some components left over (ribbon, paper, etc.), you could burn those items after it’s dismantled if you have a safe means of doing so.
More info: ۞
5 notes
·
View notes
Text
How to Grow Herbs in Containers | Gardener’s Path@|how to plant a herb garden in pots@|https://gardenerspath.com/wp-content/uploads/2020/06/How-to-Grow-Herbs-in-Containers-FB.jpg@|21
Container herb gardens are among the easiest and most rewarding of garden projects.
A must-have for cooks, herbs add wonderful flavor and fragrance to cooked foods and salads. But they provide many more benefits that go beyond their use in cooking.
[external_link_head]
Many release their intense fragrances in the warmth of the afternoon sun or when you brush up against their leaves.
And most have enchanting, aromatic flowers that pollinators adore, and make an excellent addition to cut flower arrangements.
We link to vendors to help you find relevant products. If you buy from one of our links, we may earn a commission.
Herbs are just as easy to grow in containers as they are in the garden. So you can enjoy them growing near the kitchen for convenience, or placed around decks and patios.
Plus, growing your own is an economical alternative to those pricey little packets at the market – and your pots of green gold have a garden-fresh flavor that can’t be beat!
Photo by Lorna Kring.
Most herbs are robust plants that don’t like to be fussed over, and many are drought tolerant once they are established.
Now, let’s get on with those tips to ensure your container herb garden thrives all summer! Here’s what I’ll cover:
Which Herbs Should You Choose?
With such a large variety of herbs available, the best place to start is to choose what you’ll use on a regular basis.
From there, you can ask friends and neighbors for recommendations, browse seed catalogs, and check out our herb growing guides.
Or, if you tend to cook a lot of a particular type of cuisine, choose plants based on that theme.
French cuisine favors bay, chervil, chives, fennel, garlic, marjoram, parsley, rosemary, tarragon, and thyme.
Making pizza, or an Italian theme, would include basil, bay, fennel, garlic, oregano, parsley, rosemary, sage, and thyme.
Photo by Lorna Kring.
For a taste of Mexico, cultivate chili peppers, cilantro, mint, oregano, parsley, and thyme.
Asian-inspired cuisine would feature Thai basil, coriander (cilantro seeds), garlic, ginger, lemongrass, hot peppers, and star anise.
If you put up a lot of preserves and pickles, plant a bay tree and sow celery, coriander, dill, and mustard for their seeds.
The foundation of your container garden should begin with herbaceous and woody perennials.
Chosen wisely, some of these plants can provide a year-round harvest – provided they’re hardy in your climate and region.
These include evergreens like bay, lavender, rosemary, sage, thyme, and winter savory.
Photo by Lorna Kring.
Parsley, a biennial, can also grow through the winter if pots are brought under cover or tucked into a sheltered site.
And many herbaceous ones – like chives, marjoram, mint, oregano, and tarragon – are among the very first plants to emerge as the days begin to lengthen, often well before winter is officially over.
Photo by Lorna Kring.
Annuals, such as basil, cilantro, and summer savory, are quick-growing and can be direct sown in pots once temperatures warm up in spring. Or you can start seeds indoors about six weeks before your last frost.
Learn more about which seeds to sow indoors and outdoors in this guide.
Site Selection
One of the best things about container gardens is that they’re portable.
Aside from the really jumbo-sized pots, you can lift, move, and rearrange them so they have optimal growing conditions available all year long.
Photo by Lorna Kring.
Position some close to the kitchen for quick convenience, if desired.
They can be placed anywhere for you to enjoy their beauty and fragrance, and look terrific arranged on the deck, doorsteps, edging pathways, patios, and in window boxes.
[external_link offset=1]
But not all enjoy the same growing conditions.
Some prefer arid, hot conditions while others like to keep cool and moist with afternoon shade. However, they should all receive a minimum of six hours of sunlight each day.
Aside from that, position your pots according to the needs of each plant. And only mix plants in the same pot that share similar growing requirements.
You’ll also want to locate your pots close to a water source. Remember, containers dry out much faster than ground plants, and even drought resistant plants require regular watering.
A good rule of thumb is to choose pots that are at least one-third as tall as the mature plant, and half to three-quarters of its mature width.
Information about a plant’s mature size can be found on plant tags or seed packets.
Photo by Lorna Kring.
For example, a low-growing plant like common thyme grows to 12 inches tall with an 8-inch spread. The minimum pot dimensions for container-grown thyme would be 4 inches tall by 4 to 6 inches wide.
But for larger plants like lemongrass, rosemary, or sage, bigger is definitely better. For large specimens, the pot height should be closer to one-half of the mature height – or bigger.
Also, if you need to protect plants from winter temperatures, larger pots provide better insulation from the cold.
Whatever size you choose, each one needs to have drainage holes that allow water to drain away from the roots.
Root rot is one of the leading causes of plant failure in containers, and it’s easily introduced when plants have “wet feet,” or roots are left standing in water or oversaturated soil for extended periods.
I also recommend adding a layer of material over the drainage holes to prevent the soil from becoming waterlogged. Coconut coir, pebbles, broken pottery, and other similar materials are all suitable to help drain away excess water.
Containers are typically made of materials such as ceramic, metal, plastic, resin, terra cotta, or wood, and which you choose is a matter of personal perference.
But plastic or resin are the best options for overwintering, as they’re the least likely to be damaged by the cold. They’re the lightest to move as well.
Double Your Pleasure
If you have the room, it’s a good idea to double up on your favorites with two pots growing at the same time, or more if the space will allow it.
Photo by Lorna Kring.
This is a useful tip if you love adding sage to protein or pasta dishes on a weekly basis, or if you love making a big batch of pesto to include with meals as often as you’re able to.
Place one pot in the best growing site, and when it becomes over-picked and sparse, move it to a location with dappled sunlight or light shade.
Once moved, it can rest, recuperate, and produce new growth.
Move your second pot into the prime growing location, then rotate the two pots as needed throughout the growing season.
Start with Good Soil
To ensure the healthiest start for your container herb garden, begin with high-quality soil.
Container soil should be lighter in density than garden soil and enriched with organic matter. It should also be amended to provide excellent drainage as well as moisture retention.
The addition of landscape or builder’s sand helps to ensure good drainage.
And amending with light materials like perlite, vermiculite, or peat moss helps to retain moisture without compacting or saturating the soil.
Here’s a suited blend that you can use for potted plants:
1/4 garden soil or potting soil
1/4 landscape sand
1/4 vermiculite or peat moss
1/4 aged compost or manure
This creates a light, airy soil mixture that provides essential nutrients, easy water absorption, and free-flowing drainage.
For perennial pots, it’s a good idea to work in some aged compost each spring, and to completely replace the soil every 3 to 4 years.
Watering and Fertilizing
Containers can dry out quickly in hot or windy weather. They need to be watered regularly, typically when the top inch of soil feels dry.
Usually, in-ground herbs don’t require any fertilizing. But for the best growth and productivity, potted ones should be fed regularly.
A diluted solution of fish emulsion fertilizer, watered down to half strength and applied monthly during the growing season, provides the nutrients they need.
Fertilome Fish Emulsion Fertilizer
Fertilome fish emulsion fertilizer is available in three different sizes at Nature Hills Nursery.
Harvest Wisely
To keep new growth coming, pinch back or pick from your plants often.
Photo by Lorna Kring.
With leafy, clump-forming plants such as chives, cilantro, lemongrass, and parsley, pick the outer leaves first, working in towards the center and up as you harvest.
Those that have upright stems, like basil, mint, oregano, and rosemary, can be snipped right above a set of leaves to encourage branching and bushiness.
Many herbs, such as basil, mint, and parsley, begin to lose flavor once flowers begin to form. To retain the best taste, pinch out flower buds and stalks promptly.
But don’t toss those flowers!
[external_link offset=2]
Not surprisingly, the flowers of edible herbs are edible as well – you can add them to dishes as a colorful garnish or salad topper, for a pretty and zesty addition to meals.
Fall Cleanup
As the growing season winds down, begin your cleanup.
Lightly trim away dead or damaged stems on woody perennials, and cut herbaceous ones to the ground.
Remove any existing mulch and apply a new layer of mulching material for winter protection.
Empty out any pots used for growing annuals, clean them thoroughly, and store them for the winter.
Winter Protection
To prevent frost damage, move pots used to grow perennials into a frost-free area for winter protection.
For larger containers, you can provide on-site protection for roots by insulating pots with branches, blankets, or bubble wrap.
And on chilly nights, you can give the top side of plants frost protection with fabric plant covers.
Warm Worth Plant Covers
Warm Worth covers are available in a variety of sizes at Wayfair.
Moving outdoor-grown plants indoors is another option in cool climates. We’ll cover this in another article.
Pruning
Annuals don’t require pruning, and herbaceous plants may simply be cut to the ground in late autumn.
But your woody perennials need annual pruning to control their shape and size, and to facilitate the production of fresh foliage.
Once they become overgrown, it’s very difficult to return them to a compact, tidy form because the woody stems won’t produce new growth. Cutting them at this point results in stubby sticks with no foliage.
The best time for pruning woody types such as bay, lavender, rosemary, sage, and thyme is in early spring, just when new growth emerges at the base of plants or on their lowest limbs.
Missed this window? The next best time is immediately after the plant has finished flowering.
Cut branches back by one-third, making your cuts just above a set of leaves. Remove any spent flowers and flower stalks as well.
Photo by Lorna Kring.
Avoid cutting back woody perennials late in the season. This encourages new growth to start when they should be preparing for dormancy.
Tender shoots are easily killed by winter cold, which can weaken plants to the point of killing them.
During the growing season, trim lightly as needed, choosing outside stems and snipping to keep a tidy shape.
Pots of Delight
Growing your own herbs is an easy way to enjoy fresh flavors in your cooking, and fragrance in your garden. To learn more, check out our full guide to starting your own herb garden.
Remember to water regularly, fertilize monthly, and harvest often for a steady supply of flavorful, fresh leaves.
Now that you know a bit more about how to grow your own container herb garden, will you be potting up some of your own delightful favorites? Let us know in the comments below!
And for more tips on container gardening, add these articles to your reading list next:
The Best 11 Vegetables to Grow in Pots and Containers
Keep Your Containers Looking Great with These 6 Simple Tricks
How to Grow Vegetables in Containers
Photos by Laura Kring © Ask the Experts, LLC. ALL RIGHTS RESERVED. See our TOS for more details. Product photos via Home Depot, Nature Hills Nursery, and Wayfair. Uncredited photos: Shutterstock.
About Lorna Kring
A writer, artist, and entrepreneur, Lorna is also a long-time gardener who got hooked on organic and natural gardening methods at an early age. These days, her vegetable garden is smaller to make room for decorative landscapes filled with color, fragrance, art, and hidden treasures. Cultivating and designing the ideal garden spot is one of her favorite activities – especially for gathering with family and friends for good times and good food (straight from the garden, of course)!
[external_footer]
source https://livingcorner.com.au/how-to-grow-herbs-in-containers-gardeners-pathhow-to-plant-a-herb-garden-in-potshttps-gardenerspath-com-wp-content-uploads-2020-06-how-to-grow-herbs-in-containers-fb-jpg21/
0 notes
Text
How to make unsalted butter salted UK

There are many ways to make unsalted butter taste like salted butter without adding any salt. One way is by adding a few dashes of garlic powder or onion powder, which will give the same salty flavor as table salt.
Another way is by adding some coarsely ground black pepper, which has a similar texture and slightly spicy flavor to table salt. There are also recipes that use a combination of herbs such as thyme, basil, oregano and rosemary with lemon zest for an even more complex and aromatic seasoning.
If you're a butter enthusiast and often forget to add salt to your recipes, this article is for you! It's easy enough to make unsalted butter taste like it has some salt in it. You just need one ingredient: kosher salt. All you have to do is put about 1 tablespoon of the kosher salt into a bowl or container with the unsalted butter and mix until thoroughly combined.
If you want more salty flavor, feel free to add more than 1 tablespoon of the kosher salt. The best part? This trick works on any type of unsalted butter that doesn't already contain added ingredients such as garlic or herbs. Now go forth and enjoy salted unsalted butter!
1. Find a container that is the same size as your butter
2. Pour in some table salt to cover the bottom of the container
3. Place a stick of butter on top and put it in the fridge for an hour or two
4. Remove from fridge, cut off any excess salt, and enjoy!
5. If you want to make more than one stick at once just double up this process!
6. You can also use coarse sea salt instead of regular table salt if desired
7 (optional). Melt unsalted butter over low heat before adding table/coarse sea salt for even more flavor!
8 (optional). Add other spices like garlic powder, onion powder, paprika etc for even more flavor options!
Should I omit salt if using salted butter?
If you're baking or cooking with salted butter, should you omit the salt from your recipe? The short answer is no. Salt and butter have been used together for centuries in recipes like cheese biscuits and caramels. Butter's natural flavor comes from its milk solids which are made up of minerals such as calcium, potassium, and sodium; so it makes sense that adding salt would only enhance this flavor.
Some cooks recommend omitting the added salt if using salted butter because they feel that it will make food too salty; but many people find that their food tastes bland without any additional seasoning when they do this. If you go with unsalted butter to reduce the amount of sodium in your diet, make sure to compensate by increasing other.
Why use unsalted butter then add salt?
We all know butter is great on toast, pancakes, and in cookies. But what if I told you that salt can make it even better? There are a few reasons why adding salt to unsalted butter makes the taste of your food so much more addictive. The first reason is because the natural flavor of butter is enhanced by adding just a little bit of salt. Secondly, when we add too much salt to our food it has the tendency to make everything else taste bland and salty.
Adding some unsalted butter will balance out that over-saltiness! Lastly, salted foods tend to have more calories than their unsalted counterparts which might be something worth considering if you're watching your weight or trying to reduce sodium intake for health purposes.
Which is the best butter for cakes?
What is the best type of butter to use when baking cakes? This is a question that has been hotly debated for years. Butter lends a rich flavor and moistness to baked goods, but can also cause some undesirable side effects such as greasy fingers or an overly heavy texture.
Many factors come into play in determining which type of butter should be used in cake recipes; this article will explore some of these options and provide tips on how to get the most out of your baking experience.
Does anyone ever wonder how the butter they use for baking affects their cake? Butter is an ingredient that can make or break a cake. The type of butter you choose will affect the moisture content, flavor, and texture. This blog post will explore three different types of butter to see which is best for your cakes!
How do you make buttercream frosting less salty?
Salted buttercream is a deliciously rich frosting that goes well with any flavor cake. But sometimes it can be too salty and ruin your dessert. Here are some ways to make salted buttercream less salty!
-Add more powdered sugar to the recipe, this will dilute the salt content in the frosting. -Try using unsalted or sweetened condensed milk instead of regular milk for a sweeter taste. This will also reduce the salt content in your frosting. -Mix together softened cream cheese, heavy whipping cream and vanilla extract before adding in powdered sugar and salting mixture into it. It's perfect for those who want a thick frosting without too much saltiness!
Buttercream frosting is just about the best thing ever--except when it tastes like a salty, sodium-rich pool of liquid. If you have this problem, there are several things that could cause it: too much salt in your buttercream (yikes!), too much powdered sugar, or not enough cream. Luckily, fixing any one of these problems can lead to a sweet and delicious taste!
Conclusion:
Unsalted butter is more popular in the UK than it is in America. Why? It's because of taste preferences and tradition, but also with food pairing as well. Salted butter can be used to season other foods or dishes while unsalted butter cannot. We hope you've learned a lot about how people eat, why they use different types of butter, and what makes them prefer salted over unsalted!
0 notes
Text
How to Can Tomato Sauce (My Favorite All-Purpose Version)
I’ve shied away from posting a canned tomato sauce recipe forever.
Not because it’s hard…
Not because I don’t make tomato sauce…
Not because I don’t have tomatoes…
Mostly just because I’ve just been too lazy to write down my ingredients any time I make a batch.
So there you have it.
Now that’s off my chest, I feel better.
Anyway.
Of all the things I can (like peaches with honey and cinnamon, canned apple slices, home-canned poblano salsa), tomato sauce is the most important. We use our canned tomato sauce in so many recipes during the long winter months, from homemade pasta dishes, homemade pizzas, chili, and more.
If I play my cards right, I can grow enough paste tomatoes (I love Amish Paste and San Marzano the most) in my raised bed garden to keep us stocked in tomato sauce for the whole year.
Homemade tomato sauce can easily be frozen, BUT since freezer space is always at a premium on our homestead, this is absolutely a item I prefer to can.
Plus, this particular tomato sauce recipe for canning uses a waterbath canner, so it’s the perfect recipe for beginners. (And if you are a beginner to the canning world, check out my article on how to start canning with zero special equipment so you can start canning today).
The Resource I Wish I Had When I Started
If you are a canning newbie, I just revamped my Canning Made Easy course and it’s ready for YOU! I’ll walk you through each step of the process (safety is my #1 priority!), so you can finally learn to can confidently, without the stress. CLICK HERE to have a look at the course and ALL the bonuses that come with it.
This is the information I wish I had when I first started canning– all of the recipes and safety information are double and triple-checked against tested and proved canning recipes and recommendations.
It’s the next best thing to you coming over to my house and canning right along with me.
Best Tips for Canning Tomato Sauce
Whether you use my personal favorite tomato sauce recipe or a different one, there are a few things to keep in mind for your tomato canning adventures:
Tip #1: Always Follow a Safe Canning Recipe
I’ve talked countless times in the past about the importance of following a safe canning recipe, because here’s the deal folks– botulism is no joke. And yes, people do indeed still get stick from improperly canned foods.
Also, tomatoes can be deceiving as they *are* an acidic food, but there are many aspects that factor into their exact acidity. To save yourself the hassle of becoming a tomato acidity detective, the simplest course of action you can take is to add a bit of lemon juice to each of your jars.
You can get the exact measurements for different sizes of jars here. Adding lemon juice or vinegar ensures your home-canned tomato recipes are acidic enough to be canned in your water bath canner– easy peasy.
Another important reason to always use an approved recipe for your tomato canning adventures is the ratio of tomatoes to other vegetables. Tomatoes are an acidic food, but many common tomato sauce additions, (like green pepper, onion, mushroom, or garlic), are not. You can safely add *some* of these non-acidic ingredients to home-canned tomato sauce, you’ll just need to watch your ratios.
Or, if you want to ditch ratios entirely, you can do that, but you’ll just want to pressure can the sauce instead.
A good rule of thumb is to use no more than 3 cups of other vegetables per each 22 pounds of tomatoes.
My tomato sauce recipe is safe because it is based on the recipe in the Ball Blue Blue (as is any other canning recipe you’ll find here on my blog– I always stick to approved recipes as a starting point.)
You can learn more about canning safety in my articles here:
How to Safely Can Tomatoes at Home
The Ultimate Guide to Canning Safety
The Best Resources for Safe Canning
Tip #2: Use Optimal Tomato Varieties for Canning
I primarily grow either Amish Paste, Roma or San Marzano plum tomatoes in our garden, since tomato sauce is the #1 way my family consumes tomatoes. These paste-type varieties are meatier and contain less juice and seeds, so you’ll spend less time simmering and reducing the sauce.
However, even though certain tomato varieties are preferred for canning, you can still use any type you want, so don’t let your tomato type stop you from enjoying some home-canned tomato sauce!
Tips #3: Plan on Canning Tomato Sauce for an Entire Day
You probably all know by now (especially if you own my cookbook) that I am a huge fan of quick and easy recipes that don’t take a lot of time. That being said, there are a couple exceptions to my rule, and tomato sauce is one of them.
If you’re canning a sizable amount of sauce (i.e. more than just a jar or two), it will very likely take you the majority of the day to process, simmer, and then can the tomatoes. However, don’t despair– not all of this is hands-on time!
The kids and I recently processed several boxes of our homegrown tomatoes that had been ripening in the shop. Naturally, I didn’t weigh them (FAIL), but there were well over 50 pounds.
My sister came for a visit and we put her to work making sauce
It took us about a 90 minutes to wash, trim, and process the tomatoes into puree with our Victorio Food Mill (p.s. the best investment EVER if you are planning on doing a lot of tomato or applesauce). Yes, I do employ child labor here (they actually think it’s fun– for real).
The simmering process took 4-5 hours (I was in and out of the house while this was happening), and then I finally canned it later in the day.
It wasn’t hard work, but it did stretch throughout the day.
However, if you’re looking for a ‘quick and easy’ tomato sauce recipe for supper tonight, don’t worry– I’ve got you covered! This FAST tomato sauce recipe can be ready in 20 minutes or less. It’s not a recipe you’d want to can, but if you need some quick sauce for supper, it’s golden.
Canned All-Purpose Tomato Sauce Recipe
Yield: About 7 Quarts
Ingredients:
45 pounds of tomatoes
6 cups chopped onions (I use a food processor for this)
12 cloves of garlic, minced
1/4 cup olive oil
1 tablespoon ground black pepper
2 tablespoons brown sugar (more to taste)
¼ cup coarse sea salt (more to taste)
Bottled lemon juice (2 tablespoons per quart jar)
A water bath canner
Instructions:
Wash the tomatoes and remove the ends and any damaged spots. Quarter them and deseed them by running your fingers down the middle and scraping out the bulk of the seeds and juice. Puree the tomatoes in a food processor or blender.
(OR, you can run the tomatoes through a food mill and save yourself a lot of time! When I’m using my food mill, I wash them, remove any bad spots, and that’s it– the machine does the rest.)
Sauté the onions and garlic in the olive oil in a large pot. Add the tomatoes, pepper, sugar, and salt. Bring to a simmer and allow to reduce by about one-half. If you are using very juicy tomatoes, this can take 3-5 hours.
The most important part of homemade tomato sauce is the tasting! Tomatoes greatly differ from variety to variety, so you must taste as you go.
In order to keep the ratios of high acid to low acid foods at a safe level in this recipe, you cannot increase the amount of onions or garlic you use, but you CAN increase the herbs, sugar, or salt.
Once the sauce has reduced by half and the flavor is where you want it to be, add 1 tablespoon of lemon juice to each pint jar and 2 tablespoons of lemon juice to each quart jar.
Ladle the sauce into the jars, leaving 1/2-inch headspace.
Process pints for 35 minutes and quarts for 40 minutes in a hot water bath canner. (Keep in mind that you may have to adjust your processing time according to your altitude.)
REMEMBER: Don’t start timing until the water has returned to a boil with the filled jars inside.
Store your sealed jars in a cool, dark place. I use this all-purpose sauce in all sorts of recipes- add basil and oregano to give it an Italian twist, or add chili powder and cumin for Mexican food.
Homemade Tomato Sauce Notes:
Most recipes will suggest that you peel the tomatoes before you puree them. Since I despise peeling tomatoes (it’s ok for a handful, but when you’re dealing with 60 pounds of small tomatoes, it’s an utter nightmare), I always just run mine through my food mill instead. In the past when I didn’t have a food mill, I would deseed and then puree them (with the skin on). Sometimes you’ll find a bit of peel in your finished sauce, but I absolutely do not think it’s offensive at all. It’s a small price to pay to avoid the monotony of peeling a million tomatoes.
To make this more of an Italian-style sauce, add 3 tablespoons dried oregano and 3 tablespoons dried basil (or to taste)
If you prefer, you can completely omit and onion and garlic from this recipe. Technically, you can can straight tomato puree, if you wish. However, I prefer to give mine a bit more flavor to start out.
Sugar is important in tomato sauce recipes to help cut the acidity. However, you can leave it out if you wish.
DRIED herbs and spices won’t effect the ratios of this recipe at all, so you can safely remove or add them, according to your own taste.
My favorite tomatoes to grow for making canned tomato sauce are Roma or San Marzanos.
Print
.tasty-recipes-image { float: right; } .tasty-recipes-yield-scale { border: 1px solid #979599; border-radius: 2px; color: #979599; margin-left: 3px; padding: 0 4px; font-size: 0.7rem; } .tasty-recipes-scale-container { float: right; padding: 0 0 1rem; display: flex; } .tasty-recipes-scale-container .tasty-recipes-scale-label { text-transform: uppercase; font-size: 0.6rem; color: #979599; align-self: center; } .tasty-recipes-scale-container button { background: transparent; border: 1px solid #979599; border-radius: 2px; color: #979599; margin-left: 5px; padding: 2px 4px; } .tasty-recipes-scale-container button.tasty-recipes-scale-button-active { color: #353547; border-color: #353547; } .tasty-recipes-scale-container button:focus { outline: none; } .tasty-recipes-instructions-header { display: flex; flex-wrap: wrap; justify-content: space-between; align-items: baseline; margin: 2em 0; } .tasty-recipes-entry-content .tasty-recipes-instructions h3 { margin: 0 0 1rem 0; } @media only screen and (min-width: 520px) { .tasty-recipes-entry-content .tasty-recipes-instructions h3 { margin: 0; } } /*Video Toggle button */ button[name="tasty-recipes-video-toggle"] { margin: 0; padding: 0; width: 86px; height: 30px; border-radius: 2px; border: #979599; display: inline-block; line-height: 20px; vertical-align: middle; text-align: center; font-size: 14px; background: #979599; } button[name="tasty-recipes-video-toggle"] span { padding: 0 4px; pointer-events: none; } button[name="tasty-recipes-video-toggle"][aria-checked="false"] :last-child, button[name="tasty-recipes-video-toggle"][aria-checked="true"] :first-child { background: #fff; color: #979599; border-radius: 2px; padding: 2px 4px; } button[name="tasty-recipes-video-toggle"][aria-checked="false"] :first-child, button[name="tasty-recipes-video-toggle"][aria-checked="true"] :last-child { color: #fff; } label[for="tasty-recipes-video-toggle"] { text-transform: uppercase; font-size: 0.6rem; padding-right: 8px; color: #979599; line-height: 30px; user-select: none; vertical-align: middle; -moz-user-select: none; -ms-user-select: none; -webkit-user-select: none; -o-user-select: none; } .tasty-recipe-responsive-iframe-container { margin: 10px 0; } .tasty-recipes-print-button { background-color: #666677; display: inline-block; padding-left: 1em; padding-right: 1em; padding-top: 0.5em; padding-bottom: 0.5em; text-decoration: none; } a.tasty-recipes-print-button { color: #fff; } a.tasty-recipes-print-button:hover { color: #fff; } .tasty-recipes-equipment { display: flex; flex-wrap: wrap; justify-content: space-evenly; } .tasty-recipes-equipment > h3 { flex: 0 0 100%; } .tasty-recipes-equipment .tasty-link-card { flex: 0 0 50%; padding: 1.5rem 1rem; text-align: center; } @media screen and (min-width: 500px) { .tasty-recipes-equipment .tasty-link-card { flex: 0 0 33%; } } .tasty-recipes-equipment .tasty-link-card p { font-weight: bold; font-size: 1em; margin-bottom: 0; } .tasty-recipes-equipment .tasty-link-card p a { color: initial; } .tasty-recipes-equipment .tasty-link-card span { font-size: 0.9em; } .tasty-recipes-rating.tasty-recipes-clip-10 { -webkit-clip-path: polygon(0 0, 10% 0%, 10% 100%, 0% 100%); clip-path: polygon(0 0, 10% 0%, 10% 100%, 0% 100%); } .tasty-recipes-rating.tasty-recipes-clip-20 { -webkit-clip-path: polygon(0 0, 20% 0%, 20% 100%, 0% 100%); clip-path: polygon(0 0, 20% 0%, 20% 100%, 0% 100%); } .tasty-recipes-rating.tasty-recipes-clip-30 { -webkit-clip-path: polygon(0 0, 30% 0%, 30% 100%, 0% 100%); clip-path: polygon(0 0, 30% 0%, 30% 100%, 0% 100%); } .tasty-recipes-rating.tasty-recipes-clip-40 { -webkit-clip-path: polygon(0 0, 40% 0%, 40% 100%, 0% 100%); clip-path: polygon(0 0, 40% 0%, 40% 100%, 0% 100%); } .tasty-recipes-rating.tasty-recipes-clip-50 { -webkit-clip-path: polygon(0 0, 50% 0%, 50% 100%, 0% 100%); clip-path: polygon(0 0, 50% 0%, 50% 100%, 0% 100%); } .tasty-recipes-rating.tasty-recipes-clip-60 { -webkit-clip-path: polygon(0 0, 60% 0%, 60% 100%, 0% 100%); clip-path: polygon(0 0, 60% 0%, 60% 100%, 0% 100%); } .tasty-recipes-rating.tasty-recipes-clip-70 { -webkit-clip-path: polygon(0 0, 70% 0%, 70% 100%, 0% 100%); clip-path: polygon(0 0, 70% 0%, 70% 100%, 0% 100%); } .tasty-recipes-rating.tasty-recipes-clip-80 { -webkit-clip-path: polygon(0 0, 80% 0%, 80% 100%, 0% 100%); clip-path: polygon(0 0, 80% 0%, 80% 100%, 0% 100%); } .tasty-recipes-rating.tasty-recipes-clip-90 { -webkit-clip-path: polygon(0 0, 90% 0%, 90% 100%, 0% 100%); clip-path: polygon(0 0, 90% 0%, 90% 100%, 0% 100%); } .tasty-recipes-nutrition ul { list-style-type: none; margin: 0; padding: 0; } .tasty-recipes-nutrition ul:after { display: block; content: ' '; clear: both; } .tasty-recipes-nutrition li { float: left; margin-right: 1em; } .tasty-recipes-plug { text-align: center; margin-bottom: 1em; display: flex; align-items: center; justify-content: center; } .tasty-recipes-plug a { text-decoration: none; box-shadow: none; } .tasty-recipes-plug a img { width: 150px; height: auto; margin: 5px 0 0 8px; display: inline-block; } @media print { .tasty-recipes-no-print, .tasty-recipes-no-print * { display: none !important; } }
Jill’s Favorite Canned Tomato Sauce Recipe
My tried-and-true canning tomato sauce recipe, perfect for pasta dishes, homemade pizza, and more.
Author: Jill Winger
Prep Time: 1-2 hours
Cook Time: 3-5 hours
Total Time: 8 minute
Yield: 7 quarts
Ingredients
45 pounds of tomatoes
6 cups chopped onions (I use a food processor for this)
12 cloves of garlic, minced
1/4 cup olive oil
1 tablespoon ground black pepper
2 tablespoons brown sugar (more to taste)
¼ cup coarse sea salt (more to taste)
Bottled lemon juice (2 tablespoons per quart jar)
A water bath canner
Instructions
Wash the tomatoes and remove the ends and any damaged spots. Quarter them and deseed them by running your fingers down the middle and scraping out the bulk of the seeds and juice. Puree the tomatoes in a food processor or blender.
(OR, you can run the tomatoes through a food mill and save yourself a lot of time! When I’m using my food mill, I wash them, remove any bad spots, and that’s it– the machine does the rest.)
Sauté the onions and garlic in the olive oil in a large pot. Add the tomatoes, pepper, sugar, and salt. Bring to a simmer and allow to reduce by about one-half. If you are using very juicy tomatoes, this can take 3-5 hours.
The most important part of homemade tomato sauce is the tasting! Tomatoes greatly differ from variety to variety, so you must taste as you go.
In order to keep the ratios of high acid to low acid foods at a safe level in this recipe, you cannot increase the amount of onions or garlic you use, but you CAN increase the herbs, sugar, or salt.
Once the sauce has reduced by half and the flavor is where you want it to be, add 1 tablespoon of lemon juice to each pint jar and 2 tablespoons of lemon juice to each quart jar.
Ladle the sauce into the jars, leaving 1/2-inch headspace.
Process pints for 35 minutes and quarts for 40 minutes in a hot water bath canner. (Keep in mind that you may have to adjust your processing time according to your altitude.)
REMEMBER: Don’t start timing until the water has returned to a boil with the filled jars inside.
Store your sealed jars in a cool, dark place. I use this all-purpose sauce in all sorts of recipes- add basil and oregano to give it an Italian twist, or add chili powder and cumin for Mexican food.
Notes
Most recipes will suggest that you peel the tomatoes before you puree them. Since I despise peeling tomatoes (it’s ok for a handful, but when you’re dealing with 60 pounds of small tomatoes, it’s an utter nightmare), I always just run mine through my food mill instead. In the past when I didn’t have a food mill, I would deseed and then puree them (with the skin on). Sometimes you’ll find a bit of peel in your finished sauce, but I absolutely do not think it’s offensive at all. It’s a small price to pay to avoid the monotony of peeling a million tomatoes.
To make this more of an Italian-style sauce, add 3 tablespoons dried oregano and 3 tablespoons dried basil (or to taste)
Sugar is important in tomato sauce recipes to help cut the acidity. However, you can leave it out if you wish.
DRIED herbs and spices won’t effect the ratios of this recipe at all, so you can safely remove or add them, according to your own taste.
My favorite tomatoes to grow for making canned tomato sauce are Roma or San Marzanos.
More Preserving Tomatoes Tips:
How to Safely Can Tomatoes at Home
Fast Tomato Sauce Recipe
How to Freeze Tomatoes
40+ Ways to Preserve Tomatoes
How to Save and Ripen Green Tomatoes
The post How to Can Tomato Sauce (My Favorite All-Purpose Version) appeared first on The Prairie Homestead.
from Gardening https://www.theprairiehomestead.com/2020/09/can-tomato-sauce.html
via http://www.rssmix.com/
0 notes
Text
FOOD SURVEY
1. What’s the last thing you ate?
Ramen.
2. What’s your favourite cheese?
I love many different kinds of cheese. Cheese makes everything better.
3. What’s your favourite fish?
I don’t have one.
4. What’s your favourite fruit?
Banana.
5. When, if ever, did you start liking olives?
I don’t know when exactly, but I’ve liked black olives for as long as I can remember. I’ve never liked green olives.
6. When, if ever, did you start liking beer?
I never liked beer.
7. When, if ever, did you start liking shellfish?
Never.
8. What was the best thing your mum/dad/guardian used to make?
Not used to, they still do cook delicious meals. A few of my faves are my mom’s lasagna, meatballs, and tacos and my dad’s spaghetti and scrambled eggs. Also, I’m not a big burger person and I don’t like steak or porkchops, but the rest of my family loves when my dad makes those things.
9. What’s the native specialty of your hometown?
Probably Mexican food.
10. What’s your comfort food?
Ramen.
11. What’s your favourite type of chocolate?
Milk and white chocolate.
12. How do you like your steak?
I don’t.
13. How do you like your burger?
Not a big burger person, but if I eat one it’s gotta be well done. I don’t want any red in my meat. *gag*
14. How do you like your eggs?
Scrambled, sunny-side up, hardboiled, deviled... I love eggs.
15. How do you like your potatoes?
Like every way they come, ha. I also love potatoes.
16. How do you take your coffee?
With flavored cream or cream and sugar.
17. How do you take your tea?
With a packet of sweetener.
18. What’s your favourite mug?
It’s blue on the outside and yellow on the inside with Peter Pan and the gang on it.
19. What’s your biscuit or cookie of choice?
Sugar cookies or shortbread.
20. What’s your ideal breakfast?
Scrambled eggs with shredded cheese and spinach, country gravy, hash browns, and coffee.
21. What’s your ideal sandwich?
Either bologna and sharp cheddar or colby jack cheese, mustard, and mayo or turkey, salami, either of those cheeses, spinach, mayo, and mustard. Also, a pickle on the side and some olive oil for dipping. I miss a good deli sandwich, though. That sounds really good.
22. What’s your ideal pizza:
White sauce, feta and ricotta cheese, spinach, garlic, and crumbled meatballs with pesto on top and ranch for dipping.
23. What’s your ideal pie (sweet or savoury)?
The only pie I like is cheesecake.
24. What’s your ideal salad?
Lettuce, spinach, tomatoes, black olives, shredded cheese, shredded carrots, pieces of hardboiled egg, and ranch. I used to love peppercinis as well, but I can’t eat spicy stuff anymore. :(
25. What food do you always like to have in the fridge?
I like to have some kind of sandwich fixins so that I can always make a lunch. <<< Same. And eggs. And shredded cheese cause I like to add it to my ramen.
26. What food do you always like to have in the freezer?
Healthy Choice steamers pesto pasta meal things, pizza, and Smart Ones breakfast meals.
27. What food do you always like to have in the cupboard?
Ramen.
28. What spices can you not live without?
Garlic, salt, black pepper, oregano, basil, chives, paprika (a must for deviled eggs).
29. What sauces can you not live without?
Ranch, olive oil, pesto, marinara, white sauce, mayo, sour cream, gravy, sausage gravy... I don’t know for sure if a few of those fall under the sauce category, but whatever.
30. Where do you buy most of your food?
Walmart and another local grocery store.
31. How often do you go food shopping?
We do two big grocery shopping trips a month with a few quick trips in between if we need something.
33. What’s the most expensive piece of kitchen equipment you own?
The fridge, probably.
34. What’s the last piece of equipment you bought for your kitchen?
Hmm. I think it was the home beer dispenser my brother and I got my dad for Christmas.
35. What piece of kitchen equipment could you not live without?
Keurig, fridge, stove, and microwave.
36. How many times a week/month do you cook from raw ingredients?
I never do. I’m not a cook at all, the only things I make are microwavable, cooked in the oven (frozen foods like pizzas), or made on the stovetop (ramen).
37. What’s the last thing you cooked from raw ingredients?
Wait, unless you count making hardboiled eggs for deviled eggs. If so, then there’s that. However, that just consists of me putting the eggs in a hardboiled egg cooker thing. I don’t have do much, ha.
38. What meats have you eaten besides cow, pig and poultry?
That’s the only kind I eat.
39. What’s the last time you ate something that had fallen on the floor?
I don’t do that ever. If it falls on the ground, it’s trash now to me.
40. What’s the last time you ate something you’d picked in the wild?
I’ve never done that.
41. Arrange the following in order of preference: Italian, Mexican, Chinese, Indian, Thai, Sushi –
Italian, Mexican, Chinese. I don’t eat Indian, Thai, or sushi.
42. Arrange the following in order of preference: Vodka, Whiskey, Brandy, Rum –
I don’t drink.
43. Arrange the following in order of preference: Garlic, Basil, Caramel, Lime, Mint, Ginger, Aniseed –
Garlic, basil, mint, caramel, ginger, lime. Not sure what aniseed is.
44. Arrange the following in order of preference: Pineapple, Orange, Apple, Strawberry, Cherry, Watermelon, Banana. –
Banana, strawberry, watermelon, apple. I don’t like orange, pineapple, or cherry.
45. Bread and spread:
Wheat, white, sourdough, bagels. Pesto, olive oil, peanut butter, mayo, garlic spread, cream cheese.
46. What’s your fast food restaurant of choice, and what do you usually order?
I don’t have one anymore.
47. Pick a city. What are the best dining experiences you’ve had in that city?
Bubba Gump restaurant is fun place with good food.
48. What’s your choice of tipple at the end of a long day?
I don’t drink.
49. What’s the next thing you’ll eat?
I’m not sure.
50. Are you hungry now?
A little bit.
51. Do you eat your breakfast everyday?
I rarely do now. I was doing pretty good for awhile, but then I started sleeping in past 2PM and having late lunch.
52. At what time do you have breakfast?
If I do eat breakfast food nowadays, it’s for dinner.
53. At what time do you have lunch?
Like 4 or 5PM.
54. What do you have for lunch?
Usually either a sandwich or a Healthy Choice steamers microwave thingy.
55. At what time do you have dinner?
Around 8PM.
56. What do you have for dinner?
I have a small list of foods I eat cause I’m picky and have food/appetite issues, but I’ll have something like spaghetti and meatballs, burritos/tacos, breakfast for dinner, or takeout like Wingstop or pizza. Sometimes I’ll just have another sandwich.
57. Do you light candles during dinner?
No.
58. How many chairs are there in your dining room and who sits in the main chair?
We don’t have a dining table or even a dining room anymore. We had to turn that space into a bedroom.
59. Do you eat and drink using your right hand or the left one?
Right.
61. Mention the veggies that you like most:
Spinach, broccoli, green beans, and corn.
62. What fruit and vegetable do you like the least?
I don’t eat a lot of fruits or veggies to be perfectly honest. As bad as it sounds, I haven’t had any fruit the past few years. Spinach is the only veggie I have somewhat often. And like I mentioned in this survey, there are fruits and veggies that I like, I just don’t eat them often.
63. You like your fruit salad to have more:
I don’t like fruit salad.
64. You prefer your vegetable salad to contain more:
Spinach.
65. What’s your favourite sandwich spread?
Mayo, pesto, or an olive oil/vinegar mix.
66. What’s your favourite chocolate bar?
Reese’s white chocolate.
67. What’s your favourite dessert?
Brownies, cupcakes, cheesecake, muffins, donuts.
68. What’s your favourite drink?
Coffee and Starbucks Doubleshot energy drinks (that’s coffee, too, but still it’s different).
69. What’s your favourite snack?
Movie theater popcorn.
70. What’s your favourite bubble gum flavour?
Minty flavors.
71. What’s your favourite ice cream flavour?
Strawberry.
72. What’s your favourite potato chip flavour?
Sour cream and onion and original Ruffles with ranch dip.
73. What’s your favourite soup?
Pork ramen.
74. What’s your favourite pizza?
Didn’t I describe that already?
75. What’s your favourite type of dish?
Just give me boneless garlic parm and lemon pepper wings from Wingstop, please.
76. What food do you hate?
Seafood.
77. What’s your favourite restaurant?
Wingstop.
78. Do you eat homemade food, or food delivered from outside?
Both.
80. Who cooks at home?
My parents and brother.
81. What kind of diet (e.g. low-fat, high-fiber, high-carbohydrate, balanced diet etc.) do you have?
I’m supposed to incorporate a lot of protein.
82. How do you keep yourself fit?
I don’t do anything.
0 notes
Text
Recipes typical of Molise

The Molise, one of the smallest regions of our country, but great as a culinary tradition of both sea and land and river. We talk about many typical recipes that are very well known as CAVATELLI, the typical homemade Molisana pasta that is topping with meat sauces but also vegetables. The broth, which is made in many other regions, but which has in Molise the variant of the green pepper that makes this broth unique. The pizza of St. Martin that is made on the day that the saint is celebrated. Tradition has it that over the pizza are made as many cuts as there are diners and in one of these wedges was hidden a little money and those who found it had to bring the sauce for the next party. And sweets that are so many types of treats like THE MOSTACCIOL MOLISANI or PEPATELLI.
Molise has a truly extraordinary Tradition of Norse Art. From the smoked ham of Spinete, to the ventricina of Montenero, to the Molisana cup. Not to mention cheeses such as Agnone's caciocavallo or Montefalcone's goat. Typical Molisan appetizers are therefore very often made with cured meats and cheeses. However, there is no shortage of traditional recipes of very tasty appetizers such as the COMPOSTA MOLISANA or the starter of oranges. This is a typical starter of The Very Original Molise because it combines the sweet taste of oranges with the salty taste of.
COMPOSTA MOLISANA
Required for MOLISANA COMPOTE for 6 people
6 Molisani taralli
1 green pepper
6 tomatoes
3 hard-boiling eggs
12 green olives
6 anchovies in oil
1 cucumber
1 celery stalk
6-7 tbsp white wine vinegar
1 tbsp oregano
100 grams of olive oil
salt as needed
Preparation of the MOLISANA COMPOTE
First wet the taralli with cold water and brush the surface of white wine vinegar. Leave to dry for half an hour.
We prepare the seasoning for the taralli with the oil, the anchovies finely chopped, the oregano and a pinch of salt, stirring together all the ingredients.
Vegetables, i.e. cucumber, celery, tomatoes, green pepper should be thinly sliced. Make thin slices of hard-boiled eggs as well.
Once dry the taralli start to place on the surface the slices of mixed vegetables, hard-boiled egg and a couple of green olives. Wet everything with the dressing and once ready all the taralli let rest about an hour in the refrigerator.
Starter of oranges
Necessary for the starter of oranges
4 oranges
160 grams of anchovies in oil
oil, salt and pepper just enough
Preparing the starter of oranges
Wash the oranges very well and cut them into slices of about half a centimeter leaving the skin. Arrange the slices on a serving plate by placing an anchovy in a whole oil on top of each one. Season with pepper salt and olive oil.
Let's now move on to the first dishes where cavatelli are the main dish. They are prepared with different sauces depending on the place. The main sauce with which cavatelli are seasoned is the classic one with pork, sausage and tomato, but you can also prepare it with broccoli, peppers and many other vegetables. A curiosity is the name that in Molise is given to the meatless sauce that is used to season the cavatelli, that is, it is called widowed sauce.
Let's start with the recipe of the cavatelli that in the Molisan tradition are still made strictly by hand.
Cavatelli
Necessary for CAVATELLI
300 grams of soft wheat flour
300 grams of hard wheat flour
salt and water just enough
Preparing CAVATELLI
First mix the two types of flour and add a pinch of salt.
On a flatether put the flour in fountain starting to put water little by little and working with your hands to get a ball not too soft but compact. Flatten a sheet about one centimeter high and cut it into many strips for the sense of width. These strips are then cut into pieces of about 3-4 centimeters. Each piece is then dragged onto the pavement with your fingers to give it the classic sunken shape.
And here they are ready to be cooked in plenty of salted water and seasoned with the sauce you like the most.
CAVATELLI with molisana pork sauce
This is a dish that in Molise is served on Sundays and holidays. It is a very tasty and tasty recipe and that becomes a unique dish as in addition to pasta the meat is left whole.
Necessary for CAVATELLI pork sauce
600 grams of CAVATELLI
2 sausages
500 grams of diced pork pulp
500 grams of chopped pork ribs
1 red onion
2 cloves garlic
1200 grams of chopped tomatoes
a glass of red wine
grated pecorino cheese, oil, salt, pepper just enough.
Preparing CAVATELLI pork sauce
In a rather large pan fry the finely chopped onion and the two crushed cloves of garlic. When they are golden add the meat, that is, the pork meat, the ribs. The sausages are peeled and halved. Fry the meat for a few minutes then add the red wine and let it evaporate completely. At this point add the peeled tomatoes into small pieces and allow to simmer very slowly, with the lid, for about 2 hours adding a little water in case the sauce tends to dry out too much.
Adjust the salt and pepper and season with this sauce the freshly cooked cavatelli dusting the various dishes with grated pecorino cheese.
CAVATELLI with widowed sauce
Necessary for CAVATELLI to widow sauce
500 grams of CAVATELLI
1000 grams of ripe fresh tomatoes
2 tbsp parsley
a few basil leaves
100 grams of lard
1 garlic clove
grated pecorino cheese, salt, pepper just enough.
Preparing widow sauce for CAVATELLI
Boil the tomatoes for a few minutes, then remove the peel and seeds and cut them into pieces. In a clay pan with the lard fry the garlic clove and finely chopped parsley. Add the chopped tomatoes, basil leaves, adjust the salt and pepper and cook over low heat for about 20 minutes. Season the freshly cooked cavatelli in plenty of salted water with this sauce and sprinkle the grated pecorino cheese on top of each dish.
As for the latter is lamb and pork are the most used meats, but there is no shortage of fish dishes such as baked cod or mullet stuffed with bread crumbs.
I propose here the recipe of tripe molisana and lamb with molisana, two typical dishes from the Molise hinterland,
Trippa at molisana
Required for tripe to molisana
800 grams of tripe
1 onion
1 carrot
1 celery stalk
1 slice of lard
600 grams of chopped tomatoes
chilli powder, goer, salt, pepper and olive oil just enough
grated pecorino enough
Preparation of tripe to molisana
For convenience we buy the tripe already clean, cut into strips and cooked. (it is found in all supermarkets).
Now we prepare the base for cooking with a drizzle of oil in a rather large pan. Add the lard cut into small pieces, the carrot, onion and celery, finely chopped and let cook for a few minutes. Now let's put the tripe and let it flavor a few minutes by turning often. Now add the chopped peeled tomatoes, chilli powder, a little chopped ghaunth. Season with salt and pepper and cook for about half an hour. When cooked, sprinkle with grated pecorino cheese and serve warm.
Lamb with molisana
Necessary for lamb with molisana
1200 grams of lamb stew
2 glasses of white wine
1 sprig of rosemary
7-8 sage leaves
70 grams of lard
2 cloves garlic
salt, pepper, chilli and olive oil just enough
Preparation of lamb with molisana
In a fairly large bowl possibly of crock, cook the lard cut into very fine pieces along with a few tablespoons of olive oil. Add the 2 whole but crushed garlic cloves (to be removed when the recipe is finished). Add the rosemary and sage and lamb stew. Cook for about 40 minutes over a low heat, slowly adding the two glasses of white wine. Season with salt, pepper and chilli and serve hot.
Let's move on to the cakes. Molisan ones are usually various types of cookies that typically use for breakfast or carnival pancakes or sweets of the Christmas tradition.
The pasts
Necessary for pastanylles
600 grams of flour
200 grams of sugar
3 whole eggs
100 grams of olive oil or seeds
1 packet of baking powder
1 sachet of vanillin
1 glass of milk
the grated zest of a lemon
Preparing pastanylles
In a rather large bowl mix the flour with the sugar, the baking powder sachet and the vanillin sachet. Mix everything with the 3 beaten eggs, add the oil and milk and the zest of a grated lemon. Work with a wooden spoon to remove all lumps. Finished should be a soft batter but not too fluid.
In the oven tray put a sheet of baking paper and with a spoon make small rounds of dough, about 4 - 5 centimeters apart. Bake in an already hot oven at 180 degrees for about 15 minutes. A tip, do not open the oven until cooked. Sprinkle the biscuits with sugar. They are delicious for breakfast soaked in milk.
PEPATELLI
Another typical Molisano biscuit very curious in taste that puts together the strong taste of pepper with the sweet taste of honey and almonds. They were prepared for the Christmas holidays to offer guests to wet in sweet wine.
Necessary for PEPATELLI
180 grams of peeled and toasted almonds
500 grams of flour
350 grams of honey milleflowers
1 teaspoon baking powder
grated peel of 2 oranges
1 teaspoon freshly ground black pepper
1 packet of baking powder
salt as needed
Preparing PEPATELLI
First chop the almonds into rather large pieces. In a flatbread knead with flour the honey previously heated to make it more liquid. Add the ground cinnamon to the grated zest of 2 oranges, the baking powder sachet and the black pepper. A pinch of salt and form a rather firm and elastic dough. Divide the dough in two and form two strands that should be put in the oven already hot at 180 degrees for about 25 minutes. Remove from the oven and allow to cool. Cut the strands diagonally with slices about 1 centimeter thick. Place the biscuits back in the oven for about ten minutes until golden brown.
Read the full article
0 notes
Text
How to Eat Healthy When Money’s Hard to Come By
For quite a while, I was on food stamps/SNAP. I also have several chronic health conditions that, if I didn’t eat an extremely healthy diet, I probably wouldn’t be able to get out of bed.
This forced me to do some problem solving. How could I eat healthy, stay full, and enjoy the food I ate while spending less than $180 a month? Whole Foods was the only accessible grocery store--not a cheap place! I’m also gluten intolerant, so I can’t rely on affordable staple wheat products. All additional dilemmas.
I was able to do it (at least darn close to it each month!).
Here’s how:
Look up inexpensive recipes! Here’s one of my favorite websites.
This tumblr is great for easy recipes too
Pick three recipes every week and double them, then put them in the fridge and put the portion you need in a pot or microwaveable bowl to warm up when it’s meal time! This also saves time and energy (as someone with three disabilities and running two businesses, this was crucial.)
For these three recipes, I’d recommend making one pasta dish, one rice-based dish, and one vegetable based dish (stew, salad, soup, etc). Rice and pasta are affordable staple foods that are easy to make many diverse recipes with. (Brown rice, btw, is healthier but a tad more expensive.)
When shopping, aim to have 80-90% of the food as produce (veggies, fruits) or canned ingredients (like canned beans). This is a win-win intention: you increase health and decrease grocery cost (fresh food is, actually, quite inexpensive.)
Don’t hesitate to buy frozen veggies and fruit. Really the only time you need fresh is when you’re not cooking it at all. Most cooked dishes work just fine if you use frozen food. It’s cheaper and often pre-chopped too!
Look for the cheapest version of the food you’re buying and make logical substitutes. For instance, most stores sell bagged yellow onions (about 5-6 of them) for less than $2. If a recipe called for Vidalia onions, I’d just buy these instead of spending $4 bagging the same amount of the specific type. I’ll even swap out red onions for white bagged onions! It barely makes a difference (not enough to matter when budgets are tight).
Skip dessert foods. For a while, I went without treating myself at all because I couldn’t afford to, but a cheap dessert option is frozen fruit and almond milk smoothies! Explore inexpensive desserts when you do feel a need to treat yourself (like batches of cookies, bulk candy, etc).
Go to the store with a shopping list. Plan your recipes ahead of time and buy only what you need. Impulse buying or not having a clear idea of what to make are two of the greatest cost-inducing activities.
Bean-based meals are a great staple! Two cans of beans (about $1.50-2) can make a delicious and filling chili, rice and beans dish, etc. Dried beans are even cheaper than canned ones.
Make sure to eat breakfast! It’s crucial for health, but it will also help prevent overeating or persistent hunger later in the day that can make your meals not last as long.
When preparing foods, take the cut ends of carrots, onions, celery, parsley stems, leeks, scallions, and similar veggies and keep them in a freezer bag. When the gallon bag is full, add about 16-20 cups of water to it, some spices (salt, pepper, basil, oregano, garlic powder) and boil for around two hours. Strain the liquid and you’ve made like three quarts of veggie broth! This is totally free (you just save your kitchen scraps). Typically, one quart costs $3-4. This saves a TON of money. (To do this, you need at least carrots, onions, and celery scraps--these are an essential broth base.)
Focus on cooking, not baking. Baking can be pretty costly, but cooking is much cheaper.
Buy store brand items. For instance, Whole Foods canned beans are like 99 cents, but another brand is like $2-3. The little costs add up when it comes to food.
Plan in-season recipes. Produce is often cheapest when it’s in season. Also, if you like a particular food, try hitting the sales right after it goes out of season (I love oranges, and April-May is when all the ones produced and stored during winter start to go bad so the stores sell them really fast, for like 25 cents an orange.) Buying on-sale fruit can be a great dessert substitute.
Cut down on meat consumption. Medically, I can’t be vegan/vegetarian, but limiting meat has been really helpful! For instance, if a stew calls for meat and I’m doubling the recipe, I won’t double the meat. It saves a ton on cost, is still super filling, and is better for our own bodies and the environment too! Think of meat as a side component, more for flavor, than the bulk of what you eat. You can also buy meat on sale and freeze it for up to six months.
Slowly invest in spices. When you purchase spices, they can seem expensive, but they last a really really long time. They will also help you make every recipe absolutely delicious!
If you’re making a meal that requires a specific less-common spice mix (i.e. Garam Masala), try seeing if you have spices that can make a substitute. I do this a lot, by just looking up substitute spices on google and making a very similar spice mix. It works in a pinch (no pun intended).
Bookmark recipes based on cost. If you had a low cost grocery shopping week, save those recipes in a low cost folder!
Grocery shop every week (this makes sure the fresh and affordable produce you buy doesn’t go bad!).
Whenever possible, don’t buy pre-prepared things. It’s always cheaper to do the work yourself (like using dried beans, cutting heads of lettuce yourself, etc.).
If you haven’t usually eaten a produce/veggie heavy diet, it may take you a couple weeks of feeling a bit like you haven’t eaten enough (not real hunger, but like a strange almost hunger). This will subside after a couple weeks, since fresh food actually fills our stomachs up the best!
These are tips based on living alone and being able to cook, for reference. Hopefully they can be adapted to be more accessible.
Best wishes with this!
Please share and feel free to add on your tips too.
#food#food stamps#recipes#affordable food#groceries#poverty#classism#grocery shopping#cheap food#cheap recipes#text post#important
303 notes
·
View notes
Text
Pasta Makes Perfect!
Written by Maria Rizzuti
As the saying goes, “practice makes perfect,” I say “pasta makes perfect!” Pasta is great for any meal and is comfort food for most families and especially children. What child or adult for that matter would refuse a hot from the oven homemade bubbly really cheesy macaroni and cheese? Or would you prefer a plate of spaghetti with really saucy and spicy meatballs? Yes, that would be my choice! In one form or another, pasta is a staple in family meals around the world. Whenever pasta is on sale at my local grocery store, I make sure I stock up my pantry with a variety of pastas as it’s the perfect foundation for healthy, nutritious and satisfying meals.
Pasta's origin is subject to much speculation. While many different cultures of the world ate some sort of noodle which was composed mostly of grain, the key characteristics of pasta are durum wheat semolina, with a high gluten content. Pasta is made with a technique that allows the resultant dough to be highly malleable, thus resulting in the many different shapes such as ziti, lasagna, spaghetti and ravioli to name a few that characterize “pasta.” Well whoever has claimed to invented pasta and has pronounced pasta postulation, I am sure many are glad they did! Modern food science has revealed that pasta is high in minerals such as iron, phosphorus, and essential B vitamins (Thiamine, Niacin and Riboflavin) and now it is fortified with folic acid.
Of course, Italy is synonymous with food, and nothing says Italian food like pasta. The famous actress Sophia Loren has stated that “Everything you see I owe to spaghetti.” Whenever Italians have immigrated from, northern, central or southern Italy they have brought their pasta recipes along with them and it is basically a fundamental part of their Mediterranean Diet.
Italian pasta names often end in the masculine plural suffixes like –ini, -elli, -illi, -etti like linguini, flattened spaghetti meaning little tongues or bucatini which is hollow spaghetti or spaghettini thin spaghetti or little twines. Have you tried spaghetti alla chitarra? Chitarra means guitar in Italian, it’s similar to spaghetti, except its square rather than round and made of egg in addition to flour named after the device used to the cut the pasta, which has a wooden frame strung with metal wires. Sheets of pasta are pressed down on the device, and then the wires are “strummed” so that the slivers of pasta fall through. While you are making the pasta, you can sing a song of Mambo Italiano and entertain your guests and do the mambo like a crazy Calabrese and then make some pasta e fazul!
Or you have the femine plurals –ine, -elle ect. all conveying the sense of “little” like campanelle, little bell shaped pasta or rotelle, wagon wheel shaped pasta. Or plurals with –oni, meaning “large” like pennoni a wider version of penne and zitoni a wider version of ziti. Then you have other suffixes like –otti “largish” like manicotti which are large stuffable ridged tubes which can be stuffed with meat and or ricotta or a combination of both.
Then you have your minute pasta, what’s that you ask? This class of pasta is generally used in soups, or as an alternative for rice and similar accompaniments.
Some examples of minute pasta are anici di pepe, which is a bead like pasta or the translation would be peppercorns. A common minute pasta is orzo, it’s rice shaped pasta. Stelline are little star shaped pasta and farfalline are small bow tie shaped pasta. I really like using these types of pastina for my homemade chicken soup. If I happen to run out of minute pasta for my soup, my trick is to take cappelini or spaghettini hold a bunch of strands of the pasta and break off one inch pieces and use the cut up pasta for my noodles in my soup. I also use this trick for my pasta e fagioli or pasta and beans recipe. If I run out of ditali or small sea shell pasta I use the cut up pasta. Just make sure that to allow for the fact that different pastas cook at different cooking times.
Okay, so we have established that there are literally hundreds of different shapes of pasta. Pasta is usually categorized in two basic styles: dried and fresh.
Dried pasta made without eggs can be stored for up to two years under ideal conditions, while fresh pasta will keep for a couple of days in the refrigerator.
Pasta is generally served with some type of sauce: the sauce and the type of pasta are usually matched based on consistency, ease of eating etc. Common pastas sauces in Northern Italy include pesto which is a combination of basil, crushed garlic, parsley, grated hard cheese like parmigiano-reggiano, or pecorino and pine nuts with olive oil. Historically, pesto is prepared in a marble mortar with a wooden pestle…well my ancestors may have done pesto this way but now many stores carry ready made pesto in jars, I am all for quick and easy pasta meal solutions . Or ragu alla bolognese, the traditional recipe, registered in 1982 by the Bolognese delegation of Accademia Italiana della Cucina, confines the ingredients to beef, pancetta, onions, carrots, celery, tomato paste, meat broth, white wine and milk or cream.
In Central Italy, there are simple sauces such as tomato sauce which is primarily made from tomatoes, but almost at all times starting with onions and garlic which are sautéed or sweated in olive oil, then adding the tomatoes and seeds optionally removed and other seasoning typically added are basil, oregano parsley and spicy red chili flakes if you are Calabrese like me and salt and black pepper left to simmer until it loses its raw taste.
Its really ironic that as I am writing about tomato sauce I am also cooking a BIG batch of tomato sauce in my kitchen. I am periodically getting up from my computer to stir my sauce as to make sure it is simmering slowly and cooking nicely. I make up a big batch every other Sunday and then once the sauce has cooled, I transfer the sauce into mason jars and store the sauce in my refrigerator to use during the week for the next two weeks or so. I vary the ingredients that I add to the sauce, sometimes it sauteed peppers, sauteed eggplant or a variety of mushrooms or sometimes I will make meatballs to add to my sauce. The pasta possibilities are endless!
Pasta alla carbonara is also a quick recipe. This recipe varies from one region to the next but all agree that Parmesan cheese, pecorino or a combination of the cheeses, egg yolks or whole eggs, curred fatty pork or pancetta and black pepper is the basic recipe. The pancetta is fried in olive oil, a mixture of the eggs, cheese and oil olive is combined with the hot spaghetti pasta, cooking the eggs.
In southern Italy, varieties of pasta alla puttanesca, can be found using chopped garlic, diced onions and anchovies sauted in olive oil. Chopped chili peppers, black olives, capers and diced tomatoes are added along with salt and black pepper to taste. This sauce is is reduced by simmering from 10 to 20 minutes and poured over spaghetti cooked al dente or you can use any type of long or short pasta like penne with the final touch of freshly chopped Italian parsley. Pasta con sarde or pasta with sardines is another quick pasta dish. I remember having this dish and liking it as a child. Its basically garlic cooked in olive oil until golden, add the sardines (drained from the can) cook for a minute more then stir in the bread crumbs and Parmesan cheese and toss mixture over hot cooked pasta and add freshly chopped Italian parsley. More olive oil can be added to give the mixture a more crumbly texture.
Perhaps the most classic and basic pasta recipe is for spaghetti, aglio e olio which simply translates as spaghetti with garlic and oil. This is a quick and simple pasta dish that can be prepared when you get home late from work or if your “cupboard is bare” like Old Mother Hubbard. If you can boil water than you can make the recipe, give it a try.
Pasta with Garlic and Oil (Pasta Aglio e Olio)
Ingredients:
1 pound spaghetti, or linguine or your favourite pasta
3 cloves garlic, minced
1/2 cup extra-virgin olive oil
1 tablespoon of crushed red pepper chili flakes
2 tablespoons chopped Italian flat-leaf parsley
Freshly grated Parmigiano-Reggiano or Romano
Directions:
Cook the pasta in boiling, salted water as per package directions until al dente. In the meantime heat the olive oil in a saucepan over medium heat. Add the garlic, red pepper flakes and cook until garlic is lightly browned. Remove from the heat. Drain the pasta while reserving a ½ cup of the pasta cooking liquid. Place the drained pasta in a bowl and add the olive oil mixture and chopped parsley and toss. Add some of the reserved cooking liquid if the mixture seems too dry. Serve topped with the grated cheese of your choice. This recipe yields four to six servings.
“Pasta makes perfect” and if you practice making pasta dishes you will end up with a perfect pasta meal!
#pasta#SophiaLoren#cheese#meal#garlic#oliveoil#chili#parsley#Romano#recipe#spaghetti#pancetta#tomato#sauce#OldMotherHubbard#penne#Calabrese#MamboItaliano#meatballs#story
0 notes
Text
Keto Pizza – Is it Right For You?
Keto Pizza – Is it Right for You?
Are you working up on being a Keto-dieter and struggling to make it to the end result? That’s a regular story these days. It’s so alluring to see normal people eat whatever they can reach their hands on and feel pitiful about the plate you are holding. The variety that comes with a no-dieting plan, is just too good to let go, even if it’s for the sake of weight loss or anything.
Nothing is worth sacrificing if it cannot fetch you your dream. The dream of losing weight or staying fit is about living with great health habits, because you don’t want to welcome diseases later in life.
The question is, for how long?
Life is not about sacrificing all the time, with no enjoyment or satisfaction. Killing your taste buds and forcing yourself to eat only from the given/recommended list of food items, is like restricting your life to an uncontrollable level.
How?
Just look at the amount of carbohydrates you need to chuck-off your list of food.
Look at the change in your eating habits you have embraced, though it was difficult;
Look at the resisting power you need to value so much;
Look at what you need to put in there to make a perfect balance of everything required for fats in your body;
All that you put in there for a Keto-friendly diet, is not very appealing with every meal. It can be demotivating and disheartening at the same time.
The boredom takes a toll when you run out of choices and then start visualizing a beautiful buffet service with scrumptious, unhealthy servings. It becomes even more difficult when your food starts looking dull and everyday seems a drag. It’s like living a day looking at the food being served to others, on the opposite tables. It’s not easy, we know.
What do You Need for a Keto-Diet?
Determination to begin with! And then of course, a list with nutrition value for each and every little thing you are planning to consume.
Apart from that, making sure that you have a very healthy diet with low-carb and high-fat, comes with the plan.
Also, if you are new to Keto-diet, it’s important to know everything you can before you step into this program. Check with health experts in your city or town, to know if you are fit enough to take up keto-dieting, or you need to skip the idea.
Reason being, certain health condition won’t allow your body to take in more fat while cutting off carbs. Fats isn’t healthy by any means, but though Keto-diet uses fat to burn fat in the body, the initial days of intake might be risky for you.
Checking with a professional and understanding your body need, is a must.
Already on a Keto-Diet?
If it’s been a while since you started the Keto-diet and haven’t quite found out ways of making your food interesting, you’re in the right place, right now!
Harboring yourself from carb-rich food and letting in only fatty ones, can doom your interest in a diet plan like that. The major reason to this disappointment is, cutting on your regular food like bread, rice, fruits, potatoes, cereals and more. After about a month or so, the same food type might look dull and monotonous.
Where you used to eat sandwiches, mashed potatoes as sides and cereals for breakfast, the limited option can slow down your enthusiasm. So, what can you add more to your list?

You can actually add pizza! There, we gave out the good news!
Though eating pizza is a big No-No to all Keto-dieters, there are certain ways of making a pizza that can be considered in the keto-menu. Being one of the highly consumed foods in the west and many other countries, pizza cannot be overlooked forever. Even if it is during keto-dieting, one deserves to eat pizza occasionally, but the healthy way.
Wondering what is a Keto-pizza?
Below we’ll share the difference between a normal pizza and keto-pizza, elaborating the details of each.
Normal Pizza Vs Keto-Pizza
The crust of a normal pizza contains yeast, sugar and dough flour that is high in gluten, and is certainly not a low-carb friendly ingredient. Even if you plan to run for hours, it might still become difficult to get back to ketosis after eating one of those.
While we are trying to cut down on the carb, eating a normal pizza is never ever going to help the diet-plan. So, avoiding it is the only choice left for you.
On the other hand, a keto-pizza has ways of allowing you devour the taste of it, and at the same time, making sure you aren’t being anti-keto on your diet. The healthy way to go about it, is either trying to make a keto-pizza at home or finding out a place that makes one.
All that you need crucially for a keto-pizza is a Gluten-free dough or a keto-friendly crust.
You might be wondering how a pizza with a gluten-free crust can make it taste better, especially thinking of the soggy and sloppy base it creates. Well, there is no way we can compete with the taste of an unhealthy fare because most of the tasty food is meant to be unhealthy; full of carbs, sweetness or oil/fat.
But here’s the deal – A gluten-free dough can be made using almond and coconut flour. You can skip using butter while kneading the dough. Now you can imagine what it might taste like, with a different flavor base for your pizza, and that too, a solid and neat one! Also, this one keeps you full for quite some time even after consumption, helping you avoid excess eating later.
Is Thin Crust Pizza Keto?
Though a healthy pizza crust might sound great to you right now, but if you are expecting a base that looks like a normal pizza, you might be disappointed.
To explain further, a thin crust is much safe to opt for when compared to a thick crust pizza. Although a normal thin crust will give you only slightly less carb, it is still a safe bet because the glycemic index is lower, which helps avoid sudden spike in blood-sugar.
However, the above-mentioned gluten-free dough for a thin crust is quite a treat; considering other risks you might have to check on, for a keto-friendly option. Go rummaging in your refrigerator for healthy options you have stored for your keto-diet and throw over your pizza to make one amazing creation!
Can You Meet Keto Macros with Low-Carb Pizza?
Low-carb, more-fat in the diet isn’t too complicated to list out. We need to ensure that our diet is not being compromised, solely based on low-carb.
We have a lot in this article to share on how to make a keto-friendly pizza and a variety of recipes that will guide you through making a delicious plate. However, for now here are few things you can add in your pizza to make it more-fat and less carb.
For a Healthy Vegetarian Pizza:

Add low carb vegetables as toppings, like – broccoli, zucchini, asparagus, bell peppers or mushrooms even
You can use herbs for the spread-sauce, like – thyme, oregano, basil, garlic, black pepper etc.
For More Fat:
Meat is one thing you can always count on. Adding bacon or pepperoni over your pizza will give you a high fat benefit
While you are preparing your spread-sauce, you can add oil to it (not too much though)
Cheese looks and tastes great over pizza and you don’t even have to negotiate on that. Choose a high-fat cheese to grate over your creation, like - cream cheese or cheddar
For More Protein:
Goat cheese or parmesan cheese have good protein in them. You can use them too
If you are a non-vegetarian food, you can add more meat to the pizza
Storing Your Pizza for Later
If you are a busy person and can barely take out time to make yourself a good plate every day, here is what you can do. Whenever you have time, prepare your crust and store it!
Yes, storing this amazing thin-crust base is possible and you can use them even after 2-3 days. Take it out of the refrigerator and reheat it and top it with your choice of toppings. No hassles!
Just make a couple of more and store them if you want to eat them daily. These are healthy, so you needn’t worry like you’d do for the normal pizza. Isn’t that great?
Well, here is another great tip for you. Once you have them ready and stored, you can use them for pizza as well as different kinds of wraps. Unlike the thick crust base, this one is easy to wrap or fold.
What else would you want? Make a pizza, a Veg wrap or a Taco; anything you can make is possible with your home-made pizza base.
How to Make a Keto Pizza?
Now that we have talked so much about a Keto-pizza; what can go in there, what to avoid and things like that, you would want to know more about the making. It’s like a dream come true for people who are dying to savor the lost taste, but in such a healthy manner.
So, we’ve disregarded the grain part, and chose almond flour and coconut flour over it. Few healthy tricks from here and there, will make it so much of a better pizza than you were imagining. For example: Using herbs available, low-carb veggies, high-fat cheese and meat; whatever in variety comes handy, chop and throw over your pizza.
Just be mindful of the moderate quantity you are supposed to adhere to, rest everything else is covered!
There are different ways of cooking your crust – using your oven, microwave or a pan. We’ll let you know how to do both.

1. Oven Pizza
Ingredients
For The Crust
1 and half cup of whole milk mozzarella cheese
2 tbsp. of full-fat organic cheese cream
2 Eggs (large)
1/3 cup of coconut flour
For the toppings:
¼ cup of sugar-free sauce, made of tomatoes, garlic, onion and herbs
½ cup whole milk mozzarella cheese
Desired slices of uncured pepperoni
Method
Crust Making:
Preheat the oven to 425°F and meanwhile use parchment paper to line with your baking sheet
Mix the mozzarella cheese and cream cheese in a bowl and heat them, occasionally stirring them for a better mixing
Gradually add the flour and the eggs into the cheese mix, while constantly mixing with a fork to avoid lumps. Then, knead for about 2 minutes using your hands, to form a soft dough
Spread the dough over the baking sheet with your hands, gently forming a round shape for the base
To make sure there are no bubbles, puncture the dough in short distance using a fork
Bake it for about 10 minutes
Final Product
Take the crust and spread your home-made sugar-free sauce evenly
Add the remaining cheese over the sauce
Then place the pepperoni, covering all over
Put the pizza back in the oven till the edges of the pizza and toppings turn golden brown in color
Advertisement - KetoHC MCT Oil Powder

CLICK HERE TO GET YOURS TODAY!
2. Microwave Pizza
Ingredients
For The Crust
1/3 cup of whole milk mozzarella cheese
1/8 part of garlic powder (optional)
Yolk of an egg (large)
1/3 cup of almond flour
Salt to taste (nominal)
For The Toppings
1 and half cup of sugar-free sauce, made of tomatoes, garlic, onion and herbs
¼ cup whole milk mozzarella cheese
Desired slices of uncured pepperoni
¼ tsp. Italian seasoning or similar (as per your choice)
Method
Crust making:
Preheat the Microwave in Oven setting (for baking) to 425°F
Use the top position oven rack for the baking
Meanwhile, mix the mozzarella cheese, cream cheese, along with garlic powder in a bowl and heat them, occasionally stirring them for a better mixing
You’ll need to knead the dough using your hands for a minute and then add the egg yolk to it while still kneading. Once it is well-knead, form a ball out of the dough and then flatten it in a round shape, over a baking-sheet lined with parchment paper (to avoid sticking).
Since this one might get a little hard to flatten easily with your hands alone, you can also take help of a rolling pin, and heat it for few seconds (not more than 8-10 seconds)
Once flattened well, poke the dough with a fork in closer distance to avoid bubbles from forming
Place it in the pre-heated microwave, over the top rack and bake it till the crust is golden brown in colour (about 8-10 minutes)
Final Product
Once done, take the crust out and flip it upside down.
Spread the home-made sugar-free sauce all around the crust and add the cheese over it
Place the pepperoni as you like and sprinkle the left-over cheese
Put it back in the microwave, still in oven mode and bake it for another 3-4 minutes
When the cheese starts to melt, take it out and sprinkle the Italian seasoning over the pizza
The good thing about these kinds of pizza is that it serves your purpose by giving you a nice tongue-treat, along with a healthy nutrition value, required.
With each serving, this pizza will provide you with 38-40g fat and 7-8g carbohydrates, exactly what you are looking for!
A Pan Pizza for Your Keto-Diet
When we say ‘Pizza’, it’s either just out of baking from those huge wood-fire ovens, or the conventional ones available in the bakers. It’s so unusual cooking a pizza on a pan!
Isn’t that going on in your head right now?
Pan pizzas are quite convenient and easy to make. For people who don’t have ample of time to spend on cooking, a 5 minutes’ plan might sound a great deal after all. Being able to devour such tasty and healthy stuff, while spending little time and effort, is a bonus to be honest.
Pan pizzas are quite close to the traditional pizza taste. You might not even realize what you’ve eaten, while you happily chomp off your share of keto-friendly pizza. Moreover, there are some tips and tricks to make them crusty too (check out in the end)!
Pan Baked Pizza
Ingredients
For The Crust
2 tbsp. of Parmesan cheese
1 tbsp. of Psyllium husk (powdered)
2 Eggs (large)
½ tbsp. of Italian seasoning
Salt to taste (nominal)
2 tbsp. Oil for frying
For the toppings:
3 tbsp. of sugar-free sauce, made of tomatoes, garlic, onion and herbs
42g of Mozzarella cheese
1 tbsp. Basil (finely chopped)
Method
Crust making:
Mix the psyllium husk, cheese, Italian seasoning and salt in a blender
Add eggs to the mixture, while still blending. Keeping this on for at least 30 seconds to create a nice consistency for the pan spread
Heat the pan over medium-high and add frying oil over it
Take a small ladle and pour the mixture over the pan and use the back of your ladle to gently spread it into a round shape
As the edge of the crust start looking a bit brown, flip it upside down and cook for another 30-40 seconds
Once done, take it off the pan and place it on a flat plate. Let the temperature come down
Spread your home-made sugar-free sauce over the crust and garnish it with chopped basil over it
(Tip – If you like your crust a little harder and not semi-soft, you can take it off the pan once done and broil it in the over for few more seconds)
With each serving, this pizza will provide you with 35-40g fat and 3-4g carbohydrates. Isn’t that amazing?
Advertisement - Measure Your Ketones With One Breath!

CLICK HERE TO GET YOURS TODAY!
Best Way to Eat
We all know deep down, that Keto can be a tough plan to carry on for a long time. Running short of variation in food, getting tempted while sitting with friends or family who eat everything else than healthy and coming across channels on TV that showcase amazing food joints and restaurants, are common challenges Keto-dieters face while on the track.
However, an air of relief is felt when you have options that resemble the good-looking foods and can compensate the hunger for a yearned taste. These amazing recipes and other more, that people have shared are so much help for dieters who are trying hard to make their journey successful.
Making a healthy keto-pizza is not just limited to gluten-free flour like almond and coconut, but cauliflower pizzas too are a great pick from among the healthy keto-friendly options.
Having said that, there is always a check required to make sure you are not over doing it.
How?
Eating in moderate quantities (that we keep repeating) is essential. You cannot go overboard with your portions and console yourself saying, I’m eating healthy anyway. No, eating healthy also includes eating in correct portions.
Be mindful of all that is on your plate and always, always refer your nutrition value chart. It’s a decision you made when you chose a difficult plan for weight-loss and staying fit. Stick around to that and make the most of what you have, without regretting later.
References
https://www.kidneyinternational-online.org/article/S0085-2538(15)57836-8/abstract
https://europepmc.org/abstract/med/9265974
https://annals.org/aim/fullarticle/717451
http://pediatrics.aappublications.org/content/102/6/1358.short
https://onlinelibrary.wiley.com/doi/abs/10.1111/j.1528-1157.1992.tb01770.x
https://onlinelibrary.wiley.com/doi/full/10.1002/ana.20062
WHAT TO READ NEXT:


JOIN THE KHC CLUB FOR KETO ARTICLES AND RECIPES
Thanks For Signing Up! We'll Be In Touch :)
Name This field is required
Email This field is required
JOIN THE KHC CLUB
Advertisement - Measure Your Ketones With On Breath
Final Product
from Keto Health Care - Blog http://bit.ly/2F5CDBx
via IFTTT
0 notes
Text
Chasing Lockdown Blues Away With Greens

How to Transform Your Garden in 5 Simple Steps
Keeping ourselves positive and happy through the current COVID-19 lockdown is certainly a challenge. The alarming news reports along with the inevitable cabin fever can be enough to drive anyone crazy!
In these times, we all need a reminder of how delightful life can be. And there's no better way to do that than rediscovering our love for growing and gardening!
You might think, "That's a terrific idea, but my hectic schedule before has left my yard looking brown and lifeless." Don't fret; your garden can be refreshed with a little work and a lot of TLC! You can take advantage of your time in quarantine to bring your garden back to its lush, vigorous look.
To guide you along, we've come up with 5 easy steps you can follow to give your garden a complete transformation. The best part is that you won't need to buy new tools or supplies; you'll have everything you need for your garden makeover around the house!
If you are interested in a formal course or want to get certified as an expert on all things about gardening, we recommend looking into professional bodies and colleges in gardening and floristry such as the American Institute of Floral Designers of the AIFD (www.aifd.org), the National Gardening Organization (www.garden.org), the American Floral Endowment (www.endowment.org), the American Horticultural Society (www.ahsgardening.org) and other similar organizations offering programs specializing in floristry and horticulture.
Prune and weed
Nothing says "neglected garden" quite like unpruned bushes and weeds sprouting every which way. So the very first step to revamping your garden is giving it much-needed caring which includes a lot of careful pruning and weeding.
Start with pruning dead or diseased leaves and branches to prevent infection and rot. Gardening professionals encourage using bypass secateurs for cleaner cuts, pruning at a 45 ° angle to be sure you cut away from the bud, and making sure you don't snip more than half of your plant so you keep enough foliage for photosynthesis.
The next step is to eliminate weeds by hand. Dig deep to be sure you pull out the roots and take out the buds of the weeds to prevent further growth. A good tip is to water your soil before weeding, as wet soil makes weeds a lot easier to remove.
You'll be delighted at what a huge difference these basic tasks make! These are important methods to reviving your lifeless plants and flowers. Keeping a healthy, attractive garden can be tiring, but you'll surely enjoy the fruits of your labor.
Create a landscape
Landscaping isn't as difficult as it seems! There are several ways to create a pleasing landscape without spending very much or exerting a lot of effort.
The fundamentals of landscaping comes down to aesthetics and functionality. Lay out your landscaping blueprint first based on the amount of space, the type of plants, and the look your garden has. For example, if you have a humble garden, visualize how you can maximize your space. If you want a playing spot for kids or a dining space for outdoor meals, find a suitable space to leave empty.
You can start carrying out your landscape plans by grouping plants with the same light, moisture, and soil needs together. Then, you can place them in new beds or islands and arrange them artistically. For example, you can organize them from shortest to tallest, biggest to smallest leaves, or brightest to darkest colors for a balanced look.
Creating clean lines is your next step to landscape gardening. The best way to accomplish this is by refurbishing your boundaries and installing edges.
Start with restoring your fences and panels to their tiptop condition. This is a good project that will get you working with your hands. You can renew old, faded, or rotten wood fences by washing, repainting, and applying oil stains.
Afterwards, you can design edging for your garden beds and even your potted plants. Don't be hesitant to get imaginative with this! Use decorative or composite rocks and old bricks, line up chipped plates, or-- if you're feeling particularly inspired-- pour concrete into beautiful curves. This will create a clean, well-maintained, and gorgeous look for your garden!
Enrich soil
It might not be at the top of everyone's list when it comes to revamping gardens, but improving soil is critical to creating and maintaining a stunning garden. Plants and flowers get almost all their essential nutrients from soil, meaning how well they thrive is very much based on soil health.
One of the most effective ways to enrich your soil is by making compost. Dried leaves, branches, stems, peels, coffee grounds, and shredded brown paper bags are carbon-rich items (" brown" items) that make top-quality compost. Manure, green leaves, and leftovers are nitrogen-rich items (" green" items) that can be added to your compost. Bear in mind that there should be 2/3 of carbon items and 1/3 of nitrogen items.
For optimum results, water your compost pile every once in a while to keep it damp. Turn it every few weeks to let enough oxygen in. Make sure you cover your compost heap with plastic or wood sheets to lock in moisture and heat. Check the quality of your compost: good compost usually smells earthy, has a fine and crumbly texture, can hold water, and attracts worms, insects, and microorganisms.
Grow and regrow
Once your garden is all fixed up, you can start growing new plants and filling in empty patches in your garden. Fresh seeds may be hard to find during the lockdown, but fortunately, there are a great deal of plants you can regrow from scraps! Before you toss out your leftovers, consider these choices for regrowing:
Stem plants - Celery, leeks, green onions, bok choy, cabbage, and lettuce are a few plants that can regrow from stems! Just trim 1-2 inches off the base (make sure the bottom is intact), put in a bowl of water, expose to adequate sunlight, and transfer to a pot with soil once the roots grow.
Herbs - Basil, cilantro, parsley, mint, thyme and oregano not only bring flavor and zest to your dishes, they can also be regrown! Some herbs should be put in water to let their roots grow before putting them in soil, while others can be directly transplanted into the soil. You can also put more than just one cutting in a pot; just keep the soil damp and place it in a warm area.
Seeds - Tomatoes, avocados, peppers, cucumbers, and pumpkins can regrow from seeds. There are also different regrowing techniques for seed plants, so try to research on their specific needs. For example, tomatoes can be planted into soil directly and placed near moderate light, while avocados can be half-submerged in a jar of water with toothpicks.
Other plant and flower seeds may still be available in select grocery stores, so you can take a look around if you 'd prefer different plants. Nonetheless, growing your own food is surely a smart choice during these times. Not only can you minimize waste, you can also guarantee your family eats plenty and healthy even with limited supplies outside!
Add fun decorations
Your garden makeover won't be complete without a little flair! Unique decorations add life and color to your garden. You don't even need to invest in new decor; you just need to be resourceful!
For instance, old bathtubs, buckets, chairs, watering cans, baskets, painted tires, bikes, and even a wheelbarrow can make attractive garden containers. If you would like a more natural look, go for wooden ladders as a multi-level planter or use a log of wood for your flower beds.
Repurposing old home furniture to make garden organizers is also a creative and functional way to keep your garden neat. Old dressers or potting benches can make great storage for garden essentials or outdoor dining needs.
You can also do DIY decoration projects for the entire family! Kids would love painting rocks with ladybug designs or family names, while you and your special someone can work on repainting your old furniture or your tool shed.
With all the misery and distress surrounding us today, it can be difficult to find hope within ourselves. But at times the answer to our troubles is in nature! So take in some fresh air, get your hands dirty, and find that new spirit of peace and joy by bringing life back to your garden!
Click here to read about How to Reinvent Your Home Inside and Out.
1 note
·
View note
Text
Welcome to my new series…food-related of course…I was challenged way back at the beginning of this year by Pete…who suggested that maybe I should use ingredients and cooking methods where the letter used, for example, was the last letter i.e Pizza(A)…
On reflection, I think it was a good idea although how I will fare when I get to some letters I am not sure if it will be doable but I will give it a good go… I am not one to back of if challenged…hehe
Today it starts with Bicarb(B)
Bicarb – Also known as Sodium bicarbonate, aka baking soda…Baking soda tends to be the American name, while in the UK and in Australia we tend to call it bicarbonate of soda (Bicarb).
Bicarb, or baking soda, is an alkali that is used to raise soda bread and full-flavoured cakes such as gingerbread, fruit cake, chocolate cake, and carrot cake. It needs an acid (as well as moisture) to activate it so is often combined with cream of tartar, yogurt, buttermilk, or milk.
Bicarbonate of soda gives off carbon dioxide, which expands in a mixture. Once the mixture is cooked, the carbon dioxide is replaced by air, leaving a light cake or bread.
As with all raising agents, use the amount specified in the recipe. Adding extra bicarbonate of soda can result in a peaked or collapsed cake, a strong unpleasant flavour, and a greenish tinge.
Carob – I have just learned something I thought carob was another name for cocoa well it isn’t…Carob powder and carob chips are similar to cocoa powder and choc chips in colour, however, carob is less bitter and has a naturally sweet flavour.
It is also caffeine-free and higher in fibre…It can also be used as an alternative to cocoa powder and by adding coffee it will also taste like chocolate.
Carob bean juice can also be used as a safe and effective way to treat diarrhea in children.
Crab – Who doesn’t love a crab sandwich or a crab curry? I know I do … There are thousands of different types of crabs that are divided into over 850 species. Most varieties of crab have a hard outer shell (called an exoskeleton), 3 walking legs on either side of their body, and 2 pinching claws.
Of course, like other foods, there are always the more popular of the species which we love to eat…King crabs are one of the most common and best types of edible crabs due to their large size and delicate taste.
Of the smaller crabs, the one which is very popular here are Blue crabs which are a type of swimming crab that have 2 paddle-like feet to help it swim. In fact, its scientific name literally means ‘beautiful savory swimmer.’
Crumb – a very small piece of bread, cake, or biscuit…which has many uses it can be used to coat meat or fish or as a sprinkling with some cheese on top of an au gratin…
Biscuit or cake crumbs can be used as a fruit topping or toasted and used to top ice cream or as a decoration for a dessert…So whatever you do don’t waste anything like this as it can be made into crumbs…
Corncob – the part of the maize plant on which the grain grows…
A popular and tasty vegetable which can be boiled, baked, BBQ’d…Cut from the cob and made into creamed corn, or eaten as a side or a topping for a jacket potato it is very versatile, plentiful, and tasty…
Curb –delivery (food industry term): The practice of delivering an order in bulk to the pavement in front of a retail store; or from the tailgate of a truck to an adjacent platform
Herb – A Culinary herb, which is available fresh or dried, include basil, bay leaf, chervil, marjoram, mint, oregano, parsley, rosemary, sage, savory, tarragon and thyme. Used for their aromatic properties, flavour, and texture.
Hobnob- A New World style of wine that is evenly balanced, fruit-forward, with a rich mouthfeel and hints of oak. 5 popular varieties – Pinot Noir, California Chardonnay, Merlot, Red Blend, and Cabernet Sauvignon. …
Hobnob is also a biscuit/cookie …It is the brand name of a commercial biscuit. They are made from rolled oats and jumbo oats, similar to a flapjack-digestive biscuit hybrid, and are among the most popular British biscuits. McVitie’s launched Hobnobs in 1985 and a milk chocolate variant in 1987. Wikipedia
Honeycomb- A honeycomb is a mass of hexagonal prismatic wax cells built by honey bees in their nests to contain their larvae and stores of honey and pollen.
This is my lovely fresh honeycomb…
Honeycomb is also a lovely sweet which can be covered in chocolate crunchie or used in desserts…
Made with golden syrup, sugar, and bicarb it is fun to make and although very sweet good to eat as a treat or stir some through your ice cream.
Ingredients:
butter, for greasing
200g caster sugar
5 tbsp golden syrup
2 tsp bicarbonate of soda
Let’s Cook!
Butter a 20cm square tin.
Mix 200g caster sugar and 5 tbsp golden syrup in a deep saucepan and stir over a gentle heat until the sugar has melted. Try not to let the mixture bubble until the sugar grains have disappeared.
Once completely melted, turn up the heat a little and simmer until you have an amber-coloured caramel (this won’t take long), then as quickly as you can turn off the heat, tip in 2 tsp bicarbonate of soda and beat in with a wooden spoon until it has all disappeared and the mixture is foaming. Scrape into the tin immediately but be careful as the mixture will be very hot indeed..be careful…
The mixture will continue bubbling in the tin, simply leave it, and in about 1 hr – 1 hr 30 mins the honeycomb will be hard and ready to crumble or snap into chunks.
Enjoy!
Kebab- I love a good homemade kebab either formed around a skewer and then cooked on the BBQ or if I am making chicken kebabs then I use lemongrass as my skewers and then they impart a lovely lemon flavour. or marinate your meat and skewer it with onions and peppers and pop on the barbie…
or make your own kebab meat like I did the other week and make your own pitta with love green chilli peppers.
Lamb- A meat I cannot always get here and to my way of thinking lamb, if it is lovely spring lamb, is best eaten with jersey royal potatoes and fresh peas and beans…
Rhubarb –A perennial plant with thick red stalks and large green leaves that are poisonous. The stalks have a tart flavor and are often used in pies and tarts. My favourite rhubarb pie and custard.
They do have absolutely glorious looking leaves but never ever be tempted as they are poisonous to eat…
Scab – Causes rough scabby patches on the potato skin and the flesh underneath. It is unsightly and can affect storage potential. Any potatoes with scab should be used quickly.
Shrub – An old-fashioned sweetened fruit drink, sometimes spiked with liquor which seems to be having a revival over recent years. All you have to do is make a flavoured vinegar for wonderful drinks with soda and ice or with cocktails…
Sparerib – The long cut of meat from the lower breast bone of the hog. Spareribs are best cooked slowly so that their fat can be rendered and they can become tender.
These were absolutely delicious…finger bowls required and a bib…
Squab – is a young domestic pigeon, typically under four weeks old, or its meat. The meat is widely described as tasting like dark chicken.
Syllabub – An English dessert comprised mainly of whipped cream sweetened with sugar and flavoured with sherry, brandy, or Cointreau. Lemon zest, fruit preserves or puree may also be swirled into the cream.
That’s all for this week see you in two weeks for the letter C (organiC)
Please stay safe as it seems in some places lockdowns are being introduced again…not good xx
About Carol Taylor:
Enjoying life in The Land Of Smiles I am having so much fun researching, finding new, authentic recipes both Thai and International to share with you. New recipes gleaned from those who I have met on my travels or are just passing through and stopped for a while. I hope you enjoy them.
I love shopping at the local markets, finding fresh, natural ingredients, new strange fruits and vegetable ones I have never seen or cooked with. I am generally the only European person and attract much attention and I love to try what I am offered and when I smile and say Aroy or Saab as it is here in the north I am met with much smiling.
Some of my recipes may not be in line with traditional ingredients and methods of cooking but are recipes I know and have become to love and maybe if you dare to try you will too. You will always get more than just a recipe from me as I love to research and find out what other properties the ingredients I use contain to improve our health and well being.
The environment is also something I am passionate about and there will be more on this on my blog this year
Exciting for me hence the title of my blog, Retired No One Told Me! I am having a wonderful ride and don’t want to get off, so if you wish to follow me on my adventures, then welcome! I hope you enjoy the ride also and if it encourages you to take a step into the unknown or untried, you know you want to…Then, I will be happy!
Please stay safe and well and follow your governments safety guidelines remember we are all in this together xxx
The Culinary Alphabet with a twist…The letter B(herB)
Welcome to my new series…food-related of course…I was challenged way back at the beginning of this year by Pete…who suggested that maybe I should use ingredients and cooking methods where the letter used, for example, was the last letter i.e Pizza(A)…
The Culinary Alphabet with a twist…The letter B(herB) Welcome to my new series…food-related of course…I was challenged way back at the beginning of this year by Pete…who suggested that maybe I should use ingredients and cooking methods where the letter used, for example, was the last letter i.e Pizza(A)…
#blogging#Crab meat#Honeycomb#Kebabs#Pork Ribs#Recipes#Squab#The Culinary Alphabet#Yeast Free Irish Soda Bread
0 notes
Text
30 Best Gifts For Foodies
New Post has been published on https://healingawerness.com/getting-healthy/getting-healthy-women/30-best-gifts-for-foodies/
30 Best Gifts For Foodies
Friendships built over food are the best. Someone once said that people who love to eat are the best people. How do you plan to cherish these foodies in your life? Well, gifts are a good option.
In this post, we have compiled the top gifts foodies will love. Go through them and pick the one(s) you think your foodie friend would remember for a long time!
30 Best Gifts For Foodies
1. Spiralizer 5-Blade Vegetable Slicer
The Spiralizer 5-Blade Vegetable Slicer makes for an ideal gift for people who want to have variety in their diet. This devicewill help you make pastas and spaghetti from different vegetables. The product is BPA-free. It is especially effective in making veggie pasta. You can also use hard vegetables, like sweet potatoes, turnips, zucchini, beetroot, carrots, etc.
Key Features
High carbon cutlery grade stainless steel blades
BPA-free
Comes with 4 recipe books
Buy Now From Amazon
2. ThermoProInstant Digital Read Meat Thermometer
The ThermoPro Instant Digital Read Meat Thermometer comes with a stainless steel probe and a high precision sensor. It is compact and easy to store. It shuts off automatically after 10 minutes. The device is perfect for indoor and outdoor cooking, grilling, BBQ, etc. It gives faster and accurate readings.
Key Features
Instant digital readings
Stainless steel probe and magnetic back for hassle-free storage
Shuts off within 10 minutes
Buy Now From Amazon
3. Lodge Enameled Cast Iron Dutch Oven
The Lodge Enameled Cast Iron Dutch Oven works great for broiling, braising, sautéeing, simmering, baking,and roasting at temperatures up to 500°F. It has a porcelain surface and a cast iron core to eliminate heat retention.
Key Features
Helps marinate, refrigerate, cook, and serve
Withstands temperatures up to 500°F
Ideal heat retention and even heating
Sauté, simmer, or fry on any stovetop
Buy Now From Amazon
4. Dash Mini Waffle Maker Machine
The Dash Mini Waffle Maker Machine is the ideal gift for wafflelovers. This waffle maker is lightweight; it weighs less than a lb. It heats up in minutes and serves hot and crispy waffles. It has dual non-stick surfaces that offer consistent results. The product also comes with a recipe book. You can also make paninis, hash browns, and biscuit pizzas with the waffle maker machine.
Key Features
Compact and portable
Comes with a free recipe book
Lightweight
Buy Now From Amazon
5. Anova Culinary Precision Cooker
The Anova Culinary Precision Cooker helps you cook vegetables, meat, and other items with proper control and precision. The smart device gives quick notifications when connected with your smartphone. You can receive notifications on the cooking status even when you are away from the kitchen (up to 30 feet away). Its detachable stainless steel skirt is easy to clean and maintain.
Key Features
Syncs with your smartphone for regular cooking notifications
Easy to clean and maintain
Get notifications from 30 feet away
Made of stainless steel
Dishwasher-safe
Buy Now From Amazon
6. Kona Grill Brush
We all know the pain of cleaning a messy grill after parties and intensive cooking. Where most of the cleaning materials don’t give best results, the Kona Grill Brush works very well on different kinds of grills. The brush is made of stainless steel. Its unique design has three brushes in one. It has no bristles or sharp edges and offers great results. The grill brush is especially effective on grills made of porcelain or ceramic materials.The brush is 125% more rigid than a standard brush.
Key Features
3 brushes in 1
No bristles or sharp edges
Stainless steel for better cleaning
125% more rigid than standard brushes
Buy Now From Amazon
7. Hudson Waxed Canvas Apron
The Hudson Waxed Canvas Apron is the ideal gift for a foodie friend who loves cooking. The apron has padded straps, a quick release buckle, and two hammer loops. It is available from M to XXLsizes. The apron is made of water-resistant and rugged material. It has double stitched tool pockets and thick top and bottom hems for better strength and structure. The kangaroo pockets are great for storing kitchen tools, recipe books, among other items.
Key Features
Multipurpose apron with pockets for tools and recipe books
Fits from M to XXL sizes
Water-resistant and rugged material
Padded straps and quick release buckle prevent neck pain
Buy Now From Amazon
8. Rubbermaid Storage Food Containers
The Rubbermaid Storage Food Containers are leak-proof and BPA-free. They are made using high quality triton plastic. These plastic containers have built-in vents for a tighter fit. They are dishwasher- and freezer-friendly. They can stack perfectly over one another.
Key Features
High quality triton plastic
Built-in vents and tight lids for better grip and storage
Leakproof
BPA-free
Dishwasher-safe
Buy Now From Amazon
9. ChefSofi Mortar And Pestle Set
The ChefSofi Mortar And Pestle Set is made using unpolished heavy granite. It comes with an anti-scratch protector and an Italian recipe book. The mortar and pestle are great for grinding and crushing a variety of herbs and spices.The mortar has a 500 mL capacity.
Key Features
Anti-scratch protector
Heavy duty unpolished granite
Ideal for crushing herbs and spices
Comes with an Italian recipe ebook
Buy Now From Amazon
10. Solula Professional Stainless Steel Medium Cookie Scoop
This cookie scoop can be a thoughtful gift for a dessert lover. One can use itto make evenly sized and baked cookies. The dough would release with a single squeeze and make perfectly even cookies. You can also create balls or scoops of ice cream, melon, sorbet, meat, fruits, among other items.
Key Features
Stainless steel
Rust-free
Corrosion-free
Great for making cookies, ice cream scoops, sorbet, meat or fruit balls
Very safe and easy to use
Buy Now From Amazon
11. Neet Organic Bamboo Cooking & Serving Utensil Set
This cooking and serving setmakes for a great gift for people obsessed with cooking and cooking tools. The utensils are made using 100% bamboos and are eco-friendly. The set includes a spoon, a fork, a flat spatula, a slotted spoon, a slotted spatula, and a utensil organizer.
Key Features
Organic and eco-friendly utensils
BPA-free
Silicone-free
Toxin-free
Buy Now From Amazon
12. Fox Run Polished Marble Rolling Pin
The Fox Run Polished Marble Rolling Pin is the ideal gift for bakers. It is a must-have kitchen accessory for making pastries, tacos, and other baked items. The barrel is 10” long and is made of natural marble. It is cool and has a non-sticky surface. It features nylon ball bearings for smoother rolling.
Key Features
High-quality marble
Ideal for making pastries, tacos, and baked items
Contains nylon ball bearings
Buy Now From Amazon
13. Kamenstein Revolving 20-Jar Spice Rack
The Kamenstein Revolving 20-Jar Spice Rack comes with free spice refills for five years, and with pre-filled spices and herbs. It consists of herbs like basil, thyme, parsley, marjoram, garlic salt, coriander, rosemary, oregano, and more. The stainless steel revolving design is perfectly proportioned to fit into narrow spaces. The caps of the jars are labeled for easier identification.
Key Features
20 prefilled spice jars
Free spice refills for 5 years
Stainless steel
Fits into narrow spaces
Consists of herbs like basil, thyme, parsley, marjoram, garlic salt, coriander, rosemary, oregano, and more
Buy Now From Amazon
14. Bambusi Organic Cheese Board And Knife Set
The Bambusi Organic Cheese Board And Knife Set is perfect for serving different types of cheese along with sipping some wine. It has grooves that hold crackers and nuts and a draw for storing a cheese knife. The cheese board is made with 100% bamboo. It does not stain or absorb odors.
Key Features
Wooden handles to serve crackers, nuts, cheese, and more
Made of 100% bamboo
Does not stain or absorb odors
Buy Now From Amazon
15. Greenco Dessert Bowls And Spoons
Thesedessert bowls and spoons are a perfect gift for a friend who enjoys a dessert treat every day. This set has 12 cone style bowls and blue, pink, and purple spoons. They are made of high-quality plastic that won’t chip or crack. Each bowl has a capacity of 6 to 8 fluid ounces. The bowls and spoons are BPA-free and toxin-free.
Key Features
12 uniquely designed bowls and spoons
Capacity of 6 to 8 fluid ounces
BPA-free
Toxin-free
Buy Now From Amazon
16. Totally Bamboo Triple Salt Box
The Totally Bamboo Triple Salt Box is useful for storing an assortment of salts, herbs, or other seasonings. The boxes have swivel lids that close with a magnetic lock. They are made of 100% bamboo. You can also store jewelry or office supplies.
100% bamboo
Great for salts, pepper, herbs, spices and favorite seasonings
Magnetic lock
Buy Now From Amazon
17. GoodyGoods Moscow Mule Copper Mugs
Thesemugs are made using 100% copper. The set comes with two mugs, two extra cooling straws, and a jigger. This set also includes a free creative recipe book for cocktails.
Key Features
High-quality copper mugs with creative copper straws
Cools beverages
Handcrafted with a unique hammer finish
Buy Now From Amazon
18. LUNAR Premium 6-Piece Cheese Knife Set
The LUNAR Premium 6-Piece Cheese Knife Set is ideal for those who enjoy having cheese and wine. This set includes four cheese knives, one cheese fork, and one cheese spreader. This is a stainless steel set that doesn’t rust or tarnish.
Key Features
High quality stainless steel cheese knife set
Consists of cheese knives, spreader, and cheese fork
Rust-free
Tarnish-free
Buy Now From Amazon
19. Charcoal Companion Cast Iron Garlic Roaster & Squeezer Set
TheCharcoal Companion Cast Iron Garlic Roaster & Squeezer Set will do wondersfor someone who loves authentic style cooking. It works great if you want great taste and lasting aroma in your barbeque. The set includes a garlic roaster and a squeezer. You can add some olive oil and salt on the garlic before roasting.This will give the garlic a smokey flavor.
Key Features
Made of pre-seasoned cast iron
Roaster measures 5.6” x 4.5” x 4.4” / Squeezer measures 3.4” X 3.4” x 2.1”
Designed to be used on the grill for better taste
Buy Now From Amazon
20. Hamilton Beach Electric Indoor Searing Grill
The Hamilton Beach Electric Indoor Searing Grill is a perfect gift for your friend who loves grilled foods. The grill comes with a removable and easy to clean non-stick plate. It is made using stainless steel and is compact enough to carry to a beach or on a weekend trip. The grill cooks barbeque, steak, burgers, pizzas, and many more.
Key Features
450oindoor grill for making a variety of dishes
Easy to clean and cook
Comes with a non-stick plate
Great for cooking steak, pizzas, burgers, BBQ, etc.
Buy Now From Amazon
21. Victoria Cast Iron Burger Press
This Victoria Cast Iron Burger Press is seasoned with certified flaxseed oil and makes your meals ready in minutes. This device improves grilling and saves time. It evenly transfers retained heat and cooks a perfect meal. It comes with ready-to-use seasoning of flaxseed oil.It works great for cookingbacon, beef, burgers, poultry, flatbreads, grilled sandwiches, panini, quesadillas, etc.
Key features
High-quality cast iron burger and sandwich press
Comes with flaxseed oil seasoning
Non-GMO flaxseed oil
Buy Now From Amazon
22. Proctor Silex Sandwich Toaster
The Proctor Silex Sandwich Toaster can be a great gift for that friend who loves sandwiches. One can make hot sandwiches, toast, and omeletswith this machine. It comes with non-stick plates that are easy to use and clean. You can make hot desserts, French toast, and other satisfying meals with this toaster.
Key Features
Great for making toasts, omelets, hot desserts
Easy to clean non-stick plates
Buy Now From Amazon
23. Oster Titanium Infused DuraCeramic Fondue Pot
Thisfondue pot has a non-stick coat that lasts long. It is PFOA- and PTEF-free. The fondue set consists of eight fondue forks, a removable plug, and a fork holder ring. The pot can be used to cook cheese, chocolates, and other items. The surface of the pot does not scratch easily.
Key Features
Titanium-infused duraceramic non-stick coating
Non-stick coating lasts 8 times longer
Cooks 30% faster than other fondue pots
Adjustable temperature control
Comes with 8 fondue forks and 1 removable plug and holder ring
Buy Now From Amazon
24. Secura Air Fryer
The Secura Air Fryer is the right choice for oil-free cooking. The set comes with an air fryer, recipe books, a BBQ rack, and skewers. The fryer enables one to make mouth-watering foods without frying them. It has a 60-minute cooking timer with the auto-shutoff feature. The air fryer has variable temperature control from 180o F to 400o F.
Key Features
Oil-free cooking
60-minute cooking timer with auto shut off
Variable temperature control
Comes with recipe books, BBQ racks, and skewers
Buy Now From Amazon
25. Fizzics Beer Dispenser
The Fizzics Beer Dispenser comes with added features like USB power, 25% faster pour, and a large base to accommodate bigger glasses. It works with any beer like lagers, ales, stouts, IPAs, sours, porters, ambers, and more. The device converts the natural carbonation of beer into uniform sized bubbles.
Key Features
Long-lasting and durable
Pours beer 25% faster
Comes with USB powering
Micro Foam Technology
Buy Now From Amazon
26. BLACK+DECKER 5-Cup Coffeemaker
Thiscoffeemaker is an ideal gift for coffee lovers. It comes with a one-touch control for operation. It is compact and saves space in the kitchen. The device makes fivecups of coffee and comes with a smart sneak-a-cup feature–it stops the flow of coffee temporarily, and you can take your coffee before it stops brewing.
Key Features
One-touch control for easy operation
Makes 5 cups of coffee
Compact design
Smart sneak-a-cup feature
Buy Now From Amazon
27. iTouchless 13 Gallon Stainless Steel Automatic Trash Can
The iTouchless 13 Gallon Stainless Steel Automatic Trash Can comes with an odor-absorbing filter. The mere motion of your hands can open its lid. It contains a natural carbon filter that neutralizes odors. It only draws power as needed; it has three times the battery life compared to other similar trash cans. The trash can is made of stainless steel whose surface is germ-resistant and fingerprint-proof.
Key Features
1 natural carbon odor filter to absorb odor
Germ-resistant
Fingerprint-proof surface
Extra long battery life
Buy Now From Amazon
28. Fullstar Vegetable Chopper And Spiralizer
One can reorganize their kitchen with the multipurpose Fullstar Vegetable Chopper And Spiralizer. It comes with four interchangeable blades,a built-in chop lid, and a storage counter for storing all the chopped vegetables. The product is made using heavy duty stainless steel. The chopper can be disassembled for easy cleaning.
Key Features
Heavy duty stainless steel
Rust- and stain-resistant blades
Razor sharpness for crisp and smooth cutting
Smooth grip handle
BPA-free
4-in-1 slicer and chopper
Buy Now From Amazon
29. Zevro Dry Food Dispenser
The Zevro Dry Food Dispenser Dry can hold up to 17.5 ounces of cereal. It works great for storing nuts, candy, and granola. The dispenser preserves freshness for up to 34 days. The surface is scratch-proof and shatterproof.
Key Features
Scratch-resistant
Shatterproof products
Preserves freshness for 34 days
Buy Now From Amazon
30. Totally Bamboo 3-Piece Bamboo Serving And Cutting Board Set
The Totally Bamboo 3-Piece Bamboo Serving And Cutting Board Set is made using 100% bamboo. The cutting boards are also easy to clean and are gentle on the knives. They provide a strong and dense cutting surface.
Key Features
100% original bamboo
Comes in three different sizes
Easy to clean and store
Strong cutting surface
Buy Now From Amazon
Go through the list and get your foodie friend their favorite something! These gifts would be lighter on your pocket; and they would mean a lot to your loved ones.
Was this article helpful?
Related
The following two tabs change content below.
Harini has over 12 years of experience in content writing and editing for online media. She specializes in the areas of business, health and wellness, and lifestyle and is proficient in Medical Sciences (Biology, Human Anatomy and Physiology, and Biochemistry). As the Chief Editor, Harini ensures that her team delivers interesting, engaging, and authentic content. Her background in Biomedical Engineering helps her decode and interpret the finer nuances of scientific research for her team. Harini is a certified bibliophile and a closet poet. She also loves dancing and traveling to offbeat destinations.
LATEST ARTICLES
Source: https://www.stylecraze.com/articles/best-gifts-for-foodies/
0 notes
Last Seen Blogs

ask-thearchangels
....

monomanehito
©opy©at

phisigmapiuab-blog
phi sigma pi | eta beta

aygerimlove
earth

koonico
͏ ͏ ͏ ͏ ͏ ͏ ͏𝅘𝅥𝅯 ͏ ͏ ͏ ͏ ͏ ͏